
The holidays are the best excuse for binge baking. The end of the year is marked by that unique time when being chained to your oven is considered normal—nay, it’s even encouraged! As you might imagine, it’s my favorite time of the year. As Thanksgiving and Christmas approach, I can’t seem to help myself as all kinds of bread-baking ideas swirl in my imagination, taking me in this direction and that, and lengthening my “Things to Bake” list to unhealthy measures.
For the great meals of the holiday season, I always have a favorite loaf of bread or two earmarked for the dinner table, but often I also include a (sourdough) pie, sometimes a sweet bread, and always an experimental loaf. Last year, I served a variation of this roll recipe, and while they were great, they’ve come a long way through subsequent tests and trials. They’ve matured into these soft sourdough rolls, firmly on the menu for this year’s holiday meals (especially Thanksgiving).
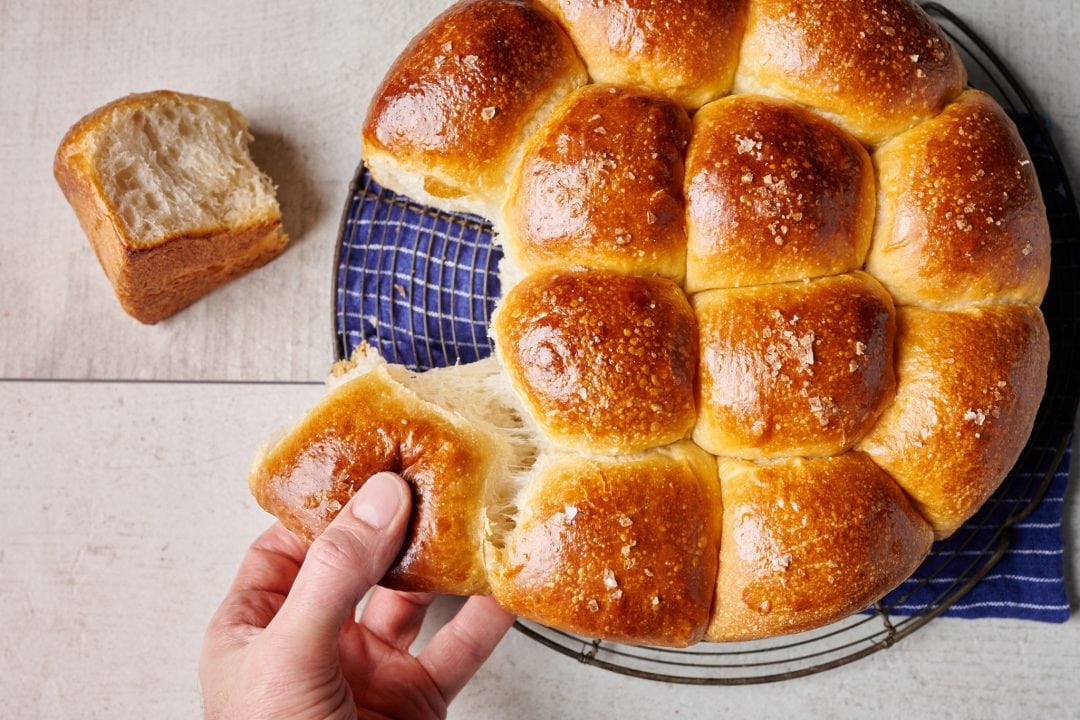
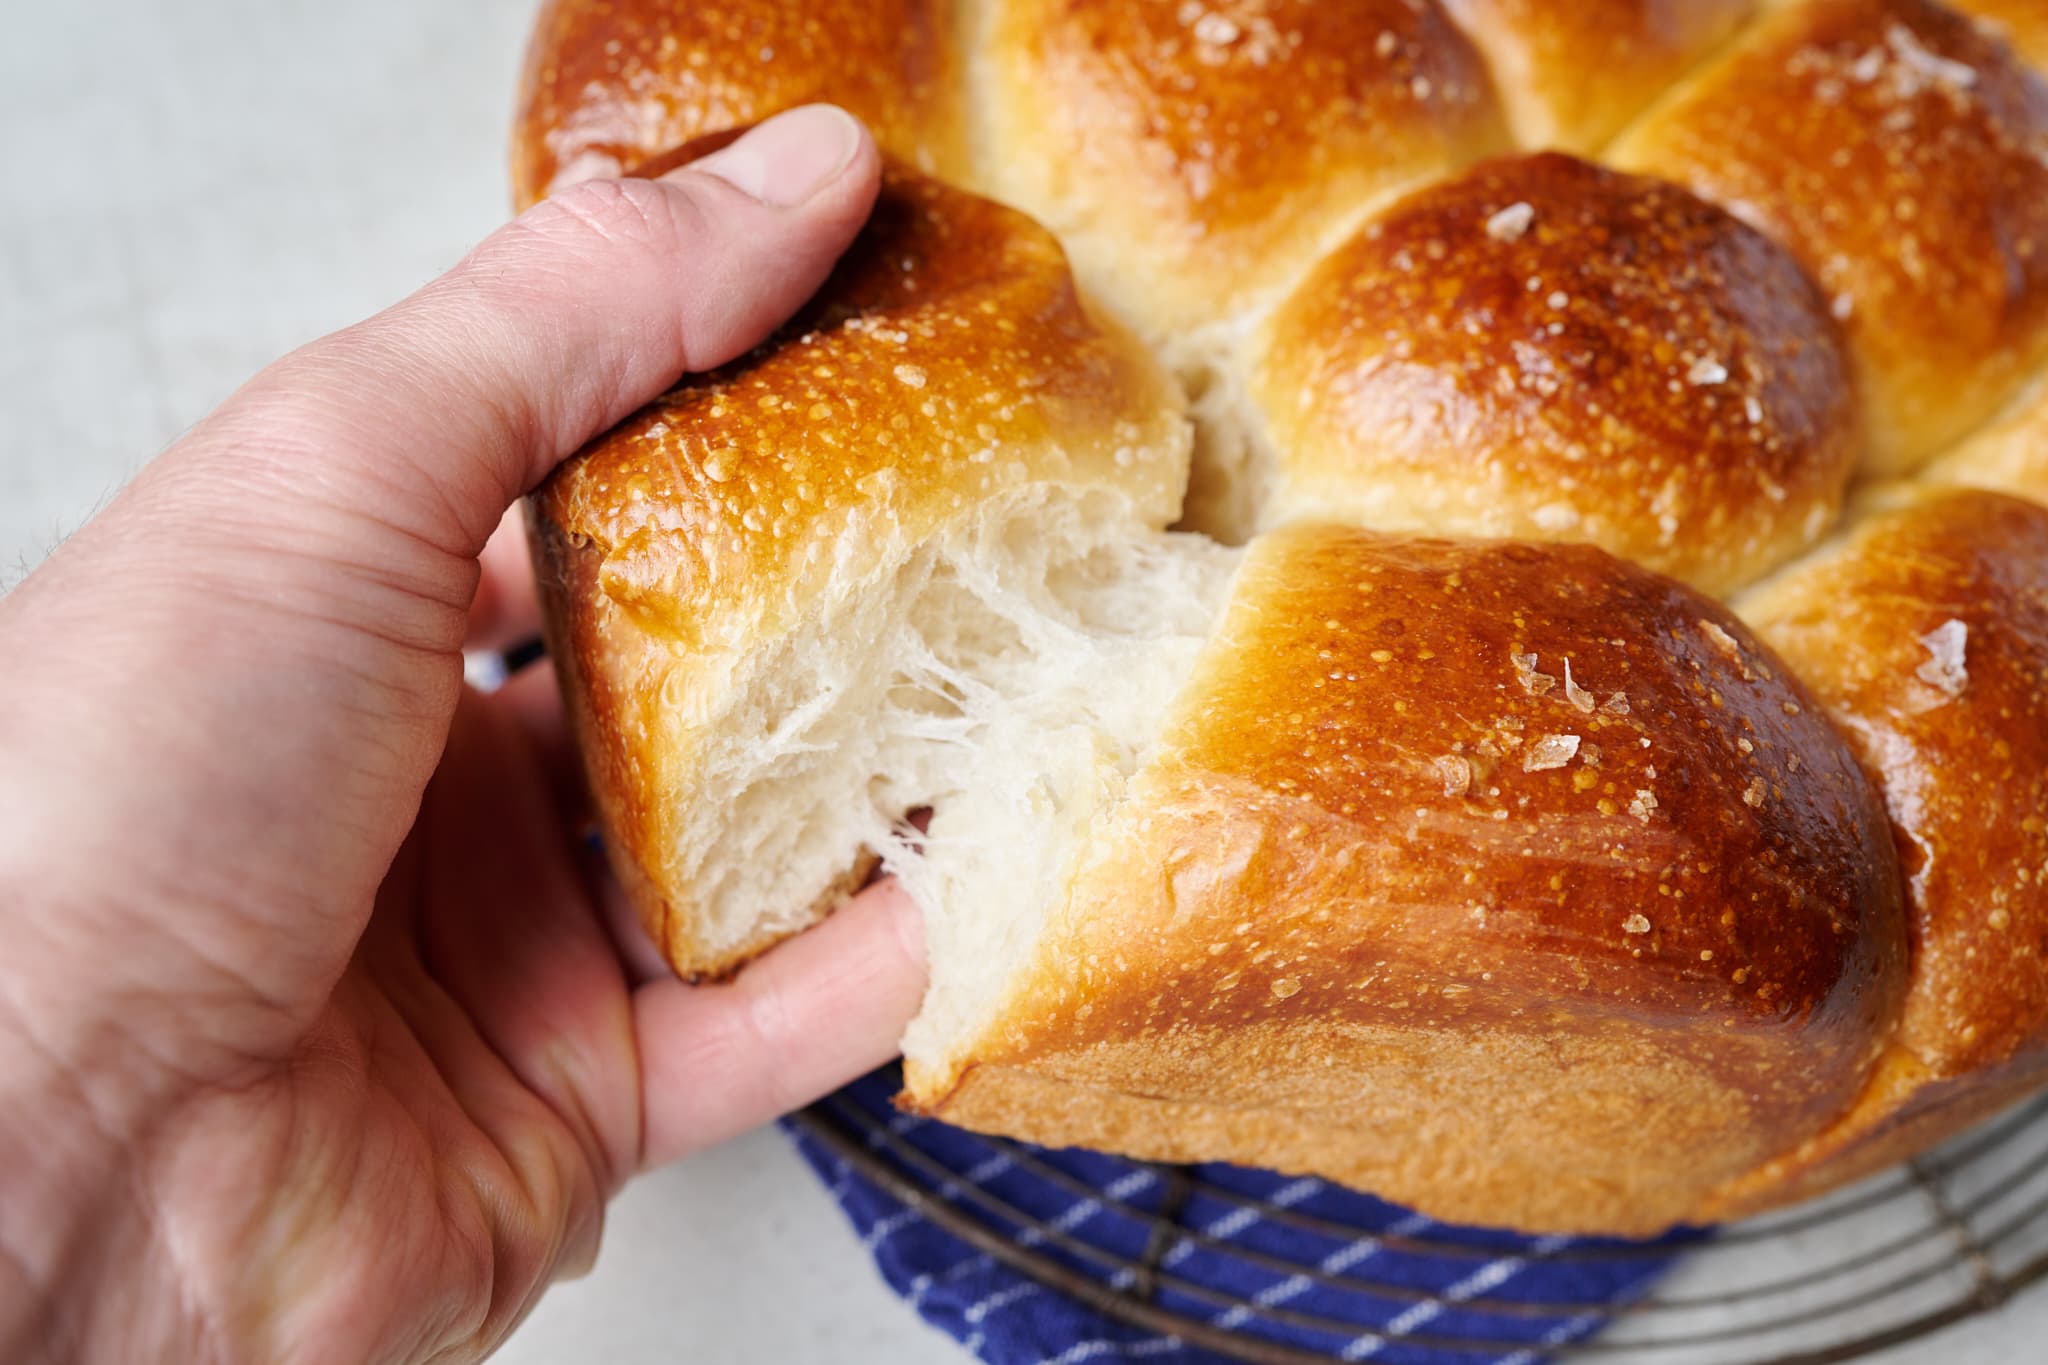
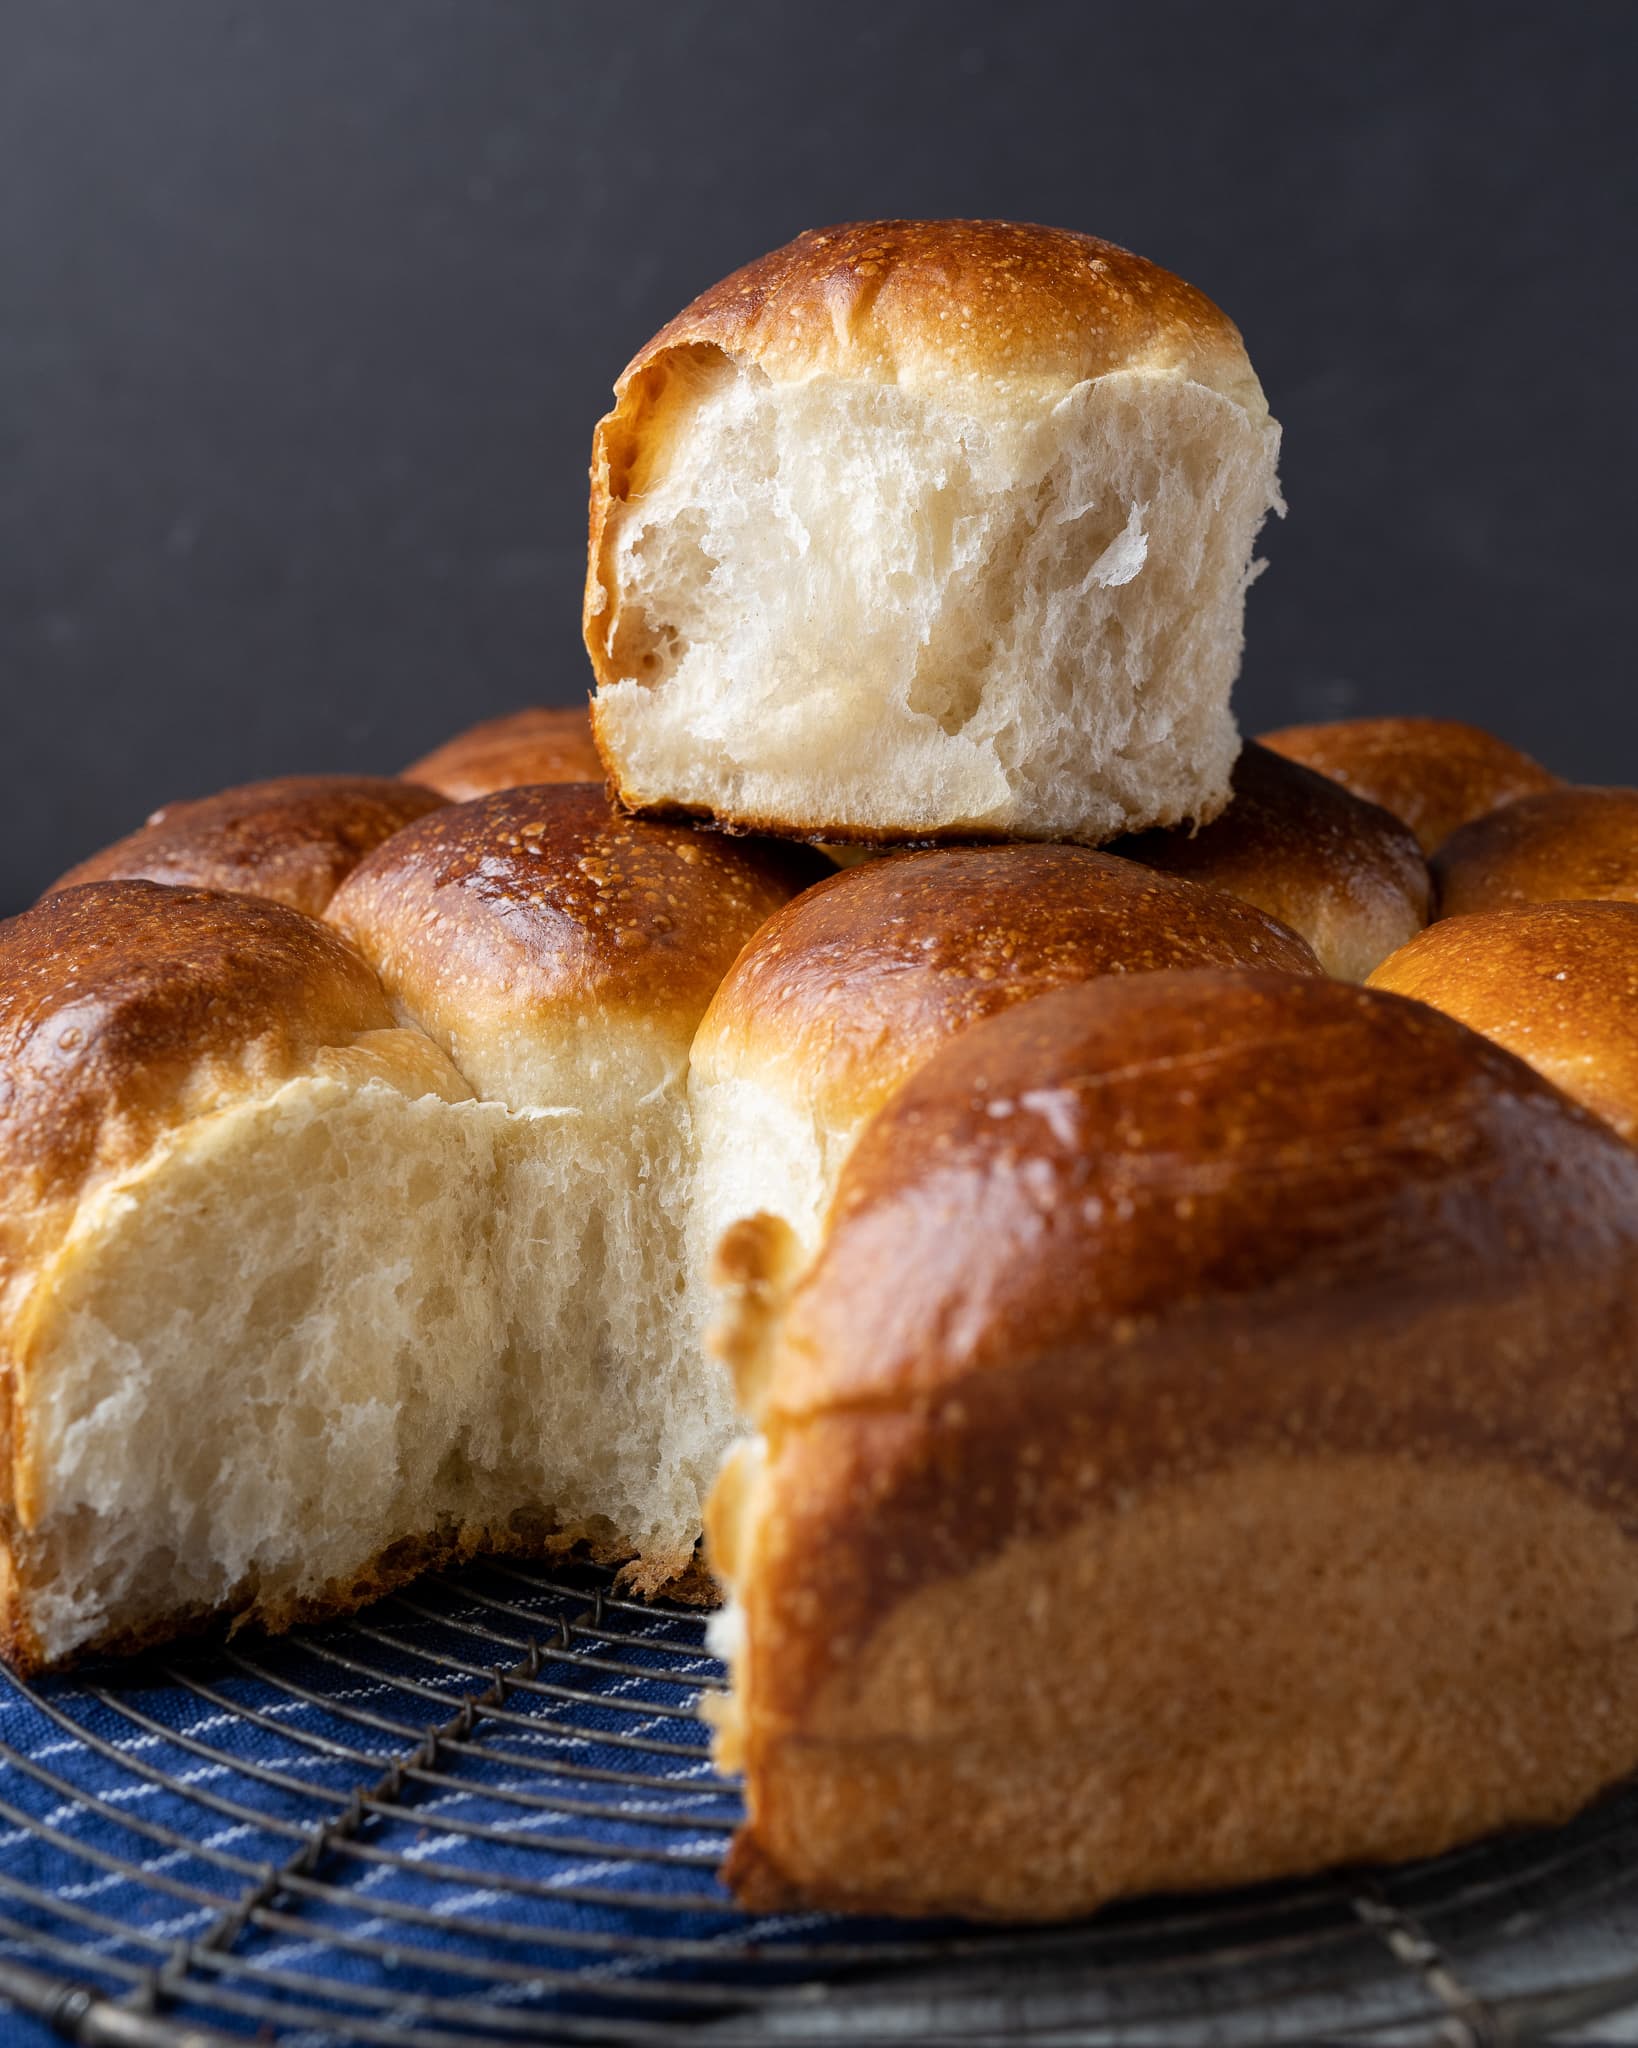
These soft sourdough dinner rolls (which are also in my cookbook!) are incredibly light and, for lack of a better adjective, squishy. Let me take you on a quick trip.
Remember your last visit to the state fair, where you ordered that massive cone of cotton candy—for me, this was many years ago, yet the memory is still quite vivid. Now pull off a large tatter of that soft, cloud-like sugar puff and watch it come apart into thick sheets, floating in front of your face. This image is similar to the delicate, yielding texture of buttery dinner rolls.
Video: Watch Me Make These Sourdough Rolls
Here’s my video of me making these rolls from start to finish!
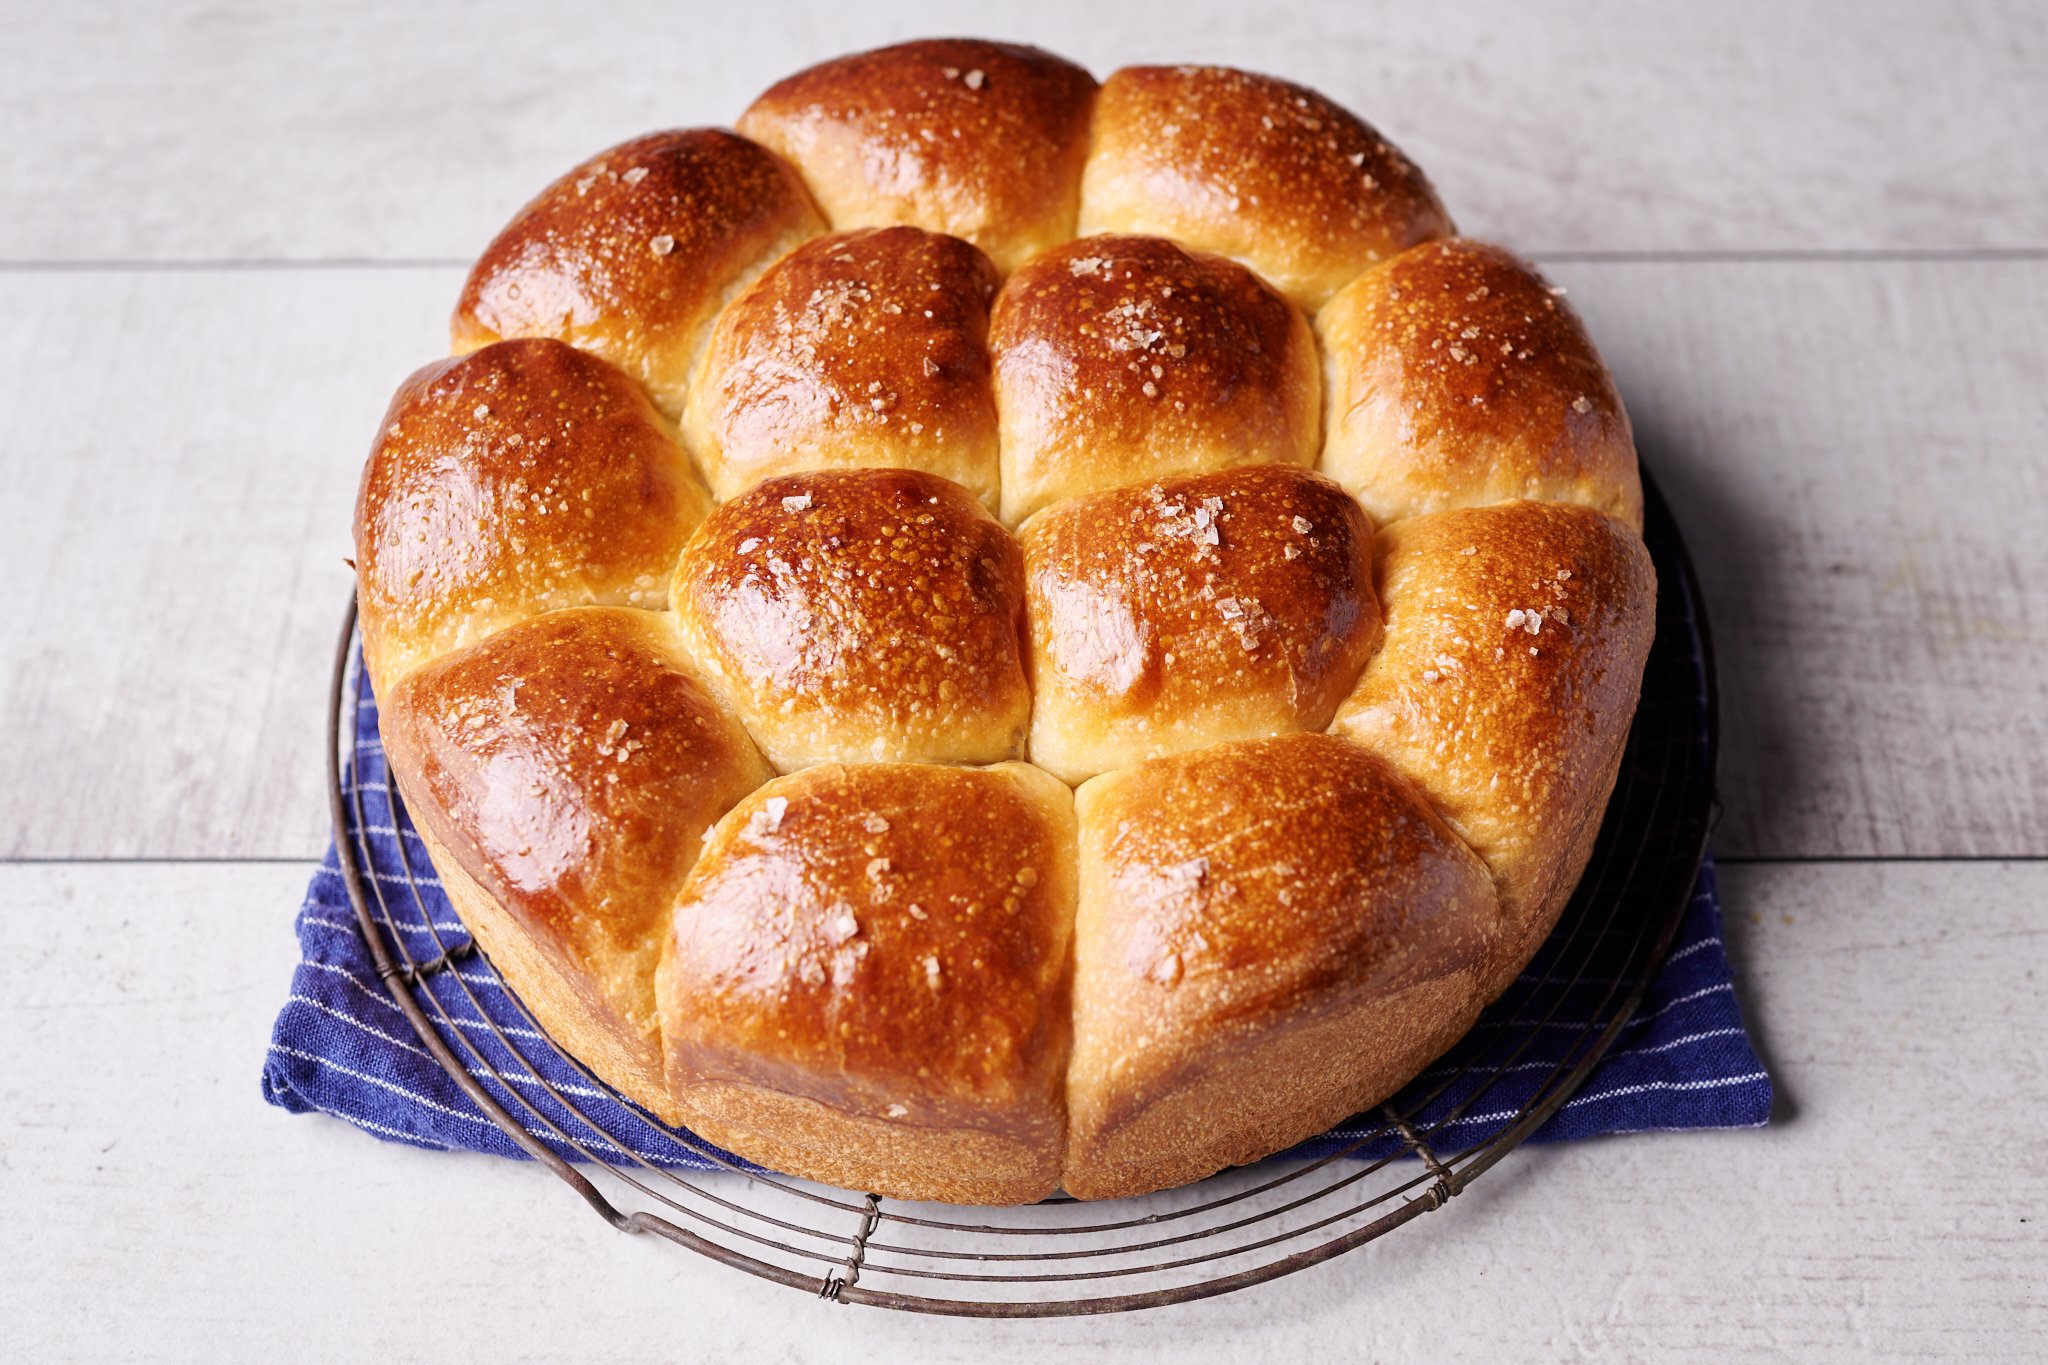
Flavorwise, these rolls are what you want and expect from a dinner roll: slightly buttery, a smidgen sweet, and with only the slightest touch of sourness (if any). The flaky salt on top is like a lightning bolt to the taste buds, waking them up and sharpening the bread’s flavor. And let’s not forget a very important purpose of rolls at any meal: to soak up all sauces (gravy! salad dressing! au jus!) on the dinner plate. And yet, they also shine when you keep it simple and plain, enjoying them as-is or simply with a pat of warm butter.
Let’s look at which flour I used for this recipe and how tangzhong helps us achieve that cotton-candy-like tenderness.
Flour selection and tangzhong
This recipe calls for standard all-purpose flour and higher protein bread flour (King Arthur brand will work well for both). The bread flour brings extra protein and strength to the mix that helps these rolls rise a little higher and have more structure. But also, using only white flour helps keep the sourness to a minimum. In testing, the rolls were even softer and more tender without the bread flour, but I found that the added high-protein flour helps keep them sturdy when used for dipping.
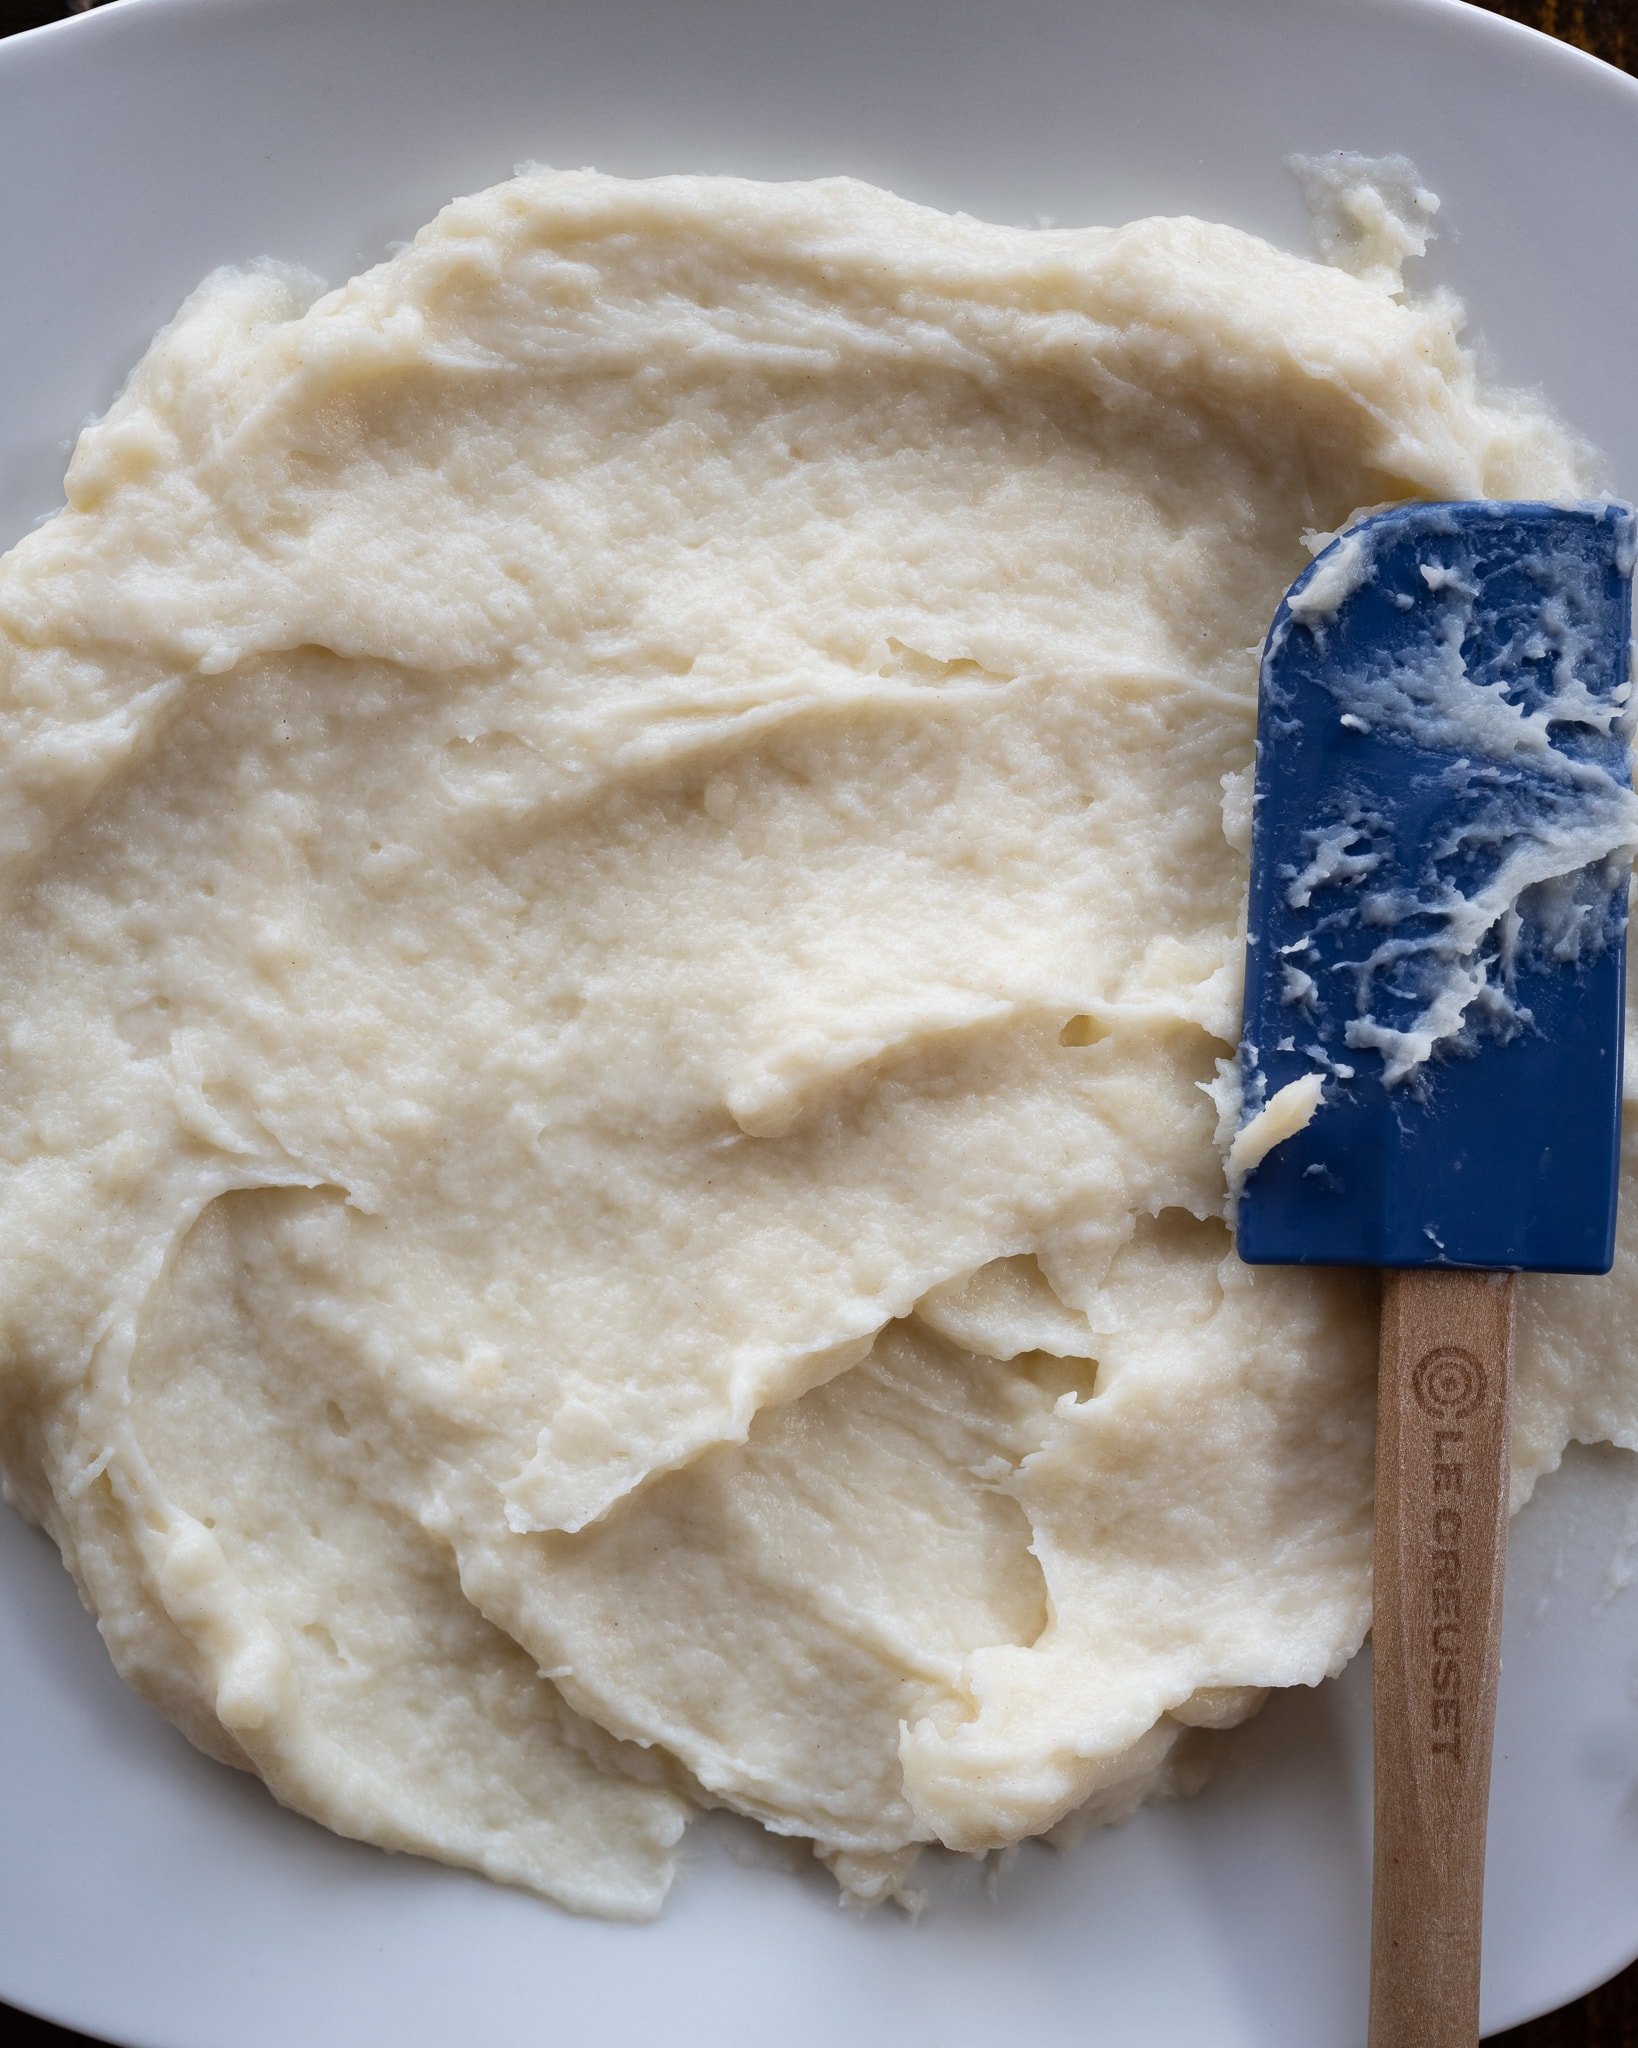
This sourdough dinner roll recipe uses a pre-cooked flour mix-in, also called tangzhong, to add extra tenderness. I use this same technique in my Hot Cross Buns and Sourdough Shokupan. The tangzhong technique is straightforward and takes only a few minutes in the first steps of the breadmaking process: you warm the flour and milk in a saucepan over medium heat until the mixture thickens, then let it cool. Then add this cooled gel paste (similar to a milk roux) to your mix as you would any other ingredient.
See my guide to the Tangzhong technique for a more in-depth discussion →
Baking Schedule
These super-soft sourdough rolls can be made in a single day (skipping the overnight levain) or they can be retarded (refrigerated) in proof to bake the next day, right before dinner. This recipe is extremely flexible, and you can adjust the timeline to fit the rolls into your cooking schedule.
For example, if you’re making these for Thanksgiving, you can make the rolls the day before and proof them in the fridge. Then on Thanksgiving day, take them out a few hours before the big meal, finish proofing on the counter if necessary, and bake them so that the rolls are warm for dinner.
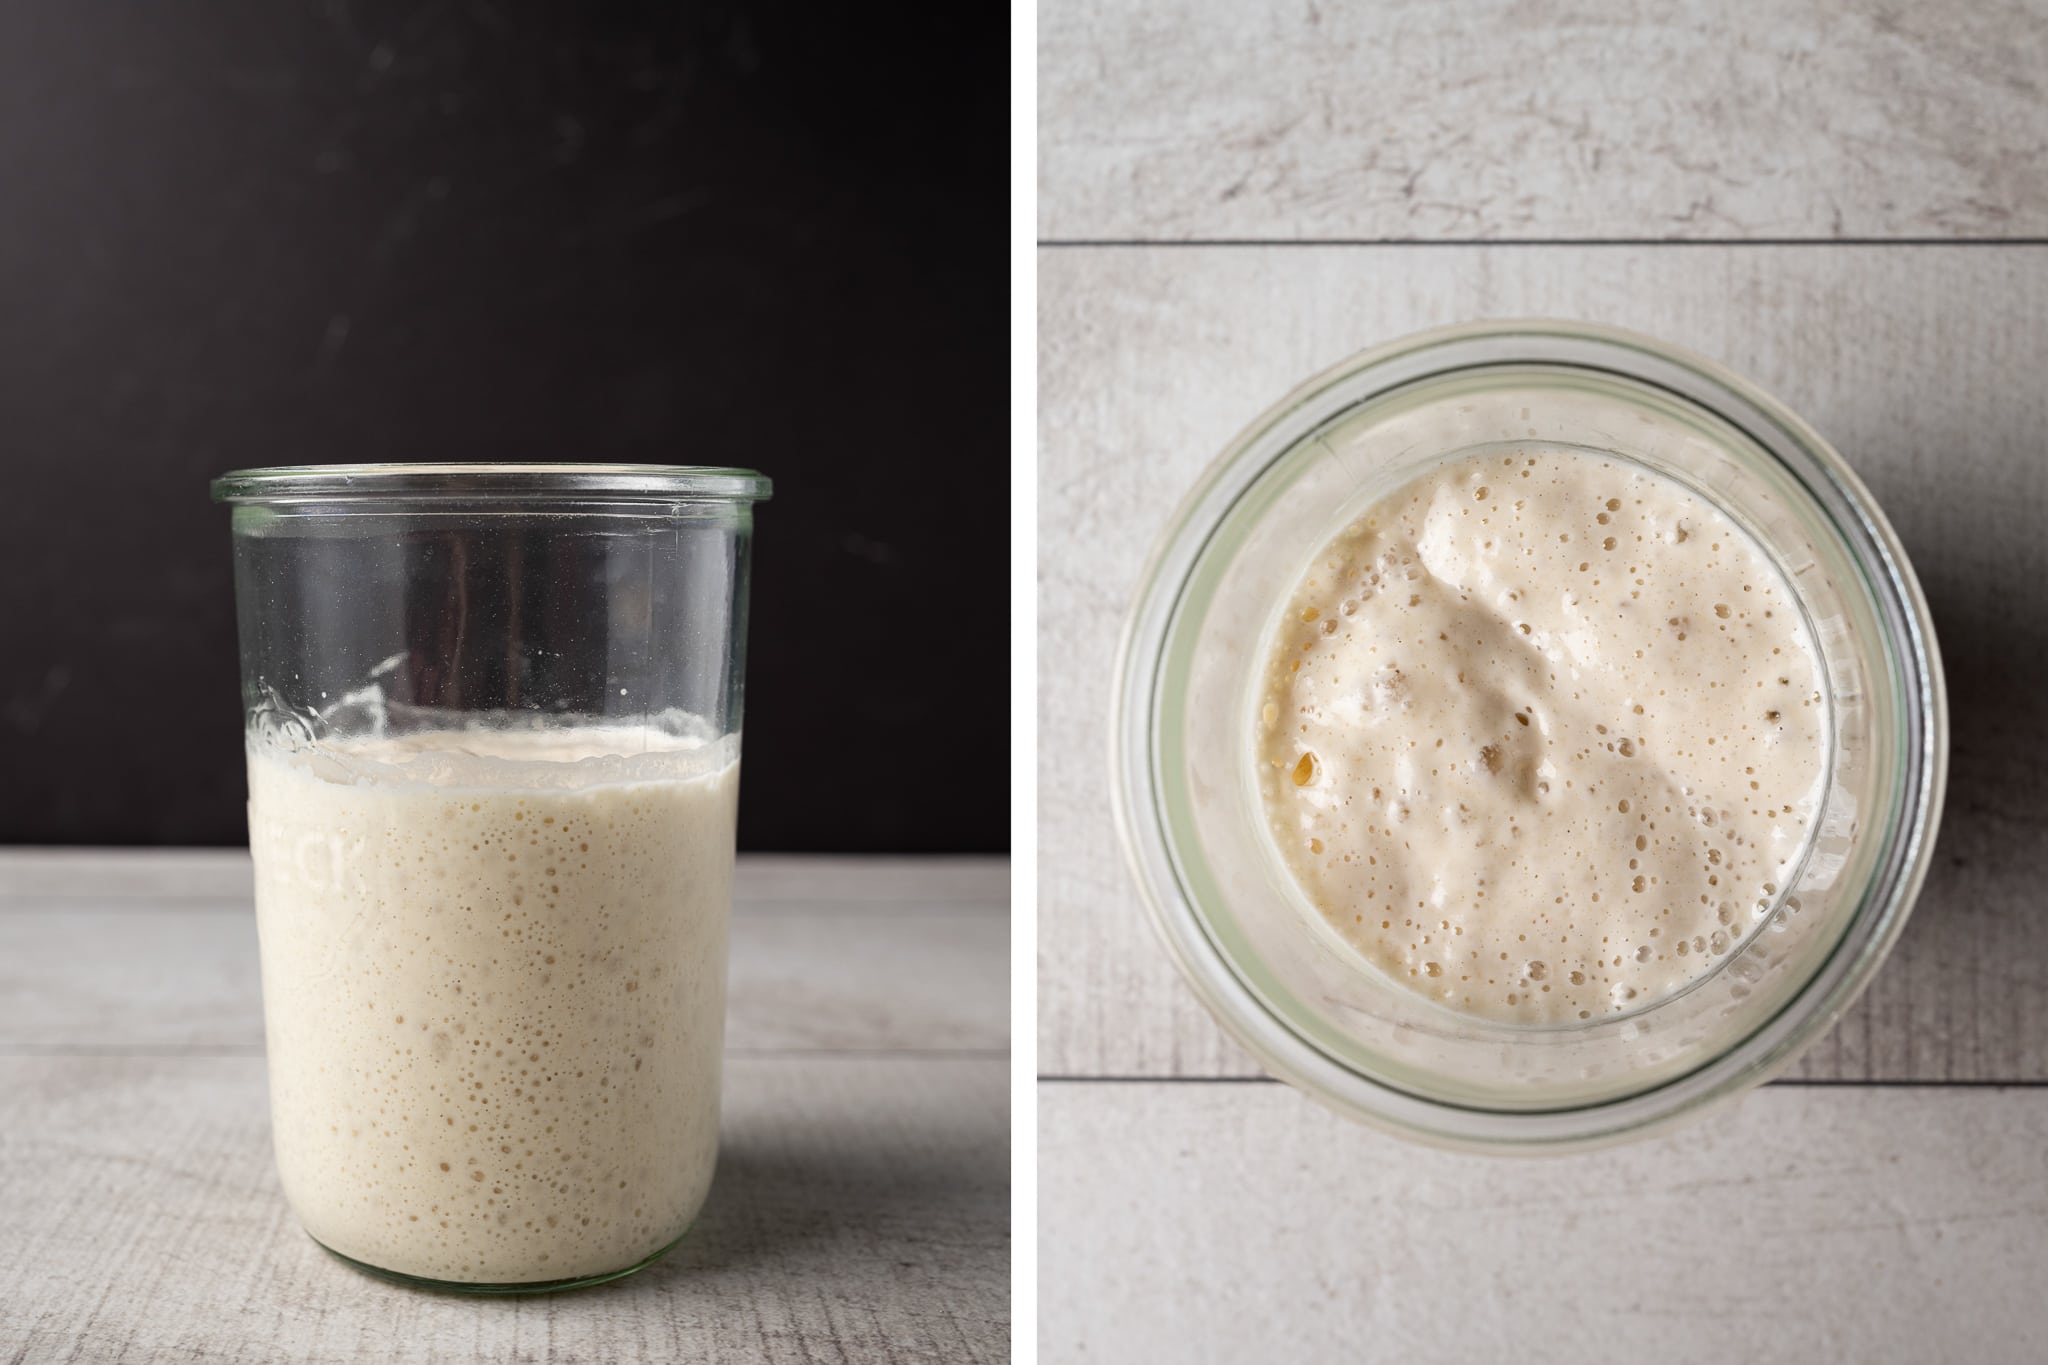
Be sure to use your levain when it’s ripe: it should be extremely bubbly, frothy, and well-risen. As mentioned in my guide to baking dough in the winter, the cold weather may slow the dough’s proofing; give it extra time if necessary.
Baking equipment
I’ve tested these super soft sourdough rolls with several baking pans, and below are my two favorites.
Round pan choice: LloydPans 10×2.25-inch round pan.
I use these round LloydPans for many things in my kitchen: from my sourdough focaccia to sourdough pizza to these dinner rolls. They are nonstick and conduct heat so well that they brown the bottom and sides of whatever is inside just as well as the top. They’re magical, actually.
Square pan choice: USA Pan 9-inch square pan.
I love this square pan because it has a nonstick liner and is extremely versatile. I use it for sweet cardamom rolls, cinnamon rolls, and even cakes or brownies. It bakes rolls that are evenly browned, and cleanup is a breeze.
Super soft sourdough rolls formula
For tips on how to calculate baker’s percentages or how to modify this formula, see my post on baker’s percentages (baker’s math).
| Total Dough Weight | 1200 grams |
| Pre-fermented Flour | 12.5% |
| Levain in final dough | 37.1% |
| Hydration | 43.0% |
| Yield | 16 x 70g sourdough dinner rolls |
Total formula
Desired dough temperature: 78°F (26°C). See my post on the importance of dough temperature for more information.
Milk & butter alternative (vegan): If you want to make these rolls vegan, substitute water, nut milk, or full-fat oat milk for the dairy milk in the roux below. For the butter, go with Earth Balance Vegan Butter or a similar product.
| Weight | Ingredient | Baker’s Percentage |
|---|---|---|
| 41g | Tangzhong: Medium-protein bread flour or All-purpose flour (~11% protein, King Arthur Baking All-Purpose) | 7.00% |
| 166g | Tangzhong: Whole milk (see vegan options above) | 28.00% |
| 402g | Medium-protein bread flour or All-purpose flour (~11.7% protein, King Arthur All-Purpose) | 68.00% |
| 148g | High-protein bread flour (~12.7% protein, King Arthur Bread Flour) | 25.00% |
| 95g | Butter, unsalted | 16.00% |
| 53g | Caster sugar | 9.00% |
| 254g | Water | 43.00% |
| 11g | Salt | 1.80% |
| 30g | Ripe sourdough starter, 100% hydration | 5.00% |
Additional ingredients:
Egg wash: 1 large egg and 1 tablespoon whole milk, for brushing
Coarse sea salt, for topping (optional)
Super soft sourdough rolls method
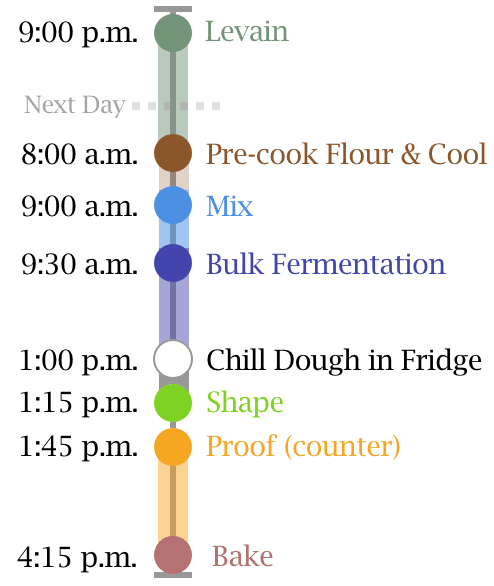
1. Prepare Levain – 9:00 p.m.
| Weight | Ingredient | Baker’s Percentage |
|---|---|---|
| 74g | Medium-protein bread flour (all-purpose flour) | 100.0% |
| 15g | Caster sugar | 20.0% |
| 74g | Water | 100.0% |
| 30g | Ripe sourdough starter, 100% hydration | 40.0% |
Mix the ingredients in the chart above in a container and leave covered to ripen at about 76°F (24°C) for 12 hours overnight.
Like my pumpkin cinnamon sourdough bread, this recipe utilizes a sweet levain, or sweet starter, which calls for a little sugar added to the levain to promote yeast activity and help reduce sourness in the final dinner rolls. See my post on the differences between a starter and levain if the two terms are new to you.
2. Make the tangzhong – 8:00 a.m.
In a medium saucepan set over medium-low heat, add the 41g tangzhong flour and 166g tangzhong milk. Cook, whisking continuously, until the mixture thickens into a paste, 5 to 8 minutes. In the beginning, whisk vigorously to break up any flour clumps, and continue whisking to avoid burning. The mixture won’t seem to do anything for a while, but it will thicken.
Remove the pan from the heat and spread the tangzhong on a small plate to expedite cooling. Set aside.
3. Mix – 9:00 a.m.
| Weight | Ingredient |
|---|---|
| All | Tangzhong (from Step 2) |
| 328g | Medium-protein bread flour (all-purpose flour) |
| 148g | High-protein flour |
| 95g | Butter, unsalted |
| 39g | Caster sugar |
| 181g | Water |
| 11g | Salt |
| 192g | Levain |
I used my KitchenAid stand mixer to mix this dough, but it could also be mixed by hand using the slap and fold technique or a series of folds in the mixing bowl.
First, cut the butter into 1/2″ pats. Set them on a plate to warm to room temperature.
To the bowl of a stand mixer fitted with the dough hook attachment, add the water, flour, ripe levain, sugar, tangzhong, and salt. Mix on low speed (STIR on a KitchenAid) for 1 to 2 minutes until the ingredients come together and no dry bits remain. Increase the mixer speed to medium (2 on a KitchenAid) and mix for 4 to 5 minutes until the dough starts to strengthen and clump around the dough hook. It won’t completely remove from the bottom of the bowl, and it will still be shaggy.
Let the dough rest in the bowl for 10 minutes.
Turn the mixer to low speed and add the room-temperature butter, one pat at a time, waiting until each pat is fully absorbed before adding the next. Adding all the butter will take 5 to 8 minutes. After this, mix on medium speed for 1 to 2 minutes, until the dough is smooth and clings to the dough hook.
In the end, the dough will still be very soft, and it will not completely remove from the sides of the bowl. Transfer the dough to a bulk fermentation container and cover.
4. Bulk Fermentation – 9:30 a.m. to 1:00 p.m.
At a warm room temperature, 74-76°F (24°C), bulk fermentation should take about 3 1/2 hours. If your kitchen is cooler, place your bulk container in a small home dough proofer, or extend the bulk fermentation time to give the dough more time to ferment.
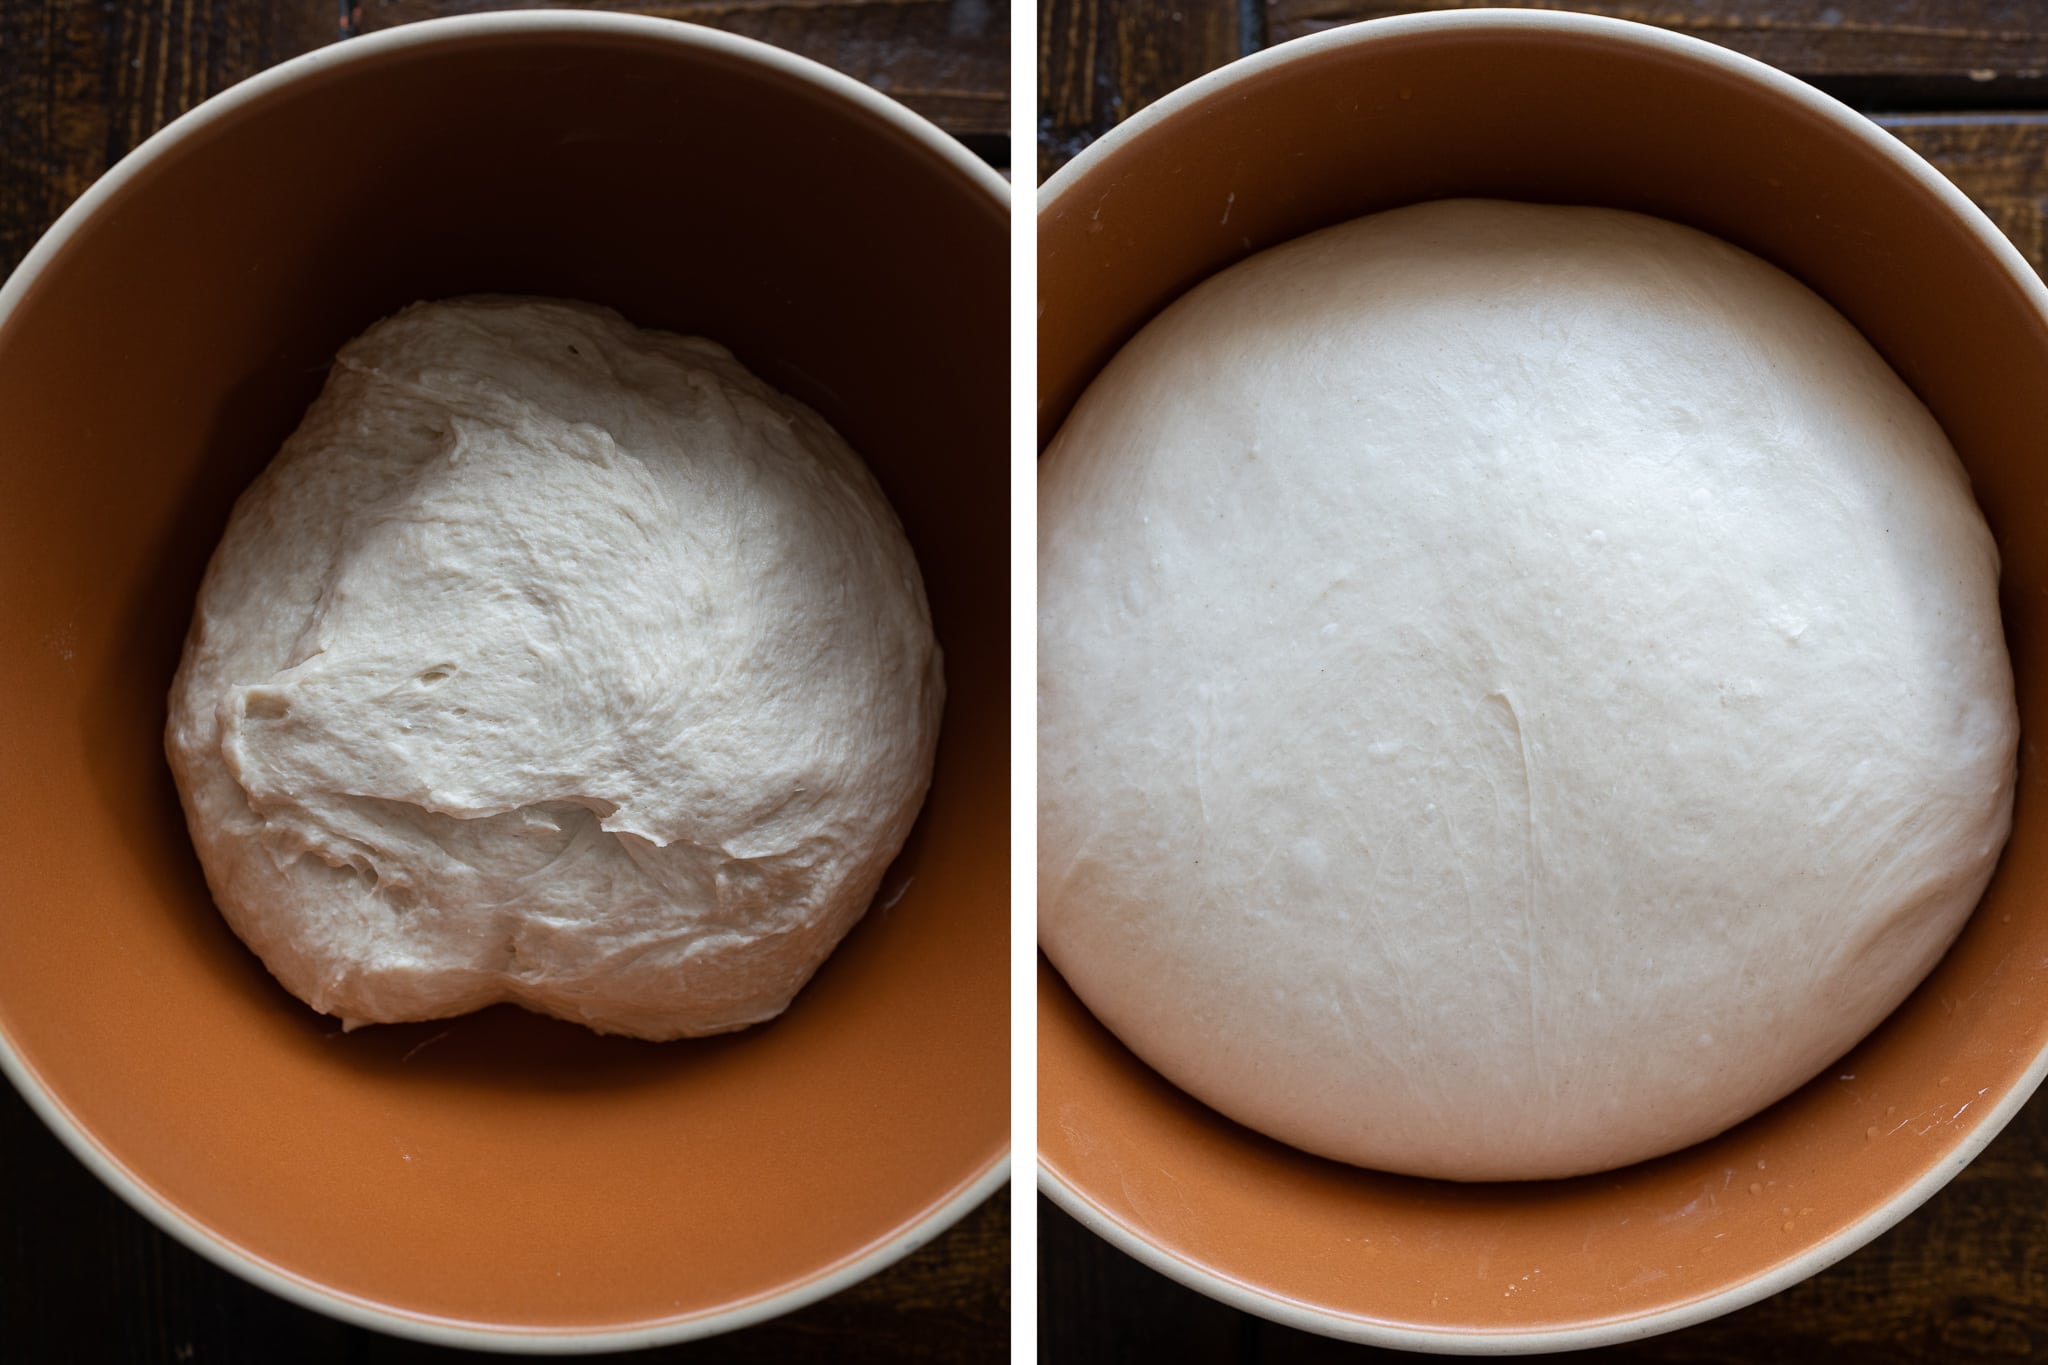
In the image below (tap/click to zoom in), you can see my dough at the start of bulk (left) and after 3 1/2 hours (right). The dough is ready when it has risen in the container, smooths, and is puffy to the touch.
Give this dough three sets of stretches and folds during bulk fermentation at 30-minute intervals. The first set begins 30 minutes after bulk fermentation starts. For each set, wet your hands, grab one side, and stretch it up and over the dough to the other side. Rotate the bowl 180°, then perform another stretch-and-fold (this forms a long rectangle in the bowl). Then rotate the bowl 90° and repeat the stretch and fold. Finally, turn the bowl 180° and do one last stretch and fold. The dough should be neatly folded up in the bowl.
After the third set, let the dough rest, covered, for the remainder of bulk fermentation.
5. Chill Dough – 1:00 p.m. to 1:15 p.m.
At this point, your dough should have risen in your bulk container, be puffy to the touch, and have smoothed out. If the dough still feels dense and tight, give it another 15 minutes and check again.
Uncover your bulk container and place it in the refrigerator for 15 to 25 minutes. Chilling the dough will help it firm up, making shaping and transferring to the pan much easier. Note that the longer you chill the dough in the fridge, the longer it will take to proof (because it will have to warm up that much more).
If your dough is extremely soft, keep the bulk container covered and chill the dough for up to 1 hour.
Overnight fermentation option: At this point, you can choose to place the covered bulk fermentation container into the fridge to retard the dough overnight and bake the next day. The next day, take the dough out of the fridge, let it warm up for 30 minutes, and then resume with the Shape step below.
6. Shape – 1:15 p.m.
Butter your baking pan (even if it’s nonstick) to ensure that the rolls come out cleanly after baking.
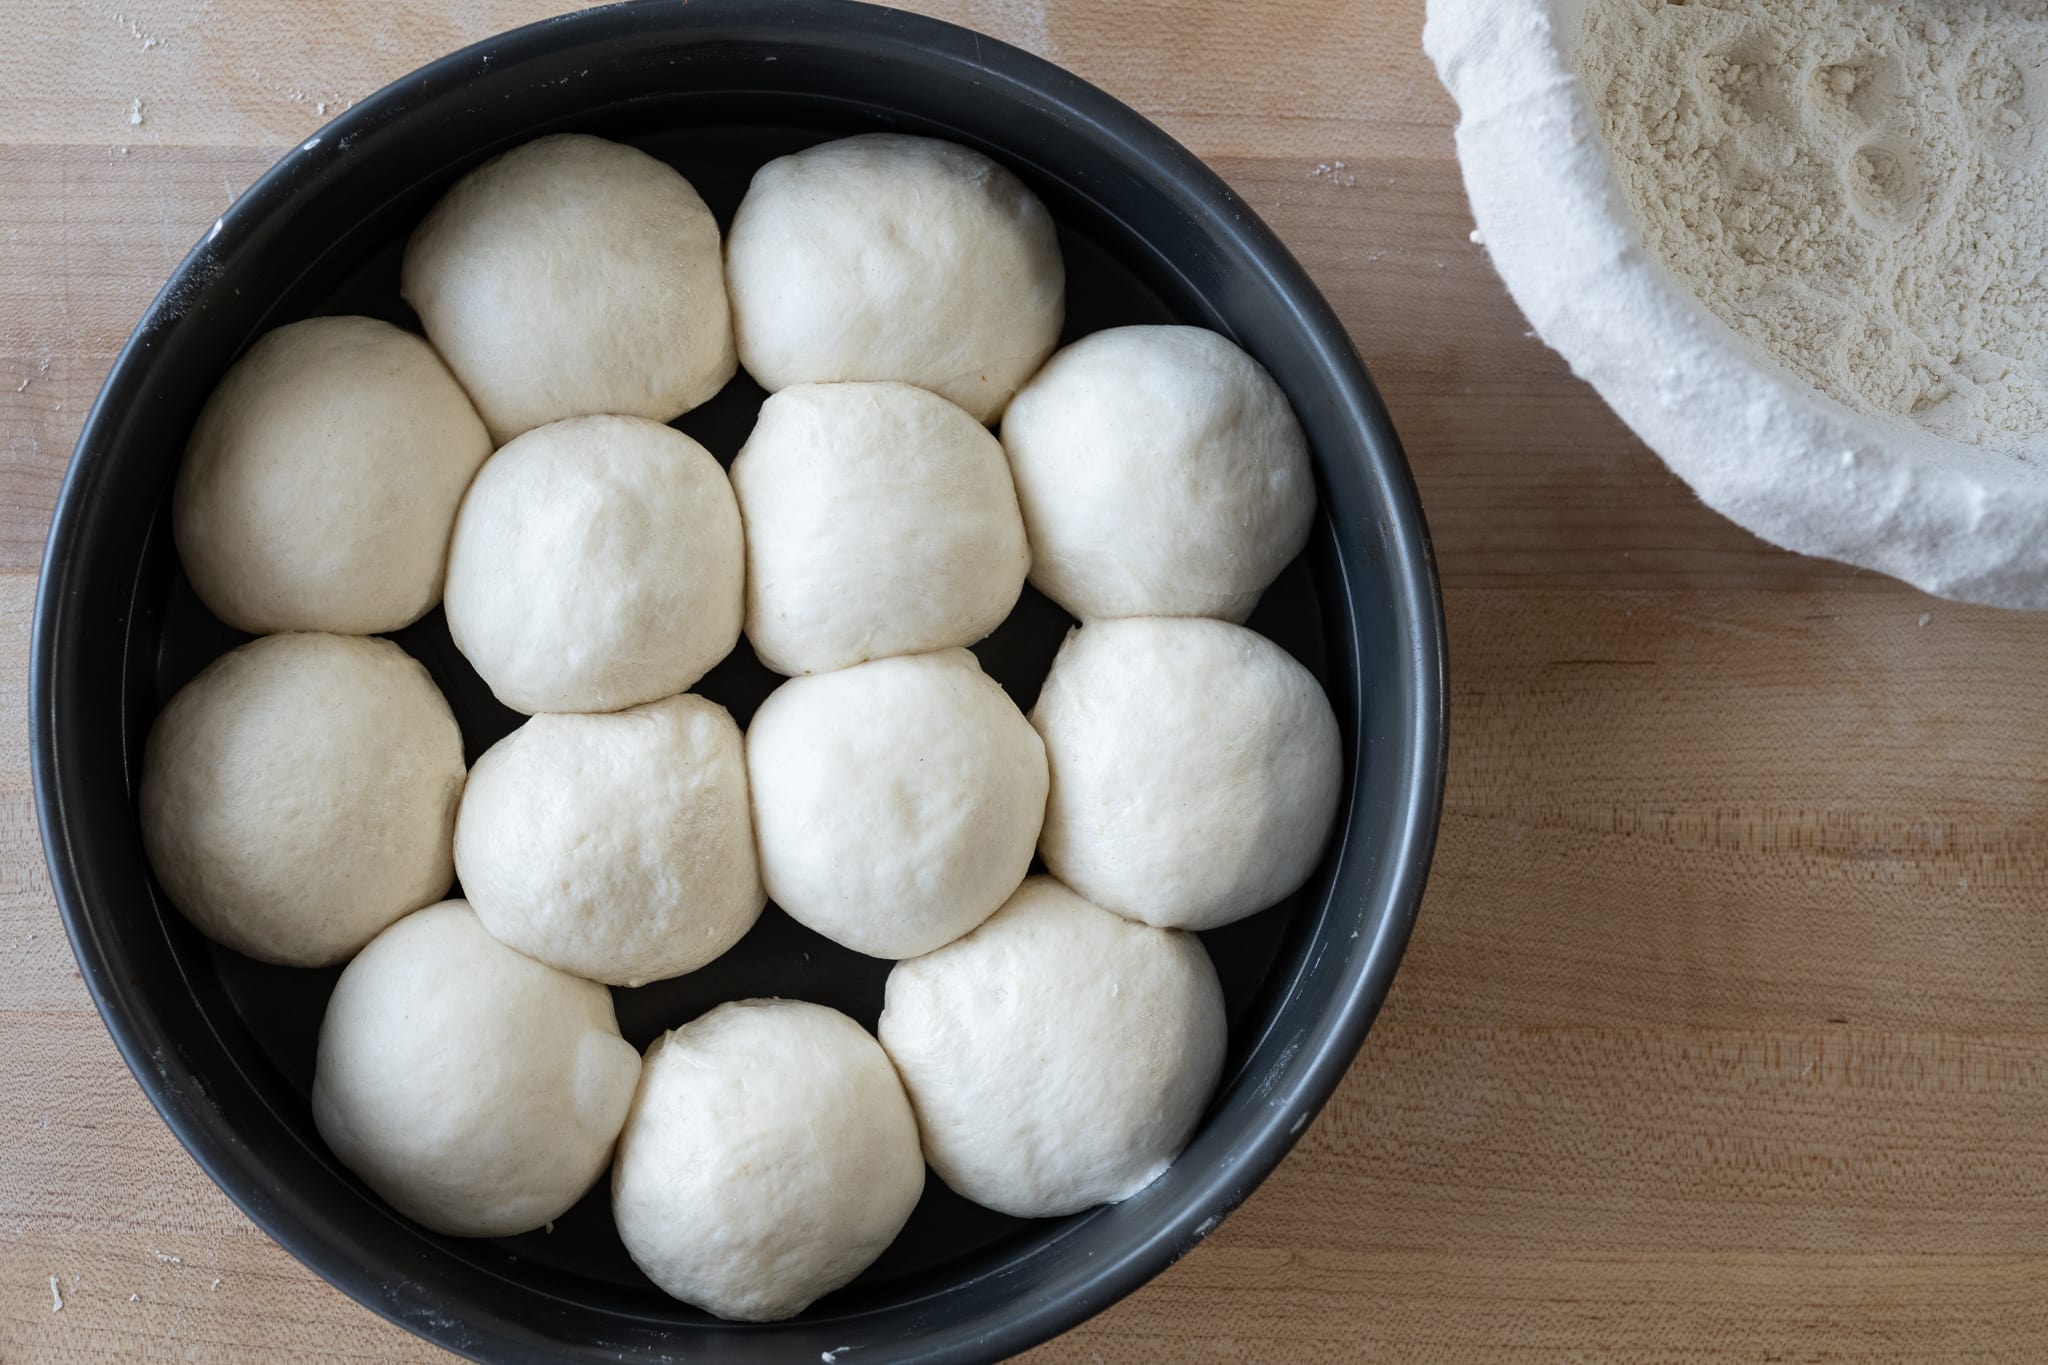
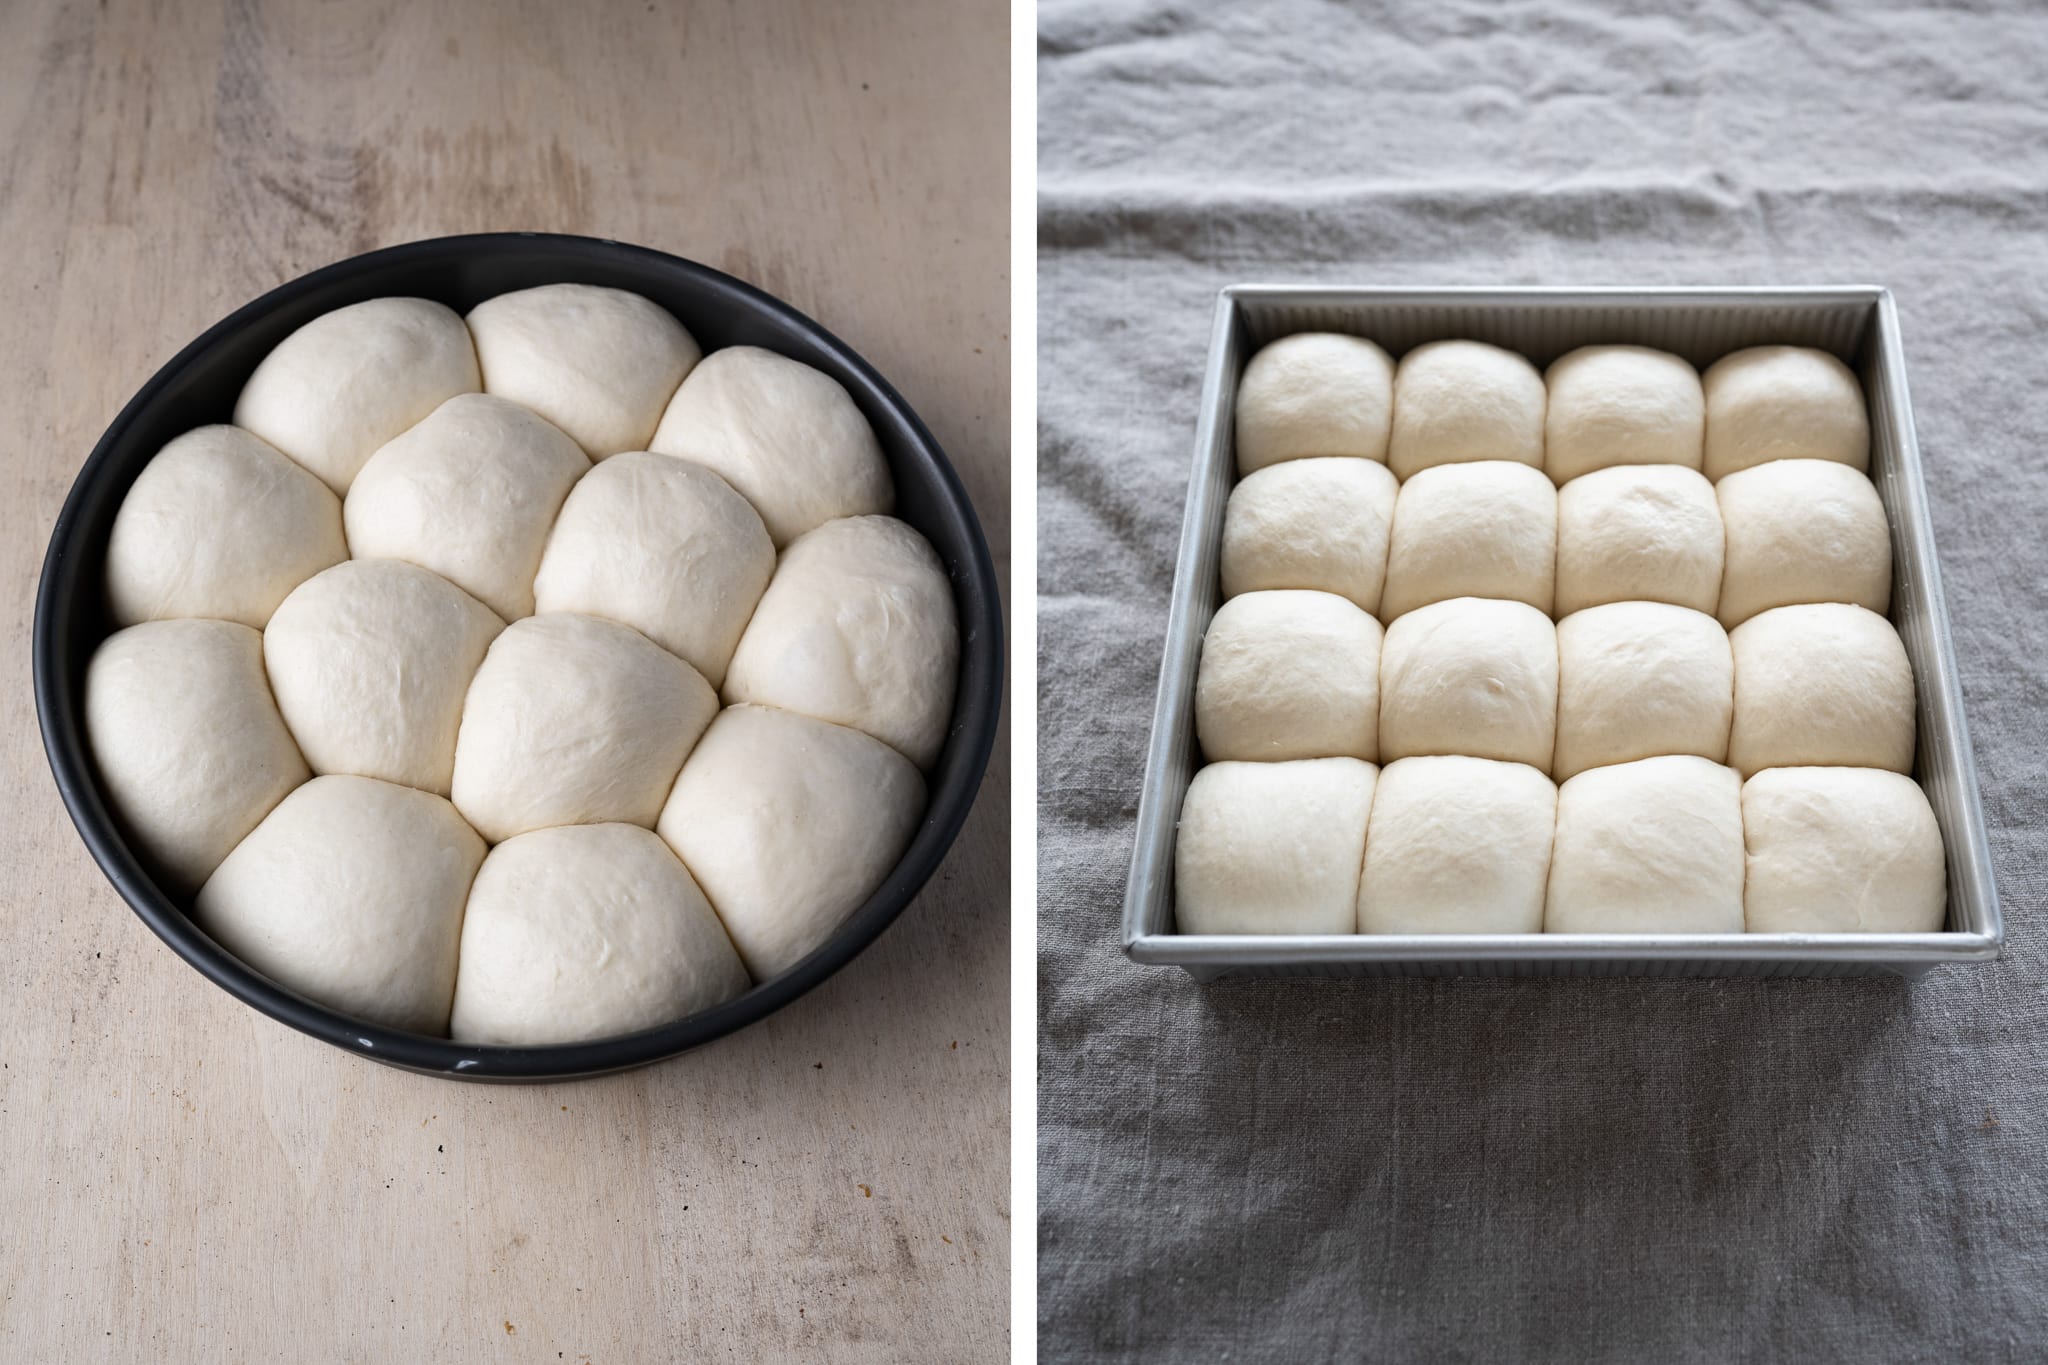
Remove the bulk fermentation container from the fridge, lightly flour the top of the dough in the bowl, and gently scrape the dough out onto a lightly floured work surface. The dough will be cool to the touch but still very soft. Lightly dust the top of the dough and divide it into sixteen 70g pieces (or fourteen 85g pieces for larger rolls).
Because the dough is so soft, I prefer to use my bench knife to shape each roll. Use the knife to drag the dough toward your body as your other hand rounds the dough, tucking the edge down under the ball. Repeat this dragging-and-tucking motion with the knife and your other hand until you have a uniformly round ball. Place the ball in the prepared baking pan. When using a round pan, I prefer to start by placing the rolls along the outside in a ring, then work inward as each ring fills.
For more shaping instruction, see my guide page to shaping buns and rolls.
Cover the pan with a large, reusable plastic bag and seal it shut.
7. Proof – 1:45 p.m. 4:15 p.m. (2 to 3 hours)
At a warm room temperature of 74-76F (23-24 °C), this dough should take 2 to 3 hours to fully proof. If your kitchen is cooler, expect it to take longer.
When fully proofed, the dough should be well-risen in the pan and very soft to the touch. Uncover your dough and gently press the tops of a few rolls. You shouldn’t feel any dense spots or tight areas—the dough should be very light and airy. If you do, cover the bowl and let your dough proof for another 15 to 30 minutes, then check again.
8. Bake – 4:15 p.m. (pre-heat oven around 3:45 p.m.)
Place an oven rack in the middle of the oven, and preheat the oven to 400°F (200°C).
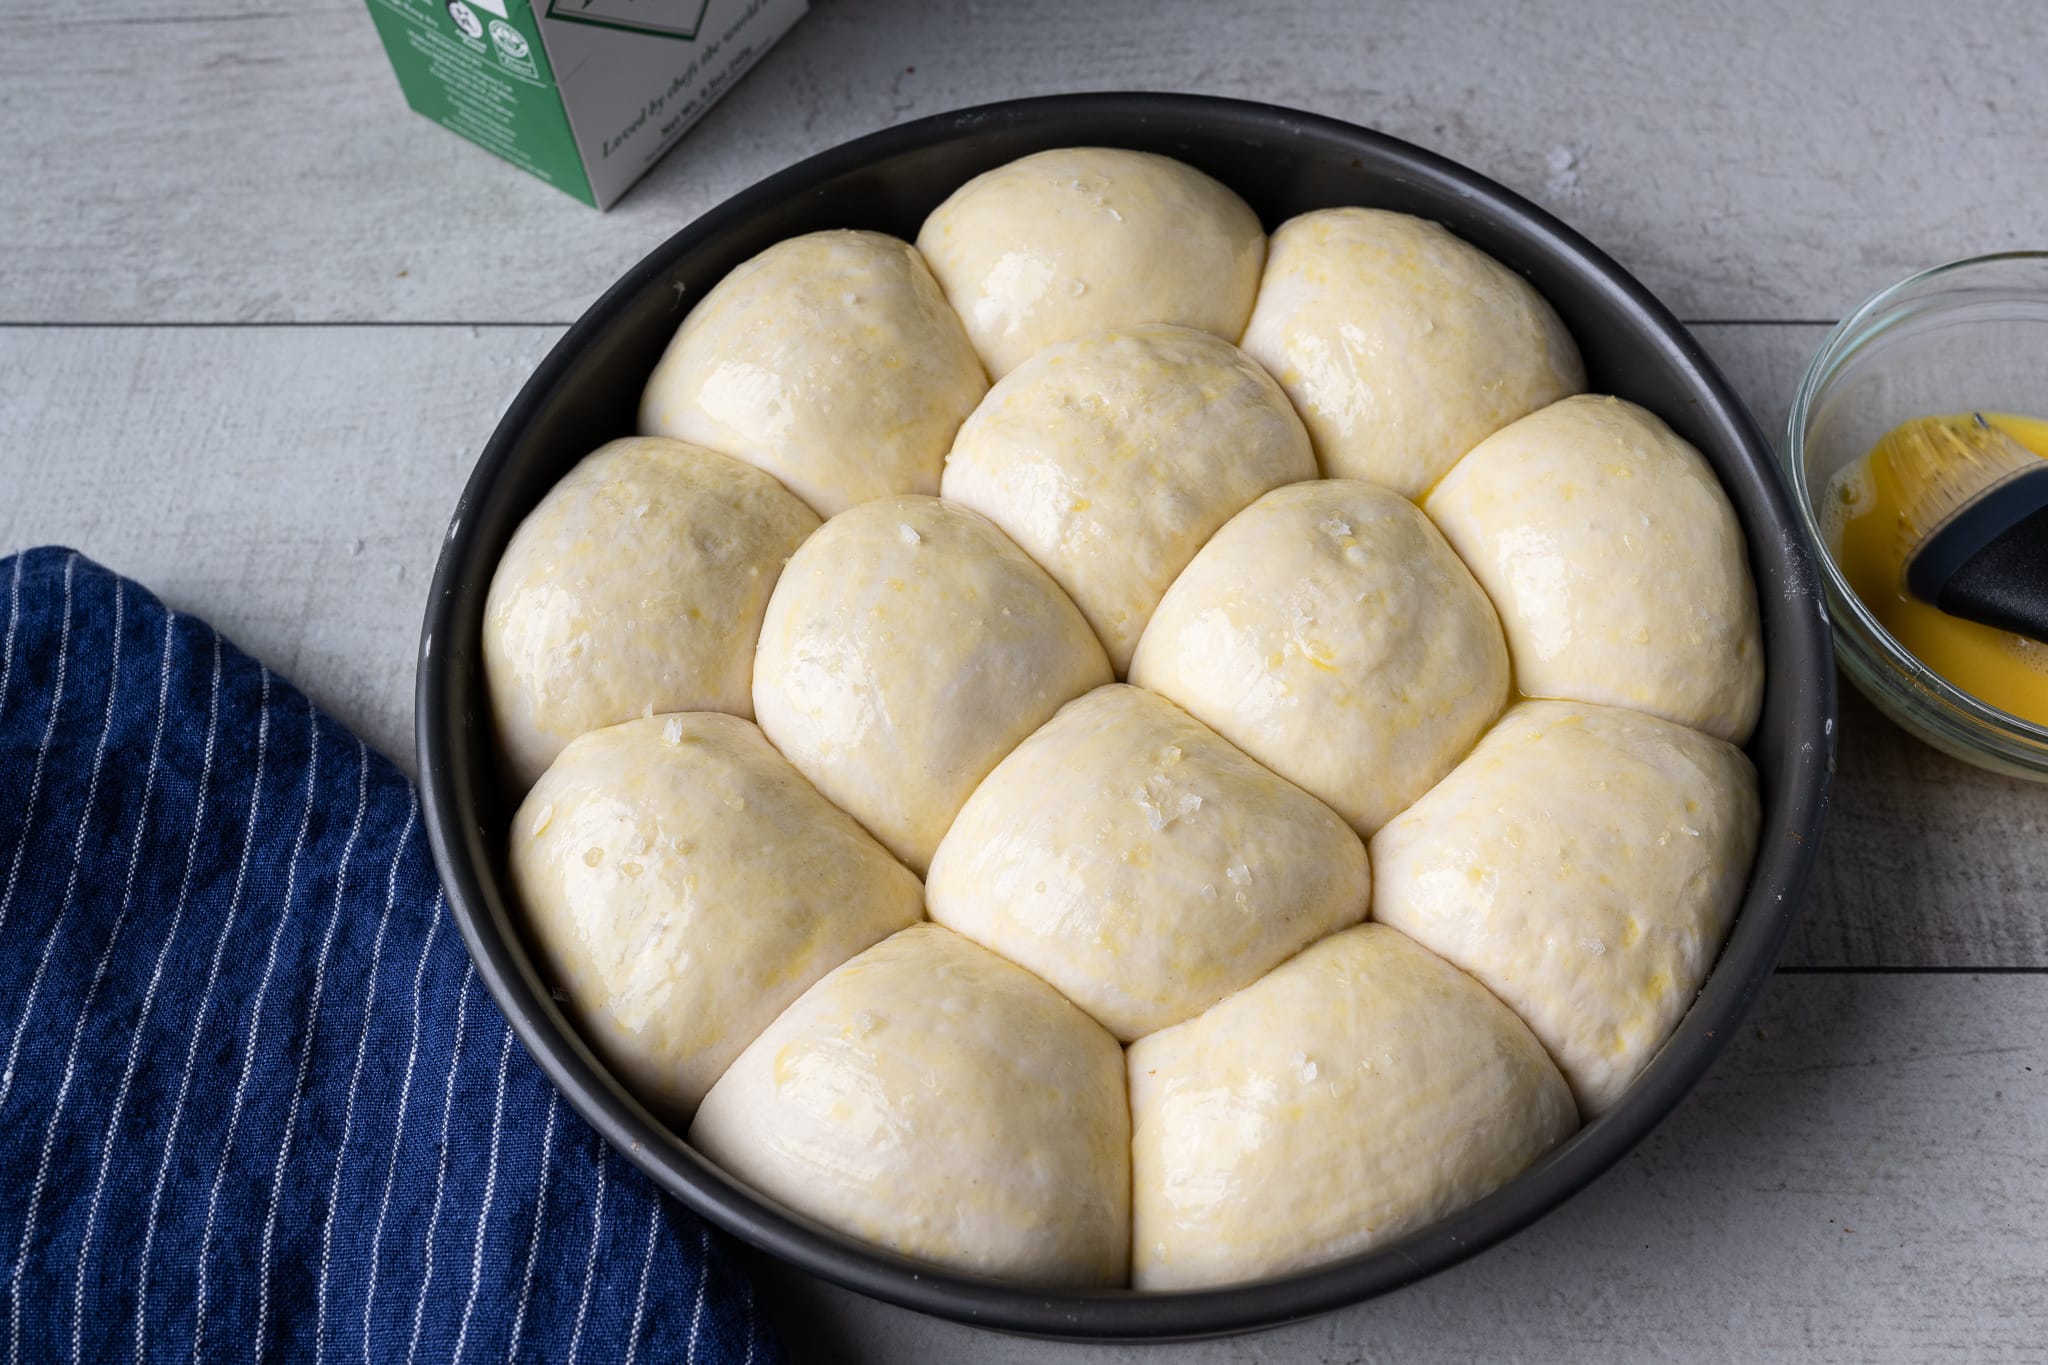
Make an egg wash: In a small bowl, whisk together 1 egg and 1 tablespoon whole milk.
Remove the pan from the bag, evenly brush the egg wash over the tops of the rolls, sprinkle with coarse sea salt (optional), and slide the pan into the oven.
Bake for 20 minutes. Rotate the pan 180° in the oven and reduce the temperature to 350°F (175°C). Bake for an additional 20 minutes until the tops of the rolls are golden and the internal temperature is around 204°F (95°C).
Remove the pan from the oven and let it cool for 30 minutes before eating.
These are wonderful warm from the oven, but I like to let them cool for at least 30 minutes before eating. These rolls are best the day they’re made, but are still great the day after (if stored according to my post on storing bread).
Print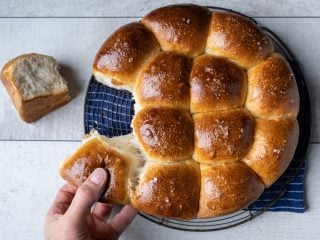
Super Soft Sourdough Rolls (with Tangzhong) Recipe
- Prep Time: 24 hours
- Cook Time: 40 minutes
- Total Time: 24 hours 40 minutes
- Yield: 16 rolls
- Category: Buns, Rolls
- Cuisine: American
Description
These super soft sourdough rolls are the perfect accompaniment to any dinner table (especially Thanksgiving!). They’re slightly buttery, a little sweet, ultra-tender, and the perfect counterpart for soups, stews, and any holiday meal.
Ingredients
Levain
- 74g medium-protein bread flour (all-purpose flour)
- 15g caster sugar
- 74g water
- 30g ripe sourdough starter, 100% hydration
Tangzhong
- 41 grams medium-protein bread flour (all-purpose flour)
- 166 grams whole milk
Main Dough
- All the tangzhong
- 328g medium-protein bread flour (all-purpose flour)
- 148g high-protein bread flour (bread flour)
- 95g butter, unsalted
- 38g sugar, caster
- 181g water
- 11g salt
- All the levain
Instructions
- Prepare levain (Day One, 9:00 p.m.)
Mix the following ingredients in a container and leave covered to ripen at about 77°F (25°C) for 12 hours overnight. - Pre-cook flour (Day Two, 8:00 a.m.)
To a medium saucepan, add the tangzhong flour and milk. Turn the heat to medium-low and cook, whisking continuously, until the mixture thickens and becomes like a paste, about 5-8 minutes. Set aside. - Mix (9:00 a.m.)
Cut the butter into 1/2″ pats. Set them on a plate to warm to room temperature. To the bowl of a stand mixer fitted with the dough hook attachment, add the water, flour, ripe levain, sugar, tangzhong, and salt. Mix on low speed (STIR on a KitchenAid) for 1 to 2 minutes until the ingredients come together and no dry bits remain. Increase the mixer speed to medium (2 on a KitchenAid) and mix for 4 to 5 minutes until the dough starts to strengthen and clump around the dough hook. It won’t completely remove from the bottom of the bowl, and it will still be shaggy. Let the dough rest in the bowl for 10 minutes. Turn the mixer on low speed and add the room temperature butter, one pat at a time, waiting to add each pat until the previous one is fully absorbed. Adding all the butter will take 5 to 8 minutes. After this time, mix on medium speed for 1 to 2 minutes until the dough smooths and clings to the dough hook. In the end, the dough will still be very soft, and it will not completely remove from the sides of the bowl. Transfer the dough to a bulk fermentation container and cover. - Bulk fermentation (9:30 a.m. to 1:00 p.m.)
Give the dough 3 sets of stretch and folds at 30-minute intervals, where the first set starts 30 minutes after the start of bulk fermentation. - Chill dough (1:00 p.m. to 1:15 p.m.)
Place the bulk fermentation container, uncovered, in the refrigerator for 15 minutes to make shaping easier. - Shape (1:15 p.m.)
Butter your pan. Divide the dough into sixteen 70g pieces (or fourteen 85g pieces for larger rolls) and shape each as a very tight ball. Place the balls in the buttered pan to proof. - Proof (1:45 p.m. to 4:15 p.m.)
Cover the pan with dough and let proof for 2 1/2 hours. - Bake (4:15 p.m.)
Preheat your oven to 400°F (220°C). Whisk together one egg and a splash of whole milk for the egg wash. When oven is preheated, brush on the egg wash and bake for 20 minutes. Then, rotate the pan 180° in the oven and reduce the temperature to 350°F (175°C). Bake for an additional 20 minutes until the tops are well-colored and the rolls have reached around 204°F (95°C). Remove from the oven and let cool in the baking pan for 10 minutes. Then knock the rolls out to cool on a wire rack. Let rest for 30 minutes, then enjoy.
Notes
Do ahead: you can prepare the tangzhong the night before. Cook the flour and milk as instructed and let cool to room temperature. Cover the tangzhong and keep in the fridge overnight. The next morning, take it out to let it warm some (to room temperature would be ideal) and proceed to add it during the mix as instructed.
Do ahead: you can prepare the dough and proof them overnight to bake the next day at any time. When chilling the dough, keep the covered bulk fermentation container in the fridge to retard the dough overnight. The next day, take the dough out, let it warm for 30 minutes, then continue with the Shape, Proof, and Bake steps. Alternatively, shape the dough into small balls and place them into the proofing pan. Cover the pan and put it into the fridge overnight. The next day, take them out 3 to 4 hours before you want to bake them and proof them on the counter until puffy and ready to bake.
To make these rolls vegan, substitute the milk for a full-fat nut or oat milk, and instead of an egg, use a flax egg.
What’s Next?
These super soft sourdough dinner rolls are now my go-to for all holiday meals, especially Thanksgiving. They’re just the right mix of buttery, sweet, savory (thanks, salt!), and squish-in-your-hand tender.
If you’d like to explore the ideas in this recipe even further, check out my sourdough shokupan loaf (which also uses tangzhong) or my sourdough pumpkin dinner rolls for a different take on rolls!
And if you are making these during the holidays, check out the Bread Baker’s Gift Guide for gifts for your favorite baker (or yourself!).


647 Comments
Hi Maurizio… any suggestions on a non-dairy substitute for the milk? Do you think a coconut or almond milk could possibly work? Thanks for sharing all of your fantastic recipes and techniques!
Stephanie, I made these following the directions but substituted vegan butter and almond milk. They came out fantastic. Happy baking.
Yes, any of those should work well! Check out my guide to tangzhong for more on milk substitutes in the roux.
I made these rolls per the recipe as I was looking for a softer dinner roll for Thanksgiving rather than my usual slack, hard French-style rolls. They came out really good and the texture was excellent. However, the crust had a bit of that fried fat taste due, I guess, to the butter. My question is when using the tangzhong technique, do you really need the fat to still get a soft interior? Or, alternately, could you just cut back on the amount of butter? This crumb with more of a bread-like crust would be perfect! Thanks.
Hey, Mark! Awesome to hear they worked out pretty well fo you. Interesting you tasted that, I don’t feel like that kind of flavor comes through. But yes you could omit the butter but you’d lose out on a lot of the rich flavor and soft texture. You’d have more of a very soft bread-y role instead—which, admittedly, would also be quite good! If going that route, I’d likely increase the hydration of the roll by 5% or so (I’d have to test).
Thanks for your prompt response. I think I will back off on the butter a bit from the 95g (16%.) I calculated the hydration at a bout 71% including a 100% starter so maybe target more like 75%?
That’s where I’d start!
I live in Utah 4500 ft. If I recall you live at higher
elevations as well. I assume most of your recipes work well at higher elevations? I have tried serval of your sourdough recipes which have turned out great. I made dinner rolls last night from challenger website using a preferment with yeast. Right after applying egg wash they deflated horribly. I think I may have over proofed them? Also support you using many of your affiliates. Thanks!! Any suggestions is appreciated before making your roll recipe. I will use the challenger without preheated pan and no lid.
Hey, Robin! Yes, I live at about 5000ft in Albuquerque, NM. Any of the recipes here at my site will work well for you. It does sound like they were over proofed. Using the Challenger pan should work just fine, but with these it does help to have the rolls rise up, which is why I use a smaller, round pan. If you use the Challenger, you might want to double the recipe… I’d have to test for the exact dough weight, though!
Also, check outmy guide to baking at high altitude for more tips!
Thank you!!
I ordered the round pan from your link 😀
Thank you so much, Robin!
I made these today and followed the recipe. They were a 9.6/10. I did only make 12 rolls, baked half fully, baked half 10 minutes less. I froze those and plan to finish baking on Thanksgiving (I’ll see how that goes). My rolls were not quite as dark as yours, I don’t know why, but it also happens with the other bread recipes I follow on this site.
A few minor questions/critiques. At the beginning of the recipe, it lists the yield of the starter as “Total yield: 260.0%, 224.4 grams” which I can’t figure out the weight. The final recipe says add “all of the roux”, which one can assume is 166 + 41 = 207 grams. I’m sure it doesn’t need to be exact, but for greater accuracy, shouldn’t we be cooking more than that to start, to account for losses in scraping from the pan, getting it off the whisk, etc? Similar with the levain, I like to account for bowl losses.
The flour is always 100 percent. Study baker’s percentage might make more sense. The water is 100 percent as well meaning the flour is 100 percent hydrated. The other percentages are calculated from the flour weight. Sugar is 20 percent of 74 which is 15 rounded up. Just follow the recipe for the Levain and roux and should turn our perfect. I am no expert but finally understand baker’s percentage. Makes it nice when altering the batch size.
I think you missed the point – I understand baker’s percentages, and if you see my initial post, I followed this and they turned out great. The overall yield percentage is correct for the 74 grams of flour.
The yield of the levain is listed as 224.4 grams. The ingredients are 193 grams (74, 74, 15, 30). To get the yield weight, twice the initial culture (30 grams x 2) would need to be used. Or three times the sugar. Which is 300% yield, based on flour.
You’re right, Dustin. I had a typo, the total yield of the levain is 192.3g.
No problem I see it’s fixed. Hard to complain, your recipe posts are amazing and detailed! I do think I’ll try these again soon with some whole wheat. Maybe even some pumpkin to really push the “fall” thing.
Thanks, I appreciate that. It’s all good commentary! Things I’ve thought a lot about and trying to improve on (always!). Check out my pumpkin cinnamon bread, that dough might make awesome rolls or you could use the ingredient percentages there as inspiration for transforming this dough into pumpkin rolls as well. Happy baking!
I see now!
Hey, Dustin! Glad to hear they turned out pretty well. Regarding the color: they might have needed a little longer bake time, more egg wash, or it could also be another factor with your oven (each is different!)—maybe a higher temp at the start or moving your oven rack higher might help as well.
The total yield of the levain is approximately 192.3g (I had a typo!), which might come in a little under and is typical. That’s ok. Same issue with the roux, usually some is lost in processing, like you said, but it’s generally a small margin. I’ve been debating whether to build a larger levain, roux, etc. to account for the excess, but I’ve run into many issues in the past where people would add the entire build and then have too much in the final mix. Hard to cover both angles!
I was thinking of making these in a cast iron pan (the rounded shape is great and I don’t have a round pan). Would you recommend changing anything like preheating the cast iron and proofing in a separate container if I wanted to bake these in the cast iron pan?
Hey, Brady! I wouldn’t preheat the pan, it would be too difficult to get these into the hot pan. It should work just fine, I would just keep an eye on them to make sure they don’t bake too quickly in the oven, cast iron tends to start slow, but really ramp up the heat toward the end (and not to mention stay hot for longer). I’ve been meaning to try this as well, I’ll update the post once I do!
Excited to try these for Thanksgiving (I will shape and then put in the fridge overnight as you suggest)! Wondering if the tangzhong could be prepped the day before, chilled in the fridge, then brought to room temp with the butter before mixing? Just trying to make my schedule work around an 11-month old! Thank you!
That is mentioned at the bottom of the recipe in the Notes section as something that can be done ahead of time as you suggest.
Hey, Logan! Yes, it certainly can. As @disqus_ZiRRtTmCOd:disqus mentioned, the post discusses this but you can also find out more on my tangzhong guide page. Happy baking!
Thanks, and sorry I missed it in the post!
Hello,
Making these again!! I noticed this in the instruction card.
Proof (1:45 p.m. to 4:15 p.m.)
Cover the pan with dough and let proof for 2 1/2 hours.
Maybe it should be towel?
Hey there! I meant “cover the pan holding the dough and let proof…” 🙂 I’ll update!
Hey Maurizio! I’m going to attempt these without a mixer; to incorporate the butter do you recommend adding one pat at a time and doing the slap & fold method until incorporated? Thank you!!
Hey, Colleen! That should work, and that’s what others have reported working for them. I would do s/f upfront to strengthen the dough sufficiently, then add the butter into the dough in the mixing bowl, one pat at a time until all absorbed, then finish folding the dough in the bowl, or if you’re wanting more strength, turn the dough back out to the counter and do more s/f. The dough will be soft after the butter is added!
Hi Maurizio, I baked these about a week ago and they were just fantastic. You can refresh them after a day or so by blasting for 20 seconds in the microwave. I live in N Ireland, so have a damp climate, but found I needed all the water as I use a proofer to control temperature. They are fragrant, light and delicious. I cooked them in a slightly lower oven heat than you suggest – maybe my oven heat isn’t accurate. i just wanted to thank you for the recipe and your wonderful website. My other favourites are your cinnamon sourdough buns – regularly send a batch of those over to my sons in Scotland and England. Might seem excessive, but, as they say, you just can’t buy them anywhere! Your enthusiasm and creativity is really inspiring and the standard of photography, tips and insight is always so good, it’s a joy to have your recipes pinging into my emails. Thanks again and keep baking! Cathy
So happy to hear that, Cathy! Thanks so much for the kind words and the feedback, that really means a lot to me—and that I can bring such joy into your (and your sons!) kitchen 🙂 Have a wonderful holiday season and happy baking!
Hi Maurizio – just have a few questions I thought I’d ask on this thread – can I use buttermilk instead of whole milk? And could I use Tipo 00 flour instead of bread flour? I’m still a bit of a novice when making bread so I didn’t want to make these substituions without checking to see what you think? My first round as you wrote the recipe came out great and I realized why they were a bit darker – I forgot to turn the oven temp down for the last 20 min – doh!
Hey Sara! I’ve not tried with buttermilk—I’m worried it might have adverse effects on fermentation given the acidity. It’ll certainly change the flavor profile. I know many recipes that do use buttermilk in baking, so it’s certainly possible, I’ve just not tried it!
Tipo 00 will work, but it doesn’t say anything about the protein content of that flour, it just means it’s highly sifted and very white flour (which is what I’m using also). I’d say it should be fine to use, but hold back some of the water in the recipe and only add it in if the dough feels manageable.
Regarding the oven, no worries, easy fix next go!
Thanks so much Maurizio, I’ll skip the buttermilk for my Thanksgiving rolls, def don’t want to mess with the flavor profile!
Hi Maurizio, many thanks for this recipe. I tried it yesterday – the rolls were soft and fluffy but the crust was leathery (quite tough). And probably that kept the rolls from rising to their max potential, methinks. What did I do wrong? I used an egg wash so I did not bother to cover the rolls during baking. TIA!
Hey there! Maybe the temperature was too high in your oven, or it was too close to a heating element. I’d try dropping the temps by 25° and see how the next bake goes!
Thank you for this wonderful recipe.
My husband still buys preservatives-filled bread (taste of childhood he says) and so I am on a mission to convert him. I baked this as a sandwich loaf and my fussy hubs finally gave his nod of approval!
Adjustments: I used ripe starter (1:1.5:1.5) without sugar (coz I’m lazy), did a 45 mins BF, “shaped” (as best as I could) and left it in the fridge for about 7 hours. Took about 3.5 hours to proof. Average RT is about 29-31C here. There is a tinge of sour taste but it’s quite slight and the toddlers love it. Will try a 1:10:10 starter feed/levain next and will report back on whether the loaf stays soft longer in the humid tropics.
Sorry for the long comment, just really excited and trying to work out timing so I can do this more often to fit into my schedule!
You’re welcome, Ying! Huge praise, so glad to hear that. Your changes sound good, glad they baked up nicely! If you add the sugar to the levain you’ll notice a significant drop in sour flavor in the end rolls. Keep me posted on how it’s going!
Hi Maurizio – thanks for this delightful recipe. Regarding the overnight fridge option. The recipe says to fridge after bulk fermentation before shaping. Would it work instead to shape after bulk and THEN put in the fridge overnight already shaped? Thinking that might work better for my Thanksgiving kitchen dance.
You’re welcome! Yes, that would also work.
Baked these rolls today and they came out great! My house was cold today (65 degrees) because our heater is broken (I’m in California) so it took longer to bulk-ferment – was keeping the bowl next to a space heater the whole time :-). My overnight levain came out short and I only had 180g, so I added 12g of regular starter, and it seemed to have worked fine. The bread was super soft and the crust crunchy. Really yummy. Thank you for all the wonderful recipes, I really enjoy trying out different type of bread from your wonderful recipe collection.
Awesome to hear that, Nami! Your modifications—temperature location and adding starter—are exactly what I would have recommended, nice work there. Happy to help and enjoy!
My levain also only came out to about 180g, but I didn’t have the foresight to add regular starter – I’ll have to see how it all comes out tomorrow, after I bulk ferment overnight. Maurizio – is there some reason the levain is coming up short? I followed the weights exactly.
That’s ok, it happens. Some of the levain is usually lost in processing. I might add a little buffer to this recipe for that reason, but then I run into the other issue where people say there’s too much levain 🙂 Your dough will still turn out just fine with the small deviation, be sure to let the dough fully proof before baking (which is always the case). Let me know how you like them!
They did turn out great! The only issue I had was the tops burned a bit (the milk in the egg wash?), and I had to reduce the cooking time for both temps (I’m at 5,000 feet – not sure if that makes a difference). But it did not affect the taste at all – best rolls I’ve ever made. Next time, I’ll reduce the 425 to 400 and make sure the rolls are on the bottom shelf, maybe lessen the splash of milk in the egg wash.
Excellent, Stacey! Glad to hear that. I Live at 5k ft. also, perhaps it’s just a difference in oven or rack placement. Easy to adjust for next go like you said. Thanks for reporting back and enjoy!
Hi Maurizio – Although it was a little hard for me to keep a consistent proofing temperature and I almost gave up, (I decided to bake them anyway after a long wait in the fridge while I decided what to do) . They are delicious!! My husband put one in his mouth and said “oh damn!” Hahaha. He’s already ordered me a proofing box so I can make them more often. Thank you for your detailed descriptions, I even switched my starter to have rye flour like yours. I’m looking forward to more baking ahead. Thanks again.
Hah! Well that’s great feedback if I’ve ever heard some! Have fun, there’s a wide world of baking before you—all delicious, no doubt. Enjoy 🙂
Hi Maurizio, can white wheat flour be substituted in this recipe for AP? Thanks
White wheat flour, sure!
I used 10% stone milled white wheat from KA and they turned out amazing!!
Hello !
Thank you for this recipe ! My whole family was really happy with the softness of the dough ! It is incredible ! just a question, I thought the taste of levain a little strong, do you have any idea why ?
thanks !!
So glad to hear that, Maelle! That’s interesting—the levain shouldn’t have a sour flavor at all, especially with the added sugar.
Could it be because I almost double the bulk fermentation time ? I only have 22°C at home in my kitchen, so the fermentation times are quite long. It also stayed in the fridge for ca 18 hours.
Yes, that will certainly do it. The longer the fermentation time, generally, the more sour the flavor as it gives bacterial longer to function (which produce acids). I’m sure it was still delicious! If you want to cut the sourness, try proofing for a shorter period.
Hi! I made these on Tuesday and they turned out perfectly! Can you give any advice on how to freeze and serve these? I’m afraid I’ll have too much going on the day of Thanksgiving. Thank you!
What you could try is proofing these in the fridge overnight after you’ve shaped them. Then on T-giving, take them out any time to finish baking them in the oven. You could even bake them early in the day, they’ll stay really well the whole day and if you want them warm, heat them in the oven for a few minutes before serving!
I need to make these days in advance for T day as I will be traveling and arrive 2 days before. I want to know if I can bake these, but shorten the bake time a little, freeze them, arrive at my destination, and allow them to bake a few minutes on T day. . . . I guess keep them in the fridge once I arrive or re freeze them?
Hey, Marcy! I think that could work, especially if they’re baked mostly through, and at destination they just need to finish off. I’ve never tried this, though. If you have time I would suggest testing it at home before to make sure that will work! That is essentially how rolls/buns are made and then frozen and sold in stores, while usually not sourdough, I think it could work since all of the heavy “lifting” (rise) has already been done and it’s just finishing to bake at that point. I’d put them in the fridge on arrival to help thaw.
yes, I am doing a test batch now. I also was thinking it might work because the bake will be nearly finished so all the spring and rise will be set. I will finish the bake at the same temp as original I’m thinking. Will let you know. I have to cool them, freeze them, and finish them. A couple of days yet. But I did notice, in recipes for non SD brown and serve rolls, the recipe says to prebake at 275° for 20 minutes, then freeze. And final bake at 400°. Your thoughts?
Hmm. That’s interesting. I honestly don’t know because I haven’t tried this. I would think you’d still want that initial high heat to get those loaves up and rising…
that’s what I thought. So that is what I did. However, I baked them at full temp . .425° . . . but they looked well set at 25 minutes. So removed them, and these are so amazing btw. Froze one in a vac seal bag. Unthawed it and used the microwave for 18 seconds to warm it up. Spectacular! Tasted just like I took them out of the oven. These are tough little buns! And BTW, I didn’t have as much dough, mine weighed 1108 gms.
Wow, great idea with the vac seal. Awesome to hear this worked out so well! I’ll have to give this a try, would certainly be handy for Thanksgiving given the business that always ensues! Thanks for reporting back, Marcy. Happy baking!
Hi Maurizo, thank you for this wonderful recipe. I live in a very hot and humid place. The levain ended up weighing 185g instead of 192g and I only added 175g water instead of 181g. It churned out a dough that looked like your pictures. Unfortunately, my bread tasted great on the first day but dried up the next. Any possible reasons why or is this supposed to happen?
That’s ok regarding the slight deviation with the levain, it’s typical to have a little less. These rolls really are best the day they’re made, but should last several after. They’re not like a typical loaf of sourdough bread which stays great for 7 days with no problem. After the first day, I wrap them in bees wrap or a large plastic bag to keep them moist.
When I add up all the amounts, the total is 1200 grams. So I can get sixteen 75 g rolls or fourteen 85 g rolls.
That’s right!
Thank you Maurizio for this keeper of a recipe. It is more than delicious! Question please. Can I use some amount of Whole Wheat and if so which would I replace, the AP or Bread Flour. Also how much do you suggest I can safely substitute without compromising the end result? Thanks in advance.
Glad to hear that, Angel! Thanks for the feedback. I’d say try starting at 10% whole wheat for some of the all-purpose flour. With more whole wheat you might need to add a touch more water when mixing and keep an eye on the dough during bulk and final proof, it might have slightly increased fermentation activity.
Hello! Do you reckon soy milk could be used in the roux instead of water, cow or oat?
Hey! Absolutely. I mention that up in the post and on my guide to the tangzhong technique 🙂
My dough gets VERY warm with the kitchen aid— 84 degrees! And I don’t mix long. Thoughts?
Try to offset that by using colder water in the main mix. Also, the tangzhong might still be warm. Be sure to make it ahead of time so it cools down to room temperature, and you can even put it into the fridge to further cool and offset any heat generated during mixing. Take notes and adjust!
I want to make these for Thanksgiving, but my only oven will be hovering between 325 and 350 all day with the sides/turkey, etc. Can I bake these at a lower temp for longer time? Or would it be better to bake them early in the day and let sit a few hours?
I’ll be making them as well, and will do them earlier in the day. I think that’s the better approach, and then a quick re-heat in the oven just to warm them right before serving will be perfect!
Laugh out loud at room temp of 76F. I’m in MN and had to turn the heat on to get to the 66F it is now! 🙂
Whoa! Perhaps I should say “room temp in the dry desert of New Mexico 🙂.”