
Baking is the final step in breadmaking, transforming flour, water, and other ingredients into sourdough bread. The oven’s heat causes the dough to expand and change, forming a sturdy structure with a crisp crust. Caramelization and the Maillard reaction give the crust its golden-brown color, aroma, and flavor.
To bake a successful loaf of sourdough bread, it’s important to set the stage for encouraging the best oven spring (rise) and crust color. In a professional bakery, bakers use ovens that inject steam into a sealed oven at the press of a button.
Unfortunately, we don’t have such luxuries at home. Fret not. In this guide to baking bread dough, I’ll discuss a few of my effective oven-baking techniques, how to get a thin crust, how to score dough properly before you put it into the oven, and tips on determining when that loaf is fully baked.
Let’s get baking.
Baking Bread Dough Guide Contents
- Baking bread dough—the science and essential information
- How to (and why) score bread dough before baking
- My best methods for baking bread dough at home (in a Dutch oven and on a baking surface)
- When is bread dough finished baking?
- Bread baking ovens
Your Ultimate Guide to Sourdough
This guide is part of a series, tap to learn about each step of the bread-making process from starter to finished loaf.
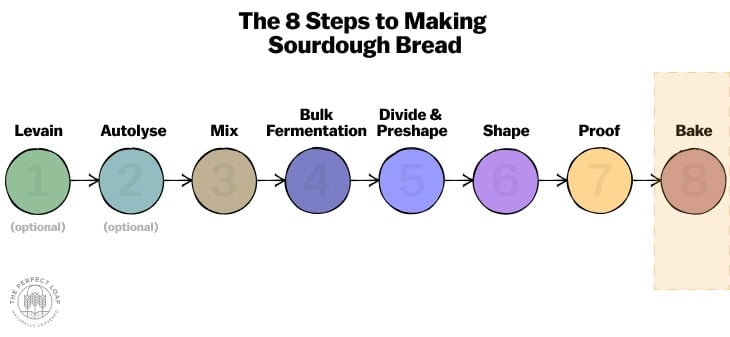
Well, you’ve finally arrived. You’re at the last step in baking sourdough bread. It’s not a terribly long process, is it? I mean, while there are 8 steps to making sourdough bread, most of the time, the dough is fermenting on its own. You just have to drop by, give it a helping hand, and ensure it’s on track.
Now that we’re at the baking step, let’s examine exactly what happens as your dough heats in the oven.
What Happens When Baking Bread Dough?
When fermented dough is placed in a hot oven, the oven’s heat causes the microbes in the dough to accelerate fermentation activity, and, more importantly, gasses expand. This causes the dough to gain volume and rise. The starches in the dough swell, pop, and gelatinize, forming a gell to support the gluten network as the dough expands. This gel traps gasses and ultimately creates the crumb structure. Caramelization and the Maillard reaction give the crust its golden-brown color, aroma, and flavor.
Next, let’s look at what exactly gives bread its dark, crusty exterior (hint: it’s a chemical reaction).
High heat and a dry oven are best for the most crust color.
The Maillard Reaction and Baking Bread Dough
The Maillard reaction gives bread its brown crust, flavor, and aroma. When bread dough bakes and the dough’s temperature rises, complex chemical changes occur between amino acids and reducing sugars present in the dough. These reactions add color, flavor, and aroma to baked goods.
High heat and a dry oven are best for the most crust color. Any moisture in the oven reduces the effectiveness of the Maillard reaction. This is one reason (in addition to helping the crust set and firm) why steam is removed—vented—in the second half of baking.
More on this in a moment.
What is Oven Spring?
Oven spring is the rise that occurs in your bread dough during the beginning part of baking as gasses expand and fermentation accelerates. We call it “spring” because the dough seems to do just that: As it heats and expands upward, it pops up.
The amount your bread dough springs in the oven is related to these characteristics:
- The hydration of the dough
- The strength of the dough
- How the dough is scored
- The temperature of the oven
- The fermentation level in the dough
Let’s look at each in detail.
Dough Hydration and Oven Spring
As a dough’s hydration increases, it springs less in the oven. This is because water can be seen as a “stressor” to the gluten network, which can cause the dough to spread more than pop up. Also, high-hydration doughs are harder to strengthen during mixing and when shaping.
Dough Strength and Oven Spring
A stronger dough with more structure can rise higher in the oven—up to a point. One of the foundational tenets in breadmaking is that dough needs to be strong but not too strong (I discuss this often in my cookbook—the balance between extensibility and elasticity). A stronger dough has the potential to rise higher thanks to the additional structure built up in the gluten network, but if it’s too strong and not extensible enough, it’ll be fighting itself to rise. Imagine trying to inflate a bike tire by blowing into it versus a water balloon.
Dough Score and Oven Spring
When scoring, be sure to cut in evenly across the dough’s surface (to prevent bulging in any one area) and with enough depth to encourage maximum rise. However, if the dough is fragile or very well proofed, avoid cutting in too deeply such that the overall structure is compromised.
More on this in a moment.
Oven Temperature and Oven Spring
Generally, a hotter oven will encourage more upfront oven spring because it encourages faster gas expansion within the dough before the crust can set. Additionally, and to a degree, properly steaming your home oven keeps that outer crust more pliable for longer.
Dough Fermentation Level (Proof) and Oven Spring
If a dough is overproofed it will lack the “energy” needed to spring in the oven.
How Do I Bake Sourdough Bread With a Thin Crust?
When looking to bake thin-crusted sourdough bread, several techniques can be used, either independently or in combination, for enhanced results. Bakers can experiment with increasing steam duration and intensity during the initial baking phase or opt for a shorter baking time at marginally higher temperatures. Proper proofing is always crucial, and underproofed dough can result in a thicker crust. Finally, skipping cold proofing (also known as retardation) can result in a thinner crust.
See my guide to baking sourdough bread with a thin crust for a deep dive into tactics and techniques.
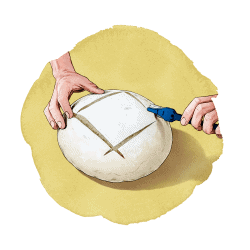
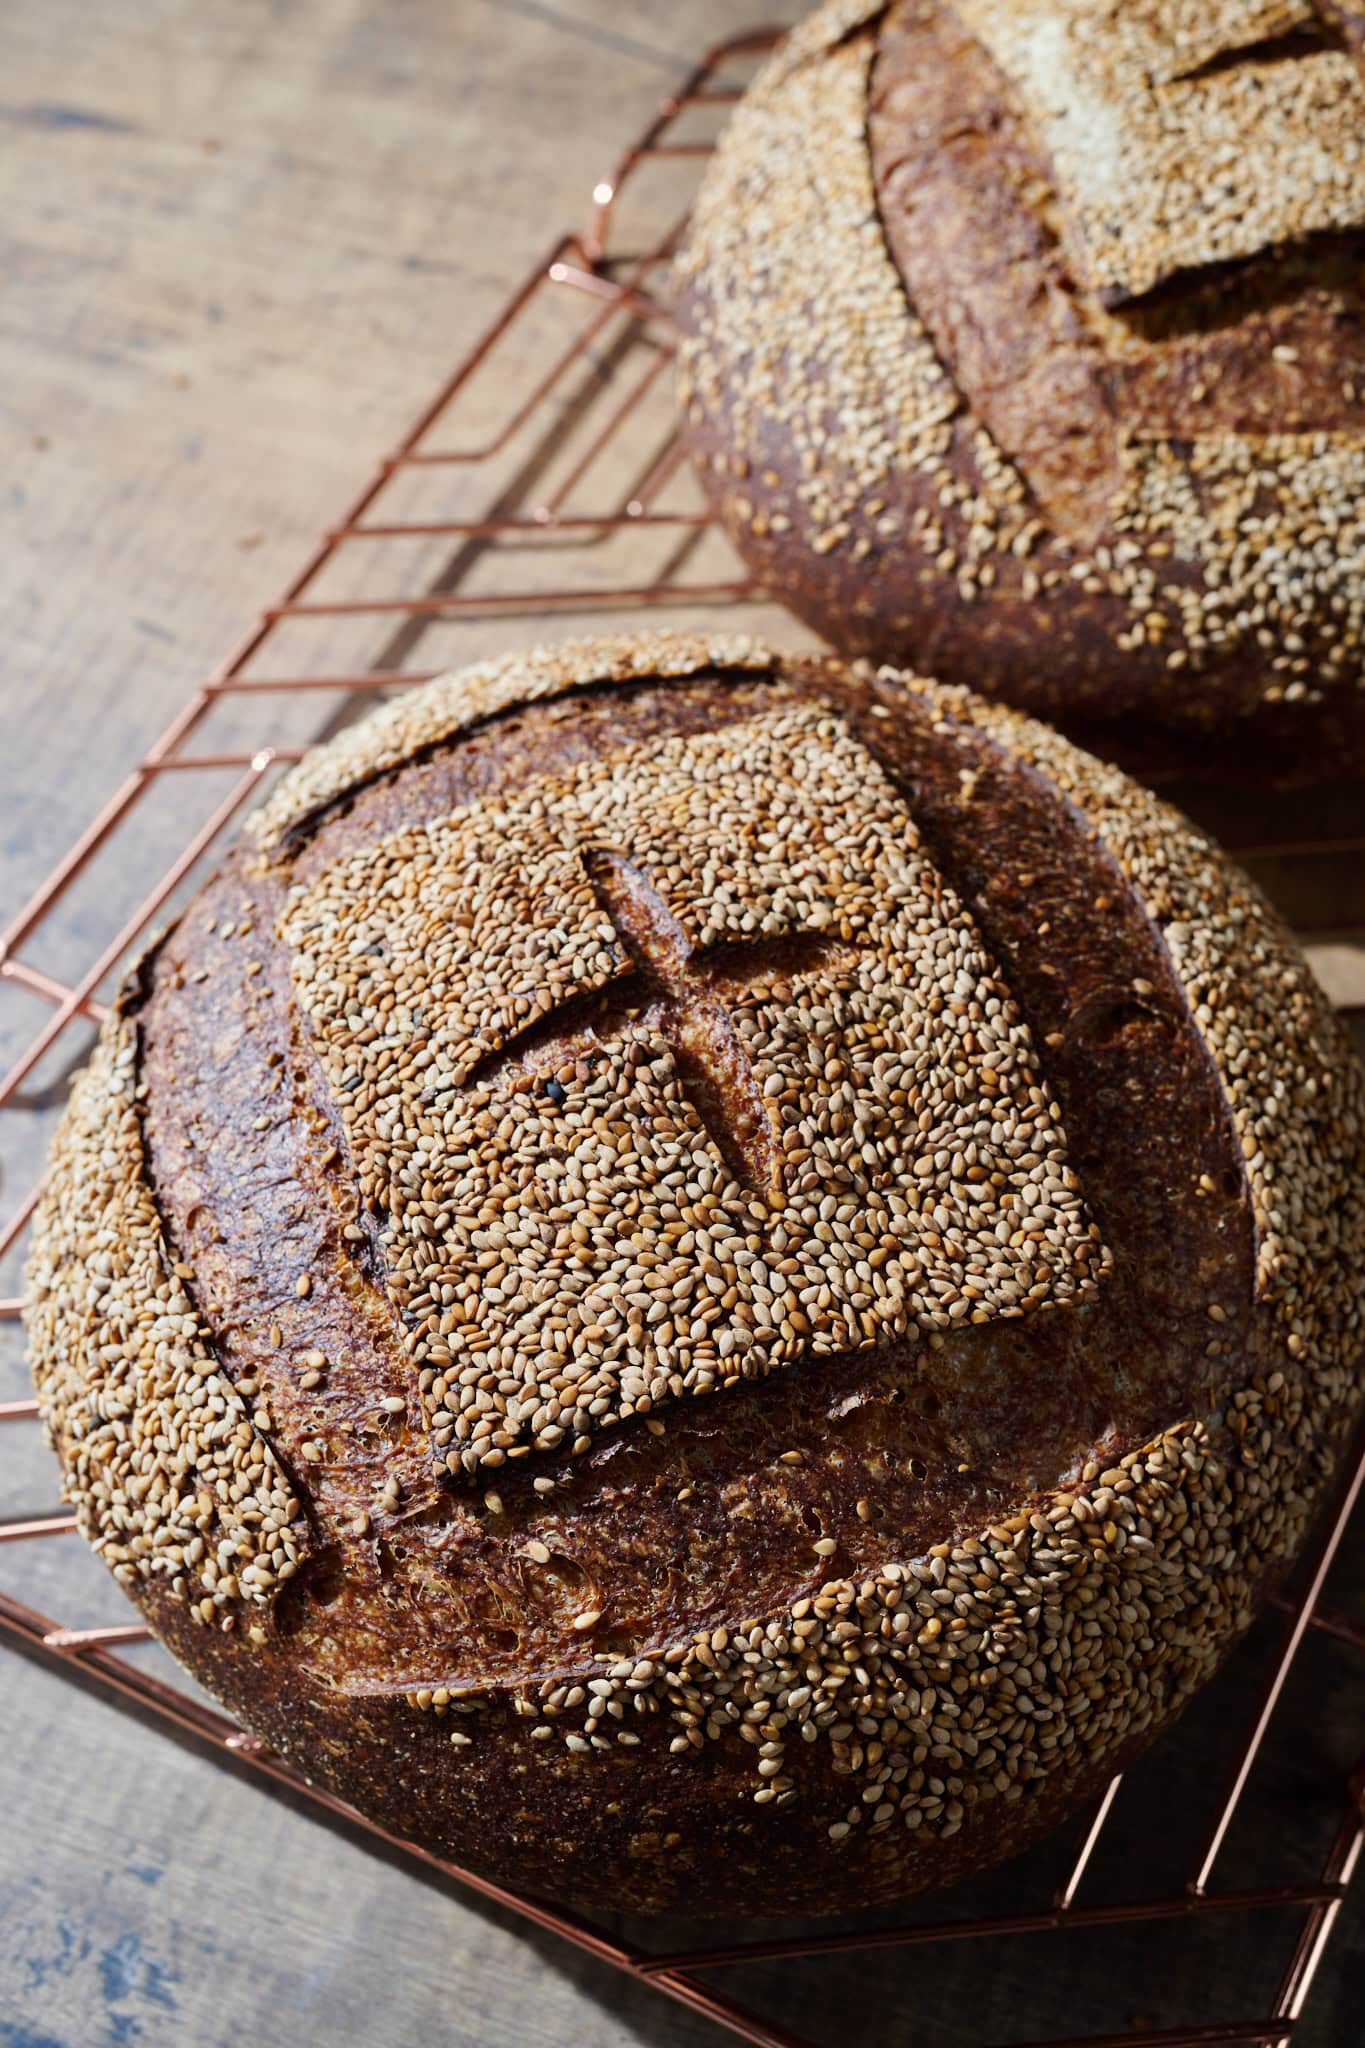
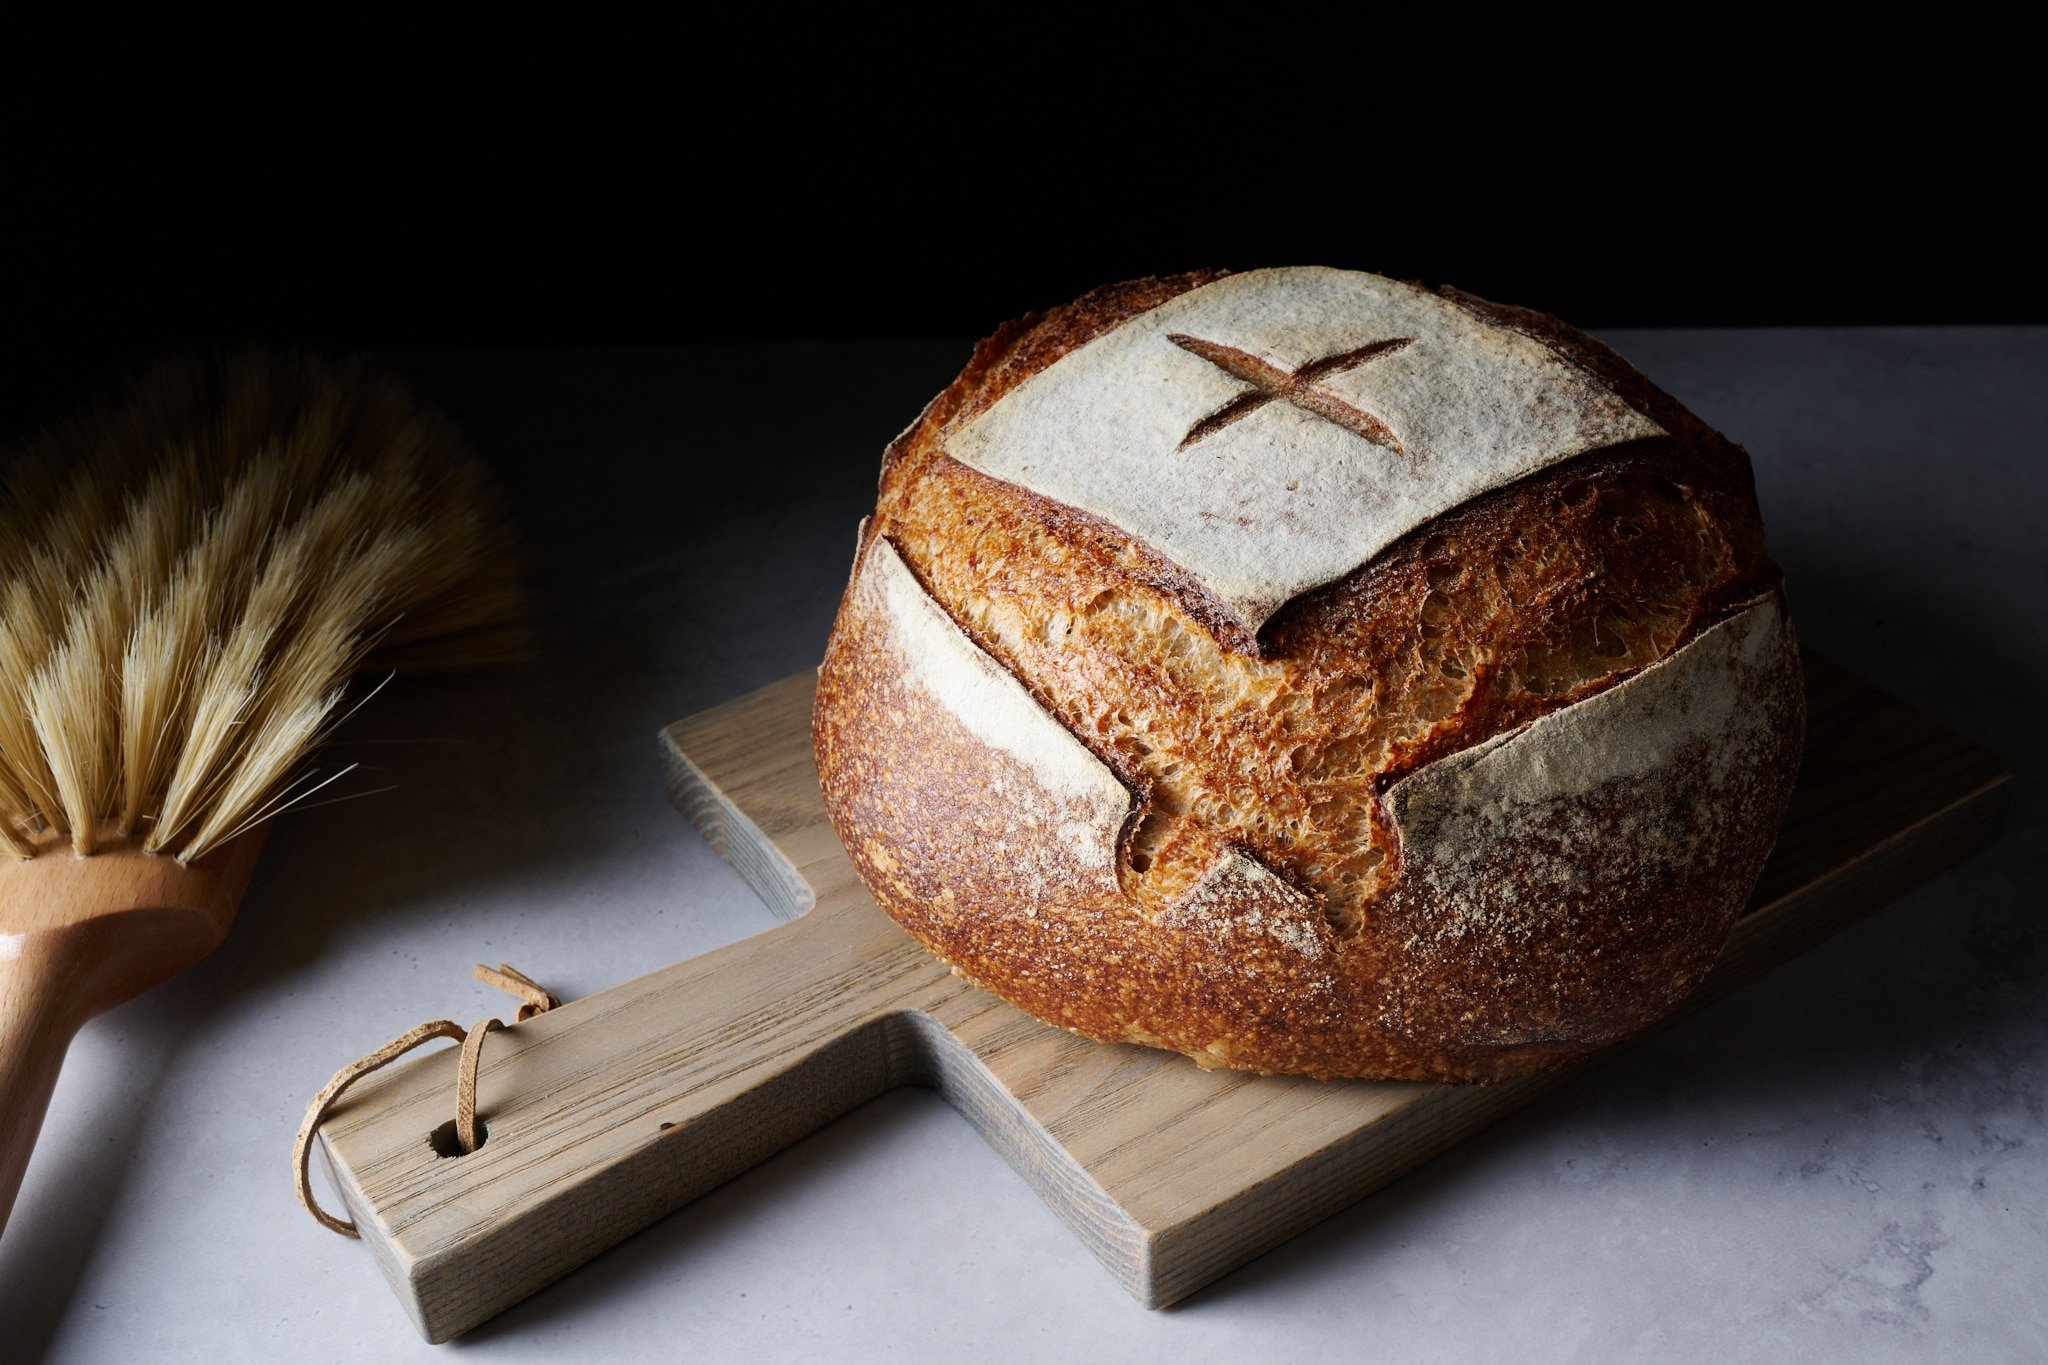
Scoring Bread Dough
Successful shaping results in dough with a smooth, taut outer skin that’s stretchy yet strong. However, this skin can only expand so much before reaching its limits. In the oven, intense heat increases fermentation and gas expansion, causing the dough to rise quickly. Scoring bread dough with a sharp tool directs and relieves internal pressure, preventing uncontrolled ruptures. The dough may burst unpredictably without scoring, which is suitable for some breads with high percentages of rye, but most hearth-style loaves require scoring to control expansion.
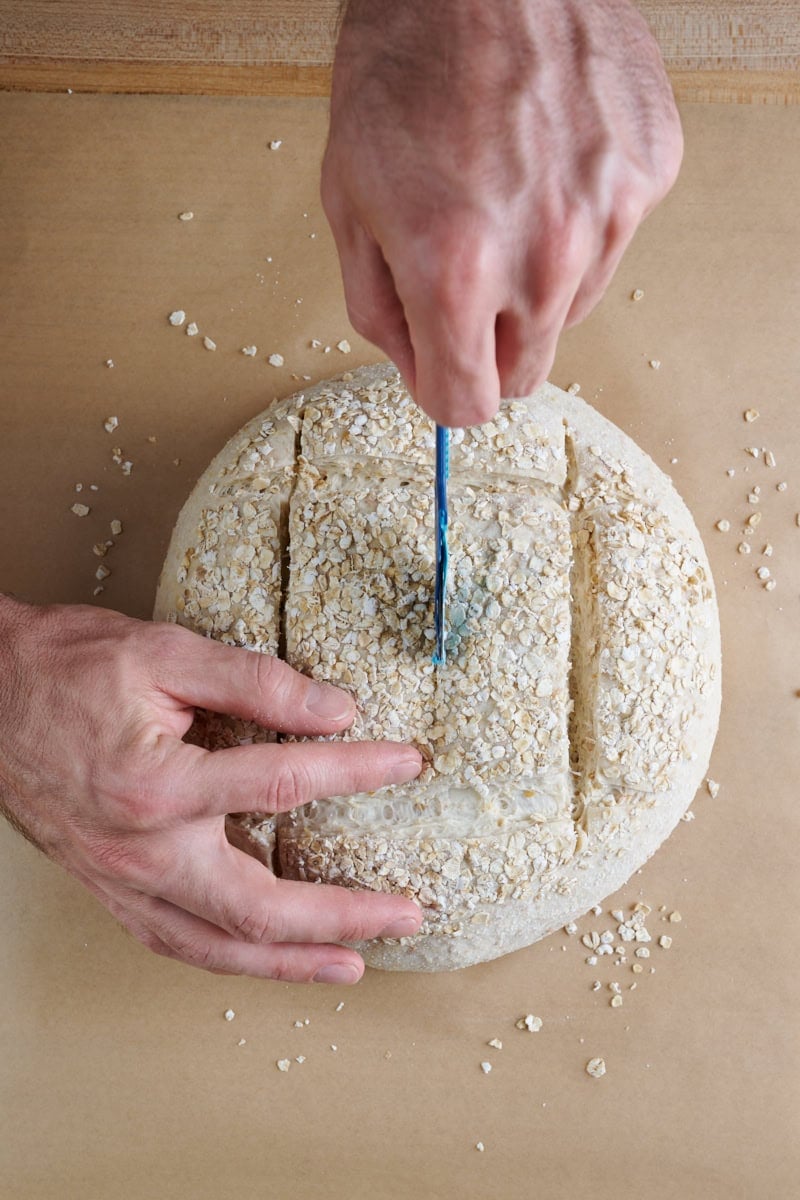
How Do You Score Bread Dough?
Scoring dough is usually done with a razor blade or a specialized tool called a baker’s lame (pronounced “lah-mmm”), which has a handle for changing the blade when it dulls. Cuts can range from simple slashes to complex patterns but must be even to ensure uniform rise and expansion. Uneven cuts can lead to a lopsided loaf. Scoring also adds an aesthetic touch, allowing bakers to create visually appealing designs, making the dough a canvas for creativity.
Watch Me Score Bread Dough
In my YouTube video below, you’ll see the tools I like to use for scoring bread dough and at what angle the cutting should be performed.
Tools For Scoring Bread Dough
Anything sharp enough to cleanly cut dough can be used for scoring: a razor blade (most common), knife, scissors, or even a surgical scalpel. Each tool has its specific uses. I use both straight and curved razor blades for most of my bakes. It’s essential to keep your tool sharp. Razor blades are effective and inexpensive but can dull quickly. If the blade snags on the dough, rotate it to a fresh edge or replace it with a new one.
Here are my favorite scoring tools:
- Handmade wooden lames (both curved and straight)
- Kitchen-grade sharp shears
Once your bread is scored, it’s time to bake it in the oven. Let’s look at how.
How To Bake Bread Dough With Steam at Home
Why Is Steam Necessary For Baking Bread?
When baking bread, steam in the oven helps the dough retain its stretch and expand during baking. Steam delays the drying of the dough’s surface, allowing longer oven spring and resulting in a higher volume loaf. It also creates a shiny, browned crust by keeping the surface cooler and moister longer, preventing premature hardening and dehydration. While steam isn’t mandatory, and your loaf will still rise without it if well-proofed, it won’t have as thin of a crust that will be duller and, overall, a loaf with slightly less volume.
Let’s look at a few ways to introduce steam into your home oven when baking bread.

Baking Bread Dough in a Dutch Oven or Combo Cooker
Probably the easiest method for baking sourdough bread at home is to use a sealed pot like a Dutch oven or combo cooker. These pots will trap the steam escaping from the dough as it bakes, creating the perfect environment for it to rise.
For more information, see my in-depth guide to baking bread dough in a Dutch oven or combo cooker.
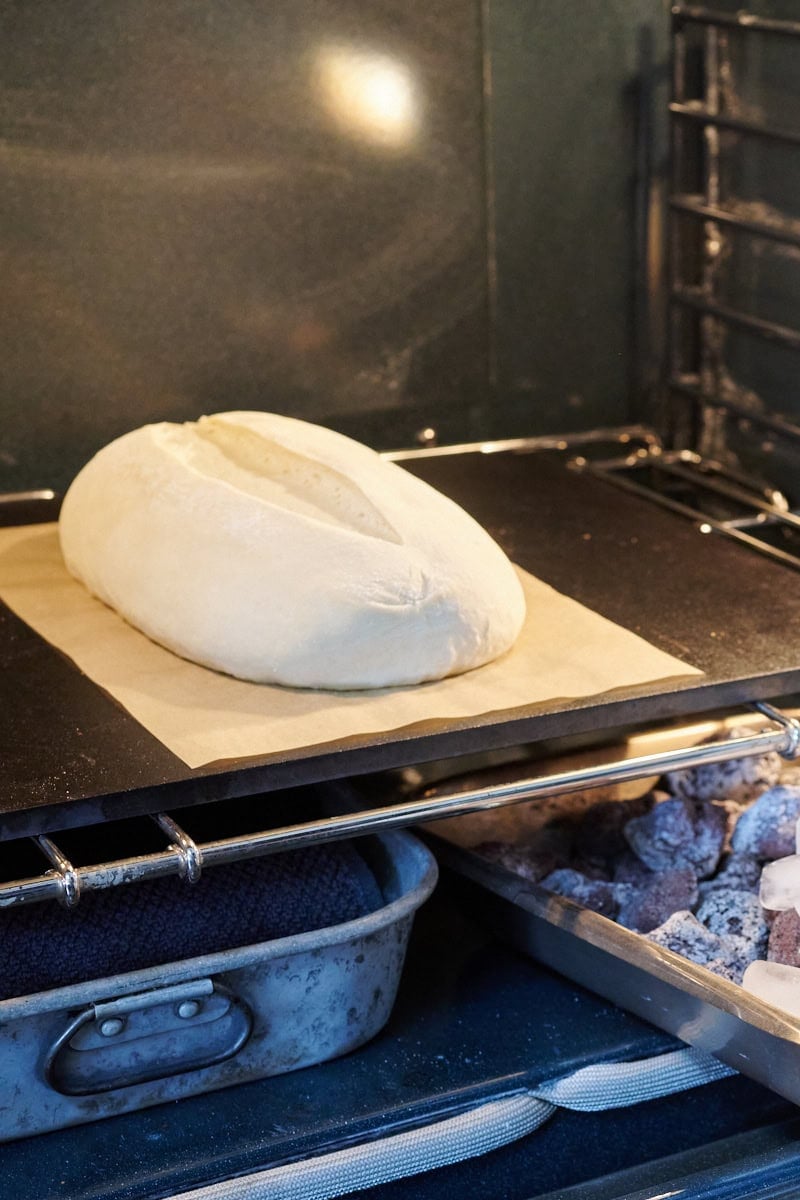
Baking Bread Dough on a Baking Surface
Instead of baking in a closed pot, you can use my method for steaming your home oven and bake bread dough directly on a preheated baking surface. This is probably the most common way I bake bread at home. Once you go through the process once or twice, it’s incredibly easy and very effective.
Steaming your entire oven allows you to bake longer loaves, such as batards (ovals) or sourdough baguettes.
Note that this method is difficult if you have a gas oven because of the extra ports and vents gas ovens have.
When Is Bread Dough Finished Baking?
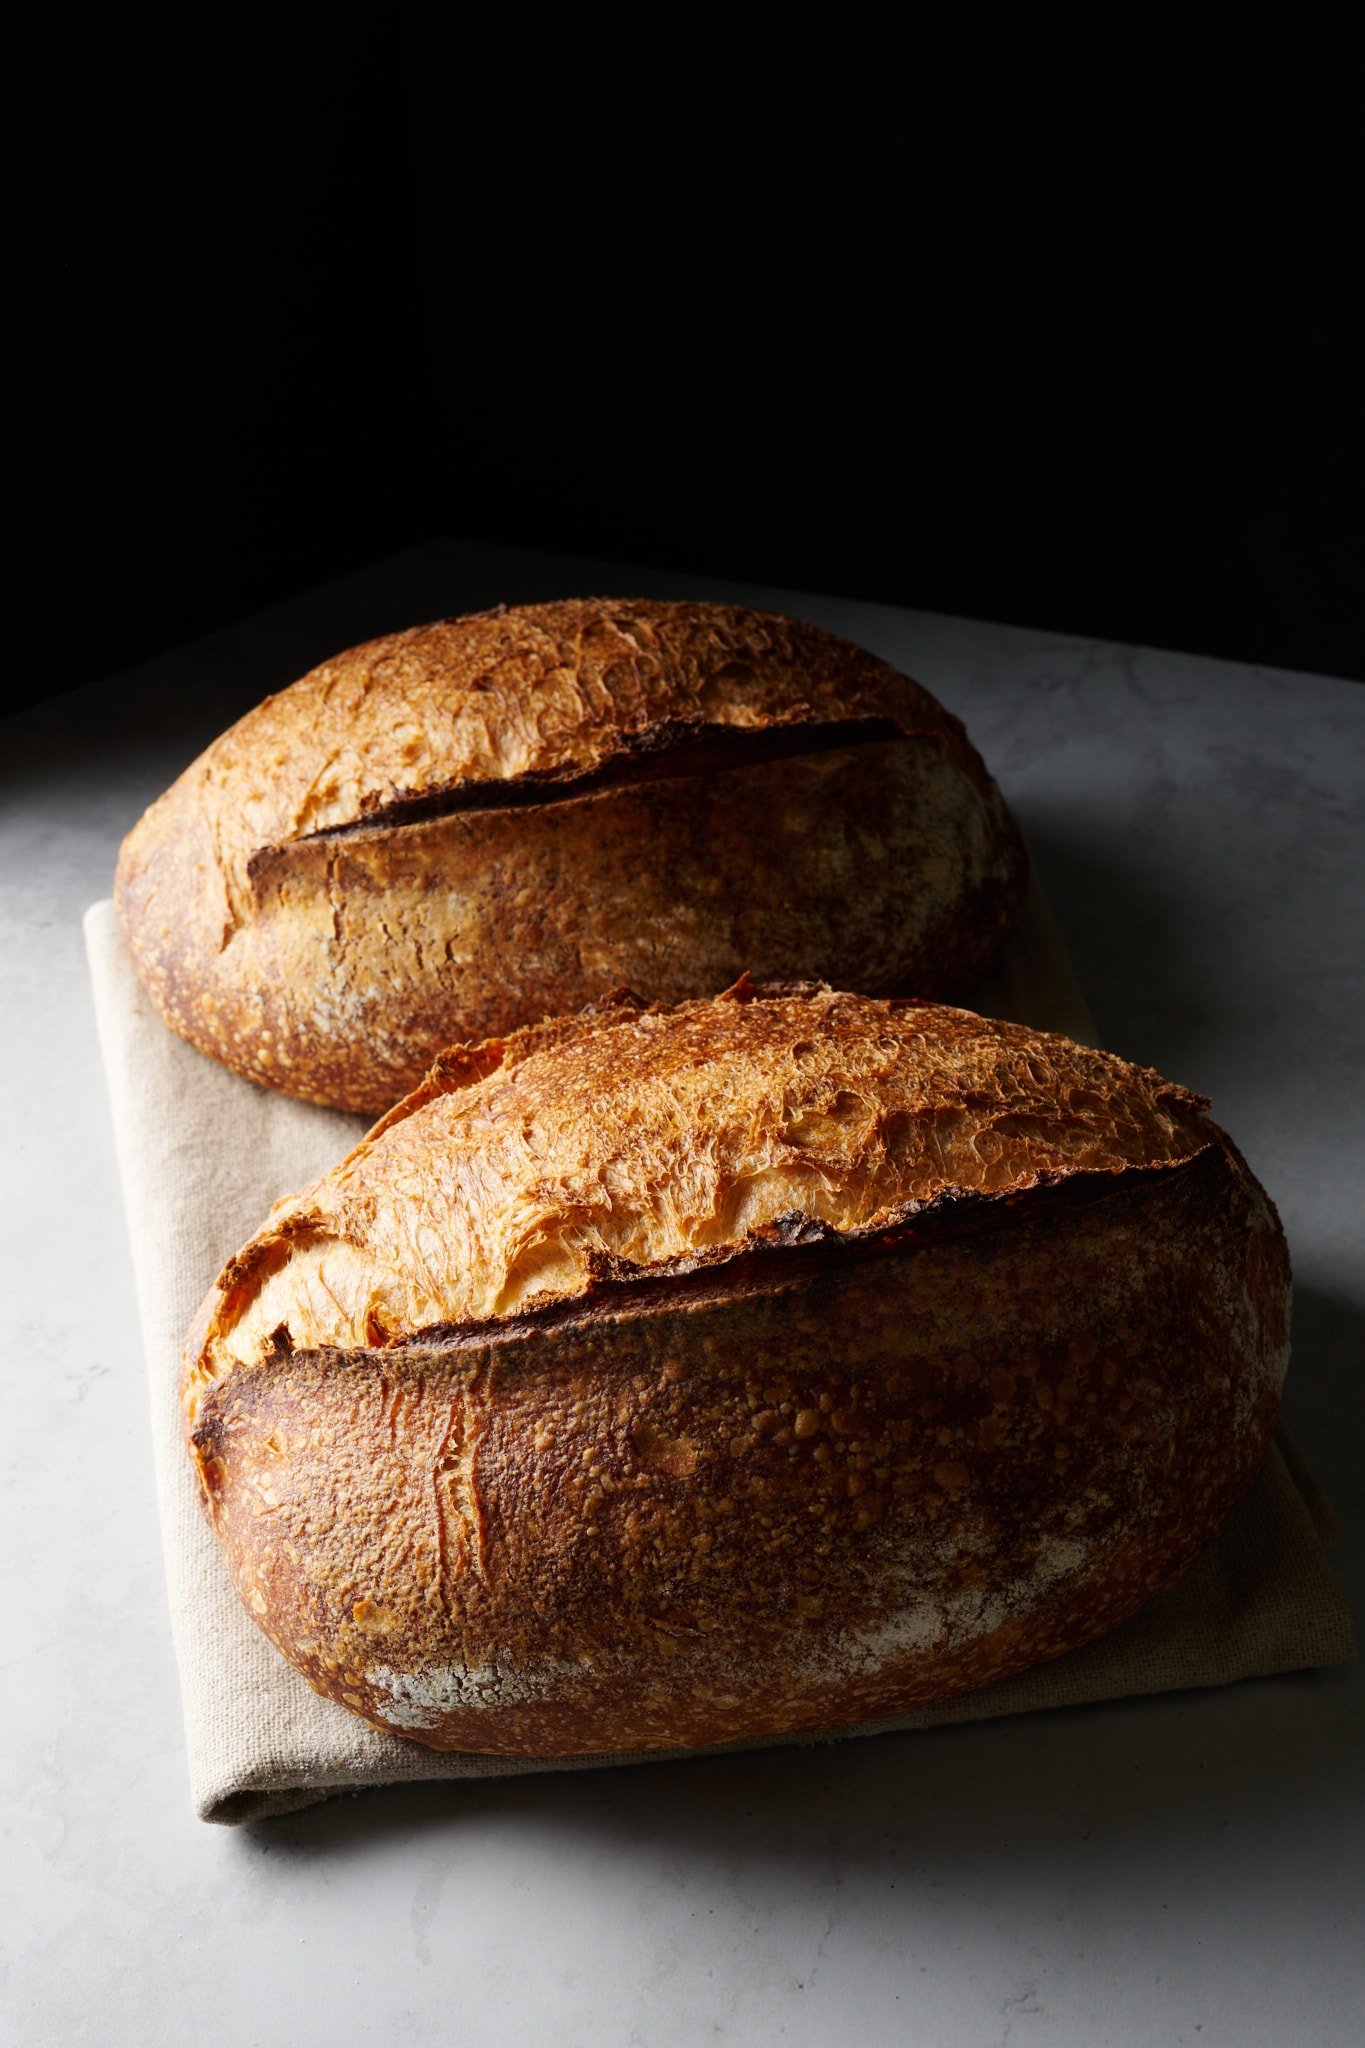
Bread dough is finished baking when the crust is well-colored without any blonde or light brown spots and the internal temperature is around 194°F (90°C) for enriched loaves or 206°F (96°C) for freeform loaves. If gently squeezed, the crust should crackle all over the loaf with no soft or “soggy” spots. Finally, if you knock on the bottom of the loaf, it’ll sound hollow instead of dense.
How to determine if your bread is fully baked:
- Well-colored crust over the entire loaf with colors ranging from mahogany to light brown
- When squeezed, the loaf will crunch and crackle
- Knocking on the bottom of the loaf will sound hollow (this can sometimes be hard to determine)
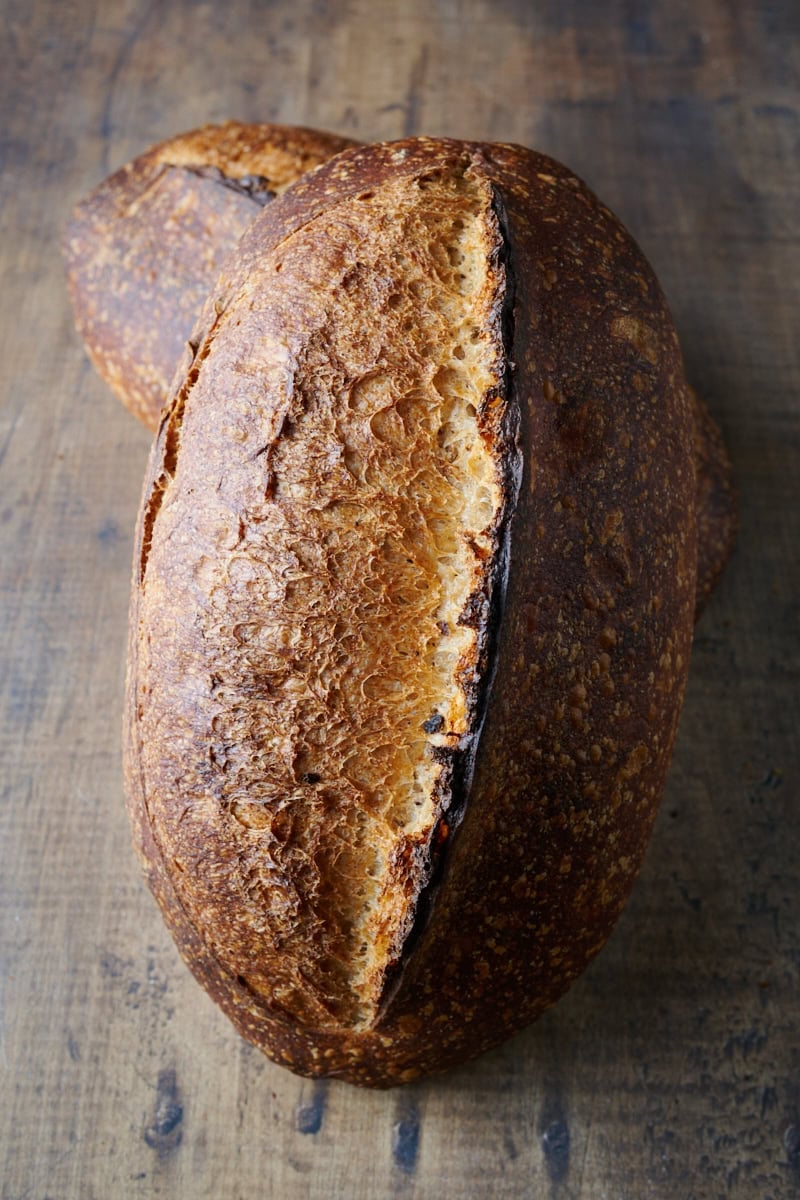
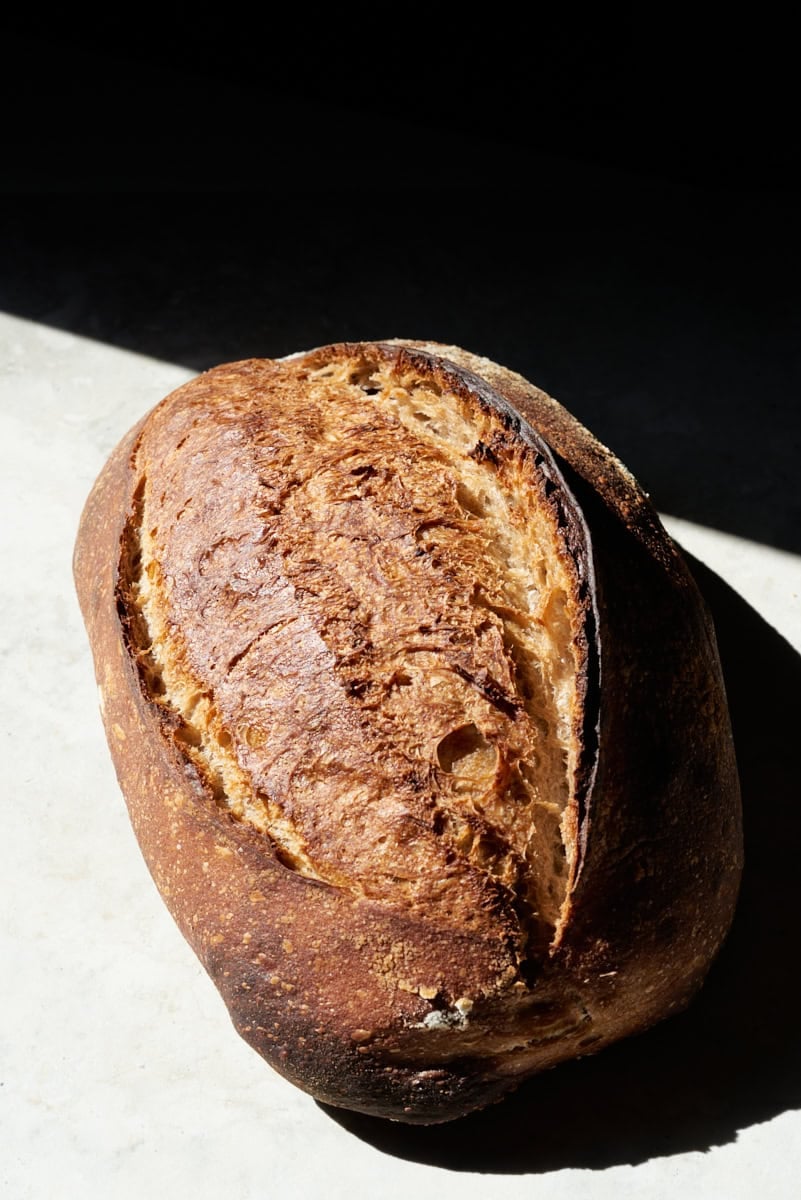
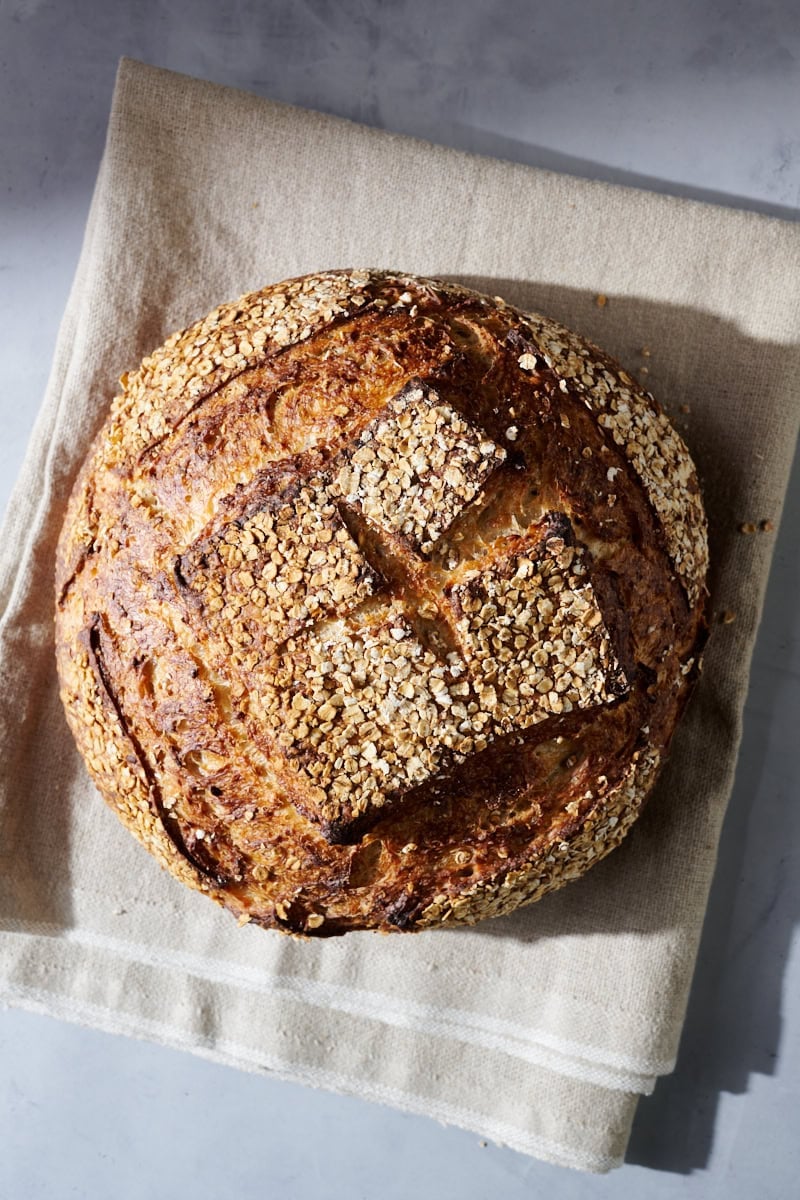
Examples of Properly Baked Bread
Let’s look at some examples of properly baked loaves. Now, I like to bake my bread a little darker for maximum flavor, but if you prefer a slightly lighter shade, that’s totally fine, too. The key is that you’ll notice none of these loaves have pale spots or underbaked crust.
Internal Temperature of Fully Baked Bread
Many recipes suggest baking until the internal temperature reaches 206° to 208°F (96° to 97°C). Enriched doughs may be fully baked at around 194°F (90°C). Loaves may only reach around 200°F (93°C) for high-altitude baking. As discussed above, the internal temperature is a good ballpark, but other cues are still used to determine if it’s finished baking.
I like to use my Thermapen to quickly (and discretely) take the internal temperature of a loaf when I remove it from the oven.
How Do I Bake Bread at High Altitude?
If you live at a high altitude (which I say is anything over 5,000 feet), when baking bread dough, you should expect to increase your oven temperature by about 25 degrees over what a recipe calls for OR bake for a longer time. Here in my kitchen, at 5,280 feet above sea level, I usually need to bake my bread dough for longer to achieve a well-colored crust. Always watch your loaf in the last 10 minutes of baking to avoid burning the crust.
Additionally, as stated above, the internal temperature of loaves baked at high altitudes may never reach the temperatures listed for loaves baked at lower altitudes.
For more tips, see my guide to baking sourdough bread dough at high altitudes.
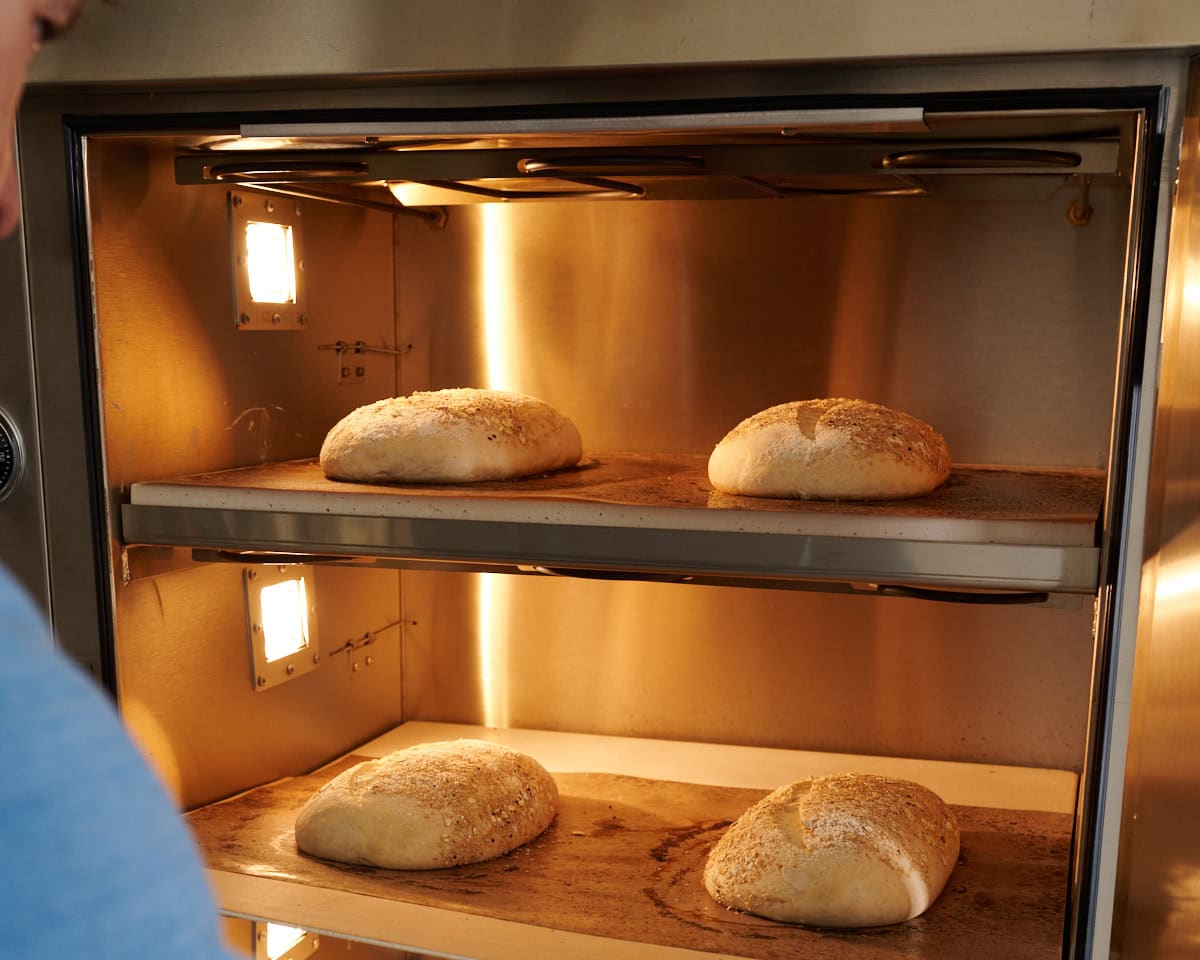
The Best Bread Baking Ovens
If you’re in the market for a dedicated bread oven, these two have been my favorite over the years:
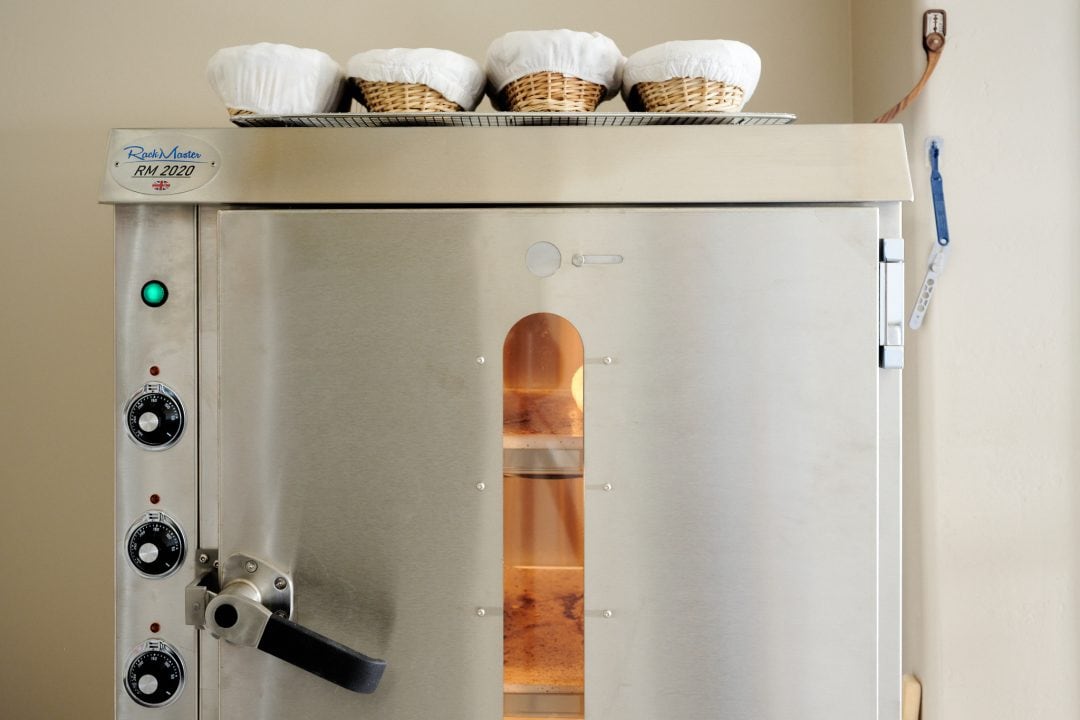
RackMaster 2020 Bread Oven
A larger oven that can bake anywhere from 2 to 18 loaves at a time. It’s incredibly well-engineered and designed to last a lifetime of continuous baking.
See my guide to the RackMaster to for information on its build, how to use it, and why I love it.

Rofco B40 Bread Oven
A smaller dedicated bread oven (though, it’s also great for pizza and other things) that comes in three sizes and configurations.
The Rofco is a workhorse oven at a great price point. See my guide to the Rofco bread oven.
Baking Bread Dough FAQs
Do I bake bread dough with or without convection (fan assist)?
Since baking bread dough benefits from having steam in the oven during the beginning of baking, using convection will blow the steam around and cause a crust to form prematurely. It’s best to bake without convection (no fan assist) unless you’re baking in a sealed pot or Dutch oven.
Do I have to add steam to an oven to bake bread?
Technically, you don’t need to steam the oven to bake bread. But, you’ll get the best rise, shiniest crust, and most controlled expansion with steam in the oven at the very beginning of baking.
What’s Next?
Well, that’s it! You’re at the end of the process and have successfully made sourdough bread. Now, learn how to store your bread to keep it as fresh as possible for as long as possible.
And if you’d like all of this information—and much more—packaged in a hardcover book you can bring into the kitchen, check out my award-winning sourdough bread cookbook.
Happy baking!
