
Near the end of the year, I start stockpiling pumpkin puree from the market. The cans appear and I can’t help myself but grab an armful and start thinking about all the things it’ll find its way into: pancakes, waffles, pies, and of course, bread. This year, I wanted to take the puree into a softer, chewier direction: sourdough pumpkin dinner rolls.
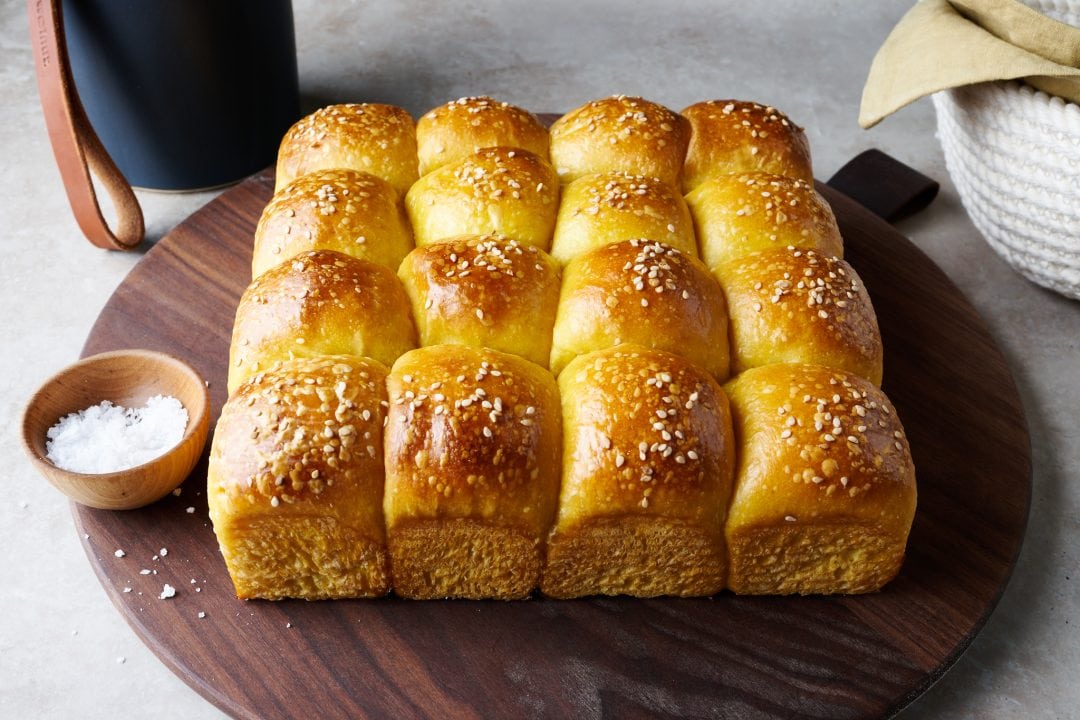
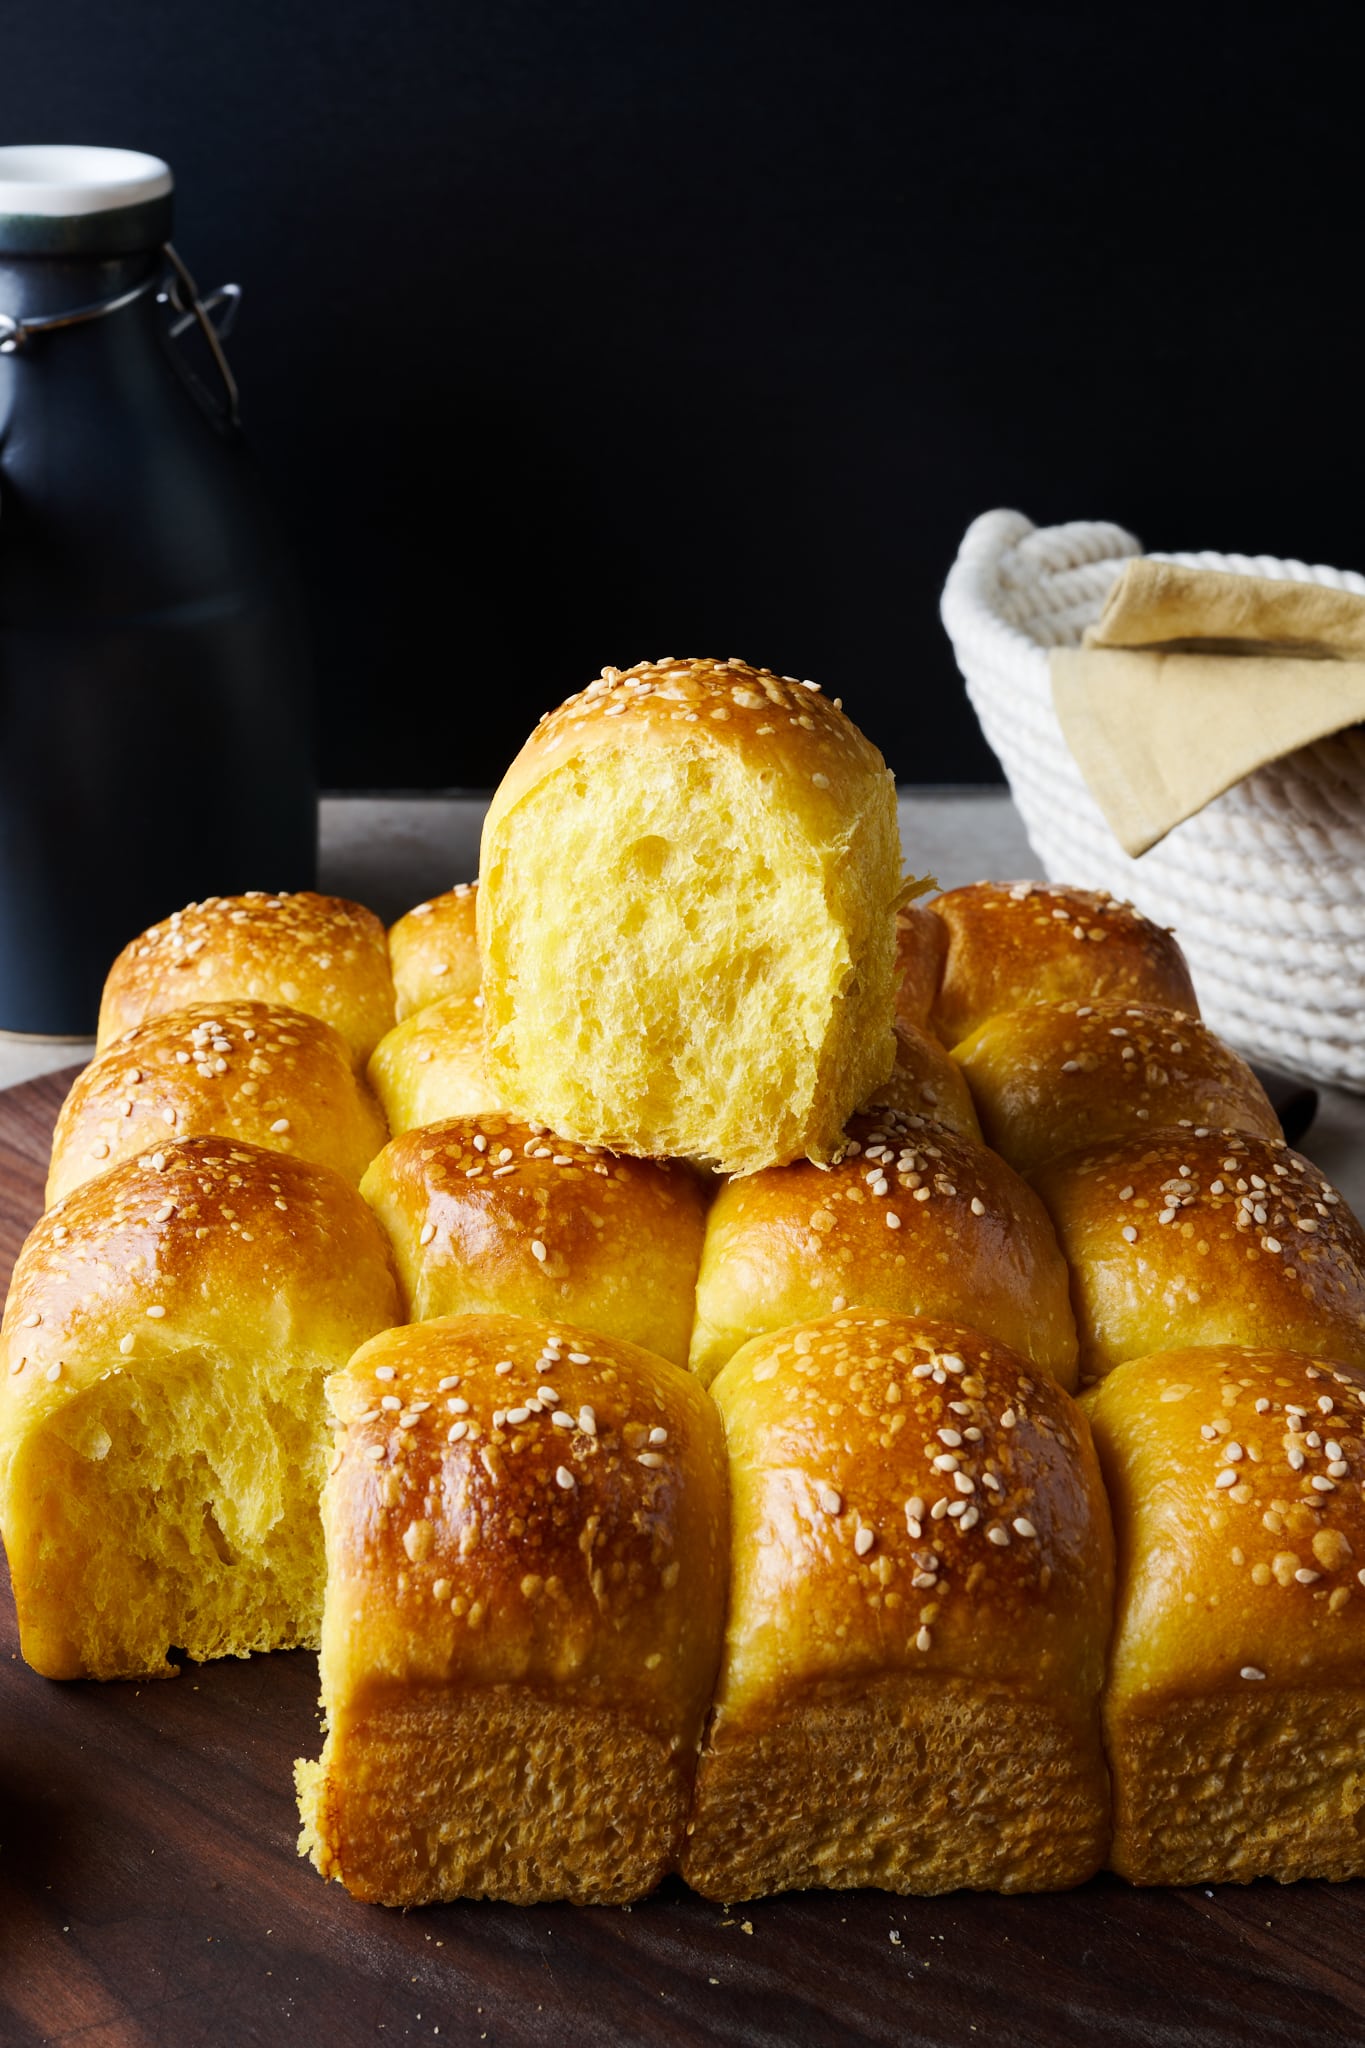
Pumpkin acts very similar to adding potato to a dough. It brings copious tenderness and a melt-in-your-mouth quality that’s utterly addictive. But the pumpkin also adds such a beautiful color—the rolls almost look like gold nuggets. The rich luster heightens the eating experience, a golden hue of shining expectation.
The flavor is slightly reminiscent of pumpkin pie in a way, but not totally so, as the usual mix of spices (ginger, allspice, nutmeg, etc.), dare I say pumpkin spice, are not invited to this party. The recipe also calls for a large percentage of honey, which brings sweetness, sure, but also richness and floral notes. The aroma of the baked rolls hints at the pumpkin contained therein, but in a very remote way; my 4-year-old son put it best: “these rolls remind me of Thanksgiving.”
Let’s look at how to make these chewy sourdough pumpkin rolls.
Flour and ingredient selection
Flour
This recipe calls for 100% higher protein bread flour to help support the added pumpkin puree, butter, milk, and even honey. I’ve found King Arthur Baking Bread Flour works really well with this recipe, it has plenty of strength for support, and the slightly chewy texture is welcome in these soft dinner rolls.
Pumpkin puree
Any plain pumpkin puree will work well with this recipe. I tend to go with Libby’s Pumpkin Puree, but any variety you have access to will work.
Another option: sweet potato puree
If you wanted to take a different approach, roasted, cooled, and pureed sweet potato would work very well in this recipe.
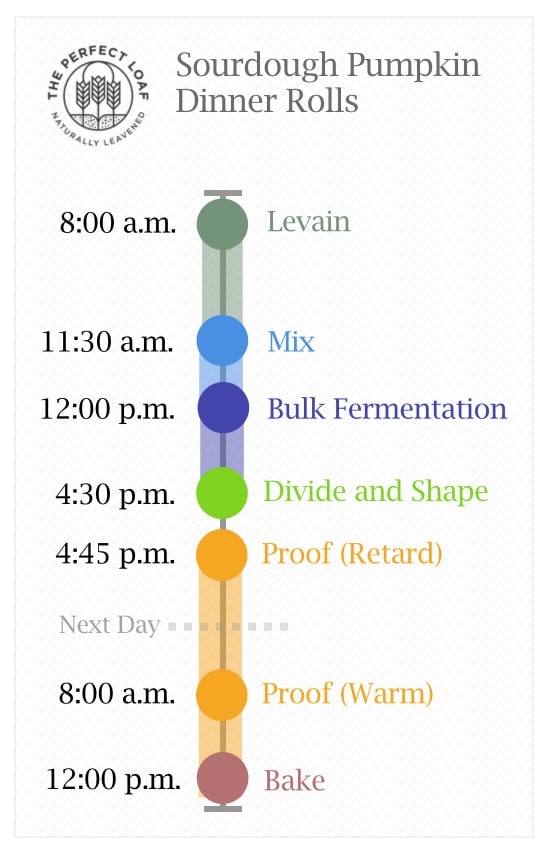
Baking schedule
These sourdough pumpkin dinner rolls can be made in a single day or spread over the course of two. This is a rather slow-moving dough (and made worse if your kitchen is cold in the winter) and the rolls need extra time in bulk and proof. Be sure not to rush the proof, the rolls need to be very, very soft to the touch before they’re baked.
The benefit to cold proofing the rolls in shape is if you’re making these for Thanksgiving, you can prep the rolls all the way until just after you shape them, then cover and place the pan into the refrigerator. The next day, take them out in the morning and let them finish proofing on the counter (for me this took about 3-4 hours) and bake them early in the day on Thanksgiving to have them fresh for the big day.
Cold proofing this dough brings added flavor complexity, but the overall flavor is still quite balanced and the rolls don’t become overly sour.
Sourdough pumpkin dinner rolls formula
Vitals
| Total Dough Weight | 1,200 grams |
| Pre-fermented Flour | 8.00% |
| Levain in final dough | 26.09% |
| Yield | Sixteen 70-gram rolls |
Total formula
Desired dough temperature: 78°F (25°C). See my post on the importance of dough temperature for more information on dough temperatures.
| Weight | Ingredient | Baker’s Percentage |
|---|---|---|
| 597g | High-protein white flour (12.7% protein, King Arthur Baking Bread Flour) | 100.0% |
| 119g | Pumpkin puree | 20.0% |
| 113g (one stick) | Butter, unsalted | 19.0% |
| 90g | Whole milk | 15.0% |
| 42g | Honey | 7.0% |
| 179g | Water | 30.0% |
| 12g | Fine sea salt | 2.0% |
| 48g | Ripe sourdough starter | 8.0% |

Sourdough pumpkin dinner rolls method
1. Prepare the levain – 8:00 a.m.
Mix the following ingredients in a container and leave them covered to ripen at a warm temperature, about 74-76°F (23-24°C) for 3 1/2 to 4 hours until ripe.
| Weight | Ingredient | Baker’s Percentage |
|---|---|---|
| 48g | High-protein white flour | 100.00% |
| 48g | Water | 100.00% |
| 48g | Ripe sourdough starter | 100.00% |
2. Mix – 11:30 a.m.
There is no autolyse step for this dough. See my guide to the autolyse technique for when and why I like to use the technique (and why it’s not strictly necessary).
I used my KitchenAid stand mixer to mix this dough.
| Weight | Ingredient |
|---|---|
| 549g | High-protein white flour |
| 119g | Pumpkin puree |
| 113g | Butter, unsalted |
| 90g | Whole milk |
| 42g | Honey |
| 131g | Water |
| 12g | Salt |
| 143g | Levain (see Prepare the levain, above) |
First, take out your butter and cut it into 1/2″ pats. Set the butter on a plate to warm to room temperature and reserve until the end of mixing.
To the bowl of a stand mixer fitted with the paddle attachment, add the water, milk, flour, ripe levain, honey, pumpkin puree, and salt. Mix on speed 1 (STIR on a KitchenAid) for 1 to 2 minutes until the ingredients come together and no dry bits remain. Switch to the dough hook attachment and mix on medium speed (2 on a KitchenAid) for 4-5 minutes until the dough starts to strengthen and clump around the hook. This is a firm dough at this point, it will clump to the dough hook and completely clear the sides of the mixing bowl.
Let the dough rest in the mixing bowl for 10 minutes.
Your butter should now be at room temperature; a finger will easily slide in and leave an impression. Turn the mixer on to speed 1 and add the butter, one pat at a time, waiting to add each pat until the previous one is fully absorbed. Adding all the butter might take 5 to 8 minutes.
In the end, the dough will still be very soft and not completely removed from the sides of the mixing bowl—we will continue to strengthen the dough during bulk fermentation.
Transfer your dough to a bulk fermentation container and cover.
3. Bulk fermentation – 12:00 p.m. to 4:30 p.m. (4 1/2 hours)
At a warm room temperature, around 74-76°F (23-24°C), bulk fermentation should take about 4 1/2 hours. If your kitchen is cooler, place your bulk container in a small home dough proofer, or extend the bulk fermentation time to give the dough more time to ferment.
Give this dough two sets of stretch and folds during bulk fermentation at 30-minute intervals. The first set starts after 30 minutes from the start of bulk fermentation. For each set, wet your hands, grab one side and stretch it up and over the dough to the other side. Rotate the bowl 180° and perform another stretch and fold (this forms a long rectangle in the bowl). Then, rotate the bowl 90° and do another stretch and fold. Finally, turn the bowl 180° and do one last stretch and fold. You should have the dough neatly folded up in the bowl.
After the second set, let the dough rest, covered, for the remainder of bulk fermentation.
4. Divide and shape – 4:30 p.m.
At the end of bulk fermentation, your dough should have risen in the container, but not a great deal. You should see signs of strong fermentation: a smooth texture, and an increase in elasticity (strength), and general puffiness.
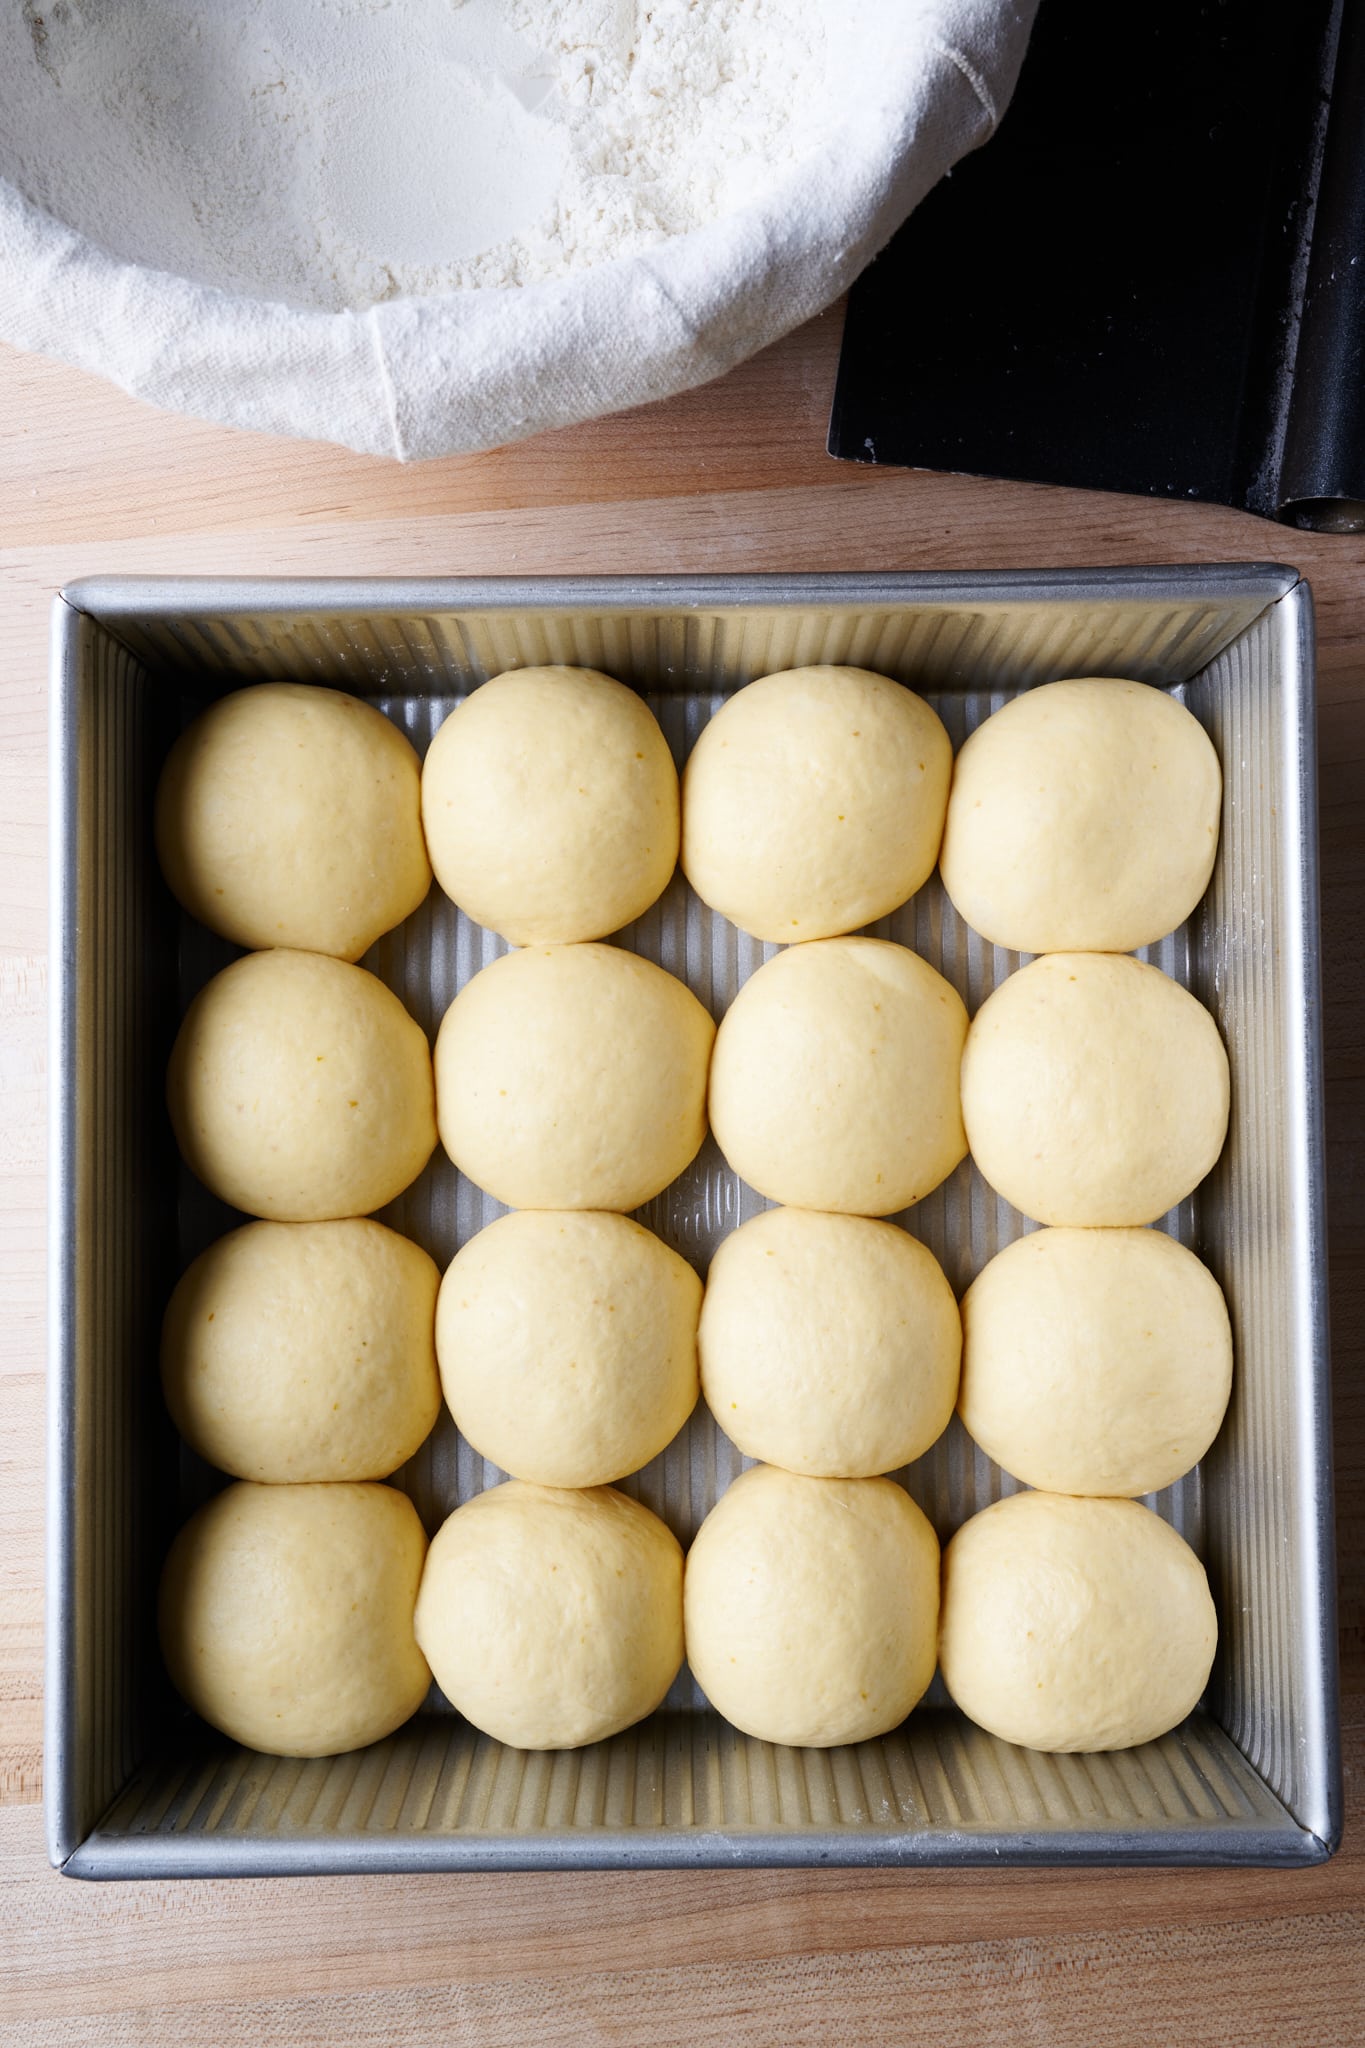
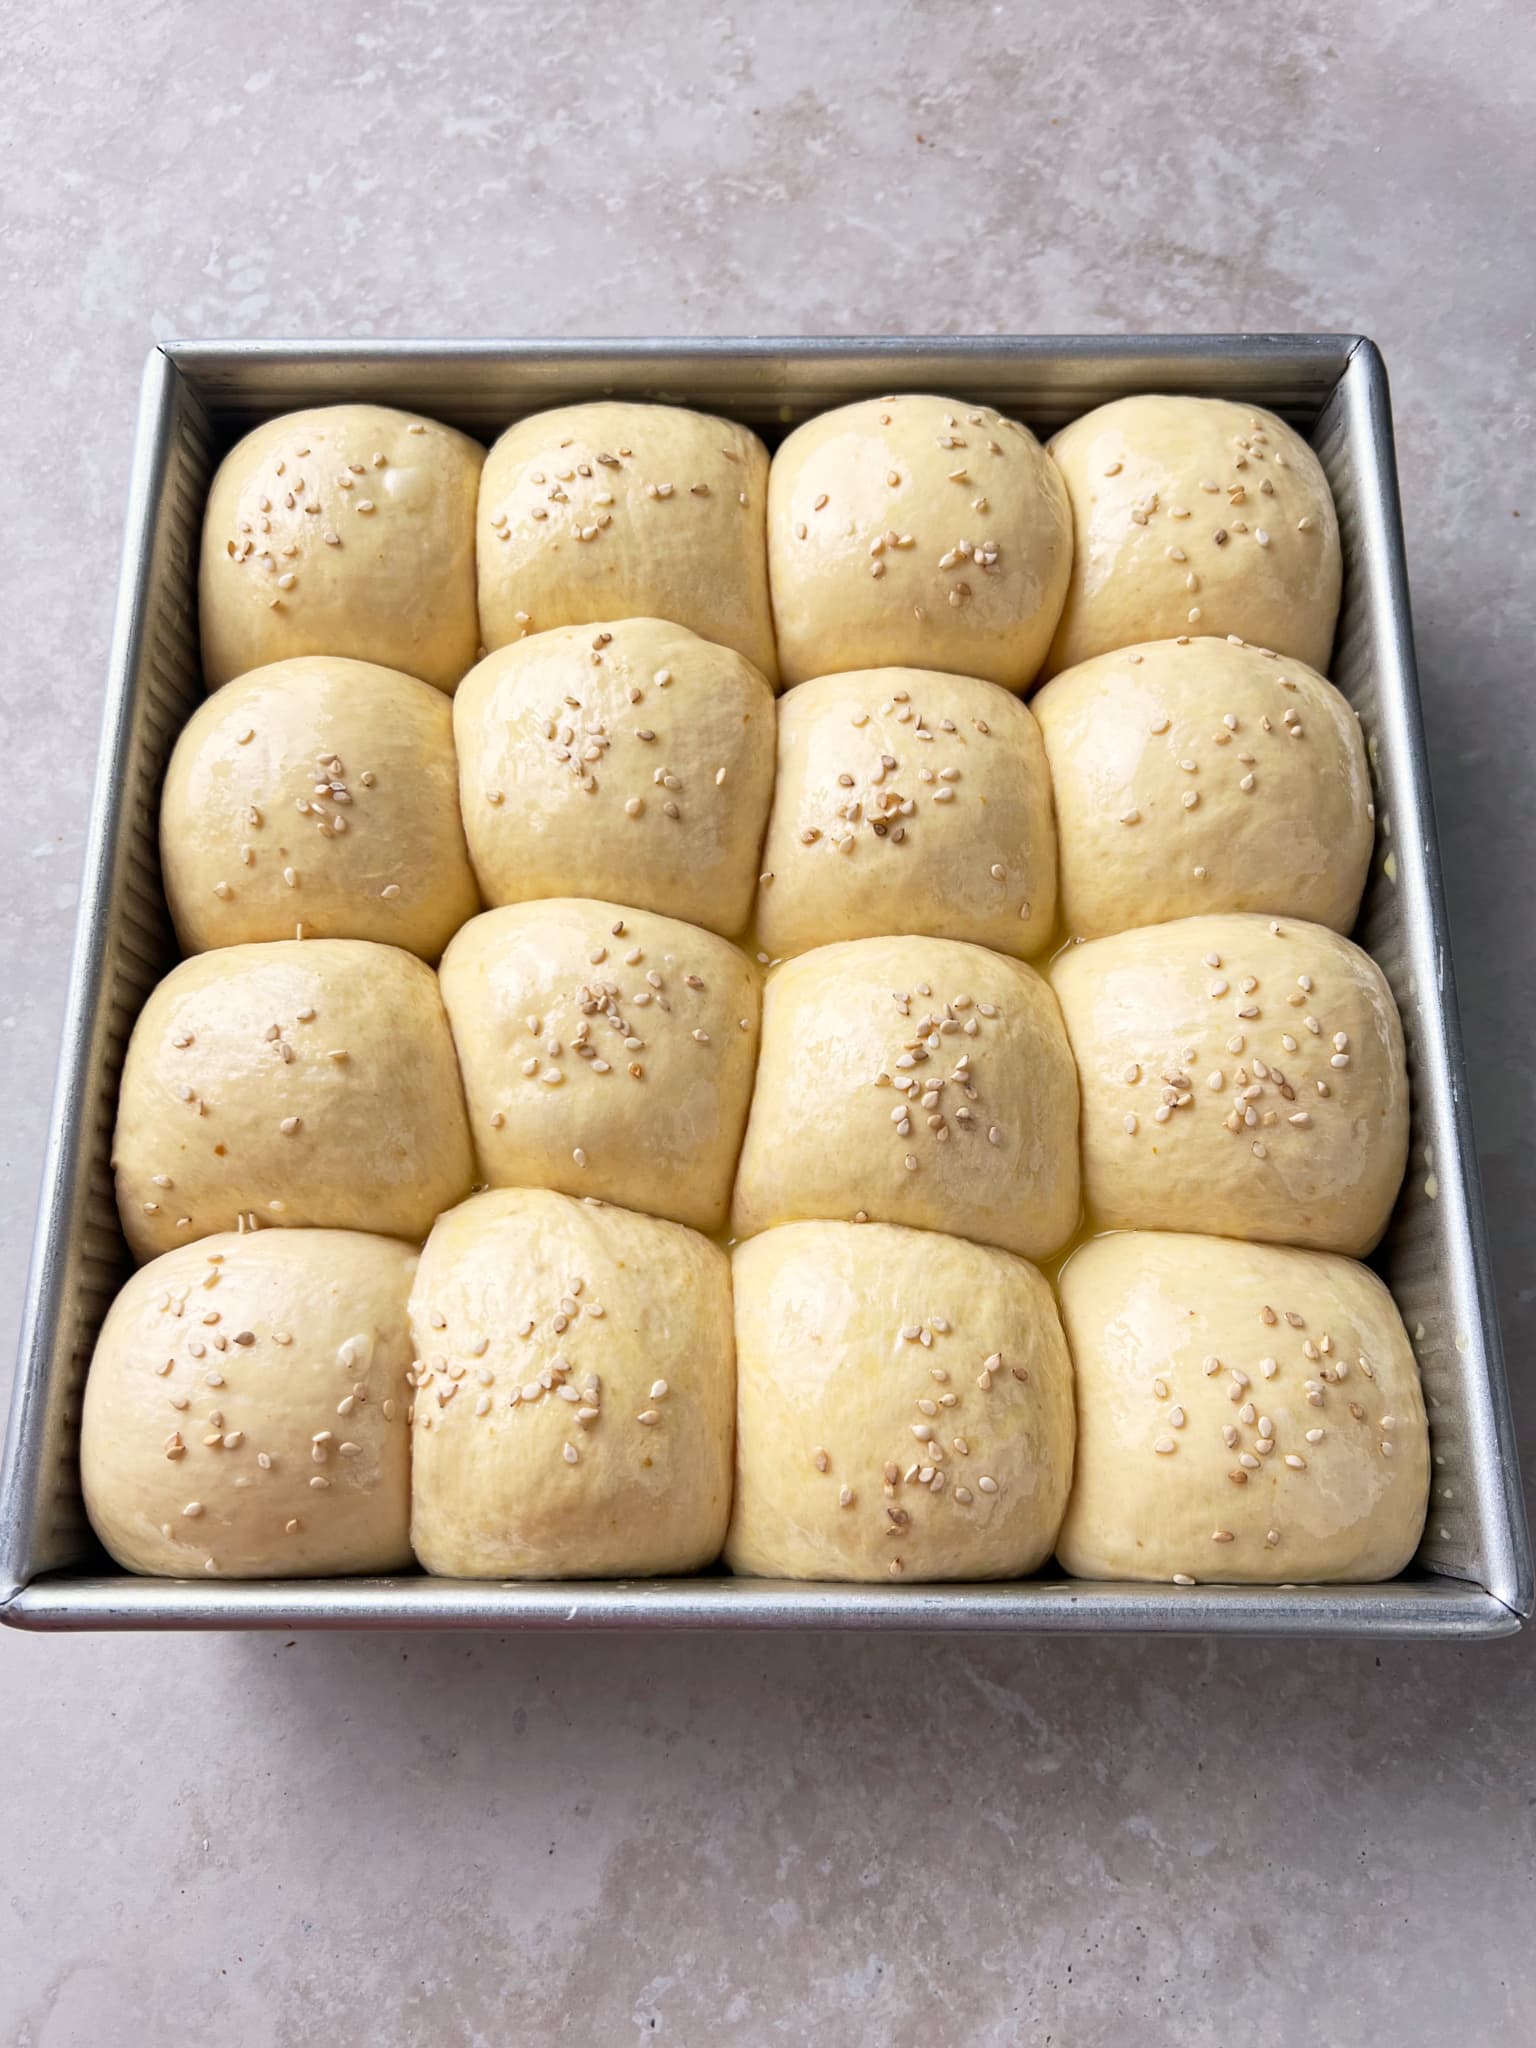
First, butter your baking pan (even if it’s nonstick) to ensure the rolls remove cleanly after baking. I like to use my 8 x 8-inch USA pan (which is also nonstick) for this recipe, but you could also use a round pan or any pan you’d like to fit the rolls.
Lightly flour the top of the dough in the bulk fermentation bowl and your work surface. Gently scrape out the dough to the work surface and divide it into sixteen 70-gram pieces.
Because of the dough texture, I prefer using my bench knife to help shape each roll. Use the knife to drag the dough toward your body as your other hand rounds the dough, tucking the edge down under the ball. Repeat this dragging and tucking with the knife and your other hand until you have a uniformly round ball.
See the following video and my guide to shaping buns and rolls for shaping help.
7. Cold Proof – 4:45 p.m. to 8:00 a.m. (next day)
Cover the pan with a large, reusable plastic bag and seal it shut.
Cover the pan and place it into the refrigerator. The next day, take them out about 3-4 hours before you want to bake them and let them proof on the counter until they’ve risen all the way to the rim of the pan and are extremely soft to the touch.
Same day bake option: For a milder flavor profile and to bake them the same day, proof them in a warm spot in your kitchen and skip the cold-proof. My kitchen was on the cooler side, around 72-74°F (22-23°C), and the dough took about 3 hours to fully proof when doing a same-day bake. Use the same cues as below to determine when they’re finished proofing.
8. Warm Proof – 8:00 a.m. to 12:00 p.m. (temperature depending)
Take the covered pan out of the refrigerator and proof at warm room temperature, 73-74°F (22-23°C), for 4 to 5 hours. Give the rolls plenty of time to proof at this stage, it will take them time to warm from the cold refrigerator and finish proofing.
Be sure to give these rolls plenty of time to proof, they need to be very soft to the touch before baking.
When they’re ready to bake, the dough will have risen to the rim of the baking pan and be very soft to the touch.
9. Bake – 12:00 p.m.
Preheat your oven, with rack in the middle, to 425°F (220°C).
Uncover your dough and gently press the tops of a few rolls. You shouldn’t feel any dense spots or tight areas—the dough should be very light and airy. If you do, cover the pan and give your dough another 30 minutes to proof and check again.
There’s no need to steam the oven for this bake because we’ll use an egg wash to top the dough. In a small bowl, whisk together a whole egg and a splash (about 1 tbsp) of whole milk.
Once your oven is preheated, remove your pan from its bag, evenly brush on the egg wash, sprinkle on coarse sea salt (optional) and white sesame seeds, and slide the pan into the oven.
Bake at 425°F (220°C) for 10 minutes. After this time, rotate the pan 180° in the oven and reduce the temperature to 350°F (175°C). Bake for an additional 20-25 minutes until the tops of the rolls are golden, and the internal temperature is around 204°F (95°C). When finished, remove the pan from the oven and let rest for 10 minutes. Then, remove the rolls from the pan to a wire rack to finish cooling.
These are wonderful warm from the oven, but I like to let them cool for at least 30 minutes before eating. These rolls are best the day they’re made but are still great the day after (if stored according to my post on storing bread).


Sourdough Pumpkin Rolls
- Prep Time: 25 hours
- Cook Time: 35 minutes
- Total Time: 25 hours 35 minutes
- Yield: 16 rolls
- Cuisine: American
Description
Super soft and ultra tender, these sourdough pumpkin dinner rolls are a little buttery and a little savory, perfect for family gatherings (especially Thanksgiving!).
Ingredients
Levain
- 48g high-protein white flour (King Arthur Baking Bread Flour)
- 48g water
- 48g ripe sourdough starter
Main Dough
- 549g high-protein white flour
- 120g pumpkin puree
- 113g butter, unsalted and at room temperature
- 90g whole milk
- 42g honey
- 131g water
- 12g salt
- 143g ripe levain
Topping
- one whole egg and splash of whole milk for egg wash
- coarse sea salt (optional)
- white sesame seeds (optional)
Instructions
- Levain (8:00 a.m.)
In a small bowl or jar, mix the Levain ingredients. Cover the jar and keep it at a warm temperature for 3 1/2 to 4 hours until ripe. - Mix (11:30 am)
To the bowl of a stand mixer fitted with the paddle attachment, add the 549g high-protein white flour, 120g pumpkin puree, 90g milk, 42g honey, 131g water, 12g salt, and 143g ripe levain. Mix on low speed for 1 minute until incorporated. Then, switch to the dough hook attachment and mix on medium speed (KA Speed 2) for 4 for 5 minutes until dough clumps around the dough hook and clears the sides. Let the dough rest in the mixing bowl for 10 minutes. Next, add the 113g butter, one pat at a time, while the mixer is running on low speed. Continue this for 5 to 8 minutes until all butter is added and the dough is cohesive and soft but still tacky to the touch. Transfer the dough to a bulk fermentation container and cover. - Bulk Fermentation (12:00 p.m. to 4:30 p.m.)
This dough will need 2 sets of stretches and folds during bulk fermentation where the first set starts after 30 minutes into bulk fermentation and the subsequent set is 30-minutes later. After the second set of stretches and folds, let the dough rest, covered, for the remainder of bulk fermentation. - Divide and Preshape (4:30 p.m.)
Butter your 8×8-inch square pan. Divide the dough into sixteen 70-gram pieces and shape each as a very tight ball. Place the balls in the buttered pan to proof. - Cold Proof (4:45 p.m. to 8:00 a.m.)
Cover pan with reusable plastic and seal shut. Place the covered pan in the refrigerator until the next day (take out of the fridge and let proof on the counter for 3 to 4 hours, temperature depending). - Warm Proof (8:00 a.m. to 11:00 a.m.)
Remove the covered pan from the refrigerator and proof at warm room temperature (73-74°F/23-24°C) for 4 to 5 hours until the rolls have risen to the rim of the pan and are very soft to the touch with no dense or tight spots. - Bake (12:00 p.m.)
Preheat your oven to 425°F (220°C). For the egg wash, whisk together one egg and a splash of whole milk. When the oven is preheated, brush on the egg wash, sprinkle on coarse sea salt and white sesame seeds(optional), and bake for 10 minutes. Then, rotate the pan 180° in the oven and reduce the temperature to 350°F (175°C). Bake for an additional 20-25 minutes until the tops are well-colored and the rolls have reached around 204°F (95°C) internally. Remove from the oven and let cool in the baking pan for 10 minutes. Then knock the rolls out to cool on a wire rack. Let rest for 10 minutes, then enjoy.
Notes
- Instead of pumpkin puree, a sweet potato puree would also work well with this recipe.
What’s Next?
Check out my sourdough pumpkin bread with cinnamon and raisins (and optional spices) for another outlet for that pumpkin puree you may or may not be stockpiling.
My classic super soft sourdough rolls with tangzhong are perhaps the softest dinner rolls I’ve ever made.
And, of course, during this time of year sourdough pumpkin pancakes are happening just about every weekend (and are perfect with the leftover pumpkin puree from this recipe!).
Buon appetito!

