

I’m often asked whether mixing dough by hand or with a mechanical mixer (like the Ooni Halo Pro Spiral Mixer) is better. My answer is always the same: You can make great bread and pizza either way. The important thing is that you develop the dough sufficiently for the best texture and rise regardless of your mixing method.
The word “sufficiently” is hard to quantify for every dough because it depends on what you’re mixing and the process (but I’ll talk about what to look for later in this post). In my baking here, this means strengthening the dough until medium development. The dough will be smooth and elastic but not pass the windowpane test (full development). Instead of mixing that far, I rely on stretches and folds in bulk fermentation to fine-tune dough strength.
You can achieve medium or even full development when mixing by hand; I’ve done it for many years before I owned a mixer. But it’s also very easy to achieve this using a mechanical mixer with no downside: in my experience, mixing by hand doesn’t necessarily make for better bread.
Today, I’m going to discuss how I’ve been using a new mixer here for many months: the Ooni Halo Pro Spiral Mixer. I’ll explain what I like about it, who I think would benefit from it, who might not, and how I use it to make a few different doughs.
Full disclosure: Ooni sent me this mixer because I’ve been working with them on its promotion, but I only agreed to this after vetting its capability (as you know, I only recommend the products I genuinely use and love). I was not paid to create this post; I’ve been asked so much about the Halo Pro that I thought I’d put together this guide.
Real Quick: Do I Recommend the Ooni Halo Pro Mixer?
As a bread baker and pizza maker who typically bakes in smaller quantities, I can say this Ooni Halo Pro spiral mixer is fantastic. I wholeheartedly recommend it for the home setting.
Over the past few months, I’ve thrown countless doughs at this thing to assess its effectiveness, and it’s handled everything from a 55% hydration pizza dough up to an 85% hydration bread dough. The top controls for changing the mixing speed and setting timers are intuitive and helpful, and the tilt head and removable bowl, breaker bar, and mixing hook are easy to clean.
All in all, this is a fantastic mixer for the home, and it is the perfect combination of compact size, mixing capacity, and price.
Let’s take a step back to first look at what makes this mixer special.
What is a Spiral Dough Mixer?
A spiral mixer has a fixed hook that spins while the bowl rotates. This design is incredibly efficient at quickly strengthening your dough and incorporates air to help aerate it, achieving an open crumb and light-textured final product. Spiral mixers often have a breaker bar in the middle of the bowl, which scrapes the hook as it rotates to prevent dough from climbing up the hook, thereby reducing effectiveness.
The Ooni Halo Pro is a spiral mixer with a breaker bar and rotating bowl. It’s a little different than others because the bowl, hook, and breaker bar are removable. This makes it really easy to clean in the sink and allows for swapping in and out other attachments to mix other types of doughs and batters (like cookies and cakes).
More on this in a moment.
Spiral Mixer versus Planetary
Below, you can listen to me talk about the features of a spiral vs. a planetary, what each is good for, and why I love a spiral mixer.
What is a Breaker Bar, and Why is it Useful When Mixing Bread Dough?
A breaker bar is a straight metal piece extending into the mixer’s bowl. In the Halo Pro, this bar attaches to the tilting head and moves up and down with the head. When the head is locked in the down position, the breaker bar sits very close to the rotating spiral hook, removing dough from the hook during mixing. This ensures the dough is mixed and strengthened evenly as a new portion is continuously stretched and folded.
This means you don’t have to stop the mixer to scrape down the hook. Less babysitting allows you to do other tasks while your spiral mixer mixes the dough evenly and effectively.
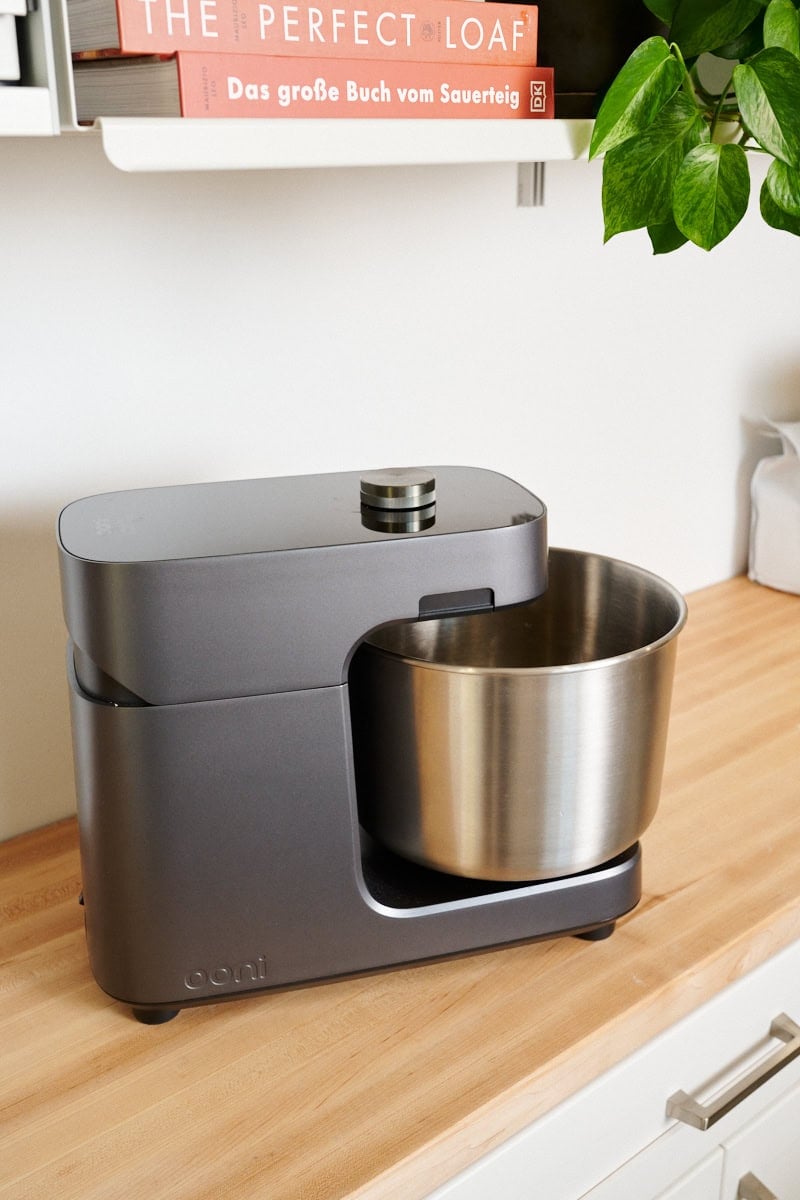
Design, Build Quality, and Construction
When I first received the Halo Pro, I was smitten by its design. If you’re familiar with Ooni products, like their Koda and Karu outdoor pizza ovens, you’ll immediately love the mixer. It’s matte black with clean lines and minimal controls. The mixer is heavy but not excessively so, making it easy to move around the kitchen if needed. The heft means it’ll stay put when mixing even low-hydration doughs—no KitchenAid “walking on the counter” for this thing.
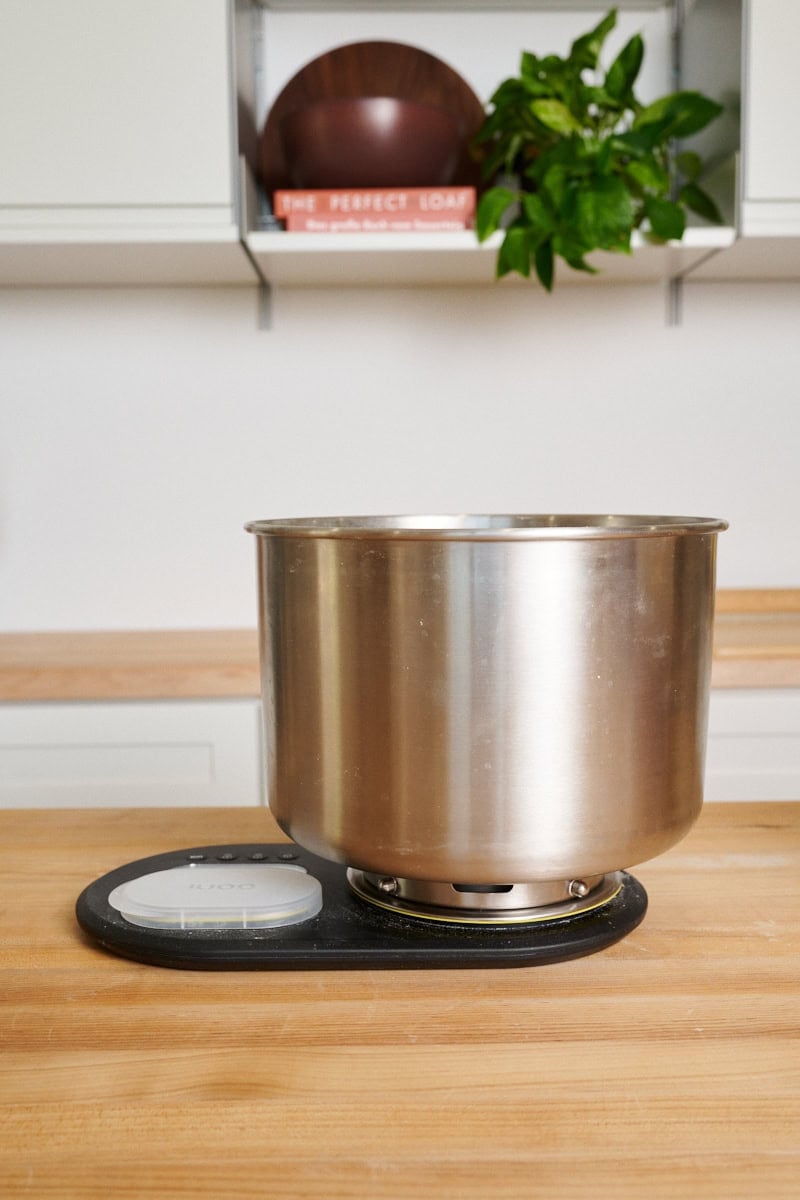
You can tell everything about the mixer was thoroughly thought out, from the rubber feet to keep it stuck to the work surface to the tapered back that feels solid yet unobtrusive. Even the mixing bowl fits perfectly on the Ooni multi-platform scale, making it easy to weigh ingredients right into the bowl.
At first, I was slightly turned off that the base connector on the mixer was plastic instead of metal. My concern was that the metal bowl might get loose over time or even break the plastic dock, but I have seen zero evidence of either thing happening. The plastic is incredibly tough, and the design is well thought out—no tiny bits that could break; the bowl sits and locks in solidly.
Ooni Halo Pro Spiral Mixer Specifications
Here are some high-level specifications for:
- Spiral mixer with tilt head and removable bowl, breaker bar, and dough hook (plus other mixing attachments)
- ~5kg dough capacity, bowl capacity of 7 liters
- 110V (650W), made for home use
- Turn dial speed control with integrated timer
- LED lights that illuminate the interior of the mixing bowl
- 14.5 kg (32 lbs) total weight
- This is a compact mixer that can easily fit on a home kitchen counter
Mixing Bowl Capacity
| Dough weight | Notes |
|---|---|
| Minimum | 1 kg of dough (anything lower than this, and I typically mix by hand anyway) |
| Maximum | 5 kg of dough |
How Do I Use The Ooni Halo Pro Mixer?
I almost always read the manual for whatever I buy, but with the Halo Pro, there’s no need. It’s all so intuitive; Ooni did a fantastic job thinking through the controls. There are minimal buttons to clean and no space for flour to fall into; it’s just one large dial and touch buttons. I love the design of the controls.
Turning On and Inserting Attachments
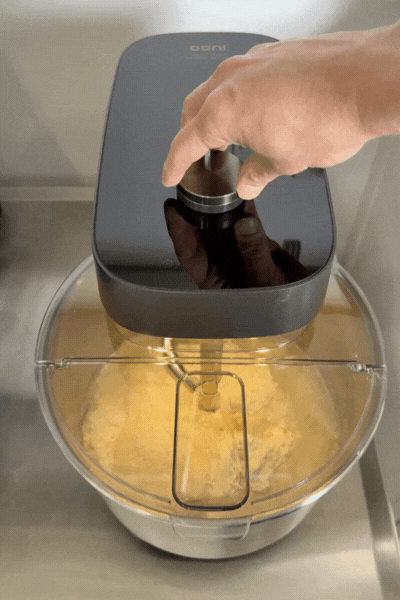
Flip the switch on the back of the machine to turn it on, and two LEDs illuminate the interior of the mixing bowl, making it easy to watch the dough as it mixes and strengthens. It’s incredible how these lights improve the mixing process—seeing the dough clearly to assess its level of strengthening during mixing is a game changer. I’ve worked with other mixers with LEDs, like Sunmix (more coming soon on these larger mixers!), and once you use them, it’s hard to go back.
To insert the dough hook, turn it counterclockwise to lock it in place. The breaker bar is first inserted, then a metal collar screwed down around to secure. Both are easy and quick. An optional splash guard can then be slid on the tilt head to keep hands out and ingredients in while mixing. I often omit this cover if it’s just me in the kitchen.
Let’s look at how to lock in the bowl, use the tilt head, and the controls.
Locking and Unlocking the Removable Mixing Bowl
The stainless steel bowl locks into the mixer’s base with a twist and a click. Once locked in, the motor can turn the bowl while the mixer runs.
Lock and Unlock The Tilting Mixer Head
Unlocking the tilting head is easy with two flanking switches (great for lefties like me!) on the head. Press one or both, and the head tilts up with a satisfying and smooth motion.
Control the Mixing Speed With The Dial
The speed and timer controls are on the top of the tilting head. Turning the single large dial controls the motor’s RPMs, while pressing it in starts and stops the mixer (and timer when selected). Two touch buttons toggle between mix controls and timer controls. Pressing one will select that mode, and then the turn dial will control that function.
For example, pressing the timer button and then turning the dial will allow you to increase or decrease the timer duration. Press the dial in to start the timer.
Change The Display From Percentage to RPM and Mute Sounds
I recently discovered that if you long-press on the mixing function, the display will change its speed display from percentage (of total speed) to RPMs (revolutions per minute). This can be helpful if you’re used to another mixer and are first using the Halo Pro; you can get your speeds to match your previous mixing workflow.
Similarly, a long-press to the timer button mutes the mixer’s beeps.
How I Use the Halo Pro to Mix Bread Dough
For a typical bread dough, this is where I start with mixing. The duration for each step is ultimately dependent on the dough you’re mixing (the flour and hydration).
- Initial incorporation: 1 minute at 15% mixing speed (“speed one”, 90-100 RPM)
- Initial strengthening: 3 minutes at 25% (“speed two”, 120 RPM) mixing speed
- Rest (optional): 5-10 minutes
- Final strengthening: 3-5 minutes at 25% mixing speed
The initial mixing phase combines ingredients and ensures even distribution throughout the dough. The rest period helps the dough unify and become slightly firm, though it isn’t always required. Significant gluten development occurs during the second mixing phase. Most doughs typically take between one and three minutes, though highly hydrated doughs or those needing more elasticity may require additional mixing time.
Again, the duration of each step will change depending on the dough you’re mixing. Usually, with increased hydration, I’ll also hold back some mixing water to “bassinage” that water during the second strengthening phase.
Does Using an Autolyse Reduce Mixing Time?
If a recipe still calls for using the autolyse technique, I’ll mix the flour and water in the spiral mixer and let it sit for the duration, covered. After the autolyse time, you’ll notice the dough will be smoother, and you can often reduce the total mixing time. This reduced mixing time is one of the many reasons we do an autolyse.

How I Use the Halo Pro to Mix Pizza Dough
When mixing pizza dough, my process is similar to bread dough, though the dough is typically lower in hydration and needs less mixing time. Also, I usually add olive oil at the end of mixing if called for in the recipe.
- Initial incorporation: 1 minute at 20% mixing speed
- Initial strengthening: 2 minutes at 30% mixing speed
- Rest (optional): 5-10 minutes
- Final strengthening: 2-4 minutes at 30% mixing speed
- Add enrichments: 1 minute at 20% mixing speed to pour in olive oil slowly
What Am I Looking For In a Fully Mixed Dough?
Whether I’m making sourdough bread or pizza, I want the dough to look and feel sufficiently developed by the end of mixing. Since I know I will give the dough at least one set of stretches and folds in bulk fermentation, I stop short of full (intensive) development—the dough should not pass a windowpane test.
But I want to start seeing defined edges and even a pumpkin shape.
Dough and the Pumpkin Shape
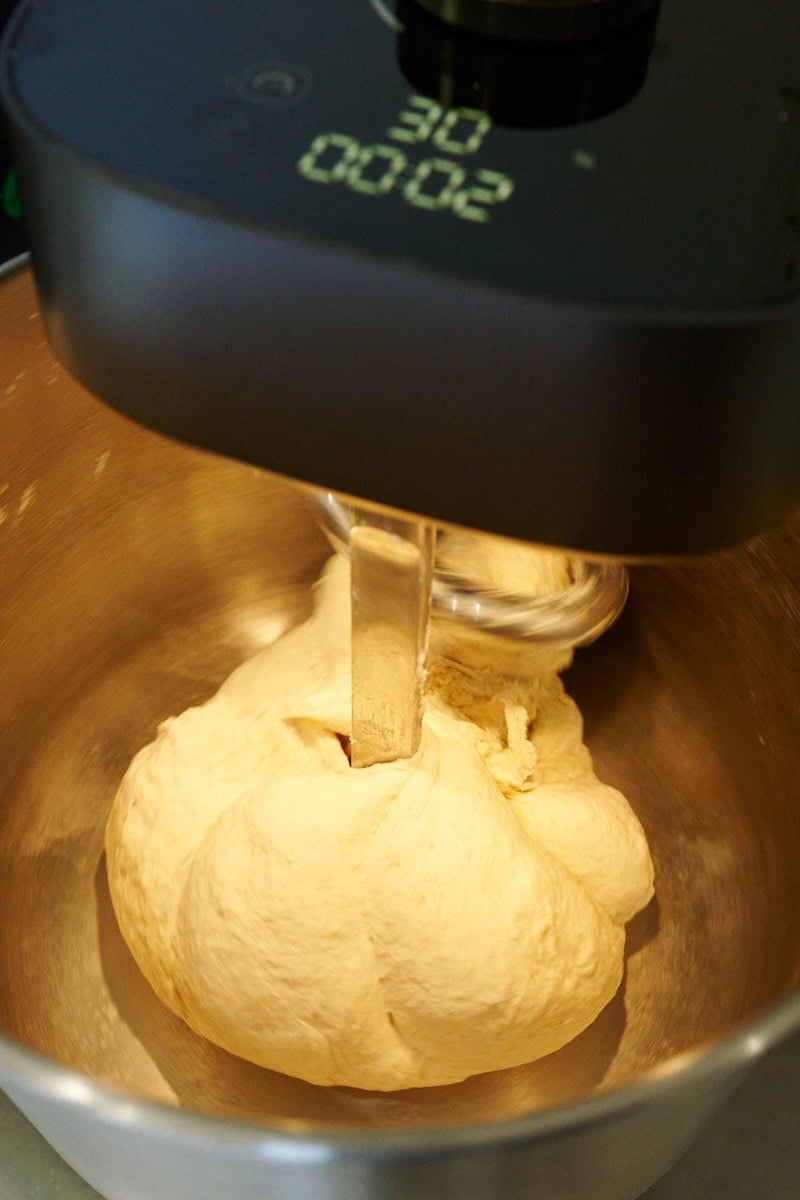
When mixed and strengthened enough, bakers and pizza makers who use a spiral mixer often describe their dough as having a pumpkin shape.
This pumpkin shape is indicative of a well-mixed dough:
- defined edges between smooth sections of dough
- elastic and holding itself together
- when tugged, it will offer resistance
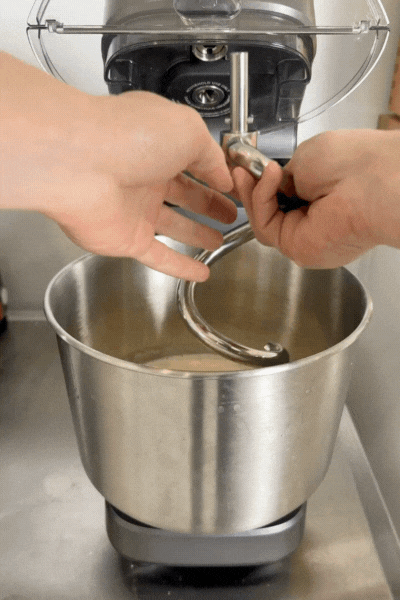
The way the dough rotates around the breaker bar when mixing creates this shape. Below, you can see it nearing the end of the first phase of mixing. The dough is starting to pumpkin in the mixing bowl, but it’s still shaggy and not quite strong enough (it needs about three more minutes of mixing).
Cleaning the Halo Pro
After mixing, I remove the bowl and scrape the dough into my bulk fermentation container using my favorite silicone scraper. I do my best to remove every bit of dough from the bowl.
Next, I remove the breaker bar and dough hook and place them in the mixing bowl and sink to finish washing off any remaining dough with the damp cloth. The ability to remove the bowl and attachments makes cleaning incredibly easy. If there are any stuck-on bits, soaking the bowl and attachments in warm water with a bit of soap quickly loosens them.
Other Attachments and Mixing
The Ooni Halo Pro also comes with a flexible beater and a geared whisk for making other products such as cakes, cookies, and biscuits. I haven’t used these other attachments because I primarily use the Halo Pro for bread and pizza dough.
Who Isn’t The Halo Pro Spiral Mixer For?
I think the Halo Pro is perfect for the home baker and pizza maker, but I’m not sure I’d use it for heavy production in a bakery. The mixer wasn’t really designed for that use, anyway. I’d recommend getting a Famag or Sunmix with a larger motor and more capacity for that setting.
I haven’t tried going below 55% hydration with the Halo Pro, and I probably wouldn’t buy this mixer to mix many batches of bagel or pretzel dough. Though I think it could handle a batch of these here and there, those types of doughs are better suited for larger mixers with heavy-duty motors geared for stiff doughs. Or, they’re easy to mix by hand, too.
Conclusion
I think the biggest testament to this mixer is that I now turn to it by default when mixing smaller batches of dough, whether that’s bread, pizza, or any enriched dough.
Before, I’d consider mixing small batches by hand, kneading with the slap and fold technique, or scaling things up to use my larger Famag mixer. But more and more, I find I’m settling in at 1 to 2kg and using the Ooni Halo Pro Spiral Mixer.
It has all the functions I’m looking for when making smaller batches of dough. It’s a capable mixer that can handle doughs at varying hydrations with ease. The sleek design, premium build quality, and intuitive controls mean it’ll be a mixer I’ll use for many years.
Watch Me Use The Halo Pro
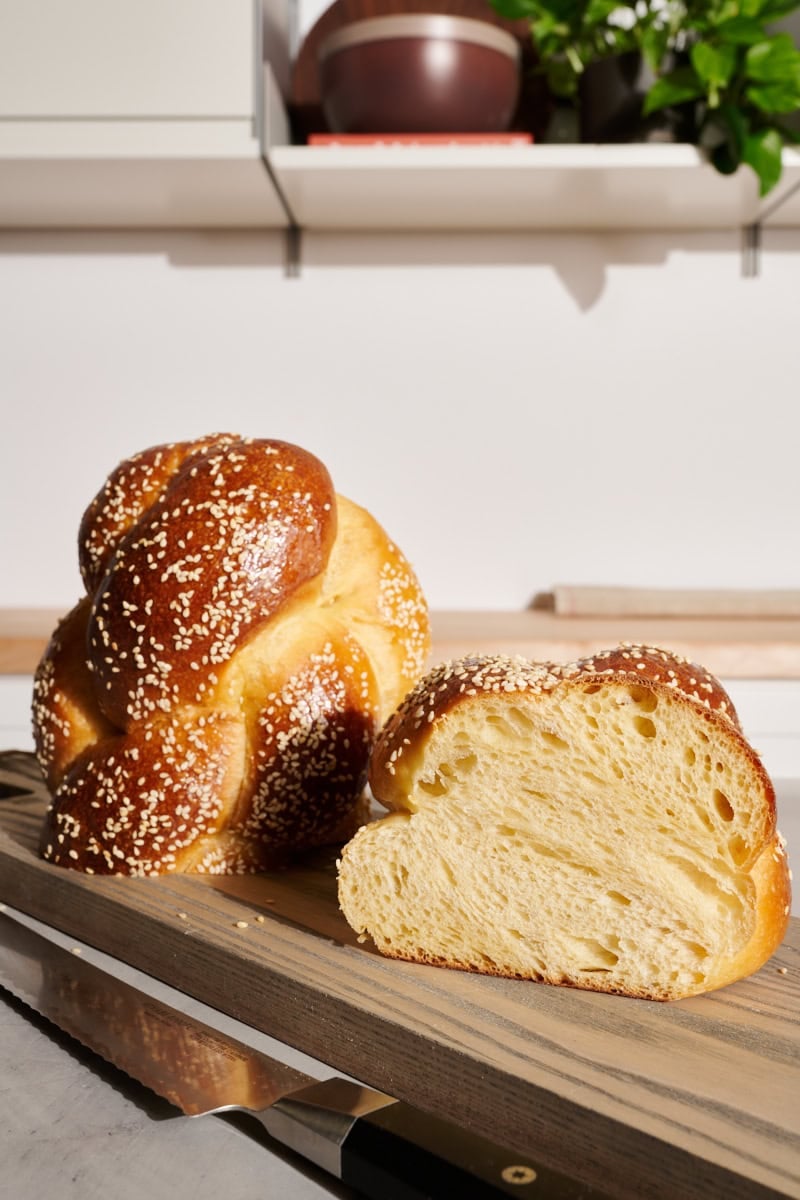
I’ve been using it with so many doughs lately, but two come to mind immediately. First, I used the Halo Pro in testing to develop my sourdough challah recipe (be sure to check out the YouTube video where I do a walkthrough).
But also, sourdough pizza. Check out this incredible home oven pizza:
The dough is based on my Sourdough Pizza Dough Recipe and cooked up incredibly well in my home oven on a baking steel. Mixing the dough in the spiral was remarkably easy, and due to the effective strengthening of the dough, I achieved a significant rise with the coveted eggshell texture.
Halo Mixer FAQs
If I mix bread dough in a mixer, can I do fewer sets of stretches and folds in bulk fermentation?
Yes, if you mix and strengthen the dough to a greater degree during the initial mixing phase, you don’t need to perform as many sets of stretches and folds during bulk fermentation.
Does the Ooni Halo Pro mixer heat up the dough during mixing?
As with any mixer, yes, it can. I’ve found that mixing at speeds exceeding 130 RPM for more than 4 minutes requires the use of cooler water to offset the heat generated during mixing.
What’s Next?
For more posts about baking equipment, including mixers, ovens, and more, check out the best baking tools for any baker.
👋🏼 Have any questions about the Halo Pro? Drop them in the comments below!

