
The holidays are the best excuse for binge baking. The end of the year is marked by that unique time when being chained to your oven is considered normal—nay, it’s even encouraged! As you might imagine, it’s my favorite time of the year. As Thanksgiving and Christmas approach, I can’t seem to help myself as all kinds of bread-baking ideas swirl in my imagination, taking me in this direction and that, and lengthening my “Things to Bake” list to unhealthy measures.
For the great meals of the holiday season, I always have a favorite loaf of bread or two earmarked for the dinner table, but often I also include a (sourdough) pie, sometimes a sweet bread, and always an experimental loaf. Last year, I served a variation of this roll recipe, and while they were great, they’ve come a long way through subsequent tests and trials. They’ve matured into these soft sourdough rolls, firmly on the menu for this year’s holiday meals (especially Thanksgiving).
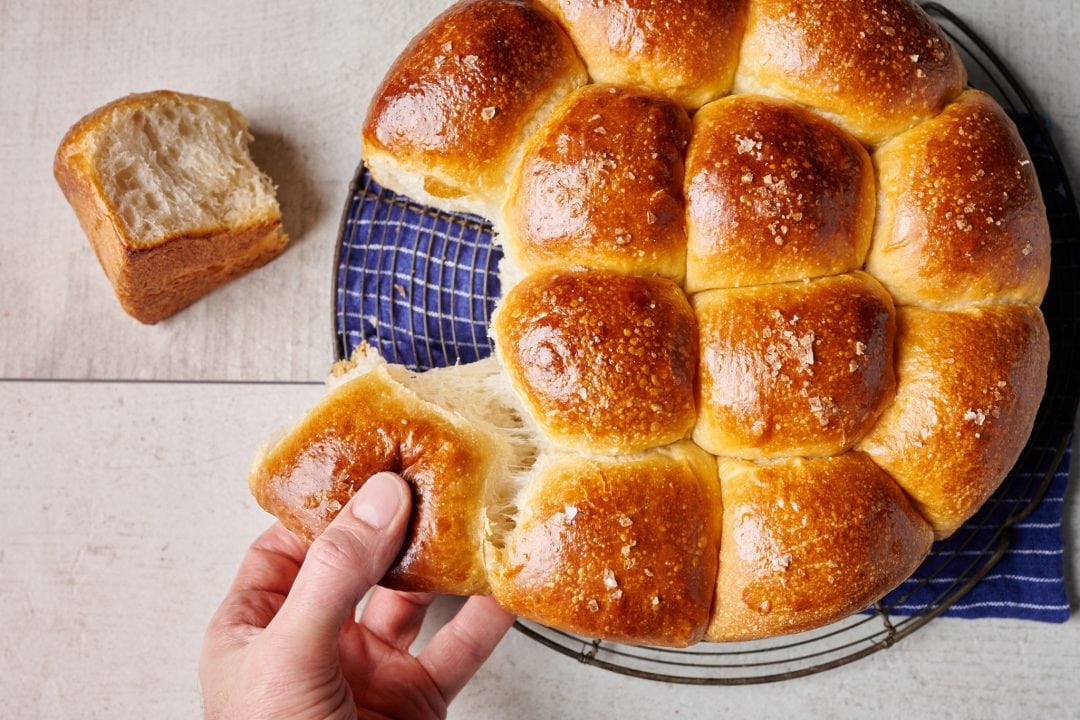
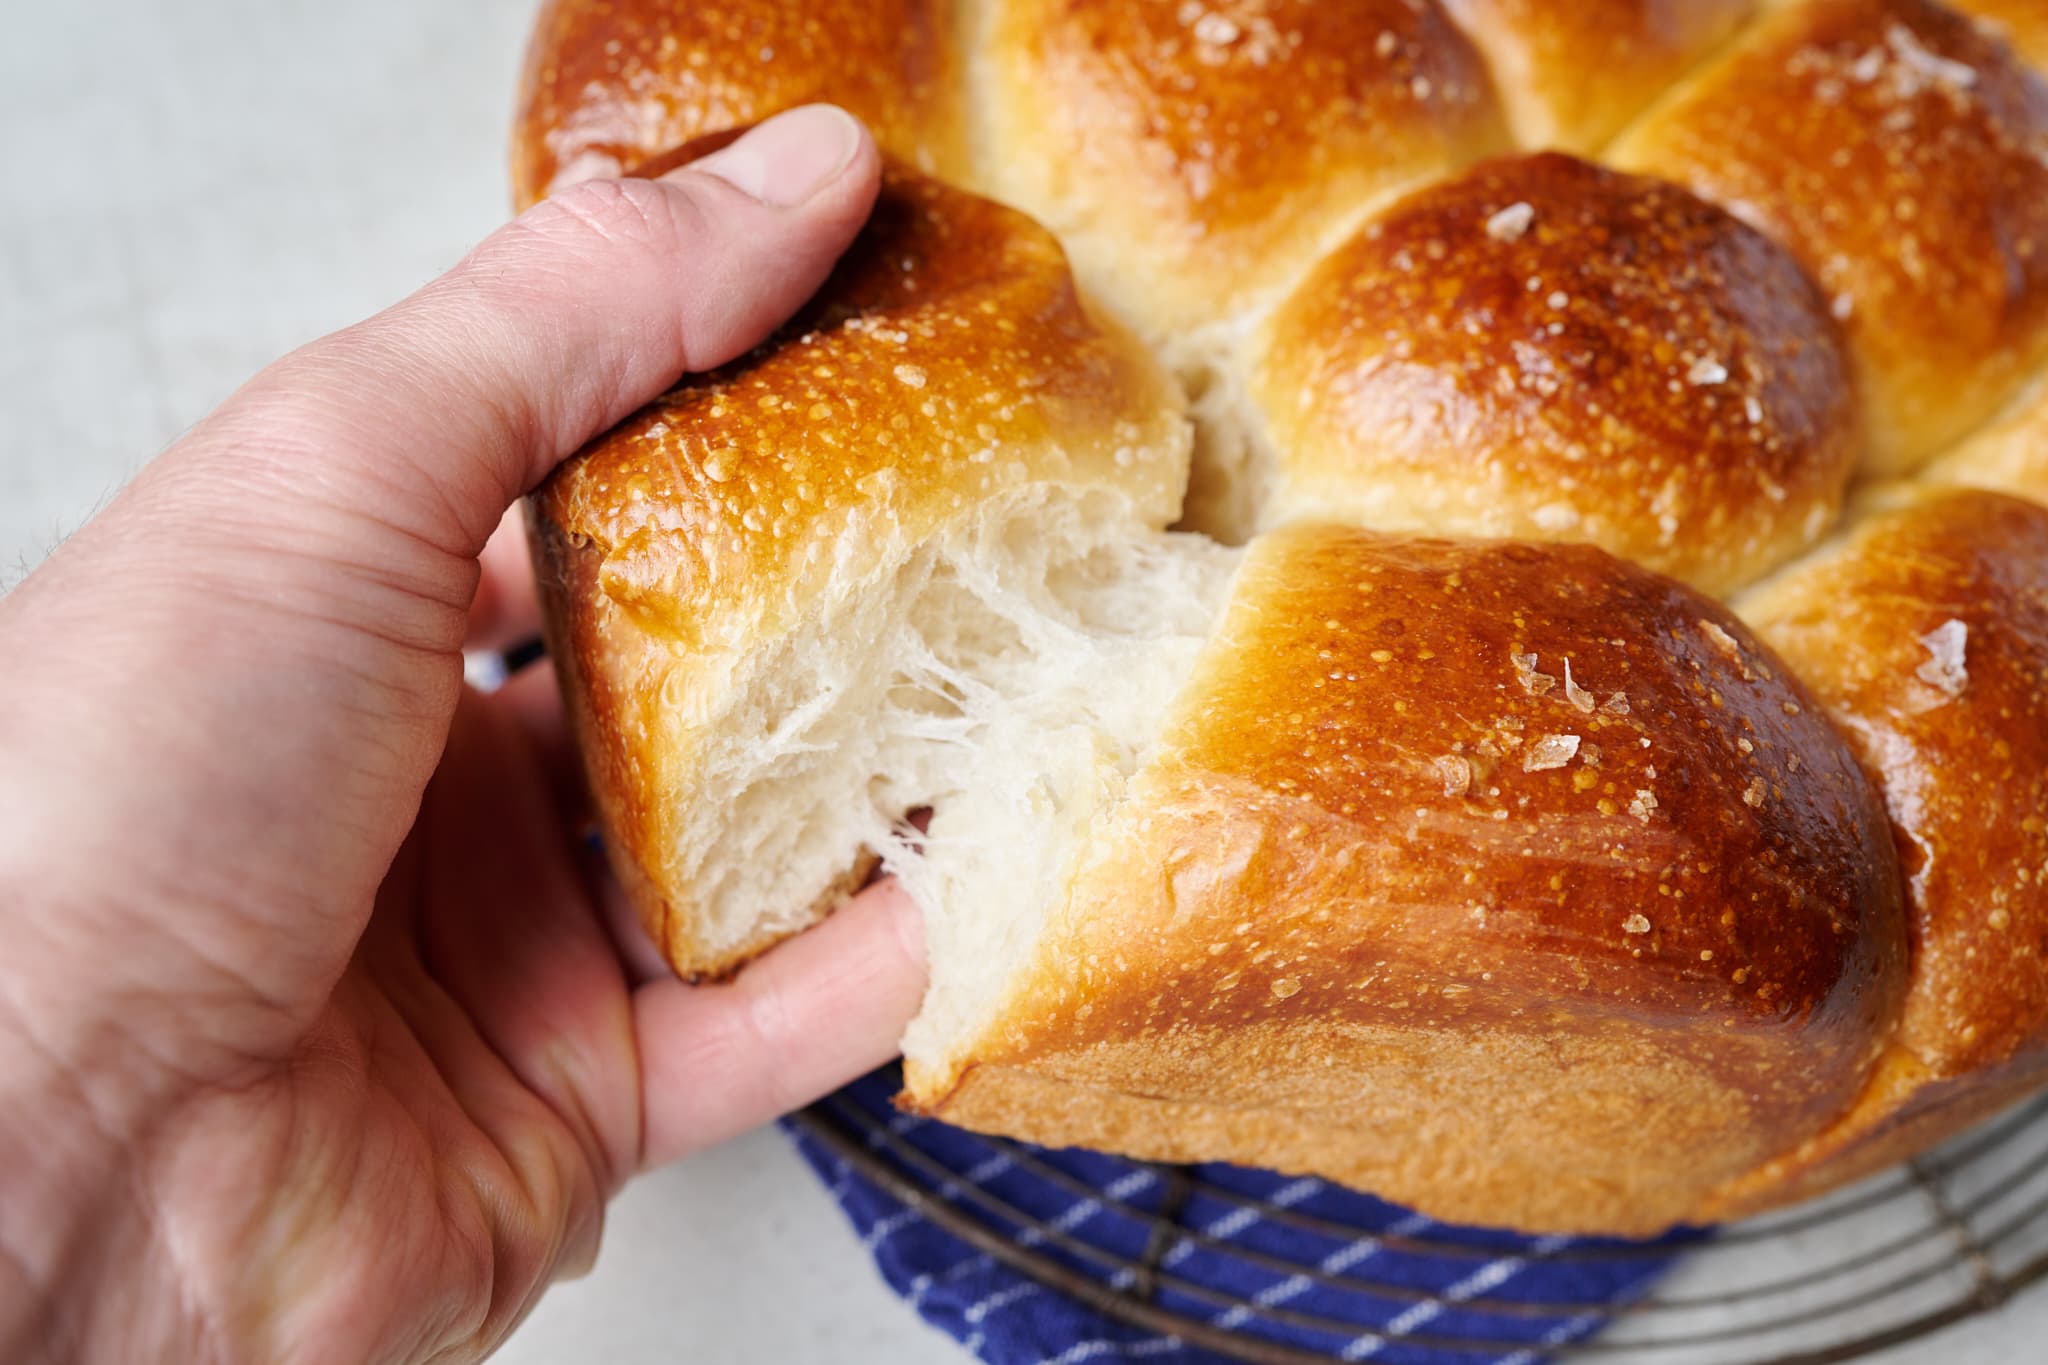
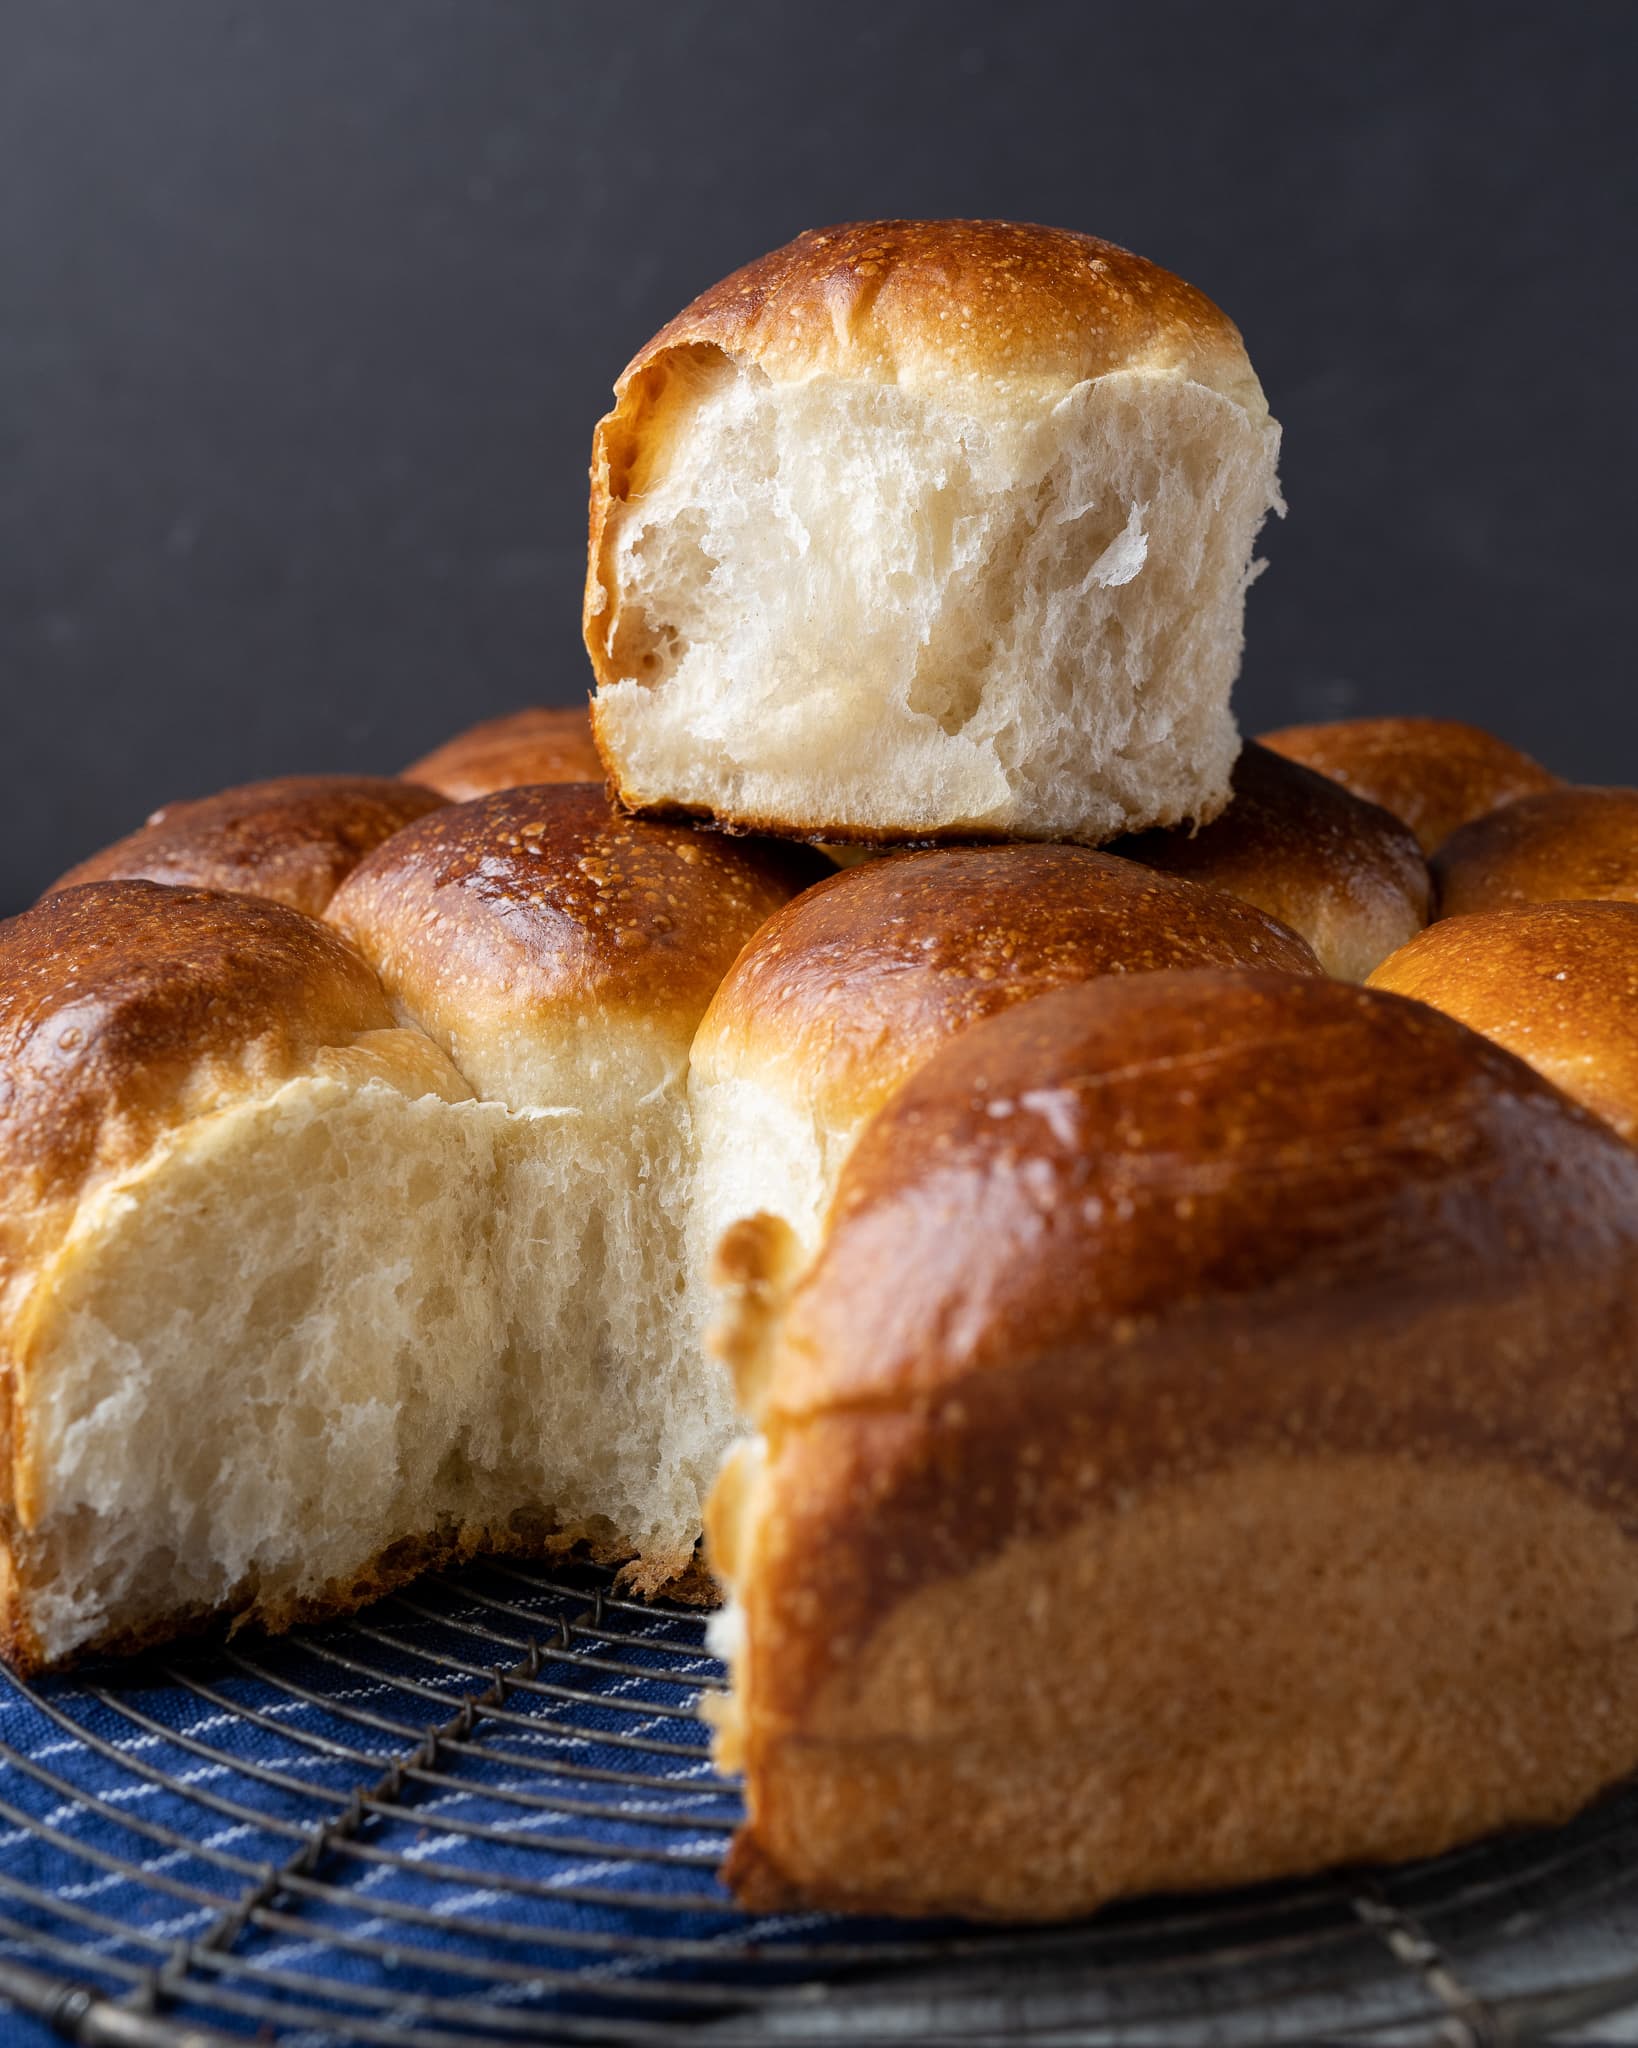
These soft sourdough dinner rolls (which are also in my cookbook!) are incredibly light and, for lack of a better adjective, squishy. Let me take you on a quick trip.
Remember your last visit to the state fair, where you ordered that massive cone of cotton candy—for me, this was many years ago, yet the memory is still quite vivid. Now pull off a large tatter of that soft, cloud-like sugar puff and watch it come apart into thick sheets, floating in front of your face. This image is similar to the delicate, yielding texture of buttery dinner rolls.
Video: Watch Me Make These Sourdough Rolls
Here’s my video of me making these rolls from start to finish!
Flavorwise, these rolls are what you want and expect from a dinner roll: slightly buttery, a smidgen sweet, and with only the slightest touch of sourness (if any). The flaky salt on top is like a lightning bolt to the taste buds, waking them up and sharpening the bread’s flavor. And let’s not forget a very important purpose of rolls at any meal: to soak up all sauces (gravy! salad dressing! au jus!) on the dinner plate. And yet, they also shine when you keep it simple and plain, enjoying them as-is or simply with a pat of warm butter.
Let’s look at which flour I used for this recipe and how tangzhong helps us achieve that cotton-candy-like tenderness.
Flour selection and tangzhong
This recipe calls for standard all-purpose flour and higher protein bread flour (King Arthur brand will work well for both). The bread flour brings extra protein and strength to the mix that helps these rolls rise a little higher and have more structure. But also, using only white flour helps keep the sourness to a minimum. In testing, the rolls were even softer and more tender without the bread flour, but I found that the added high-protein flour helps keep them sturdy when used for dipping.
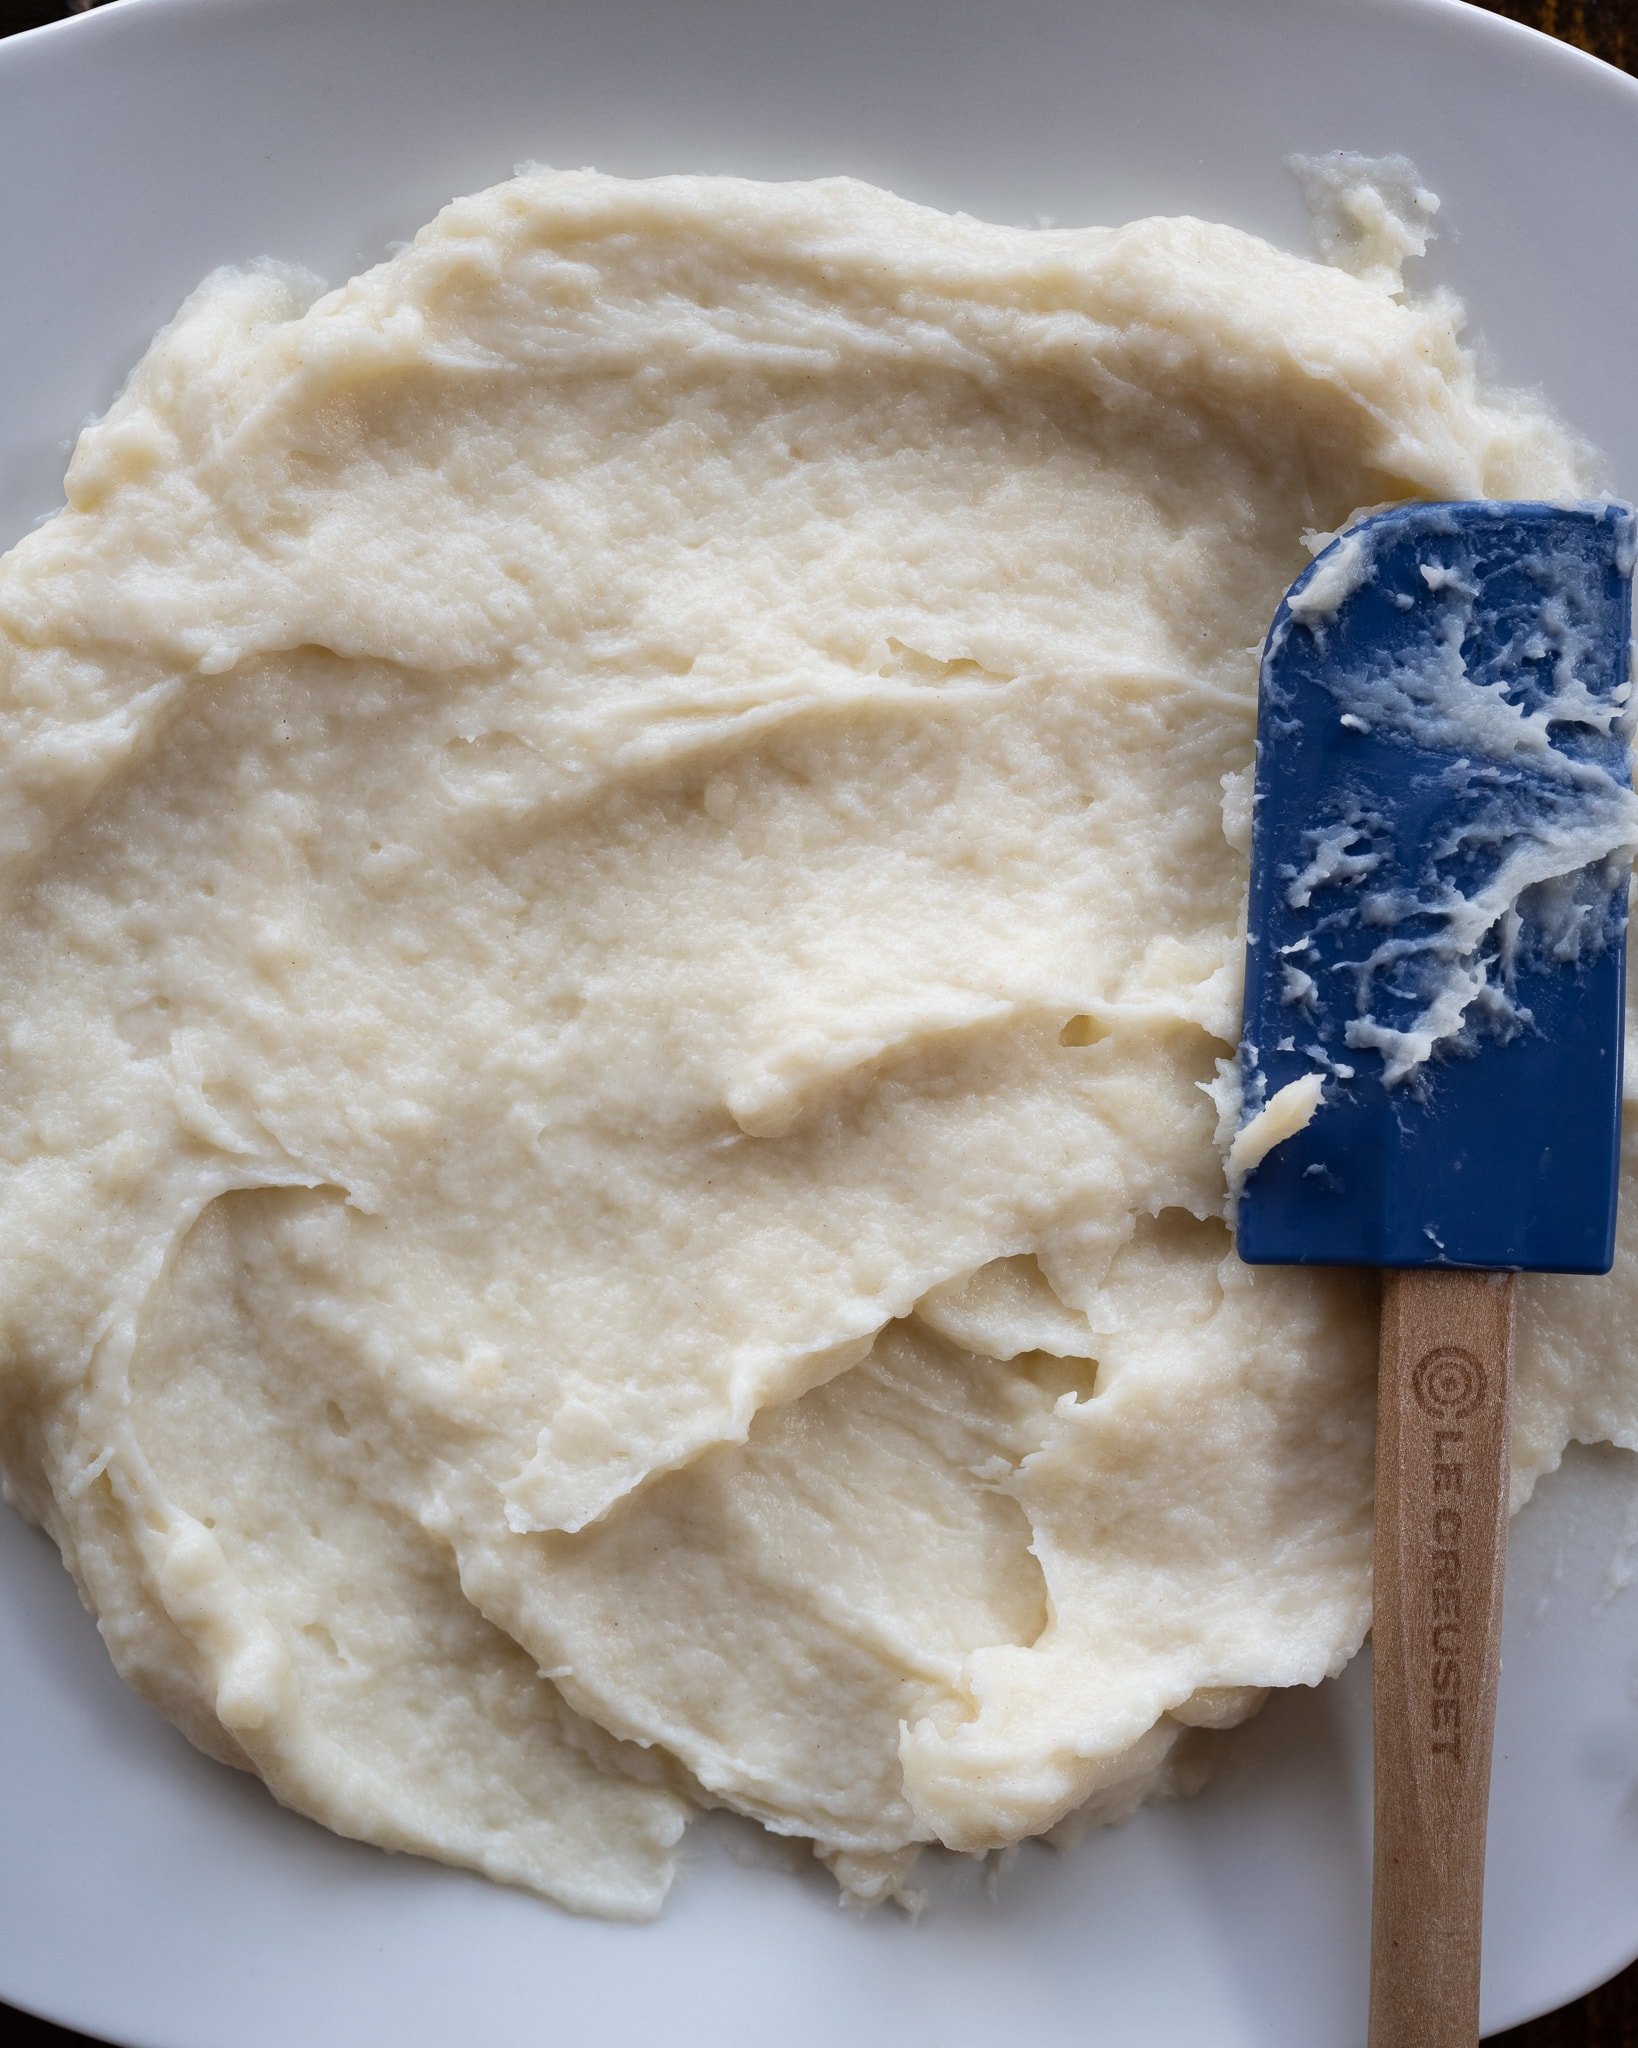
This sourdough dinner roll recipe uses a pre-cooked flour mix-in, also called tangzhong, to add extra tenderness. I use this same technique in my Hot Cross Buns and Sourdough Shokupan. The tangzhong technique is straightforward and takes only a few minutes in the first steps of the breadmaking process: you warm the flour and milk in a saucepan over medium heat until the mixture thickens, then let it cool. Then add this cooled gel paste (similar to a milk roux) to your mix as you would any other ingredient.
See my guide to the Tangzhong technique for a more in-depth discussion →
Baking Schedule
These super-soft sourdough rolls can be made in a single day (skipping the overnight levain) or they can be retarded (refrigerated) in proof to bake the next day, right before dinner. This recipe is extremely flexible, and you can adjust the timeline to fit the rolls into your cooking schedule.
For example, if you’re making these for Thanksgiving, you can make the rolls the day before and proof them in the fridge. Then on Thanksgiving day, take them out a few hours before the big meal, finish proofing on the counter if necessary, and bake them so that the rolls are warm for dinner.
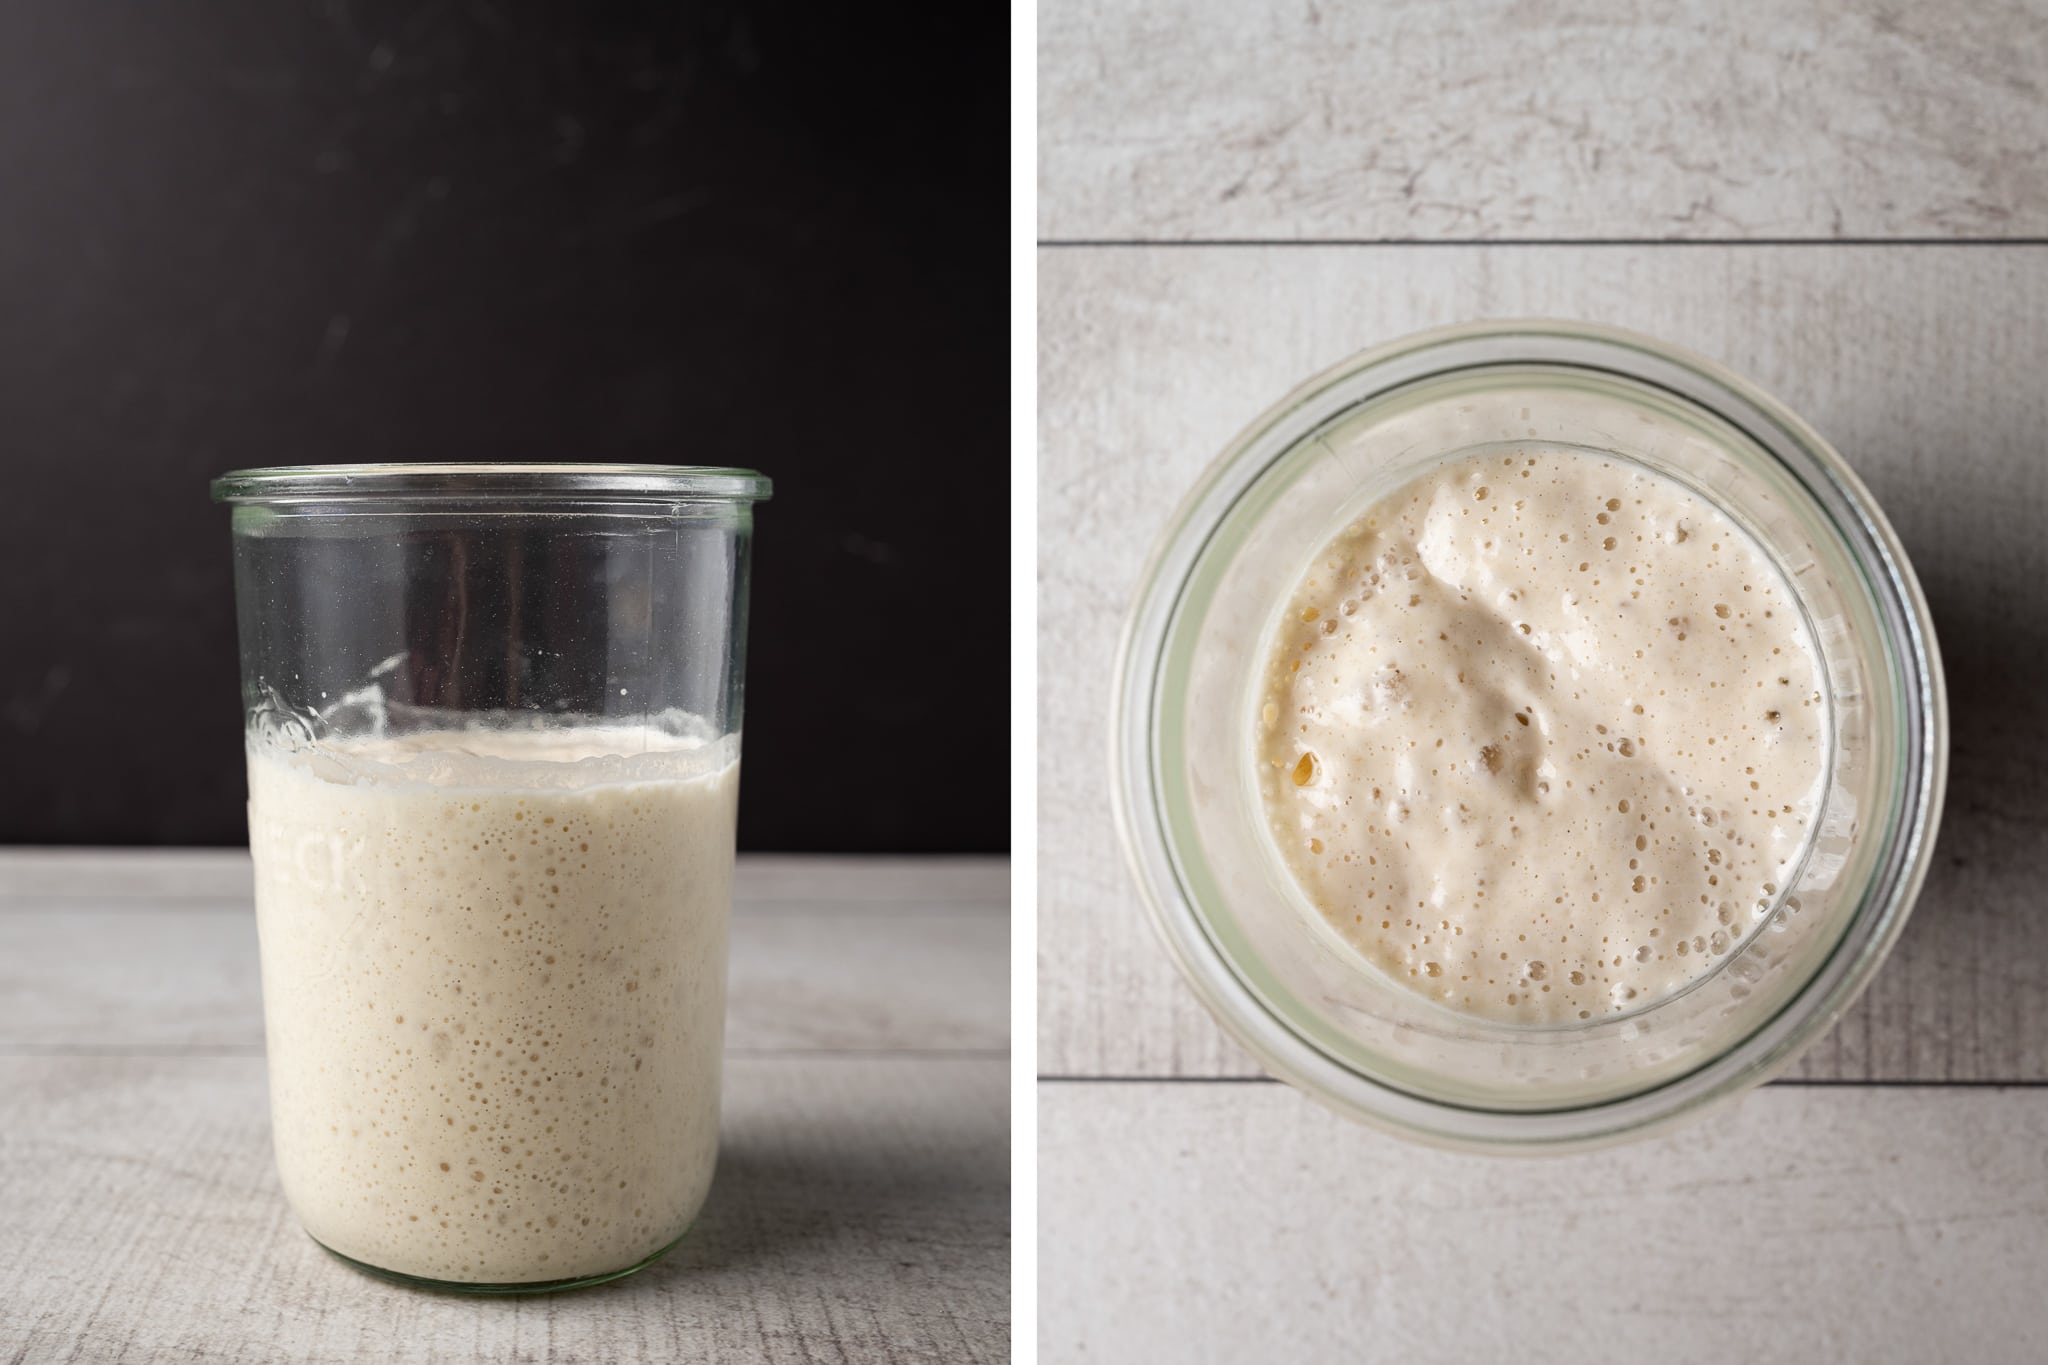
Be sure to use your levain when it’s ripe: it should be extremely bubbly, frothy, and well-risen. As mentioned in my guide to baking dough in the winter, the cold weather may slow the dough’s proofing; give it extra time if necessary.
Baking equipment
I’ve tested these super soft sourdough rolls with several baking pans, and below are my two favorites.
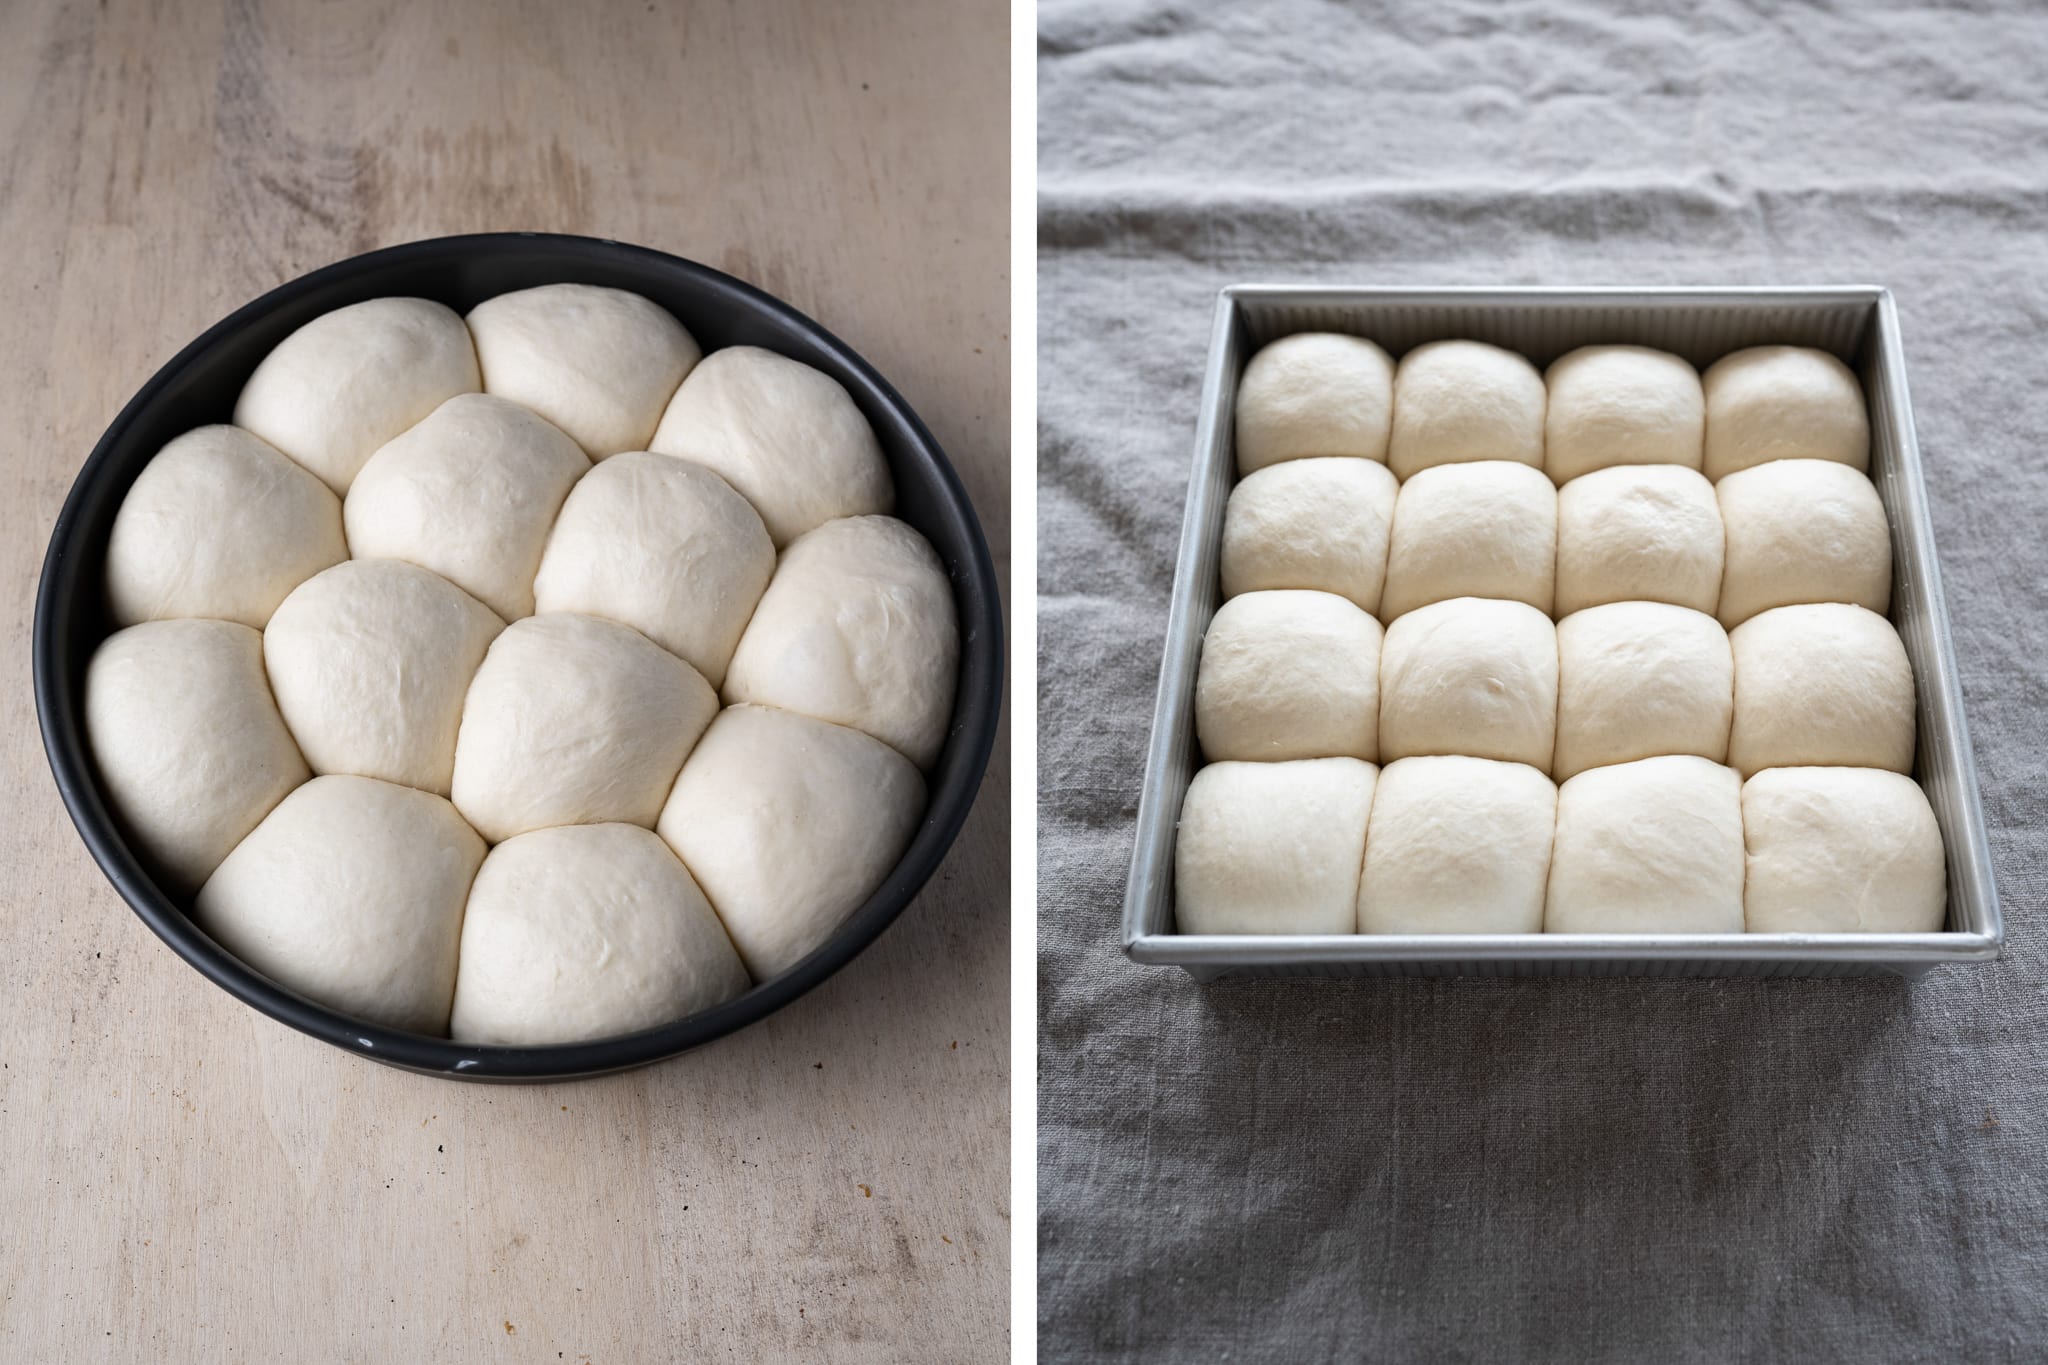
Round pan choice: LloydPans 10×2.25-inch round pan.
I use these round LloydPans for many things in my kitchen: from my sourdough focaccia to sourdough pizza to these dinner rolls. They are nonstick and conduct heat so well that they brown the bottom and sides of whatever is inside just as well as the top. They’re magical, actually.
Square pan choice: USA Pan 9-inch square pan.
I love this square pan because it has a nonstick liner and is extremely versatile. I use it for sweet cardamom rolls, cinnamon rolls, and even cakes or brownies. It bakes rolls that are evenly browned, and cleanup is a breeze.
Super soft sourdough rolls formula
For tips on how to calculate baker’s percentages or how to modify this formula, see my post on baker’s percentages (baker’s math).
| Total Dough Weight | 1200 grams |
| Pre-fermented Flour | 12.5% |
| Levain in final dough | 37.1% |
| Hydration | 43.0% |
| Yield | 16 x 70g sourdough dinner rolls |
Total formula
Desired dough temperature: 78°F (26°C). See my post on the importance of dough temperature for more information.
Milk & butter alternative (vegan): If you want to make these rolls vegan, substitute water, nut milk, or full-fat oat milk for the dairy milk in the roux below. For the butter, go with Earth Balance Vegan Butter or a similar product.
| Weight | Ingredient | Baker’s Percentage |
|---|---|---|
| 41g | Tangzhong: Medium-protein bread flour or All-purpose flour (~11% protein, King Arthur Baking All-Purpose) | 7.00% |
| 166g | Tangzhong: Whole milk (see vegan options above) | 28.00% |
| 402g | Medium-protein bread flour or All-purpose flour (~11.7% protein, King Arthur All-Purpose) | 68.00% |
| 148g | High-protein bread flour (~12.7% protein, King Arthur Bread Flour) | 25.00% |
| 95g | Butter, unsalted | 16.00% |
| 53g | Caster sugar | 9.00% |
| 254g | Water | 43.00% |
| 11g | Salt | 1.80% |
| 30g | Ripe sourdough starter, 100% hydration | 5.00% |
Additional ingredients:
Egg wash: 1 large egg and 1 tablespoon whole milk, for brushing
Coarse sea salt, for topping (optional)
Super soft sourdough rolls method
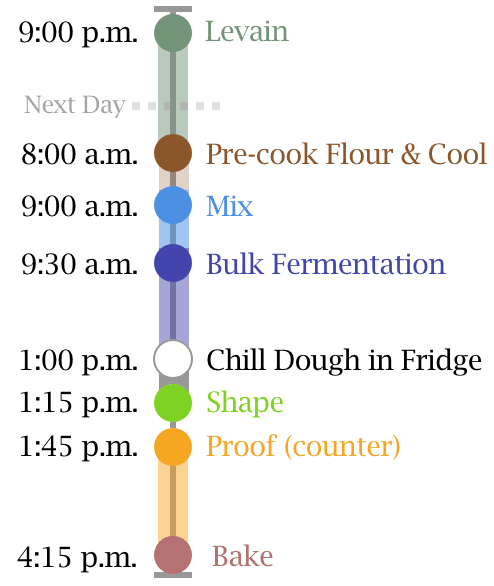
1. Prepare Levain – 9:00 p.m.
| Weight | Ingredient | Baker’s Percentage |
|---|---|---|
| 74g | Medium-protein bread flour (all-purpose flour) | 100.0% |
| 15g | Caster sugar | 20.0% |
| 74g | Water | 100.0% |
| 30g | Ripe sourdough starter, 100% hydration | 40.0% |
Mix the ingredients in the chart above in a container and leave covered to ripen at about 76°F (24°C) for 12 hours overnight.
Like my pumpkin cinnamon sourdough bread, this recipe utilizes a sweet levain, or sweet starter, which calls for a little sugar added to the levain to promote yeast activity and help reduce sourness in the final dinner rolls. See my post on the differences between a starter and levain if the two terms are new to you.
2. Make the tangzhong – 8:00 a.m.
In a medium saucepan set over medium-low heat, add the 41g tangzhong flour and 166g tangzhong milk. Cook, whisking continuously, until the mixture thickens into a paste, 5 to 8 minutes. In the beginning, whisk vigorously to break up any flour clumps, and continue whisking to avoid burning. The mixture won’t seem to do anything for a while, but it will thicken.
Remove the pan from the heat and spread the tangzhong on a small plate to expedite cooling. Set aside.
3. Mix – 9:00 a.m.
| Weight | Ingredient |
|---|---|
| All | Tangzhong (from Step 2) |
| 328g | Medium-protein bread flour (all-purpose flour) |
| 148g | High-protein flour |
| 95g | Butter, unsalted |
| 39g | Caster sugar |
| 181g | Water |
| 11g | Salt |
| 192g | Levain |
I used my KitchenAid stand mixer to mix this dough, but it could also be mixed by hand using the slap and fold technique or a series of folds in the mixing bowl.
First, cut the butter into 1/2″ pats. Set them on a plate to warm to room temperature.
To the bowl of a stand mixer fitted with the dough hook attachment, add the water, flour, ripe levain, sugar, tangzhong, and salt. Mix on low speed (STIR on a KitchenAid) for 1 to 2 minutes until the ingredients come together and no dry bits remain. Increase the mixer speed to medium (2 on a KitchenAid) and mix for 4 to 5 minutes until the dough starts to strengthen and clump around the dough hook. It won’t completely remove from the bottom of the bowl, and it will still be shaggy.
Let the dough rest in the bowl for 10 minutes.
Turn the mixer to low speed and add the room-temperature butter, one pat at a time, waiting until each pat is fully absorbed before adding the next. Adding all the butter will take 5 to 8 minutes. After this, mix on medium speed for 1 to 2 minutes, until the dough is smooth and clings to the dough hook.
In the end, the dough will still be very soft, and it will not completely remove from the sides of the bowl. Transfer the dough to a bulk fermentation container and cover.
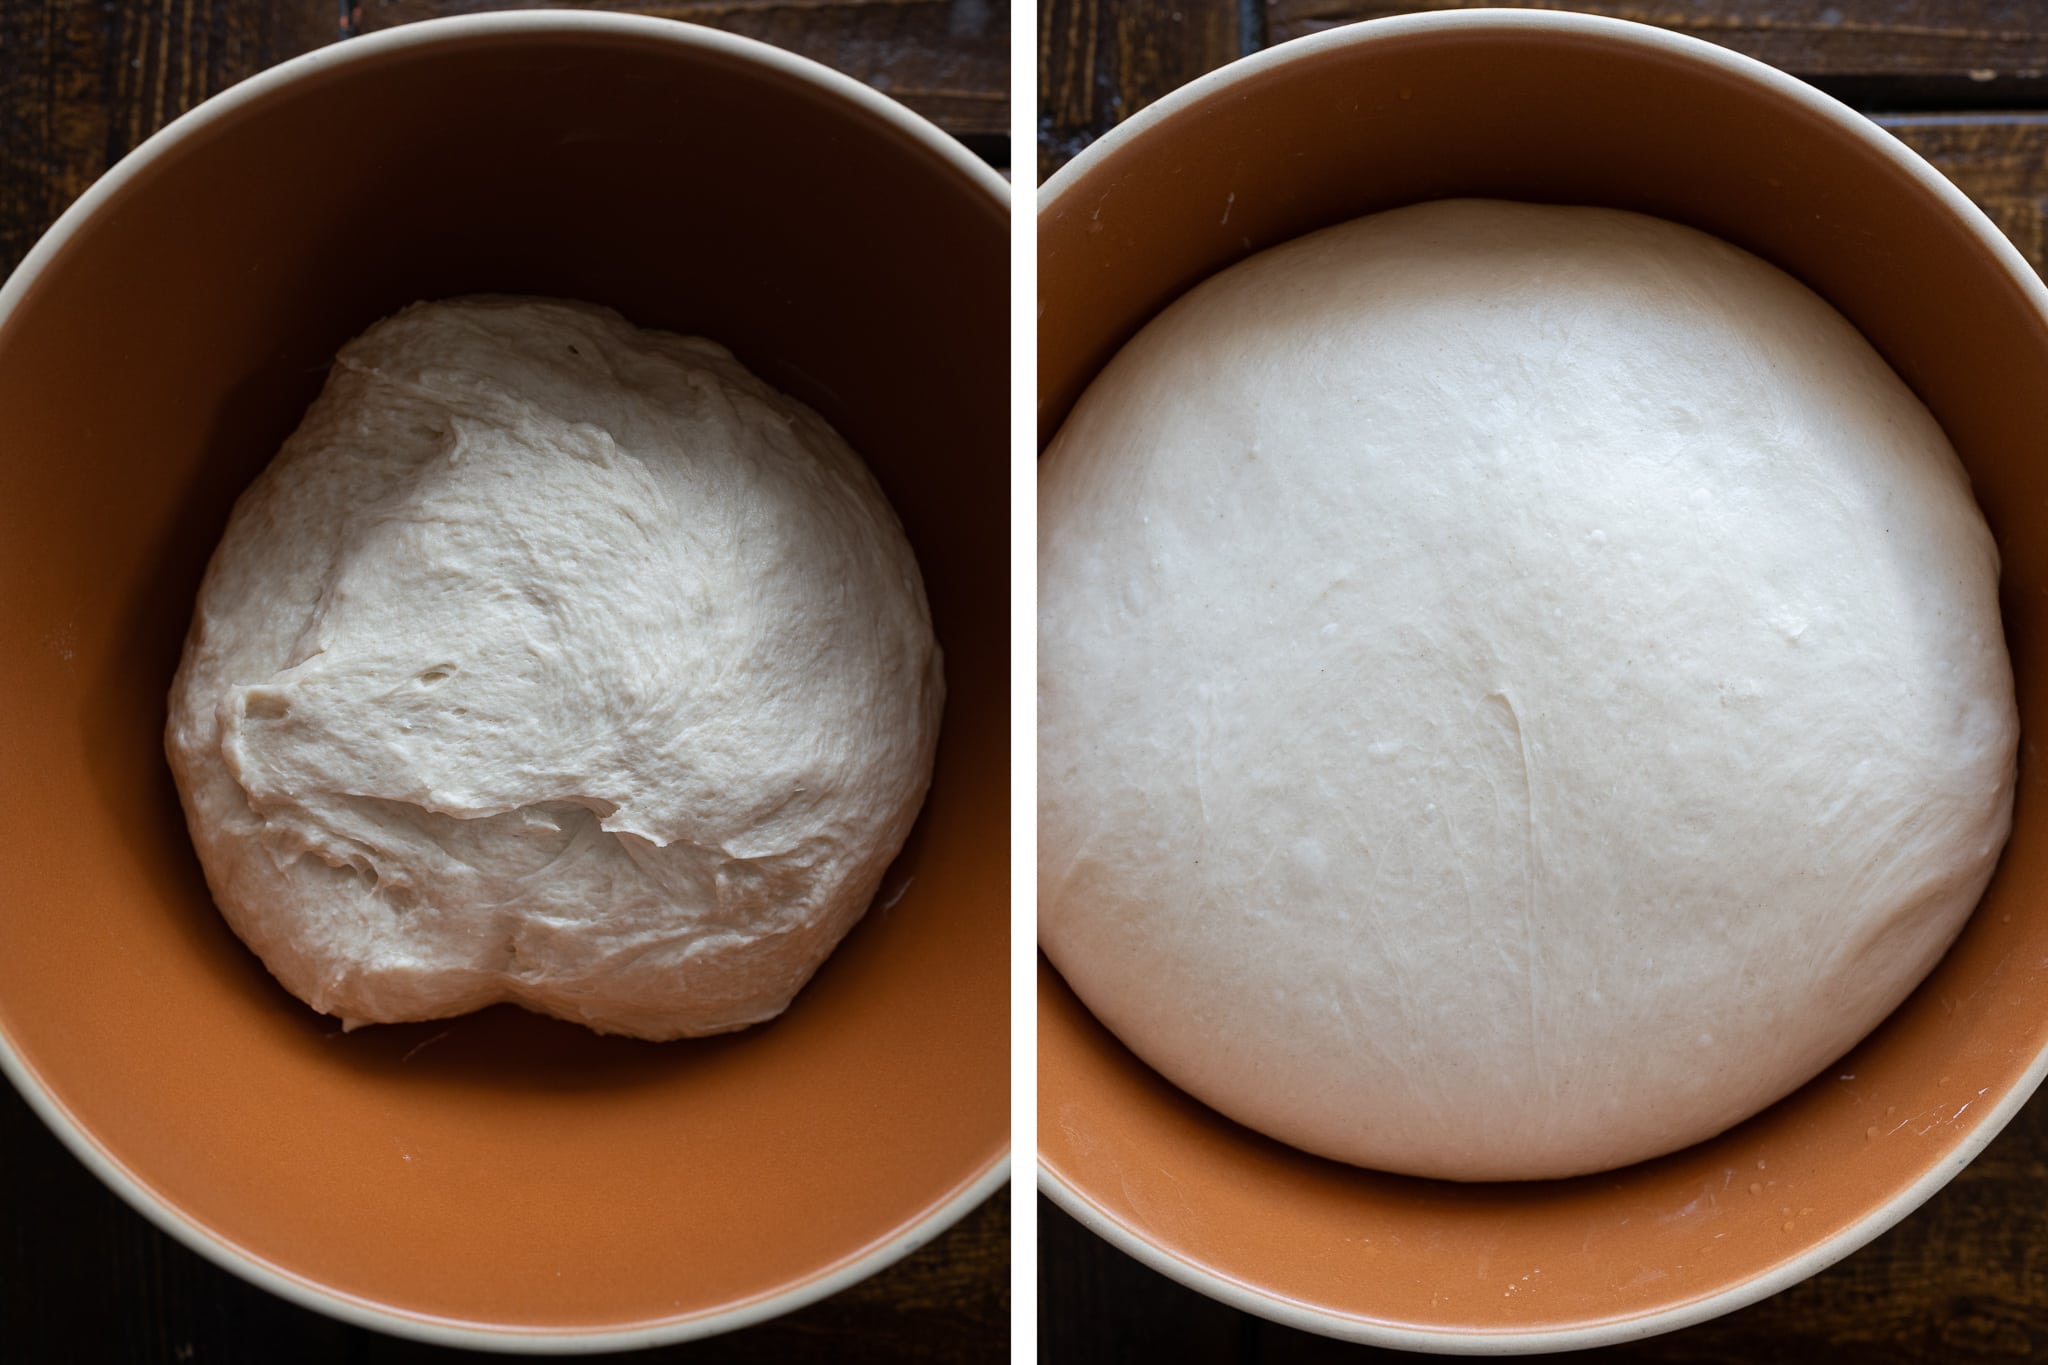
4. Bulk Fermentation – 9:30 a.m. to 1:00 p.m.
At a warm room temperature, 74-76°F (24°C), bulk fermentation should take about 3 1/2 hours. If your kitchen is cooler, place your bulk container in a small home dough proofer, or extend the bulk fermentation time to give the dough more time to ferment.
In the image below (tap/click to zoom in), you can see my dough at the start of bulk (left) and after 3 1/2 hours (right). The dough is ready when it has risen in the container, smooths, and is puffy to the touch.
Give this dough three sets of stretches and folds during bulk fermentation at 30-minute intervals. The first set begins 30 minutes after bulk fermentation starts. For each set, wet your hands, grab one side, and stretch it up and over the dough to the other side. Rotate the bowl 180°, then perform another stretch-and-fold (this forms a long rectangle in the bowl). Then rotate the bowl 90° and repeat the stretch and fold. Finally, turn the bowl 180° and do one last stretch and fold. The dough should be neatly folded up in the bowl.
After the third set, let the dough rest, covered, for the remainder of bulk fermentation.
5. Chill Dough – 1:00 p.m. to 1:15 p.m.
At this point, your dough should have risen in your bulk container, be puffy to the touch, and have smoothed out. If the dough still feels dense and tight, give it another 15 minutes and check again.
Uncover your bulk container and place it in the refrigerator for 15 to 25 minutes. Chilling the dough will help it firm up, making shaping and transferring to the pan much easier. Note that the longer you chill the dough in the fridge, the longer it will take to proof (because it will have to warm up that much more).
If your dough is extremely soft, keep the bulk container covered and chill the dough for up to 1 hour.
Overnight fermentation option: At this point, you can choose to place the covered bulk fermentation container into the fridge to retard the dough overnight and bake the next day. The next day, take the dough out of the fridge, let it warm up for 30 minutes, and then resume with the Shape step below.
6. Shape – 1:15 p.m.
Butter your baking pan (even if it’s nonstick) to ensure that the rolls come out cleanly after baking.
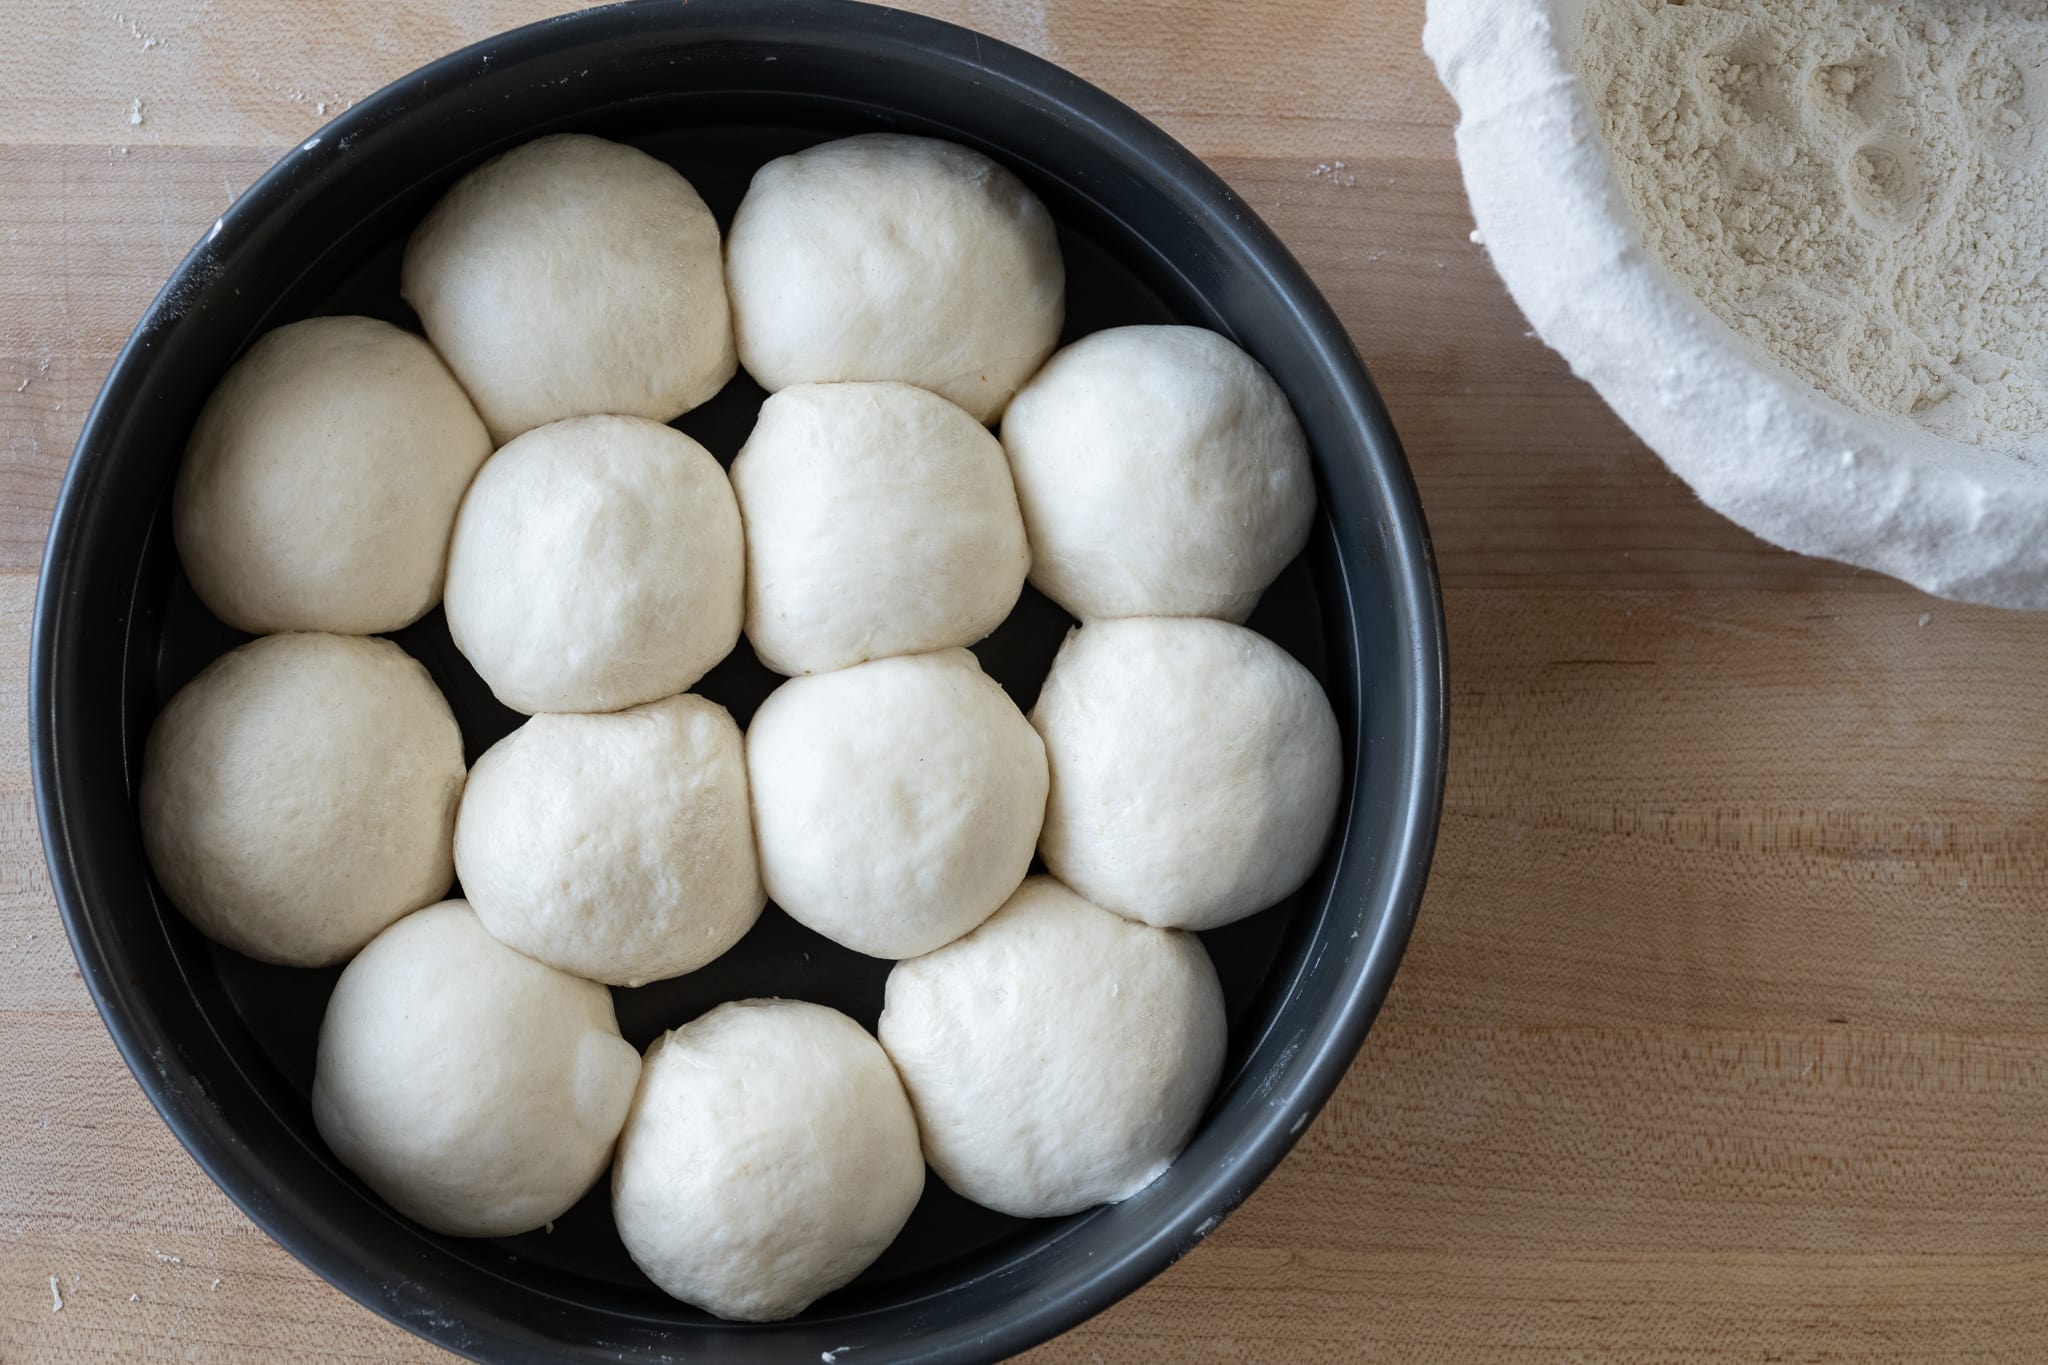
Remove the bulk fermentation container from the fridge, lightly flour the top of the dough in the bowl, and gently scrape the dough out onto a lightly floured work surface. The dough will be cool to the touch but still very soft. Lightly dust the top of the dough and divide it into sixteen 70g pieces (or fourteen 85g pieces for larger rolls).
Because the dough is so soft, I prefer to use my bench knife to shape each roll. Use the knife to drag the dough toward your body as your other hand rounds the dough, tucking the edge down under the ball. Repeat this dragging-and-tucking motion with the knife and your other hand until you have a uniformly round ball. Place the ball in the prepared baking pan. When using a round pan, I prefer to start by placing the rolls along the outside in a ring, then work inward as each ring fills.
For more shaping instruction, see my guide page to shaping buns and rolls.
Cover the pan with a large, reusable plastic bag and seal it shut.
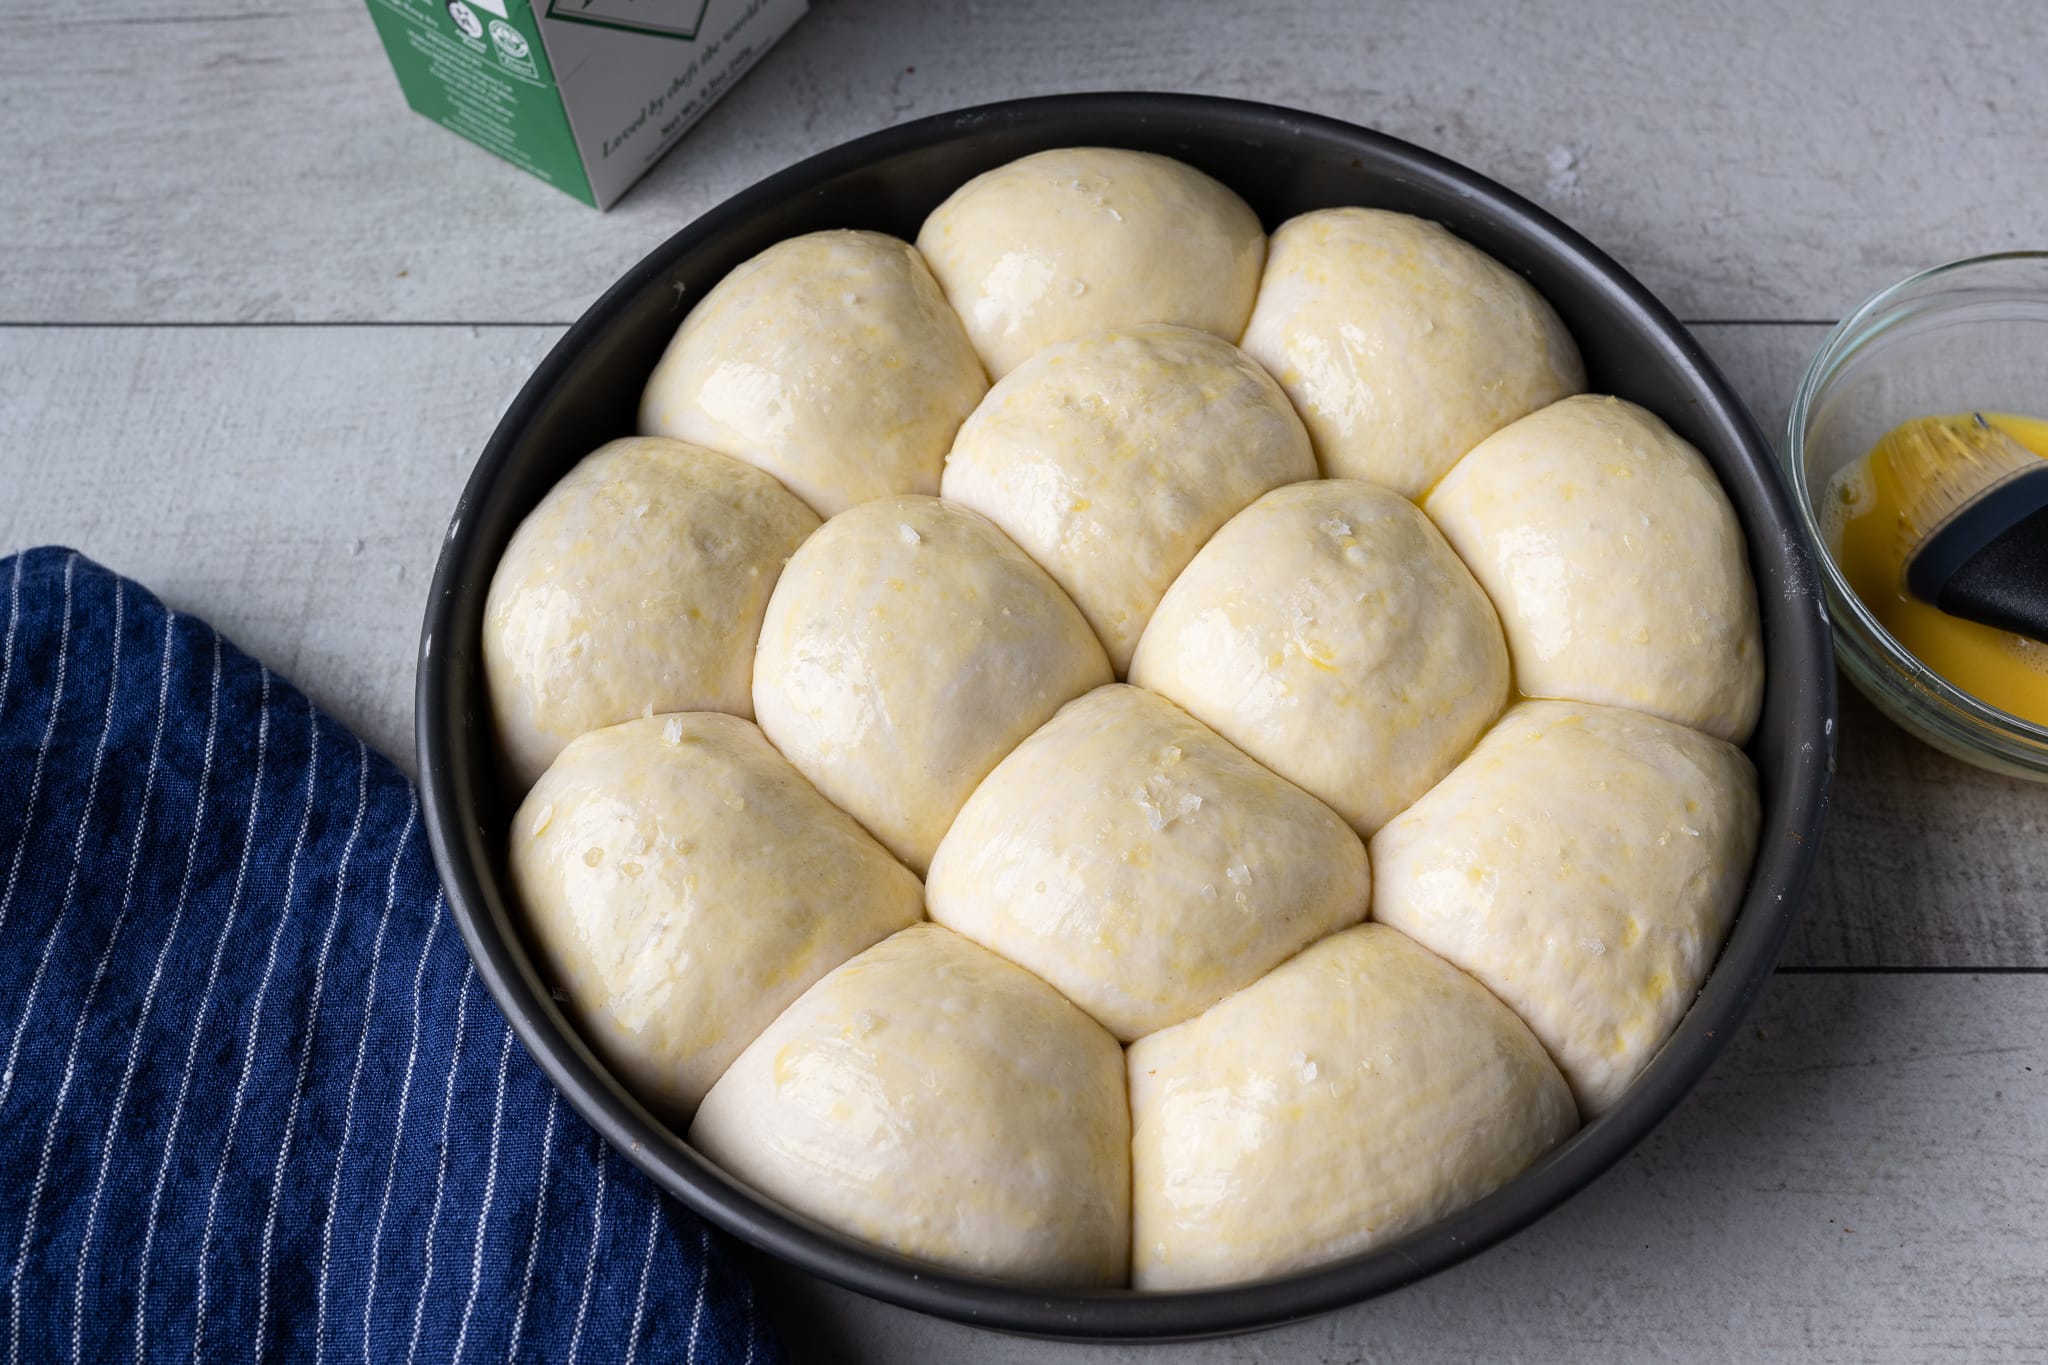
7. Proof – 1:45 p.m. 4:15 p.m. (2 to 3 hours)
At a warm room temperature of 74-76F (23-24 °C), this dough should take 2 to 3 hours to fully proof. If your kitchen is cooler, expect it to take longer.
When fully proofed, the dough should be well-risen in the pan and very soft to the touch. Uncover your dough and gently press the tops of a few rolls. You shouldn’t feel any dense spots or tight areas—the dough should be very light and airy. If you do, cover the bowl and let your dough proof for another 15 to 30 minutes, then check again.
8. Bake – 4:15 p.m. (pre-heat oven around 3:45 p.m.)
Place an oven rack in the middle of the oven, and preheat the oven to 400°F (200°C).
Make an egg wash: In a small bowl, whisk together 1 egg and 1 tablespoon whole milk.
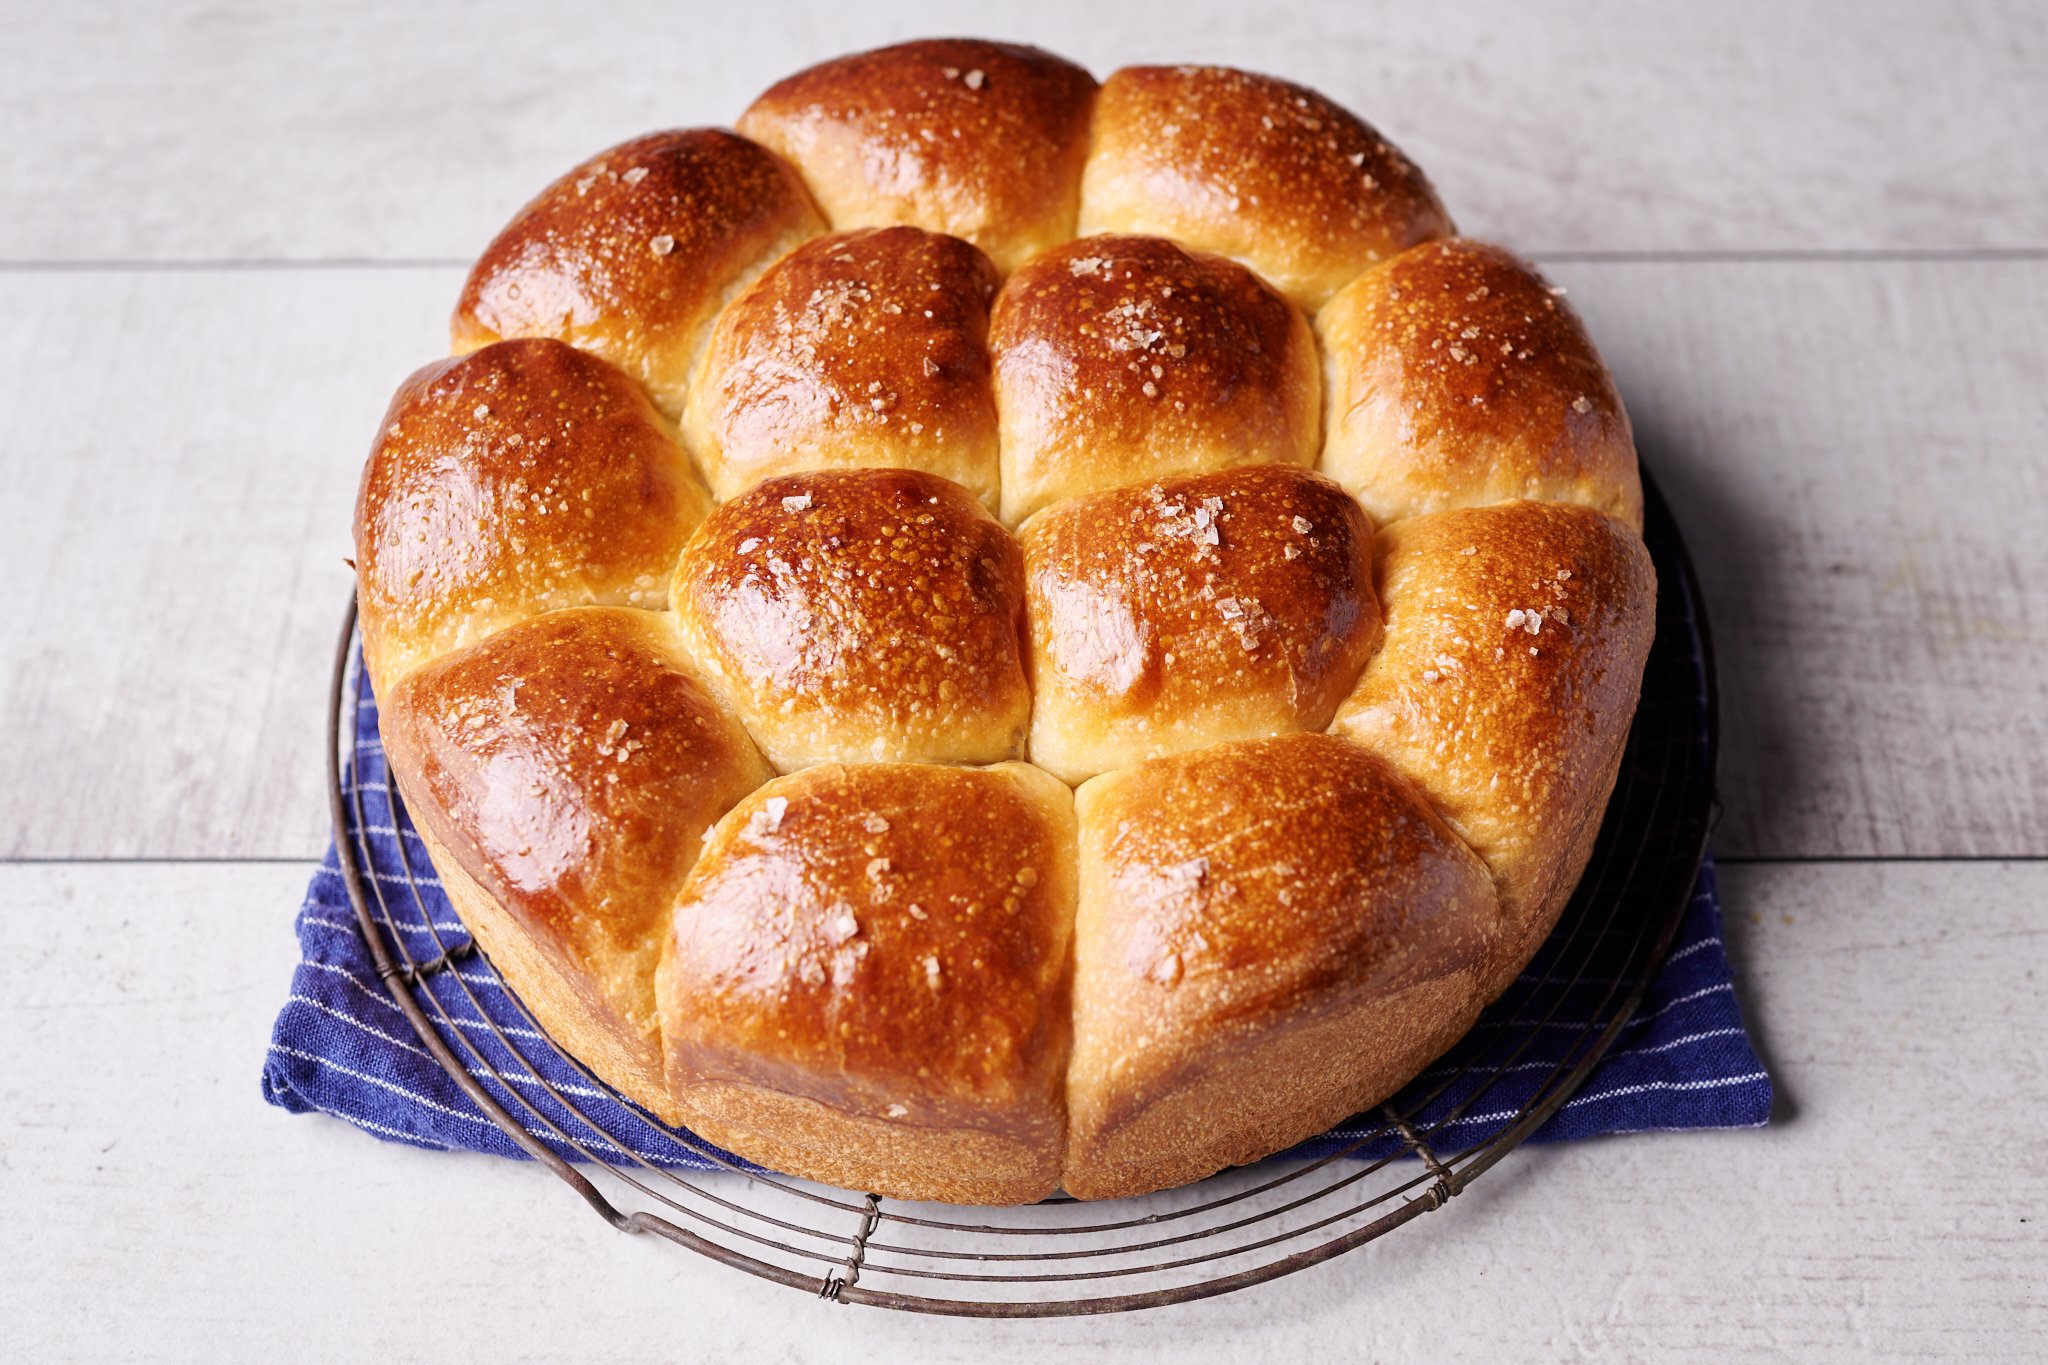
Remove the pan from the bag, evenly brush the egg wash over the tops of the rolls, sprinkle with coarse sea salt (optional), and slide the pan into the oven.
Bake for 20 minutes. Rotate the pan 180° in the oven and reduce the temperature to 350°F (175°C). Bake for an additional 20 minutes until the tops of the rolls are golden and the internal temperature is around 204°F (95°C).
Remove the pan from the oven and let it cool for 30 minutes before eating.
These are wonderful warm from the oven, but I like to let them cool for at least 30 minutes before eating. These rolls are best the day they’re made, but are still great the day after (if stored according to my post on storing bread).
Print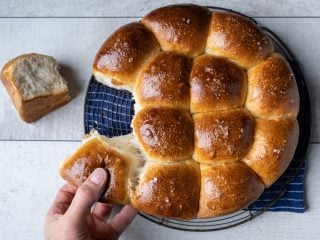
Super Soft Sourdough Rolls (with Tangzhong) Recipe
- Prep Time: 24 hours
- Cook Time: 40 minutes
- Total Time: 24 hours 40 minutes
- Yield: 16 rolls
- Category: Buns, Rolls
- Cuisine: American
Description
These super soft sourdough rolls are the perfect accompaniment to any dinner table (especially Thanksgiving!). They’re slightly buttery, a little sweet, ultra-tender, and the perfect counterpart for soups, stews, and any holiday meal.
Ingredients
Levain
- 74g medium-protein bread flour (all-purpose flour)
- 15g caster sugar
- 74g water
- 30g ripe sourdough starter, 100% hydration
Tangzhong
- 41 grams medium-protein bread flour (all-purpose flour)
- 166 grams whole milk
Main Dough
- All the tangzhong
- 328g medium-protein bread flour (all-purpose flour)
- 148g high-protein bread flour (bread flour)
- 95g butter, unsalted
- 38g sugar, caster
- 181g water
- 11g salt
- All the levain
Instructions
- Prepare levain (Day One, 9:00 p.m.)
Mix the following ingredients in a container and leave covered to ripen at about 77°F (25°C) for 12 hours overnight. - Pre-cook flour (Day Two, 8:00 a.m.)
To a medium saucepan, add the tangzhong flour and milk. Turn the heat to medium-low and cook, whisking continuously, until the mixture thickens and becomes like a paste, about 5-8 minutes. Set aside. - Mix (9:00 a.m.)
Cut the butter into 1/2″ pats. Set them on a plate to warm to room temperature. To the bowl of a stand mixer fitted with the dough hook attachment, add the water, flour, ripe levain, sugar, tangzhong, and salt. Mix on low speed (STIR on a KitchenAid) for 1 to 2 minutes until the ingredients come together and no dry bits remain. Increase the mixer speed to medium (2 on a KitchenAid) and mix for 4 to 5 minutes until the dough starts to strengthen and clump around the dough hook. It won’t completely remove from the bottom of the bowl, and it will still be shaggy. Let the dough rest in the bowl for 10 minutes. Turn the mixer on low speed and add the room temperature butter, one pat at a time, waiting to add each pat until the previous one is fully absorbed. Adding all the butter will take 5 to 8 minutes. After this time, mix on medium speed for 1 to 2 minutes until the dough smooths and clings to the dough hook. In the end, the dough will still be very soft, and it will not completely remove from the sides of the bowl. Transfer the dough to a bulk fermentation container and cover. - Bulk fermentation (9:30 a.m. to 1:00 p.m.)
Give the dough 3 sets of stretch and folds at 30-minute intervals, where the first set starts 30 minutes after the start of bulk fermentation. - Chill dough (1:00 p.m. to 1:15 p.m.)
Place the bulk fermentation container, uncovered, in the refrigerator for 15 minutes to make shaping easier. - Shape (1:15 p.m.)
Butter your pan. Divide the dough into sixteen 70g pieces (or fourteen 85g pieces for larger rolls) and shape each as a very tight ball. Place the balls in the buttered pan to proof. - Proof (1:45 p.m. to 4:15 p.m.)
Cover the pan with dough and let proof for 2 1/2 hours. - Bake (4:15 p.m.)
Preheat your oven to 400°F (220°C). Whisk together one egg and a splash of whole milk for the egg wash. When oven is preheated, brush on the egg wash and bake for 20 minutes. Then, rotate the pan 180° in the oven and reduce the temperature to 350°F (175°C). Bake for an additional 20 minutes until the tops are well-colored and the rolls have reached around 204°F (95°C). Remove from the oven and let cool in the baking pan for 10 minutes. Then knock the rolls out to cool on a wire rack. Let rest for 30 minutes, then enjoy.
Notes
Do ahead: you can prepare the tangzhong the night before. Cook the flour and milk as instructed and let cool to room temperature. Cover the tangzhong and keep in the fridge overnight. The next morning, take it out to let it warm some (to room temperature would be ideal) and proceed to add it during the mix as instructed.
Do ahead: you can prepare the dough and proof them overnight to bake the next day at any time. When chilling the dough, keep the covered bulk fermentation container in the fridge to retard the dough overnight. The next day, take the dough out, let it warm for 30 minutes, then continue with the Shape, Proof, and Bake steps. Alternatively, shape the dough into small balls and place them into the proofing pan. Cover the pan and put it into the fridge overnight. The next day, take them out 3 to 4 hours before you want to bake them and proof them on the counter until puffy and ready to bake.
To make these rolls vegan, substitute the milk for a full-fat nut or oat milk, and instead of an egg, use a flax egg.
What’s Next?
These super soft sourdough dinner rolls are now my go-to for all holiday meals, especially Thanksgiving. They’re just the right mix of buttery, sweet, savory (thanks, salt!), and squish-in-your-hand tender.
If you’d like to explore the ideas in this recipe even further, check out my sourdough shokupan loaf (which also uses tangzhong) or my sourdough pumpkin dinner rolls for a different take on rolls!
And if you are making these during the holidays, check out the Bread Baker’s Gift Guide for gifts for your favorite baker (or yourself!).


647 Comments
Have you ever doubled this recipe? Would the recipe need any adjustments if doubled? Thank you!
I have not doubled this, but the beautiful thing about working with baker’s percentages (as I do) is any recipe can be halved, doubled, tripled, etc. without any issues. Check out my guide to baker’s percentages for more on that!
Great! Thank you!
Carefull, I doubled and my KA got covered in dough, till IN the upper hook. It had also a hard time mixing. So I would make this in 2 badges not to overheat the KA.
I made these using the overnight fermentation schedule and they came out great. The only modification I made was that I used a normal (non sweetened) levain since I already had one built when I decided to make them. A bonus – when portioned to 115-120g and proofed separated this dough makes fantastic burger buns!
Awesome, Ken! Yes, these would make some pretty killer burger buns—I’ll be trying that exact thing next time I fire up the grill. Thanks for the feedback and happy baking!
Thanks Maurizio for another fabulous recipe. I made them exactly to the recipe but rounded the quantities. I admire your attention to detail and am not worried about decimal points myself so please don’t change what you do!!! These roll turned out perfectly. I divided my dough by 12 and put them 3×4 in a rectangular pan. (9×13 I think people in the US would call it.) I found they were done before the time was up. Thanks for giving the internal temperature when done as this gave me the confidence to pull them out earlier.
So soft and fluffy and delicious. You are awesome 👏😎
Fantastic, Judith! So glad to hear they worked out for you and thanks so much for the comments—much appreciated 🙂 Enjoy!
Made the rolls which are great.
I have one gripe: that giving weighs and hydrations to one or two decimals is overkill.
I’m a long-time sourdough baker and am all for accuracy, but TWO decimals? To nearest ten grams would be fine. I’m concerned that some beginners might get hung up weighing 147.6 g of this or that, when 150g would be fine.
IMHO
Super glad to hear they turned out great! I hear you, I was waiting for someone to comment on that recent change 🙂 I’m not sure what’s best there. With most ingredients that level of precision is not important, but depending on our own individual levels of rigor, measuring things like salt, sugar, and even malt, might necessitate that extra precision. Based on the feedback from readers, I think you’re right, it’s a little too much for beginners and I might be swapping back to my usual method for rounding.
I’m always inspecting and changing the site, hopefully heading toward a better end! So thanks for that feedback, it helps me figure out what to keep and what not to.
I also rounded the numbers
Oh, I should mention I’d still round 147.6g (one decimal) up to 148g 🙂
Glad you corrected and they turned out great, Sarah! That’s an interesting question about panettone. I’ve never considered using tangzhong there. I’d like to try, but I feel it might be risky; panettone to me is an exercise in pushing things to the absolute extreme (sugar, fat, etc), I’m not sure how the added roux would fare and whether it would help the overall light structure of a panettone. I’d like to try, though 🙂
Hi Maurizio,
I made these rolls today and they turned out fabulous! My wife said these were the best dinner rolls she has ever eaten! I did make a few changes to make them vegan: Soy milk, coconut oil instead of the butter. I also used spelt flour in place of 100g of the AP flour in the main mix, and I used molasses instead of the sugar in the main mix, just to give it some extra color. I topped with some sesame seeds. I will be making these again and again! Thanks for all you do!
That’s great, Clay! Huge praise there from your wife, can’t get any better than that. I really like the idea of topping with sesame seeds also, I bet that was a tasty addition!
Hi Maurizio.
I asked last week about making your Tangzhong Sandwich Loaf as buns. but before I had the chance to try that out I found this recipe. The texture was perfect – just like the Pav buns you get in India with enough of a sourdough tang to be authentic. My family found the buns a bit sweet for the savory and spicy toppings that traditionally go with these buns. How mush could I cut down on the sugar without affecting the texture of the buns? I know that sugar has a moistening effect on baked goods as well as sweetening so I’m reluctant to just cut it out completely. I have to say though, toasted for breakfast with a thick smear of butter and a cup of chai, they were perfect. Thanks for another excellent recipe.
Hey, Jay! Yes, I remember. So glad you liked these. Adjusting the sugar will alter more than the flavor in these as it does effect fermentation. I would say you could reduce the sugar in the final dough by reducing it 25% (to total sugar weight). Expect that the dough might have increased fermentation, so keep an eye on it during bulk!
Would making this recipe be doable if one does NOT have a stand mixer?
Definitely possible! The challenge will be working in the softened butter in the second stage of mixing, but many readers have reported this is definitely possible by hand. Check out my guide to the slap and fold kneading technique, which is a great way to quickly strengthen a dough!
These are just great, even my oldest daughter, not loving sourdough, loved them. Thank you for always making it so easy to follow your recipes.
As for this one I will add some more water I think, next time or/and proof a little more. I did an overnight proof, already shaped. When I took them out they needed some more proof. I guess my kitchen was on the cold side so they should have had a bit more but we were anxious to eat them. Still they turned out pluffy.
You’re very welcome, Ann, and thanks for the feedback! Super happy to hear you all loved them. It seems about half the readers have added a little more water with great success. This recipe is right on the edge with hydration, I’m hesitant to increase the hydration because I feel others who are in the other camp (their flour isn’t as absorbant) have had really soft dough. When adding a good measure of butter like this, there’s a fine line! I’ll keep an eye on it though, I might increase 🙂
Happy baking!
Just noticed a couple of things…precooked flour milk 165.7g in first instructions and in recipe 175.7g? Also BF time, which I know is extremely variable, but you have 3.5hrs when your time says 1.45pm – 4.15pm? That is only 2.5hrs proof?
You’re right, all should be fixed now! Sorry about the confusion.
No problem – they came out great. I made 145g burger buns. Not on Instagram so can’t tag etc.
One other reader said they did buns as well—I’ll be trying that soon with this recipe myself! Thanks for the feedback, super glad to hear they came out great 🙂
Hi Maurizio,
I was wondering in cold weather, winter time what are things we could to get our dough to the right temperature. Tried this today, but they are not as fluffy, and the dough kept sticking to my hand when shapping, added some flour to dust them a bit and it helped. I’m currently living in Lyon France.
Looking forward to hearing from you,
Anabel
Hey, Anabel! The biggest thing you can do: warm the mixing water (or milk) to help the dough reach the final dough temperature listed in the recipe. Check out my guide to dough temperatures for some tips there. Additionally, you can keep your bulk fermentation container well wrapped and somewhere warm, like the oven (turned off!) with the light toggled on and off.
Hope that helps, let me know how the next attempt goes, these rolls should definitely be light and airy!
I have an over-the-cooktop microwave oven that I use for warm-temperature proofing. Leaving the door slightly ajar makes the interior light come on, providing steady warmth. (I use a bit of tape to keep the door from swinging open any further.) For more warmth, I turn on the underside lights that illuminate the cooktop (for a short while — they produce a lot of heat).
I made these yesterday, they were fantastic w a dinner of short ribs, mashed potatoes and a salad. Very fluffy and tasty! At about 85g ea, only 9 fit in my 8×8. Perfect, though.
Right on, so glad to hear that! Sorry, I should have made that more clear about the 8×8 pan; yes, with large rolls it’s hard to get more than 9-10!
Thanks for all that feedback, Branch! I saw them on IG, they look perfect. And that’s exactly the way to adjust the hydration and bake time—well done! Those two… Always requiring some adjustment 🙂 Enjoy!
These rolls look fabulous! Thank you so much for the recipe. Do you think they can be made in two 5.5″ by 9.5″ bread pans? 8 rolls in each one.
Thanks, Sahar! They can really be made in any pan, you just have to adjust how many to fit. Yes, that should work, when you’re shaping see how they fit in, I shape them so they’re slightly touching (but not crammed in there) to allow room for rise. But, even if they were really crammed in, you’d still get a great set of rolls, it would just look more like a traditional bumped loaf.
Thank you so much Maurizio, really appreciate it.
Hi! I’m very exciting about this recipe. However, I’m concerned about the water quantity. I live in Arizona, and I do know that usually any bread recipe needs more water in dry zones (I’ve discovered that with my previous experience). So, I assume that I should be careful with the amount of water before adding the butter. Isn’t?
I live in New Mexico where it’s also very, very dry. The water content should be close for you, but what’s more important than the environment is the flour you’re using. You might need to adjust when mixing, just add a little water (slowly) during mixing if the dough is too firm. Be cautious, though, because once you add the butter the dough will soften.
Really excited about making these this morning. The dough so far is incredibly STIFF (added all the ingredients listed for the first round in the stand mixer before the butter). My stand mixer can’t handle the strength so I ended up mixing by hand and it is now resting for 10 mins. Is this normal? If i need to loosen would it be better to add more milk or water? My levain was close to the right amount but came out a little less in my colder kitchen. I pre-measured and double checked everything else. Grazie Maurizio!
Hey, Megan! Yes, definitely add some more water or milk as necessary to loosen the dough up. Be cautious, though, because once you add the butter it will further soften.
Thank you! I ended up adding somewhere between 20-40g water a little at a time, then it got more gooey, but then I added more flour and got the texture looking right without breaking the mixer and now it’s bulking beautifully. Cannot wait to eat these, the dough actually smells crazy good.
Hello! These look amazing and I’ll be making them soon following the recipe above for my own household. In addition, any way to make these mult. days in advance of baking? Is there a way to par-bake? With COVID food sharing is a bit more complex so was thinking about a way to make them a few days in advance of Thanksgiving and then giving to some friends and family so they can bake on their own on Thanksgiving.
Thanks, Sarah! One approach would be to chill the rolls after shaping, then give them out cold. The recipient can then finish proofing them (just say “wait till they rise to the rim before baking”), and bake in their own oven. I’ve not tried par-baking, but that could also work quite well! Just bake them perhaps 60-75% of the way until they rise fully, then let the recipient finish them off in the oven right before Thanksgiving.
Thank you so much for the response. This is SUPER helpful. I’m curious about the par-baking so I might experiment with a small batch of those. But your other workaround will be great. Thanks again.
Excited to try this new version of your rolls!
These are pretty wonderful. Let me know what you think once you make ’em!
Hi Maurizio,
I just divided my dough and shaped the balls. In the blog you say to make 14 pieces 85 grams each but in the actual recipe it says it makes 16 rolls. There was no way to get 16 85 gram pieces. I got 14 81 gram pieces with some left over for a @68 g 15th ball. They barely fit into my 10″ baking pan!
So should it maybe be 16 balls, 65-70 g each, which would fit better in a 10″ baking pan? I think your other sourdough dinner rolls were 65 g? If these are really tight together will that still be ok? At this point before the final proof I can make them in 2 pans.
Hey! I had a typo in my original post, you’re right, it should be 14 rolls, not 16. The post has been updated but you might have saved/printed an old copy.
It’s definitely ok if they’re tight, they’ll just rise up together and be a little more stuck, but will tear apart just fine. Yes, a 10″ square pan would be much better for the larger rolls (or the other pan options I discuss at the top of the post).
Sorry for the confusion—they’ll still turn out wonderful!
I was about to start separating- so glad you were able to jump on this question! I will leave them be and I am sure it will work out great.
AND oh my dinner rolls, these are great! I tagged you on my instagram post just now. @ceegu11 they were definitely squished in there but rose up so well. Thank you so much for this recipe!
They came out just fantastic! A little cramped but not bad at all. Nice bake and enjoy!
Hi Maurizio! Thank you for this recipe, these look great! I was wondering, do you think
i can proof the buns in the pan in the fridge overnight to bake them directly in the morning for breakfast?
Thank you for sharing these wonderful recipes! If I wanted to have these for breakfast, do you think the rolls could be shaped and proved overnight in the fridge (rather than shaping the next day?)
Thank you 🙂
You’re very welcome, Jasmin! Yes, I do think that would also work well. Instead of proofing them on the counter, once they’re shaped pop them into the fridge (covered). The next morning check on them right away to see how proofed they are, they might need a little more time on the counter (or not), it all depends on your dough. It’ll work well!
Thank you so much
I need to make these for a vegan. Could I successfully sub a dairy-free milk and swap for a vegan butter?
Yes, I’d go with any nut milk (or full-fat oat milk) and Earth Balance Vegan Butter!
I was going to ask the same question! Thanks!
I was even thinking of coconut oil instead of the butter. Or would that be a weird flavor combination?
I think that’d work just as well, actually. But I would get the variety of coco oil that has minimal flavor (it’s either refined or not, can’t recall!).
The rolls look wonderful! I was wondering if I could use the flour that I have at home to make this recipe. I have central milling organic beehive 10-10.5% protein, central milling organic artisan bakers craft plus 11.5%, and organic high mountain 13.5%. What combination of flour would you suggest? BTW, I love your website! I have learned as a newbie and only use your recipes for my breads.
Thanks, Nellie! Yes, you have a wonderful suite of flour there. Use CM ABC Plus for the “medium protein bread flour” and CM HM (high mt) for the “high protein bread flour” I call for in the recipe. Those will work very well.
So happy to hear my site has helped and thanks for the feedback, I appreciate that!
If you’re dairy-free, can you substitute almond milk?
That’ll work! I’d use Earth Balance Vegan Butter for the butter as well.
If I take regular granulated sugar and grind it a bit in the blender, will that be the same as caster sugar? I can’t wait to try these rolls!
Yes, that’ll work, Clay! You could also use the food processor. If you have fine granulated sugar, that’ll work just fine as well, I just find it a bit easier to work the sugar into the dough with caster.
Thanks, Rosa! Typo is now fixed, all the quantities are the same.