
The holidays are the best excuse for binge baking. The end of the year is marked by that unique time when being chained to your oven is considered normal—nay, it’s even encouraged! As you might imagine, it’s my favorite time of the year. As Thanksgiving and Christmas approach, I can’t seem to help myself as all kinds of bread-baking ideas swirl in my imagination, taking me in this direction and that, and lengthening my “Things to Bake” list to unhealthy measures.
For the great meals of the holiday season, I always have a favorite loaf of bread or two earmarked for the dinner table, but often I also include a (sourdough) pie, sometimes a sweet bread, and always an experimental loaf. Last year, I served a variation of this roll recipe, and while they were great, they’ve come a long way through subsequent tests and trials. They’ve matured into these soft sourdough rolls, firmly on the menu for this year’s holiday meals (especially Thanksgiving).
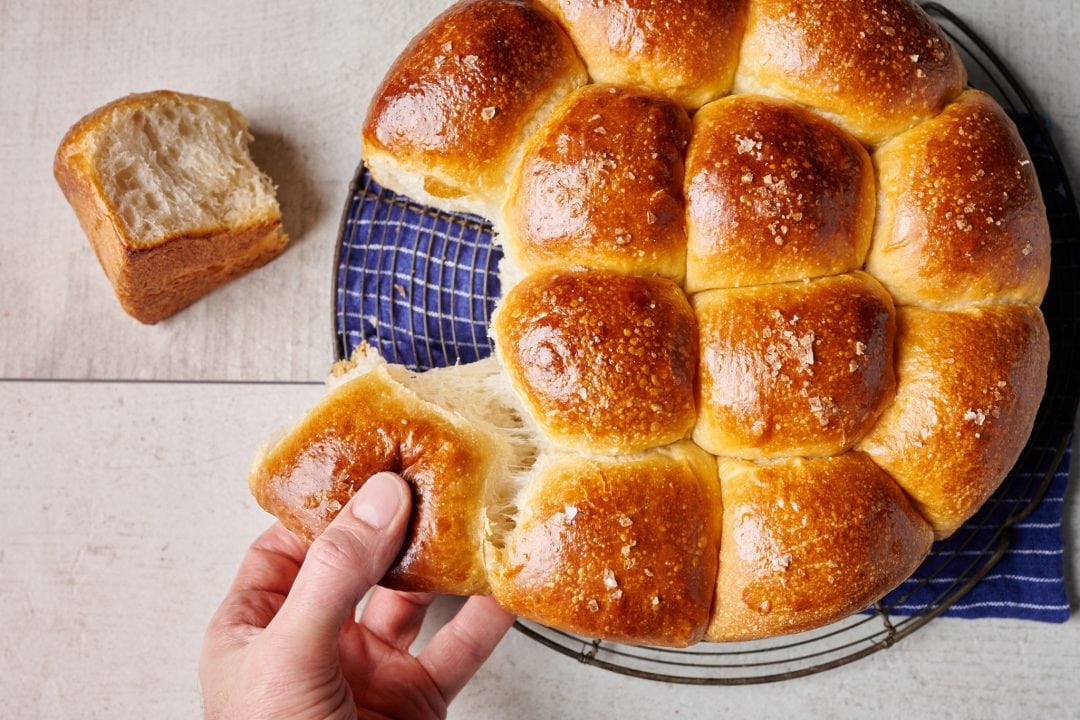
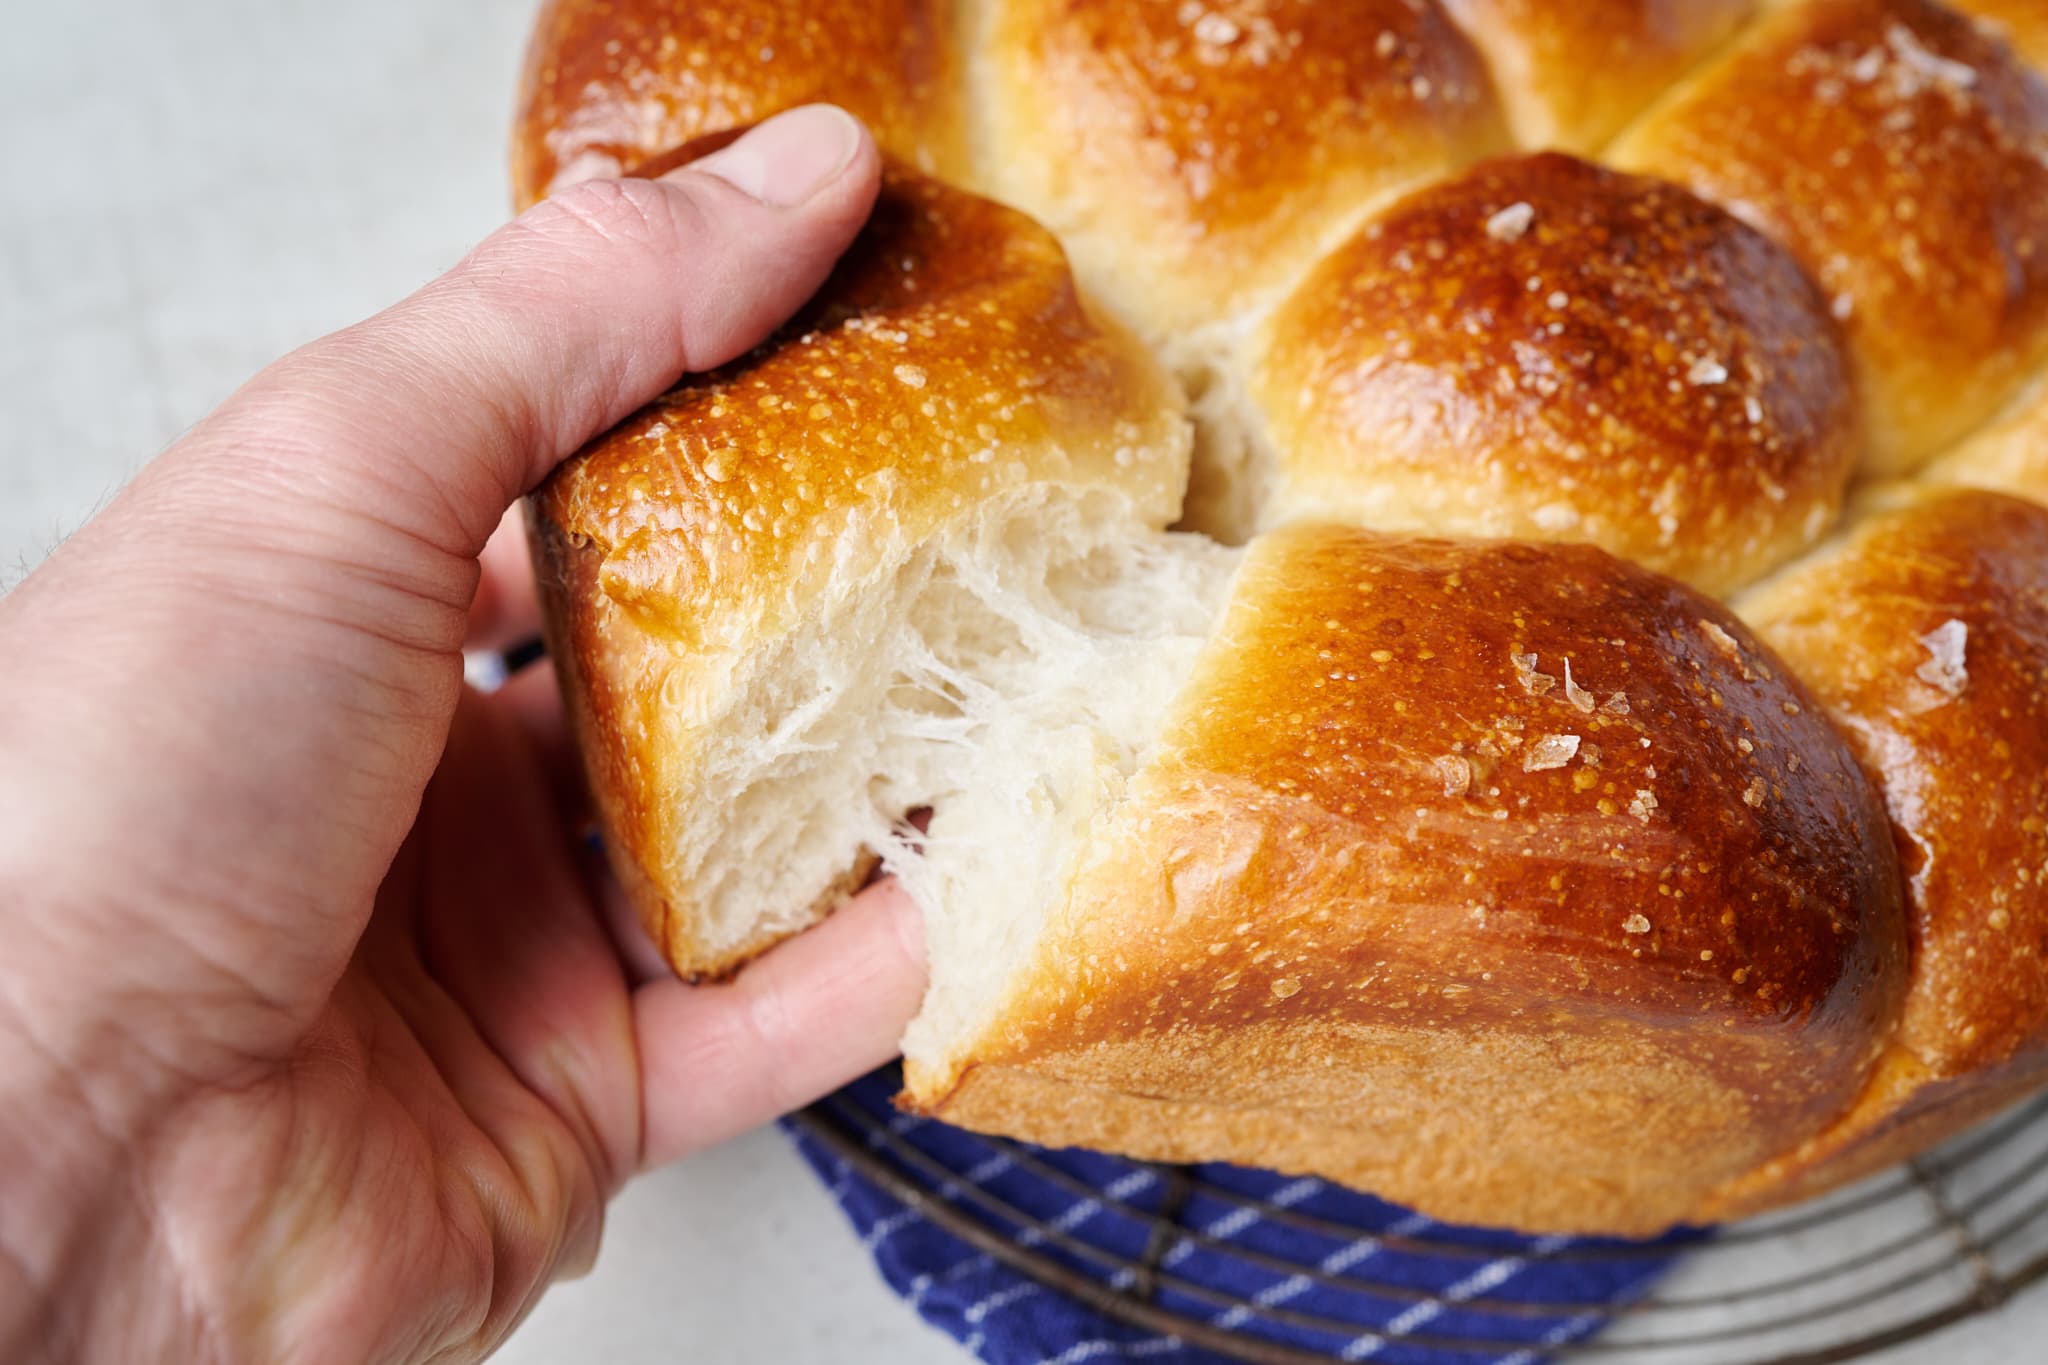
These soft sourdough dinner rolls (which are also in my cookbook!) are incredibly light and, for lack of a better adjective, squishy. Let me take you on a quick trip.
Remember your last visit to the state fair, where you ordered that massive cone of cotton candy—for me, this was many years ago, yet the memory is still quite vivid. Now pull off a large tatter of that soft, cloud-like sugar puff and watch it come apart into thick sheets, floating in front of your face. This image is similar to the delicate, yielding texture of buttery dinner rolls.
Video: Watch Me Make These Sourdough Rolls
Here’s my video of me making these rolls from start to finish!
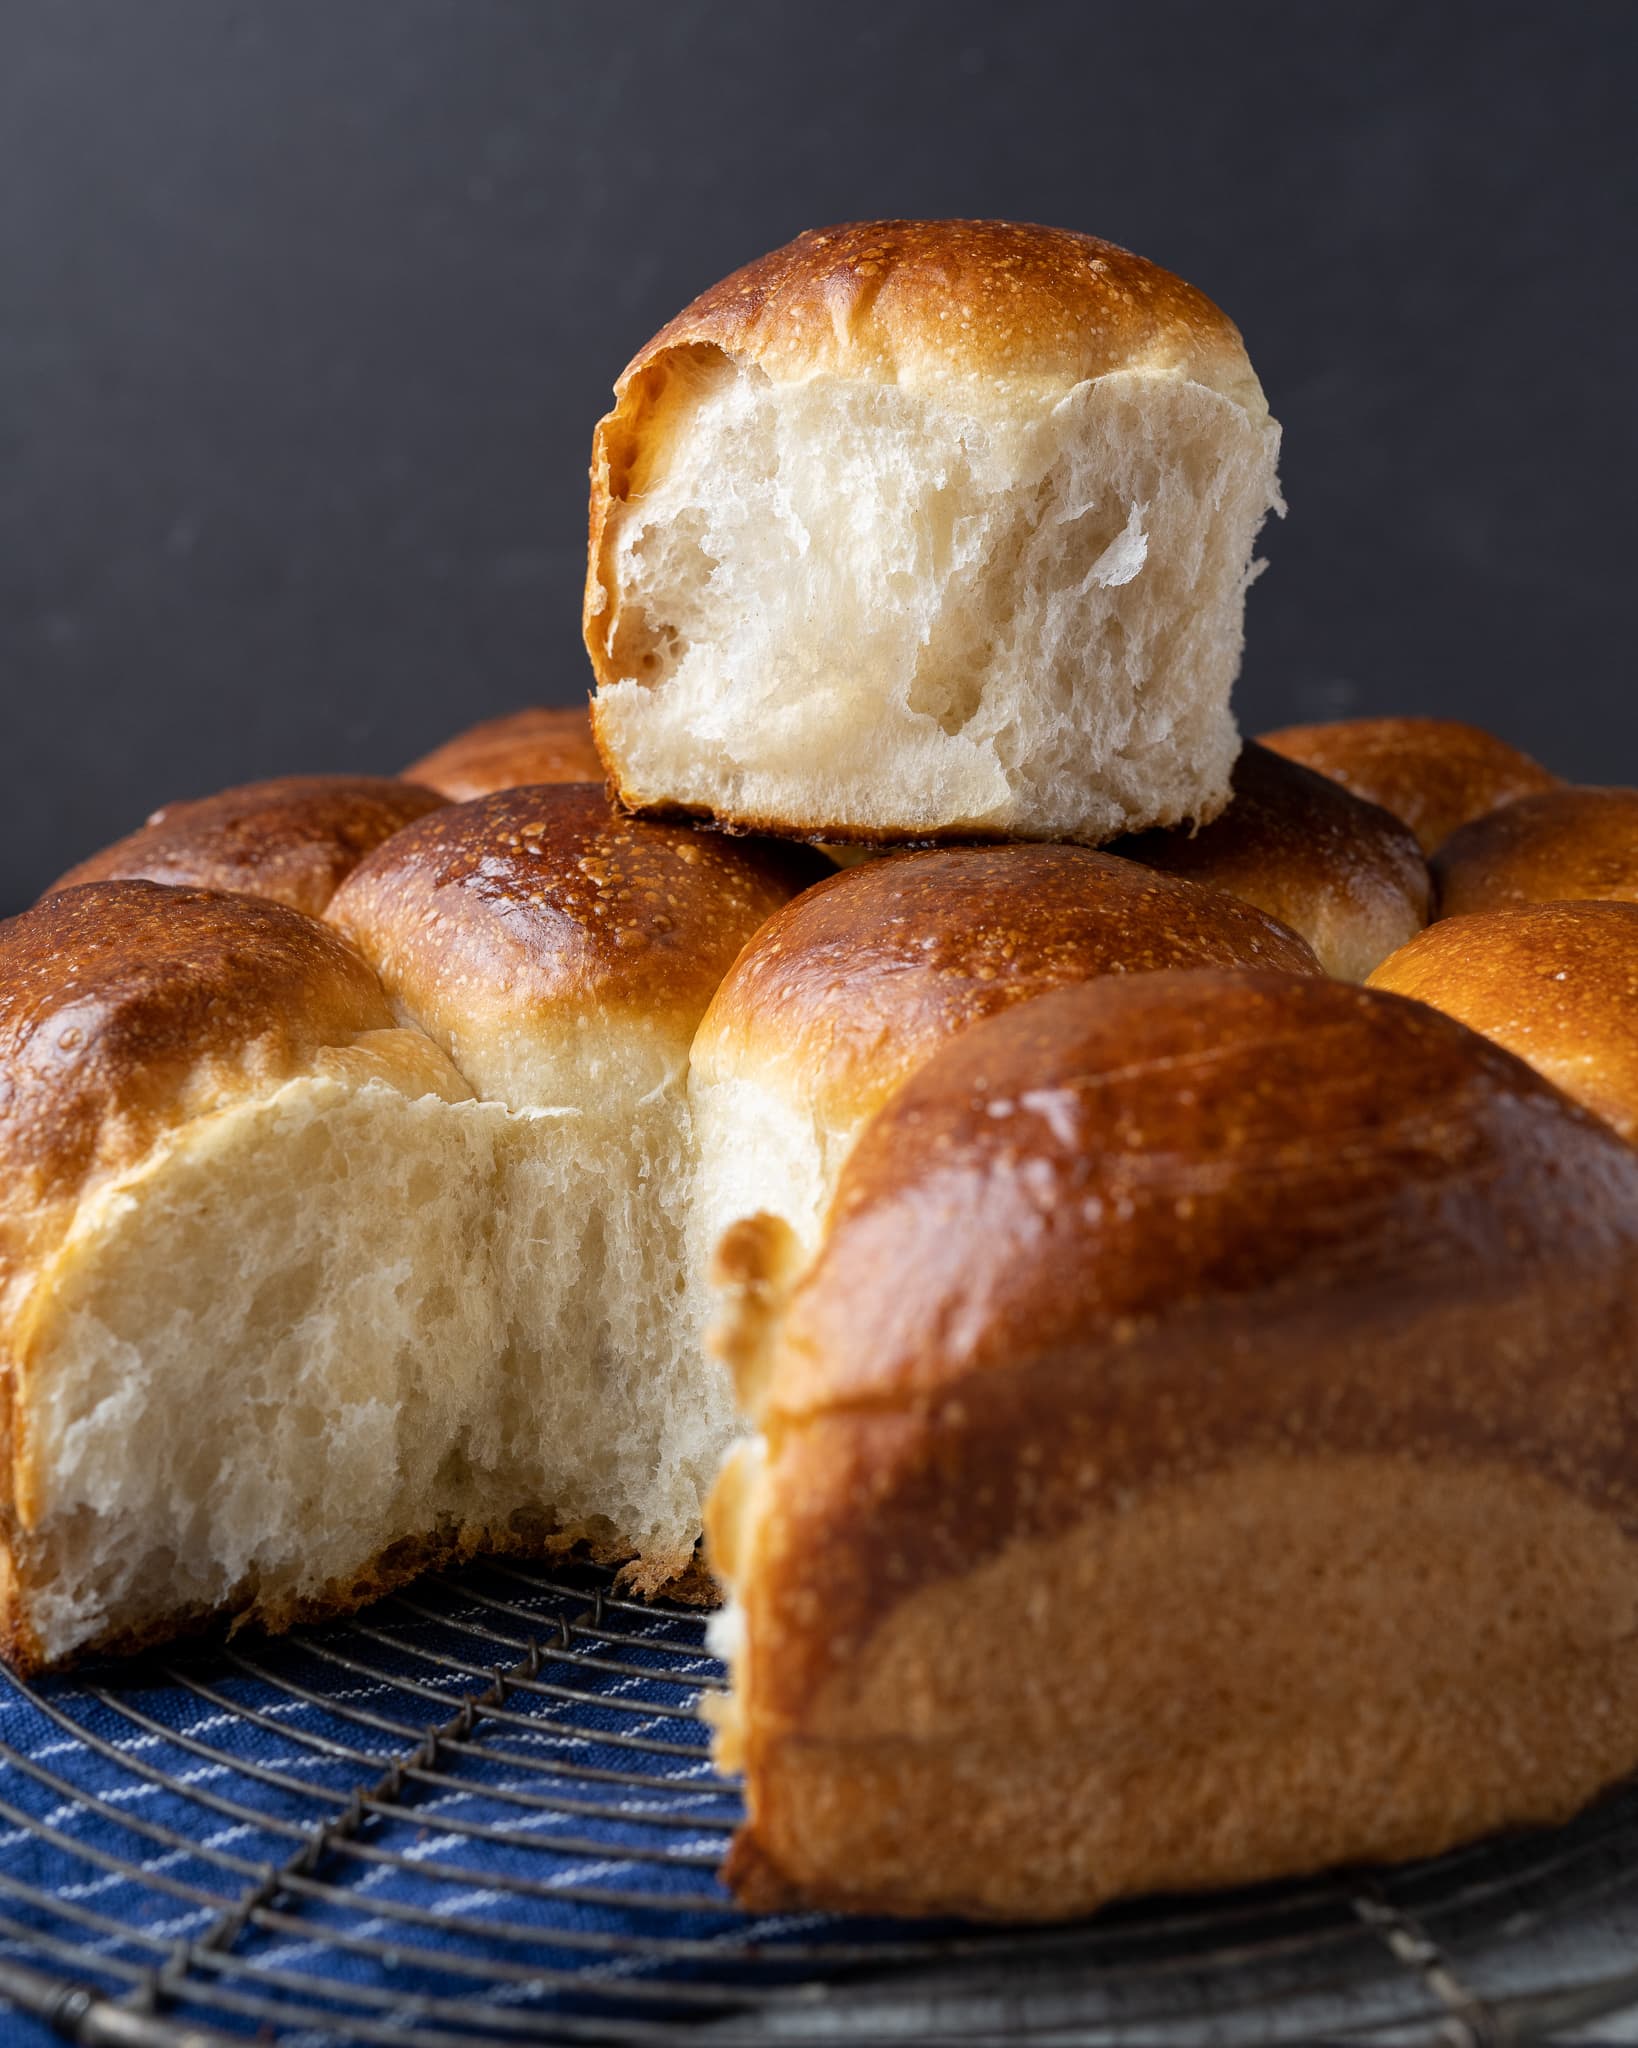
Flavorwise, these rolls are what you want and expect from a dinner roll: slightly buttery, a smidgen sweet, and with only the slightest touch of sourness (if any). The flaky salt on top is like a lightning bolt to the taste buds, waking them up and sharpening the bread’s flavor. And let’s not forget a very important purpose of rolls at any meal: to soak up all sauces (gravy! salad dressing! au jus!) on the dinner plate. And yet, they also shine when you keep it simple and plain, enjoying them as-is or simply with a pat of warm butter.
Let’s look at which flour I used for this recipe and how tangzhong helps us achieve that cotton-candy-like tenderness.
Flour selection and tangzhong
This recipe calls for standard all-purpose flour and higher protein bread flour (King Arthur brand will work well for both). The bread flour brings extra protein and strength to the mix that helps these rolls rise a little higher and have more structure. But also, using only white flour helps keep the sourness to a minimum. In testing, the rolls were even softer and more tender without the bread flour, but I found that the added high-protein flour helps keep them sturdy when used for dipping.
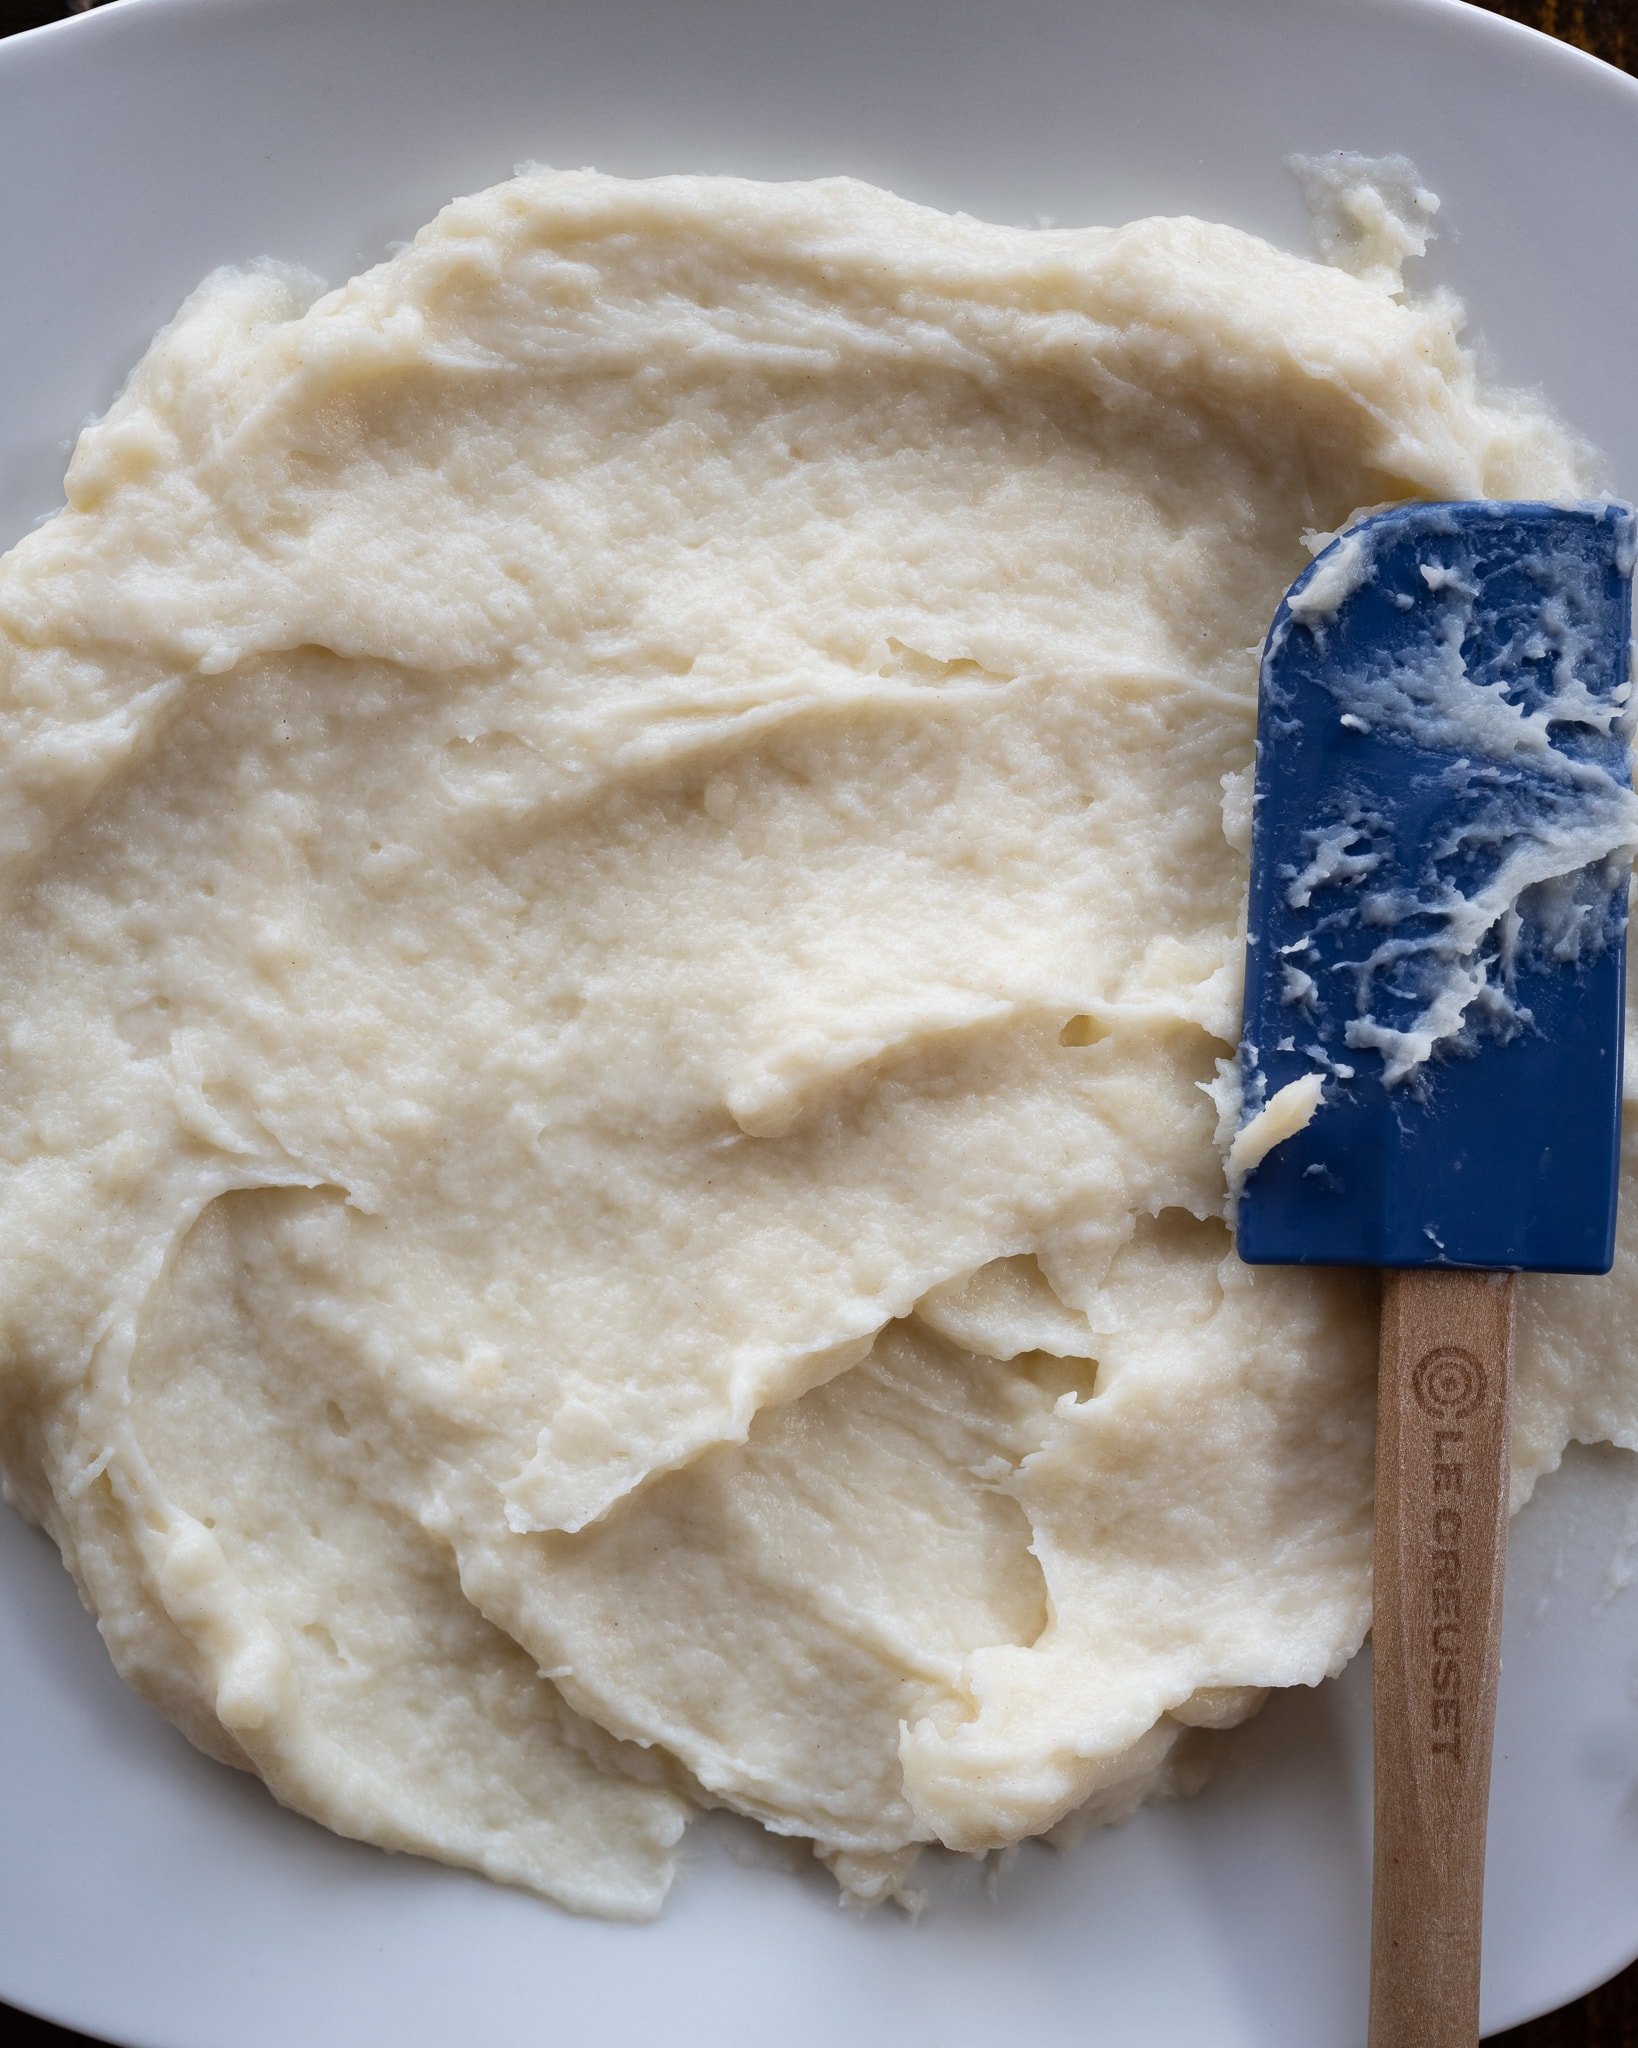
This sourdough dinner roll recipe uses a pre-cooked flour mix-in, also called tangzhong, to add extra tenderness. I use this same technique in my Hot Cross Buns and Sourdough Shokupan. The tangzhong technique is straightforward and takes only a few minutes in the first steps of the breadmaking process: you warm the flour and milk in a saucepan over medium heat until the mixture thickens, then let it cool. Then add this cooled gel paste (similar to a milk roux) to your mix as you would any other ingredient.
See my guide to the Tangzhong technique for a more in-depth discussion →
Baking Schedule
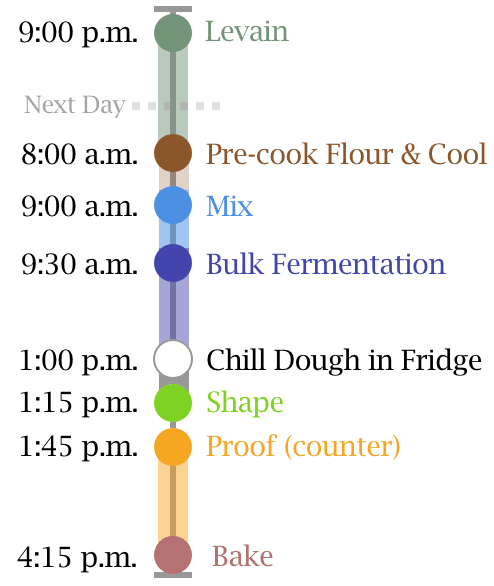
These super-soft sourdough rolls can be made in a single day (skipping the overnight levain) or they can be retarded (refrigerated) in proof to bake the next day, right before dinner. This recipe is extremely flexible, and you can adjust the timeline to fit the rolls into your cooking schedule.
For example, if you’re making these for Thanksgiving, you can make the rolls the day before and proof them in the fridge. Then on Thanksgiving day, take them out a few hours before the big meal, finish proofing on the counter if necessary, and bake them so that the rolls are warm for dinner.
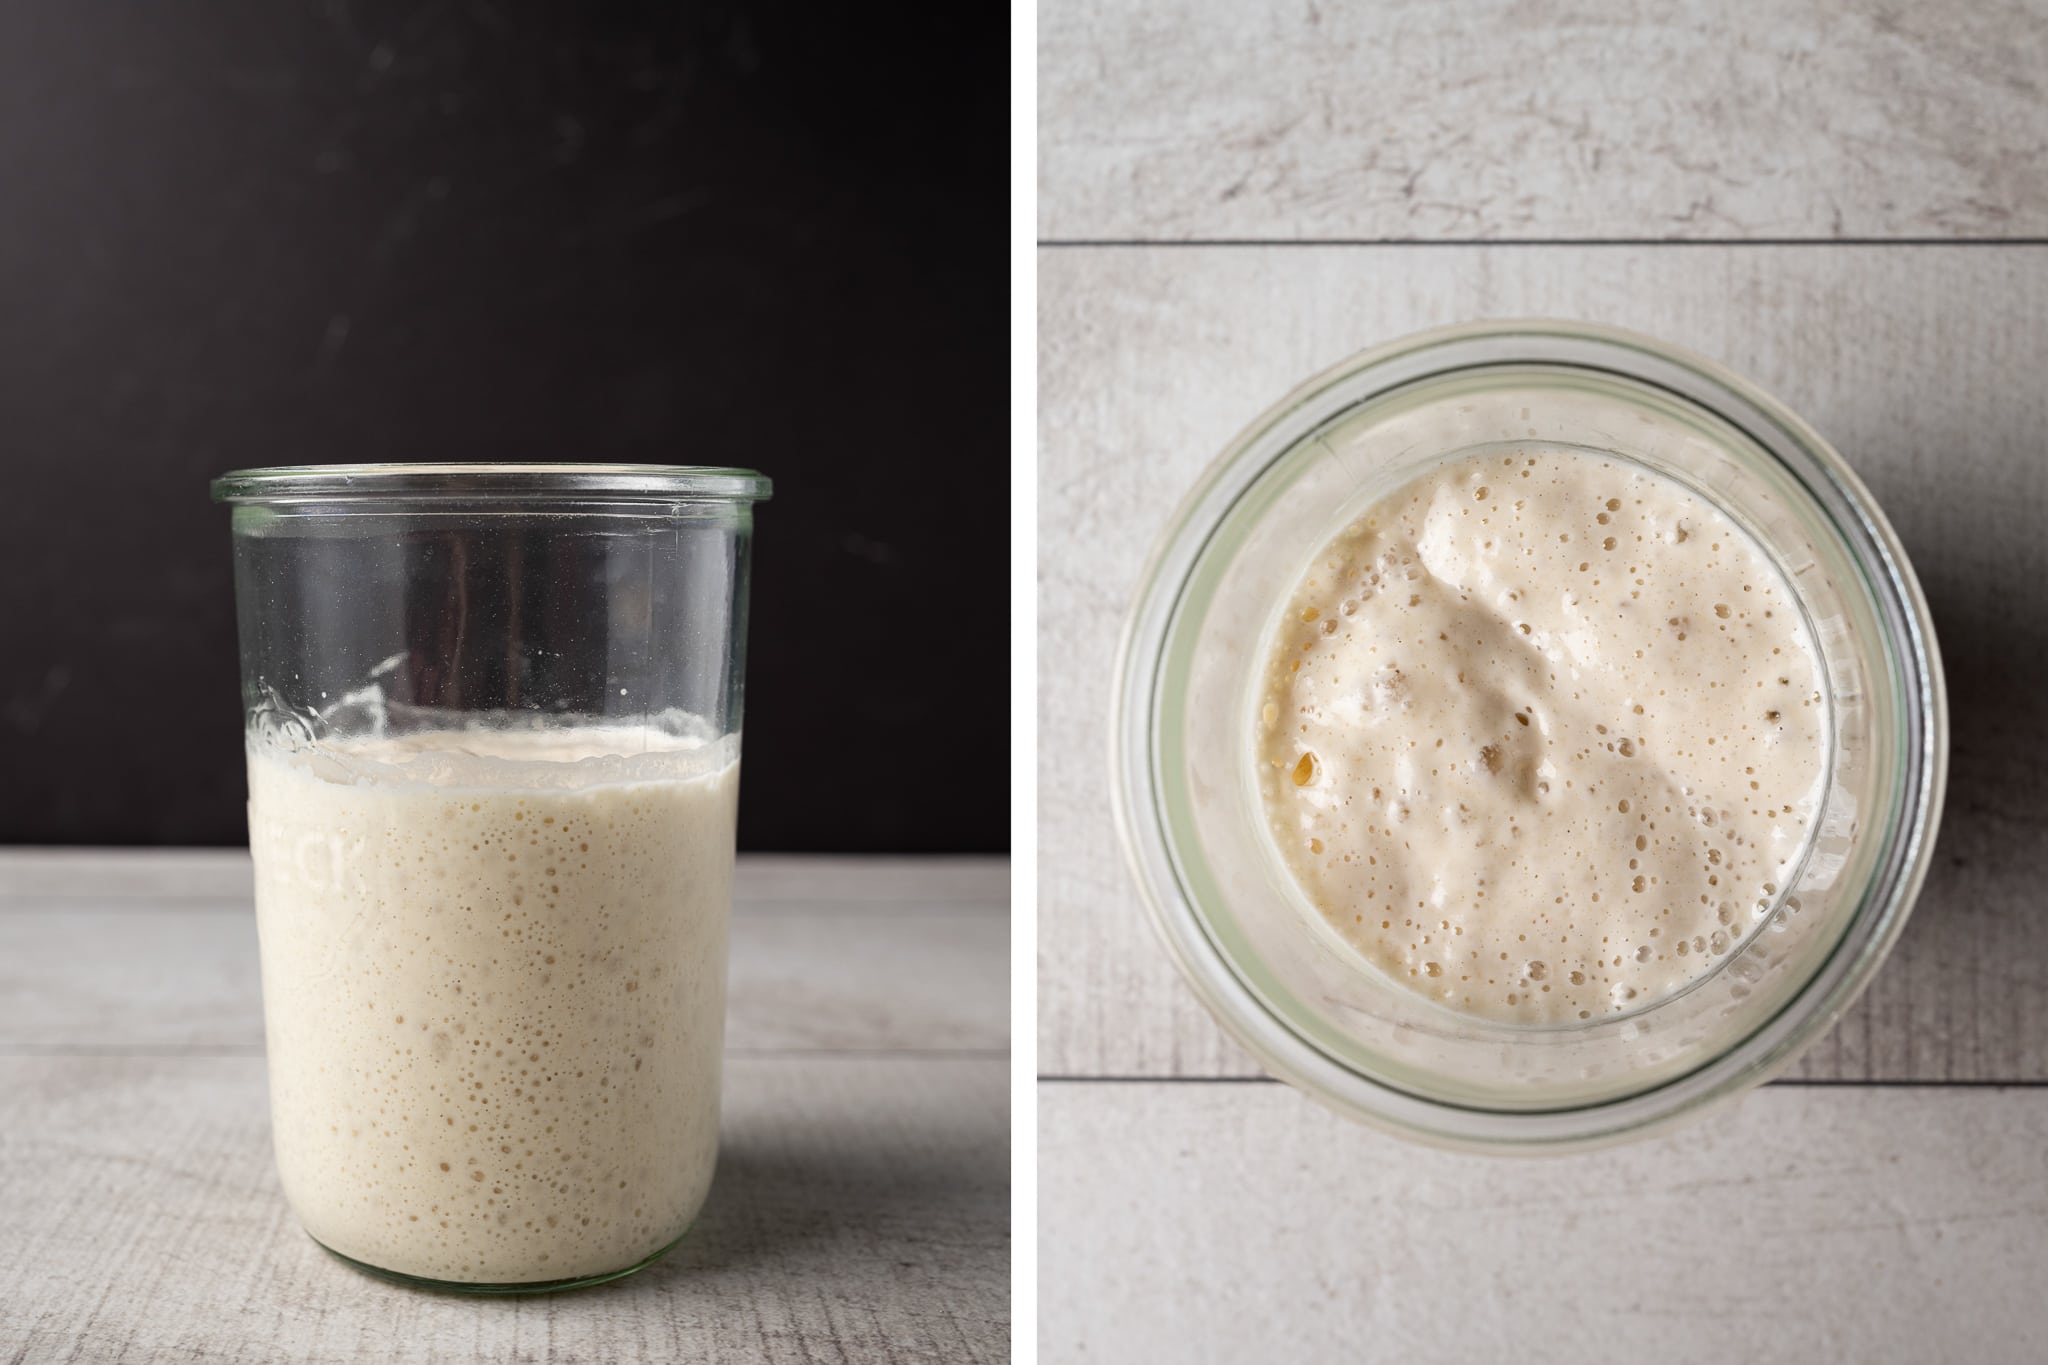
Be sure to use your levain when it’s ripe: it should be extremely bubbly, frothy, and well-risen. As mentioned in my guide to baking dough in the winter, the cold weather may slow the dough’s proofing; give it extra time if necessary.
Baking equipment
I’ve tested these super soft sourdough rolls with several baking pans, and below are my two favorites.
Round pan choice: LloydPans 10×2.25-inch round pan.
I use these round LloydPans for many things in my kitchen: from my sourdough focaccia to sourdough pizza to these dinner rolls. They are nonstick and conduct heat so well that they brown the bottom and sides of whatever is inside just as well as the top. They’re magical, actually.
Square pan choice: USA Pan 9-inch square pan.
I love this square pan because it has a nonstick liner and is extremely versatile. I use it for sweet cardamom rolls, cinnamon rolls, and even cakes or brownies. It bakes rolls that are evenly browned, and cleanup is a breeze.
Super soft sourdough rolls formula
For tips on how to calculate baker’s percentages or how to modify this formula, see my post on baker’s percentages (baker’s math).
| Total Dough Weight | 1200 grams |
| Pre-fermented Flour | 12.5% |
| Levain in final dough | 37.1% |
| Hydration | 43.0% |
| Yield | 16 x 70g sourdough dinner rolls |
Total formula
Desired dough temperature: 78°F (26°C). See my post on the importance of dough temperature for more information.
Milk & butter alternative (vegan): If you want to make these rolls vegan, substitute water, nut milk, or full-fat oat milk for the dairy milk in the roux below. For the butter, go with Earth Balance Vegan Butter or a similar product.
| Weight | Ingredient | Baker’s Percentage |
|---|---|---|
| 41g | Tangzhong: Medium-protein bread flour or All-purpose flour (~11% protein, King Arthur Baking All-Purpose) | 7.00% |
| 166g | Tangzhong: Whole milk (see vegan options above) | 28.00% |
| 402g | Medium-protein bread flour or All-purpose flour (~11.7% protein, King Arthur All-Purpose) | 68.00% |
| 148g | High-protein bread flour (~12.7% protein, King Arthur Bread Flour) | 25.00% |
| 95g | Butter, unsalted | 16.00% |
| 53g | Caster sugar | 9.00% |
| 254g | Water | 43.00% |
| 11g | Salt | 1.80% |
| 30g | Ripe sourdough starter, 100% hydration | 5.00% |
Additional ingredients:
Egg wash: 1 large egg and 1 tablespoon whole milk, for brushing
Coarse sea salt, for topping (optional)
Super soft sourdough rolls method
1. Prepare Levain – 9:00 p.m.
| Weight | Ingredient | Baker’s Percentage |
|---|---|---|
| 74g | Medium-protein bread flour (all-purpose flour) | 100.0% |
| 15g | Caster sugar | 20.0% |
| 74g | Water | 100.0% |
| 30g | Ripe sourdough starter, 100% hydration | 40.0% |
Mix the ingredients in the chart above in a container and leave covered to ripen at about 76°F (24°C) for 12 hours overnight.
Like my pumpkin cinnamon sourdough bread, this recipe utilizes a sweet levain, or sweet starter, which calls for a little sugar added to the levain to promote yeast activity and help reduce sourness in the final dinner rolls. See my post on the differences between a starter and levain if the two terms are new to you.
2. Make the tangzhong – 8:00 a.m.
In a medium saucepan set over medium-low heat, add the 41g tangzhong flour and 166g tangzhong milk. Cook, whisking continuously, until the mixture thickens into a paste, 5 to 8 minutes. In the beginning, whisk vigorously to break up any flour clumps, and continue whisking to avoid burning. The mixture won’t seem to do anything for a while, but it will thicken.
Remove the pan from the heat and spread the tangzhong on a small plate to expedite cooling. Set aside.
3. Mix – 9:00 a.m.
| Weight | Ingredient |
|---|---|
| All | Tangzhong (from Step 2) |
| 328g | Medium-protein bread flour (all-purpose flour) |
| 148g | High-protein flour |
| 95g | Butter, unsalted |
| 39g | Caster sugar |
| 181g | Water |
| 11g | Salt |
| 192g | Levain |
I used my KitchenAid stand mixer to mix this dough, but it could also be mixed by hand using the slap and fold technique or a series of folds in the mixing bowl.
First, cut the butter into 1/2″ pats. Set them on a plate to warm to room temperature.
To the bowl of a stand mixer fitted with the dough hook attachment, add the water, flour, ripe levain, sugar, tangzhong, and salt. Mix on low speed (STIR on a KitchenAid) for 1 to 2 minutes until the ingredients come together and no dry bits remain. Increase the mixer speed to medium (2 on a KitchenAid) and mix for 4 to 5 minutes until the dough starts to strengthen and clump around the dough hook. It won’t completely remove from the bottom of the bowl, and it will still be shaggy.
Let the dough rest in the bowl for 10 minutes.
Turn the mixer to low speed and add the room-temperature butter, one pat at a time, waiting until each pat is fully absorbed before adding the next. Adding all the butter will take 5 to 8 minutes. After this, mix on medium speed for 1 to 2 minutes, until the dough is smooth and clings to the dough hook.
In the end, the dough will still be very soft, and it will not completely remove from the sides of the bowl. Transfer the dough to a bulk fermentation container and cover.
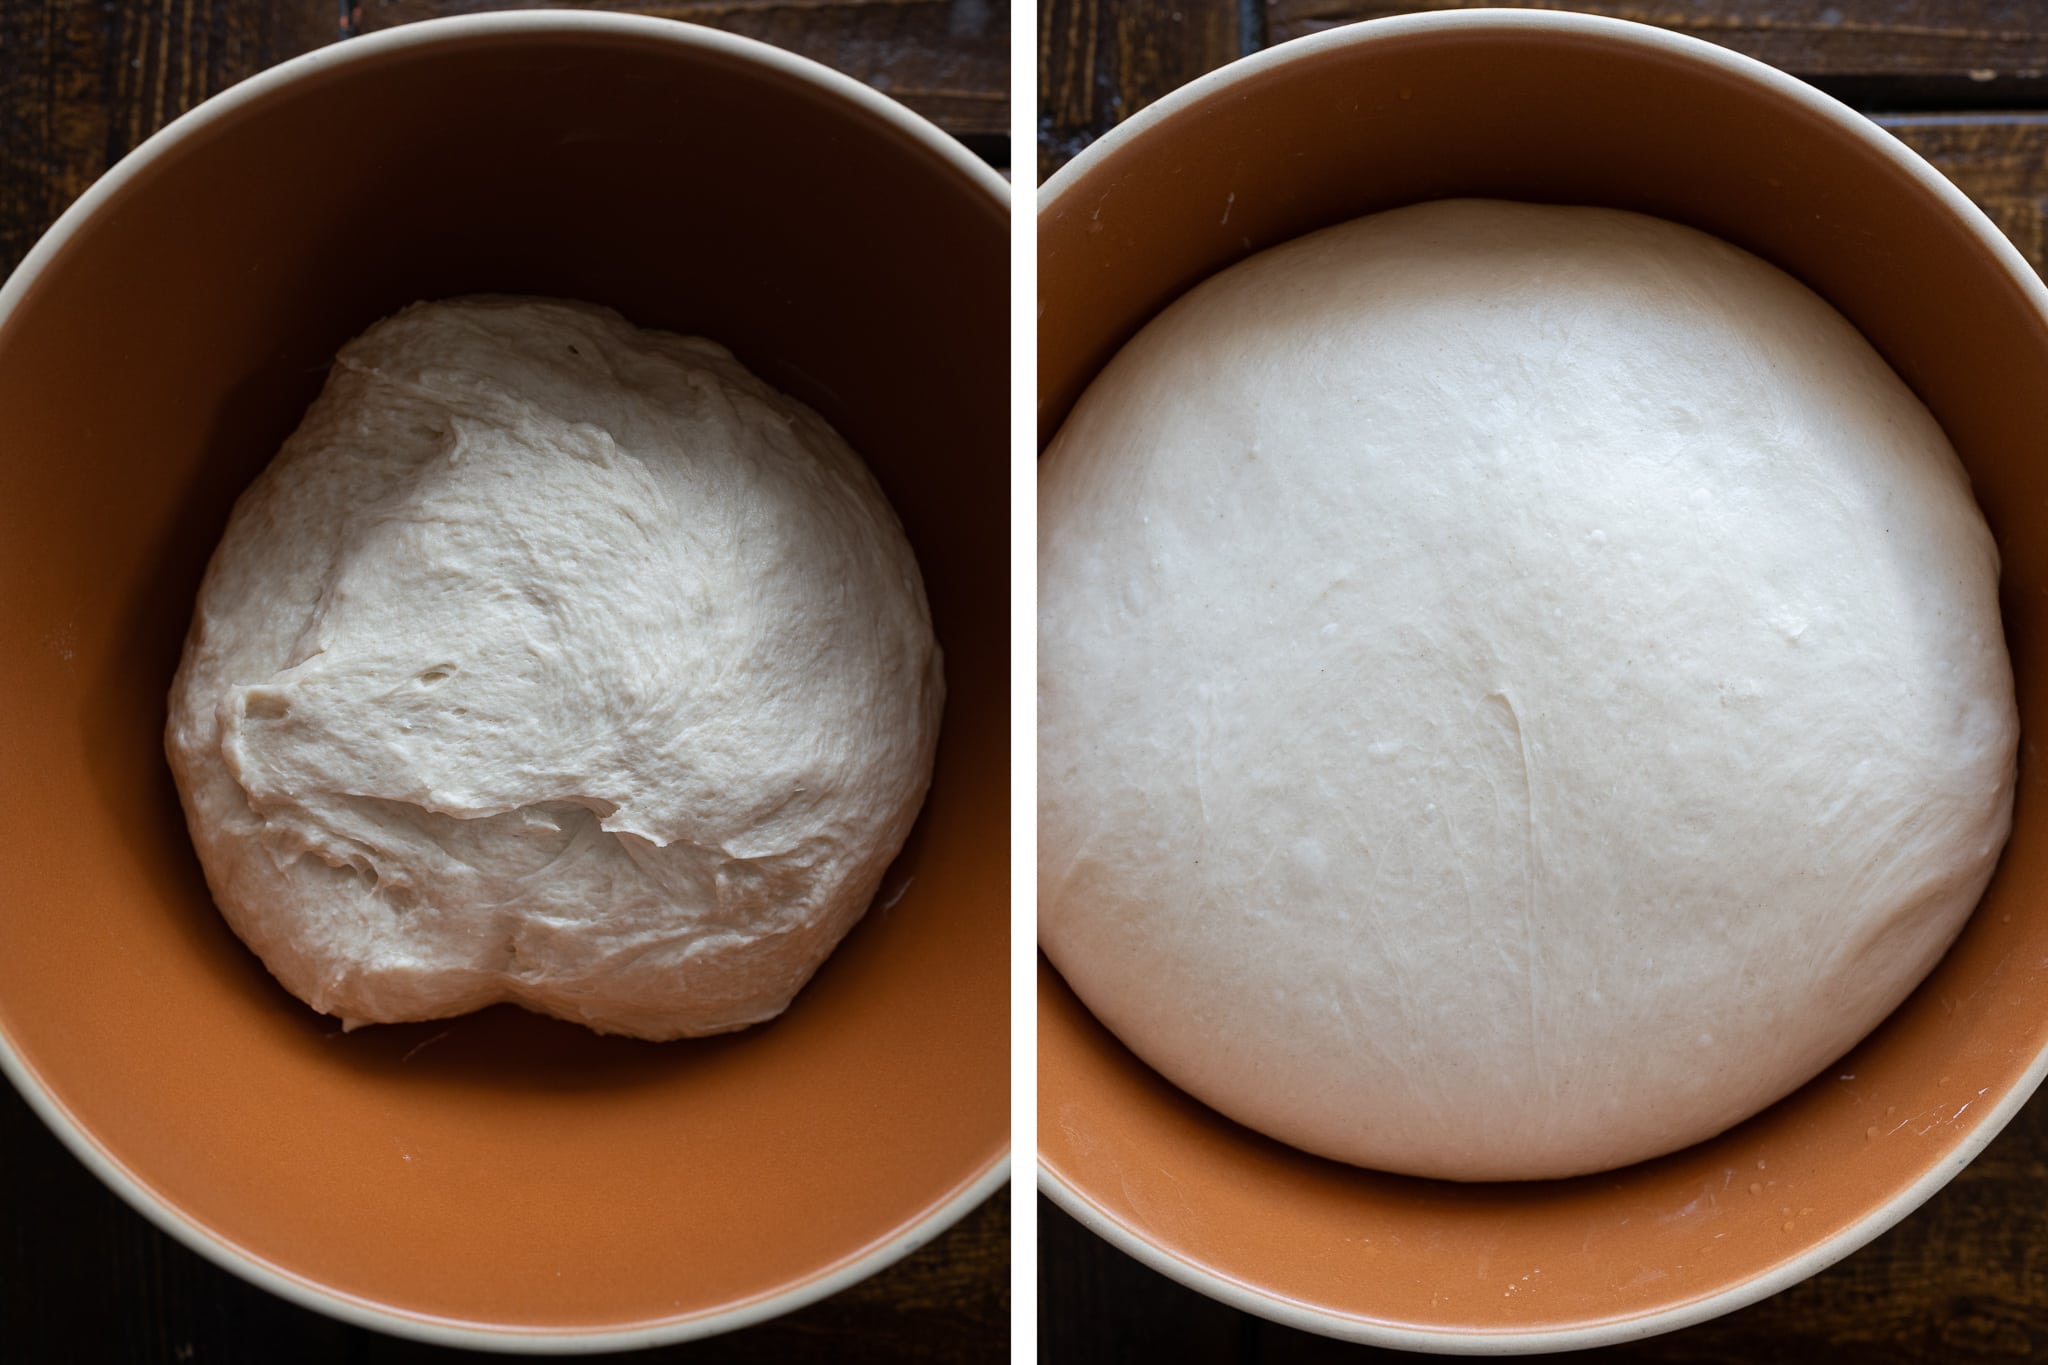
4. Bulk Fermentation – 9:30 a.m. to 1:00 p.m.
At a warm room temperature, 74-76°F (24°C), bulk fermentation should take about 3 1/2 hours. If your kitchen is cooler, place your bulk container in a small home dough proofer, or extend the bulk fermentation time to give the dough more time to ferment.
In the image below (tap/click to zoom in), you can see my dough at the start of bulk (left) and after 3 1/2 hours (right). The dough is ready when it has risen in the container, smooths, and is puffy to the touch.
Give this dough three sets of stretches and folds during bulk fermentation at 30-minute intervals. The first set begins 30 minutes after bulk fermentation starts. For each set, wet your hands, grab one side, and stretch it up and over the dough to the other side. Rotate the bowl 180°, then perform another stretch-and-fold (this forms a long rectangle in the bowl). Then rotate the bowl 90° and repeat the stretch and fold. Finally, turn the bowl 180° and do one last stretch and fold. The dough should be neatly folded up in the bowl.
After the third set, let the dough rest, covered, for the remainder of bulk fermentation.
5. Chill Dough – 1:00 p.m. to 1:15 p.m.
At this point, your dough should have risen in your bulk container, be puffy to the touch, and have smoothed out. If the dough still feels dense and tight, give it another 15 minutes and check again.
Uncover your bulk container and place it in the refrigerator for 15 to 25 minutes. Chilling the dough will help it firm up, making shaping and transferring to the pan much easier. Note that the longer you chill the dough in the fridge, the longer it will take to proof (because it will have to warm up that much more).
If your dough is extremely soft, keep the bulk container covered and chill the dough for up to 1 hour.
Overnight fermentation option: At this point, you can choose to place the covered bulk fermentation container into the fridge to retard the dough overnight and bake the next day. The next day, take the dough out of the fridge, let it warm up for 30 minutes, and then resume with the Shape step below.
6. Shape – 1:15 p.m.
Butter your baking pan (even if it’s nonstick) to ensure that the rolls come out cleanly after baking.
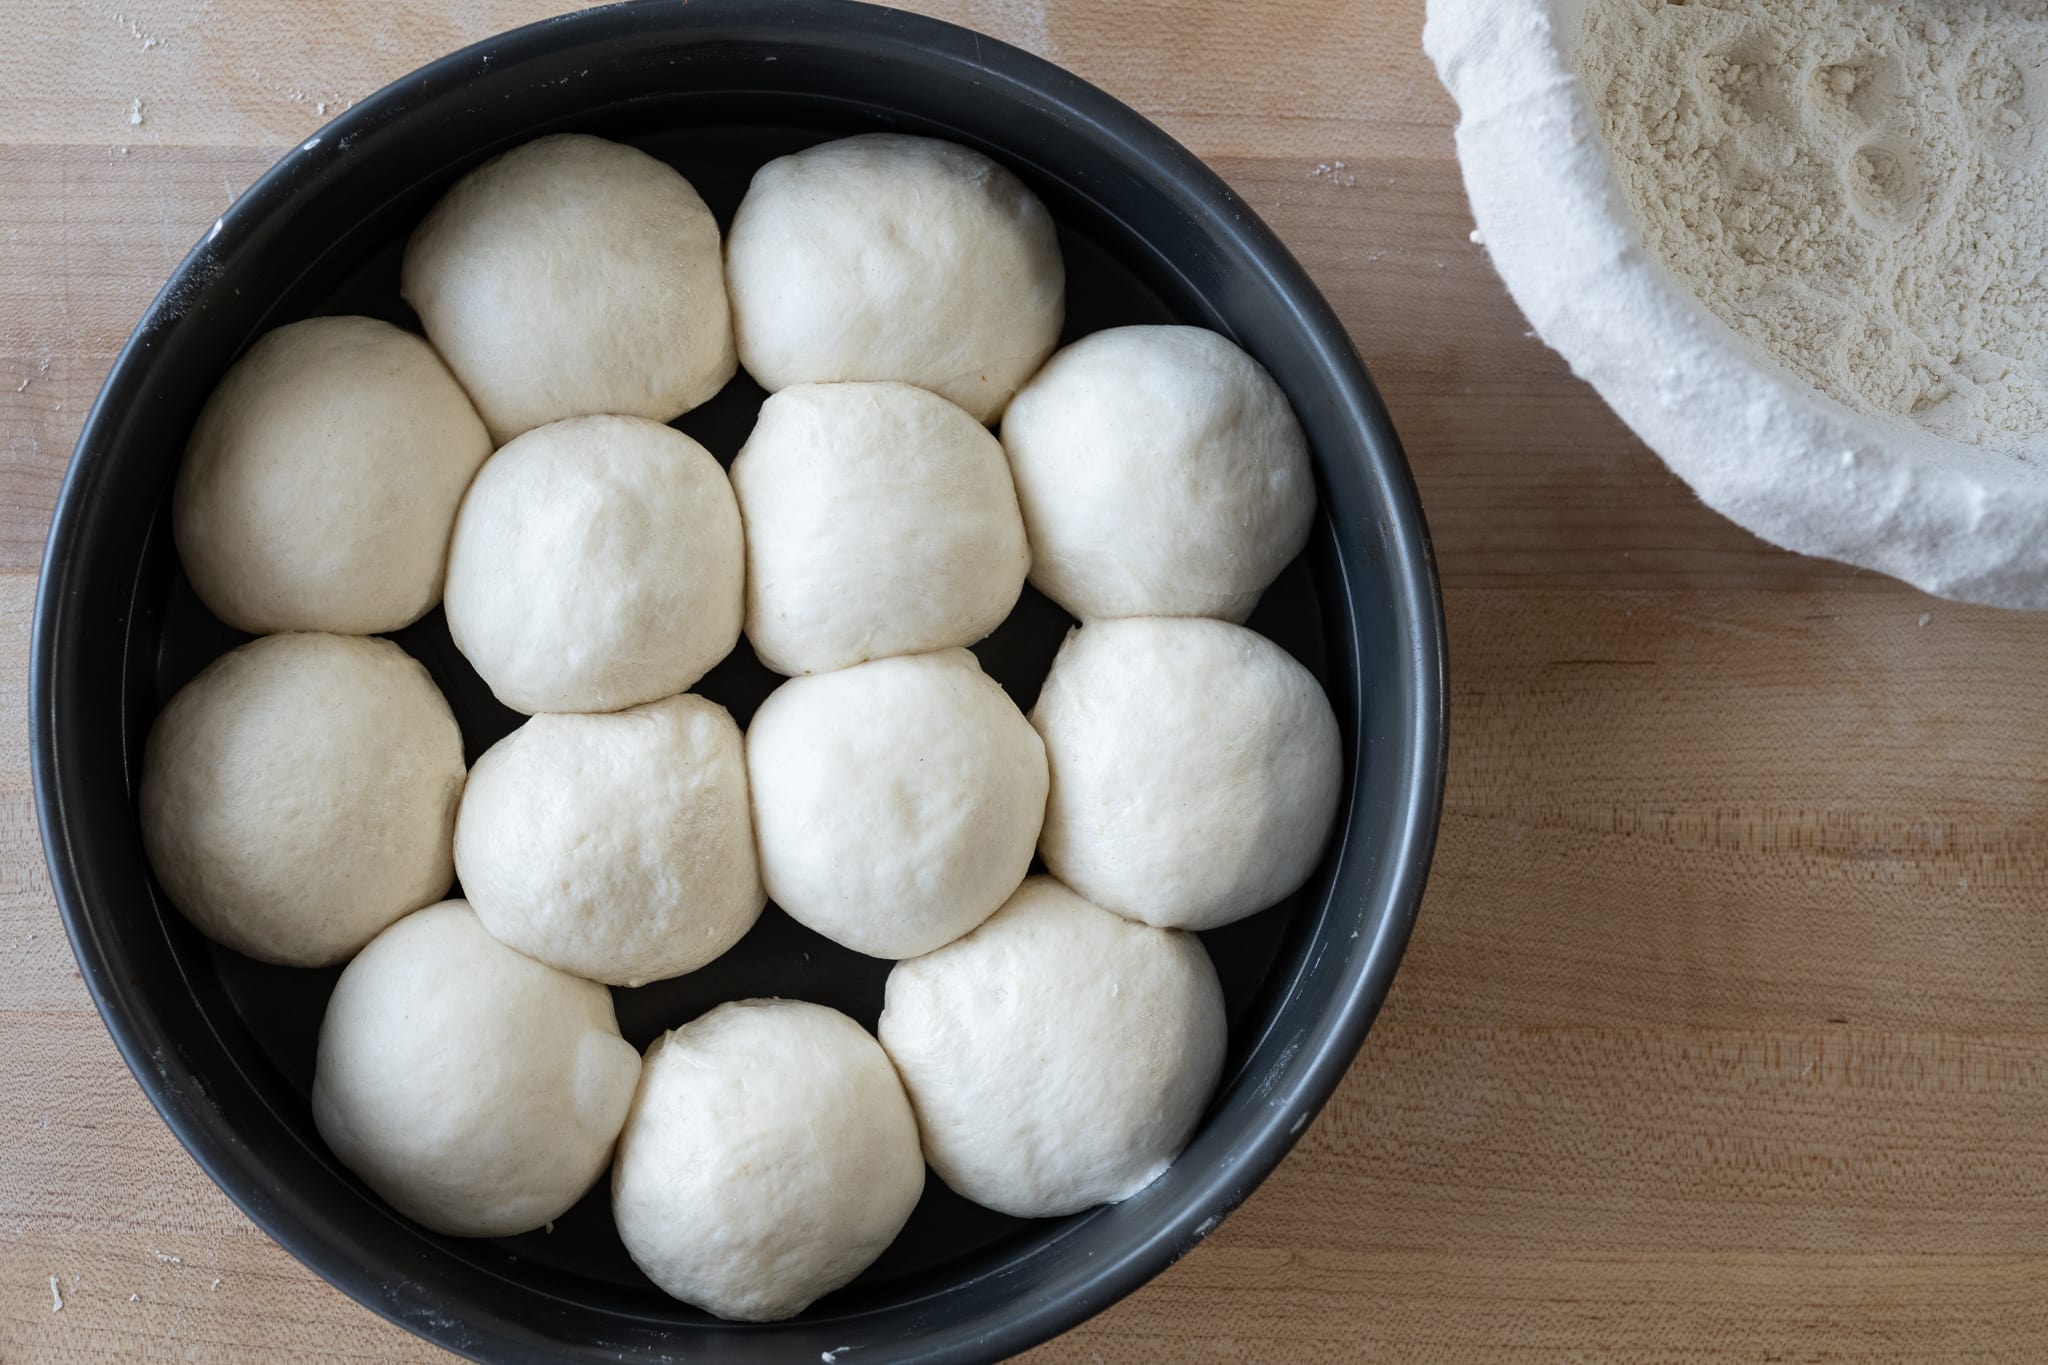
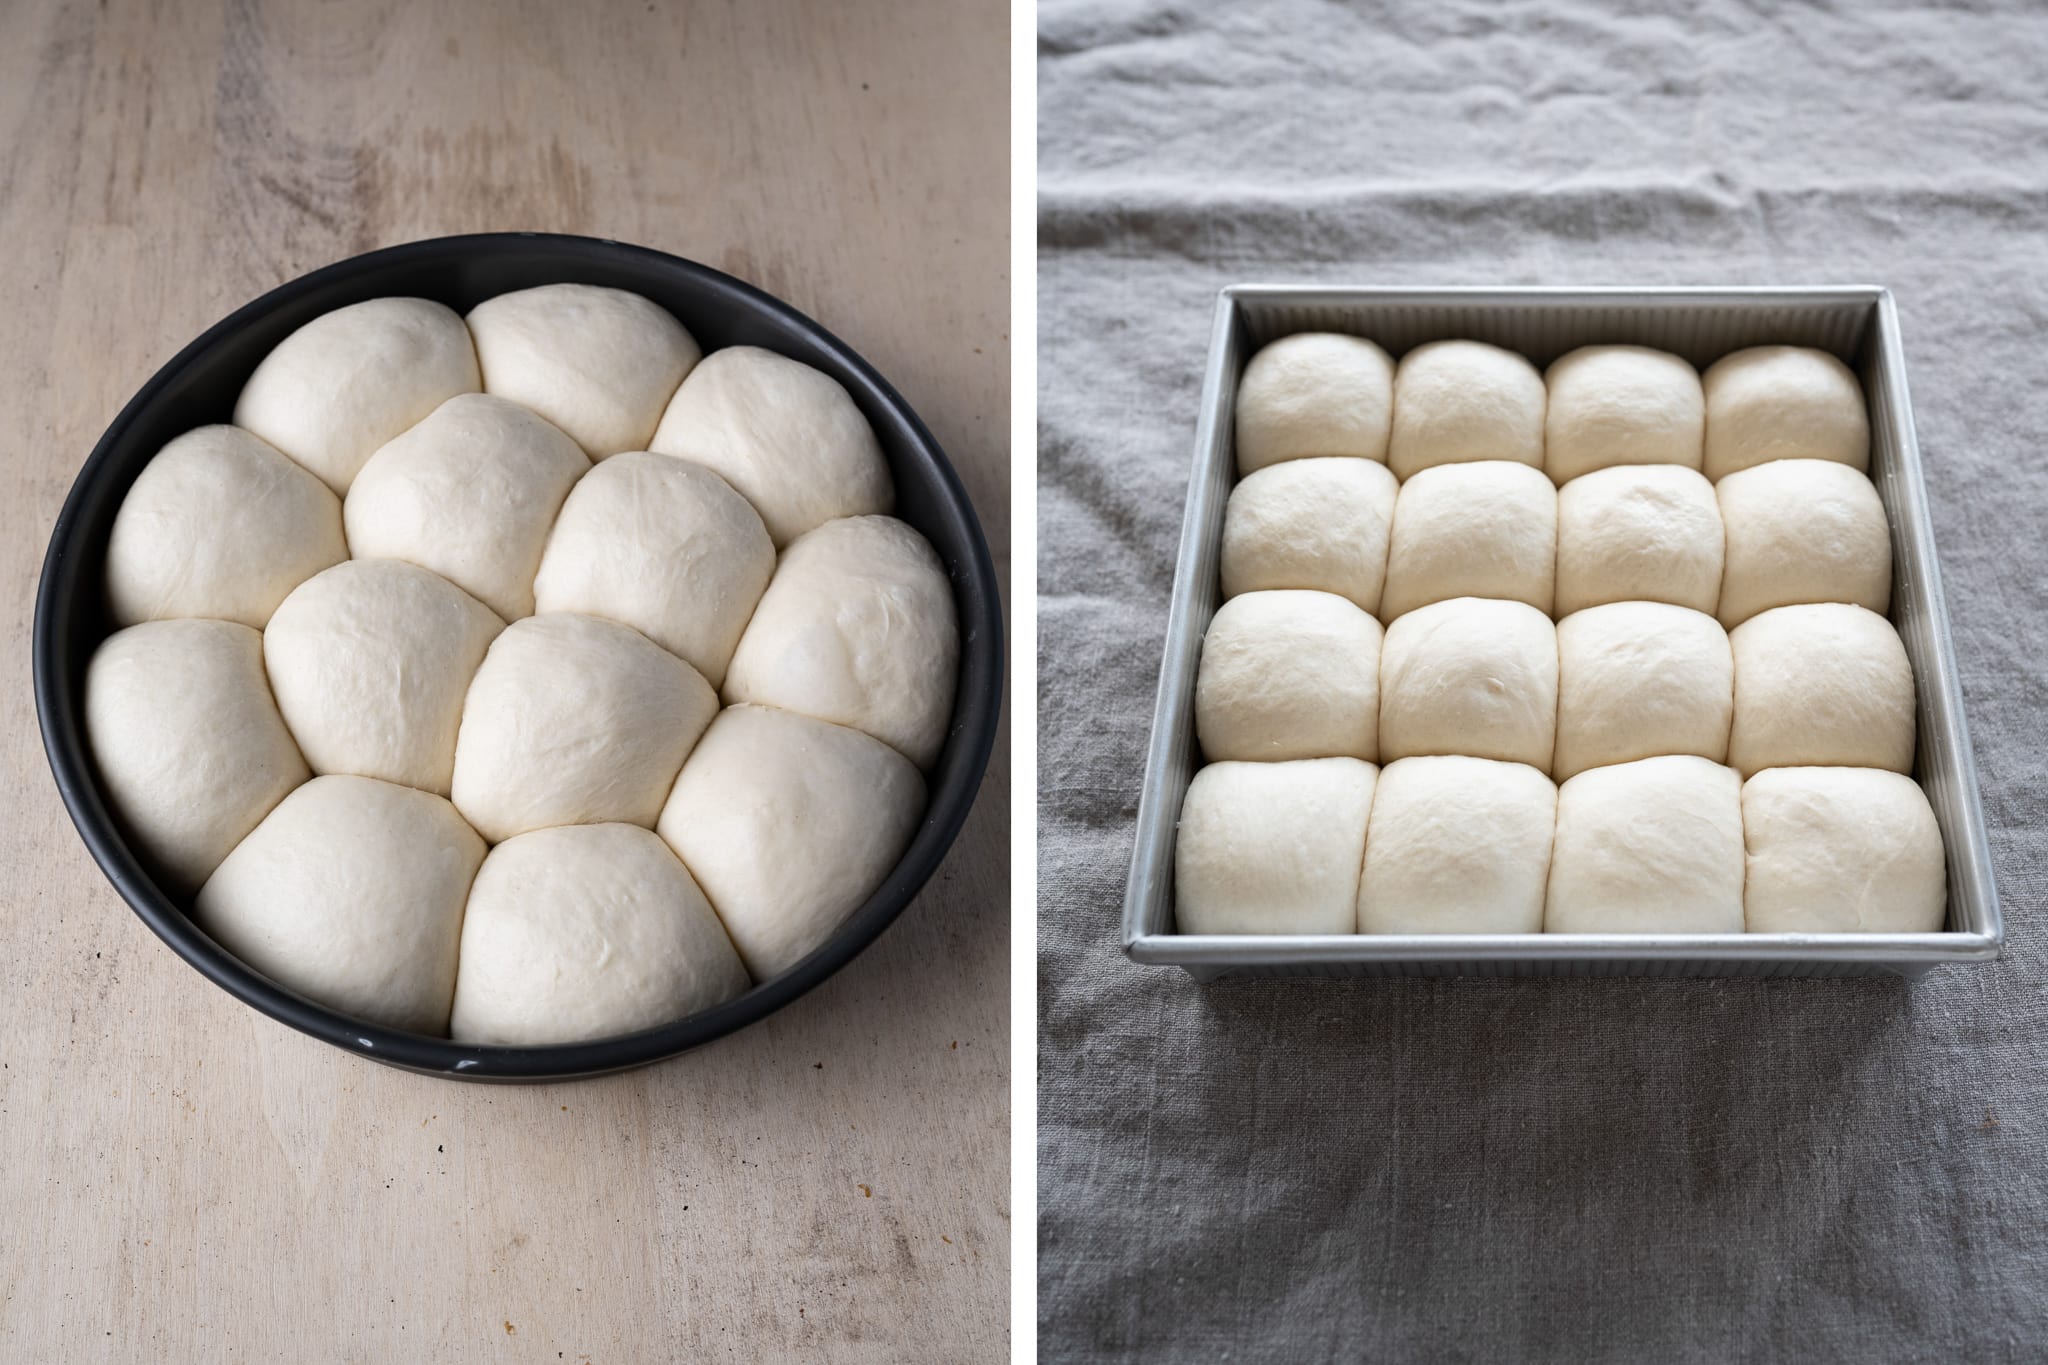
Remove the bulk fermentation container from the fridge, lightly flour the top of the dough in the bowl, and gently scrape the dough out onto a lightly floured work surface. The dough will be cool to the touch but still very soft. Lightly dust the top of the dough and divide it into sixteen 70g pieces (or fourteen 85g pieces for larger rolls).
Because the dough is so soft, I prefer to use my bench knife to shape each roll. Use the knife to drag the dough toward your body as your other hand rounds the dough, tucking the edge down under the ball. Repeat this dragging-and-tucking motion with the knife and your other hand until you have a uniformly round ball. Place the ball in the prepared baking pan. When using a round pan, I prefer to start by placing the rolls along the outside in a ring, then work inward as each ring fills.
For more shaping instruction, see my guide page to shaping buns and rolls.
Cover the pan with a large, reusable plastic bag and seal it shut.
7. Proof – 1:45 p.m. 4:15 p.m. (2 to 3 hours)
At a warm room temperature of 74-76F (23-24 °C), this dough should take 2 to 3 hours to fully proof. If your kitchen is cooler, expect it to take longer.
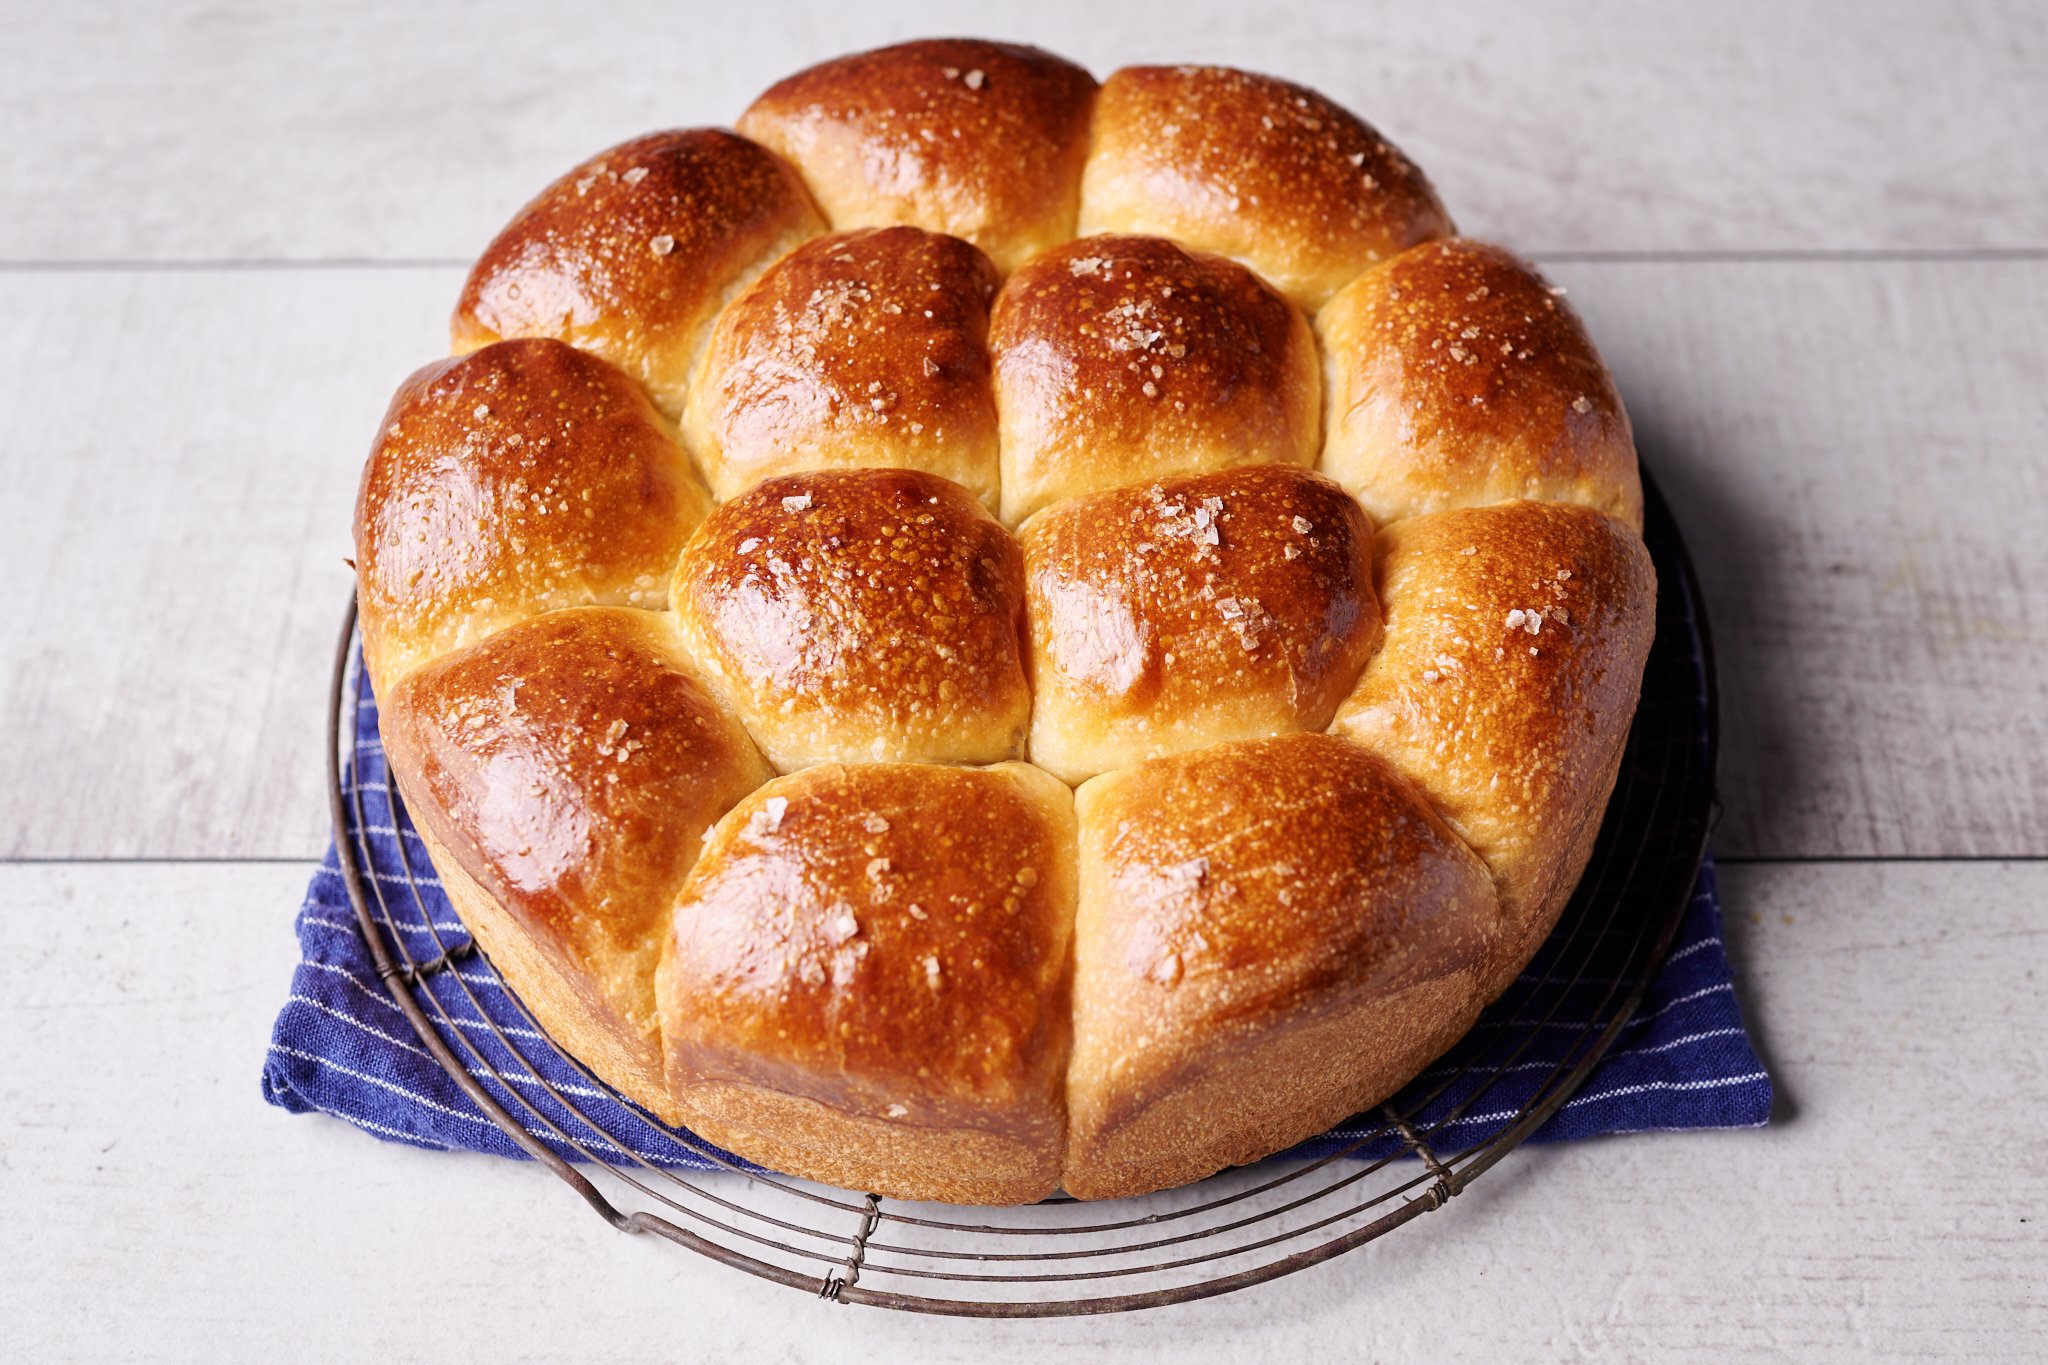
When fully proofed, the dough should be well-risen in the pan and very soft to the touch. Uncover your dough and gently press the tops of a few rolls. You shouldn’t feel any dense spots or tight areas—the dough should be very light and airy. If you do, cover the bowl and let your dough proof for another 15 to 30 minutes, then check again.
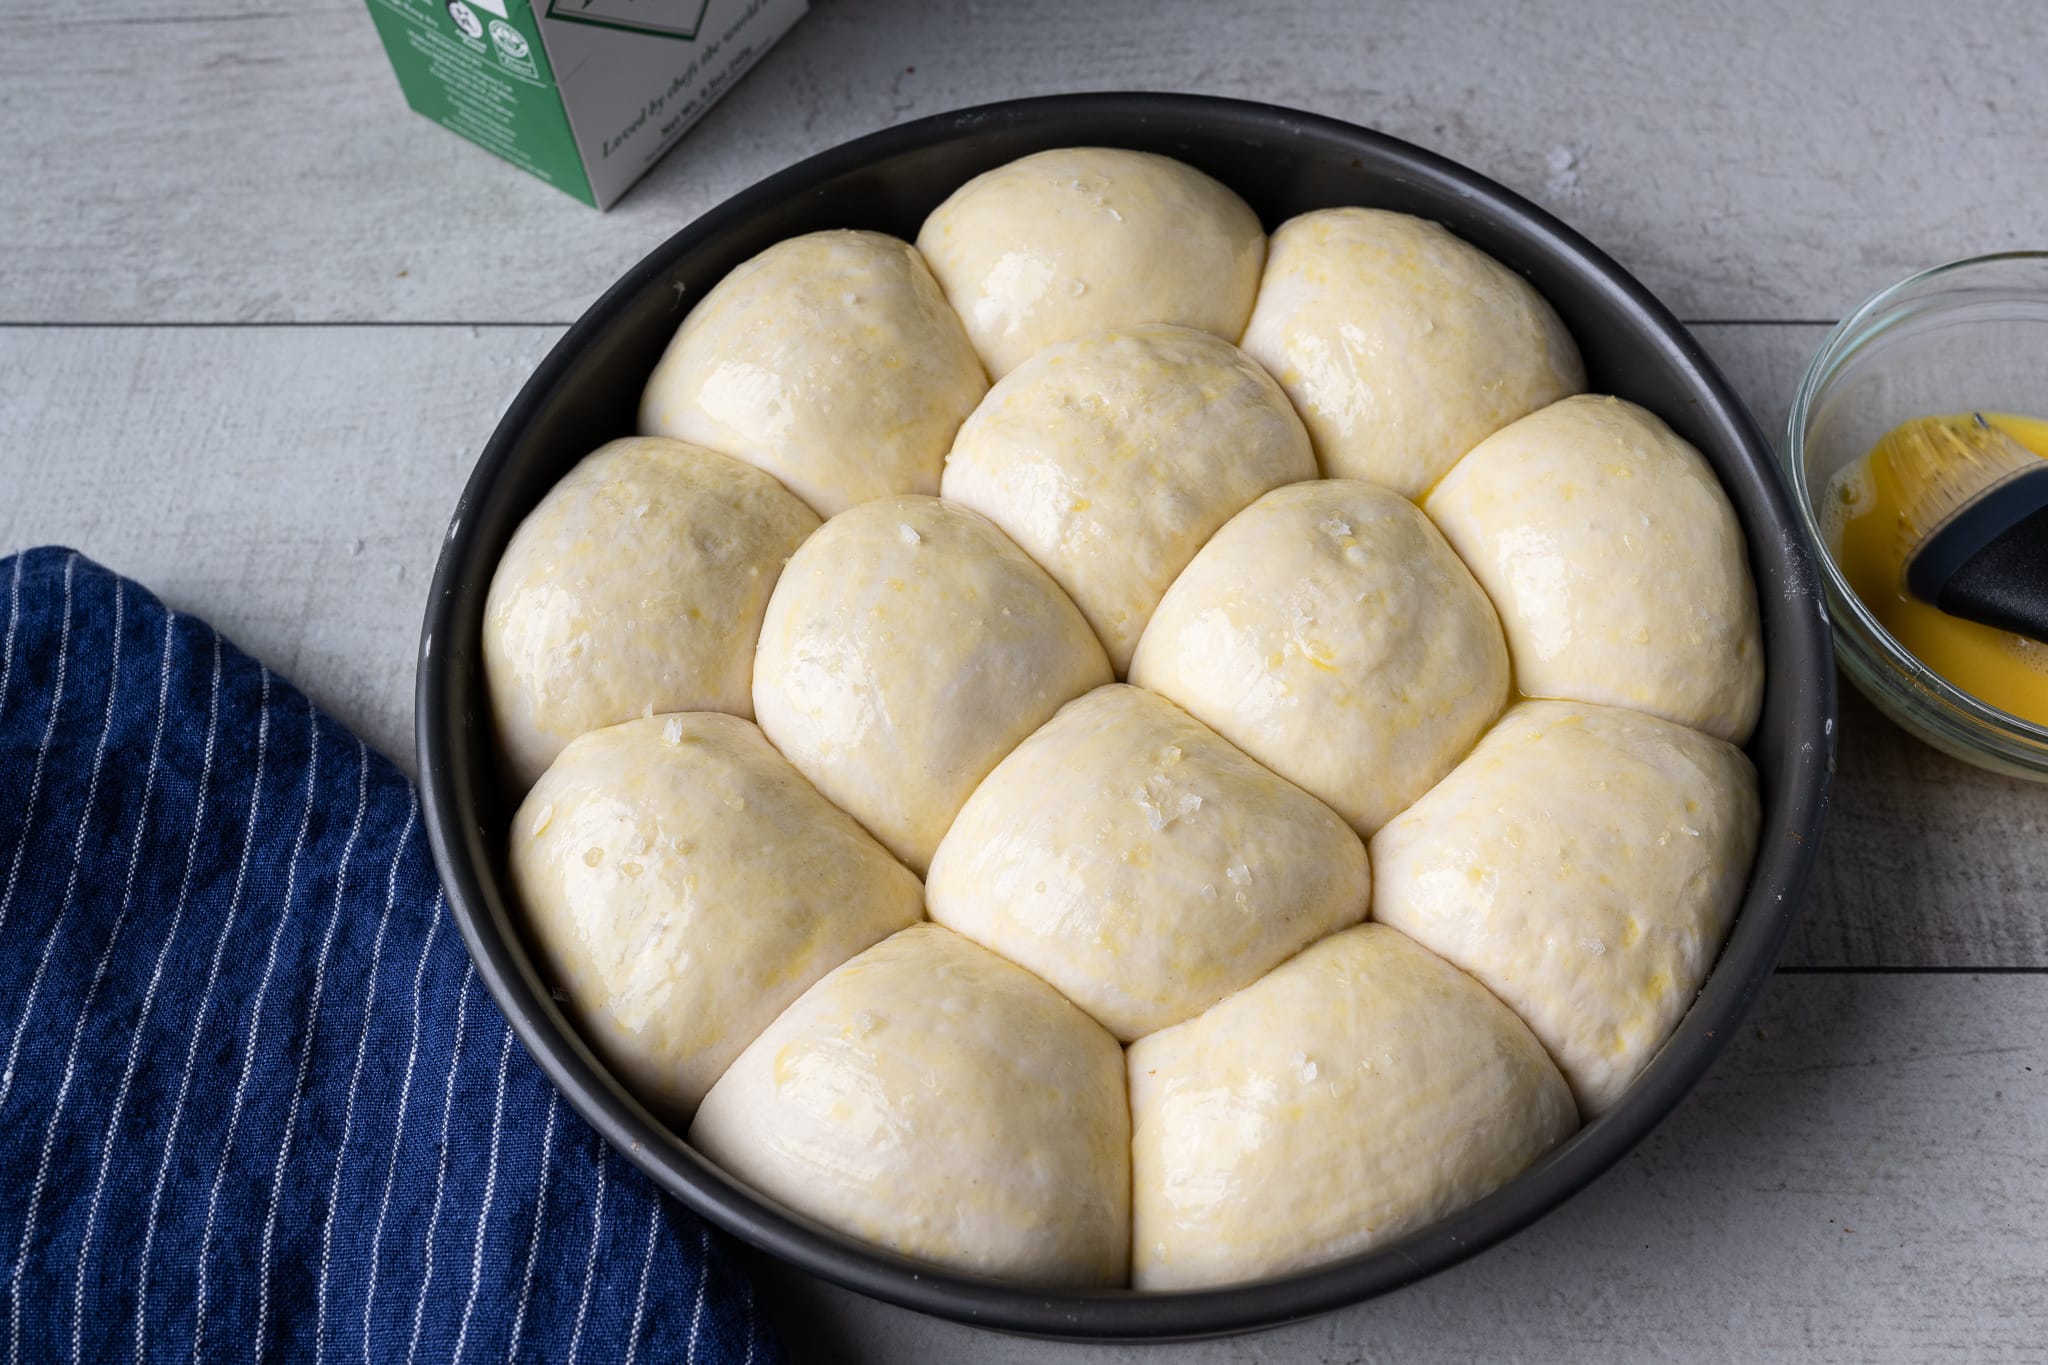
8. Bake – 4:15 p.m. (pre-heat oven around 3:45 p.m.)
Place an oven rack in the middle of the oven, and preheat the oven to 400°F (200°C).
Make an egg wash: In a small bowl, whisk together 1 egg and 1 tablespoon whole milk.
Remove the pan from the bag, evenly brush the egg wash over the tops of the rolls, sprinkle with coarse sea salt (optional), and slide the pan into the oven.
Bake for 20 minutes. Rotate the pan 180° in the oven and reduce the temperature to 350°F (175°C). Bake for an additional 20 minutes until the tops of the rolls are golden and the internal temperature is around 204°F (95°C).
Remove the pan from the oven and let it cool for 30 minutes before eating.
These are wonderful warm from the oven, but I like to let them cool for at least 30 minutes before eating. These rolls are best the day they’re made, but are still great the day after (if stored according to my post on storing bread).
Print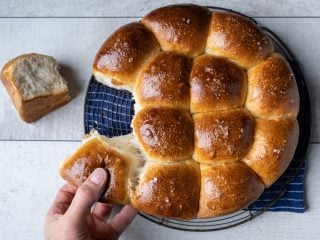
Super Soft Sourdough Rolls (with Tangzhong) Recipe
- Prep Time: 24 hours
- Cook Time: 40 minutes
- Total Time: 24 hours 40 minutes
- Yield: 16 rolls
- Category: Buns, Rolls
- Cuisine: American
Description
These super soft sourdough rolls are the perfect accompaniment to any dinner table (especially Thanksgiving!). They’re slightly buttery, a little sweet, ultra-tender, and the perfect counterpart for soups, stews, and any holiday meal.
Ingredients
Levain
- 74g medium-protein bread flour (all-purpose flour)
- 15g caster sugar
- 74g water
- 30g ripe sourdough starter, 100% hydration
Tangzhong
- 41 grams medium-protein bread flour (all-purpose flour)
- 166 grams whole milk
Main Dough
- All the tangzhong
- 328g medium-protein bread flour (all-purpose flour)
- 148g high-protein bread flour (bread flour)
- 95g butter, unsalted
- 38g sugar, caster
- 181g water
- 11g salt
- All the levain
Instructions
- Prepare levain (Day One, 9:00 p.m.)
Mix the following ingredients in a container and leave covered to ripen at about 77°F (25°C) for 12 hours overnight. - Pre-cook flour (Day Two, 8:00 a.m.)
To a medium saucepan, add the tangzhong flour and milk. Turn the heat to medium-low and cook, whisking continuously, until the mixture thickens and becomes like a paste, about 5-8 minutes. Set aside. - Mix (9:00 a.m.)
Cut the butter into 1/2″ pats. Set them on a plate to warm to room temperature. To the bowl of a stand mixer fitted with the dough hook attachment, add the water, flour, ripe levain, sugar, tangzhong, and salt. Mix on low speed (STIR on a KitchenAid) for 1 to 2 minutes until the ingredients come together and no dry bits remain. Increase the mixer speed to medium (2 on a KitchenAid) and mix for 4 to 5 minutes until the dough starts to strengthen and clump around the dough hook. It won’t completely remove from the bottom of the bowl, and it will still be shaggy. Let the dough rest in the bowl for 10 minutes. Turn the mixer on low speed and add the room temperature butter, one pat at a time, waiting to add each pat until the previous one is fully absorbed. Adding all the butter will take 5 to 8 minutes. After this time, mix on medium speed for 1 to 2 minutes until the dough smooths and clings to the dough hook. In the end, the dough will still be very soft, and it will not completely remove from the sides of the bowl. Transfer the dough to a bulk fermentation container and cover. - Bulk fermentation (9:30 a.m. to 1:00 p.m.)
Give the dough 3 sets of stretch and folds at 30-minute intervals, where the first set starts 30 minutes after the start of bulk fermentation. - Chill dough (1:00 p.m. to 1:15 p.m.)
Place the bulk fermentation container, uncovered, in the refrigerator for 15 minutes to make shaping easier. - Shape (1:15 p.m.)
Butter your pan. Divide the dough into sixteen 70g pieces (or fourteen 85g pieces for larger rolls) and shape each as a very tight ball. Place the balls in the buttered pan to proof. - Proof (1:45 p.m. to 4:15 p.m.)
Cover the pan with dough and let proof for 2 1/2 hours. - Bake (4:15 p.m.)
Preheat your oven to 400°F (220°C). Whisk together one egg and a splash of whole milk for the egg wash. When oven is preheated, brush on the egg wash and bake for 20 minutes. Then, rotate the pan 180° in the oven and reduce the temperature to 350°F (175°C). Bake for an additional 20 minutes until the tops are well-colored and the rolls have reached around 204°F (95°C). Remove from the oven and let cool in the baking pan for 10 minutes. Then knock the rolls out to cool on a wire rack. Let rest for 30 minutes, then enjoy.
Notes
Do ahead: you can prepare the tangzhong the night before. Cook the flour and milk as instructed and let cool to room temperature. Cover the tangzhong and keep in the fridge overnight. The next morning, take it out to let it warm some (to room temperature would be ideal) and proceed to add it during the mix as instructed.
Do ahead: you can prepare the dough and proof them overnight to bake the next day at any time. When chilling the dough, keep the covered bulk fermentation container in the fridge to retard the dough overnight. The next day, take the dough out, let it warm for 30 minutes, then continue with the Shape, Proof, and Bake steps. Alternatively, shape the dough into small balls and place them into the proofing pan. Cover the pan and put it into the fridge overnight. The next day, take them out 3 to 4 hours before you want to bake them and proof them on the counter until puffy and ready to bake.
To make these rolls vegan, substitute the milk for a full-fat nut or oat milk, and instead of an egg, use a flax egg.
What’s Next?
These super soft sourdough dinner rolls are now my go-to for all holiday meals, especially Thanksgiving. They’re just the right mix of buttery, sweet, savory (thanks, salt!), and squish-in-your-hand tender.
If you’d like to explore the ideas in this recipe even further, check out my sourdough shokupan loaf (which also uses tangzhong) or my sourdough pumpkin dinner rolls for a different take on rolls!
And if you are making these during the holidays, check out the Bread Baker’s Gift Guide for gifts for your favorite baker (or yourself!).


647 Comments
I made these today, they’re very, very nice! They’re quite a ‘heavy’ white roll, as it they’re not ‘light’ because of all the butter/milk, but they’re springy and squidgy and have a slight crust. Really delicious! I doubled the recipe and made 32 rolls, frozen half. I love the detail of this chap, a true sourdough lover!
Thank you! So glad you liked them 🙂
Thank you so much for sharing this recipe and the detailed explanation. I had despaired of being able to bake at altitude but these turned out wonderful and the recipe was very forgiving. My levain wasn’t very bubbly. Then started mixing and realized I’d forgotten to add the levain in, so had to work it into the already formed dough. It didn’t get smooth and wasn’t very puffy after proof. But the rolls still came out fluffy, browned and delicious. Thank you!
You’re very welcome! Nice adjustment there and so glad to hear they turned out great 🙂
Probably not the best place to ask a basic levain question, but I really want to make these rolls. What do I need to do differently with my overnight levain to make it bubbly close to the 12 hour mark. My starter is always peaked and bubbly by 6-7 hours, and that is in a kitchen that stays at 71-72 degrees? So many of your recipes use the overnight levain which makes the timeline so great, but I must be doing something wrong?? Thanks for your great videos!!
I worked it out! Its all in the feeding ratio. I learned something, again. On to making rolls!!
Woo hoo! Have fun 🙂
Hello Maurizio! Is there a way to retard the levain, so that instead of being ready at 9 AM it’s ready in the afternoon? I always feed my starters on 8 AM and 8 PM schedule, but it’s hard sometimes with my schedule to bake in the AM. I wanted the levain to ripen around noon or even closer to 3-4 PM. I did an experiment and made the sweet levain with 1/2 the starter (15 g) instead of full amount called for in the recipe (30 g), thinking it might retard its time of ripeness, but it still ripened by 9 AM (in the 76F proofer box, where I keep my starter). When it was ripe, the levain rose about 2.5X in volume or so and looked frothy. I guess I could just leave it on the counter overnight, which is around 70F, but I was wondering if there are “other levers” I could pull besides the temperature to regard levain ripening (I prefer to keep the temp consistent). Thanks for any suggestions you might have!
Hoping somebody is paying attention to these comments and might be able to answer my question. My levain is moving very slowly. It’s now been an hour and a half longer than the 12 hours it should have been. I am using the brod and Taylor proofing box set at 76°F. It looks somewhat bubbly, Not nearly as bubbly as the picture in this post, and it has not quite doubled. And in the last half hour or so I marked where it was risen and it doesn’t seem to have moved since then. Is this all I can expect? Or should I wait longer?
I ended up waiting a little longer and finally, compared the picture of my levan to the picture here in the post and decided it looked close enough. But I ended up waiting an extra 5 hours, and I’m still not sure why mine took so much longer. My bulk ferment ended up taking more like 6 hours instead of 3 and 1/2, and after shaping the rolls I decided to just let them proof overnight and they pretty much took about 10 hours. They still did not look as well-proofed, but I couldn’t wait any longer, so I put them in the oven and they ended up rising very well and looked much more like the pictures here than I thought they would. They also tasted great!
The only thing I’ve noticed about my rolls is that when they cool completely to room temperature, they do not feel soft and pillowy but sort of dense and firm. I’m wondering if that’s because my room temperature here right now is around 65°? When I warm them up a little bit the microwave then they feel very nice and soft.
Good move. Just let the levain ripen longer as necessary until it’s ready. When they cool, they should still be pretty soft. Be sure they’re not over-baked!
Sorry for the late reply 🙂
I’ve made these rolls four times now and they are fabulous. My wife says they’re better than her mothers “sacred” yeast rolls. I like the new version of the recipe that’s in line with the video. The dough is a lot easier to work with. Thanks for updating it.
So glad to hear this!
I make my Tangzhong in the microwave instead of on the stove. I thoroughly whisk the flour and milk and then put it in the microwave for 80 seconds, stopping it every 20 seconds to whisk it some more. It’s a lot quicker and easier and it comes out perfect every time. Your timing may vary based on your microwave.
I’ve done this as well, works a treat!
Made them for the third time today, yes the 2 eggs did add color. They browned very nicely, even though I forgot to brush them with the egg. Used the increased amount of flour and buttermilk, that I made the first time and added 75g of potato flakes. Made 24 in three 8″ pans, each weighing 72-73g. Look forward to serving them this weekend. They will go in the freezer for the next few days.
These rolls were such a hit with my husband! I was a little worried because 1) I think I cooked the tangzhong too long (it was a bit thick) and 2) I didn’t get all that much rise after either the bulk fermentation or after the rolls were formed — even after leaving them longer than specified. That said, there was great oven spring, they were soft and moist, delicious flavor and kept very well for as long as we could without my husband eating them!
Thanks for a great recipe!
So glad to hear they turned out well, Debra!
Making them again, wondered about adding a couple of eggs the next time? I usually use potato flakes in my sourdough and wondered if that would work?
Eggs would bring color, but I find they really don’t need them. Would be fun to experiment with this! Adding potato will make them even softer.
Made them for the third time today, yes the 2 eggs did add color. They browned very nicely, even though I forgot to brush them with the eggwash. Used the increased amount of flour and buttermilk, that I made the first time and added 75g of potato flakes. Made 24 in three 8″ pans, each weighing 72-73g. Look forward to serving them this weekend. They will go in the freezer for the next few days.
Great recipe! Despite liberal butter there was some sticking to the pan, so I’ll add parchment paper next time. One question: I used your new book (which is, BTW, the best sourdough book I’ve read!) which specifies a 9″ pan. Recipe above calls for an 8″ square. I’m guessing that might work but would def be a bit squishy, as my 9″ pan fit perfectly.
Glad they worked out for ya! Oops, yes, it’s a 9″ pan—will update the post. Enjoy and thanks for the feedback! I make these so often this time of the year, people start calling me “the rolls man,” could be worse.
Thanks so much Darryl, glad to hear you guys liked these!!
Thanks Maurizo for this amazing recipe! Congrats on your new book! This thread/ sourdough community here is absolutely phenomenal! I tried this recipe for first time today – substituted for vegan butter and Oatly full-fat oat milk. I accidentally misread and switched the measurement for AP flour and bread flour, but it’s no biggie. I didn’t have a kitchen mixer, so I did everything by hand. The dough turned out a little tacky (maybe vegan butter has higher water content?) – not the most fun to work with, but I got the shaping job done after taking a few pauses and deep breaths. I learnt that wet hands are easier to handle doughs with high hydration.The cold weather in Stockholm called for longer proofs, I did 8h bulk and 6h proof; turned out great, soft and pillowy! Also, for vegans out there, flax egg isn’t a usual substitute for egg wash. Since egg wash is more for aesthetic rather than binder purpose, a plant milk + some maple syrup would do a better job at browning nicely. From my experience with vegan baking, flax egg is more for substituting the binder function in a recipe e.g. in a cake recipe.
You’re very welcome, Hazel! Fantastic modifications there to suit your location—yes, cooler climates will need much longer rise times, great job on the 8hr bulk ferment. I hope they turned out well for you and welcome to the community here at TPL! Happy holidays 🙂
Thanks so much for sharing. I was digging through the comments looking to see if anyone made a vegan version. I’ll try it myself this week.
Hello Maurizio, greetings from Germany! (although I’m 100% born and raised Italian). I have tried this rolls recipe full of hope and it was a disaster. The dough was much too liquid, impossible to handle and it did not raise an inch.
I assume I made a mistake with the Tangzhong. I must admit I could not watch your video before starting, just printed the recipe. I never used the Tangzhong before and believed (from your description) that it was a sort of water roux, so in the end the consistence was a bit like polenta; I see yours is much more dense.
I was very scrupulous about weighting the ingredients, so in the end I truly cannot tell whether it was the Tangzhong alone or perhaps the sourdough.
Sourdough: i created a 100% hydration sourdough using a pure rye wholewheat sourdough (the one I use for German pure rye wholewheat bread) and adjusted the quantity of water and bread flour as you recommend in your own sourdough recipe. Refreshed it twice before creating the sweet sourdough you use in this roll recipe. It developed more than twice in about 6 hours, so I thought it was OK to use because it was starting to collapse. But the dough never took consistency and was very liquid. I baked it anyway, it didn’t raise one inch.
Do you have any idea of all that went wrong?
Thank you in advance for your help.
It’s likely the flour you used wasn’t able to handle all the liquid in this recipe! Sorry to hear they didn’t turn out well for you. Next time, reduce the amount of liquid in the main mix to better suit your flour (and there’s nothing “wrong” with that at all, it’s just different flour has different capabilities!).
These rolls aren’t super they are awesome! Made them for a potluck dinner and they disappeared very quickly. Used buttermilk instead of water, and accidently poured in too much, so I had to add extra flour of course. Ended up with 15 rolls, 97g each in a 9×13 pan. Also let the dough rest in the frig for about 8 hours before shaping the rolls and letting them rise in the oven with the light on for 2 hours before baking. Next time will make 16 in two round 9″ pans. Will be adding the extra liquid and flour.
Amazing, thank you! I love the idea of using buttermilk, too.
I made these rolls for Thanksgiving and they were fabulous even if I did mis-read the recipe a bit. I used 402 g of all purpose flour instead of 328g in the dough. And 53g of sugar instead of 38g and 254g of water instead of 180g. Oh my. Now I’m afraid to make them “correctly”! I made the Levain and Tangzhong on Tuesday evening then made the rolls on Wednesday. I baked 4 rolls that night to test and they were fabulous although at 425 degrees it only took 20 minutes in my oven. I put the remaining 12 rolls in the refrigerator inside a ziplock bag until Thursday morning. I put them in my oven with the light on for 1 hour then turned the light off for another hour and they were ready to bake. Again 425 was a bit too hot and they baked completely in 25 minutes (20 at 425 and 5 at 375). They were absolutely wonderful!
Thanks so much for reporting back, Bev! Happy to hear these turned out well for you—and great job with the modifications to suit your environment!
Hi Maurizio. I would like to make these for my department pot luck. Quick question: have you ever attempted to
stuff them with cheese?
I have not but I bet that would be pretty amazing.
I made these 2 days ahead and reheated them just before Thanksgiving dinner. They got rave reviews! Soft and delicious. Thanks for the great make-ahead recipe.
Ah so glad to hear they worked so well for you, Sidney!
Hi Maurizio, I made these and they tasted great, but like some other people here, mine were more dense and not as soft/light/fluffy. Since my house is only around 67 in the winter, I do bulk ferments and proofing in my oven with the light on and the door cracked open. I use a thermometer and it averages in the 82-84F. But I still think my issue is underproofing. With the warm temps in the oven, I can’t figure out why my proofing is moving slow? Do you have any insight?
Yeah, a dense roll is likely due to proofing. The other very important factor with these is to be sure you use your levain when it’s very ripe: super bubbly, loose consistency, tall rise. If you use your levain too early (which may happen if your kitchen is cool overnight and it’s rising at 67F!) it will result in a sluggish dough.
Thanks, I do think that was the problem. I think my starter wasn’t quite ripe enough when I made the levain, and then the levain was moving slow despite the warm oven, and I got impatient. I will make sure to be more patient next time!
Made these rolls for our Thanksgiving dinner. Holy cow did they deliver! These will be my go to dinner rolls for our holiday and everyday meals. Soft, fluffy, everything promised. I followed your timeline and wrote everything down. Followed the recipe exactly and baked at 425 degrees without a problem. I used the book and will change the temp to 400 degrees.
Wonderful, Karen! So happy these turned out for you 🙂 And like you, since I made these a few years ago I make them every time a roll is called for. Have a wonderful weekend.
Was an earlier version of this dough wetter? I started baking sourdough bread when the pandemic hit in the US and I feel like I found this recipe that fall. I did not have a stand mixer at the time so I had to use a slapping technique to knead the dough because it was so wet/sticky. Now I do have a stand mixer and it feels stiffer than I remember. I’m adding an extra tablespoon of water at a time to get it how I want it. It’s so delicious!
No, the ratios has been the same! It’s almost surely due to changes in the flour you’re using (which always needs an adjustment!). Glad you love this recipe!
Is the vegan note at the bottom meant to say instead of butter, use a flax egg? I don’t see egg in the original recipe.
The egg is in the egg wash before baking.
Hmmm. Mine baked to an internal temp of 204ish in the first 20 minutes. Hope they turn out ok — or no rolls today for Thanksgiving. Meant to post this on the pumpkin roll recipe. Too much going on…
Whoa, that’s very fast!! They take a full 40 minutes here. I’m wondering if it was the pan you used?
Maybe! It was a dark pan…
I made the recipe as written and it’s in bulk now. I want try and make 32 smaller rolls instead of 16. Any tips on making that work?
That should work just fine! Keep an eye on them during baking, they may bake faster (depending on the pan you’re using).
They are baking in the oven as I type this, my whole house smells fantastic. Didn’t have milk on hand so I used some yogurt whey. Being my first time making these shapes I got a little frustrated with the dough, now I know for next time to watch the hydration more.
Right on, Aaron! That sounds like a wonderful swap. Hope they turn out wonderful and enjoy!