
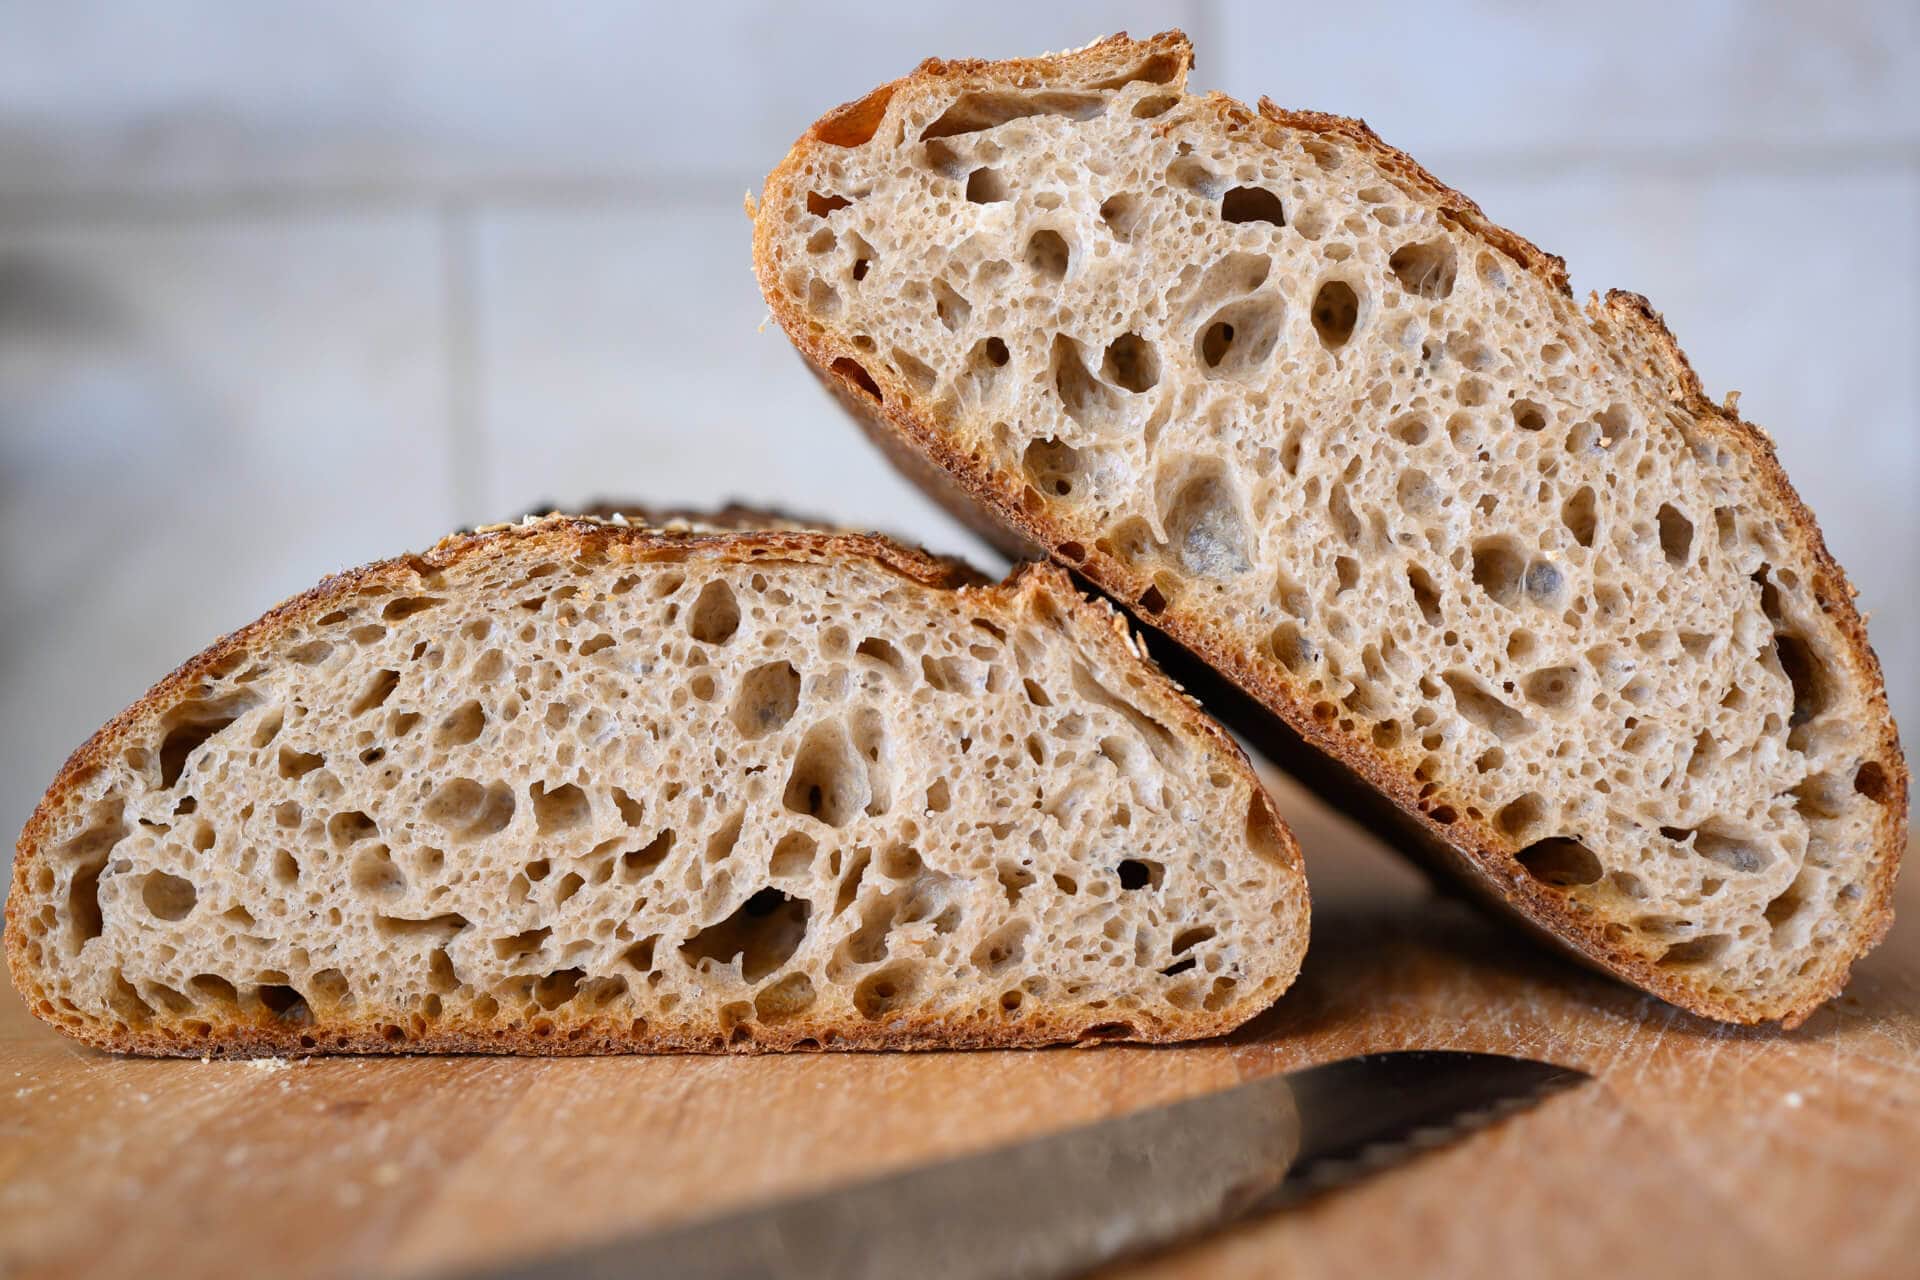
As the chill of winter sets in, I find myself drawn to this recipe. Vibrant and flavorful, healthful yet comforting, it is excellent at combating the cold weather, warming both your body and your kitchen at the same time. Winter urges me to bake anything and everything bread more than any other season. There’s nothing more wonderful to me than the aromas of freshly baked bread from a hot oven in contrast to the snow and howling wind outside. For this bread, I baked, tweaked, and baked again, ultimately landing on a mixture of white, spelt, rye, and whole wheat flours that produced a very craveable, satisfying sourdough bread that I cannot stop baking.
Part of this loaf’s abundant flavor is due to a little more sourness than you find in my typical recipe: a welcome addition that elevates the wholesome character of the crumb and crust. Sure, it has all the usual zest that comes with increasing the whole grain percentage, but it also has something more.
But what? What is that “something”? Is it the crust’s texture or the crumb’s tenderness altering my taste, or is it the perception of the loaf itself? Sometimes I wonder if the full range of textures, colors, and flavors I experience are genuinely there–visible to my eyes, present on my palate–or if I manufacture them when I see something mouthwatering. Perhaps this is the same way a barista might salivate at the sight of a properly pulled espresso, the aroma conjuring that recent summer strawberry, the allusion of toffee or black licorice. That “something more” seems to evolve as the loaf cools, hardens, and matures—an ever-changing kaleidoscope of flavors and textures.
Baking a loaf of sourdough seems to be the only thing that has this effect on me. I think it has something to do with the art of the craft, the work that goes into it, and the satisfaction that results. It’s like a woodworker sitting in their precisely constructed no-nail design chair, corners fitting just so and pieces curved where they’re to be curved, straight where they’re to be straight. The pleasure of a well-executed bread is undoubtedly more than the aesthetic of it; it is also in the culmination of a detailed, devoted process that amplifies everything. Tasting how every piece is in the right groove, how the flavors and textures shift like fragments of colored glass from one bite to the next, is exhilarating.
Of course, it’s likely all of this is simply a result of my obsession with baking naturally leavened bread. But! I do proclaim that this is a great recipe that will make those who eat it smile, and you may even spy a split-second closing of their eyes as they savor the moment. This little, often overlooked token is what I look for when my kids are eating, indicating they deeply enjoy something. And I imagine that this bread will push its way to the top of your baking priorities more often than not.
Flour Selection
I love the small addition of rye flour in this recipe–it’s something you also see in my Beginner’s Sourdough Bread recipe. Even in a small percentage, rye seems to bring loads of flavor and color to the crust. And this loaf is all about flavor.
I use whole grain Red Fife for the whole wheat part of this recipe, which adds significant character to this already flavorful bread. If you have Red Fife, I’d recommend it, but if not, any whole wheat variety will also work very well.
Whole grain spelt brings a nutty, almost sweet character to the flavor profile. I use spelt often because of this addition, and in this bread, even though it’s in small quantity, it’s still a significant contributor to the overall complex flavor profile.
The white flour I use in this recipe is medium protein at around 11-12%. This would be a typical all-purpose flour or a base white flour used for bread-making. If you wanted to increase the strength of this dough and bring additional flavor and nutrition, you could substitute this white flour for a high-quality type 85 flour.
Baking Schedule
This sourdough bread recipe is made over two days, which gives the dough plenty of fermentation time, which results in a deeply complex and flavorful bread.
It’s also possible to bake this loaf all in a single day by allowing the dough to proof on the counter, shaped and covered, until the dough is puffy, relaxed, and passes the dough poke test.
Spelt, Rye, and Whole Wheat Sourdough Bread Recipe
If you want to make only a single loaf or scale this recipe up to make many more, see my guide to baker’s percentages to modify this formula.
Vitals
| Total Dough Weight | 2,000 grams |
| Pre-fermented Flour | 5.3% |
| Levain in final dough | 16.6% |
| Hydration | 85.0% |
| Yield | 2 x 1000g loaves |
Total Formula
The desired dough temperature for this recipe is 78°F (25°C).
| Weight | Ingredient | Baker’s Percentage |
| 520g | White flour (about 11.5% protein; Central Milling Artisan Baker’s Craft Plus) | 50.0% |
| 260g | Whole spelt flour (Central Milling Whole Grain Spelt) | 25.0% |
| 208g | Whole-grain wheat flour (Flourist Whole Grain Red Fife) | 20.0% |
| 52g | Whole-grain rye flour (Central Milling Whole Rye Flour) | 5.0% |
| 781g | Water 1 (levain and autolyse) | 75.0% |
| 104 | Water 2 (mix) | 10.0% |
| 20g | Fine sea salt | 1.9% |
| 55g | Ripe sourdough starter, 100% hydration | 5.3% |
Additional ingredients
Instant or rolled oats, for topping (optional)
Spelt, Rye, and Whole Wheat Sourdough Bread Method
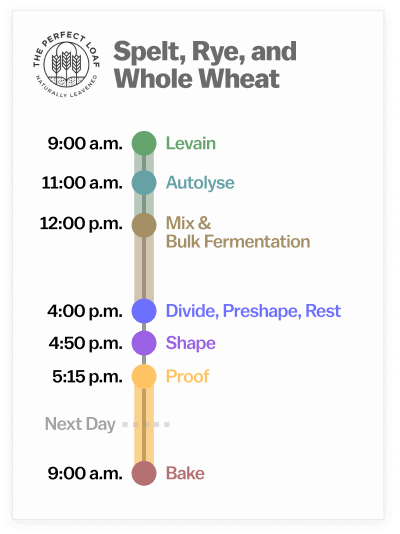
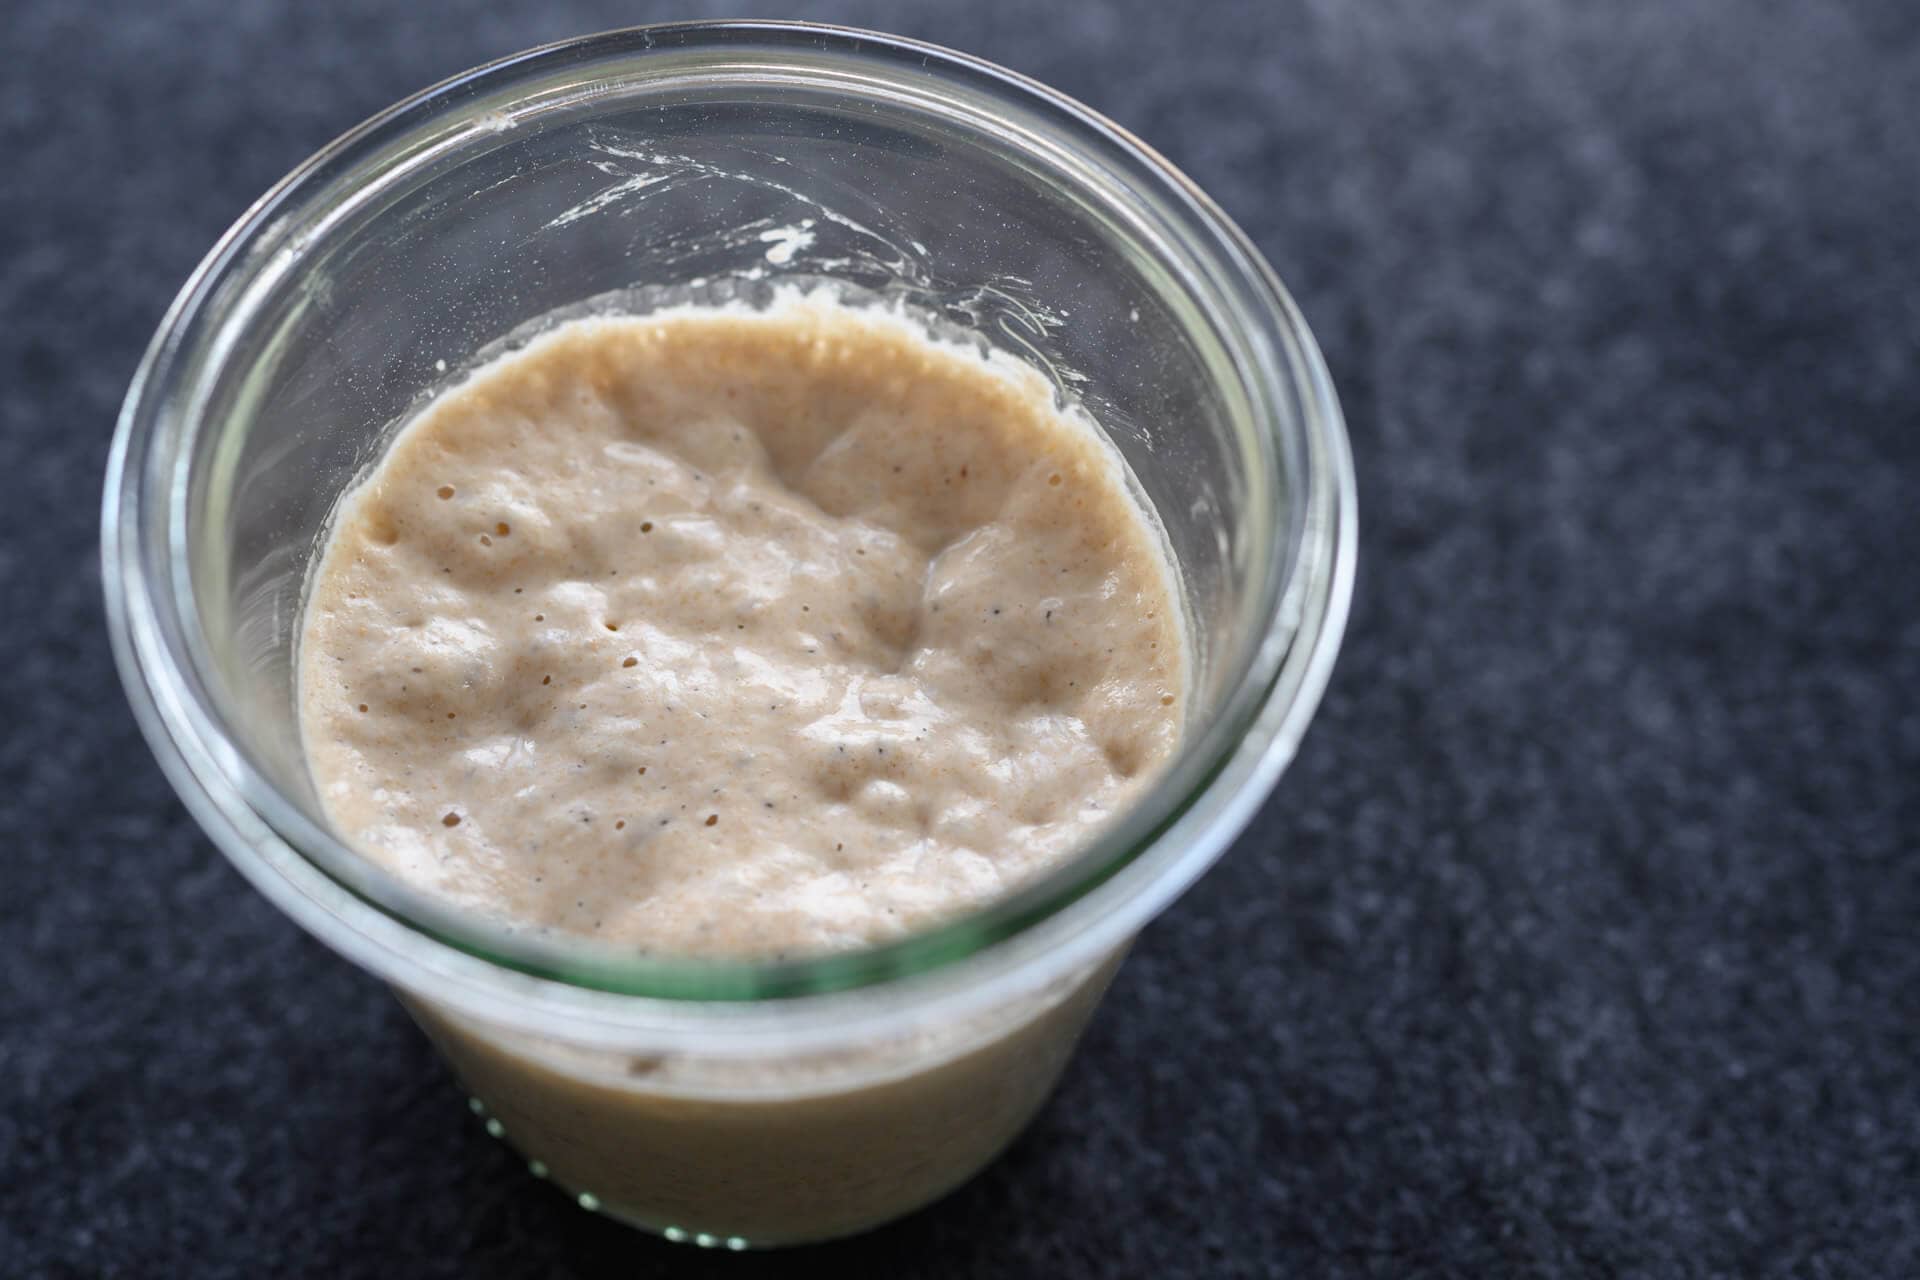
1. Prepare the levain – 9:00 a.m.
| Weight | Ingredient | Baker’s percentage |
| 27g | White flour | 50.0% |
| 27g | Whole spelt flour | 50.0% |
| 55g | Water 1 (levain) | 100.0% |
| 55g | Ripe sourdough starter, 100% hydration | 100.0% |
Mix the above ingredients in a jar and leave them covered at a warm temperature, 74-76°F (23-24°C), to ripen for 3 hours.
2. Autolyse – 11:00 a.m.
| Weight | Ingredient |
| 493g | White flour |
| 233g | Whole spelt flour |
| 208g | Whole wheat flour |
| 52g | Whole rye flour |
| 726g | Water 1 (autolyse) |
Warm or cool the autolyse water so that the temperature of the mixed dough meets the FDT (final dough temperature) of 78°F (25°C) for this recipe. Place all of the flours and water 1 in a large bowl. Use wet hands to mix until no dry bits remain; the dough will be shaggy and loose. Use a bowl scraper to scrape down the sides of the bowl to keep all the dough in one area at the bottom. Cover the bowl and place it near your levain for 1 hour.
3. Mix – 12:00 p.m.
| Weight | Ingredient |
| 104g | Water 2 (mix) |
| 20g | Fine sea salt |
| 164g | Ripe levain (from Step 1) |
Add the salt and levain to the top of the dough in autolyse, and use a splash of water 2 to moisten. With wet hands, mix thoroughly. Add the remaining water if the dough feels cohesive and it can handle the rest. Next, knead the dough for a few minutes using either the slap and fold technique or folds in the bowl. For this dough, I kneaded for about 5 minutes until the dough smoothed and became elastic.
Transfer the dough to a bulk fermentation container and cover.
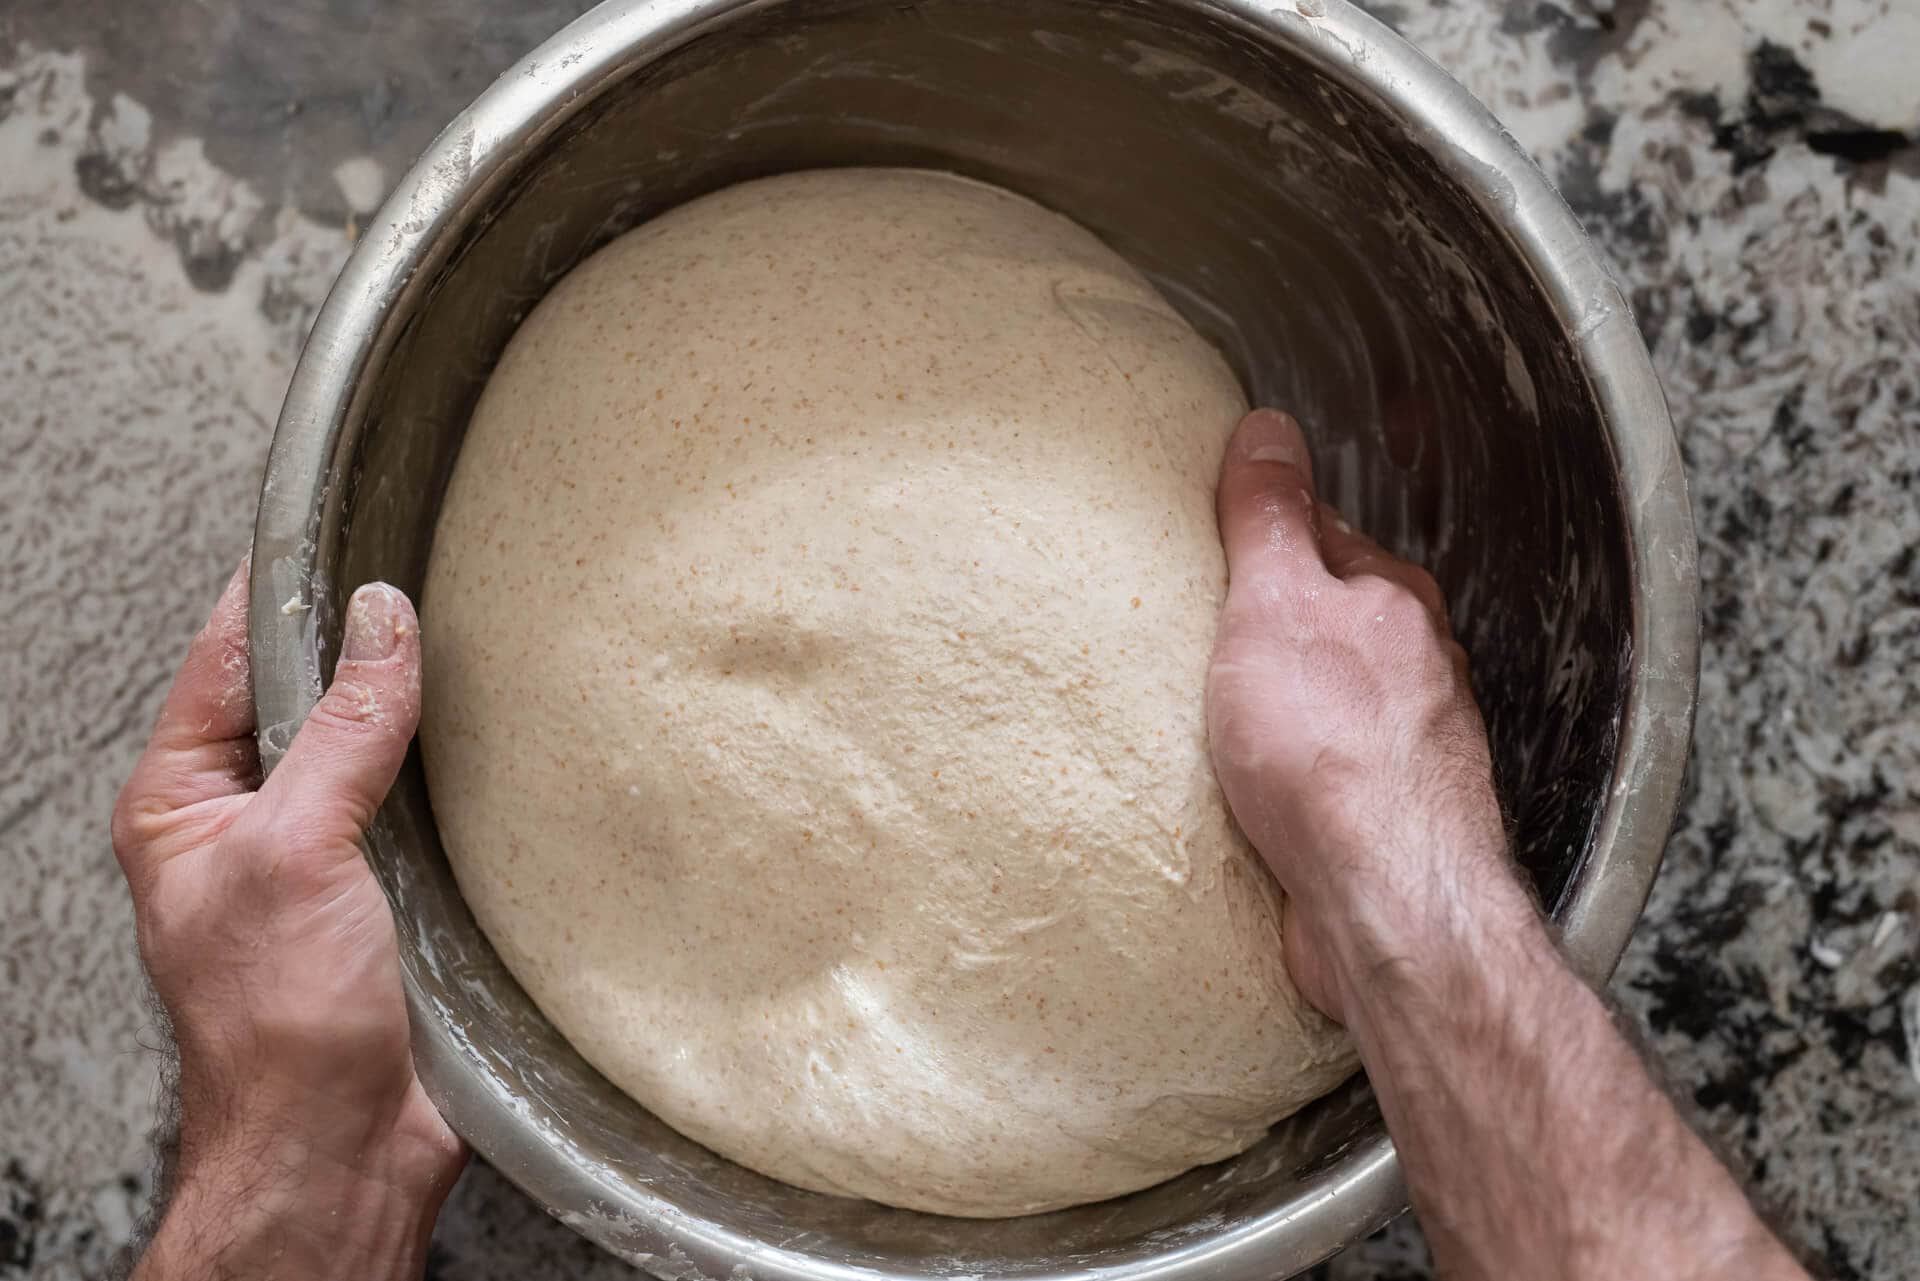
4. Bulk fermentation – 12:30 p.m. to 4:00 p.m. (3 1/2 hours)
At a warm room temperature, 74-76°F (23-24°C), bulk fermentation should take about 3 1/2 hours.
This dough will require 3 sets of stretches and folds during bulk fermentation. After the first 30 minutes, wet your hands, grab one side of the dough, and lift it up and over to the other side. Rotate the bowl 180 degrees and repeat. The rotate the bowl a quarter turn and stretch and fold that side. Rotate the bowl 180 degrees again and finish with a stretch and fold on the last side. The dough should be neatly folded up in the bowl. Cover and repeat these folds every 30 minutes for a total of 3 sets of stretches and folds. Then let the dough rest, covered, for the remainder of bulk fermentation.
5. Divide and preshape – 4:00 p.m.
After 3 1/2 hours, the dough should be well-risen in the bulk fermentation container and puffy to the touch. The edge where the dough meets the container should be domed downward, showing strength and rise.
Fill a small bowl with water and place it next to your work surface. Scrape the dough onto a clean counter. Divide the dough into two equal pieces and prehsape each into a tight round.
Let the dough rest, uncovered, for 20 minutes. This is a shorter bench rest because the dough will be looser and slacker than most breads, spreading faster than usual.
6. Shape – 4:50 p.m.
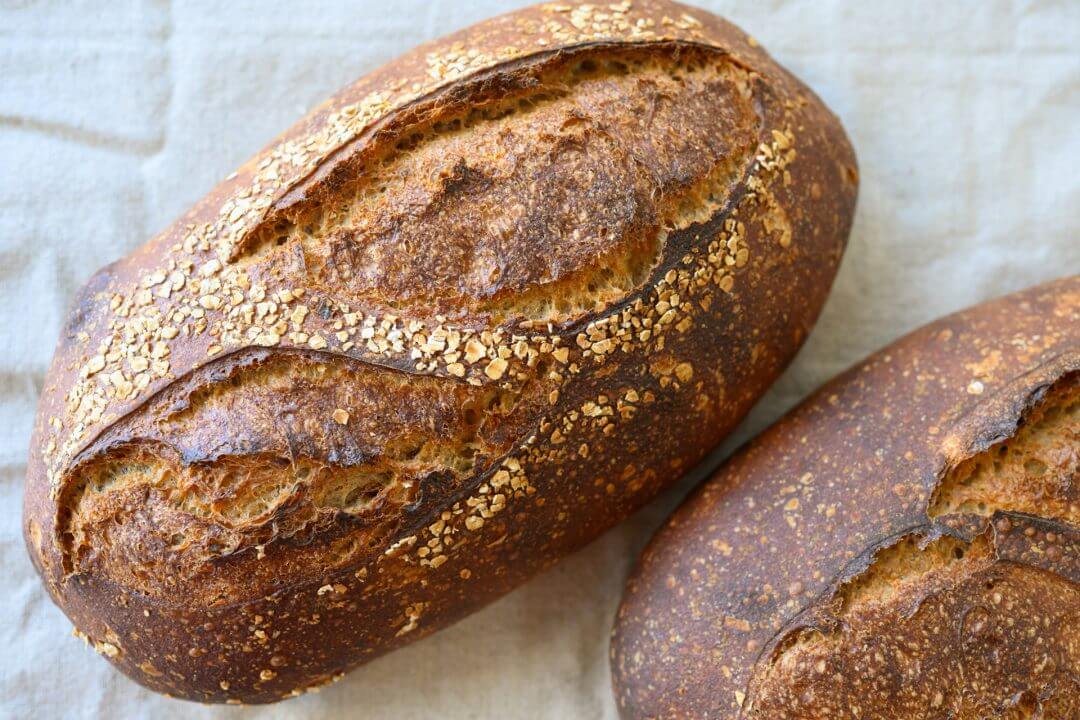
I like to top this spelt, rye, and whole wheat sourdough bread with instant or rolled oats, but this step is optional. Spread an even layer of rolled oats on a clean kitchen towel or sheet pan.
I love to shape this recipe as a long, tapered batard (oval). See my process for shaping a batard or watch me shaping below for a quick tutorial.
Flour the top of each preshaped round and your work surface. Using your bench knife, flip one round over onto the floured area and shape it into a batard. Using two hands, transfer the dough top-side down to the oats, gently rocking the dough back and forth so that the oats stick. Then, flip the dough and place it seam-side-up into a prepared proofing basket.
Repeat for the other preshaped round.
7. Proof – 5:15 p.m. to 9:00 a.m.
Cover the baskets with a large, reusable plastic bag and seal shut. Let proof overnight in the refrigerator.
8. Bake – 9:00 a.m. (the next day)
Due to the large size of these loaves, they may not fit inside of a typical Dutch oven or Combo cooker. I prefer to bake them directly on a baking surface and steam my oven. See my guide to steaming a home oven for bread baking for instructions.
Place an oven rack in the bottom-third of the oven. Preheat your oven with a baking surface inside to 450°F (230°C).
Take the proofing baskets out of the fridge, uncover them, and put a piece of parchment paper over the basket. Place a pizza peel or inverted baking sheet on top of the parchment and, using both hands, flip everything over. Gently remove the basket and score the dough. I like to score these long ovals with a single long slash or a double slash.
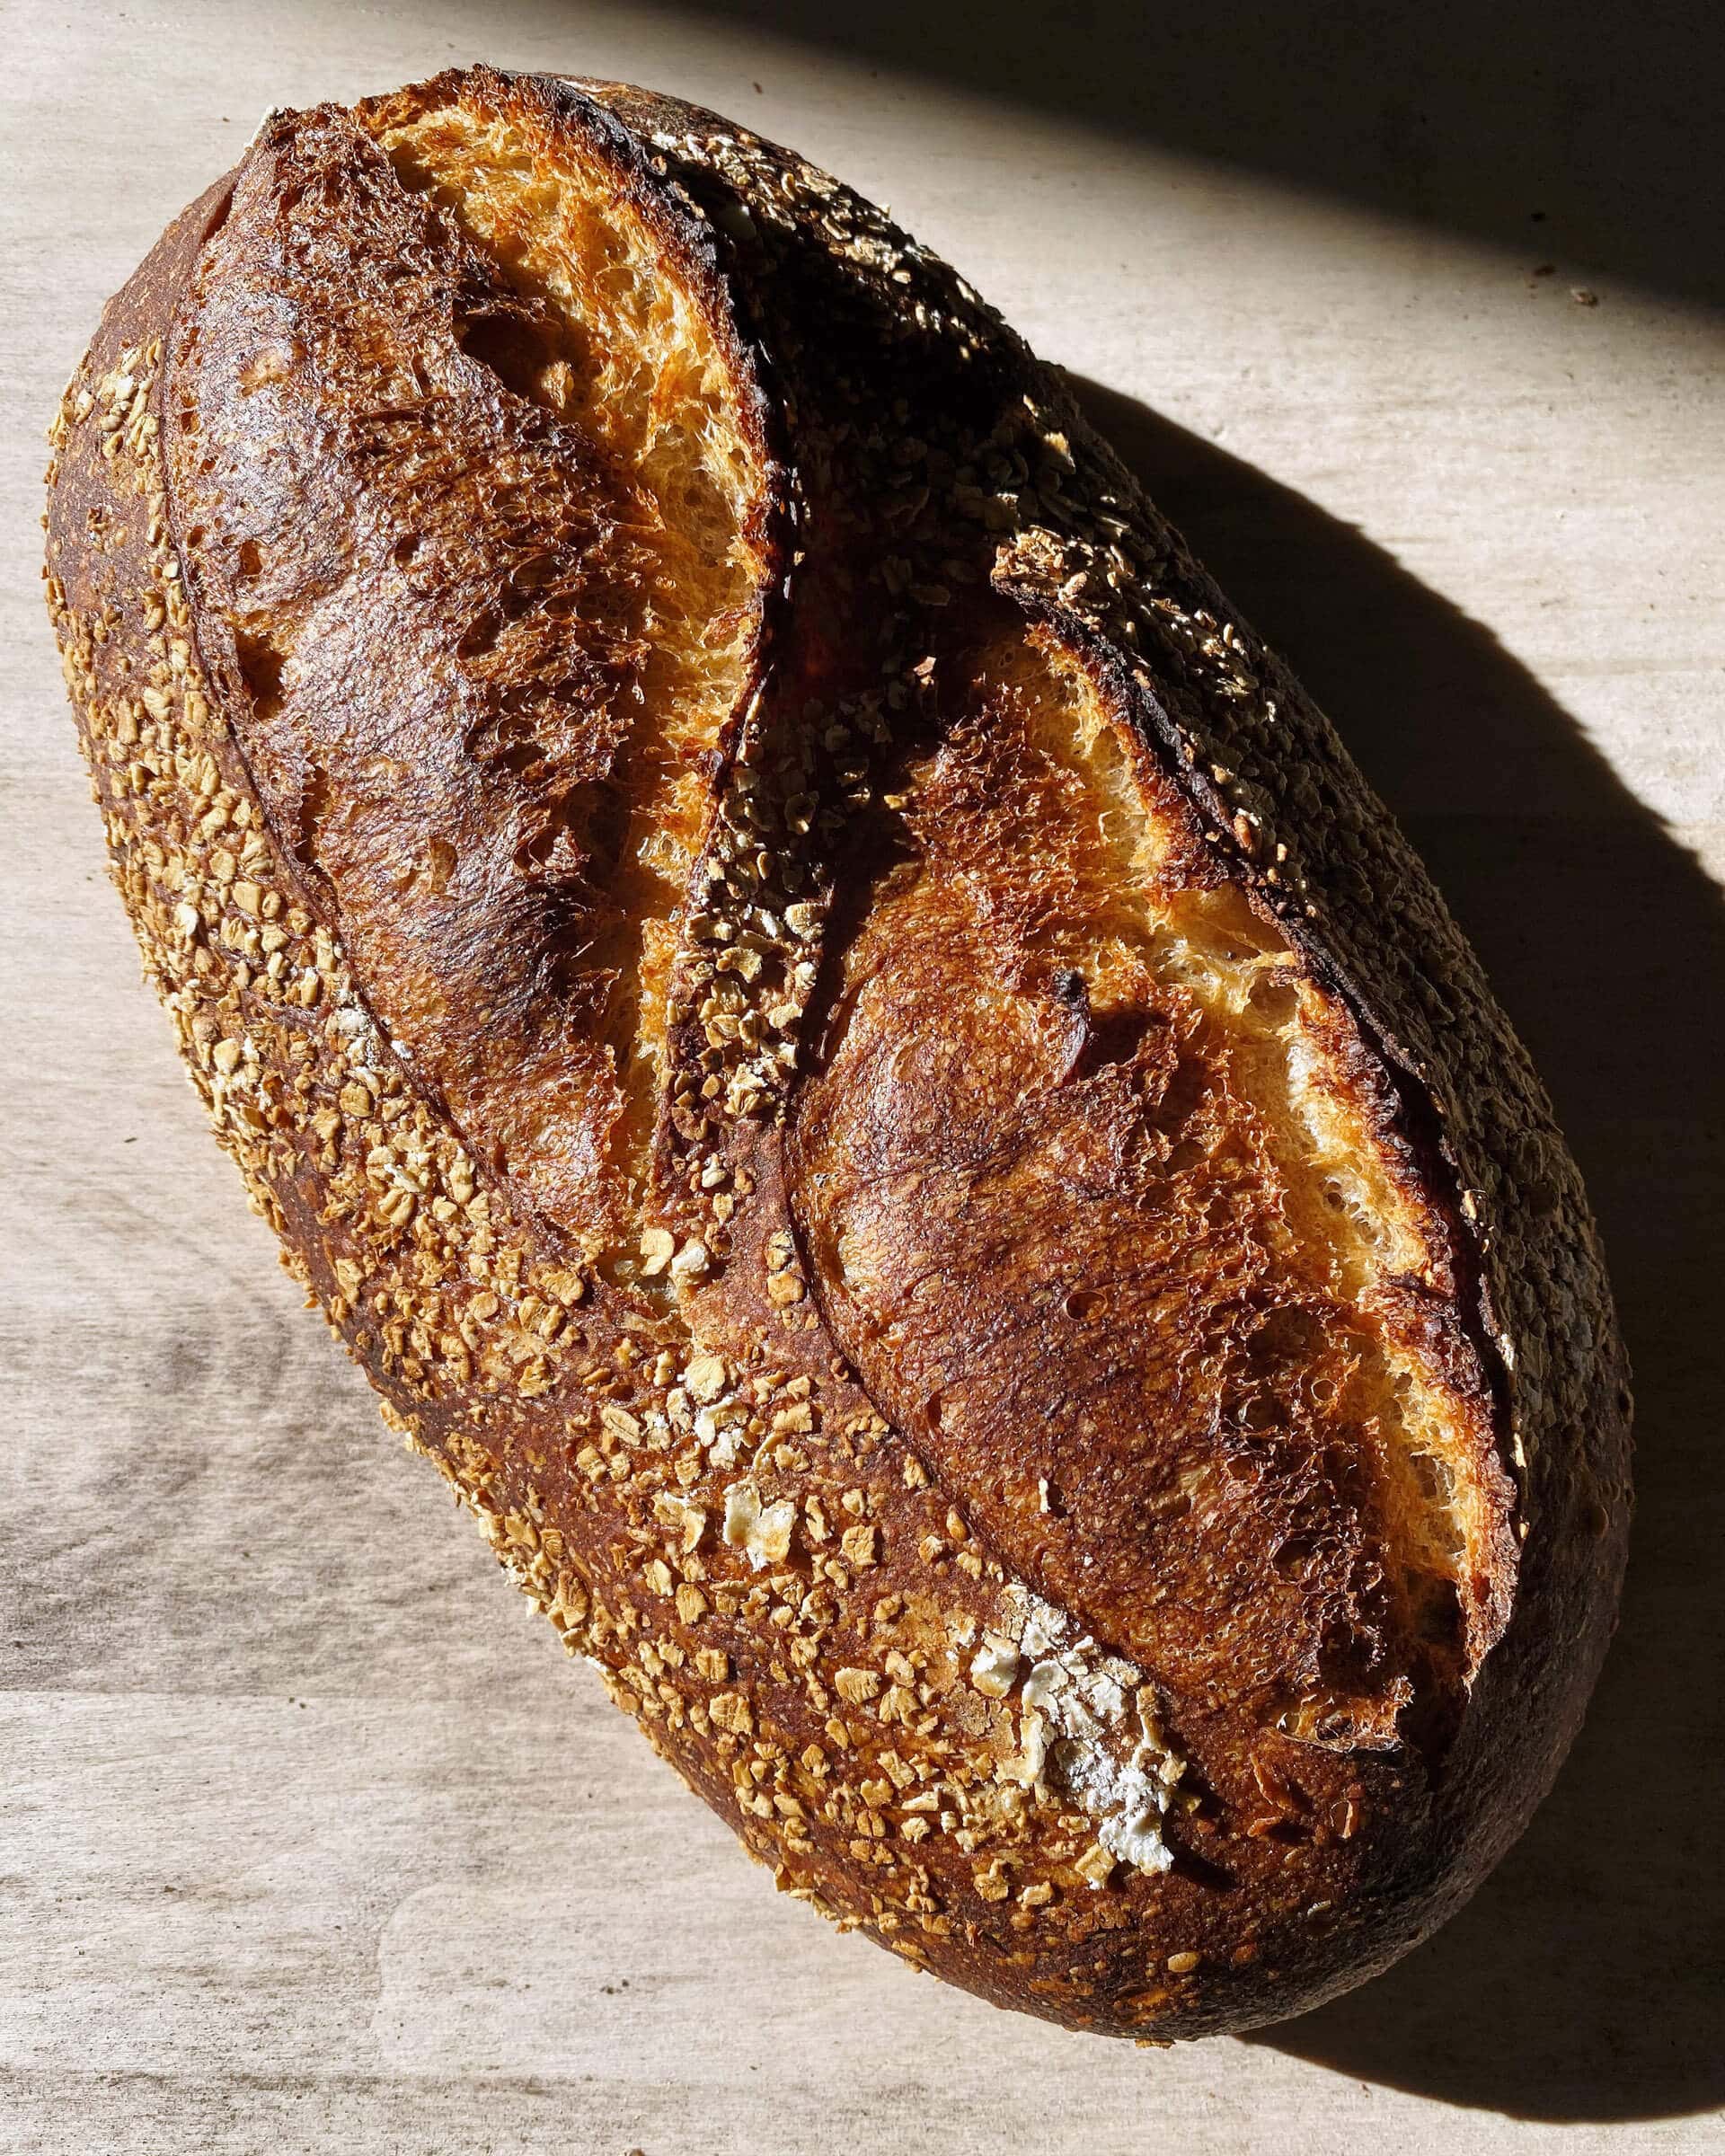
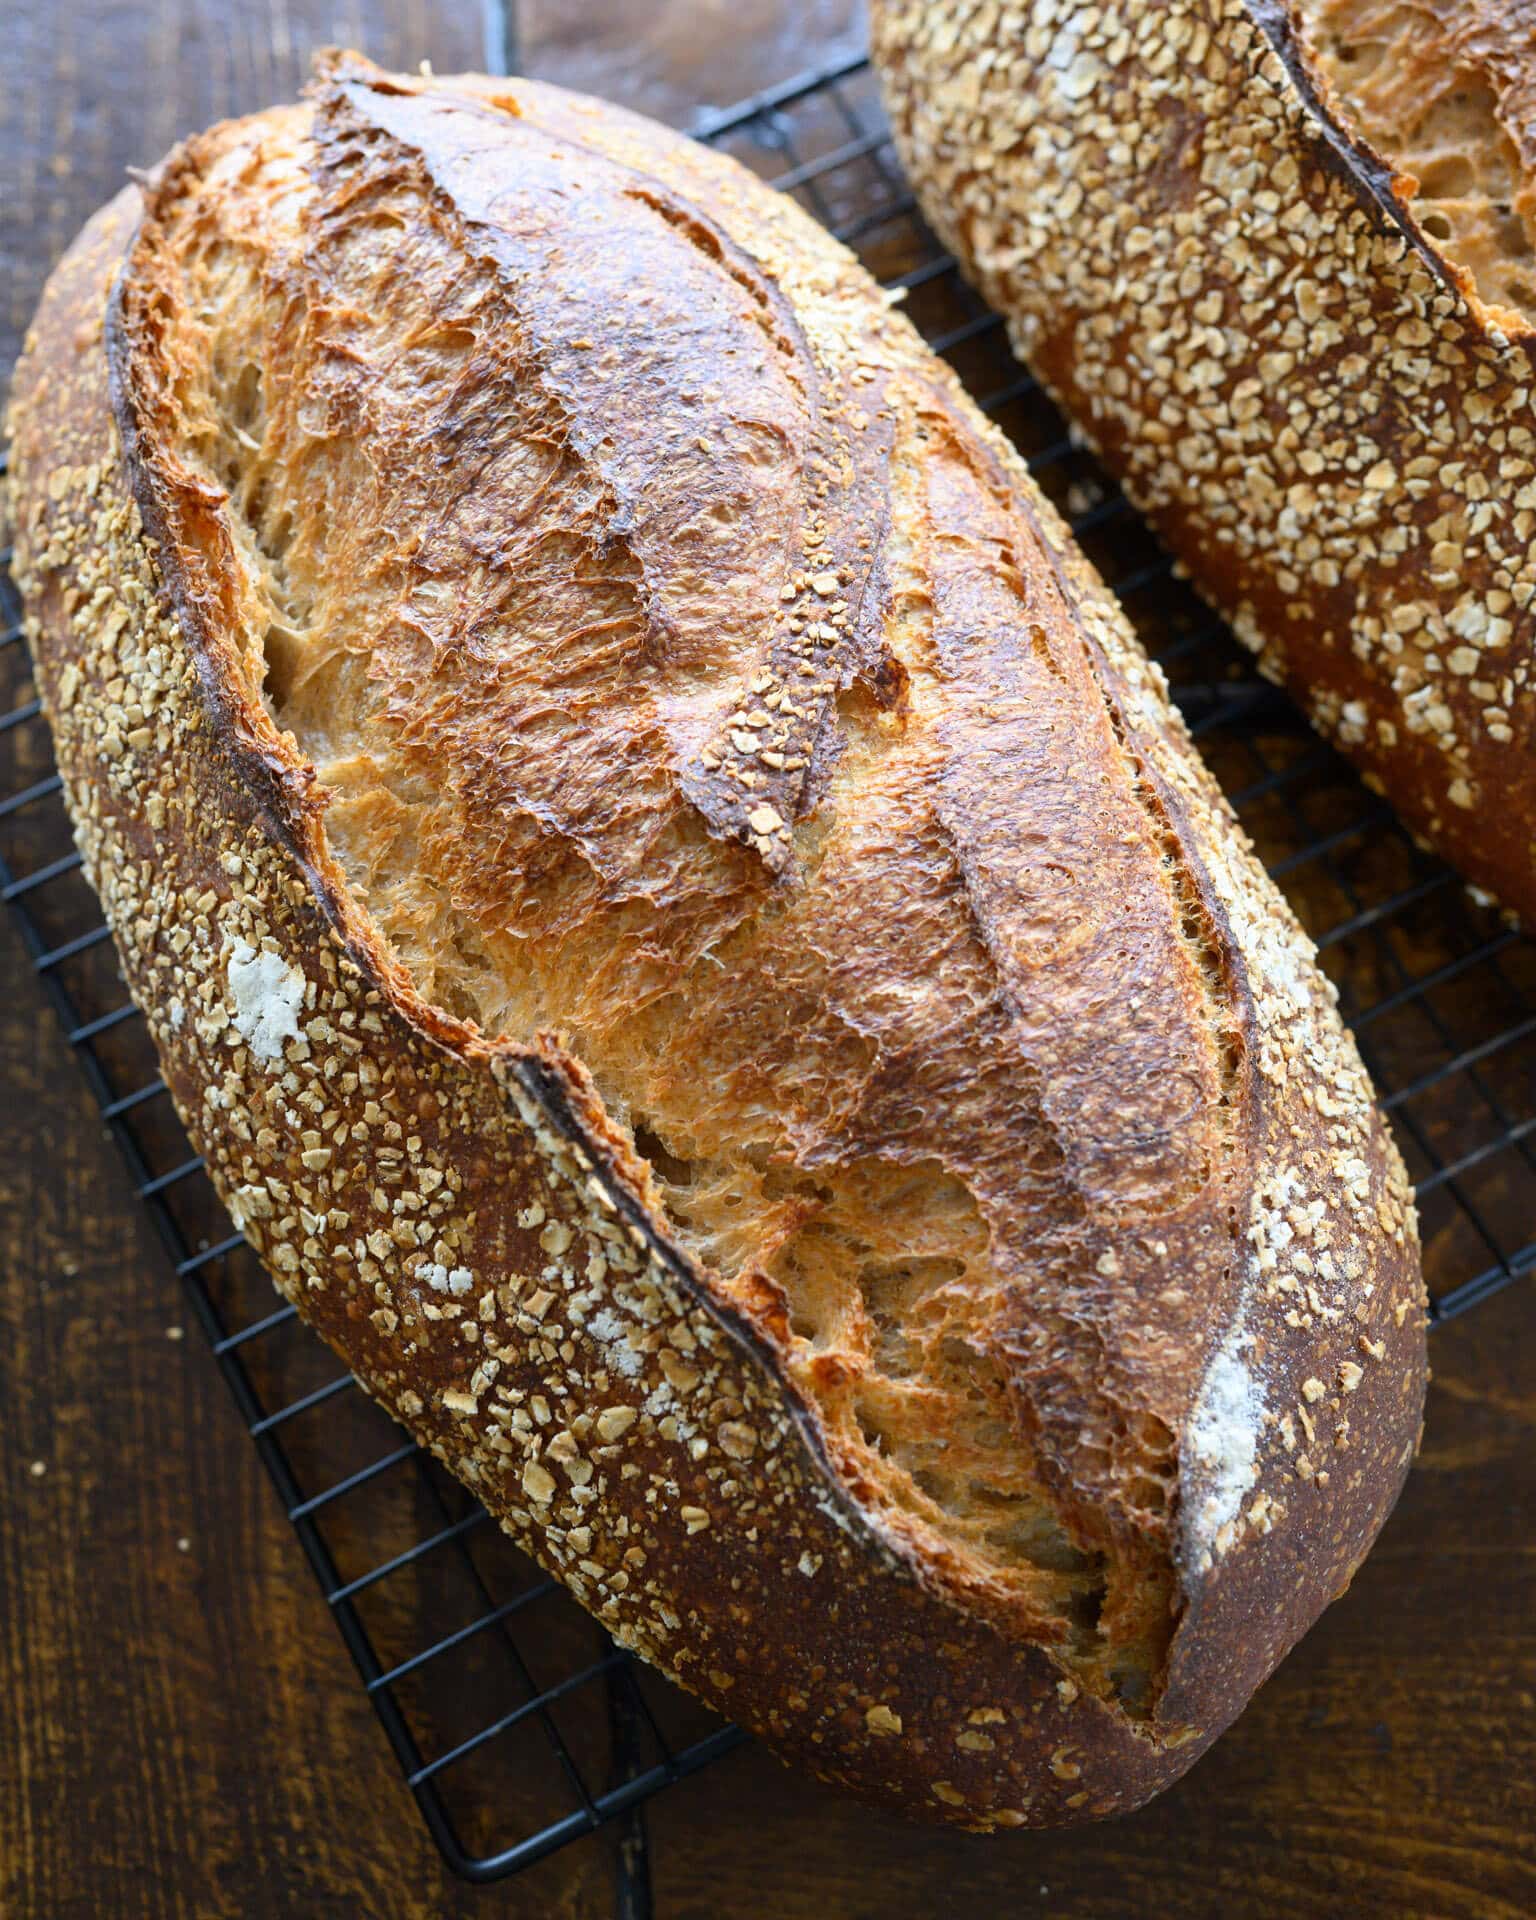
Slide the dough into the oven. Steam the oven by pouring ice into the preheated pan at the bottom of the oven. Bake for 20 minutes. Vent the oven of steam by removing the steaming pans. Continue to bake for 35 minutes more. When done, the loaf should have an internal temperature of around 204°F (95°C), and the crust should be deeply colored.
Let the loaf cool on a wire rack for 3 to 4 hours before slicing. This bread will keep well for a week or more if stored properly.
Print
Spelt, Rye, and Whole Wheat Sourdough Bread
- Prep Time: 24 hours
- Cook Time: 1 hour
- Total Time: 25 hours
- Yield: 2 loaves
- Category: Sourdough, Bread
- Cuisine: American
Description
A flavorful—and wholesome—loaf of sourdough bread with whole spelt, whole rye, and whole wheat.
Ingredients
Levain
- 27g white flour (about 11.5% protein)
- 27g whole spelt flour
- 55g water
- 55g ripe sourdough starter, 100% hydration
Autolyse
- 493g white flour
- 233g whole spelt flour
- 208g whole wheat flour
- 52g whole rye flour
- 726g water
Mix (final dough)
- 104g water
- 20g fine sea salt
- 164g ripe levain
Instructions
- Levain (9:00 a.m.)
In a small bowl or jar, mix the Levain ingredients. Cover the jar and keep it at a warm temperature for 3 hours. - Autolyse (11:00 a.m)
In a mixing bowl, add the autolyse ingredients until no dry bits remain. Cover the bowl and let rest for 1-hour. - Mix (12:00 p.m.)
Add the salt and levain to the top of the dough in autolyse, and use a splash of water to moisten. With wet hands, mix thoroughly. Add the remaining water if the dough feels cohesive and it can handle the rest. Next, knead the dough for a few minutes using either the slap and fold technique or folds in the bowl. For this dough, I kneaded for about 5 minutes until the dough smoothed and became elastic.Transfer the dough back to the bowl or to a container for bulk fermentation and cover. - Bulk Fermentation (12:30 p.m. to 4:00 p.m.)
This dough will require 3 sets of stretches and folds during bulk fermentation. After the first 30 minutes, wet your hands, grab one side of the dough, and lift it up and over to the other side. Rotate the bowl 180 degrees and repeat. Then rotate the bowl a quarter turn and stretch and fold that side. Rotate the bowl 180 degrees again and finish with a stretch and fold on the last side. The dough should be neatly folded up in the bowl. Cover and repeat these folds every 30 minutes for a total of 3 sets of stretches and folds. Then let the dough rest, covered, for the remainder of bulk fermentation. - Divide and Preshape (4:00 p.m.)
Use water and a wet hand or lightly flour your work surface (whichever you prefer) and scrape out your dough. Using your bench knife, divide the dough in half. Lightly shape each half into a round shape. Let the dough rest for 20 minutes, uncovered. - Shape (4:50 p.m.)
Lightly flour the top of your preshaped rounds and using floured hands, shape the dough into an oval (batard) shape, then place the dough in proofing baskets, seam side up. - Proof (5:15 p.m. to 9:00 a.m. the next day)
Cover proofing baskets with reusable plastic and seal. Then, place both baskets into the refrigerator and proof overnight. - Bake (The next day, 9:00 a.m.)
Preheat your oven with a baking surface inside to 450°F (230°C). When the oven is preheated, remove your dough from the fridge, score it, and transfer it to the preheated baking surface. Bake for 20 minutes with steam. After this time, vent the steam in the oven and continue to bake for 35 minutes longer. When done, the internal temperature should be around 204°F (95°C). Let the loaves cool for 3 to 4 hours on a wire rack before slicing.
Notes
If you want to bake only a single loaf, divide all the ingredients in half.
What’s Next?
If you love the nutty, almost sweet flavor of spelt flour as I do, check out my whole grain spelt pan loaf which is 100% whole spelt.
If you want to use some more rye in your baking, check out our Light Deli Rye which uses a scalded rye porridge to bring even more flavor.
Buon appetito!


335 Comments
Hey, Megan! For larger bakes, 900g-1200g or so, I typically use 14″ oblong baskets. You could use smaller ones, though, perhaps a 10″ would work if you shaped tightly.
Hello Maurizio, I was wondering if you think this recipe might be adapted to your less levain, longer autolyse method? You mention here about using a lower protein BF and I’m wondering if that contributes to the lower rise? I’m very unclear about the relationship of rise to gluten. Thank you for all of your work and a beautifully designed site.
I wouldn’t do a longer autolyse with this recipe, it’s rather highly hydrated and with the added spelt this might all mean a really slack dough. Yes, the white flour in this recipe is moderate protein, so you’ll get a little less rise but the result is more tender, in my opinion. You could go with a lower levain percentage if you’d like, but it will change the characteristics of this bread a bit!
I have baked this formula twice. The second time I got huge oven spring (baked in DO). I am very happy with the openness of the crumb, albeit a bit uneven – I need to work on my shaping. It is one of the best tasting breads I’ve eaten, home baked or otherwise.
Super glad to to hear that, Adam! I make this often here and it’s one of my top formulas to be sure — lots going on with flavor and texture! Thanks for the feedback and happy baking.
Hi Maurizio, why 986g of flour instead of 1000g of flour? Is it just to make slightly smaller loaves that are easier to handle?
It’s because of the way I create my formulas, it has little to do with the actual weights of ingredients but more about their percentages in the overall formula. Check out my post on baker’s percentages where I have a section on why the numbers are rarely “round numbers” in my formulas 🙂
Just made this and it’s no doubt the best bread I’ve ever made. The flavor is SO good and the bread just melts in your mouth. https://drive.google.com/drive/folders/1biqlKC2n8djinoMRNMy8gSmXmYNxb7ZM?usp=sharing
It really is the best bread I’ve ever had. I made regular country bread after a few loaves of this, and it tasted so bland compared to this spelt rye bread! Has me contemplating getting the KitchenAid mockmill attachment to mill my own local spelt!
Right on, Eric! You’ll love freshly milled flour, guaranteed.
Glad to hear this, Lauren!
Hi Maurizio. Thanks so much for all the great recipes and all the time you spend educating us all! We have not tried this one yet because we don’t have any Spelt. We just finally got our hands on some Dark Rye (Bob’s Red Mill) today. We also have AP, Bread, and Whole Wheat (all King Arthur). Any suggestions for substituting the Spelt out? Can I just replace it with more Rye?
I’d sub out the spelt and use whole wheat flour in its place. Spelt really makes this loaf, but I understand, it can be difficult to find in these times. That said, with wheat in its place you’ll still get an amazing loaf!
Hey, everyone! Any tips on how we might adjust the recipe if we’re substituting fresh milled spelt for the regular spelt flour? I’m guessing I should lower the hydration a bit and keep an eye on a quicker bulk fermentation time?
That’s exactly right, Eric. I’d expect a lower hydration and perhaps reduced fermentation activity.
you have a 16 hr final cold proof, my dough was well over proofed by 11 hrs.. sl I’m unsure how your making it 16 hrs with a 17% hit of levain. I usually do 10% for such long final proof. I do not have issues handling hi hydration dough either. what am I missing here
Do what’s right for your environment and dough, if you need to reduce proof time that’s just fine. It might be the bowl you’re using to retard (thicker means the dough will cool slower, proofing at warm temp longer), the fridge temp, etc.
Thank you for your great site! I created a starter when the Stay at Home order came in March and I’ve made sourdough almost every weekend since. I appreciate your detailed recipes and explanations. Question….I follow the instructions to the gram but often I don’t have enough levain for the recipe. Both water and air temps are correct. Would more time help? And what do I do when short of levain?
This is pretty common! It’s ok if it’s a little bit short. If you’re getting a huge discrepancy, you can increase every ingredient in the levain a bit to make a little more. For example, add 5g flour, 5g starter, 5g water. If it’s short, it’s ok, just keep an eye on the dough and give it a little extra time (if it’s even needed)!
Hi. I left about 150ml of water out. It had tightened up a bit during the slap and fold but has become wetter during the 3.5 hour bulk fermentation and there’s no way I can shape it into anything resembling a boule or batard.
Do I have to start again or is there something I can do to rectify this?
This is now my favourite regular loaf. I’ve messed around with the proportions of flour a bit – I tend to use 25% spelt and 25% rye and dispense with the wholewheat. But the combination of sourness, crisp crust and soft crumb, which lasts many days, is just perfect.
Glad to hear that, David! I like those mods, too.
What dough temp are you looking for?
Do you let the dough come to room temp while the oven heats or put the cold dough directly from the fridge into the hot oven when it’s ready?
Cold dough straight to the oven.
Hey, everyone! I can’t seem to locate any whole wheat flour, but I do have an overabundance of Central Milling Type 110. Any ideas on how this might fair as a substitute?
I’ve used CM 110 — I’d sub the WW out 1-for-1 with the 110.
Thank you!
I’ve tried this recipe twice – 85% Hydration (it was not pretty) and then at 75% Hydration, the dough seemed to take the water well so I proceeded. After baking, I got a wet center and not much crumb to speak of. I think my flour can’t handle that much hydration. Any ideas?
After three tries, I found the bread to be much better with 150g less water than called for. So of the 200g held back, I only added 50. Give that a try!
It sounds like your dough is most likely over hydrated. Try reducing the hydration by another 5% (so shoot for 70%) and give it another go — the reduced water should bring a lot of strength to the dough and you’ll feel it immediately. Once you find a suitable hydration, you can try to push it back up, but as you do, take note of how the consistency of the dough changes: the dough will start to slacken out as you add more and more water, this means you’ll likely have to mix more upfront or add another set or two of stretch and folds during bulk fermentation.
Try to keep everything else as consistent as possible and let me know how the next attempt goes!
I made this again with Central Milling High Mountain for the bread flour, Central Milling type 85 Spelt for the spelt, the Flourist Red Fife and Central Milling Rye. When I mixed the flours for the autolyse I held back 200g of water but then realized that I had forgotten to add the Red Fife so I wound up using another 50g water for that and after mixing didn’t add any more. Shaping went a lot better and the second loaf (I bake them one at a time) came out beautiful. The first loaf was user error – the steam tray was too far to one side and I forgot to turn down the temp from 500 until about 10 minutes in so we wound up with what we termed “The Display Loaf” – I wish I took a picture – closest to the door it rose really high – kinda looked like what a pita is supposed to look like baking (I haven’t tried that yet). When I took the water out I spun it around and it browned beautifully but the top is kind of at an angle so sitting on the cooling rack it looked like it was in an angled display case. The second loaf I gave to my parents but when I left for work this morning there was only about a 1/4 of the loaf left, even my MIL liked it! Thanks again!
Flour subs look great! Type 85 spelt will not be whole grain spelt, but that’s just fine — it would also mean perhaps a slight reduction in hydration would help. Funny deal with the rise on that bread! And I should have collected all the mistakes in my baking journey, they’d make for a funny post, believe me 🙂
I want to double check with you whether we add the full amount of the levain to the recipe. It says 55g of starter but that seems like a small amount for two loaves.
Never mind! I figured it out. Thanks for the beautiful recipes.
Hi Cate, I’ve found that Maurizio loves a small levain. That’s his thing (hi, if you’re reading). I’ve decided that it gives the loaf time to become itself more. Slow and steady building flavours. But perhaps change the recipe if you don’t have as much time? It’s winter here and it definitely takes all day to BF. Making these recipes, my intro to sourdough, has definitely made me sensitive to time and texture. You watch and wait.
👋🏼
You’re very welcome, and thanks! (And yes, that small starter goes into a larger levain, which goes into the dough 🙂)
Maurizio, a question for you regarding the composition of this dough. I got everything ready and my levain was awesome and then I discovered that I didn’t have enough bread flour. I had to substitute just a little under half the bread flour with AP as I didn’t want to scrap the whole thing. I used a bit less water in the recipe, would that be your solution to having added AP or would you recommend something else? The rest of my mix was as you instructed, aside from substituting hard stone ground whole wheat for the red fife (I have red fife coming but it’s hard to find!).
Yes, AP flour would work just fine. I would reduce the hydration a bit to compensate, start at 10% reduction and add water if it feels like it can handle.
Hi Maurizio,
Thank you so much for your recipes and guides, very very helpful.
I’ve been trying to do my own sourdough for the past month, I have tried a few different recipes and techniques but I always end up with the same issues. Hopefully you might be able to help me out:
1) my dough is always very watery and difficult to shape (water is at 85F and bulk fermentation at 73C)
2) inside the bread after being cooked the air gaps are uneven and usually at the very top part of the bread (I often have huge hole sbetween the crust and the crumb)
Again, you help is much appreciated, thank you.
Sounds like the dough is over hydrated, I’d drop it 10% and give it another try. My feeling is dropping the water will solve both issues!
I have been toying with a white/spelt/rye as my go-to loaf, but I’m thinking there might be a point of spelt and rye percentage that the dough just falls apart during slap and fold? I know it’s supposed to get more extensible before it strengthens, but this is a little crazy. The dough seems to just loose all gluten strength and my hand just goes through it. Should I just not slap and fold for higher percentage spelt and rye and just use coil or stretch? Maybe something to do with my ‘new to slap and fold’ technique? I have this idea that I should push through, but perhaps that is for wheat flours?
The dough seems stiff at first and seems to gently gets more extensible during careful work with my usual coil and folds, but I’ve been trying to do slap and fold because it’s cold here and the bulk fermentation seems to never get to a decent ‘jigglyness’ before I shape and I’m sick of underproofed loaves.
Yes, if you have too much rye in the formula you’ll have a very loose and shaggy dough that might not come together — it depends on how much rye. Also, spelt is very sensitive to hydration, if you push it too far you’ll end up with a very slack and weak dough. If you push the percentage of all these too high slap and fold will be very difficult. You could try holding back some of the mixing water, slap and fold for a while till it strengthens, then put it back in the bowl and add the rest of the water. It’ll break apart when you mix in the bowl, but should eventually come back together — and at that point I’d proceed with stretch/fold in bulk fermentation.
ta. So many different qualities of these flours to explore!
Ciao, Maurizio. I just finished baking this recipe. Other than add a few extra coil folds during the bulk fermentation, I followed it pretty closely — with great success! My only note: I could easily have gotten three loaves rather than two. Grazie!
Glad to hear that, John! Yes, these are large ones 🙂 Enjoy!
Yes, give the dough as many sets as needed!
Hi Maurizio, I’m trying this recipe but realized I’m out of white bread flour. Wondering if I could substitute Central Milling Type 85 flour for the white bread flour (or the white bread flour AND the whole wheat, since Type 85 is in between.) Thanks!
You could, but you’ll likely see increased fermentation activity (type 85 is pretty active flour in my experience!). Keep an eye on the dough and perhaps shoot for a cooler FDT of 76F.
Thanks, Maurizio. Maybe I’ll try subbing it just for the white bread flour and use the whole wheat as specified in the recipe. Fingers crossed!
This was a roller coaster of an experience! I reduced the water by 30 grams but will cut 50 next time and I think it will be more manageable. It was so wet that after the bulk rise it flattened like a huge pancake on the counter. (Too hydrated or too fermented? Don’t know – the dough rose and had a lot of bubbles after the bench rise.) I couldn’t use the bench knife on it – way too sticky. In desperation, I put flour around the edges, wet my hands and managed to shape it by hand and give it some tension. I was very skeptical, but it came out so beautifully! I baked it in my Dutch oven as usual – 20 minutes at 500, 5 minutes at 450, then uncovered for 30 minutes. It’s crust but very tender inside. My substitution for the white bread flour was 100g Arrowhead Mills all purpose and the rest Central Milling Type 85 malted. So overall the percentage of whole grains is probably higher than the original. Thank you, Maurizio! https://www.instagram.com/p/CBGp2DFAEKA/?igshid=o69n13svvgqa
Reporting back on my second time baking this. I drastically reduced the water from 830 to 670g this time. And reduced the bulk rise by 45 minutes because it was 80 degrees in my house. The result once again seemed disastrous after the bulk rise – it was as sticky as glue and still spread out a lot. I couldn’t use a bench knife and it stuck to the counter like crazy. I could barely shape it due to the gluey quality. So I just sort of threw it into the banneton and refrigerated. But like and behold, the result was even better than last time. Very open crumb, lots of oven spring and great flavor. This is one crazy bread!
Wow, very interesting! Do you have access to a mechanical mixer (like a KitchenAid)? I’m wondering if you tried strengthening the dough for a few minutes in the mixer (still at the new hydration). It sounds like under strengthened dough to me! Glad it still turned out well, though — sometimes bread we are certain won’t work out still surprises us 🙂
I don’t have a Kitchen Aid but maybe I should do a longer slap and fold. I’ll try 15 minutes instead of 8 next time.
That’ll work. Also, hold back some of the mixing water when doing slap/fold. It’ll be easier to develop a stronger dough, then transfer it back to the bowl and add the water in stages as you massage it in. This is typically called bassinage and helps develop some strengthen before adding all the water, which makes it more difficult.
Back for my fourth or fifth try with this loaf. I’m finding that I start seeing a few large bubbles on the edges after only 90 minutes of the bulk rise, in a room that’s about 71 degrees. Should i keep going or move to the next step? Thanks!
That’s quite a cool temp, I’d keep going for a bit longer to see if you can get a little more rise and activity in the dough. At 71F final dough temp I’d expect this dough might take 4-5 hours in bulk fermentation or so.
Thanks, I moved it to the microwave where I had heated a glass of water. Will keep checking it!
What batard did you use, I’m planning on getting 2 and i don’t know which ones to get. What size.
You mean basket? I like 14″ long baskets from sfbi.com.
I tried this today. The taste is really good but…..I had some issues with the rise. It was difficult to work with and I persisted. It rose a LOT in the fridge but when I took it out of the form, it started spreading like a pancake. I quickly transferred it to the dutch oven and tried to score it. Once I baked it, there were many bubbles on the crust, like big bubbles, but not much oven spring. Cut it and the bread has even holes but on the top, there are a lot of large holes. Any suggestions on what went wrong??
Nicole, it sounds like your dough is most likely over hydrated. Try reducing the hydration by 10% and give it another go — the reduced water should bring a lot of strength to the dough and you’ll feel it immediately. Once you find a suitable hydration, you can try to push it back up, but as you do, take note of how the consistency of the dough changes: the dough will start to slacken out as you add more and more water, this means you’ll likely have to mix more upfront or add another set or two of stretch and folds during bulk fermentation.
Try to keep everything else as consistent as possible and let me know how the next attempt goes!