

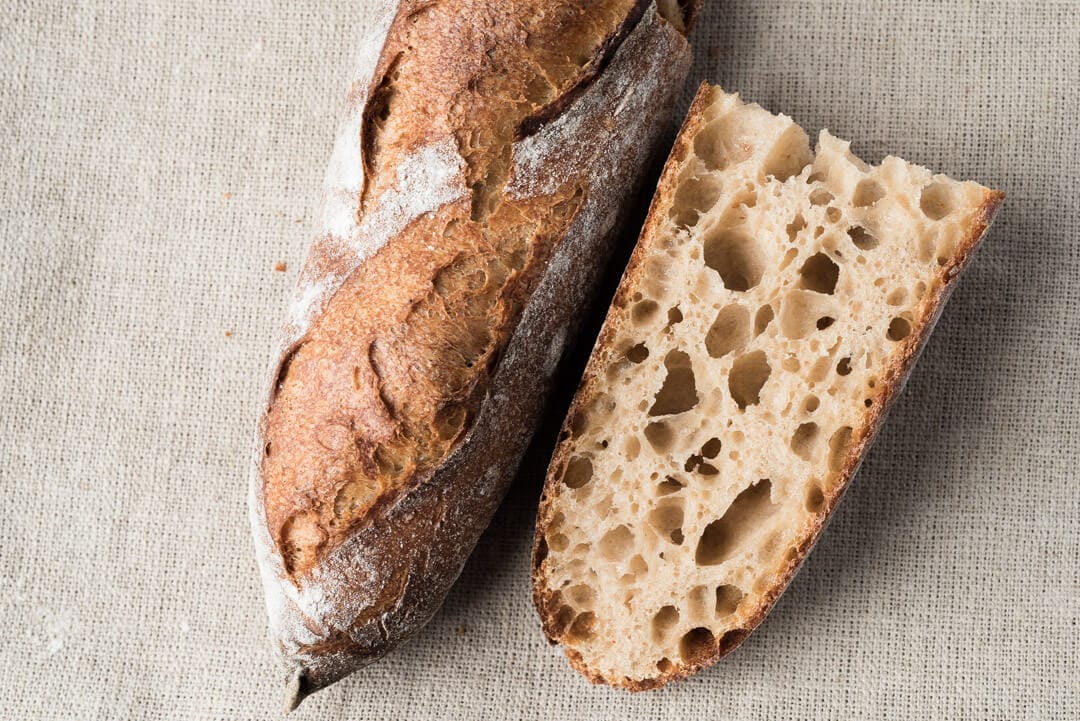
Baguettes are something I’ve had my sights on for some time, and they’re also probably one of the most requested. I’m delighted these are the first ones to share here. These Kamut demi-baguettes contain close to 50% whole grain, most of which is fresh milled khorasan (Kamut is the commercial name for Khorasan wheat), an ancient wheat variety. Kamut imparts a sweet and nutty flavor to this dough that contrasts beautifully with the baguette’s rustic and craggy crust.
I’ve talked in the past about spelt which also has some of these characteristics, but Kamut, to me, is even sweeter and also brings a very appealing creamy, yellow color to the crumb. The hallmark of a good baguette is a thin, crispy crust and ultra-tender interior—I’d say this recipe yields just that, and more.
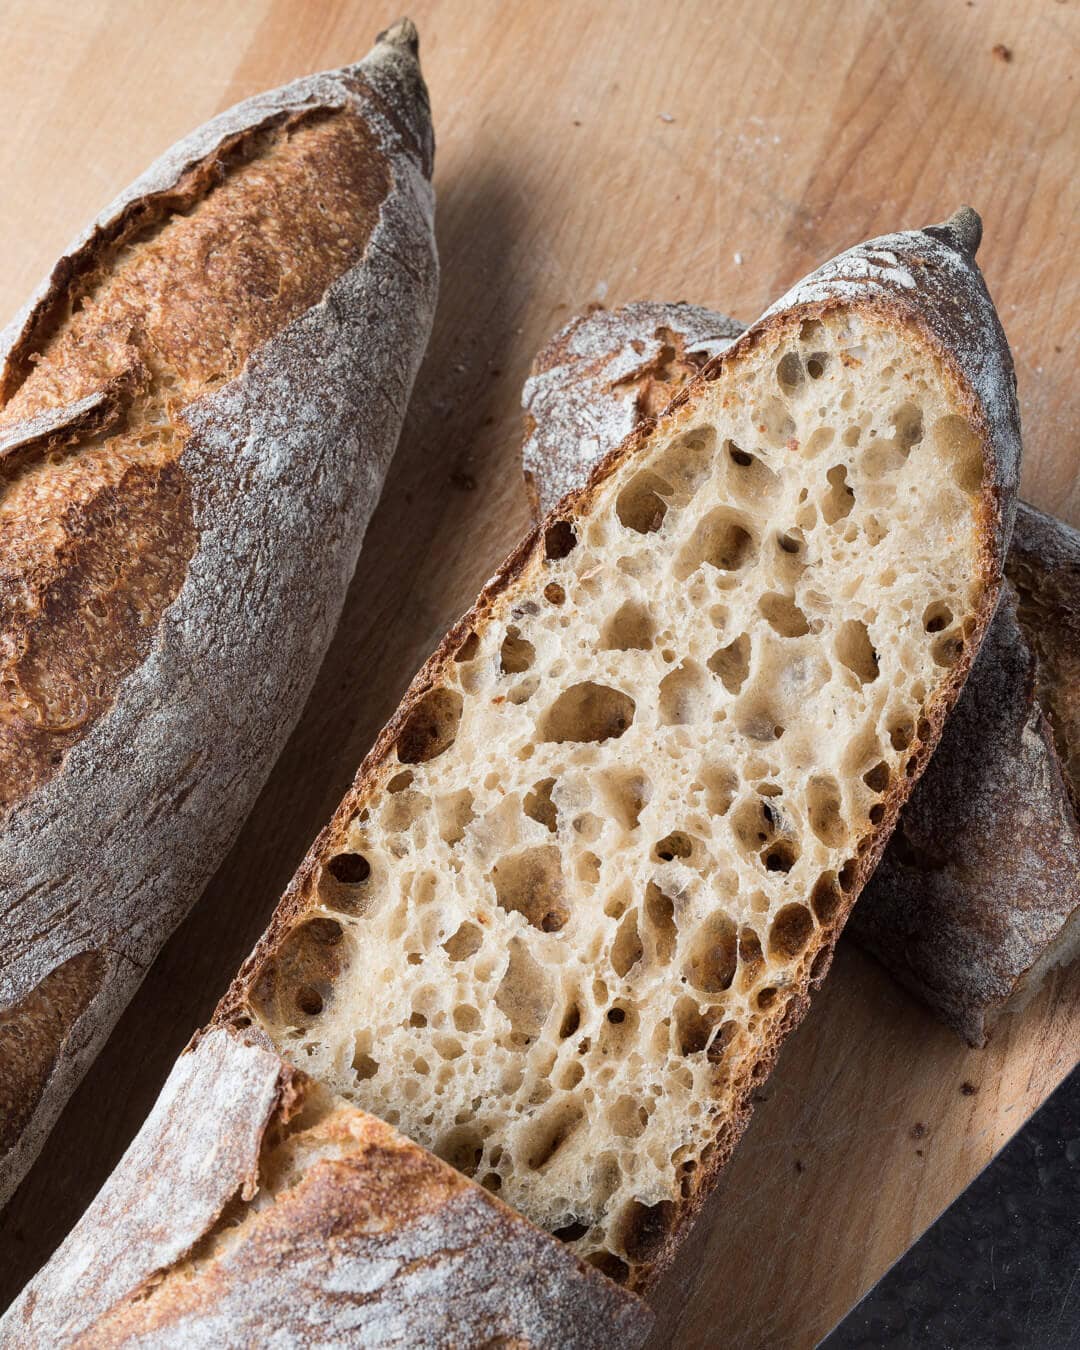
In this post, I explore a few new techniques to produce some genuinely delicious fresh milled Kamut demi-baguettes. First, the dough is bulk fermented in the refrigerator (cold bulk) which adds flexibility to this recipe as the final proof can take place at a variety of times the second day. Also, because the dough is cold and firm from being in the refrigerator, I find it much easier to handle when shaped. Second, the dough will undergo its final proof on the counter at a warm temperature on a couche, or baker’s linen (which is great for so many things in the kitchen!). This final proof for the dough is typically between 1-2 hours and using the “poke test,” we’re able to determine when to bake the dough. Finally, I utilize a stiff preferment to bring more control to the fermentation in this dough and add additional strength.
First, let’s talk about Kamut and the other grains used in this demi-baguette recipe.
Flour Selection

I’ve always liked using a high percentage of whole grains when making baguettes. This recipe, at close to fifty percent whole grain, is more than I had initially planned for—the freshly milled Kamut tastes so good I couldn’t help but continue to increase the percentage. The surprising thing is, when eating one, you’d be hard-pressed to say there’s this much whole grain packed in there. The Kamut flour is naturally sweet and has a beautiful yellowish hue (I find it somewhat similar to durum flour)—these things directly translate to the finished, baked baguette. And all of these qualities seem to be amplified even further since the flour is freshly milled hours before mixing.
In addition to the whole grain Kamut, there’s also a portion of red whole wheat in this recipe. I use this red wheat mostly in the levain build (outlined below), but it does bring a depth of flavor to the dough, even in such a small percentage. You could replace the red wheat with either more Kamut, another grain such as spelt or replaced entirely with white flour.
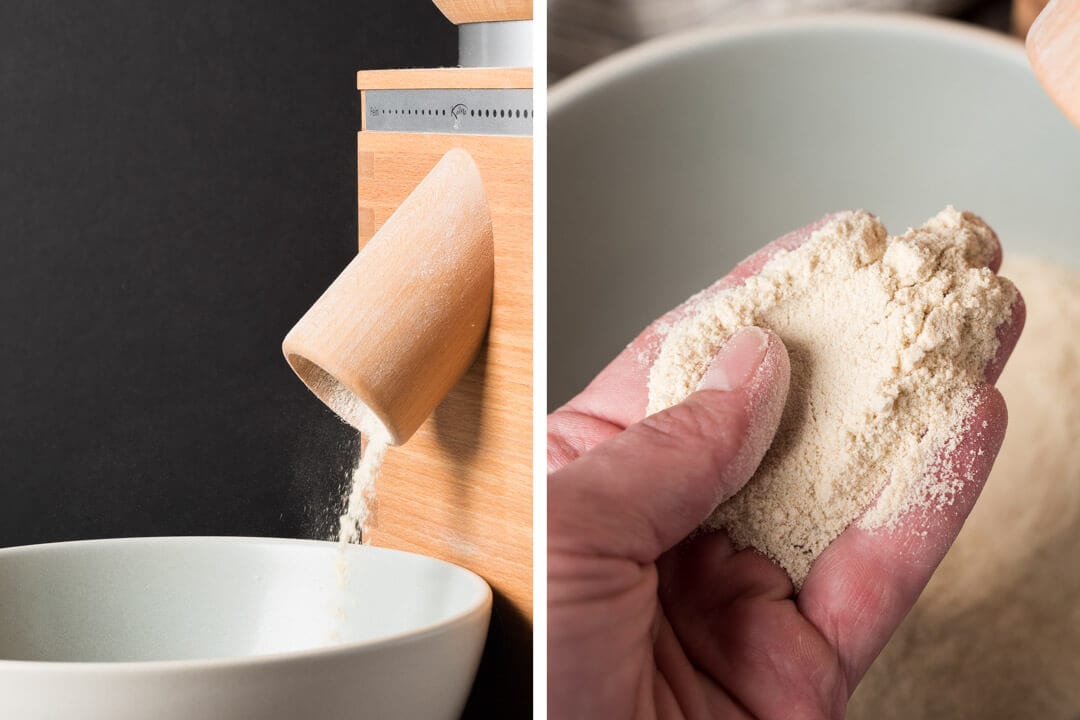
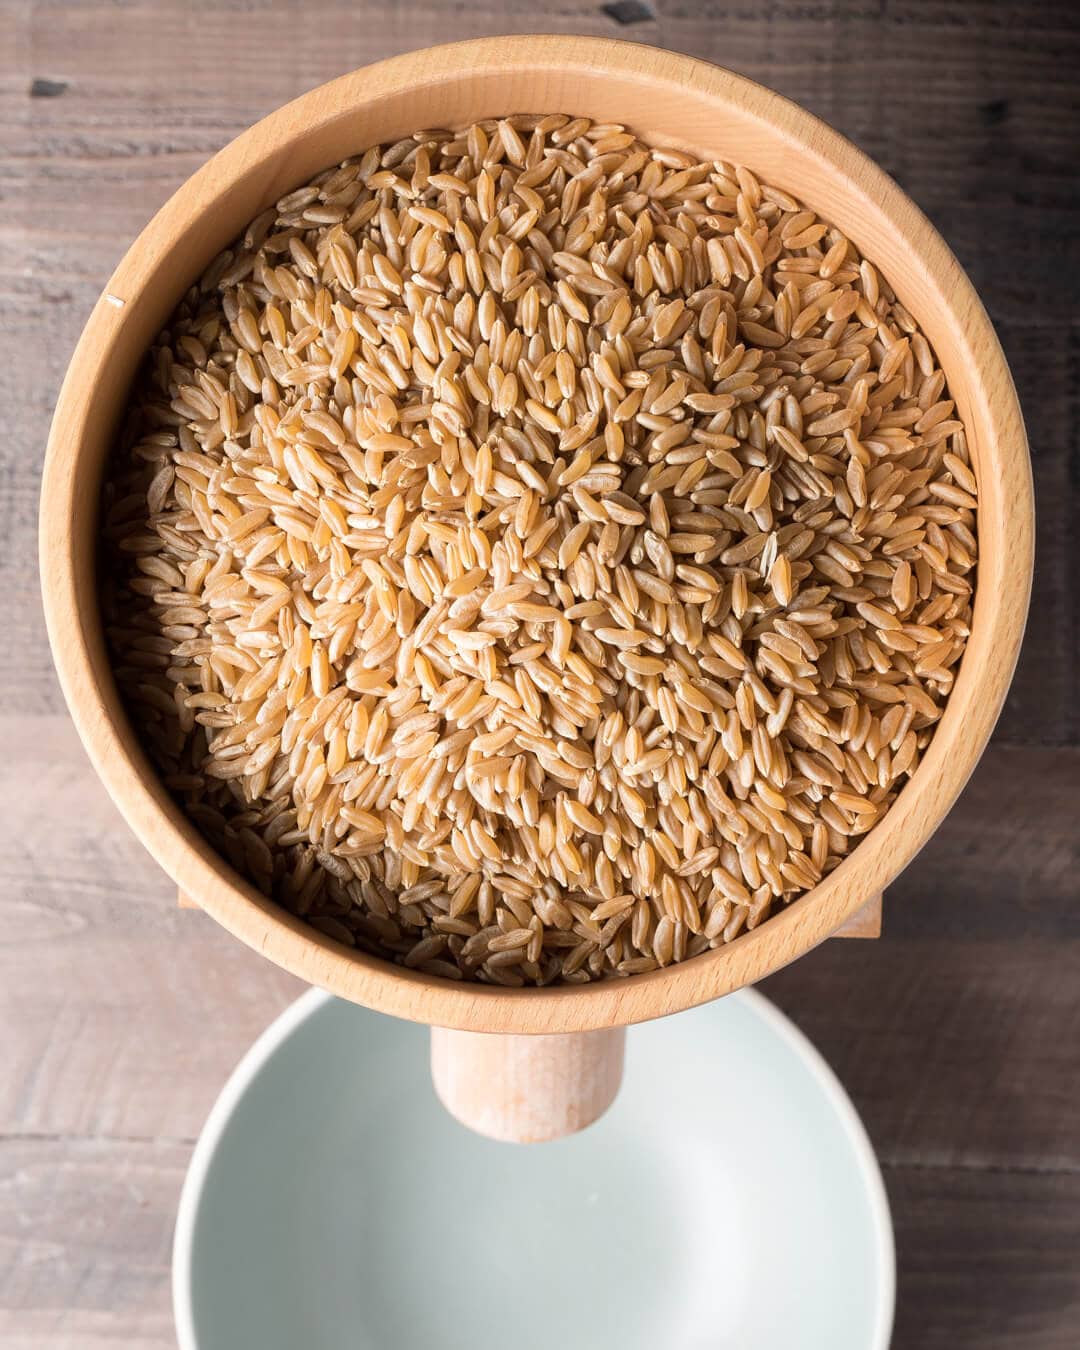
The Kamut milled for this post was done exclusively on my KoMo mill just like the one in the giveaway below. I find that milling such a large quantity of raw berries does tend to heat the resulting flour right out of the mill. To offset this, I place the required berries in the freezer a couple of hours before milling. Additionally, I like to mill all the grain needed for the recipe at the same time I build my levain; this gives it several hours to cool and reach room temperature (if necessary).
To keep the milled flour cool, keep the kamut berries in the freezer.
Now that we have our flour selected let’s discuss a few new techniques for making these Kamut demi-baguettes.
Techniques for Shaping and Proofing Kamut Demi-Baguettes
Shaping Baguettes
Lots of complicated thoughts rolled around my head when I first attempted shaping baguettes, as is true with anything with bread. Over time thinking gives way to muscle memory and thoughtlessness, a truly learned skill. The best way to get good at shaping these is to practice.
There are many ways to shape these, and each baker has their preference, but I’ve stuck to the method outlined by Jeffrey Hamelman in his seminal book, BREAD. (Additionally, I recently attended a week-long class taught by him in Washington where we all practiced this method.)
This approach imparts significant structure to the dough, and this is beneficial when working with this formula —the higher hydration dough can be sticky and a bit slack. This shaping method helps keep the shape tight through its warm proof all the way to the oven.
With this style, I see five steps to shaping a baguette:
- Starting with a preshaped round, first fold the top half down to the middle and seal (upper left image, below)
- Flip the dough 180° and fold the new top-down to the middle again, slightly overlapping the first fold (upper right image, below)
- Using your left-hand place your thumb horizontally with the middle seam and, using your fingers on the left hand, pick up and curl the top edge of the dough up and over your thumb. At each curl, use your right palm to seal this curl to the middle of the dough. Work your way from the right side of the dough all the way to the left. Note that your right hand is only sealing the dough with the palm, it does nothing else (lower left image, below)
- Flip the dough 180° and repeat step 3 above, but this time seal the dough all the way to the bottom firmly against the bench
- Using one hand, start rolling the dough away and toward your body in the middle, then transition to two hands and roll the dough back and forth as evenly as possible until you reach the desired length. Note that during this rolling it’s best to keep your fingertips and palms in contact with the bench at all times
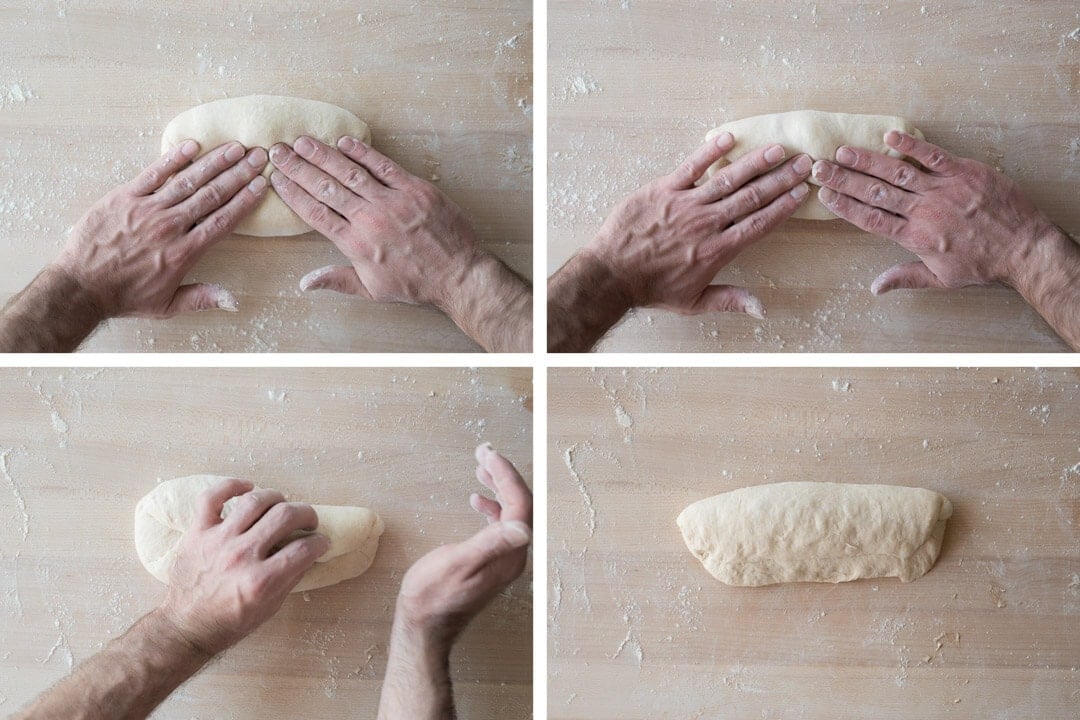
The image below shows steps 1, 2, and 3. Starting in the upper left (1), upper right (2), lower left (3) and then lower right (dough resting before step 4).
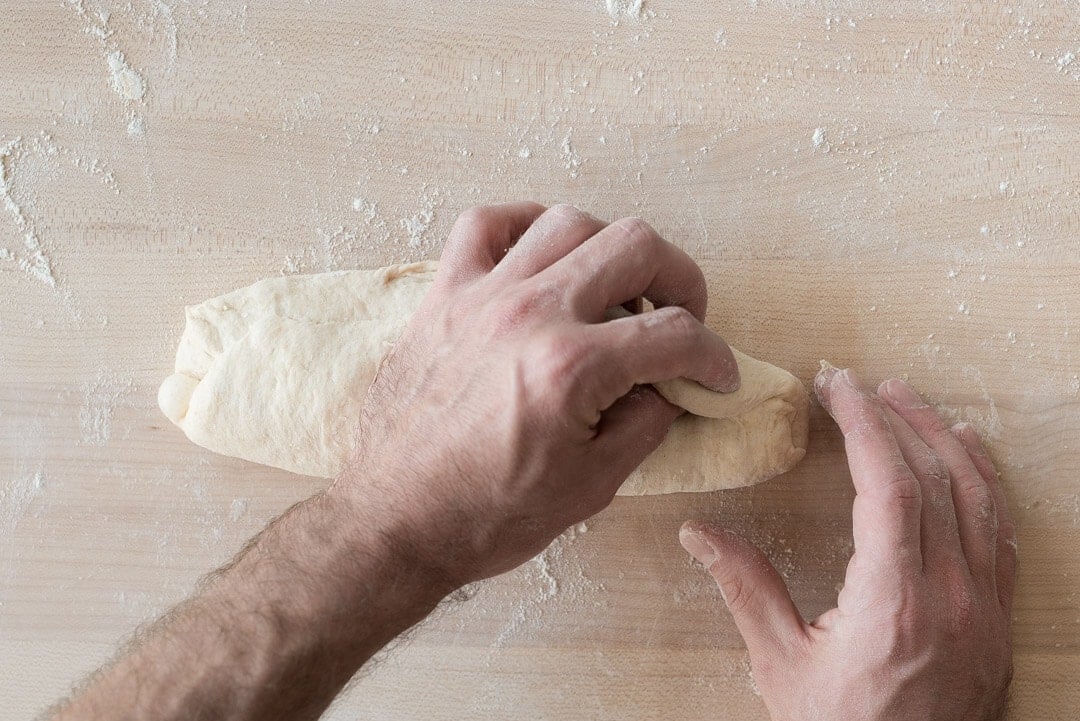
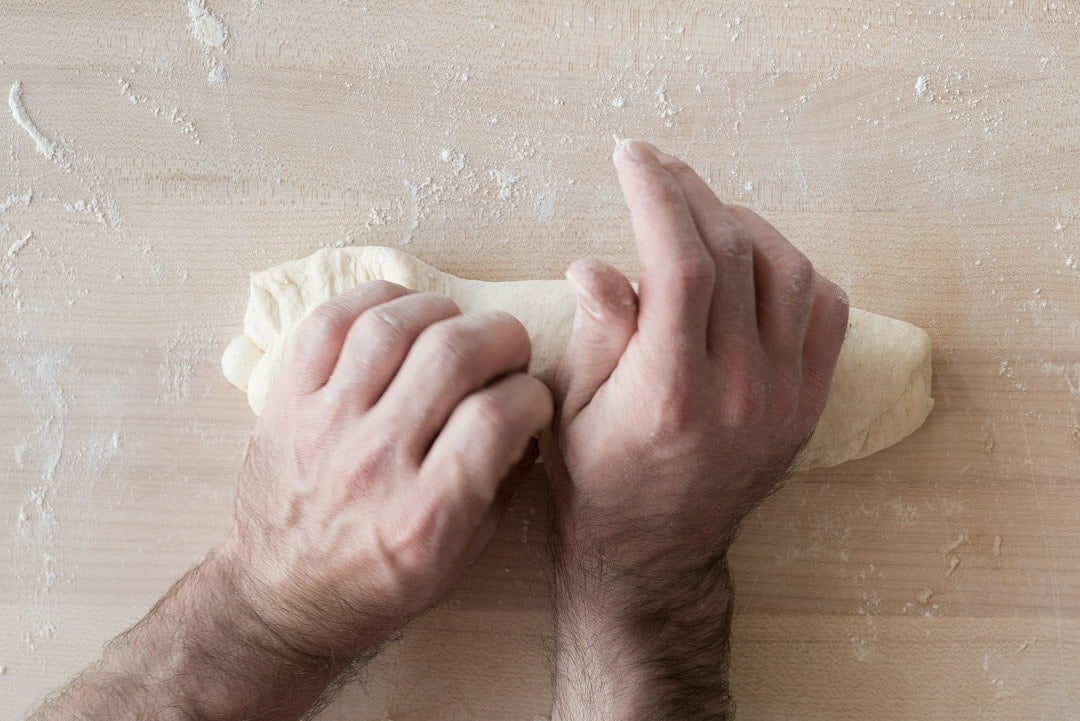
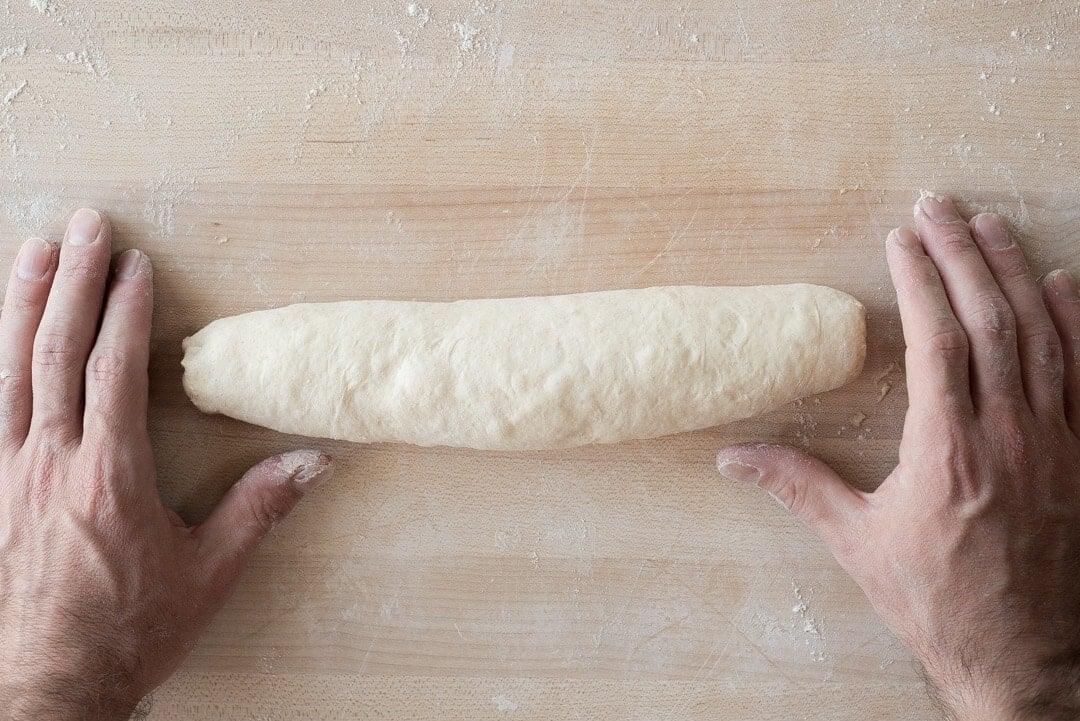
It’s worth showing more detail on the sealing portion of this technique (steps 3 and 4). The images below show the second set of sealing, that is, after the 4th image above and the dough has been rotated 180° to finish the shape before rolling.
Once you have sealed up the entire length, you can now begin step 5: rolling out the cylinder to the desired length (for me, 14″ long). First, use one hand in the middle of the cylinder to start rolling and create the initial starting taper. You want it to be thicker in the middle with a gradual taper to the very ends. Then, as you’re rolling with one hand transition into using two hands next to each other and continue moving back and forth to thin, and gradually taper, the cylinder.
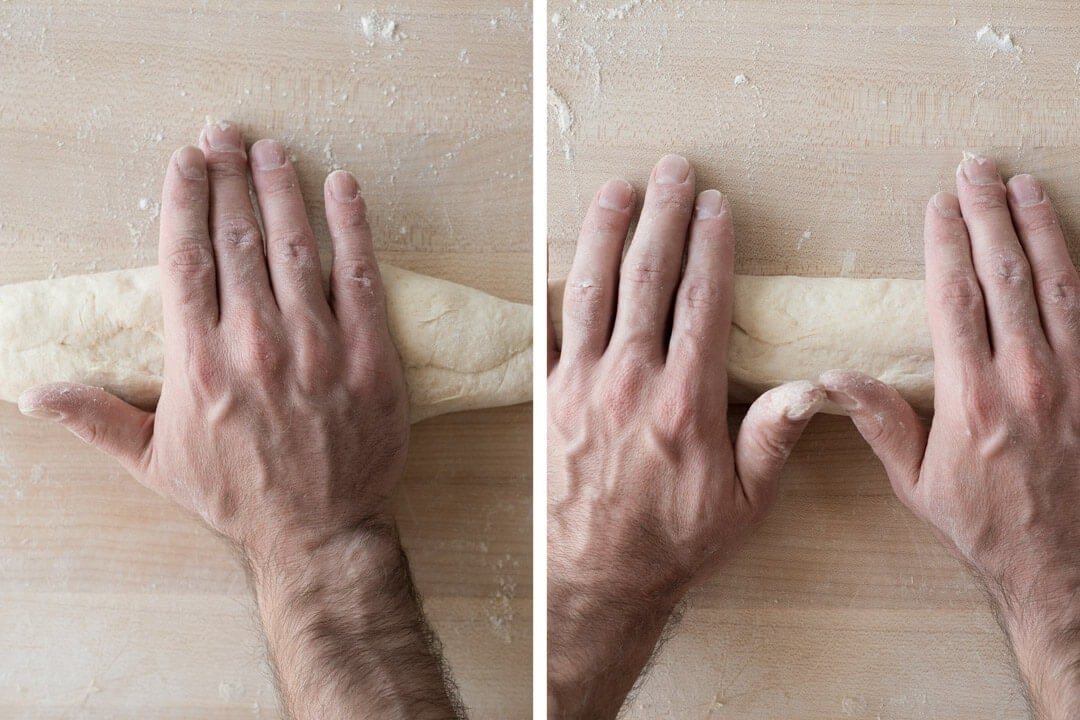
Be sure to keep your fingertips and palms in contact with the bench as you roll back and forth; this helps create the consistent taper on each side of the dough.
For more instruction and a video on how to shape, see my guide to shaping baguettes.
Preparing a Proofing Surface
This dough undergoes most of the bulk fermentation in the fridge, meaning we’ll be finishing off the proof for the dough at room temperature on the counter. To do this, we need a few items to ensure the dough holds shape and doesn’t spread:
- wooden proofing board (or large cutting board, or just the counter)
- couche (or large kitchen towel, or several towels)
Gather a wooden proofing board (mine is 18” x 26”), or cutting board, to serve as a proofing surface. Spread out a couche (or baker’s linen, is a large rectangle of slightly-stiff linen that you can roll and fold to hold proofing dough in shape), or large kitchen towel, on the proofing surface.
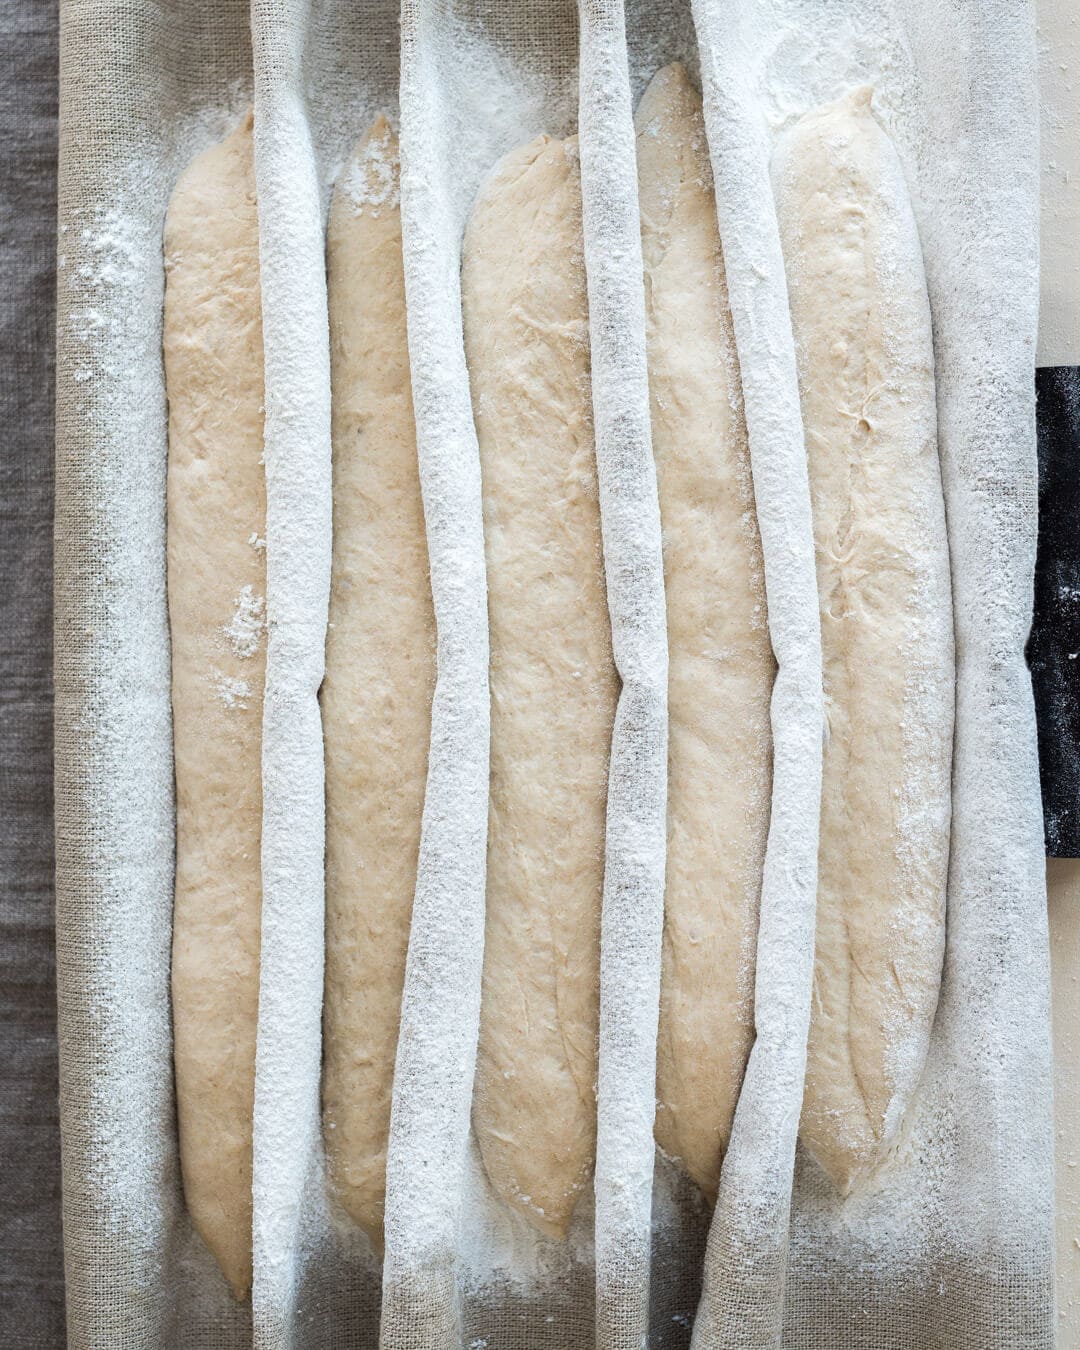
Tightly roll one end (left side, above), the starting end, to provide a stiff “bookend.” Thoroughly dust the couche where the dough will rest and, after shaping each baguette, place the dough parallel to this rolled end. Then, pick up the couche at the top and bottom and form a crease at the right side. Necessarily this will create a well where the proofing dough will rest. Continue placing shaped baguette one after the other, seam side up, on the couche while folding it until all pieces have been set (see the above photo). At the ends, you can then drape the couche up and over the dough to keep everything in shape and covered.
Freshly Milled Kamut Demi-Baguette Formula
Traditional baguettes are longer than the demi-baguettes outlined here, but in a home oven, we’re limited by space. I tested varying lengths and dough weights for these baguettes and settled on a 14” length (the depth of my Baking Steel baking surface) and 300g weight. At a dough weight of 300g, these are thin, but they still have substance and are perfect for sandwiches. I started testing these at 350g per baguette, and they were almost like mini-batards rather than demi-baguettes. However, if you’d rather have wider and heftier baguettes, increase the weight of each until the result is to your liking.
The hydration of this dough is relatively high for baguettes, but the freshly milled Kamut can take on quite a bit of water before becoming overhydrated. When mixing, you might want to hold back some water until you’re sure your dough can handle the entirety. Let’s look at the vitals for these Kamut demi-baguettes.
Vitals
| Total Dough Weight | 2000 grams |
| Pre-fermented Flour | 4.00% |
| Hydration | 83% |
| Yield | 6 x 300 gram Kamut demi-baguettes (approximately 14″ long) |
Levain Build (Stiff)
| Weight | Ingredient | Baker’s Percentage |
|---|---|---|
| 22g | Mature liquid starter (100% hydration) | 50% |
| 22g | Whole Wheat Flour (Giusto’s Whole Wheat) | 50% |
| 22g | White Bread Flour @ ~11.5% protein, malted (Giusto’s Artisan Baker’s Flour) | 50% |
| 22g | Water | 50% |
Dough Formula
The target final dough temperature (FDT) is 78°F (25°C).
Note that the baker’s percentages listed below are with respect to the final dough ingredients and do not take into account the levain.
| Weight | Ingredient | Baker’s Percentage |
|---|---|---|
| 373g | Fresh Milled Kamut (Khorasan Wheat) | 36.46% |
| 352g | White Bread Flour, ~11.5% Protein (Giusto’s Artisan Baker’s Flour) | 34.38% |
| 213g | High Gluten Bread Flour, ~13.5% Protein (Central Milling High Mountain) | 20.83% |
| 85g | Whole Wheat Flour (Giusto’s Whole Wheat, Fine) | 8.33% |
| 864g | Water | 84.38% |
| 3g | Diastatic Malt Powder (Optional) | 0.26% |
| 25g | Salt | 2.40% |
| 85g | Mature, stiff levain (See levain build, above) | 8.33% |
Method
1. Levain – 11:00 a.m.
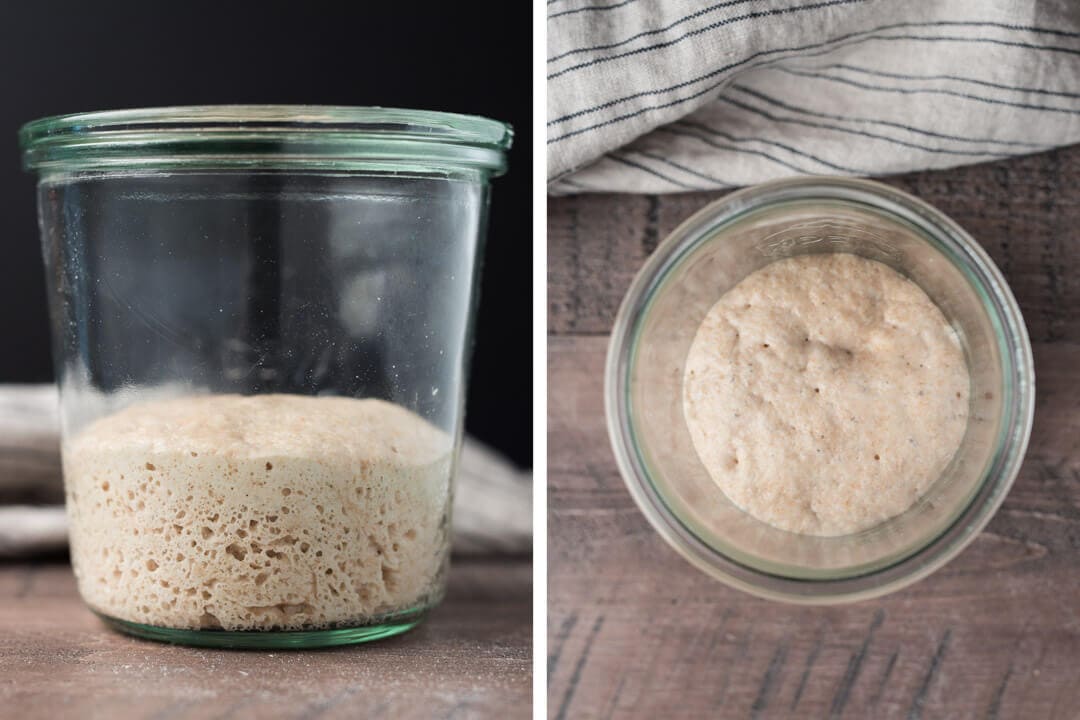
Build the stiff levain (everything listed in the Levain Build section above) in the morning and store somewhere around 80°F (26°C) ambient until ripe, about 4 hours.
2. Autolyse – 2:00 p.m.
Mix flour, diastatic malt powder, and water (reserve 100g water for the mix, later) in a bowl until all dry bits are hydrated. Cover bowl and store somewhere warm, near the levain, for 1 hour.
3. Mix – 3:00 p.m.
Breakup the called for stiff levain on top of the resting dough in the mixing bowl. Add the salt and the reserved mixing water. Mix until well combined.
Dump the dough onto the counter and slap and fold the dough (French fold) for about 5-6 minutes, just until the dough starts to show signs of a smooth surface. If you aren’t comfortable with slap/fold method or don’t like it, you can do stretch and folds in the bowl until the dough tightens up and becomes harder to stretch out and fold over. Transfer the dough back to the mixing bowl and cover.
Let the dough rest 15 minutes.
After 15 minutes, dump the dough out to the counter and mix (slap/fold) for an additional 2-5 minutes until the dough starts showing signs its catching air and has tightened up. We’re not looking for full gluten development, but enough development, so the dough only needs 2-3 sets of stretch and folds during bulk fermentation.
Transfer the dough to a tub or thick-walled bowl for bulk fermentation.
4. Warm Bulk Fermentation – 3:30 p.m. to 5:30 p.m.
At 78°F (25°C) ambient temperature, this portion of bulk fermentation will go for 2 hours.
Perform a total of 3 sets of stretch and folds during the bulk, spaced out by 30 minutes. After the last set, let the dough rest for the last 30 minutes then cover the bulk container and place it in the refrigerator until the next day.
5. Cold Bulk Fermentation – 5:30 p.m. to 8:00 a.m. (next day)
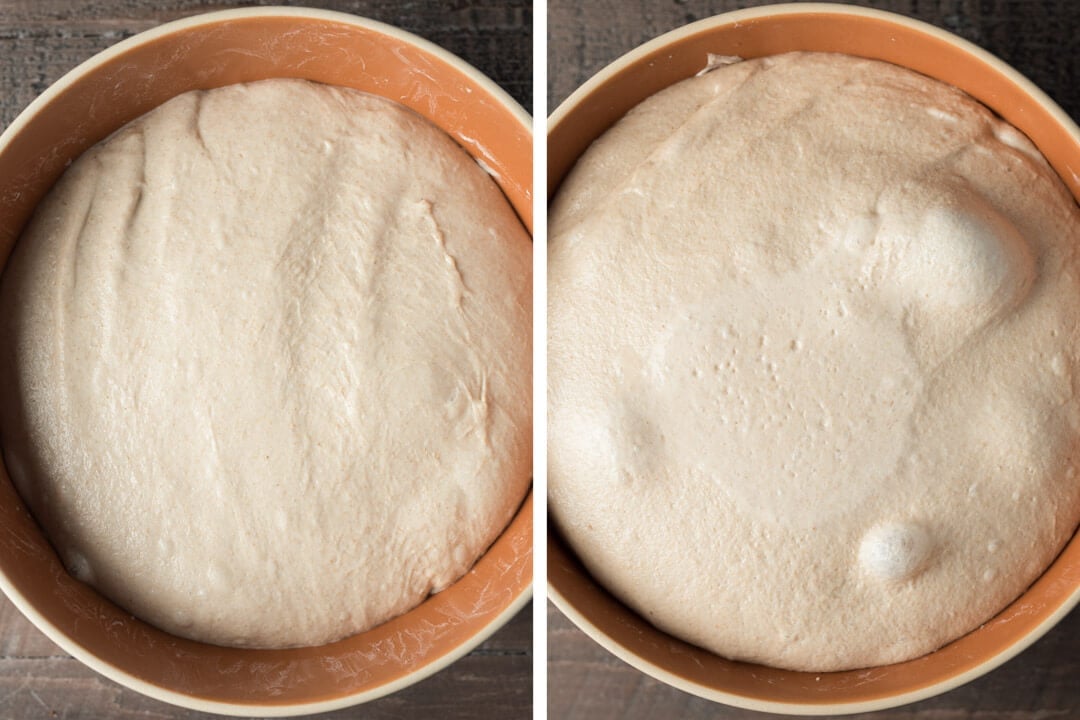
The duration of this cold bulk fermentation step is very flexible. The dough can continue to rest in the fridge several more hours (or perhaps even more) after I have listed here if desired. Take it out and proceed with the rest of the process when convenient.
The image above shows my dough at the end of the warm bulk (left) and after pulling the dough out the next day after the cold bulk (right). Even though the dough was in the fridge, you can still see plenty of rise and activity in the dough. Note that in the right image above, the area in the middle pushed up and pressed against the plastic wrap.
6. Divide & Preshape – 8:00 a.m.
Take the cold bulk fermentation container out of the fridge, uncover, and dump the dough onto an un-floured work surface. The dough will feel very cold and stiff, and because of this, you will not need much (or any) bench flour to divide and pre-shape it into rounds.
Using a scale, divide the mass of dough into six 300g pieces (you might have a bit of dough remaining). Using your hands, gently pre-shape the dough pieces into rounds. I prefer to preshape this dough gently. It will be cold, stiff, and challenging to shape into a super tight ball — but this is not necessary. The strength from the stiff dough will help hold its shape long enough for it to warm up and relax, right before final shaping.
Let the rounds rest for 30 minutes, uncovered.
7. Shape – 8:30 a.m.
After the 30 minute rest, the dough should be warmer to the touch and slightly relaxed. If the dough still feels very cold, firm, and it hasn’t relaxed at all, give it another 5-10 minutes.
See the sections preparing a proofing surface (couche) and shaping baguettes near the beginning of this post for instructions on shaping this dough.
8. Proof en Couche – 8:45 a.m. to 10:15 a.m. (appx. 1.5 hours)
Again, refer to the section near the beginning of this post on preparing a proofing surface for details on how to proof this dough.
Use the “poke test” (when poked, the dough slowly fills back the indention) to determine when the dough is ready for the oven. For this dough, it was approximately 1.5 hours at room temperature (~76°F/24°C).
Note that you’ll have to preheat your oven at some point when your dough is proofing.
9. Bake – Preheat oven at 9:15 a.m., Bake at 10:15 a.m.
Preheat your oven for one hour at 450°F (230°C).
One challenge with these baguettes is you’ll likely have to bake these in two batches. If you have two racks each with a baking stone (or Baking Steel), you could utilize both surfaces and bake all six simultaneously. My method is to break the bake up into two sessions: in the first, three are loaded and baked. Then, the remaining three baguettes are left on the couche, folded up gently, and placed into the refrigerator until it’s time to start the second baking session.
To start the first baking session, ready a pizza peel lined with parchment paper. I use one large piece to cover the entire peel, which is precisely the same width as my baking surface.
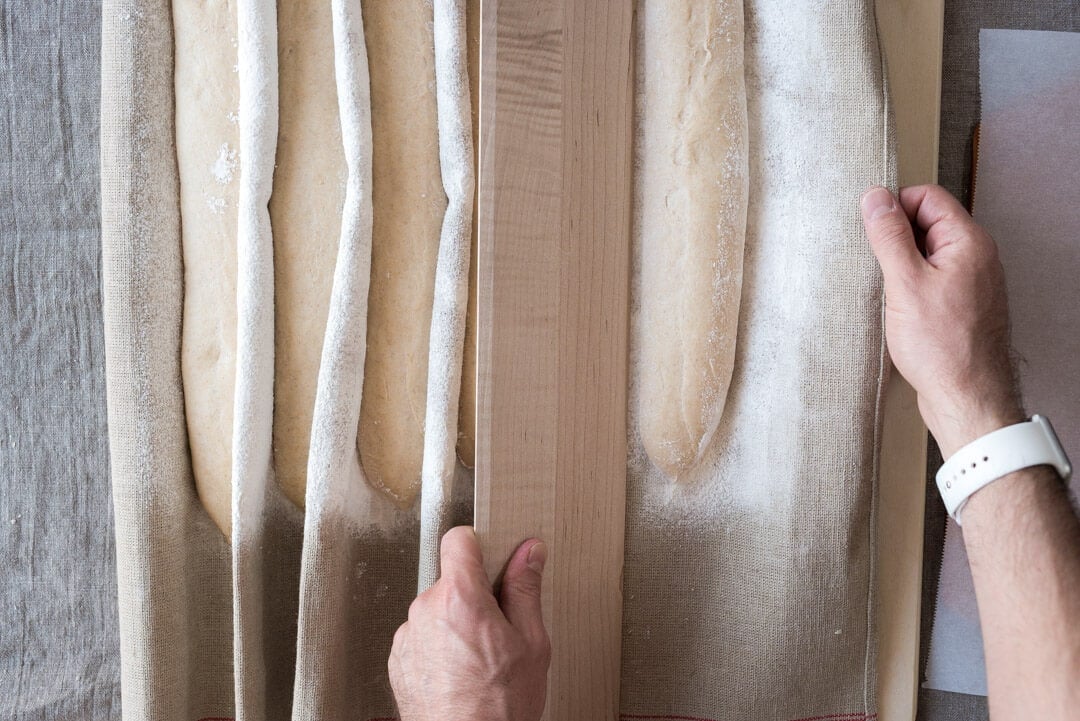
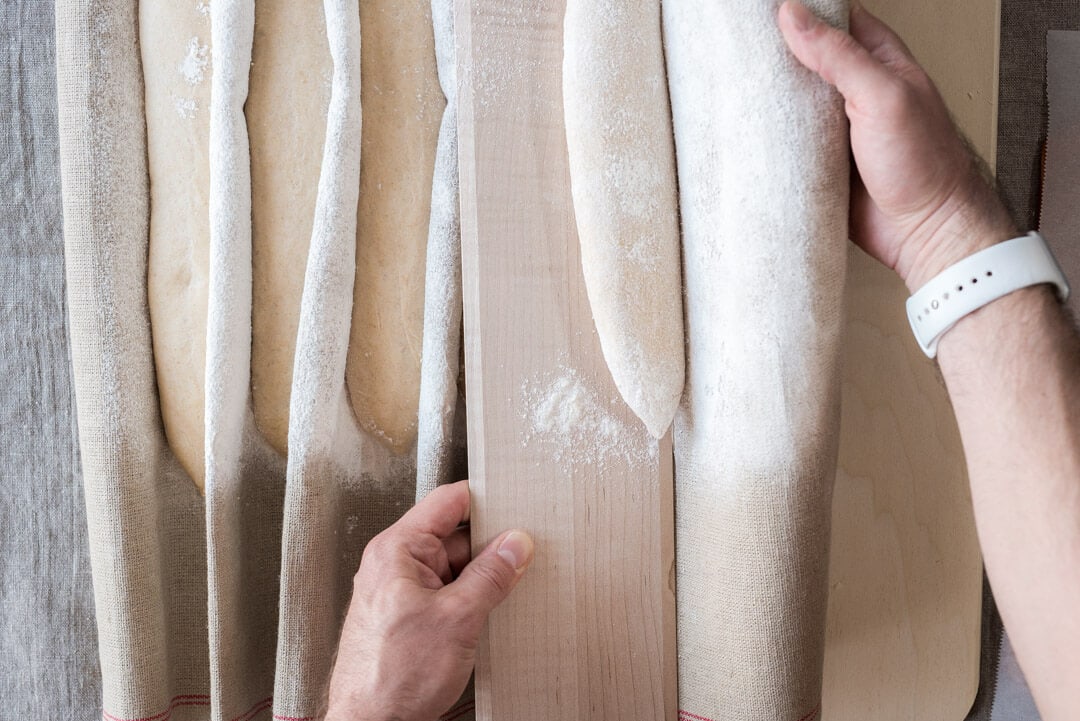
Grab the right end of the couche and pull it out, so the piece of dough moves away from the rest. Then, using a dough transfer board (a smaller pizza peel or a small cutting board could also work), place the board to the inside of the baguette (the side closest the rest of the dough pieces). With the hand holding the couche, quickly flip the dough onto the peel by tugging up and slightly over the transfer board. The baguette should now be seam side down on the transfer board.
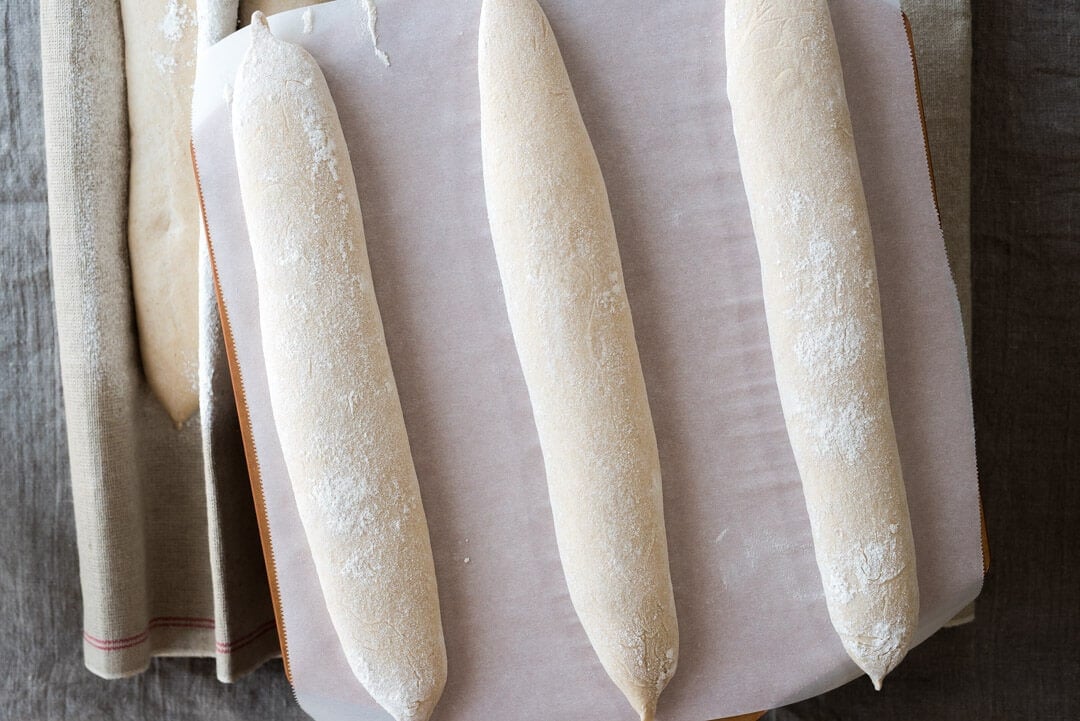
Slide the dough off the transfer board and onto the prepared pizza peel with parchment paper, seam side down, and continue until you have three pieces (see below).
Once all three baguettes are on the parchment paper, score each with three (or more, or less) slashes. Each slash should reasonably shallow to the dough, and the beginning of one should overlap about 20% of the previous. Scoring these takes practice!
Slide the parchment paper with dough onto your baking surface. Due to the smaller mass of these baguettes, they will take less time to bake than a large hearth loaf. Once you load the dough, steam the oven and bake for 20 minutes. Then, remove the pans used for steaming, vent the oven, and bake for an additional 20-25 minutes until done.
Cool on a rack and repeat for the remaining three baguettes from the fridge.
I steamed my oven in my usual way, described here in my post on how to steam your home oven for baking.
Conclusion
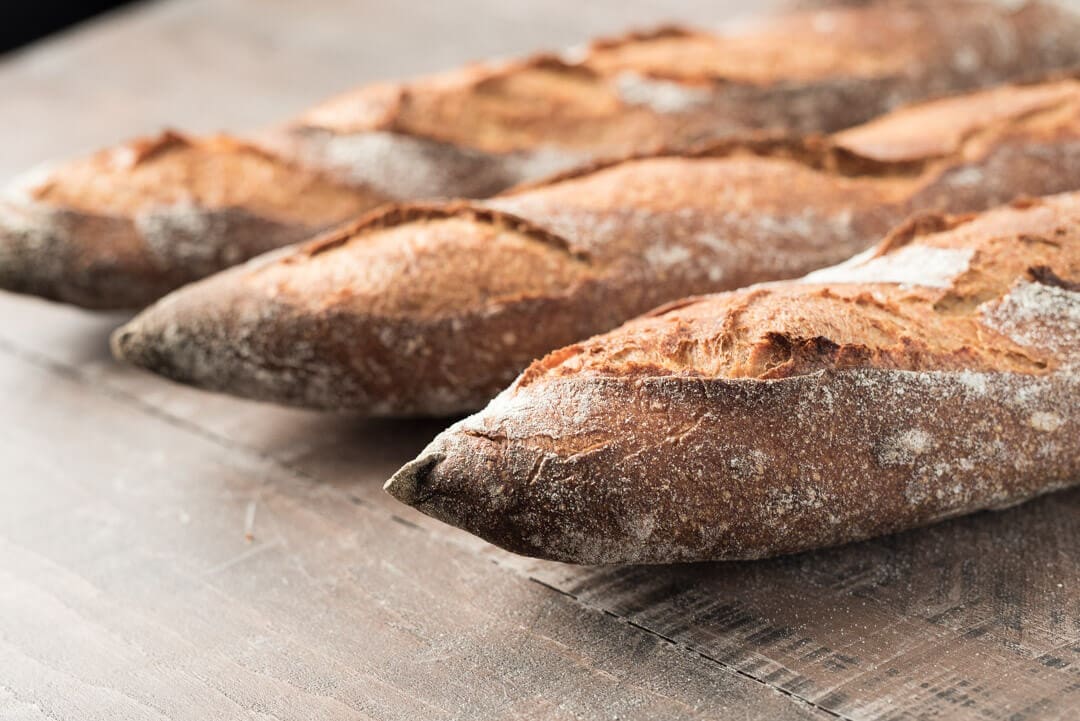
These freshly milled Kamut demi-baguettes are mouthwatering. As you eat your way through one of these (and believe me, that’s an easy task), you would never think they consist of almost 50% whole grain. They are sweet, nutty, tender, and light in hand. The craggy crust plays well with the interior flavors and textures and provides just the right crunch at each bite—the perfect contrast.
Crust
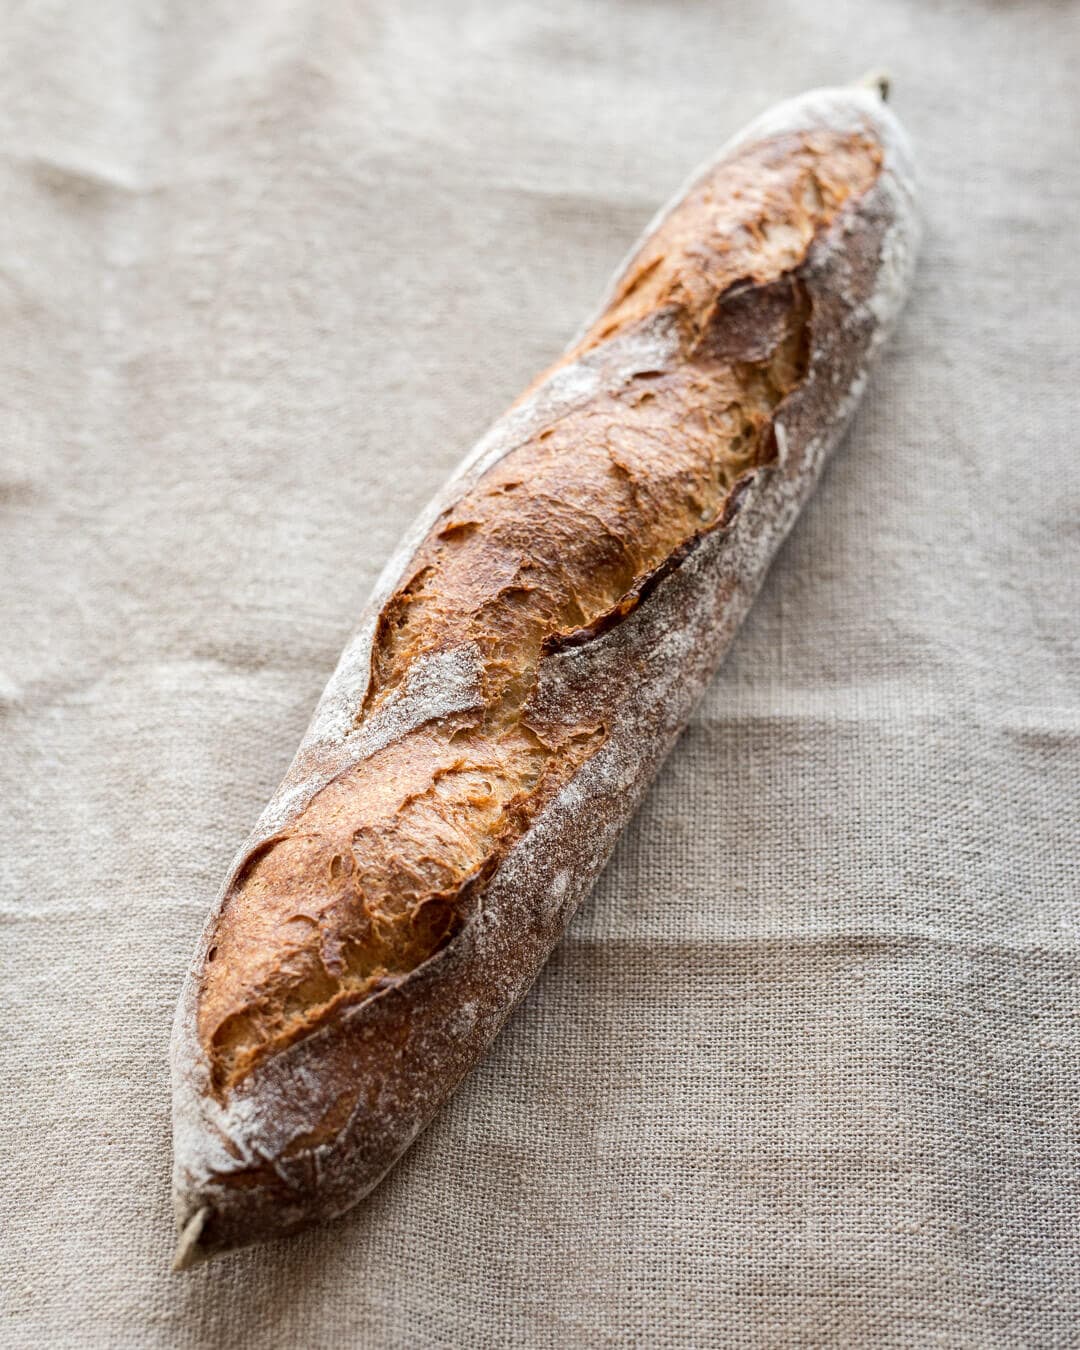
The goal for a baguette is a fragile, crackly crust. The crust is slightly thicker than with an all-white flour baguette, but this is not a bad thing. I like the extra crunch, and the contrast between the rustic crust and creamy crumb is further emphasized. However, because of their shape and lack of moisture-retaining mass, they will dry out quicker than, say, a 1 kg batard. Therefore, these are at peak eating quality the day they are baked.
Crumb

Open, light, creamy — I couldn’t want anything more. Through sufficient and proper fermentation, this recipe achieves the tender and open interior indicative of a great baguette. When cut open, the yellow hue of the crumb is visually striking against the well-baked crust. It’s a beautiful sight.
Taste
The flavor of freshly milled Kamut shines through prominently in these demi-baguettes—a sweetness not typically found in such a high percentage of whole grain. I see this grain to be the perfect addition to a baguette dough. This sweetness, in combinations with a subtle nutty flavor, plays well against the little hint of sourness present—a nicely balanced flavor profile.
The KoMo can mill finely milled Kamut that brings loads of flavor and nutrition to these demi-baguettes. As you know, I love using freshly milled flour, and this ancient grain is the perfect addition to this dough.
What’s Next?
If you haven’t tried a classic sourdough baguette, that’s your next stop. They call for more white flour, but result in a super open interior, thin crus, and very delicate flavor profile.
Or, twist things up with sourdough green olive filoncini—kind of like an Italian baguette, that’s twisted. So delicious.
Buon appetito!


108 Comments
Hi Maurizio! Can I sub the white flour for whole wheat? Thanks.
Hello Maurizio,
I’m a long time sourdough baker. Recently found your site and purchased your book. I made the baguettes this morning. For a first attempt I’m very impressed with the finished product. Look forward to trying many more of your recipes. I’ve also been milling my own flours for several years.
Recently I’ve been experimenting with sprouting. I follow a process described by Peter Reinhart, sprout the grain, dehydrate, then mill the flour. I’ve made loaves with a small amount of sprouted flour to 95% sprouted loaves. I know from my reading the nutrition levels of sprouted flour is higher and sprouting reduces many of the anti-nutrients.
Have you worked with this type of sprouted flours? If not would you consider testing them and posting your thoughts?
Thanks for picking up my book, Steve! Glad you’re enjoying it so far. Yes, I’ve done a fair bit of sprouting at well. Have you seen my sprouted grain sourdough bread? It’s wonderful. Additionally, I’ve also sprouted buckwheat and worked that into a dough as well. Both really fun, delicious, and healthy!
Maurizio I had not seen your sprouted breads. The sprouted grain loaf is very close to one of my experiments. You have several techniques which I didn’t use in mine so I’ll be making yours this weekend to compare.
Maybe you can offer your thoughts on my latest experiment. My loaf flours consisted of;
200 g freshly milled kamut
200 g freshly milled spelt
100 g Sprouted hard white winter wheat flour
50 g Rye flour, dark
137 g All Purpose flour
I’ve made this loaf once and preparing to make it again. The flavor is amazing, full, nutty, and complex. Though the finished loaves didn’t get much oven pop. I didn’t do any autolyse. Would you recommend some autolyse time? Any suggestions on the flour types, ratios?
I had one of the baguettes for breakfast this morning. Spread it with fresh creamery butter and thin sliced hard salami. Brought back memories of my youth traveling in France. lol
Right on! An autolyse can help reduce the mixing time required, but it’s not mandatory. With sprouted flour, these days I do not autolyse.
Hi Maurizio!
I recently used your recipe for sourdough baguettes, and they turned out amazing!
I wanted to check out this recipe thanks to its high whole wheat percentage, however, I don’t have Kamut flour (nor a grain mill…).
So I wanted to ask a couple of questions: first, which Kamut flour would you recommend using? and second, can I just replace the Kamut flour with Whole Wheat and leave the recipe as is, or should I make some adjustments? what about replacing it with Spelt?
Right on, so glad to hear that, Roy! You can definitely replace the Kamut with another grain. I wouldn’t go with spelt, it’s a little too extensible for this recipe (though you could if you changed a few things around). Any traditional whole wheat would work well for these.
First timer on baguettes here! Very wet dough but got good tension thanks to your instructions. My “couche” kitchen towel was heavily floured yet the baguettes stuck ! First fournée out already and they are delicious. Will dusting with rice flour help with the couche sticking? Or need I get a real couche?
Really appreciate all the instruction you give here and also on your other posts. Don’t think I’d have become the bread baker I am today without having found you during lockdown! Thank you!
Glad they turned out pretty well, Daniella! To help with that sticking, try to strengthen the dough longer OR reduce the hydration (I’m guessing the latter will be a better option to start). This will make for a stronger dough overall and will help with all the rest of the steps of the process, including helping to ensure they remove cleanly from your towels.
Happy you’ve found my site helpful, sorry for the late reply!
Thanks Maurizio, will get my hands on some more flour and give it another go ! Cheers!
So I accidentally used spelt grain instead of kamut. I had both on the counter and one got mixed up with the other. I had never made these baguettes before as I am not easily relinquishing my favorite dutch oven method, but I wanted to try these. It turns out the recipe is very forgiving! Last night, I left the dough on the counter far longer than the recipe instructs, and the dough had risen quite a bit. In my defense, I was baking the Enkorn miche, sourdough boules, rye bread and baguettes, all in one session. The shaping wasn’t easy either this morning, as the dough was probably over-proofed and therefore way too sticky. Still, I baked them, using all the tools Maurizio recommends, and the baguettes rose and turned out DELICIOUS. The crust wasn’t too thick at all! Seriously, what a great recipe. Thank you! Next time I’ll use kamut and pay closer attention to the recommended times.
So glad to hear all this, Birgit!
Hi Maurizio and all 👍🏼
I started these yesterday, I have a very strong started, used everything in the recipe (kamut not freshly milled)) , the dough was quite hydrated(?) but after the cold overnight fermentation, there was no difference at all.. (fridge is a 4°) I continued with the recipe, and as expected they were quite flat.. what did I do wrong do you think?
The Sunflower/Sesame loaf is a huge winner in our house, thank you for that ❤️👌🏼
I just read Janelle’s post, and realised I used a small amount of spelt flour would that be it?
Hey, Jude! It’s possible they were over hydrated (especially if you used spelt, which is pretty sensitive to excessive water), or they needed more time in warm bulk fermentation. I’d go with the latter–be sure the dough has some rise and fermentation signs display before retarding to the fridge!
HELP!! I’ve agreed to make 100 bread rolls with this recipe for a friends event and I was planning to follow your schedule and shape and proof en couche the morning of the event but it will take me close to 7 hours. My QUESTION – if I do the shaping and proof en couche in the fridge overnight (yes, many fridges!), what changes would I need to make to the rest of the schedule? Shorten the first cold bulk? Any other suggestions. Thank you so much Maurizio!
Hey, Janelle! Wow, that’s a lot of bread 🙂 I don’t like to shape retard this dough because I find with baguettes they get a thicker crust… But you can if you’d like. I’d probably schedule things so I bulk retarded the dough, as in the post, then shape and proof the dough the day of if possible!
Hey Maurizio, well the 100 rolls went out yesterday!! 👌 I ended up following your schedule as written and baking the day prior (freezing overnight and refreshing in the oven prior to the event). Ah to complicate matters I also did a spelt variation and accidentally dialled up the hydration when scaling. Haha oops. Well by some miracle they turned out in the end!
That’s amazing, Janelle! So glad to hear it turned out well. Ahh yes, spelt and its sensitivity to water, I’d be lying if I didn’t say I’ve been caught there, too!
I love Kamut. I make my basic soudough bread mixing bread flour with kamut flour. I typically use 25% of Kamut and it gives me a wonderful loaf. I will try this recipe.
Awesome, Maribel! Let me know how you like it 🙂 Happy baking!
Can I make this into a boule instead of baguette?
Sure, that would work well. Be sure to adjust the bake time (longer) as needed!
I believe this makes 6 x 333g baguettes. (I was confused yesterday when I divided my dough and had excess lol)
I usually factor in a little extra to be leftover (or used!) when dividing. You’re exactly right, Delphine 🙂
@maurizioleo:disqus does “cover” the bowl means “seal” the bowl with kitchen foil? I mean should the cold fermentation be aerobic?
An airtight cover, yes.
I want to bake these ASAP but only have white, brown, whole-wheat and brown bread flours. I have very strong starter that have kept going for months now. Can I make these with white flour only?
Thank you for the help, your website has turned me into quite a baker!!!
Hey, the recpie will work with liquid levain also ??
thanks.
Hi Maurizio, so happy to support your website! I’m thinking of making the baguettes, although this will be a first for me, especially the shaping. But I will be using Khorasan flour from my organic store, it will not be freshly milled. As I am still a newbie at sourdough baking – only since last November – I don’t know if this will have an impact on the dough. Any advice is welcome.
Thanks, Sharon