
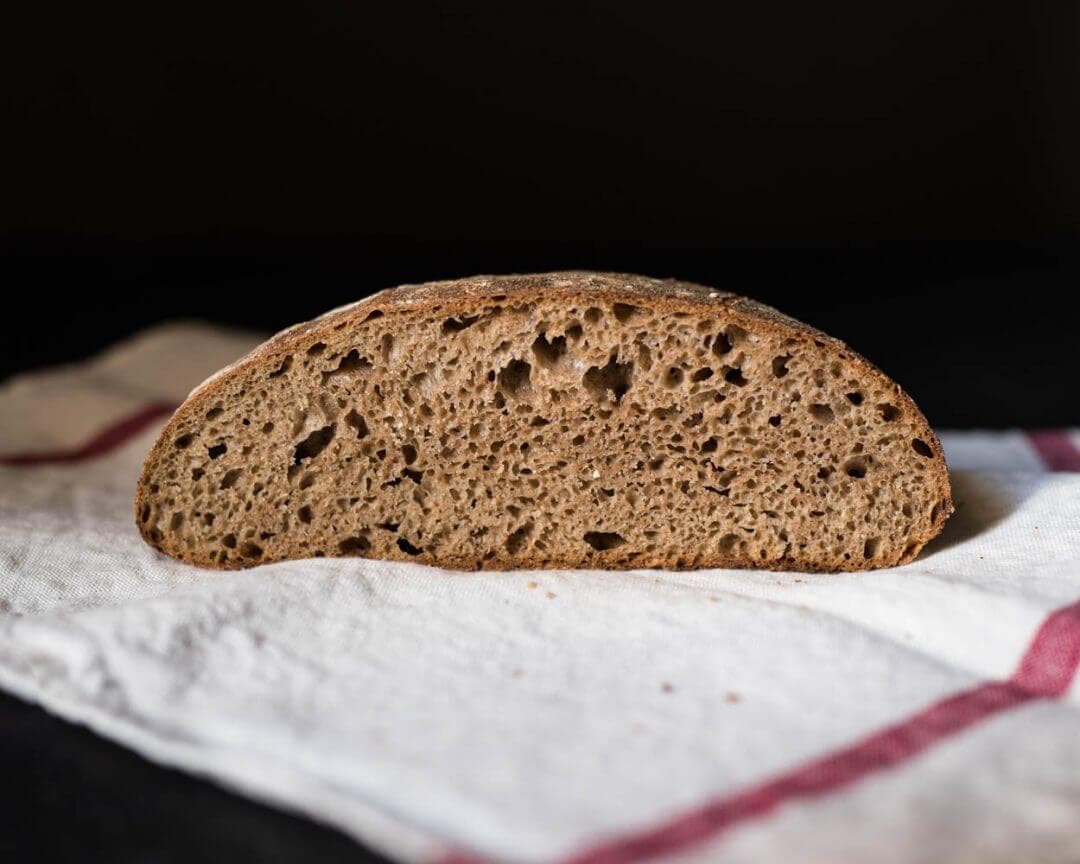
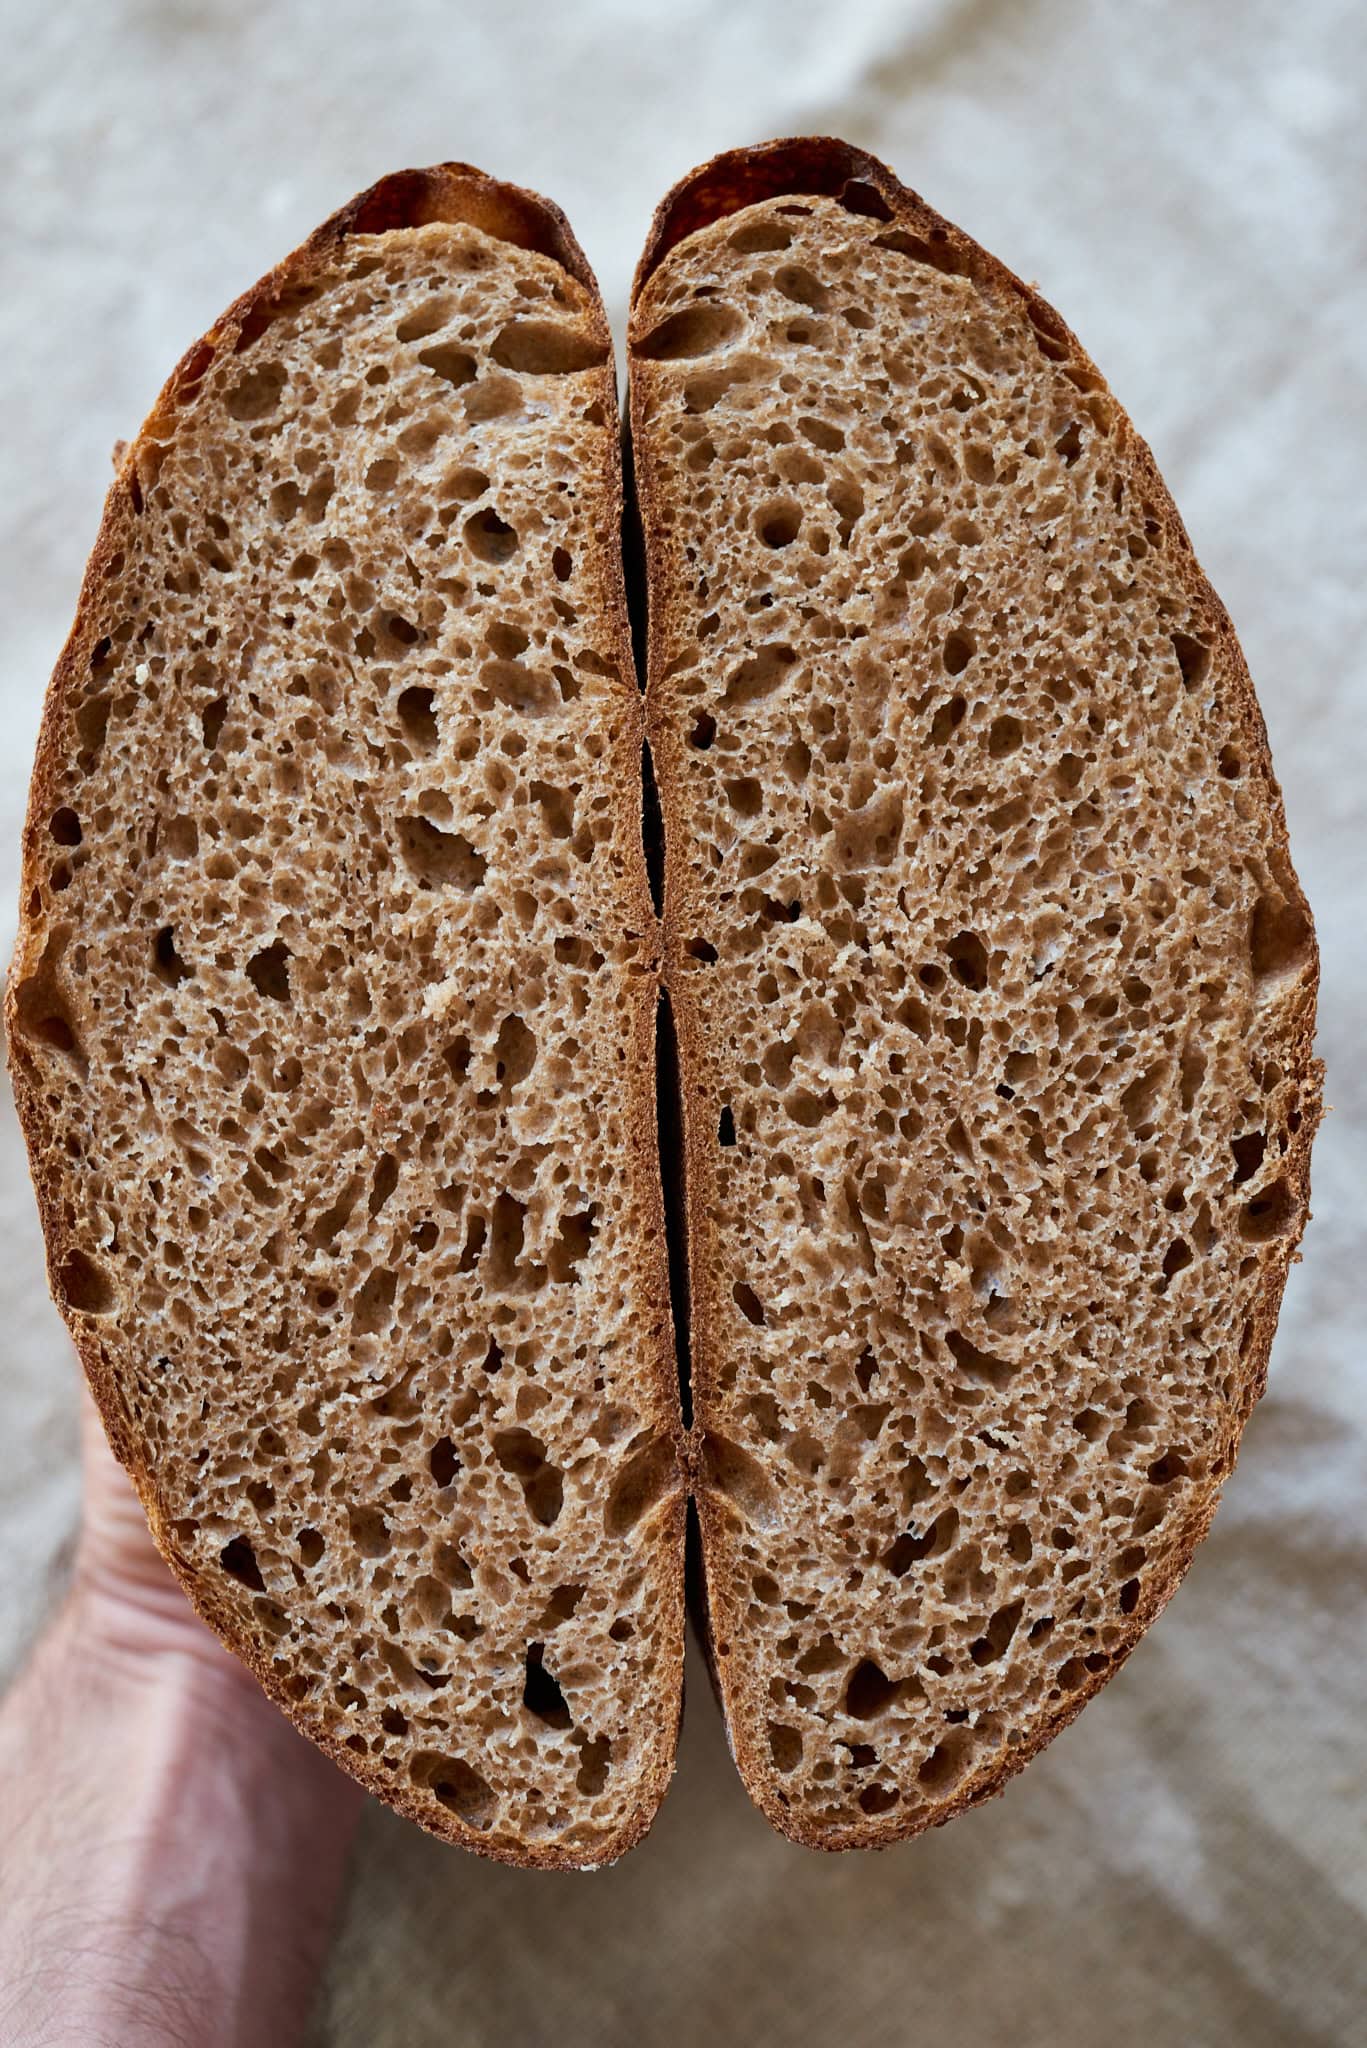
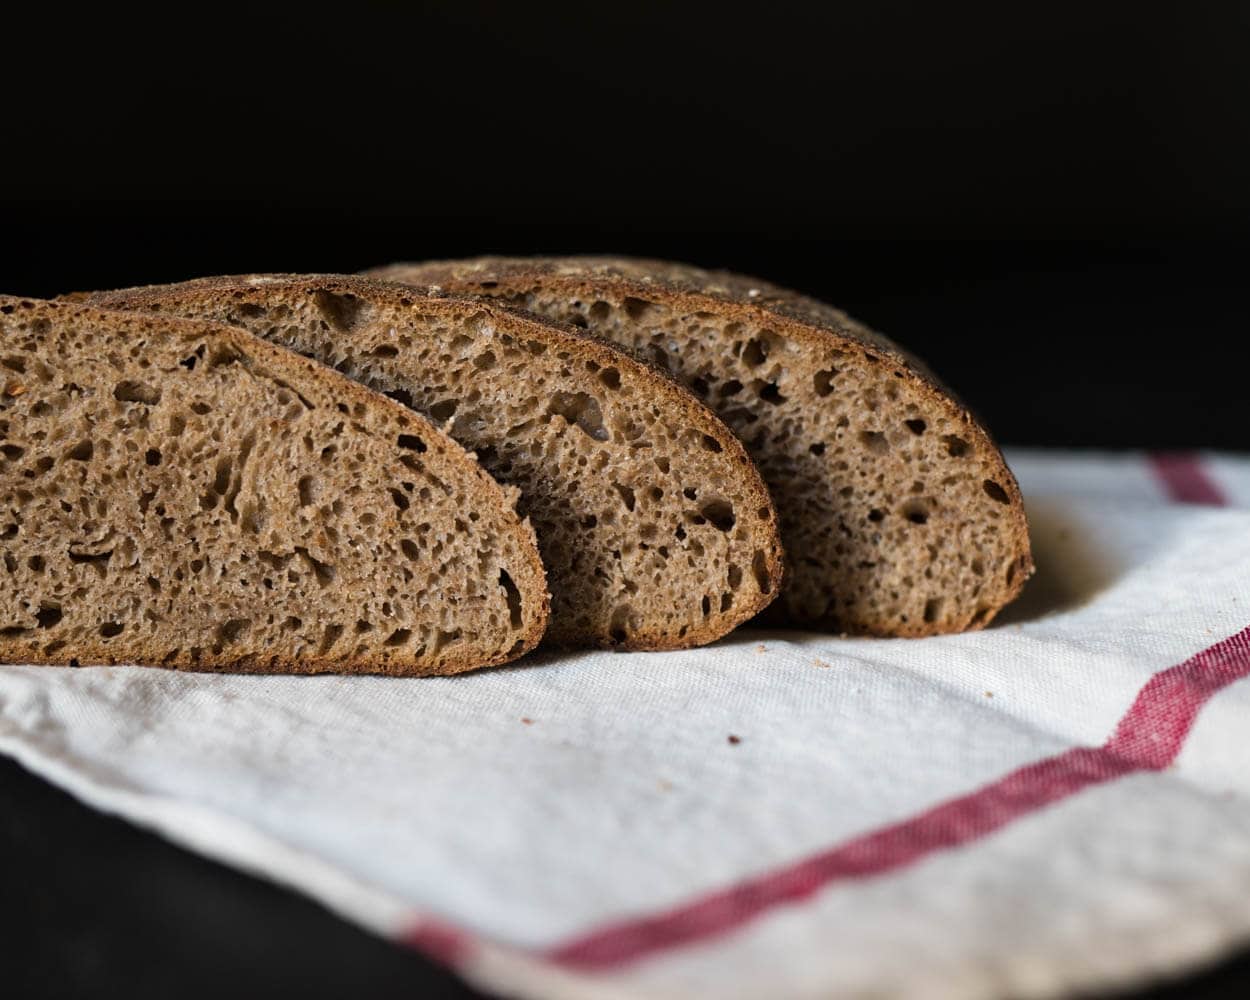
The wonderfully rich flavor profile of whole wheat sourdough bread ranges from sweet caramel notes to robust earthiness depending on the wheat variety used. But what I find even more important is the sense of satisfaction when eating this style of bread, both in terms of satiety and knowing you’re eating all of the nutrition a wheat berry has to offer.
Depending on the wheat variety you use, whole hard red wheat will give an upfront and personal flavor profile, whereas a white whole wheat loaf will be more subtle, thanks to the reduced tannins. Both kinds of wheat and other grain like spelt, Khorasan, and even durum are worthy additions to a loaf, as they serve different desires. My favorite, though, is to use hard red wheat, as I do in this recipe, to get all that robust and punchy wheat flavor.

When it comes to whole-grain bread, it’s important to adjust our expectations of what exactly makes a successful loaf. Because whole wheat flour contains the entirety of the wheat berry, including much more of the nutritious bran and germ—and more fiber—the final loaf will be a little more squat than bread made with highly sifted white flour. But! While you’re trading ultra-tall loaves with an open crumb for a squatter loaf with a tighter interior, whole wheat sourdough bread is like a pirate’s ship hauling new bounty, laden with copious flavor and nutrition.
Still, if you want to eke out the highest rise and the most open whole wheat sourdough bread, I have an option with this bread to sift out the bran and germ, create a soaker from these bits, and then work them back into the dough during bulk fermentation. This sifting and scalding, as it’s sometimes called, helps you get more rise in a loaf by softening these nutritious bits by treating them like any seed soaker or other mix-in. This helps preserve a strong gluten network and open interior without forgoing nutrition or flavor.
Note: if you have my sourdough bread cookbook, you’ll find this recipe starting on page 219!
Flour Selection
I used Cairnspring Organic Whole Grain Expresso flour for this 100% whole wheat sourdough bread. This flour, made from hard red spring wheat, has a protein percentage of around 13.5 to 14.5%.
Note that compared to high-protein white flour, also known as whole wheat flour with a high protein content, is not “high-protein” in the same way we think about something like white bread flour. This is because whole wheat flour contains the entirety of the wheat berry, including the brand and germ, which are naturally high in protein. So while whole-grain flour is “high-protein,” it’s referred to as such because it is literally the entire grain, and not because it’s very strong white flour.
Due to the nature of whole wheat flour and the high level of nutrients available for your starter or levain, dough fermentation will be vigorous. Keep an eye on your dough during bulk fermentation, especially if it’s warm in your kitchen, and divide the dough when it looks ready (more on this later).
Can I Use Freshly-Milled Flour for This Whole Wheat Sourdough Bread?
Yes, freshly-milled whole-grain flour can be used for this sourdough bread recipe. Use your home grain mill to mill whole wheat berries into the finest flour possible. If available, I recommend using Yecora Rojo hard red wheat berries.
Be sure to follow my guide to freshly-milled flour at home for more tips on operating your mill for the highest quality flour and storing it after milling.
Why is Whole Wheat Bread Dense?
White flour primarily contains only the starchy and strong endosperm part of the wheat berry. When mixed into a dough, white flour produces an extensible and tight-knight viscoelastic dough that excels at trapping the gaseous byproducts of fermentation. With sourdough fermentation, and assuming all else equal, white dough is generally less acidic (higher in pH) when baked, leading to less gluten breakdown.
This means bread with potentially large interior holes, or an open crumb.
One challenge in baking bread with 100% whole-grain flour is that the resulting loaf will have less volume than a loaf made from all white flour (or a mix of white and whole wheat flour). Unlike white flour, whole-grain flour contains the entirety of the wheat berry, including the fibrous bran and germ. These nutritious bits can interfere with gluten development and, to a degree, reduce the volume and openness of a loaf.
But there’s a way around all that.
For Open Whole Wheat Bread, Sift and Scald Your Flour
To reduce the effect of the increased bran and germ in whole wheat flour, which can result in a tighter crumb, these larger bits can be sifted out of the flour, soaked in boiling water, and then reincorporated into the dough at the end of mixing or beginning of bulk fermentation. By performing this, we can soften these large particles and add them in after the dough has been strengthened when mixing (especially if you’re mixing in a mechanical mixer).
In essence, we’re transforming our whole wheat flour into whiter flour, then adding back in the bran and germ using a technique similar to that of porridge bread.
Another way to look at it is to think of the sift-and-scald technique as similar to how seeds, nuts, or other mix-ins might be incorporated gently into dough to reduce their impact on its structure.
Note that it’s a little easier to add the scalded mixture back into the dough at the very end of mixing instead of folding it back in during bulk fermentation—and it’s just fine to do this. (I personally add it back in bulk fermentation to reduce the impact on the dough structure as much as possible, but it does take some work to get it reincorporated.)
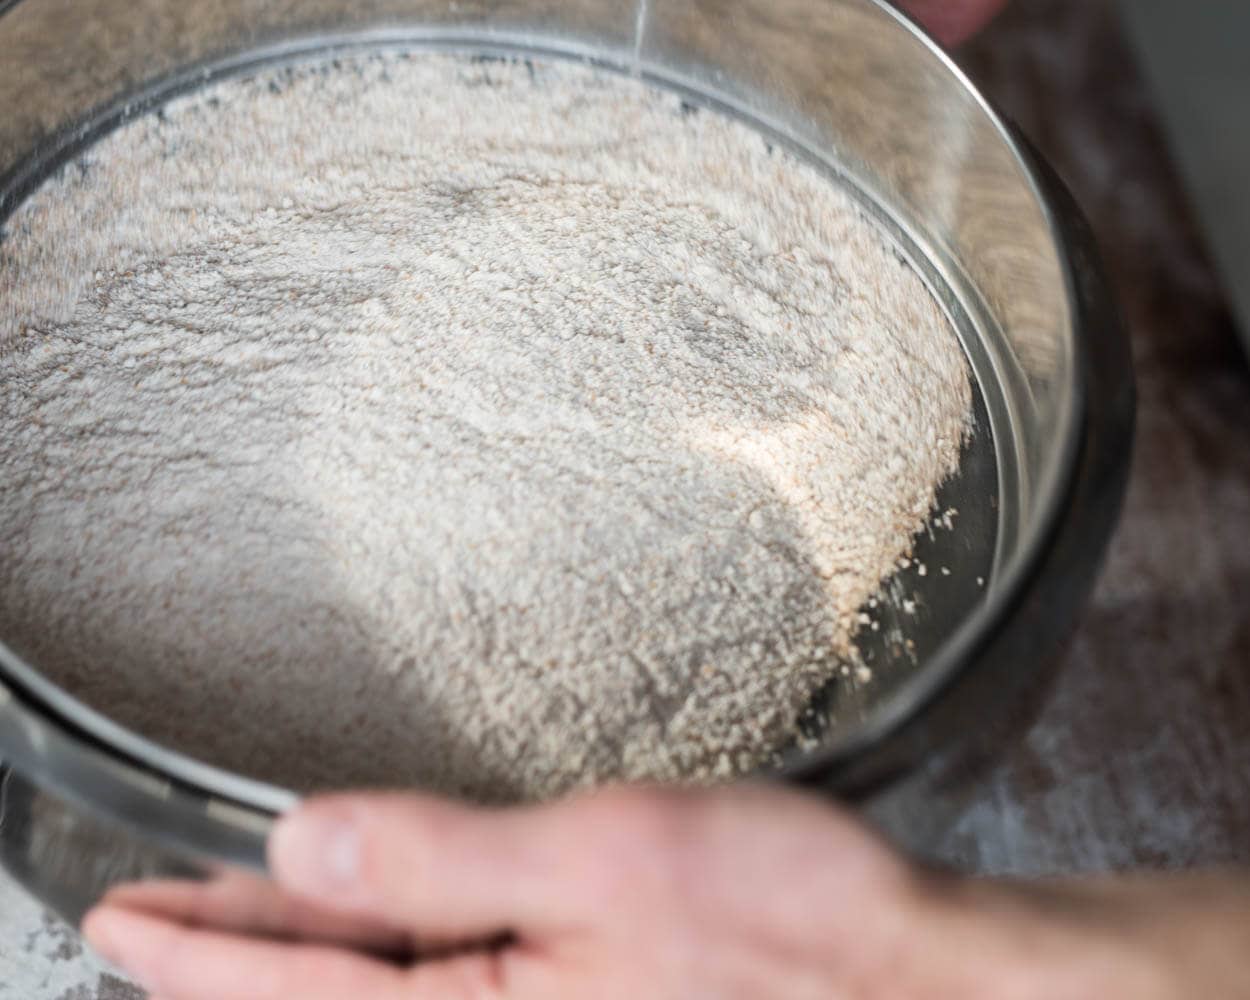
Sifting and Scalding Whole-Grain Flour: Step by Step
- Place a flour sifter or sifting screen over a large container or bowl
- Pour all of the whole wheat flour called for in the recipe on top of the screen
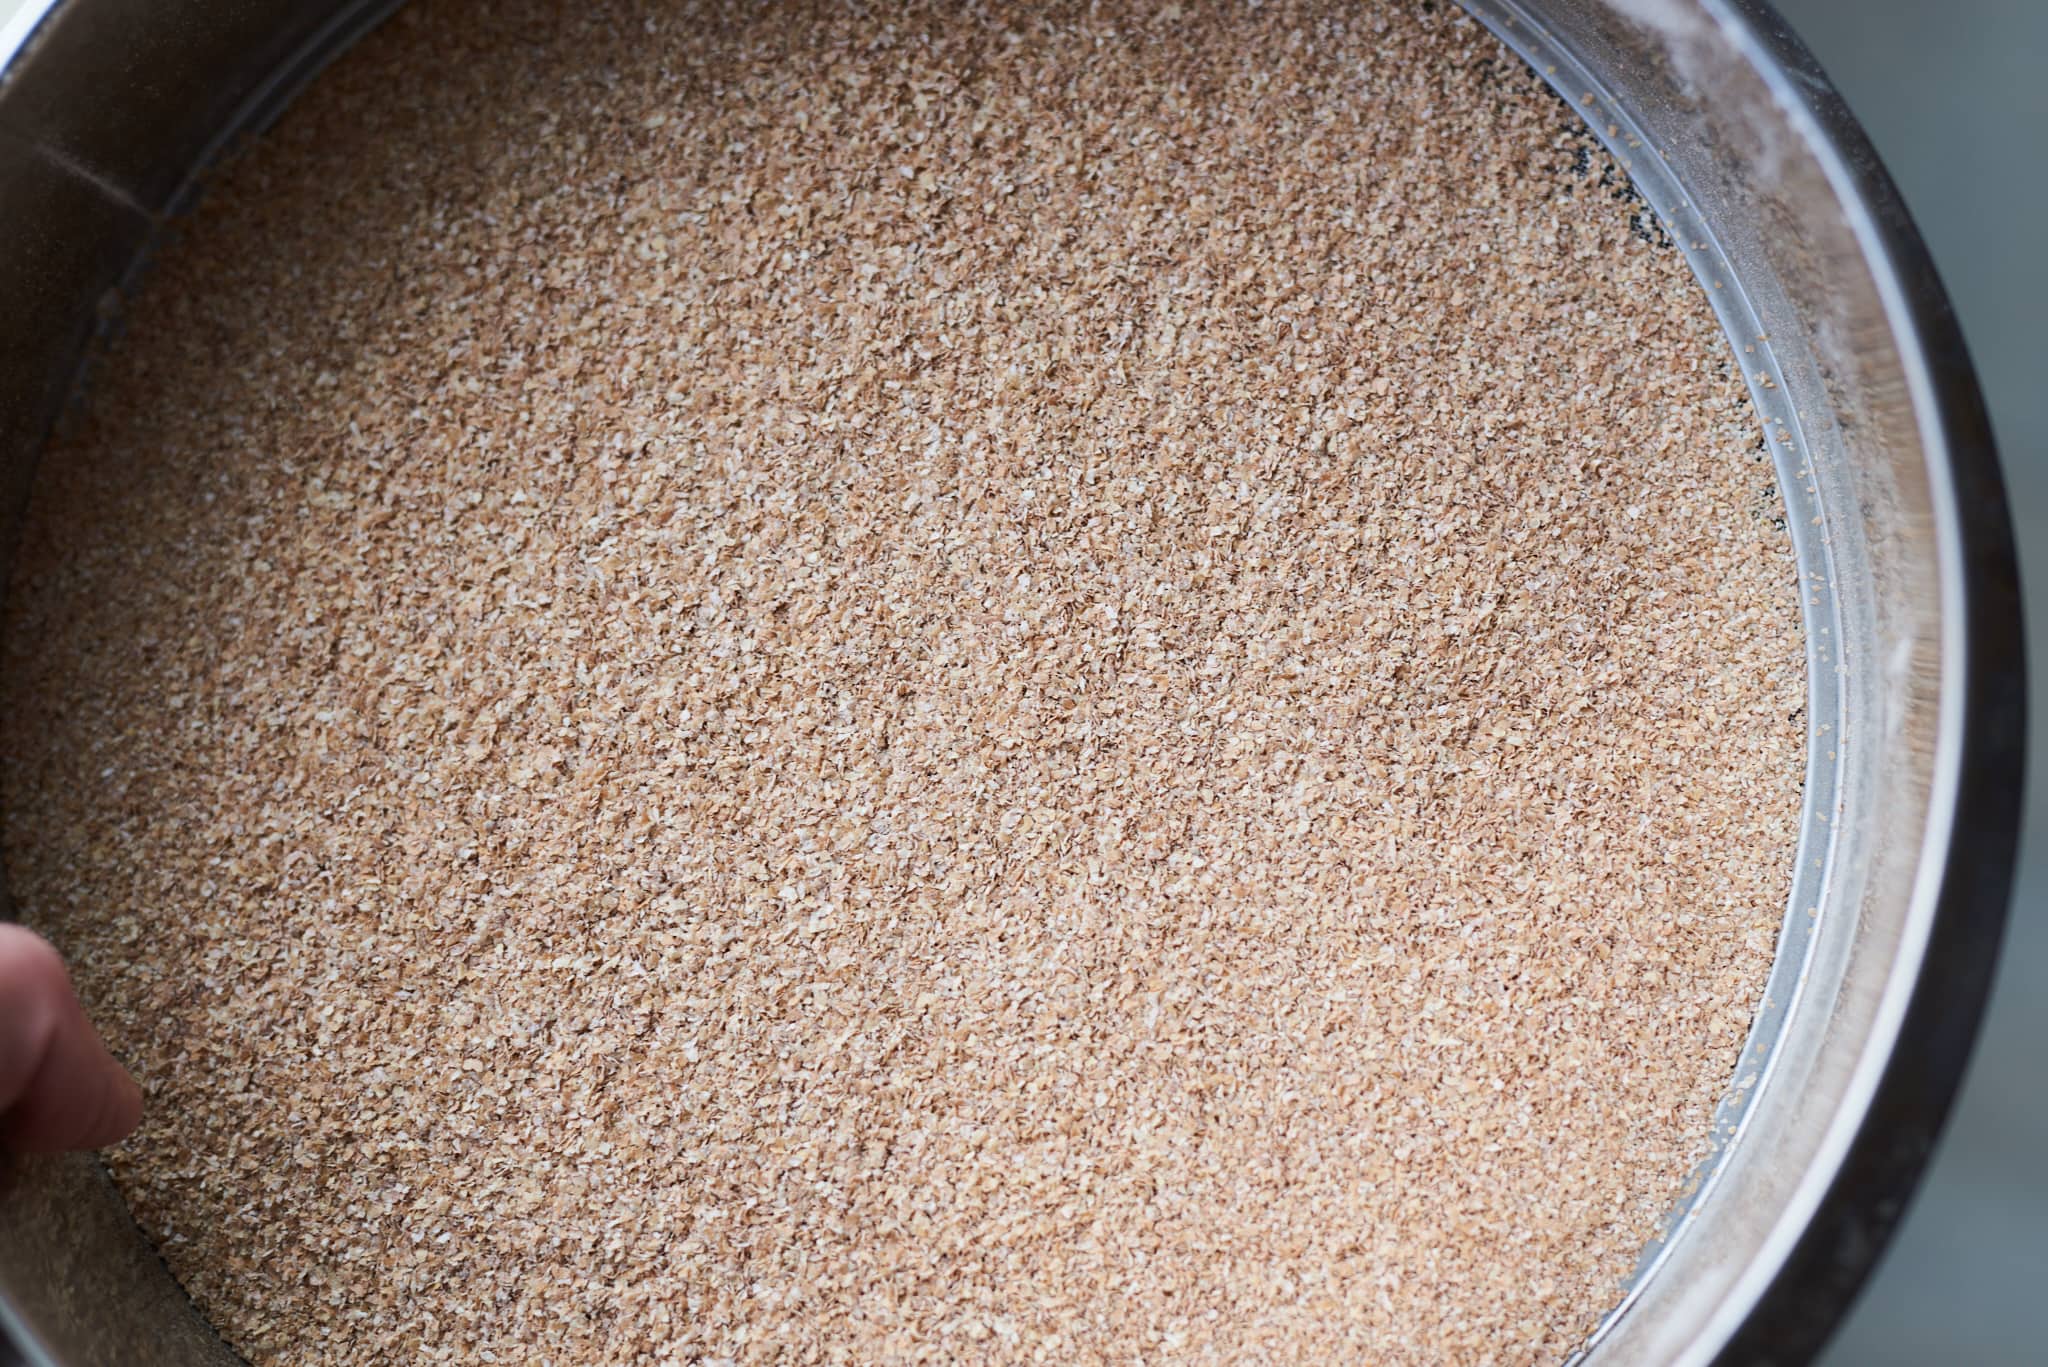
- Shake the container and screen to allow the fine bits (endosperm) fall through while the larger bits (bran and germ) are retained on top of the screen
- Remove the sifter and pour the retained bran and germ into a heatproof container or bowl and pour in boiling water to cover
- Let the mixture cool, then cover until ready to add it to dough at the end of mixing or in bulk fermentation
This is the sifting screen I use. After sifting my flour, about 13% remained on the screen. This means if I sifted 1000 grams total whole wheat flour, I’d have about 130 grams leftover to scalded. The final extraction heavily depends on the flour you’re using and how it was milled.
If your screen is more coarse or more fine, it’s okay, too. The extraction percentage here doesn’t have to be precise. Any amount sifted out will help lighten the loaf and it’s okay if more or less flour ends up in the dough.
Note that the amount of water used to scald the bran and germ should be accounted for in the recipe. In other words, I will take water from Water 1 or Water 2 (the water used in the recipe). This way, you’re not adding extra water to the dough, which may result in overhydration.
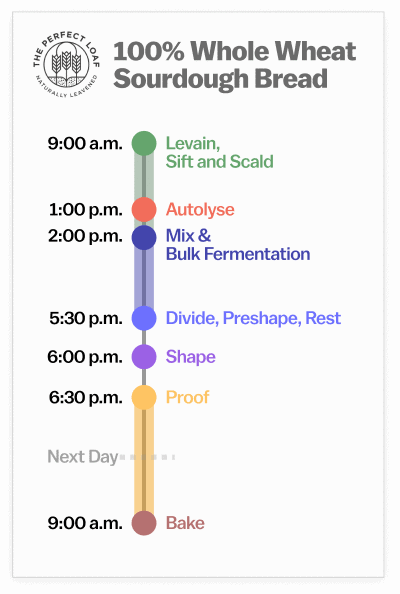
Baking Schedule
This whole wheat sourdough bread is made over two days for increased flavor and a convenient baking schedule. But it’s also possible to make it in a single day by allowing the dough to proof on the counter, shape it, and cover until it is puffy, relaxed, and passes the poke test (about 2 to 4 hours, temperature depending).

100% Whole Wheat Sourdough Bread Recipe
For tips on calculating baker’s percentages or modifying this formula (including baking only a single loaf), see my post on baker’s percentages (baker’s math).
Vitals
| Total dough weight | 1,800 grams |
| Prefermented flour | 7.0% |
| Levain in final dough | 15.1% |
| Hydration | 90.0% |
| Yield | Two 900g loaves |
Total Formula
Desired dough temperature: 75°F (23°C) (see my post on the importance of dough temperature).
| Weight | Ingredient | Baker’s Percentage |
|---|---|---|
| 921g | Whole wheat flour (Cairnspring Organic Whole Grain Expresso or Central Milling Hi-Pro Fine Whole Wheat) | 100.0% |
| 737g | Water 1 (levain, optional scald, and autolyse) | 80.0% |
| 92g | Water 2 (mix) | 10.0% |
| 18g | Fine sea salt | 1.9% |
| 32g | Ripe sourdough starter, 100% hydration | 3.5% |
Additional Ingredients
About 60g (½ cup) of raw wheat bran or, previously sifted bran and germ, for topping (optional)
100% Whole Wheat Sourdough Bread Method
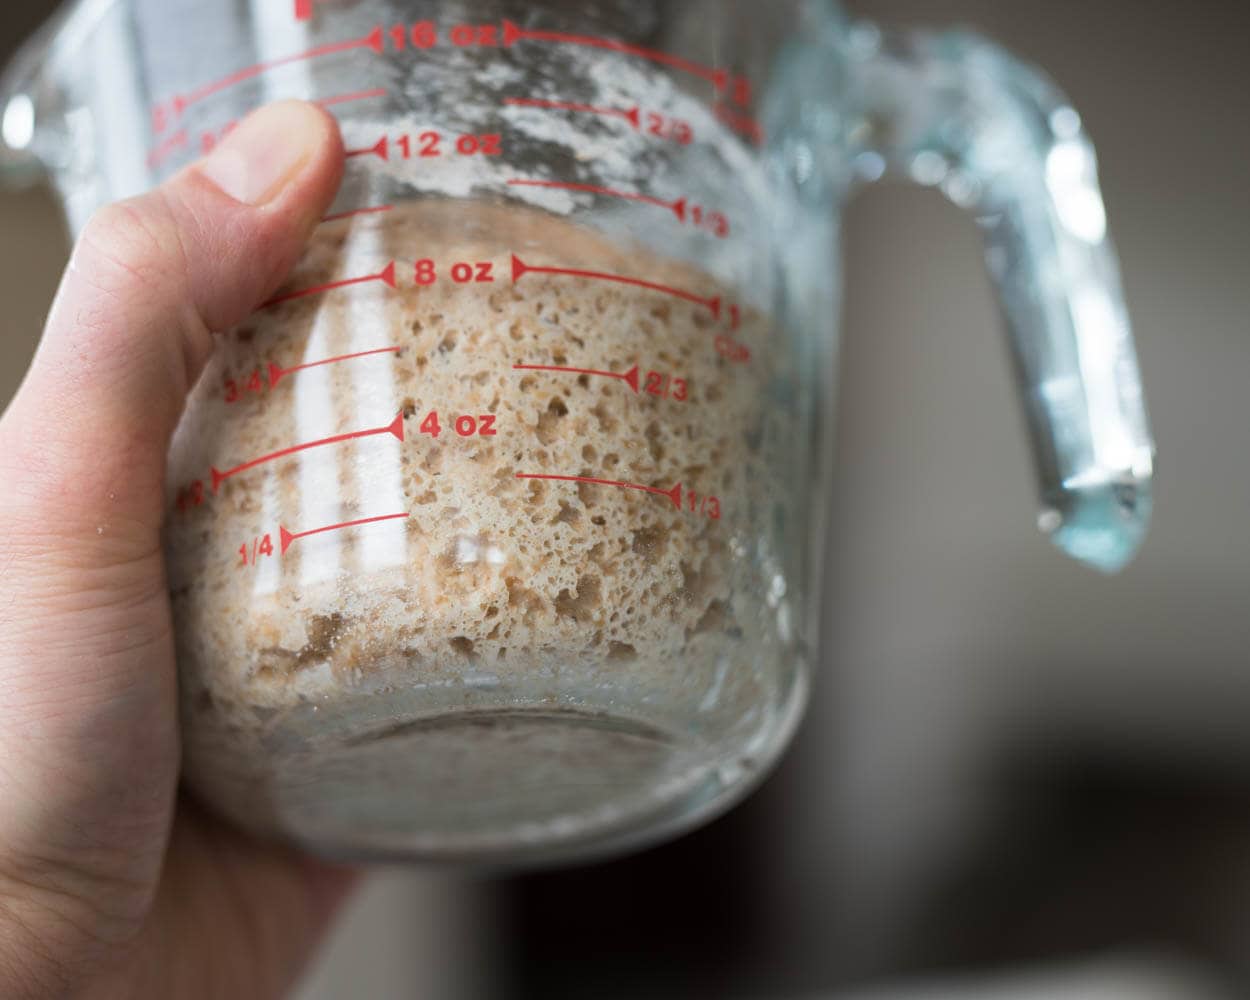
1. Prepare the levain – 9:00 a.m.
| Weight | Ingredient | Baker’s Percentage |
|---|---|---|
| 64g | Whole wheat flour | 100.0% |
| 32g | Water 1 (levain) | 50.0% |
| 32g | Ripe sourdough starter, 100% hydration | 50.0% |
Mix the ingredients in the chart above in your favorite jar and leave them covered at a warm temperature, 74-76°F (23-24°C), to ripen for 5 hours. This is a stiff levain; if it is hard to knead the ingredients together, use more water as needed to make incorporation easier.
2. Optional: Sift and scald flour – 9:10 a.m.
Place your sifting screen over a large container. Pour some whole wheat flour and sift it by shaking the stack. When no more flour falls through, continue until you’ve processed all the flour.
Place the sifted-out bran and germ in a heatproof bowl and pour 200 grams of boiling water on top to cover. Let this soaking mixture rest near your levain until we are ready to mix the dough.
See earlier in this post, here, for more details on sifting and scalding.
3. Autolyse – 1:00 p.m.
| Weight | Ingredient |
|---|---|
| 857g | Whole wheat flour (minus any sifted) |
| 705g (or 505g if sifting and scalding, which will absorb all 200g of water) | Water 1 (autolyse) |
I use the autolyse technique for this recipe to help reduce the total mixing time required, but I also find it helps aid in the dough’s extensibility.
Warm or cool the autolyse water so that the temperature of the mixed dough meets the final dough temperature (FDT) of 75°F (23°C) for this recipe. Place the flour and water 1 (autolyse) in a large bowl. Use wet hands to mix until no dry bits remain; the dough will be shaggy and loose. Use a bowl scraper to scrape down the sides of the bowl to keep all the dough in one area at the bottom. Cover the bowl and place it near your levain for 30 minutes.
4. Mix – 2:00 p.m.
| Weight | Ingredient |
|---|---|
| 92g | Water 2 (mix) |
| 18g | Fine sea salt |
| 128g | Ripe levain (from Step 1) |
This highly hydrated whole wheat dough benefits from extra strengthening during mixing. Below, I’ll discuss mixing this dough by hand, but it’s also possible to use a mechanical dough mixer. In this case, mix the dough until it smooths and holds itself together, about 5 to 6 minutes on speed 2 in total.
To mix by hand, add the salt and break the stiff levain apart, and spread on top of the dough in autolyse. Use a splash of water 2 to moisten. With wet hands, mix thoroughly. Use wet hands or a dough whisk to help make mixing easier.
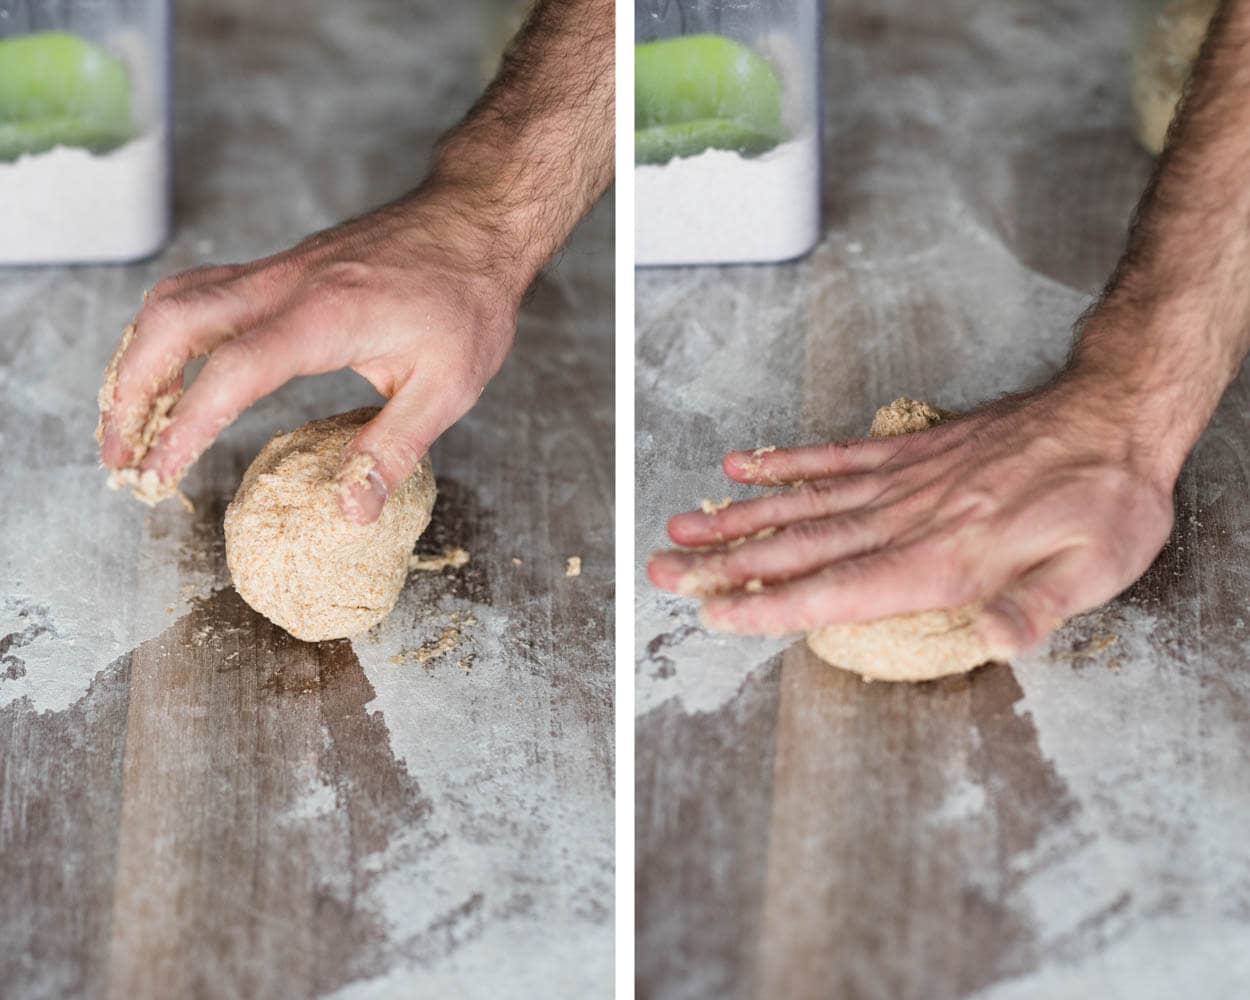
Next, knead the dough for a few minutes using either the slap and fold technique or folds in the bowl. For this dough, I kneaded for about 5 minutes until the dough smoothed and became elastic. Transfer the dough back into the bowl, cover, and let rest for 10 minutes.
If the dough feels very wet and soupy, don’t add any remaining water. If it seems cohesive, add the remaining water 2, mixing it in until absorbed. Once again, scrape the dough out to the counter and use wet hands to slap and fold the dough for 3-5 minutes, making it smoother and more cohesive.
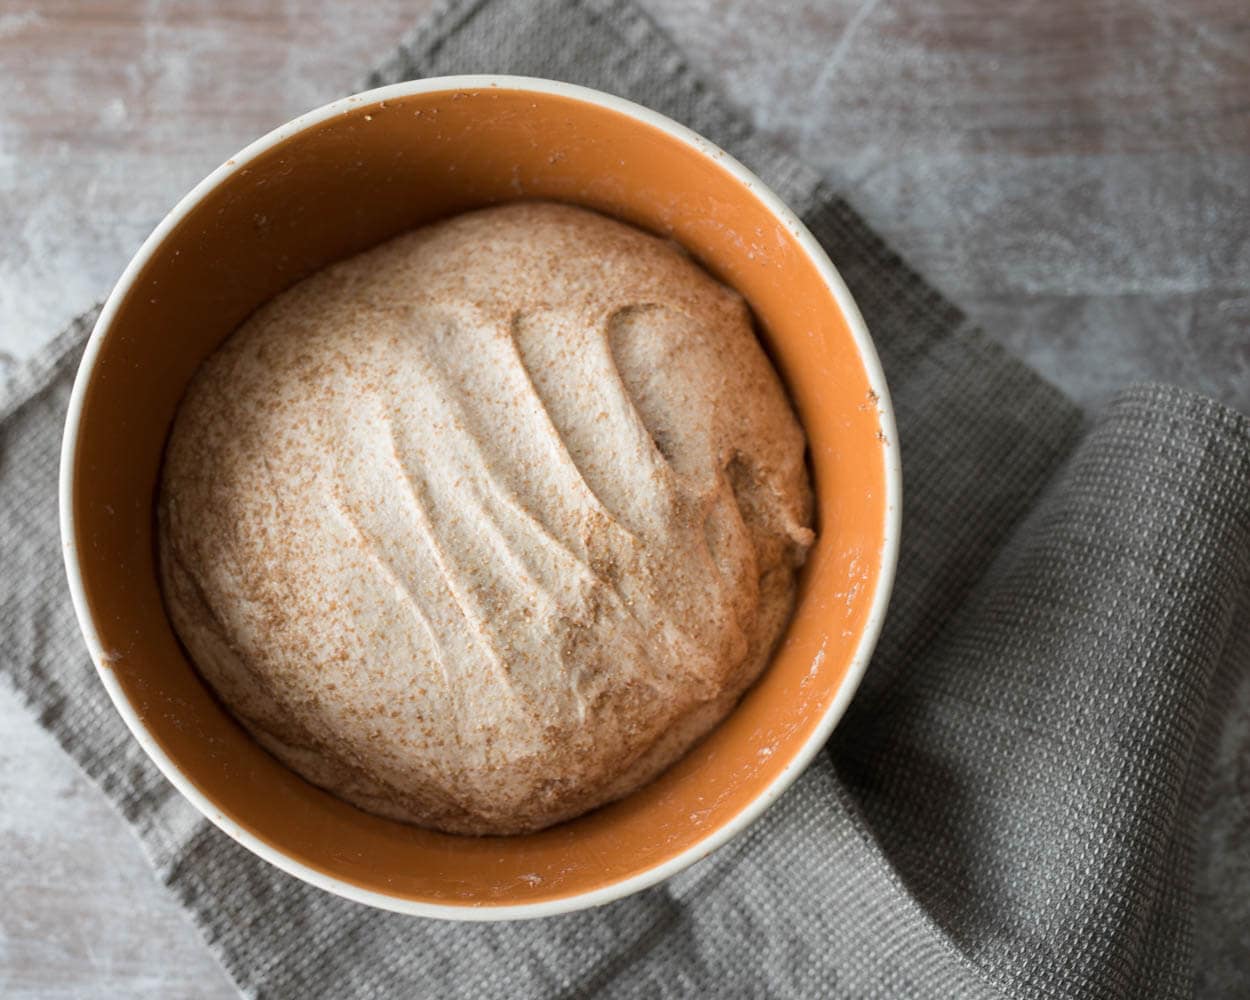
Transfer the dough to a bulk fermentation container and cover.
5. Bulk Fermentation – 2:30 p.m. to 5:30 p.m. (3 hours)
At a warm room temperature, 74-76°F (23-24°C), bulk fermentation should take about 3 hours and need 4 sets of stretches and folds at 30-minute intervals.

Before you give your dough its first set of stretches and folds, spread about 1/4 of the scald over the top of the dough (if you decided to do this optional step). Then, grab one side of the dough and stretch it up and over the dough to the other side. Spread on another 1/4 of the scald to the new top. Rotate the bowl 180° and perform another stretch and fold. Spread on another 1/4 of the scald, then rotate the bowl 90° and do another stretch and fold. Finally, spread on the last of the scald, turn the bowl 180° and do one last stretch and fold.
It’s okay if the scald streaks through the dough at this point, there will be more stretching and folding to help it incorporate more thoroughly.
Perform 3 more sets of stretches and folds at 30-minute intervals. After the fourth set, let the dough rest, covered, for the remainder of bulk fermentation.
6. Divide and Preshape – 5:30 p.m.
After 3 hours, the dough should be risen and puffy in the bulk fermentation container. Because of the high percentage of freshly milled flour and whole grains, the dough may not rise as high as a recipe with more white flour. It will be ready to divide when the top of the dough is smooth, bubbly, and the edge where the dough meets the container is slightly domed downward.
Fill a small bowl with water and place it next to your work surface. Scrape the dough onto a clean work surface and divide it into two equal pieces. With one wet hand and a bench knife in the other, preshape the pieces of dough into loose rounds.
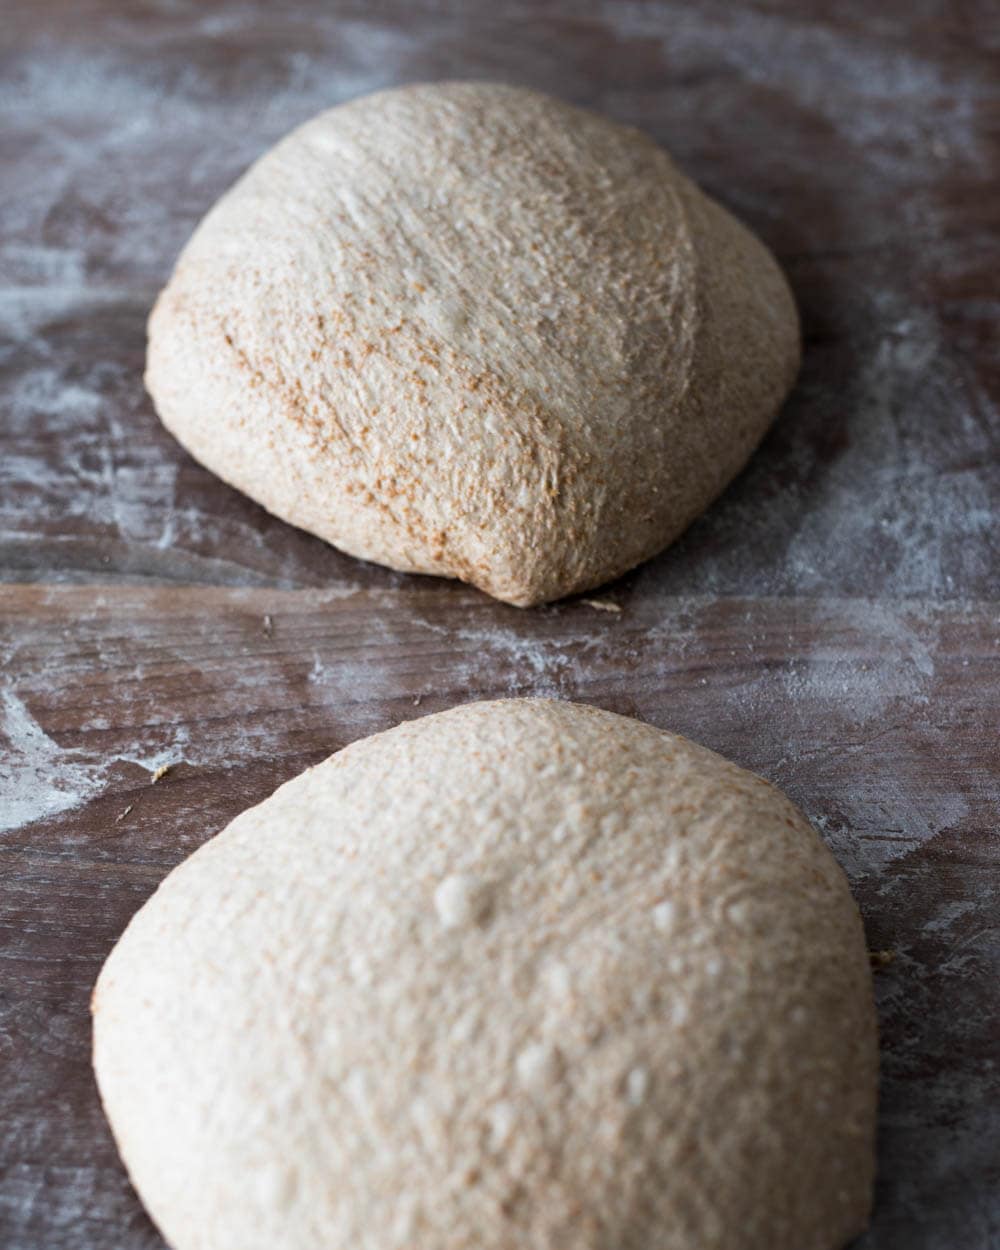
Let the dough rest, uncovered, for 30 minutes.
7. Shape – 6:00 p.m.
Place a baking sheet or clean kitchen towel next to your work surface and, if using, spread an even layer of raw wheat bran or germ on top, if using.
Flour the top of the preshaped round and your work surface. Using your bench knife, flip one of the rounds over onto the floured area. Using floured hands, shape the dough into a bâtard or a boule. Transfer the shaped dough, seam-side up, to the baking sheet with germ, if using, and rock it back and forth so the germ sticks. See my guide to topping bread dough for more help on topping bread dough.
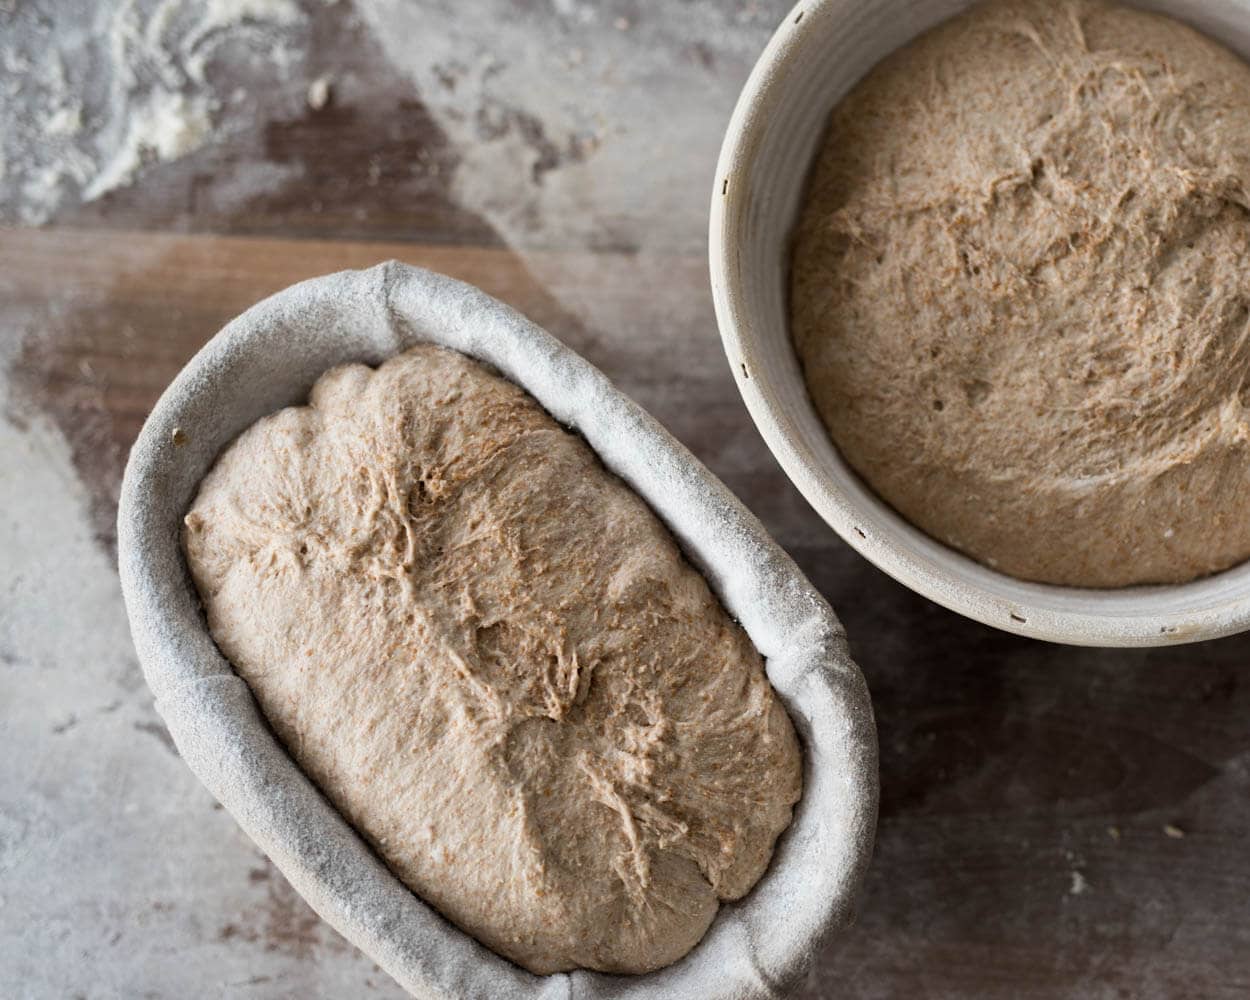
Gently transfer the dough to an 11-inch long proofing basket, seam-side up. Repeat with the remaining round.
8. Proof – 6:30 p.m. to 9:00 a.m.
Cover the baskets with a large, reusable plastic bag and seal shut. Place the baskets in the refrigerator to proof overnight.
9. Bake – 9:00 a.m.
Due to the oval shape of these loaves, you can bake them in a Challenger baking pan as I’ve done here or directly on a baking surface, steaming your oven.
Place an oven rack with an oval Dutch oven in the bottom-third of the oven. Preheat the oven to 450°F (230°C) for 30 minutes.
Take one of the proofing baskets out of the fridge, uncover it, and put a piece of parchment paper over the basket. Place a pizza peel or inverted baking sheet on top of the parchment, and using both hands, flip everything over. Gently remove the basket and score the dough.
Remove the bottom of the preheated Dutch oven and slide the dough into the pan. Return the pan to the oven and cover with the lid. Bake for 20 minutes. Vent the pan of steam by uncovering the pan (remove the lid from the oven or place it on the rack next to the bottom of the Dutch oven). Continue to bake for 35 minutes more. When done, the loaf should have an internal temperature of around 204°F (95°C), and the crust should be deeply colored.
Carefully remove the loaf from the Dutch oven to cool on a wire rack. Return the Dutch oven lid and bottom to the oven to preheat for 15 minutes. Repeat with the remaining dough in the refrigerator.
Let the loaves cool on a wire rack for at least 2 hours, preferably 3, before slicing.

100% Whole Wheat Sourdough Bread
- Prep Time: 24 hours
- Cook Time: 1 hour 15 minutes
- Total Time: 25 hours 15 minutes
- Yield: 2 loaves
- Category: Bread
- Cuisine: American
Description
Sourdough bread made with 100% whole-grain wheat flour. With a robust and Earthy flavor, this is nourishing and wholesome bread.
Ingredients
Levain
- 64g whole wheat flour
- 32g water
- 32g ripe sourdough starter
Autolyse
- 857g whole wheat flour (minus any sifted)
- 705g water (or 505g if sifting and scalding)
Main Dough
- 92g water
- 18g fine sea salt
- 128g ripe levain
Instructions
- Levain (9:00 a.m.)
In a small container, mix and knead the levain ingredients and keep at 74-76°F (23-24°C) for 5 hours. - Optional Sift and Scald (9:10 a.m.)
Place your sifting screen over a large container. Pour some whole wheat flour and sift it by shaking the stack. When no more flour falls through, continue until you’ve processed all the flour. Place the sifted-out bran and germ in a heatproof bowl and pour 200 grams of boiling water on top to cover. Let this soaking mixture rest near your levain until we are ready to mix the dough. - Autolyse (1:00 p.m)
In a medium mixing bowl, mix the Autolyse ingredients, cover and let rest for 1 hour. - Mix (2:00 p.m.)
To the mixing bowl holding your dough, add the Main Dough ingredients: salt, ripe levain (from step 1), and water. Mix by hand or with a dough whisk and strengthen the dough for 5 minutes until it becomes smoother and slightly elastic. Transfer to a bulk fermentation container and cover. - Bulk Fermentation (2:30 p.m. to 5:30 p.m.)
Give the dough 4 sets of stretch and folds at 30-minute intervals, where the first set starts 30 minutes after the start of bulk fermentation. - Divide and Preshape (5:30 p.m.)
Lightly flour your work surface and scrape out your dough. Using your bench knife, divide the dough in half. Lightly shape each half into a round shape. Let the dough rest for 30 minutes, uncovered. - Shape (6:00 p.m.)
Shape the dough into a round (boule) or oval (batard)—place in proofing baskets. - Proof (6:30 p.m. to 9:00 a.m. the next day)
Cover proofing baskets with reusable plastic and seal shut. Then, place both baskets into the refrigerator and proof overnight. - Bake (Preheat oven at 8:00 a.m., bake at 9:00 a.m.)
Preheat your oven with a combo cooker or Dutch oven inside to 450°F (230°C). When the oven is preheated, remove your dough from the fridge, score it, and transfer to the preheated combo cooker. Place the cooker in the oven, cover with the lid, and bake for 20 minutes. After this time, remove the lid (you can keep it in the oven or remove it) and continue to bake for 30 minutes longer. When done, the internal temperature should be around 208°F (97°C). Let the loaves cool for 2 hours on a wire rack before slicing.
100% Whole Wheat Sourdough Bread FAQs
Why is my whole wheat bread gummy inside?
This can be from underproofing, overproofing, or underbaking. Be sure you use your sourdough starter when it’s ripe to make the levain, and ensure the levain is ripe when mixing it into your dough. To spot overproofing, look for a lack of rise in the oven and a dense interior with lots of little holes. Be sure to fully bake your dough until the interior temperature reaches around 204°F (95°C) and let it fully cool before slicing.
What gauge is your sifting screen?
My sifting screen is #20, but any gauge will work as long as it’s not too fine so that nothing falls through, or too large where everything falls through. You’re looking for around 10 to 20% extraction (meaning, for every 1000g you sift, 100 to 200g will be left over).
Can I make the sifted and scalded mixture ahead of time?
Yes. I would sift the flour, scald with boiling water, let it cool, then cover and keep it in the fridge for up to 3 days. The morning you want to add it to bread dough, let it come to room temperature so it doesn’t adversely cool the dough.
Can I add the scald back into the dough during mixing instead of bulk fermentation?
Yes. It’s easier to add the scalded bran and germ back in at the very end of mixing and if you prefer this, by all means, go for it.
What’s Next?
This 100% whole wheat sourdough bread is the purest example of healthy sourdough bread. If you’re looking for a loaf that’s just as flavorful but lighter in texture, my Fifty-Fifty Sourdough Bread is the ticket.
Buon appetito!


261 Comments
How long do you bake with steam? I always go for about 20 mins, but I found that for higher hydration do 80+ the inside still wet even after cooling it completely before cutting. Do you recommend baking longer with steam or raising the temperature!
I typically bake with steam for 20 minutes, this bread I went a little longer. If the inside of your finished bread is gummy or moist it could be due to over hydration of the dough (dial back the water in the recipe), under proofed dough or not enough bake time. Chances are it’s simply that your bread could use a bit longer time in the oven, if you have an instant read thermometer make sure the interior of the loaf is at least 210ºF to ensure it’s fully baked.
Hope that helps!
Thanks,
Would a longer (~12 hr) cold rise in the refrigerator be too long?
It really depends on how developed (how much fermentation) your dough has undergone. You could certainly try it out and see if the flour/dough can handle the longer proof. With pan breads I love to push the proof even past that but the structure of the pan helps keep the dough into shape.
Hi there!
I’ve been baking with sourdough for some weeks now, and I’m really excited.
I followed this recipe to the letter, and, even though the taste of the bread was very good, with a nice crust, the crumb was still a bit dough-y inside. Any idea why this happened? Is there any tip? I would really appreciate your advise. Thanks in advance. 🙂
If the interior tastes a little doughy, or gummy, there’s a few things it could be. The first cause is usually underbaking this bread — it’s really important, especially with 100% whole wheat, to fully bake the loaf. If you have an instant read thermometer make sure the interior is at least 210ºF. Second, let the loaf fully cool for several hours after baking to ensure everything sets, if you cut too early the interior can become gummy. Finally, some of this might just be due to the actual flour and the fact that it’s 100% whole wheat. My loaves typically are not gummy but just keep in mind the texture will be much different than a mostly-white loaf (for the better, I say!).
I hope these suggestions help!
Thank you for the quick reply!
Much appreciated.
I will let you know what happened next time.
Wonderful blog! I have been baking with sourdough for just a few weeks now but I really love it.
This recipe looks wonderful but I live off grid without a fridge, so could you tell me if it would at all be possible to adjust it so it can be done without fridge? At night te temperature in my kitchen is as low as 9 °Celcius at the moment, would that maybe be sufficient?
Thanks, Renetta! Glad to hear you’re having a good time making sourdough at home.
9ºC is still a bit on the warm side for a long overnight proof with this dough recipe. You could, instead, avoid the long, cold proof and let the dough ferment at room temperature for 2-4 hours and bake it straight away. The flavor will be a bit different, but you’ll have delicious bread nonetheless.
Alternatively you could experiment with lowering the levain percentage drastically (perhaps by half?) to see if this would let you do a long 8+ hour proof at 9ºC. That will take some experimentation on your end, I’d say give it a try and see how it turns out. If you’d like to send over some pictures of the result use the Contact link at top to shoot me an email.
Happy baking!
Hey Maurizio, was just curious what was your reason to go up as high as 95% on hydration? I thought 70% was the typical target? Thanks, Andrey
Hey, Andrey! Hydration is a very relative thing and it’s very specific to not only the type of flour you’re using but also the batch that you might use (each batch of flour can have different water absorption characteristics). With whole grains, specifically this 100% whole grain recipe, it’s possible to push the hydration very high and still have a totally workable dough. The added bran/germ in whole wheat flour compared to white, sifted flour allows this flour to absorb much more water.
Hope this helps!
Great, thanks! Your 100% whole wheat looks amazing!
Thank you and happy baking!
Good morning Maurizio,
I have to say this post is very informative with loads of good information. I am definitely going to start sifting the flour, soaking a re-incorporating. I have one question regarding the crust. The method and baking temperature I use is very similar to your method, however, I often find that the crust is incredibly tough and almost impossible to cut through on the bottom (cooking in a pre-heated dutch oven). It seems that this thick/tough crust might be an unavoidable result of whole wheat sourdough bread making. I was wondering if you could describe the crust that this method has yielded and if you also found it to be a bit tough. Thank you very much sharing your knowledge and experience.
Respectfully Submited.
Thanks Thomas, really happy to hear that! The thick crust is not related to sourdough per se, it’s more related to the Dutch oven and other things. I find when I bake in a DO I do get a slightly thicker crust that gets cooked just a bit more than the rest of the loaf. You might want to try reducing the temperature of your oven a bit, reducing the time the DO is preheated, or finally you could coat the bottom of your dough with something such as raw wheat germ (or cornmeal) to help insulate. One of these things, or a combination of them, will definitely help reduce the bake on the bottom!
Hope that helps and happy baking Thomas!
Great advice, I appreciate the quick response and I’ll give each of these a try!
Hi Maurizio, I’ve just discovered your site and have quickly become obsessed!
I’m a newbie to this world and am confused by one thing in each of your recipes that I’ve looked at – the amount of levain used in the recipe is less than the amount that you make up at the start. In this recipe you’ve made 215g levain but only used 175g in the dough. Is there a reason for this? Could I scale it back to make just the amount that the recipe calls for? What do you do with the extra?
Thanks for the incredible resource that you’ve created here!
Sarah — really glad to hear you’re enjoying my site! I tell you, sourdough really takes over, doesn’t it 🙂 You can definitely scale back the levain if you’d like. I prefer to make a little extra just to be 100% sure I’ll have enough to cover the recipe requirements at mix time. Sometimes if you make exactly what’s called for you might be several grams short as it can be hard to scrape every bit out of the container, etc.
Hope that helps, glad to have you along and happy baking!
do you just add the remaining 30g to a backup starter? it’s discard (whatever that means to us) at this point, right?
Right, it’s discard so you can compost it or use it in something like sourdough waffles/pancakes/banana bread.
Ok. So you said AT LEAST a 2 hour autolyse. What’s the upper limit for autolyse time. Would mixing it the night before and combining the levain and salt in the morning? I.e., would 8-9 hours be too long for the autolyse step?
Hard to say what the upper limit is, I’d think that depends on the flour used. I find really long autolyse times work well with mostly whole grain flours but when a very long (3+ hour) autolyse is done with a mostly-white flour recipe the dough becomes extremely extensible and hard to strengthen back up. For a recipe like this, with this much whole grain, an overnight autolyse would probably work quite well — in fact I used to do this occasionally.
Love all your posts. I am obsessed with tartine no 3 style breads and your posts answer so many of my questions. Thank you!
Thanks so much Anjali, really happy to hear that. Happy baking!
Hey! I just made this loaf the other day and it was wonderful! Quick question, how do we get away with retarding this bread for so much significantly longer than your sandwich pan loaf recipe?
That’s great to hear! I think there are a few minor, but significant, differences between the two. This recipe utilized a stiff levain (which in my experience tames fermentation a bit compared to a liquid levain/starter) and also the flour used here was aged whole wheat whereas my sandwich loaf used Grist & Toll which is milled right when buying. My theory is the combination of the two is what results in the disparity!
Ciao Maurizio! First, congrats for this amazing page, it has been a light at the end of the tunnel. I’m getting started in the world of sourdough. Using a recipe for a starter given to me by my brother in law I tried to make a whole wheat starter, but failed, repeatedly. I also have tried your starter recipe with whole wheat but I’m on day 4 and things don’t look so well. Could you give any advise for using 100% Whole Wheat starter or maybe a recipe given the case is different from the one you have published?
Grazie mille! Saluti da Barcellona!
Luis — thank you so much I appreciate that! I think you could definitely follow my guide to creating a starter with 100% whole wheat (I typically use a mix of white flour and rye flour). The process should be overall the same. What specific issues are you running into? If you’re not seeing any activity just stick with the process: discard a portion each day and feed with new flour and new water. Eventually you’ll see activity and your starter will get stronger.
if you need more specific advice feel free to shoot me over an email (the Contact link) at the top and I’ll help you out!
Hi Maurizio! I bought some Central Milling WW flour at my local store (in VT) and made a whole wheat loaf with it. I found the flavor kind of funny – spicy is the only word I can think of – and decided not to use it anymore sadly. I wonder if it just traveled too far or sat with other things that tainted its flavor. But I have a good source of hard red winter here and have been using that with good success. I don’t get as large holes as you have but then again I am not good at following directions 🙂 and do a lot by feel! I appreciate your site and thoughts, ideas, and strategies – it’s taught me a lot! Ciao!
Darn! Well it’s actually a really great thing to use flour that’s as local as possible. I know out there in your area there are some fantastic farms and millers, happy to hear you have a good source! Central Milling is not too far from me and I’ve had nothing but success using their flour, but again, they are relatively close by!
Thanks so much for the comments, really happy to hear you’re enjoying my site! Happy baking, ciao! 🙂
My plan is to soon experiment with sourdough. I’ve been using the Artisan Bread in 5 minutes per day method this year.
I’ve been using about 450g fresh ground hard red winter wheat.
If I make a batch at least weekly, how long could I soak the bran before it spoiled? It would save me time to sift my flour and use soaked bran from the previous batch. I could then incorporate the soaked bran immediately into my dough. In this way, I could continue with my low time intensive dough method, and benefit from the soaked bran not cutting through my gluten.
You could probably keep the soaked bran for at least a week if you kept it in the fridge most of the time and then take it out early to come up to room temp before using in your dough (you don’t want a large mass of cold ingredients in your dough to slow down activity). I think that’d work quite well!
Hi Maurizio,
Re-incorporating soaked bran is such a great idea. Have you heard of the term “bolting flour” for this process?
It seems superior to using commercial “high extraction” flours. It definitely is cheaper!
For my bake, I milled Central Milling Hard Red Whole Wheat and sifted out the “bran” ( I only got 8.2%). I weighed the flour and “bran” to check that the sum of the 2 separate weights was the total starting weight.
The brown part looked like bran but some discussions on sifting suggest that what is separated out might include non-bran parts of the wheat kernel. What do you think? I am satisfied that enough of the bran was separated because the resulting dough handled so well.
I soaked the bran for 7 hours with just enough cold water to moisten it and it ended up really soft. I worked the bran in right when combining the levain and autolysed dough. Gas deflation at that point was not an issue.
My “heavy hand” in getting the bran back in the dough did not seem to hurt the gluten development because the dough turned billowy soft and full of air after a couple of S/F sets during the bulk fermentation.
I was a little fearful of going above 87.5% hydration but I may try to go higher next time.
After making it through a trial bake, I am much better able to appreciate all the details you are giving us on the write ups! Thanks!!
Thanks, Joe! Yes, definitely have heard of bolting flour, and I do this sometimes when I mill my own flour fresh. Definitely cheaper.
Yes, when sifting your own flour it’s inevitable some other parts of the kernel will come out as well. At a proper mill they are better able to precisely control the extraction as the flour is milled (typically in rollers) because the bran/germ will flake out and they can sift that out. But for the purposes of this loaf, like you said, it works pretty well!
I appreciate the comments, Joe — look forward to hearing from you again on how my recipes work out for ya! Happy baking 🙂
Hi Maurizio
When I added the bran to the dough the bran tended to remain in clumps which were difficult to break up, and I ended up having to work the dough a lot and pinch individual clumps of which there were many. I certainly couldn’t just fold the bran in. What do you do to allow the bran to disperse easily?
Thanks
Harry,
Yes, it can be difficult to reincorporate the bran without mixing like crazy and pressing those precious gasses out. I found what worked best was to spread the bran in a layer on top and also tuck some under the dough. Then, wet your hands and also splash a bit of water on top of the bran to help it fall apart more readily. At that point you should be able to gently massage the bran through the dough along with a couple folds and squeezes.
it’s not completely easy going but it’s very similar to mixing in seeds or nuts.
I hope that helps!
Hi Maurizio,
I really want to try making this 100% whole wheat bread as it looks and souns AMAZING but I generally try to use spelt instead of wheat (I could buy some wheat flour though, if I need too), my question is do you think I could follow this recipe but use wholegrain spelt instead? What things might I need to tweak?
Mia — thanks! Yes, you can definitely use whole grain spelt just the same way I used wheat here. You can sift just the same. The only tweak would be watch the hydration of the dough when you use spelt. I’m not sure if your flour will need more or less water. You could start with the hydration listed here and then adjust up/down until it feels right — a few trials might be necessary. I’m sure you’ll get delicious bread, spelt is incredible! I am working with it right no on an upcoming post I hope to have out soon.
Happy baking!
Thank you for sharing! Your blog has done wonders for baking, which was sketchy at best! I was wondering if you’ve ever done this with freshly milled flour? I recently picked up an old impact mill and was wondering if this technique of sifting out the bran and soaking would work. Thanks again
Thanks, I’m so glad my site has been helping! I actually haven’t tried this with fresh milled wheat (surprisingly), but I will surely do so soon. I’m pretty sure it’ll work extremely well! Congrats on the new mill, you’re going to love the taste of fresh milled flour 🙂
I actually tried it this weekend. It turned out shockingly well! My loaves usually grow after proofing in the fridge overnight, but it was virtually overflowing. Its crazy how much faster the loaves ferment with the freshly milled flour
That’s awesome to hear — yes you’re right fresh milled flour really moves fast!
If I wanted to add a bit of honey to sweeten my whole wheat sourdough, at which stage would you suggest adding it? And should I make other adjustments to account for the additional hydration of honey (like reduce the water a tad)? Also, what size Dutch oven are you cooking this bread in? I have a 6 inch diameter stoneware French oven and am trying to figure out how many mini 6 inch boules this recipe would make.
I’ve never added honey, but I’d say you can add it in during bulk fermentation, after your second turn. When I add walnut oil, or other oils, I typically do it at that point. Depending on how much you add you probably won’t have to adjust hydration. I’d say you’d be safe up to about 5%, more than that you could reduce hydration a few percentage points to compensate.
I actually didn’t bake these loaves in a Dutch oven, I baked them right on baking stones using my home oven steaming method. When I do use a Dutch oven I like my 3qt. Lodge combo cooker, perfect size for typical boules!
Hope that helps, happy baking Jessica!
Amazing results. So do you take the ‘proofed’ doughs straight from the fridge and into the preheated oven? No ‘warming up’ time to room temperature? I will try this asap
Thanks, David! Correct, I do not warm up the dough before loading into the oven — straight from fridge to oven.
Let me know how it goes!
I had a great proofed loaf removing the heavy bran particles really made a difference. But I think it slightly overproofed it and stuck to my banneton. I will try this again soon, I’ll post you a photo if it turns out
Excellent, looking forward to your results. Yes, have to watch that whole wheat dough — it moves fast!
What a lovely loaf!
Just to double check, the final proof in the refrigerator is overnight?
Thank you for sharing, your website is a great source of information.
I hope you will do more posts on 100% whole wheat (or whole grain) loaves in the future.
Emilye, thanks! Yes, the final proof is overnight in the refrigerator. You’re very welcome, and yes I do plan to do more 100% whole grain posts coming up here soon. Thanks for following along!
What a wonderful post, Maurizio!! Hear that clapping and whistling in the background?!?!!! Yep, that’s me! 😀 I am so excited to give this a try. Thank you so much for sharing this.
Thanks, Lisa! I just love whole wheat bread, even though it can sometimes be a little bit trickier to bake than a typical white sour.
Let me know how this recipe works out for ya!
This is just beautiful and thank you for sharing. Love your posts! I make a 70% whole wheat sourdough loaf that I pepper with mashed/chopped up sprouted organic wheat berries. Like you, I ferment this almost totally (except for 15-20 min bulk) under the cool temps of the fridge in order to get some control over the fermentation rate. The only time it is outside of the fridge is for shaping. It works pretty well for me and I manage to get respectable oven spring and grigne. Well done and looking forward to more!
Thanks, I appreciate that! That’s an interesting way to incorporate some of the whole wheat kernel. I’ve also been meaning to experiment more with sprouting grains and I hope to get to that more in the next few months. I’ve heard the flavors are superb and it adds another dimension to your bread.
Thanks for stopping by and the comments, hope to hear from you again on a future post!
Good point, we could totally use the bran as a topper or even just roll the entire loaf in it before retarding. It shouldn’t burn in the oven and would provide some nice crunch to the bread. However, did you see that picture up there of the 129 grams of bran I mixed back in? It’s A LOT! Maybe a 50/50 combination of the two would be ideal.
Yup, just like I mentioned, if you have a white starter it really isn’t that big of a deal if you use it, the eventual contribution of this will be very low in the final dough.
I’m eyeing a mill, that’s for sure. Later this year, I’m hoping!
Thanks for the comments, Paul! Keep at that country loaf, it gets better each and every time.
Bravo Mario another beautiful bread well done! The tecnique you applied works well for me as well. I’ve done this with freshly milled Red Fife but instead of the boiled water and bran soaker I applied the sifted bran into my sourdough build…works like a charm :)) Now, you really need to invest in that Komo mill to take your experience to a whole new level! Happy bread baking!!
You meant “Maurizio”, right? 🙂 No worries, people do it all the time. You’re right of course, I’d love to use this same technique on fresh milled flour — one day I’ll get that mill I’ve been eyeing!
Thanks for the comments!
Awesome looking Loaf… thank you for sharing!
Thank you! Would love to hear how it turns out for you if you give it a try. Happy baking!