
I’ve been baking sourdough bread padded to the brim with walnuts and cranberries since even before this recipe was originally posted back in 2014. Earthy walnuts are undoubtedly a favorite, as evidenced by the many recipes I have here with their inclusion, and there’s a real joy in the pairing of this enigmatic nut with the tart—yet sweet—cranberry. Walnuts and cranberries seem diametrically opposed, but as is usually true in nature, when two things ripen at around the same time, they almost always taste great together. And when looking over this walnut cranberry sourdough, you might read cranberry and think, “too tart!” I urge you to try baking this bread because it’s anything but.
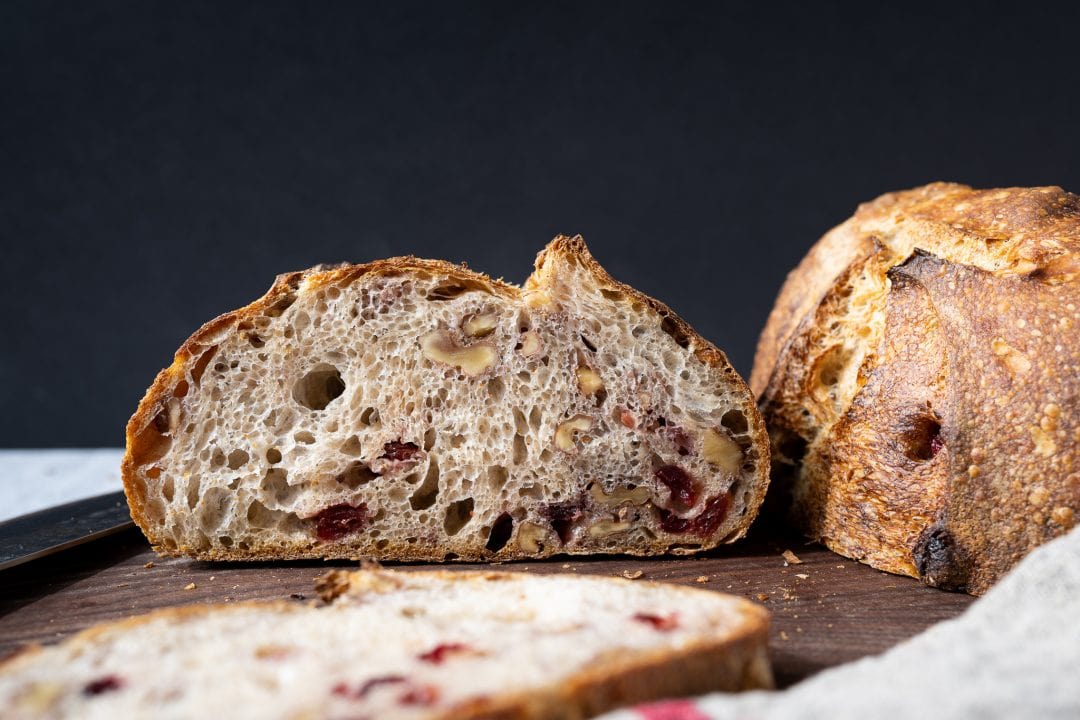
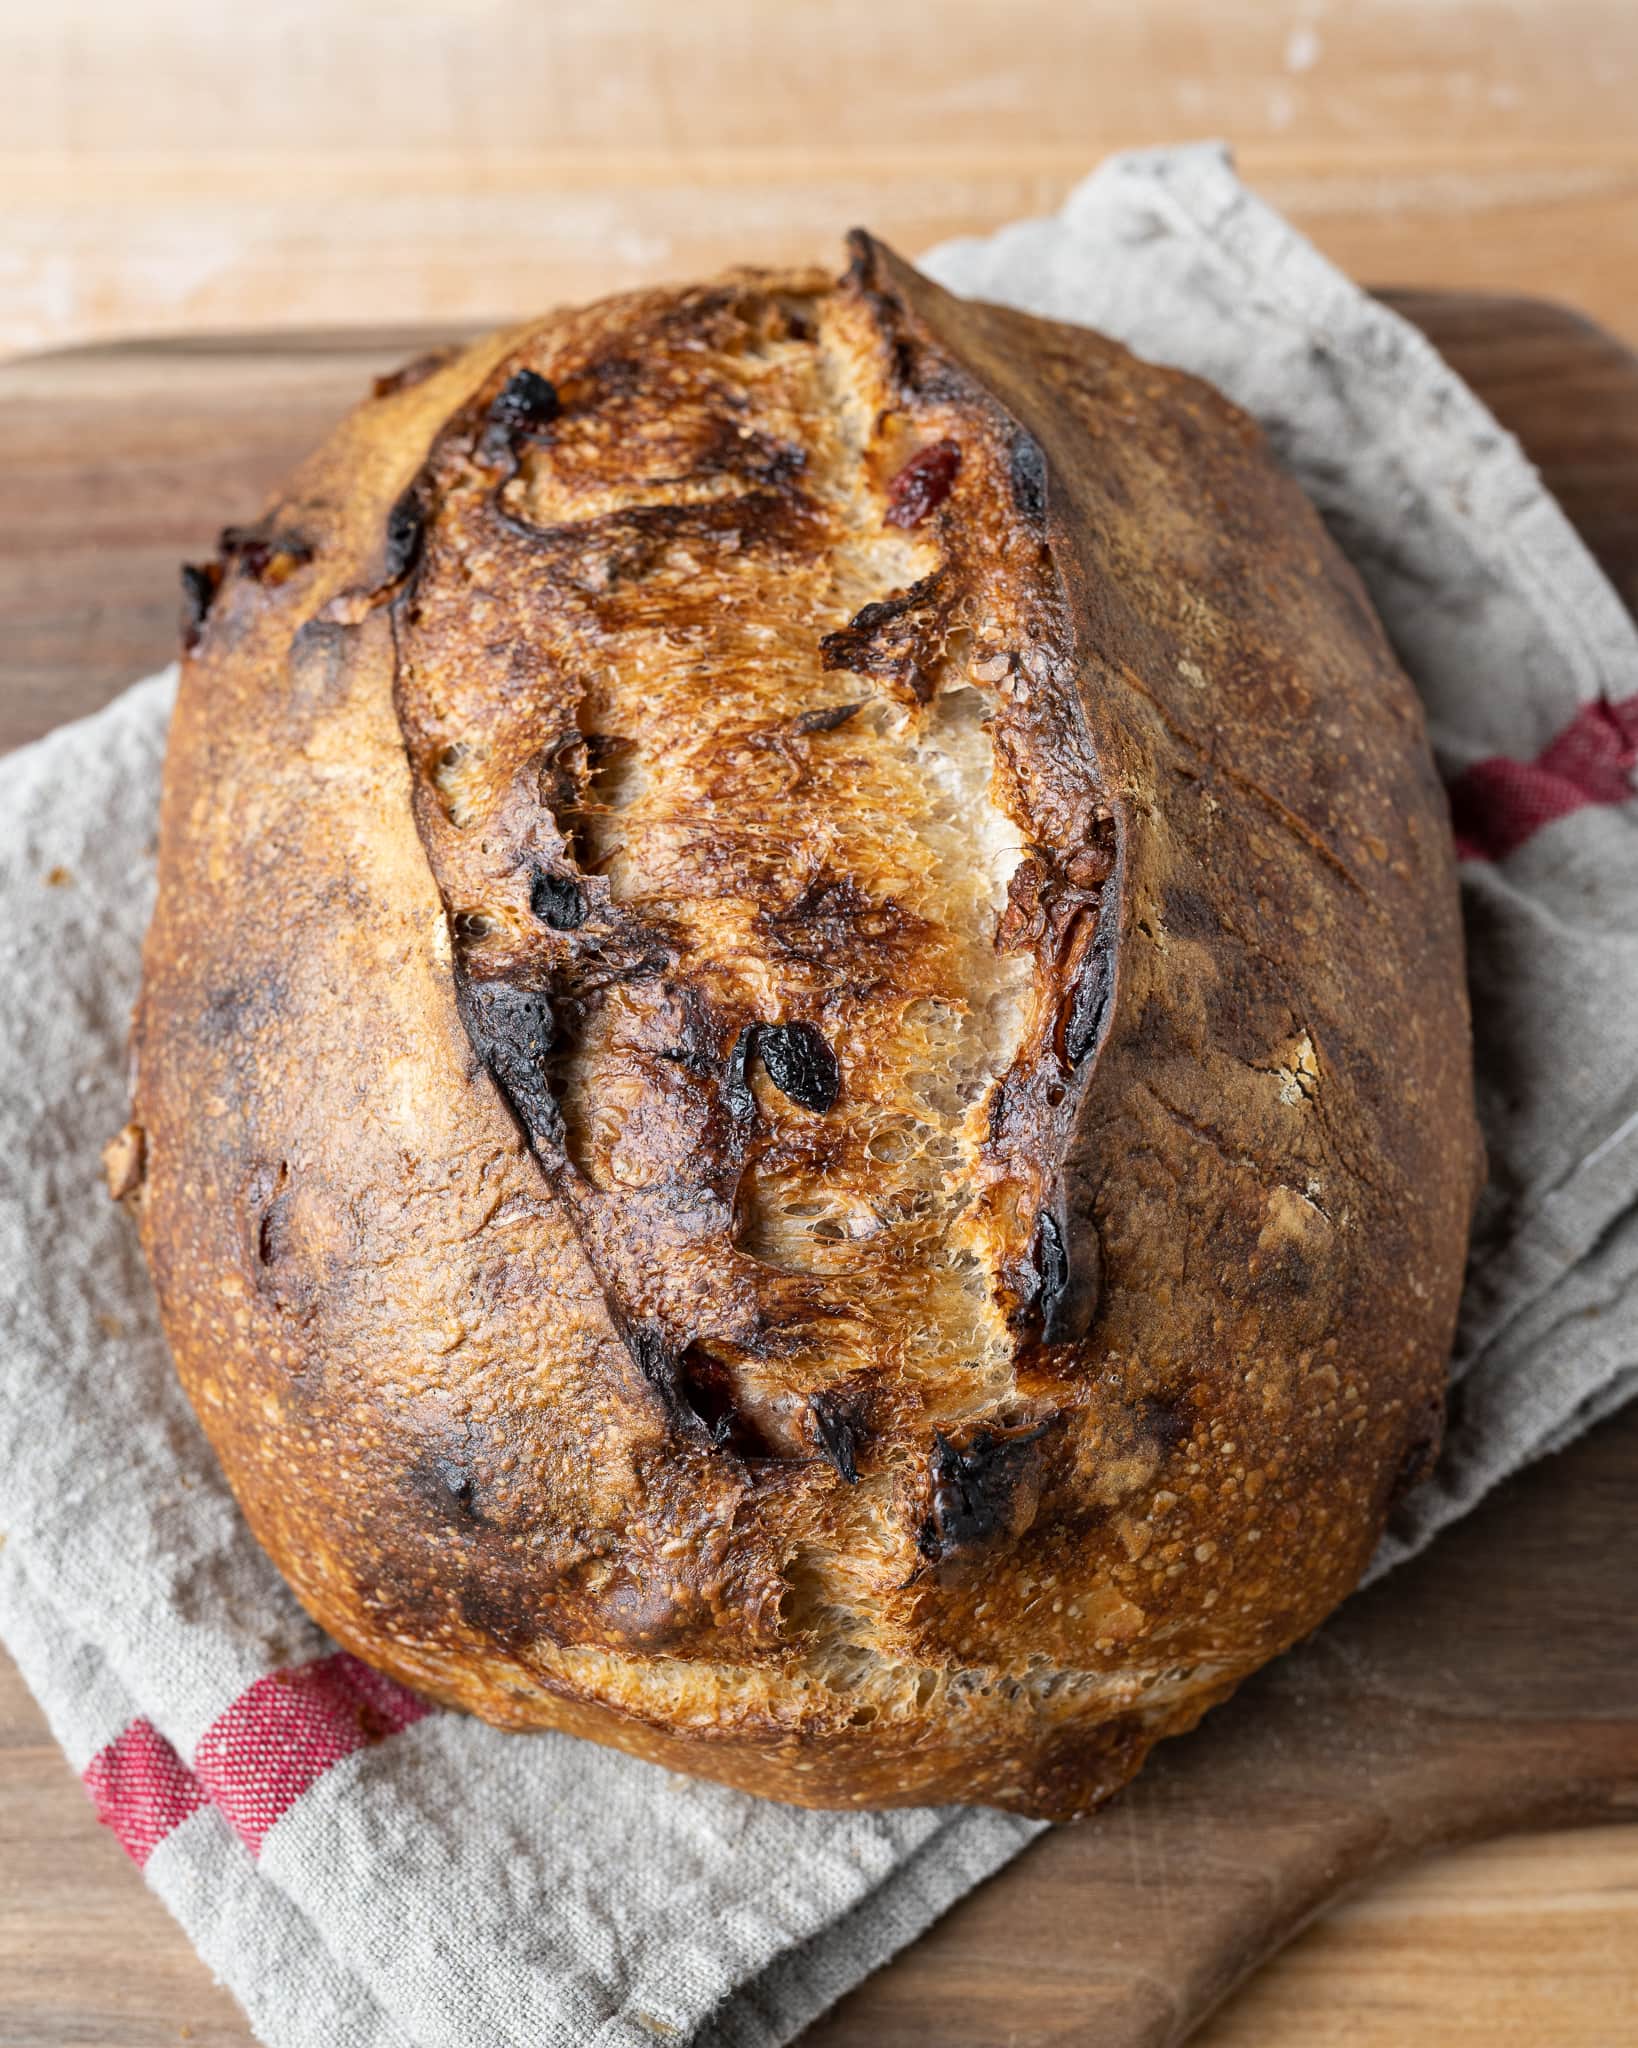
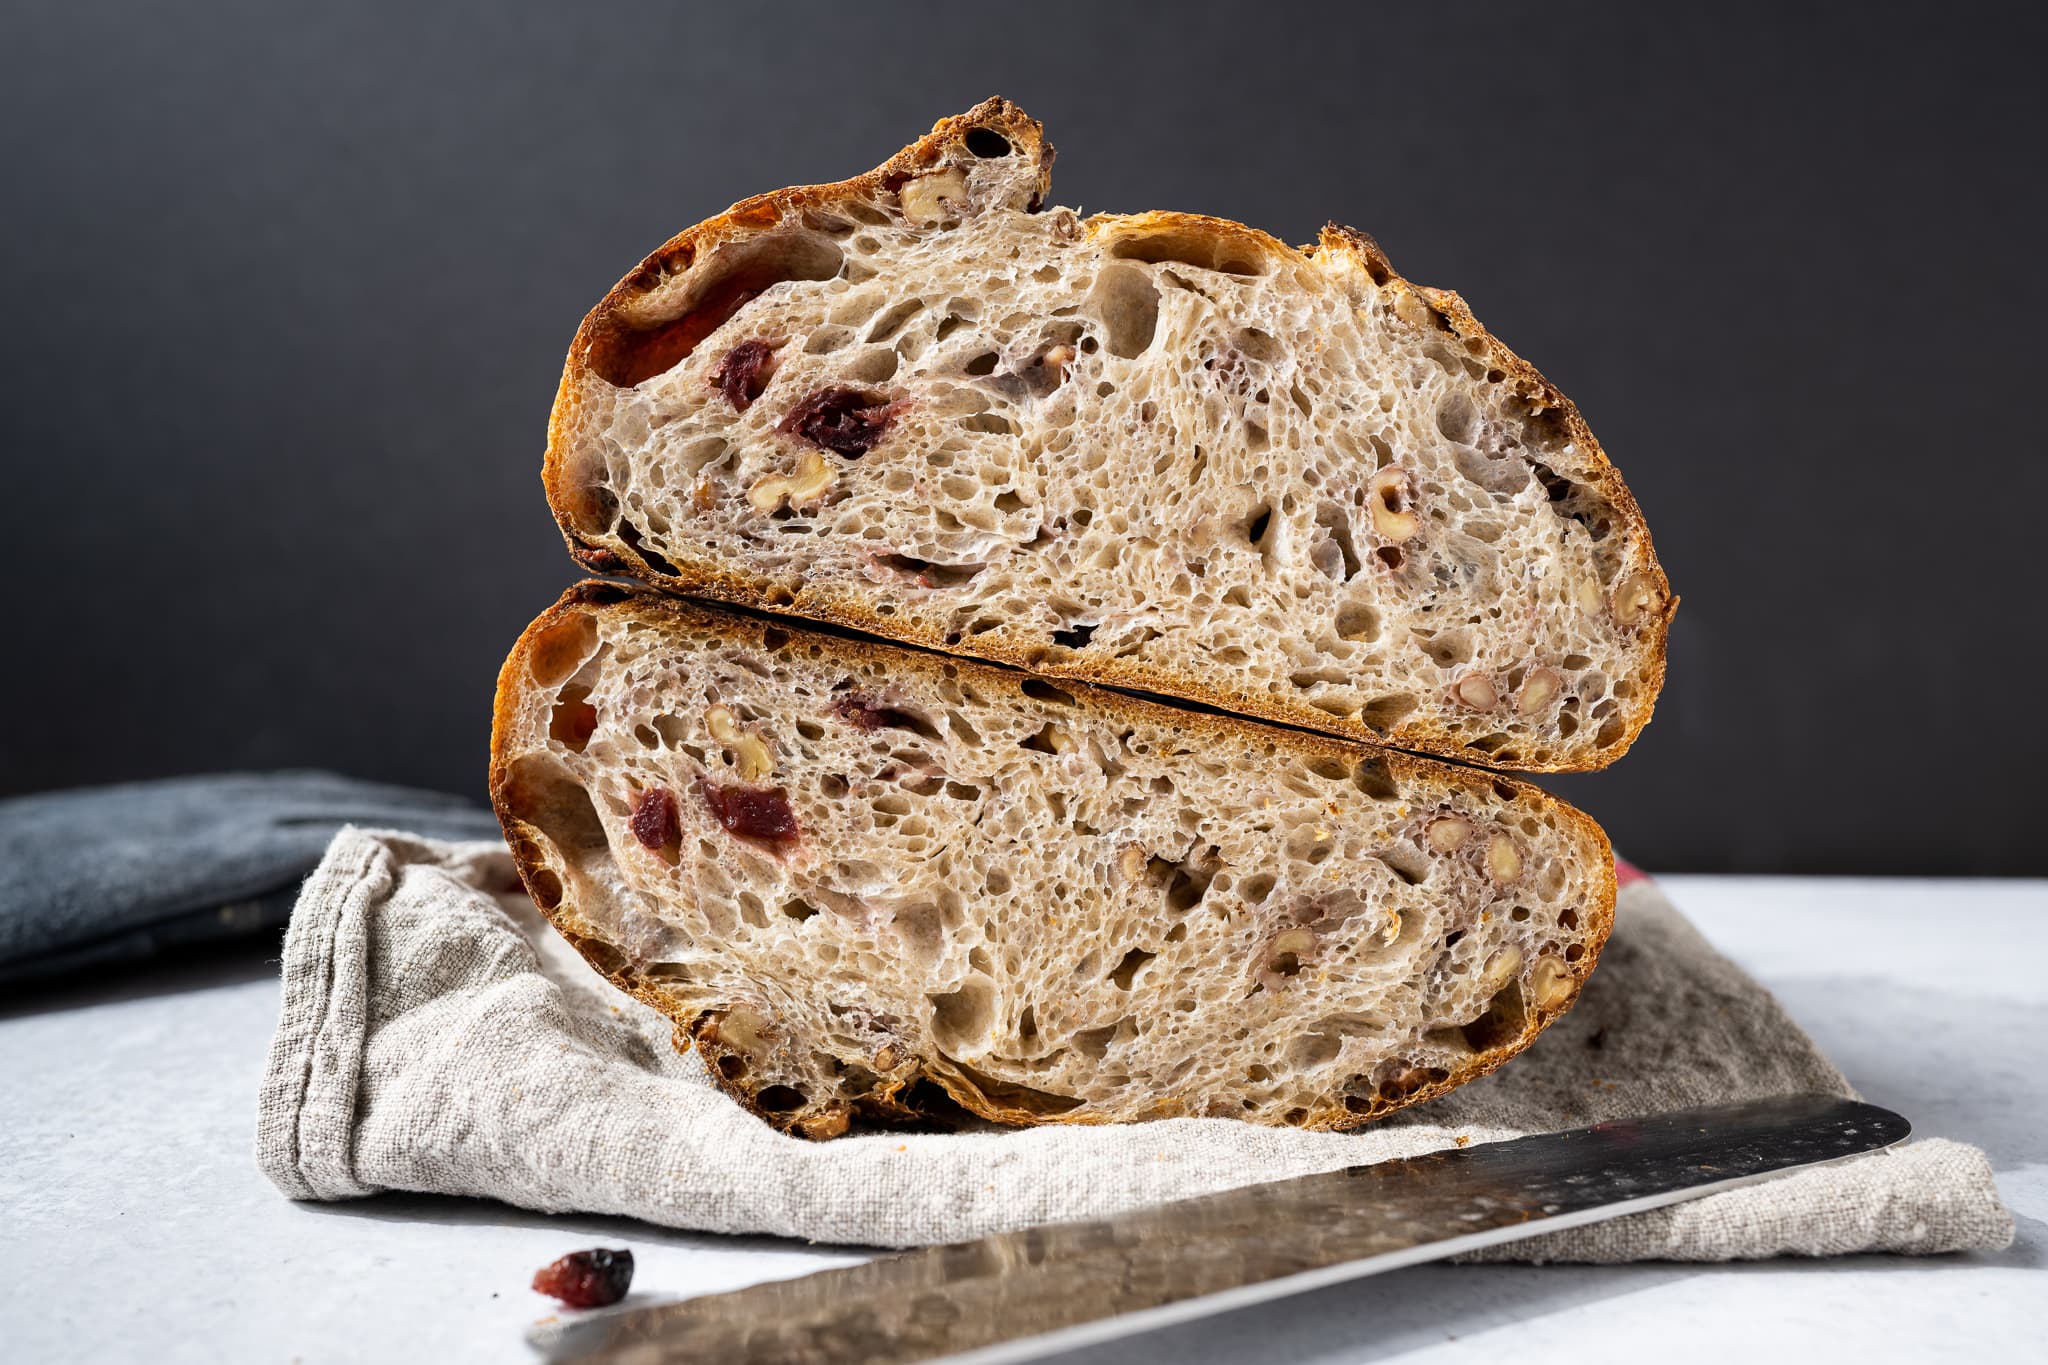
Out of the oven, this loaf carries some of the most dramatic coloring of any bread I bake. The crust ranges from burnished to just a kiss of brown, stopping everywhere between. The stray cranberries and walnuts that might have made their way to the surface, coloring deeply in the oven, add even more dramatic landscape to this darkly expressed loaf. What an eater experiences in drama on the outside is equally apparent inside, as each slice contains a scattering of sliced tart and sweet fruit and earthy nuts. But the show’s real star is the overall melding of flavors: the fruit, the nuts, and how the rich walnut oil enrobes the entire eating experience.

Let’s first look at the flour used in this walnut cranberry sourdough bread recipe, the dried cranberries, and the called for walnut oil.
Flour Selection, Cranberries, and Walnut Oil
This recipe calls for whole-grain rye flour in the levain. I mostly maintain my sourdough starter by refreshing it with a percentage of whole rye flour each day, so I always have some on hand. Additionally, I find adding it to the levain results in a flavor-forward end loaf by increasing the vigor of the levain.
The cranberries I used in this recipe are sweetened, ever so slightly. I find them at my local market in the bulk area, and I think in the end, they’re pretty similar to Craisins. I like to buy a big bag and keep it in my pantry, always ready to go into my next batch of this dough.
The small amount of walnut oil in this recipe brings a disproportionate amount of aroma and flavor to this bread. in this recipe, it sure brings with it a disproportionate amount of aroma and flavor to this bread. The oil carries an irresistible, luxurious aroma that’s only outstripped by the exuberant flavor. If I could sneak this oil into every bread I bake, I wouldn’t be sad about it. But in addition to the aroma and flavor, the oil also softens the end loaf much as any oil would; I highly recommend using it in this recipe (and it’s also great for salads). Alas, my love of walnuts continues.
Baking Schedule
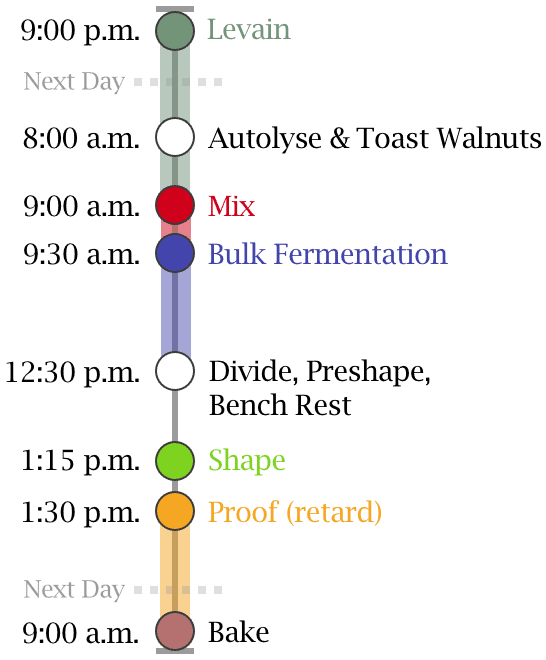
This walnut cranberry sourdough is made over the course of two days (not including the overnight levain). The cold proof of the dough brings significant flavor to this dough, but you could also opt for a same-day bake. Instead of placing the shaped dough into the refrigerator to proof overnight, leave it out, covered, to proof for 1-3 hours (depending on kitchen temperatures) until ready to bake.
See the baking schedule at right.
Walnut Cranberry Sourdough Bread Formula
Formula updates: There are a few subtle changes to this recipe over the one standing here for so many years: a slightly reduced salt percentage (from 2% to 1.9%), 3% reduction in hydration, 4% more dried cranberries, levain reduced from 25% to 23.33%, and finally, a conversion from “2 tablespoons walnut oil” to a more baker’s math friendly 3.00% walnut oil. After many iterations and permutations with this bread, these subtle changes have made this bread even better.
Vitals
| Total Dough Weight | 1,800 grams |
| Hydration | 85% (88% including walnut oil) |
| Pre-fermented Flour | 10.00% |
| Levain in final dough | 23.33% |
| Yield | 2 x 900g loaves |
This recipe makes two loaves. If you’d like to make a single loaf of walnut cranberry sourdough, divide all the ingredients in half. See my guide to using baker’s percentages for help with scaling.
Total Formula
Desired dough temperature: 76°F (24°C). See my post on the importance of dough temperature for more information on dough temperatures.
| Weight | Ingredient | Baker’s Percentage |
|---|---|---|
| 640g | Medium-protein bread flour or All-purpose flour (~11% protein, Central Milling Artisan Baker’s Craft or King Arthur Baking All-Purpose) | 80.00% |
| 120g | Whole wheat flour (Giusto’s Whole Wheat or King Arthur Baking Whole Wheat) | 15.00% |
| 40g | Whole rye flour (Flourist Whole Grain Rye) | 5.00% |
| 160g | Walnuts, shelled and toasted | 20.00% |
| 112g | Cranberries, sweetened and dried (Craisins would work well) | 14.00% |
| 24g | Walnut oil | 3.00% |
| 600g | Water 1 (levain and autolyse) | 75.00% |
| 80g | Water 2 (reserve for mixing) | 10.00% |
| 15g | Fine sea salt | 1.90% |
| 8.0g | Sourdough starter | 1.00% |
Walnut Cranberry Sourdough Bread Method
1. Prepare levain – Night before mixing, 9:00 p.m. (day one)
This is an overnight levain: mix the following ingredients in a container and leave covered to ripen at about 77°F (25°C) for 12 hours.
| Weight | Ingredient | Baker’s Percentage |
|---|---|---|
| 40g | Medium-protein bread flour or all-purpose flour | 50.00% |
| 40g | Whole rye flour | 50.00% |
| 80g | Water | 100.00% |
| 8g | Ripe sourdough starter | 10.00% |
2. Prepare mix-ins – 7:30 a.m. (day two)
Preheat your oven to 350°F (175°C). Spread the 160g walnuts out evenly on a sheet pan and bake for 10 to 15 minutes until they start to take on a little color and become very fragrant. Keep an eye on them; they can burn quickly. Set aside until called for during bulk fermentation.
3. Autolyse – 8:00 a.m.
This recipe uses the autolyse technique to increase the extensibility of the dough and make mixing by hand easier. The increased extensibility helps with incorporating the walnuts and cranberries.
Add the following to a mixing bowl and mix until incorporated.
| Weight | Ingredient | Baker’s Percentage |
|---|---|---|
| 600g | Medium-protein bread flour or all-purpose flour (~11% protein, Central Milling Artisan Baker’s Craft or King Arthur Baking All-Purpose) | 80.00% |
| 120g | Whole wheat flour (Giusto’s Whole Wheat or King Arthur Baking Whole Wheat) | 15.00% |
| 520g | Water 1 | 76.00% |
4. Mix – 9:00 a.m. (Day two)
| Weight | Ingredient | Baker’s Percentage |
|---|---|---|
| 24g | Walnut oil | 3.00% |
| 80g | Water 2 | 10.00% |
| 15g | Fine sea salt | 1.90% |
| 168g | Ripe levain (from step 1) | 1.00% |
Gather the following ingredients for mixing. The remaining water (water 2) should only be added through mixing if your dough feels like it can handle the addition. Use a splash to work in the levain and salt, adding the rest based on how the dough feels. If the dough is extremely slack, omit the rest of the water.
Finally, hold back the walnut oil until the later steps of mixing.
I strengthened this dough by hand using the slap and fold kneading technique, which quickly develops the dough. Alternatively, you could use a home spiral dough mixer, or even a KitchenAid would work with this dough.
Add the levain to the top of your dough in the mixing bowl (that’s been in autolyse) and use a splash of water to moisten. Mix the levain in thoroughly and slap and fold (or do folds in the bowl) for 5 minutes until the dough begins to smooth out and become elastic.
Let the dough rest in the mixing bowl for 10 minutes.
Sprinkle the salt over the dough, then dissolve with a splash of the reserved mixing water. Mix thoroughly. If the dough still feels very slack, continue to strengthen the dough in the bowl by stretching and folding (or do slap/fold on the counter) for a few minutes until it begins to tighten. Then, slowly begin adding the walnut oil while folding the dough in the bowl. I like to add a small pour every minute or so as I’m folding.
At the end of mixing this dough will still be very extensible and slack, but it will look smooth and shiny. The walnuts and cranberries will be added during bulk fermentation.
Transfer the dough to a container for bulk fermentation and cover.
4. Bulk fermentation – 9:30 a.m. to 12:30 p.m.
At a warm room temperature, around 74-76°F (23-24°C), bulk should take about 3 hours. If your kitchen is cooler, place your bulk container in a small home dough proofer, or extend the bulk fermentation time to give the dough more time to ferment. This dough needs about three sets of stretch and folds during the 3-hour bulk.
Combine the 160g toasted walnuts and 112g cranberries in a large bowl.
Before you give your dough its first set of stretch and folds, spread about 1/4 of the mix-ins over the top of the dough. Then, grab one side of the dough and stretch it up and over the dough to the other side. Spread on another 1/4 of the mix-ins to the new top. Rotate the bowl 180° and perform another stretch and fold. Spread on another 1/4 of the mix-ins, then rotate the bowl 90° and do another stretch and fold. Finally, spread on the last of the mix-ins, turn the bowl 180° and do one last stretch and fold. You should have the dough neatly folded up in the bowl with all the mix-ins tucked into the dough.
Here’s a video of me stretching and folding this dough over on Instagram.
The remaining two sets of stretch and folds should be a little more gentle. After the third set, let the dough rest, covered, for the remainder of bulk fermentation.
5. Divide and preshape – 12:30 p.m.
Fill a bowl with some water and place it on your work surface. Scrape out your dough from the bulk container onto your dry counter. Divide the mass in half using a bench knife. Using a wet hand and the knife in the other, gently preshape each half into a loose round.
Let the dough rest, uncovered, for 30 minutes until its relaxed outward.
6. Shape – 1:15 p.m.
I like to shape this loaf as an oblong batard, but a round boule would also work well. Shape each by first flouring the top of the rested rounds and your work surface, then shape them into your desired shape.
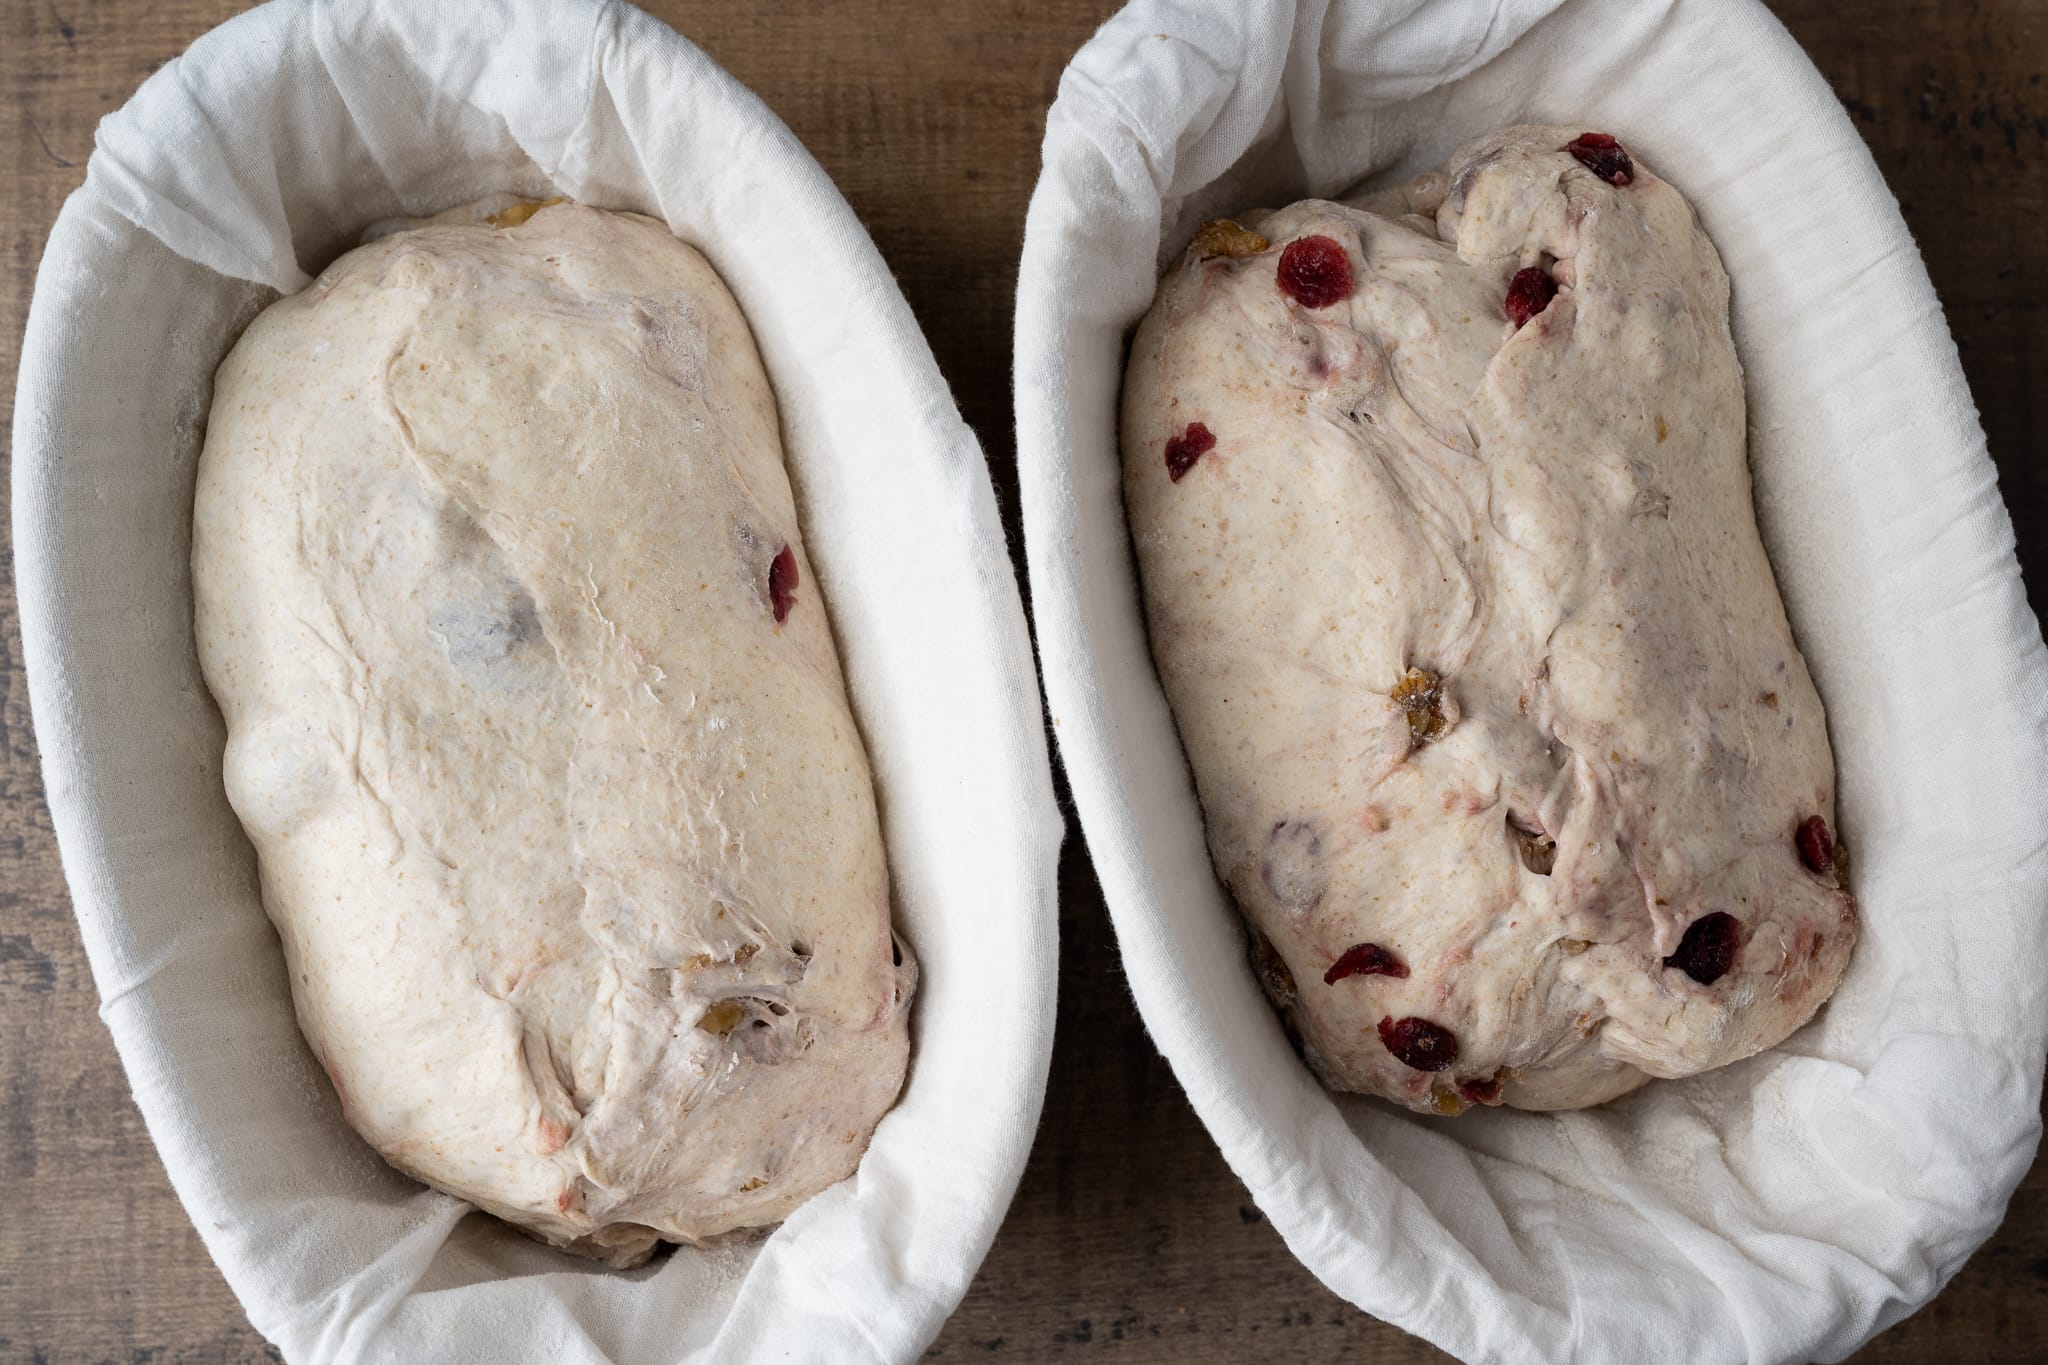
After the dough is shaped, place it seam side up in a proofing basket lined with canvas or a clean kitchen towel. I recommend lining your proofing basket because the red cranberries can ooze out a bit of color during the long, cold-proof. I like to use smaller, 10″ proofing baskets for this dough to keep it in a tighter shape during proof.
7. Proof – 1:30 p.m. to 9:00 a.m. (overnight)
Cover the baskets with a large, reusable plastic bag and seal it shut. Place the baskets into your refrigerator to proof overnight.
8. Bake – 9:00 a.m. (next day)
Preheat your oven with a baking stone or Baking Steel inside to 450°F (230°C).
I baked these loaves on my Baking Steel in my oven, following my guide on how to steam an oven for baking bread. However, you could also use a Dutch oven if you’ve shaped your dough as a round shape (see my guide to baking bread in a Dutch oven here).
Score each piece of dough and slide it into the oven—bake for 20 minutes with steam. Then, remove the steaming pans from inside the oven (or remove the lid to your combo cooker or Dutch oven) and bake for an additional 30 minutes, or until the crust is deeply colored and the interior temperature registers around 204°F (95°C).
Once fully baked, cool your loaves on a cooling rack for 1-2 hours. See my post on the best way to store bread to keep it fresh for a week or longer.
Walnut Cranberry Sourdough Recipe
- Prep Time: 24 hours
- Cook Time: 1 hour
- Total Time: 25 hours
- Yield: 2 loaves
Description
A delicious loaf of sourdough bread padded with tart and sweet cranberries and earthy walnuts, all tied together with a small addition of roasted walnut oil. This is one of the most flavorful bread recipes I bake, and there’s a good reason it’s also one of the most requested—it’s delicious!
Ingredients
Levain
- 40g medium-protein bread flour or all-purpose flour
- 40g whole rye flour
- 80g water
- 8g ripe sourdough starter
Main Dough
- 600g medium-protein bread flour or all-purpose flour
- 120g whole wheat flour
- 160g walnuts, shelled and toasted
- 112g cranberries, sweetened
- 24g walnut oil
- 15g sea salt
- 520g water 1 (autolyse)
- 80g water 2 (mix)
- 168g levain
Instructions
- Levain (night before mixing, 9:00 p.m.)
In a small container, mix the Levain ingredients and keep it at a warm temperature overnight. - Prepare mix-ins (the next day, 7:30 a.m.)
Preheat your oven to 350°F (175°C). Spread the 160g walnuts out evenly on a sheet pan and bake for 10 to 15 minutes until they start to take on a little color and become very fragrant. Set aside until bulk fermentation. - Autolyse (8:00 a.m)
In a medium mixing bowl, add the 600g medium-protein bread flour, 120g whole wheat flour, and 520g water and mix until no dry bits remain. Cover the bowl and let rest for 1 hour. - Mix (9:00 a.m.)
To the mixing bowl holding your dough, add the levain and a splash of water. Mix thoroughly and strengthen the dough for about 5 minutes. Let the dough rest for 10 minutes in the mixing bowl. Add the salt, another splash of water, and mix until incorporated. Strengthen the dough further if necessary until it’s elastic and smooth. Then, slowly add the walnut oil over the course of the next few minutes while stretching and folding until the oil is absorbed and the dough is smooth and shiny. Transfer the dough to a bulk fermentation container and cover. - Bulk Fermentation (9:30 a.m. to 12:30 p.m.)
Before you give your dough its first set of stretch and folds, spread about 1/4 of the mix-ins over the top of the dough. Add the rest of the mix-ins in the same way through the remaining folds for the first set. Perform two more sets of gentle stretch and folds during this 3-hour period, then let the dough rest the remainder of bulk fermentation. - Divide and Preshape (12:30 p.m.)
Lightly flour your work surface and scrape out your dough. Using your bench knife, divide the dough in half. Lightly shape each half into a round shape. Let the dough rest for 30 minutes, uncovered. - Shape (1:15 p.m.)
Shape the dough into a round (boule) or oval (batard) and place in proofing baskets. Cover the baskets with a reusable plastic bag. - Proof (1:30 p.m. to 9:00 a.m. the next day)
Cover proofing baskets with reusable plastic and seal shut. Then, place both baskets into the refrigerator and proof overnight. - Bake (The next day, bake at 9:00 a.m.)
Preheat your oven with a baking surface or combo cooker/Dutch oven inside to 450°F (230°C).When the oven is preheated, remove your dough from the fridge, score it, and transfer to the preheated baking surface or combo cooker. Bake for 20 minutes with steam. After this time, vent the steam in the oven or remove the lid (you can keep it in the oven or remove it) and continue to bake for 30 minutes longer. When done, the internal temperature should be around 204°F (95°C).
Let the loaves cool for 2 hours on a wire rack before slicing.
What’s Next?
While I’ve been baking this bread for ages, revisiting the formula and formalizing it here made me appreciate how much I love it. It’s surprising how much I look forward to the moments when I can eat a slice of this walnut cranberry sourdough, whether it’s in the morning toasted with butter, the afternoon with a turkey sandwich, or the evening simply on its own. When baking this bread, I often regret not doubling the recipe and making more—easily fixed next time!
Next, try your hand at my sunflower and sesame sourdough for another wonderful loaf with inclusions!
Buon appetito!


367 Comments
Thank you for this amazing recipe, I made it lots of times and it is sure a favorite in this house. A question, as I read a lot about sourdough most of the inclusions are done at the last S&F, you add it in at the beginning. I am keen to learn why you add it in so soon? Is it to soak up some moisture or what is your reason. Thank you so much for helping me understand.
Hey, Ann! I add it in early to help it incorporate better throughout the dough during each stretch and fold.
Truly the best loaves I’ve produced in my year long journey with sourdough. (I jumped right into the deep end never having baked bread in my life). I used a combination of Ankarsrum mixing/kneading and your slap and folds. First time using the Ank and first time doing slap and fold, your demonstration video was so helpful. This is the wettest dough I have made and your folding videos were also SUPER helpful as well. Dough handling has been a problem for me I think. I learned so much with this bake and definitely gained some confidence. I was out of walnuts so subbed pecans, and used all but 50g of the water called for. The dough could probably have handled the additional hydration but I wasn’t sure if I could 😆. Perfect crumb, texture, rise, crust… excellent recipe with excellent instructions. It’s just delicious.
Wow, so glad to hear that Dana!
You’re very welcome, glad you like the recipe!
Hi Maurizio,
Would it be possible to use fresh cranberries for this recipe? If yes, how should I adjust the ingredient ratio and/or process? Thanks so much! I’ve learnt so much from all your sharing.
Hey there! Hmm, I have never done this! My fear is they might actually be too tart. The dried cranberries I use are sweetened (sometimes just with apple juice).
I read the comments because I wasn’t sure if you were calling for sweetened dried or fresh cranberries.
I started with beginner’s sourdough bread, then made the weekday recipe, and today I baked the walnut cranberry bread! I am sure things could be improved upon, but the end result was delicious and I will definitely make again. My dough at the end of bulk fermentation was not smooth nor domed; my house is warm and I had given it extra time so I just moved on. I love reading about everyone’s attempts at this bread and your very thoughtful and generous responses. I’ve learned a lot here. Thank you!
You’re very welcome, Donna! Glad the loaves mostly turned out great. Definitely give it more time if needed in bulk ferment!
Hi Maurizio,
Thank you so much for this website! It is amazing and so helpful. If I wanted to make this recipe as dinner rolls instead, how do you recommend I adjust things? I have the Emile Henry crown baker and was thinking of shaping into smaller balls and letting them proof in there, but otherwise following the recipe. Thank you in advance!
Hey, Libby. Love the idea of this as rolls. I’d say that would work just splendid! Let them proof right in the baker as you suggested, until super soft and fully proofed. I’d probably go with an egg wash on top before baking, too.
Thank you and great idea about the egg wash! I was planning to use the same oven temperatures as the original recipe, but maybe shortening the “uncovered” baking time. Fingers crossed!
Thanks Maurizio, for this recipe and all your tips. Could you elaborate please on what this dough should look and feel like at the end of bulk fermentation. I’m at very high elevation (Mexico City), and all my loaves seem to be either under proofed or not baked long enough. I’d love to get this one just right. With the inclusions, after 3.5 hours, 3 stretch and folds, it seems a bit heavy, not risen, absolutely no possibility of a “window pane.” Thank you!
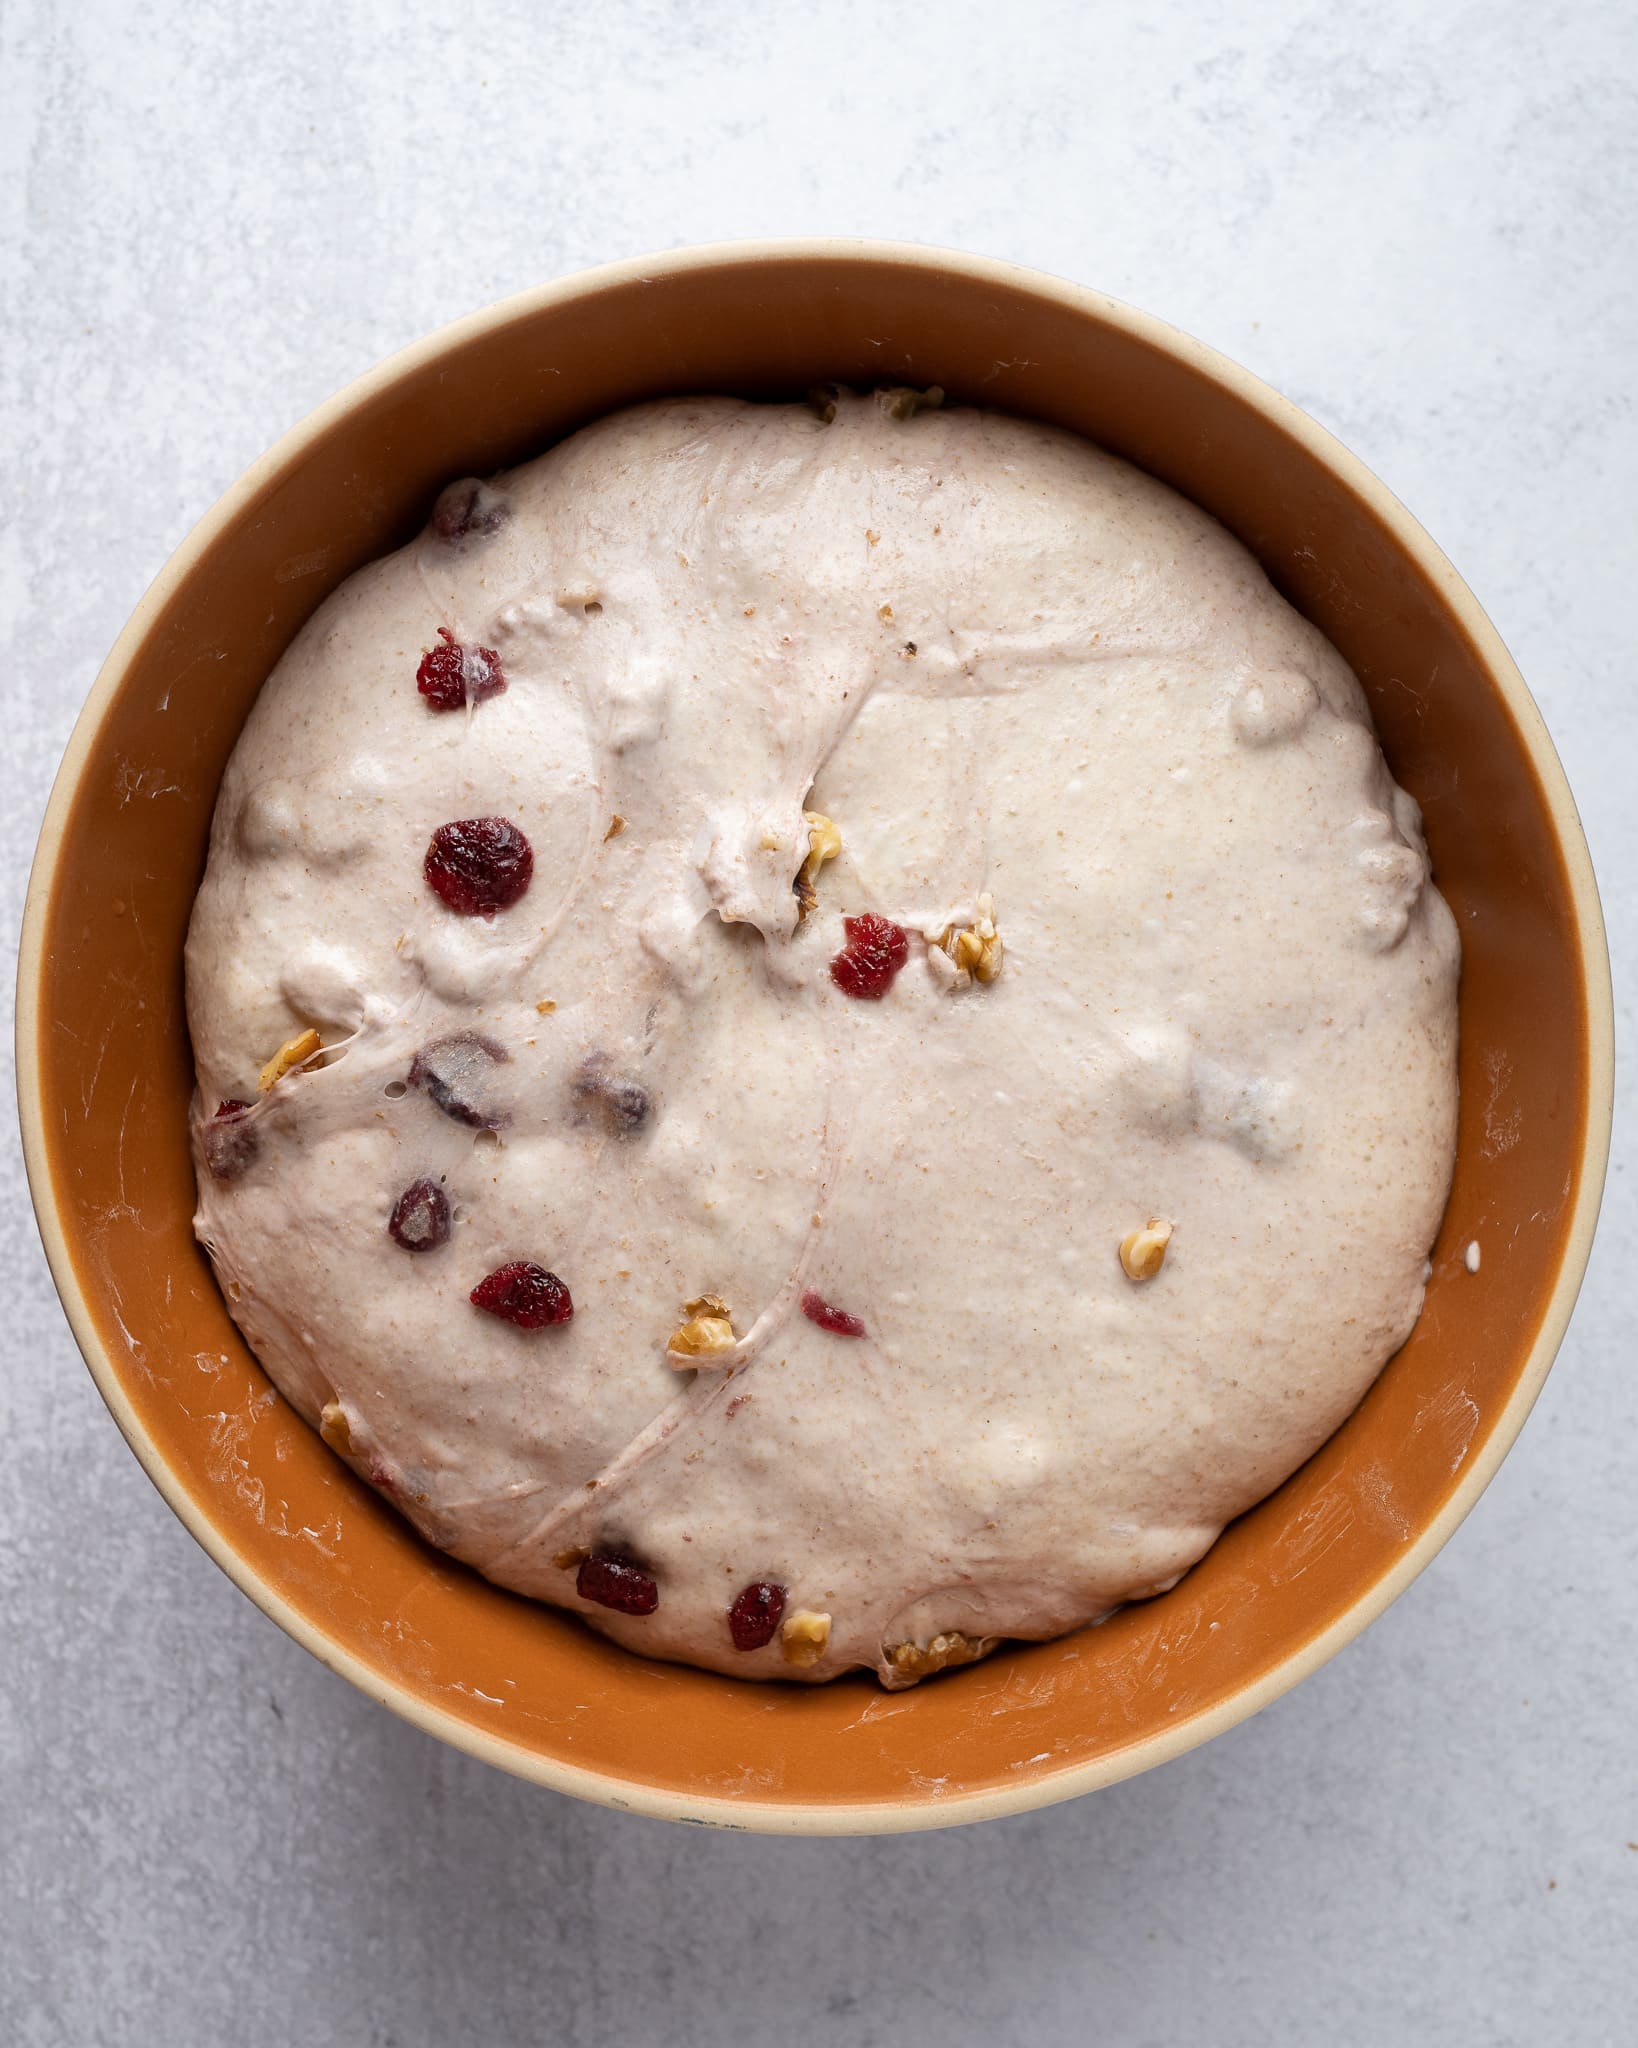
At the end of bulk the dough should be well-risen, smooth, and have edges that are domed downward. You might see a bubble here and there, and the dough will be stronger if you tug on it. It’ll feel thick, and if you jiggle the bowl, the dough will jiggle as well.
Thank you, that’s helpful. I’ll keep going a few more hours then.
Likewise I’m a huge fan of walnuts, so I had to try this bread as the Grenoble walnuts are plenty and cheap (new harvest!). I used 80% french T65, 15% T150 and 5% T130 rye. I switched cranberries for Sultanine raisins (soaked them a couple of hours), and the bread is just perfect for cheese and wine. I’m on a kick with your recipes, haha, thanks for everything!
Cheers!
Yes, you’ve been tearing through them–that’s awesome! Glad they’ve been working out well for you, too. Walnuts are probably my favorite mix-in into a dough, just so much flavor. Enjoy, Mathieu, and thanks as always for the feedback!
Anytime! It’s always a pleasure to try out the formula, eat and review it! I am onto the the whole grain / spelt pan loaf now, it’s cold-proofing! Have a good day! 🙌
Hi Mathiew, did you use the same percentage of flours in the levain? I’m so new to sourdough that I don’t know if I’m asking dumb questions. Thanks!
Hi @Sandra! Here in Switzerland, I get some organic stone-milled french flours (Celnat brand). The T65 is the rough equivalent of bread flour, and the T150 is the rough equivalent of whole wheat flour. Same goes for the T130 rye which is the equivalent of whole rye (or dark rye).
So to answer your question, I did follow the same ratio as @maurizioleo:disqus’s to make the levain, but using my flours, that is:
– 50% T65 (bread flour)
– 50% T130 rye (whole rye).
The small portion of rye in the levain represent 5% of the total flour weight.
Definitely not a dumb question, better to ask and learn!
Cheers!
Hi Maurizio, I would love to know your thoughts on incorporating almonds into sourdough? best to use flaked or slivered? Are they too heavy regardless and should be avoided? Thank you! Janelle
I’ve actually never done this, but I’d go with slivered for sure, or maybe even the sliced ones? I’d start with slivered!
I’ve made this one successfully several times, but today it didn’t rise much. And I know it’s not the starter, which I recently used for two wonderful bakes. Wonder what it was….
Hard to say, Ariela! In general, this loaf doesn’t rise significantly due to the mix-ins in the dough, but you should still have a light and airy bread. It could be under or over proofed–one of these is usually the cause.
Thanks Maurizio – it came out delicious and it did rise some, but not the usual spring – I wonder if I let it go too long before fridge.
Ce pain est un pur délice, tout y est, la couleur, l’odeur et surtout le goût excellent! J’ai juste remplacé l’huile de noix que je n’avais pas, par de l’huile d’olive . Le goût ne m’a pas choqué mais le prochain, demain 😉 sera avec de l’huile de noix. Merci pour vos conseils Maurizio!
Tellement heureux de vous entendre aimer le pain! J’adore la saveur et l’arôme luxueux de l’huile de noix. Bon appétit et bonne pâtisserie !
I have cooked this loaf a few times on my baking stone, and while the interior is delicious, the top crust always ends up a bit burned. I have tried to decrease the dry baking time to 20 minutes, but then the bottom crust is very light colored a bit underdone. I steam for 20 minutes and then bake for 20 minutes. Would appreciate any tips or ideas you might have. Is it my baking stone? Perhaps it’s not hot enough and I should use a dutch oven or baking steel? Or is it better to lower the temp and increase the cooking time? Thanks! My whole family loves the bread regardless!
Ah, sorry to hear that, Denice! I would try reducing the temp when you load your dough by 25° to see if that helps. Preheat at the temp listed above, but then drop it when you load your dough. This way, the stone will be nice and hot to bake the bottom, but the top will color a little slower. Hope this helps, let me know how it goes!
Hi Maurizio! Thanks for the advice! I tried making your cherry and pecan bread, and decreasing the temp by 25 degrees. Definitely worked better, although the top crust still seemed overdone. I am trying to get that nice golden tan/brown that you have in your photos but mine always ends up as a dark/almost burnt brown, although the decrease by 25 degrees helped. Would you recommend decreasing by another 25 degrees or less? I am only worried that the interior will be insufficiently baked and gummy/wet if I decrease too much. Would appreciate your thoughts. However, as usual, the bread still disappears pretty quickly! Love the flavor of the cherry/pecan!
You could try dropping it another 25° or reduce the bake time. Dropping the temp should let you bake longer, which would mean the interior should be fully baked through without the top burning!
Old discussion, but wanted to add: throwing some foil on top towards the end. I have a top element that seems to get extra gets hot so I’ll often do this.
If I do not want to add the walnut oil , must I add an additional equal amount of water ?
Good question, but no, I would just leave it out!
Hi,
An additional question: I currently only have rye flour (which I’ll use for the levain), white patent flour (so high protein) and whole weat flour. Can I substitute the medium protein bread flour with the white patent flour (and keep percentages), or do I need to make changes (or maybe it’s not possible at all)?
Yes, that should work just fine with this recipe! Keep an eye on hydration, sometimes higher protein flour requires a little more water in the mix, but not always.
Hi Maurizio,
Thanks!
Additionally: my starter had gone over it’s peak, but I decided to use it still to create my levain. However, it’s now only 4 PM, and not 9 PM. Do I need to keep it in a colder place to slow down the process until tomorrow? Or do I need to start again – since the starter had already gone over it’s peak by the time I decided to use it?
A cooler spot will help or leave less ripe starter in the jar—both will work. If it’s going overnight, I would make it again!
Hello,
I’d really like to give this recipe a try, but I have a diabetic family member who cannot eat dried fruits.
Is it possible to leave out the cranberries? Do I need to add more walnuts instead or change percentages?
Thanks!
Yes, absolutely. Just omit the cranberries and this loaf should work just fine. I’d lave the walnuts the same percentage.
Hi Maurizio- I’ve followed this recipe once before with great results. I’m working on it again but just realized that I am going to have to bake it tomorrow either a couple of hours early or late, so the dough might be under- or overproofed. Do you have an opinion about which is preferable? Thanks for the excellent instructions!
I usually like to go over than under! If in the fridge, a few hours either way will likely be ok.
Hi Maurizio- I’ve done your version and a variation of this cranberry walnut bread twice now, and both were delicious but I have a question: In my version, I used the 520 g of water from the main dough (heated until just below boiling) to soak and plump the dried cranberries overnight. I then used that soaking water for the main dough. It slowed down the bulk fermentation by hours and hours! That dough took more than twice as long to bulk ferment as the regular version. I presume that the sugar from the soaked cranberries is the cause, but WHY does it do this? Does anything sugary slow down bulk fermentation? I noticed something similar happened when I made a pumpkin sourdough with fruit and nuts, but I also noticed it when I hydrated my sourdough with pureed roasted red peppers. Why do additions like these slow down BF, but additions like olives, cheese, roasted tomatoes and herbs don’t seem to? In my mind, giving the dough something with a little extra sugar should speed up BF, if anything. I don’t understand the mechanics here!
Glad to hear that! Yes, that would be my guess as well. Soaking pulled some of the sugar out of those cranberries, which has a profound impact on fermentation. Sugar is hygroscopic, meaning it sucks up water. In doing this, it actually robs yeast cells of the water they need to function, slowing their activity. The higher the sugar concentration, the slower the fermentation activity. You’re right as well, I’ve found some mix-ins to have a bigger impact than others, and it’s all about experimentation to find out which do what…
Thanks so much for your response! HYGROSCOPIC – word of the day! Now I get it – it actually produces the exact opposite result of what I thought it would, which is fascinating! It gives me insight and new ideas to play around with!
Hi, Mr. Chef
Please let me what temperature the refrigerator is for last proofing.
Hey, Lee. It runs around 39-40°F (3-4°C).
Hey, Lee. It runs around 39-40°F (3-4°C).
Great! Thank you very much.
I made the walnut cranberry sourdough bread yesterday and it is delicious, you forgot to count the 3 hours for stretch and fold. It will take 3 hours longer to make the bread
So glad to hear you liked it, Robert! I’ll take a look at the timeline and make sure it’s correct.
I just made this bread for the second time but this time I had the roasted Walnut oil, and oh my goodness, it is definitely worth the extra$$ to add it in. I also used a mix of berries and golden raisins I found at the store- a mx of cranberries, cherries and raisins. I only had half the amount of walnuts on hand so doubled up on the fruit-WOW….next level! I have recently been putting my banneton in the freezer for 15 minutes while the oven and dutch oven preheats and it really seems to help with scoring and keeping the bread from spreading out. Walnut Cranberry Sourdough is a marvel!
Yes, that oil is pricey but so good, right!? Thanks for the comments and enjoy!
Help (pls)! Made this bread for the first time – baked into nice rounded loaf with good height but nobear. It splayed out instead of up. I ran into same problem as with sunflower sesame bread: when time to preshape, dough was a mess. Very sticky and flat, impossible to work with. I carefully followed instructions, didn’t over hydrate, fermented at about 75 degrees for allotted time. Dough only rose about one quarter to one third, so hard to think it was overproofed. Would really appreciate any suggestions, thanks!
That was supposed to read “no ear”
It sounds like your dough is most likely over hydrated—your flour likely isn’t able to take on quite a much water, and that’s ok! Try reducing the hydration by 5% and give it another go—the reduced water should bring strength to the dough and you’ll feel it immediately. Once you find a suitable hydration, you can try to push it back up (if desired), but as you do, take note of how the consistency of the dough changes: the dough will start to slacken out as you add more and more water, this means you’ll likely have to mix more upfront or add another set or two of stretch and folds during bulk fermentation.
Generally, with an increased hydration, you need to mix longer to develop the gluten in the dough to sufficiently support the water added, but this only goes so far. At some point, the flour you’re using just isn’t able to take on any more water and you’ll essentially have a weak and slack dough. It’s always best to start conservatively and work your way up with hydration as you feel out your flour. This is typically why I recommend holding back water during mixing, adding it in as the dough handles it.
Try to keep everything else as consistent as possible and let me know how the next attempt goes!
I can’t thank you so much for taking the time to offer such a detailed, helpful response! It’s such a relief to have a solution and plan. l’ll adjust the hydration and report back. Thank you!!
You’re very welcome. Happy baking, Janet!
Thanks for the great recipe! I made these for the first time the other day and everyone loved them. How do you get yours not to have flour on the top? I put rice flour in my banneton to ensure not sticking so my top crust had some on it.
Also, how do you clean banneton liners? Thanks.
Glad to hear that, Frances! I don’t dust my baskets heavily with flour, and the remainder seems to come off in the oven! For cleaning, just brush the dry flour out. Be sure to keep the baskets dry (I place them in the sun to dry after baking).
I baked my two loaves this morning one after the other. Sensational. The dough is very easy to work with. It’s astounding that only 8 grams of starter get so much action going. Although i don’t have lava rocks or a second baking stone for a roof, and so made steam with cups of water tossed in during the first 20 minutes, the crust cam out perfectly. I also enjoyed tending the dough over two cold winter days. Thank you!
So glad to hear that! Enjoy 🙂
What should we be looking for at the end of the bulk proof. What kind of increase in size? This is my first loaf with mixins and I didn’t really recognize the signs of readiness I usually see (lots of bubbles throughout and some forming on top) despite giving it more time in the bulk proof. Loaf came out delicious regardless!
I’d say 40-50% or so? I don’t usually go by volume increase, instead I go by the signs I talk about in the post (smoothness, bubbles, some rise, a strengthening of dough)… Glad it turned out well!
While my loaves flattened out (advice please) considerably and are not at all attractive, I canNOT get over the flavour on this recipe! So delicious! I did not have walnut oil, I used olive oil and was pleased. I will definitely be trying this recipe again to try and figure out how to keep them from looking like oblong pancakes. Thank you for such a delicious recipe
Ahh, bummer Susan! Is it possible the dough was over hydrated? I’d say either that or over proofed. This is a good one, I hope you give it another shot!
Thanks for posting a recipe with overnight levain! I wonder how can I adjust your other recipes for an overnight levain so I can make the main dough the following day? Way more feasible for me to split the work over 3 days than a very long day of levain and bulk fermentation. Thank you!!
You’re very welcome, Virge! Just adjust the amount of ripe sourdough starter that goes into the levain. For overnight, I’d say around 10% starter (assuming you’re working with a levain not made from 100% whole wheat flour).
trying this for this first time – can I bake this in a pullman pan? I have the bannetons and dutch ovens, just want to get more of loaf shape. Would the cook time be the same?
This is looking very good so far – dough was very wet while I did a very novice slap and fold but as I added the walnut oil and kept working the dough (now doing S&F), it is getting nice and smooth. Starting bulk fermentation now.
I love love love your recipes!!!
You could, but you’ll have to adjust the weight of the dough to fit your pan. You might have to bake it at a lower temp for longer, otherwise I’ve found pan loaves tend to bake a little too quickly on top before the interior is completely done.
Glad to dough is moving along well, I hope it turned out awesome, Debbie!
I did not adjust the weight of the dough for my pans. It took a LONG time to rise to just over the rim though (after an overnight fridge proof and then almost 6 hours in my proofing box at 79 degrees). I reduced the starting temp to 400 – 410 for 20 minutes then turned it down to 375 for 30 (similar to the pumpkin sourdough recipe). It did not even go the full 30 before temp was 208. No gumminess at all – it is delicious! Next time I will let the bulk fermentation go much longer.
I will try this per the recipe next time – I think the bannetons have more room for the dough to expand and that may be needed due to the heaviness of the add ins.
Thank you!
Oh no!!! Where is the original recipe??? It has been my favorite recipe. Would you be able to re-post it? Many thanks!!!
Hey, Rada! Ah, the changes were very minor! The biggest modification was the addition of extra cranberries, which I think is a great thing. I’ve tested this so many times in the past 6 years and this version really is an improvement. Do you think you’d be game for giving it a try? I’d love to hear if it’s better than you remember (and I think it will be!). 🙂
Hello Maurizio! Will let you in on a secret ))), I loved the old recipe because I was able to cut it in half and produce really nice soft single loaf. It was a hit! I did the same with your new one and unfortunately it was lacking flavor, did not taste the same, it was denser as Allison pointed out. So here is what I’m going to do: I will follow instructions in your updated recipe as written, no modifications, and will report results. I love your blog, baked many recipes. About to start baking your country sourdough. )))
Hello Maurizio,
Happy to report that I followed your updated recipe, slightly modifying the flour mix but keeping measurements. Loved everything about it, you were absolutely right and thank you for encouraging me to try ))). Shaping the dough was definitely easier due to reduced hydration and I had a much better rise this time after overnight proofing. My first loaf is in the oven now. Can’t wait to try it.
That’s just fantastic to hear, Rada! So glad you were able to bake the new recipe and that it turned out well. Yes, I find the slightly reduced hydration to really help in the end, and result in a dough that’s just as great but much easier to handle. I hope you enjoy and thanks for reporting back!
I really liked the original recipe better. This one turned out denser and I didn’t like it as well. Maybe it was user error, I’m not sure. Would you post original recipe again? Thanks.
I agree Allison!
Hey, Allison! The changes weren’t major, the biggest being I have now included more cranberries. Would you be up for giving it another try? I was telling @disqus_fAv83xl7Ma:disqus how I really do feel this version is superior in every way to the original (and it’s evolved steadily over the past 6 years I’ve been baking it). It is a more dense loaf than those without mix ins, but it shouldn’t be overly tight or gummy. I’m wondering if the dough might have been under/over proofed? If you have photos I’d love to see and help you out—I’m confident you’ll love this new version!!
A great recipe, just like all of your other recipes I’ve made. So delicious and a wonderful texture, chock full of goodies! I used dried sweetened Montmorency cherries because that was the closest thing to cranberries that I had. You have to try it! So good! I didn’t have walnut oil but will use it next time. Thanks again for the wonderful recipe!
Thanks, Anne! That sounds amazing, I’ll see if I can find some of those at the market. I have other recipes here that call for dried cherries, but in this bread I bet it’s wonderful. You’re very welcome and enjoy!
FWIW, I found them at Trader Joe’s. 🙂
This bread is absolutely delicious! One question though – my loaf came out slightly gummy. What could have caused this? The bread was 210F when I took it out and I let it cool for 2 hours before cutting. Could it have been my levain wasn’t quite ready? It took a lot longer than 12 hours before I felt it was ready, and at the 16 hour mark I was running out of time to be able
to finish bulk fermentation that day, so I went ahead and used it then. Maybe it still needed more time? Anyways, thanks for the awesome and flavorful recipe!!
Thanks, Sami! It’s absolutely one of my favorites. It’s a denser bread than others here, and definitely quite moist, but it might have been underproofed—that and under baking are usually the two biggest issues I see when the interior is slightly gummy. I’d say yes, a little more time in bulk and/or proof will help it improve.
Great, thank you! My husband said the flavor in this bread was 11/10, so I’ll definitely be giving this another try soon!
Hi Maurizio! I remade this loaf again this week with a few adjustments, and it came out perfect! As others have mentioned, I did struggle to get some nice tight shaping with this dough, so one of my loaves definitely had better oven spring than the other, but even the “flatter” one had a great texture. No gumminess! I’m so happy because the flavor in this recipe is truly the best I have experienced with sourdough, so perfecting the texture makes this a real keeper!
In case it helps others, the main adjustments I made was a longer bulk ferment (I took mine to 4.5 hours, but honestly, I think it could have kept going for 5-6. I’m just always nervous of letting it go too far…) and I let it sit on the counter for 2 hours before going in the fridge. Also for reference, my dough started at 72F but ended bulk ferment around 78F.
In the future, I may strengthen the dough even further before bulk. The mix-ins make it harder to strengthen with stretch and folds, and I noticed some slight tearing around the mix-ins when shaping (hence why shaping was a little trickier than usual). I think starting with a stronger dough next time will help!
Thanks again for sharing your incredible recipes and expertise!!
I found that 30 minutes was a bit too much for my bread – I did the 20 minutes steam bake at 450, then 25 minutes without the lid. By 25 minutes, the bread was darker black on the edge of the ear and 210 degrees inside. Still beautiful, though! Wonderful loaf and instructions, per usual!
Thanks Ben! Yes, this loaf can color quickly given the additions to the dough. Good job no the adjustment, you just never know 🙂 Enjoy!
Hi Maurizio- is there a way of making the crust stay crispy? I’m already storing it uncovered in the open but the crust turns leathery and tough. Would spraying it with water before putting it in the Dutch oven / turning up the temperature help? Thanks- the loaf tasted amazing though!
Hey, Charmaine! Check out my guide to storing sourdough bread for all the answers 🙂 If that doesn’t help, let me know and we’ll see if anything else works. This dough has a bit of oil added, which should help keep it soft!
I’m looking forward to making this loaf! Quick question – I currently don’t have any walnut oil, what do you recommend to use as a substitute until I can source some? Can I use Olive oil in its place in the meantime? Thanks so much for all your wonderful recipes. I love making all your breads and can’t wait for the English muffin recipe!
Nina—yes, I’d go with olive oil! English muffins in the works 🙂 Enjoy and happy baking!
Thanks!
Hi,
A wonderful recipe!
A query about the levain if I may: I measured out the ingredients very accurately the night before, but coming back to the recipe the next day, the weight of the levain was down from 168g to 157g.
Two questions then – Is this down to evaporation and secondly is the remaining levain sufficient for the recipe?
Many thanks
Grant
Thanks, Grant! Yes, that’s very common and even expected. Some of the levain will get lost in processing (the jar, spatula, etc), and that 10g deviation will be just fine.
Happy baking, Grant!
Cheers Maurizio! 👍