
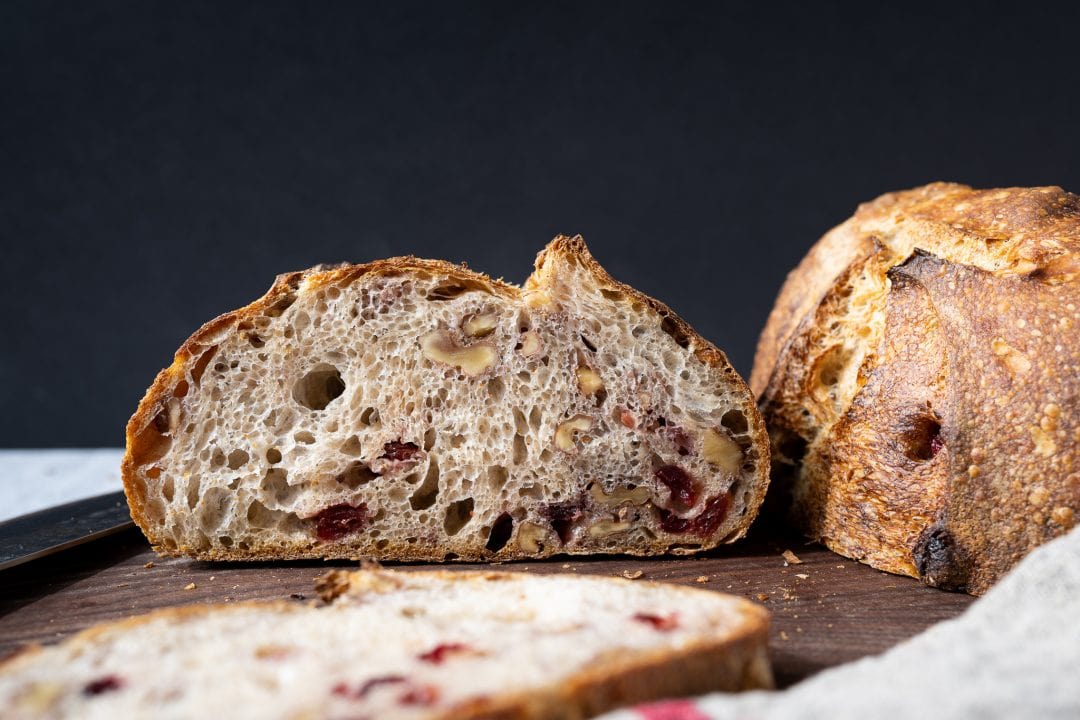
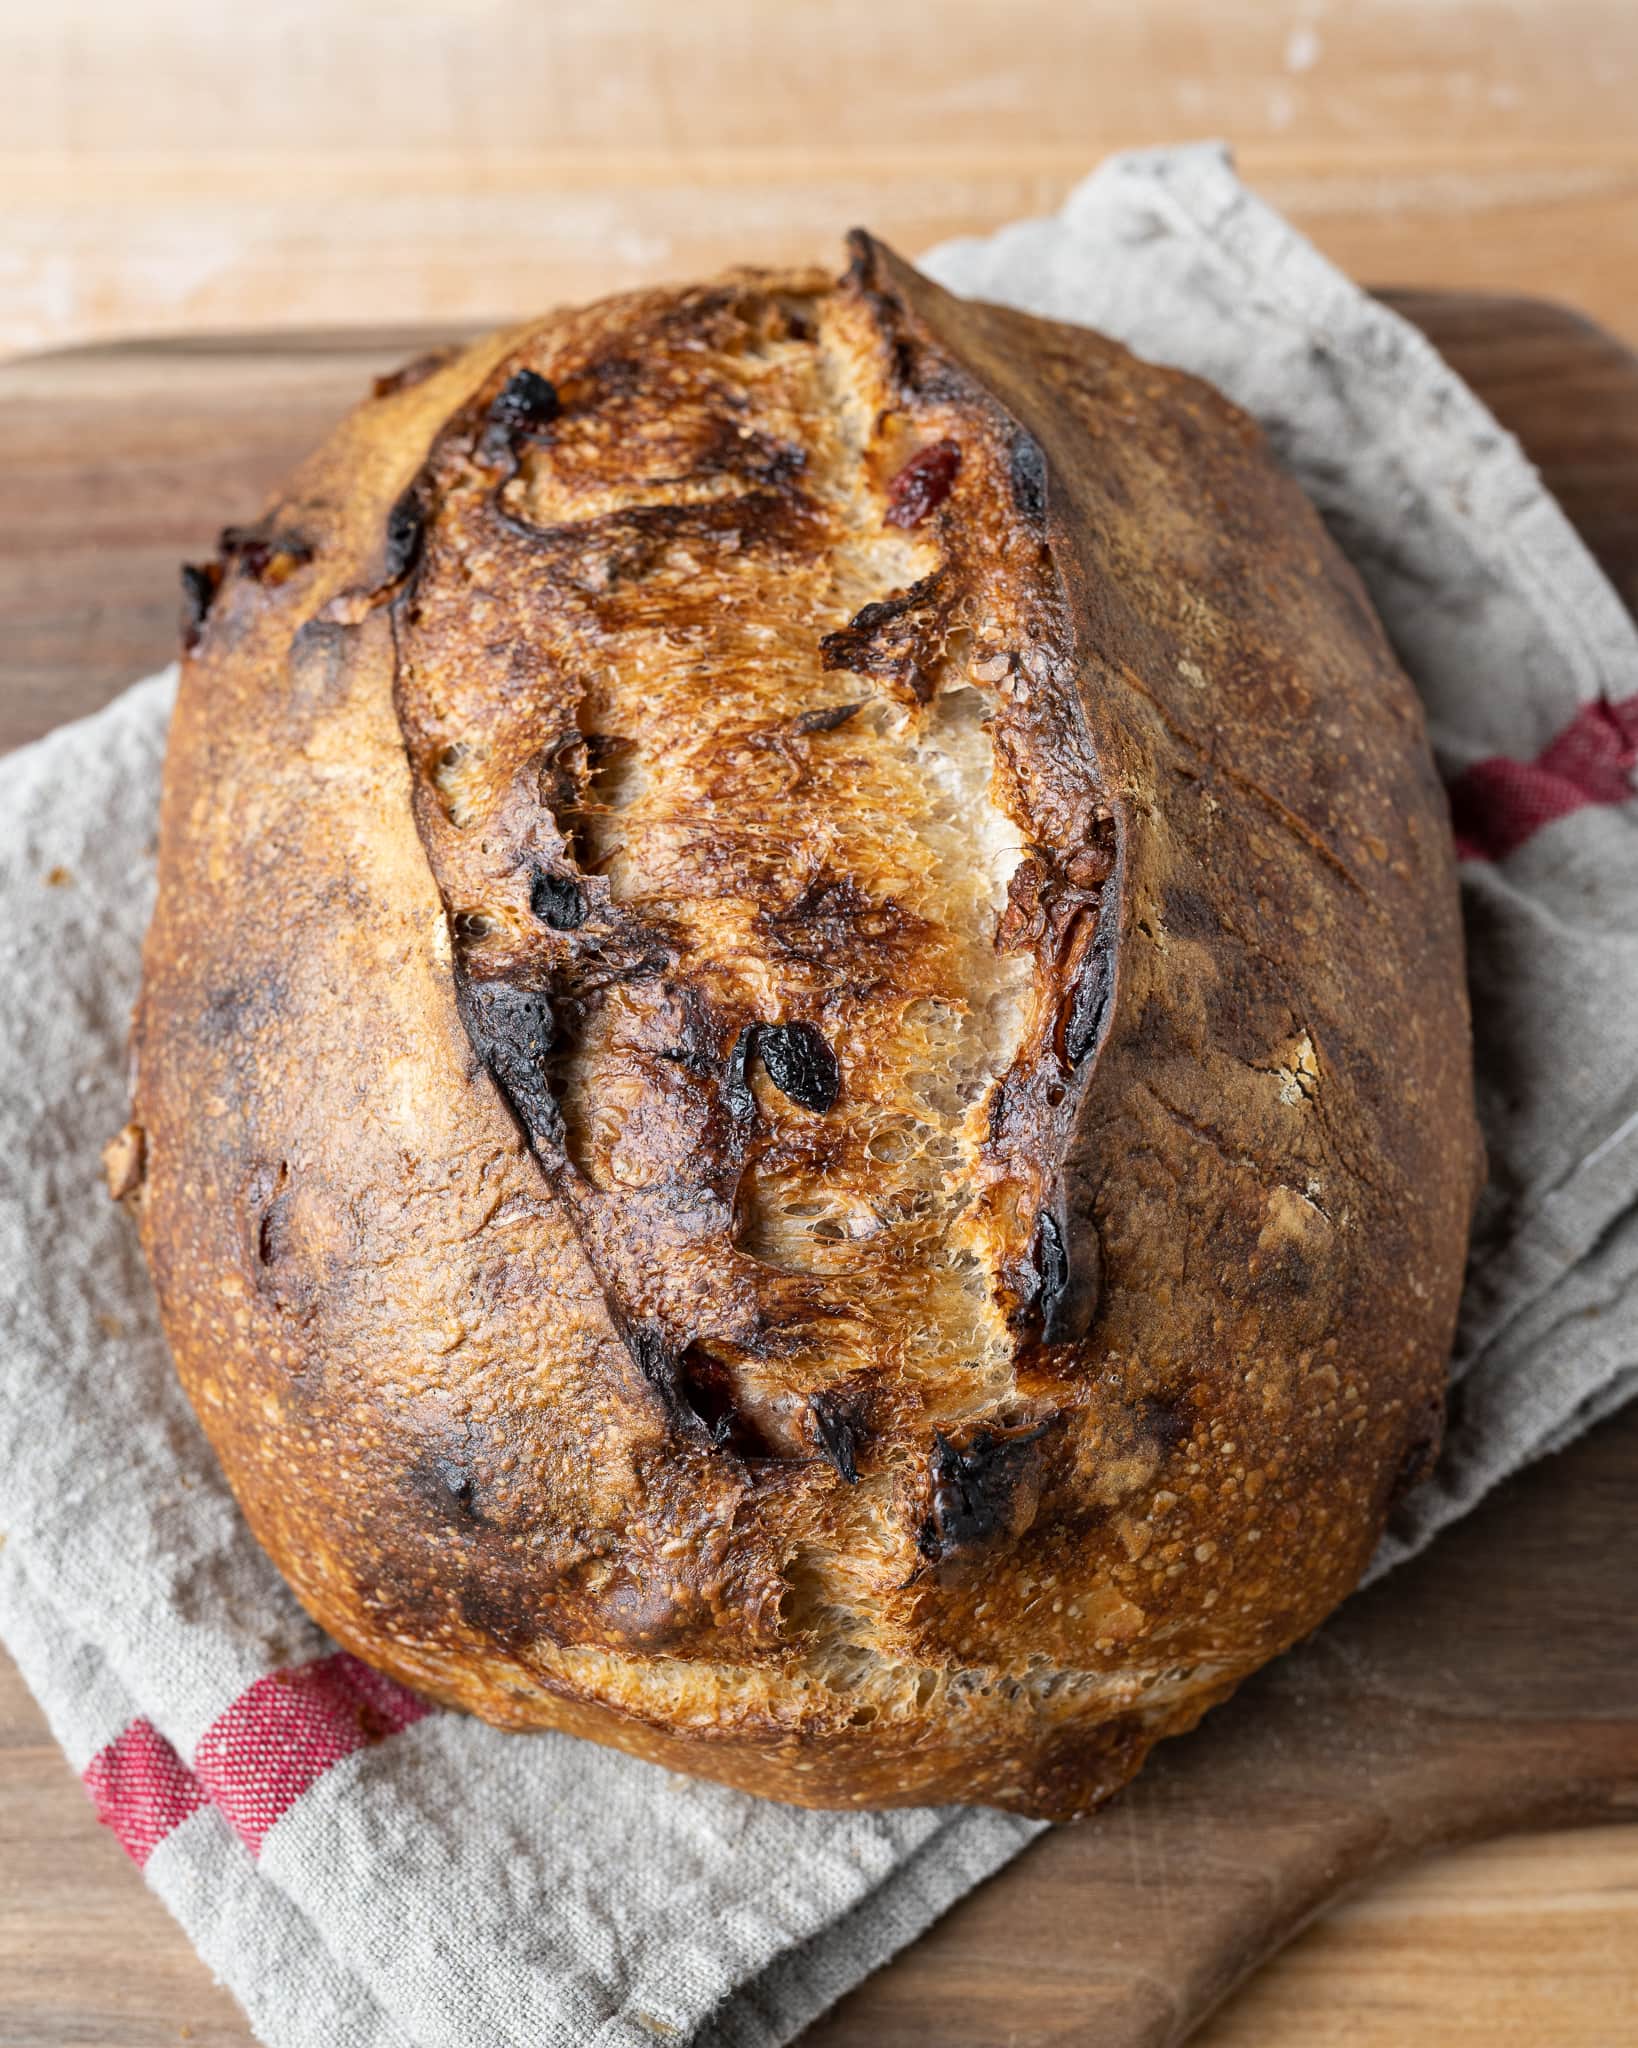
I’ve been baking sourdough bread padded to the brim with walnuts and cranberries since even before this recipe was originally posted back in 2014. Earthy walnuts are undoubtedly a favorite, as evidenced by the many recipes I have here with their inclusion, and there’s a real joy in the pairing of this enigmatic nut with the tart—yet sweet—cranberry. Walnuts and cranberries seem diametrically opposed, but as is usually true in nature, when two things ripen at around the same time, they almost always taste great together. And when looking over this walnut cranberry sourdough, you might read cranberry and think, “too tart!” I urge you to try baking this bread because it’s anything but.
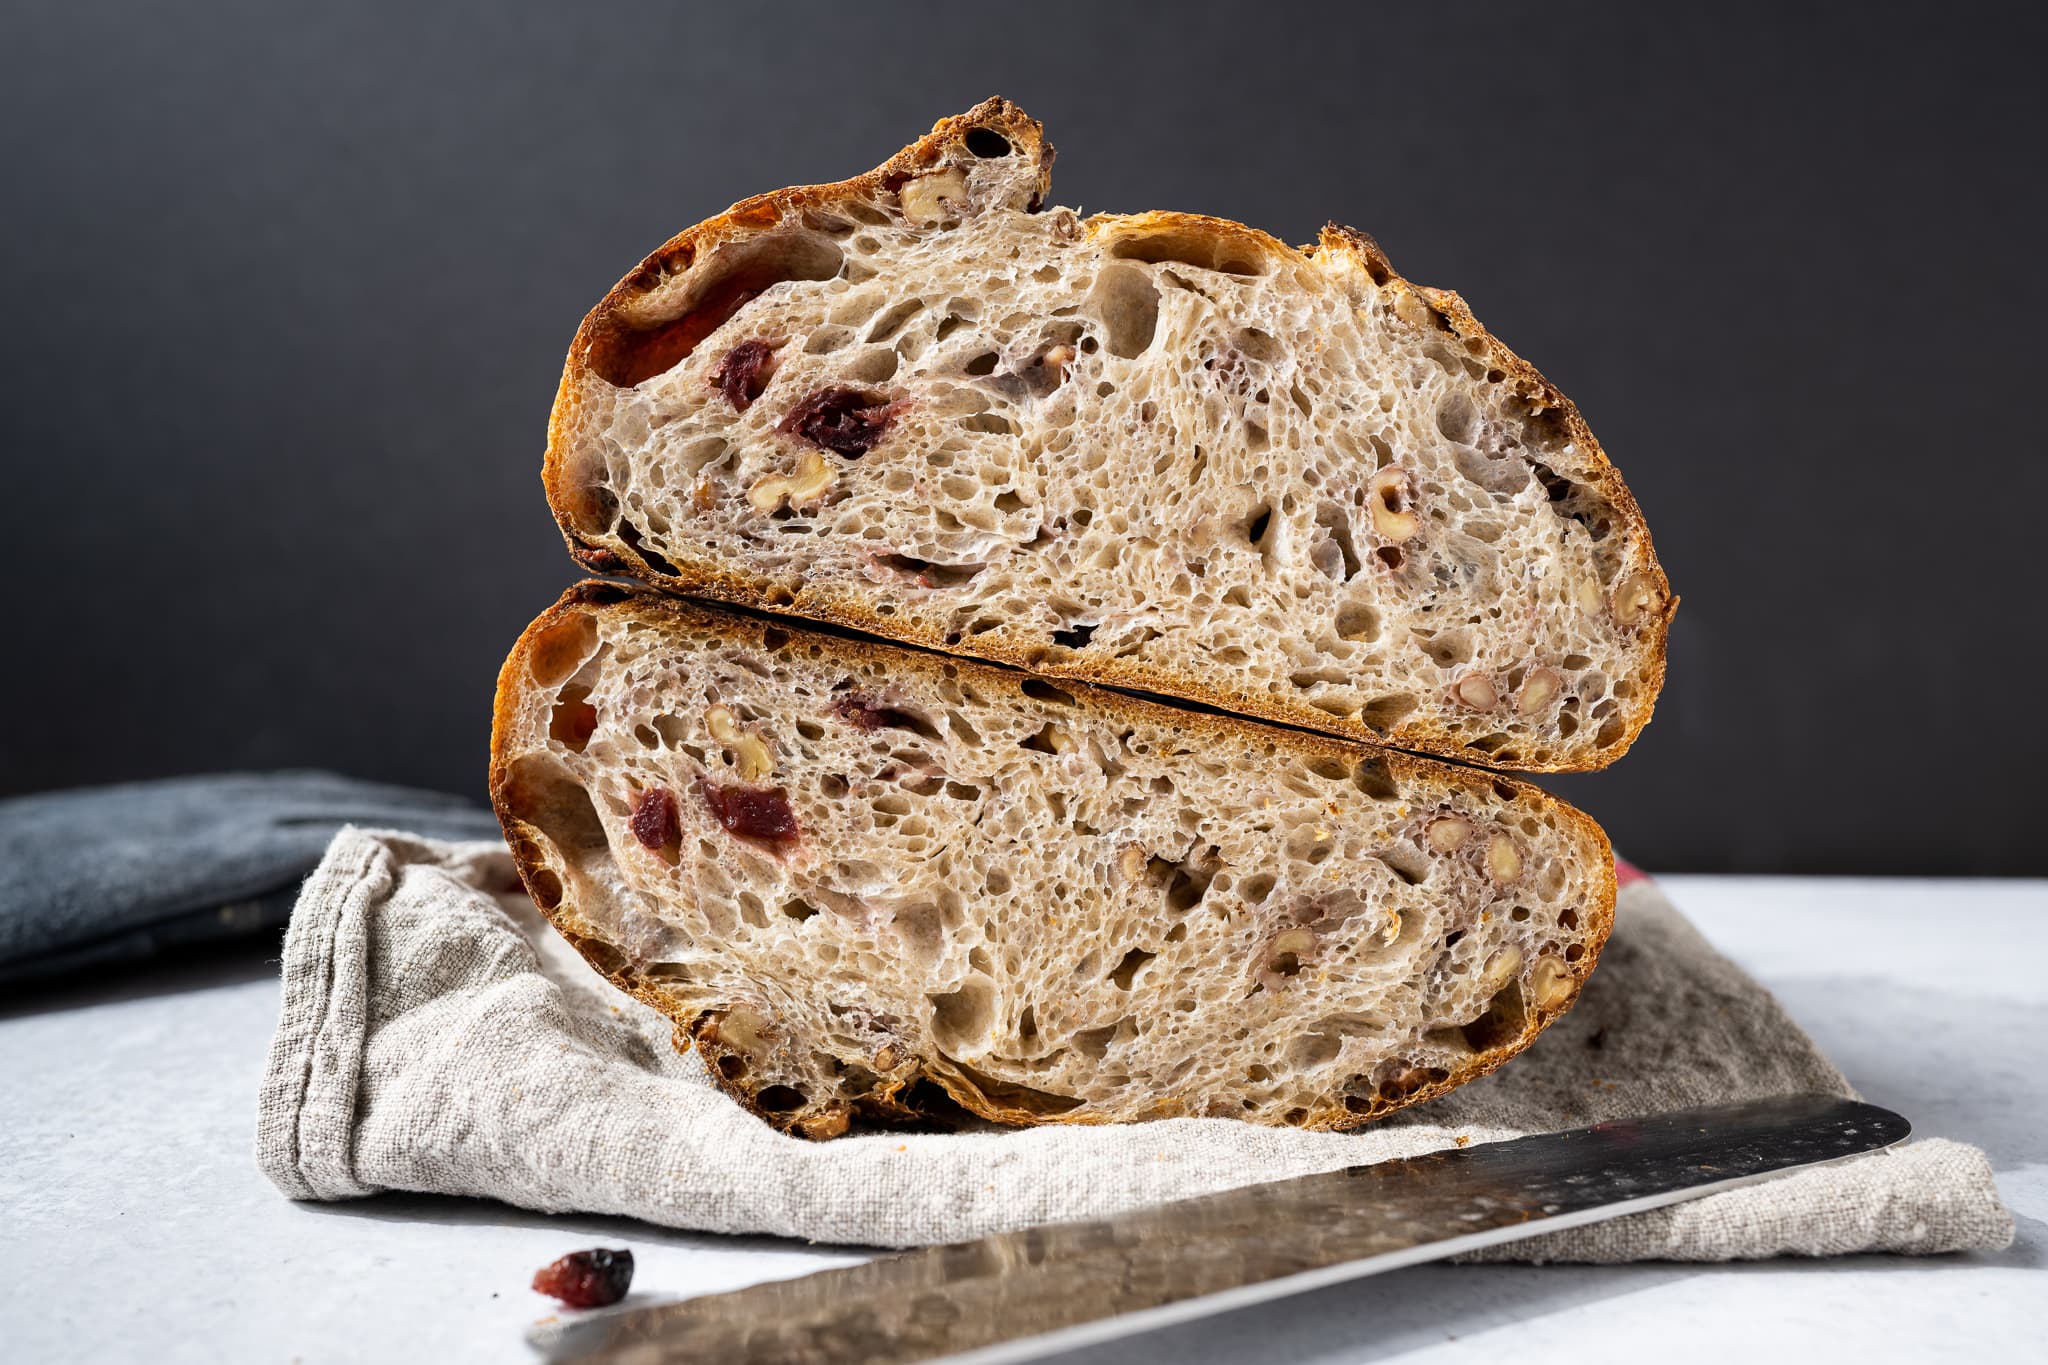
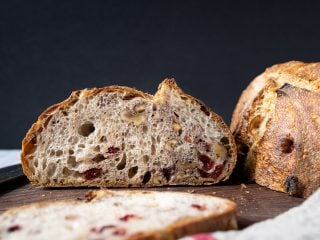
Out of the oven, this loaf carries some of the most dramatic coloring of any bread I bake. The crust ranges from burnished to just a kiss of brown, stopping everywhere between. The stray cranberries and walnuts that might have made their way to the surface, coloring deeply in the oven, add even more dramatic landscape to this darkly expressed loaf. What an eater experiences in drama on the outside is equally apparent inside, as each slice contains a scattering of sliced tart and sweet fruit and earthy nuts. But the show’s real star is the overall melding of flavors: the fruit, the nuts, and how the rich walnut oil enrobes the entire eating experience.

Let’s first look at the flour used in this walnut cranberry sourdough bread recipe, the dried cranberries, and the called for walnut oil.
Flour Selection, Cranberries, and Walnut Oil
This recipe calls for whole-grain rye flour in the levain. I mostly maintain my sourdough starter by refreshing it with a percentage of whole rye flour each day, so I always have some on hand. Additionally, I find adding it to the levain results in a flavor-forward end loaf by increasing the vigor of the levain.
The cranberries I used in this recipe are sweetened, ever so slightly. I find them at my local market in the bulk area, and I think in the end, they’re pretty similar to Craisins. I like to buy a big bag and keep it in my pantry, always ready to go into my next batch of this dough.
The small amount of walnut oil in this recipe brings a disproportionate amount of aroma and flavor to this bread. in this recipe, it sure brings with it a disproportionate amount of aroma and flavor to this bread. The oil carries an irresistible, luxurious aroma that’s only outstripped by the exuberant flavor. If I could sneak this oil into every bread I bake, I wouldn’t be sad about it. But in addition to the aroma and flavor, the oil also softens the end loaf much as any oil would; I highly recommend using it in this recipe (and it’s also great for salads). Alas, my love of walnuts continues.
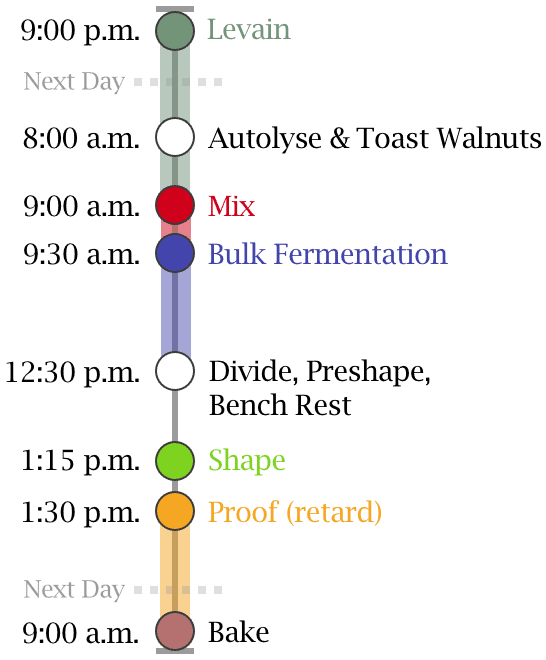
Baking Schedule
This walnut cranberry sourdough is made over the course of two days (not including the overnight levain). The cold proof of the dough brings significant flavor to this dough, but you could also opt for a same-day bake. Instead of placing the shaped dough into the refrigerator to proof overnight, leave it out, covered, to proof for 1-3 hours (depending on kitchen temperatures) until ready to bake.
See the baking schedule at right.
Walnut Cranberry Sourdough Bread Formula
Formula updates: There are a few subtle changes to this recipe over the one standing here for so many years: a slightly reduced salt percentage (from 2% to 1.9%), 3% reduction in hydration, 4% more dried cranberries, levain reduced from 25% to 23.33%, and finally, a conversion from “2 tablespoons walnut oil” to a more baker’s math friendly 3.00% walnut oil. After many iterations and permutations with this bread, these subtle changes have made this bread even better.
Vitals
| Total Dough Weight | 1,800 grams |
| Hydration | 85% (88% including walnut oil) |
| Pre-fermented Flour | 10.00% |
| Levain in final dough | 23.33% |
| Yield | 2 x 900g loaves |
This recipe makes two loaves. If you’d like to make a single loaf of walnut cranberry sourdough, divide all the ingredients in half. See my guide to using baker’s percentages for help with scaling.
Total Formula
Desired dough temperature: 76°F (24°C). See my post on the importance of dough temperature for more information on dough temperatures.
| Weight | Ingredient | Baker’s Percentage |
|---|---|---|
| 640g | Medium-protein bread flour or All-purpose flour (~11% protein, Central Milling Artisan Baker’s Craft or King Arthur Baking All-Purpose) | 80.00% |
| 120g | Whole wheat flour (Giusto’s Whole Wheat or King Arthur Baking Whole Wheat) | 15.00% |
| 40g | Whole rye flour (Flourist Whole Grain Rye) | 5.00% |
| 160g | Walnuts, shelled and toasted | 20.00% |
| 112g | Cranberries, sweetened and dried (Craisins would work well) | 14.00% |
| 24g | Walnut oil | 3.00% |
| 600g | Water 1 (levain and autolyse) | 75.00% |
| 80g | Water 2 (reserve for mixing) | 10.00% |
| 15g | Fine sea salt | 1.90% |
| 8.0g | Sourdough starter | 1.00% |
Walnut Cranberry Sourdough Bread Method
1. Prepare levain – Night before mixing, 9:00 p.m. (day one)
This is an overnight levain: mix the following ingredients in a container and leave covered to ripen at about 77°F (25°C) for 12 hours.
| Weight | Ingredient | Baker’s Percentage |
|---|---|---|
| 40g | Medium-protein bread flour or all-purpose flour | 50.00% |
| 40g | Whole rye flour | 50.00% |
| 80g | Water | 100.00% |
| 8g | Ripe sourdough starter | 10.00% |
2. Prepare mix-ins – 7:30 a.m. (day two)
Preheat your oven to 350°F (175°C). Spread the 160g walnuts out evenly on a sheet pan and bake for 10 to 15 minutes until they start to take on a little color and become very fragrant. Keep an eye on them; they can burn quickly. Set aside until called for during bulk fermentation.
3. Autolyse – 8:00 a.m.
This recipe uses the autolyse technique to increase the extensibility of the dough and make mixing by hand easier. The increased extensibility helps with incorporating the walnuts and cranberries.
Add the following to a mixing bowl and mix until incorporated.
| Weight | Ingredient | Baker’s Percentage |
|---|---|---|
| 600g | Medium-protein bread flour or all-purpose flour (~11% protein, Central Milling Artisan Baker’s Craft or King Arthur Baking All-Purpose) | 80.00% |
| 120g | Whole wheat flour (Giusto’s Whole Wheat or King Arthur Baking Whole Wheat) | 15.00% |
| 520g | Water 1 | 76.00% |
4. Mix – 9:00 a.m. (Day two)
| Weight | Ingredient | Baker’s Percentage |
|---|---|---|
| 24g | Walnut oil | 3.00% |
| 80g | Water 2 | 10.00% |
| 15g | Fine sea salt | 1.90% |
| 168g | Ripe levain (from step 1) | 1.00% |
Gather the following ingredients for mixing. The remaining water (water 2) should only be added through mixing if your dough feels like it can handle the addition. Use a splash to work in the levain and salt, adding the rest based on how the dough feels. If the dough is extremely slack, omit the rest of the water.
Finally, hold back the walnut oil until the later steps of mixing.
I strengthened this dough by hand using the slap and fold kneading technique, which quickly develops the dough. Alternatively, you could use a home spiral dough mixer, or even a KitchenAid would work with this dough.
Add the levain to the top of your dough in the mixing bowl (that’s been in autolyse) and use a splash of water to moisten. Mix the levain in thoroughly and slap and fold (or do folds in the bowl) for 5 minutes until the dough begins to smooth out and become elastic.
Let the dough rest in the mixing bowl for 10 minutes.
Sprinkle the salt over the dough, then dissolve with a splash of the reserved mixing water. Mix thoroughly. If the dough still feels very slack, continue to strengthen the dough in the bowl by stretching and folding (or do slap/fold on the counter) for a few minutes until it begins to tighten. Then, slowly begin adding the walnut oil while folding the dough in the bowl. I like to add a small pour every minute or so as I’m folding.
At the end of mixing this dough will still be very extensible and slack, but it will look smooth and shiny. The walnuts and cranberries will be added during bulk fermentation.
Transfer the dough to a container for bulk fermentation and cover.
4. Bulk fermentation – 9:30 a.m. to 12:30 p.m.
At a warm room temperature, around 74-76°F (23-24°C), bulk should take about 3 hours. If your kitchen is cooler, place your bulk container in a small home dough proofer, or extend the bulk fermentation time to give the dough more time to ferment. This dough needs about three sets of stretch and folds during the 3-hour bulk.
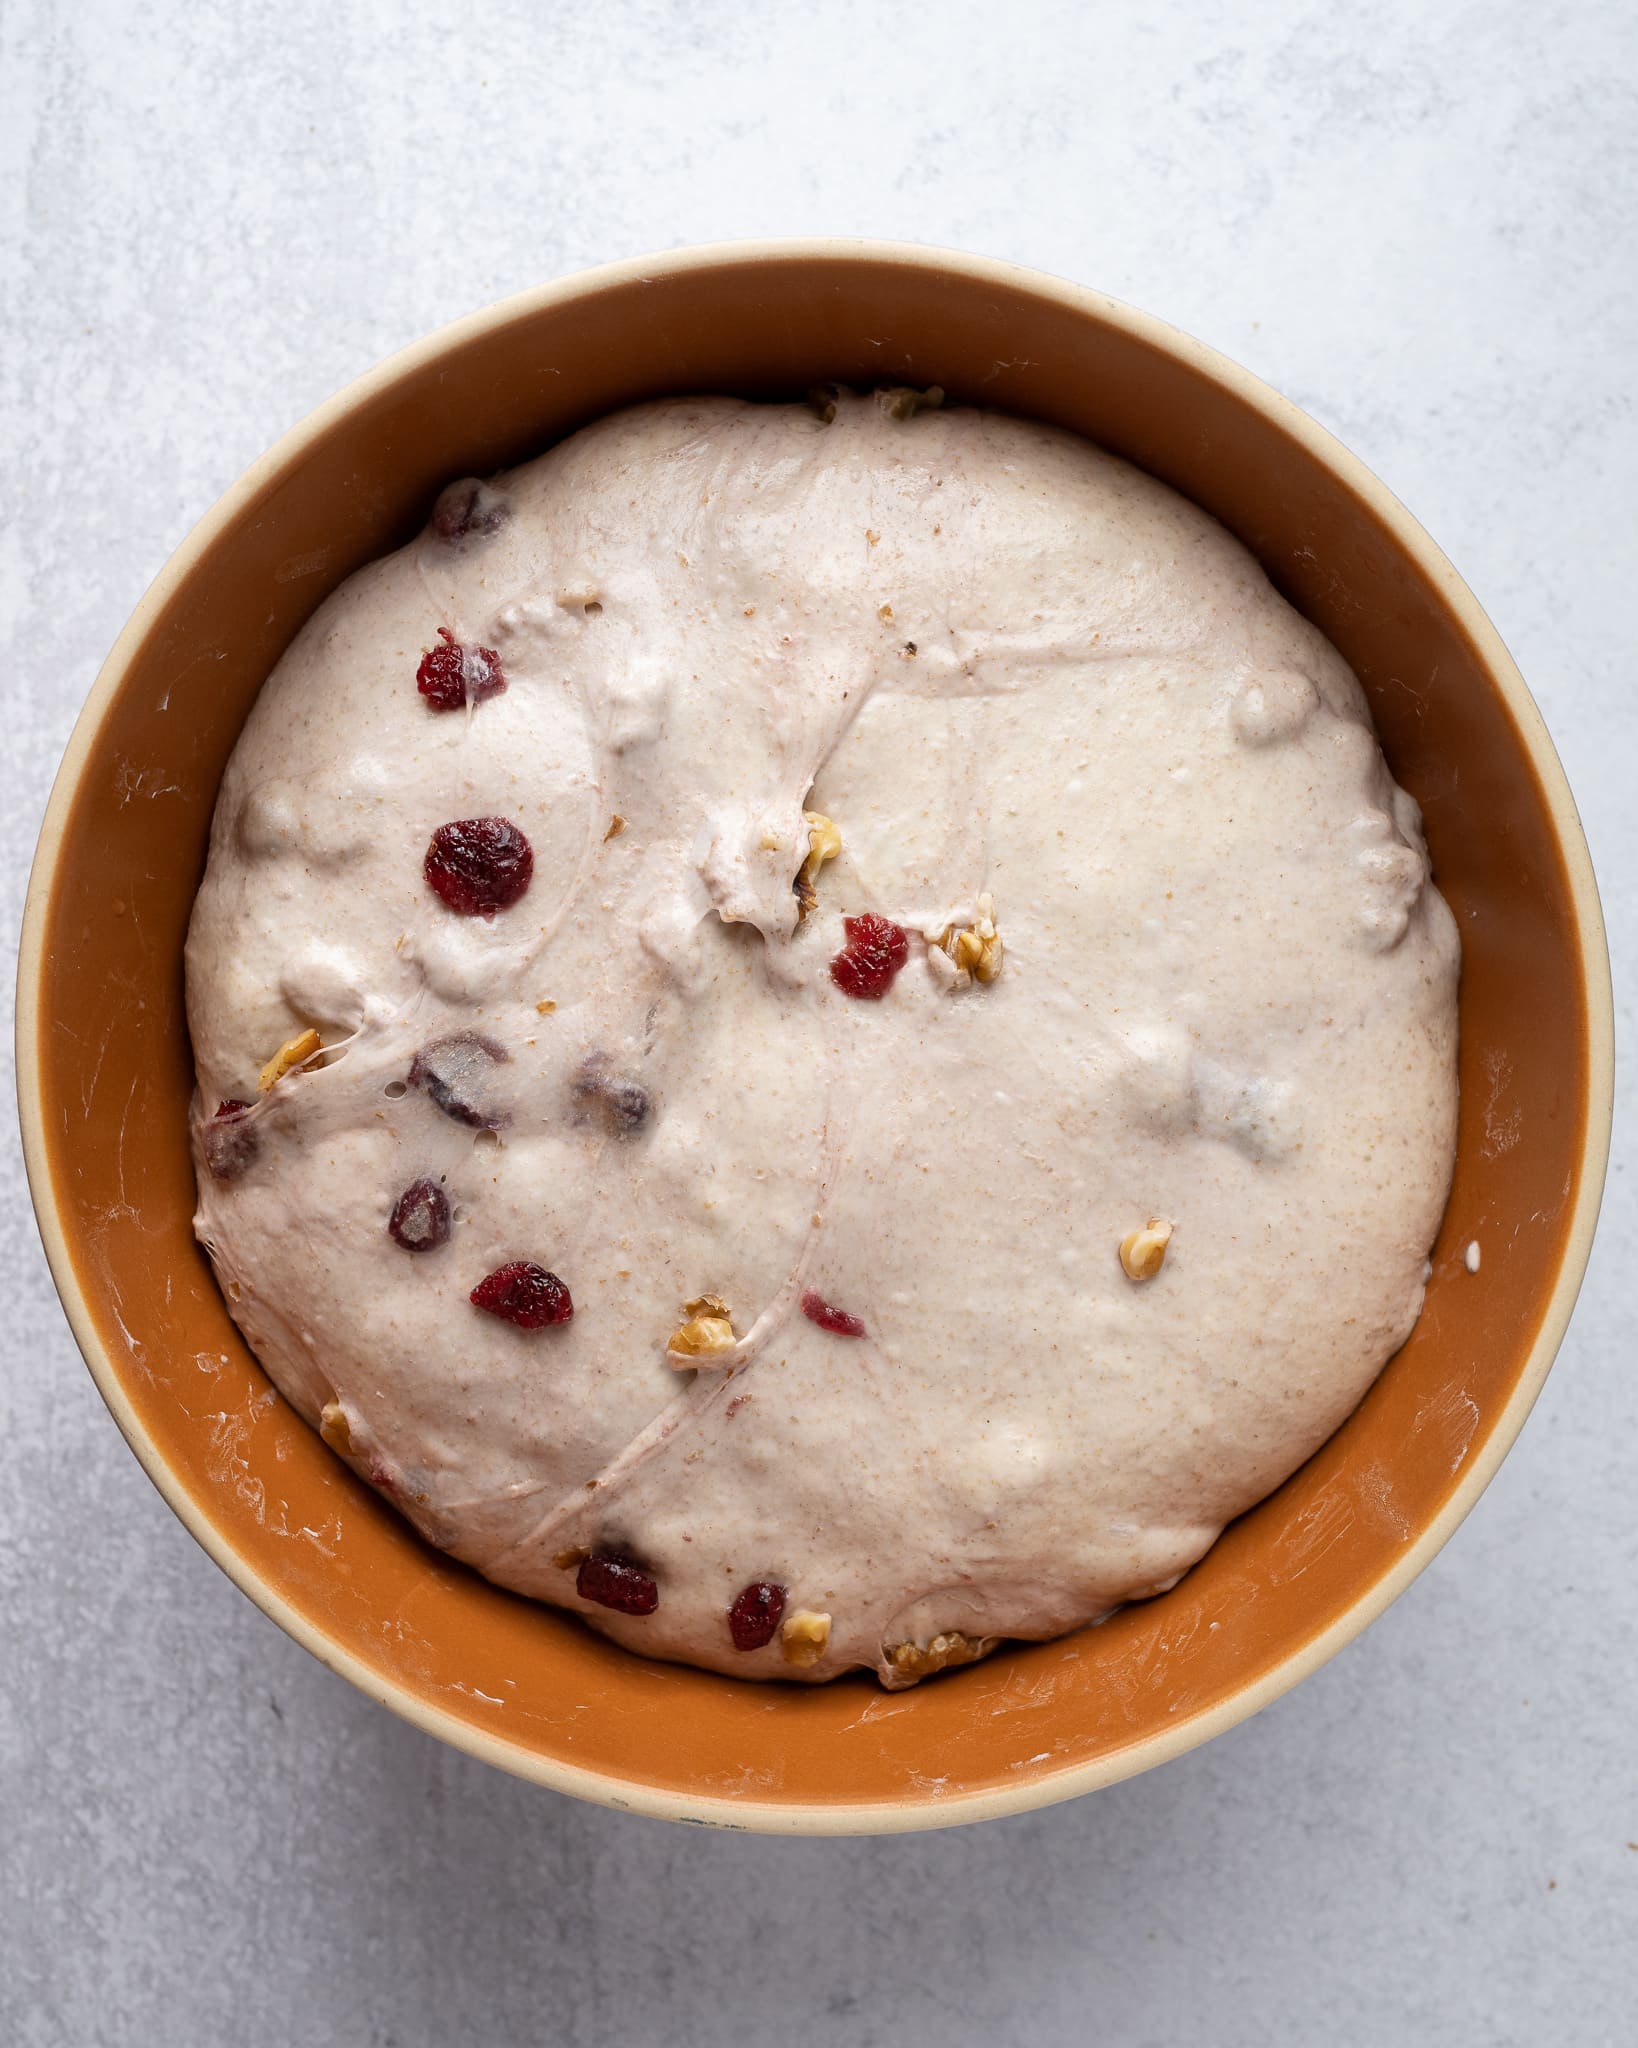
Combine the 160g toasted walnuts and 112g cranberries in a large bowl.
Before you give your dough its first set of stretch and folds, spread about 1/4 of the mix-ins over the top of the dough. Then, grab one side of the dough and stretch it up and over the dough to the other side. Spread on another 1/4 of the mix-ins to the new top. Rotate the bowl 180° and perform another stretch and fold. Spread on another 1/4 of the mix-ins, then rotate the bowl 90° and do another stretch and fold. Finally, spread on the last of the mix-ins, turn the bowl 180° and do one last stretch and fold. You should have the dough neatly folded up in the bowl with all the mix-ins tucked into the dough.
Here’s a video of me stretching and folding this dough over on Instagram.
The remaining two sets of stretch and folds should be a little more gentle. After the third set, let the dough rest, covered, for the remainder of bulk fermentation.
5. Divide and preshape – 12:30 p.m.
Fill a bowl with some water and place it on your work surface. Scrape out your dough from the bulk container onto your dry counter. Divide the mass in half using a bench knife. Using a wet hand and the knife in the other, gently preshape each half into a loose round.
Let the dough rest, uncovered, for 30 minutes until its relaxed outward.
6. Shape – 1:15 p.m.
I like to shape this loaf as an oblong batard, but a round boule would also work well. Shape each by first flouring the top of the rested rounds and your work surface, then shape them into your desired shape.
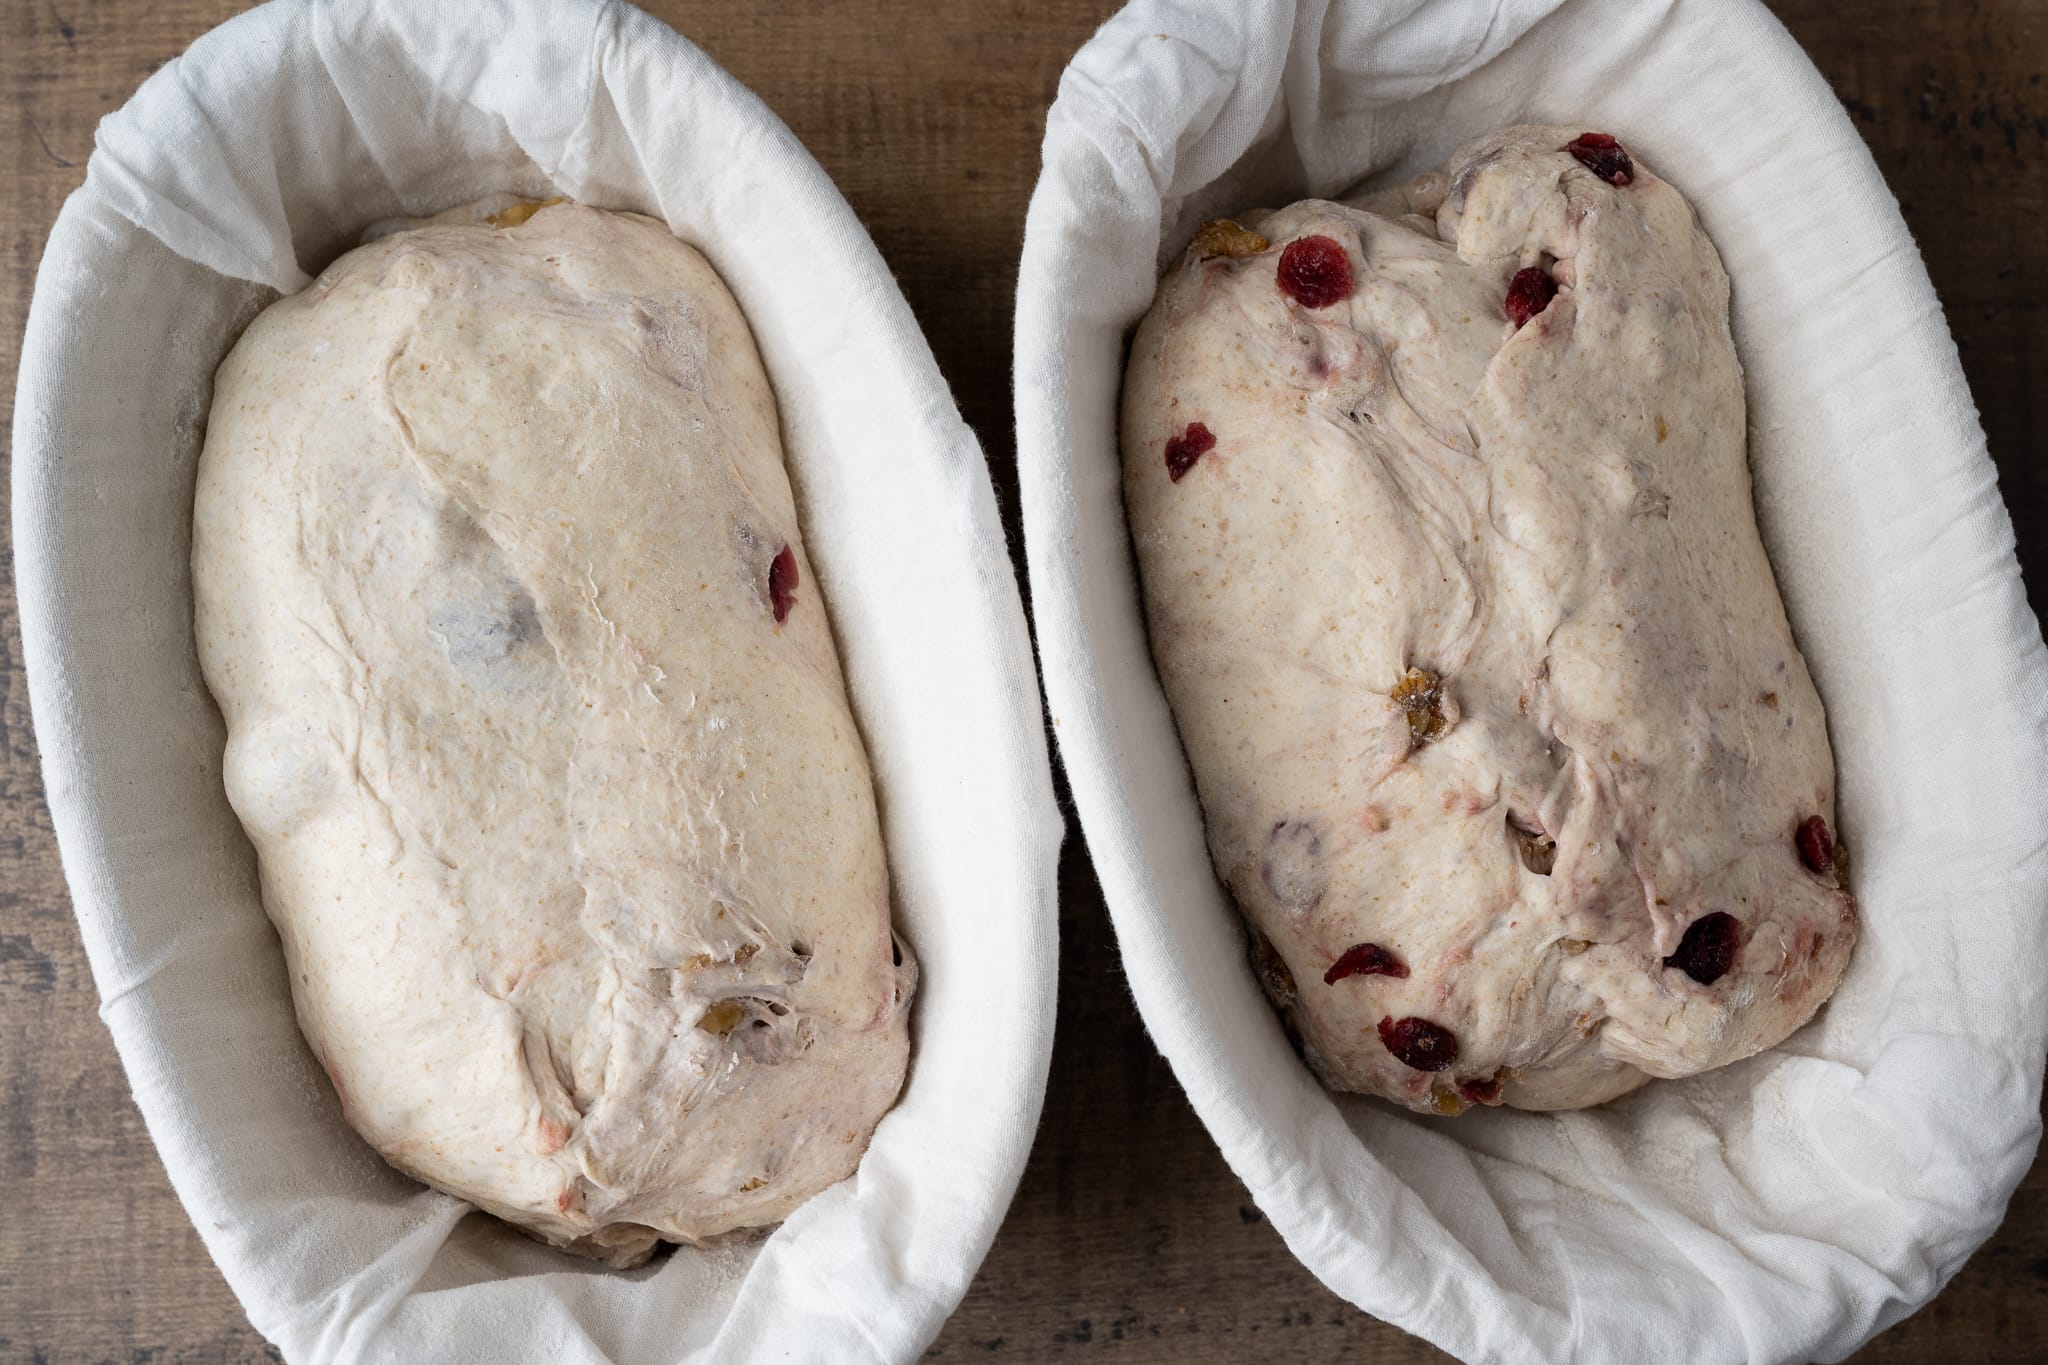
After the dough is shaped, place it seam side up in a proofing basket lined with canvas or a clean kitchen towel. I recommend lining your proofing basket because the red cranberries can ooze out a bit of color during the long, cold-proof. I like to use smaller, 10″ proofing baskets for this dough to keep it in a tighter shape during proof.
7. Proof – 1:30 p.m. to 9:00 a.m. (overnight)
Cover the baskets with a large, reusable plastic bag and seal it shut. Place the baskets into your refrigerator to proof overnight.
8. Bake – 9:00 a.m. (next day)
Preheat your oven with a baking stone or Baking Steel inside to 450°F (230°C).
I baked these loaves on my Baking Steel in my oven, following my guide on how to steam an oven for baking bread. However, you could also use a Dutch oven if you’ve shaped your dough as a round shape (see my guide to baking bread in a Dutch oven here).
Score each piece of dough and slide it into the oven—bake for 20 minutes with steam. Then, remove the steaming pans from inside the oven (or remove the lid to your combo cooker or Dutch oven) and bake for an additional 30 minutes, or until the crust is deeply colored and the interior temperature registers around 204°F (95°C).
Once fully baked, cool your loaves on a cooling rack for 1-2 hours. See my post on the best way to store bread to keep it fresh for a week or longer.
Walnut Cranberry Sourdough Recipe
- Prep Time: 24 hours
- Cook Time: 1 hour
- Total Time: 25 hours
- Yield: 2 loaves
Description
A delicious loaf of sourdough bread padded with tart and sweet cranberries and earthy walnuts, all tied together with a small addition of roasted walnut oil. This is one of the most flavorful bread recipes I bake, and there’s a good reason it’s also one of the most requested—it’s delicious!
Ingredients
Levain
- 40g medium-protein bread flour or all-purpose flour
- 40g whole rye flour
- 80g water
- 8g ripe sourdough starter
Main Dough
- 600g medium-protein bread flour or all-purpose flour
- 120g whole wheat flour
- 160g walnuts, shelled and toasted
- 112g cranberries, sweetened
- 24g walnut oil
- 15g sea salt
- 520g water 1 (autolyse)
- 80g water 2 (mix)
- 168g levain
Instructions
- Levain (night before mixing, 9:00 p.m.)
In a small container, mix the Levain ingredients and keep it at a warm temperature overnight. - Prepare mix-ins (the next day, 7:30 a.m.)
Preheat your oven to 350°F (175°C). Spread the 160g walnuts out evenly on a sheet pan and bake for 10 to 15 minutes until they start to take on a little color and become very fragrant. Set aside until bulk fermentation. - Autolyse (8:00 a.m)
In a medium mixing bowl, add the 600g medium-protein bread flour, 120g whole wheat flour, and 520g water and mix until no dry bits remain. Cover the bowl and let rest for 1 hour. - Mix (9:00 a.m.)
To the mixing bowl holding your dough, add the levain and a splash of water. Mix thoroughly and strengthen the dough for about 5 minutes. Let the dough rest for 10 minutes in the mixing bowl. Add the salt, another splash of water, and mix until incorporated. Strengthen the dough further if necessary until it’s elastic and smooth. Then, slowly add the walnut oil over the course of the next few minutes while stretching and folding until the oil is absorbed and the dough is smooth and shiny. Transfer the dough to a bulk fermentation container and cover. - Bulk Fermentation (9:30 a.m. to 12:30 p.m.)
Before you give your dough its first set of stretch and folds, spread about 1/4 of the mix-ins over the top of the dough. Add the rest of the mix-ins in the same way through the remaining folds for the first set. Perform two more sets of gentle stretch and folds during this 3-hour period, then let the dough rest the remainder of bulk fermentation. - Divide and Preshape (12:30 p.m.)
Lightly flour your work surface and scrape out your dough. Using your bench knife, divide the dough in half. Lightly shape each half into a round shape. Let the dough rest for 30 minutes, uncovered. - Shape (1:15 p.m.)
Shape the dough into a round (boule) or oval (batard) and place in proofing baskets. Cover the baskets with a reusable plastic bag. - Proof (1:30 p.m. to 9:00 a.m. the next day)
Cover proofing baskets with reusable plastic and seal shut. Then, place both baskets into the refrigerator and proof overnight. - Bake (The next day, bake at 9:00 a.m.)
Preheat your oven with a baking surface or combo cooker/Dutch oven inside to 450°F (230°C).When the oven is preheated, remove your dough from the fridge, score it, and transfer to the preheated baking surface or combo cooker. Bake for 20 minutes with steam. After this time, vent the steam in the oven or remove the lid (you can keep it in the oven or remove it) and continue to bake for 30 minutes longer. When done, the internal temperature should be around 204°F (95°C).
Let the loaves cool for 2 hours on a wire rack before slicing.
What’s Next?
While I’ve been baking this bread for ages, revisiting the formula and formalizing it here made me appreciate how much I love it. It’s surprising how much I look forward to the moments when I can eat a slice of this walnut cranberry sourdough, whether it’s in the morning toasted with butter, the afternoon with a turkey sandwich, or the evening simply on its own. When baking this bread, I often regret not doubling the recipe and making more—easily fixed next time!
Next, try your hand at my sunflower and sesame sourdough for another wonderful loaf with inclusions!
Buon appetito!


367 Comments
I just made one of this loaf today. I halved the recipe because there are only 2 of us. First I started my leaven at a wrong time (started in the morning instead of at night), not wanting to waste it, I tossed it into the fridge when it almost peaked and resumed the next day. Next I did the bulk fermentation in a rush. Naturally my loaf didn’t rise too much. It almost didn’t rise at all overnight in the fridge. I was close to giving up and was expecting to get a very dense, underpriced loaf. But.. but… when I cut it open, whoa the texture looks so nice, the crumbs! I never achieved such open crumbs in my bread making before. The bread was so MOIST and so FULL OF FLAVOURS, I had several slice with marmalade (homemade), the tanginess of sourdough, the cranberry and the citrus all worked so nicely together, I was in heaven! Thanks for the recipes! I am sure I will make it again and again, maybe even try it out with dried apricot and hazelnut! Thanks!
That’s excellent to hear! Sounds like your modifications worked well. Definitely a drastic departure from my timetable with this bread but that doesn’t mean mine is the only way — bread baking requires changes, modifications, and adjustments during the bake. Well done!
I just made a big batch of these loaves and I have to say its one of the nicest doughs to work with. during bulk fermentation it showed such nice bubbles and the dough is very soft. I do have one question though. I’d like to bake them on the open stone. I have a steam bake inside my oven plus I always squirt some inside just before baking. What would the temperature be and how long is the bake on the stone instead of dutch oven?
Glad to hear this baked went so well for ya, Sharon! I’d say stick with the same times and temps even if you’re baking directly on a baking stone. It’s likely you’ll be able to increase the temperature of the first part of the bake, but I would test this first just to be sure. Happy baking and enjoy!
Thanks for all your wonderful recipes! I’m wondering if I could use this recipe as a template for other mix-ins. For example, could I use this same recipe but mix in rosemary, garlic and walnuts? (Same amount of walnuts, a few tablespoons of rosemary, and 100 grams of roasted garlic)? Or are there other measurements you would recommend?
Yes, you can definitely do that! I’d say this recipe is a really good springboard for other ideas. The thing to be aware of here is hydration: some mix-ins will leech water out of the dough and some might add moisture back in. Adjust the hydration as necessary (e.g. walnuts usually pull water out of the dough so I add a little extra in to compensate). Happy baking!
I baked my bread this morning. It’s gorgeous and it tastes great! But I have a couple of questions.
1. I halved this recipe. Is it a particularly large loaf? Mine is bigger than I thought it would be. Maybe it’s not as rounded as the Beginner Sourdough loaves I’ve been making?
2. When I took it out of the refrigerator this morning it had grown more than the basic sourdough recipe ever does. What does that mean?
Thanks for all your help. I think I’m finally understanding things!
Glad to hear it worked out well! I’m not sure why it seems larger, but it might be a bit larger than the other loaves here at my site. I’ve since gone down to 800-900g loaves instead of 1kg.
Hard to say why it rose up more in the fridge overnight. Could be from stronger fermentation, greater dough strength, different flour… If you like the end result, try to replicate the bake and see if it rises as much next time. And as I always recommend: try to change only one thing per bake so you know what to attribute any progress to!
I want to try this recipe out before baking loaves for Christmas. Can I halve the recipe for my test loaf? I’m thinking of using figs instead of cranberries. Any thoughts on that?
Yes, you can definitely halve the recipe to test, that’ll work just fine. Figs would be great, too! Have a look at my fig & fennel sourdough recipe for some ideas there. Happy baking!
One more question….somewhere in your blog I think I saw that you suggested we use the whole amount of starter even if we halve the recipe. Is that right, or should I halve the amount of starter as well?
You should halve the amount of levain/starter you add to the dough if the rest of the ingredients are also halved (this way the percentage of levain in the final dough is still the same). In other comments I recommended making the same levain build, though, but in the end just using half of it in the dough mix. I recommend this because sometimes that levain build can be really small if it’s halved. It’s up to you, though, either way will work!
Yes it’s a very forgiving recipe I have made with stem ginger and pecan nuts and it comes out fine
I stopped scrolling down once I saw yr dog…handsome boy! My dog Sasha is my baking helper but like yours, she does a lot of ‘helping’ from her bed. Always sleeping on the job, only cock one eye open when the oven bell goes off.
Why thank you! My dog, Arya (a female German Shepherd), is such a good dog — but yes, she sits on the couch while I bake 🙂 Just like your Sasha, she’s quick to jump when she hears the cheese come out of the fridge, or when I open a container of yogurt!
Hi Maurizio, I made this loaf for breakfast this morning (I replaced cranberries with apricots as that’s what I had), and it turned out beautifully, it is such an interesting bread because you kind of expected it to be sweet but it isn’t and it is at the same time… very flavourful. I was worried when I shaped last night that the bulk fermentation wasn’t complete as it did feel a lot less airy than what I am used to at the end of the bulk fermentation, I had already left it for a couple hours longer, but I needn’t have been anxious, it turned out perfectly. Thanks for the recipe and inspiration!
Right on, happy to hear that, Lucy! Apricots sound great as well. I find as long as the fruit mixed in isn’t at too high of a quantity the natural sourness in sourdough helps balance, and brighten, the flavors of the fruit. Just perfect. Thanks for the update and idea to use apricots!
Hi Maurizio–
I tried this recipe and found the dough so different from the Beginners Sourdough–much wetter and softer but fun to work with! (On a side note, after weeks of practicing in a house that’s typically 68 degrees, we had a heat wave in Boston with temps of 90 degrees–so a new problem! I’m really beginning to understand ‘temperature as ingredient.’) It really takes so much practice and experience to improve as a baker. The crust on my Walnut Cranberry Sourdough is thin and very crisp and the crumb is much softer. Here’s a picture of the finished product— https://www.instagram.com/p/BiULuyFHY59/?taken-by=kathleenshugrue. I only baked one loaf and plan to hold back on baking the second because there’s too much bread in the house! How long do you think I can keep it in the refrigerator before it over-proofs?
Thanks so much for your guidance–it’s nice to have an e-baking-mentor. Honestly I still can’t get over the magic of my bread rising with my own starter–it’s really so exciting.
Hey, Kathleen! There’s definitely a lot to making bread, but each time you do it you’ll find it becomes easier and easier — a muscle memory of sorts. It’s hard to say how long you can keep it in the fridge as it really depends on how much overall fermentation/development the dough had when you put it in. Generally, I’ve been able to keep the over half 12-16 hours longer and it’s baked up just fine. It might have less rise and be a little more sour, but still delicious!
Making sourdough bread at home is such a wonderful thing, right? It’s endlessly fascinating! Happy baking 🙂
So–now for my update on the 72 hour (!) proof in the fridge. This was entirely unplanned but my life was too crazy to do it otherwise. The dough had definitely risen in the banneton and subsequently rose very little in the oven. I guess it was over-proofed? The crust was much smoother than I would have like, the scoring barely made a difference and the crumb was a little tighter—but the sourdough flavor…magnifique!!! I definitely like my bread sour.
Hi Maurizio, I am getting proficient at the Beginner’s Sourdough and I thought I’d graduate to this one. The taste is great and it even looks good, but I couldn’t get a tall boule and I think it’s because I had a tough time shaping it. The walnuts and cranberries make it really hard to get a smooth top. I have been using the technique in this video https://youtu.be/xYWyxkBWq7Q?t=1m50s and it’s been working really well. Any tips on how to better shape it so that I can get a nice tall boule? Thanks.
Hey, Pravin! This is a great bread to tackle next. The mix-ins are super, super delicious but do make shaping a little harder. I usually just do a “letter fold” — that is, flip the resting round over, fold the bottom “flap” up to about the middle, the sides up and over to the middle, then the top down. Then, flip that so all the seams are on the bottom and gently either twist the round to form tension as it snags the counter, or push with one hand as the dough gets trapped between the palm of your hand and the counter.
The other thing you can do is shape it a little lighter and then place it steam side up in your proofing basket. Let it rest for a few minutes in there then grab the edges of the dough at each direction (North, South, East, and West) and pull it up and over just beyond half. This little folding in the basket will add a lot of strength assuming the fold over sticks.
I know words really don’t do shaping justice, you need video. I’m working on that! I hope that helps in some way.
Thank you! I’ll try that next time. I’m going off the reservation and I’m trying a roasted garlic & olive oil loaf this weekend with the beginner’s recipe as the base. I’m keeping my fingers crossed.
The first time I tried this recipe, I went right by all the timings & measurements suggested, until the final proof. I realized things were moving too fast – maybe the altitude in Colorado? So I baked that day instead of refrigerating it. The crumb looked beautiful, the taste was fantastic, but the loaves were too flat, in spite of a beautiful-looking proof. But it was over-proofed, even with the shorter timeline. Today I went with the same ingredients & hydration, but kept a close eye to work with the dough as I’m used to doing. Apparently, my levain, when combined with whole wheat flour, is super frisky! I know my sourdough bread dough, and wow, I was baking by 1 PM, and have high, gorgeously bloomed loaves! (Would post pics, but don’t see a way to do it on this platform.) Again, Colorado is a whole different climate (5000 feet altitude, and dry air) than Mexico, and that might be the difference.
Your intuition there is spot on — I’ve noticed at high altitude sometimes my dough moves along much faster than others. I don’t live in Mexico but rather New Mexico, similar to your elevation, at 5280 ft. I usually have to reduce the levain percentage in my recipes to counter this speedy activity (you could also do this if you find it’s moving too fast). It could be the flour you’re using or it could be the temperature of your dough was higher than expected (higher than 78°F?). Either way, it sounds like you have a really good feeling for how to adapt to suit the activity in the dough which I’d say is the most important thing to learn here!
Next time you make this you could try reducing the levain by 2-5% and see if it helps slow things down, or you could keep it as it is and use cooler water to mix (perhaps 72°F), or, finally, you could cut bulk fermentation a little short and see if it helps enable you to lengthen proof.
Happy baking!
Thanks Maurizio! I will definitely try your suggestions. Thanks for being so interactive with everyone here – great to learn from everyone’s experiences!
I baked this (somewhat Christmas-y) bread yesterday. Like all the “Perfect Loaves” I have made so far, it tasted great and we loved it. My baking time was 10 minutes shorter, after removing the lid the bread needed only 15 more minutes to register at 208ºF.
Merry Christmas, Maurizio, and a Happy New (Baking) Year!
Hey you know, this is kind of a Christmas-y loaf! Great idea. Glad it turned out so well for ya and happy holidays to you and your family!
Hello Maurizio, first of all thank you very much for sharing this great information about sourdough! So helpful and inspirational. I learnt most of the starter maintenance here and it basically saved my starter and baking. So big thank you..! So, I made yesterday this cranberries & walnuts amazing bread and unfortunately it turned out very flat after baking. The bulk fermentation and everything looked really well and I was over the moon… just after baking it was very flat compared to my other classic country breads bakes on the same day. I bake in a french Emile Henry ceramic cookware, closed for 35mins at 250C then opened and reduced temperature to 230C.. So I really dont know what could affect this… Thanks in advance and happy baking! 🙂 Lucia
Lucia — you’re very welcome! I’m glad my site has helped in your kitchen. A flat loaf could be due to quite a large number of issues and I’d really only be guessing as to what the issue was. Is it possible the dough over proofed? There are a few key things that could indicate your dough went over: sluggish rise in the oven (as you said), the score on top of the dough might not open with a nice “ear” and instead just kind of fuse together, the interior will have lots of small holes and perhaps one or two large ones near the top (but no dense areas of unfermented flour), and finally the loaf could be a little on the sour side.
If you don’t see any “holes” at all on the inside and it’s very dense, then there’s a good chance the opposite was true: you didn’t have enough fermentation in the dough and it needed more time in bulk and/or proof. You said your bulk progressed well, though, so I’m leaning towards over proofing!
I hope this helps!
Hello Maurizio!
i tried your 50-50 wholewheat recipe at 78% hydration and it turned out to be one of the best loaves i have done. Then i tried this one, i had alot of difficulty shaping this 88% hydration dough and it just spreaded the moment i put it in the oven. I knew that was coming when my bulk fermentation dough looked nothing like your 5th fold picture- still very wet and shaggy after my 5th fold.
Any tips for managing or shaping super hydrated dough like this? I tried to do the slap and fold before the bulk fermentation and it created a major mess at my counter as the wet dough bits was flying all over!
The next qn i have was a problem i have with all my breads, the base of the my loaf is never crispy. i dont use a hot stone, just a normal baking oven with a tray of hot water at the bottom to create the steam.
PS i live in a tropical country, it’s hot and humid here. Not sure if it affects my bread.
Awesome, really glad to hear that about the 50/50 recipe! I would say you should try reducing water first to see if that helps with kneading and shaping. Since you live in a tropical environment your flour, and your definitely your environment, are more humid than mine here and that’s contributing to the problem.
Regarding the slap and fold, hold back some water from the dough until after you do slap and fold, that way the dough isn’t quite so wet when it’s on the counter — it can quickly get out of control! Add it in after you finish slap and fold and it’s back in the bowl (perhaps with a small rest to soften the dough up a bit).
You could try preheating your oven for a little bit longer to make sure your baking stone is super hot, or you could even look into buying a Baking Steel which I find gets incredibly hot (almost too hot).
Hope this helps!
What Is white flour? Can I buy it in another brand name??
For the “white flour” component, which is flour that has been sifted down so most of the bran/germ are removed, you could use regular all purpose flour, or even better for this recipe, bread flour (as they call it in the USA). I’d look for flour that has around 12-13% protein. Any good quality brand will work well!
I made this for a special Christmas bake. I found the ideas of others on this comment thread really helpful, and decided to add 2 tbs maple syrup to my water to make it just a bit sweet. It turned out very well, beautiful soft, open crumb, and delicious! I don’t often bake such a high hydration bread and so I had my doubts when it went into the oven, since it looked like it was going to spread out into a flat pancake, but it had great oven spring and I was not disappointed. My only issue was that the baking heat was too high. I use cast iron, and it burnt the bottom of my loaf at these temps. So back down to 475F preheat and lowered to 440F works better for me. But all in all a wonderful recipe! Thanks for sharing and for the great instructions. Merry Christmas 2016. 🙂
Your modifications sound great! I’ve been meaning to do another loaf like this one here very soon, it’s just so tasty. I did bake these pretty fast and hot but also my altitude might require a bit higher temp than others! Glad you dialed that part in.
You’re welcome and thank you so much for the tips and kind words! Hope you are having a great holiday 🙂
Maurizio – I was so enamored with the walnut raisin variation of your lovely recipe that I made it again this weekend — with some additional changes/tweaks to suit my taste. This time, I turned it into walnut/fig, used sprouted spelt flour, added some diastatic malt, and baked to a truly burnished mahogany… The crust was other-worldly. Maurizio, your beautiful website, bakes, and supportive voice have been such a welcome inspiration in my kitchen. Thank you!
Seeded Sprouted Spelt Sourdough with Walnuts & Figs (AKA Alliteration Sourdough)
400g KAF bread flour
400g KAF Artisan Bread Flour
200g One Degree Organics Sprouted Spelt Flour
250g 50/50 rye/spelt fed and bubbly starter (about 85% hyd)
880g water 85-90 degrees
22g fine sea salt
2 TBL honey
2 TBL walnut oil
scant 2 TBL diastatic malt powder
200g or more toasted walnut halves
200g or more dried Black mission figs (soaked; rough chop)
1/2c KAF Harvest Seed blend – soaked for a few hours in hot water; drained if needed
Do soaker of seeds and figs separately; draining if needed before use. Reserve 50g water from fig soaker.
Toast walnuts – 325 for 10-12 minutes and cool completely. Set aside. Mix 830g of water with honey, all flour, diastatic malt powder. Cover bowl and autolyse somewhere warm (around 78ºF) for 1.5-2 hours. After autolyse, add starter, salt, reserved 50g fig soaker water, walnut oil, & seeds (can add ¼ tsp instant yeast at this point if starter needs oomph). Mix by hand to incorporate ingredients – don’t over mix. Complete 4 stretch & folds spaced out by 30+ minutes (1st S&F after 30 min; store dough someplace warm during rests). Gently add figs/nuts at second stretch & fold – don’t worry if they are not well dispersed at this point – they will be by the end. After completing the 4 S&Fs, cover & complete bulk ferment in refrigerator over night (about 7 hours; alternatively let bulk ferment at rest for additional 2-3 hours on counter/warm room). After bulk ferment, divide dough into 2 masses. Pre-shape into boules, let rest seam down for 20 minutes UNcovered. After 20 min rest, shape each into batard or boule. Proof in bannetons (lined with linen dusted with rice flour, covered) for 3 hours in fridge and 1 hour on warm countertop while oven preheats. (Or approx. 1.5 hours on countertop or in warm room. If you have chosen the shorter countertop bulk fermentation, consider doing final proof in refrigerator over night/about 7 hours for flavor development). (Choose whichever fermentation/proofing method meets your schedule needs.)
Preheat oven & cookers for 1 hr. at 500º. Turn out loaves onto parchment rounds. Score. Spritz with water. 45 min. at 500º. After 45 min, reduce oven to 450º, remove cooker lids & bake for an additional 10 min. Watch for scorching figs if any are sitting on the surface of the breads – can loosely cover with foil to prevent scorching, although this may interfere with deep browning of crust. Remove from the oven & cool on wire racks. LET COOL 100% – BEFORE SLICING (difficult, but I swear it’s worth it particularly b/c the walnut oil and soaked seeds/fruit have added to the moist crumb — slicing early will result in gumminess). https://www.facebook.com/photo.php?fbid=10208911352794519&set=a.1597603653434.84947.1036288044&type=3&theater
Wow. That sounds incredibly delicious! You’ve paired up two of my favorite things in this world: walnuts and figs. I have, have to try this one soon 😀
I like the use of sprouted spelt flour also, I’ve used this a few times in baking cakes and such but never bread (although I do love milled spelt), I can imagine the flavor is even more intensified.
Thanks again for sharing your recipe with us, it really means a lot! It gives me some new ideas to work with and heck, I just want to bake your version as soon as I can 🙂
I’m glad my website is proving such an inspiration to you, really makes me happy to hear! Thanks again and happy baking!
This recipe inspired me to make the best bread I have made yet. The flavor was incredible. Here’s what I did. You’ll see your recipe shining through with variations to suit my schedule and taste.
Seeded Spelt Sourdough with Walnuts & Raisins
400g KAF Bread Flour (12.7% protein) 40%
400g KAF APF Flour (11.7% protein) 40%
200g BRM Spelt flour (13.3% protein) 20%
880g H2O @ 85-90ºF 88%
22g Fine sea salt
250g Spelt Starter (any starter will work – mine is about 85% hydration – like thick cake batter)
2 TBL Boiled cider (or honey or agave – if using agave, reduce to 1 TBL)
2 TBL Walnut oil (optional)
200g or to taste Toasted walnuts
½ c KAF Harvest Seed Blend (1 c. hot water soaker)
200g or to taste Raisins (soaked in hot water for 1-2 hours; drained)
Do soaker of seeds and raisins separately; draining if needed before use.
Toast walnuts – 325 for 10-12 minutes and cool completely. Set aside.
Mix 830g of water (reserving 50g water) with boiled cider and starter.
Add all flour.
Cover bowl and autolyse somewhere warm (around 78ºF) for 40 minutes.
After autolyse, add salt, reserved 50g water & seeds (can add ¼ tsp instant yeast at this point if starter needs oomph). Mix by hand to incorporate ingredients – don’t over mix. Complete 4 stretch & folds spaced out by 20-30 minutes (1st S&F after 30 min; store dough someplace warm during rests). Gently add raisins/nuts and walnut oil at second stretch & fold. After completing the 4 S&Fs, cover & complete bulk ferment in refrigerator over night (about 7 hours; alternatively let bulk ferment at rest for additional 2-3 hours on counter/warm room). After bulk ferment, divide dough into 2 masses. Pre-shape into boules, let rest seam down for 20 minutes uncovered. After 20 min rest, shape each into batard or boule. Proof in bannetons (lined with linen dusted with rice flour, covered) for 1.5 hours on countertop or in warm room. (If you have chosen the shorter countertop bulk fermentation, do final proof in refrigerator over night/about 7 hours).
Preheat oven & cookers for 1 hr. at 500º. Score. 20 minutes at 500º. Reduce oven to 450º. Bake for 30 min at 450º. Remove cooker lids & bake for an additional 10 minutes. Watch for scorching raisins if any are sitting on the surface of the breads. Remove from the oven and cool on wire racks for 90 minutes before slicing.
Wow this bread sounds delicious! Very interesting with the addition of the cider, I’ve never thought of adding that to sourdough bread. I definitely see my recipe lurking in there but I think you’ve really taken this and made your own signature bread — excellent!
I’m marking this down to try in a future bake, I’m inspired 🙂 Thanks so much for sharing the recipe and all the details!
Bear in mind it’s boiled cider (manufactured here, but purchased on KAF site: http://woodscidermill.com/PRODUCTS.html), not full cider, so it’s a very thick reduction. You certainly could make your own too.. https://www.washingtonpost.com/pb/recipes/boiled-cider/12318/
Ahh ok gotcha. Now you have me tempted to make my own… 🙂
Hi Maurizio! I had a question regarding the preheat of the dutch oven/combo cooker. Have you ever tried baking with it unheated? Just curious what you think would be different as far as times, temperature etc. Thank you again for everything you do!
No I’ve actually never tried baking with it unheated. You really want to do the preheat, in my opinion. Once the dough hits the baking surface you want that jolt of very high heat to rapidly get you yeast/bacteria moving so your bread rises. I would guess with a cold surface you wouldn’t get the same level of rise.
You’re welcome, I’m glad you’re enjoying my site! Happy baking 🙂
I do not know what could have gone wrong, my bread did not raise that much, even though I did the test floating of the levain, the bread is good, it has the holes, but not raised as it should be, I did all the fermentation process, but I will try again, though it is very good!!!!
Glad to hear the taste came out great! There are many, many things that could cause a sluggish rise, unfortunately. I’d say try to keep things as consistent as possible from bake-to-bake and pay attention to the dough at each step along the way. Try to “watch the dough” as it is progressing and make sure it’s moving along as expected, sometimes things take a little bit longer sometimes a little bit less time.
Feel free to post here or send me an email if you need more help!
Thank you so much, the bread had holes, but it was not a bit like yours, I know it will take time , but we have been eating, it is good in spite of not rising. I will do as you mention, on my next try I will observe more the developing of the dough, I noticed it did not raise that much at the bulk fermentation, so, I knew something was wrong, just one more question, do you put the bread in the oven right after you take it out from the fridge??? please forgive my English, as I am writing from Mexico, by the way I love Italian food!!!! today I had italian food!!! sooooo goooood!!!!
Thank you so much for taking the time to answer. Take care
Not a problem — yes straight from fridge into your oven!
Maurizio, I apologize for not answering before, thank you so much for your reply, you are an Angel to all of us. God bless you!!!!
I am sorry, I meant thousand of times!!!!!
I am on the process of fermentation and folding, the dough looks so beautiful, with bubbles, it is my first attempt, I have read your post tousands of times along chad’s, I really thank you, as your blog has helped me a lot to understand Tartine Bread, thank you, thank you we will see how it turns out once is baked.
If I had your LOAF in front of me, I would probably would eat it all!!!!!!!!, I am sure many of us think the same, your bread is always so beautiful!!!!!
Glad my instruction has helped out, that’s why I started this site 🙂 Thanks for the kind words about my bakes!
Thanks for the prompt response.Ended up starting early and have a few more questions.
The levain – recipe calls for 250g. What do I do with the leftover? Can it be reused or scrapped?
Timing – Can the dough proof for longer in the fridge (say a couple of days)? Asking if that is ok or it will end up[ being over proofed?
You’re very welcome.
You can adjust the amount of levain you create for the next bake so you don’t have any leftover, or you can use the excess in pancakes, banana bread, waffles and many other things. I have a post here at the site that’s in the works with several of my favorite recipes — I hope to have it up soon. Otherwise, just pitch the excess (make sure you do save enough to keep your starter going, though!).
I’ve left dough to proof in my 37ºF fridge for up to 36 hours with no ill effect, but there are many considerations here. If you have a high amount of levain (20% or more) or you let your bulk fermentation go very long at a warm temperature there will be little “food” left for the yeast/bacteria in your dough. Think of it this way, the minute you add your levain to the rest of the flour and water, fermentation begins. As it progresses yeast and bacteria (your levain) are consuming the starches in the flour until there is nothing left, at that point your dough won’t rise when baking. It takes quite a long time for this to happen, though, in your cold home fridge.
So it’s a hard question to answer definitively, but I’d say you can usually do 36 hours with no problem, after that you might still be ok just know that your bread will probably rise a bit less, and be a little more sour than usual.
I hope that helps — let me know if you have any other questions!
I hope to try this over the weekend – we have along weekend here in Canada.
When you refer to turn set 1, 2, etc. What are you referring to? S&F? How many? Would really appreciate your help! Thanks!
Perfect time to squeeze in some baking! Yes, each “set” is 4 stretch and folds, one stretch and fold from each of the cardinal directions (north, south, east, west). You want to start out stretching fairly vigorously and then east off as bulk progresses.
Let me know if you have any more questions, happy baking!
So I made the exact loaf following your recipe. Overall, it got great crumb, and crust. Pretty open inside as well (big holes throughout). However, both my husband and kids complained about the walnut being a bit rubbery. I think the nut is a bit soft (not as crisp as I would have hoped). I did toast the walnut before adding to the dough. Any tricks as to how to keep the walnut less moist? I use Diamond Brand Shelled walnut ( pretty standard grocery store stuff). Could it be the brand of the nut? Thank YOU
Excellent! Glad to hear the loaf went successfully. So far as the walnuts, I’m not too sure what more could be done to firm them up… One thing I haven’t tried is using walnuts with shells on, toasting those, then cracking them to get the inside out and use that in the dough. It’s not always easy to find fresh walnuts, though. I’ve used the brand of walnuts found at Costco one or two times and those were pretty good, do you have a Costco nearby?
Hope that helps!
I try not to go Costco 🙂 you know, I go in for Walnut and comes out with $500 worth of STUFF I think I may need (and never use!). So I pretty much ban myself from going. I will try to order another brand of walnut online and see if that makes a difference. Thx!
I also wanted to make your oatmeal loaf too. But don’t have enough courage yet. Will let you know once I try it. Thank you again for making the posts. Wonderful recipe and stunning pictures.
Thanks!
You’re right about Costco… I hardly ever go there and when I do I regret it. 🙂
Ok let me know how it goes!
Maurizio,
Thanks for clarifying my questions. It still amazes me how a simple stretch and fold affects the dough.
As far as proofing in the fridge, I’ve started doing that same thing you’re doing. I give the dough a head start on the counter before it goes in the fridge.
It’s all about experimenting. The more experience you get, the more comfortable you get in adjusting certain aspects of a recipe. As an example, I’ve been making bagels now for about six months. This last batch I decided to let the dough autolyse for 20 minutes before adding the salt and doing the kneading, which has to be done by hand because of the low hydration. The autolyse made the dough softer and easier to knead and resulted in some amazing crumb.
So tomorrow I start on your recipe. My starter is firing on all eight cylinders. I’ll keep you posted.
Dave
Dave,
You’re right a single S & F can do wonders. Sometimes if I notice my bread is still a bit slack after pre-shape I’ll do one more pre-shape and it helps tremendously.
Autolyse times have a significant impact on the extensibility of your dough and I’ve noticed the longer I let the autolyse go the better result (to an extent) — more extensibility, better caramelization, and an nice open crumb.
That’s the fun part about experimenting, right? Sometimes these little things give great results!
How did the bake go? Hopefully things went well and this morning your snacking on some incredible walnut-cran toast for breakfast!
I just did a little more reading here and saw that the stone and dutch oven add a lot of mass to the oven thereby helping regulate the temperature. That makes a lot of sense.
Regarding the protein content of the Sangre de Cristo white flour, there doesn’t seem to be anything out there on the net, hard to believe, but would you happen to know what that would be?
The initial oven preheat is 510 degrees. But you say to bake the first loaf for 20 minutes at 500 degrees. I don’t know that 10 degrees would cause a problem, but after the preheat, should I lower the temp to 500 and wait till the oven reaches that temp before baking?
Right, the dutch oven and stone absorb heat during the preheat and help to keep the oven temperature regulated. Opening the oven door in regular home ovens causes quite a bit of heat loss.
I also did significant searching online to determine the protein percentage of Sangre de Cristo, unfortunately, I couldn’t find a single ounce of information on its makeup. Through baking I have determined the protein percentage has to surely be over 10%, probably around 11 or 12%, but I don’t have any hard facts to prove this.
Occasionally I’ll preheat the oven above 500º to test. It’s not significant, but it does have an impact on the total bake duration (obviously when I go up to 510 bake time reduces). Yes, lower the temp to 500ºF for that first part of the bake.
There are many methods for performing the pre shape, my preferred method is to simply divide the entire mass in two and with each half “spin” the dough around until it lightly forms a resting boule. You essentially have your bench knife in one hand and use it to very slightly pickup your dough and spin around in one motion (imagine turning a car’s steering wheel except rotated down to your countertop). I use the other hand to help twist the dough around and follow the lead hand (the one with the knife). By only slightly lifting the dough it will catch a little bit of your countertop pulling it inwards, causing tension to form on the top and outside. Hopefully that makes sense!
Thanks very much for the reply.
My bottle of walnut oil is due to arrive today, so I am getting everything ready for the big bake.
As you well know, these breads take a lot of time, so I want to make sure I understand everything. I have several questions.
It looks like you are preparing far more levain that you need. Is this just so you have some left for your next batch?
Your final dough temp is stated as 79 degrees with an 86 degree h20 temp. Isn’t the water temp derived by using the desired dough temp formula?
What constitutes a turn set?
Finally, I’ve never had any luck with overnight refrigerated proofs. The dough never rises because I’ve always felt is was just too cold. Indeed, according to what I read online, home refrigerators are far too cold. Extended rises should be at 45 – 48 degrees. However I have seen videos of successful rises in home fridges, just not in mine. I know that to get that great sourdough sourness, you need that slow proof. What are your feelings on this?
And yes, the biggest problem with these bakes is that nearly the entire loaf disappears during the very critical taste testing phase.
I totally understand, you definitely want to have everything planned out before starting your bake — it’s a large time investment but well worth it!
I do prepare a little more levain than is actually needed. You can reduce this levain with no problem, just ensure you have enough for the recipe plus a little to keep your starter going. I’ve been reducing my levain build by 1/2 lately and I just keep my starter going on its own.
Yes, my water temperature of 86º was derived by calculating my desired final dough temperature of 78-79º. Since it’s now warmer here, I’d definitely have to reduce that 86º to something much lower so the dough is not overly hot after mixing. I’ve found that 78º is the ideal dough temperature for my bakes.
A “turn set” is simply 4 stretch & folds of the dough. You reach down into the container holding your dough, grab the underside of the dough, unroll up and fold over to the other side. Do this 4 times (one for each side of the dough) when the dough is in its bulk fermentation step.
I’ve actually been experimenting lately with the final proof time & temperature as well. I’ve placed a thermometer in my fridge and I’ve found the temperature to be around 37ºF, which is pretty cold. Up until this point I haven’t had much problem keeping the dough in there overnight and have had great results. Lately, however, I’ve been playing with keeping the dough out on the counter for 1 to 1.5 hours to proof before popping it into the fridge. I’ve noticed some good results by allowing the dough to proof a little bit longer at room temperature before cooling off. All in all I do think the standard home fridge is a bit too cool and results in lower fermentation rates but this can be offset by leaving it in there longer (16-18 hours), turning the temp up on your fridge (not really recommended!), or leaving out a little while after final shaping.
I guarantee this walnut-cran loaf is not going to last you very long! Would love to hear how your bake goes, good luck!
This is an amazing loaf that I am looking forward to baking. I have a few questions. Why use a baking stone when you use a combo cooker? Also, what do you mean by “Divide the mass into two halves and lightly spin each half with your dough knife in one hand and your other hand.”. What is lightly spinning? I’ve never seen that before.
Hi Maurizio,
I finally made this loaf. My husband says I could sell this one & compared it to a Tartine loaf. That is for flavor, really wonderful.
I got decent spring & crumb, but not as good as yours. I think I might have been an hour late getting from fridge to oven. I also didn’t get nearly as dark a bake with your temperatures. I think I may keep the temp @ 450 next time. My crusts usually get soft pretty quickly, even when baked darker & left in oven after bake. I haven’t figured this out yet.
This dough was really sticky @ time of shaping. I tried to get a pretty tight final shape, but was wondering if this is where I lost some openness. I like your idea of banding the dough to keep it tight. I will try that next time. Any discoveries on how to handle such sticky doughs?
On to 95% Whole Wheat!
Compared it to a Tartine loaf — huge compliment! I’m really glad my entry has guided you down the right path. Yes, you will definitely need to vary your oven temperatures to your liking. Each oven, and each environment, is different. Out here the opposite is true, the crust will get super hard very quickly due to our very dry air.
Higher hydration like this can be tricky to work with, and that taut skin is key to a nice rise when baking. Practice a few times at this loaf and it will come easier to you. I like to work on a wood surface that is sprinkled with a tiny amount of flour to keep sticking to a minimum — not too much but just a tad. I also only have my hands in contact with the dough when necessary, and they are always lightly floured. Use your bench knife as much as you an and in a quick but decisive fashion.
That said, it’s still difficult to handle such sticky dough! Sometimes I hear myself cursing under my breath… 🙂
Let me know how the 95% WW goes! Happy baking.
Maurizio,
You likely touch on this question elsewhere…but why do you line bannetons with linen for the final proof? Bannetons leave such a nice design as is, I wonder if there’s some other reason why linen is used. My bannetons release nicely and create a nice shape and spiral look.
Thanks.
The majority of the time it’s purely for ease of cleanup. Taking out the flour sack towels and tossing them into the washer is a time saver (not that much, I know). You’re right though, I love the look of the spiral flour designs on the loaves when they are finished. I’ll have to make a point next time to go straight into the banneton.
Sometimes, however, I use the linen and a rubber band to keep the dough in a nice tight boule, whereas letting it expand out into the banneton might be too much. This happens when the dough looks very slack and I don’t want it to spread out too much.
Well done. Unique combination, amazing pics, keep up the hard work my friend !
Thank you!
Hi Maurizio, I am making this loaf as I type, just wanted to let you know I am trying hazelnut oil, as I dont have walnut oil, and also using hazelnuts and raisins. So I am hopeful it will work? Yours looks amazing! Well done and thanks so much for sharing. Janina
Janina,
Those substitutions sound really great! I think hazelnuts and raisins will taste great together (does anything ever taste bad with hazelnuts??).
Thanks for the feedback, really happy to hear you’re enjoying the posts. I’d love to hear how your loaves turned out!
Happy baking,
Maurizio
Emilie,
Thanks so much! Your bread came out superb as well, looks very tasty. Raisins would be another good walnut pair and I must say it’s on my horizon. I’m looking forward to trying out some of your recipes!
Happy baking!
Just a little more. I know you use more levain because of altitude, but, I have read that bakers use a smaller seed in their levain when the temperatures rise, to control speedy fermentation, and Tartine 3 has gone from 200g to 150g with the whole grains.
I was recently told by a professional baker here that actually uses less levain due to our elevation. Their premise is that the air density is lower and therefore bread rises easier. Was pretty shocked when I was told that and you know, it does make sense. I’ve lately come to realize my added levain helps when the temperatures are lower, but when things heat up (as they are starting too now) I’m probably going to have to reduce.
When using whole grains you will either need to reduce levain or reduce your bulk/proof times. Your starter will be on overdrive when giving it all the nutrients in whole grains — this is probably the primary reason in Tartine No. 3 they have reduced levain quantities. I’ve also read in several places reducing your levain actually results in a more open crumb… But that is a test for a future entry 🙂
Great questions!
Ohhh! I could look at that all day 🙂 Have you tried the walnut oil in the porridge bread from Tartine 3?
I think I will just mimick your bakes. That way I will get a nice mix of types, & have someone to trouble shoot with. I sometimes get stuck, & discouraged trying to make mostly whole grain breads. MM, walnut cranberry here I come!
It sure was tasty! I did put walnut oil in this bread, and have tried the oat porridge bread with almond oil from Tartine No. 3. I’m really struggling with the porridge breads and have not had a decent outcome yet to share. I’ll keep practicing and hopefully I’ll gather some tips in hopes of helping others out.
The addition of walnut and almond oils is very very nice!
Thanks so much!