
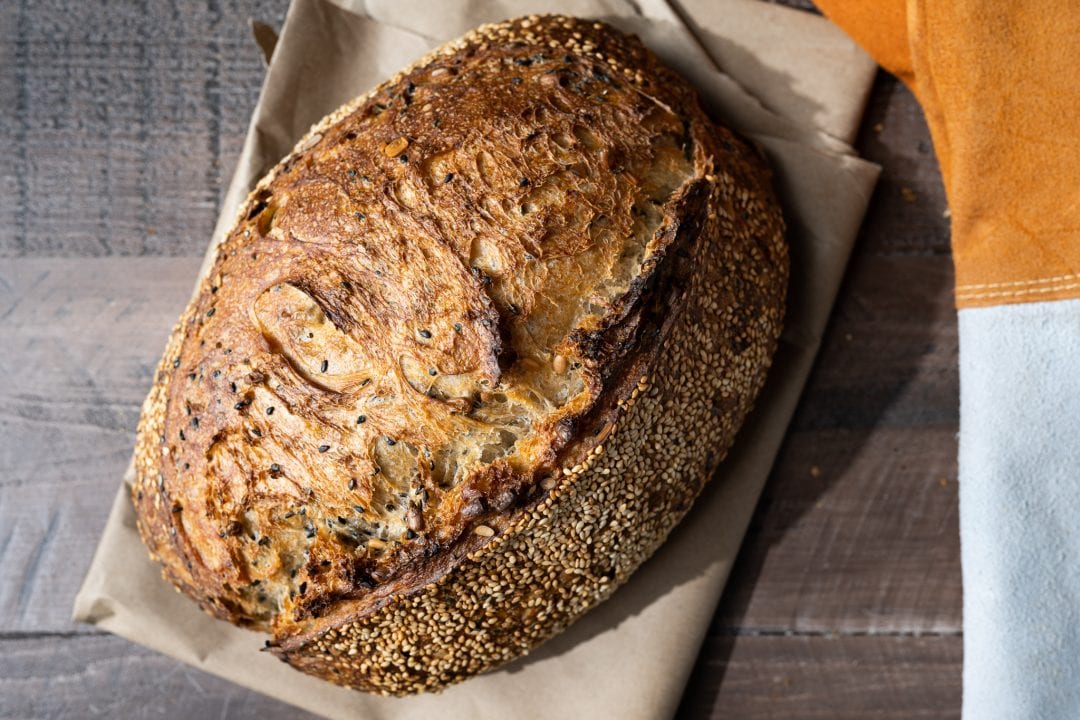
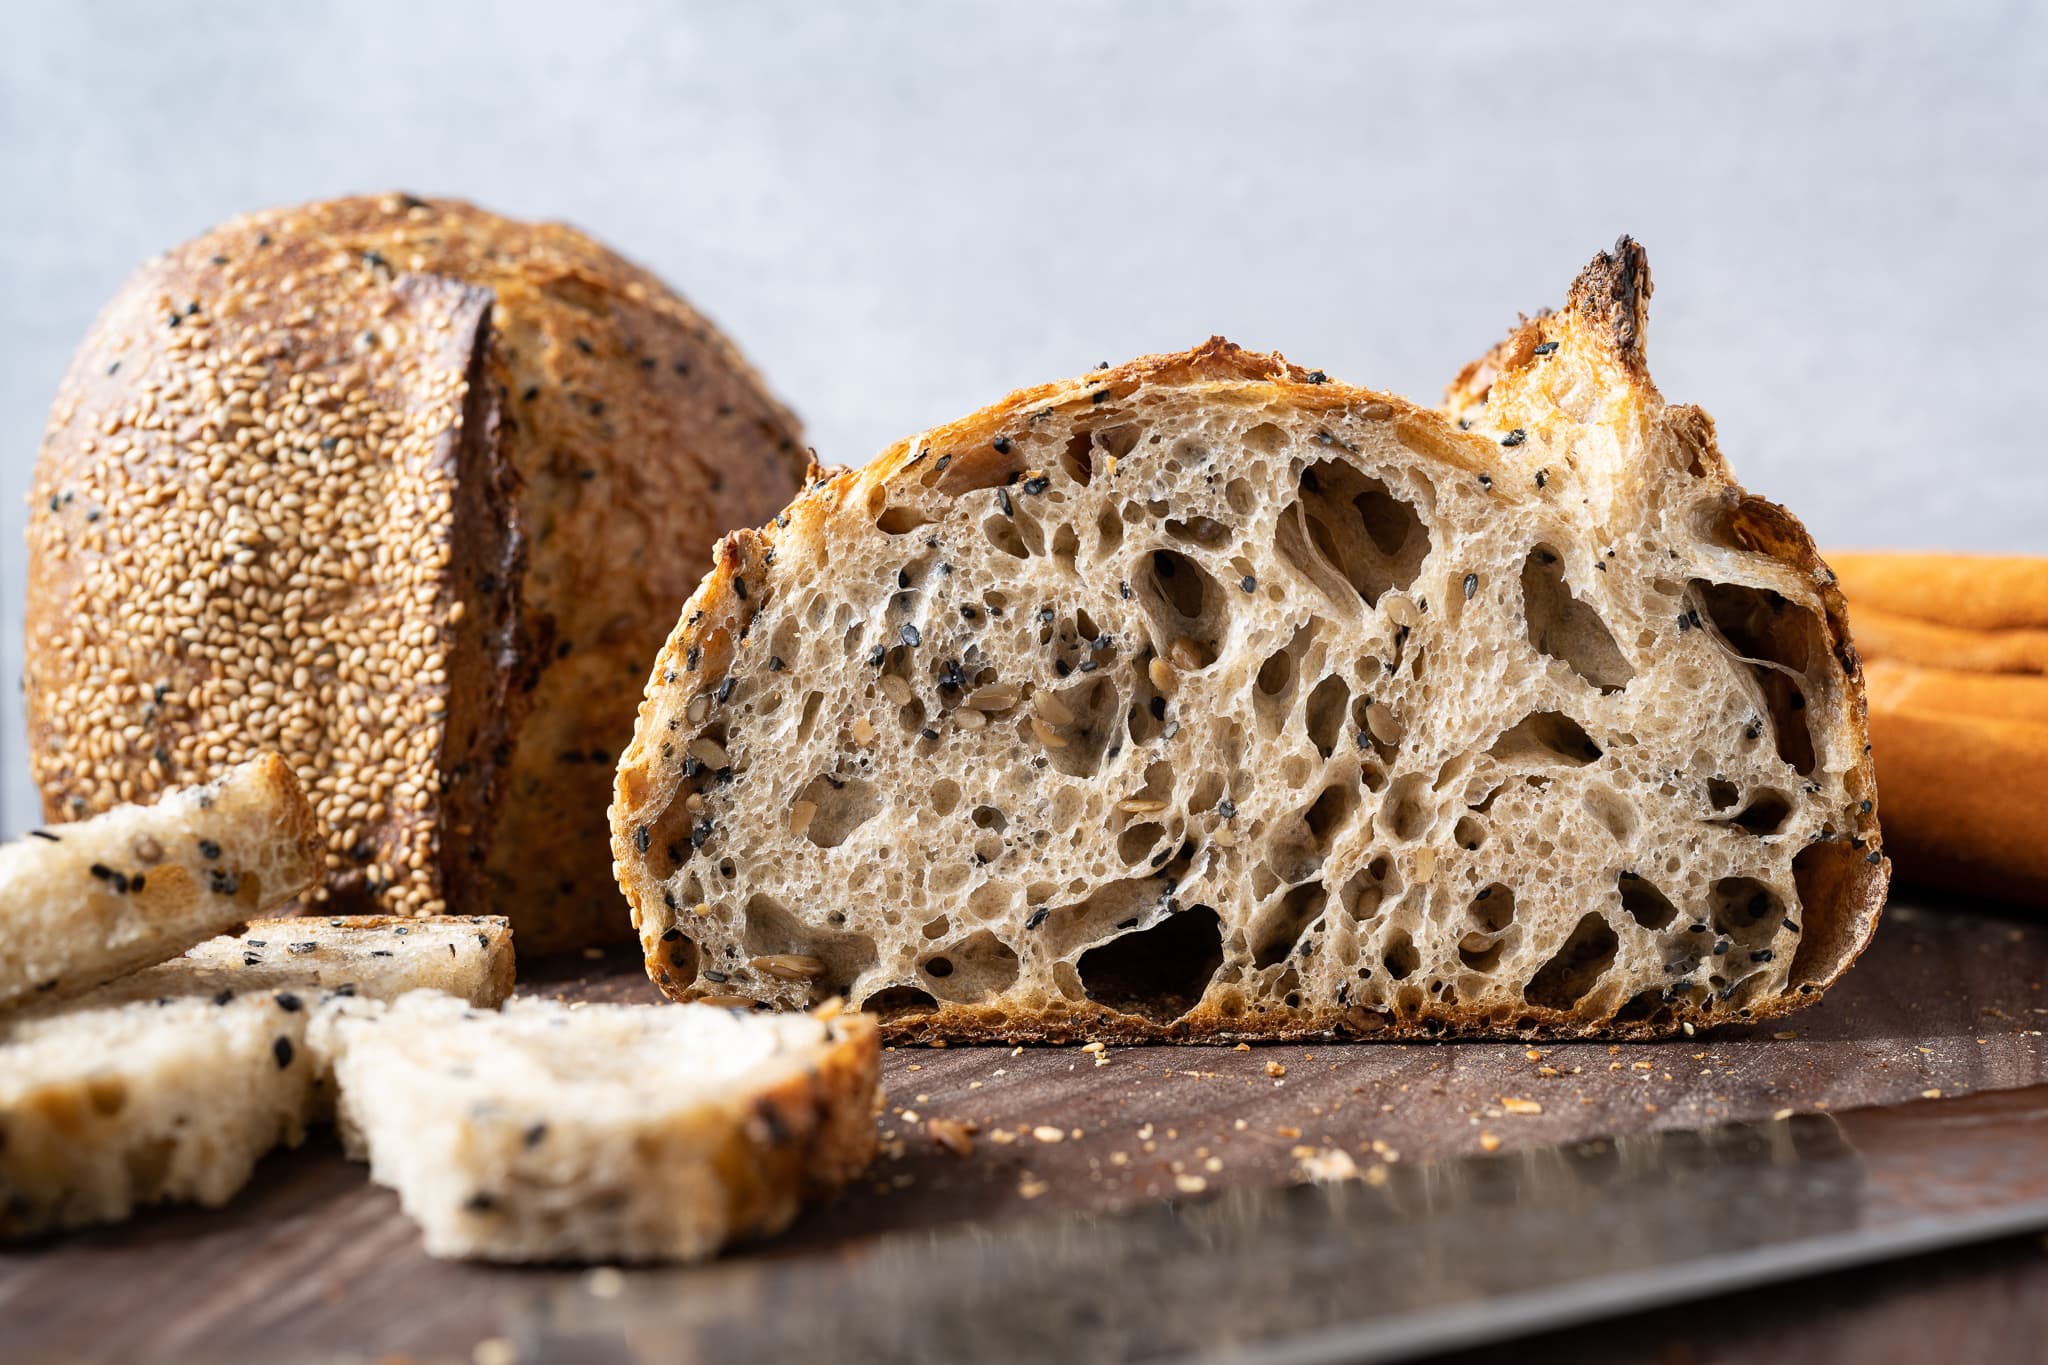
Every once in a while, a bread comes along that surprises you with its wholesomeness. Add in a little more whole grains, a few handfuls of nutritious seeds, a little sweetness from natural honey, and with sufficient natural fermentation, the result is a loaf that tastes as good as it is healthy. Nutty sunflower seeds—something I’ve surprisingly often overlooked in my baking—and my often-used and never under-appreciated sesame seeds are a winning combination I need to turn to more often. And this sunflower and sesame sourdough bread is so easy to put together! The loaf has the flavor of these rich seeds, in concert with the dash of mellow and warming honey, makes for a delightful loaf.
I just love eating my way through a slice of this bread. Toasting takes the whole package up a notch, making it—especially the crust—crunchy like a boot through fresh, crisp snow left overnight to harden. There’s something a seed soaker brings to a loaf that seems to conjure this crunchiness; whether it’s the water in the soaker or the seeds themselves, it has the potential to turn me into a seed fanatic. I mean, it is easy to add them into a dough, and their nutrition is always welcome—perhaps I should do it more often.
The flavor of sunflower seeds will always remind me of summers spent digging through bags of salt-covered shells, cracking each one to get the prized kernel. They’re an addictive lot, these seeds, a snack for mindless consumption. I always found myself quickly polishing off an entire bag before realizing I’ve even started. That is, until the inevitable salt overload kicks in, compelling you to chug a few bottles of water and swear next time you’ll take it easy. But of course, you don’t. And the wonderful cycle repeats.
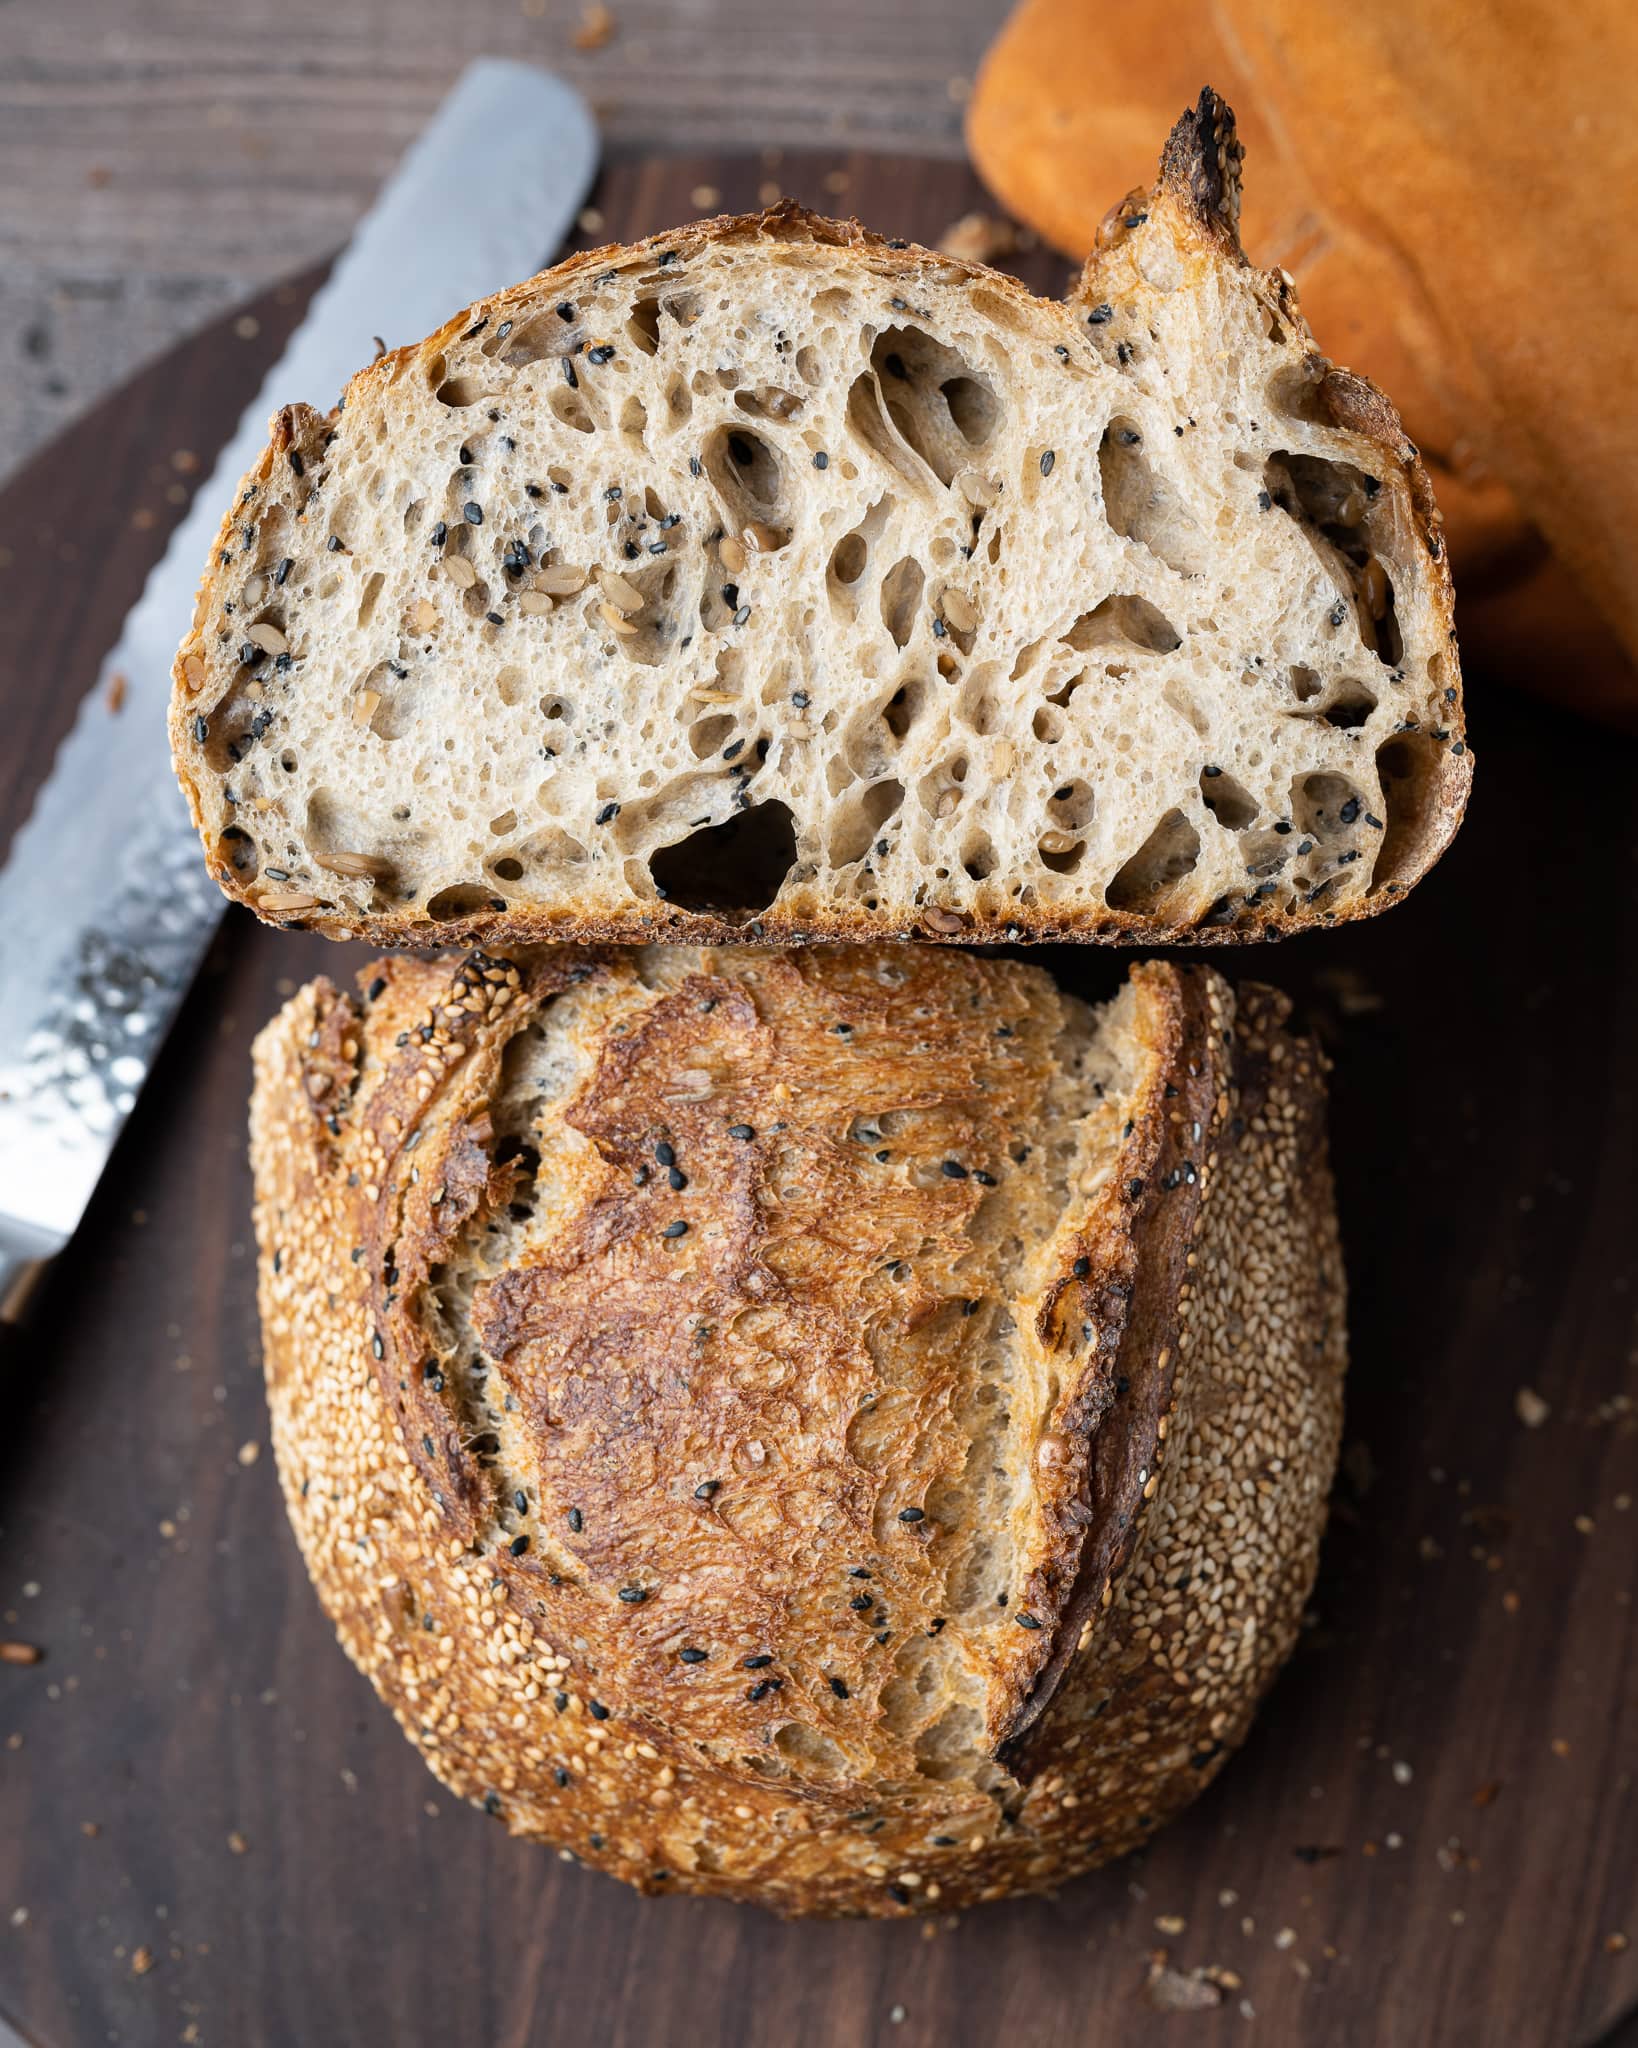
I’ve since curbed my appetite for salted sunflower seeds, but my appreciation for their flavor never left. This bread is chock full of the tasty little morsels, and roasting them beforehand amplifies their nutty flavor. The 30% whole grain in the formula brings an earthiness that works well with the added seeds, and I could see going even higher to bring even more flavor.
Let’s first look at how to prepare the sunflower and sesame seeds.
Choosing and preparing sunflower and sesame seeds
I used roasted and unsalted sunflower seeds from the market, but raw, unsalted sunflower seeds with a quick toast—10 minutes should do it—in the oven at 350°F (175°C) would work well. Roasting/toasting the seeds amplifies their nutty (isn’t it interesting we say sunflower seeds have a nutty flavor when they’re seeds?) flavor.
I’m a huge sesame seed fan, and I always have a jar of white and black sesame seeds in my pantry ready to be used on the outside of any loaf. I prefer using white sesame seeds on the outside; when they are toasted in the oven while the bread is baking, they take on a deliciously subtle nutty flavor. By contrast, black sesame already has a vibrant flavor thanks to its dark hull. Because of this, I prefer to use them mixed into a dough (and the look is quite striking!).
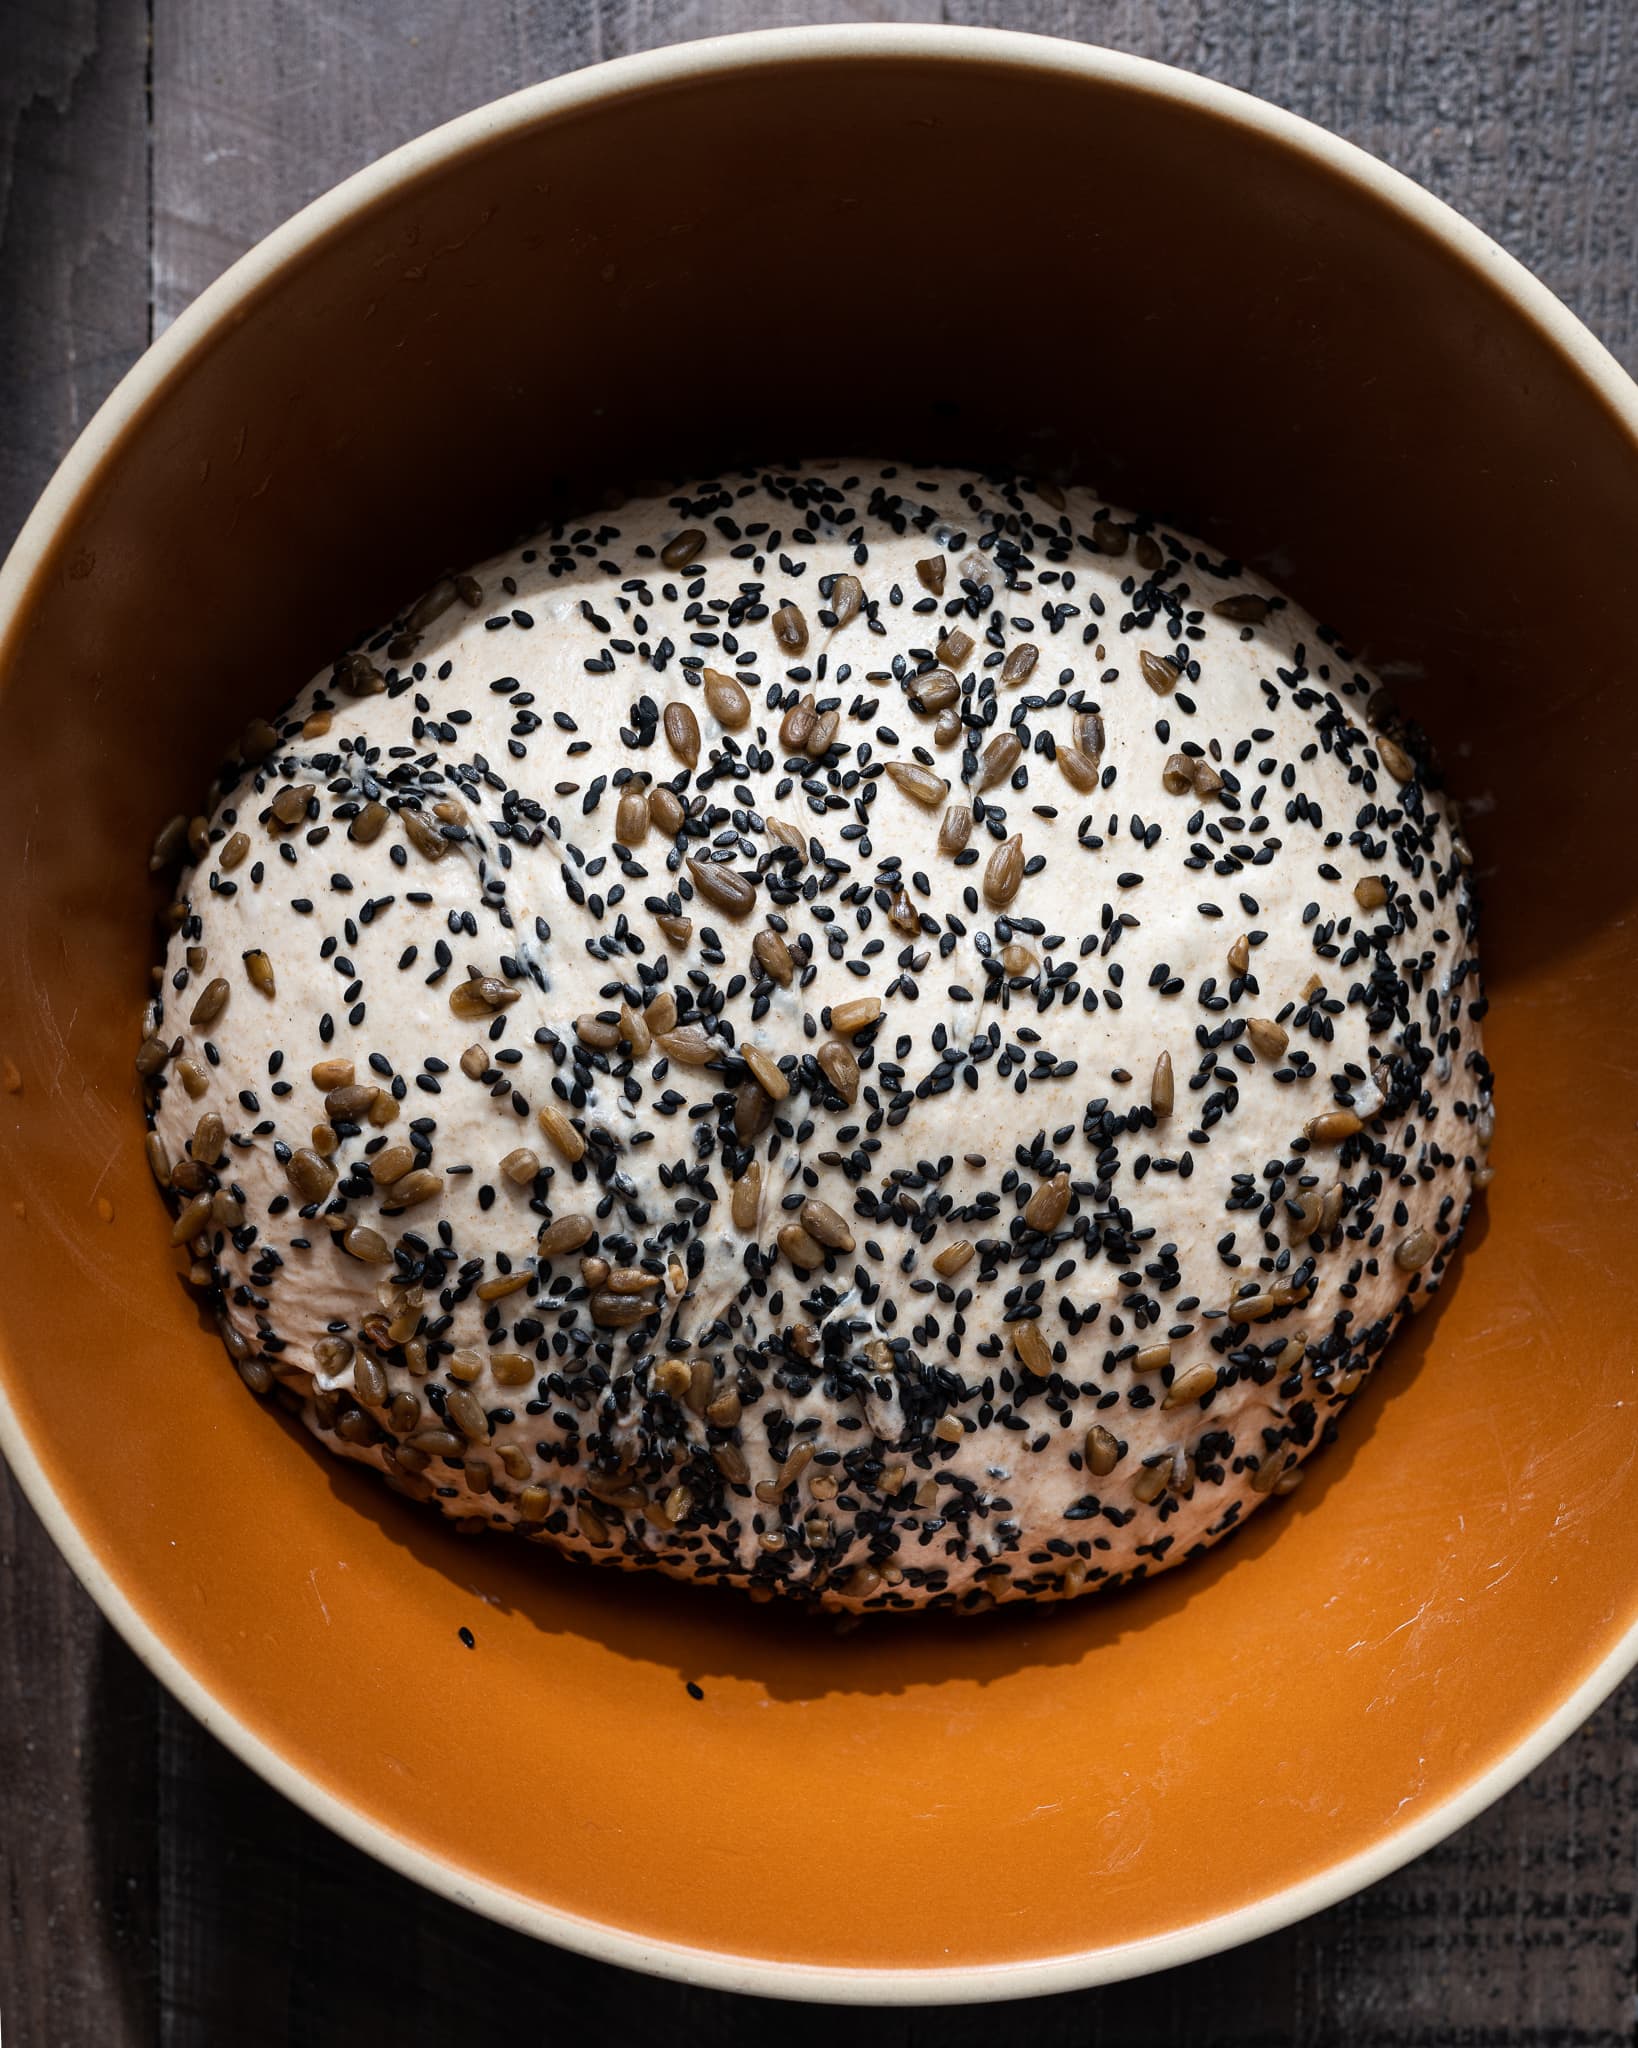
This recipe uses a seed soaker to prepare the black sesame seeds, which have their hull intact. Soaking seeds like this for a time period helps to soften them and make them more palatable. The water for the soaker is taken from the overall hydration of the formula. This way, no unaccounted for water is added to the recipe.
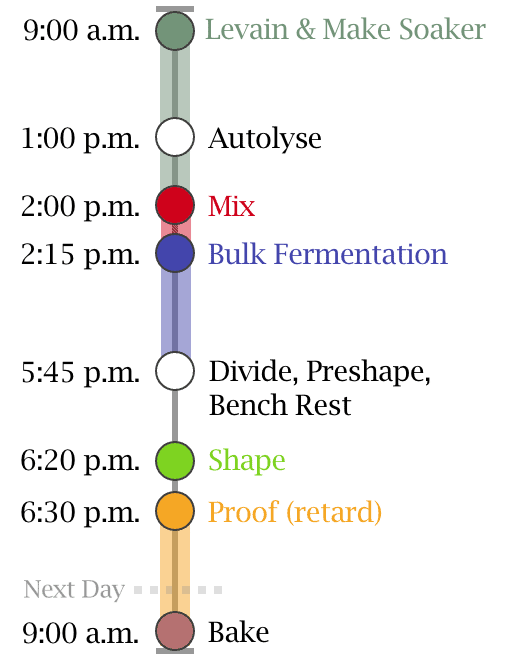
Baking schedule
This sunflower and sesame sourdough bread is made over the course of two days. Cold proofing this dough brings additional flavor, but as always, a same-day bake can be done as well. Instead of placing the shaped dough into the refrigerator to proof overnight, leave it out, covered, to proof for 1-3 hours (depending on kitchen temperatures) until ready to bake.
Sunflower and sesame sourdough bread formula
Vitals
| Total Dough Weight | 1,800 grams |
| Hydration | 77% |
| Pre-fermented Flour | 6.25% |
| Levain in final dough | 16.67% |
| Yield | 2 x 900g loaves |
This recipe makes two loaves. If you’d like to make a single loaf of sunflower and sesame sourdough bread, divide all the ingredients in half. See my guide to using baker’s percentages for further help with scaling.
Total formula
Desired dough temperature: 78°F (25°C). See my post on the importance of dough temperature for more information on dough temperatures.
The table below shows the total ingredients needed for this entire bake. In each of the Method steps below, I’ve broken out each ingredient as they’re needed in the recipe. If you’re baking in the kitchen, follow the Method steps and it’ll tell you what you need, and when.
| Weight | Ingredient | Baker’s Percentage |
|---|---|---|
| 615g | Medium-protein bread flour or All-purpose flour (~11% protein, Central Milling Artisan Baker’s Craft or King Arthur Baking All-Purpose) | 70.00% |
| 264g | Whole wheat flour (Giusto’s Whole Wheat or King Arthur Baking Whole Wheat) | 30.00% |
| 132g | Sunflower seeds, roasted and unsalted | 15.00% |
| 35g | Black sesame seeds | 4.00% |
| 35g | Honey | 4.00% |
| 632g | Water 1 (soaker, levain, and autolyse) | 72.00% |
| 44g | Water 2 (reserve for mixing) | 5.00% |
| 16g | Fine sea salt | 1.80% |
| 27g | Sourdough starter | 3.13% |
Sunflower and sesame sourdough bread method
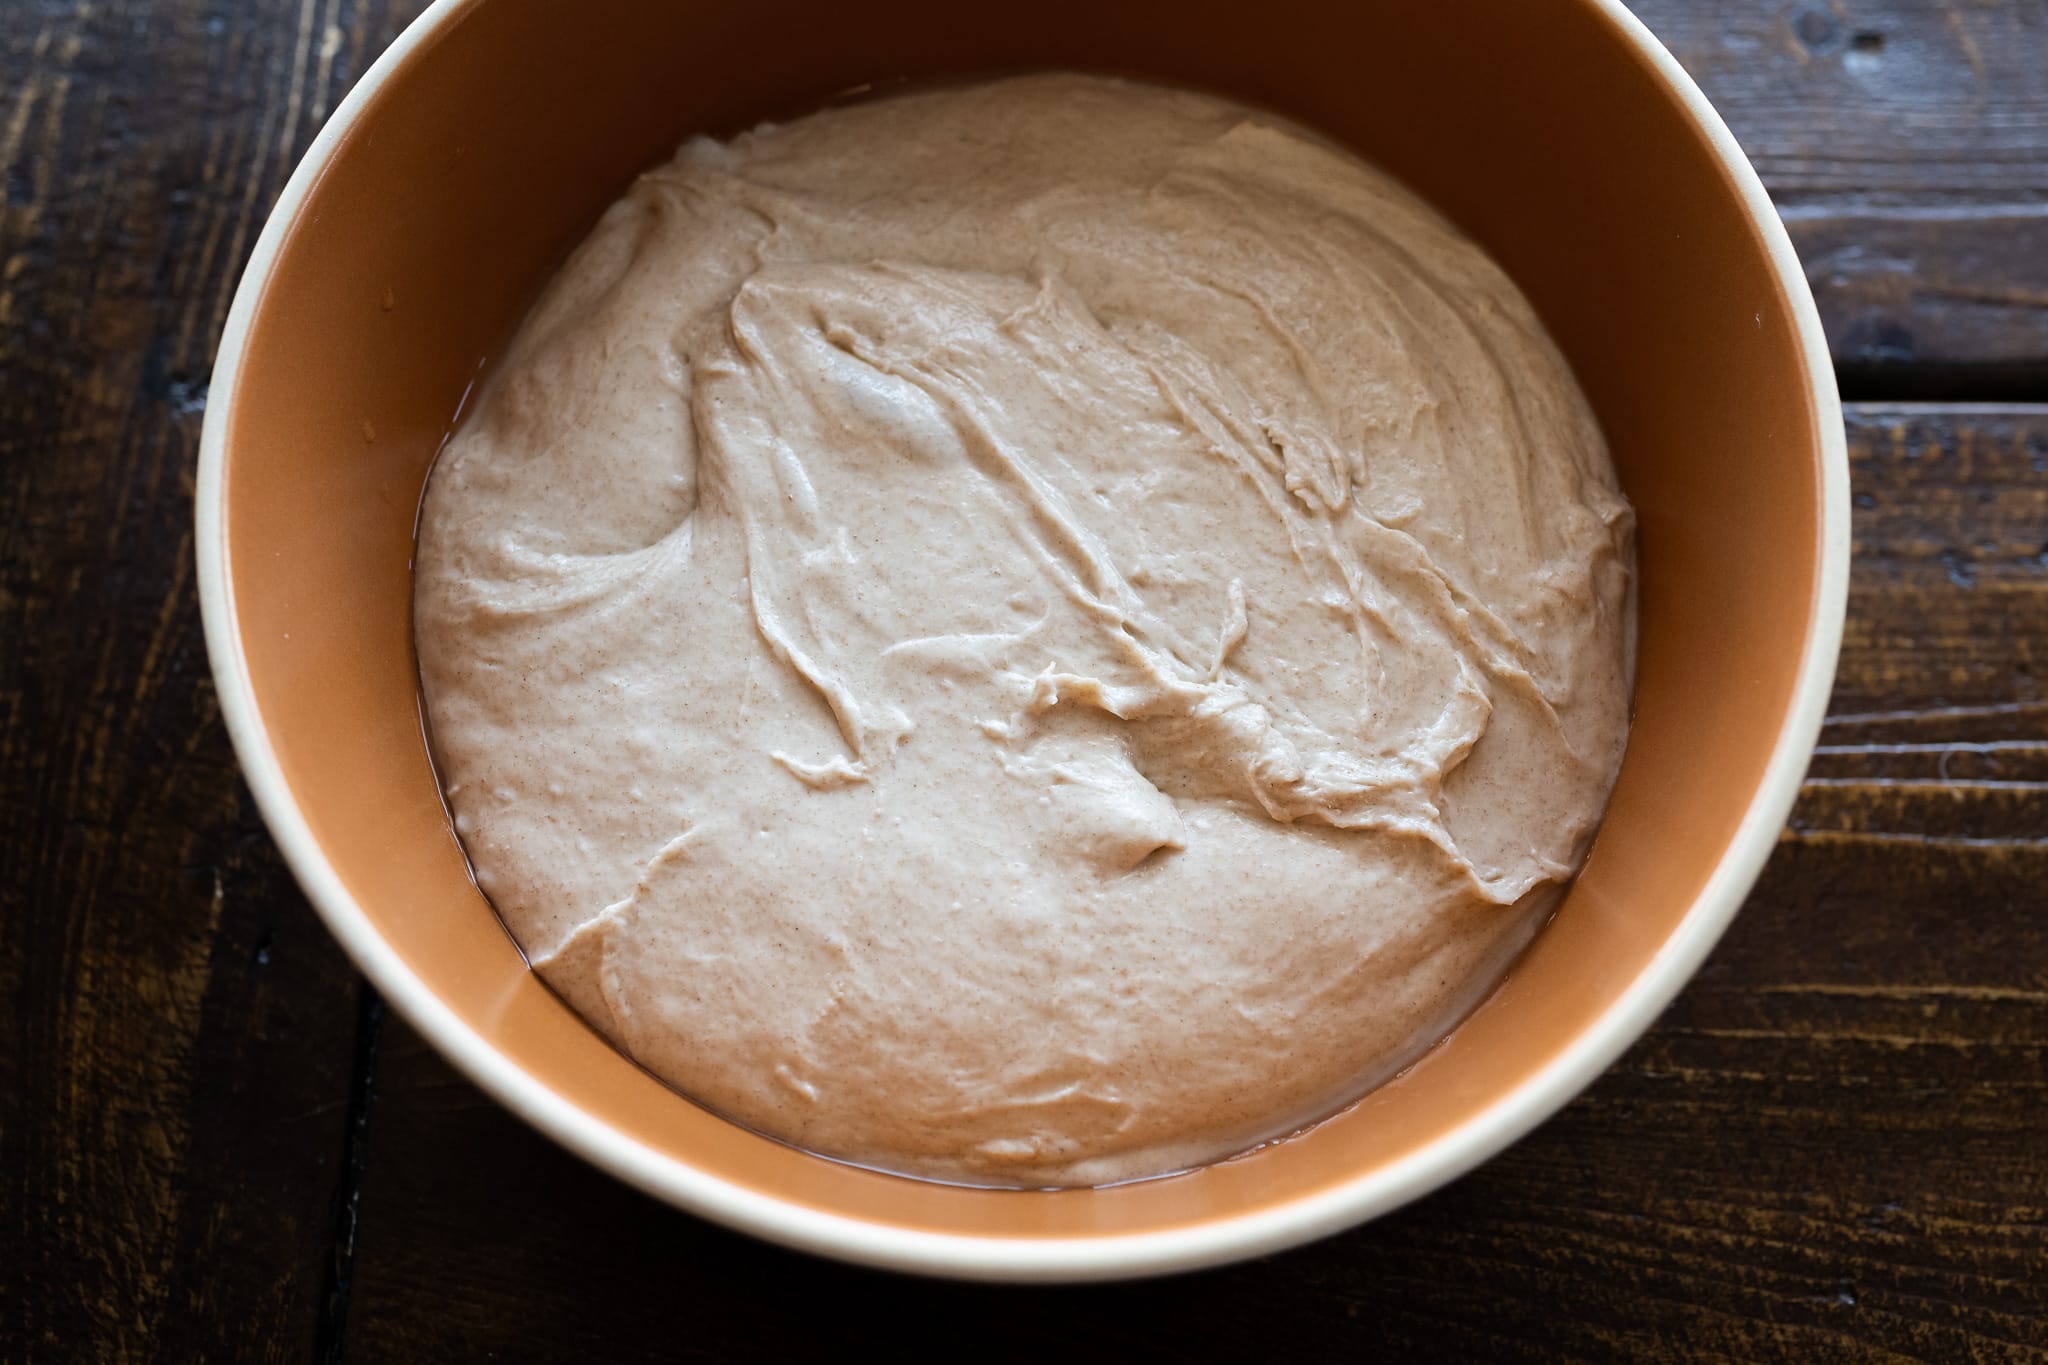
1. Prepare the levain – 9:00 a.m.
This is a relatively fast levain, ripening in five hours. Mix the following ingredients in a container and leave covered to ripen at a warm temperature, about 76-78°F (24-25°C) for 5 hours.
| Weight | Ingredient | Baker’s Percentage |
|---|---|---|
| 27g | Medium-protein bread flour or all-purpose flour | 50.00% |
| 27g | Whole wheat flour | 50.00% |
| 55g | Water | 100.00% |
| 27g | Ripe sourdough starter | 50.00% |
2. Prepare the seed soaker – 9:10 a.m.
To soften the seeds and make them more palatable when eating the final loaf of bread, soak them in boiled water while the levain is ripening, about 5 hours.
Right after making the levain, prepare the seed soaker. Add the 35g black sesame seeds to a heat-proof bowl and pour 35g boiled water over the seeds. Stir to combine and ensure all the seeds have been wet. Cover the bowl and let rest until called for in bulk fermentation.
3. Autolyse – 1:00 p.m.
This recipe uses the autolyse technique to increase the extensibility of the dough and make mixing by hand easier. In a small way, the increased extensibility also helps with incorporating the seeds.
Add the following to a mixing bowl and mix until incorporated. Let the mixture rest, covered, for 1-hour.
| Weight | Ingredient |
|---|---|
| 587g | Medium-protein bread flour or all-purpose flour |
| 236g | Whole wheat flour |
| 542g | Water 1 (this is the remaining water 1 after taking some for levain and soaker) |
4. Mix – 2:00 p.m.
Gather the following ingredients for mixing. The remaining water (water 2) should only be added through mixing and kneading if your dough feels like it can handle the addition. Use a splash to work in the levain and salt, adding the rest if the dough feels cohesive.
| Weight | Ingredient |
|---|---|
| 35g | Honey |
| 44g | Water 2 |
| 16g | Fine sea salt |
| 137g | Ripe levain (from step 1) |
I strengthened this dough by hand using the slap and fold kneading technique, which quickly develops the dough. Alternatively, you could use a bread dough mixer, or even a KitchenAid would work with this dough.
Add the honey and levain to the top of your dough already in the mixing bowl, and use a splash of the reserved water to moisten. Mix the levain thoroughly and slap and fold (or do folds in the bowl) for 5 minutes until the dough begins to smooth out and become elastic.
Let the dough rest in the mixing bowl for 10 minutes.
Sprinkle the salt over the dough, then dissolve with a splash of the reserved mixing water. Mix thoroughly. If the dough still feels very slack, continue to strengthen the dough in the bowl by stretching and folding (or do slap/fold on the counter) for a few minutes until it begins to tighten and come together.
As you can see above, at the end of mixing, expect this dough to be rather firm, smooth, and elastic. Hold back the sesame and sunflower seeds until just before the first set of stretch and folds during bulk fermentation.
Transfer the dough to a container for bulk fermentation and cover.
4. Bulk fermentation – 2:15 p.m. to 5:45 p.m.
At warm room temperature, around 74-76°F (23-24°C), bulk should take about 3 1/2 hours. If your kitchen is cooler, place your bulk container in a small home dough proofer, or extend the bulk fermentation time to give the dough more time to ferment. This dough needs about three sets of stretch and folds during the 3-hour bulk.
Combine the 132g sunflower seeds and the black sesame seed soaker (approximately 70g) in a large bowl.
Before you give your dough its first set of stretch and folds, spread about 1/4 of the mix-ins over the top of the dough. Then, grab one side of the dough and stretch it up and over the dough to the other side. Spread on another 1/4 of the mix-ins to the new top. Rotate the bowl 180° and perform another stretch and fold. Spread on another 1/4 of the mix-ins, then rotate the bowl 90° and do another stretch and fold. Finally, spread on the last of the mix-ins, turn the bowl 180° and do one last stretch and fold. It would be best to have the dough neatly folded up in the bowl with all the mix-ins tucked into the dough.
The remaining two sets of stretch and folds should be more gentle. After the third set, let the dough rest, covered, for the remainder of bulk fermentation.
5. Divide and preshape – 5:45 p.m.
First, check on the dough in the bulk fermentation container. This dough can be sluggish if the dough temperature came in below the FDT listed in the recipe, or it cooled during bulk fermentation. If the dough looks flat, shaggy, and doesn’t jiggle some when you shake the bowl, give it another 15 minutes and check again.
Fill a bowl with some water and place it on your work surface. Scrape out your dough from the bulk container onto your dry counter. Divide the mass in half using a bench knife. Using a wet hand and the knife in the other, gently preshape each half into a loose round.
Let the dough rest (also called a bench rest), uncovered, for 35 minutes until its relaxed outward. Because this dough was strong and firm for me, a slightly longer rest period of 35 minutes was helpful (see why in my guide to preshaping bread dough).
6. Shape – 6:20 p.m.
I like to shape this sunflower and sesame sourdough bread as a batard shape, but a round boule would also work well. Shape each by first flouring the top of the rested rounds and your work surface, flip the dough over to the floured space, and then shape them into your desired shape.
This sunflower and sesame sourdough bread is wonderful topped with white sesame seeds. Spread out a thin layer of seeds on a clean kitchen towel or on a sheet pan. After shaping the dough into a batard or boule, roll it, smooth side down, on the seeds so they stick.
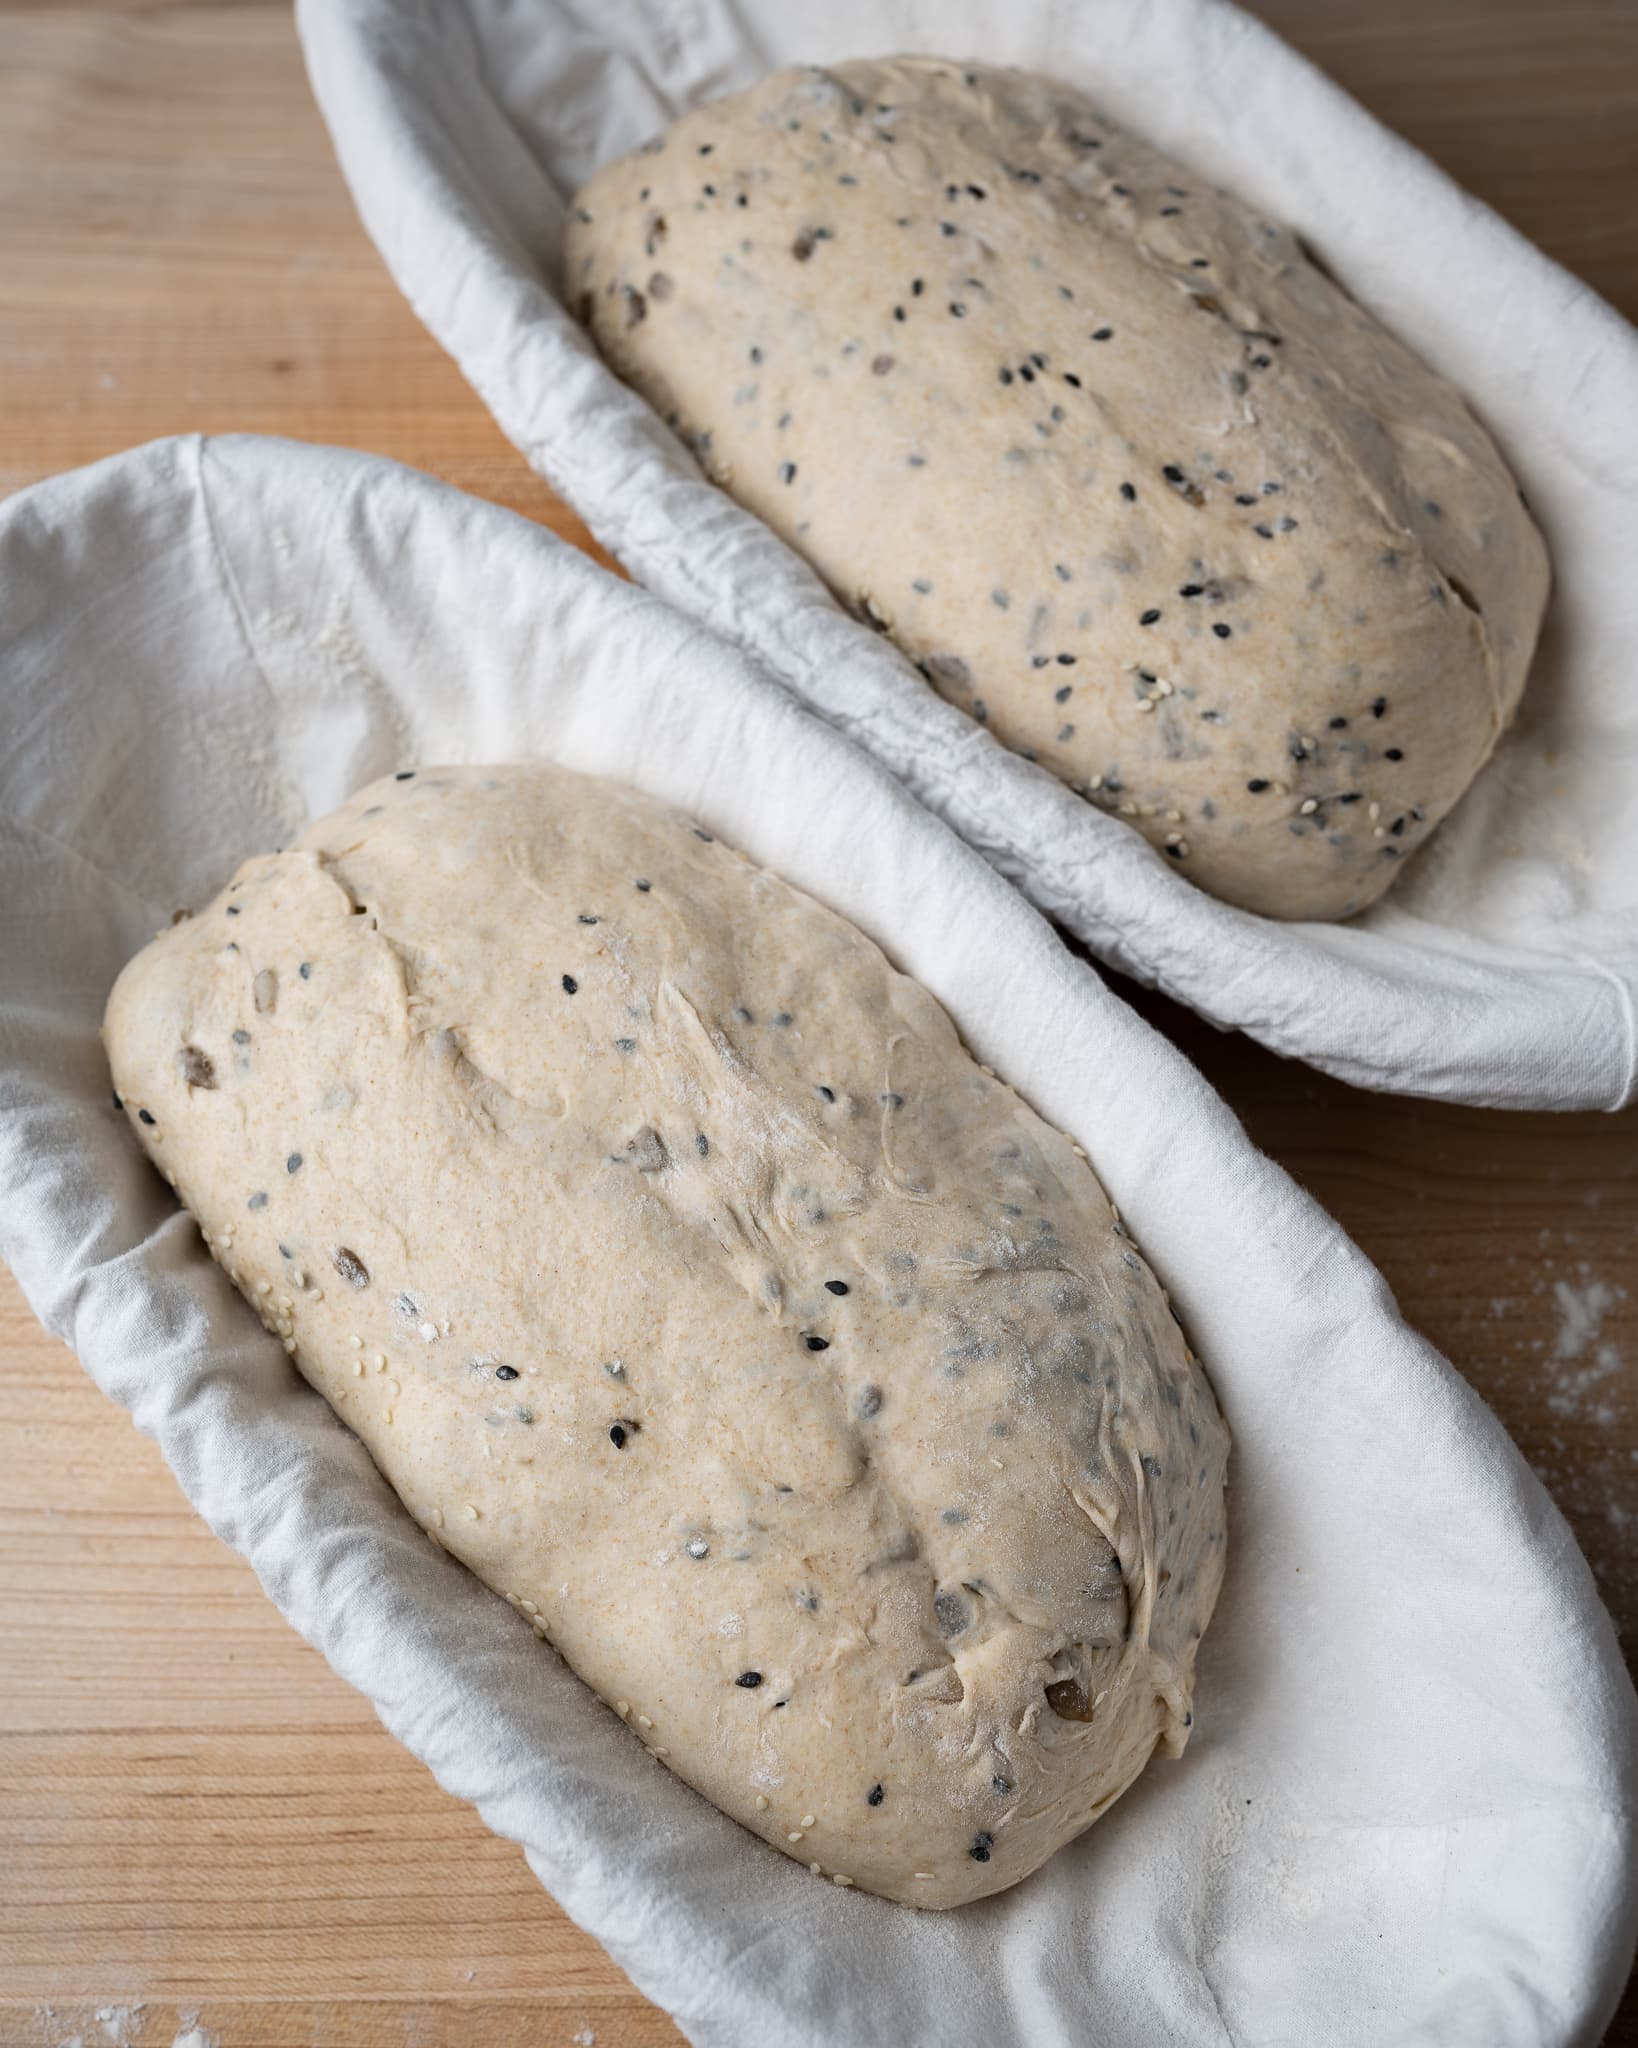
After each dough piece is shaped and optionally topped with seeds, place it seam side up in a proofing basket lined with canvas or a clean kitchen towel.
7. Proof – 6:30 p.m. to 9:00 a.m. (overnight)
Cover the baskets with a large, reusable plastic bag and seal it shut. Place the baskets into your refrigerator to proof overnight.
8. Bake – 9:00 a.m. (next day)
Preheat your oven with a baking stone or Baking Steel inside to 450°F (230°C).
I baked these loaves in my Challenger bread pan, but you could also follow my guide to steaming an oven for baking bread.
Score each piece of dough and slide it into the oven—bake for 20 minutes with steam. Then, remove the steaming pans from inside the oven (or remove the lid to your baking pan) and bake for an additional 30 minutes, or until the crust is deeply colored and the interior temperature registers around 204°F (95°C).
Once fully baked, cool your loaves on a cooling rack for 1-2 hours. See my post on the best way to store bread to keep it fresh for a week or longer.
Print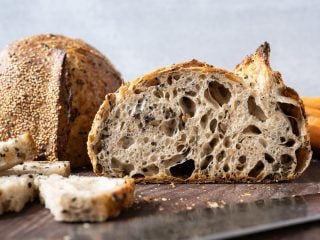
Sunflower and Sesame Sourdough Bread Recipe
- Prep Time: 24 hours
- Cook Time: 1 hour
- Total Time: 25 hours
- Yield: 2 loaves
Description
This delicious sourdough bread is chock full of healthy roasted sunflower seeds and black sesame, finished off with a touch of honey. The sunflower seeds bring a rich, nutty flavor, and the umami-forward sesame adds depth and complexity. A wonderful bread for lunch, dinner, or any snack!
Ingredients
Levain
- 27g medium-protein bread flour or all-purpose flour
- 27g whole wheat flour
- 55g water
- 27g ripe sourdough starter
Seed Soaker
- 35g black sesame seeds
- 35g water, boiled
Main Dough
- 587g medium-protein bread flour or all-purpose flour
- 236g whole wheat flour
- 132g sunflower seeds, unsalted and roasted
- 35g honey
- 16g sea salt
- 542g water 1 (autolyse)
- 44g water 2 (reserved for mix)
- 137g levain
Topping
- White sesame seeds to top dough (optional)
Instructions
- Levain (9:00 a.m.)
In a small container, mix the Levain ingredients and keep it at a warm temperature for 5 hours. - Prepare soaker (9:10 a.m.)
Right after making the levain, prepare the seed soaker. Add the soaker ingredients to a heat-proof bowl. Cover the bowl and let rest until called for in bulk fermentation. - Autolyse (1:00 p.m)
In a medium mixing bowl, add the 587g medium-protein bread flour, 236g whole wheat flour, and 542g water 1 and mix until no dry bits remain. Cover the bowl and let rest for 1 hour. - Mix (2:00 p.m.)
To the mixing bowl holding your dough, add the honey and levain and a splash of water. Mix thoroughly and strengthen the dough for about 5 minutes. Let the dough rest for 10 minutes in the mixing bowl. Add the salt, another splash of water, and mix until incorporated. Strengthen the dough further if necessary until it’s elastic and smooth. Transfer the dough to a bulk fermentation container and cover. - Bulk Fermentation (2:15 p.m. to 5:45 p.m.)
This dough will need 3 sets of stretch and folds during bulk fermentation. First, mix together the soaked and cooled sesame seeds with the sunflower seeds. Before you give your dough its first set of stretch and folds, spread about 1/4 of the mix-ins over the top of the dough. Add the rest of the mix-ins in the same way through the remaining folds for the first set. Perform two more sets of gentle stretch and folds during this 3 1/2 hour period, then let the dough rest the remainder of bulk fermentation. - Divide and Preshape (5:45 p.m.)
Lightly flour your work surface and scrape out your dough. Using your bench knife, divide the dough in half. Lightly shape each half into a round shape. Let the dough rest for 35 minutes, uncovered. - Shape (6:20 p.m.)
Shape the dough into a round (boule) or oval (batard) and roll in the white sesame seeds to top, if desired. Then, place the dough in proofing baskets. - Proof (6:30 p.m. to 9:00 a.m. the next day)
Cover proofing baskets with reusable plastic and seal shut. Then, place both baskets into the refrigerator and proof overnight. - Bake (The next day, bake at 9:00 a.m.)
Preheat your oven with a baking surface or combo cooker/Dutch oven inside to 450°F (230°C).When the oven is preheated, remove your dough from the fridge, score it, and transfer it to the preheated baking surface or combo cooker. Bake for 20 minutes with steam. After this time, vent the steam in the oven or remove the lid (you can keep it in the oven or remove it) and continue to bake for 30 minutes longer. When done, the internal temperature should be around 204°F (95°C).
Let the loaves cool for 2 hours on a wire rack before slicing.
What’s Next?
Sometimes it’s the simplest approach to baking that yields the best loaf. I originally started this recipe with a complex blend of flours, seeds, and other additions and, through testing, slowly pared it back until just the essentials remained. While I’m all about exploring different ingredients and techniques (like sift and scald) to see if they yield an improvement, oftentimes, great sourdough bread is simply beginning with a strong starter, using good flour, attention to detail, and a few seeds you might already have in the pantry.
If you liked this sunflower and sesame sourdough bread but want to take it even further with more additions, check out my seeded sourdough, which is chock full of seeds (including flaxseed) and also sure to delight.
Buon appetito!


215 Comments
This bread is absolutely wonderful! The sesame seeds didn’t seem to mix well in the first fold, but they eventually mixed in nicely. I use Parisian blend bread flour that I purchase on Etsy. I have had consistent and beautiful rise with this flour. I use a combination rye and bread flour starter. The sunflowers are awesome!
Have to agree, the sunflower seeds brought so much more to this bread than I was anticipating when I dreamed it up. A seriously addictive quality I’d say—just wonderful. Thanks for the feedback, Kim!
This bread turned out wonderfully tasty, my new favorite! I used my rye sourdough starter, and filled up 5% of missing black sesame with flax seeds. I find it easiest to integrate coarse add-ins by using Keith Forkish’s pinch & fold approach.
Super happy to hear you like it! I thought about adding flax at the start, always a good option. Enjoy!
This may be my new favorite–baked this morning before beginning to work-from home and had the best grilled tuna melt for lunch. Thanks!
Now you have my lunch for tomorrow sorted, that sounds wonderful! Glad you like it Sophie, enjoy!
Good morning! Wowwww! Great recipe – very sluggish in bulk fermentation, I have the proofer set to 26°and I didn’t think it was going to inflate at all! But patience is needed 🙂 I kept checking every 15 minutes. And eventually it was just great.. beautiful oven spring and excellent crumb.. definitely a keeper! Thank you Maurizio x
Thanks for reporting back, Jude! Really happy to hear it turned out well you and like the recipe! Enjoy 🙂
It doesn’t last long 😂 such a lovely loaf – I am going to have to do another tomorrow 🤣🥰
Thank you so much for sharing 🥰
Thank you for your response. Another questions please. Which technique did you use for getting the white sesame to adhere to the outside? Mine does not look as evenly coated with sesame. And boy, the sesame seeds were pretty yummy.
Yes, they’re so good. I lay out a towel with the seeds spread in a thin layer. After shaping my dough, I invert the dough on the towel and sort of rock it side to side to get them to stick.
THANK YOU! Will try that next time. BTW, I ordered the bread lame you recommended. Thank you!
Thank you for sharing this recipe. I baked this yesterday and I must say this is one of our family’s favorites. The chewiness of the dough plus the flavors brought about by the sunflower and toasted black sesame seeds made the difference.
Super happy to hear you guys liked it, Guia! Enjoy and thanks for the feedback 🙂
Why do you bake this to 204 degrees? I thought sourdough bread was done at closer to 210 degrees.
Thank you.
I think there’s really a range, I find depending on the bread anywhere between 204-208F is usually good over here!
Thank you for sharing your amazing recipes. I made this loaf yesterday, and it’s already a family favorite. One question: why do you suggest a medium protein flour? How would this loaf do with a higher protein content (King Arthur Bread Flour @12.7%)?
Great to hear that, David! I tend to prefer lower protein flour unless the higher protein flour is needed for additional structure/support. I find high protein flour quickly gets “chewy” and tough in the final loaf if used in high percentage.
Thank you! Giving it a second go today.
Maurizio, first THANK YOU as always for sharing your recipes. I’ve made several of your recipes every single one of them are keepers. It is also so much fun to try new breads. I have 2 questions please: #1 you said to keep the levain for 5 hours. Did you really mean 5 hours or until it is peaked. Even at 80 degrees, my levain usually takes longer before peak. #2 I had a little trouble scoring. The seeds get in the way and the razor keeps sliding off. Do you have a bread lame you can suggest that will workaround this problem? Thank you again for your generosity in sharing your knowledge and creative projects.
You’re very welcome, Angel!
1) My levain is plenty ripe after 5 hours given the 50% starter seed, but of course, base that on how your starter is and when it’s ready.
2) This Mure & Peyrot bread lame is the one I used for these loaves (and many of mine). Another option is to use scissors and snip at a shallow angle from top to bottom.
Hope that helps and happy baking!
A general question. When you take the dough from the fridge do you immediately place it in the oven? Or do you let it reach room temperature before the bake?
That’s correct, baking straight from the fridge is just fine.
Thanks. It came out really good. My fridge is pretty cold so next time I think I will allow a longer bulk.
Hi Maurizio, thank you so much for this recipe, it looks and tastes amazing! One general question: my bread does rise very nicely in the over (I bake it in a Challenger pan, 20 minutes with the lid, and then uncovered for the rest of the bake) but when it cools, it does tend to deflate a bit. Is this normal, and if not, what could I be doing wrong? Thanks again!
You’re very welcome, Laura! That’s interesting, I’ve never noticed my loaves deflating after baking. Is the interior to your loaf even or are there very large holes near the top? If there are large holes near the top it could be a sign the dough was either under proofed (most likely) or over proofed.
Thank you for the reply Maurizio! The interior of the dough looks like the one in your photo, but maybe a little denser, i.e. not quite so many large holes. But they were uniformly distributed.. Umh… I’ll experiment with different proofing times next time (this loaf was gone in 1 day, and there are only two of us 🙂
Hey Maurizio! I’ve noticed you have moved away from preheating to 500 and baking at 500 for the first 20 or so minutes. Maybe you’ve talked about that and your explanation is tucked away in a blog post, but I haven’t seen that – would you mind explaining why the shift and/or linking to where you do? Thanks!
That’s right, Leah. Over the years I’ve found going with the 450F temp is better overall. I seem to get just the same rise but it also prevents the loaf from burning on the bottom in the Dutch oven (or Challenger pan). With some 100% whole wheat doughs I do still like to go with the super hot initial temp, but those loaves tend to fare much better with the high heat (perhaps because of the increased percentage of bran/germ in the flour, or the higher hydration).
What a nutty, yummy bread! I don’t have any black sesame seeds, so I went ahead with white in the soaker as well as the outside of the loaf. I brewed my levain overnight, so I tweaked the proportions to 1:4:4 rather than 1:2:2. Used King Arthur APF and Red Fife WWF. I timed the bulk fermentation wrong to interfere with dinner, so it went 5 hours rather than 3.5, but it was fine — good oven spring in the dutch oven the next morning. Wife loves it, declares it my best yet, and promptly gave away half the loaf, so I’m starting another 2 loaves worth tonight. Thanks, Maurizio!
Awesome to hear it worked out well for you guys, Jerry! Modifications sound right on, and the longer bulk might have actually been a great thing given the levain build (but it would depend on how ripe it was when you mixed it in). I’m with your wife on that one, I think this might be one of my all-time best loaves I’ve made. It’s just too good! Enjoy 🙂
Hi Maurizio, in the cranberry walnut loaf I loved the addition of walnut oil, and I’m going to try this loaf with some walnuts as well as the sunflowers and sesame seeds. Any thoughts about a touch of walnut oil here too?
Should work just fine in this dough since it’s on the firmer side anyway!
What an awesome recipe! First attempt and I am 80% happy with the result. The crumb is a little tighter and the spring didn’t rise as much as yours.
Could it be to do with using slightly different white flour? I used T65 which is 12% protein? Dough temp was 24C so at the lower end of the recommended. Also, I didn’t allow for any room temp prove, once shaped I put into banneton and straight in the fridge for 15h. Is it advised to allow for some room temp proving beforehand if dough temp is under recommended?
Thanks, Yasmin! If your dough was on the cooler side, it might have needed additional fermentation time to get to the right point. I’d say next time try to push bulk fermentation a little longer, perhaps 15-30m, if your dough comes in at 24C. I think that’ll help!
I am making this recipe today, and I have a question about what I should look for as an indicator that the bulk fermentation can end. I have another recipe like this in many ways, and in that one, the fermentation is to end when I see bubbles on the dough. Is that a good rule of thumb? Look for large bubbles? Thanks! Linda
Hey, Linda! Bubbles are a good sign, for sure. This is a pretty stiff dough, so the signs should be more apparent, which will help. I look for very defined edges to the dough, both where the dough meets the bowl and anywhere it’s been folded over itself. It should be smooth on top, and the entire surface should be domed downward (higher in the middle, lower at the edges)—just a bit. If you tug on the dough, you’ll notice more strength and resistance. If you hit the final dough temp specified in the recipe, your dough should be right around the time I specify for bulk. Hope this helps!
Hi, can I get some insight on what type of flour can I pick between the t55 and t65 type, what would you suggest for the sourdough bread?
Depends on what you’re after! Those are both “whiter” flour types, so either will work well. For this recipe, I’d go with t55 for the “all purpose” portion.
Hi, can I know what type of flour can I picj between the t55 and t65 type, what would you suggest for the sourdough bread
Oo, fancy new recipe layout! I like it.
Thank you, Berty! Hopefully makes printing easier. The top part of my posts are more detailed, and the bottom recipe card for use in the kitchen 🙂
Berty, I agree! Love the new layout on the bottom!
A question. When I try to incorporate solids (eg fruit, seeds) into dough they keep bursting through the surface of the dough during s&f and lamination. Breaking the outside surface of the dough is usually considered undesirable. Am I doing something wrong or is this normal? Is there a solution. Thank you
It does happen, especially if you’re manipulating the dough aggressively (and sometimes even not so). When I make a chunkier loaf, like my walnut and cranberry, there’s no stopping the mix-ins from peeking out. This is usually not a problem. What you don’t want to see is excessive tearing of the dough when you’re shaping and preshaping (usually from forcing the dough when it needs to relax).
Thanks. It was delicious. Very happy. I’d like to send a photo but not sure how. Anyway it looked good and tasted even better. Thank you!!!
I just shaped my loaves – all going very well, except after the 35-minute uncovered bench rest there was a noticeable skin on the rounds. (Maybe I waited a bit longer than 35 minutes, but not much, and I don’t have any windows open.) The skin mostly broke up as I shaped them, and most of the harder bits ended up on the interior – hopefully won’t impact the final result too much. I’m excited! 🙂
Update: came out great! Photo: https://twitter.com/bvdbirds/status/1351982099125960707/photo/1
You’re right about that, fantastic bake!
Making this right now! Curious why you recommend soaking only the sesame seeds and not the sunflower seeds.
Awesome, Benjamin! The sunflower seeds are hulled, so they don’t have the hard, outer shell. The black sesame seeds need softening, so soaking them helps. I don’t usually soak sunflower, but you probably could, as long as they don’t get too soft! Hope the bake turns out great!
Got it! I had read somewhere to soak any seeds going into the dough to avoid them absorbing moisture and effectively lowering the hydration of the dough, but I take it you don’t find this is an issue? (Or you’ve simply accounted for this in your overall hydration.)
Yes, that’s a great way to deal with the nature of seeds, and this also works for dried fruit. But yes, accounted for in the hydration of the recipe (which is higher than usual)!
I don’t bake frequently enough to make it seem worth creating a sourdough started (Altho I really like your site). Can this bread be made using yeast?
Thanks, Sam! You could make this with yeast but you’d have to convert it over. There’s a portion of water and flour in the levain itself, so you’d have to take that into account and add more flour and water. From there, maybe 1-1.5% yeast?
Can this be done as boules in a dutch oven?
Yes, absolutely (I mentioned that as an option in the Bake section, too)!
I would love to try this recipe, but if I make it I would divide it and do one loaf with seeds and one without. My husband can’t have nuts and seeds. Would there be any adjustment needed for the seedless one?
Brigid, I’d instead do two different recipes (maybe this and then my Beginner’s Sourdough recipe). Because this recipe has the soaker, some of the water is taken out to soak the seeds, which messes a bit with the final hydration.
Hello marzario ,I love the recipe it looks absolutely delicious and I like the way you have posted your printing copy it’s much way easier to understand🙏😷🤗
Glad to hear that, Rosa! And thank you 🙂
Your very welcome 🙏
Wow to this loaf. DANG.
Anyway, I am going to make this. I’m curious about your overnight proofing temps. I picked up a B&T Folding Proofer recently, which has really upped the game for my proofing consistency. The post-shape / overnight proof is the last blind spot, I think.
In an older article on the site, you built a cold-proofer (maintaining ~45F for those overnight proofs). You also mentioned that if you lacked one of these, just to let the shaped loaves proof in the banneton for a certain amount of time (how much time obv depends on fridge temp and dough) before putting into the fridge.
Are you still doing your overnight proof in your DIY thing? 45F? I’m never quite consistently achieving an interior like the ones in your pictures…. not super far off, but not to the point where I cut into the loaf and think “holy s….” and I look at your pics and get that reaction 🙂 ha. So – would you have any suggestions for me? My fridge is at 37F, so perhaps on the cooler side. If it is that final proof I am missing, how far would you push the post-shape proof? Is the post-shape proof the determiner of that beautiful crumb?
At 37F you won’t get much activity. I would allow it to proof once in your banneton until 80-90 percent fully proofed then refrigerate overnight to develop flavor and firm up for ease of scoring.
But definitely wait to hear what Mauricio has to say.
Basically what you said, Teri. I’d say 90% would be a bit far, but that’s very hard to quantify 🙂 But yes, since our home fridges are so cold, they really slow things to a halt, and rather quickly depending on the fridge and whether your dough is covered and how much food you have in there.
Thanks, Adam! I do still use my dough retarder for some of my larger bakes, but I also use my home fridge just as well. I tend to keep my larger retarder at 39-40F, which is similar to my home fridge anyway.
If you find your fridge is running cold, or your dough is never fully proofed by the time you bake, you could leave it out a bit on the counter before retarding. It really depends on the dough how long to leave it out… When I do this, I usually go for 20 mins or so (but it really does depend on the state of the dough).
I’d have to have more info on your results to see what else could be the issue! If you’re a member of the TPL Discord sever you could post some photos there or shoot me an email with them attached!
Thanks for the reply! I think the real question is for me: what does a perfectly proofed loaf look like before it goes in the oven? How does it feel? Etc.
Any normal person would look at my bread and think it’s beautiful – I’m just trying to get that last 5-10%. I’m familiar with underproofed dough, and I’ve completely overproofed dough before (fridge broke, levain % way too high, etc.)…. but I’m curious about what that “perfect proof” looks like. Is it even measurable? Or once you get it, you just “know” ? It’s not like my crumb is closed or overly tight; I just see yours and I’m like, now THAT’S what I want (or at least think I want – ha).
How would you describe when the dough is perfectly proofed? I know you mention percentages of total rise – however – does that total rise change based on how much the proof level? If there are 2 variables and one is tied to the other, it might be tough to nail down…
Anyway happy to hear more thoughts.
Unfortunately, there’s no one answer to that first question! Each dough will look very different before hitting the oven. A whole wheat dough might be more slack and thin, whereas a white dough that’s really gassed up might be plump and strong.
I know where you’re at, Adam. I’ve been slowly tackling that last 10% for longer than I’ve been tackling the previous 90% 🙂 As they say, that first 80% can come quickly, but the remainder cant take forever.
I usually don’t mark my proof level by how much the dough has risen because that’s very dependent on the dough itself (i.e. a 100% whole wheat dough @ 100% hydration will look very different than a 70% white dough).
For this recipe, the dough actually looks rather low (not super well risen) when going into the oven, I bake it at a level that’s not pushed very far in bulk or in proof. I was looking for more spring in the oven, and that gets me there. When I’m doing a different style of loaf, maybe one with mostly white flour, I know I can push both of those farther because the dough will be more resilient and handle that extended fermentation time (this is very subjective to the flour you’re using).
My best advice if you really want to cut to gaining that feel for proof level, do the same recipe for the next 10 bakes or so. When you have 2 or 4 loaves, try baking one hours before the other (or leave one out to proof a little longer before retarding). See how the dough feels and the result in the oven.
Determining that final proof—and in bulk!—level is a difficult thing. Sometimes I’m surprised when I go to bake a loaf and I’m certain it’s over proofed, sometimes it springs up just fine 🙂
I hope this helps in some way!
What is the significance of using boiled water when soaking the seeds? Is it just about removing the chlorine? Or is there more to it?
The boiled water helps kickstart the softening. Not quite cooking the seeds, but helping to soften them a little further.
Looks great. How do you factor in the honey (or any sugar for that matter) in the fermentation process? Won’t it ferment out and lose the sweetness? Or is it not long enough for that to happen completely?
For sweetener (honey, sugar, maple syrup, etc.) I go completely by taste. I have a few set percentages of honey I like to use, typically 4-8%, and test, test, test. If the end product doesn’t have any sweetness coming through, I’ll slowly bump up the percentage to compensate. I have noticed with honey, and most other sweeteners, that it can impact fermentation at certain percentages, especially when they go too high. With white sugar this is absolutely the case as it interferes with yeast and bacteria activity.
Do the black sesame seeds have to be raw or roasted?
For black sesame, I usually leave them raw and just incorporate them in the soaker (to soften them). Toasting might bring out more bitterness in the end.
Thanks for the response! I bought toasted by mistake. Should i buy Raw instead? Or can i use Them as they are?
That’s ok! Use those, they’ll be just fine.
Hi Maurizio! Thanks for all of the great recipes, you are truly an amazing resource. I was curious if you know what your fridge temp is? I have been fooling around with different bulk fermentation times before throwing my shaped loaves into the fridge. My most recent loaves seemed underproofed as they had a seemingly excessive oven spring, and one burst out the top despite the relatively deep scoring. I was thinking that maybe I should have left them to proof in their bannetons at room temp for a bit longer before putting them into my fridge as the temp is 2C/35F. They bulk fermented for 5 1/4 hours at 24C, and my worry about letting them bulk much longer is having dough that is difficult to work with. With a bulk fermentation of only 3 1/2 hours, do you think you’re getting significantly more fermentation in your fridge overnight? Thanks again for all the great insight!
Caleb
Hey, Caleb! You bet, happy to help. My fridge runs around 39F/4C. Yes, if you saw explosive and unpredictable rise like that, sounds like it needed more fermentation time. 24C is a little on the cool side, so I’d expect to have to lengthen bulk to compensate. Around 5 hours or so might have been right on (it depends on the dough that day). With a 3.5 hour bulk, and the amount of levain I typically use in my doughs, the dough temp really needs to be on the warmer side; I shoot for 26-28°C most bakes. If the dough comes in cooler, I can expect to have to compensate with a longer bulk.
As for the fridge, they’re all so different! Sometimes the dough cools faster than others, which can help it from going over. But I’d say for the most part, I kind of ignore the fridge and assume there’s going to be some variability there out of my control. I try to get the dough in there in a certain state (not pushed too far in bulk), and then adjust in the morning if I have to (and can). Adjustment could come from additional fermentation time at room temp before baking.
Hope that helps!
When adding the sesame seeds during bulk fermentation do I drain them first or do they absorb all the water?
They do absorb all the water. Since the water used for the soaker is calculated into the overall recipe, if they didn’t absorb all the water you’d add everything in together.
Gorgeous… as always!!!
Do you see any difference in crust or crumb by baking in challenger pan vs. your method of steaming the oven?
Thank you, Khushi! Yes, I find the crust is slightly thicker in the Challenger. They’re both awesome in their own way, whether it’s thin and crispy, or slightly thicker and more crunchy. In the end, I love both 🙂
Thank you for the inspiration. I intend to try it. However, let me suggest that there are errors in the flour amounts given in the Total Formula chart: the WWF weight should be 3/7 of the APF, and it clearly isn’t! And the total of the weights is over 2400 g, not 1800. I haven’t checked in detail, but the weights given in each step look to be correct.
Thank you, Jerry! Fixed 🙂 Let me know how you like the loaf when you try it, it’s a tasty one. Happy baking!
Someone has a good eye catching that error! It’s still not corrected in the table of the main narrative. Would you mind looking at this again? Thank you!
Indeed! I just checked, it all looks correct. Can you try refreshing, Jeanne?
It’s the total formula table that is incorrect. It looks like this:
878g Medium-protein bread flour or All-purpose flour (~11% protein, Central Milling Artisan Baker’s Craft or King Arthur Baking All-Purpose) 70.00%
615g Whole wheat flour (Giusto’s Whole Wheat or King Arthur Baking Whole Wheat) 30.00%
I think the total bread/AP flour should be 605g (27g from the levain and 578g in the autolyse) and the WWF 263g. (27g in the levain and 236g in the autolyse). If you add 878 + 615 = 1493 and that doesn’t seem right to me. The numbers in the individual sections appears correct otherwise. Is it me?
You’re right, that is incorrect. I fixed it this morning, it must have not pushed out all the updates. I’ll do that now!
Thank you for this formula, it looks wonderful. I have had lots of success with your recipes. I have one question: If I’m
using the white sesame seeds on the outside of the dough, should I flour the lining of the bannetons or not? BW, Sophie
You’re very welcome, Sophie! I generally still do flour the outside, but it’s not necessary if you have sufficiently coated the exterior with seeds (they’ll act to prevent the dough from sticking). If you’re worried, flour the liner. Happy baking!