

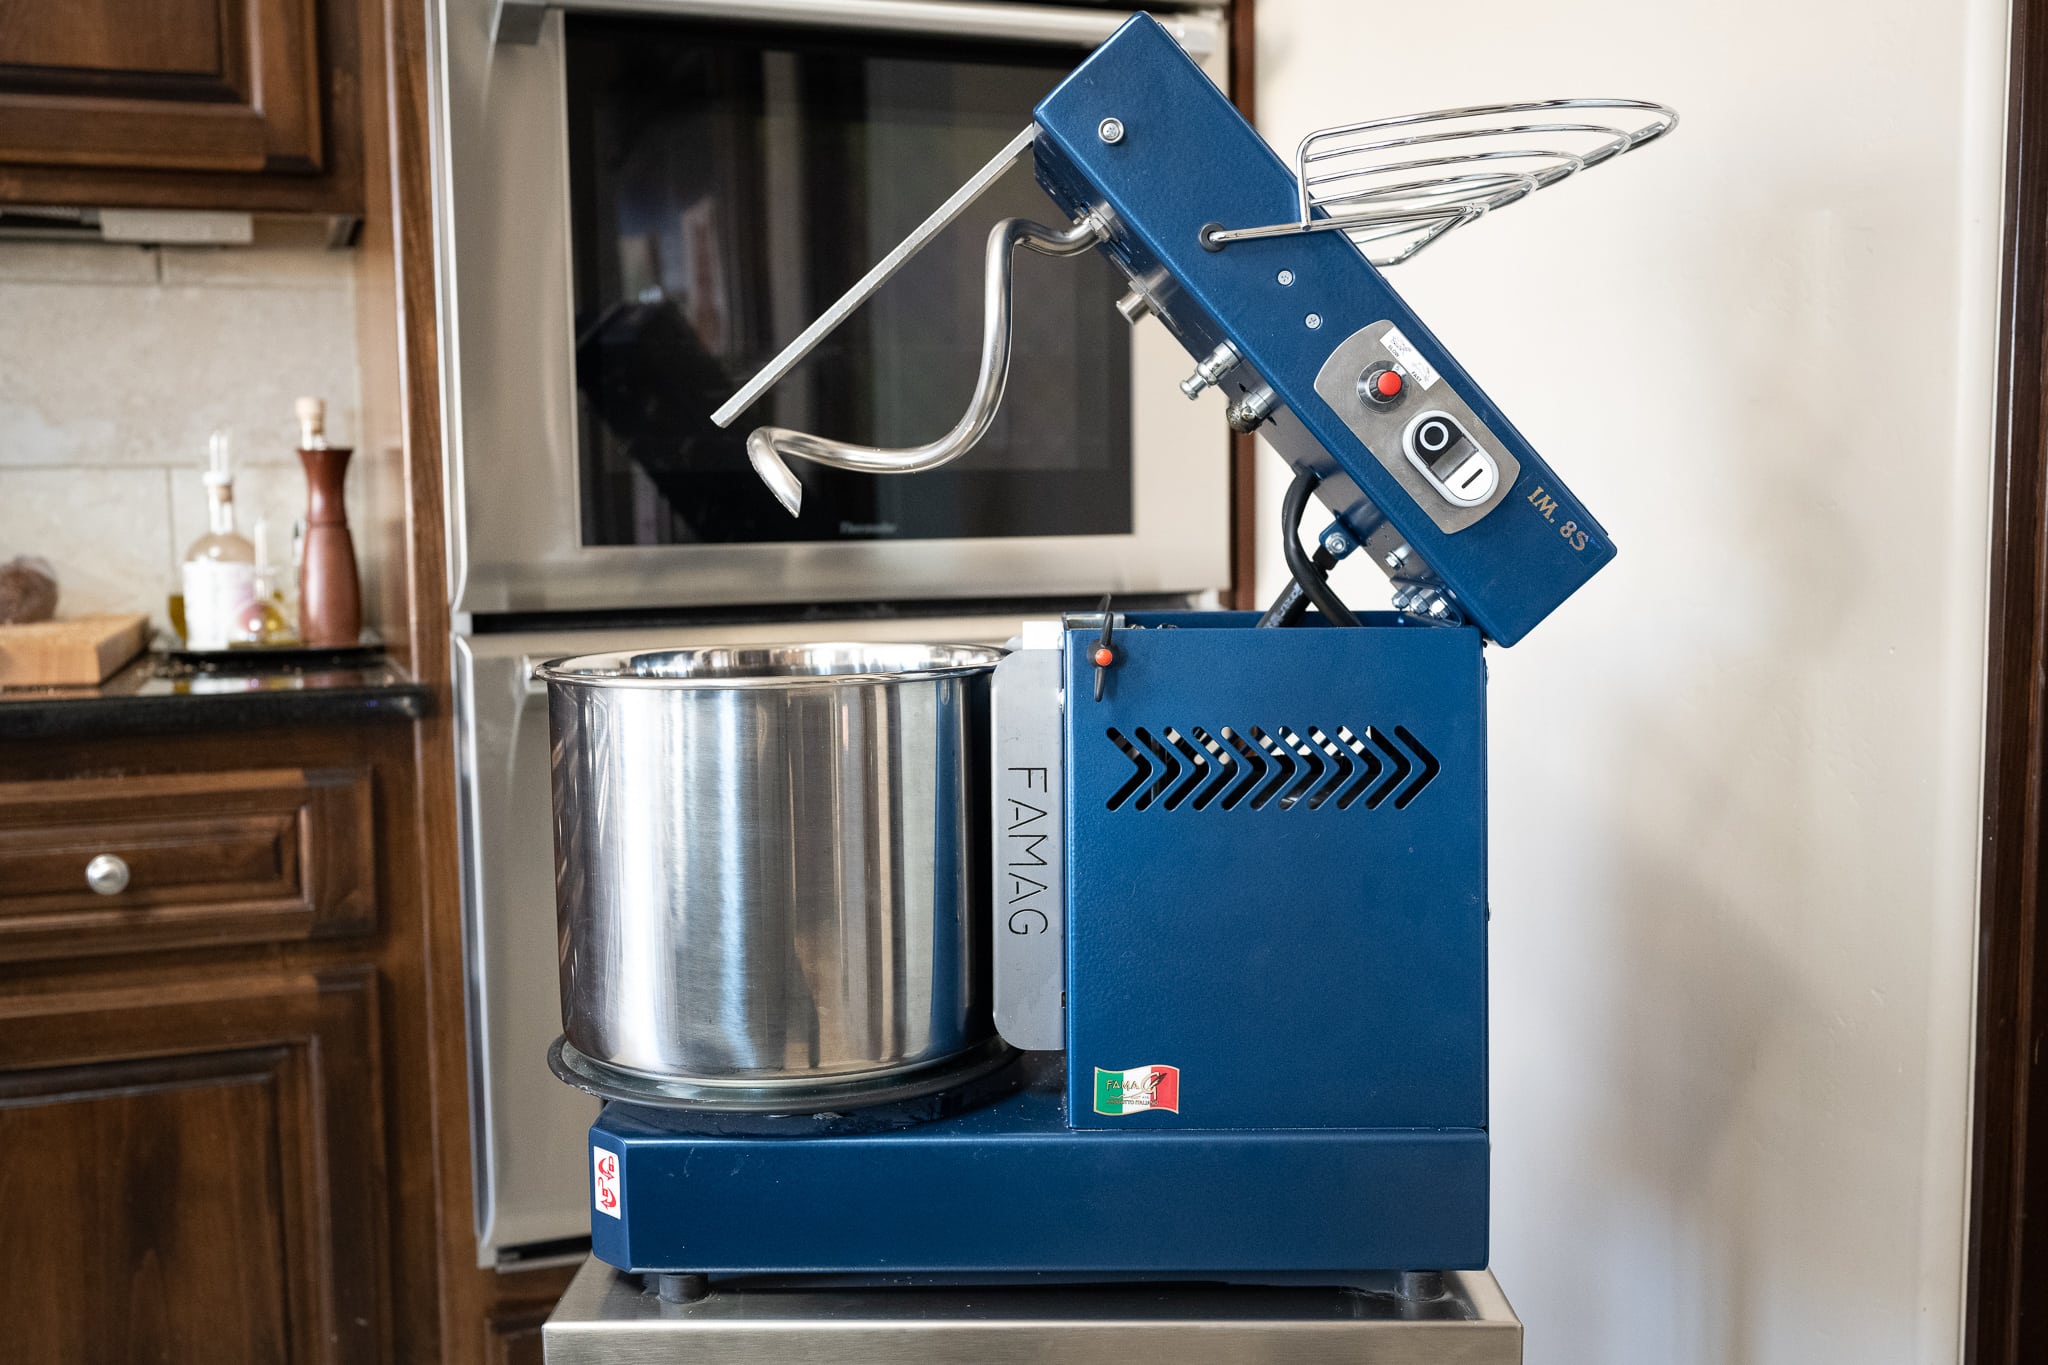
This guide on using a Famag mixer is a look into how I use a larger spiral mixer when making larger batches of sourdough bread dough in my home kitchen. The Famag IM-8S has an 8 kg dough capacity, a breaker bar, and a removable bowl. These are all great features for a spiral mixer, and in this post, I’ll go into how I use the mixer, its thoughtful design features, and a few things I wish it had.
Here at The Perfect Loaf, I often mix bread dough by hand, though I do sometimes use my KitchenAid stand mixer for enriched doughs or a Famag spiral mixer to mix larger batches. The Famag IM-8S is one of the best small spiral mixers with a breaker bar (I’ll explain this later in this guide).
Full disclosure: Pleasant Hill Grain gave me this mixer when it was first released for my feedback without any expectations. But I’ve received so many emails about the mixer that I thought I’d put together this comprehensive guide.
Real Quick: Do I Recommend the Famag Dough Mixer?
In the end, I love the Famag IM-8S spiral dough mixer. It mixes bread dough incredibly well, is solidly built, and has a much-needed breaker bar to keep the dough from riding up the dough hook—all while having a small footprint perfect for the home kitchen. I highly recommend this option for those home bakers who want to mix larger bread dough quantities.
Read on for instructions on how to use a Famag dough mixer, including what I like and dislike about its design. But first, let’s discuss what a spiral mixer can do for us.
What is a Spiral Mixer?
A spiral mixer has a fixed dough hook that spins in place in the head of the mixer as the bowl rotates. Due to the design of the hook and its motion, it is incredibly efficient at quickly strengthening bread dough. Additionally, it incorporates a relatively large amount of air into the dough during mixing, which can help result in a more open loaf of bread.
Most home bakers are familiar with a KitchenAid-style planetary dough mixer. Planetary mixers are great for most doughs, especially cookies, cakes, batter, and even pizza dough. A planetary mixer is designed so the mixing arm rotates around the mixing bowl while the hook (or paddle) attachment spins.
Think about this action much like the Earth orbits the sun: the Earth spins on its axis while at the same time orbits around the sun (and hence the term “planetary”). Planetary mixers have a fixed mixing bowl and typically a single motor.
Recommended reading: The Importance of Dough Temperature in Baking.
Famag Spiral Dough Mixer Specifications
Here are some high-level specifications for the Famag IM-8S spiral dough mixer:
- Spiral mixer with tilt head and removable bowl
- ~8kg dough capacity (based on my experience), bowl capacity of 11 liters
- Has a breaker bar (more on this below)
- 110V, made for home use
- 1/2 horsepower
- 77 lbs. total weight
- Analog speed control from speed 0 (80 RPM) to 10 (240 RPM)
Famag IM-8 versus IM-8S
There are two types of Famag mixers at this size: the IM-8 and the IM-8S. The IM-8 has no removable mixing bowl, and the mixing head does not tilt up, but they are both fixed. The IM-8S, the unit I have, has a removable bowl, and the mixing head tilts up (to facilitate the removal of the bowl).
Before we talk about how to use a Famag dough mixer, let’s look at what a breaker bar is and why it’s helpful.
What is a Breaker Bar, and Why is it Useful When Mixing Bread Dough?
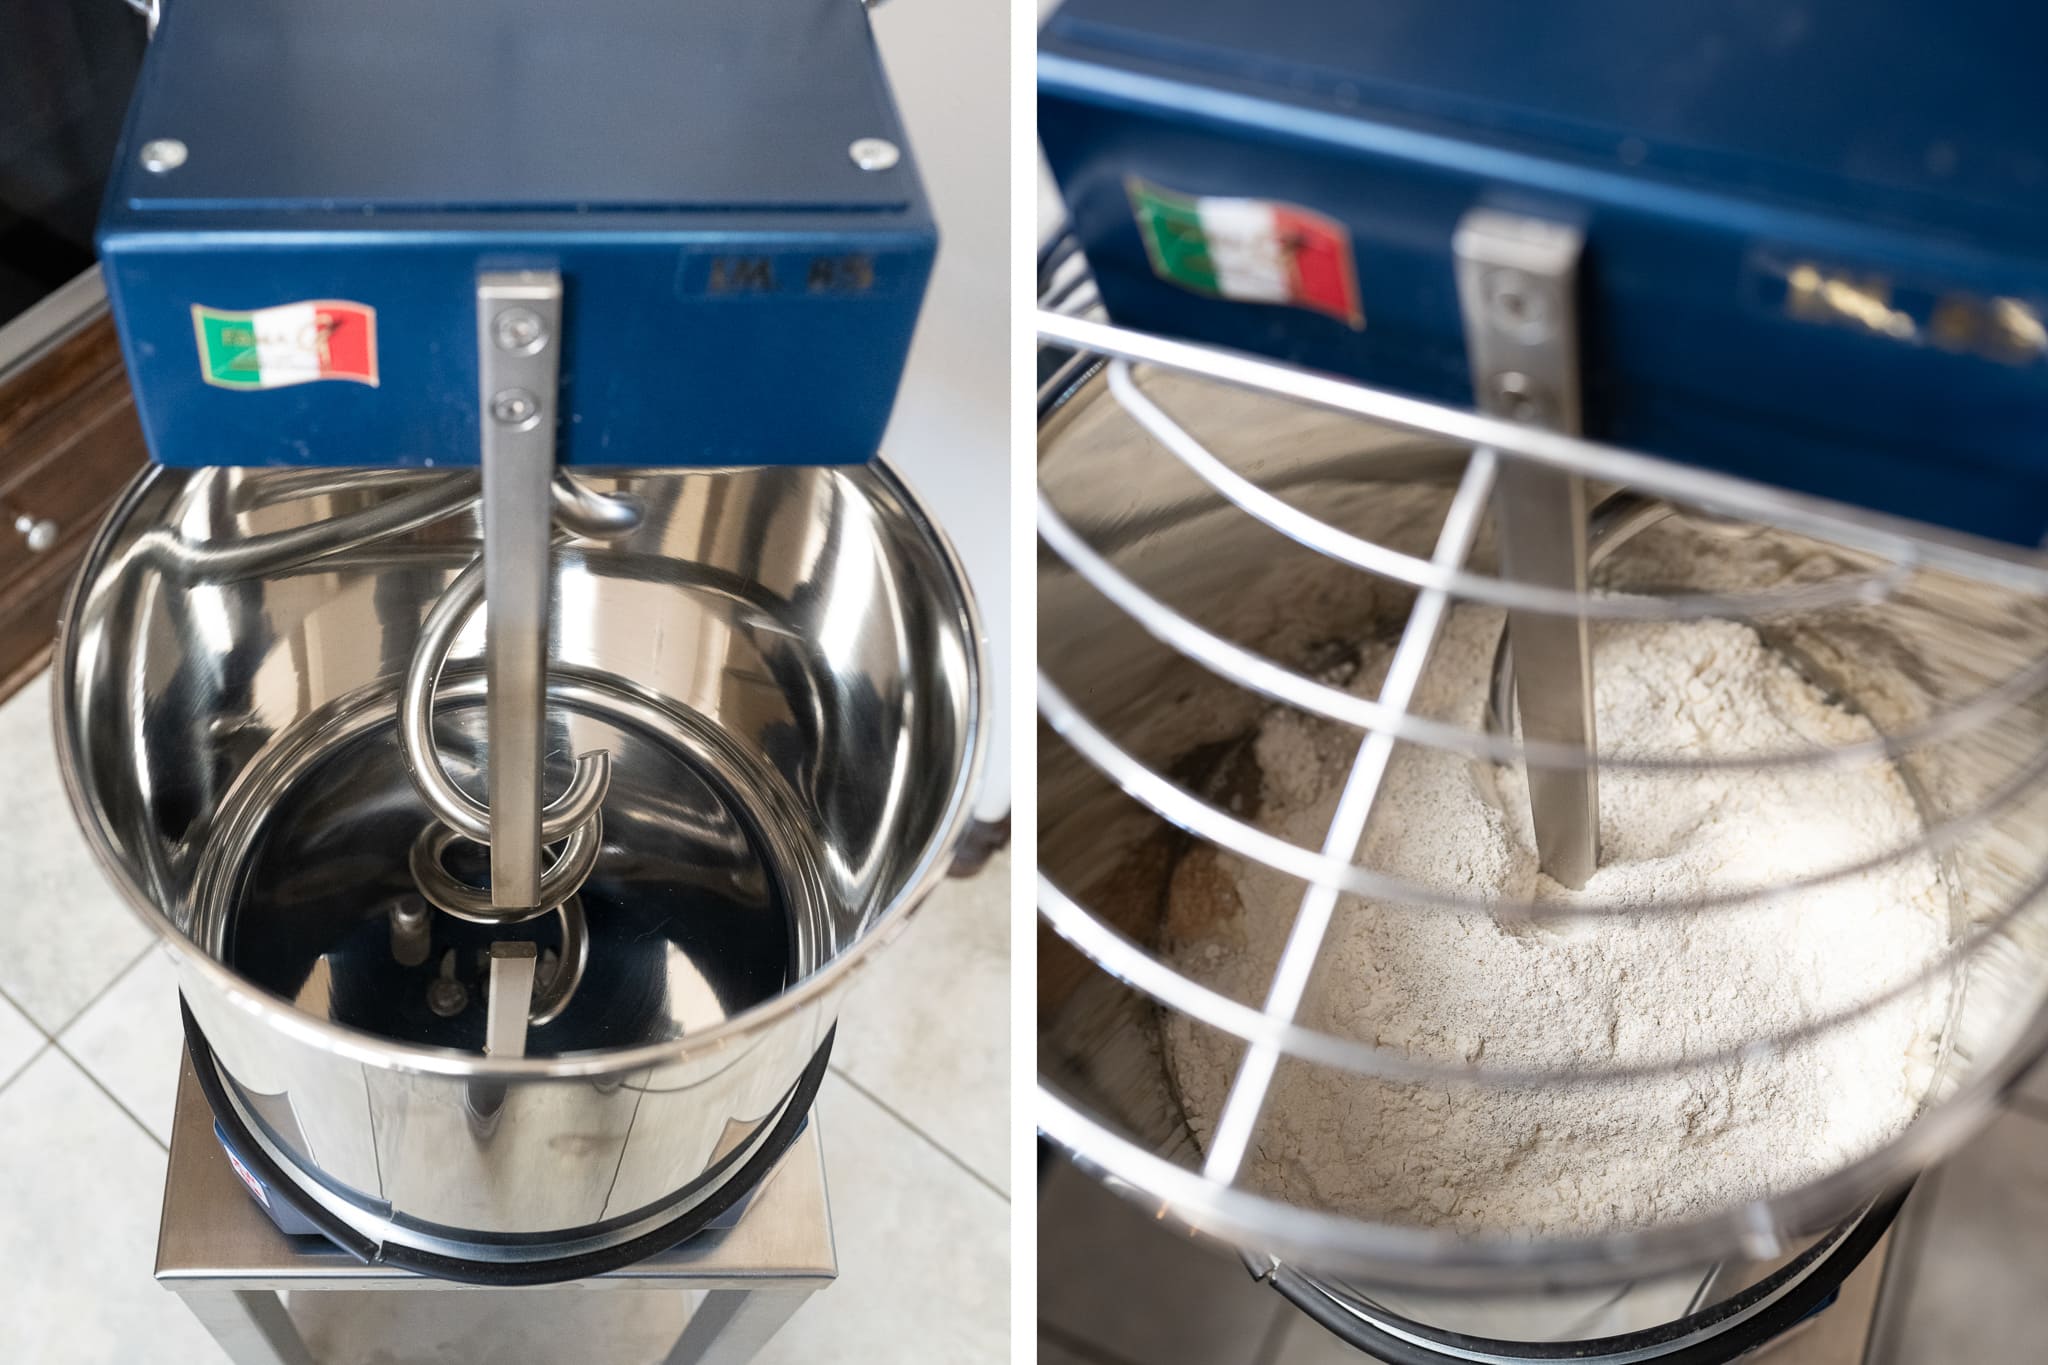
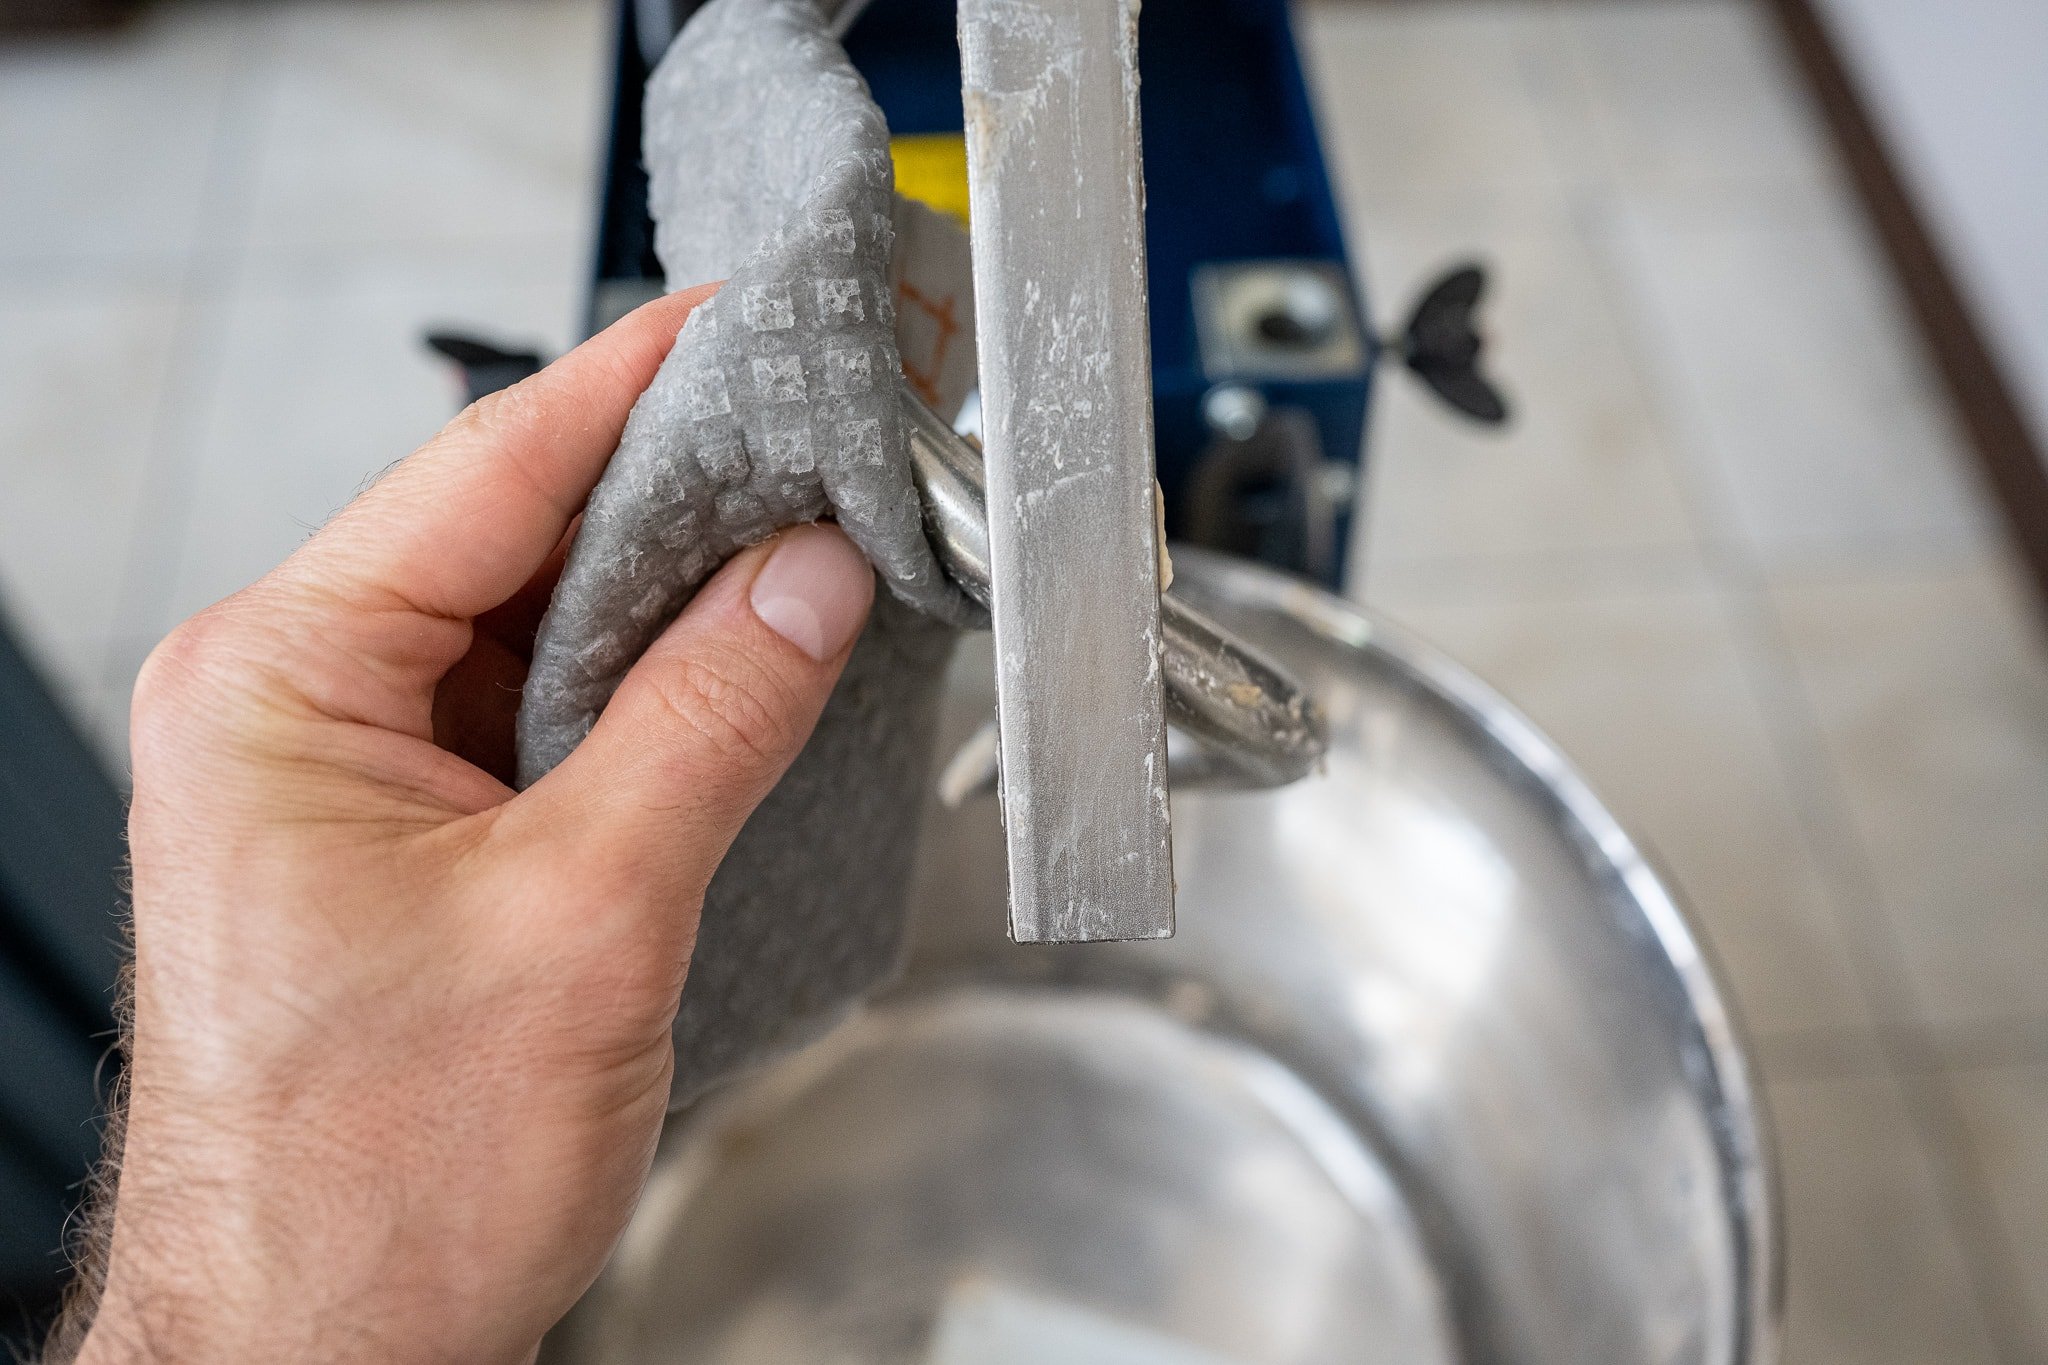
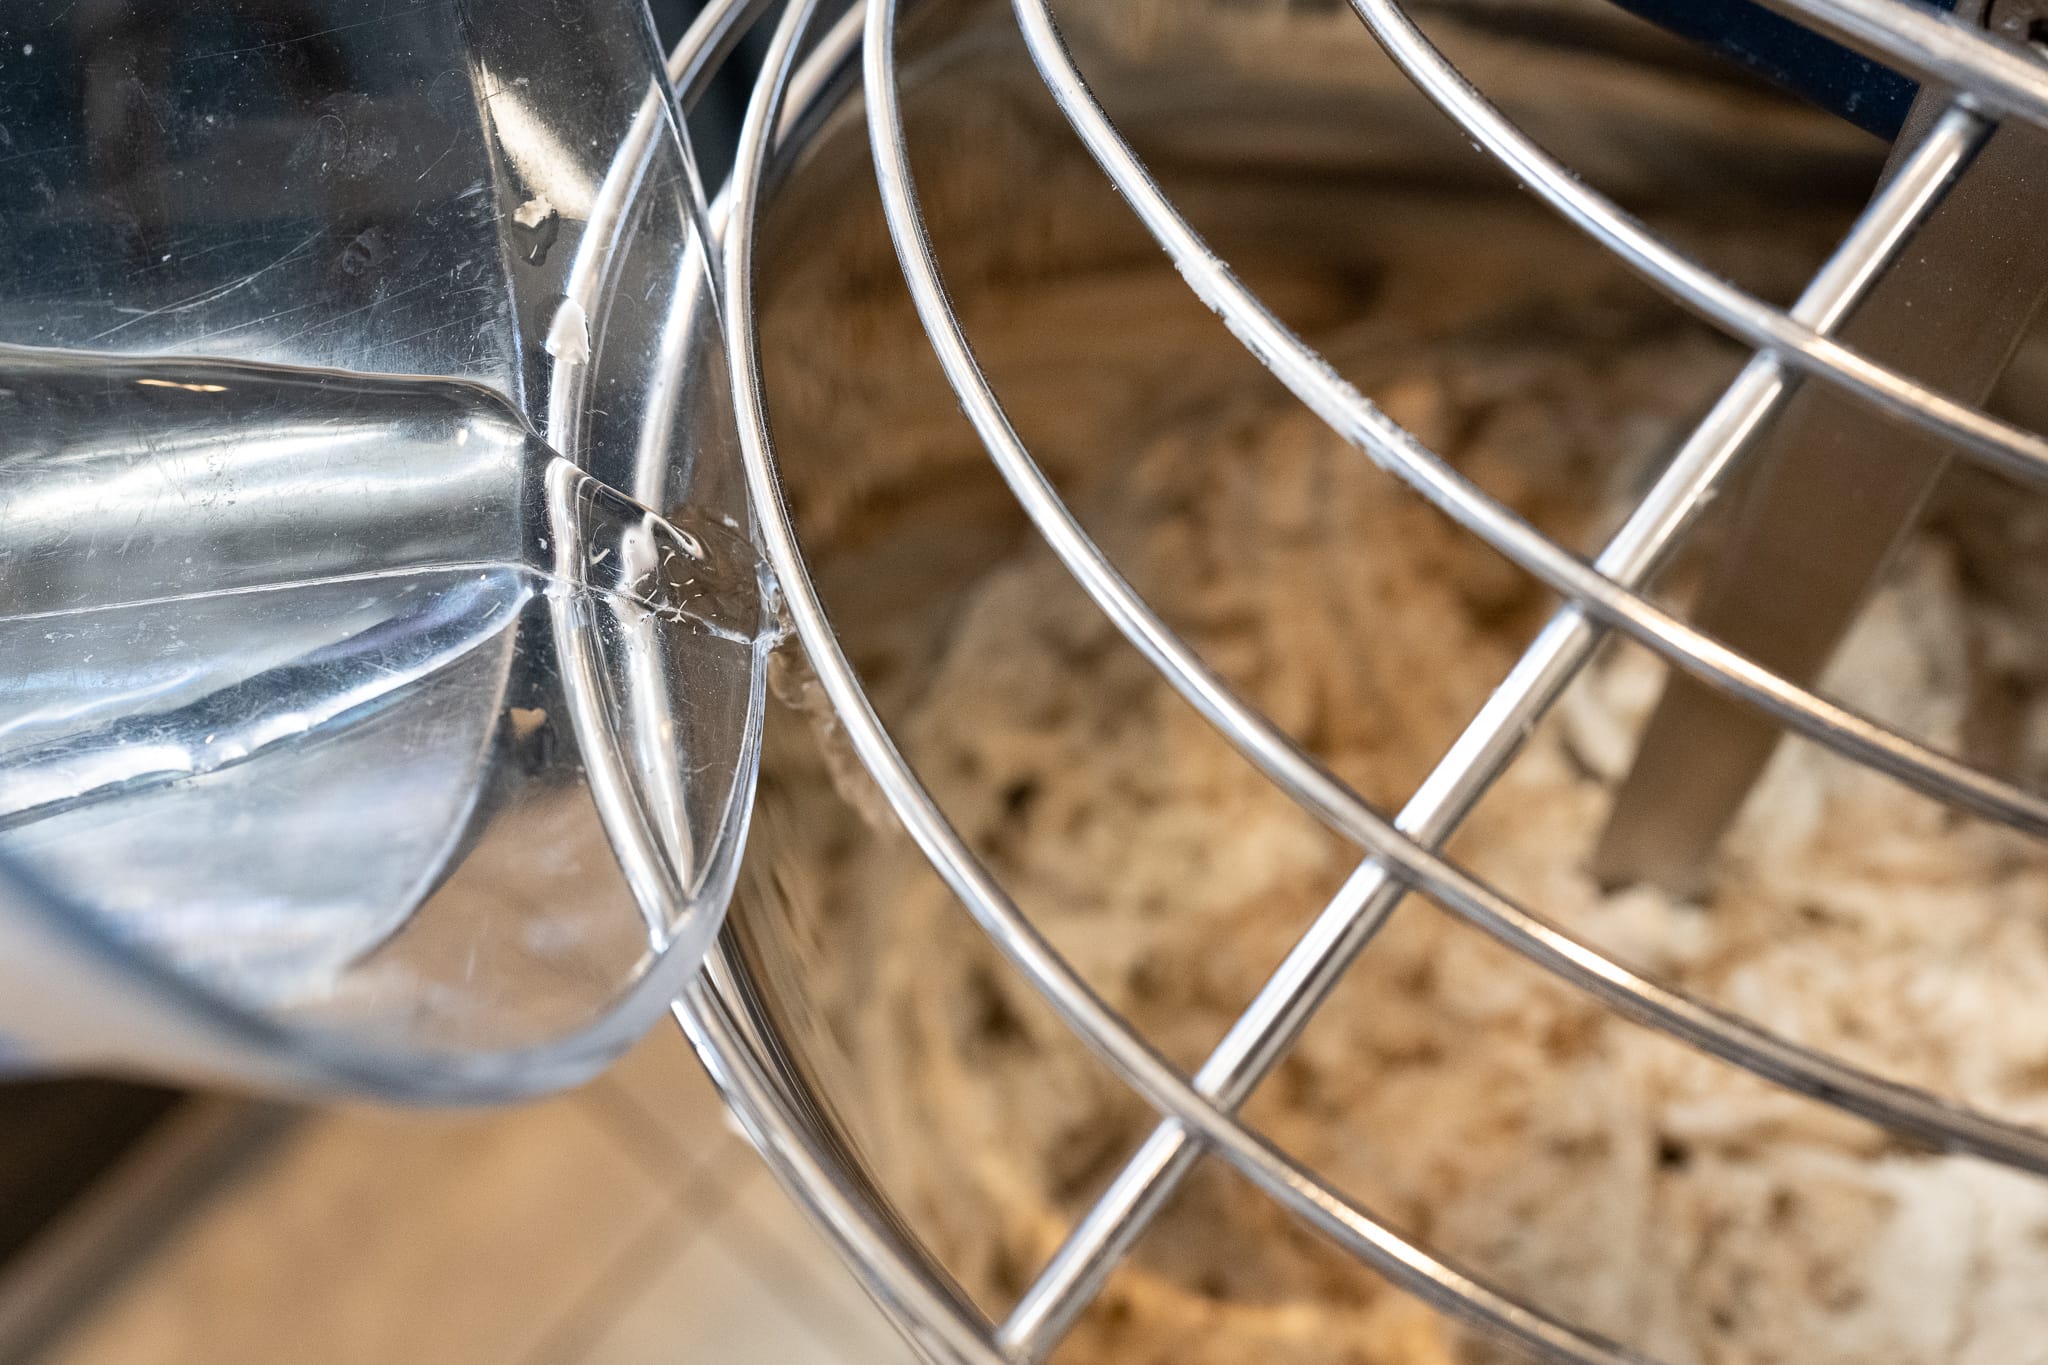
A breaker bar is a straight metal piece that extends down into a mixer’s mixing bowl. The bar is either attached to the mixer’s top and extends down or sometimes it’s part of the mixing bowl and extends up. In the case of the Famag, it’s attached to the tilting mixer head, raising and lowering as the head is unlocked or locked into place, respectively.
When the tilting head is locked, the breaker bar is positioned very close to the rotating spiral dough hook, scraping dough off the hook as it spins during mixing. Think of it as someone holding a spatula against the dough hook as it spins: the dough scrapes off the hook with each revolution.
A breaker bar with a spiral dough mixer prevents the dough from climbing up the dough hook, which eventually requires stopping the mixer and scraping the dough back into the mixing bowl. With the Famag, you turn it on, and it’s primarily hands-off until your dough is done mixing.
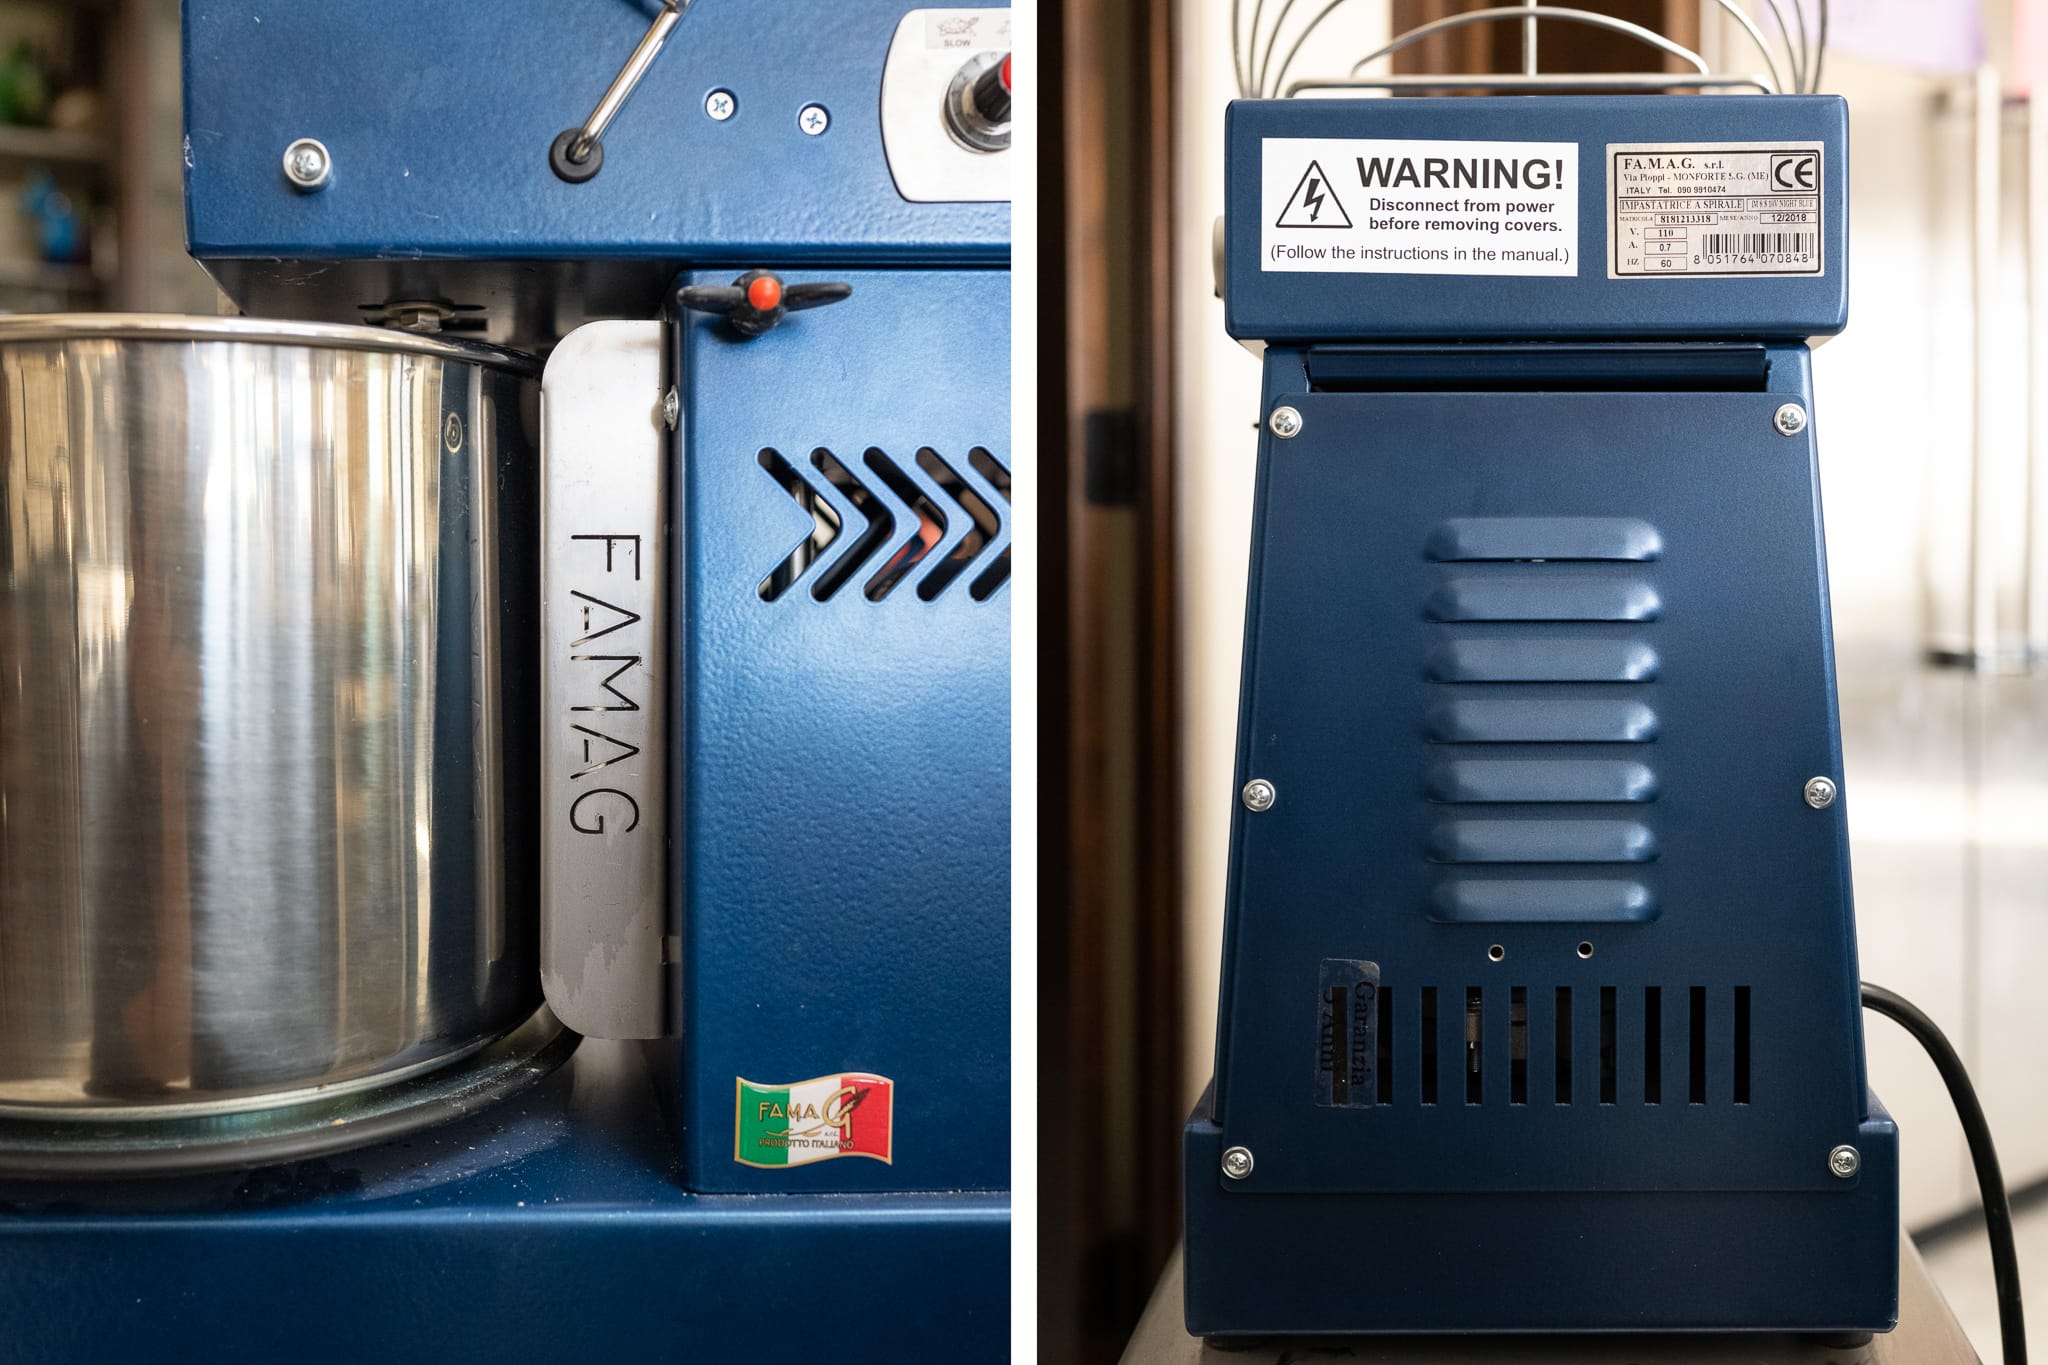
As you can see above, the Famag has the breaker bar attached with two large screws to the front of the tilting mixer head. When the mixing bowl is in place and the head is lowered, the bar is centered chiefly within the mixing bowl.
I was initially worried about how this breaker bar was attached to the mixer’s tilt head: was it strong enough to handle stiff dough? I haven’t seen this ever show signs the bar would pop off, bend, or warp in testing. It flexes slightly, especially when mixing something like my sourdough pretzel dough, but it holds strong and mixes easily.
How to Use a Famag Dough Mixer
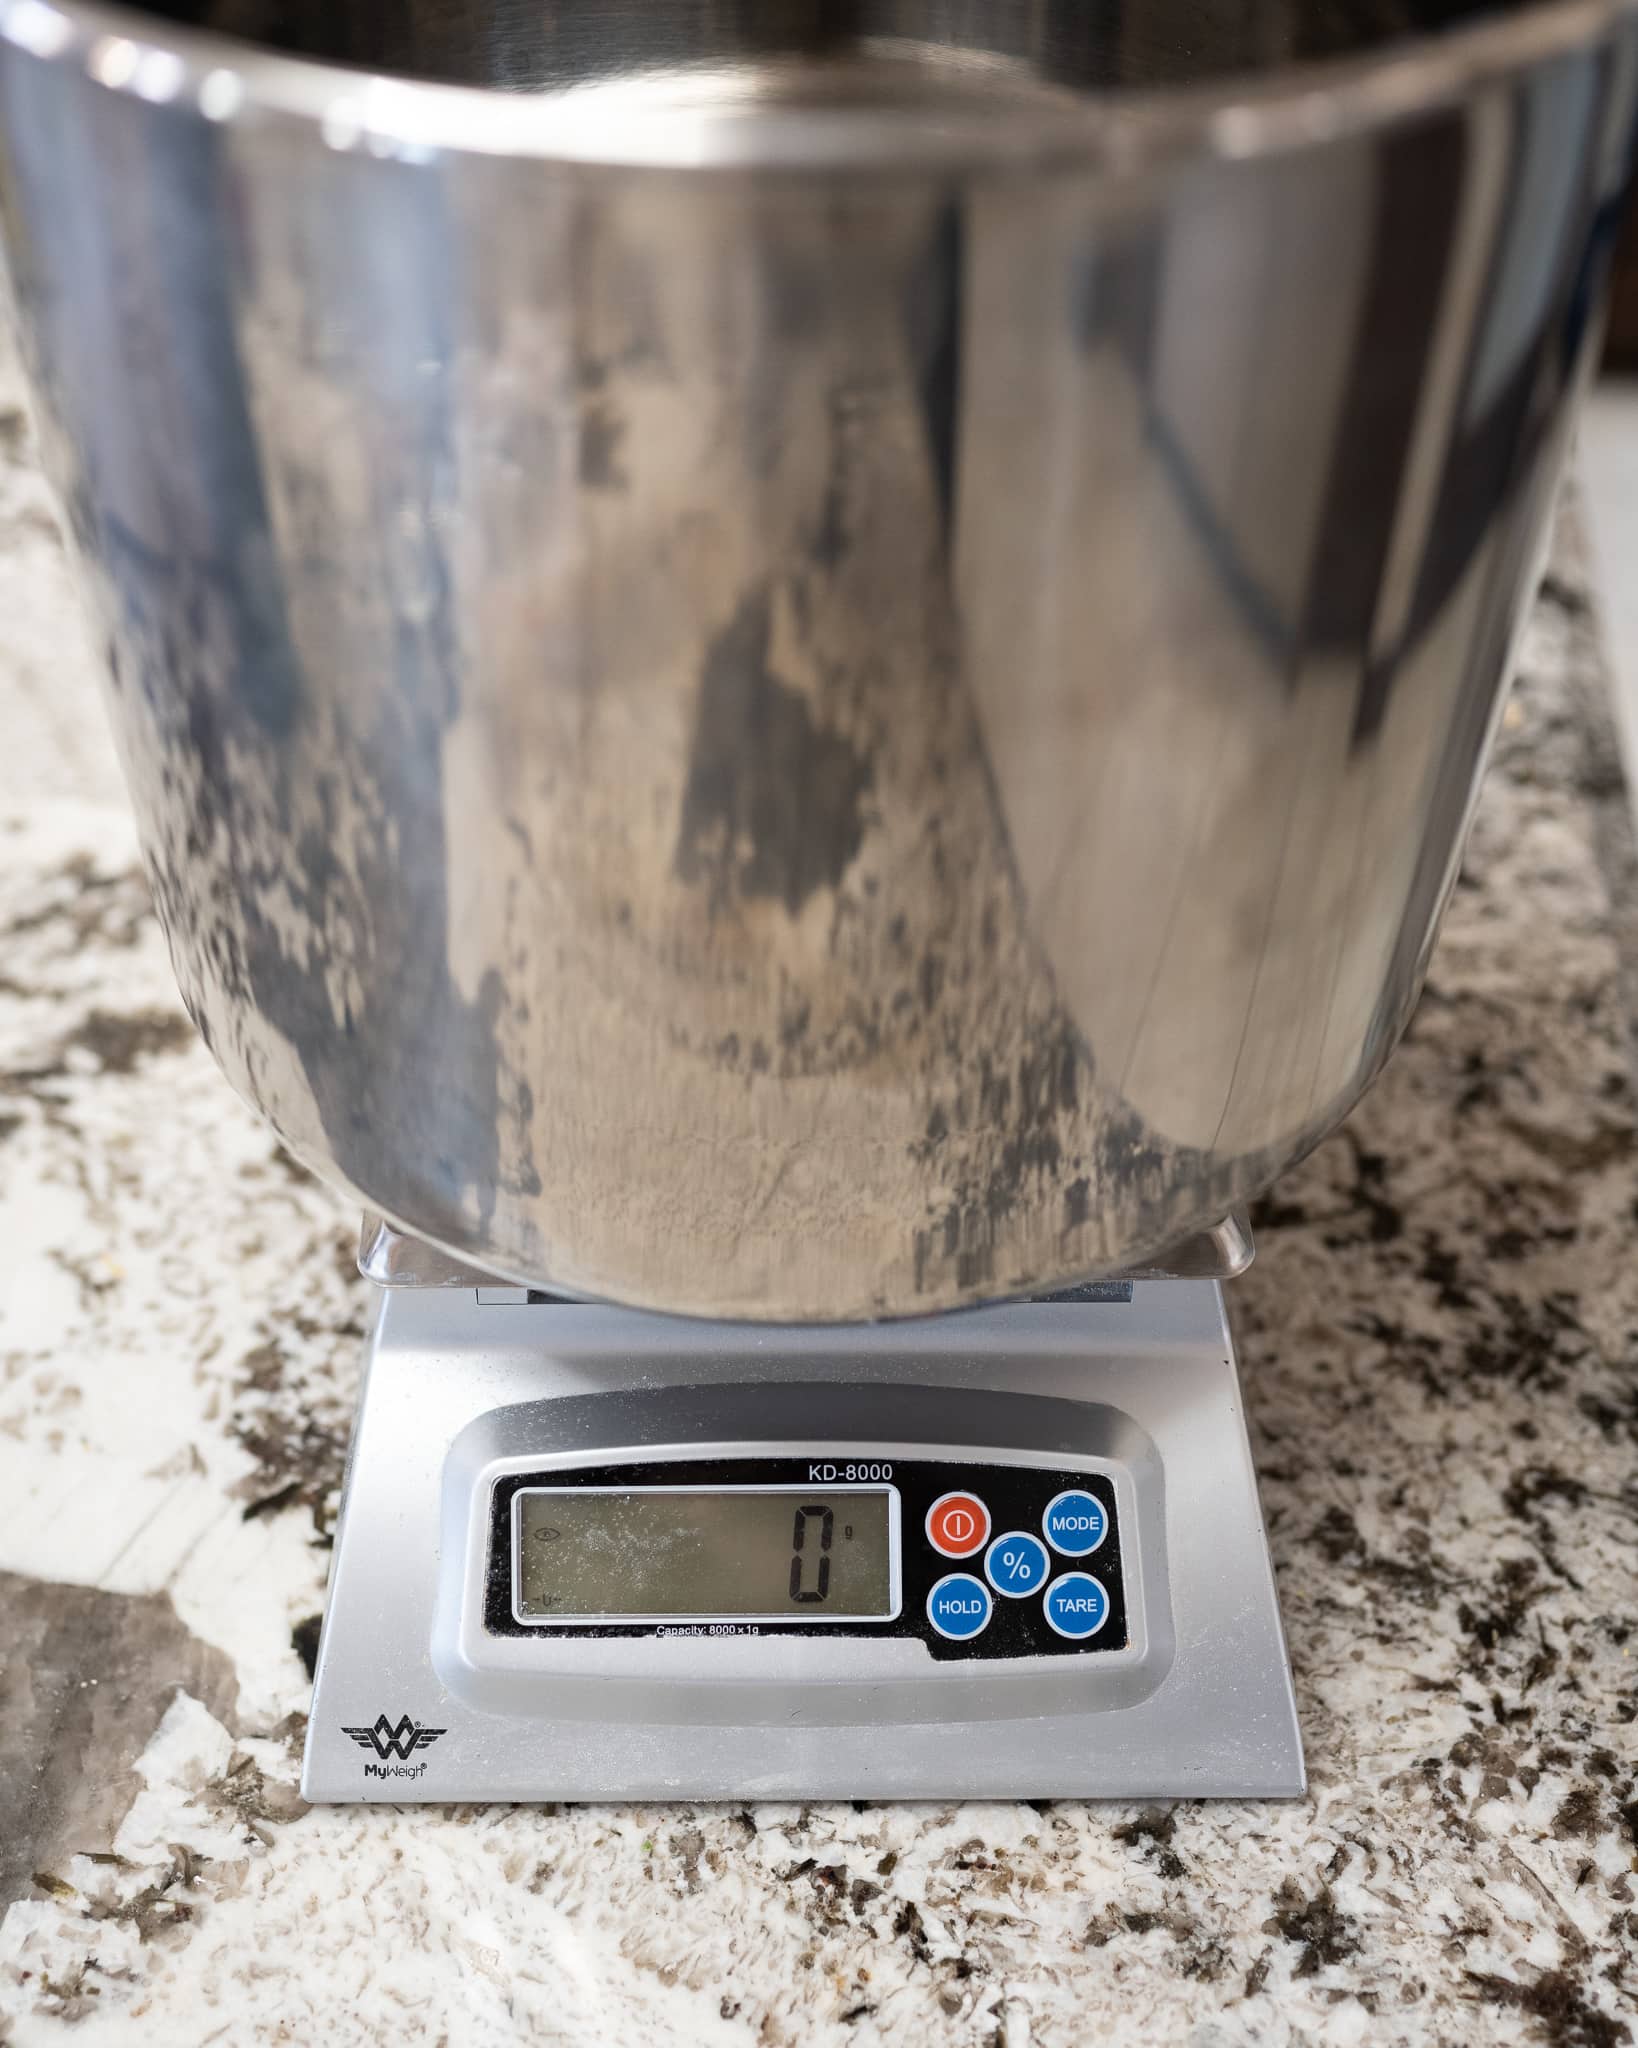
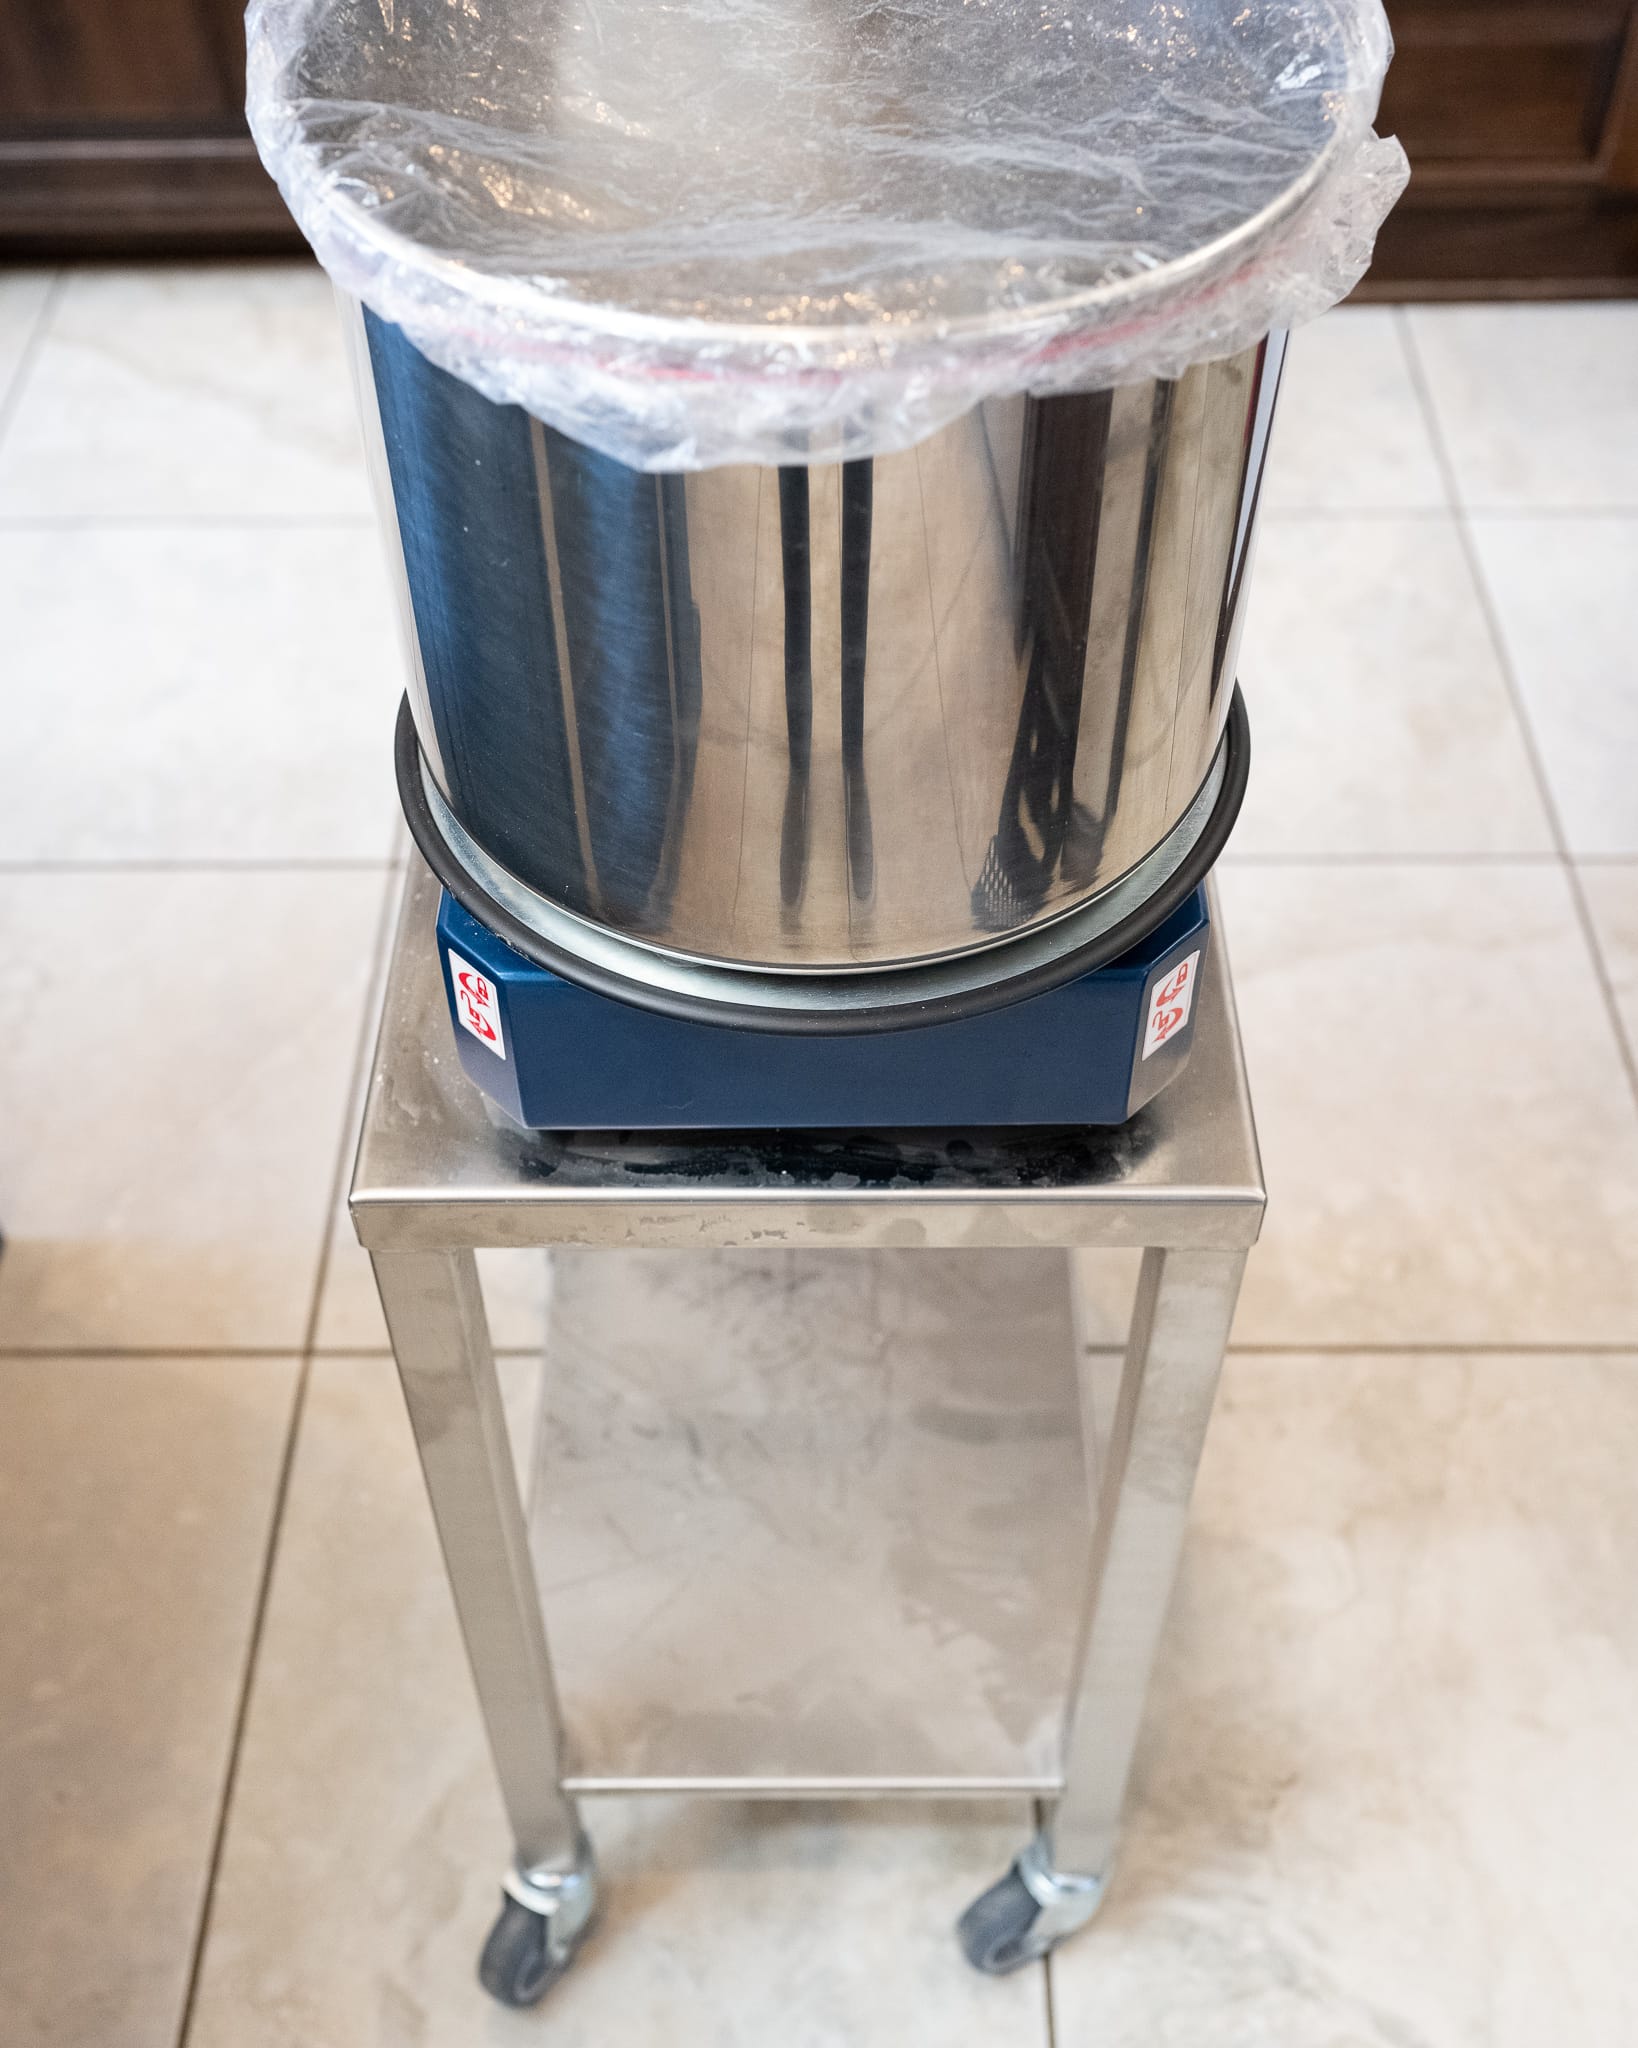
Using the mixer is incredibly straightforward. I unscrew one of the screw levers that secure the tilt head and hinge it upward. Then, I remove the mixing bowl by turning the bottom locking plate and placing the bowl on my kitchen scale. Surprisingly, the tall 8kg capacity Famag mixing bowl fits (barely) on my favorite baking scale, the My Weigh KD8000 scale, which is handy.
Next, I add water to the mixing bowl first (more on this below) to prevent excessive flour from sticking, then add the flour and other ingredients (including the sourdough starter or levain).
As I often do, I hold back about 5-10% of the mixing water at this time. I’ll then add this water in after the dough is strengthened to some degree (commonly called bassinage); this helps develop the gluten in the dough at a faster rate, but also the reserved water can be used to help remove flour from the edges of the mixing bowl by pouring the water slowly right at that corner when the mixer is running.
Then, I transfer the mixing bowl back to the locking plate, turn to lock, drop the wire safety guard, set the dial to #1 (speed 1 in my mapping), tap the black “go” button, and mix until everything is incorporated. I will periodically scrape down the mixing bowl’s sides and the edge during mixing to remove any dry flour.
Let’s look at a few of these steps in detail.
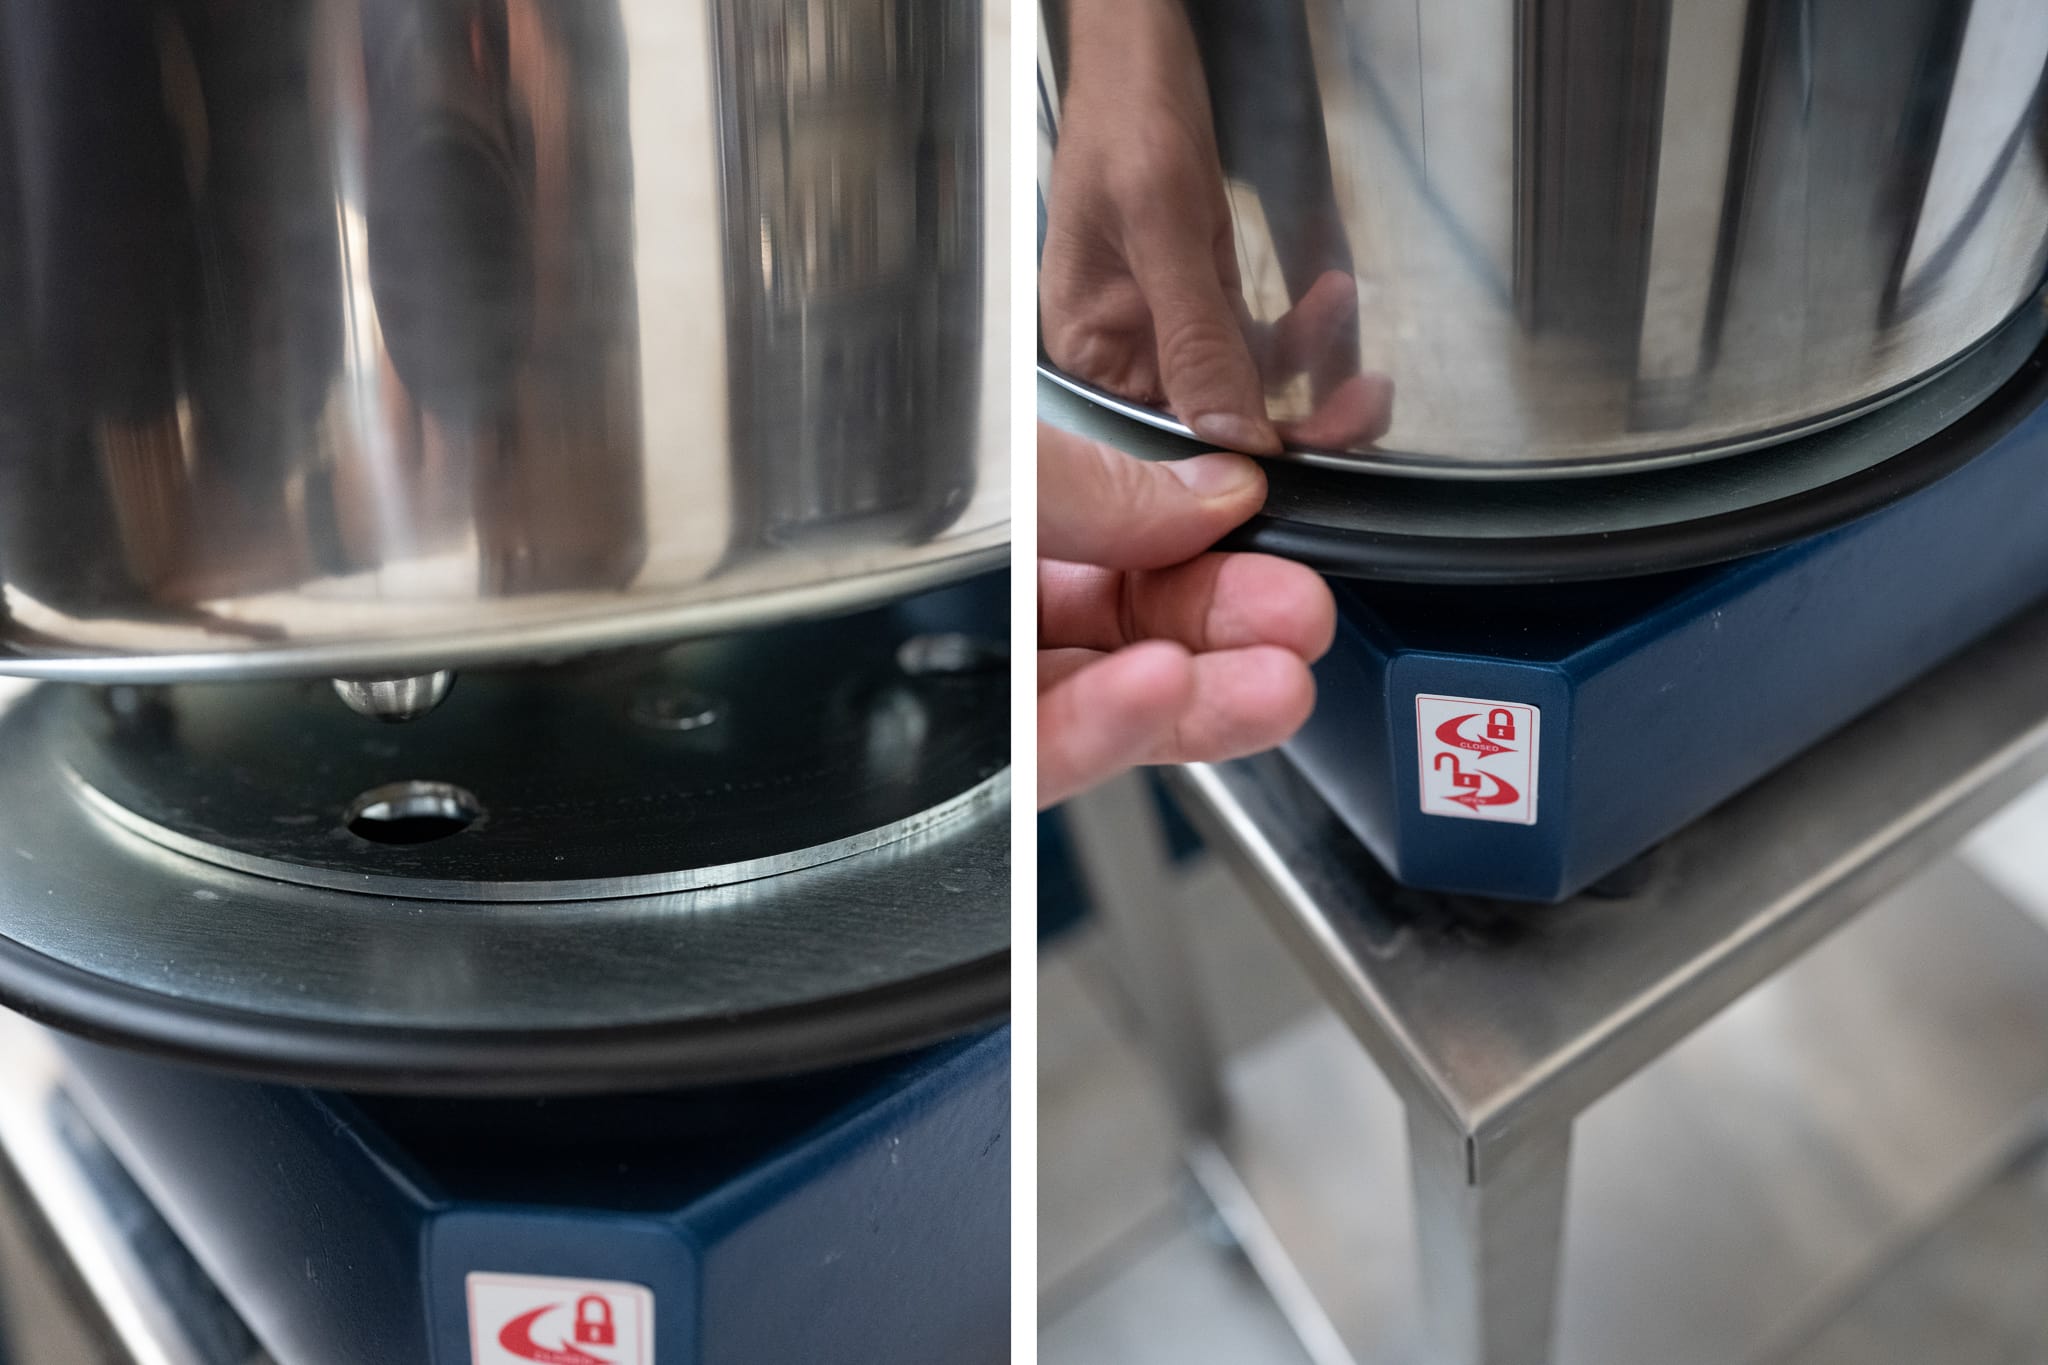
Locking and Unlocking the Removable Mixing Bowl
As you can see above, the mixing bowl fits onto the locking plate by inserting all four metal nubs into holes cut out into the plate. Then, as shown on the white and red sticker, you turn the plate to lock or unlock the mixing bowl. This process is easy, and the bowl locks in securely.

Locking and Unlocking the Tilting Mixer Head
Note: Some older Famag mixers may have a wing nut instead of the straight lever you see above. Mine had the wing nuts, but Pleasant Hill Grain sent me a set of straight levers that come with newer Famag mixers.
As you can see above, the Famag tilting head locks into place with a set of screw levers, one on the right and one on the mixer’s left. These levers unlock the tilting mixer head by screwing it in and out. The on-button will function when the mixer head is down, and the screw is sufficiently screwed in.
While turning the straight screw lever is very easy, I wish the Famag would have used a sliding lock (similar to the Haussler dough mixers) or some other more convenient mechanism. I’ve turned the left screw lever in just far enough to satisfy the safety mechanism but still allow the mixer head to move up or down freely. I must operate the right side lever to lock or unlock the tilting mixer head.
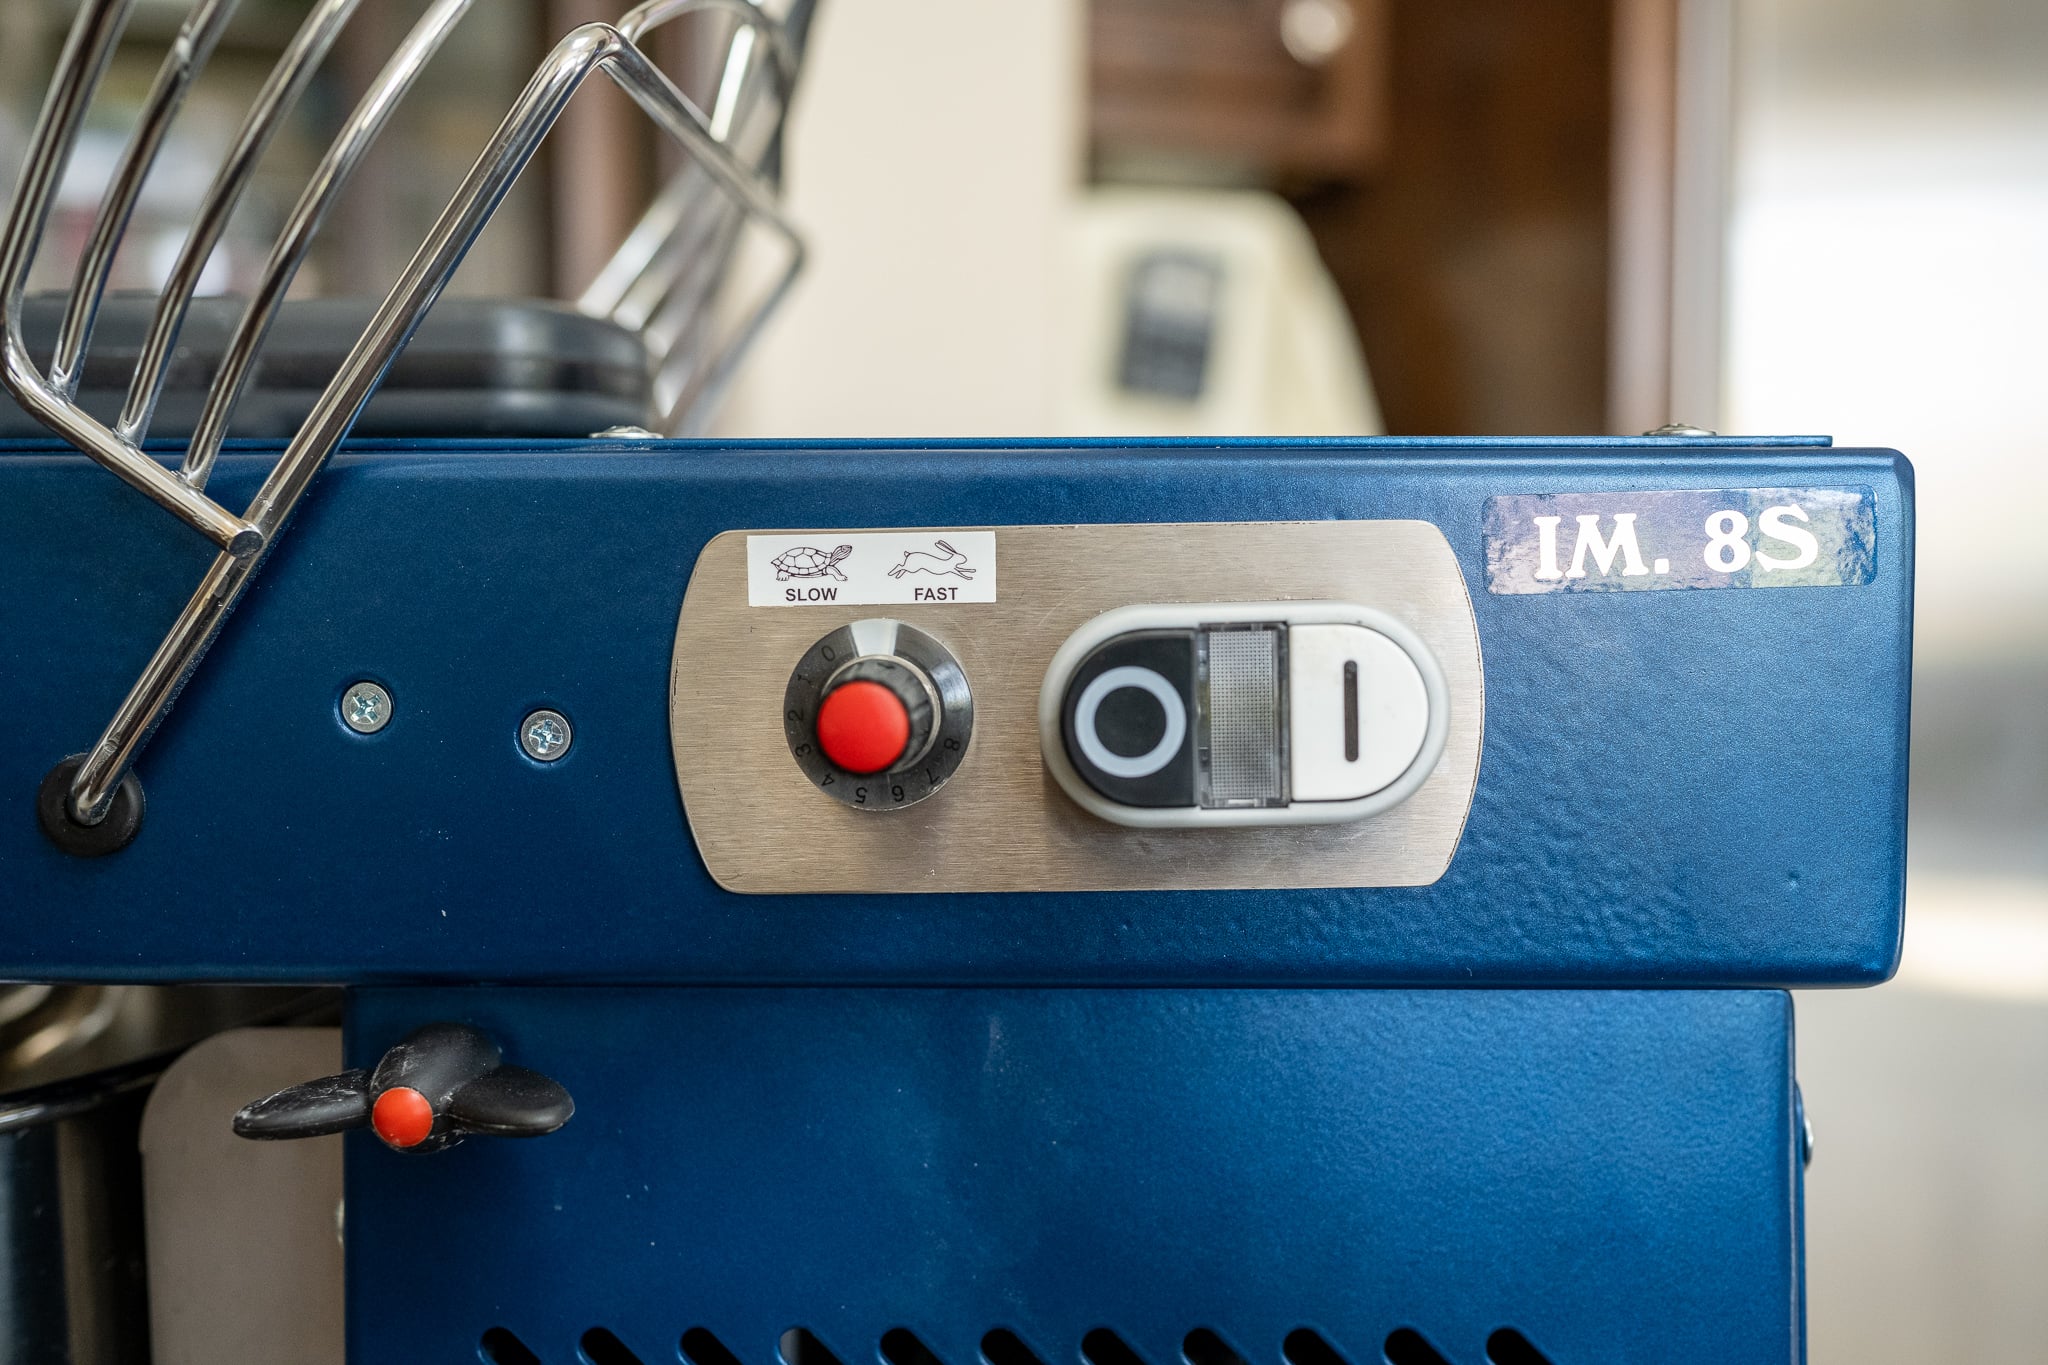
Controlling the Mixing Speed
The Famag dough mixer has a variable dial (as seen above under the turtle and rabbit sticker) for controlling the spiral dough hook’s revolutions per minute (RPM) and the mixing bowl’s rotation. The RPMs range from slowest at speed #0 to fastest at speed #10:
| Speed | Hook RPM | Bowl RPM |
|---|---|---|
| Slowest speed (#0 on the speed dial) | 80 | 8 |
| Fastest speed (#10 on the speed dial) | 240 | 24 |
The variable speed dial on the Famag mixer is unnecessary. Other spiral dough mixers I’ve used typically only have a speed one and speed two, which is wholly sufficient. Speed one is for ingredient incorporation or gentle mixing on these other mixers, and speed two is for rapid gluten development.
Variable Speed Update: After using this mixer more, I’ve found the variable speed dial very useful when making other products besides bread. For example, when making panettone, mixing at very slow speeds is useful to avoid overheating the dough, even at speed 0.
On the Famag dial, I use #2 as a typical speed one and #6 as a typical speed two.
In my testing, I’ve mapped the Famag variable speed dial to what I would typically use, speeds one and two. I use speed #2 on the variable dial to equal my typical speed one, and speed #6 as my typical speed two.
My Typical Mixing Times
No mixing times are universally applicable to every type of bread dough. Depending on your process, higher hydration doughs typically require longer mixing times. Conversely, lower hydration doughs might not require as much.
For my typical loaves of sourdough bread, such as with my spelt, rye, and whole wheat sourdough bread, I might typically do the following mix schedule. The following assumes the dough did not have an autolyse, which might reduce the overall mixing time required).
- 2 to 3 minutes on first speed (which is #2 on the Famag speed dial)
- Optional rest (5-10 minutes)
- 1 to 3 minutes on second speed (which is #6 on the Famag speed dial)
The first mixing phase mostly incorporates ingredients and ensures everything is homogenous. The rest helps the dough come together and firm up some, but it is not always necessary.
The second phase of mixing is when the gluten in the dough is substantially developed. It typically takes between one and three minutes for most of my doughs. Still, it might be longer if the dough is highly hydrated or needs additional time to develop more elasticity.
Recommended reading: How to Autolyse Bread Dough to help reduce mixing time.
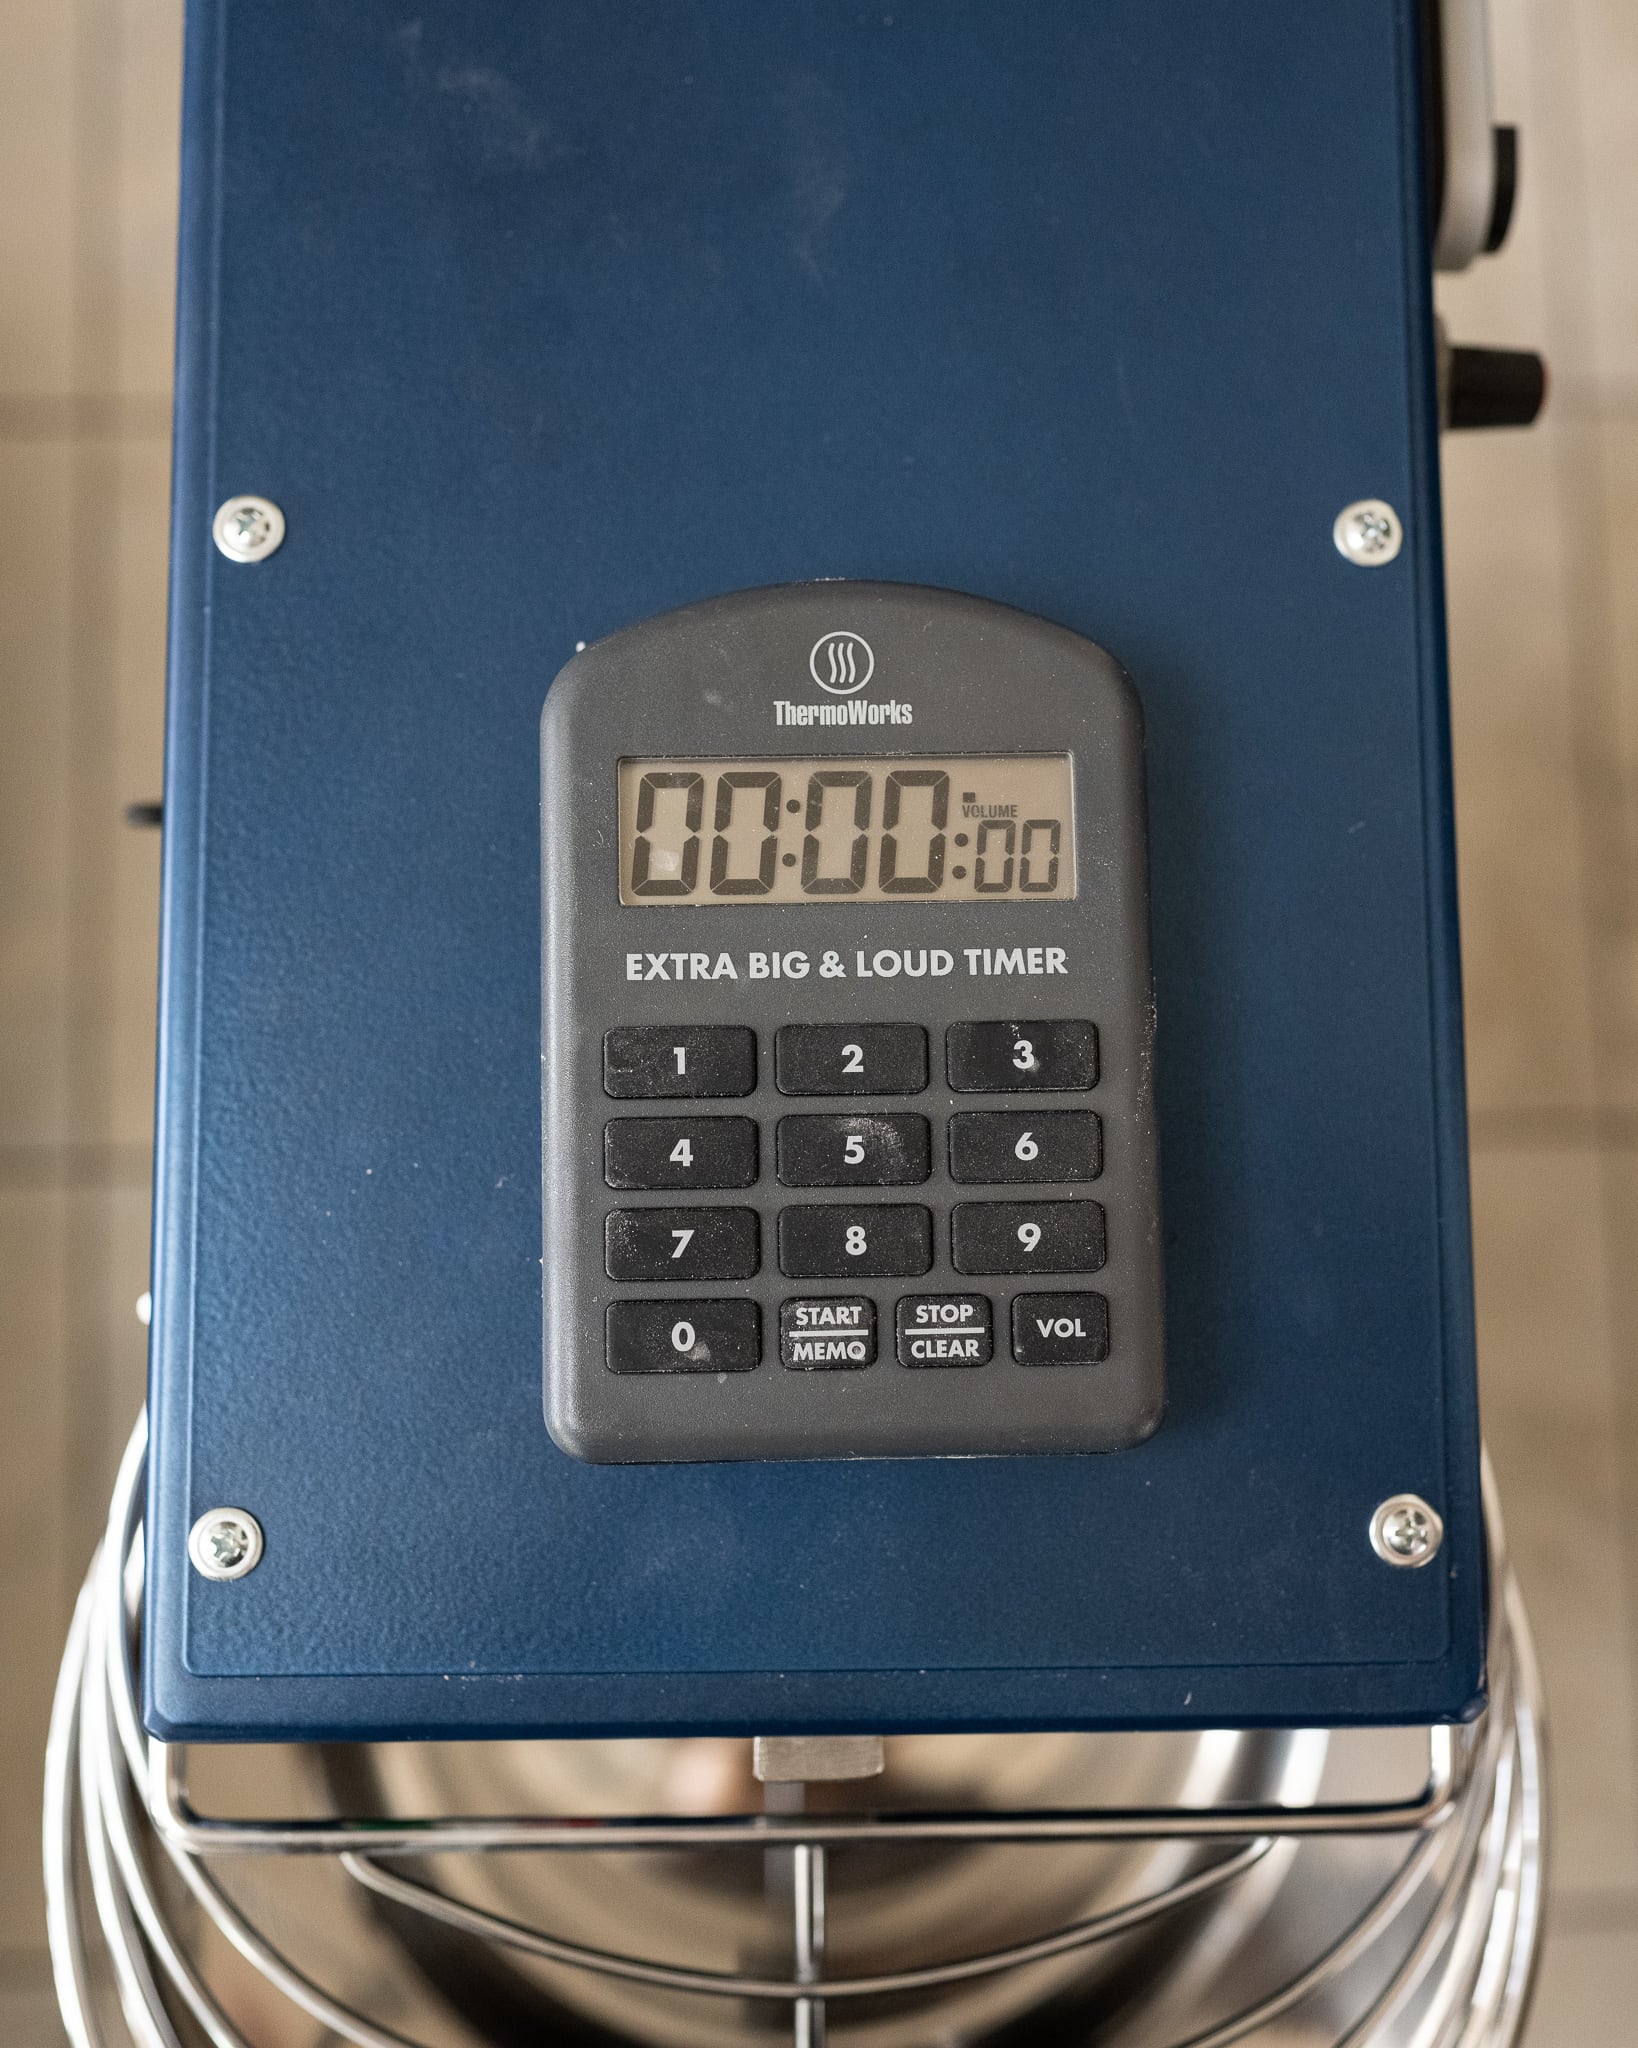
I like to keep a magnetic timer attached to the top of the Famag spiral dough mixer. When I push the button to start mixing, I start the timer. This helps me keep track of mixing times, and I can mostly walk away and do other baking tasks.
Maximum and Minimum Mixing Dough Weight
| Dough weight | Notes |
|---|---|
| Minimum | The Famag can handle smaller batches of dough, but I’ve found anything below 1,800g of dough too small for the mixer to mix effectively. It’s possible to go lower, but when dipping below 1,800g, I’ll typically mix the dough by hand. |
| Maximum | I’ve mixed up to 8,000g in the Famag without a problem. I haven’t tested outside this range, but I’ll update this post if I get there! |
Mixing Pizza Dough with the Famag Dough Mixer
The Famag spiral dough mixer handles pizza dough incredibly well. I use the Famag to make larger portions of my sourdough pizza dough recipe. I don’t mix my pizza dough excessively; usually, I mix for only 1 to 2 minutes on the first speed and then 1 to 3 minutes on the second speed.
Cleaning
I find it best to clean the mixing bowl, breaker bar, and dough hook immediately after mixing. If the dough is left to dry and cake on the bowl or any other surface, it becomes tough to scrape off.
When I finish mixing my dough, I scrape it out of the mixing bowl and put it into my bulk fermentation container. Then, I place the mixing bowl back into the mixer base and clean the dough hook and breaker bar with a damp sponge cloth (I like these reusable cloths, they’re compostable and grippy enough to pull the dough off the mixer). The mixer bowl in place catches any water falling while wiping. Then, I transfer the bowl to the sink to continue to wash any dough bits off using the damp cloth.
Flour Sticking to Mixing Bowl
Many bakers say flour sticks to the bottom of the mixing bowl when using a spiral dough mixer. After many, many mixes in the Famag dough mixer, I’ve found a few tricks to help with this issue.
First, add water to the mixing bowl before the flour or other ingredients. Also, as described above, hold back 5 to 10% of the mixing water. This held-back water will not only help you adjust for the dough’s consistency that day in the kitchen, but you can stream in the water during mixing right to the edge of the mixing bowl to help release some of that stuck flour.
I find this “double hydration” also helps because it allows you to quickly strengthen the dough (even if you’re using a high percentage of high-protein white flour) and then add more water without overloading the dough, causing it to spread.
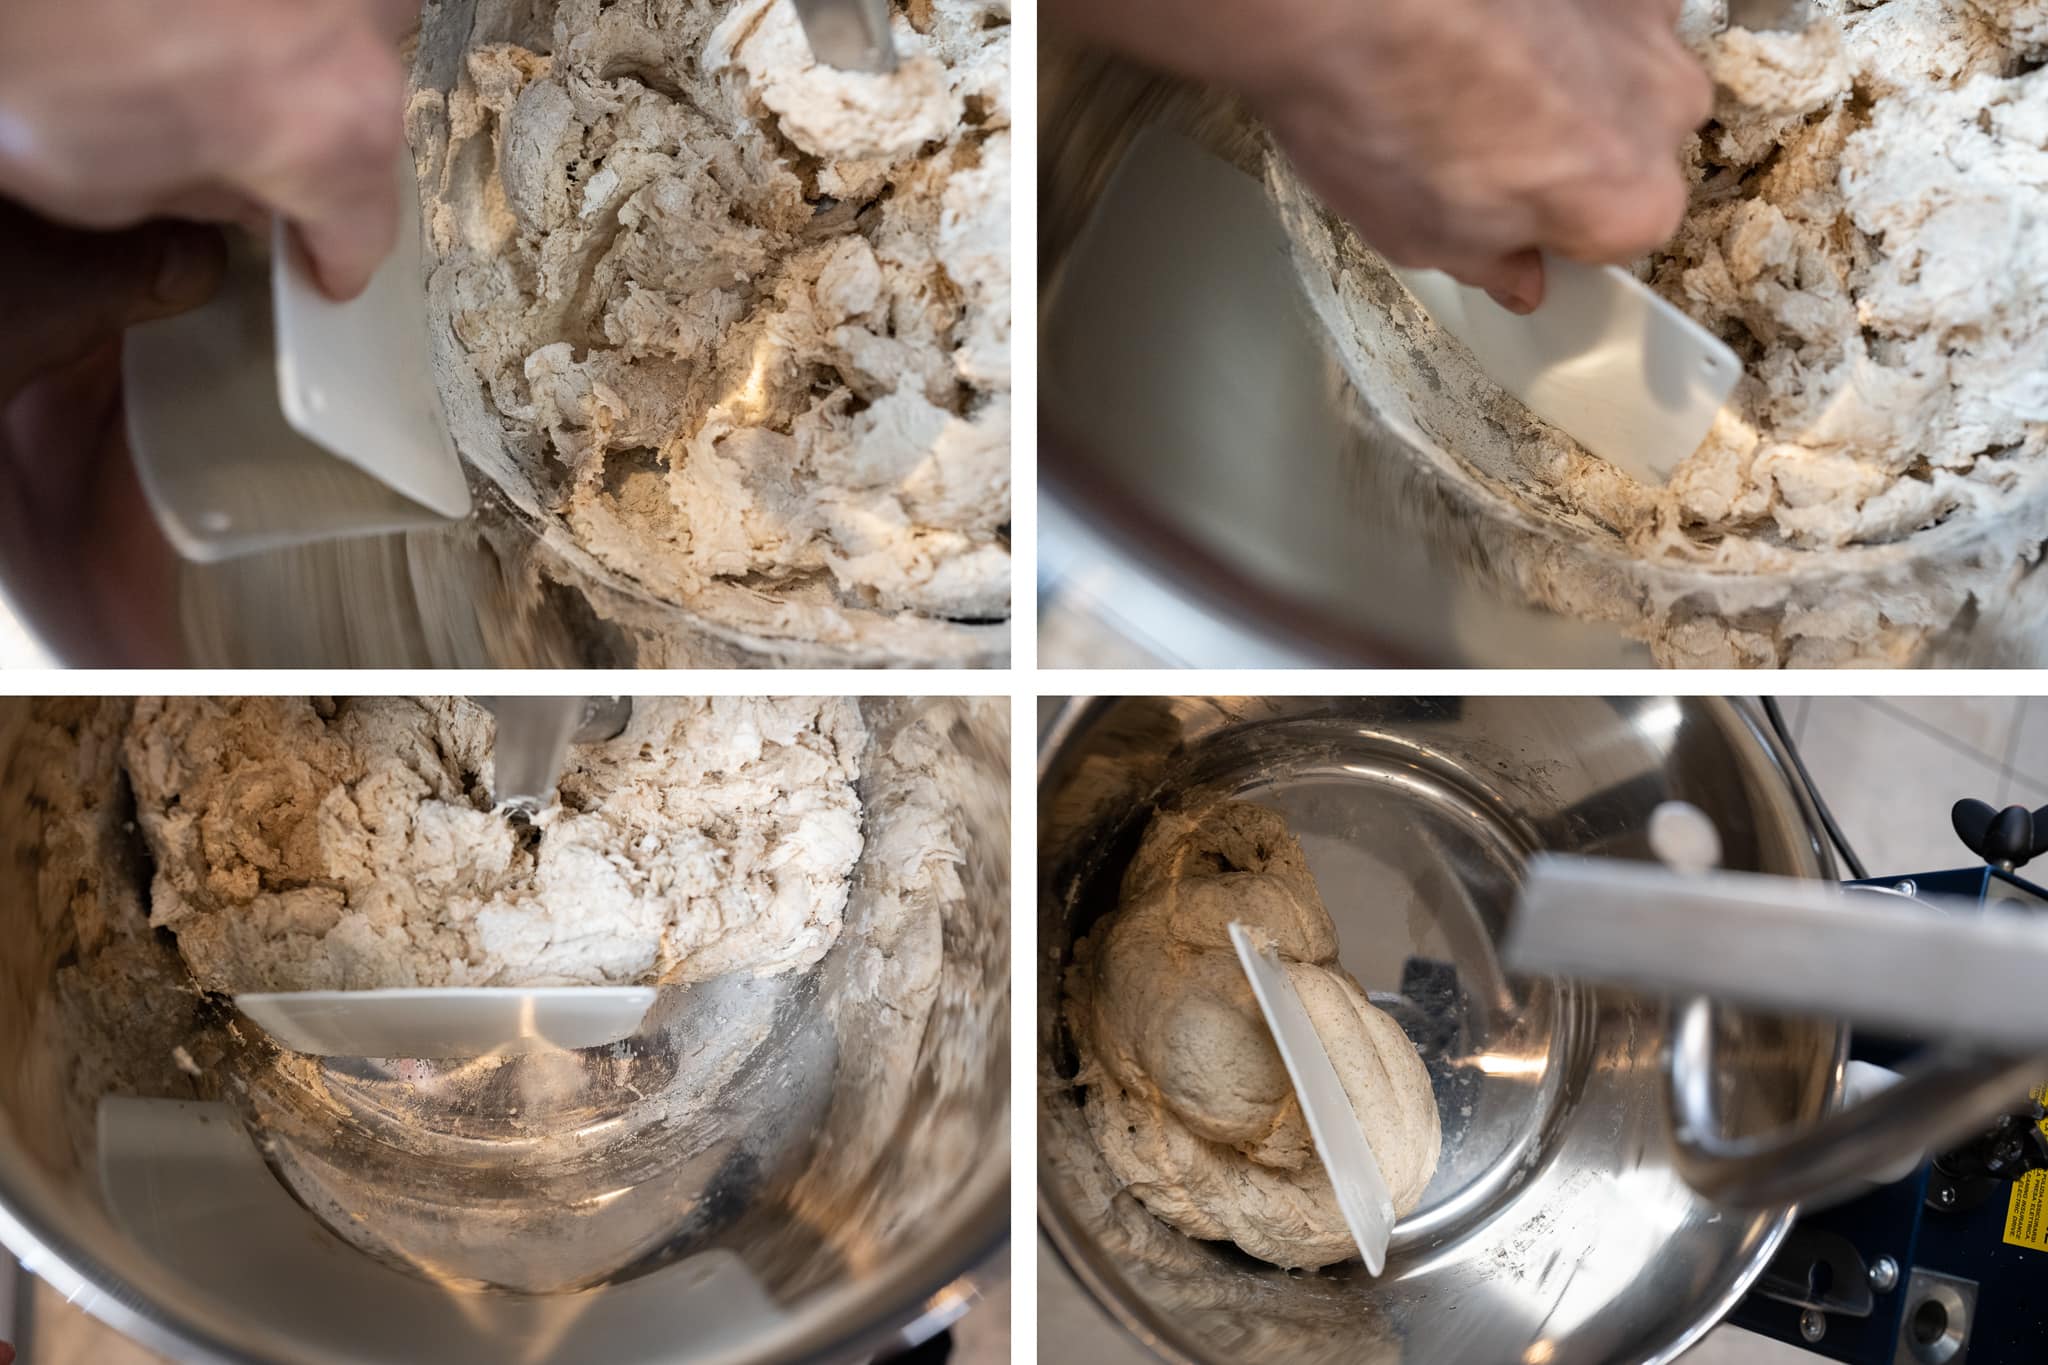
As you can see above, periodically scraping the sides of the mixing bowl with a plastic bowl scraper will help remove any stuck flour. I like to use these plastic Ateco scrapers because they can gently bend to match the bowl’s curvature, making for a clean scrape.
Famag Spiral Dough Mixer Maintenance
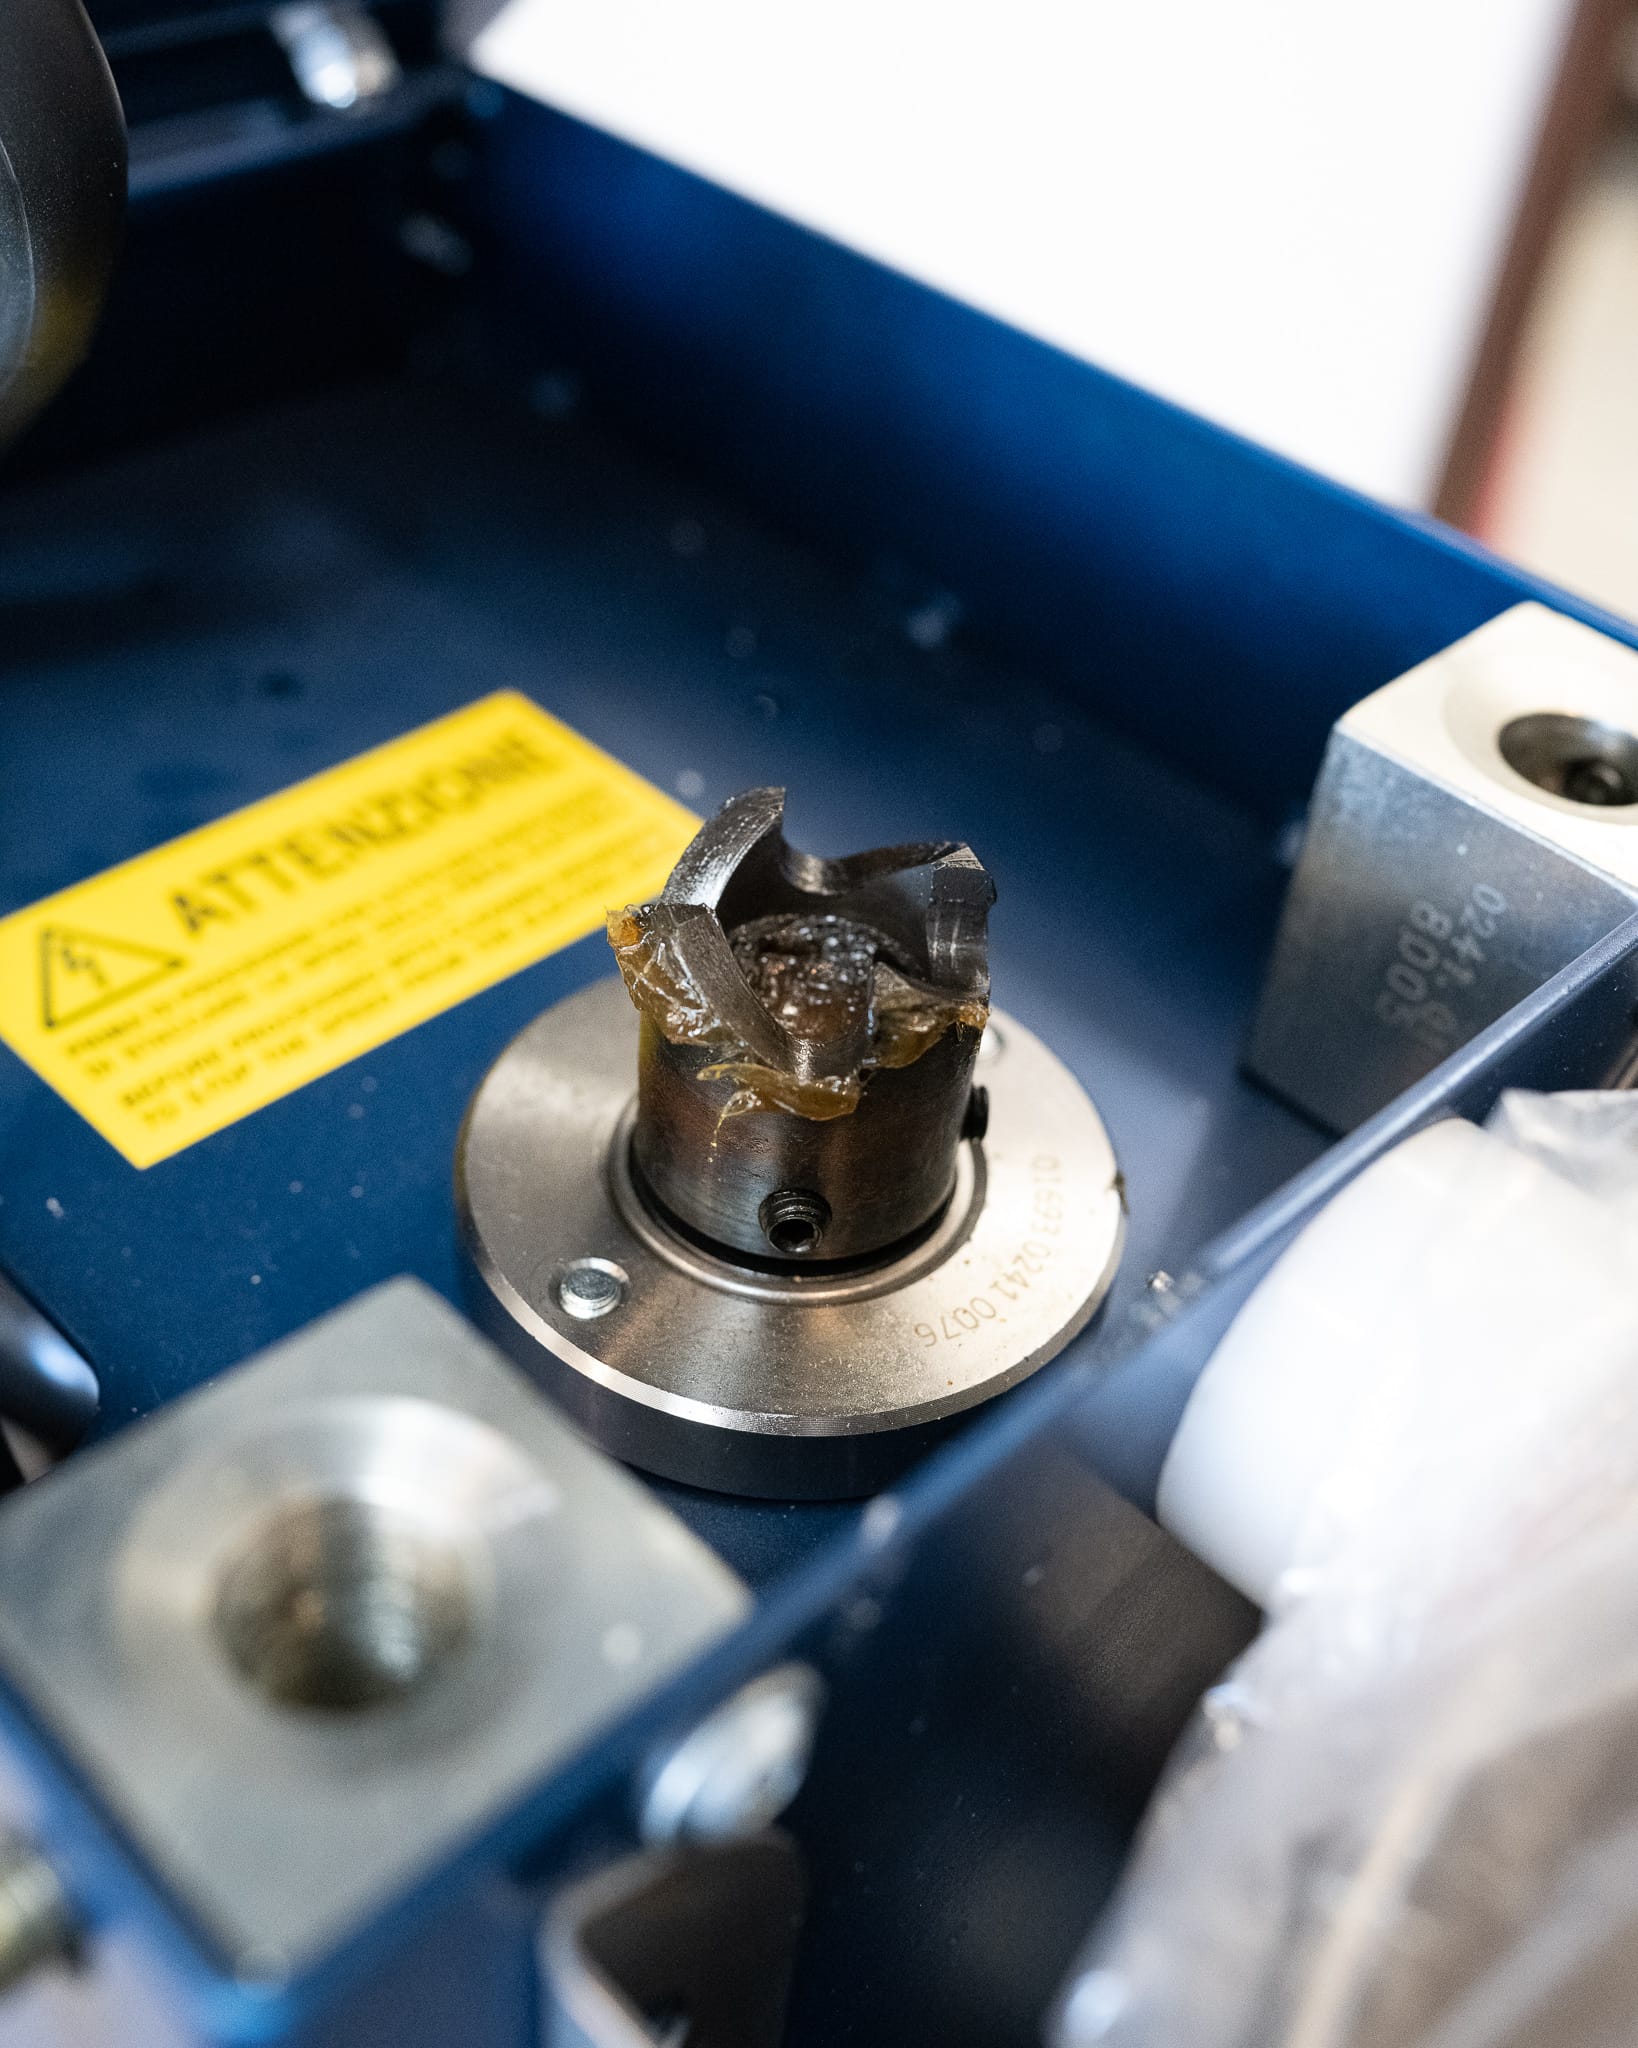
Aside from keeping the mixer clean during everyday use, the one spot I know I’ll have to pay attention to is where the mixing head connects to the unit’s base. As shown below, a lubricant keeps the joint between the motor shaft and the top gear assembly. Mine has plenty of lubricants, but I plan to use a food-grade lubricant on this joint as necessary. This is a typical maintenance task for any mixer.
Moving the Mixer
The Famag dough mixer is a heavy piece of machinery. While it is possible to pick it up and move it around your kitchen (and I do this periodically), I prefer to keep it on a metal cart with castors for rolling around.
The cart pictured is the Haussler steel cart, which fits this Famag and the Haussler Alpha mixer. There’s another cart available that perfectly fits the Famag (and is the one I’d get if buying the mixer today).
Famag Wish List
I couldn’t write a how-to-use a Famag dough mixer guide without listing a few things I wish the mixer would change or have. Here’s my short list of minor issues and things I wish the mixer had:
- Mixing reverse: Some Famag spiral mixers have a reverse function, but my version does not. A reverse function sets the bowl and hook moving in the opposite direction from when mixing. This makes cleanup easier, as any dough stuck to the hook will slide off when running in reverse.
- There are only two speeds, speed 1 and speed 2. Having an analog speed control with ten speeds isn’t necessary; in the end, I use the same positions on the dial (speed 1 and speed 5) to approximate a typical mixer with speed 1 and speed 2 (low and high).
- A better mixer head locking mechanism: spinning the lever to tighten the tilting head is incredibly easy. However, I’d prefer a sliding head-locking mechanism like the Haussler Alpha (a large steel bar slides into the base to lock the head).
- Mixing timer control: Setting a timer for the mixing duration would be nice.
Even with those wants, I still think it’s one of the best home mixers you can buy, especially with a breaker bar.
Conclusion
Ultimately, I think this Famag IM 8S spiral dough mixer is one of the best mixers for the home kitchen (and some commercial kitchens, especially the larger capacity versions). The mixer has a breaker bar, a rarity in smaller spiral mixers, making it much more desirable. Also, the mixer is thoughtfully designed and solidly built. There are a few things I wish were changed, and I wish they had, but I think that’s always the case with any equipment.
Ultimately, I’d recommend the Famag for any sourdough bread baker looking to mix larger batches of bread dough from the home kitchen.
Famag Dough Mixer FAQ
How long do I knead dough in my dough mixer?
It ultimately depends on the bread dough formula itself. But generally, I mix for 2 to 3 minutes on speed 1 and then 3 to 4 minutes on speed 2.
How do I keep flour from sticking to the bottom of the mixer bowl?
I like to add water to the mixing bowl first, then the flour and other ingredients. I also use a plastic scraper to scrape the sides of the dough while mixing to prevent dry flour accumulation. Finally, I add a little water while the mixer runs to help loosen the dried flour.
What is a breaker bar on a spiral dough mixer?
A breaker bar in the middle of the mixing bowl helps keep the dough from climbing or riding up the dough hook during mixing.
What’s Next?
If you’re looking for more professional-level bread-baking equipment, check out my writeup on the larger RackMaster RM2020 Bread Oven, a workhorse for any home or professional baker.
Looking for a smaller spiral mixer for the home? Check out my review of the Ooni Halo Pro Spiral mixer.


40 Comments
I've been making your beginner sourdough recipe with my Famag IM-5S the past few months and getting decent results, but still learning the ropes….really chasing the super light and lacy crumb!
I'm trying to take the mix to the point where it only needs one coil fold before going into bulk. The mix times/speed seem to be highly dependent on the batch size….I've found starting with a fermentolyse at Speed 2 for 5 minutes, followed by a a 30 minute rest, and then 90-seconds to 2 minutes at Speed 5 works pretty well.
Wondering if you've experimented any more with your Famag and sourdough recipes since posting and have made any changes? This mixer is incredible and think a good amount of your readers would love to see you use it more! I'm short on time somedays and really trying to come up with a good way to do an overnight levain, mix/coil fold in the morning, leave for 8 hours whilst bulking and then shape/cold ferment when I get back home.
Would love to chat more about using the Famag for other recipes in your book too!
Cheers!
The Ankarsrum mixer is great for making bread dough at home. It has an adjustable upper arm to help prevent the dough riding up the dough roller and a separate spatula blade to keep sides of bowl clean. The bottom of the bowl is flat and it mixes all the ingredients together without sticking on bottom. There is a learning curve going from a stand mixer to Ankasrum, because it simulates hand kneading and have to mix longer than a kitchenaid. It’s very easy to clean, two control knobs, multiple adjustable speeds and has a built in timer and 7year warranty, and multiple attachments for other baking needs. (See at King Arthur baking website)
Does anyone have a Famag mixer specific sourdough country bread recipe with mixing times/speeds they could share? I've had the IM-5S model for a few years and haven't developed a good workflow for country bread. I'm currently using the Tartine recipe and start all the ingredients out in the mixer for 2 minutes on speed 1, 30 minute auto-lyse, add salt/additional water and mix for 3 minutes on speed 1…..then unfortunately am doing stretch/folds every 30 minutes for 3 hours and feel with a mixer like this that there has to be a better way! Committing so much time to 6 sets of stretches and folds over 3 hours really limits when I actually have time to bake bread….would love to find a way to use the power of the mixer to maybe only have to do 1 or two sets of folds and just let it bulk ferment most of the time.
Please let me know…I'd be incredibly appreciative!
I would try my mixing times above in the article. But it sounds like you need to mix longer on "speed 2" with the Famag, so maybe speed 5 on the dial for 3-5 minutes after that rest period.
Hi Maurizio, do you still need to autolyse when you use a spiral mixer?
Autolyse almost always optional, whether you're mixing with a mechanical mixer or not. But with a mixer, since you can mix more efficiently, you can skip. When I use my mixer, I still do an autolyse most times, though, but again, it's optional and dependent on the flour you're using, hydration, schedule, and more.
When mixing in the mixer only, without later stretch and folds during bulk fermentation, will the loaf develop fewer / smaller air pockets, than when mixing by hand with later stretch and folds? Or will it be the same?
It's very difficult to answer that! There are so many factors at play there. But as I mention above (and in my larger guide to mixing bread dough ), for a more open interior it's key that the dough needs to be strengthened sufficiently.
What's speeds do you prefer to use when making panettone dough?
For panettone in this mixer, I usually stay around 2-3. Lower speed I've found is best to avoid overheating the dough.
Isn’t a key feature of the breaker bar that it shears out the dough? I hadn’t thought of its role in keeping dough from climbing the spiral before.
Yup, the breaker bar is key for preventing the dough from climbing up the hook.
The Sunmix are fantastic, too. I will have. writeup on them here soon!
As James said, no, the tilt head will hit the cabinets.
Good article, thanks. I have a Famag mixer on it’s way. What would you suggest as an initial number to use as a friction factor? Thanks!
Hi, have you any experience with an Ankarsrum? Just got one, partly because KA couldn’t handle bagel or pretzel dough. Apparently not quite as much of a “beast” as Famag. And not technically a spiral, although it does employ some of the same mechanics.
How do you store this mixer? Could I keep it in my garage? It can get pretty cold at night (I live in Ohio)
Hi Maurizio. Good review! Just got an IM-10. Kind of scratching my head about mixing times. I mainly make sourdough bread 70% hydration. 80% KA Bread Flour and 20% home ground white berries (Palause). About 9 to 15 pounds of Dough at a time. Ferment starter (fed the day before) for 2-3 hrs. 1 hr autolise of the “main” Dough, then add the salt and mix-in both in the Famag then 4 S&F with 20 min wait time, followed by app 2 hr bulk fermentation, cut, shape, bench rest 15, final shape, proof app 2 hrs then bake. All fermentations done over a temp controlled seed germinator set to run between 83-85 F
Could you suggest mixing times for the Famag, I would then experiment around them. First time I used it I kneaded for 10 min speed 1. Results were ok but I did not get a good oven spring and crumb was average (not looking for big alveoli). 2nd time, I mixed for 20 min and yes, overdid it. Would you do between 6-9 or test between 10 and 15
Dan
Hi, do you have ani insight on mixing 100% whole rye dough with the FamaG? Does it do the job? How is the cleaning done? (especially if i have the fixed head model). Thank you very much, Jul
Hi maurizio,
Thank you for the detailed post. I’ve been using a famag 10s for some time now and one issue I continually run into is small lumps in my final dough. It also seems to be related to the amount of dough I am mixing. The larger the amount the more lumps. How do you avoid this from happening without running the risk of over mixing the dough during the autolyse?
Thanks,
Otto
Hi Maurizio .. great article/review .. thanks! My question is really the most basic of all: Spiral mixers are clearly designed to help mix larger quantities dough, faster and with less effort than can be achieved by hand mixing .. But what about the qualitative characteristics of the end, baked product? .. Spiral versus hand mixing? Are there scenarios/doughs where you consider the spiral mixer to produce superior results, or perhaps there might be a trade-off in some way? .. Have you experimented with different combinations of mix speeds and times to achieve a particular end result? Such as in a sourdough loaf, or a pizza crust? ..
A really great question, Russ. I used to hold fast to the thought that hand mixing is always superior to mechanized mixing and that using a machine was done out of necessity, not choice. For what reason exactly, I’m not quite sure. Perhaps it’s the built up ideal of sourdough baking in my mind where a baker would do everything by hand, by touch, by sight—all the senses. I think there’s definitely some merit to using your senses and doing things by hand, and it’s certainly an important part of baking, but I’ve come to realize over the years I’ve baked that using mechanized means in certain parts of the process isn’t a bad thing. In the end, we must develop the dough to the point where it will gain sufficient volume in the oven. This development can happen by hand or in a mixer, the choice is up to the baker. I certainly see benefits to using a spiral mixer, it actually does result in a dough that’s efficiently developed in a way that’s hard to achieve with hand mixing. However, this doesn’t mean hand mixing doesn’t have a place in my baking, because it certainly does and always will!
I guess what I’m saying is that neither hand mixing nor machine mixing is better than the other, the results of each are equally wonderful. At the end of the day, bakers are required to develop their dough sufficiently through whichever means they prefer.
I’ve played with mix times all over the spectrum, from very short only in second speed, to very long in single speed, to somewhere in the middle. I can’t say I notice too much different there, but if I had to choose, I’d say I like more of a gradual approach to mixing where I mix at slower speed, rest, then at faster speed.
Finally, I also like to only mix (in a spiral or by hand) up to a point where I still need to give the dough 2-3 sets of stretches and folds during bulk fermentation. That means stopping well before full development.
I hope that answers your question!
lol i keep popping up all over your blog but i have a question about using a mixer, i own a stand mixer and would like to use it just so i can save time during the week and still make sourdough, when you use a mixer do you add all the ingredients at once than mix than knead with the machine and would you still autolyse?
Hmm, that’s interesting. I can’t say I’ve noticed a correlation between how much total weight I have in the mixer and how long I have to mix, but I might expect it to take longer as there’s more mass to physically strengthen. At very low quantities I’d expect the mixer to be inefficient, but then at some point it should reach max efficiency, perhaps up to the mixer’s capacity… I’d have to test this!
Awesome, David! Yes, the more you mix upfront, the less you’ll have to develop the dough during bulk fermentation.
You’re very welcome, Curtis! Thanks for all the comments and feedback there. I think ultimately the mixing time will certainly be dependent on the mixer itself, and that final time comes with experience. My mixing times are definitely different in a Haussler!
Glad to hear the mixer is working well for you. I have thought about getting the 5S from time to time, especially when I’m doing small batches (in which case I usually hand mix).
Happy to help and happy baking!
I also read your post about Famag and I bough the IM 8 (single speed). I need to mix the dough a little bit longer but the effect awesome 🙂
I was able to mix 900g of the dough in small bath and it was well developed 🙂
I’m thinking only about adjusting the folds count. Previously I was baking Tartine recipe in which we’re developing the dough by stretch and folds but when I’m using sprial mixer I can skip half or even most of the stretch and folds. Am I right ?
Thank you so much. I will go with the single speed and save myself 150 euro (750 euro for single speed vs 894 euro for 10 speed) on the 5-S. Savings will be used for ingredients! 🙂
I wish you a great weekend!
Thanks a lot for the reply. So you’re saying that the somewhat longer mix times isn’t a problem e.g. in relation to oxidation? Is there anything you can’t do with the single speed version?
There’s really a true science / chemistry aspect to baking that I’m not really too familiar with! 🙂 Not even sure if longer mixing time at low RPM results in more or less oxidation than shorter mixing time at high RPM. Maybe its equal? Is oxidation even a problem? What about compared to hand mixing e.g. a pizza dough which compared machine mixing would be considered much less “RPM” and much longer mixing time? So many questions.
I’m convinced either way – now I just need to decide on the size 5 vs 8.. Will probably 5’er due to the smaller footprint. 🙂
THANKS again.
In my experience, longer mix times at reduced RPMs should about equal a shorter time at higher RPM. In terms of oxidization, it’s definitely a concern with a mechanical mixer, but it’s always important to properly mix a dough (and oxidization is actually a good thing to a degree, the dough needs it for proper gluten development). I think a single speed mixer should be able to do all the same as a multi, it just needs more time.
They are nice mixers, especially for the home! I really do like the flip up option, but that’s just me. It’s nice to take the bowl out to the sink for cleaning. A single speed is just fine, like you said, it just means longer mix times (which isn’t a big deal IMO). Hope that helps and let me know if you get one! Mine is coming out today for some heavy mixing 🙂
It does help, thank you very much for the response.
Congrats on the mixer! You’ll likely still need stretch and folds, which is a good thing in my opinion. I never fully develop my dough (unless doing a special enriched style bread or something special), instead I opt for medium development in the mixer, then 1-3 sets of stretch and folds during bulk. Those sets give you a chance to check in on the dough and ensure it’s on track. It also helps keep the dough’s temperature mostly consistent from top to bottom, side to side (folding redistributes a bit). Hope that helps and happy baking!
Hey, Debbie! I’ve not mixed challah dough in this Famag, but I would guess it would work well. I know I do tend to use my planetary KitchenAid for enriched doughs, but that’s typically because they’re smaller batch sizes. If it were me, I wouldn’t hesitate using my Famag for an enriched dough—if I was making a large enough batch, that is 🙂 Hope that helps!
interesting… the current models seem to have a 1:10 bowl:hook ratio. mine has a 1:8 ratio. wonder how significant that is. i bought mine from EU before PHG started selling them in the us. i wonder how significant those extra 2 hook rotations are for higher hydration dough development. wonder if there’s a gear kit one could upgrade and if it’d be worth the trouble.
That is interesting. Not sure about efficiency/effectiveness differences there. My guess is adjustments in mixing time will likely compensate for the difference, though!
when you decide to get a spiral mixer, you’ll be glad you have the planetary mixer for cakes and cookies.
Hi Maurizio, I’m going to rock the sunflower sesame recipe today. I have a KA, your post says I can use it but I have no idea how to do that. Do I use the paddle, the hook? At what speed? How long?
With that dough, I’d go with the hook. Perhaps something like 3-5 minutes total mixing time should do it! I have a guide coming on how to use the KA mixer for enriched doughs and regular doughs alike… Getting there!
Hi Maurizio, I have a KA mixer…your guide is already out yes?