
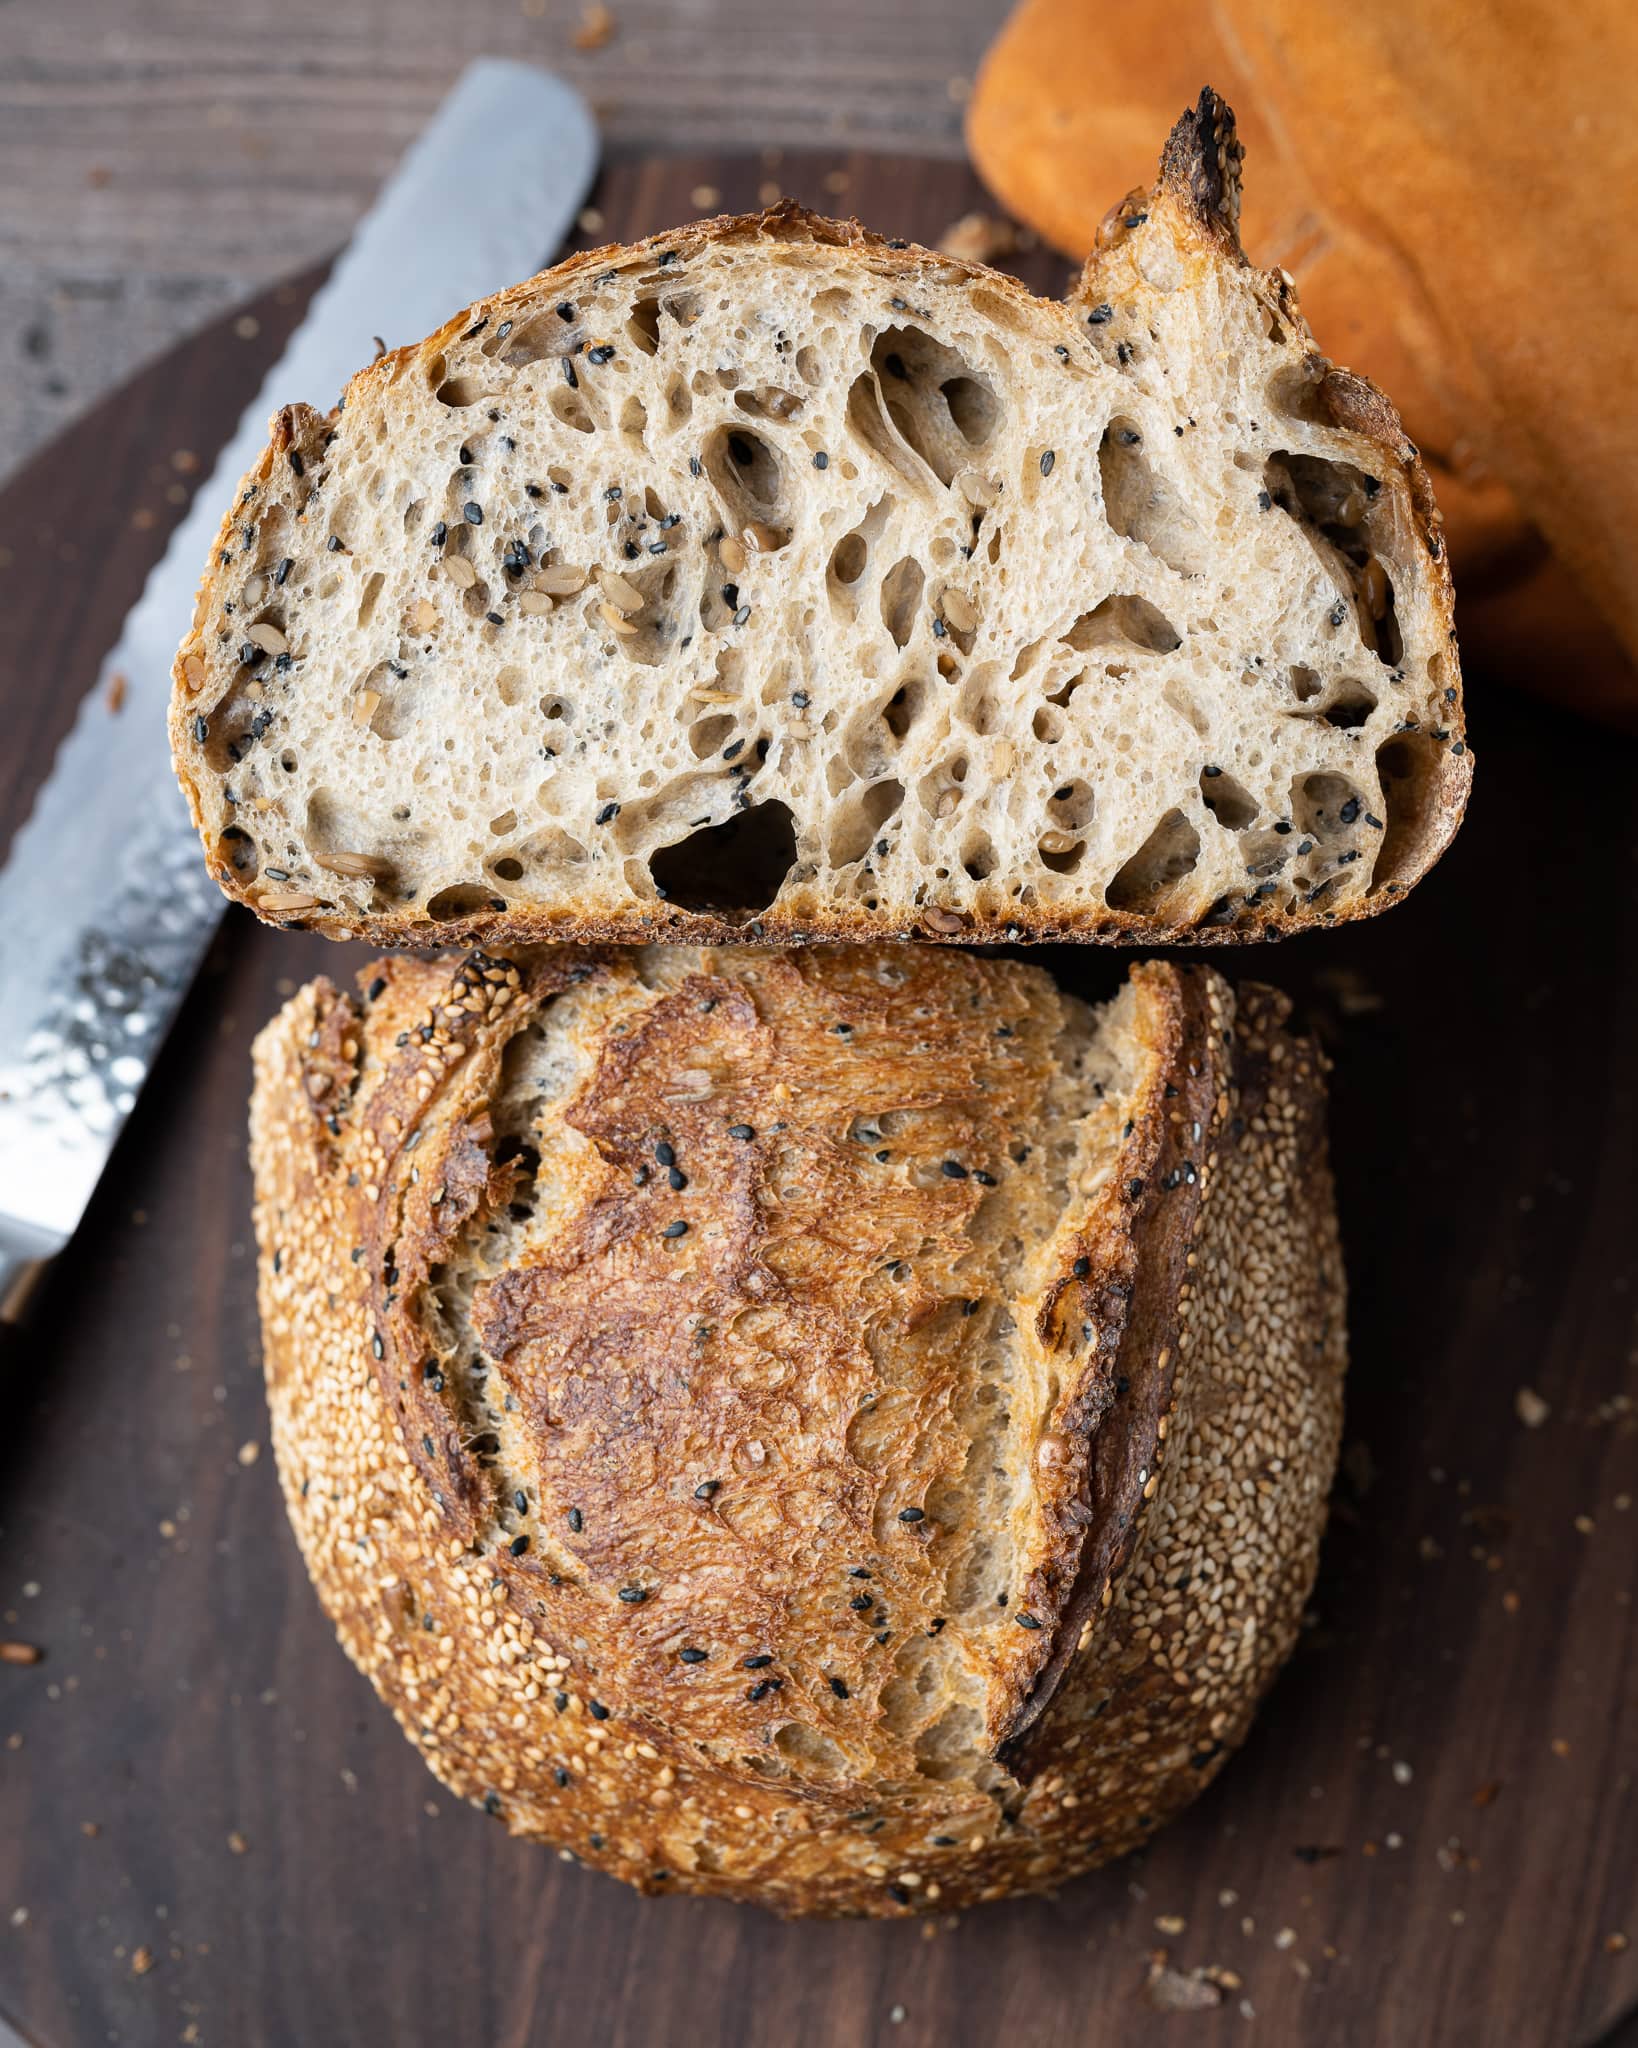
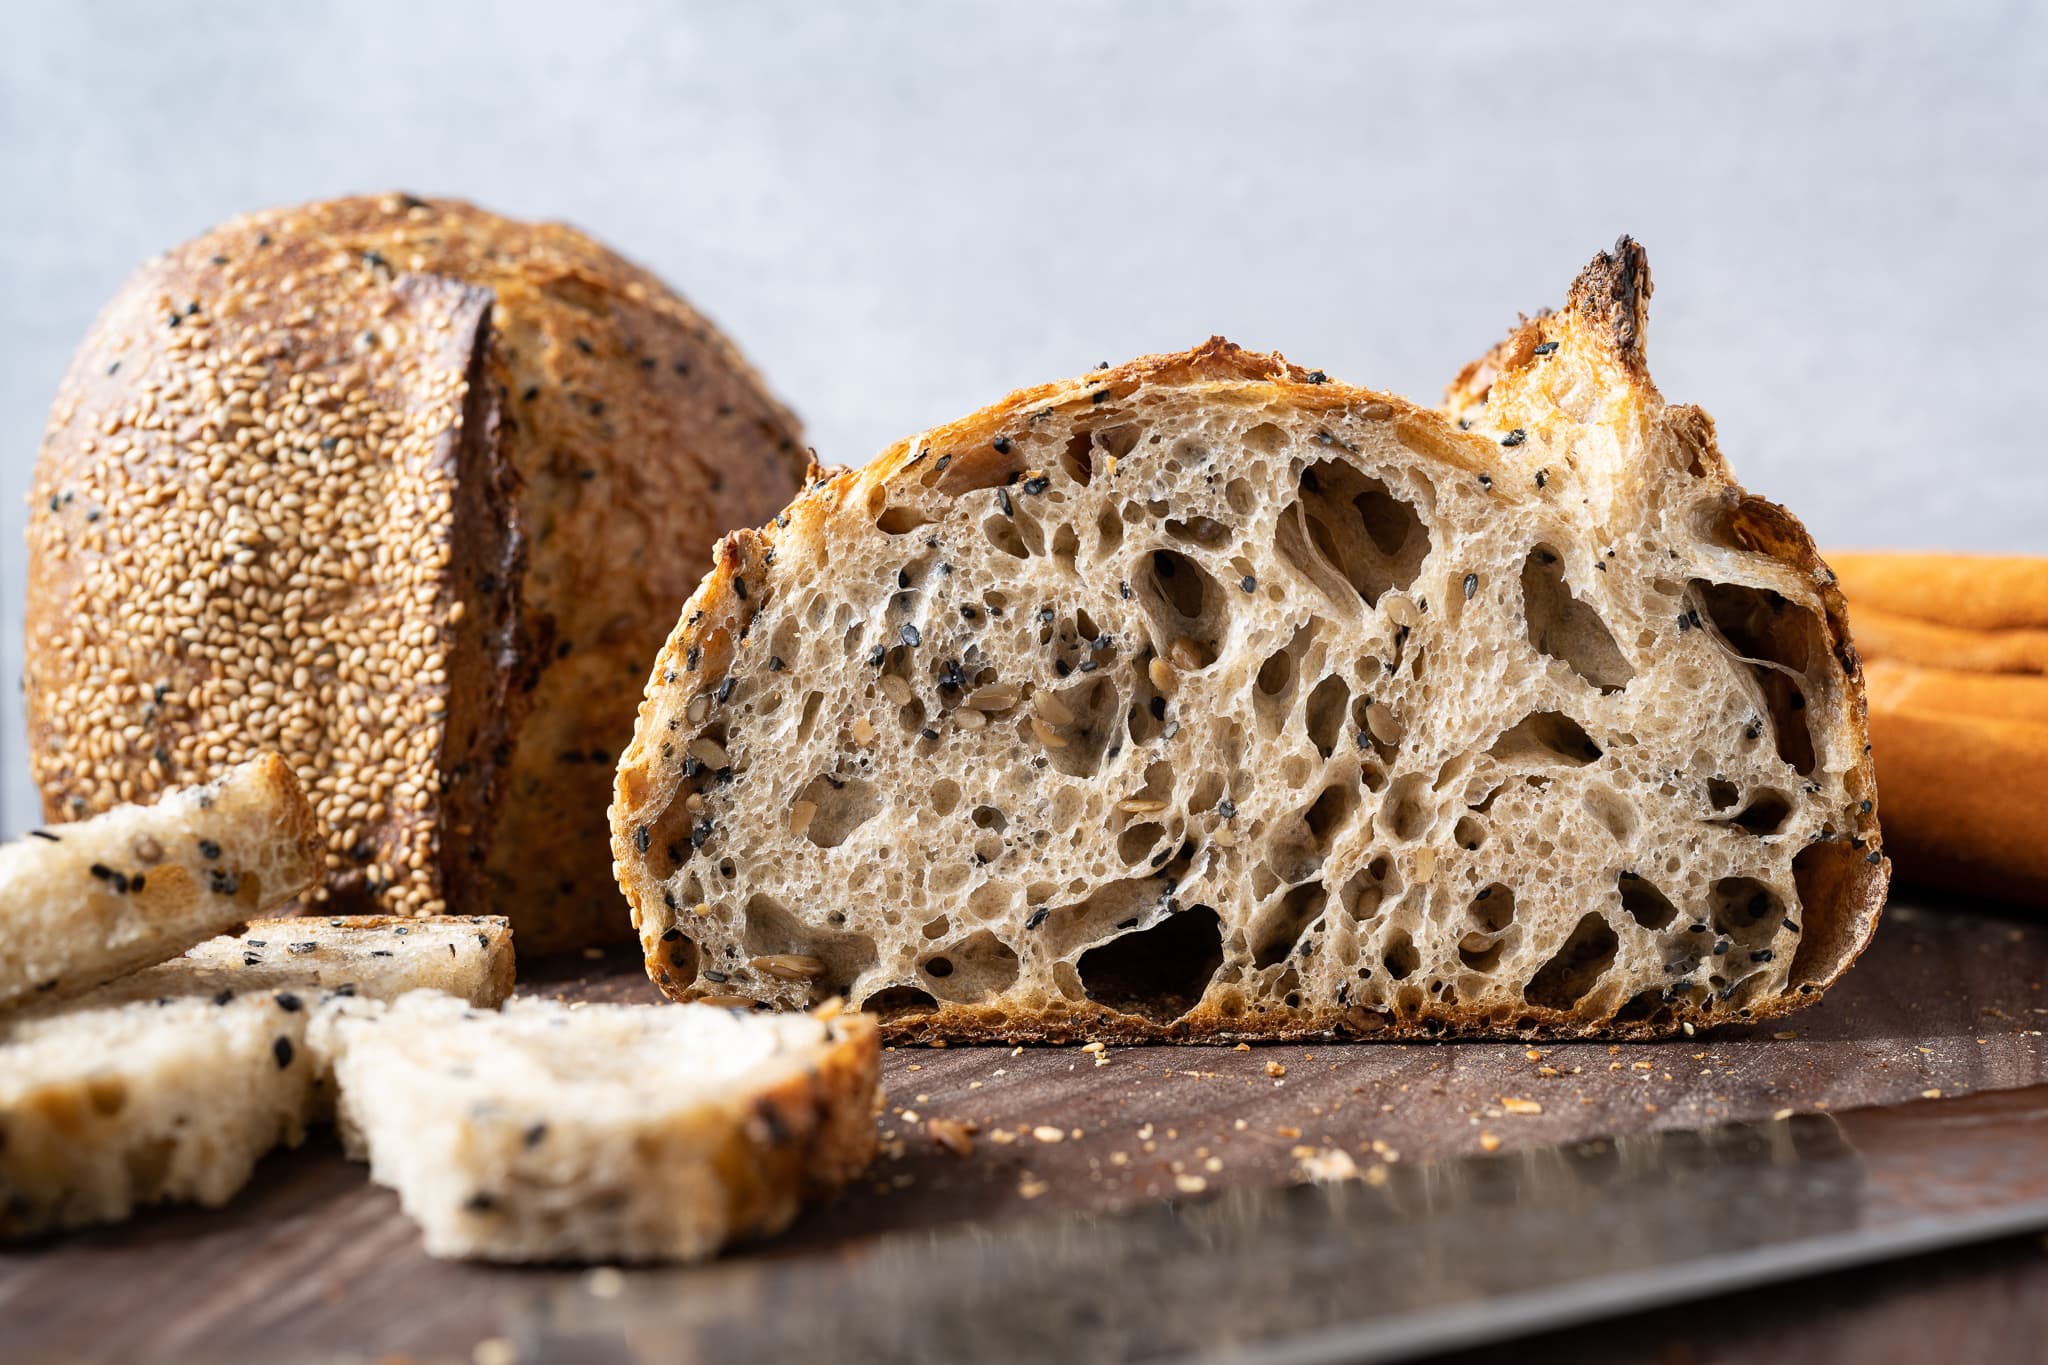
Every once in a while, a bread comes along that surprises you with its wholesomeness. Add in a little more whole grains, a few handfuls of nutritious seeds, a little sweetness from natural honey, and with sufficient natural fermentation, the result is a loaf that tastes as good as it is healthy. Nutty sunflower seeds—something I’ve surprisingly often overlooked in my baking—and my often-used and never under-appreciated sesame seeds are a winning combination I need to turn to more often. And this sunflower and sesame sourdough bread is so easy to put together! The loaf has the flavor of these rich seeds, in concert with the dash of mellow and warming honey, makes for a delightful loaf.
I just love eating my way through a slice of this bread. Toasting takes the whole package up a notch, making it—especially the crust—crunchy like a boot through fresh, crisp snow left overnight to harden. There’s something a seed soaker brings to a loaf that seems to conjure this crunchiness; whether it’s the water in the soaker or the seeds themselves, it has the potential to turn me into a seed fanatic. I mean, it is easy to add them into a dough, and their nutrition is always welcome—perhaps I should do it more often.
The flavor of sunflower seeds will always remind me of summers spent digging through bags of salt-covered shells, cracking each one to get the prized kernel. They’re an addictive lot, these seeds, a snack for mindless consumption. I always found myself quickly polishing off an entire bag before realizing I’ve even started. That is, until the inevitable salt overload kicks in, compelling you to chug a few bottles of water and swear next time you’ll take it easy. But of course, you don’t. And the wonderful cycle repeats.
I’ve since curbed my appetite for salted sunflower seeds, but my appreciation for their flavor never left. This bread is chock full of the tasty little morsels, and roasting them beforehand amplifies their nutty flavor. The 30% whole grain in the formula brings an earthiness that works well with the added seeds, and I could see going even higher to bring even more flavor.
Let’s first look at how to prepare the sunflower and sesame seeds.
Choosing and preparing sunflower and sesame seeds
I used roasted and unsalted sunflower seeds from the market, but raw, unsalted sunflower seeds with a quick toast—10 minutes should do it—in the oven at 350°F (175°C) would work well. Roasting/toasting the seeds amplifies their nutty (isn’t it interesting we say sunflower seeds have a nutty flavor when they’re seeds?) flavor.
I’m a huge sesame seed fan, and I always have a jar of white and black sesame seeds in my pantry ready to be used on the outside of any loaf. I prefer using white sesame seeds on the outside; when they are toasted in the oven while the bread is baking, they take on a deliciously subtle nutty flavor. By contrast, black sesame already has a vibrant flavor thanks to its dark hull. Because of this, I prefer to use them mixed into a dough (and the look is quite striking!).
This recipe uses a seed soaker to prepare the black sesame seeds, which have their hull intact. Soaking seeds like this for a time period helps to soften them and make them more palatable. The water for the soaker is taken from the overall hydration of the formula. This way, no unaccounted for water is added to the recipe.
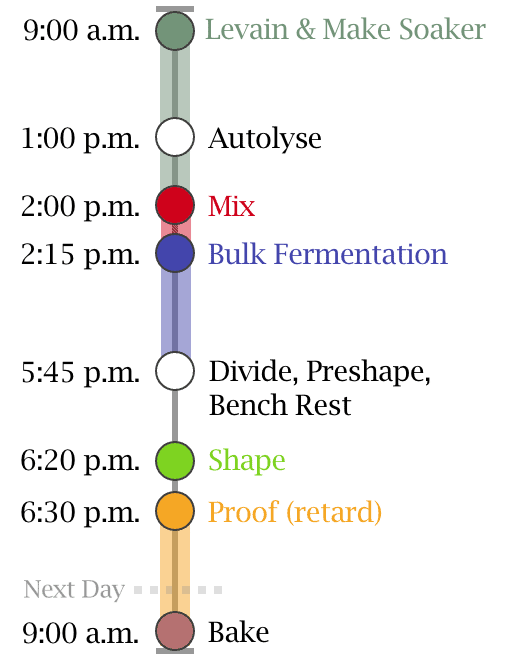
Baking schedule
This sunflower and sesame sourdough bread is made over the course of two days. Cold proofing this dough brings additional flavor, but as always, a same-day bake can be done as well. Instead of placing the shaped dough into the refrigerator to proof overnight, leave it out, covered, to proof for 1-3 hours (depending on kitchen temperatures) until ready to bake.
Sunflower and sesame sourdough bread formula
Vitals
| Total Dough Weight | 1,800 grams |
| Hydration | 77% |
| Pre-fermented Flour | 6.25% |
| Levain in final dough | 16.67% |
| Yield | 2 x 900g loaves |
This recipe makes two loaves. If you’d like to make a single loaf of sunflower and sesame sourdough bread, divide all the ingredients in half. See my guide to using baker’s percentages for further help with scaling.
Total formula
Desired dough temperature: 78°F (25°C). See my post on the importance of dough temperature for more information on dough temperatures.
The table below shows the total ingredients needed for this entire bake. In each of the Method steps below, I’ve broken out each ingredient as they’re needed in the recipe. If you’re baking in the kitchen, follow the Method steps and it’ll tell you what you need, and when.
| Weight | Ingredient | Baker’s Percentage |
|---|---|---|
| 615g | Medium-protein bread flour or All-purpose flour (~11% protein, Central Milling Artisan Baker’s Craft or King Arthur Baking All-Purpose) | 70.00% |
| 264g | Whole wheat flour (Giusto’s Whole Wheat or King Arthur Baking Whole Wheat) | 30.00% |
| 132g | Sunflower seeds, roasted and unsalted | 15.00% |
| 35g | Black sesame seeds | 4.00% |
| 35g | Honey | 4.00% |
| 632g | Water 1 (soaker, levain, and autolyse) | 72.00% |
| 44g | Water 2 (reserve for mixing) | 5.00% |
| 16g | Fine sea salt | 1.80% |
| 27g | Sourdough starter | 3.13% |
Sunflower and sesame sourdough bread method
1. Prepare the levain – 9:00 a.m.
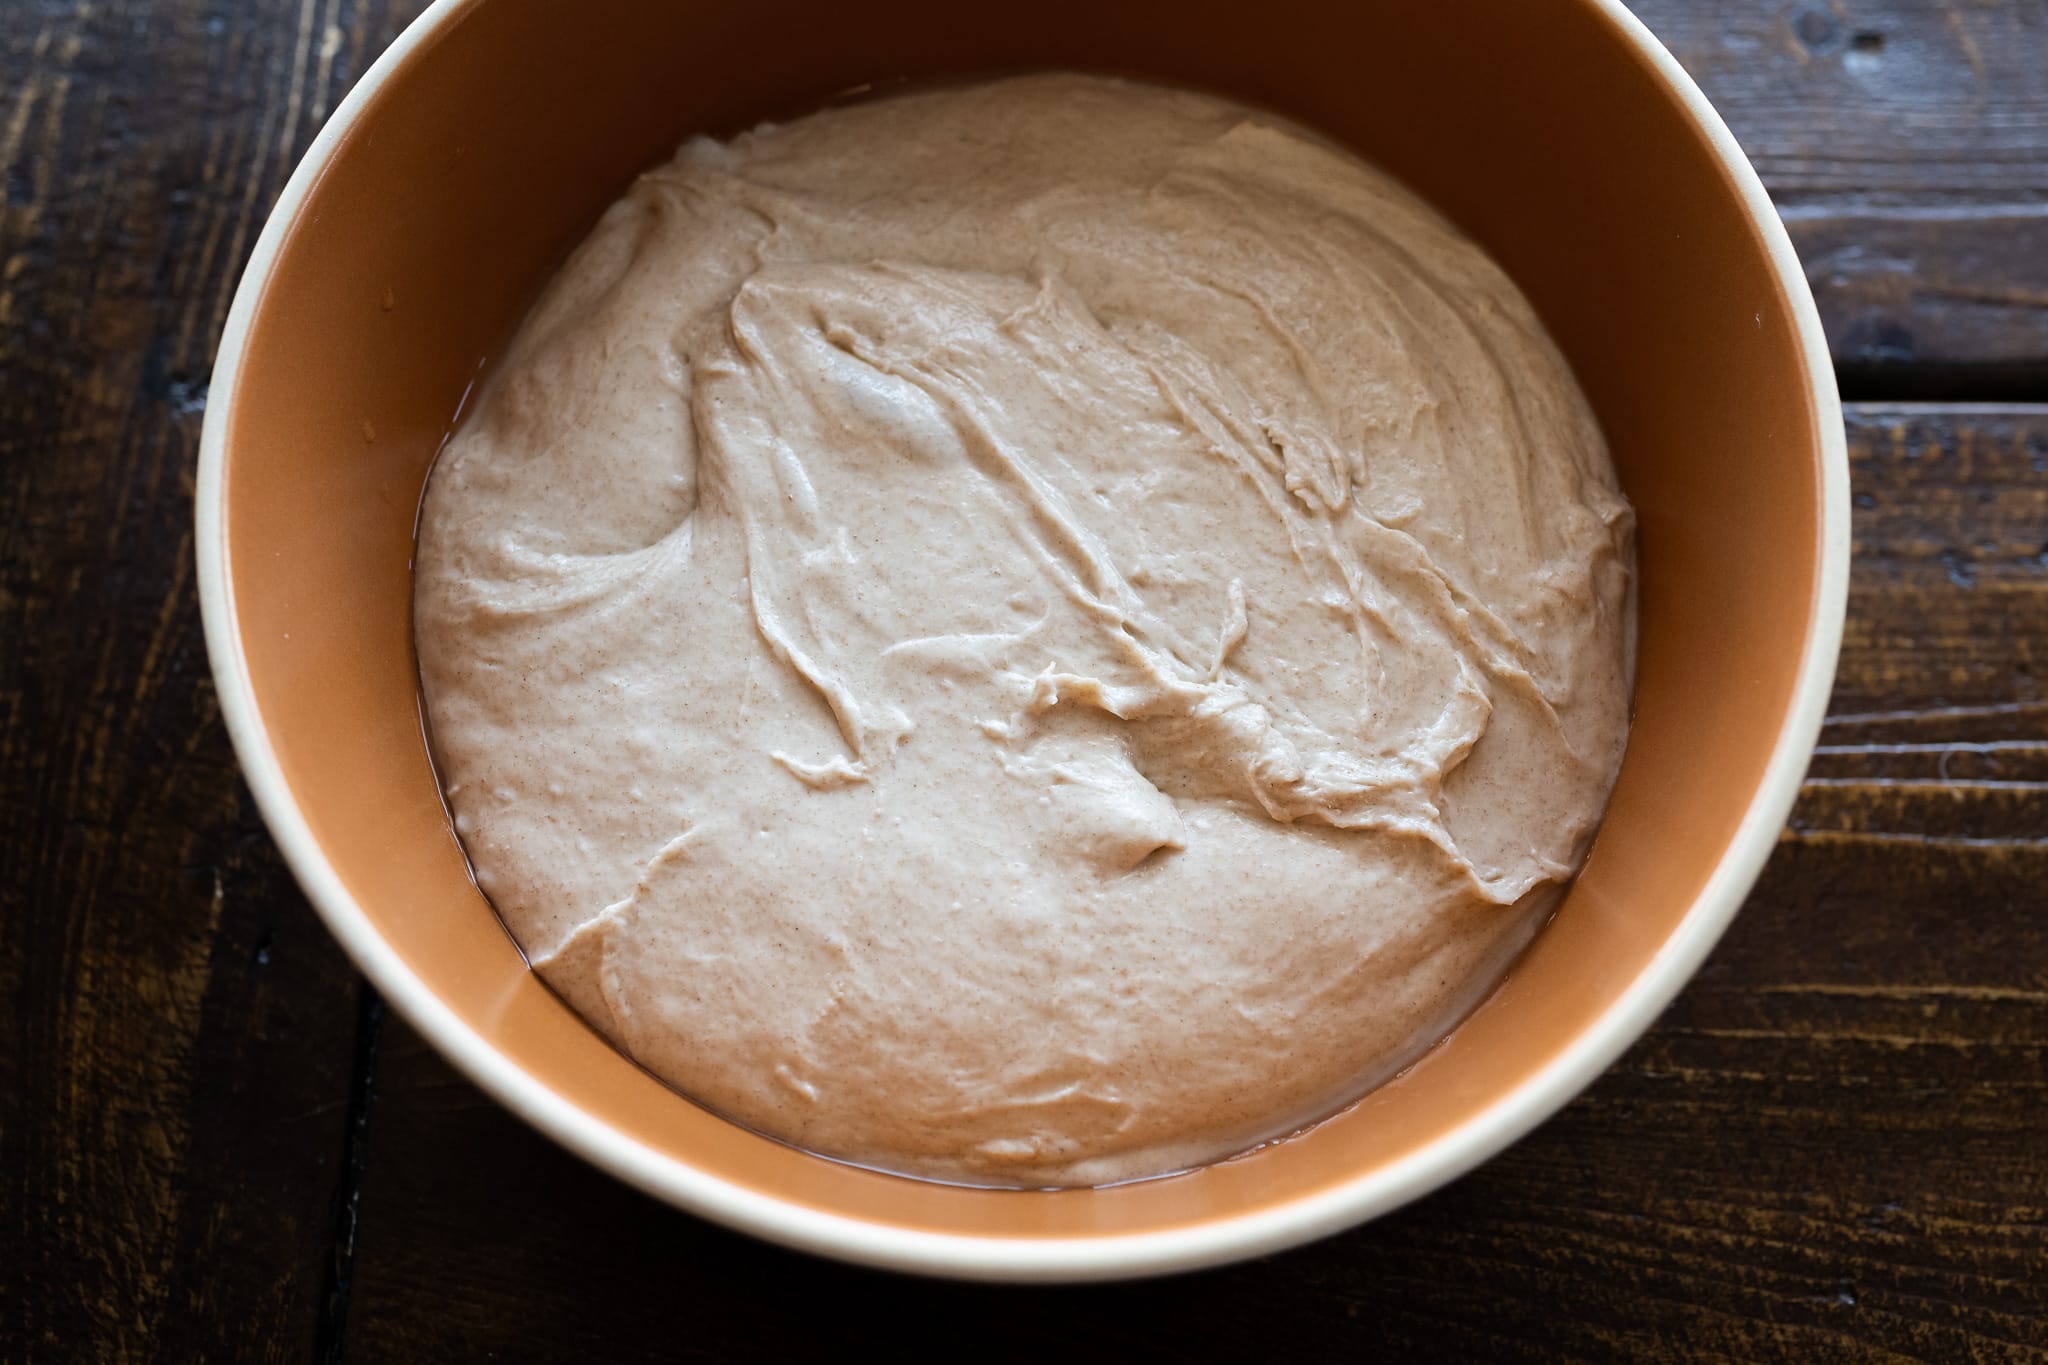
This is a relatively fast levain, ripening in five hours. Mix the following ingredients in a container and leave covered to ripen at a warm temperature, about 76-78°F (24-25°C) for 5 hours.
| Weight | Ingredient | Baker’s Percentage |
|---|---|---|
| 27g | Medium-protein bread flour or all-purpose flour | 50.00% |
| 27g | Whole wheat flour | 50.00% |
| 55g | Water | 100.00% |
| 27g | Ripe sourdough starter | 50.00% |
2. Prepare the seed soaker – 9:10 a.m.
To soften the seeds and make them more palatable when eating the final loaf of bread, soak them in boiled water while the levain is ripening, about 5 hours.
Right after making the levain, prepare the seed soaker. Add the 35g black sesame seeds to a heat-proof bowl and pour 35g boiled water over the seeds. Stir to combine and ensure all the seeds have been wet. Cover the bowl and let rest until called for in bulk fermentation.
3. Autolyse – 1:00 p.m.
This recipe uses the autolyse technique to increase the extensibility of the dough and make mixing by hand easier. In a small way, the increased extensibility also helps with incorporating the seeds.
Add the following to a mixing bowl and mix until incorporated. Let the mixture rest, covered, for 1-hour.
| Weight | Ingredient |
|---|---|
| 587g | Medium-protein bread flour or all-purpose flour |
| 236g | Whole wheat flour |
| 542g | Water 1 (this is the remaining water 1 after taking some for levain and soaker) |
4. Mix – 2:00 p.m.
Gather the following ingredients for mixing. The remaining water (water 2) should only be added through mixing and kneading if your dough feels like it can handle the addition. Use a splash to work in the levain and salt, adding the rest if the dough feels cohesive.
| Weight | Ingredient |
|---|---|
| 35g | Honey |
| 44g | Water 2 |
| 16g | Fine sea salt |
| 137g | Ripe levain (from step 1) |
I strengthened this dough by hand using the slap and fold kneading technique, which quickly develops the dough. Alternatively, you could use a bread dough mixer, or even a KitchenAid would work with this dough.
Add the honey and levain to the top of your dough already in the mixing bowl, and use a splash of the reserved water to moisten. Mix the levain thoroughly and slap and fold (or do folds in the bowl) for 5 minutes until the dough begins to smooth out and become elastic.
Let the dough rest in the mixing bowl for 10 minutes.
Sprinkle the salt over the dough, then dissolve with a splash of the reserved mixing water. Mix thoroughly. If the dough still feels very slack, continue to strengthen the dough in the bowl by stretching and folding (or do slap/fold on the counter) for a few minutes until it begins to tighten and come together.
As you can see above, at the end of mixing, expect this dough to be rather firm, smooth, and elastic. Hold back the sesame and sunflower seeds until just before the first set of stretch and folds during bulk fermentation.
Transfer the dough to a container for bulk fermentation and cover.
4. Bulk fermentation – 2:15 p.m. to 5:45 p.m.
At warm room temperature, around 74-76°F (23-24°C), bulk should take about 3 1/2 hours. If your kitchen is cooler, place your bulk container in a small home dough proofer, or extend the bulk fermentation time to give the dough more time to ferment. This dough needs about three sets of stretch and folds during the 3-hour bulk.
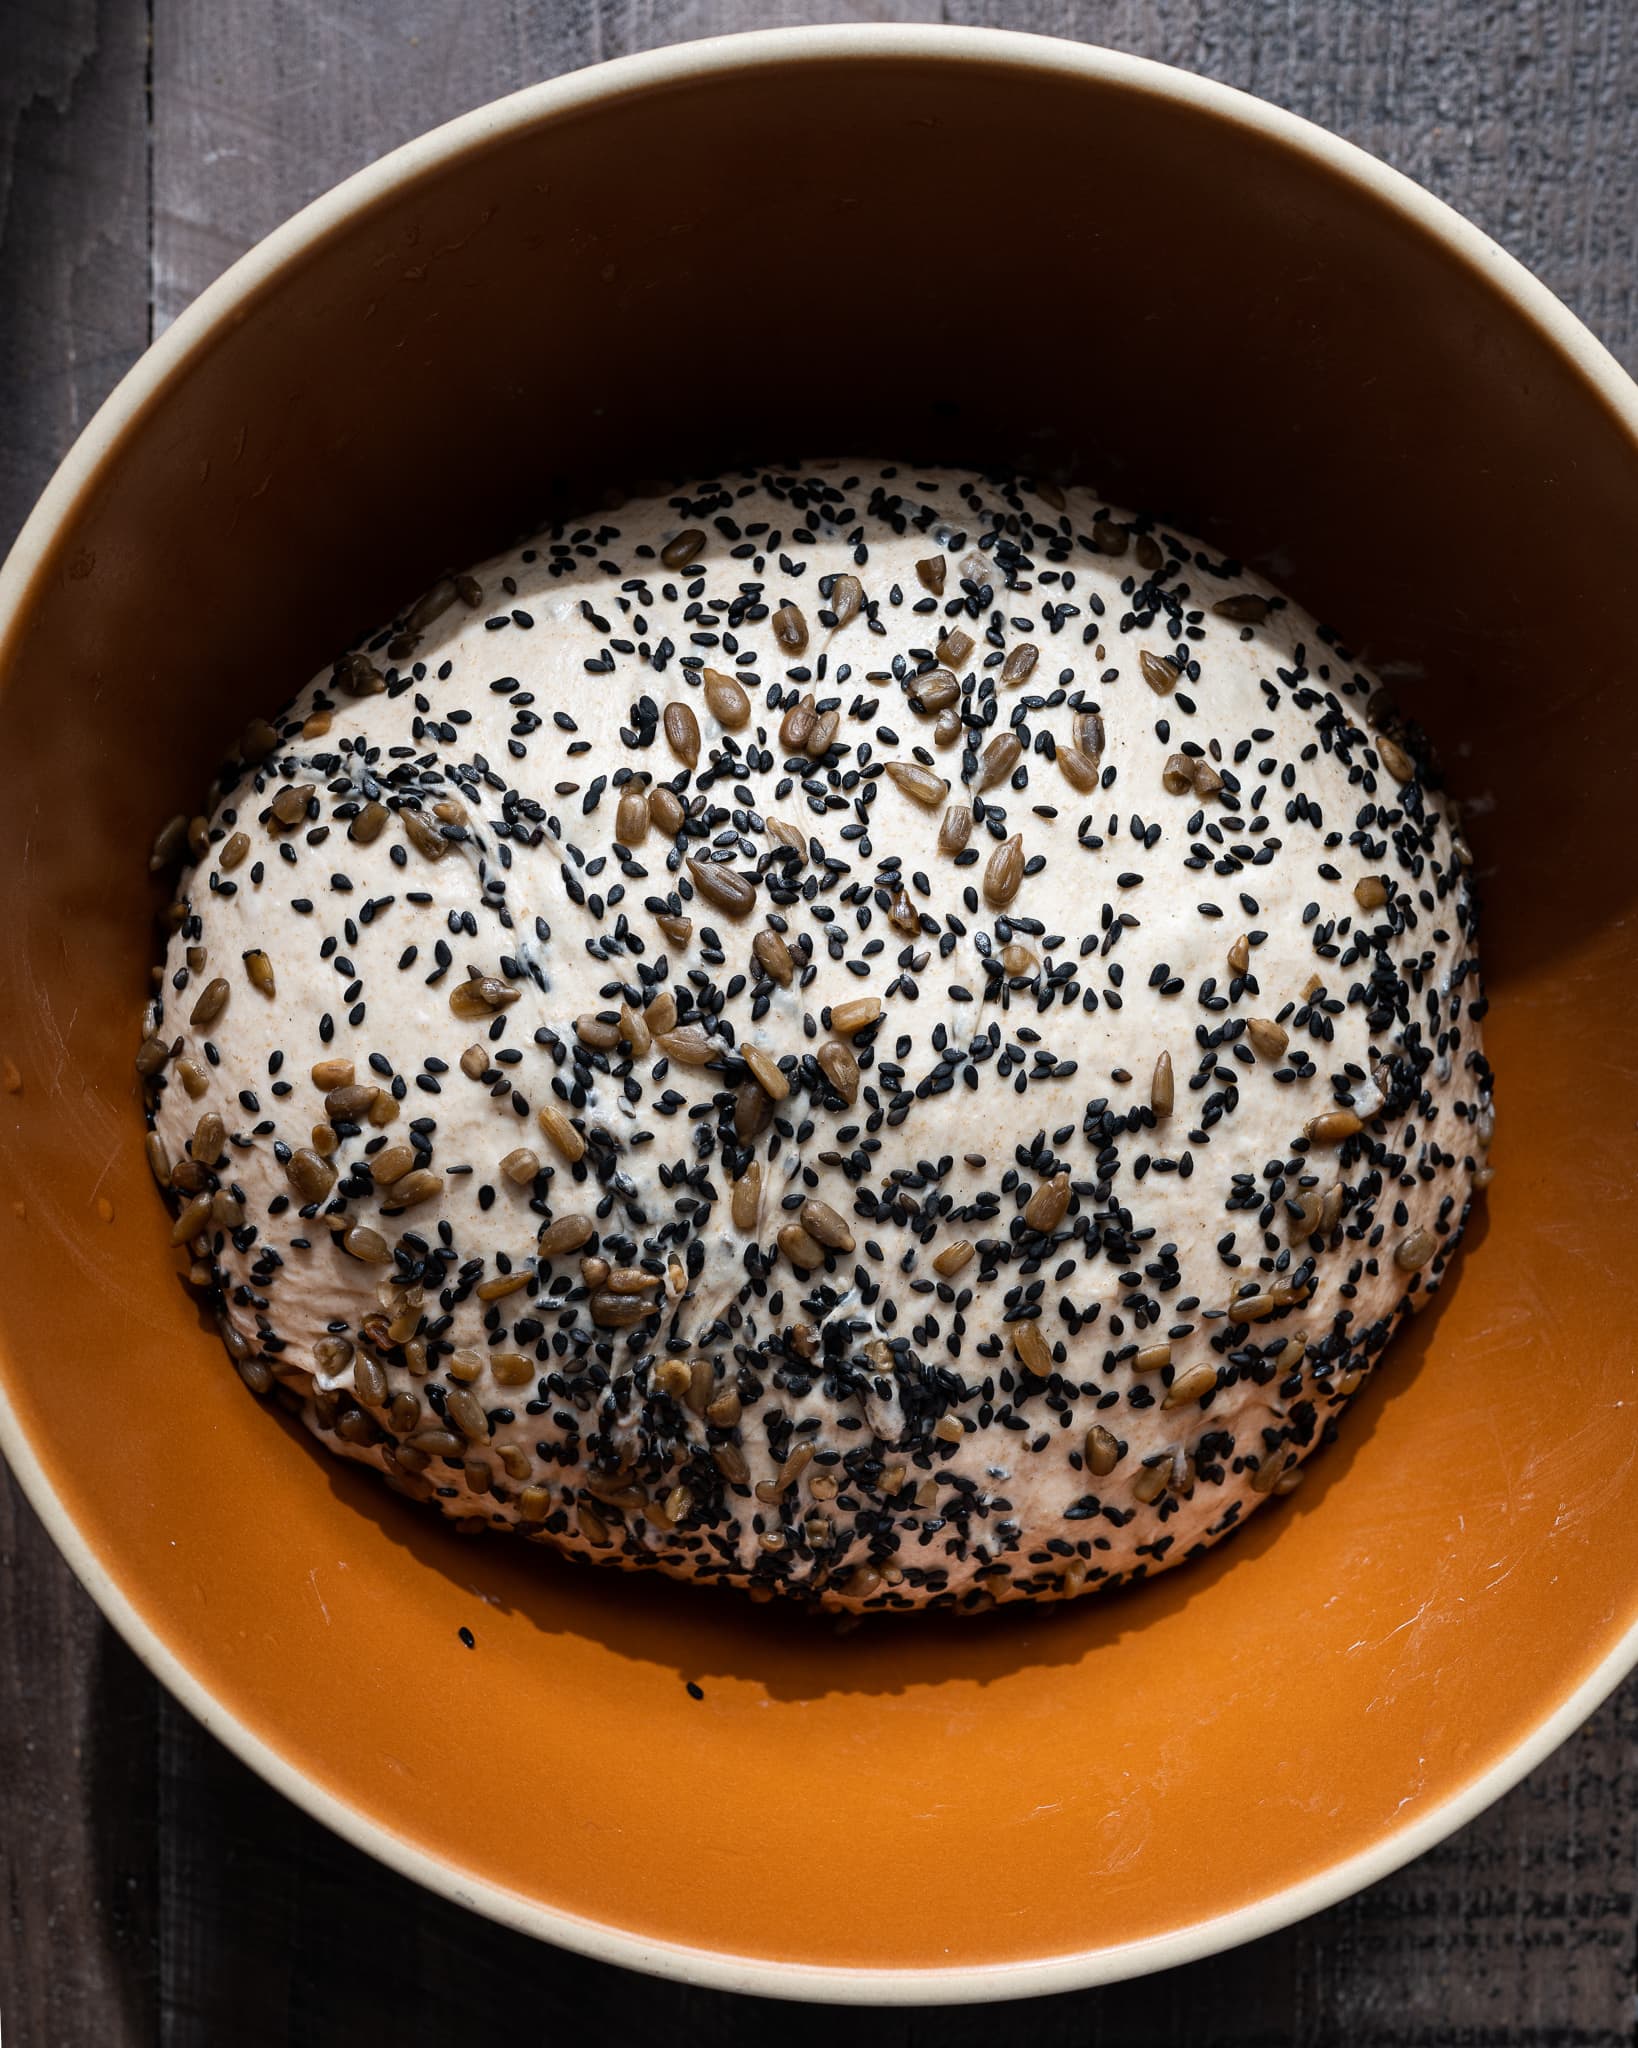
Combine the 132g sunflower seeds and the black sesame seed soaker (approximately 70g) in a large bowl.
Before you give your dough its first set of stretch and folds, spread about 1/4 of the mix-ins over the top of the dough. Then, grab one side of the dough and stretch it up and over the dough to the other side. Spread on another 1/4 of the mix-ins to the new top. Rotate the bowl 180° and perform another stretch and fold. Spread on another 1/4 of the mix-ins, then rotate the bowl 90° and do another stretch and fold. Finally, spread on the last of the mix-ins, turn the bowl 180° and do one last stretch and fold. It would be best to have the dough neatly folded up in the bowl with all the mix-ins tucked into the dough.
The remaining two sets of stretch and folds should be more gentle. After the third set, let the dough rest, covered, for the remainder of bulk fermentation.
5. Divide and preshape – 5:45 p.m.
First, check on the dough in the bulk fermentation container. This dough can be sluggish if the dough temperature came in below the FDT listed in the recipe, or it cooled during bulk fermentation. If the dough looks flat, shaggy, and doesn’t jiggle some when you shake the bowl, give it another 15 minutes and check again.
Fill a bowl with some water and place it on your work surface. Scrape out your dough from the bulk container onto your dry counter. Divide the mass in half using a bench knife. Using a wet hand and the knife in the other, gently preshape each half into a loose round.
Let the dough rest (also called a bench rest), uncovered, for 35 minutes until its relaxed outward. Because this dough was strong and firm for me, a slightly longer rest period of 35 minutes was helpful (see why in my guide to preshaping bread dough).
6. Shape – 6:20 p.m.
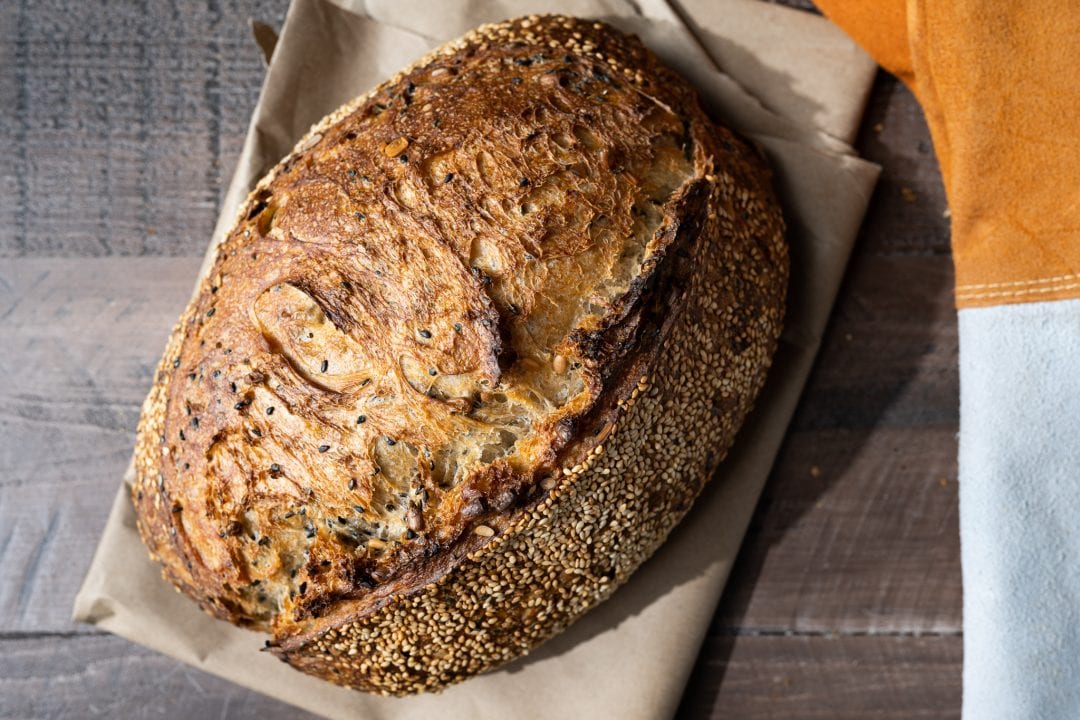
I like to shape this sunflower and sesame sourdough bread as a batard shape, but a round boule would also work well. Shape each by first flouring the top of the rested rounds and your work surface, flip the dough over to the floured space, and then shape them into your desired shape.
This sunflower and sesame sourdough bread is wonderful topped with white sesame seeds. Spread out a thin layer of seeds on a clean kitchen towel or on a sheet pan. After shaping the dough into a batard or boule, roll it, smooth side down, on the seeds so they stick.
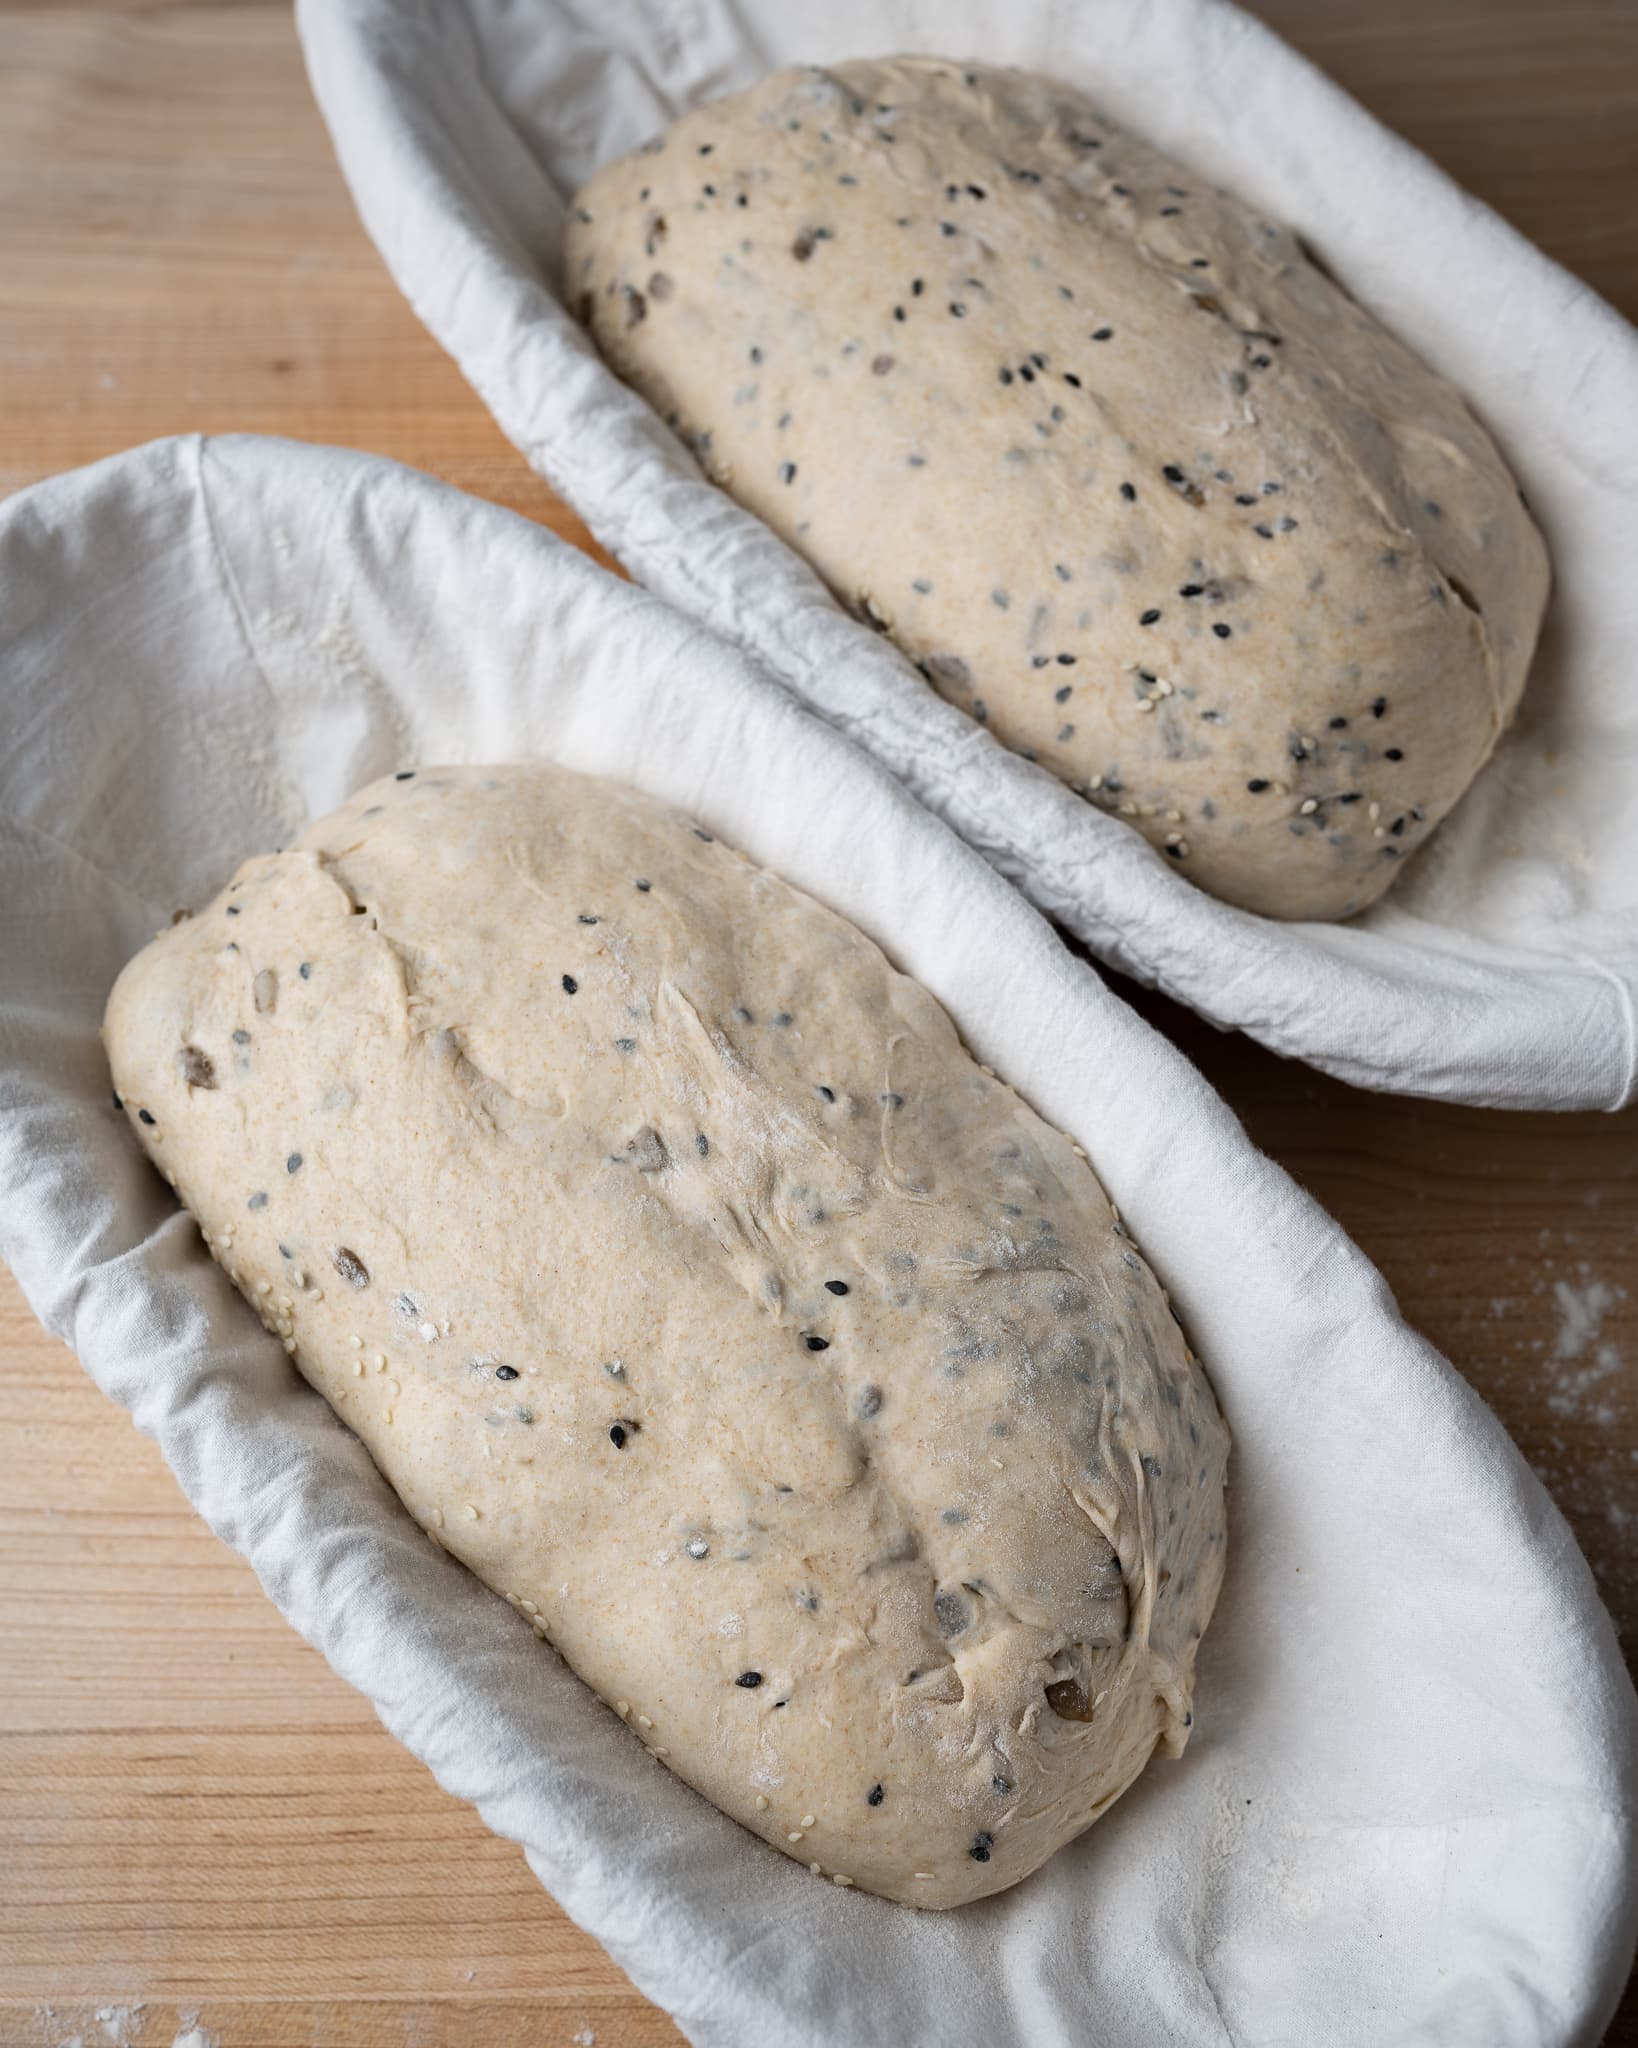
After each dough piece is shaped and optionally topped with seeds, place it seam side up in a proofing basket lined with canvas or a clean kitchen towel.
7. Proof – 6:30 p.m. to 9:00 a.m. (overnight)
Cover the baskets with a large, reusable plastic bag and seal it shut. Place the baskets into your refrigerator to proof overnight.
8. Bake – 9:00 a.m. (next day)
Preheat your oven with a baking stone or Baking Steel inside to 450°F (230°C).
I baked these loaves in my Challenger bread pan, but you could also follow my guide to steaming an oven for baking bread.
Score each piece of dough and slide it into the oven—bake for 20 minutes with steam. Then, remove the steaming pans from inside the oven (or remove the lid to your baking pan) and bake for an additional 30 minutes, or until the crust is deeply colored and the interior temperature registers around 204°F (95°C).
Once fully baked, cool your loaves on a cooling rack for 1-2 hours. See my post on the best way to store bread to keep it fresh for a week or longer.
Print
Sunflower and Sesame Sourdough Bread Recipe
- Prep Time: 24 hours
- Cook Time: 1 hour
- Total Time: 25 hours
- Yield: 2 loaves
Description
This delicious sourdough bread is chock full of healthy roasted sunflower seeds and black sesame, finished off with a touch of honey. The sunflower seeds bring a rich, nutty flavor, and the umami-forward sesame adds depth and complexity. A wonderful bread for lunch, dinner, or any snack!
Ingredients
Levain
- 27g medium-protein bread flour or all-purpose flour
- 27g whole wheat flour
- 55g water
- 27g ripe sourdough starter
Seed Soaker
- 35g black sesame seeds
- 35g water, boiled
Main Dough
- 587g medium-protein bread flour or all-purpose flour
- 236g whole wheat flour
- 132g sunflower seeds, unsalted and roasted
- 35g honey
- 16g sea salt
- 542g water 1 (autolyse)
- 44g water 2 (reserved for mix)
- 137g levain
Topping
- White sesame seeds to top dough (optional)
Instructions
- Levain (9:00 a.m.)
In a small container, mix the Levain ingredients and keep it at a warm temperature for 5 hours. - Prepare soaker (9:10 a.m.)
Right after making the levain, prepare the seed soaker. Add the soaker ingredients to a heat-proof bowl. Cover the bowl and let rest until called for in bulk fermentation. - Autolyse (1:00 p.m)
In a medium mixing bowl, add the 587g medium-protein bread flour, 236g whole wheat flour, and 542g water 1 and mix until no dry bits remain. Cover the bowl and let rest for 1 hour. - Mix (2:00 p.m.)
To the mixing bowl holding your dough, add the honey and levain and a splash of water. Mix thoroughly and strengthen the dough for about 5 minutes. Let the dough rest for 10 minutes in the mixing bowl. Add the salt, another splash of water, and mix until incorporated. Strengthen the dough further if necessary until it’s elastic and smooth. Transfer the dough to a bulk fermentation container and cover. - Bulk Fermentation (2:15 p.m. to 5:45 p.m.)
This dough will need 3 sets of stretch and folds during bulk fermentation. First, mix together the soaked and cooled sesame seeds with the sunflower seeds. Before you give your dough its first set of stretch and folds, spread about 1/4 of the mix-ins over the top of the dough. Add the rest of the mix-ins in the same way through the remaining folds for the first set. Perform two more sets of gentle stretch and folds during this 3 1/2 hour period, then let the dough rest the remainder of bulk fermentation. - Divide and Preshape (5:45 p.m.)
Lightly flour your work surface and scrape out your dough. Using your bench knife, divide the dough in half. Lightly shape each half into a round shape. Let the dough rest for 35 minutes, uncovered. - Shape (6:20 p.m.)
Shape the dough into a round (boule) or oval (batard) and roll in the white sesame seeds to top, if desired. Then, place the dough in proofing baskets. - Proof (6:30 p.m. to 9:00 a.m. the next day)
Cover proofing baskets with reusable plastic and seal shut. Then, place both baskets into the refrigerator and proof overnight. - Bake (The next day, bake at 9:00 a.m.)
Preheat your oven with a baking surface or combo cooker/Dutch oven inside to 450°F (230°C).When the oven is preheated, remove your dough from the fridge, score it, and transfer it to the preheated baking surface or combo cooker. Bake for 20 minutes with steam. After this time, vent the steam in the oven or remove the lid (you can keep it in the oven or remove it) and continue to bake for 30 minutes longer. When done, the internal temperature should be around 204°F (95°C).
Let the loaves cool for 2 hours on a wire rack before slicing.
What’s Next?
Sometimes it’s the simplest approach to baking that yields the best loaf. I originally started this recipe with a complex blend of flours, seeds, and other additions and, through testing, slowly pared it back until just the essentials remained. While I’m all about exploring different ingredients and techniques (like sift and scald) to see if they yield an improvement, oftentimes, great sourdough bread is simply beginning with a strong starter, using good flour, attention to detail, and a few seeds you might already have in the pantry.
If you liked this sunflower and sesame sourdough bread but want to take it even further with more additions, check out my seeded sourdough, which is chock full of seeds (including flaxseed) and also sure to delight.
Buon appetito!


215 Comments
This is a dreamy loaf of bread. I didn’t have any black sesame, so I used nigella seed (a seed used for baking in ancient times). Can highly recommend this substitution.
Love nigella. So glad this all worked out for you, Ann!
Making a third loaf this week. My family devoured the first two loaves in a couple days. The flavour is wonderful. The crust tastes like a really good cracker. The roasted sunflower seeds are my favourite. It was delicious with butter or toasted with honey. We also had veggie butter. (A savoury butter with tomato and herbs).
Awesome, Laura! Yea, this is a magical bread to be surer, the seeds come out incredible after baking! Thanks so much for the feedback and enjoy!
The loafs were delicious. People loved them. Though I didn’t get the same crumbs as you have in the picture. What can I improve to get bigger crumbs?
Glad the flavor was delicious! Unfortunately there isn’t a single thing that leads to a more open interior in a baked loaf of bread. First, the flour used is very important, it needs to be strong enough (protein) and have the proper gluten properties to trap the gasses produced during fermentation. For example, no matter how hard you try with rye flour, the gluten properties in the grain just won’t lead to an open interior.
From there, a very strong and well-fed starter is important — it all begins there. Fermentation in general is so critical, it’s worth spending some time really stepping back to look at how your starter is performing and how well-fermented your dough is during bulk fermentation and the final proof. Without strong fermentation your loaf will never rise to its full potential.
A full and complete bulk is also very important. Cutting bulk fermentation short before the dough is sufficiently fermented will hinder the development in final proof.
I also find that, and this depends on the dough you’re working with, a very gentle preshape and shape are key to maintaining an open interior. If you’re rough with the dough during these times the delicate interior will quickly break down and become more dense. That said, the dough does still need enough strength through shaping to hold its shape during baking.
Sorry for the long winded answer but really all of these things are important! Each part plays into the next and overall what we’re searching for as bakers is balance. Balance between the extremes in each phase of the process.
Thank you for the detailed response. Gives me so many ideas where to improve. I do feel the starter is performing very well but the bulk fermentation the dough is maybe 20-30% bigger. I use Central milling Organic Artisan Bakers Craft Plus for the dough. Will continue to improve!
I think an easier approach to learn what works best with your setup is to overproof a few batches. I like to proof in a slightly warm oven 85 degrees, which helps accelerate the bulk. If you notice it rising too fast, you can pull early and get them into the fridge for a retard. The warmth of the initial bulk causes some additional stronger fermentation to occur in the first couple of hours is the fridge. Balancing the timing and the warmth (along with things like a healthy levain and good flour) are some easier variables to tinker with 😉
Just made these loaves. I’ve made a lot of your loaves, but this one is unquestionably the best ever. Incredible flavor and crumb. Thanks for sharing what an outstanding bread recipe.
Really glad to hear you like it, Dave! I agree, this is also one of my favorites in the past few years. The flavor and texture is just superb. Enjoy and thanks for the comments!
Just made this loaf for the first time. The dough wasn’t as hydrated as I’m used to and I was a bit concerned this morning when I took the loaves out of the fridge. They looked like two heavy blobs that had spread a bit in the bannetones. I was pleasantly surprised at how well these baked up. I got a nice ear and great oven spring in my Rofco. The crumb was even and open. Need I say how delicious they were? My hubby even commented this is his new favorite loaf! The flavors and crunch from the seeds are so delicious. I will definitely make again but with more water in the mix. Another great recipe Mauricio!!
Awesome, happy to hear they turned out great! Yes, sounds like you can squeeze in a bit more water next time, but regardless, glad they were delicious! This is hands-down one of my favorite loaves of the past year 🙂 Thanks so much for the comments and happy baking!
I had the same thought in the morning. During the mixing stage, I added more water as the dough was quite dry compared to what I am used to and still had a pretty dense dough both at the time of shaping and after the overnight cold proof. Just to experiment, I bake one loaf right away and let the other dough warm up in a proofer at 80F for about 2 hours. The proofing certainly let the dough rise more and this loaf had much more rise. Anyways, in the future I might go for an even longer proof either in the fridge or on the countertop.
This is my favorite of your breads. It turns out perfect for me every time. Thanks!
So glad to hear that, Mekayla! It’s one of my favs of the past few years I’d say. Enjoy!
This sure as heck does not look very beginner ish!! Yowza…
It’s a pretty straightforward loaf! But each has their comfort zone 🙂
OK, I’ll give it a go, Go big or go home?!
That’s my motto!
Absolutely perfect!
I used french T65 (12.9% protein – 78% extraction) and T150 (12.8% – 95% extraction) and bumped hydration to 80% as the flours could handle it. Beautiful crumb and oven spring, the touch of Greek thyme honey works really well with the taste of the seeds. This recipe will be on heavy rotation, as I just love seeded bread!
Which brings me to a question… Have you ever tried using toasted pine nuts?
Cheers from Geneva, Switzerland!
Awesome, Mathieu! Super happy to hear it turned out great. I sure would love to use your French flour… I bet it was delicious. I do agree, I think this is one of my favorite loaves in the past few years.
Funny you should ask about pine nuts, I was recently just thinking of that as I’ve been making fresh pesto from the garden with pine nuts. I think it would be delicious! They are expensive, though 🙂
Thanks again from the comments and enjoy!
Hey @maurizioleo:disqus ! The loaf is almost already gone, which normally doesn’t happen that fast around here, haha.
Pine nuts are definitely expensive; that’s why sometimes I just use sunflower seeds to make pesto. Not the same but it’s still satisfying! I believe pine nuts could be used just like sunflower seeds with this recipe (maybe a bit less, their flavor is bolder).
Gonna try this out next time, “for science” 😅.
I will let you know, I have a pack of pine nuts I shall use before they go rancid.
Cheers and enjoy the fresh pesto, t’is the season!
Yes, please do let me know how it turns out—if I don’t try it first. 🙂 Have fun!
Hi there! Thank you so much for your amazing resources. I have made this loaf a few times with a local flour out of NY. I find the dough quite tough, making the stretch and fold during bulk difficult. The loaf doesn’t rise noticeably during proofing. The loaves come out with beautiful oven spring but quite dense and the surface is ripping. I am thinking I need to increase the hydration level? That way the dough will be a little more slack, extend the bulk fermentation time, and be gentle in the shaping? Any help is appreciated! Thanks, Emily
I would try increasing the hydration a bit to soften the dough!
Thanks so much!
I’ve been enjoying making this bread since last winter, using white sesame seeds ‘cuz that’s what I had. I recently found some black sesame seeds at a natural foods store, so I used them for the first time, and the bread came out a lot darker than before. I suspected the soaker, so the next time, I peeked at the residual water and sure enough, it was blackish, so I rinsed the soaked seeds, and the dough and bread came out with a more reasonable color. Do others have this problem with black sesame seeds? Or do I have bogus black seeds that have been dyed black?
That’s interesting, Jerry! I do notice the color of the crumb is darker when using seeds this way, but not super dark. It’s like a warm brown color.
Hey Maurizio! I seem to be having two issues with this recipe:
1. My dough seems a little tough/stiff when I am working with it
2. In the oven, the loaves rise more out than they do up.
Are those related? Any thoughts? thank you!
Interesting, Elle! When I hear a tough dough like that I think it likely needed more water in the mix (adding more than called for). If your loaf spread out more than up, it could be under-strengthened and/or not shaped tightly enough to ensure it keeps its form when baking.
I usually bake my pan loaves at a lower temp, for longer. 425F for something like 35-40 min or more. Keep an eye on it and if it’s coloring too fast drop the oven temp. The interior should be around 200-205F.
So glad to hear these worked for you!
Maurizio, In your timeline diagram you say prepare the soaker with the autolyse and in the directions you say to prepare the soaker when you make the leaven. Can you clarify that piece? Thank you.
Hey, Kim. Sorry about the confusion. Make the soaker when you make the levain. I’ll fix the diagram!
Hi Maurizio! I’m excited to try this recipe. If I don’t have black sesame on hand to add, should I add the 35g of soaking water to the autolyze?
Yes, exactly, Avi!
White sesame seeds work well also!
Can I do this without the sunflower seeds??
Absolutely. Just omit them 😊
Thank you! Wasn’t sure if it would mess with hydration
Hello! Excited to bake this loaf tomorrow. Question on the levain. Your recipe says to let it sit for 5 hours. Is this timeframe flexible? Are we looking for an almost peak levain or something different? I typically bake when my levain is right before peak so curious if we should be doing the same here or stick with the 5 hours.
Definitely go with your judgement on its use, but I like to use it when it’s ripe (fully fermented, bubbly, smelling sour). I think we each kind of learn the signs of our starter and when to use it, so the times and temps listed here are definitely a guideline!
Thanks so much for the recipes and response!
Hi Maurizio! Got this loaf in the oven right now. Although it didn’t rise as much as I wanted it to upon popping the lids for inspection, it certainly smells great. I did notice an issue I had with the recipe. Your levain ingredients add up to 136g. And then you call for adding 137g of levain to the dough. Of course this is a very minor difference, but I found it very difficult to get every gram of levain out of my container and into the dough; in fact I was short by about 12g. You might adjust the levain amounts slightly upward so that there’s a little buffer built-in.
It’s common to be a little short, if you want to ensure you have exactly the right amount, add 5g to the flour, water, and ripe starter next time to build in a little buffer 🙂 I hope the bread turned out great!
I want to try this bread but I have a question. Do I really need to boil black sesame seeds? The kind I buy are Asian and they’re already toasted. I have used black sesame in Shokupan without boiling then. You might have answered similar questions in the past and I apologize if that’s the case.
I made your sourdough walnut and cranberry bread a few weeks ago and oh my they were good! I switched walnuts to pecans and sunflower seeds combined, and used chopped dates for cranberries but the rest was the same. So good!
And I like the way you explain processes hour by hour. Looking forward to trying more recipes from your site!
Hey, Yoko! They’re not boiled, just softened with boiled water. But, if you’ve used them in other breads and they’re not super hard when eating, no need to soak them. The soaking is only to make them softer in the final baked loaf.
So glad to hear that about the walnut bread! Absolutely one of my favorites 🙂 I’ve made it with pecans as well, so good!
Here’s to more wonderful bakes!
Baked my loaves up this morning and made some honey butter to slather on it. Omg this might be my new favorite bread.
I don’t know which I liked better, toasted or not. All I know is that I had to distribute hunks of the loaves before it ate it all! Thank you for another outstanding recipe!
So glad to hear that, Kara! Yes, I find myself toasting it about half the time… Hard call on which is better! Enjoy 🙂
Awesome to hear that, Helen! Yes, sounds like additional water needed with your dough, as @disqus_GLABgcJNsi:disqus suggested as well. It’s very dry here in ABQ and I usually have to bump the water a bit in the winter, too.
Hi Maurizio, I want to try the Sunflower and Sesame Sourdough Bread Recipe, but can’t get black sesame seeds in my part of Canada. I can get hemp seed or poppy seed and wonder which would be better and whether they should be soaked in the same way? Or, is there a better alternative. Many thanks. Mark
I’ve actually never tried hemp or poppy in a proper hearth loaf. I’d be hesitant with poppy, but hemp might work nicely! Another option would be flaxseed (linseed) in place of the sesame.
Flax worked well thank you. Very tasty.
delicious bread! I used white sesame seeds, since that is what was on hand, but the flavor is still excellent. It rose nicely in the overnight ferment, but the oven spring was impressive. I used the Challenger bread pan, which makes batards easier than a combo pan or dutch oven. One thing I have observed with both my combo pan and the Challenger pan is that the bottom crust gets very dark, relative to my baking stone. I do use a piece of parchment paper, but it doesn’t seem to prevent that. Do you have any suggestions?
to respond to Helen–I also live in a very dry climate (Colorado). I have found that I sometimes need to add a little more hydration than the recipe calls for, but I do it by feel during the autolysis phase.
So glad to hear that, Alison! White sesame is just fine. When I use my DO/Challenger, I don’t bake on a baking stone, just bake on a rack at 450F/230C.
Great suggestion with hydration adjustments!
Can you define “venting the steam” for the second portion of the bake using a Dutch Oven? I see that I can “vent the steam in the oven” “or remove the lid.” Can “vent” mean place the lid simply ajar? What would it mean to “keep it in the oven?” Just put it on another shelf? Crazy question!! Thanks!! In the oven now! Second time to make it. Amazing recipe! Much thanks!
Hi, I love your recipes! just one question if I used half of the quantities and I only want to bake one loaf in the oven: how long should I keep it? Is it the same (20 min with steam, 30 without)? Or half time? Thank you!
Thank you! Yes, bake for the same time, with same durations for steam. Happy baking!
Made this recipe for the first time, also inaugurated my new challenger bread pan. and was very pleased with the results, two beautiful, delicious loaves. But not much of an ear in either. Just read your King Arthur post on this subject – wondered if this denser dough tends to result in a flatter ear? Thanks
Glad to hear that, Janet! Having this many inclusions into the dough can reduce some spring, but I still got decent ears with this bake. Quite a bit goes into it, and making sure 3 things are in place is important: sufficient dough strength, a tight enough shape, and a dough that’s not over proofed. You really want to encourage that explosive rise in the oven, and all three of those will help!
Thank you Maurizio; so great to get help from an expert! I think I need to improve my shaping and monitoring proofing …
Those are always a work in progress for every baker 🙂
Hello again. Decided to try the recipe again, carefully following instructions. This time I used AP flour instead of bread, went thru all the steps. When time to preshape, dough was very sticky, expansive, incredibly hard to form into shape. Breads bake up ok, with good rise, but again no ear – it spread instead of rose in center. Is this a sign of overproofing? Also can a longer autolyse be a problem? Thank you!
So….first time making this recipe and did (what I thought) was a fatal misstep. I forgot about my bread in the morning and wasn’t able to bake it until almost 5pm. Just pulled it out of the oven and it looks to be the best loaf yet in terms of oven spring. I haven’t cut into it, but I might have accidentally found out that I need to leave my loaves in the frig for longer?? The learning never stops.
Ahh yes, I’ve been there many a time! There have been so many bakes where I thought I was going to get a pancake in the oven, only to pull an absolutely beautiful loaf. In fact, some of my most important baking lessons I’ve learned have been from loaves I thought were going to fail, and ended up being the best yet 🙂 Thanks for the comments, Nicole, and happy baking!
Amazing!!
Bravo Maurizio 🙂 This recipe is excellent!!! Continua così 🙂
Grazie!! Thank you—this is one of my favorites of the past few years 🙂
Hi Maurizio – I have been baking with your formulas & guides for nearly a year and this was one of the best results I’ve got yet. Thank you.
One thing I have noticed though is that I never seem to generate as much levain as you suggest should result from the formulas – I come up slightly short every single time (or in some instances like with the Rye Smorrrbrod, as much as 100g short). What am I doing wrong? I think my starter is active enough when used… it’s half rye half plain white flour and looks very lively… any insight much welcome. Thanks. Alex.
So great to hear that, Alex! This is one of my favorite loves to day, and that’s after many years of baking. It’s just so delicious! That’s ok that you come up short, it’s the way I structure the formulas. Either you come up a little short, or you go over (and if you go over, people wonder why!)—it’s hard to get exactly the right amount!
100g is a little excessive though, if you repeatedly get that much difference I’d say add 10-20g of each ingredient (flour, starter, water) to your levain build. This will keep everything in proportion but give you a little extra. You can do this to any levain here on the site as well, adjusting that extra amount as needed.
Happy baking!
OK great! Will give it a go this week. Thank you.
Maurizio – thank you for the great recipe. I’ve tried it twice so far and it tastes great. One area where I’m struggling though is the spring, and I think it’s because I don’t have enough steam (despite pour boiling water into a preheated cast iron and using the towel-pan technique). I’ve been leaning towards dishing the cash for the Challenger so I can improve the steam and spring. Are you able to fit both loafs at once or do you need to bake in two batches? Also do you use the Challenger for any other purposes (eg cookies, braising or roasting meat, etc)? Thanks again for your insights. – Patrick
You’re welcome, Patrick, glad to hear you’re liking the results! The Challenger really is an investment, but it’s one heck of a pan. You can’t fit two loaves in there at a time, though, unless they were smaller boules or rolls. I typically do two batches (leave one in the fridge). You can use the Challenge for anything you’d use a cast iron pan for, but I’ve really only used it for bread. Happy baking!
Got it thank you! I’ve also been looking at the Lodge Combo Cooker (since it’s more affordable, more versatile and folks say the results are great), but I’ve heard mixed feedback on whether a 10-inch batard would fit. Amazon says the diameter is 10.25 inches, which I take to mean the interior diameter, so there’s not a ton of space, but maybe it’s enough. Do you use the Combo Cooker for 10-inch batards, or do you use it mostly for boules?
I am going to try your Best Sourdough Recipe next, which will be the highest in hydration I’ve gone yet. Looking forward to it!
The combo cooker is best for boules! I hope you like that recipe, it’s a delicious bread with a wonderful texture. Let me know how it goes 🙂
Hello, looking for some guidance, as I have baked a few of your loaves , i continue to have a crumb that is tighter and more moist than expected. Wondering where to troubleshoot? I did read some comments about maybe a longer bulk fermentation.. is there something specific to look for to understand when your bulk fermentation is complete ? dough temp?
Any tips appreciated. Thank you 🙂
It sounds like perhaps your dough was slightly underproofed. There are a few indicators your dough could be under: explosive rise in the oven, dense spots in the interior with potentially scattered large holes, and a gummy texture to the interior. Finally, it’s possible the bottom of the loaf might be slightly bowed upward (like the letter “U” — the top will kind of dome).
Make sure to build your levain from a starter that’s strong and mature (meaning it’s risen to it’s peak height before you take some to use). From there, bulk fermentation is very important! Make sure your bulk fermentation goes sufficiently far, you want the dough to look smooth, it should have risen considerably, and have bubbles here and there — it should look alive. If you tug on the dough a bit it should offer resistance to your tugging, it’ll feel stronger. Give the dough the time it needs in bulk fermentation! If you have to give it another 30m or hour to see these signs, do so. It’s important for this step to go sufficiently far for the dough to have enough fermentation activity before its proof.
I have made this twice so far. The first time I divided the dough and baked one without seeds (my husband can’t have them). I just added a little extra water and they turned out great. I just got another 2 loaves out of the oven, one baked in my DO and the other on the baking steel, using a turkey roaster to cover for the first 20 minutes. More success! Next time I’m going to add some rosemary.
Fantastic! Oh, I love the idea of adding rosemary to this loaf as well—great idea!
This recipe turned out a really tasty loaf — thank you! I noticed, though, that during stretch and folds and shaping, some of the pointy sunflower seeds were creating little tears in the dough. The loaf came out well, but with a tighter crumb than I usually get. Any tips for minimizing the damage the sunflower seeds do to the dough? Thank you!
I like to strengthen the dough significantly before adding the seeds, knowing they’ll potentially break up the dough a bit. The best way is to strengthen it enough so your dough only needs perhaps one more set of stretch in folds after you add the seeds. This way, once they’re in the dough, you don’t have to handle it too much which can lead to a tighter crumb.
Super helpful – thank you!!!
This formula did not disappoint! Thank you for providing such reliable recipes.
So glad to hear you liked it, Judith! Enjoy 🙂
Love this bread. The first time I made it gave one of the loaves to my daughter and son in law and now they text me asking when I am going to make it again so they can get more 😉
Can’t beat that! Thanks so much for the feedback—enjoy 🙂
This recipe is a keeper! I increased the amounts by 10% and made 3 small loaves using 8”batard bannetons (about 650 g each). This bread was so delicious! Can I substitute other seeds for the sesame and sunflower? I might like to try a mix of pumpkin, sunflower, flax and sesame? Can I mix it up and just keep the total weight of the seeds the same?
Glad to hear you like it, Helga! Yup, that’s exactly how I’d go about changing the seeds. Just be sure to soak them where appropriate (I’d soak all of those).
Maurizio, how would you determine which seeds should be soaked?
Also, I noticed that the amount of water wasn’t quite enough to cover my seeds. Any downside to shifting a bit more water from the dough mix to the soaker?
This loaf was awesome, btw, and I’m not even a huge sunflower seed fan!
Usually when a seed has a hard outer shell (hull) I’ll soak. As long as they don’t fall apart, you could soak any of them, if you prefer. No issues moving water over within limits: if you move too much, it will be hard to mix the dough!
Glad to hear you liked it, thanks so much for the feedback!