

Over the numerous years I’ve baked bread, and the countless nights my dough has proofed overnight in the family fridge, there have been (so many) times where I yearned for the luxury, and sometimes a necessity, of a dedicated space for my dough. An open, expansive space where I could control the temperature and didn’t have to fight with those items that spoil at warmer temperatures. Oh, that precious fridge real estate, something highly wrestled for in a family with two kids. I finally decided it was time to remove my dough as a contender for that sought-after space and construct it: a place just for dough. Let’s go into how to build your dough retarder.
This may seem like an extravagance. But when you bake as often as I do, and in ever-increasing quantity, this dough retarder (I like to colloquially call it a fretarder—freezer + retarder) has gradually elevated to necessity. The actual physical space was one motivator but I’ve also yearned for the ability to experiment with warmer proof temperatures (45ºF and above) to test the effect on the resting dough overnight. If you’ve read my posts for a while now you’ll know that I typically push bulk fermentation pretty far and/or I’ll leave the dough out, in shape, for some period of time before retarding in the fridge at 39ºF. This, in effect, helps further the fermentation in the dough but in a different way due to the warm ambient temperature, whereas proofing at a cooler temperature, say 50ºF, has the effect of slowing yeast activity in relation to bacteria activity (more on this below). These varying proof temperatures, warmer than a typical household fridge but cooler than ambient temperatures, are something I’ve wanted to test and experiment with for some time now.
Before construction, I considered many other options for controlling my overnight proof temperature: buy a small wine fridge, search Craigslist for a used refrigerator, purchase a small, professional dough retarder and, of course, continue to use the family fridge. After researching, planning, and plotting, I stumbled on several home beer brewer’s forums. I realized the tools used to control brewing temperatures accurately could work for controlling dough proofing temperatures. Inspired, I picked up a positively reviewed digital thermostat controller, an upright freezer, and a few other small items and began construction.
So how does the digital thermostat controller allow us to proof at any temperature we want? Instead of plugging the freezer directly into the wall for the power, it’s plugged into the thermostat controller. This controller provides power to the freezer only when the sensed temperature inside the freezer goes above a set temperature threshold. Once the inside temperature cools back down to our desired dough proof temperature, it cuts power to the freezer, stopping cooling. Essentially we are bypassing the internal thermostat of the freezer (which can usually only go up to 40-45°F/4-7°C) so we can set it to cool to any temperature we desire.
The tool covered in this post can go by many names: dough proofer, dough retarder, and finally, retarder proofer. While they are all technically correct, the retarder constructed in this post should not be confused with a dough proofer I use during bulk fermentation and house my sourdough starter. As I prefer to call it, this dough retarder keeps the dough at a much colder temperature (typically 40-55°F/4-12°C) during the final fermentation phase of baking. In contrast, the Brød & Taylor proofer cannot actively cool, it can only heat, and I typically use this during the bulk fermentation (first fermentation) phase.
Terminology
First, a quick clarification on terminology: what’s the difference between proofing and retarding?
What is Proofing Bread Dough?
Proofing (or final fermentation) refers to the phase in the baking process when the dough has been shaped and is fermenting until it’s at just the right point to be baked.
What is Retarding Bread Dough?
Retarding signifies the act of placing the dough (whether in bulk or after it’s shaped like I typically do) into a colder environment to slow fermentation (primarily yeast) activity.
So essentially, proofing and retarding can refer to the same period of time in the process if the dough is proofing at a cold temperature.
For more, read through my comprehensive guide to proofing bread dough.
Why Cold Retard Bread Dough?
A cold, overnight proof is not mandatory when making sourdough bread. Perhaps schedule conflicts arise, or you desire a different flavor profile, and the dough benefits more from a few hours on the counter at a warmer temperature instead of the long, cold-proof.
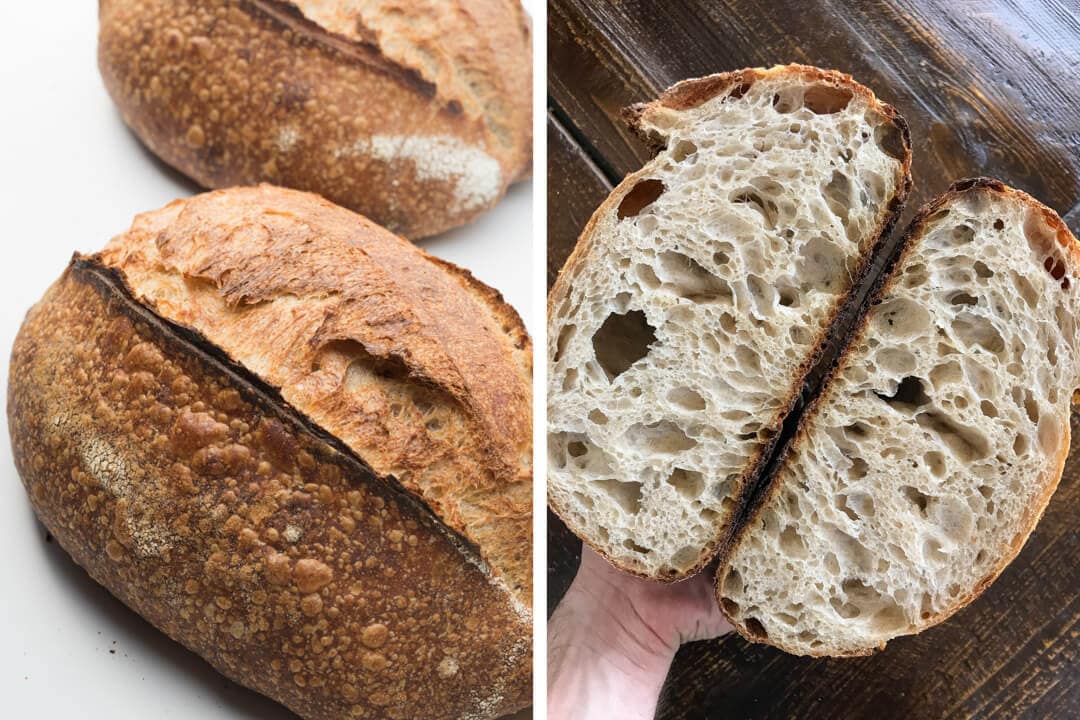
However, I’ve found that counter-proofed dough usually results in a milder flavored bread, where the flavor focus is more on the grain without the subtle sour notes typical of a longer sourdough process. Conversely, I’ve found a retarded dough (at colder temperatures) to have more depth of flavor (I usually call this depth complexity) due to the increased acidity produced during the long, cold-proof.
At colder temperatures, wild yeast activity is typically slowed in relation to the bacteria (Lactobacilli) that makes lactic and acetic acids (flavor!). Also, the crust coloring I achieve on retarded doughs is typically much more to my liking, usually with a wide gamut of colors ranging from light browns to dark mahogany.
Construction Materials
First, a breakdown of the ancillary materials I used for construction, and then I will briefly delve into the major pieces with additional detail. Some of the items below are optional but are things I’ve installed for convenience mostly, but also for monitoring performance.
- Silicone sealant to seal the drill hole where the thermostat probe is inserted (any general silicone sealant will work as long as it adheres to the interior material of your freezer)
- Interior LED lights. These are fantastic motion-sensitive and magnetic lights. They will stick to the interior of the freezer
- Temperature and humidity monitor
- 12” x 1/4” Dewalt extra-long drill bit
- Plastic zip-ties
Digital Thermostat
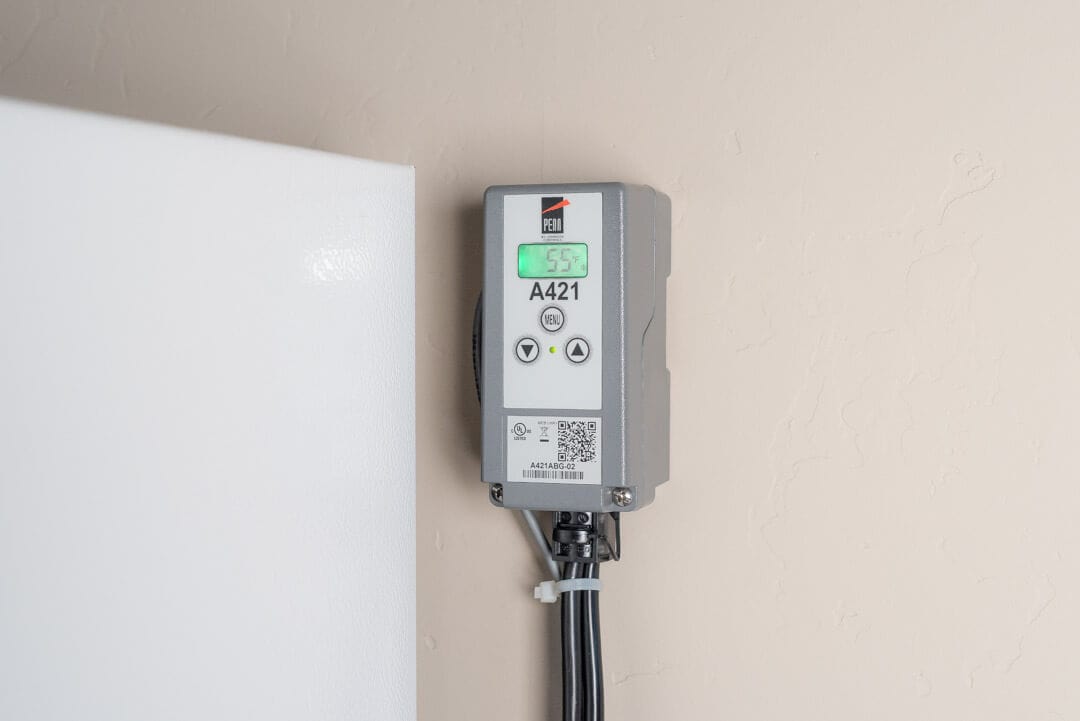
The Johnson Controls Digital Thermostat Control Unit is the best unit I found to control the temperature inside the freezer. There are others with an analog display, but it’s nice to have a lit, digital readout to make reading and setting the temperature quick and easy.
As I described above, the thermostat controller performs a very simple task: it provides power to the freezer only when the internal sensed temperature rises above the selected proof temperature. When the freezer’s compressor kicks on, the interior will cool until it gets to the selected temperature, and then the controller cuts power to prevent further cooling.
The control unit is also capable of running in heating mode (the opposite of what we want) as well, but since we are only concerned with retarding at cool temperatures (and we have no active heating) we can ignore this capability. Just note that on the control unit display if you have things programmed incorrectly a little flame icon will be displayed instead of a snowflake (make sure it shows a snowflake!) — see below for images of the display set to the correct cooling mode.
Upright Freezer
You could use any freezer or fridge to build your own dough retarder, even a second-hand one you might have lying around or one sourced from Craigslist. I chose to use a Frigidaire 12.8 cu. ft. upright freezer because as it fits all my selection criteria: a single tall inside cavity with no bins, simple shelving, door shelves (I’ll use these to store whole grain flour), it’s not frost-free, it has a compressor for cooling (a compressor, instead of some other cooling mechanism, will cool the interior faster, and it has thick walls with significant insulation.
The freezer is large at 30.25″ deep, 62.2″ tall, and 29.6″ wide, and I’m sure I can fit in a significant amount of dough. I figure at least 12 x 1kg batards (3 baskets on each of 4 shelves), and probably more if I got creative with stacking and/or constructing more shelves.
I specifically chose a unit that’s not frost free as some of these units can suck moisture out of the inside cavity to prevent extra condensation buildup. Humidity will be important inside the freezer, we don’t want our dough to dry out if you don’t want to cover your dough with plastic bags. If you can’t find a frost free freezer don’t worry, you can always cover your baskets as I’ve done for quite a while.
Build Your Own Dough Retarder
There are two options for constructing the unit: to drill or not to drill. If you want to drill through the freezer for the cleanest install proceed with Step 1, below. If instead, you’d like to simply run the temperature probe through the front opening of the freezer you can skip drilling altogether and simply tape the sensor wire so it’s off the floor and cleanly enters the freezer. Then, secure the sensor to somewhere inside the freezer as I’ve done in Step 2 below.
Gather the materials outlined above, and:
- a drill
- a tape measure
- a pencil
- protective eyewear
Step 1
First, ensure the freezer unit is unplugged.
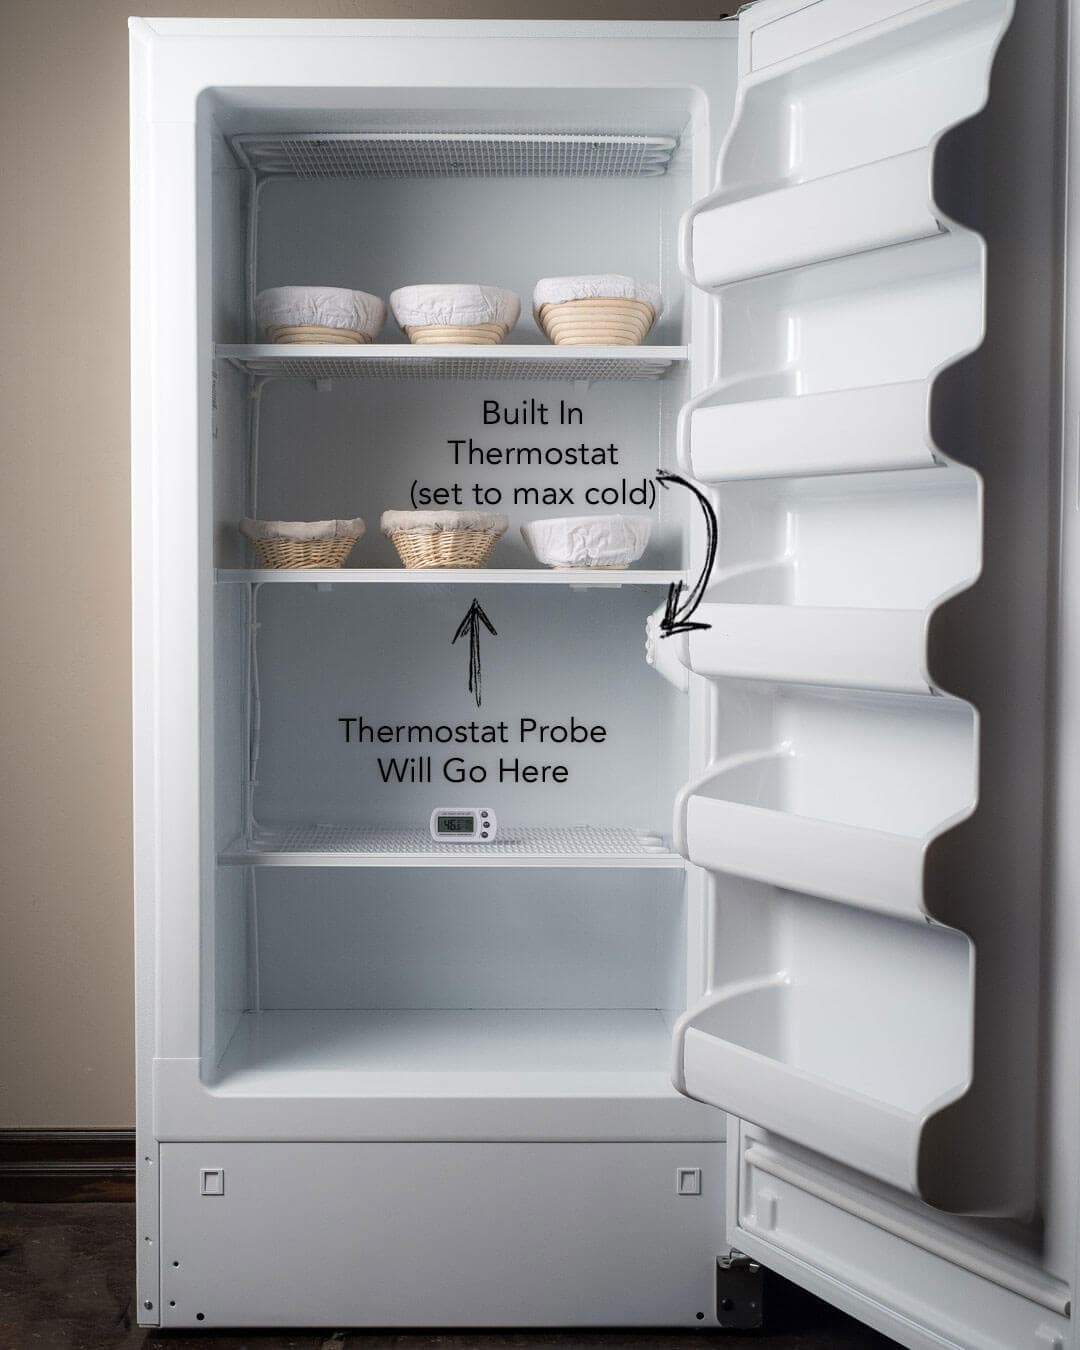
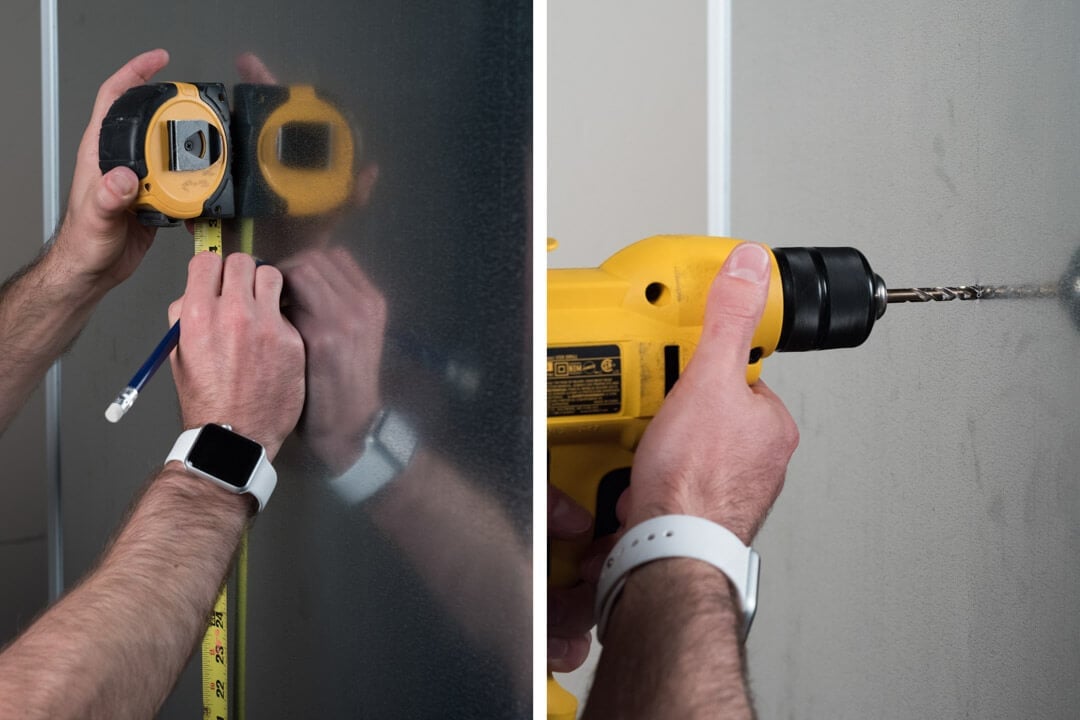
Measure out the height from floor to where you want to insert the temperature probe. Try to pick a spot that will measure an average temperature of the inside cavity, away from any areas that are secluded, near a vent or cooling element.
Make sure the spot you choose for drilling does not have any coolant piping or other sensitive material that could be damaged.
In my freezer, I decided to mount the sensor probe in the dead middle of the unit, in terms of height and width. When I received the freezer I measured temperatures throughout the interior over the course of a few days to find a place where the temperature was most stable and provided the most accurate representation of the entire inside cavity temperature.
Go to the back of the unit and measure from the floor up to the spot you chose from the front. Mark with a pencil and get out your drill.
Step 2
Put on protective eyewear and, using a drill with an extra-long drill bit attached, slowly drill through the back of the unit until you feel it puncture into the inside cavity.
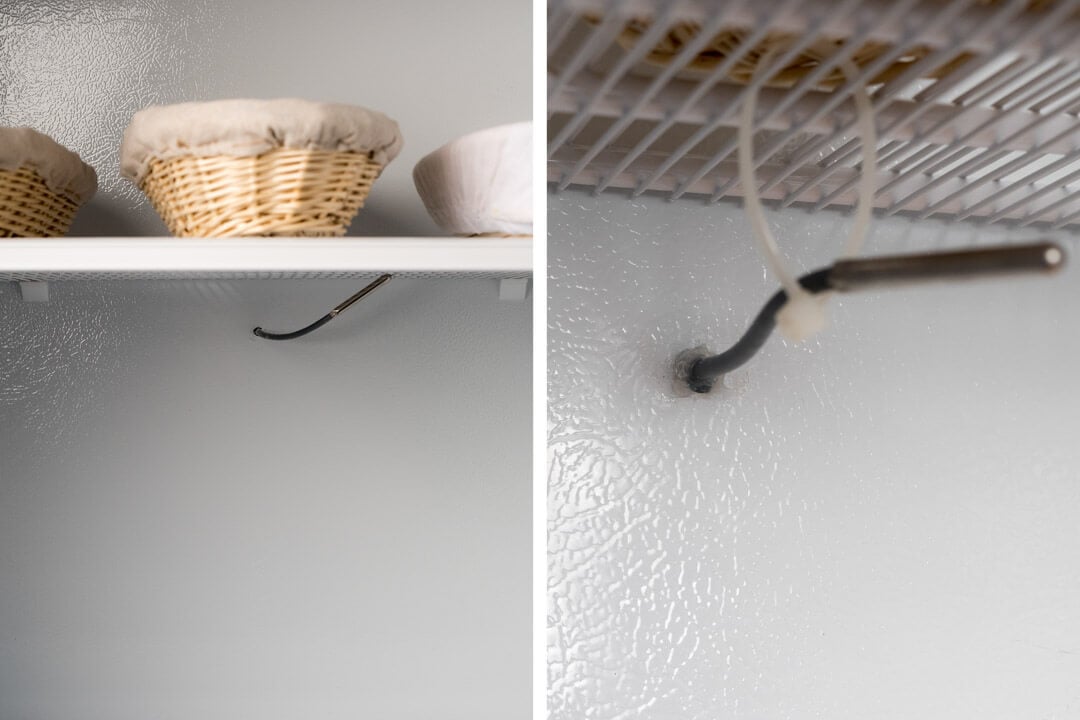
Run the temperature sensor into the hole from the back of the unit and secure it to the inside. I used a simple plastic zip-tie to hang the sensor from the bottom of the second shelf. Then, using the silicone sealant, seal the hole around the sensor so no cold air can escape. You can also seal the other end of the drilled hole on the outside of the unit if desired (I did).
Step 3
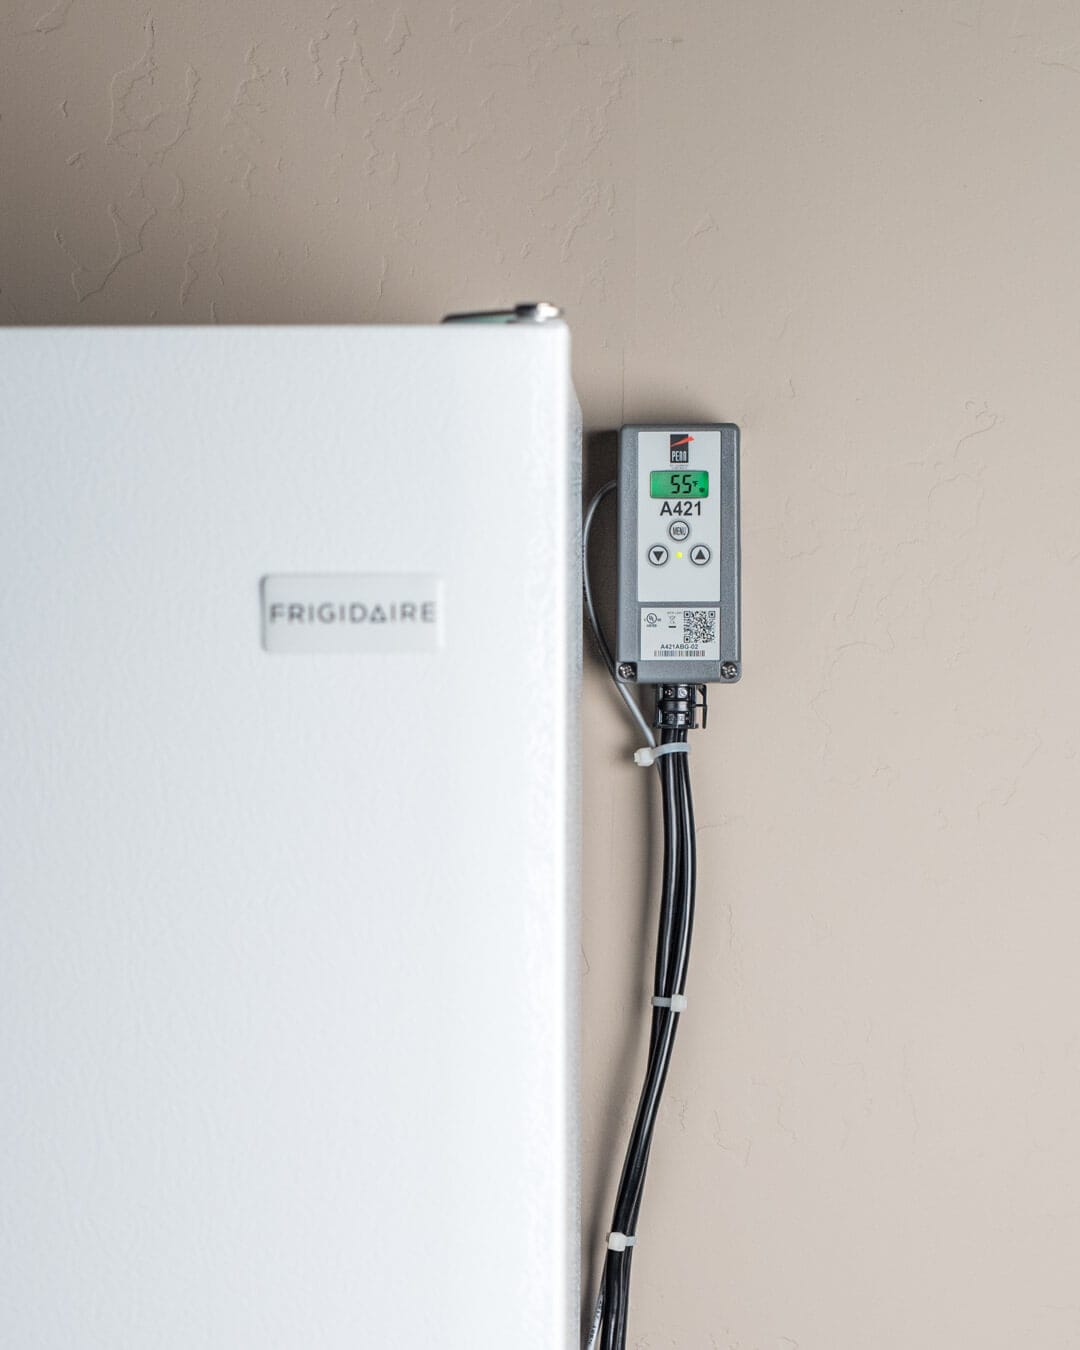
Mount or place the digital thermostat controller somewhere convenient. I chose to mount the unit to the wall next to the freezer and zipped the cables to keep it clean. Plug the digital thermostat into the wall and then the freezer into the controller.
Step 4
Set the interior freezer temperature thermostat to the coldest setting. Mine is a small dial inside that only has an analog turn dial from “coldest” to “warmest.” Since our installed thermostat controller will control the temperature from here on out, the one that shipped with the freezer can be set to the coldest setting so it will cool as fast as possible when the freezer is turned back on.
Mount any interior LED lights and other nice-to-haves and program the digital thermostat (see Operation, below) to your desired proof temperature.
Upgrades
2020 Update: Over the years since first posting this, I’ve found and added a few things to my dough retarder to get better performance.
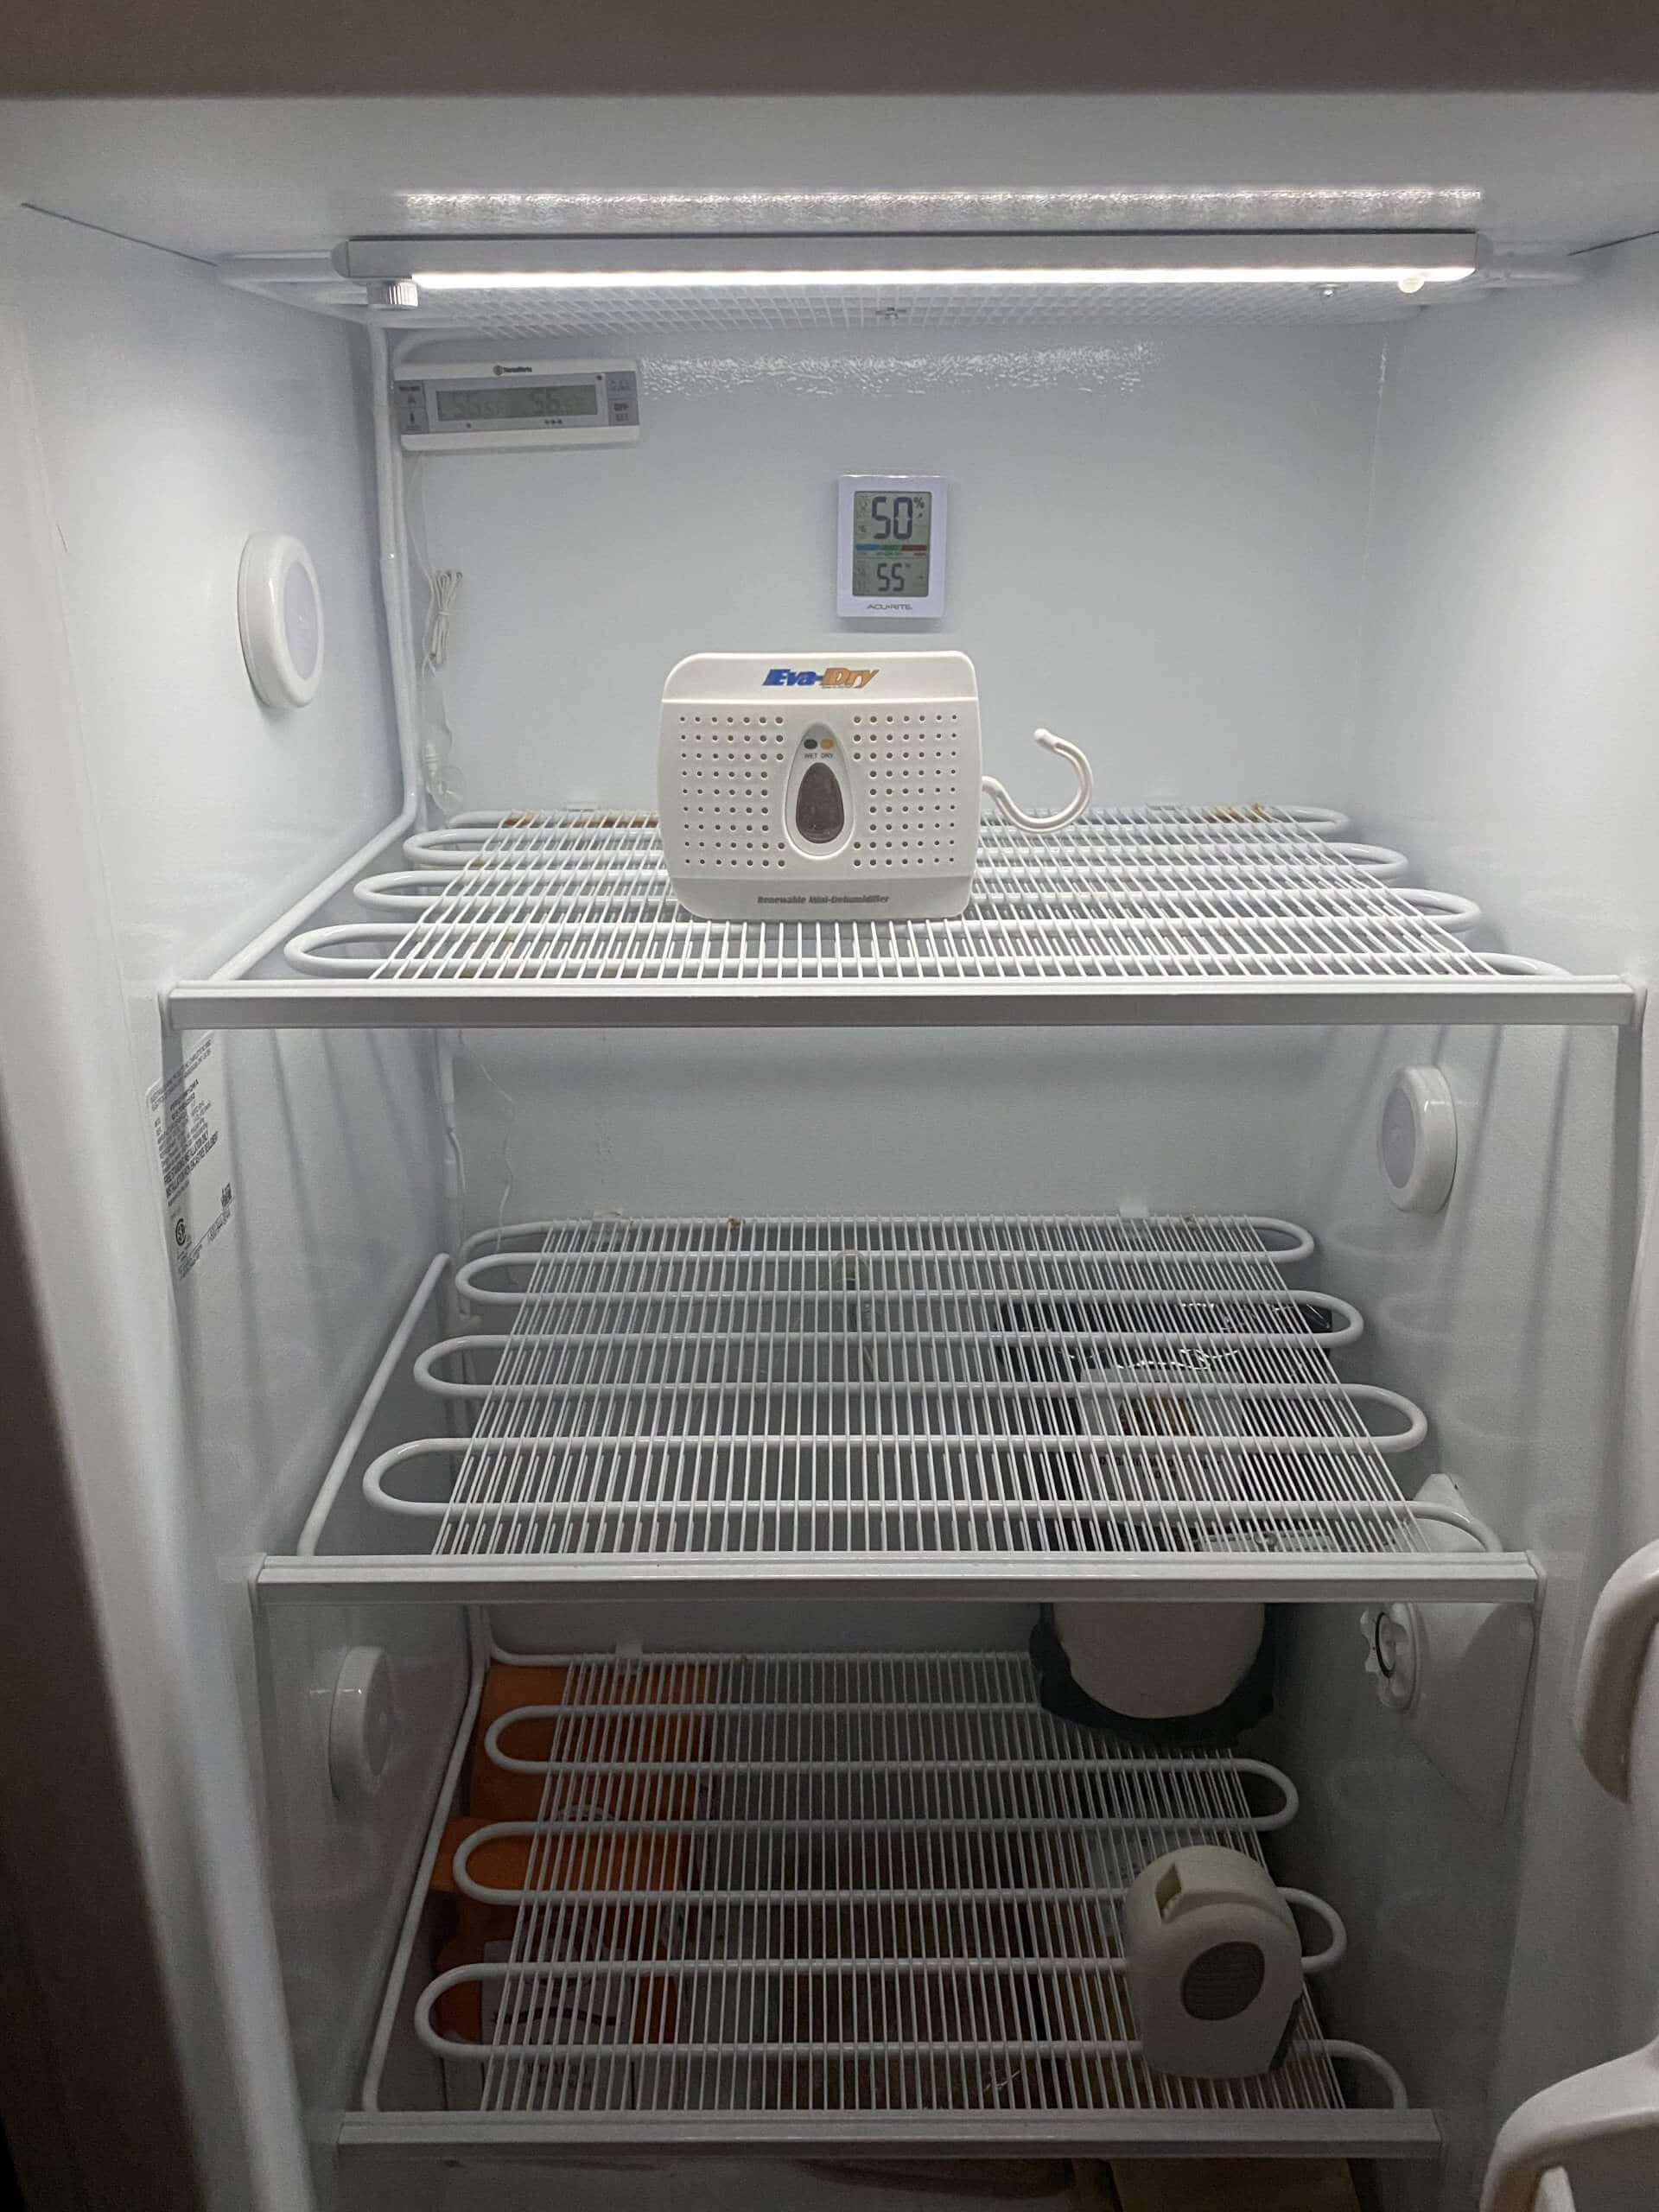
The first is the LED light bar (attached to the top of the freezer in the photo above) linked in the materials section above. This LED light bar is just incredible and fully illuminates the retarder once you open the door.
Next is the small battery-operated air circulator you see in the lower-right. This thing lasts for months on a set of batteries and keeps the air in the freezer moving. I turn it on when I load my dough to help cool them faster, dropping them to the temperature specified for the entire retarder.
Finally, in the middle, you see a small dehumidifier. I keep this in the retarder at all times when the dough is not inside. This way, I can avoid excessive moisture from collecting inside the retarder. When I load my dough to proof, I take the dehumidifier out, plug it in to “recharge” it, and then put it back into the retarder when I take the dough out to bake.
Operation
Setting A Temperature on the Digital Thermostat
First, I would recommend you read the owner’s manual on the new controller so you understand all the functions, even if the manual can be a little cryptic.
Setting the desired temperature is a pretty straightforward process. There are 3 buttons on the face of the unit: 1) MENU, 2) UP arrow, and 3) DOWN arrow. Pressing MENU will cycle through the options for the controller and the UP and DOWN arrows will modify the value for each option. The two we are most concerned with are the OFF and ON options.
OFF signifies when the digital thermostat should cut power to the freezer (so it stops cooling). For example, if we want the internal temperature to be 50°F (10°C), we would set the OFF option to 49°F (9°C). This means the freezer will turn off when it’s cooled down to 49°F (9°C), which is 1-degree lower than our target.
Conversely, the ON option signifies when the digital thermostat should provide power to the freezer (so it cools). Continuing with our example, if we desired an internal temperature of 50°F (10°C), we would see the ON option to 51°F (10°C). This means the freezer will turn on and cool once the internal temperature reaches 51°F (10°C) and above.
So, if we wanted to retard our dough at 50°F (10°C) we’d:
- Press MENU until the unit displays OFF, then press MENU one more time to see the OFF value
- Press the UP or DOWN arrow until the display shows one degree Fahrenheit below our target of 50 (so OFF should show 49°F/9°C)
- Press MENU until the unit displays ON, then press MENU one more time to see the ON value
- Press the UP or DOWN arrow until the display shows one degree Fahrenheit above our target of 50 (so ON should show 51°F/10°C)
- Press both the UP and DOWN arrows simultaneously to exit the programming menu and let the unit run (you can also just leave at this point, and the digital controller will eventually exit programming)
That’s it! The controller display should now show a single temperature, the current sensed temperature inside the freezer, and also a little snowflake in the lower right indicating it’s in cooling mode (if you see a little flame, this means you have the OFF and ON temperatures reversed, modify your temperatures so the OFF temperature is a smaller value than the ON temperature).
It seems like a lot of steps, but once you get the hang of programming the controller, you’ll do it in a matter of seconds.
How I Retard My Dough
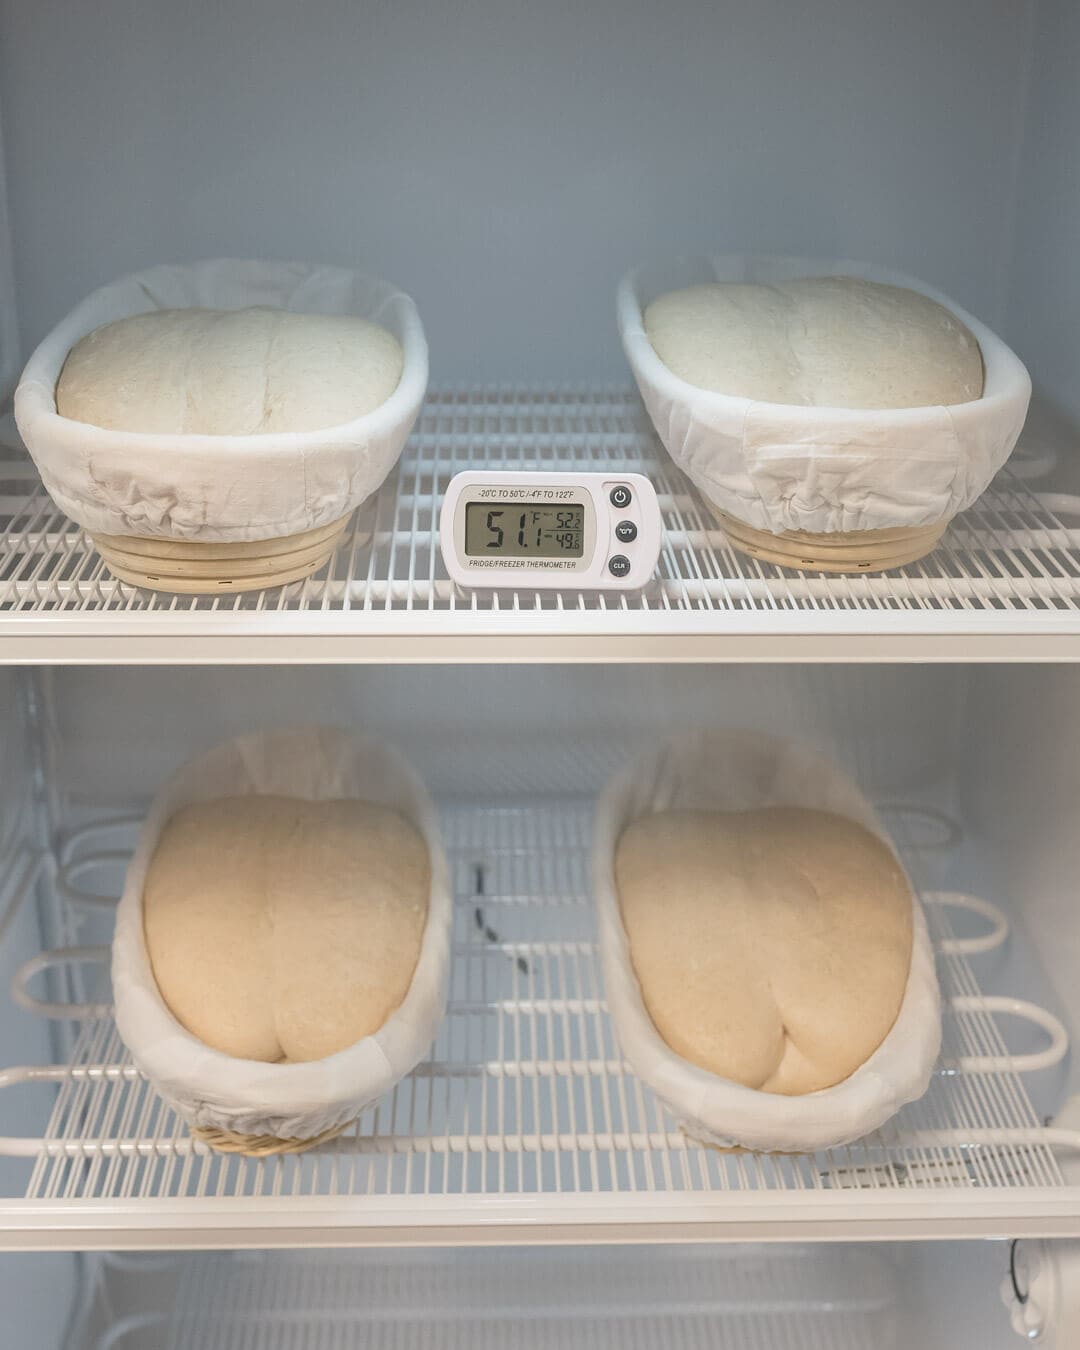
I typically turn on the retarder at the end of my bulk fermentation or during bench rest and set my desired temperature. Once I’m done shaping and the dough is in its proofing basket, I’ll simply place the baskets in the unit and shut the door quickly.
I’ve been monitoring the humidity in my freezer through many bakes, and I’ve noticed the freezer traps humidity extremely well (it usually ranges between 80% and 90%). Because of this, I no longer need to bag my baskets as I have done in the past—fantastic.
If you notice the humidity in your unit is not high enough, you may still need to place your baskets in food-grade plastic bags while proofing.
Performance and Energy Use
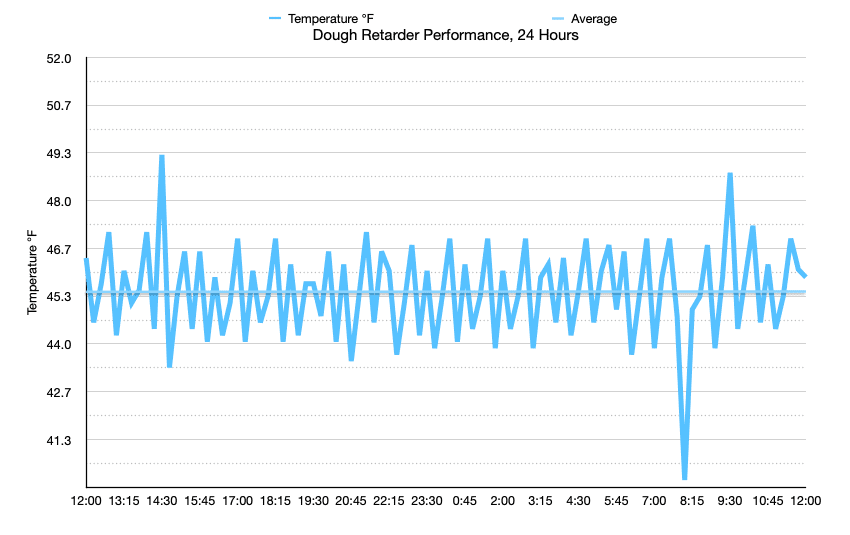
I monitored the temperature inside the unit over the course of 12 hours to try and determine the effectiveness of the setup. Ignoring the small amount of error introduced by my opening and closing the unit very briefly to read the temperature, I found that over 12 hours, the unit performed extremely well.
There were a few blips up and down, but the time it took the retarder to get back up to temp or drop back down wasn’t very significant. Plus, you have to remember it will take time for the dough mass of each loaf to change temperature. A short blip won’t have a significant effect.
The unit was set to a temperature of 45°F (7°C) for testing (the “ON” setting was set to 46°F/8°C and the “OFF” setting was set to 44°F/3°C) and, as you can see in the chart on the right, the deltas from the target temperature was very minimal over the course of the 12 hours. The end result was approximately a 45-46°F (7-8°C) average during that time period. Stellar.
These upright deep freezers have incredibly thick walls and thick rubber seals to help keep the cold in and the hot out. Because of this heavy insulation, the reality is this unit will not frequently turn on the compressor to cool the interior. Once the retarder is loaded with dough, the door is closed, and the interior reaches the initial desired temperature range, it will usually remain idle for many hours before needing to kick the compressor back on.
Further, when I’m not baking I’ll typically just turn the unit completely off by unplugging it (unplug the freezer from the thermostat controller) or I program the thermostat to a high temperature. When I’m baking, I’ll turn it back on at the end of bulk fermentation to let it cool to my desired temperature in preparation for use.
Conclusion
I realize not everyone will want to go the lengths to build their own dough retarder as I have—I am kind of obsessed, as you know. However, I decided I’d document my process for building this unit and the tests I’ve undergone in the hopes you might one day build your own dough retarder.
While this post documents every little step I’ve taken to build this thing, when you boil it down, it’s really a very simple set of steps to construct. Over the last couple of months I’ve used this fretarder I’ve wondered one thing: why didn’t I build this sooner?
For more of the best tools I’ve found for baking, head to My Baking Tools page.

