
Baking a healthy and nourishing loaf of sourdough bread with your sourdough starter is gratifying, to be sure, but what if you’re not home all day to check in on the long-fermented dough? I mean, some of us do have to work, right? This simple weekday sourdough bread recipe and schedule are uncomplicated for mixing and baking a loaf of bread during the busy workweek.
This post includes pictures and videos that clearly and concisely convey the full sourdough bread-making process. But why is this recipe so easy compared to others?
Real Quick: Why is This Sourdough Bread Easy?
- It’s a no-knead sourdough bread recipe: mix everything in one bowl
- It uses only two types of flour: bread flour and whole-wheat flour
- It’s moderate hydration—no messy dough or counters
- It’s baked in a Dutch oven or combo cooker
- Timing is extremely flexible
Let’s go over the workweek schedule.
A simple weekday sourdough bread schedule
In the past, I’ve discussed a weekend baking schedule that outlines a schedule for low maintenance during the week with a bake on the weekend. The following schedule, however, allows baking during the week around a typical nine-to-five workday. It’s also quite flexible, and you always have the option to place the dough in the fridge longer to bake when you get a chance.
Read through my ultimate guide to dough proofing for more information on adjusting the proofing period for this sourdough bread.

| Time | Step |
|---|---|
| 7:00 a.m. (before work) | – Make the 10-hour levain (ready ~5:00 p.m.) – Save time later, scale-out flour & salt into bowls and cover |
| 5:00 p.m. (after work) | When levain ready, mix dough for autolyse |
| 5:30 p.m. | Finish mixing and begin bulk fermentation |
| 9:00 p.m. | Divide, pre-shape, and bench rest |
| 9:30 p.m. | Shape and place into the refrigerator to proof overnight |
| 7:00 a.m. (next day) | – Bake the next day before work – Alternatively, bake after work |
The schedule above has example times, so shift the timeline to earlier or later according to your schedule. Don’t worry if you don’t hit the times precisely as they’re written. There’s some flexibility there.
A Simple Weekday Sourdough Bread Recipe
Vitals
| Total Dough Weight | 1,800 grams |
| Pre-fermented Flour | 8.0% |
| Hydration | 76.0% |
| Yield | Two loaves |
Total Formula
The following table shows all the ingredients needed to make this bread. Each ingredient will be called out as needed in the method steps below.
My final dough temperature for this simple weekday sourdough bread was 75°F (24°C). For more information, see my post on the importance of dough temperature.
| Weight | Ingredient | Baker’s Percentage |
|---|---|---|
| 806g | High-protein white bread flour, malted (King Arthur Bread Flour) | 80.0% |
| 202g | Whole wheat flour (King Arthur Whole Wheat Flour) | 20.0% |
| 766g | Water | 76.0% |
| 19g | Fine sea salt | 1.9% |
| 8g | Ripe sourdough starter (100% hydration) | 0.8% |
Method
1. Prepare levain – 7:00 a.m., before work
A levain is simply an off-shoot of a sourdough starter. A sourdough starter is never used up completely; it’s continually fed day after day indefinitely. A levain is created with a small bit of a sourdough starter and left to mature (ferment) until ready to be mixed into a dough. Ultimately, it meets the same fate as the dough: baked in the oven.
In the morning before work, mix in a jar:
| Weight | Ingredient |
|---|---|
| 40g | Bread flour |
| 40g | Whole wheat flour |
| 81g | Water |
| 8g | Mature sourdough starter |
Loosely cover the jar; it should be ready after about 10 hours at room temperature, 72-75°F (22-24°C).
2. Autolyse with Levain – 5:00 p.m. after work
Performing an autolyse gives our dough a chance for the flour to fully hydrate and begin the gluten development process (all without kneading). I typically don’t do an autolyse with the levain included, but we’ll do that in this simple weekday sourdough bread recipe because it’s a short period.
Add all the ingredients below to a mixing bowl. Mix with wet hands until all the dry bits are incorporated. Cover and keep somewhere warm at room temperature for 20 minutes.
Note: the water in the table below is 50g less than the total water for this recipe; the water (and the salt) are held back for the next mixing step.
Dough Mix
| Weight | Ingredient |
|---|---|
| 766g | High protein bread flour, malted (King Arthur Bread Flour) |
| 161g | Whole wheat flour (King Arthur Whole Wheat Flour) |
| 635g | Water, Autolyse |
| 169g | Ripe levain (created in Step 1) |
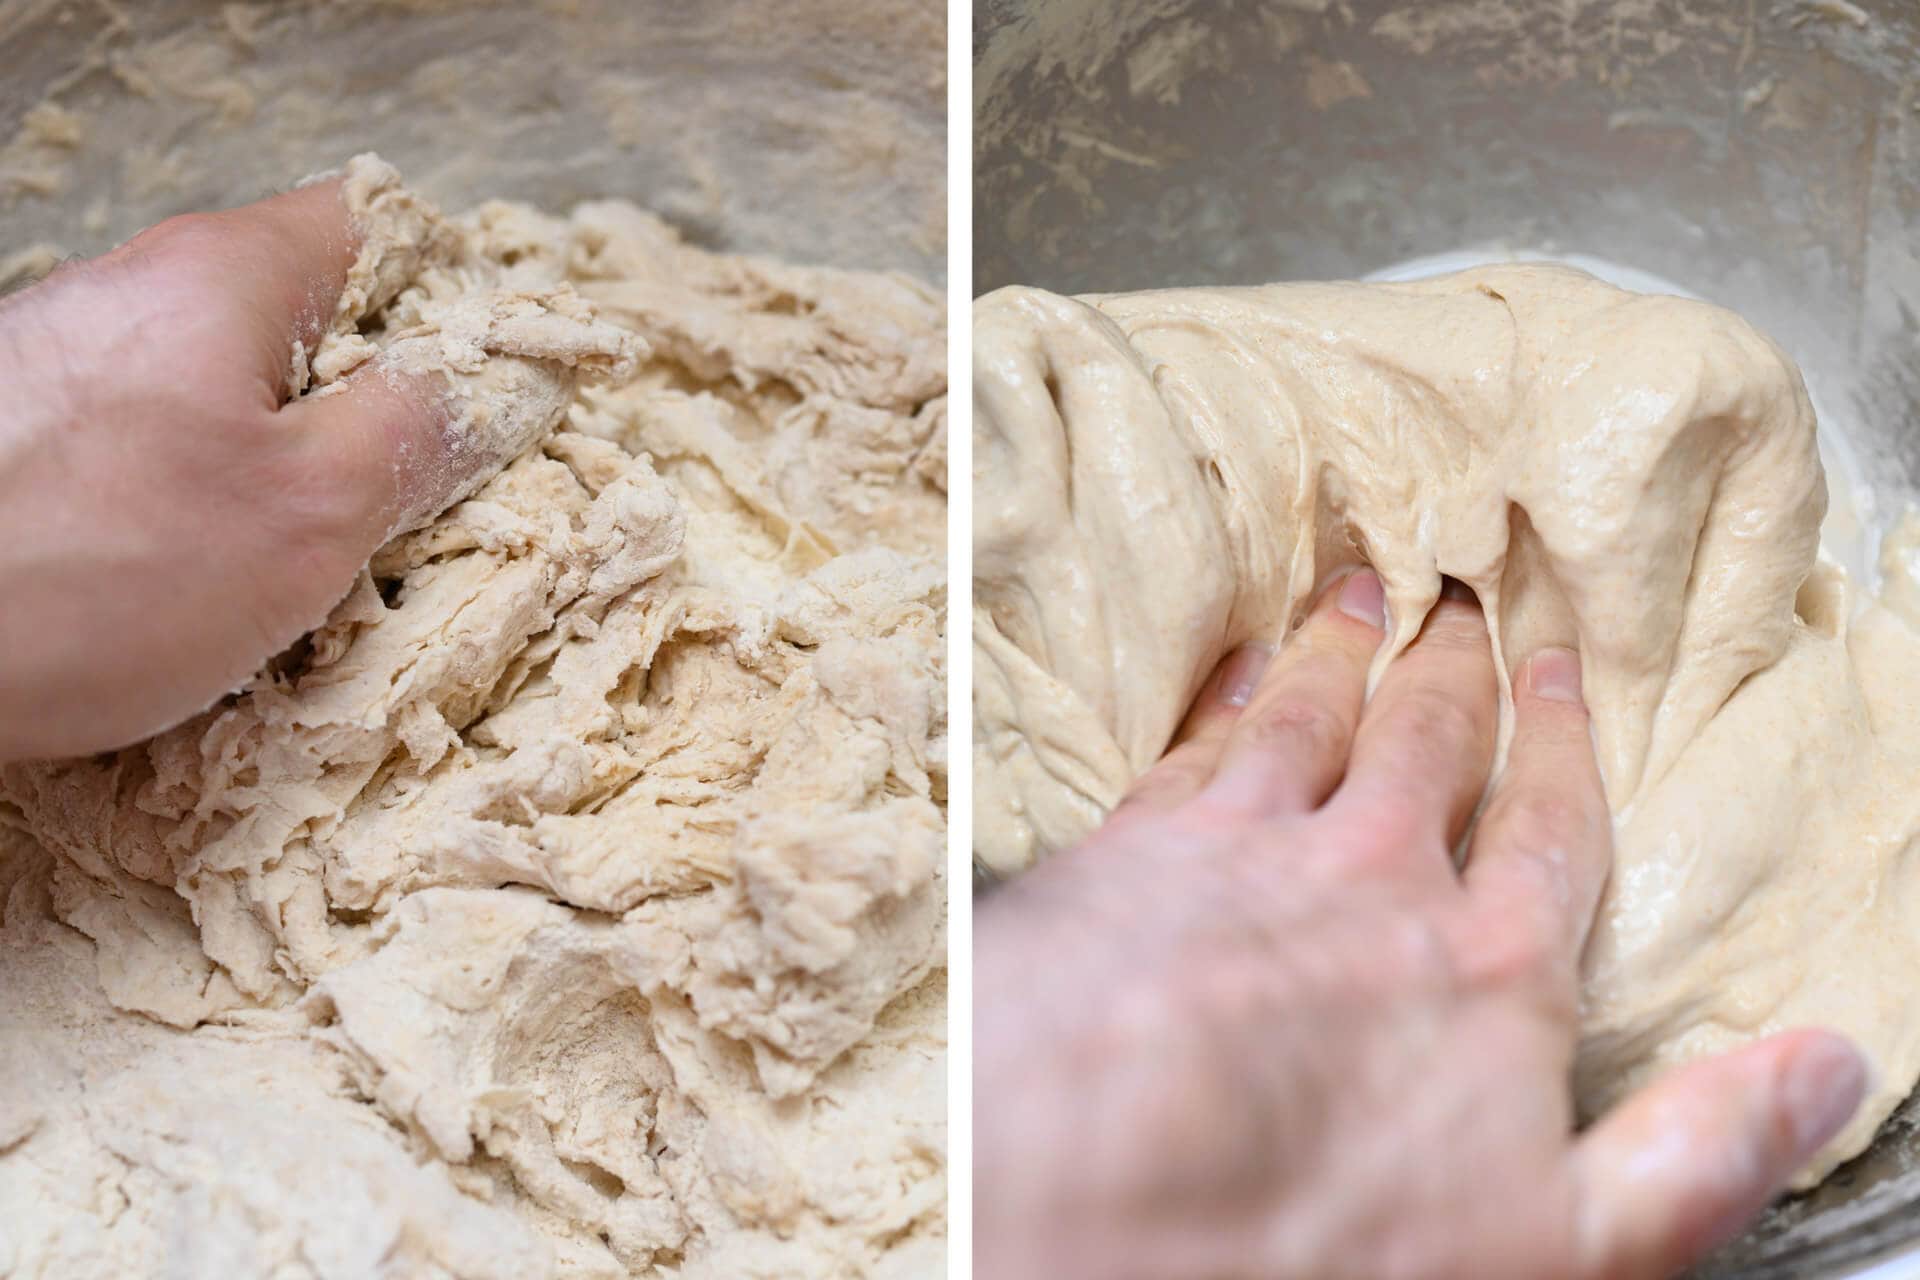
The image above shows the direct result of even a short autolyse. The left image shows the shaggy mass just before I finished incorporating everything. The right image shows how smooth and strong the dough becomes simply by resting. Let’s take this further with a little mixing.
3. Mix – 5:20 p.m.
Add the ingredients in the table below to the top of the dough: first, add the salt and then add the reserved water slowly to help dissolve the salt. Add the water a little at a time, depending on how the dough feels: it should be shaggy and loose, but not “soupy.” You can pause midway through pouring the water to incorporate it with a wet hand. If it feels like the dough can handle the rest of the water, add it all.
| Weight | Ingredient |
|---|---|
| 50g | Water, Mix (as needed) |
| 19g | Salt |
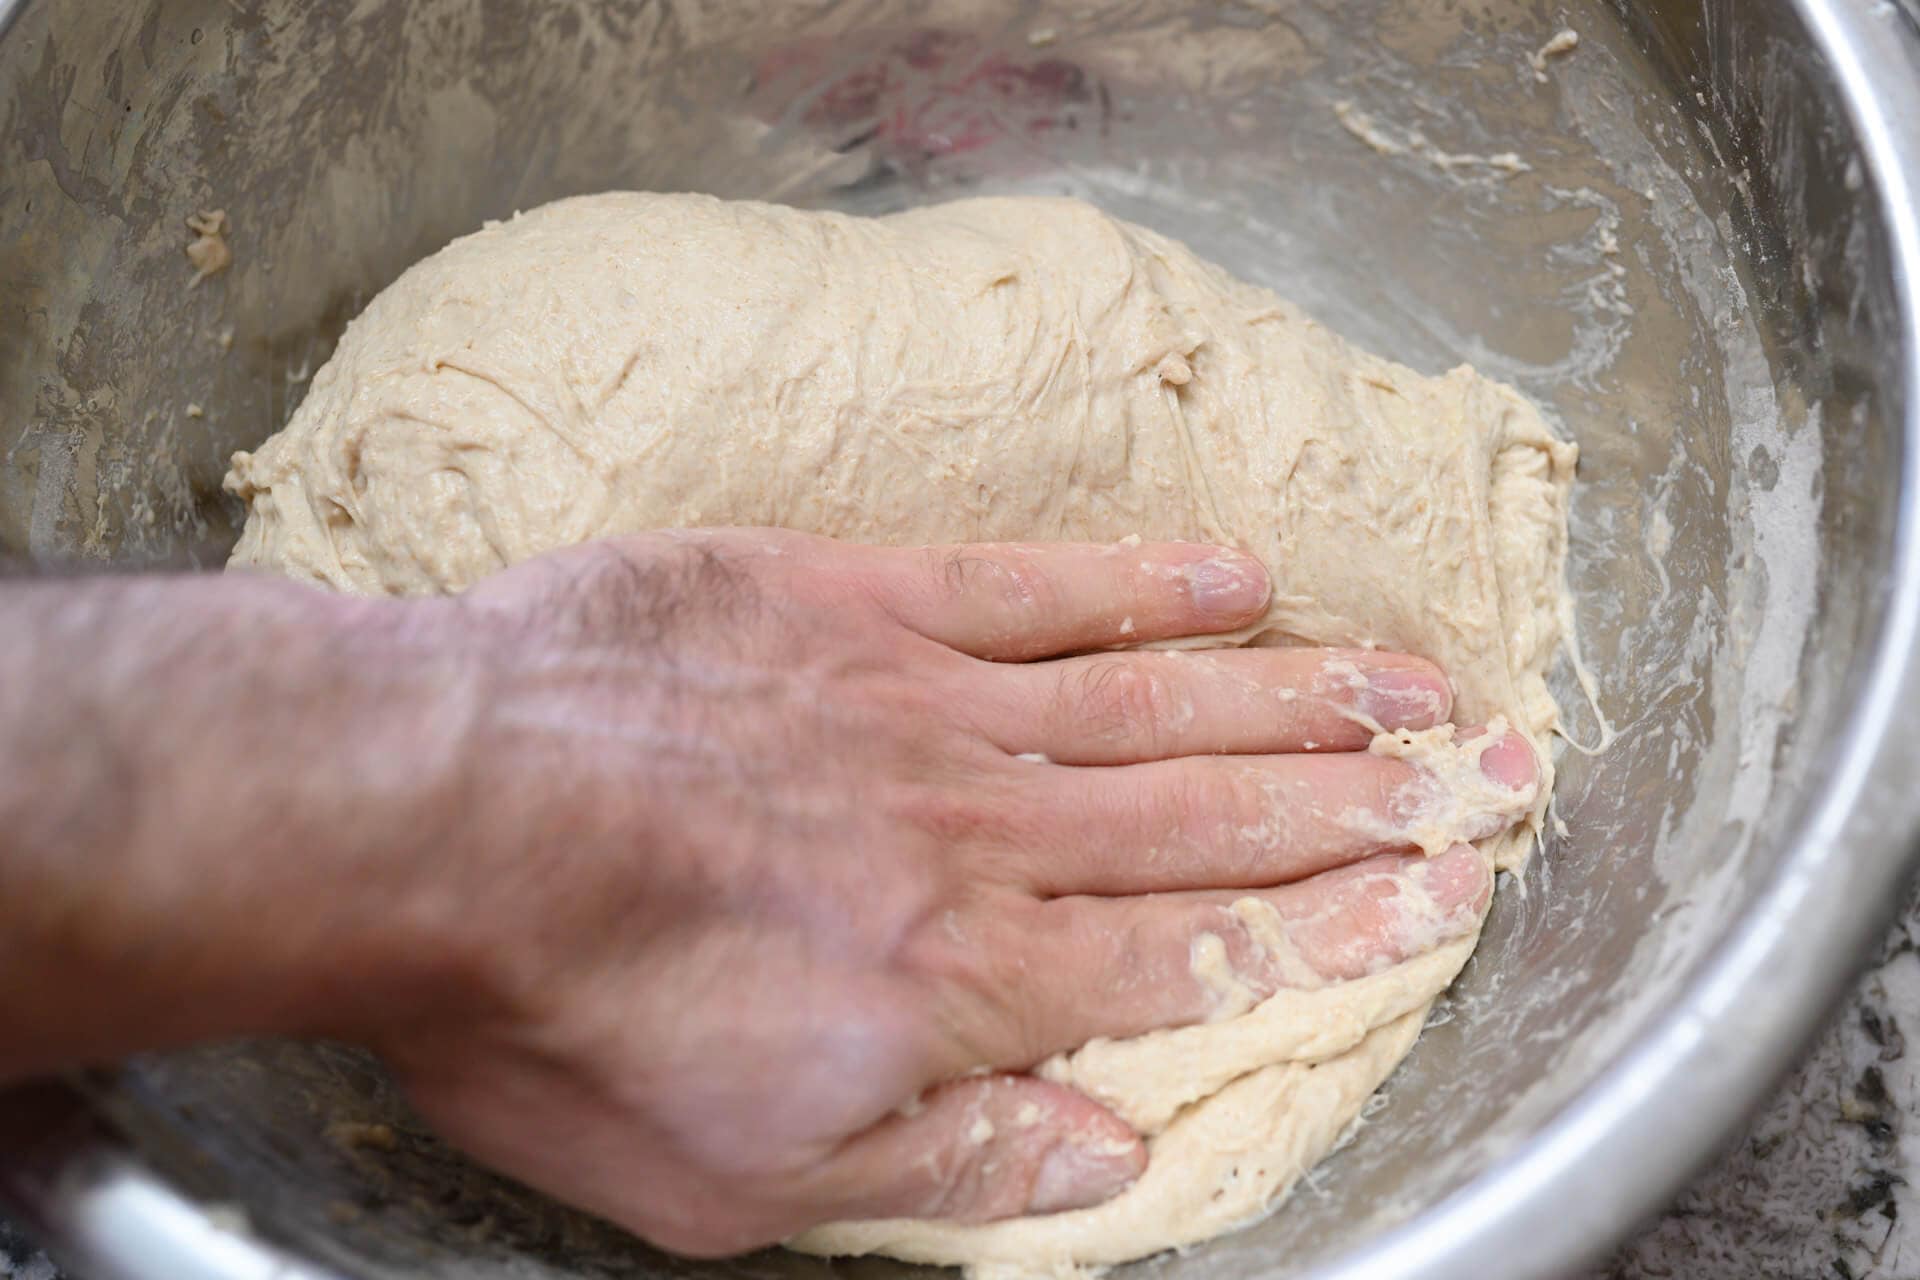
Since this dough uses a fair amount of high-protein white bread flour, it doesn’t require extensive mixing or kneading.
Using wet hands, mix everything until it comes together into a shaggy mass. This dough is rather strong and doesn’t require intensive mixing or kneading, but give it a few folds in the bowl, perhaps 5-10, until it smooths slightly (see the image, right).
Cover the bowl with reusable plastic and keep it somewhere warm in your kitchen for bulk fermentation.
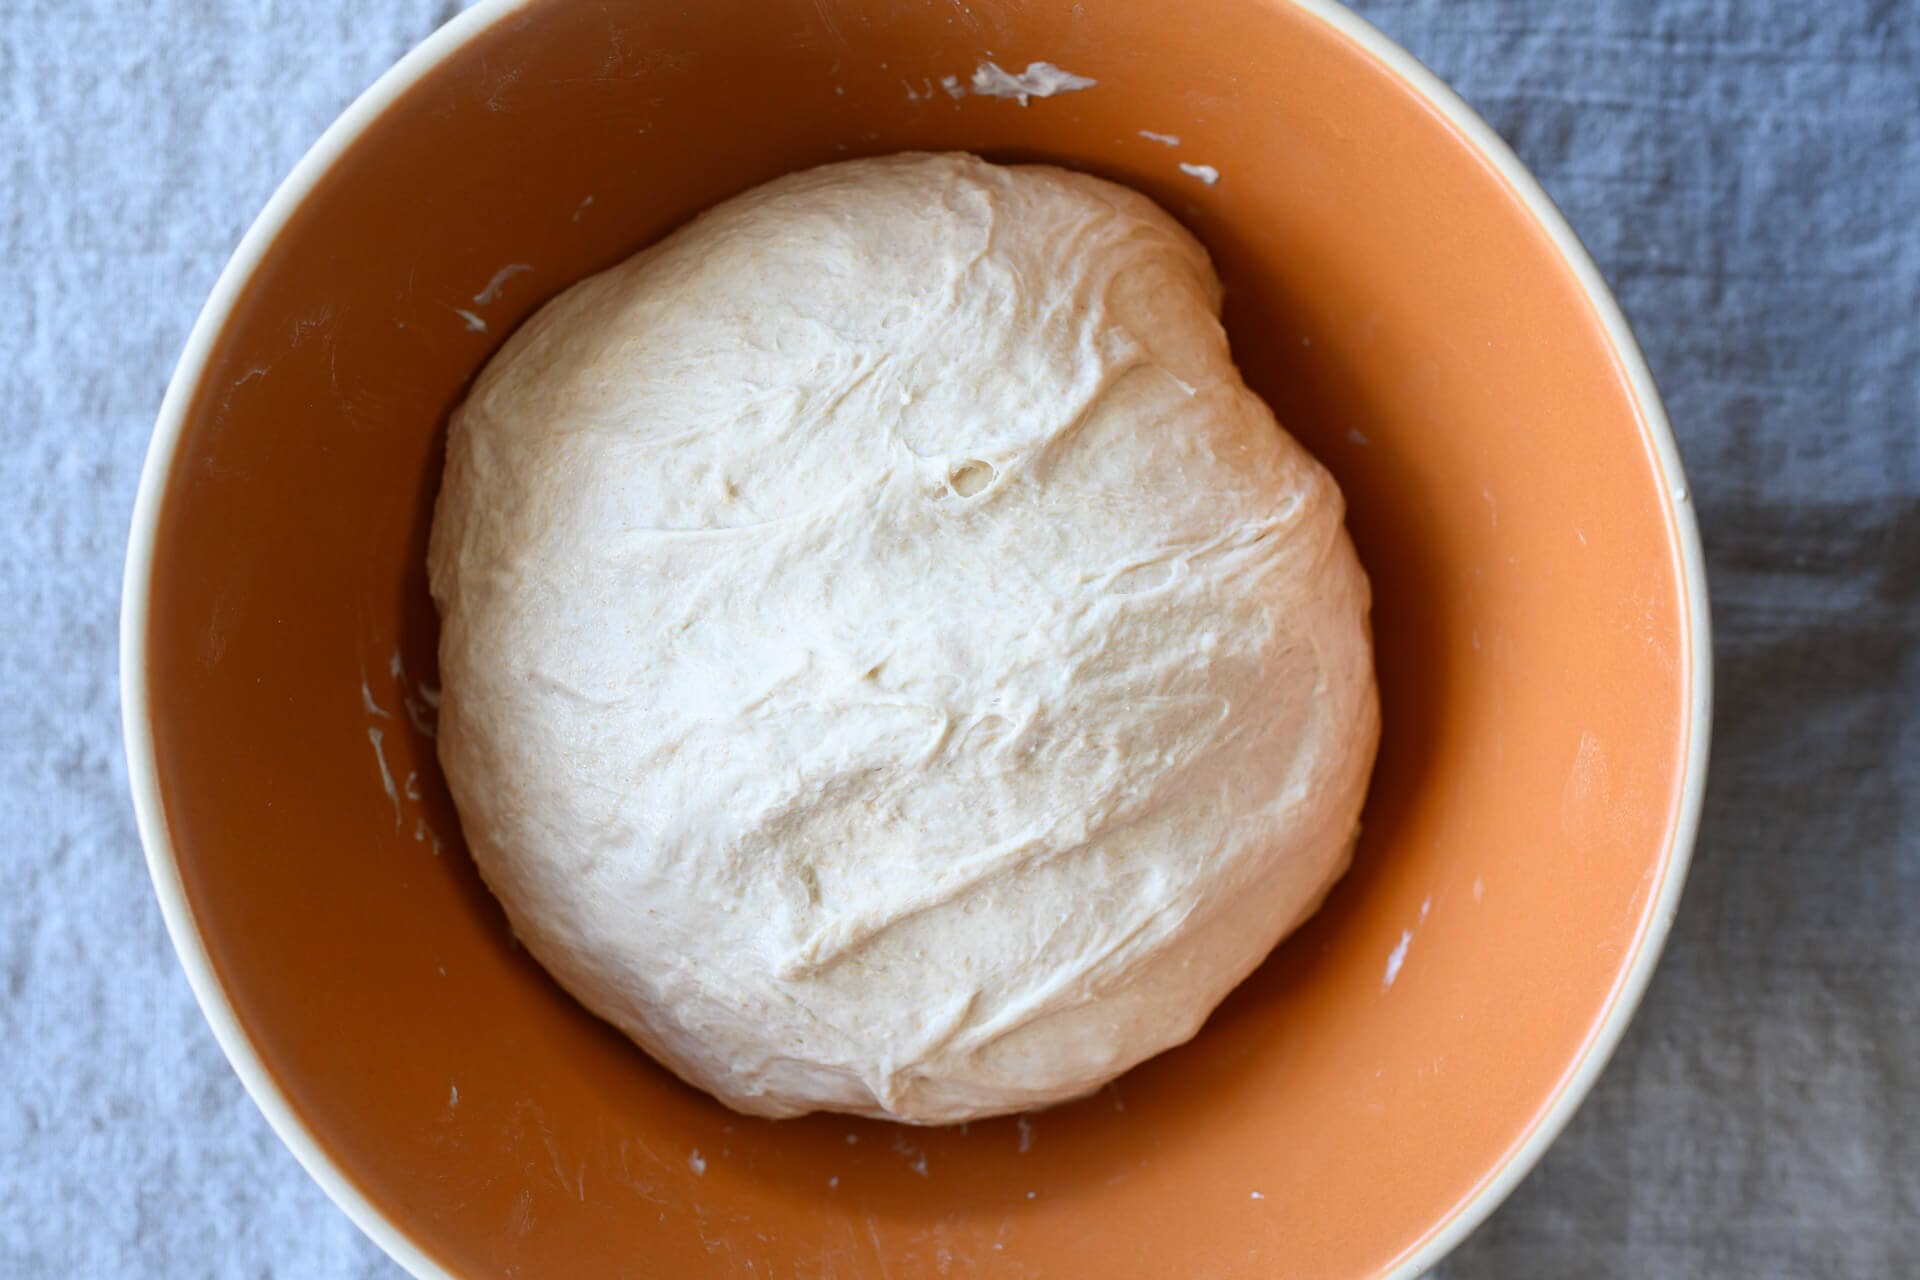
3. Bulk Fermentation – 5:30 p.m. to 9:00 p.m.
Bulk fermentation, or first rise, occurs when the dough is leavened (through the production of carbon dioxide gas) and flavored (through the production of organic acids) as a result of natural fermentation. Below, you can see how much my dough rises during this 3-hour and 30-minute bulk fermentation at 75°F (24°C).
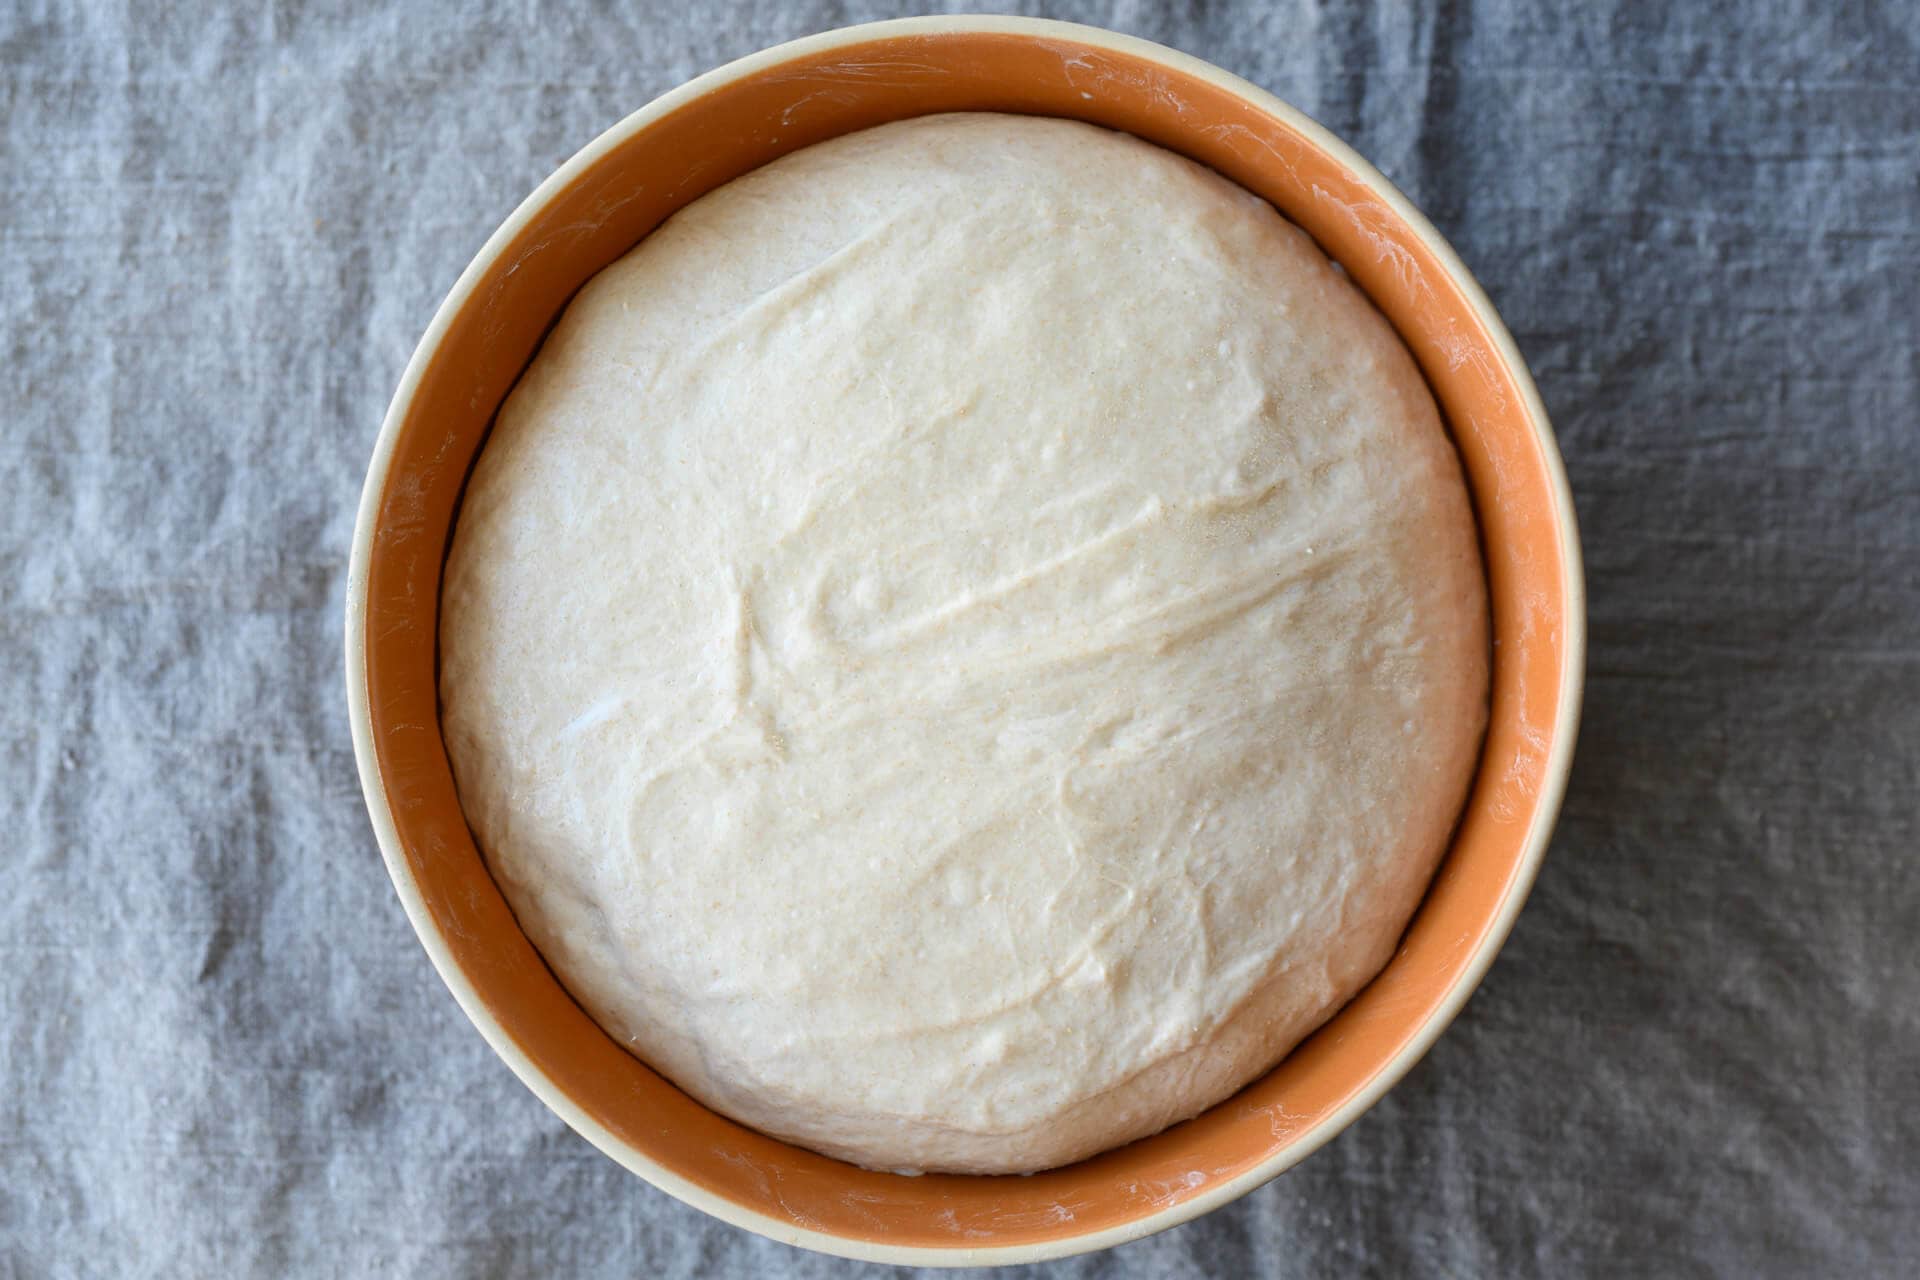
During this time, give the dough 2 sets of stretch and folds: the first set is 30 minutes after the beginning of bulk fermentation, and the second set is 30 minutes after the first. After the second set, let the dough rest, covered, until the next step.
As you can see in the video above, each set of stretches and folds is simple: With wet hands, grab one side and gently stretch it up and over to the other. Perform this fold in each direction: North, South, East, and West.
4. Divide & Preshape – 9:00 p.m.
Fill a bowl with some water and place it on your work surface. Scrape out your dough from the bulk container onto your dry counter. Divide the mass in half using a bench knife. Using a wet hand and the knife in the other, gently preshape each half into a loose round. Let the dough rest, uncovered, for 30 minutes until it’s relaxed outward.
See my guide to preshaping bread dough for a video and more instructions.
5. Shape – 9:30 p.m.
As seen in the video below, flour the top of the round with your hands and flip it over. Take the bottom edge and fold it up to about the middle. Take the left and right sides in your hands and fold the right over to about 2/3 of the left side. Repeat for the left side. Then, take the top and fold down to about the middle and gently seal. This should form a little envelope shape.
Now, flip over the entire thing and begin dragging and sealing the dough underneath itself (top-right, above). Using both hands, rotate and drag the mass toward you to create tension on the top. Repeat the dragging if necessary.
Read through my guide to shaping a boule for more instruction.
6. Proof – 9:45 p.m. to 7:00 a.m. or 6:00 p.m. (the next day)
Cover both proofing baskets entirely and put them in the fridge to proof overnight. The fridge allows us to slow fermentation to bake before or after work the next day.
7. Bake – 7:00 a.m. (pre-heat oven at 6:00 a.m.)
Preheat your oven with the rack at the bottom third to 450°F (230°C). Place your Dutch oven inside, with the lid and bottom side-by-side.
Take one basket out from the fridge and uncover it. Your dough might not have risen considerably in the fridge, but that’s fine. Cut a piece of parchment paper to fit over the basket and place a pizza peel (or large cutting board) on top. Using both hands, flip the entire stack over and remove the basket.
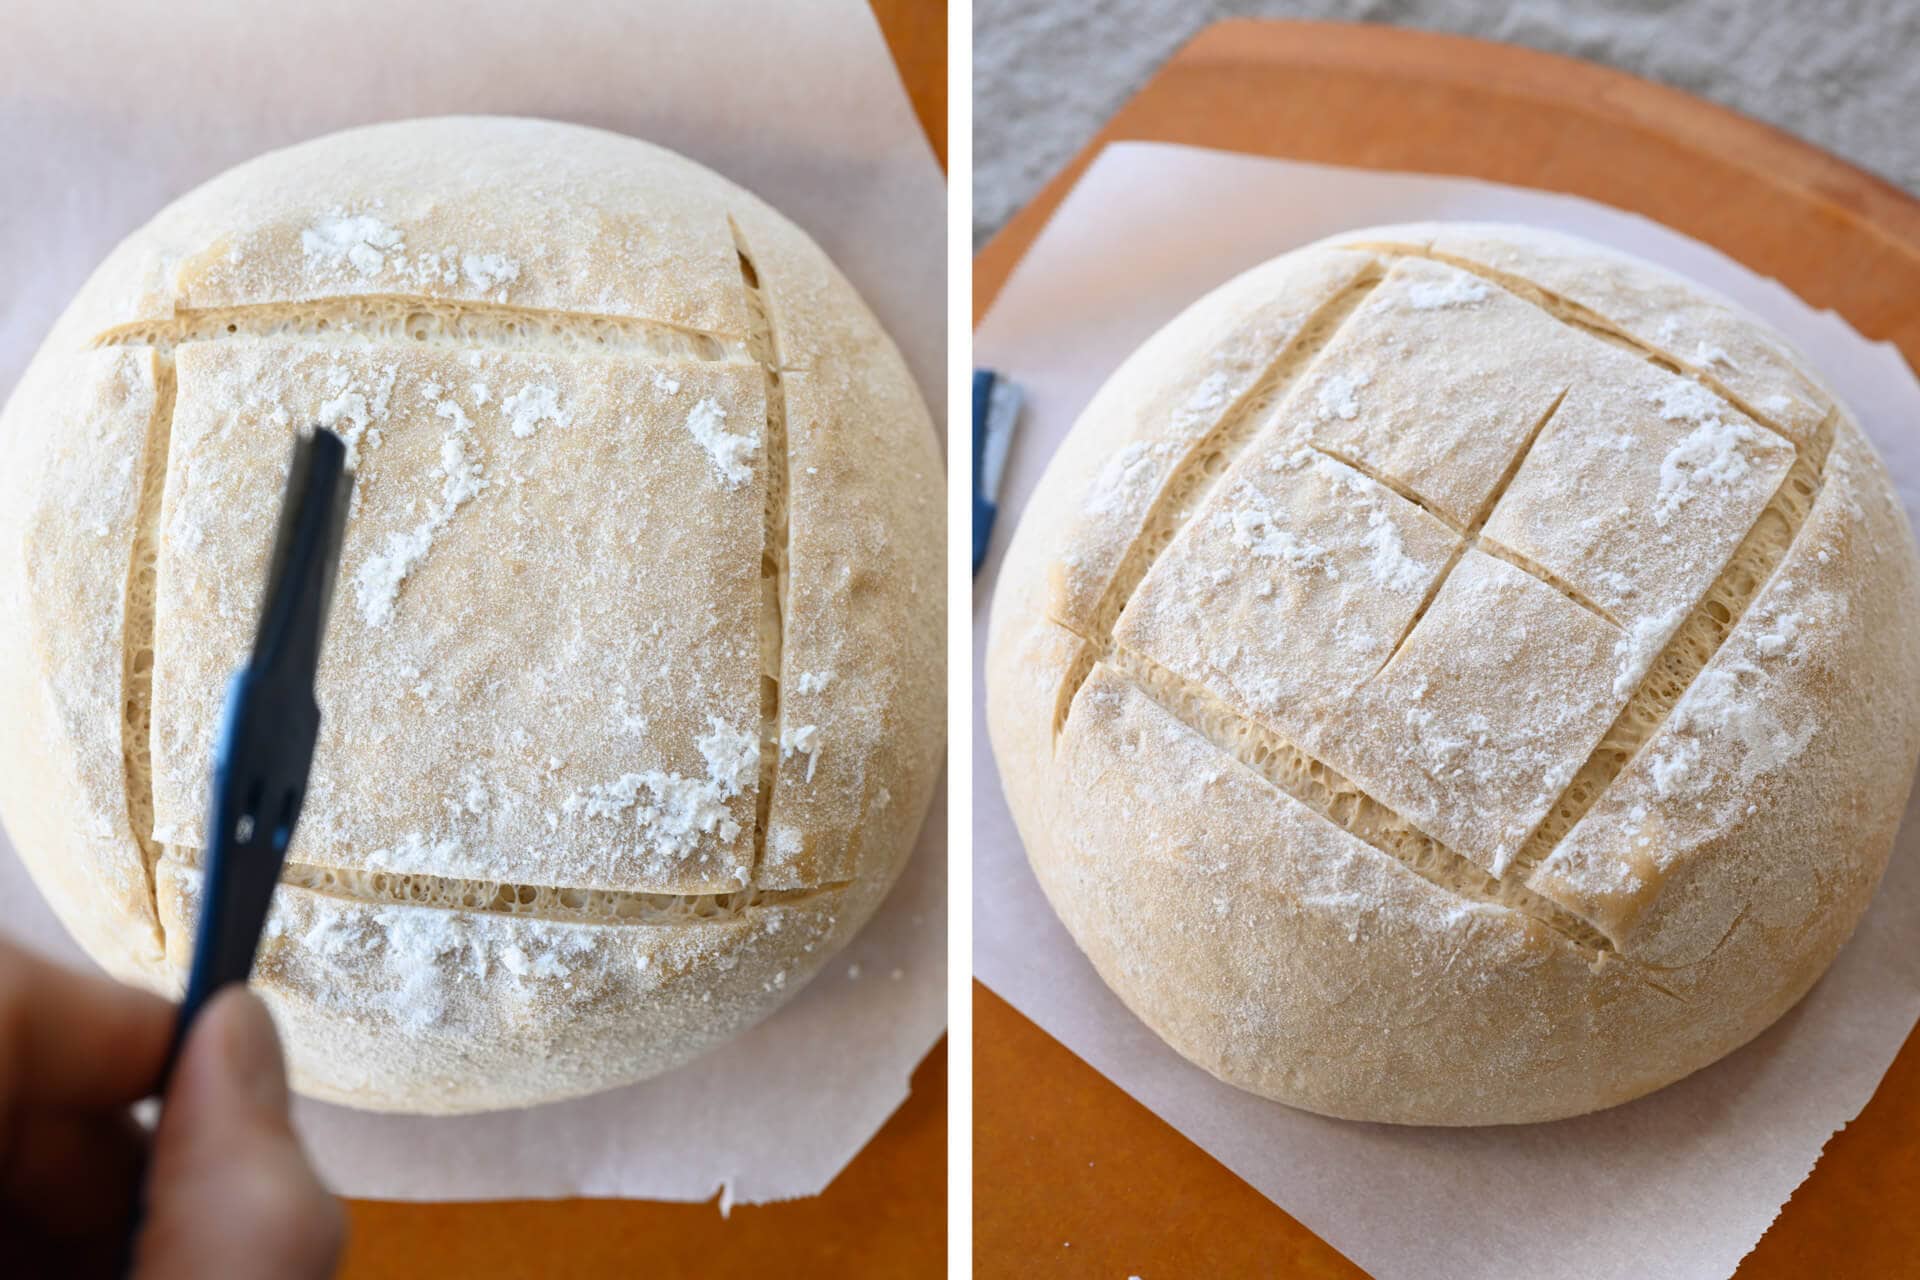
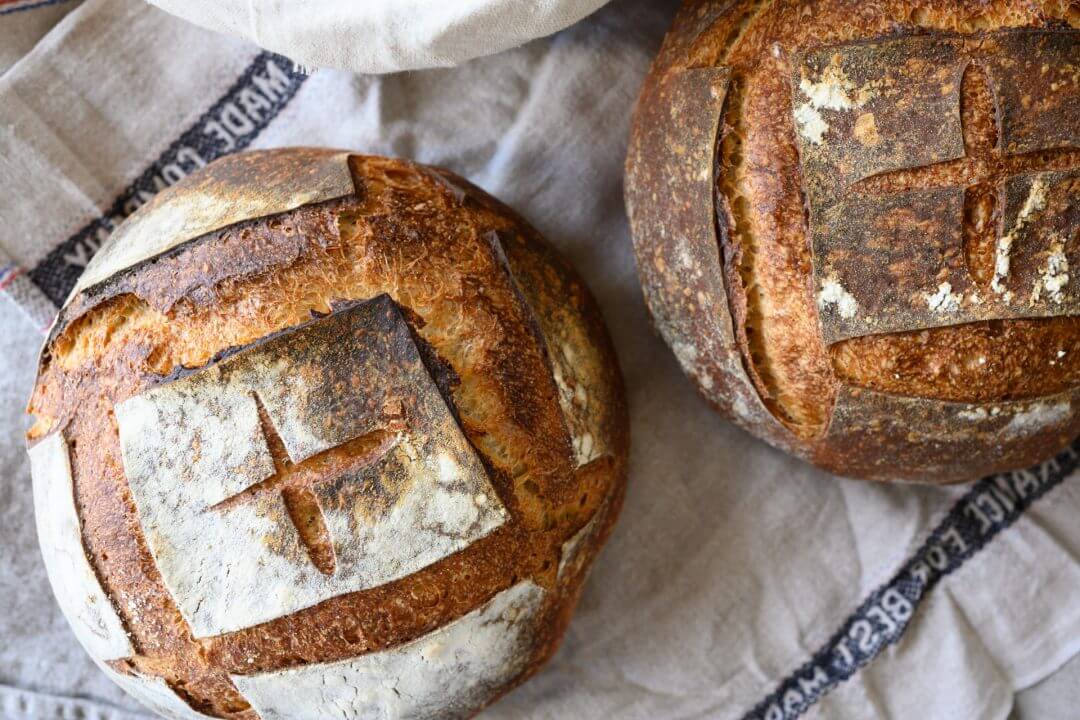
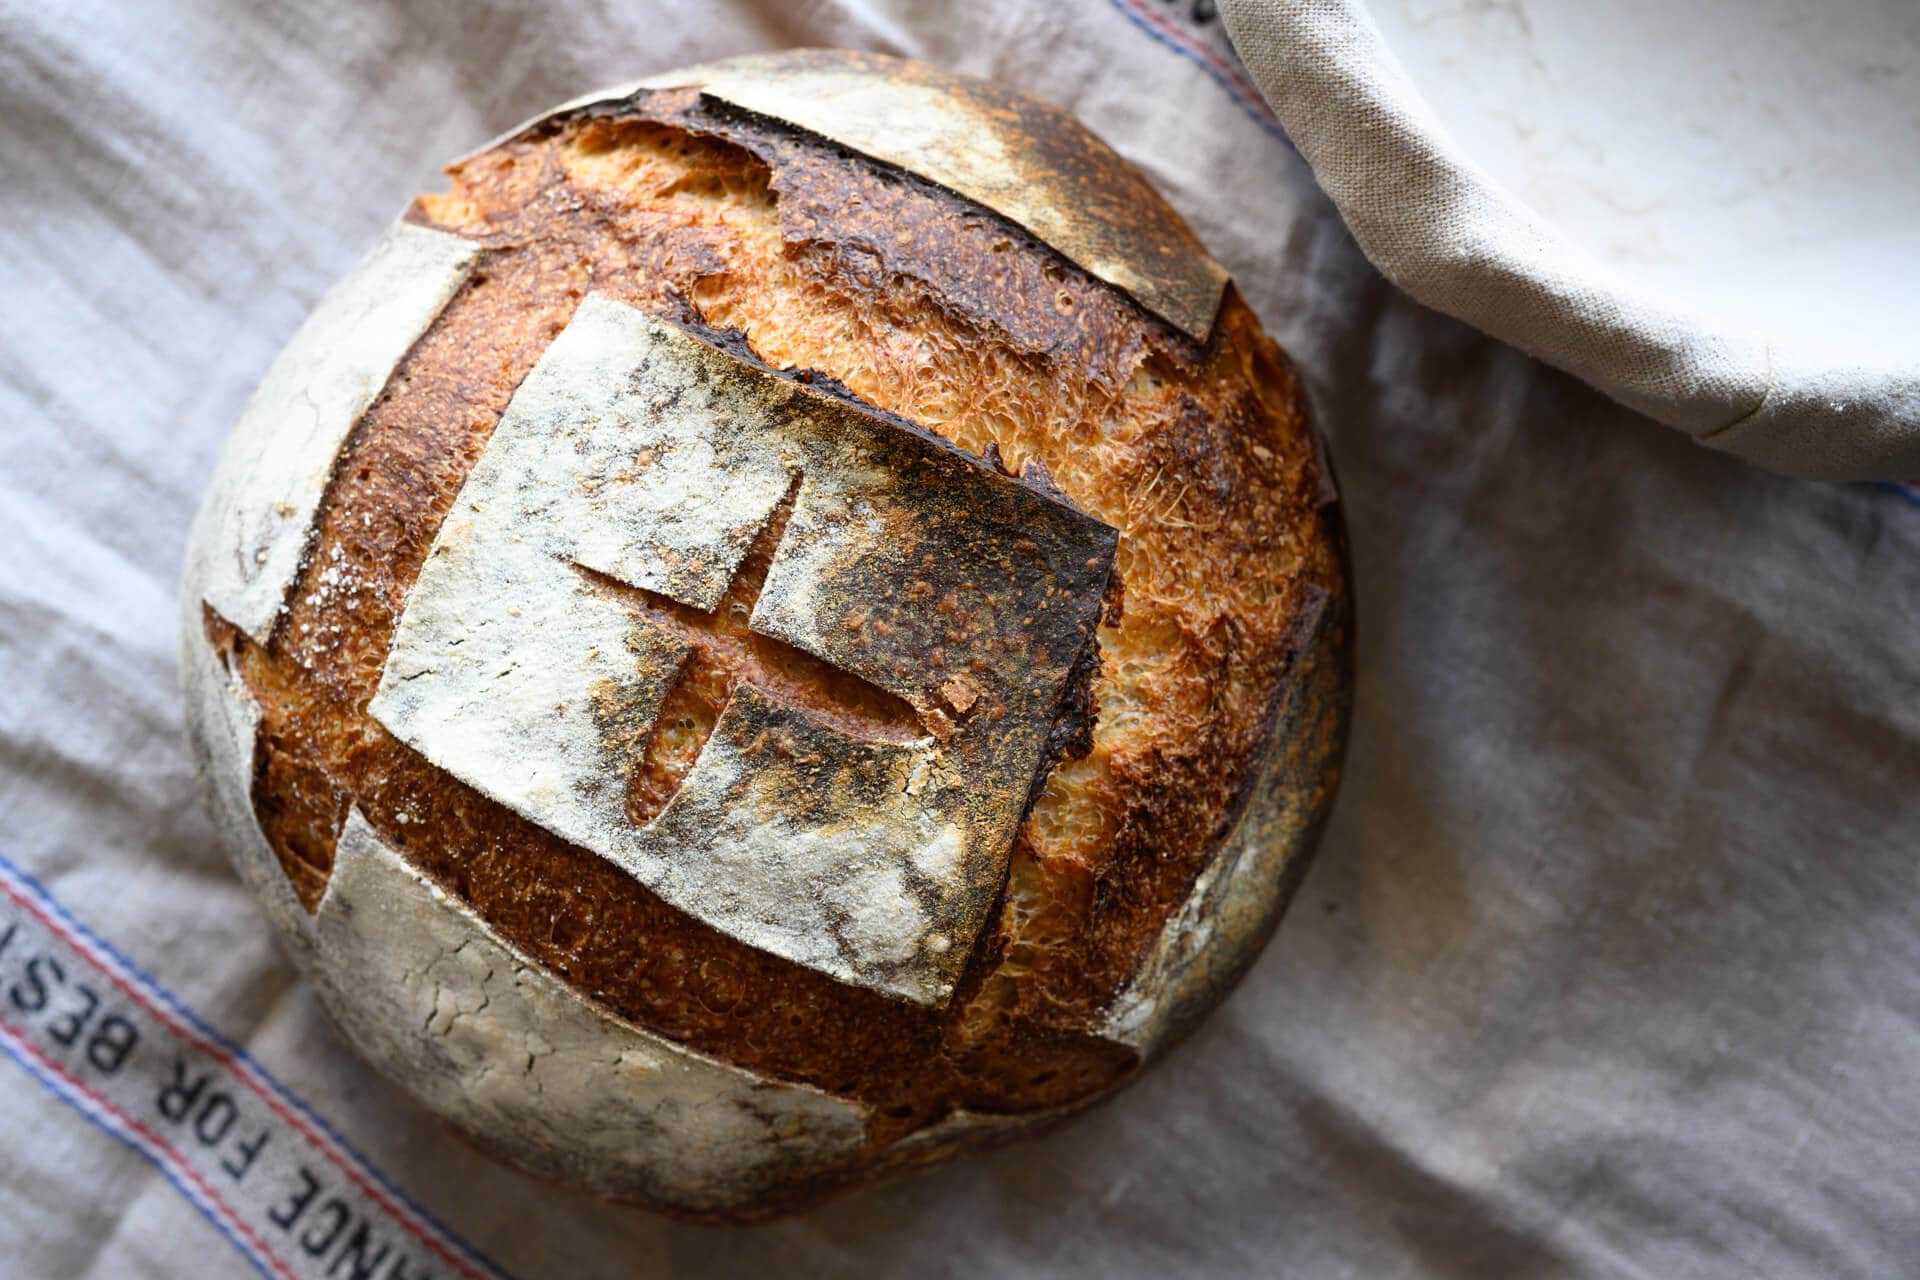
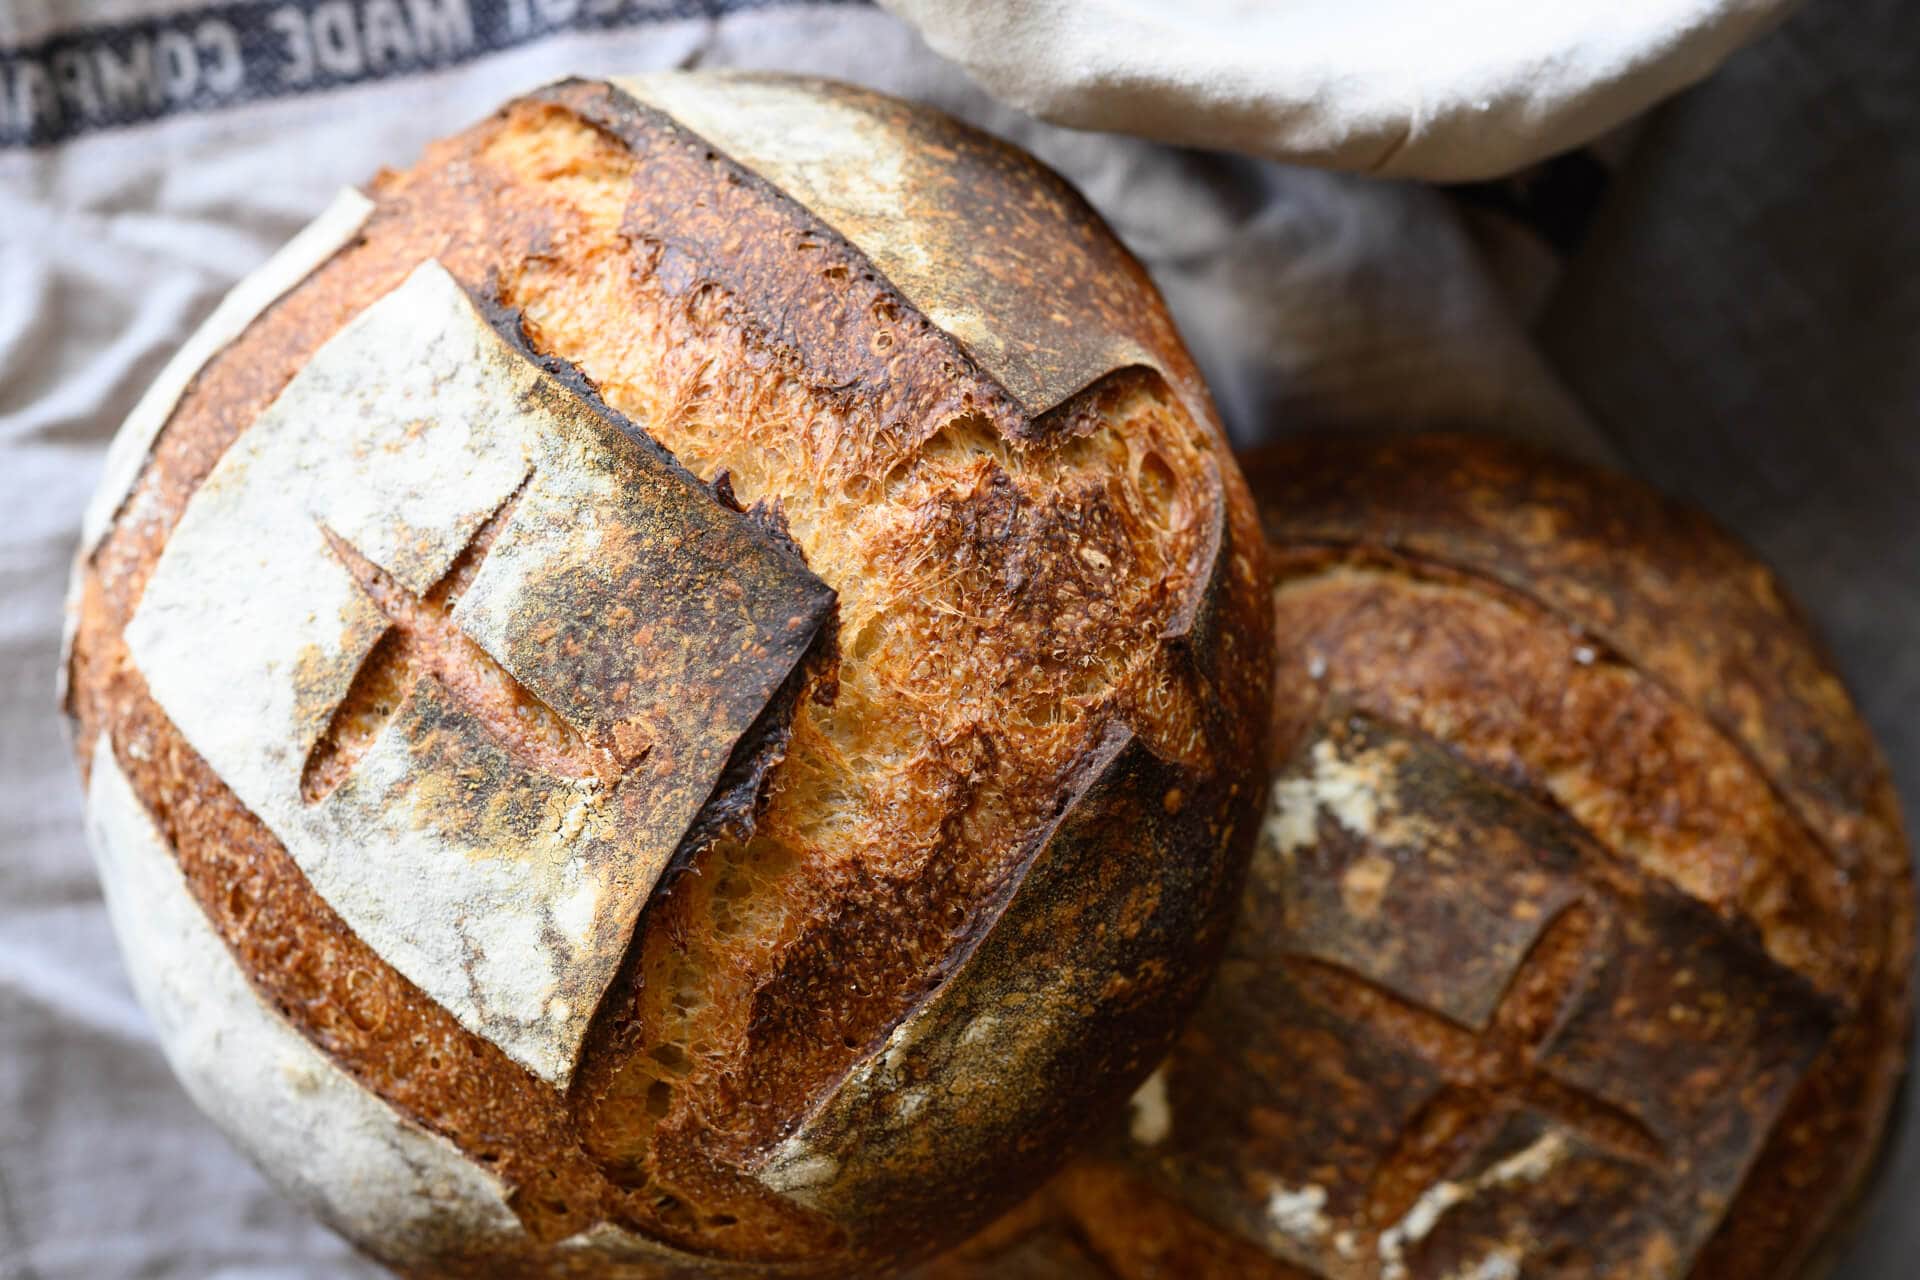
Score the dough using your favorite design. As you can see above, I love the “box top” score. Check out this video of me scoring this style (and a few others) below:
Now that your dough is scored, carefully slide it into the Dutch oven and bake for 20 minutes, covered.
After this time, remove the lid and bake for 30-35 minutes or until done. The internal temperature should be around 205-210°F (96-99°C).
(Note that If you’d like a thinner crust on this bread, increase the covered bake time to 30 minutes and reduce the second half of the bake (without steam) by 10 minutes. This increased baking time with steam can help reduce the thickness of the crust.)
Remove the loaf to a cooling rack for 2 hours before slicing. This lets the crust and crumb fully set and the flavor develop. Return the Dutch oven to the oven (without parchment) and bring it back to temp to bake the second loaf.
Follow my guide to storing sourdough bread to keep it fresh for the next week (or freeze it for longer!).
Print
Simple Weekday Sourdough Bread
- Prep Time: 24 hours
- Cook Time: 1 hour
- Total Time: 25 hours
- Yield: 2 loaves
- Category: Bread, Sourdough
- Cuisine: American
Description
A loaf of delicious sourdough bread designed around a busy workday. The levain is prepared for this bread in the morning and left to ripen while you’re at work. When you get home, continue with the baking process. The dough can then be baked at night or the next day in the morning, or after work.
Ingredients
Levain
- 40g bread flour
- 40g whole wheat flour
- 81g water
- 8g ripe sourdough starter
Main Dough
- 766g bread flour
- 161g whole wheat flour
- 19g salt
- 685g water
- 169g ripe levain
Instructions
- Levain (7:00 a.m. before work)
In a small container, mix the Levain ingredients and keep it at a warm temperature for 10 hours. - Autolyse with levain (5:00 p.m after work)
In a medium mixing bowl, add all of the levain, 766g bread flour, 161g whole wheat flour, and 635g water (50g was reserved for mixing, later) and mix until no dry bits remain. Cover the bowl and let rest for 20 minutes. - Mix (5:20 p.m.)
To the mixing bowl holding your dough, add 19g salt and some of the reserved 50g water (or all if the dough feels like it can handle it). Mix thoroughly and strengthen the dough for about 5 minutes. Using wet hands, mix everything until it comes together into a shaggy mass. This dough is relatively strong and doesn’t require intensive kneading (like slap and fold), but give it a few folds in the bowl, perhaps 5-10, until it smooths slightly. Transfer the dough to a bulk fermentation container and cover. - Bulk Fermentation (5:30 p.m. to 9:00 p.m.)
This dough will need 2 sets of stretch and folds during bulk fermentation, the first set 30 minutes after bulk fermentation begins. Perform the second set 30 minutes after the first, and then let the dough rest the remainder of bulk fermentation. - Divide and Preshape (9:00 p.m.)
Lightly flour your work surface and scrape out your dough. Using your bench knife, divide the dough in half. Lightly shape each half into a round shape. Let the dough rest for 30 minutes, uncovered. - Shape (9:30 p.m.)
Shape the dough into a round (boule) or oval (batard), then place the dough in proofing baskets. - Proof (9:30 p.m. to 7:00 a.m. or 6:00 p.m. the next day)
Cover proofing baskets with reusable plastic and seal shut. Then, place both baskets into the refrigerator and proof overnight. - Bake (The next day, bake at 7:00 a.m. before work, or 6:00 p.m. after work)
Preheat your oven with a baking surface or combo cooker/Dutch oven inside to 450°F (230°C). Remove your dough from the fridge, score it, and transfer it to the preheated baking surface or combo cooker. Bake for 20 minutes with steam. After this time, vent the steam in the oven or remove the lid (you can keep it in the oven or remove it) and continue to bake for 30 minutes longer. When done, the internal temperature should be around 204°F (95°C). Let the loaves cool for 2 hours on a wire rack before slicing.
Notes
- This recipe is wonderful left plain, or you could top the dough with rolled oats, white sesame seeds, or flax seeds.
If you use this recipe, tag @maurizio on Instagram so I can take a look!
What’s Next?
There you have it; this simple weekday sourdough bread can be made daily and adjusted to fit your schedule. Now, there’s no reason not to bake. This recipe is also a great place to experiment: mix 125g of nuts like walnuts and pecans and dried fruit like cranberries, cherries, or raisins.
Many recipes on my site can be adapted to this simple weekday sourdough bread schedule, most notably my Beginner’s Sourdough. Both recipes use flexible doughs, and the fridge provides even more.
For a more hands-off approach, check out my easy no-knead sourdough bread recipe. It can also be adapted to bake in a single day or ferment longer for an easier schedule.
Happy baking!


903 Comments
The baker’s percentages for the flour mix don’t seem to correspond to the masses. E.g. the baker’s percentages say the bread flour to whole wheat flour ratio should be 4:1, but that’s not the ratio of masses in the table.
Fixed — I had the baker’s percentages for the overall formula not just the dough mix (which look strange because they’re not round numbers, but that’s how it goes!). Thanks for pointing that out.
Hi. Thanks for this walk through for beginners! One thing I haven’t found anywhere is whether you place the parchment paper in the Dutch oven with the loaf to bake. Do you slide the dough into the pan (and off the paper) or place it in using (and keeping) the paper. Thanks!
Yes, I slide the dough on the parchment right into the DO, it fits just fine and doesn’t burn 🙂
Hi, Thank you for the response on the white flour! I have one more question….
My starter (day 6) tends to peak between the 3 and 4 hour mark (I’m keeping it in an 80 degree environment) then by around 6 hours it’s back down to it’s original height. Is this rising and falling too quickly in a 12 hour period? My concern is that when it’s time to mix in the starter to the Levain at 7am, my starter will not be at it’s peak from the night before – it will be back to it’s original height. If I wanted it at it’s peak, I would have to wake up at 4am to refresh it which isn’t realistic.Any advice would be helpful!
Leave less starter in your jar when you refresh, that’ll lengthen the time between refreshments. Check out my stater maintenance routine post for some ideas there!
Hello, I do not have bread flour and I cannot locate some right now. Can I replace the bread flour with King Arthur Flour All-Purpose Flour? I am aware it may not produce the same result, but would it still come out well?
Yes, actually you’ll get a wonderful result with AP flour! Be cautious with that reserved 50g water: you might not need to add all of it to the dough, only as as much as needed. I might also suggest giving it one more set of stretch and folds during bulk. Let me know how it goes and happy baking, Rose!
I am above 8000 feet. How should I adjust the starter or the sourdough recipe?
Thanks
You might be able to get away with using less starter/levain in the recipe at that altitude. I would likely reduce the levain percentage by 2-5%. Also, you might find your dough needs additional water during mixing, but this really depends on your flour. Add more water to the mix if necessary. Finally, you might find you need to bake these loaves longer until they reach the desired internal temperature (and signs shown above in the post). Hope this helps, I’ve never baked at that high of an altitude, it’s 5280ft here.
great article thanks Maurizio. smashing schedule, i just used it to bake using a variation, 1.5% salt. slightly wetter dough, allowed 3 more hrs at room temp after retarding. results g8, to me they look like real artisan sourdoughs. No dutch oven but i steamed my old oven 3 times during the first 20 minutes, and plugged the internal vent with tin foil.
Hi – I have been cultivating my starter based on your recipe for 5 days now and it seems to be doing great! I want to start making your simple no-knead weekday loaf, but I am unable to procure the ‘bread flour’. Due to the pandemic all stores and online are out of EVERYTHING! I have all-purpose white and wheat flour. Is there any way to make the bread using these flours and this same recipe, or is the bread flour (higher gluten/malt) a must-have? Thank you!
try calling your local bakers. i bought 1kg bags of ‘their’ flour they we’re happy to sell. (battle – uk).
Yes, just use all purpose flour — it’ll turn out great! I would say if using AP flour be careful to add all the 50g reserved water in the recipe, it might be a little too wet for your flour (not necessarily, but possibly). Only add that 50g reserved water if it feels like the dough isn’t overly wet or slack. This should work out just fine, happy baking!
also, if you have Costco, try there?
Firstly- this site is amazing! You’re brilliant! I love how I depth everything is, really explaining how and why things happen.
I baked my first loaves today. I used a 50/50 mix of spelt and white (had fed my starter with the same a couple times, seemed to get the same growth each 12hrs). Was a little nervous as there wasn’t a huge amount of action last night when bulking. I ended up leaving the dough an extra hour before Shaping and then putting in the fridge.
Upon slicing the loaf, there are some holes, but the bread seems a bit more dense than I was expecting? Not nearly as beautiful and holey like your pictures. Any tips on improving this?
Thanks heaps!
Thanks for the kind words, Tash! It sounds like maybe you had a little less fermentation activity than desired. Be sure you are using your starter and levain when they are nice and mature: they should be bubbly and perhaps have started to fall a bit in their jar. This is important! From there, give the dough the time it needs in bulk fermentation — your adjustment sounds right on for the dough that day. Usually a dense loaf with scattered, big holes means under fermented dough, it likely was from a less-than-mature starter/levain, not enough time in bulk fermentation (especially if it was cold in your kitchen), or not enough time in proof. Hope this helps!
Hi I love this site, had a lovely sour dough starter, froze it for a few months when I was in the Arctic and got it going again without any trouble. I have made bread, basic, a couple of times, just one loaf at a time. Both times when I with the autolyse step my dough was lumpy with pockets of flour. After adding the Levantine and during my folds x 4 I tried to break them up with my fingers. Did I not add enough water when mixing the levain and salt into the flour and water? Does the autolyse step require enough water to break up the flour, should I sift the flour? Does the amount of levain remain the same whether making one or two loaves. Very aggravating. I wondered if I should just make two loaves rather than one. Thanks for any advice. PS it still tasted great.
Sorry for the spelling errors and bad sentences- autocorrect and not reading it through.
The autolyse does require all dry bits of flour to be removed, keep mixing and pinching the dough until every bit is hydrated. It’s best to do this at that point. You don’t need to sift the flour, it should be enough water to fully hydrate everything, if it’s not, take a little of the reserved 50g water and use that until it all come together. Sometimes our flour needs more water! If you want to make only one loaf, just divide everything (even the levain) by two. I would highly recommend making two loaves, it makes the process easier, I think at least!
I’m glad to hear it tasted great. Don’t sweat all the details, it shouldn’t be an aggravating process! Let me know if you have more questions — have fun with it 🙂
I’m so nervous about making my first loaf! I’ve read so many recipes, watched about a gazillion Youtube videos and this morning I’ve finally taken the plunge with this recipe. I’ve got my ingredients weighed and ready to go, Levain is (hopefully) doing it’s thing. Fingers crossed that by this time tomorrow I’m taking my first sourdough loaf out of the oven!
OMG just as writing this I realised I have two very similar looking recipes open. It seems I’ve made the Levain from the Beginner’s sourdough and I’ve weighed out (and mixed the flours) for this weekday loaf. There’s only 20g difference in the flour – should I just get rid of that 20g and continue following the beginner recipe? Argh! Have I ruined it before I’ve even started? >_<
Yes, just omit that 20g flour and keep on with this recipe — should work out well!
Both times I have made this, my dough has been way too sticky. The starter is good, and I’ve followed the schedule with the only change being I proofed it at room temperature for 3 hours. Is this where I’m going wrong? And this second time it wasn’t crazy sticky during bulk fermenting, then was after proofing
Hey Kevin, this has happened to me as well. I had not subtracted the water for the levin from the second part (I also pre-measured out the 50g for the third) so I was essentially adding 81g to much water to the dough. Subtracted 81gm from the volume added to the second part today and my dough was perfect.
Hi Maurizio and Katelyn- my dough is also really wet and sticky. I’m about to put it in the oven anyways and see what happens- but I did only use 635g water and a tiny bit of the reserved 50g. Am I misunderstanding/anything else I could have done wrong to get such a high moisture content? Thank you!!
The total water in the dough mix should be 685g, so it sounds like you did things correctly. That 50g reserve is taken from the 685g and only added if the dough feels like it can handle it — next time leave out that entire 50g if the dough was too sticky/wet!
I’ve updated the post to make the water in the dough more clear. It now explicitly says what to add at each step of the Mix so you don’t have to scroll up and down, or subtract out the 50g of reserved water!
Katelyn, thanks for the comment. I’ve updated the post to make the water in the dough more clear. It now explicitly says what to add at each step of the Mix so you don’t have to scroll up and down, or subtract out the 50g of reserved water!
As Katelyn said below, be sure you’re measuring the water properly. But also, that 50g reserve is my attempt at giving you a last minute adjustment with the water — if the dough feels to slack and wet, don’t add that reserve at the end!
Pls see my question below- accidentally only sent it to Katelyn. Thank you! 🙂
I made this for my first-ever sourdough loaf… and it worked! I will say, I misread some of the steps around timing, so I went rogue after my first three stretch and folds and stuck it in the fridge overnight for its bulk rise bc I didn’t want to be up until 1 a.m. on a work night (figured I’d be okay with failure if it didn’t work). Took it out in the a.m., let it sit for 30 min, did a final stretch and fold after which I divided dough, let sit 30 minutes, shaped and let sit on counter for 2.5-3 hours. It still rose beautifully in the oven and the crust is brown and bubbly just like in your picture. Can’t wait to cut it open to try. Thanks for this!
Glad to hear that, Christine. That goes to show just how versatile all of this is and you’ll still get a wonderful loaf in the end! Enjoy and happy baking 🙂
I’ve also used this recipe since my initial comment twice now and it works a charm following the recipe down to the letter, too. 😛
I have been baking bread for the last month or so using recipes on this site. Generally I have good success. I am trying to follow recipes to the t. I have not seen anywhere step for checking dough for gluten development. Before placing it into refrigerator overnight, do I need to do windowpane test?
Glad to hear things are going pretty well, Kay! I rarely check for a windowpane unless I’m doing an enriched dough (butter and sugar in the dough), but you can do this if you’d like, but it’s typically done after kneading, before bulk fermentation. At that time, you won’t see a clear windowpane because this dough is not aggressively strengthened through mixing, it’s strengthened from there and all the way through bulk fermentation with stretch and folds. As long as your dough is holding shape well on the counter when you go to preshape and shape, it’ll be just fine!
Just tried this recipe, and ended up with a huge cave inside the bread! https://photos.app.goo.gl/92Ex4yWFdL29KTC8A
Things I can think I may have done wrong: 1. accidentally left the levain out of the autolyse, so added it 5 minutes late (is it possible to overmix an autolyse?), 2. used too much flour in shaping (I keep finding that shaping will be going well, and then the bread seems to suddenly start losing some shape again, not sure what to do about that), or 3. dutch oven was on the bottom rack of the oven – too close to the heat?
Anyone’s input is very welcome – My first loaf (from your beginner’s guide) turned out super flat and dense, so I’m feeling a bit defeated!
Hey, Cass. First off it looks a little under proofed to me. Make sure to build your levain from a starter that’s strong and mature (meaning it’s risen to it’s peak height before you take some to use). From there, bulk fermentation is very important! Make sure your bulk fermentation goes sufficiently far, you want the dough to look smooth, it should have risen considerably, and have bubbles here and there. If you tug on the dough a bit it should offer resistance to your tugging, it’ll feel stronger.
Second, try not to use a ton of flour in preshape/shape because that flour can cause large holes inside your bread — it’s like introducing raw flour right into the dough at a time when the rest has been fermented.
Should be ok with the oven rack.
My feeling is under proofed dough. Be sure to give the dough the time it needs and keep it warm 🙂 Stick with it, you got this!
One small thing: “build the levain” does not add up to 165 grams: 37+37+74+7=155 grams
I’m not sure if I’m missing something or if it’s just a typo.
I was reworking the formula just a bit, sorry about that. All fixed now!
Thank you! 🙂
Im currently trying this recipe but have lowered the hydration as I struggle a little shaping the higher breads. They’re delicious with an amazing crumb but always go a little flat. I see the hydration says 76% but I can’t figure it as that. The leaven is 81.5 + 735 + 184 which is 1000.5g flour. Theres 83.5g water in the leaven + 698 in the recipe which is 781.5. Does that make is 78% hydration? I’ve brought the water down to 616.5g so hoping that makes in 70%. I’m still trying to get my head round calculating the % so any advice on hydration would be epic. Thanks for all your recipes and sharing your hard work, its really helpful 🙂
Maxwell — sorry about that, the issue was on my end. I had a few numbers in the levain table off, everything should add up correctly now (this wouldn’t have impacted anyone baking). If you want to drop to 70% hydration, the dough mix would be: Bread flour (720g), WW flour (152g), Water (588g), Salt (18g), Levain (All, about 159g). The levain would be: Bread flour (38g), WW flour (38g), Water (76g), Starter (8g). Hope that helps!
Thank you! what I have reshaping now is a bit of a hybrid! haha! 735g bread flour, 184g WW Flour, 616g Water, 18g Salt and 165g Levain. I woke up too late so used 41g starter, 22g bread flour, 39g WW Flour and 63g water and kept it really warm and it doubled in size in the shorter time period. I hope it bakes ok because using your videos its the best shape I’ve ever managed to get and is rising well! I’ve made a monster haha! Thank you!!!
I will try the amended recipe you sent me once I’ve eaten this weird batch! 🙂
Thanks again for your time and support!
Max
Hi Maurizio I just tried this simple weekday sourdough bread recipe today and both loaves came out great. I felt it was little dense and could have used a bit more water.
I just wondered however why your levain starter calls for 7 grams of starter 78 grams of flour & 80 grams of water while your beginners sourdough recipe calls for 37 grams of starter for 74 grams of flour and 74 grams of water. Should I be increasing my starter from 7 grams to 37%. Martino
Glad to hear that, Martino! Add water as necessary for your flour! This is a different levain build than my Beginner’s Recipe, it goes overnight for 12 hours and therefore requires less sourdough starter since it’s fermenting for longer.
Hello! I’m on my third attempt and not having much luck. My loaves are too flat. I’m out of wheat flour but am using bread flour and substituting white for the wheat. Starter seems healthy. Any ideas what I’m doing wrong?
Hey there. It could either be under proofing or over proofing, it’s hard to say without more information!
I’m adjusting this schedule to fit my stay at home mom schedule. I want to do the real work parts during Napa etc:-)… So, if I wanted to proof in baskets at room temperature instead of in fridge overnight. (My proof is scheduled to begin at 10:30am. When can I bake it? 3 hours?5?8? I’ve done many other recipes with these type of timings. In the past I just did the poke test… But I just wanted to ask for guidance. Thanks!
Hey, Ashley! I hear you, I’m doing the same right now with my kiddos at home, working all of this around their schedule 🙂 So yeah, you can do a room temp proof, generally I find it to be 2-4 hours but that’s just a loose guideline, it really depends on your dough and the temperatures in the kitchen. Start with that as a guideline and then use the poke test to refine and tell you exactly when to put it into the oven. The dough should feel alive and puffy, the indentation should slowly spring back, perhaps not completely filling back in. That’ll work well!
Hi Maurizio – This recipe worked for me, when several others I tired didn’t. I got a beautiful rise for the first time! I was concerned because my dough didn’t look as active as yours at then end of the bulk fermentation and even did look as good when I took the lid off my pot, but by the time it came out of the oven it really sprung up. I held back some water this time (vs previous attempt with your 50% whole grain recipe which didn’t work at all). My question is re: the second loaf – can you wait till the next day to bake this? And secondly, if you did this all in one larger loaf, how would you adjust your baking time? I’m posting pictures if helpful to any other beginners. Many thanks to you for your help for all of us novices seeking distraction and comfort in the science, wonder, and taste of bread during this time!
https://www.dropbox.com/sh/cb3q5o9hfbuemxl/AACXadGjlvedgGM5VC9lIJ6La?dl=0
That’s great to hear, Teresa! Yes, you could leave the other loaf in the fridge until the next day. Expect a little less rise on that second loaf and perhaps a slightly more sour flavor, but it’ll be delicious nonetheless. If you the second loaf fails to rise as much as you’d like, start to reduce that long proof time until it’s just right — the longer you leave it in the fridge, the more squat it will be. Happy to help and happy baking!
Hi, Maurizio. I am in the midst of making a sourdough loaf, but my timing was off; I got started too late in the day. I mixed the dough and did five stretch and folds last evening. It was too late to wait for full bulk fermentation, so I put the dough in the fridge overnight.
This morning, I have it sitting out to get up to room temp. Should I now let it sit for a few hours before shaping? There are a few large bubbles showing, but it has not increased in volume yet.
As always, appreciate your guidance.
If you had at least a few hours of bulk at room temp yesterday the dough should be fine today. Take it out, preshape it cold and let it rest for 30-40 minutes in rounds. Then shape and place in a proofing basket and cover. Let proof on the counter until ready to bake, perhaps 2-4 hours. It’s ready when you poke the dough with a finger and it slowly fills the indentation back, perhaps not entirely filling it back up. Hope that helps and let me know how it goes!
Thank you! Looks like it’s going to turn out okay.
Hello! I am a beginner and made your other standard sourdough. For my first time, I was quite pleased! My question is about starter. My neighbor gave me starter which I used (about 1Tbsp) for my levain. Worked great! I am now feeding the starter. It grows well, lots of bubbles, smells like it should…but does not float! If the starter was mature, what gives?? Did I ruin it? Can I still try and use it? I’ve been feeding it for about 4 days. Thanks! Vanessa
Awesome, Vanessa! Happy it turned out well. It doesn’t have to float — this isn’t a foolproof test for when your levain/starter is ready. As long as you’re seeing consistent rise and fall each day, with adequate signs of fermentation (bubbles, sour smell, some rise, etc.) then it should be just fine to use. Try to keep it warm if you can, 78F would be awesome!
First timer here and I couldn’t be more pleased with the results. I halved the recipe just in case things didn’t work out, but I was pleasantly surprised. Expect slightly longer times if your kitchen isn’t quite as warm.
Thank you, Maurizio. This guide (and entire site) is fantastic. Lots of technical information, yet very approachable for bakers new to the world of naturally leavened breads. If you find yourself overwhelmed by the mountain of information about sourdough, this is a great recipe to start with.
Also, I meant to ask: is there a way to mix the whole recipe, but somehow proof at different times without over-proofing? I only have one banneton for now. Could I proof one loaf as directed in the banneton, with the other half in a bowl, and transfer the second loaf to the banneton (and back to the fridge) once the first loaf goes into the oven? This would actually make for a morning AND evening bake. I’m just not sure about shuffling things around mid-proof. Thanks again!
I’m a beginner too. I would like to clarify, the dough doesn’t need warming up after coming out of the fridge, and straight into the oven? I am not using Dutch oven, just a regular oven. Thanks in advance!
No warmup needed — straight from fridge to oven!
I’m in the same boat, i proofed the second loaf in a large wire seive/collandar with a floured teatowel between the mesh and the dough. Seemed to work out just fine. Maybe slightly more airflow than a banneton but i’m very pleased with the results as a first time breadmaker and sourdougher.
Glad to hear that, Brett!
Glad to hear things worked out so well for you! Yes, cooler temps will generally mean longer times for each step of the process.
You could do that, but I fear it would be challenging and quite a lot of work. I’d take @disqus_ePVXVrdgws:disqus approach below: use another bowl from the kitchen! If you have a medium sized mixing bowl that’ll work really well — I used those for years before getting more baskets. Just be sure to line it with a towel and you’re good to go.
I hope this helps and happy baking!
Great recipe! I’d been thinking of trying to find something like this for a while: a recipe that would let me have the bulk of my day to do other things and one that would also compress/minimize some of the intermittent prepping/bulk fermentation steps. Due to the coronavirus-induced flour shortages in my area, I was left with a hodgepodge of half-opened flours in my pantry, so this recipe lent itself pretty well to some improvisation in that respect. As I was over 100 g short on strong white bread flour, I had to make up the difference with whole wheat and rye (and within the whole wheat it was a mix of strong and regular). I used about 50 g of rye and the rest my mix of whole wheat flours. As can be imagined, I used up all the water called for but didn’t seem to need any extra.
One other bit of feedback regarding the levain build (not sure if anyone else has experienced this): I ended up being short on the required 165 g levain build by about 8 g, so next time I’ll probably make a bigger levain. I scraped the glass that the levain had been in with the spatula as much as I could but I couldn’t eke out any more!
This being my ninth bake, perhaps it was a testament to my burgeoning ability to feel the character of the dough (or perhaps it was just some other attribute of the recipe that I’m unaware of) but I found just by going from previous experience I was able to attain good dough strength, despite not adhering to the flour mix. And on one of the boules I was finally able to score it properly (a horizontal one going to end-to-end) and got my first little ear going! Unless I can get more strong white bread flour, I will try your 100% whole wheat sourdough recipe next!
Thanks for posting this great recipe! Here are a few pics from the two boules: https://www.dropbox.com/sh/y8eomljtck2kbiu/AADCMnxMbO4wHPm7f9GBthYfa?dl=0.
It’s common to be just a little short with the levain — when I used to post larger levain builds here readers would say “there’s too much levain!”, so I think it’s the closest we’ll get 🙂 No worries if it’s just a little short, or like you said, you can make one that’s a little bigger.
What you said about building on experience is exactly right, over time you’ll instinctively build up that feel for the dough. Over time your confidence will build and build and things that were once challenging seem to disappear (although new challenges always come up, but that’s the fun of this).
Thanks for sharing and your bread looks wonderful!
This was incredibly easy and simple, took no time at all and produced a fantastic bread. The one piece of advice I could give to others is to not overmix the dough when adding salt cause you tear the gluten strands. I did it and instead of a smooth strong dough it fell apart into a ragged mess, yet it still proofed well and there was no problem with oven spring, it actually rose more than my other tries with more complicated methods. This is indeed perfect for an everyday bake, try it!
Also, if your flour can’t take all the water, neither did mine, I added maybe 20g of those 50g reserved for later.
Thanks so much for the comments and feedback, Igor! Glad to hear it worked out well for you — definitely a good weekday bread without much fuss 🙂 Enjoy!
@igor_vihnanek:disqus Agree with your advice of not over-mixing the bread—the same thing happened to me as did you with this. But, again as to your experience, it proofed fine for me as well.