
My goal when developing this high-fiber sourdough bread recipe was to create a healthy and nutritious bread recipe that my kids will enjoy. The recipe title might immediately make you think of food that tries to be too healthy, sacrificing flavor and texture for nutrition. But the surprising result here is that all the fiber and good-for-you ingredients to improve gut health result in a delicious, extremely easy-to-eat sourdough bread.
I knew I wanted the foundation of this super healthy bread to be a high percentage of whole wheat flour, and then to that I added a seed and oat soaker. While I picked seeds with high fiber content, I also love the different flavors and textures they bring to the bread. And there’s zero refined sugar in this dough; a little bit of natural honey brings just enough sweetness and more depth of flavor.
After many trials tweaking the baker’s percentages of each ingredient, I finally arrived at the right balance of whole grains, seeds, oats, and honey to make a subtly sweet, light, and delicious pan loaf that checks all the sandwich loaf requirements. It makes a pretty rad BLT.
Watch me make this high-fiber sourdough bread recipe from start to finish
Flour and ingredient selection
Flour
This recipe is primarily made with whole wheat flour and a smaller percentage of medium-protein white flour (all-purpose flour). I use whole wheat flour in the tangzhong, too, which is a neat technique for working in more whole grains without them causing a negative impact on the crumb structure of this bread. The result is a high-fiber, high-whole-grain bread with an open and light texture.
Wheat bran
I always have a bag of wheat bran in my pantry. I use it often to coat the outside of my large loaves, but I also use it in baked goods like sourdough muffins to bring added texture and nutrition. In this bread, I follow suit and add it to the dough during mixing. If you don’t have wheat bran, swap it out for more whole wheat flour or wheat germ.
Seeds and oats
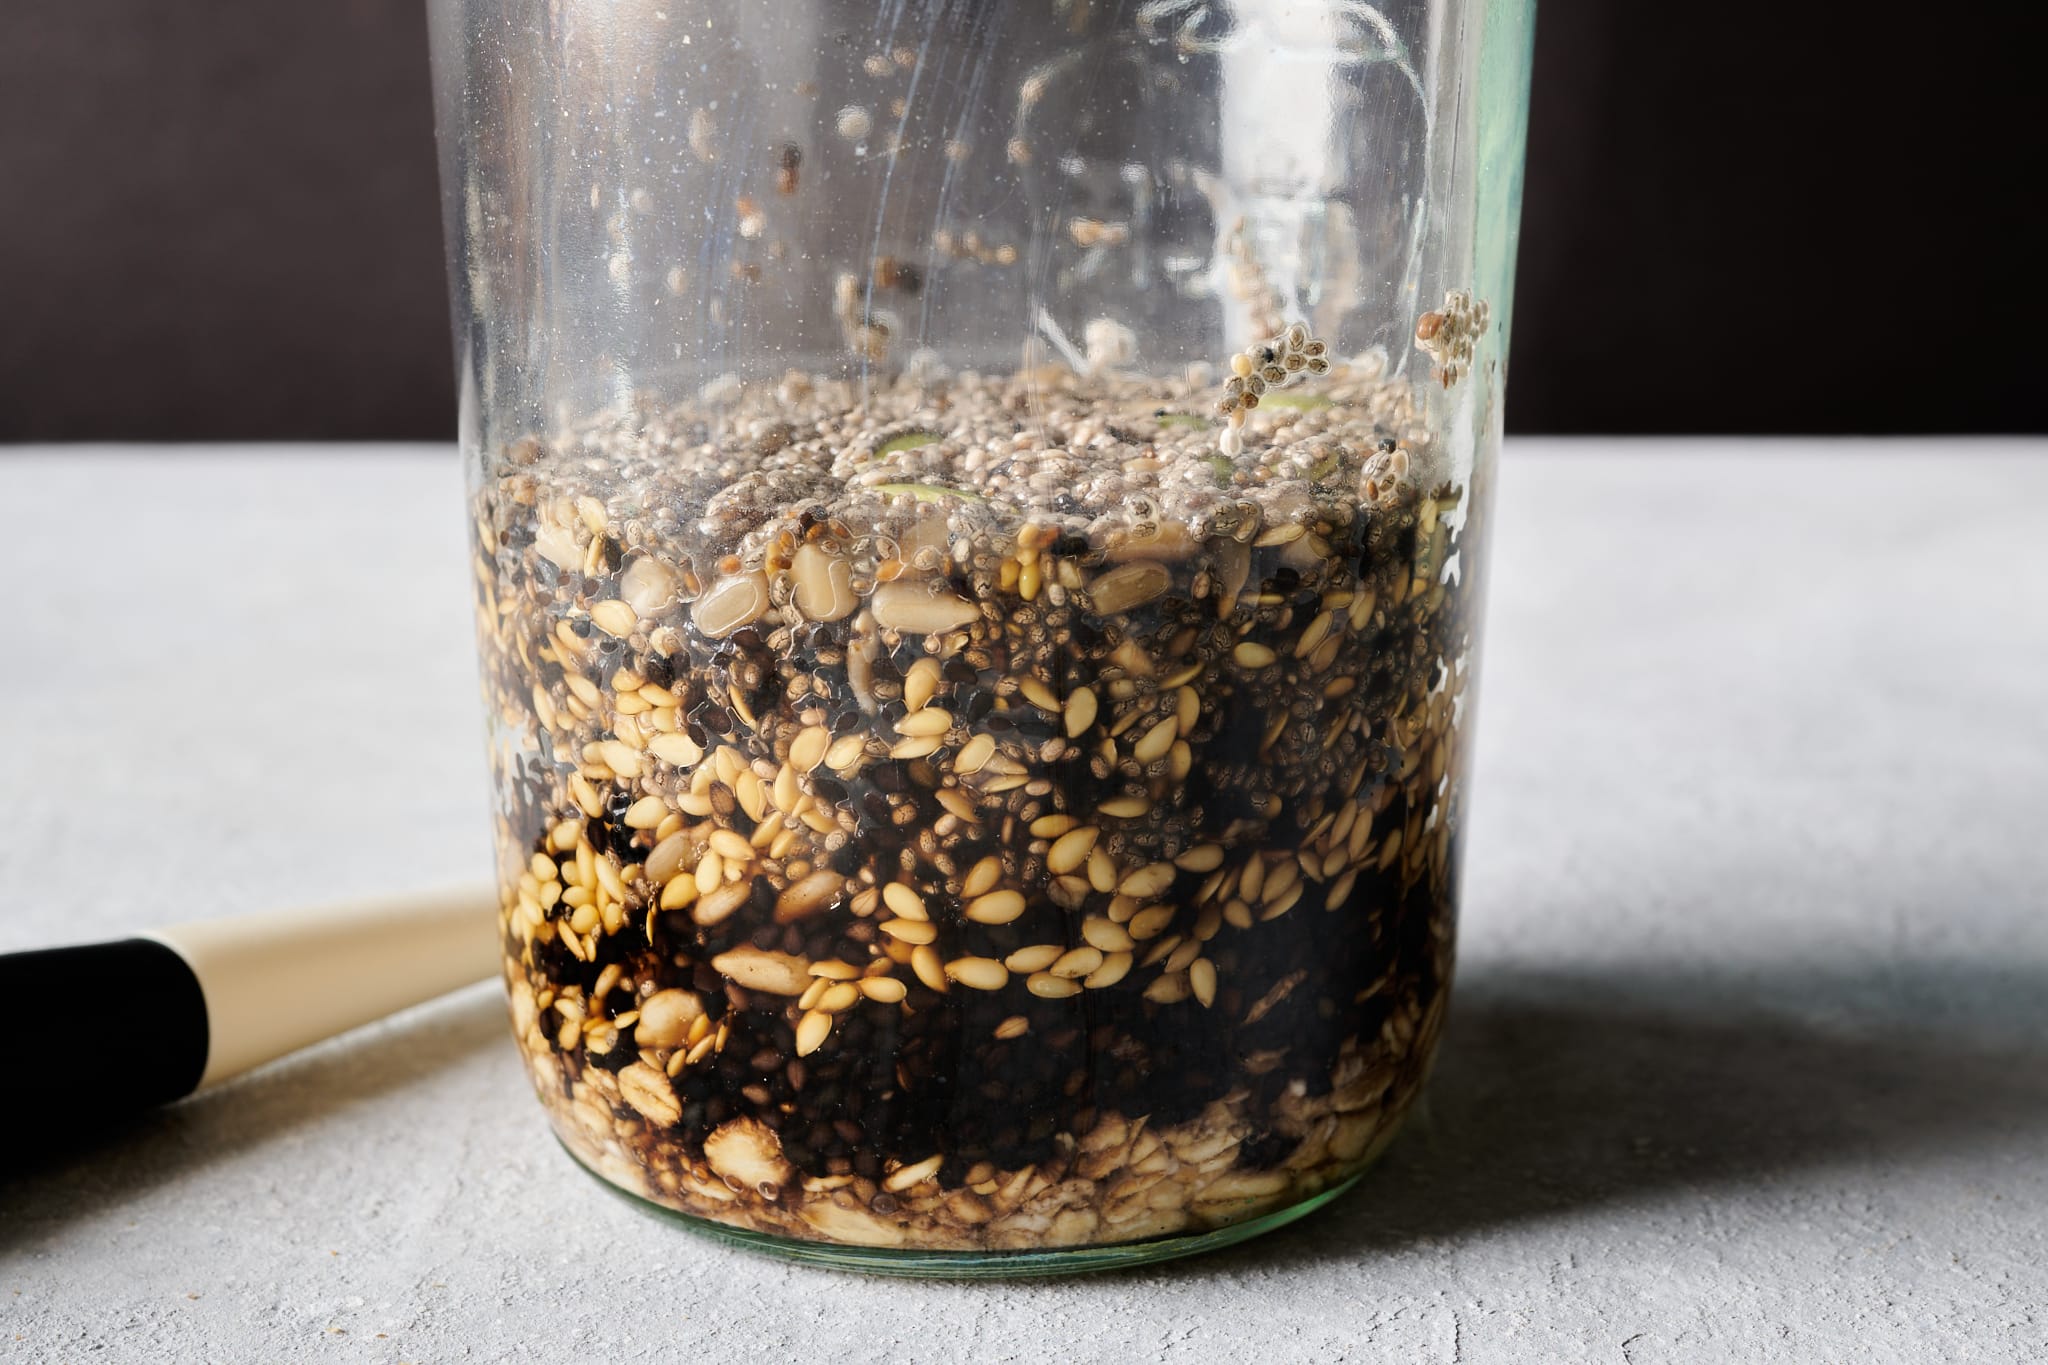
This high-fiber bread recipe calls for a seed soaker made up of rolled oats, sesame seeds (I like black), pumpkin seeds (also known as pepitas, and are an excellent source of phosphorus, magnesium, and iron), sunflower seeds (rich in healthy fats, vitamins, and minerals), flaxseeds (helpful for improving digestive health due to high fiber content), and chia seeds (high in omega-3 fatty acids and fiber). If you don’t have any of these seeds in your pantry or don’t like one of them, feel free to swap them out for what you do have or what you prefer. For instance, if you don’t have flaxseed (which would be a shame because they are very high in omega fatty acids and fiber!), swap them out for an equal amount of chia seeds, sunflower seeds, or even benne seeds.
I like using rolled oats for the oat portion of this recipe, but steel cut oats will also work quite well. If you don’t have oats, you could coarsely crack wheat or spelt in your home grain mill.

Baking schedule
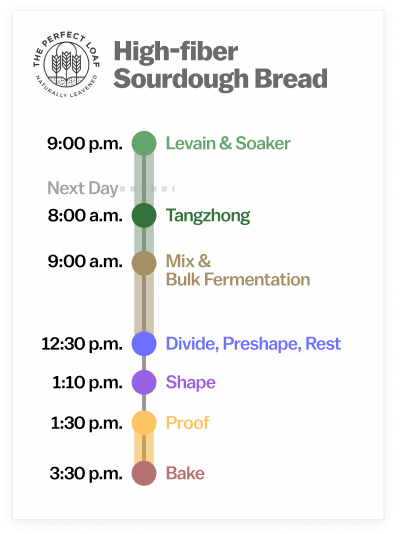
This high-fiber sourdough bread is made all in a single day, except for the overnight levain and seed soaker. The night before you want to bake these loaves, prepare the levain when your sourdough starter is ripe, and make the seed and oat soaker simultaneously. The next day, mix the dough when the levain is ripe, ferment it throughout the day, then bake it in the later afternoon or evening.
It’s also possible to extend the fermentation time of this dough by refrigerating it overnight. After you’ve shaped the dough and placed it into pans, cover them tightly and place them in the refrigerator. The next morning, take the pans out and let them finish proofing on the counter if necessary, or bake straight from the refrigerator if the dough looks well-risen and is puffy to the touch.
High-fiber sourdough bread recipe
The following tables represent the total formula for this recipe in baker’s percentages. In other words, they include every ingredient you will need to make this bread. In the method section that follows, the total formula table will be broken down into smaller tables showing you exactly what you need for that step of the recipe.
Vitals
| Total dough weight | 2,000 grams |
| Pre-fermented flour | 8.0% |
| Hydration | 73.0% |
| Levain in the final dough | 17.4% |
| Yield | Two 1,000g pan loaves |
Total formula
Desired dough temperature: 78°F (25°C) (see my post on the importance of dough temperature).
| Weight | Ingredient | Baker’s Percentage |
|---|---|---|
| 492g | Whole wheat flour (Central Milling Hi-Pro Whole Wheat) | 60.0% |
| 246g | White flour (about 11.5% protein; Central Milling Artisan Baker’s Craft) | 30.0% |
| 82g | Tangzhong: Whole wheat flour | 10.0% |
| 328g | Tangzhong: Whole milk | 40.0% |
| 57g | Honey | 7.0% |
| 16g | Wheat bran | 2.0% |
| 57g | Rolled oats | 7.0% |
| 25g | Sesame seeds (black or white) | 3.0% |
| 25g | Pumpkin seeds (pepitas) | 3.0% |
| 16g | Sunflower seeds, shelled, roasted, and unsalted | 2.0% |
| 16g | Flaxseeds | 2.0% |
| 16g | Chia seeds | 2.0% |
| 599g | Water | 73.0% |
| 16g | Fine sea salt | 2.0% |
| 7g | Ripe sourdough starter, 100% hydration | 0.8% |
Additional ingredients:
Neutral-flavored oil, for greasing
Black and white sesame seeds, for topping (optional)
High-fiber sourdough bread method
1. Prepare the levain – 9:00 p.m., the night before mixing
| Weight | Ingredient | Baker’s Percentage |
|---|---|---|
| 33g | Whole wheat flour | 50.0% |
| 33g | White flour | 50.0% |
| 66g | Water | 100.0% |
| 7g | Ripe sourdough starter, 100% hydration | 10.0% |
Use your sourdough starter when ripe, mix the above ingredients in a jar, and leave them covered at a warm temperature, 74-76°F (23-24°C), to ripen overnight.
2. Prepare the seed and oat soaker – 9:10 p.m.
In a tall jar, combine the 57g rolled oats, 25g sesame seeds, 25g pumpkin seeds, 16g sunflower seeds, 16g flaxseeds, 16g chia seeds, and 179g water. Stir, cover the jar, and let sit until called for during mixing.
3. Prepare the tangzhong – 8:00 a.m., the day of mixing
In a medium saucepan over medium-low heat, combine the 82 grams tangzhong flour and 328 grams tangzhong milk. Cook, whisking continuously, until the mixture thickens and becomes a paste (like mashed potatoes), 4 to 6 minutes. Remove the pan from the heat and spread the tangzhong out on a small plate to expedite cooling. Set aside.
4. Mix – 9:00 a.m.
| Weight | Ingredient |
|---|---|
| 459g | Whole wheat flour |
| 213g | White flour |
| 57g | Honey |
| 16g | Wheat bran |
| 354g | Water |
| 16g | Fine sea salt |
| 138g | Ripe levain (from Step 1) |
| All | Seed and oat soaker (from Step 2) |
| All | Tangzhong (from Step 3) |
I mixed and strengthened this dough in my KitchenAid stand mixer, but you could also mix it by hand using the slap and fold technique. If mixing in a mixer, be sure to hold back the soaker until the end of mixing. If mixing by hand, you can add the soaker at the end of mixing or during stretching and folding in bulk fermentation.
To the bowl of a stand mixer fitted with the dough hook attachment, add both flours, the honey, the wheat bran, the water, salt, ripe levain, and tangzhong. Mix on low speed (STIR on a KitchenAid) for 1 to 2 minutes until the ingredients come together and no dry bits remain. If the dough is very dry, conservatively add a splash of water as needed to moisten. Next, mix on medium speed (2 on a KitchenAid) for 5 minutes until the dough smooths and begins to cling slightly to the hook. This is a very soft dough and won’t completely clear the sides of the bowl at this point.
Let the dough rest in the bowl for 5 minutes.
Turn the mixer on medium speed and mix for 2 minutes until the dough gains more strength and clings once again to the dough hook. Add the entire contents of the seed and oat soaker jar and mix on low speed just until the soaker is incorporated. The dough will still be very soft and even shaggy looking, and it won’t altogether remove from the sides of the bowl.
After mixing this bread dough, transfer the dough to a bulk fermentation container and cover.
5. Bulk fermentation – 9:30 a.m. to 12:30 p.m. (3 hours)
At a warm room temperature, 74-76°F (23-24°C), bulk fermentation should take about 3 hours.
This dough will require 2 sets of stretches and folds during bulk fermentation. After the first 30 minutes, wet your hands, grab the side of the dough farthest from you, and stretch it over to the other side. Rotate the bowl 180 degrees and repeat. Then rotate the bowl 90 degrees, and stretch and fold that side. Rotate the bowl 180 degrees again and finish with a stretch and fold on the last side. The dough should be neatly folded up in the bowl. Cover and repeat these folds once more after 30 minutes. Then let the dough rest, covered, for the remainder of bulk fermentation.
6. Divide and preshape – 12:30 p.m.
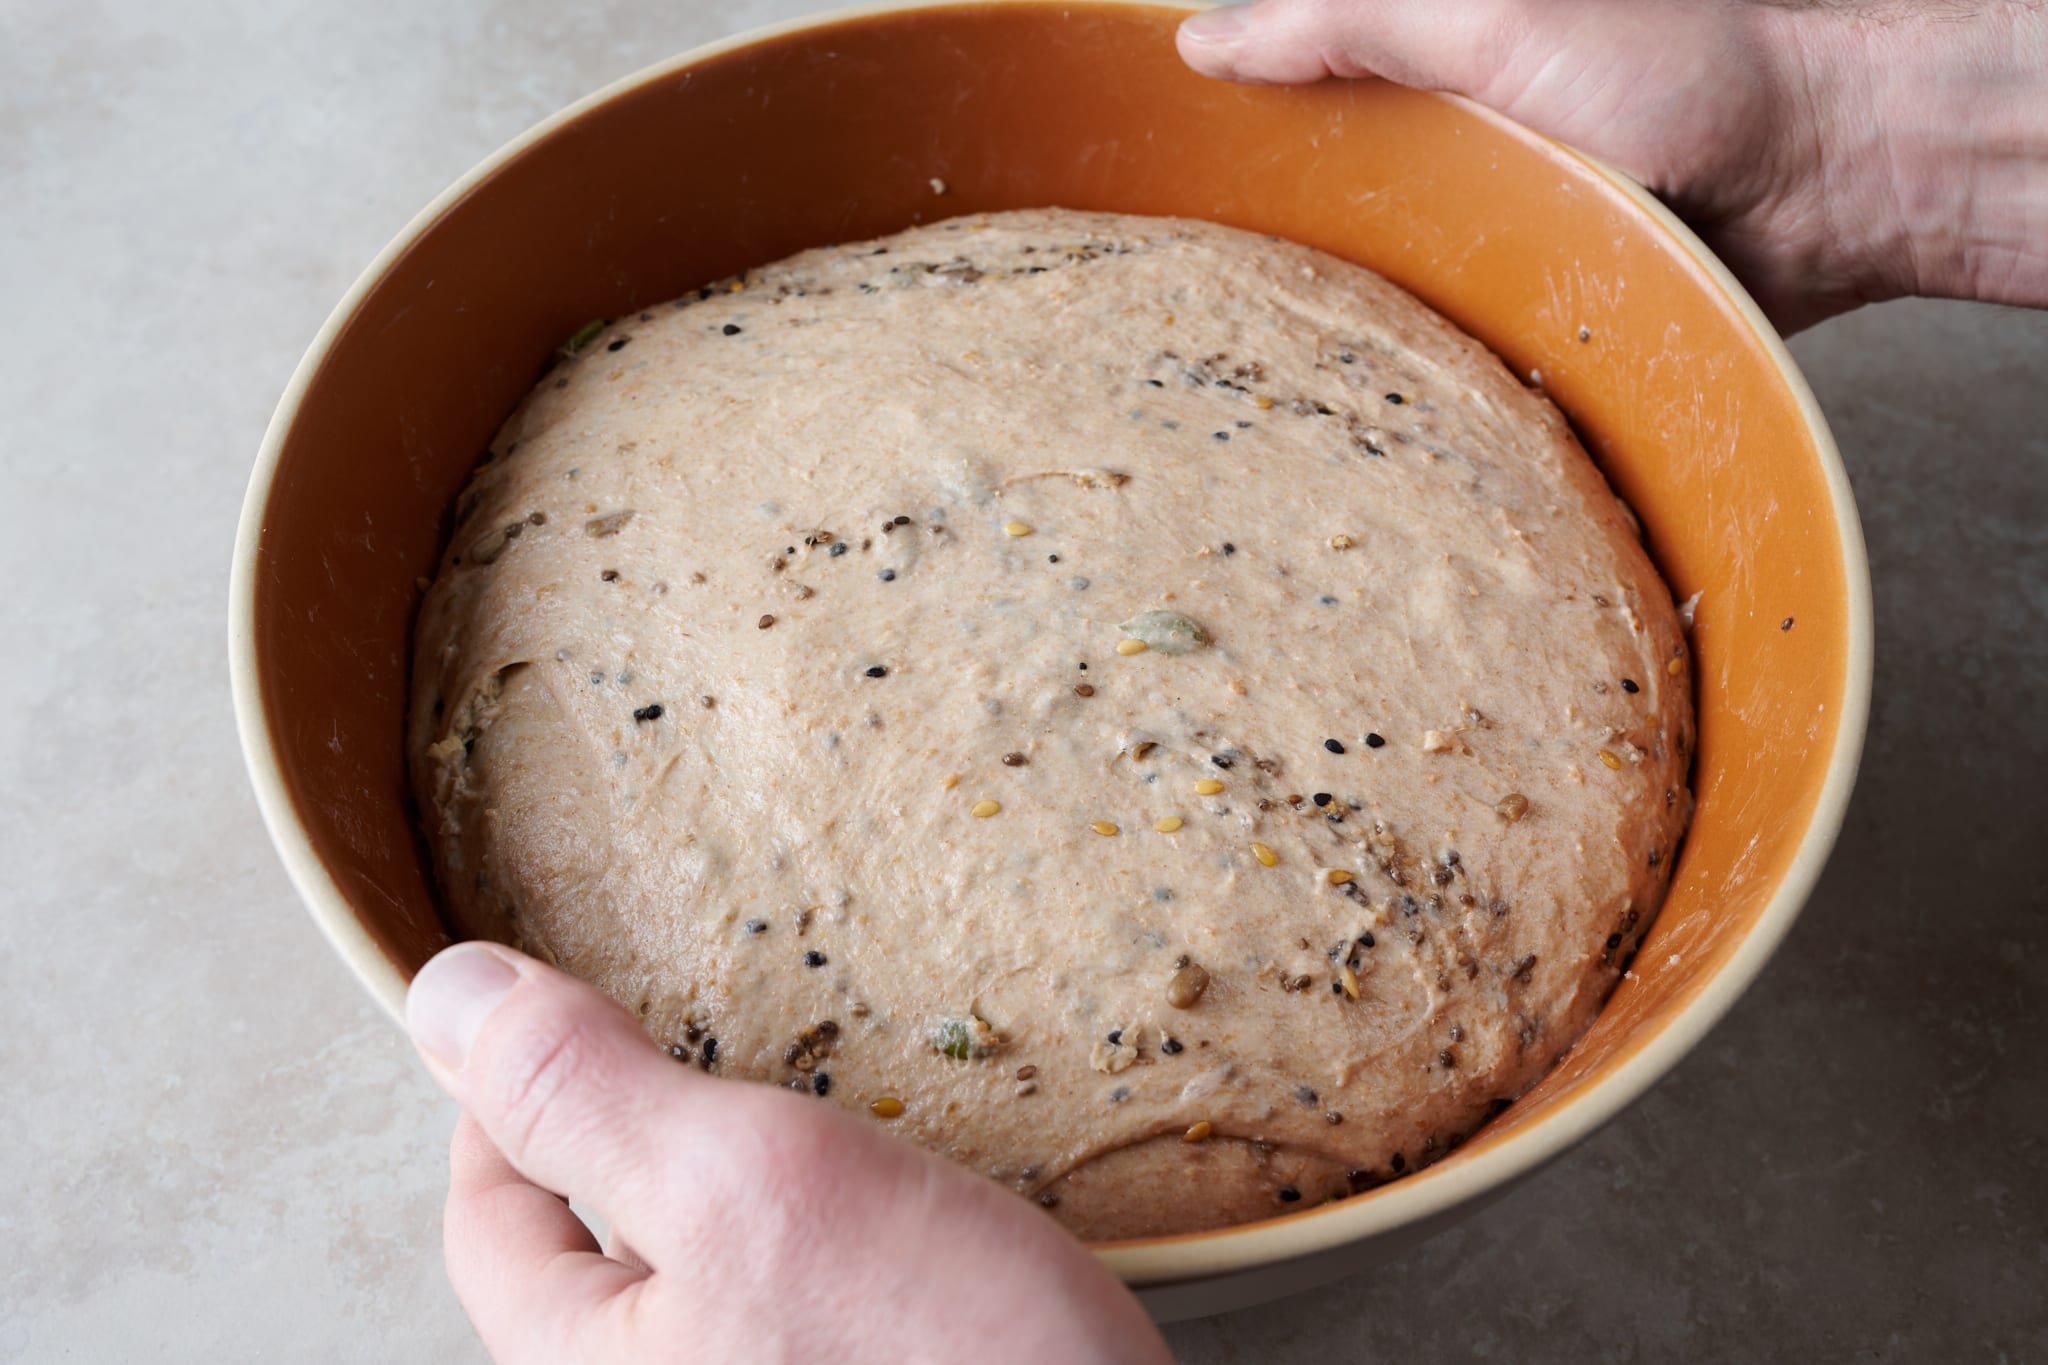
After 3 hours, the dough should be well-risen in the bulk fermentation container and puffy to the touch. The edge where the dough meets the container should be domed downward, showing strength and rise.
Fill a small bowl with water and place it next to your work surface. Scrape the dough onto a clean counter. Wet your free hand to keep it nonstick, divide the dough into 2 equal pieces, and preshape the pieces into loose rounds.
Let the dough rest, uncovered, for 30 minutes.
7. Shape – 1:10 p.m.
Grease two 9 x 4 x 4-inch Pullman pans with a neutral-flavored oil.
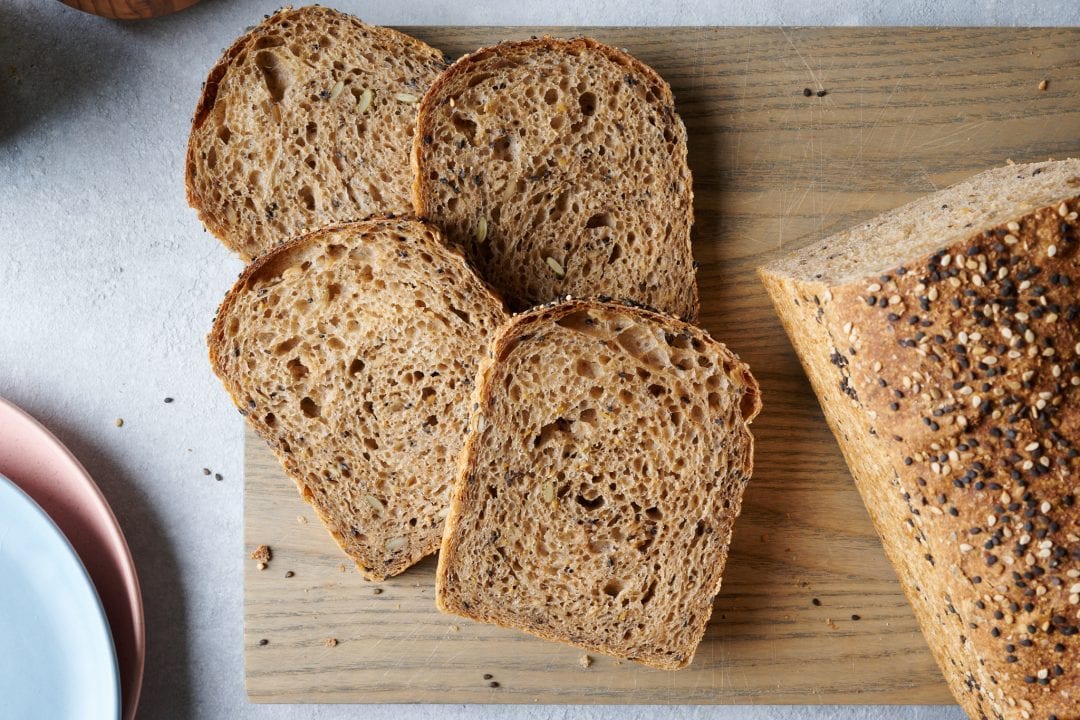
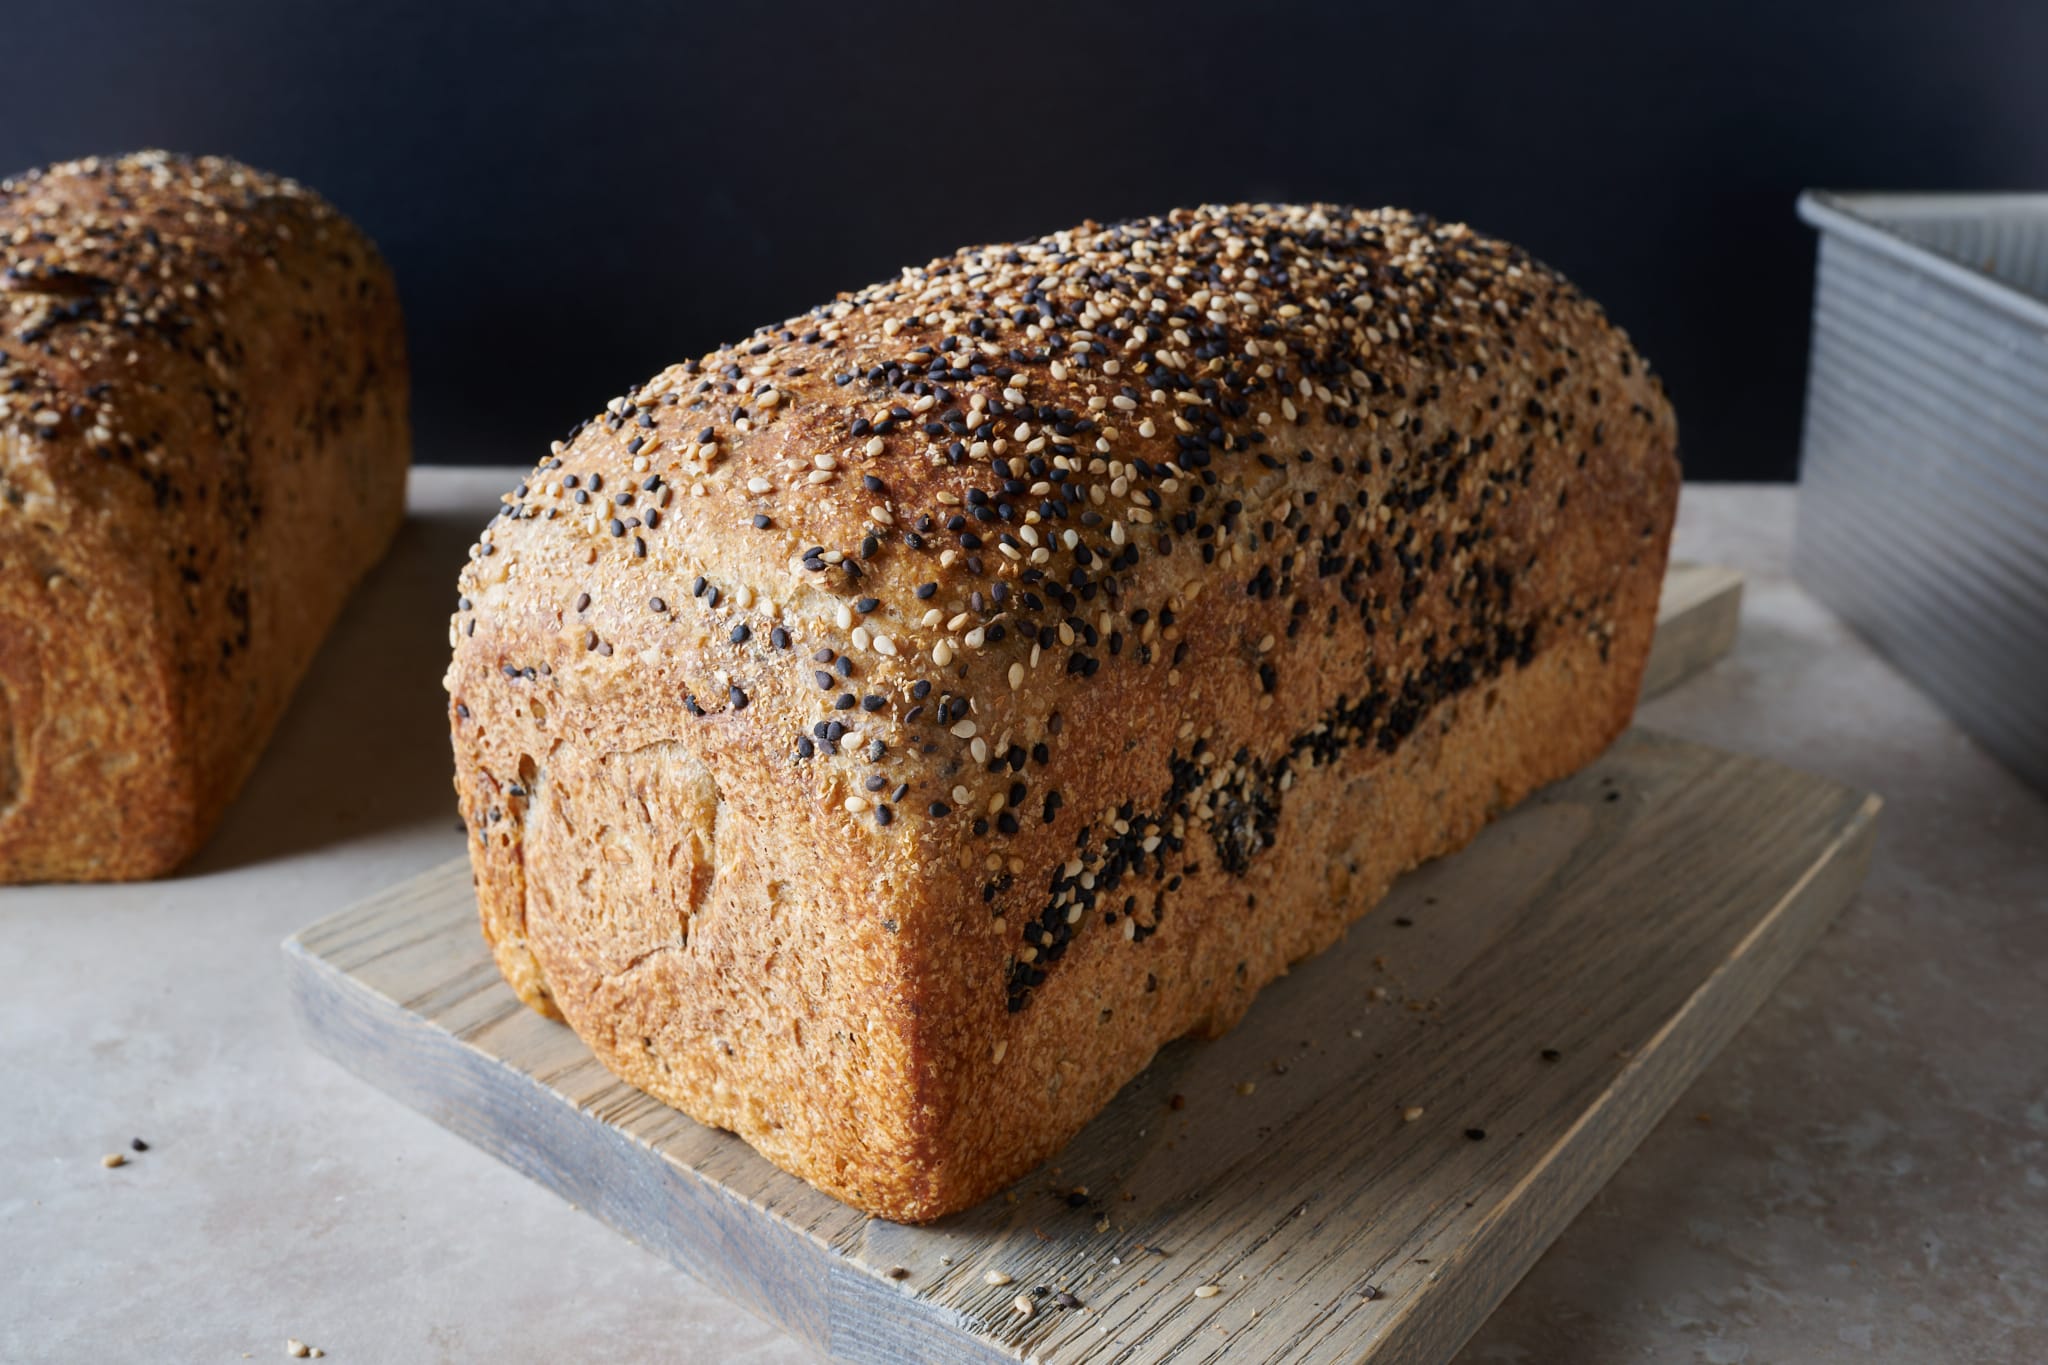
I like to top this high-fiber bread dough with a mixture of black and white sesame seeds (or use a single color, if you’d like). Other options include rolled oats or even more wheat bran, or you can omit all toppings. See my guide to topping bread dough for other topping ideas.
Spread an even layer of sesame seeds on a clean kitchen towel or sheet pan.
Flour the top of each preshaped round and your work surface. Using your bench knife, flip one round over onto the floured area. Using floured hands, fold in the sides of the dough, and then roll it down from top to bottom. Using two hands, transfer the dough top-side down to the sesame seeds, gently rocking the dough back and forth so that the seeds stick. Then, flip the dough over and place it seam-side-down in the prepared pan.
Repeat for the other preshaped round.
For information on baking in different pans, shaping pan loaves, and more, see my guide to pan loaves.
8. Proof – 1:30 p.m. to 3:30 p.m. (about 2 hours)
Cover the pans with a large, reusable plastic bag and seal shut. Let the dough proof on the counter for about 2 hours.
9. Bake – 3:30 p.m.
Place an oven rack in the bottom-third of the oven. Preheat the oven to 425°F (220°C) for 30 minutes. I baked these loaves on a bare oven rack in my oven; follow my guide on how to steam an oven for baking bread (you don’t need to bake on a baking surface—stone or steel—with pan loaves, just right on the oven rack).
The dough is ready to bake when it is puffy to the touch (it will pass the poke test) and has risen about 1/2 to 1 inch below the rim of the pan (see image below). If you see any large bubbles on the surface, gently pat them down.

Slide the pans into the oven and bake for 20 minutes with steam. Then, reduce the oven temperature to 350°F (175°C) and remove the steaming pans from inside the oven. Continue to bake for 25 to 30 minutes more. When done, the loaf should have an interior temperature of around 204°F (95°C), and the crust should be deeply colored. Remove the pans from the oven and the dough from their baking pans.
This high-fiber bread recipe benefits from additional rest after baking before slicing. Let the loaves cool on a wire rack for at least 2 hours before slicing with your bread knife. Be sure to store this bread properly to keep this bread fresh for a week or more.
Print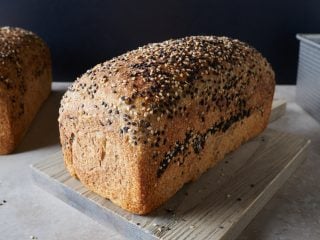
High-fiber sourdough bread recipe
- Prep Time: 15 hours
- Cook Time: 50 minutes
- Total Time: 15 hours 50 minutes
- Yield: 2 loaves
- Category: main course
- Cuisine: American
Description
A nutritious pan loaf with lots of whole grains, seeds, and fiber.
Ingredients
Levain
- 33g whole wheat flour
- 33g white flour (about 11.5% protein; all-purpose flour)
- 66g water
- 7g ripe sourdough starter, 100% hydration
Seed soaker
- 57g rolled oats
- 25g sesame seeds (black or white)
- 25g pumpkin seeds (pepitas)
- 16g sunflower seeds (roasted and unsalted)
- 16g flaxseeds
- 16g chia seeds
- 179g water
Tangzhong
- 82g whole wheat flour
- 328g whole milk
Main Dough
- 459g whole wheat flour
- 213g white flour
- 57g honey
- 16g wheat bran
- 354g water
- 16g fine sea salt
- All the levain
- All the soaker
- All the tangzhong
Topping
Black and white sesame seeds (optional).
Instructions
- Levain – 9:00 p.m. (the night before mixing)
Mix the levain ingredients in a jar and leave them covered at a warm temperature, 74-76°F (23-24°C), to ripen overnight. - Prepare the seed and oat soaker – 9:10 p.m. (the night before mixing)
In a tall jar, combine the seed soaker ingredients, cover, and let sit until called for during mixing. - Tangzhong – 8:00 a.m. (the day of mixing)
In a small saucepan over medium-low heat, combine the tangzhong ingredients and whisk continuously until a thick paste forms. Scrape out to a plate to cool until called for during mixing. - Mix – 9:00 a.m.
To the bowl of a stand mixer fitted with the dough hook attachment, add all of the main dough ingredients except the seed soaker. Mix on low speed for 1 to 2 minutes until the ingredients come together and no dry bits remain. If the dough is very dry, conservatively add a splash of water as needed to moisten it. Next, mix on medium speed for 5 minutes until the dough smooths and begins to cling slightly to the hook. Let the dough rest in the bowl for 5 minutes. Turn the mixer on medium speed and mix for 2 minutes until the dough gains more strength and clings once again to the dough hook. Add the seed soaker and mix on low speed just until the soaker is incorporated. Transfer the dough to a bulk fermentation container and cover. - Bulk fermentation – 9:30 a.m. to 12:30 p.m. (3 hours)
Give the dough 2 sets of stretches and folds during this time, at 30-minute intervals. After the second set, let the dough rest, covered, for the remainder of bulk fermentation. The dough is ready when it is smooth, puffy, and well-risen. - Divide and preshape – 12:30 p.m.
Fill a small bowl with water and place it next to your work surface. Scrape the dough onto a clean counter and divide the dough into 2 equal pieces. Then, preshape each piece into a loose round. Let the dough rest, uncovered, for 30 minutes. - Shape – 1:10 p.m.
Grease two 9 x 4 x 4-inch Pullman pans with a neutral-flavored oil. Shape each piece of dough into a long tube, top with sesame seeds if desired, and place them in their prepared pans. - Proof – 1:30 p.m. to 3:30 p.m. (about 2 hours)
Put the pans in a large, reusable plastic bag and seal shut. Let the dough proof at warm temperature for about 2 hours. The dough is ready to bake when it is puffy to the touch and about 1/2 to 1-inch below the rim of the pan. If you see any large bubbles form on the surface, gently pat them down to disperse. - Bake – 3:30 p.m.
Place an empty pan or pan with lava rocks on the bottom of the oven and preheat it to 425°F (220°C). Uncover the dough and slide the pans into the oven. Pour a cup of ice into the pan at the bottom of the oven and bake for 20 minutes. Then, reduce the oven temperature to 350°F (175°C), remove the steaming pan, and continue to bake for 25 to 30 minutes more. When done, the loaves should have an internal temperature of around 204°F (95°C), and the crust should be deeply colored. Remove from the oven, remove the loaves from their pans, and cool on a wire rack for at least 2 hours before slicing.
Notes
To make this recipe vegan, substitute out the whole dairy milk for full-fat nut or oat milk.
Be sure to liberally grease your baking pans with neutral-flavored oil or extra-virgin olive oil.
High-Fiber seeded sourdough bread frequently asked questions
Why does this high-fiber bread recipe have so little sourdough starter?
The 7 grams of sourdough starter are used to make a levain, which essentially scales up the starter to a much larger amount to seed fermentation in this bread (a sourdough starter and a levain are essentially the same things).
Do I need to toast sesame seeds before using them on the outside of the dough?
No. Since the sesame seeds are on the outside of the dough, they will toast in the oven as the loaf is baking.
Why don’t you add the wheat bran to the seed soaker?
You could do this, but the amount of water in the seed soaker is just enough to hydrate the seeds and oats properly. Adding the bran will cause the mixture to be overly dry, and the seeds may not sufficiently soften overnight. Soaking the bran (like I do in my 100% whole wheat sourdough bread) can make incorporating it into the dough easier and with less negative impact (it can cause a tighter crumb). However, I’ve found the bran hydrates sufficiently in this highly hydrated dough, and because of the strong tangzhong, the crumb is still quite open, resulting in a light and airy loaf of bread.
Can I mix this sourdough pan loaf by hand instead of using a mixer?
Yes! Use the slap and fold or folds in the bowl kneading techniques to quickly and efficiently develop the gluten in the dough before adding the seed soaker.
Can I proof this high-fiber seeded sourdough bread overnight?
Yes, absolutely. After shaping the dough and placing it in the proofing pans, cover them and put them into the refrigerator overnight. In the morning, take them out, uncover, and bake them straight from the refrigerator.
I don’t have one of the called-for seeds (or I don’t like it). Can I swap it out for another in this bread?
Yes. Change any seed for another, or leave it out entirely (don’t reduce the water in the recipe, though). I usually like to use similar seeds when swapping; for instance, I use poppy or more flaxseed instead of chia.
Can I use plant-based milk instead of dairy milk in this sourdough bread recipe?
Yes, any full-fat nut milk or oat milk will work as a substitute for the cow’s milk in this high-fiber sourdough bread recipe.
What’s next?
If you’re looking for a pan loaf that’s a little lighter than this one but no less healthy, check out my honey whole wheat sandwich bread. Or, if you want an incredibly light and airy pan loaf, my sourdough shokupan is still the one to beat.
Buon appetito!


268 Comments
I finally finished this one today! I started the levain and soaker 4 days ago, then got sidetracked by life, so I put both in the frig and pulled them out yesterday to finish the process. I used the same levain and gave the dough a longer bulk fermentation time (5 hours total) to compensate for it not being as “awake” at the beginning. I also didn’t want to pull out my big KitchenAid, so I mixed it by hand with a bread whisk initially and then gave it more slap and folds to develop structure (every 15 x3, then every 30 x2). I like cold proofed sourdough, so I shaped it per instructions – I like the wet hands/no flour process for pre-shaping! – and put it in the frig overnight (about 14 hours). The loaves proofed nicely and still had another inch or so of spring in the pan. I baked them with steam, no steel. They are not cool enough to slice yet, but look lovely. One thing though, the tops cracked slightly. Perhaps because they were cold proofed? The cracks don’t mar the appearance, and I’m sure won’t ruin the taste. Just wondering about the “why”…
Update: Just sliced into the first loaf. Beautiful crumb, moist but not gummy, delicious!
10/10 and definitely will be in the regular baking rotation!
Cracks might be because you didnt steam the oven!
Today is hot. My dough at proofing time was 80F. I let rise for over 4 hrs because it stopped rising after 3 hrs proofing. Not sure why, I have 2 different pan shape. Also my starter is 3 years old and it has been very reliable. Maybe I did not separate them right. 13x4x4 and other one is 7.5x4x4. Is it because it was too hot at proofing time? Could you help me please, and thank you I would like to make the loaves again. It tastes wonderful.
Your post doesn’t mention the % volume increase you had at 3 hrs proofing, nor the final result, so this reply is a bit speculative. Some thoughts: 1) My starter base is about 10 years old and I don’t feed it every day because I usually bake only once a week. I wake up the starter a day or two before I need to make the levain depending on how long it’s been since I used the starter. Then I make the levain as per the recipe. 2) Proofing is usually faster at higher temps. It may have stopped rising because it was “done” (i.e., overproofed). You’ve probably already read this, but Maurizio has a great post on proofing in general that addresses overproofing: https://www.theperfectloaf.com/guides/proofing-bread-dough/. 3) When I’m dividing into different pan sizes, I use proportional volumes by weight. That is, I get the proportional volumes of the pans and then divide up the dough by weight using the same proportions. If you are not sure of your pan volumes, you can measure them using water, or use this handy chart: https://cookiesandcups.com/baking-pan-equivalents/. The smaller loaf will bake faster, so I go by internal temp and start checking that one first.
Hope your bread was tasty anyway!
It sounds like it rose up as high as it possibly could (Based on the hydration and the flour you’re using).
I have 2 different size pullman pans. 1 large =13.5×5.4×5 , and smaller= 8.5×4.75×4.3.
Do you think I could make 1 large and 1 small with your recipe. Or just use the large pan. Thank you can’t wait to make it. Looks wonderful. Thank you🙂
When I’m dividing into different pan sizes, I use proportional volumes by weight. That is, I get the proportional volumes of the pans and then divide up the dough by weight using the same proportions. If you are not sure of your pan volumes, you can measure them using water, or use this handy chart: https://cookiesandcups.com/baking-pan-equivalents/. The smaller loaf will bake faster, so I go by internal temp and start checking that one first.
I usually fit about 1300g in the 13″ pullman. Any leftover dough could be put in the smaller one. Or, use the TPL membership spreadsheets to increase the dough weight to 2100g so you can do one 1300g pullman, and one 900g one. 🙂
Oh, no!! Yes, you definitely need the preferment, Tom. Sorry to hear about that. I’ve actually done this in the past with my pizza dough, hours later asking “why isn’t this rising?”
WOW ! Made this today as written (except no chia, subbed more flax). A little longer bulk and proof times. It is truly fantastic tasting bread and first time baking in a loaf pan for me. Mille grazie 🙂
So glad you liked this one!!
I mill my own whole wheat flour from Hard Winter Weed seeds. One benefit is that this includes the bran. Would I use the same water quantity in this case?
I would try mixing with the same amount of water, though I find with freshly milled flour, you might need to increase the hydration.
Due to recent surgery, I’ve been placed on a high fiber diet. My friend made this bread for me, which by the way, I love, but I was wondering what the fiber count per slice or loaf is. Even an approximation would be helpful. Thank you.
So glad you like this one, Kim. I don’t know the nutritional content, sorry about that!
Hi Maurizio, the bread is delicious, but the texture is somewhat gummy and not like your photos above. What could have gone wrong? Underproofed?
If the hydration is too high for your dough it can lead to an overly wet or gummy interior. If the dough feels “soupy” or very “slack” then try pulling back the water percentage by 5% and see if that helps.
Make sure to bake your loaves completely. The interior should register around 204-206°F (95-96°C) or higher.
If your loaf is under proofed then this will typically lead to a gummy or “wet” textured interior. Make sure your starter and levain are very vigorous and strong when you use them. This is very important! From there, make sure to bulk ferment your dough fully (use the images you see in my posts to guide you on what the dough should look/feel like). You want the dough to be alive and aerated before you divide and shape. From there, a full and complete proof is also very important.
I just baked this bread yesterday. Let me just say, this is one of the best tasting breads I’ve ever made! Usually I’ll make crusty boules or batards, but sometimes it’s nice to have some good regular old tight crumbed sandwich bread for weekdays, preferably something heartier and healthier with whole grains. This is the first recipe I’ve done with inclusions in a while, and the experience I’ve had since then really helped. This is not the easiest dough to work with, but it came out perfectly. I’ll need to try more seeded loaves in the future! 10/10
Thank you so much for the comments Ian, glad you liked this one! My feeling is, healthy bread doesn’t have to have bad texture or taste “healthy” 🙂 Sorry for the delay!
Hi Maurzio, I’m going to bake this tomorrow, I was curious if you think i could swap type 85 flour for the white flour?
You could, but I might consider reducing the hydration a bit to suit.
Hallo Maurizio,
Meine Form ist 13,5×30,0x13,0
Ist die zu groß?
Grüße Peter
If I increase the amount of starter in the levain, do I increase the amount of flour or water?
If you just increase the amount of starter and leave the other ingredients the same, it will ferment faster and be ready sooner.
Can you make this recipe without the oats and just sub in more seeds? or eliminate? What do the oats do for the bread?
Can I make the tangzhong with water instead of milk?
The oats bring nutrition and moisture, but you could swap them out for seeds or even barley flakes. If you want to leave them out, you totally can, too! Just know you might want to reduce the water in the soaker a bit, too.
Yes, tangzhong with water works, or a nut/oat milk.
I have a difficult time getting sourdough to rise without the added help of some instant yeast. This recipe was no exception. I loved the bread which turned out rather like a brick the first time I made it. But a delicious brick. The next time I added 1/2 tsp of instant yeast and it turned out perfect! This will be my go-to sandwich bread now. It is delicious as well as nutritious.
So glad this worked out for you, Stevie! What you could try instead of using the instant yeast is to double the amount of levain you mix into your dough. I’m positive you’ll see more fermentation activity then. Enjoy!
Such a great recipe! This bread was a huge hit at home! I added a little bit more honey which I think might explain why it took extralong for the loaves to rise (twice as long as recommended)?
Yes, more honey can do this—I find there’s a point when the honey percentage gets high enough to impede fermentation (which is why you’ll often see honey here at around the same percentages in my doughs). so glad you liked this, Holly!
What a great bread! I ended up making this with mostly white bread flour because it is all I had left, but I would love to try this method as a cross with your spelt bread recipe. Thank you for all of the great options to put incredible bread on our tables!
That works, Melanie! So glad you like this recipe 🙂
Hello Maurizio!
I made this delicious sandwich bread the other day and it turned out great! So yummy and a wonderful soft crumb from the Tangzhong. I made it without any modification.
Thank you so much for the recipe and sharing your knowledge on sourdough. I was blessed.
Awesome, Julie! You’re very welcome, thanks so much for the comments—enjoy!
Hi Maurizio, I am getting ready to make this bread and realized I only have King Arthur White Whole Wheat, which is 12.2% protein, vs. their Red Whole Wheat, which is 13.8%. I am assuming I would need to add less water and/or less honey but not sure and certainly not sure how much to adjust. Have you used their White Whole Wheat flour and do you have any guidelines for substitution in your recipes?
Maurizio, as a follow up, I baked the bread with the White Whole Wheat flour. The dough came together very quickly, but it was not nearly as hydrated as yours. It was dense from the beginning, even when adding the seeds, they just basically sat on top of the dough as it was already a stiff ball around the dough hook. Very hard to stretch and fold, didn’t stretch much. I saw in the comments a question about the water. The recipe says 354 grams of water in the main dough, is that right or is it supposed to be 599? It was sluggish in bulk fermentation and it weighed less than 1900 grams. The dough only filled the pans about 1/2 way and after 4.5 hours of rising, it never reached the top or sides although it seemed to be ready to bake. It exploded in the oven, creating an ear on the loaves. It’s still baking but it’s definitely not going to be a winner for me.
Oh wow! Ok, well it sounds like that white whole wheat actually needed MORE water added to properly hydrate the dough. That flour is really nice, I use it here often, and I’m sure it will work well in my recipe here—just add more water during mixing as needed.
I am currently making this bread and while the texture seems good it is not rising. My house is a little cooler so I put in a rising bucket in the oven with the light on. Still not rising much. Is there a solution at this point ? should I continue bulk fermentation or divide and put in proofing baskets or baking tins to final proof?
Thanks so much
I’d extend bulk fermentation AND proof as necessary!
Baked this yesterday and it is delicious – tender and tasty! I just used my regular bread pans, which worked fine, as they definitely didn’t rise as high as your pics show…dough was VERY sticky and hard to work, esp after adding the seeds which were still quite wet. I mixed by hand, no mixer, and I’m wondering if maybe I didn’t work it enough at the start? I thought it would stiffen up more during bulk ferment..but not so much. I did pre-shape with flour… which helped a little. Next time I think I need to remember to hold back some water at first mix? But I’ll certainly try again. Still working my way thru your book! All good 🙂
Yes, sounds like a little too much water perhaps in the recipe for your flour. Try reducing the water by 2-5% or so and see if that helps! Thank you for getting my cookbook, Lillie 🙂
By the way, I split one of the loaves and shared with a couple of neighbors…. it’s getting rave reviews! Obviously a keeper!
When I printed out the recipe for this high fiber loaf the honey and wheat bran were omitted in the page break. I baked this yesterday according to the printed recipe and it’s my new favorite bread. Now I have to see how much better it will be when all the ingredients are included! My question: could I substitute spelt flour for any of the white flour?
Ha ha, well that’s interesting! I bet you you’ll love it even more with those added 🙂 Yes, you could swap out the white flour for spelt, I’d start at 15% and work, up.
the best seeded wheat loan recipe I have tried. thanks for this, Maurizio!
So glad to hear that! Enjoy 🙂
Do you think this loaf would work baked freeform or does it need to support of the tins? Or reduce hydration and bake free form?
It could, but it would need a reduction in hydration, as you said.
Hi I have just baked two loaves but they have burst in the surface. I proofed for 3.5 hours and they seemed ready to bake. Are they still under proofed or should I have scored them? Don’t seem able to add photos Gaye
Hey, Gaye. Yea, sounds like they might have been a tad under proofed… I’d give them a little more time to help temper that explosive oven spring!
could I just shape the dough round and bake them using the dutch oven. Thank you
Yes, but as I said to Lawence above, I’d probably reduce the hydration a bit!