

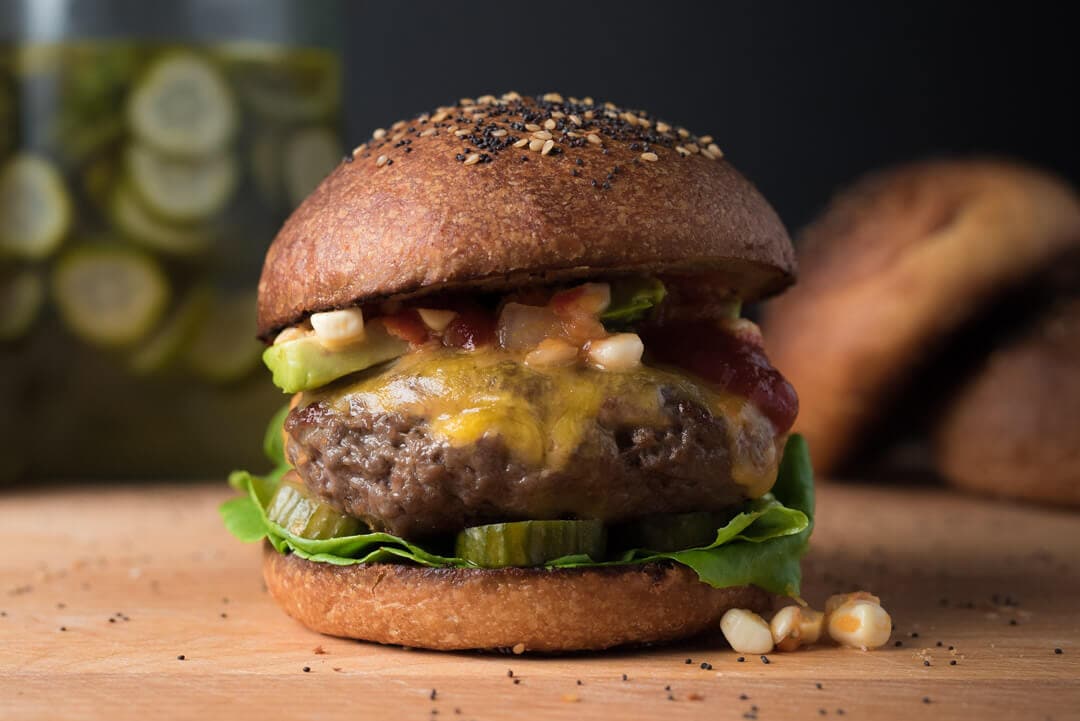
This past weekend, I had the wonderful opportunity to attend a workshop by the one and only Sandor Ellix Katz, author of The Art of Fermentation (essential reading!). I walked away from the workshop infused with inspiration and a head full of fermentation ideas. Of course, it wouldn’t be a hands-on workshop if I didn’t leave with a jar of bubbling veggies — a relish of sorts.
The fermenting relish we created by hand during the workshop had numerous spicy New Mexico chiles (as is the custom here in New Mexico, if it’s not spicy, let’s first make it spicy, then figure out the rest of the details), onion, corn, tomato, sweet potato (cooked), and garlic added to the mix. After getting my hands dirty with mixing, mashing, and packing, I began to ponder what I’d like to use this spicy concoction on, and then it came to me: hamburgers with brioche hamburger buns!
Coincidentally, the upcoming weekend of July 4th has always been a big grilling weekend out here, and what better way to celebrate our Nation’s independence than to fire up the grill and throw on some burgers and veggies?
I’ve made hamburger buns several times but have yet to formalize a recipe for my favorite version. This formula has evolved and is similar to my cinnamon roll recipe in that it’s based on an enriched brioche dough but with changes to butter, milk, and flour types.
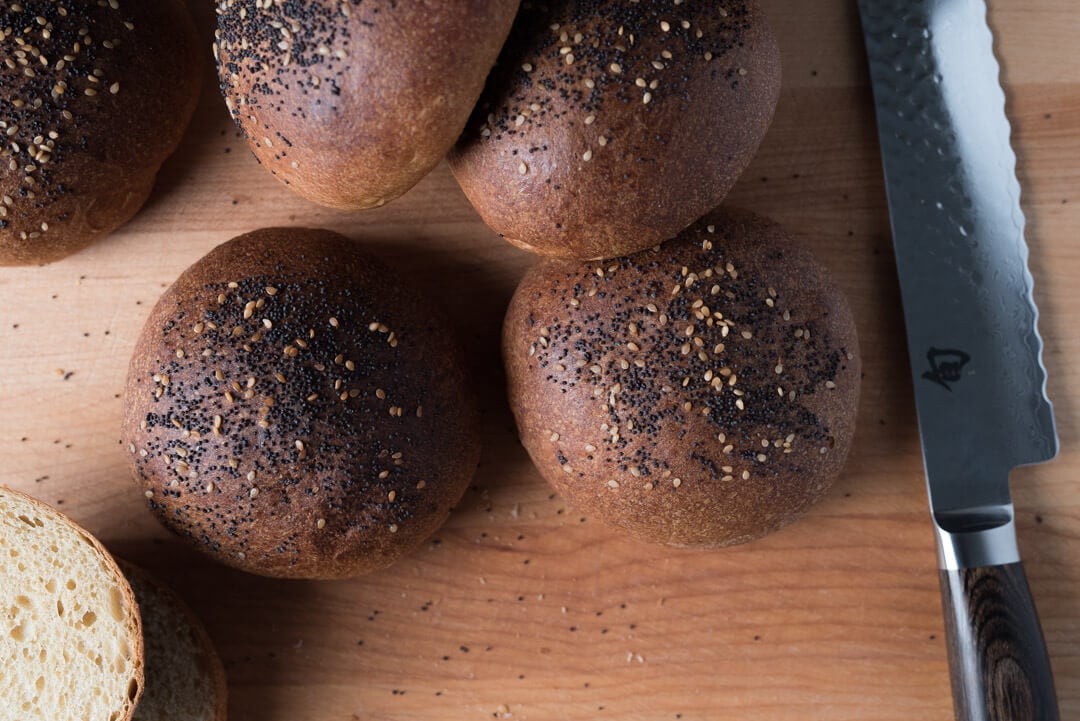
What I like most about this brioche hamburger bun recipe is its versatility. Not only can the dough be chilled in the fridge (similar to my fluffy milk bread hamburger buns) at multiple points before baking, once baked, but these buns also keep very, very well for days after. If you are planning an event, you can easily make these a day or two beforehand and keep them wrapped up so they stay pliable and ready to slice the morning of.
Additionally, these brioche hamburger buns can be used for many more things around the kitchen than just hamburgers—they are secretly a dinner roll that’ll blow those store-bought ones out of the water.
Let’s break out the butter.
Brioche Hamburger Bun Recipe
When compared to my cinnamon roll recipe, you’ll first notice I reduced the butter a smidgen and worked in a significant percentage of whole wheat flour. The added white whole wheat adds a subtle flavor boost to these, promoting them from just another hamburger bun to more of a central player in the overall meal. Further, the whole wheat gives the buns more rigidity after they’re baked, helping them to support the hamburger patty, toppings, and condiments.
However, this brioche hamburger bun recipe would work very well with 100% white flour or a different type of whole grain for the white wheat component—be sure to adjust the milk percentage up or down to suit.
Feel free to change the flour variety used, but be sure to adjust the hydration to suit.
The schedule outlined below has times and temperatures listed for the same day bake. Meaning the dough is started in the morning and then baked in the late afternoon, ready for a late grilling session or early dinner. However, the dough can be retarded overnight in bulk to add even more flavor and make scheduling easier (more on this below).
Note that you don’t have to make a levain for this recipe, just use your ripe sourdough starter (see the difference between the two here). However, make sure the night before when you refresh your starter you build up enough to cover the starter requirement below (185g).
Vitals
| Total Dough Weight | 1200 grams |
| Yield | 10 x 120-gram buns |
Dough Formula
The target final dough temperature (FDT) is 74°F (23°C).
| Weight | Ingredient | Baker’s Percentage |
|---|---|---|
| 278g | White Bread Flour (~11.5% protein), Malted (Central Milling Artisan Baker’s Craft) | 60.00% |
| 185g | White Whole Wheat (King Arthur Flour White Whole Wheat) | 40.00% |
| 162g | Unsalted European Style Butter (Kerrygold Unsalted) | 35.00% |
| 185g | Eggs (about 4 large) | 40.00% |
| 46g | Fine White Sugar | 10.00% |
| 148g | Whole Milk (cold, from the fridge) | 32.00% |
| 10g | Salt | 2.30% |
| 185g | Ripe sourdough starter | 40.00% |
Method
I used my Kitchen Aid mixer to mix this brioche dough. It’s possible to mix this all by hand but it gets a little tricky with the added butter. If you choose to do it by hand you could knead the dough in a bowl with a wet hand or even slap/fold on the counter.
1. Incorporation – 8:45 a.m.
Take out the butter from the fridge and cut into 1/2” thick pats and place in a small bowl. Let the butter come up to room temperature while mixing the rest of the ingredients.
Add the sugar, eggs (from the fridge), milk (from the fridge), and mature sourdough starter to the bowl of a stand mixer. Whisk everything together until incorporated.
Add the salt and flour to the mixing bowl. Using the dough hook attachment, mix the dough on STIR (lowest setting) for 3 minutes until all the flour is hydrated and everything is incorporated. The dough should look very shaggy at this point but should not be overly stiff. You might need to add more milk, a little at a time if the mixture is too dry.
Let the dough rest 10 minutes, covered.
2. Mixing & Butter Incorporation
After the 10 minute rest, the dough will be strengthened further before adding the butter.
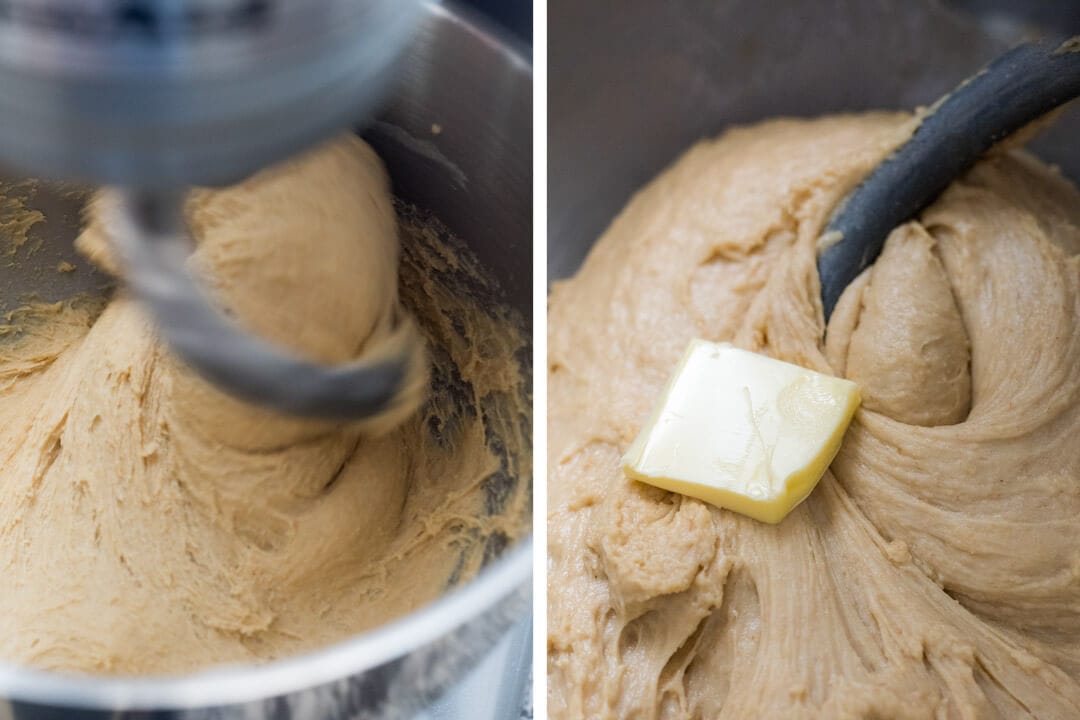
Mix 4-6 minutes on speed 4 (4 notches above STIR for me on my Kitchen Aid, medium speed) until the dough comes together and starts to pull from the sides of the bowl. It will most likely still stick to the bottom, but you’ll notice the dough will strengthen up and become slightly more smooth.
Butter temperature is important! At this point, it should be soft to the touch but not melted (see above, right). It should not be too cold or it won’t incorporate easily, and conversely, if it’s too warm it’ll get greasy and melt. Use the freezer or the microwave (in short increments) to adjust the butter temperature if necessary.
Turn the mixer down to speed 3 and start adding the butter one pat at a time right where the dough hook meets the dough mass. Wait to add the next pat until the previous one is fully incorporated and continue until all the butter is worked into the dough.
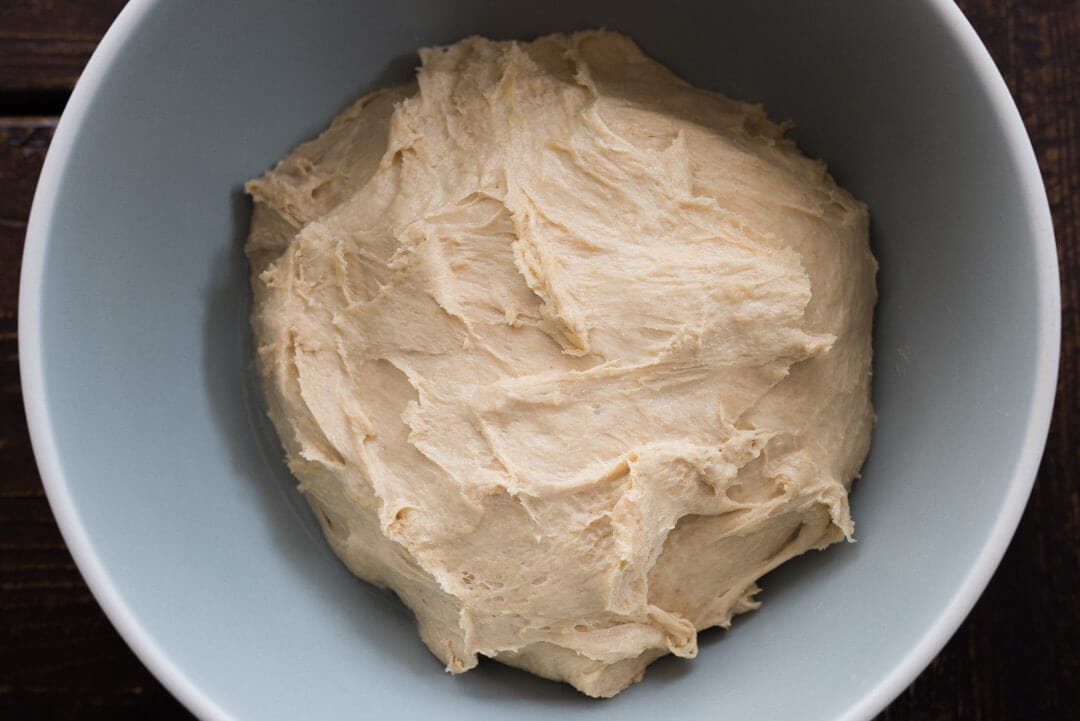
Total mixing time for this step could take 8-10 minutes. The dough will still be slightly shaggy (see below) but this is ok because we will perform a couple of sets of stretch and folds during bulk to further add strength. Additionally, you can see the dough does not look greasy from any melting butter. If your dough temperature is too high, pop it into the fridge for 15 minutes to help cool it down.
Once the butter is added, transfer the dough to a tub or thick-walled bowl for bulk fermentation.
3. Bulk Fermentation – 9:45 a.m. to 12:45 p.m.
As the dough is bulk fermenting on the counter, perform a total of 2 sets of stretch and folds, spaced out by 30 minutes (the first one 30 minutes after you finish mixing). For each set do a letter fold with wet hands (pick up the Northside and stretch up and fold over to the South, and so on).
After the second set of stretch and folds, place the covered bulk container into the refrigerator; chilling the dough for 1-2 hours in the fridge will make shaping much, much easier.
Here’s where the flexibility I mentioned earlier comes into play. You can let the dough chill in the fridge for 2 hours like I typically do, or you could leave it in the fridge overnight and shape the buns early in the morning to bake the next day.
4. Divide & Shape – 12:45 p.m.
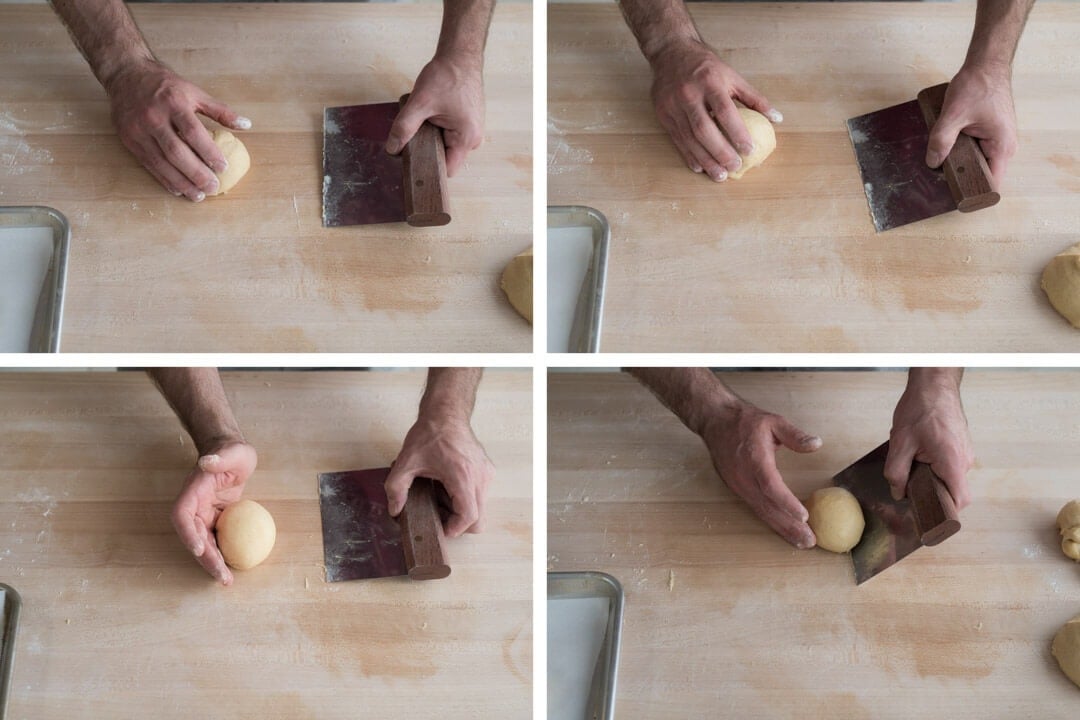
There’s no need to preshape this dough because we’re shaping it directly into small balls for final proofing. Prepare a full-sized baking sheet and another half sheet by lining them with parchment paper.
Remove the dough from the fridge and gently dump it to a lightly floured work surface. Using a scale and bench knife, divide the dough into 10 pieces. Then, using lightly floured hands, shape each piece into a taught ball.
I find shaping these to be very similar to how I shape pizza dough balls, but another method is to use a single hand and cup the dough ball down against the work surface. Then, move your hand in a small circle slightly pressing down on the dough as it moves around and slightly anchors to the bench (see above). Alternatively, you could shape each ball like you would a boule. Either way, be sure the dough has a fairly taut surface.
For more shaping instruction, see my guide page to shaping buns and rolls.
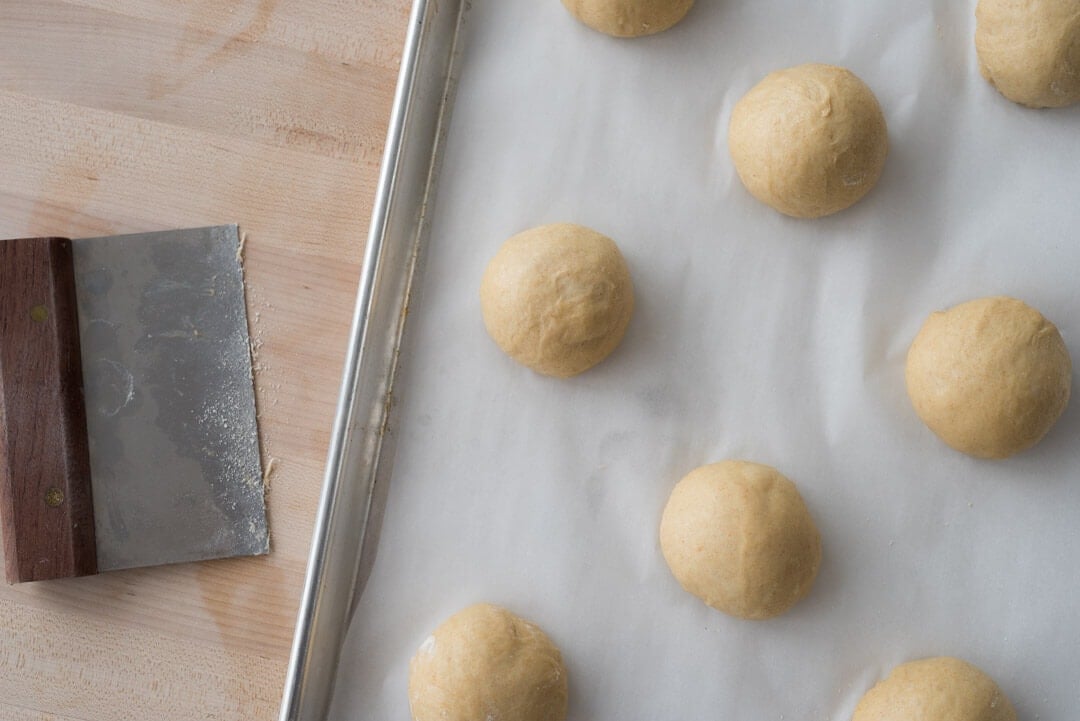
Once a ball is shaped, place it on the baking sheet so each is spaced out by 3″-4” or so. Using your hand gently flatten out each ball so they increase in diameter just a bit.
Cover the baking sheet with plastic to proof on the counter. I use these large plastic liners to cover my proofing baking sheets, they are even large enough to fit a full-sized baking sheet inside.
5. Proof – 1:00 p.m. to 3:30 p.m.
Covered and on the counter at about 73-76ºF (22-24°C), these trays of dough should proof for about 2.5 hours.
6. Bake – Preheat oven at 2:30 p.m., Bake at 3:30 p.m.
Preheat your oven to 425°F (220°C).
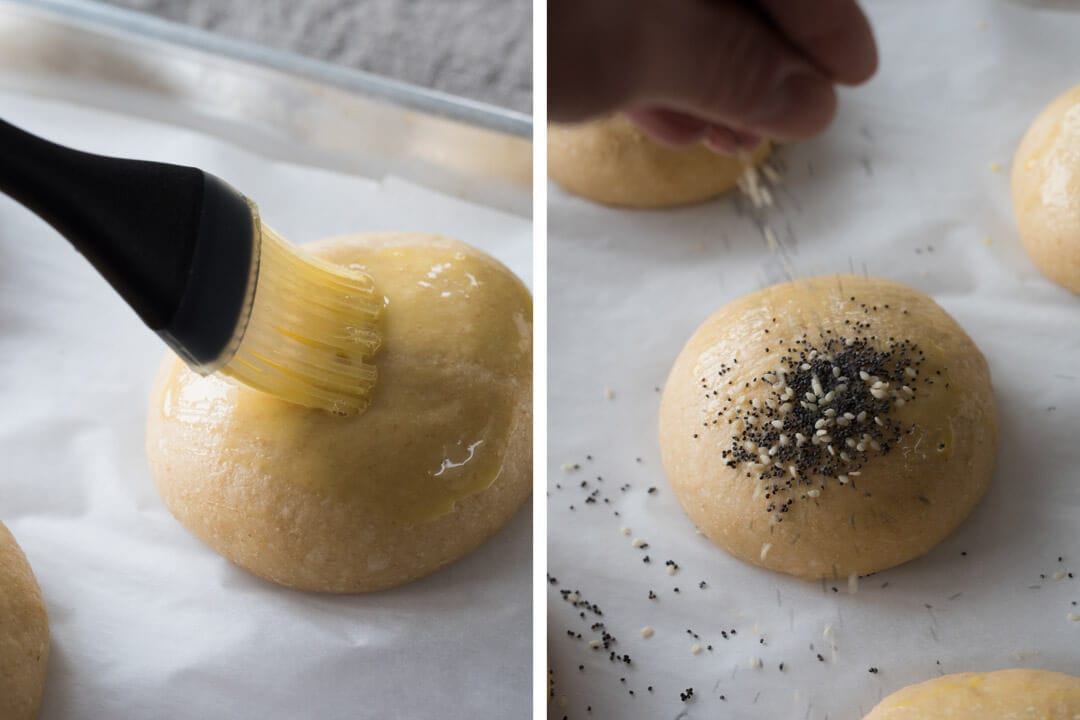
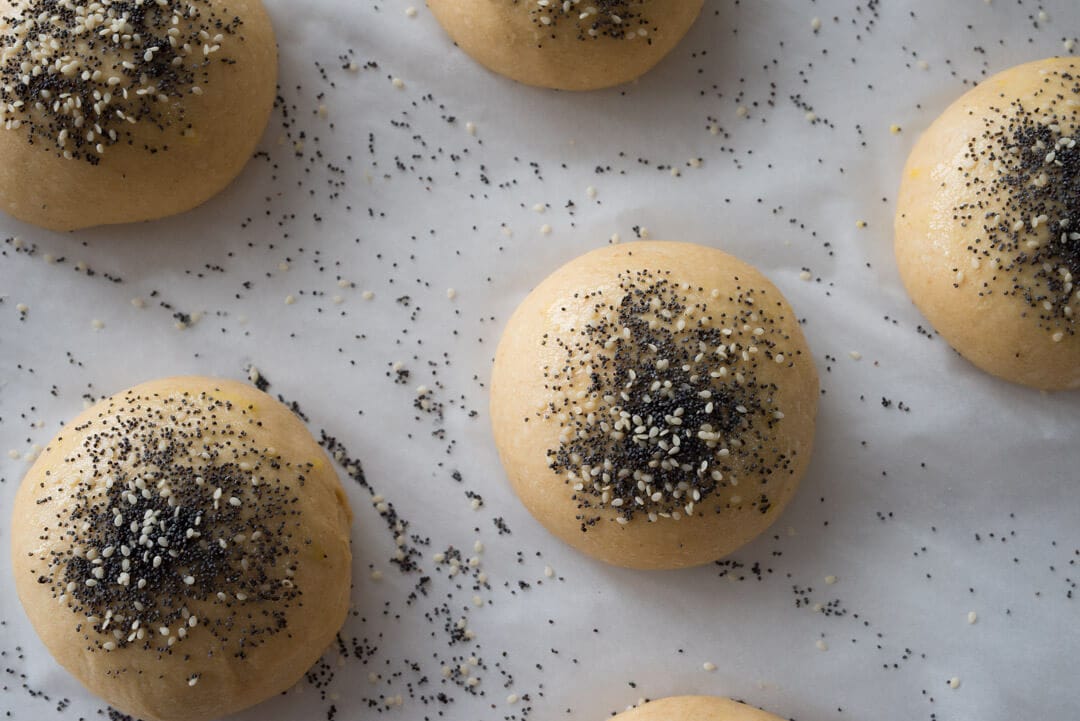
Make an egg wash by whisking a whole egg and a splash of heavy cream or whole milk. When the dough is ready to be baked, uncover the trays and paint on the egg wash with a pastry brush.
I mixed together 50% white sesame seeds and 50% poppy seeds for the topping of each bun. After the egg wash is applied spread some seeds on top as desired.
You don’t need to bake these on a pizza stone or Baking Steel, they’ll bake right on their own baking sheet. Because these brioche hamburger buns are topped with an egg wash, there is no need to steam the oven.
Slide in the baking sheets and bake the buns for 25 minutes. After the first 15 minutes rotate the trays, front to back, and top to bottom. Do keep an eye on these near the end, they may need more or less time depending on your oven.
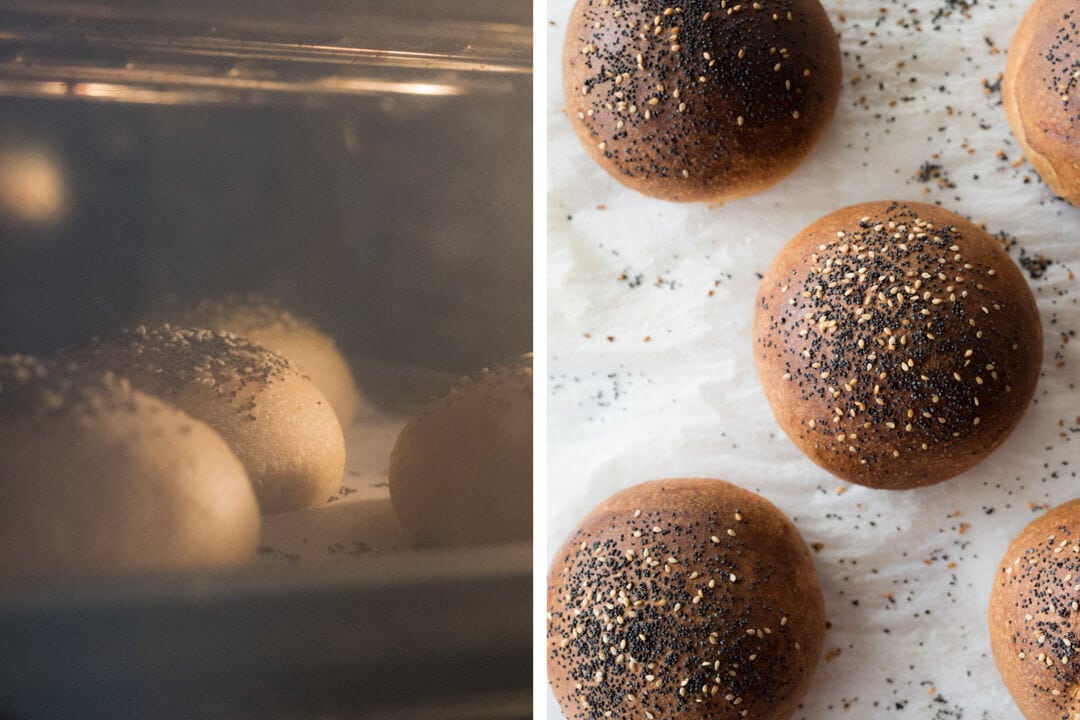
Once baked, remove from the oven and let the buns cool on wire racks.
Conclusion
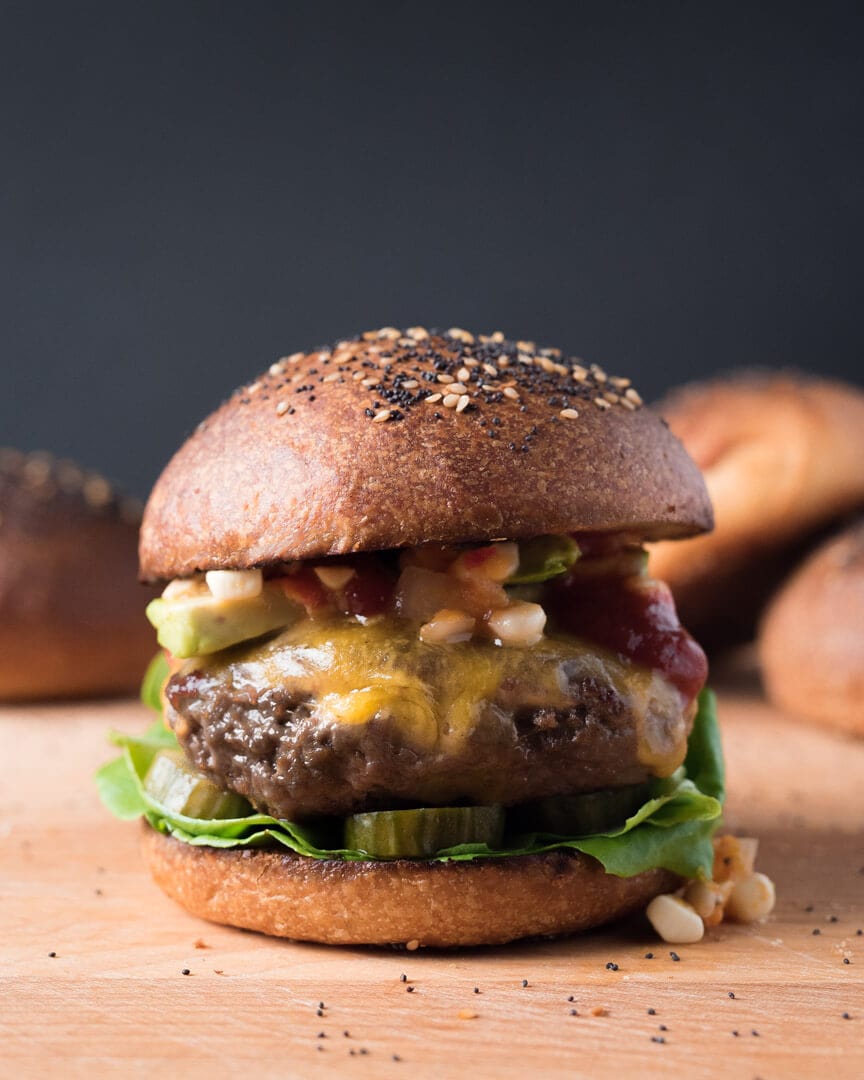
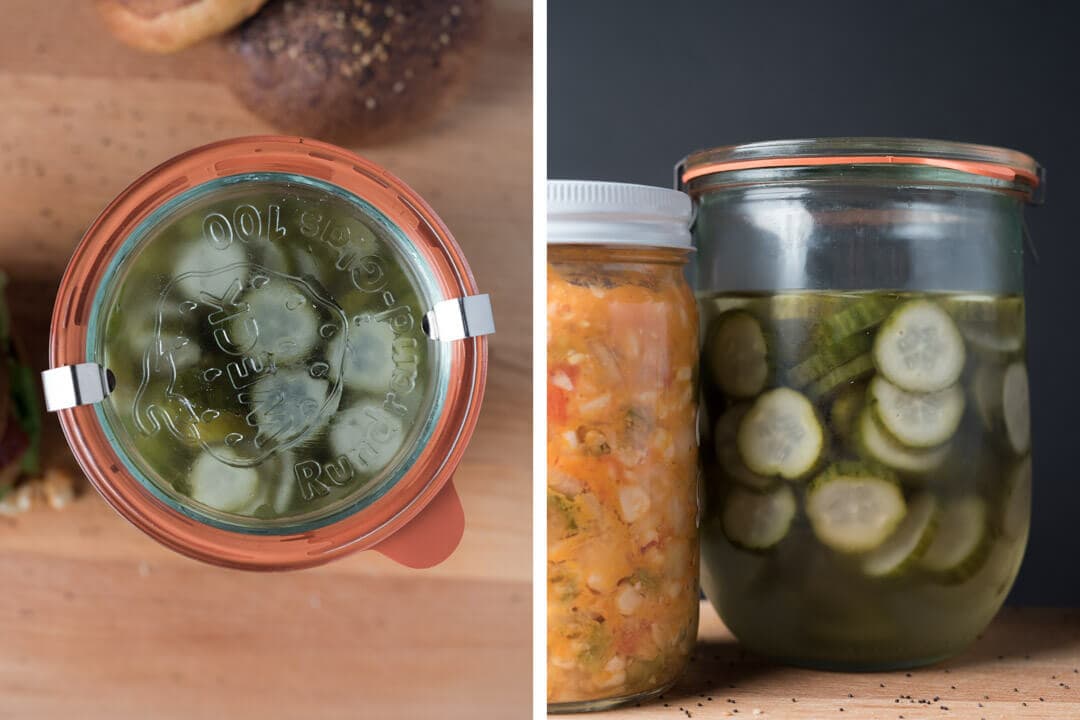
As I mentioned earlier, this was the perfect storm of motivation for me to finalize this brioche hamburger buns recipe and grill some hamburgers: the creation of a fermented relish, a holiday weekend approaching, homemade pickles in the fridge, and the pièce de résistance: homemade brioche hamburger buns.
For my hamburger, I sliced each bun in half and spread on some butter before placing them crumb side down on the grill for a few minutes to get nice and crispy. I mixed up some grass-fed beef with a dash of salt and sriracha and grilled each to medium. Then the burgers were topped with my Katz-fermented relish, homemade pickles, avocado, ketchup, and finally enrobed in the grilled buns. Mighty, mighty tasty indeed.
Crust & Crumb
The crust on these brioche hamburger buns is crispy but not tough or unduly firm. There’s nothing more off-putting for me than a hamburger bun that’s totally soft and mushy; I want some texture! Happy to say these definitely do deliver, and grilling them for a few minutes with butter further amplifies this.
I like seeds as a topping for these, not only for the added splash of flavor but they add a desirable texture to the top. If you don’t like seeds or prefer a different type, by all means, omit or change the toppings to suit.
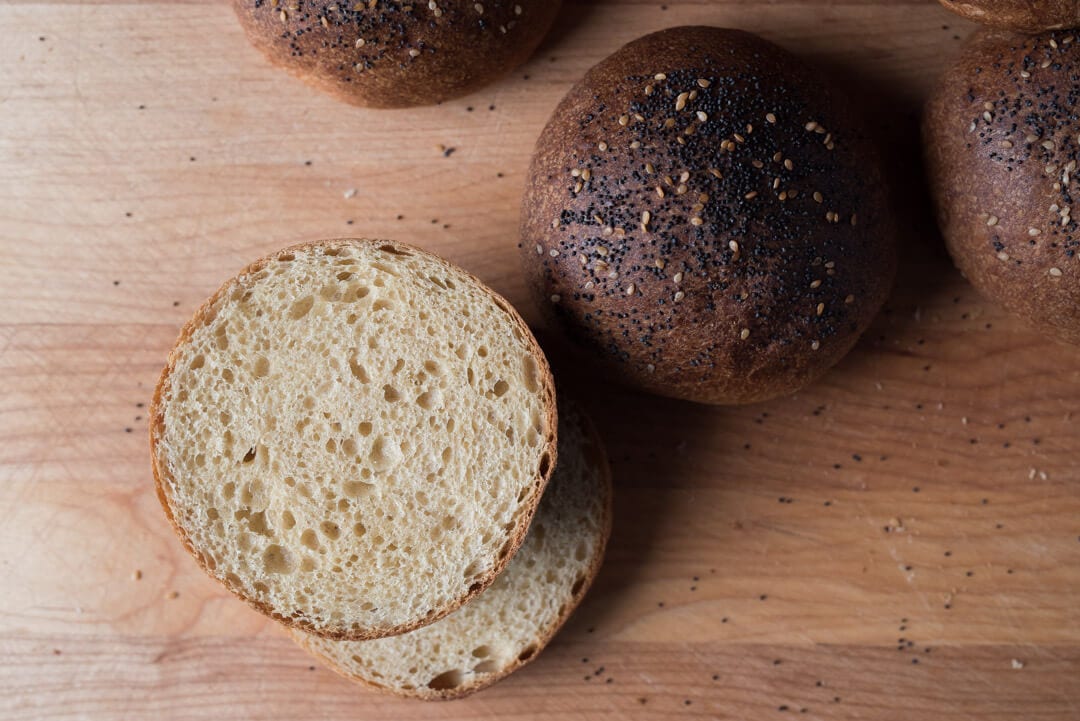
The interior is soft and open with a wonderful yellow tint from the white whole wheat flour and rich butter. You definitely don’t want the interior of these to be too open, but even, full fermentation is key to a light and airy bun. No dense spots and no gaping holes—the middle road.
Taste
With this same-day brioche hamburger bun dough, there’s just a hint of sourness. The added acidity brings additional flavor but is not overwhelming. The buns add subtle wheat and butter flavor to the overall hamburger, which is just what I wanted: a bun that brings more flavor to the stage without overpowering the other ingredients—a well-tuned concert of flavors and textures. And I think the added flavor from Mr. Katz’s well-fermented condiment just pushed these over the top into crazy good territory.
What’s Next?
If something better exists for a weekend by the grill, I might not want to hear about it. These brioche hamburger buns and burgers were heaven, and I’m looking to do a repeat in the next few days. I can now safely say this formula finalizes my question of how to make buns at home.
If you’re looking for another option, check out my sourdough potato hamburger buns, or if you’re making hot dogs, my homemade hot dog buns.
Nice buns ya got there! Had to say it—buon appetito!
If you use this recipe, tag @maurizio on Instagram so I can take a look!


309 Comments
Hi Maurizo, hope you’re well
Trying to do this recipe by hand (unfortunately don’t have a mixer) and whilst I’m able to incorporate the butter pretty well, I’ve real hard time trying to get any strength or smoothness as per your photos when it comes to doing so; 15/20 minutes or so or slap and fold doesn’t really seem to help much, despite it being pretty coheseive I’m still having to get the scraper out after every slap to clean up and put it back on. Any tips? Obviously just adding flour isn’t going to help the situation.
First attempt the dough was left overnight; whilst shaping into balls was OK, the end result was more like dough balls that lifted up instead of staying flat at the bottom (if that makes sense). Also despite looking well cooked at the temp, they were all raw inside, and unfortunately not edible. Any idea there? My starter seems OK because I’ve been doing the weekend loaves without any real issue.
Cheers!
Alex
Yes, this dough is hard to strengthen fully by hand, but it is possible. You could also add many more sets of stretch and folds during bulk fermentation to help further strengthen this dough, potentially scraping it out and doing a few quick folds on the counter to really strengthen and smooth the dough.
It almost sounds like the dough is under proofed to me, hence the gummy/dense spots inside after baking. Sometimes under proofed dough and under baked dough can look very similar. Be sure to let the dough fully ferment, rise up, and look alive when you go to divide. This dough is different than the weekend loaf dough because the enrichments (fat and sugar) will inhibit fermentation to a degree. It’s important with these recipes to use your starter when very mature and give the dough the time it needs to really puff up and ferment.
From there, you might also want to try dropping the baking temperature 25F and lengthening it if you find the interior is still under-baked.
I hope this helps — let me know how the next attempt goes!
Hello! I’ve tried this recipe twice now, and both times I’ve struggled. I think my main problem has to do with developing strength (I’m mixing by hand, and new to the slap and fold method), and I don’t think I’m getting the fermentation quite right (they’re quite flat, likely some shaping issues there, too), but my biggest concern is how underbaked they are. Even when I bake them until they’re nearly black, they’re still a bit raw in the middle. I lowered my oven temperature 25°, and that seemed a bit better, but still. I never struggle this hard on my classic sourdough loaves. Any thoughts? Other than keep practicing? Thank you!
Sorry to hear about the troubles, Lauren! Sounds like a combination of under worked dough and under fermented dough perhaps as well. Be sure to hold back that butter until later (very last, actually) and only work it in by hand once the dough is quite strong. If your dough is underproofed you’ll also notice gummy spots in the end, but it could also be baking times and temps. Drop the oven temp another 25F to see if that helps bake the interior without burning the exterior.
Keep at it! Enriched doughs are a little more challenging, but once you get the process down you’ll be set.
Success! I swung a bit in the other direction and they ended up at least 2 hours overproofed, but the structure was there and they were baked all the way through! Some edits to my process that helped: I occasionally misted the counter with water as I did my slap and folds, which made the process much easier. I did about 15 minutes of s&f before incorporating the butter, which took a good 15 minutes more of s&f. And for the bulk proof, I used coil folds as opposed to envelope folds, every 30 min for 4 hours. Cold proof in the fridge for 20 hrs, shaped, then on the counter for about 5 (definitely overdid it there, but wanted to see how much was too much!), and I ended up baking them in batches in my dutch oven, preheated at 450º, baked 15min covered at 400º, then 5 min uncovered at 375º. Thank you for your encouragement! I look forward to fine-tuning this skill even further in the future!
Thanks for reporting back, Lauren! Sounds like a good approach to doing this by hand. Now you know the upper limit on the proof for these, easy enough to dial back and really nail it 🙂 These enriched doughs do take a little longer to proof, but most of that time is just waiting anyway. Happy baking!
How would this work without a kitchen aid mixer? Could you knead it and add in the butter
It’s possible but will be a bit of work. I’d mix and strengthen the dough as usual (likely using the slap and fold method, see my guides page, and then add the butter into the dough once nice and strong, one pad at a time while continuing to mix.
Thanks — im familiar with the folding method. Maybe i’ll hold off until i’m back home with my mixer. Appreciate the reply.
Just a quick note, 4 large eggs do not weight 186 grams. Where I’m from, even 3 large eggs weight more than 200 grams. That, of course, doesn’t excuse me being an idiot and coming up with dough that’s more like pasta than brioche :/
Ahh bummer, yeah it’s totally variable, each egg is different, really — that’s why I also give the gram measurement 🙂 Sorry to hear the dough was too stiff, you can always add in more liquid!
it was too sticky, as it had an excess of something like 40% egg. I added flour but I still got a very yolky, yellow crumb. You live and learn 🙂
Is the egg mass with shells on or just the cracked eggs?
Just the cracked egg (weigh the eggs without shells, just yolk and whites).
Hello – love this site. I’m new to sourdough baking and thoroughly enjoying the wealth of info here. Wondering if I could half this recipe?
Yes, you could certainly halve it — just divide everything by two and you’re good to go. Note that you’ll have a pretty small dough so it will be very susceptible to temperature changes. Keep it warm, 78F, if you can!
I always wanted to try potato bun, so I replaced 100g of flour with 100g of cooked potato and it worked like a charm! I also put a bit less sugar to compensate the sweetness of the potato (it was a regular potato, not sweet potato, but still, it’s a bit sweeter than flour.
Super super soft buns
That sounds awesome, Olivier! I’ve added potato to a dough before and have also wanted to work on a potato bun… I’ll have to give your suggestion a try. Did you boil the potatoes or roast them in the oven? Or even, cook them in the microwave?
Thanks for the suggestion and enjoy!
I just boiled a whole potato in skin. Then peeled it and mash it before measuring. Of course it’s wet, but I don’t really mind high hydration. Roasting the potato is probably a better idea in order to have a better control of hydration.
And… oh I forgot: thanks a lot for your work and for this recipe!
You’re very welcome! Ah ok, thanks for that info, very similar to how I make my roasted potato loaf 🙂 I’ll be giving this a try soon. Enjoy and thanks!
That sounds like a great idea! Did you sub out the bread flour or the whole wheat for the potato?
While I’ve dabbled with sourdough a few years ago, I’m picking it back up after a long hiatus since I suddenly have a lot of time to kill at home. I’ve had some practice runs with other recipes and have a great starter to use (thanks for that!), so I’m feeling good about trying this one to go with some smoked pulled pork.
I do have a question about the salt, though. I’m looking for places to trim salt from my diet, and was wondering about it’s impact in this recipe (besides the taste). If I cut it in half to 5g (or even lower), do you think it would impact the fermentation significantly? I am under the impression that salt slows down fermentation, so I’m just making sure that it doesn’t rise too quickly if I leave out some of it.
Thanks! This site has been an incredible resource.
Glad your back to baking sourdough, Brad! Salt plays a very important role in baking and reducing the percentage below 1.8% is not usually recommended, it helps temper fermentation (as well as add flavor) and bring it under control. You could likely get away with dropping the salt in this recipe (which is, admittedly, a little high at 2.3%) a few grams, but I would not cut it in half.
But first I would venture to say that there really isn’t that much salt in this recipe if you think about it. There’s 10g in all of the dough, meaning every single bun. If you ate even 3 buns (I’d be surprised!) you’d only eat a small percentage of the total salt compared to other sources where it’s likely much higher. I know, I sound like a baker justifying their craft, but really it’s true 🙂
I hope this helps and happy baking, Brad!
Thanks for the detailed response! I wasn’t aware of the 1.8% minimum, which will be a good number to keep in the back of my head. And I agree that there really isn’t that much salt in this recipe, just trying to use as little as I can get away with wherever I can.
I made the dough today and I’ll shape and bake them tomorrow. I wanted to say how much I appreciate the photos and the weight in grams in all the ingredients.
I was mixing the dough and when I dumped my first scoop of flour in the bowl that already had the liquid in it my scales battery died! I had to guess how much more flour to put in and because of the photos in the mixing bowl and after adding the butter I am pretty confident mine will turn out ok.
Also, I have bantam chickens so I have tiny eggs I love knowing exactly how many grams I need, not guess how many.
Thanks Maurizio.
Be well.
mo
You’re very welcome, Mo! Sounds like you’ve got that instinct built up and are just fine 🙂 Thanks so much for the feedback and enjoy these! Wishing you good health.
I have the dough in the fridge, waiting to be shaped right now, and wondering whether to stick to the bun shape or shape it as a loaf. Have you tried making this a loaf?
I haven’t tried but I’m sure it will work very well! You’d have to adjust the bake time to be longer, to be sure, so keep that in mind. Make sure the interior is around 200-205°F before taking it out. Enjoy!
It worked like a dream. Only should have shaped it better. I tagged you on Instagram! Eating through this bread faster than I should!
Glad to hear that! I’ll take a look. Enjoy 🙂
Hi Maurizio, I’ve been lurking for a while and baking your hearth loaves with great success. Your 50/50 whole wheat loaf is quite the crowd pleaser. I made these for the first time this weekend with an overnight refrigerated bulk and using 30% spelt instead of the whole wheat (ran out of white whole wheat and the current national flour situation has rendered me creative). I got a really nice color, smell, and rise, but the tops all split. I’m wondering if I might have underproofed since I only gave it the 2.5 hours stated here. Should a brioche like this have the same appearance post proof as an unenriched dough? They passed the poke test (or at least did to my eye). Could this be a consequence of the spelt? Thanks.
Glad to hear that, Colin! Yes, splitting is typically a sign of underproofing (assuming you did do the egg wash on these to help them rise) — and that’s my guess as to what happened with your dough. It should be similar to a lean dough (a dough without any sweetener or fat) in terms of feel when it’s ready for the oven, but these do take extra time to fully proof. Next time give the dough a bit longer, they should be very soft going into the oven!
Hi Maurizio, For the 185g of leavin, can you use starter leftover stored in the fridge? Thanks!
Emily — in my experience, no, you need a properly functioning and mature starter to leaven these successfully. However, I would use that discard in any of these recipes (waffles, pancakes, banana bread) without hesitation 🙂
Hi Maurizio, i didn’t understand how long is the baking time. you first bake 20 minutes and after another 10 you remove the water pan or is it after the first 10 minutes (while you rotate the baking pan), total time is about 25 min?
Sorry, that is a bit confusing. If I recall correctly (haven’t made these since summer), total bake time should be around 25 mins or so, depending on your oven. Remove the steaming pan after the first 10 minutes and yes, rotating at that time is perfect!
Thanks! you’re the best
Hey, love the site and have baked several of your recipes with a lot of success. Any tips you have for making a 100% einkorn hamburger bun? I’m trying to shift my bread baking to all ancient grains. If you think something like an einkorn/spelt bun would work better that’s cool too. Your einkorn sourdough came out great.
Thanks John, so glad to hear that! I’d say try a mix of einkorn and traditional wheat at first, to see how the dough feels and bakes up. You’ll likely get less rise out of the bun but using all purpose (sifted) einkorn might help keep it light and airy. If that works well, keep increasing the einkorn as you get a feel for the dough and process.
I think it’d be possible to use 100% einkorn, but your expectations would need to be adjusted to expect a little more dense result with less rise, but loads of flavor to offset all that 🙂
Thanks for all of your detailed instructions! Would you happen to have a base recipe or link for more information on Katz fermented relish? I love the idea of fermenting sweet potatoes in a relish.
You’re welcome, Lana! It almost felt like Katz used whatever veggies he could get a hold of for the event, but there’s a standard recipe/formula he uses for this type of thing. It’s all in his excellent book!
Thank you for all your detailed information! I do have to ask, what is Katz fermented relish and how would I go about fermenting some? If you don’t mind sharing of course!
Do you prefer the spiral dough hook or the standard one? I need to grab one so figured I’d ask a pro before I purchase 🙂 love your site! Every loaf I make turns out beautiful because of your recipes 🙂
If the dough moves and mixes well with the dough hook, that’s what I’d go with. I use the paddle sometimes if the ingredients have a hard time incorporating with the hook, then I might change to the hook after it strengthens a bit and starts coming together.
Glad to hear that, Brittany! Happy I can help 🙂
May I know the purpose of preheating the oven at 475F for one hour before baking the buns? Is this preheating necessary? Thanks
Since we’re not using a baking stone a full hour isn’t exactly necessary, just however long it takes to heat your oven. I’ll update the post!
Thanks for quick response! I plan to make the buns this weekend.
to me these are like a leavened scone. good for breakfast, not what i want with my burger. after one try holding a burger i am toasting these, double split, for breakfast.
eating one now, watching the spurs and palace game [footie] from yesterday on dvr. i recommend homemade apple-chile jam and almond butter and strong black tea.
Well they definitely should not be so crunchy/crispy/stiff they resemble a scone! Perhaps they were baked too long or the dough was under hydrated… At least I know I can double this recipe as a scone, though! 🙂
not crisp when finished. to crisp them i toast them. with a burger, to me the toasted bun [i toast all hamburger buns] was a bit too sweet and soft.
hydration was fine, what was called for in the recipe. when finished mine looked very much like your foto of your buns [no seeds].
probably a difference in taste. i appreciate your blog and recipes.
try one of yours toasted with jam. i think you’ll like it.
Oh, now I see what you meant. I’ll have to give this a try, a makeshift scone recipe, I like it. You’re very welcome, thanks for the suggestion, there’s no limit to our sourdough baking, is there? Enjoy!
Dan Lepard has a good Hot cross bun recipe
i have been making these buns for a long time using spelt and wwbread flour and they are the best. i now have a mock mill and would like to make them with 100% fresh milled flour. i currently have only hard red and white winter but will be getting kamut. any helpful hints for this?
Right on, Terry! Glad to hear that. I’d say go with 100% fresh milled, should be just fine for the whole wheat component. You might be able to get away with adding a bit more hydration to the recipe (either water or even milk would work) as I find freshly milled flour tends to be a bit more “thirsty” than aged.
Hi Maurizio! I made these for the fourth of July and my family and I were absolutely blown away by the flavor. Thank you for a wonderful recipe!
Quick question: if I wanted to make them thinner (not necessarily smaller in diameter), how would you recommend I do that? I wouldn’t mind a slightly smaller ratio of bun to patty for my burger. I was thinking weigh them to be less and flatten out wider, but I’d love your expert take. Thank you for all you do!
So glad to hear that, Sarah! You could try flattening them out a bit after you shape them into balls and place them out to proof. Just a gentle press-down with a flat hand should do it. I’ve not tried this myself, but I imagine this would work!
You could also try flatting them slightly after they’re fully proofed, before baking, but I fear you’d degas them too much, then they’d likely be too squat.
Let me know how it goes!
These look great, I’ll definitely give these a shot! Is there any chance you could update the recipe to include temperatures in celcius as you do with some of the others? I can of course do it, but quite often I just bring up my phone to use it so it’d be handy not to have to hop out of the flow to convert.
Yes, I must have missed this post! I’ll go through soon and update the temperatures.
Wow! Wow! Wow!
I love hamburgers. I hate store bought buns.
I have been on a quest for a great bun recipe for years. The quest is over! These were wonderful. I had never worked with a dough as wet as this one. I now fully appreciate the step on refrigerating the bulk fermentation for an hour I may extend that an hour next time. And there will be a next time. The crust was marvelous. Almost, just almost, tasted like cookies. How can you go wrong with almost a stick and a half of butter :).
Thanks for all the work you put into this recipe.
Hah! Really glad to hear you liked the buns, Jeffrey. I make these fairly often when the weather is warm and it’s grilling season — they’re not super sweet and not super buttery, just right. Thanks for the feedback and happy baking!
The results certainly look amazing, and I really want to give this a try! 😀
Would you say that this recipe would also work for making a standard brioche bread in a pan? I’ve been searching everywhere for a sourdough brioche recipe (using baker’s percentage) without any luck, but I really like your recipe and explanation. Is there anything special that should be done differently if I want to use this recipe for brioche bread?
I was thinking of following steps until the “Divide & shape” step, and instead make a braid before letting it proof in a bread pan.
Yes, you could definitely go that route, it would work pretty well. Usually those have a little bit higher butter percentage than I’m using here, though, but that’s an easy modification. I’d say try it out as-is and adjust as desired!
Maurizio, hi! First of all… huge thanks for sharing the recipe! I think they look stunning, honestly.
So I am writing because I tried to make them, and these were my first brioches every by the way, they looked good, tasted great, but became so crumbly. SOOOO crumbly. My texture seemed totally off, especially on the crust. It became such a dry crust! Any ideas were I could have failed? Thank you so much!
Thank you, Babi! That’s interesting. I’m wondering, did you add all the water called for in the recipe? Make sure all the measurements listed above are performed as accurately as possible. Additionally, I’m wondering if the loaves were over baked. You might be able to get away with baking them less in your oven. Keep an eye on them in the last 10 minutes of the bake and pull them out when they look sufficiently risen and nicely colored on top. If they’re over-baked they can dry out rather quickly!
You know, since Babi said that her buns BECAME so crumbly, not that they started out crumbly…It makes me wonder whether she might have left them out, or in a bread box, or something so that they lost moisture. I am guessing that you would store them in something airtight to prevent moisture loss.
Also, I feel her pain. Keeping hamburger or hot dog buns fresh and not crumbly can be a problem.
That’s very possible, Lynda! Great suggestion. And yes, buns like this can dry out quickly over the course of a few days, especially if not covered sufficiently…
Hey there Maurizio,
we have vegan friends visiting next week and want o to make burgers. Any suggestion for a fluffy bun that doesn’t contain and animal products? Thx!
Phillip
Hey! I think there are some comments down below on what others have done to make these vegan — they say their changes work really well! I need to verify myself before I amend the post with those options. Let me know if you get around to trying their changes!
Thanks for the really fast response! They are still talking about using eggs which is not an option for me unfortunately.
Thanks again for all your great recipes. Got the Einkorn Miche and Pizza dough fermenting in the kitchen at the moment 🙂
Ah, bummer. There’s got to be a common substitute out there, though. Flax meal I think is one? You’re very welcome, glad to hear you’re making those — both so good 🙂 Enjoy!
Hello Maurizio,
I did your recipe using just white flour (only 7% protein) and it worked very well. Thanks a lot!! It’s really a delicious bun. If you wanna see it, it’s on my instagram: https://www.instagram.com/p/BtIt1EeBDco/
Those look super, super nice! Really glad to hear my recipe worked out well for you, Márcia — enjoy!
Hi Maurizio,
this recipe sounds really yummy (just like all the others from your blog that I´ve tested so far 😀 )
Do you think I could shape the dough into hot dog buns instead of burguer buns?
Thanks !!
Luiza
Thank you, Luiza! Yes, these would work super well shaped as hot dog buns!
Great!! 🙂
Thank you for answering me!
I just found your site and know already that I’ll be happily browsing for inspiration regularly. I’d love to try to make a version of these buns for Thanksgiving, but in dinner roll size. I’m picturing the characteristic pull-apart rolls. Do you see any issues using that method with this dough (i.e., letting the shaped buns touch as they do their final rise)? Thanks, and please keep the recipes coming!
No, these would work very well in that format!
I made a double batch of this dough because I loved your cinnamon roll recipe so much, and this dough looked similar. I made 10 hamburger buns, 12 dinner rolls (about 1.75 oz each), and a loaf of cinnamon swirl bread (a little more than a pound). I just misted everything with a spray bottle for the steam, and it all turned out great. The hamburger buns were so good for burgers last night, and my kids were excited for the bread this morning to toast for breakfast! This dough is so easy to work with once it’s chilled (I chilled over night), and makes the most tender, soft bread! Thank you so much!
Right on, awesome to hear that, Aubri! Yes, once the dough is chilled is so easy to handle, and lots of flexibility there with time in the fridge as well. Thanks for that update and happy baking!
Have you tried brioche made with einkorn flour? How would you substitute it? Thank you!
I have not yet, but would definitely like to. I’ve used einkorn in a variety of things here, including areas where I’d typically use “pastry flour” (a low protein flour) — it works so, so well. I’d probably start with it at a small percentage, perhaps 10-20%, and then work it up to see how it handles the dough enrichments (butter & sugar). The tender result from using einkorn would be fantastic!
Thank you for replying! Do you mean 10-20% pastry and 80-90% bread flour or ap? How well do you think it would work for 100% einkorn? Probably wouldn’t hold up with such an intensive mix method? Trying to make these for a gluten intolerant bf.
Sorry, I meant start with 10-20% einkorn and work your way up, if desired. Hard to say with 100% einkorn but I think it would still work. It’s actually something I’ve been wanting to try: a 100% einkorn brioche pan loaf. Worth and experiment!
Hi, could you tell me what your percentage of water to flour is in your version of liquid starter? I can’t seem to find it. I almost always use equal parts by weight flour and water. Thanks!
Nevermind, I answered my own question. Great website!
Ok, sounds good; I hope you enjoy them! And thanks! 🙂
Tried the recipe and the buns were flavourfull, but they did not rise properly. I put the dough into the fridge (around 7-9º C) for 6 hours second fermentation, but the seemed to solidify and the dough could not rise and got a crust.
Any bet about what I did wrong?
Did you cover the dough when it was in the fridge?
Would you recommend adding diastatic malt powder if making this without malted bread flour?
It’s not completely necessary but I do find a little diastatic malt helps bring a nice color to the crust on these buns. If I was using flour without malt, I’d add just a bit, perhaps 0.5%, to the dough.
Happy baking!
Hi Maurizio, i want to start of with saying that this recipe is great, and has brought me great joy!
Recently i stumbled upon a very interesting technique, where you use heavy cream, in place of milk and butter. This makes the proces a lot easier, and suggest you check out the recipe 🙂
https://www.seriouseats.com/recipes/2015/05/cemitas-mexican-saseme-seed-sandwich-buns-recipe.html
Best reggards, Jonas
Super glad to hear that, Jonas! That’s a very interesting technique, I’d like to try that sometime. It sure seems like an easy way to get the required fat into the dough. Thanks so much for passing that along!