

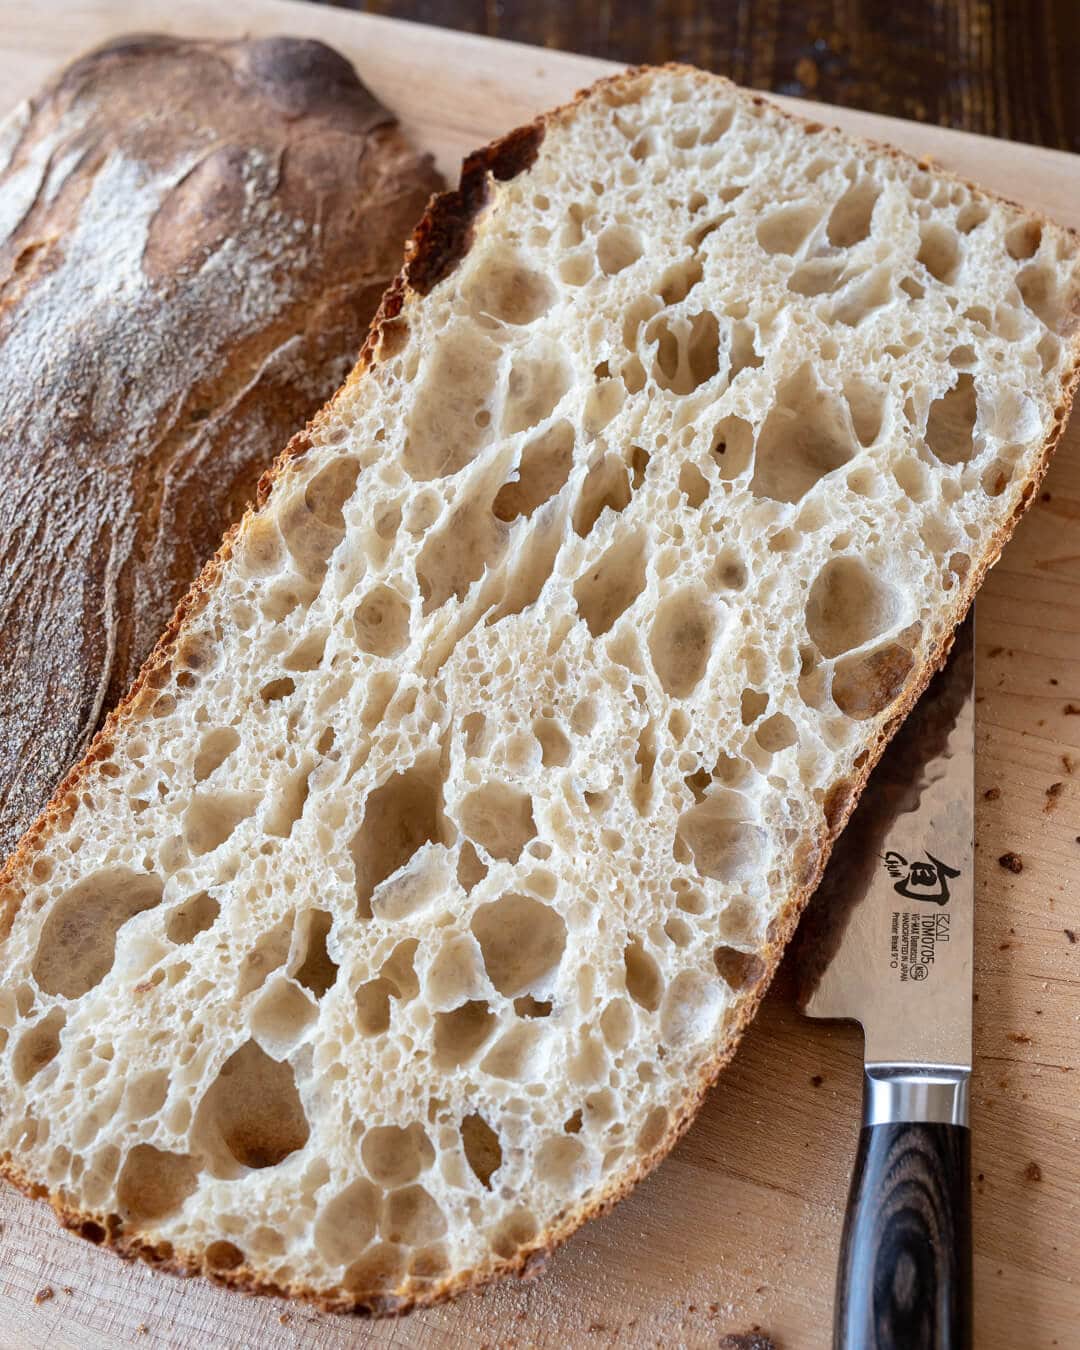
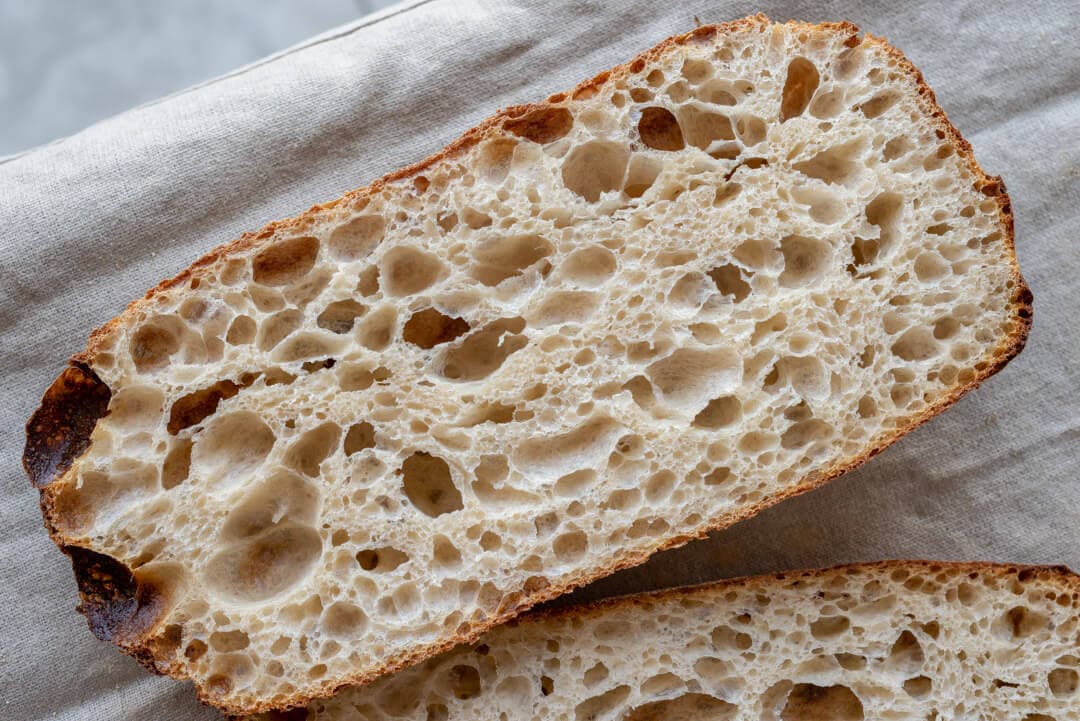
This bread is such a treat. It’s soft, incredibly open, and light in hand—almost like a bushel of puffy marshmallows bound together by a crust poised to shatter at the slightest pressure. It begs you to tear it with your hands and dunk it into the best olive oil in the pantry. That is, if you can stop cutting it in half and sandwiching delicious ingredients (I couldn’t, as you’ll see later). I hope this sourdough ciabatta bread recipe becomes a regular in your kitchen as it has been in mine.
Once you embrace its “hands-off” approach, you’ll find this is an incredibly easy bread to make.
While the appeal of this specialty bread is evident in its beautiful rustic crust and open crumb, working with a highly hydrated and wet dough can be challenging. But, once you embrace its “hands-off” approach, you’ll find this is an incredibly easy bread to make.
What is Ciabatta Bread?
Ciabatta is a rustic bread from Italy with a high hydration, chewy texture, thin crust, and wildly open crumb (interior). If you squint, you’ll see that the shape of the ciabatta loosely resembles a slipper (ciabatta means slipper in Italian) with a wide, sturdy crust and somewhat tubular shape. Smaller ciabatta panini are wildly popular in Italy, and even here in the United States, they’re the perfect little sandwich.
Flour Selection
Whole-Grain Flour for Ciabatta
I’ve iterated on this recipe utilizing a variety of grains, ranging from modern wheat to spelt to Khorasan (Kamut). When using 15% whole grain Khorasan, the grain imparts its characteristic golden hue and buttery, sweet flavor. The beauty of this formula is that the 15% can be used as a playground for whatever grain you fancy.
Whole-grain spelt sure was good—and you all know I have a soft spot for spelt—but I also enjoyed hard red whole wheat. So, if you don’t have Khorasan, swap that out for any whole wheat you have in your pantry.
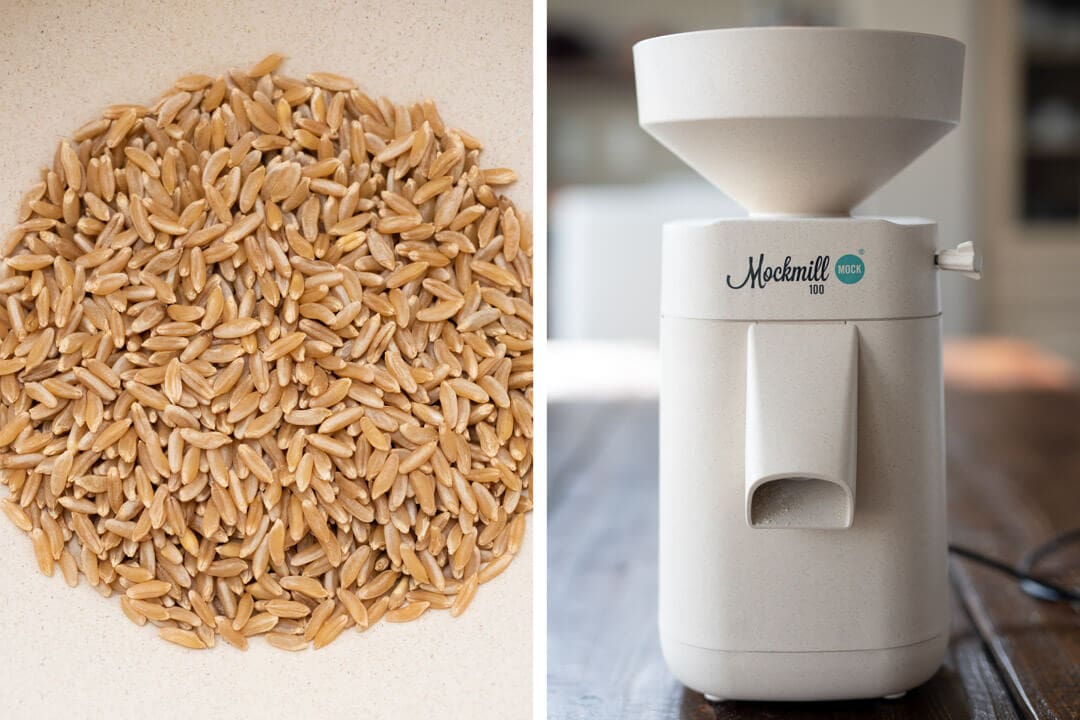
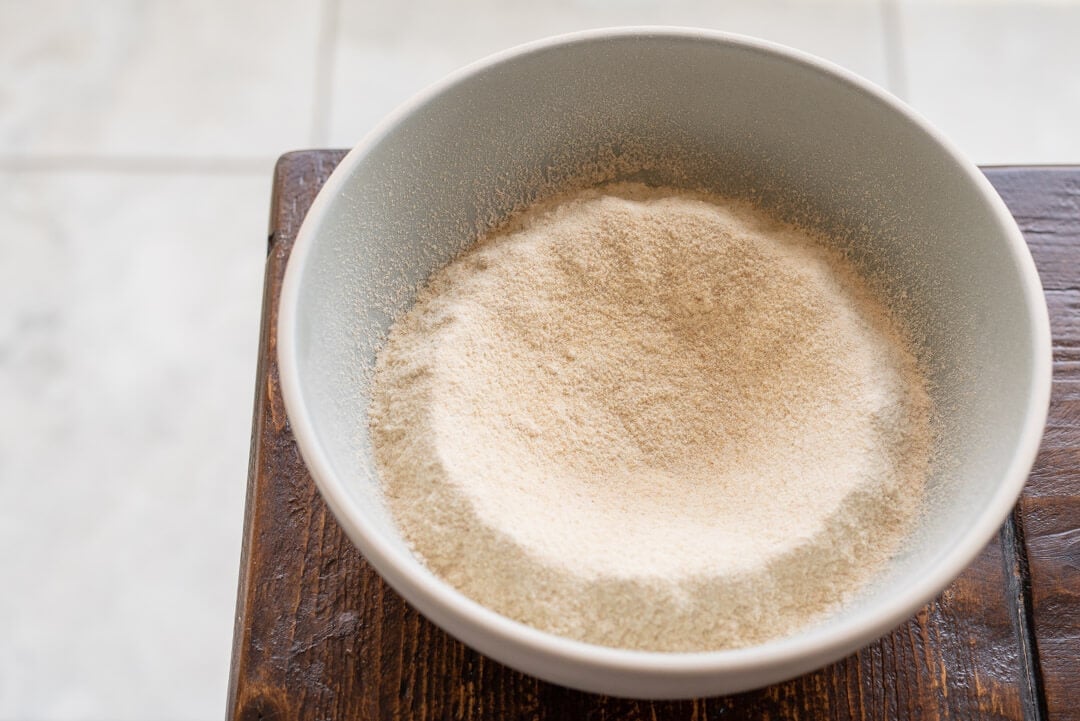
I milled the whole Khorasan berries into fine flour on my Mockmill 100 countertop mill. Because Khorasan is a relatively “hard” berry, it takes a bit longer to mill the grain, but it’s not a problem for the Mockmill.
High-protein White Flour for Ciabatta
I also use a large percentage of high-protein white flour in this formula. Why? In testing, I found that the high-protein flour helps support the high hydration of this dough and the added olive oil enrichment.
Generally, with bread formulas, I like to use as little high-protein flour as possible to avoid an overly gummy crust and interior. With high hydration doughs that have lots of inclusions (like seeds and nuts), though, the higher protein content gives the dough more structure to achieve a taller rise and more open interior.
Always a balancing act.
Mixing and the Bassinage Technique
What is the Bassinage Mixing Technique?
Bassinage is a French term that describes the process of adding water in several stages during mixing and kneading. This is helpful when working with highly hydrated dough, such as this, to increase mixing efficiency—it’s easier to develop a dough’s gluten when it’s at lower hydration levels. Adding water in two or more stages also helps you judge the consistency of the dough as you mix and avoid over-hydrating the dough.
If you’re a frequent reader here, you already know I do this often. It shows up in my recipes as a “Water 1” and “Water 2” in the recipe formula. Water 2 is held back until the dough is strengthened and smooths out. Then, it’s slowly added at the end of mixing to adjust the dough’s consistency. Holding back this water to avoid over-hydration and make mixing more manageable and efficient is essential. If all of the water is added at the start, it takes much longer to mix the dough to the right level of strength.
How to Mix Ciabatta with a Mechanical Mixer and By Hand
Mixing with a Mechanical Mixer
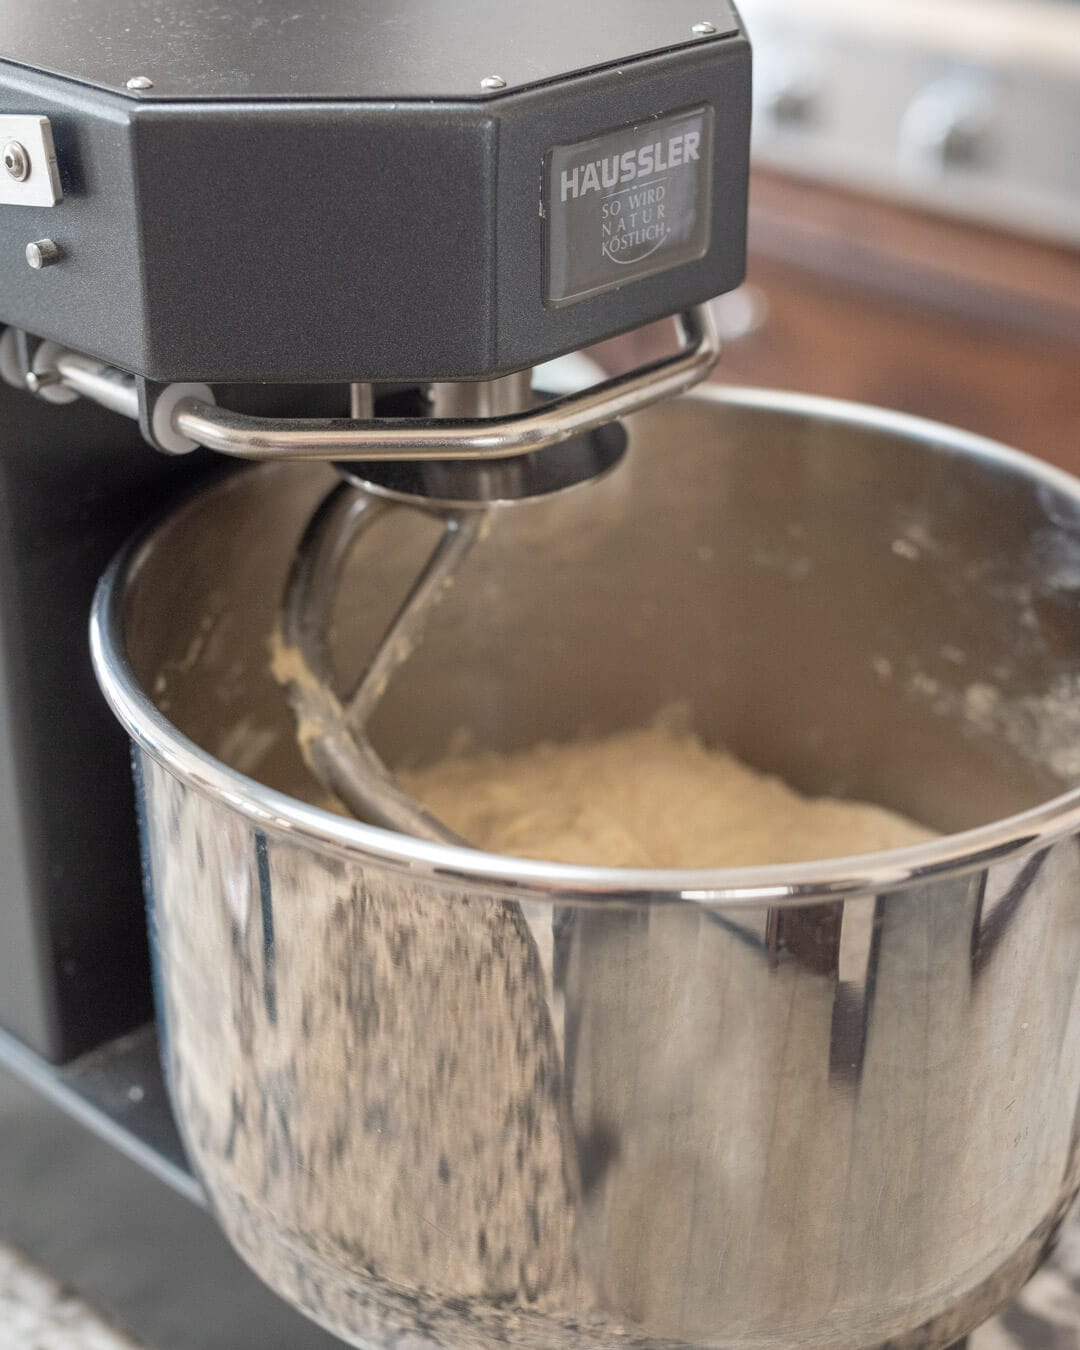
Due to its high hydration, this ciabatta dough benefits from mixing and kneading with a mechanical mixer such as a KitchenAid, Ankarsrum, or larger mixer like a Famag or Sunmix. These mixers are incredibly efficient at incorporating ingredients and developing the gluten in the dough, and when there’s a high water content, this is even more helpful.
Mixing By Hand
You can make this ciabatta dough all by hand, though. To do this, perform the autolyse as indicated in the recipe, perhaps extending it to 1 hour. This will help start the dough off with more strength. Then, slap and fold the dough on the counter or fold it in the bowl to strengthen it before adding more water—you want to lean into the bassinage technique when mixing by hand. Once you strengthen the dough significantly, add the water to the dough in stages while you’re mixing. Continue to mix the dough until it absorbs the remaining water.
At the end of mixing this dough by hand, it won’t be quite as smooth as it would be coming out of a mixer. To give the dough more strength, add in another set or two of stretches and folds during bulk fermentation.
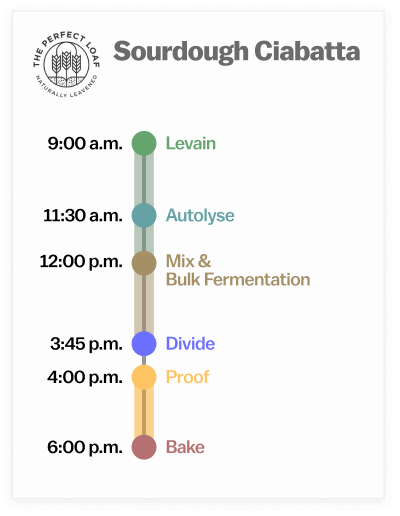
Baking Schedule
This sourdough ciabatta is a same-day, direct, recipe, meaning it’s mixed and baked in the same day. The fast levain can be created in the morning, the dough mixed 3 hours later, and then the ciabatta baked early evening for dinner.
If you’d like to do an overnight levain or change its timing, take a look at my options on my levain quicksheet reference.
Sourdough Ciabatta Bread Recipe
Recipe Update!
I recently updated this sourdough ciabatta to streamline the process and make the dough much more manageable—especially if you’re not using freshly milled flour. If you’d still like to follow the old recipe, I’ve saved it and have it for download. However, I urge you to try the new version below. I feel like the dough is more straightforward, and the results are even a little better!
Here’s a link to the old sourdough ciabatta recipe.
Use baker’s percentages to scale up or down this recipe. For example, if you’d like to make only two large ciabatta, divide all the ingredients in half (including the levain).
Vitals
| Total dough weight | 2,000 grams |
| Prefermented flour | 6.5% |
| Levain in final dough | 20.9% |
| Hydration | 80.0% (does not include olive oil) |
| Yield | 4 x 500g ciabatta (or 6 x 330g smaller ciabatta) |
Total Formula
Desired dough temperature: 78°F (25°C) (see my post on the importance of dough temperature).
| Weight | Ingredient | Baker’s Percentage |
|---|---|---|
| 945g | High-protein bread flour (King Arthur Flour Bread Flour, 12.7% protein) | 90.0% |
| 105g | Freshly milled whole-grain Khorasan wheat or hard red whole-grain wheat | 10.0% |
| 756g | Water 1 (levain, autolyse) | 72.0% |
| 84g | Water 2 (mix) | 8.0% |
| 21g | Extra-virgin olive oil | 2.0% |
| 20g | Fine sea salt | 1.9% |
| 68g | Ripe sourdough starter, 100% hydration | 6.5% |
Sourdough Ciabatta Bread Method
1. Prepare the levain – 9:00 a.m.
| Weight | Ingredient | Baker’s Percentage |
|---|---|---|
| 68g | High-protein bread flour | 100.0% |
| 68g | Water | 100.0% |
| 68g | Ripe sourdough starter (100% hydration) | 100.0% |
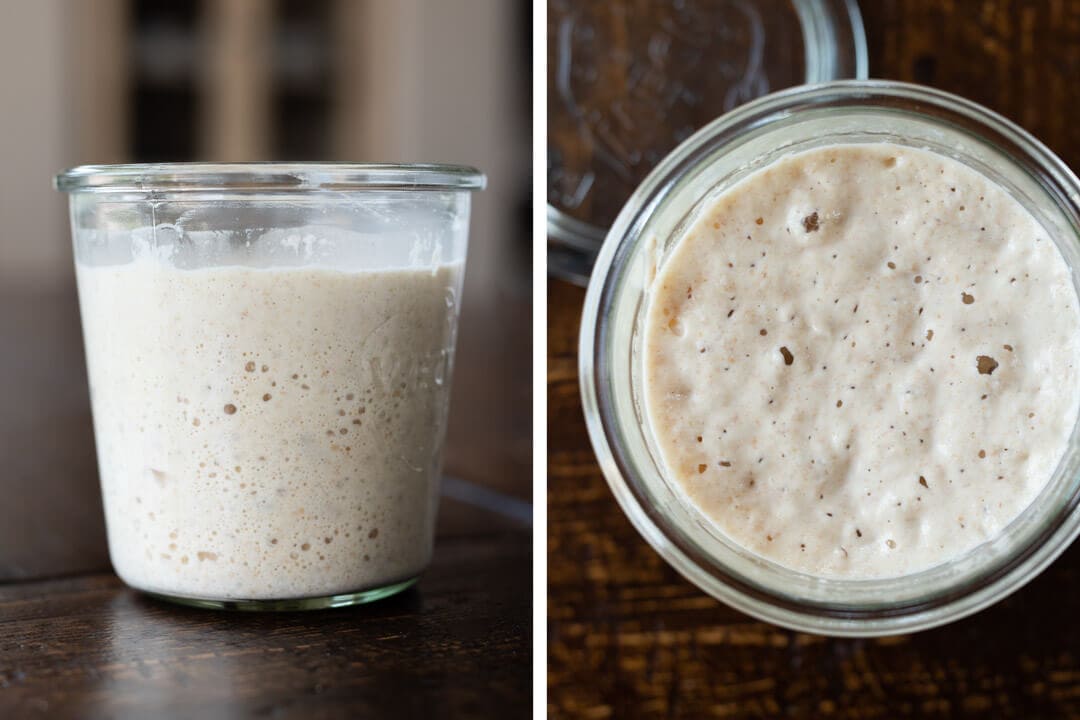
This is a fast levain build: we go from feeding to ripeness in only 3 hours. The high inoculation percentage and warm temperature expedite the ripening of this levain, but it also helps emphasize yeast activity for large volume in the final ciabatta.
Mix the above ingredients in a jar and leave them covered at 74-76°F (23-24°C) to ripen for 3 to 4 hours.
2. Autolyse – 11:30 a.m.
| Weight | Ingredient |
|---|---|
| 876g | High-protein bread flour (King Arthur Flour Bread Flour, 12.7% protein) |
| 105g | Freshly milled whole-grain Khorasan wheat or hard red whole-grain wheat |
| 687g | Water 1 (autolyse) |
I use the autolyse technique for this recipe to help reduce the total mixing time required, but I also find it helps aid in the dough’s extensibility.
Warm or cool the autolyse water so that the temperature of the mixed dough meets the final dough temperature (FDT) of 78°F (25°C) for this recipe. To do this, use my water temperature calculator to input the temperature of your kitchen and your ingredients to have it automatically calculate precisely what temperature to heat or cool the mixing water.
Place the flour and remaining water 1 (autolyse) in your mixer bowl or a large bowl (if mixing by hand). Turn the mixer on to low speed and mix for 2 minutes until no dry bits remain; the dough will be shaggy and loose. Use a bowl scraper to scrape down the sides of the bowl to keep all the dough in one area at the bottom. Cover and let rest for 30 minutes.
3. Mix – 12:00 p.m.
| Weight | Ingredient |
|---|---|
| 84g | Water 2 (mix) |
| 21g | Extra-virgin olive oil |
| 20g | Fine sea salt |
| 204g | Ripe levain (from step 1) |
To the mixer, add the levain, salt, and a splash of the reserved water. Mix on speed one until everything is incorporated, about 30 seconds. Then, switch the mixer to speed 2 and mix for 4 minutes. After 4 minutes, start adding the rest of the reserved water, a little bit at a time, throughout an additional 4 minutes for a total of 8 minutes mix time.
Turn the mixer to speed 1 and slowly stream in the olive oil. Continue to mix until the oil is absorbed and the dough is cohesive and shiny about 2 minutes.
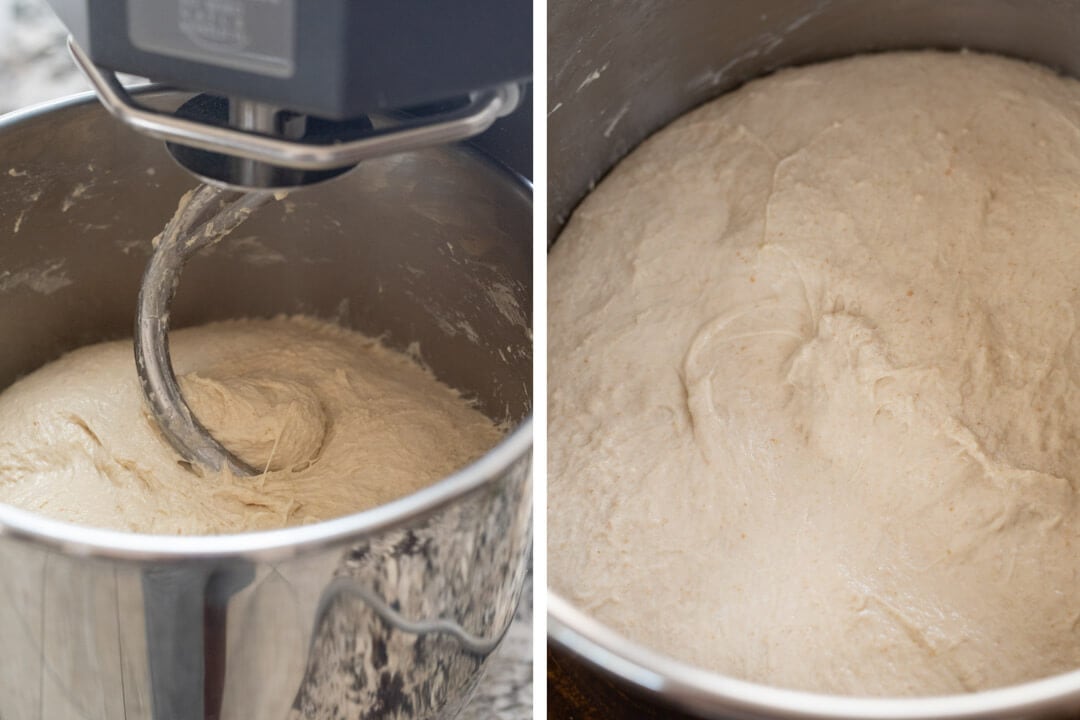
As you can see in the mixing progress images above (left: after mixing 4 minutes, and right: at the end of mixing), the dough will still be plenty wet and sticky by the end of mixing, but smoother and with some strength. At the end of mixing the dough will not pass a full windowpane test, but will come very close. Be sure to mix this dough sufficiently!
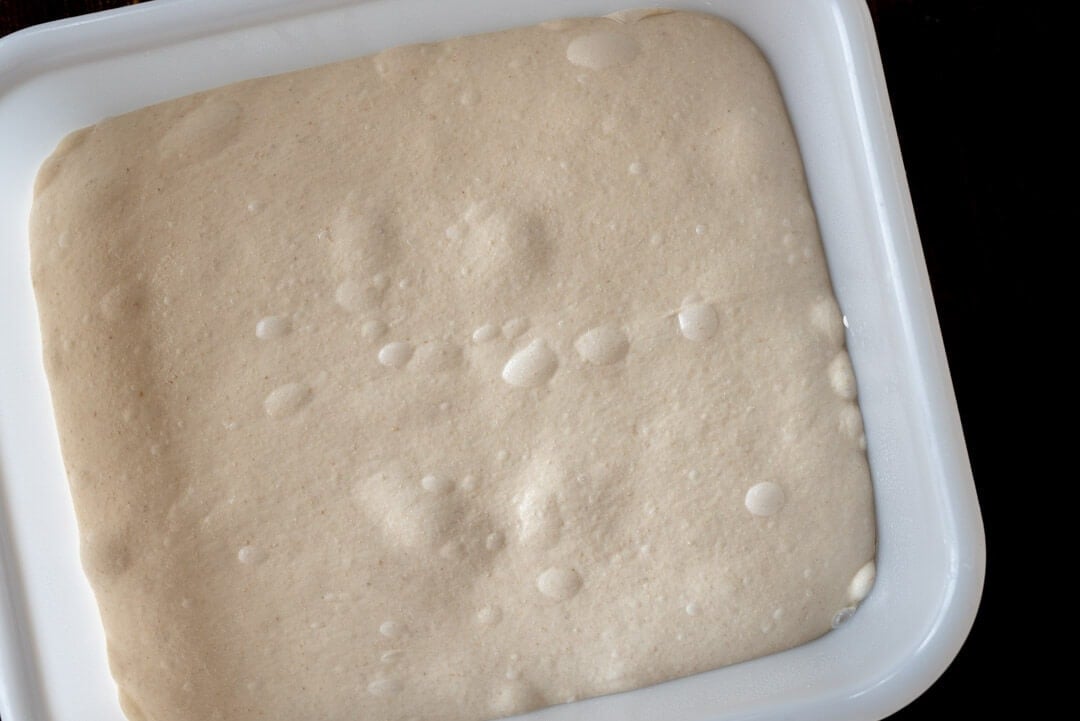
4. Bulk Fermentation – 12:15 p.m. to 3:45 p.m. (3 hours 30 minutes)
For bulk fermenting this dough I used the 11-quart Rubbermaid rectangular tub, which is the perfect size for 2 kg of dough (and more). It makes dividing the dough into four equal rectangles much more straightforward: when the container is inverted, it drops the dough into a perfect rectangle.
During this phase (of the two-step bulk fermentation phase), give the dough 3 sets of vigorous stretch and folds separated by 30 minutes each. The first set happens 30 minutes after the beginning of bulk. The dough will be very slack and wet. Use wet hands and perform the folds quickly.
After the last set of stretch and folds, let the dough rest for the remainder of bulk fermentation, covered.
5. Divide – 3:45 p.m.
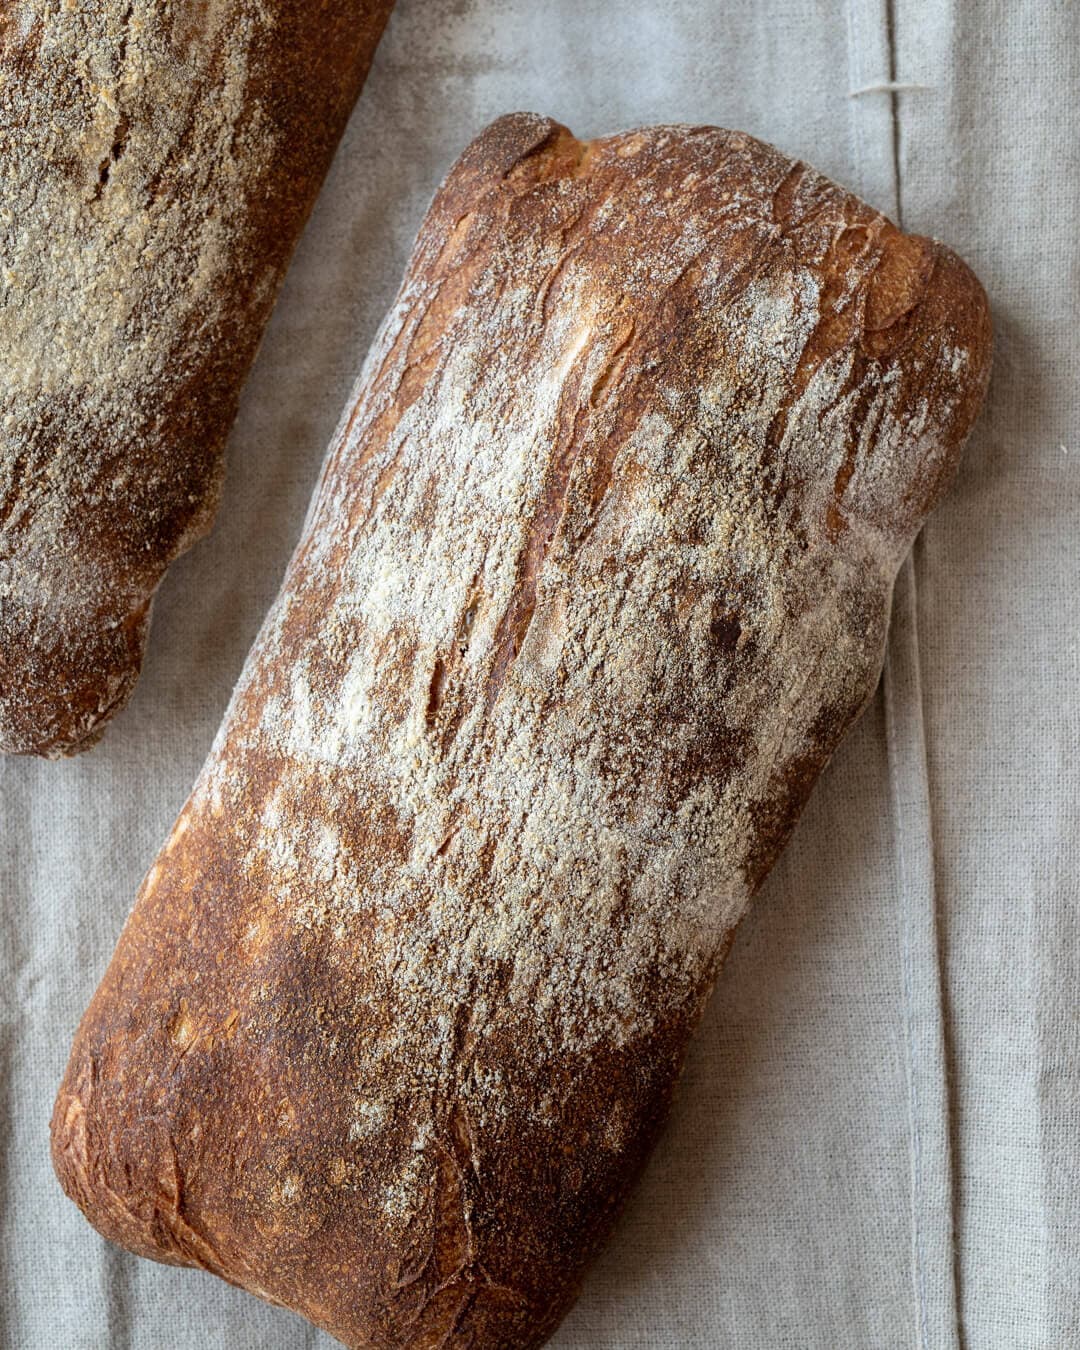
To maintain an open and light interior, try to handle this dough as little as possible.
First, put aside any notion of using only a small amount of bench flour when handling this dough. The heavy use of dusting flour not only allows you to control the dough more naturally but also makes it possible. And anyway, the thin veil of flour on the crust adds to the classic look of ciabatta and adds visual appeal.
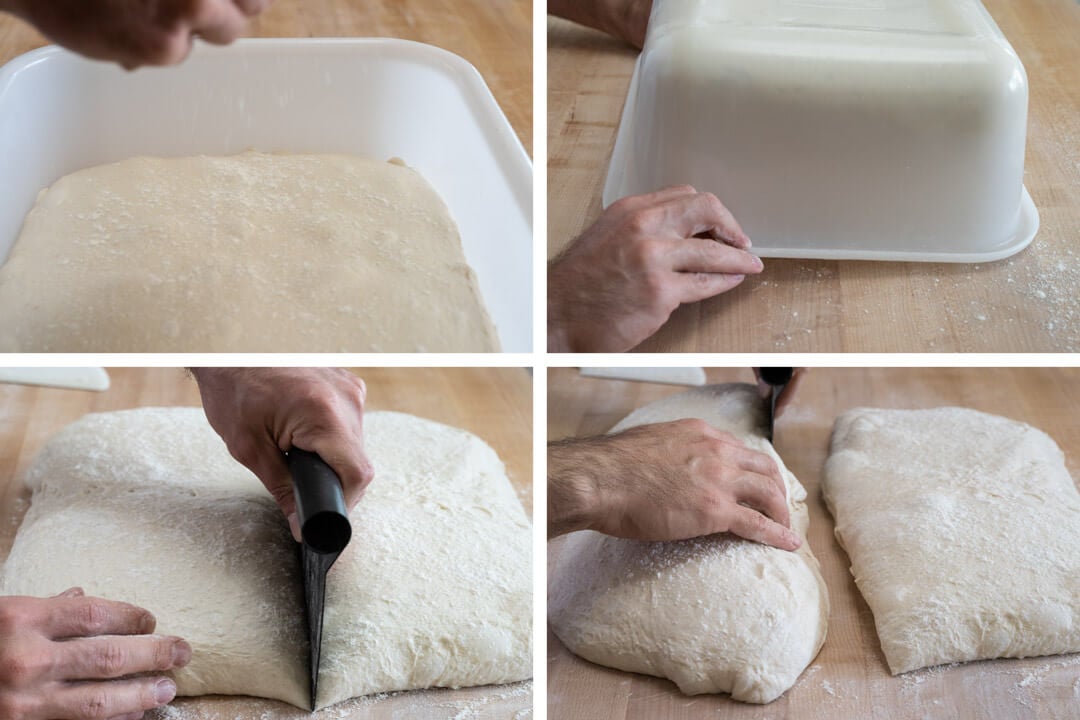
Heavily dust the top of your dough in the bulk fermentation container with white flour.
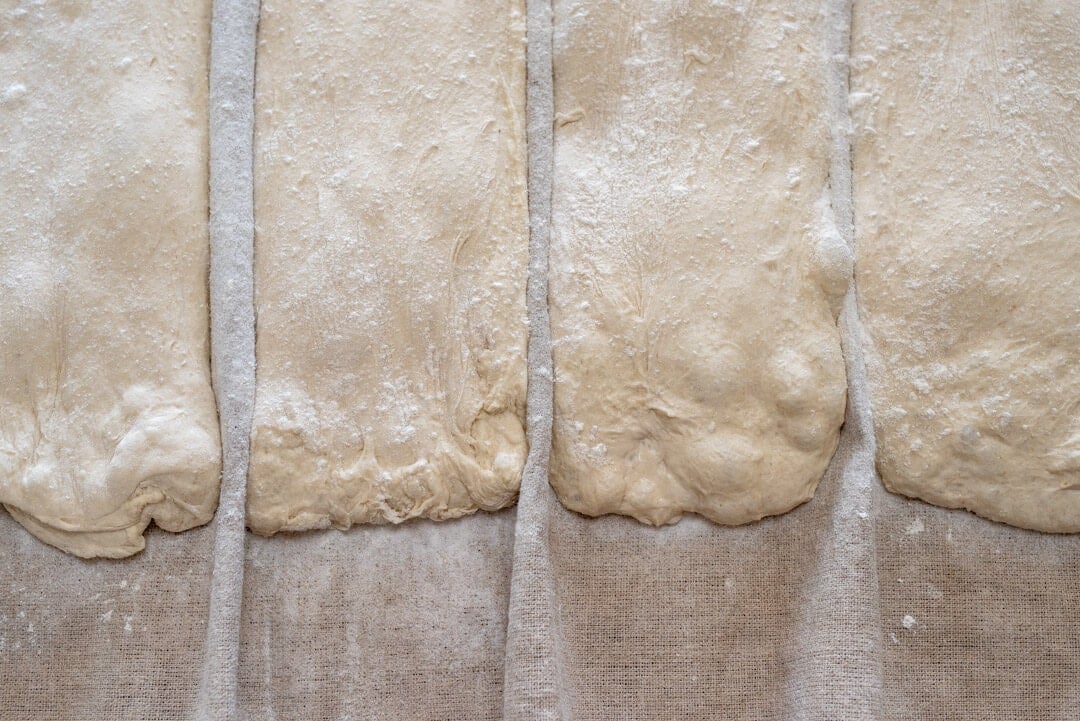
Using your bench scraper, loosen the dough from the sides (insert your scraper between the dough and the container). Then, in one quick motion, invert the rectangular bin and let the dough fall from the inside of the container down to your work surface (upper-right image above). Liberally flour the new top of the dough. Using your bench knife, cut the dough into four rectangles and separate them by dragging them apart.
You will use the couche in the same fashion as when making baguettes, but the “wells” are much wider to accommodate the pudgy ciabatta.
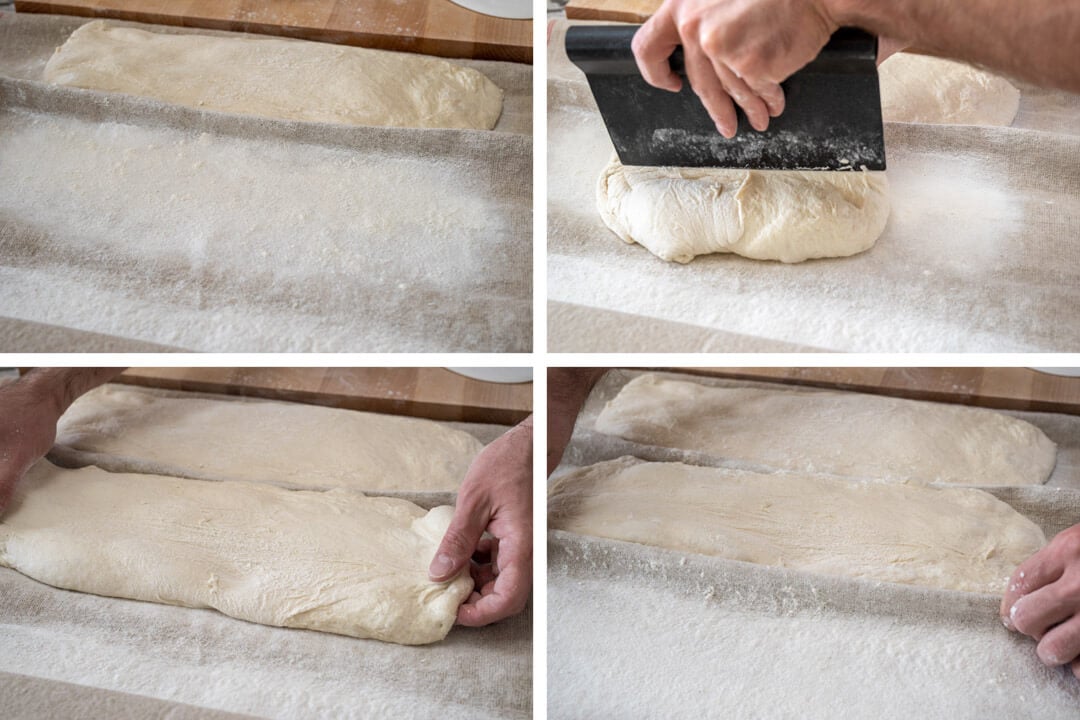
Lay your couche (a large kitchen towel also works well) out on your work surface and flour it very liberally (upper-left image, above). You want to be generous with the flour to avoid sticking.
Using your bench knife grab one of the four rectangles and transfer it to the couche. I like to keep the dough the same way it was resting on the work surface: the bottom stays on the bottom when transferring. Next, using your hands gently stretch the rectangle out as tall as you desire (for me this was about 14″ to fit my home oven).
Instead of stretching them out into long ciabatta, you can also keep them in smaller rectangles about 6-7 inches long.
Finally, make a crease in the couche and flour the new spot to get ready for the next piece.
6. Proof – 4:00 p.m. to 6:00 p.m.
Cover your dough with the end of the couche or a food-safe plastic bag (be sure not to let the plastic touch the dough). Let your dough proof for around 2 hours. At the end of this time, the dough will look significantly fermented and bubbly all over, and when poked for the poke test, it will almost have little to no spring back.
7. Bake – 6:00 p.m.
There are two effective ways you can bake ciabatta in the home oven. The first is to transfer all the pieces of dough to a full sheet pan (21 x 15 inches) lined with parchment paper, then slide the pan into the oven on a baking surface (or empty oven rack). This is the easiest method, but it may (just may!) result in a little less rise in the oven due to the slightly less efficient heat transfer than baking directly on the baking steel.
The second option is to bake the pieces of dough directly on a baking surface such as a baking steel or baking stone. This is the method I will outline below.
Preheat your oven with baking stone/steel for half an hour at 450°F (230°C).
Prepare a single, large piece of parchment paper that will cover your entire baking stone or baking steel. Flour the top of the resting dough to ensure there are no sticky parts. Then, using a large, straight cutting board placed at the edge of a piece of dough, grab the couche and flip each portion out onto the cutting board: what was resting on the bottom is now on the top. Transfer the dough to the parchment paper by sliding it off the cutting board to one side of the parchment paper. The process for flipping the dough is the same as shown/described on my Kamut baguette post, only with a broader cutting board in place of the thin transfer peel.
Place the other two pieces of dough into your fridge; you will bake these after the first two.
Slide the parchment paper with dough onto your baking surface using a pizza peel. Once you’ve loaded the dough, steam the oven and bake for 20 minutes with steam. Then, remove the pans used for steaming, vent the oven, and turn it down to 425°F (220°C). Bake for an additional 15 to 20 minutes until done. The crust should be golden brown with no pale or white spots.
It’s important to bake this bread fully—if underbaked, it could result in a gummy and “wet” interior.
I steamed my oven in my usual way, described here in my post on how to steam your home oven when baking bread.
Print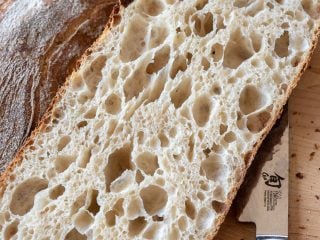
Sourdough Ciabatta Bread Recipe
- Prep Time: 9 hours
- Cook Time: 45 minutes
- Total Time: 9 hours 45 minutes
- Yield: 4 loaves
- Category: Bread, sourdough
- Cuisine: Italian
Description
Rustic bread with a thin crust, creamy and open crumb, and delicate flavor profile. Ciabatta is perfect for sandwiches!
Ingredients
Levain
- 68g high-protein white bread flour (King Arthur Bread Flour)
- 68g water
- 68g ripe sourdough starter (100% hydration)
Autolyse
- 876g high-protein white bread flour
- 105g freshly milled Khorasan or hard red whole wheat
- 686g water
Main Dough
- 84g water
- 21g extra-virgin olive oil
- 20g fine sea salt
- 204g ripe levain
Instructions
- Prepare the levain – 9:00 a.m.
Mix the levain ingredients in a jar and leave them covered at 74-76°F (23-24°C) to ripen for 3 to 4 hours. - Autolyse – 11:30 a.m.
Place the flour and autolyse water in your mixer bowl or a large bowl (if mixing by hand). Turn the mixer on to low speed and mix for 2 minutes until no dry bits remain; the dough will be shaggy and loose. Use a bowl scraper to scrape down the sides of the bowl to keep all the dough in one area at the bottom. Cover and let rest for 30 minutes. - Mix – 12:00 p.m.
To the mixer, add the levain, salt, and a splash of the reserved water. Mix on speed one until everything is incorporated, about 30 seconds. Then, switch the mixer to speed 2 and mix for 4 minutes. After 4 minutes, start adding the rest of the reserved water, a little bit at a time, throughout an additional 4 minutes for a total of 8 minutes mix time. Turn the mixer to speed 1 and slowly stream in the olive oil. Continue to mix until the oil is absorbed and the dough is cohesive and shiny about 2 minutes. - Bulk Fermentation – 12:15 p.m. to 3:45 p.m. (3 hours 30 minutes)
During this phase (of the two-step bulk fermentation phase), give the dough 3 sets of vigorous stretch and folds separated by 30 minutes each. The first set happens 30 minutes after the beginning of bulk. The dough will be very slack and wet. Use wet hands and perform the folds quickly. After the last set of stretch and folds, let the dough rest the remainder of bulk fermentation, covered. - Divide – 3:45 p.m.
Heavily dust the top of your dough with white flour. Loosen the dough from the sides using a bench scraper, then invert the container to let the dough fall onto your work surface. Flour the new top of the dough, cut it into four rectangles, and separate them. Lay out a floured couche (or kitchen towel) on your work surface. Transfer each dough rectangle to the couche, keeping the bottom side down. Gently stretch the dough to your desired length. If you prefer, leave them in smaller rectangles. Make a crease in the couche and flour it before placing the next piece. - Proof – 4:00 p.m. to 6:00 p.m.
Cover your dough with the end of the couche or a food-safe plastic bag (be sure not to let the plastic touch the dough). Let your dough proof for around 2 hours. At the end of this time, the dough will look significantly fermented and bubbly all over, and when poked for the poke test, it will almost have little to no spring back. - Bake – 6:00 p.m.
Preheat your oven with a baking stone or steel at 450°F (230°C) for 30 minutes. Flour the dough and flip each piece onto a large cutting board, then slide them onto parchment paper. Transfer two pieces to the fridge for later. Use a pizza peel to slide the parchment and dough onto the baking surface. Steam the oven and bake for 20 minutes, then remove steam pans, vent the oven, and reduce heat to 425°F (220°C). Bake for another 20-25 minutes until fully done to avoid a gummy interior.
Ciabatta FAQs
Can I mix this dough by hand?
It’s possible, but I do recommend using a mixer. If mixing by hand, hold back the reserved water (Water 2) until after mixing in the bowl or on the counter for a while to develop the dough. Once you strengthen the dough significantly, add the water to the dough in stages in a mixing bowl. Continue to mix the dough until it absorbs the remaining water.
Can I modify this recipe to make ciabatta rolls?
Small ciabatta panini are wonderful. I’d dump the rectangular dough out and divide it into six identical pieces (around 330g each). You could go even smaller if desired. Note that the bake time will likely change. Smaller pieces will bake faster.
Can I use a round bulk container for this dough instead of a rectangular one like you use?
You bet. Though, it will require more dough-handling to get each shape into rectangles.
Is ciabatta similar to focaccia?
They are pretty different. Focaccia can be high hydration like ciabatta, but it’s proofed in a pan, spread and dimpled out with fingers, and then topped (usually with salt and herbs) before baking. Conversely, Ciabatta is proofed on a flat surface or on a couche to give it structure, then transferred to the oven and baked.
What’s Next?
Now that you’ve mastered sourdough ciabatta, try your hand at another tast—and fun-to-make—Italian bread: filoncini (kind of like twisted baguettes).
Happy baking!


190 Comments
Would the baking times need to be adjusted if I were to use a long covered baker?
Most likely. It’s hard to say exactly how to adjust, but I would expect that your bread might bake faster if the baker was preheated along with the oven.
Hi Maurizio! These are some delicious ciabattas I must bake soon!
But in the meantime, maybe you can help me understanding something. You say you have 5.75% pre-fermented flour for the levain built. With 100% hydration, wouldn’t this mean that the levain should be 117g (58.7g flour + 58.7g water) in total?
Of course this must be built with some starter, and since you say this levain has 100% inoculation, wouldn’t that mean that the levain should look something like this: 39g starter + 39g water + 39g flour = 117g?
Is the 5.75% sourdough starter addition something that you decided to bring to the recipe?
Please correct me if all these assumptions were wrong. I’m very determined to learn more on this topic 🙂
Thanks in advance!
Thanks, Corina!
That’s right, this formula has 5.75% pre-fermented flour. This means that out of all the flour used in the recipe (1,022g), 5.75% of it is pre-fermented via the levain (1,022g * 5.75% = ~59g). Essentially this means the ~59g of total flour in the levain is fermented ahead of time, before it’s mixed into the dough — this is the total amount of flour fermented beforehand.
Typically, the amount of flour in the starter used to inoculate the levain isn’t factored into the pre-fermented flour percentage.
Hope this answers your question!
It does, thank you for replying 🙂
Looks beautiful! As a home baker I’ve started experimenting with additives like vitamin c powder, King Arthur special dried milk and their whole wheat bread improver. I also have a lovely sourdough starter going from them. I’ll have to try your recipe. I’m currently trying the Reinhardt recipe, or close to it. I’m finding in my dry climate all the recipes are not as “wet” as they are supposed to be..guess I need to just add more liquid. Do you like the additions of milk and or oil to this recipe vs a plain flour ciabatta? What do you think of vitamin c in baking?
Thanks! I’ve never used vitamin c powder in any of my doughs so I can’t comment on how well it works. It’s my understanding, though, that ascorbic acid (vit c) will help add strength to a dough and can help if the flour is overly weak or not fully suitable for baking. I also have not used dried milk.
I like adding oil to the dough here to add a little softness and tenderness to the result. To me it imparts that classic “ciabatta” feel and flavor.
If your climate is dry (I live in Albuquerque, NM where it’s around 30% humidity — very dry!) add water as necessary to the dough to get to the right consistency. This type of hydration adjustment, whether up or down, is almost necessary! Happy baking!
I recently bought a Haussler Alpha and am looking forward to your future insights on the powerhouse of a mixer.
It sure is a nice mixer, isn’t it? I’ve been using it quite extensively and hope to have a post about it sometime soon. Happy baking, Erich!
Where do you buy your olive oil? The bottle you used looks really nice but I wasn’t really able to find it available online.
This oil was purchased in Italy directly, I haven’t been able to find it out here or online either. It’s very high quality and straight from the source. You could substitute in another fruity/grassy olive oil, though!
Ah that sounds great. Yes, this is seriously delicious bread, it’s just a little on the challenging side! Kamut brings such a nice flavor, I love it. Happy baking, Larry!
My starter took 6 hours to double, so I wonder if it just wasn’t active enough. I’ll try again cutting the proof time, but I might keep a 2nd loaf out for longer than called for as another experiment. I’ll also cut the oven temps. Thanks for the advice! I’m not sure if I’ll get to your perfect loaf, but it would be nice to come close eventually.
Stick with it, you’ll get there! A big part of baking is testing, testing, and more testing. The results are always edible — and always delicious — it just takes a bit of work 🙂
Thanks so much for following up. I’ll give it a try. I’m generally a weekend baker though, so it might be a few days. It would be interesting to know if you reproduce the effect.
Dan, I gave some more advice to Frank above, who is seeing a similar issue as you:
“You might also want to try dropping the to 450°F for the first part of the bake, and then 425°F after venting the oven. I might also give this a try here and see if I see the same results, if I do then dropping the oven temperature might be the way to go! Please let me know if that works out for you.”
Very interesting. I’m wondering if the dough is actually overproofing. Usually when I see large bubbles here and there with dense spots I lean towards a dough that’s under proofed, but it’s very possible the dough might be going over, causing it to essentially collapse when baked (likely do the high hydration). I’d be curious to hear how the instant yeast works out, but I’m wondering now if we need to pull back on the bulk/proof times. Either way, a reduction in water will still help.
Maurizio…long time follower. Impressed with your work. I’ve had success with many of your recipes, and appreciate you sharing what you do. I’ve tried this particular recipe twice. Both times the loaves, upon baking, puffed up like balloons, and came out hollow. Can you provide some insight into what I might be missing?
Thanks, Frank! I’m wondering if this was caused by dough that was over hydrated. Have you tried this recipe with reduced water? Was the bottom dense?
Yes, and no. Bottom was dense (maybe 1/2 inch thick) at ends. Otherwise, cracker thin top and bottom. First time, I panicked at the hydration and added flour. Thinking that was the problem, the second time I used all of the water. Maybe I’ll give it another shot with less water. Thanks for the response, your photos of perfection inspire me to continue!
Frank, another thought I had after chatting with another baker is that perhaps the oven temperature is a bit too high. You might also want to try dropping the to 450°F for the first part of the bake, and then 425°F after venting the oven. I might also give this a try here and see if I see the same results, if I do then dropping the oven temperature might be the way to go! Please let me know if that works out for you.
Like Douglas, I had similar mishaps. I used a LOT of flour on my couche, my housemate who works in a bakery asked me why I’m using so much flour. After 2 hrs of rise my couche was soaked through and the dough didn’t want to let go. I also tried the parchment paper in the bulk container which became part of the dough and created another challenge. The aroma of the dough before and during baking made my stomach rumble!. Another problem I had was during the autolyse. When I went to add the levain, oil , salt and splash of water, I couldn’t get a good mix. Subsequently, it took much longer to achieve a smooth dough because the autolysed dough wasn’t blending very well, it was too dry. This could be a limitation of my much less expensive Ankarsrum mixer which normally has no trouble mixing much lower hydrated doughs like bagels. Next time, reserve 150-200 grams of water for the autolyse instead of he 300 grams plus a reduction of the total water and oil the bottom of the bulk container. Very good aroma and flavor, but I’m going to have to work on the method. Also the first ones I baked after the final rise were a little flat but the ones from the fridge baked up nicely…the take away…after 2 hrs of final rise, I’ll put them in the fridge for a bit before I bake them.
Using the fridge at the end is a good approach — it should help firm up the dough quite a bit. I do wonder if the hydration is just too high for your flour/environment, even with a lot of flour it should remove from the couche — but only if the dough is sufficiently strengthened. If it’s not smooth and strong enough, there’s a possibility it’ll just stick to everything and never pull with strength.
Please let me know how it works out with the reduced water! This will bring more strength to the dough.
I’m definitely trying this again. As challenging as it was, it was still very good. I also used 15% Kamut and 15% Hard White Wheat for the Perfect Sour Loaf from your fresh milled flour recipe it was phenomenal!
Thanks Maurizio! I’m actually trying again today. I held back 100g water, and the dough is much easier to work with. Fingers crossed.
Well, second time, and although slightly improved, still basically a brick (great crust but very dense crumb). Both times formed huge bubbles on top with dense crumb underneath. My starter takes twice as long as yours to double, so that might be it (I only feed once per day). I might try adding a bit of yeast next time.
Thank you Maurizio!
Thanks for this recipe – another winner. I got a great result, maybe the best crumb I’ve ever achieved, and really nice flavour. But there were some serious mishaps. The first one is that when I inverted my plastic tub, the cold dough stuck to the bottom and really didn’t want to come out. Maybe I should put parchment paper under the dough before the cold fermentation. The second problem is that my loaves stuck to the couche . . . I guess I didn’t put enough flour everywhere (I think I neglected parts of the couche which weren’t touching the loaves at first, but of course they grew in size). So getting the loaves onto the peel was very messy and they were rather misshapen. But, as I said, I still got a great result. I’ll be better at this next time! By the way, when I bake high-hydration loaves on my baking stone, I flip them over for the last 5-10 minutes, to brown the bottoms.
Right on, Douglas! Glad to hear that. Yes, there’s a few points in this recipe that require liberal flour dusting and a few areas where things can get “sticky.” This type of thing happened to me the first few times in testing, then I learned to just layer it on thick.
Great idea about flipping — thanks for that suggestion and happy baking!
Might there be any videos of the method you described?
Hi, I’m in the process of making your recipe now. I used spelt instead of the khorasan. During mixing, the dough became extremely soupy as I added in the final 1/4 cup or so of water. After 8 minutes of mixing, it was still more like cake batter in consistency. I was able to turn and fold it once so far, but barely. I’m guessing I need to cut back on the water somewhat. Or should I have extended the mixing?
Spelt is pretty picky when it comes to water, it can’t take too much (depending on your particular batch). Yes, you’ll likely have to reduce water next go. Try and give it as many folds as you can before the fridge, you might be able to get enough strength in to it!
Good to know! About how much less water would you suggest using spelt?
I did give it an extra turn-and-fold and folded many more times than normal each turn. We’ll see what happens tomorrow! And thanks for the recipe.
It really depends on the flour… I’d probably hold back 50g or so, see how it feels, add it back in only if it feels cohesive.
Hi Maurizio. I am excited to try your Ciabatta recipe! I usually grind my own grain whenever I can, as I am close to a grocery store that carries a real variety of grains. Is there anything you can recommend to sub for the “high protein bread flour (Central Milling High Mountain, 13% protein).” If not, where do you get the flour? And thank you as always for your work, and for sharing it so generously with bakers everywhere!
Hey, Lindy! I get that High Mountain high protein flour from Central Milling online (they’re from Utah). However, you can use King Arthur Bread Flour, which is available in just about every market here in the US. KA BF has similar protein levels and it’s great flour.
You’re very welcome and enjoy this ciabatta!
hi Maurizio
I made this one few days ago: very good. I tweaked the recipe a little: I used bog standard wholewheat flour instead of Kamut and I used the paddle attachment instead of the hook (I think it works better for wet doughs). My flours absorbed more than yrs, because there was no way I could hold back those 300 ml water (and get a workable dough)… I in fact might have added more water. .. anyway.. the recipe worked: nice bread that is not too sour, open structure, beautiful crust. I tagged u on instagram. I found this recipe easier (in terms of timing) of the otherwise excellent Craig Ponsford’s ciabatta. I love that there is no shaping. All in all this a good, easy recipe (I guess it helps if u have handled wet doughs before). thanks, stefano (u can find pics on my Instagram feed: italianhomecooking)
Stefano — really glad to hear that! Good move on using the paddle, next time I make this I will also do the same, it’s much more efficient and mixing wet dough such as this. I’ll check out your IG feed — thanks for the update and comments!
Hey, Michael! A whole grain ciabatta is so, so good. I’d say if you wanted to increase the whole grain percentage in this base recipe (and I’ll definitely be doing this in a future post here) I’d work it up slowly, adjusting the hydration and bulk time to compensate. As you know, bread with a higher percentage of whole grain will likely be able to take on even more water than outlined in my formula above. Additionally, you might have to adjust the levain percentage down a few points at a time if you want to keep the bulk times the same — whole grain flour tends to increase fermentation activity. And finally, once you start to get close to 100% whole grain I’d also likely reduce the final dough temperature down to 75°F or so — this is my typical FDT for whole grain breads.
I hope that helps!
Gina, these would work really well as smaller rolls. If I were doing rolls I’d likely scale the pieces as I divide them, but you could also just eyeball the rectangle and divide it evenly as possible. The weight for each piece would be up to you, I’d probably try 200g to start and adjust from there. Happy baking!
I need my ciabatta to be in rolls, any suggestions about that?
Hey Maurizio, would this recipe work with all whole grain flours, or even just a much higher percentage? And how might the process need to be modified to try this? I’ll probably try it directly as you have outlined and also as a version with more whole grains. Thanks! I can’t wait to try.
We make a Ciabatta in the bakery i work in and we divide into 470g pieces roughly, we then place onto a heavily floured tray maximum of 5 and then prove. Once proved we flour our hands liberally and kind of fold in half and lift and turn which then allows the dough to drop with it’s own weight and get that beautiful stretch with the flour form underneath whilst handling it minimally. Do you think this would work with this dough? I’m gonna try it anyway, Aaron (the guy who you helped with US to UK flour)
Hey, Aaron! That’s an interesting transfer method — and there are so many! This is the way I found to best work with this dough, especially as they get larger. However, your method will definitely work with this dough. Let me know how it works out!
How lovely! And what a mess! lol! Right up my alley! It will have to wait until I get home and make some soup, which is not happening until i make some stock. Just hope I can find my DLX mixer (now known as Ankersrum and sold by Pleasant HIll as well). It’s great machine! Still going strong after about 18 years!
Ha ha, yes it’s definitely a “fun” dough to work with. The results are so, so good, though! Ankarsrum mixers really are nice, and they’re built to last. Eighteen years is quite a long time! Let me know how you like the recipe, Gina 🙂