

With a crust that’s thin and slightly soft and a flavor profile that’s a touch salty and briny, these are hard to put down once you take a bite. The flour I use brings ample flavor (more on this in a minute), and while they look simply like twisted baguettes, I like to think of these sourdough filoncini as low-pressure baguettes. The dough is so much fun to handle—twisting and rolling and pinching—without any stress that you’re not shaping them “correctly.”
They’re fun and different, not something you’d find at your local bakery, and the flavor and texture is just as extraordinary. Sometimes baking in the kitchen can become too serious, especially if you’ve been at it a while and expectations start to creep in.
I like to think of these sourdough filoncini as low-pressure baguettes.
Well, these green olive filoncini are here to reset that. It’s an easy dough to mix, divide, shape, and twist—have fun with them and indulge in their incredible flavor!
In The Baker’s Corner (the community here at The Perfect Loaf), I posted a preview of this recipe and Mark K. called them the “Twisty Baguette Recipe for People Too Chicken to Do the Real Deal Recipe”—which I think is hilarious. But also, maybe a little true?

The beautiful thing is there is no right way with these filoncini. You can leave them straight as sticks, twist them aggressively into long and tight rods, or do as I do and twist a few times to give them some edges and a beautiful striated pattern.
I see these filoncini as a gateway into making classic baguettes. So, if you’ve been intimidated by them, start here, then tackle the baguette once you have a few filoncini under your belt (and in your belly).
They’re what I want to be when I grow old: rough around the edges, gnarly, and a little acerbic—their twists and turns exude character. They make a statement!
What Are Filoncini?
Filoncini means “small loaves” or “small strands” in Italian and is often used to describe spindly, short, or long and skinny bread that is sometimes twisted. These are also called “filoncini di pane” or “filoncini rustici” and come in variations, ranging from those with olives to those plain with nothing mixed in. I think of filoncini as long and twisted loaves that are very much like baguettes.
I first stumbled on these during my recent trip to Italy. A small bakery had long, thin, and twisted sticks with olives, and after trying a few, I knew I had to make my sourdough version when I returned home. That’s how the best trips (especially food-focused trips) end, right? A head full of culinary ideas and a to-do list much longer than when you left.

Flour Selection
A lot of that flavor comes from the long fermentation time, yes, but also the flour. I’m using the Hayden Flour Mills The Perfect Loaf flour blend as 100% of the flour in this recipe. This blend of fresh flour has a hefty portion of high-extraction flour and rye. The rye gives the blend a wholesome slant and a touch of sweetness.
I bake with our collaboration flour often here, and I love that you can open a single bag of flour and have flavor practically springing from the bag (take notice of the aroma as you mix this dough!).
Here’s the flour breakdown:
| Flour | Percentage |
|---|---|
| White bread flour (sifted hard red spring wheat) | 70.0% |
| Rouge de Bordeaux Type-85 Flour (high-extraction flour) | 25.0% |
| Gazelle Rye (stone-milled 100% whole-grain rye flour) | 5.0% |
If you’d like to know more about how I developed this blend and worked with Hayden Flour Mills (my neighbor in Arizona), check out my recipe, where I use it in country-style sourdough bread.

Baking Schedule
My recipe for these filoncini uses a ripe sourdough starter instead of a levain, making the timeline a bit shorter for the recipe. Additionally, and in keeping with the theme of fun and easy, this is a direct bake, meaning the dough is baked the day it’s mixed.
No overnight cold fermentation required.
If you’d like to create a dedicated levain for this recipe, check out my starter and levain quicksheet, which has several options—pick one!

Green Olive Filoncini Recipe
Use baker’s percentages to modify this formula (e.g., add more olives or olive oil or scale it up and down).
Vitals
| Total dough weight | 1,800 grams |
| Prefermented flour | 8.8%* |
| Sourdough starter in final dough | 17.5% |
| Hydration | 66.0% (does not include olive oil) |
| Yield | 6 x 300g filoncini |
*Since there is no levain for this recipe, the prefermented flour is calculated using half of the sourdough starter flour (since my starter is about half flour and half water) to the total flour in the recipe.
Total Formula
Desired dough temperature: 76°F (24°C) (see my post on the importance of dough temperature).
| Weight | Ingredient | Baker’s Percentage |
|---|---|---|
| 868g | The Perfect Loaf Bread Flour (Hayden Flour Mills custom blend) | 100.0% |
| 165g | Green olive, pitted and coarsely chopped or broken | 19.0% |
| 26g | Extra-virgin olive oil | 3.0% |
| 530g | Water 1 | 61.0% |
| 43g | Water 2 | 5.0% |
| 16g | Fine sea salt | 1.8% |
| 152g | Ripe sourdough starter, 100% hydration | 17.5% |
Green Olive Filoncini Method
1. Mix – 9:00 a.m.
I used my KitchenAid stand mixer to mix and knead the dough efficiently. However, it’s also possible to mix this dough by hand using slap-and-fold kneading or folds-in-the-bowl techniques. Just be sure to hold back the olive oil until the dough is significantly strengthened, smooth, and elastic.
To the bowl of a stand mixer fitted with the dough hook attachment, add the flour, water, salt, and ripe sourdough starter. Mix on low speed (STIR on a KitchenAid) for 1 to 2 minutes until the ingredients come together, no dry bits remain, and the sides of the bowl are clean. This is a rather cohesive and firm dough because of the moderate hydration.
Next, mix on medium speed (2 on a KitchenAid) for 4 to 5 minutes until the dough smooths and begins to cling slightly to the hook.
Let the dough rest in the bowl for 10 minutes.
Return the mixer to medium speed and mix for 3 to 4 minutes until the dough gains more strength and clings again to the dough hook.
Reduce the mixer speed to low speed and add slowly stream in the Water 2, adding it in only if the dough is cohesive after each addition (if the dough gets sloppy, overly wet, or breaks apart, omit the remainder of the water). Then, with the mixer still running, slowly stream in the olive oil. Use a spatula to scrape the sides of the bowl as needed. Once all of the oil is added, about 3 minutes later, the dough will be in a cohesive ball in the mixing bowl with the sides clean.
Transfer the dough to a bulk fermentation container and cover.
2. Bulk Fermentation – 9:30 a.m. to 12:30 p.m. (3 hours)
At a warm room temperature of 74-76°F (23-24°C), bulk fermentation should take about 3 hours. During this time, give the dough a single set of stretches and folds 30 minutes after the start of bulk fermentation. At the same time, we’ll incorporate the olives into the dough.
Before you give your dough its first set of stretches and folds, spread about 1/4 of the olives over the top of the dough (see below). Then, grab one side of the dough and stretch it over to the other. Next, spread another 1/4 of the olives to the new top. Rotate the bowl 180° and perform another stretch and fold. Spread on another 1/4 of the olives, rotate the bowl 90°, and do another stretch and fold. Finally, spread on the last of the olives, turn the bowl 180°, and do one last stretch and fold.


After this set, try to have the dough neatly folded up in the bowl with all inclusions tucked inside (it’s okay if there are some sticking out, as you see in my dough above).
Let the dough rest, covered, for the remainder of bulk fermentation.
3. Divide and Preshape – 12:30 p.m.
At the end of bulk fermentation, the dough should be moderately risen and slightly puffy to the touch but not excessively bubbly or weak (see below).

To make the final shaping of these filoncini easier and more consistent, I like to gently preshape the divided dough pieces into small rounds.
Lightly flour the top of the dough in the bulk fermentation container, then scrape it out to an un-floured work surface. Divide into six 300g pieces (it’s okay if the last piece is a little below 300g) and preshape the dough into gentle rounds.

Let the preshaped dough rest for 30 minutes, covered with a large piece of reusable plastic or slightly damp kitchen towel.
4. Shape – 1:00 p.m.
After 30 minutes, the preshaped rounds will have relaxed just a bit. We will now shape each piece into a stubby tube approximately 6″ long. I use the same process as when shaping baguettes to shape these into tubes, except I do not roll them out as far and do not taper the ends.
Be sure to scroll to the end of this step to see a shaping video.
Prepare a board or space on your work surface with a couche (baker’s linen) or a large kitchen towel. You’ll place the shaped filoncini on top of the cloth in little channels designed to hold the dough (more on this in a moment).
At one side, where you will start laying down preshaped filoncini, roll a section so that it stands up by itself, creating a strong edge. Then thoroughly and evenly dust flour on a 3- to 4-inch-wide strip down the couche, from farthest from you to nearest, where the first piece of shaped dough will sit.


To shape each filoncini:
- Lightly flour the top of a relaxed round and your work surface
- Using a bench scraper, pick up and flip over the floured round
- Fold the top of the circle down to the middle (upper-left, above)
- Flip the piece of dough 180° and fold the new top of the circle down to the middle (upper-right, above)
- Using both hands, fold the dough down in successive motions to make a round (bottom-left, above)
- Finally, use both hands to evenly roll out the tube to about 6-inches (bottom-right, above)
Once you’ve shaped a piece, place it in the flour-dusted channel on the couche, seam side up. Then, using both hands at the edges, pick up and drag a little of the couche toward the dough (like making a pleat in the couche) so that it forms a matching wall of the channel to hold the dough while it’s proofing. Once the new wall is formed, it will look like the dough is nestled between two straight walls.
See the video below for more help with shaping and placing the dough on the couhe.

Flour a new strip down the couche on the other side of the newly formed wall in preparation for another piece of dough. Repeat this process for all the preshaped rounds.
I like to cover the dough on the couche with a large piece of reusable plastic (or the ends of the couche if it reaches) to prevent the dough from excessively drying out during proofing.
Watch the quick video below for my step-by-step approach to shaping filoncini.
5. Proof – 1:30 p.m. to 3:00 p.m.
Proof the shaped filoncini dough for about 1 1/2 hours at warm room temperature, 74-76°F (23-24°C).
At this time, you might also want to set a timer for 30 minutes. You’ll need to preheat your oven one hour before baking.
6. Twist and Bake – 3:00 p.m. (preheat oven at 2:00 p.m.)
Thirty minutes before you want to bake, preheat your oven to 450°F (232°C) with a baking stone or baking steel in the bottom third of the oven. After proofing for 1 1/2 hours, the dough will be puffed up and soft to the touch but not sticky. It should pass the poke test when it’s ready for baking.
TIP: To get the most contrast in the twists after baking, before removing the pieces of dough from the couche, lightly sift white flour over the top of the dough pieces. This way, the dough will have white flour on the bottom (where it’s resting on the couche) and the top.
Prepare a pizza peel with parchment paper matching the width of your baking surface.
Grab one end of the couche and pull it out, moving the piece of dough away from the rest. Using both hands, grab the piece of dough very gently and transfer it to the parchment paper. Repeat until three pieces are on the parchment paper on the pizza peel.
I can comfortably fit 3 filoncini on my baking steel, so I break the baking step into two sessions. After transferring 3 pieces of dough to the pizza peel, place the remaining 3 pieces into the fridge, covered. If you’re couche was on a board, move that to the fridge, or, place the remaining three pieces on a piece of parchment paper on top of a cutting board or inverted baking sheet.
To twist each piece, imagine your hands like the letter “C,” grabbing a thick pipe. You want to maintain this “C” shape while you twist, avoiding excessive clamping or pinching. Grab the dough and perform successive twists, moving from the center to the edges.


Remember: there’s no right way to do this! Twist and have fun with it. Even if the dough gets pinched, it’ll still puff up and be delicious 🙂
Transfer the dough onto the baking surface in the oven using the parchment paper. Next, steam the oven and bake for 20 minutes. Remove the steaming pans and bake for another 20-25 minutes until done. Keep an eye on these in the last 10 minutes to ensure they don’t color too much; they should be golden brown.
Cool on a rack. Repeat the process for the remaining pieces of dough in the fridge.
Due to the olive oil in the dough, these will keep well for a few days on the counter, uncut. After a few days, transfer them to a bread box or bag to keep them fresh.
Print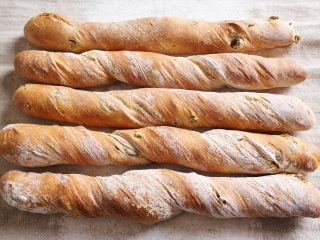
Green Olive Filoncini (Twisted Baguettes)
- Prep Time: 6 hours
- Cook Time: 45 minutes
- Total Time: 6 hours 45 minutes
- Yield: 6 loaves
- Category: Lunch, Dinner, Snack
- Cuisine: Italian
Description
These fun, long sticks are packed with flavor thanks to the salty green olives and fruity olive oil (which also gives them a wonderfully soft-ish crust). Use them for sandwiches, appetizers, or just torn and dunked into more olive oil at any time of the day.
Ingredients
- 868g The Perfect Loaf Bread Flour (Hayden Flour Mills custom blend)
- 165g Green olive, pitted and coarsely chopped or broken
- 26g Extra-virgin olive oil
- 530g Water 1
- 43g Water 2
- 16g Fine sea salt
- 152g Ripe sourdough starter, 100% hydration
Instructions
- Mix – 9:00 a.m.
Add the flour, water, salt, and ripe sourdough starter to the bowl of a stand mixer fitted with the dough hook attachment. Mix on low speed (STIR on a KitchenAid) for 1 to 2 minutes until the ingredients come together, no dry bits remain, and the sides of the bowl are clean. Next, mix on medium speed (2 on a KitchenAid) for 4 to 5 minutes until the dough smooths and begins to cling slightly to the hook. Let the dough rest in the bowl for 10 minutes. Return the mixer to medium speed and mix for 3 to 4 minutes until the dough gains more strength and clings again to the dough hook. Reduce the mixer speed to low speed and slowly stream in the Water 2, adding it only if the dough is cohesive after each addition (if the dough gets sloppy, overly wet, or breaks apart, omit the remainder of the water). Then, with the mixer still running, slowly stream in the olive oil. Use a spatula to scrape the sides of the bowl as needed. Once all of the oil is added, about 3 minutes later, the dough will be in a cohesive ball in the mixing bowl with the sides clean. Transfer the dough to a bulk fermentation container and cover. - Bulk Fermentation – 9:30 a.m. to 12:30 p.m. (3 hours)
At a warm room temperature of 74-76°F (23-24°C), bulk fermentation should take about 3 hours. Give the dough a single set of stretches and folds during this time. At the same time, we’ll incorporate the olives into the dough. Before you give your dough its first set of stretches and folds, spread about 1/4 of the olives over the top of the dough (see below). Then, grab one side of the dough and stretch it to the other. Next, spread another 1/4 of the olives to the new top. Rotate the bowl 180° and perform another stretch and fold. Spread on another 1/4 of the olives, rotate the bowl 90°, and do another stretch and fold. Finally, spread on the last of the olives, turn the bowl 180°, and do one last stretch and fold. Cover and let rest the remainder of bulk fermentation. - Divide and Preshape – 12:30 p.m.
Lightly flour the top of the dough in the bulk fermentation container, then scrape it out to an un-floured work surface. Divide into six 300g pieces (it’s okay if the last piece is a little below 300g) and preshape the dough into gentle rounds. Let the preshaped dough rest for 30 minutes, covered with a large piece of reusable plastic or slightly damp kitchen towel. - Shape – 1:00 p.m.
Prepare a board or space on your work surface with a couche (baker’s linen) or a large kitchen towel. You’ll place the shaped filoncini on top of the cloth in little channels designed to hold the dough (more on this in a moment). For each piece of dough, lightly flour the top of a relaxed round and your work surface. Using a bench scraper, pick up and flip over the floured round. Fold the top of the circle down to the middle. Flip the piece of dough 180° and fold the new top of the circle down to the middle. Using both hands, fold the dough down in successive motions to make a round. Finally, use both hands to evenly roll the tube to about 6-inches. Place it in the flour-dusted channel on the couche, seam side up. Then, using both hands at the edges, pick up and drag a little of the couche toward the dough (like making a pleat in the couche) to form a matching wall of the channel to hold the dough while it’s proofing. Once the new wall is formed, it will look like the dough is nestled between two straight walls. Repeat for all pieces. - Proof – 1:30 p.m. to 3:00 p.m.
Proof the shaped filoncini dough for about 1 1/2 hours at warm room temperature, 74-76°F (23-24°C). - Twist and Bake – 3:00 p.m. (preheat oven at 2:00 p.m.)
Thirty minutes before you want to bake, preheat your oven to 450°F (232°C) with a baking stone or baking steel in the bottom third of the oven. Prepare a pizza peel with parchment paper sized to match your baking surface. Gently transfer three pieces of dough from the couche to the parchment. Place the remaining dough in the fridge, covered. Twist each piece by holding the dough in a “C” shape, twisting from center to edges. Transfer the dough to the oven using the parchment, steam, and bake for 20 minutes. Remove steaming pans and bake for another 20-25 minutes until golden brown, monitoring the last 10 minutes. Cool on a rack and repeat with the remaining dough.
Notes
Instead of green olives, any black olives (including Kalamata) would be a great substitution.
What’s Next?
Now that you have these under your belt, try my Khorasan baguettes! Or, if you’re looking for another easy Italian-themed bake, my sourdough friselle (rusks) are lovely and keep for months.
Buon appetito!


37 Comments
I bake entirely by hand, without a mixer. I'm old school Italian I guess and like to mix everything by hand. I assume for us "luddites" that hand mixing for several minutes and kneading will accomplish the same result as a motor.
Also,I'm going to add pistachios and olives together (I've made regular olive baguettes before, and semi-often make walnut, olive and fresh rosemary sourdough boules).
Your writing is like a breath of fresh air in the often stale world of online content. Your unique perspective and engaging style set you apart from the crowd. Thank you for sharing your talents with us.
helloI like your writing very so much proportion we keep up a correspondence extra approximately your post on AOL I need an expert in this space to unravel my problem May be that is you Taking a look forward to see you
http://sprintmath.education/__media__/js/netsoltrademark.php?d=mythav.com
I just want to say that this trick of twisting the loaves saved my Christmas baguettes (using your baguette recipe) when I forgot the dough in the refrigerator and didn't have time to shape them carefully, rise completely or score. They came out gorgeous and absolutely perfectly risen and delicious. Much less fussy for what I consider more beautiful results. People kept coming back for more and exclaiming over them. Thank you so much for posting these. Made the timing much more flexible. I steamed the oven but used baguette pan (dough onto cold pan, pan into hot oven).
Amazing, glad to hear that, Robin! I just love the rustic look and nature of these, too. And they're stunning, in my opinion 🙂 Thanks for coming back with the comments and happy holidays!
Hey Maurizio – Hope you had a fabulous Thanksgiving!
I've been wanting to make an olive bread for a while, and this seemed like just the thing 🙂
I'm prepping my flours right now. I didn't buy the Perfect Loaf flour though because, interestingly enough, the mix is almost exactly my standard one, albeit I usually don't use high-extraction Rouge de Bordeaux but mill it and use it straight as whole-grain flour. I was low on RdB berries but luckily had exactly the right amount remaining, so MockMilled them and bolted the result down to (roughly) T85. I always add 5% rye to almost everything, so that was a no-brainer, and the rest is King Arthur Bread Flour.
I'll be doing the actual baking tomorrow – can't wait to see how they come out! I'll follow up here 🙂
OK – baked 'em.
Delicious, but not an unqualified success – mostly due to me 🙂
Here are my observations/learnings – I hope they will be of use to someone:
1) I was maybe too rough during the twisting, so the dough degassed a bit and crumb was not as open as I expected
2) A more strongly flavored olive would be much better here. The olive flavor was not as pronounced as I would have liked, which I think was because I used Castelvetrano olives, which are quite mild.
3) Challenger bread pans are great for boules and batards but not long enough for 300g filoncini or baguettes, so they came out short and overly puffy – the twists pretty much disappeared during the oven-spring. In a closed baking vessel like the Challenger, these loaves should be demi-sized, so half the weight per loaf – i.e. about 150g each. This recipe would then make a dozen demi-filoncini (or the recipe could be reduced). I did open-bake the final two loaves, on a baking stone, but my steaming was inadequate for them. They had the right size and look but didn't get as much oven spring and the crust wasn't as good. That's on me – I'm not really set up for open bakes with good amounts of steam
Really great feedback here, Jeff, sorry for the delay. Hope you had a great Thanksgiving! My comments:
1. Yes, it takes a few practice rounds and focus on keeping your hands more like "blunt instruments" instead of using your fingers too much. After you do a few you'll get the hang of gentle twisting.
2. Yup, I hear you on this. I added the OO mostly to soften the dough, but a punchier OO will bring more flavor.
3. Great idea making them a bit smaller and more spindly!
Hi Maurizio. I love your recipes and website. I’ve learned so much. I would like to try this recipe with some fresh milled flour. Any recommendations? I was thinking it might be a good idea to autolyse before mixing, and that I would probably have to play with hydration. Not certain which grain to use, or what percentage of FMF is should use. Thanks! Patti
Thank you so much Patti! These would work really well with fresh flour, as the Hayden Flour I call for is very fresh, too. I'd say if you're milling yourself, swap out 50% of the called for flour for freshly milled hard red wheat (or a variety like Butcher's Gold, Red Fife, Rouge de Bordeaux—all great). You might need to adjust the hydration up just a little, but be conservative here because this dough is actually on the drier side to make it easy to shape and twist later. Let me know how they turn out!
Thank you so much for your quick response. I’ll let you know how it goes!
Do you use the same type of steam as with your regular baguettes, as described in the book? IE Lava rocks with ice and towels with boiling water.
Yes, that's correct, Miriam!
I made them last week and they were absolutely delicious! I had some garlic scape infused oil that was a perfect accompaniment.
Oh that sounds wonderful. Glad you liked them!
Just ordered a bunch of the flour blend to try these. I have a thought to make them with some crisp rendered guanciale after I try the olive version!
Love your website and the recipes and advice. Thank you for sharing your knowledge and experience. It’s definitely helped me become a better baker.
Whoa, Joe. That sounds amazing. I think you have the right idea with these 🙂 Thanks so much, means a lot to hear that. Happy to have you here and have fun!
Thank you for always being open and honest with your readers It’s refreshing to see a blogger who is unafraid to be vulnerable and real
Hi Mauicio,
Can this be be left in the fridge to proof overnight?
l
Yes, you can definitely do that. I'd put it in the fridge after shaping into a cylinder. The next day, take them out, let them warm a bit and finish proofing. Twist. Bake.
Hi Mauricio. Thank you so much for the generosity with which you share your knowledge of sourdough bread. I really liked how you write about your travels to Italy. I fell in love with your cute filoncini at first sight. And despite the fact that I have a convection oven at home, I decided to try to make these little brawlers. They came out great inside, but with a non-chewy, very hard crust. Do I understand correctly that this is because they were baked in a convection oven? What would you recommend to make my filoncini better next time?
Hey, Nadiia! Yes, most likely, the convection (and lack of steam) caused these to come out hard. Steam is critical when baking these because they're so thin, they will dry out quickly if not kept moist. If you have a large pan to bake these in (I know, that's not easy to find), something like the Challenger or a long pan, to help trap the steam that would be your best bet. Alternatively, if you have a large rectangular roasting pan, you could place the dough on your parchment paper, slide it to your baking surface, then invert the pan so it covers the pieces of dough completely. This will trap the steam.
Just some ideas there!
Thank you very much for the advice!!!! Let me thank you again for your openness and sincerity!🙏🙏🙏
I made these over the weekend and they were fabulous!! I have to figure out how to store them though. Regular bread bags are too short!
Ha ha, you're right, Kelsey. I've been cutting them in half! So glad you liked these 🙂
Good morning, I am preparing to bake these this morning, what temperature do you recommend? Perhaps I missed that in the recipe. TIA. I baked them @450 (per your khorasan recipe), they came out delicious and beautiful. I used a baguette pan, that I thrifted, it worked wonderfully with semolina on parchment. Thank you!
Yes, that's the right temp! So glad you liked these.
I didn't have the temp in the printable directions, but I've since updated it. 🙂
In April 2009, I took my daughter and her best friend to Firenze for a high school graduation trip. Every day, we ate this terrific sandwiches made from that bread, and filled with fresh mozzarella, basil, tomatoes, and proscuitto. I have been looking for a recipe for 15 years! I even tried Marcella Hazan's "Olive Bread", but it wasn't the same as what we ate in Firenze. I ended up making up my own recipe, but wasn't quite the same. Am so happy to see this, and learn the real name of this fantastic bread. Thank you.
Oh my, means so much read your comments! I, too, used one of these for a sandwich and it was fantastic. If you lightly toast the pieces it gets this amazing crispness to it. The flavor is wonderful.
Hope you enjoy these and happy baking!
In the directions, I don’t see when Water2 is added
Sorry, Rick! You want to add it in after the rest during mixing. I updated the directions. Let me know how you like these, they're so tasty.
Just wondering if there are any other flours that can be used. I have some of the Hayden Mills, but when that is finished I really don’t want to order more because of shipping expense. Definitely want to try this one!! Been making your Best Sourdough for 4 years now and finally perfected it.
Hey Laurinda! You can swap the flour out, for sure. In the post above, I give the breakdown of the flour, you could blend something similar. Or, I'd go with a 70/30 mix of medium protein white flour and whole wheat. Super cool to hear about the Best SD recipe! That's one that pays off with constant work. Happy baking 🙂
What percentage do you consider to be a medium protein flour?
These look great. I like that they have green olives and are easier than baguettes
What’s the difference between pre fermented flour and starter or levain?
Thanks, San! The pre-fermented flour percentage is just the amount of flour that's fermented ahead of time (before mixing). This is essentially the levain, calculated with respect to the total flour in the dough.
Check out my guide to baker's percentages , I have a section in there about how to calculate it and why it's useful.
Hope you like these filoncini, once you eat them, it's hard to stop 🙂