
So many intangible inputs get mixed into our sourdough starter each day besides the raw, physical ingredients: the time needed to mix, attention, observation, and perhaps a little worry now and then—all the resources constantly tugged at, and contributed to, by daily life. At first glance, this list might seem like a lot of fuss needed to keep a small, bubbling culture going. But really, it’s a smidgen of time in the day, and I think, at least, the resulting bread is always justified.
There’s undeniably a lot of value in maintaining a healthy and regularly fed sourdough starter, but sometimes we do need a vacation, don’t we? Luckily for us, a starter is not only incredibly resilient but it also can be sent into “low power mode” by following a few tips on how to store a sourdough starter for a longer period of time.
In the past, I’ve talked about placing a starter in the fridge for around a week to reduce required maintenance, and this is always a valid option. However, what if we’re going to be gone longer than a week? Or two weeks? Or a month? I’ve experimented over the years with ways to store my sourdough starter and have found the following methods to all be effective means for storage and quick revival.
But first! If you don’t yet have a sourdough starter read through my guide on creating a sourdough starter in 7 steps and then head back here to pick up where you left off.
How to Control Sourdough Starter Fermentation
Control isn’t a word I like to use lightly regarding natural fermentation. Rather than control, I think of it as guiding fermentation in a certain direction. A seemingly small semantic difference but an important one. It’s a facet of baking I didn’t fully appreciate until I had a better grasp of the factors that play into modifying fermentation activity in a dough (like temperature).
The table below outlines a few of these factors and how we can modify them to adjust fermentation activity. With this knowledge, we can adjust them to slow down our starter to accommodate our desired storage time.
| Increased Fermentation Activity (↑) | Decreased Fermentation Activity (↓) | |
|---|---|---|
| Hydration | Higher hydration (e.g. liquid starter) | Lower hydration (e.g. stiff starter) |
| Temperature | Higher temperature | Lower temperature |
| Percentage of Whole Grains | Higher percentage | Lower percentage |
| Inoculation (the percentage of ripe starter carried over at each feeding) | Higher percentage | Lower percentage |
| Salt (while not typically used in a starter, salt can be mixed in at a very low percentage to temper fermentation) | Lower percentage | Higher percentage |
Many inputs determine a sourdough starter’s vigor, not just the items above. The table also assumes we can modify each factor independently, which is sometimes not the case! Usually, they are related and intertwined—changing one might have subtle side effects on another. In the end, it’s best to try and isolate a single factor and make a change. Then, observe how your starter behavior was impacted: its smell, rise time, and visual cues.
With the above information, let’s examine how we can modify our starter to reduce maintenance feedings.
How To Store Your Sourdough Starter

The following sections are divided into several storage time durations. You should read through all the sections to understand how the above chart and fermentation-altering factors affect your starter’s timeline. If you’re having any issues with the processes below or with reviving your starter, scroll down to the troubleshooting section for more information.
How To Store Your Sourdough Starter For A Day Or Less
While not exactly storing, I’m referring to small adjustments you can make to change your starter’s daily feedings. If you do feed daily (either once, twice, or even more) then you’re likely already in an effective maintenance routine. But what if you’re going to be gone for the night and won’t come back in the morning? Or you just want to skip a feeding? Let’s take a look at how I’d modify my personal starter to accommodate that change.
I usually keep my starter somewhere warm, always in a proof box or the new Sourdough Home in the winter (see more on the importance of temperature when baking), with a refreshment early in the morning and one 12 hours later. If I expect to miss a refreshment, I mix my starter to a slightly stiffer consistency with a smaller ripe starter carryover (inoculation). For example, if my normal starter feed is:
| Flour | 100% (100g) |
| Water | 100% (100g) |
| Ripe starter | 20% (20g) |
I would modify to:
| Flour | 100% (100g) |
| Water | 80% (80g) |
| Ripe starter | 10% (10g) |
A small change, but not much more is needed. The reduced hydration and smaller carryover will slow fermentation activity. Additionally, you could instead use cooler water or keep your starter a few degrees colder to also slow activity.
It’s easy to just stick a starter in the fridge when we can’t get to a feeding. And while placing your starter in the fridge at around 38°F (3°C) isn’t a huge problem, why place your starter in a “stressful” situation? For me, the preferred option is to reduce hydration and inoculation when I need to do small, daily adjustments. You can play with the amount of carryover at each feeding and see how your starter reacts to the change. In some cases you might not even need to adjust the hydration, just the inoculation percentage will afford enough control.
But what if we’re going to be gone a week or more?
How To Store Your Sourdough Starter for Up to Three Weeks
Building on the comments above, a home refrigerator can be a very convenient place to store your starter for extended periods. However, I don’t like to leave my starter for more than three weeks in the fridge because it usually takes longer to revive with the additional care required. If I need a break for more than this time, I’ll opt for another method below (usually drying into crumbles).
Storing Your Sourdough Starter In The Refrigerator
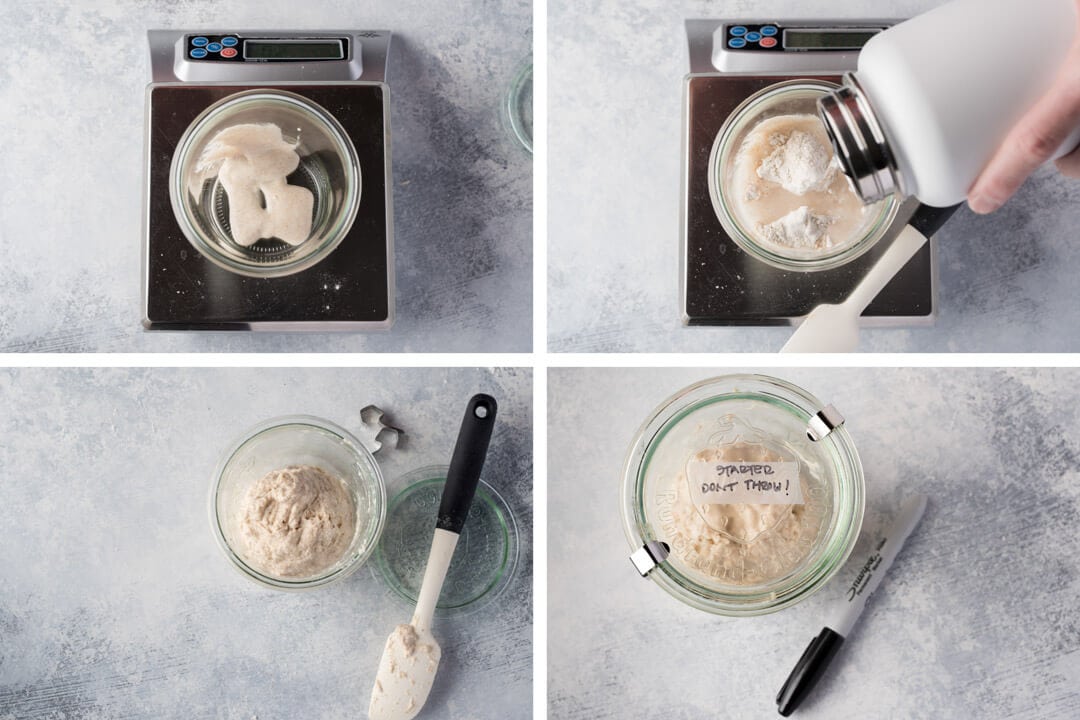
You can see the consistency of my fully mixed starter prepared for the fridge in the images below. Notice the consistency is stiffer than when at 100% hydration. This reduction in hydration helps the starter hold up extremely well in the fridge.
Take out a new, clean jar with a lid. To the jar add the 20g ripe starter and 100g flour (whatever flour you usually use for feedings). Then, add 80g room temperature water and stir until all dry bits are hydrated. Place a lid on top, and secure. Let the jar sit out on the counter for about an hour to let fermentation get started. Then, place it in the fridge somewhere near the back where it will go unnoticed (and no one will be tempted to throw it out).
How to Revive Your Sourdough Starter From The Refrigerator
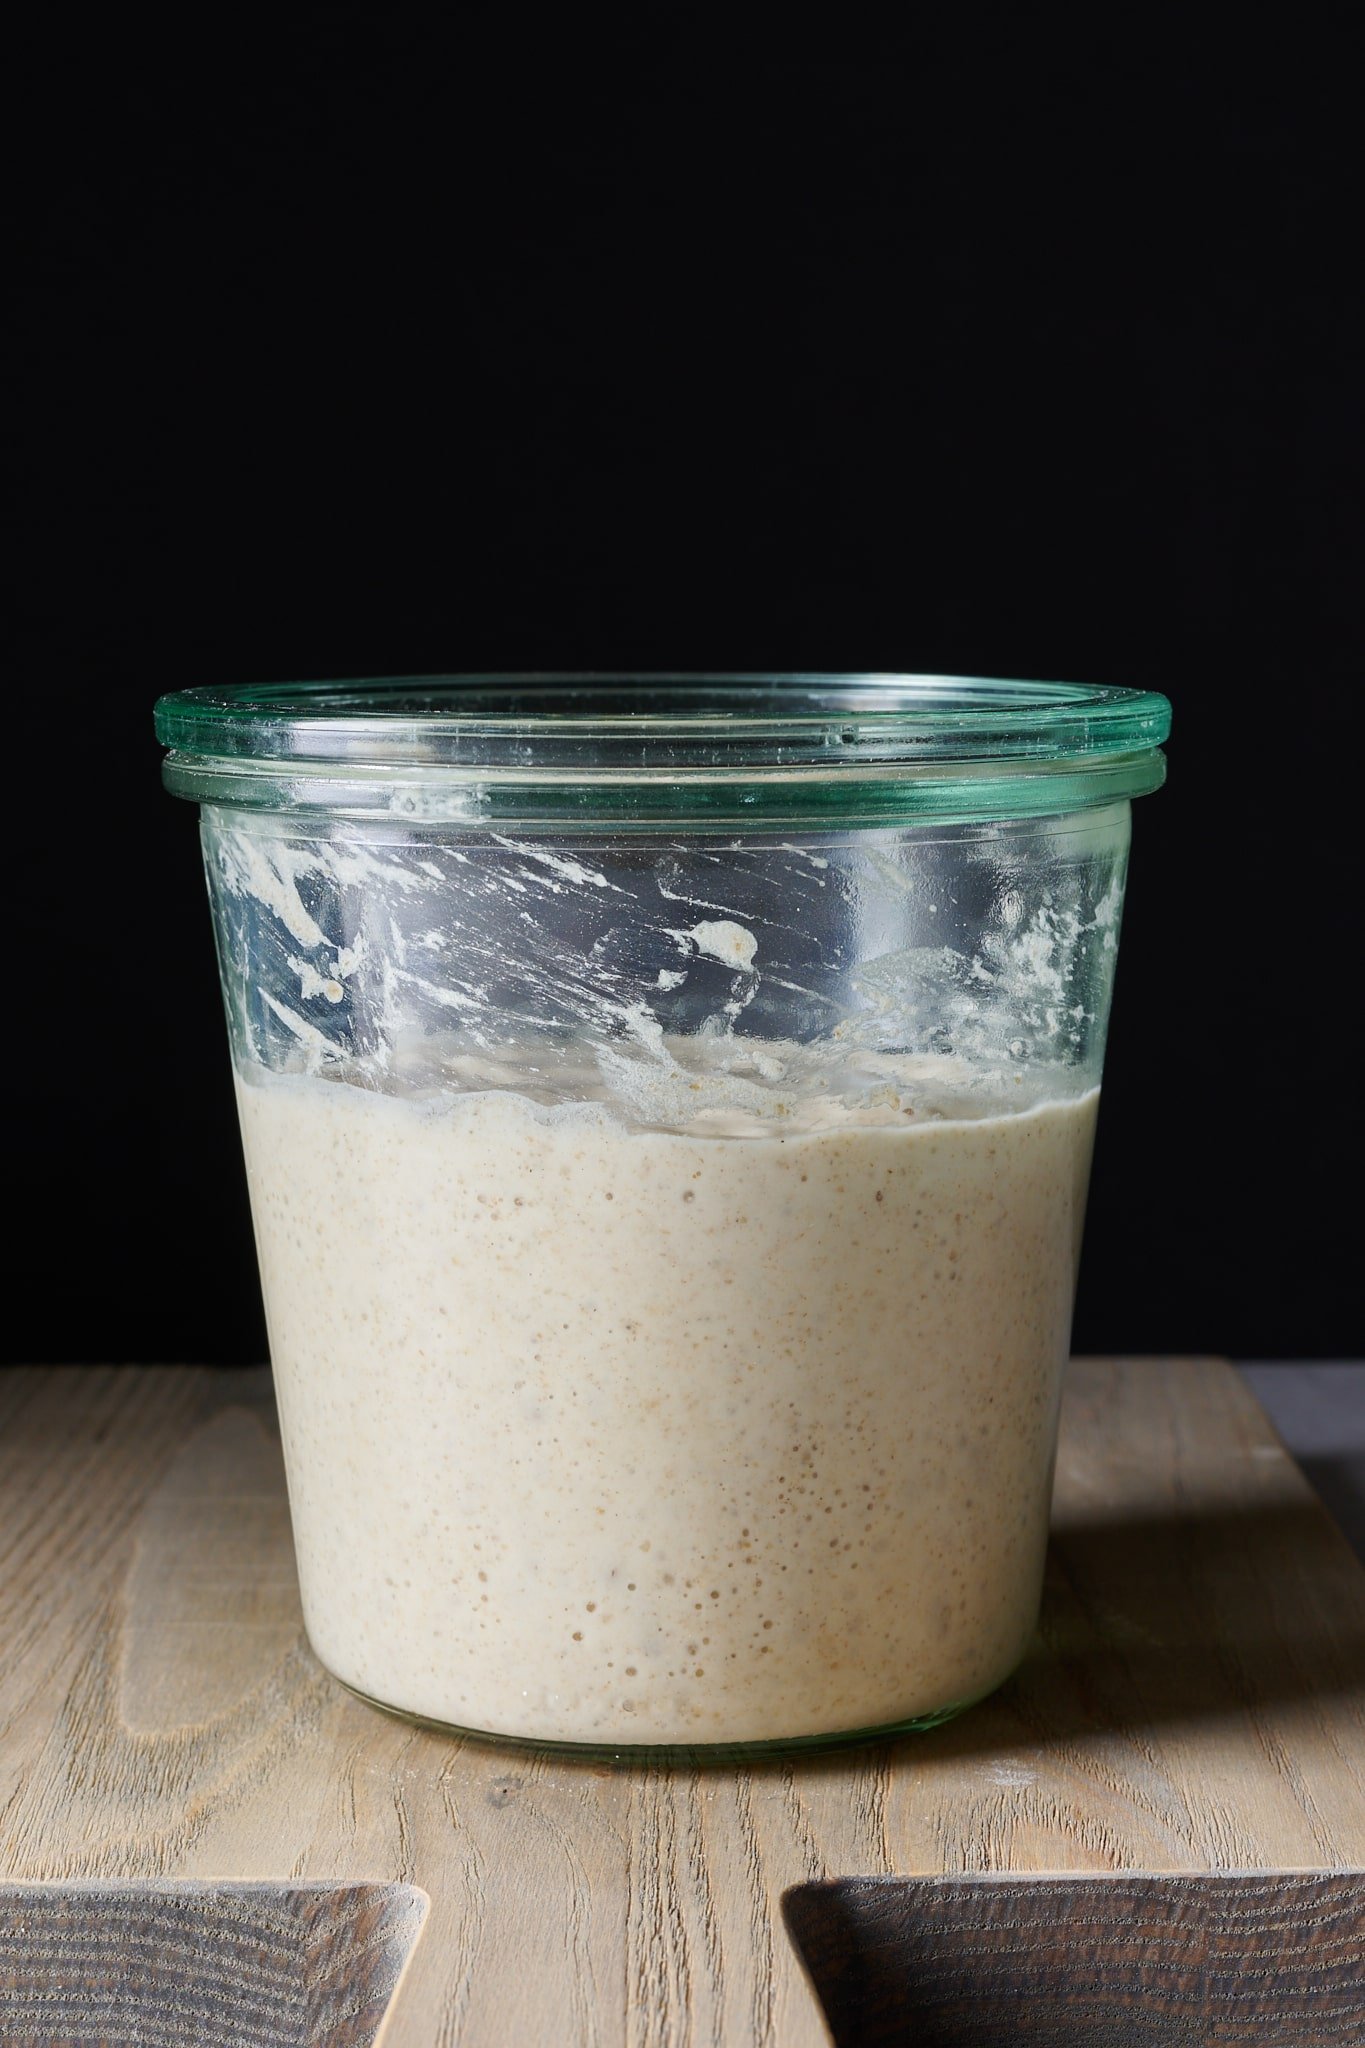
To revive, take your jar out of the fridge and let it sit on the counter for an hour or two to warm up. The mixture may or may not be bubbly like mine below, but either way, stir it so everything is reincorporated. Proceed with your normal starter feeding (discard down, add fresh flour and water) and place in a warm spot until it shows the signs it needs a refreshment. For my starter sitting at 78°F (25°C) this is usually around 12-14 hours later.
I prefer to do at least 2, preferably 3, regular feedings before using the starter to make a levain. I’ve rushed this in the past and, at least with my starter, it needs some time to get back up to full strength.
See my guide to storing a sourdough starter in the fridge for vacation for more tips on storing it for short periods.
How To Store Your Sourdough Starter For Long Periods
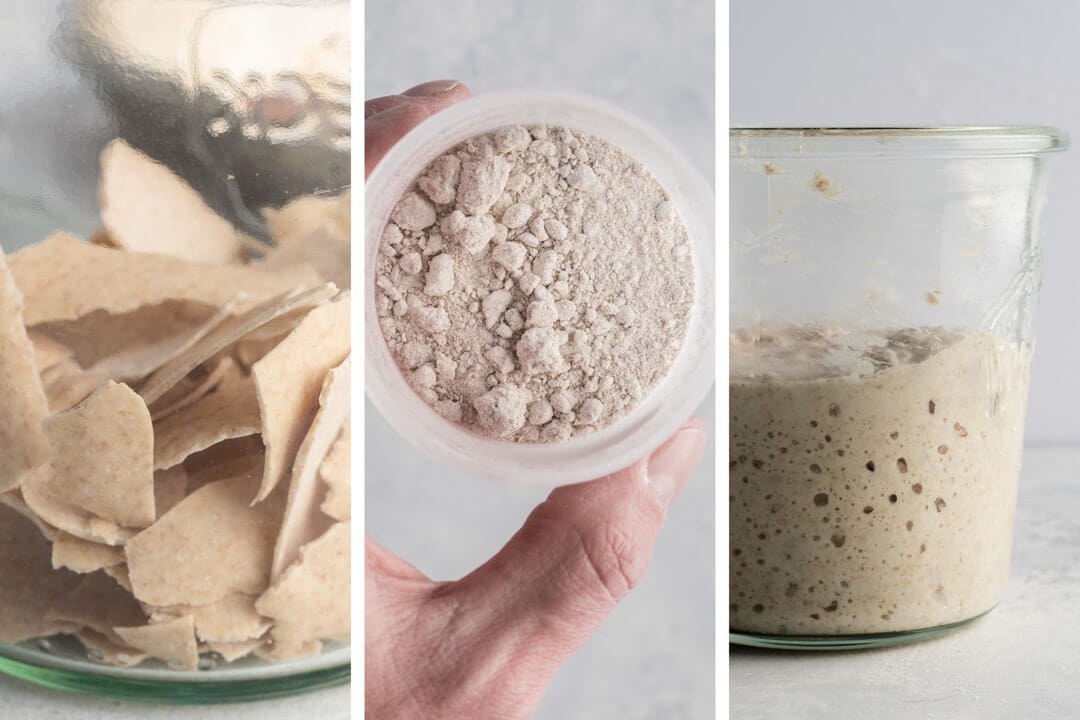
I use two methods to store my starter for long periods and usually opt for the first: crumbling and drying it out in flour. I’ve left my starter dried in my pantry and out of direct sunlight for up to 8 months (Update: I now have one stored for over two years!) without any issues.
Usually, I notice my starter springs back faster using this method, but both have proven equally effective. While these methods can be slightly laborious, especially the second, they’re handy options in your baker’s tool chest.
Moisture is the enemy of successfully storing a dried starter.
Additionally, these methods are excellent ways to ship or travel with your sourdough starter. If you have a friend that lives many miles away, dry your starter, seal it in a jar, and send it on its way. If no moisture enters the jar, it will reach its destination without issues. Then, point them back to this website to learn how to revive the now well-traveled starter.
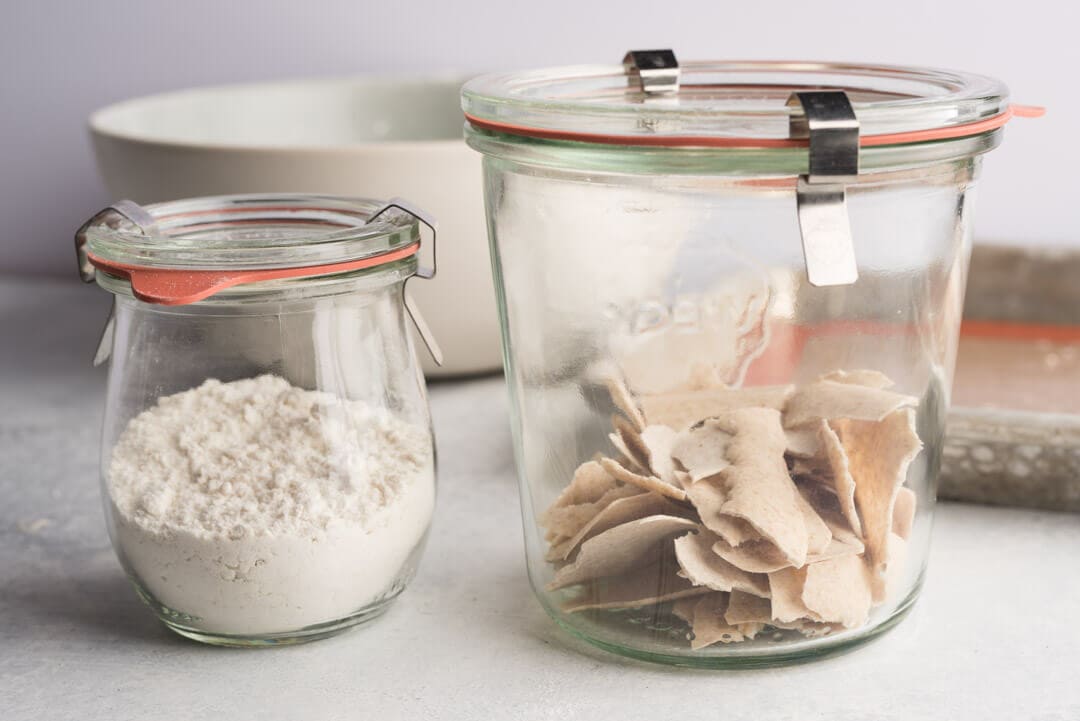
Moisture is the enemy of successfully storing a dried starter. To ensure your starter is truly hibernating, you must ensure the results are completely devoid of hydration and kept in a dry location. Once it’s dry, place the crumbs or shards in a container and seal it shut. I usually use a Weck jar with a rubber seal and clips to create an airtight seal.
These jars are designed for canning, so they’re perfect (here’s more about why I love them).
Storing: Crumble Into Dry Flour
This is by far my preferred method for long-term sourdough starter storage.
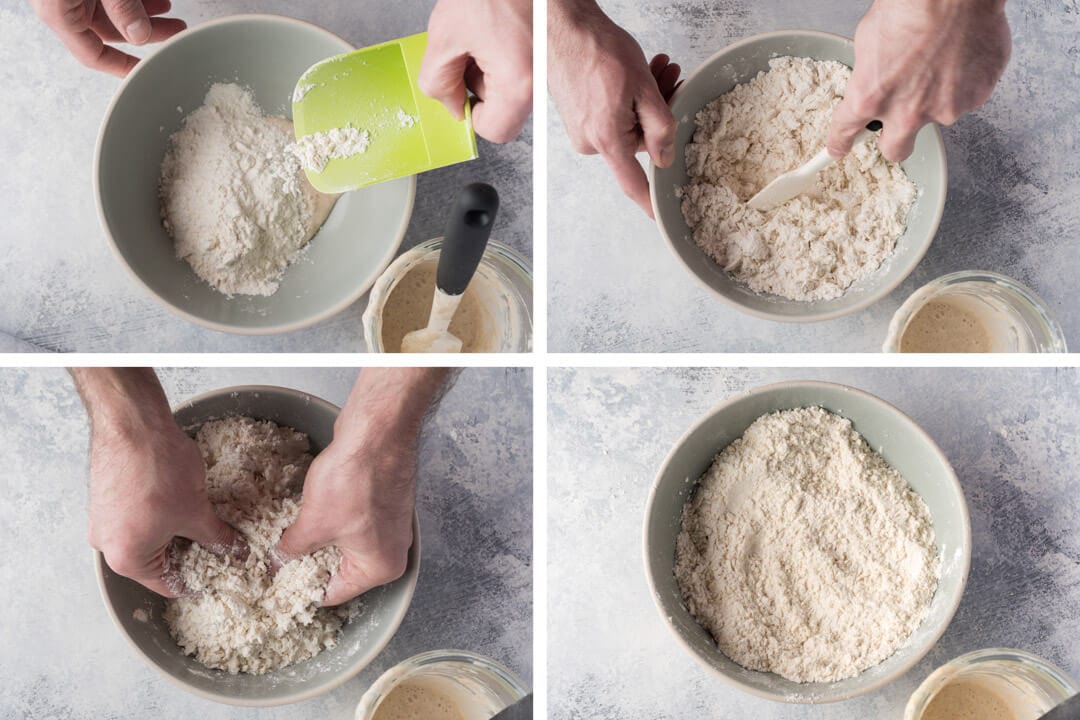
Place a large dollop of your ripe sourdough starter in the bottom of a large bowl. Cover the starter with lots of flour—you can use the same flour used for feedings or 100% white flour. First, using a spatula, mix everything until it’s fairly incorporated. After mixing, you’ll still see large lumps throughout. Next, use your hands to pinch through the mixture, seeking out large clumps to break them into small pea-sized balls. Continue doing this for several minutes, depending on the quantity of starter you poured into the bowl. If the mixture feels wet, keep adding flour as needed.
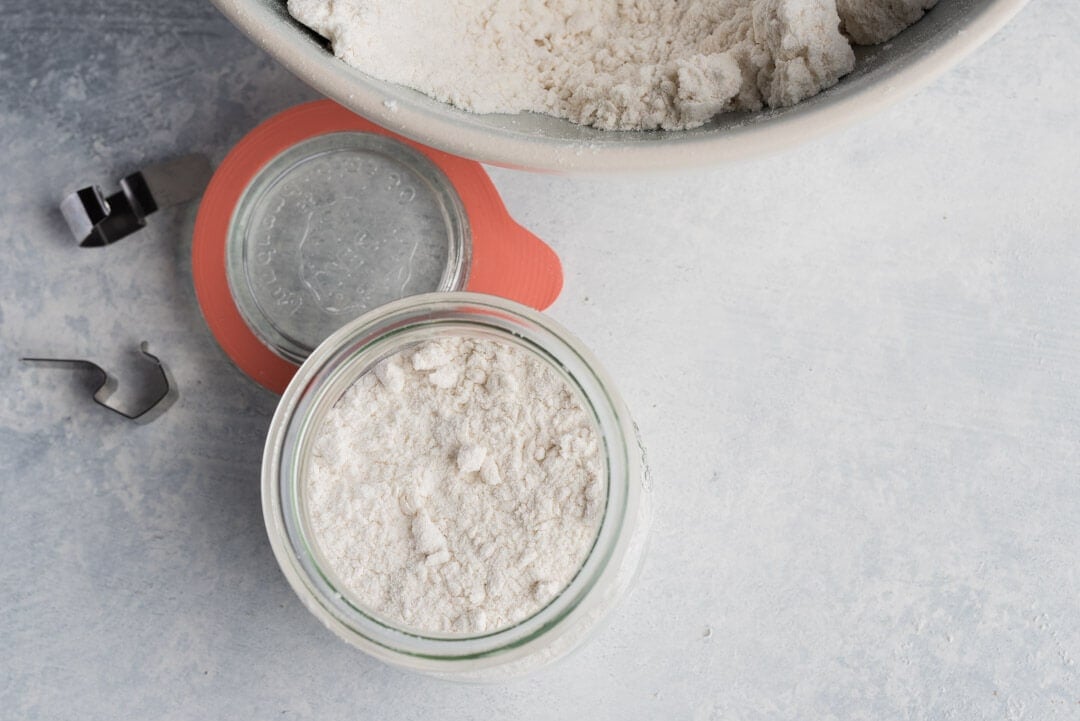
Once the entire mixture feels dry, let the bowl sit out exposed to dry air for an hour or so. Then, place the contents in a jar and seal it shut. You can spread the contents across multiple jars if you’d like to keep a few backups or give some away to friends. The key is to get enough of the mixture in each jar, so there’s a large sample of your dried ripe starter.
Keep the jar sealed in a dry area in your pantry away from light and moisture.
Reviving: Dry Crumble
The crumbs from the above method won’t require any preparation before adding fresh flour and water. Without discarding any of the dried contents of the jar, add 50g of fresh flour and enough water to make the mixture easy to stir, then stir until no dry bits remain. The exact hydration of the mixture isn’t really critical, there just needs to be enough water to make the mixture easy to stir and feel about right to you.
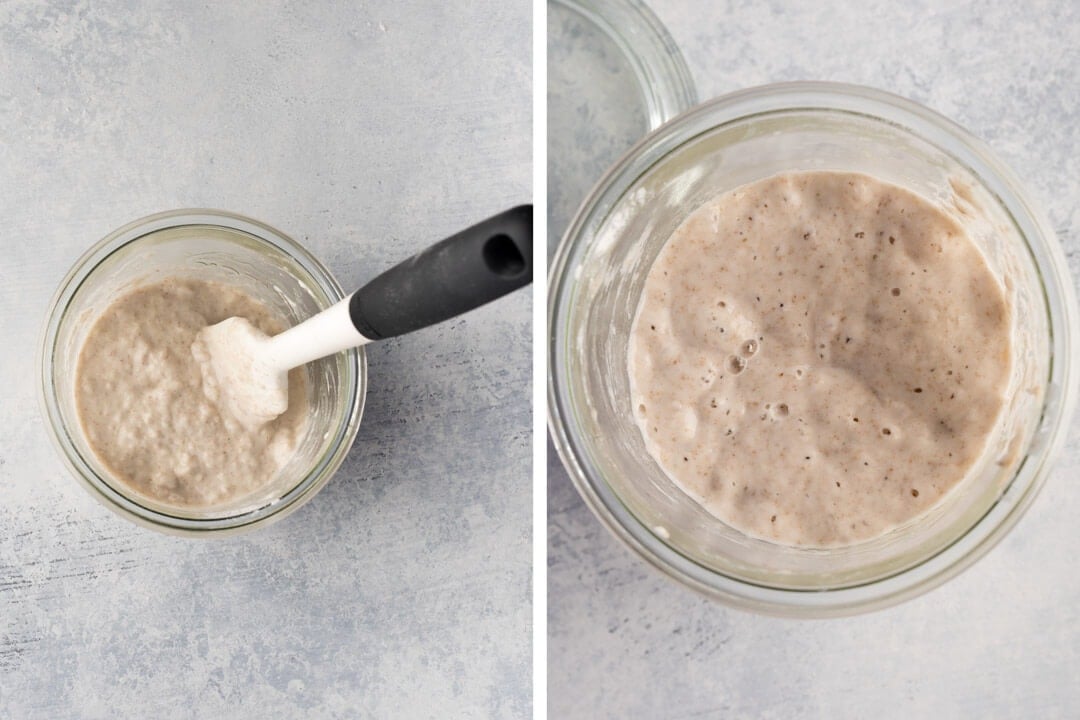
Let everything sit until it looks like it needs another feeding, usually 12 to 24 hours, at warm room temperature. It’s important to try and keep the mixture warm during this time; between 78°F (25°C) and 82°F (26°C) would be ideal. Once you see activity in the mixture and it looks like it needs feeding, feed it with your typical flour and water ratio after that.
Above, the image at the left shows the mixture just after adding the stored starter, fresh flour, and water. You’ll notice it’s rather loose and highly hydrated with lumps present. Next, the image at right is after about 12 hours at 80°F (26°C)—plenty of activity and ready for the first real feeding.
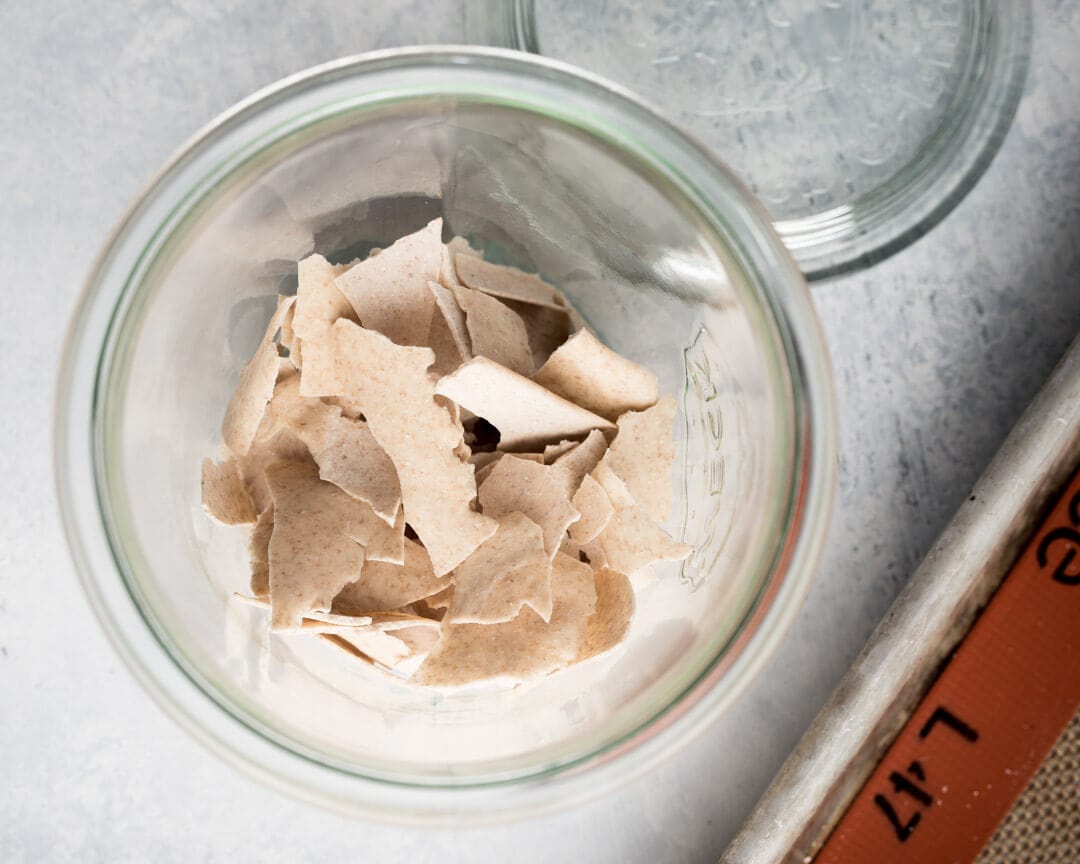
Storing: Spread, Dry, and Crack Into Shards
This method is similar to the above in that the starter is dried completely, but this takes it a step further by drying the starter itself into “shards.” The shards are then broken into small pieces and stored away from moisture.
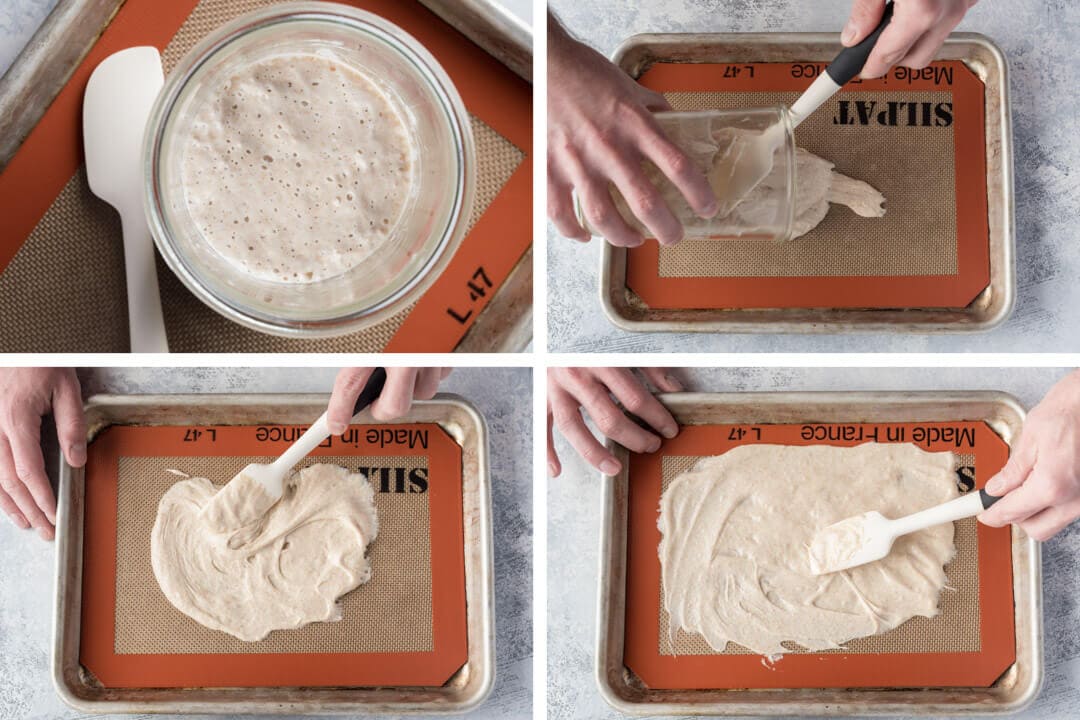
The easiest way to dry your starter is to use a baker’s quarter sheet lined with a silicone liner (or parchment paper).

Pour a large dollop of your sourdough starter out onto the silicone liner. Using a spatula, spread your starter out into a thin layer. The thinner and more even, the better, this way, it uniformly dries and begins to crack. Using a quarter sheet is handy because it fits nicely into my Brod & Taylor dough proofer, which speeds up the drying process considerably. Place the quarter sheet in the proofer on the bottom rack and turn the temperature controller to 76°F (24°C). If you don’t have a proofer, place the quarter sheet uncovered on your kitchen counter.
Leave the quarter sheet untouched for several days until the starter begins to crack and lift up off the surface. It will visually change from a dark color (where it was wet) to a uniform, light color. Once it looks completely dry, crack the pieces with your hands and place them in a sealed jar.
Reviving: Shards
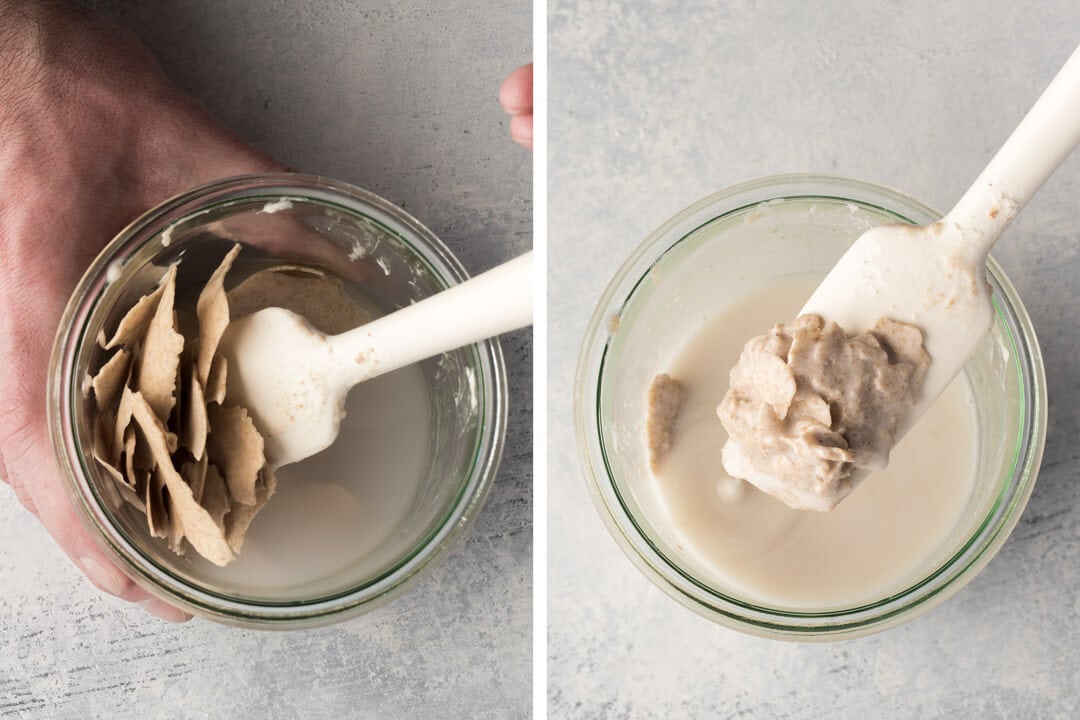
The shards need a little help rehydrating before we can add fresh flour and water. To rehydrate, add just enough warm water to cover. Let them sit in the water for an hour until soft and they start to break apart. Below, the image at the left is about 30 minutes into the soak and the image on right is after a full hour.
Next, without discarding any of the soaking mixture, add 100g fresh flour and about 90g water and stir completely. The result will feel overly wet due to the new water plus the water that was previously soaking. The mixture should feel close to 125% hydration.
Let everything sit until it looks like it needs another feeding, usually 12 to 24 hours, at warm room temperature. It’s important to try and keep the mixture warm during this time. A temperature between 78°F (25°C) and 82°F (26°C) would be ideal. Once you see sufficient maturity in the mixture, perform a feed with your typical flour and water quantities.
Sourdough Starter Storage FAQs
What should I feed my starter with when I revive it?
Use the same flour you normally use to do feedings.
What temperature should I keep the starter at when trying to revive it after storage?
Similar to when we are creating a new starter, it’s best to keep the mixture warm. If you can do 78°F (25°C) to 80°F (26°C) it will help expedite the revival process considerably.
My sourdough starter isn’t springing back to life, what can I do?
Start by picking up some good quality (organic if possible) whole grain rye flour. If you have a local source that mills rye I’d go with that first, and my second choice would be to order some online. I usually replace 50% of the flour I normally use for feedings with this rye flour.
Second, keep your starter nice and warm—78°F (25°C) to 80°F (26°C) if possible. Warm up the water used to do feedings, keep your starter insulated, or keep it in a proofer.
Finally, time your sourdough starter feeding so they are just when your starter ripens, not too early and not too late. If you feed too early you might reduce populations of bacteria/yeast before they can fully metabolize the mixture. If you feed too late, acidity will build in the mixture and will eventually create unfavorable conditions.
If you’re still having trouble, check out my top 21 sourdough starter problems (with solutions) ↗
What’s Next?
Of the many ways to store a sourdough starter the above have kept my starter healthy over the years, even with breaks now and then. They promote a quick recovery from storage, which means we can get back to baking as soon as possible. Armed with these new methods, don’t feel like your starter is keeping you from taking a break. They will ensure your starter perks back up in no time after it, and you, take a little rest.
Once your sourdough starter is up and running, head over and mix up a batch of my Beginner’s Sourdough for fresh bread this weekend! If you have more questions on sourdough starter maintenance have a look at my sourdough starter frequently asked questions or leave a comment below.


161 Comments
Hello! I’ve started my starter 6 days ago, day 2 the starter was very active and exploded but since then I didn’t see any bubbles on the top and it didn’t rise at all, I’m keeping it in a warm place and feeding it every 12 hrs.
What should I do?
Thanks for your help.
Stick with the process! It’s typical to see a lapse in activity after day 2/3. You could switch back to 1x feeding a day for a few days, then once you see activity, switch to 2x a day.
My starter took a full 22 days to take off, mostly because temperatures in my kitchen range from 66-72 in January (when I decided to start this adventure) and I opted to use mostly all purpose flour after starting with whole wheat. It was really bubbly and grew a lot on day 2, but didn’t get above 10% growth (even on days I just fed once) until day 22, when it doubled in 24 hours, and then on day 23 it doubled in 12 hours. I agree that you should stick with the process. It’ll get there.
What is your fav long storage method? Flour or shard?
They both work really well, but for super long term storage, I do the flour method.
Would you consider vacuum sealing for long term storage or just the flour method?
Ive never tried that but it could be a really good option!
Hi Mauricio, my question is about my refrigerator-stored starter. The last few weeks in NJ, with frig. at 39 degrees F., my starter has been really active, even overflowing in there. This hasn’t happened before. Can you tell me why or how this happens? And, I recently read on one of your posts that our starter shouldn’t be “too overripe” in order to bake good bread. How do we keep it from getting too overripe?
Fermentation will still continue in the fridge, and especially so if it takes a while for your starter to cool down when you put it in there. A home fridge is also opened frequently, depending on where it’s at and the container, it might stay warmer, for longer, than you think! When I put mine in the fridge I like to dehydrate it some, perhaps just to 70% hydration, which may help.
To avoid a starter/levain from becoming over-ripe, just feed it sooner! Use my guides here on maintenance to spot the signs for when a starter is ripe and give it a feeding (or use it to bake with) at that point before it becomes overly acidic.
Thanks very much!
Would you stretch out your regular feeding schedule even further? I am a physician and work 48 hr shifts in the hospital (yes, I usually get to sleep). Could one decrease carry-over, and/or decrease hydration further, for a 48 hr feeding schedule? I live in south Texas, so lower ambient temperatures (less than 72F, let’s say) only occur a few times a year. Also, when using stiffer starters, do you bother adjusting your dough recipe to make up the difference, even though it would just be a few grams of water?
I personally don’t like to go below 1x feeding a day, but you might be able to work by keeping a very small amount of starter left in the jar at each feeding and keeping it cool. I’d also go with 100% white flour and a lower hydration–a stiff variety would work best, but it takes a bit more effort because you have to mix in a bowl like a dough. If the deviation isn’t major, you probably wouldn’t have to adjust, especially since you’re using the starter to likely make a small levain.
Let me know if that works out for you, Adrian!
I have a very sour started I have stored in the fridge for a couple of months. Is it worth using again or do I need to throw it away?
I’d try to revive it as long as you don’t see any signs of mold!
Hi Maurizio! I hope you’re doing well. I was hoping you could help me with a question I have. I used the shards method and stored it in June 2020 (my starter was about 3 months old when I dried it) and this is the first time I’m trying to revive it.
I grabbed 20g of dried starter, covered it in warm water, fed it about 2 hours later with 90g of warm water and 100g of AP flour, however I haven’t seen much activity and it’s almost 24 hours later. There’s about 5 bubbles on top but nothing else. I’m gong to feed it tonight, perhaps even with some Whole Wheat and keep it in a warmer environment to see if that was my issue (it was cold today here in Mexico) but my question is: should I take some of the mixture out or only do this once it has become active again? My problem is I did it in a medium size glass container and I don’t think it’ll hold two or three more feedings without throwing some out but I don’t want to accidentally throw away some of the dried starter bacteria. I did not think this through hehe. Thanks for your help and great tips!
Hey, Mayra! I hope by now things have picked up, but what you’re doing is correct. Keep it warm and give it fresh flour and water. If you get close to overfilling your jar, just discard some of that at that time and give it more flour and water. If you have whole grain rye flour, use some of that for the feedings as well.
Hi Maurizio,
Believe it or not, after all these years, I still have questions. Starter is going great since 2019, had to start carrying over way less in this warm weather and it seems to really love it. So I’m at 20g of carry over, fed with 100g of flour and roughly 100g of water, a little more just to get it stirring easily. I’m still at a half rye/half AP starter food. My BIG question has always been with my leaven. To make it for my usual weekly 2 loaf bake, I use 25g of ripe starter and mix in 140g flour/140g water. Always. That’s my go-to. Overnight ferment. Bubbly in the morning. Makes two loaves. My basic weekly bake has evolved from using 150g of leaven (as per all of Tartine 3 recipes) to 200g per kilo of flour. Not sure how or why I increased it — i may have journaled about it but can’t remember– but all of the Chad Robertson recipes in Book 3 have 150g of leaven and I never understood why. Then I watched Jennifer Letham bake on Insta and she used even more in her demo. I’m sure there’s a formula that answers this, but what gives? How do you determine how much leaven you add to a recipe?? And I always have leftover leaven so I’ve experimented with using the 100 or so grams leftover for some pizza dough. That worked great last week. Thanks in advance for your help. And I hope you and your family have been ok through everything this past year and more. Stay well!
Hey, Nancy! Sorry for the delay. The amount of levain depends on so many things: timeline for your bake, flour blend, hydration, desired flavor/performance, and more. I typically start with 20% levain and adjust from there, usually down for my style of baking, but in some cases I increase the percentage. For example, if I’m baking a loaf with lots of freshly milld flour, I’ll often drop the levain significantly (sometimes as low as 8%) to ensure my dough doesn’t over proof with my typical 3-4 hour bulk fermentation time and final dough temp around 75F. So there’s no single answer for how much levain, it’s all about what you’re baking and what you’re after in the end. I hope that helps in some way!
Hi Maurizio!
I´ve been following your recipes and guides for about a year, so useful thankyou very much, since you helped me get into the magical sourdough world.
I have a question, Its the second time I dry my starter into shards because I took a very long 2- 3 month trip and now coming back, trying to revive my shards, I am having a bit of trouble. I soaked the shards for about an hour with warm water, the mixture was very liquidy and waited until the next day to refresh even though there was no activity, it didnt grow in size, no bubbles, it remained liquidy same. So now, I am trying refreshing with some rhye flour doing a 1 -1 – 1 ratio. Have been doing 2 experiments on one jar I put 100 grams of the liquidy shards with 100 flour (50% rhye, 20%white, 30% whole wheat) and 100 warm water. Its been a day and no activity. On the other jar I mixed 50 grams of the liquidy shards with a different mix of flours and warm water, same ratios, and no activity yet. This has happened to me before, and after like 3 days of no activity that I thought I killed my started one of the experiments springed back up, and I have no idea what made it spring.
Do you have any tips or comments ?? I would appreciate any help!!!
I am also keeping the jars in the microwave with the light on, so its about 26 celcius in there.
Thank you!!!!
Alexandra—I hope your starter came back by now! It’s likely it just needed time to get a full population going. Keeping it warm is a good move as that should help it. It sounds like you’re making all the right steps there, it might just be a function of giving it time to get going! For me, it usually takes a little time, and it seems each time has been different.
Hi Maurizio! I used the dry crumble method to dry out my starter in October and am trying to revive it now. I used 250g of the dry crumble and added 50g flour with a good bit of water at ~85 deg F.
I left it overnight (~12 hours) in a sous vide at 81 deg F but have not seen any growth. I’m planning on waiting another 12 hours to see if isn’t activity starts.
At that point, how much should I discard down to? I don’t think I will have enough room to expand in my current container to add 100g of flour and 100g of water. Thank you for the help!
Great question, I usually see activity resume after a day or two. If you still don’t see activity, I’d discard down by half and give it fresh flour and water to replace after a couple days. You should start to see something!
Thank you for your help! I am seeing growth, but it is never expanding to twice its size, and it is taking closer to 24-36 hours to reach its peak. I have started doing the standard feedings (50g starter, 50g rye, 50g all purpose, 100g water). Do you have any other advice to get it back to health?
hi there! thanks for your helpful guides! What if I have to miss an evening feeding because I ran out of all-purpose flour ran didn’t realize it? OR can I just use bread flour? or should I stick it in the fridge for a night?
I’d go with bread flour, not a problem there! If you miss a feeding it’s totally fine, too.
Hi Maurizio!
I have a question about reviving dry crumble: How much of the mixture should I use with 50 g of flour? I crumbled quite a bit of starter, so using all of it feels a bit much. Thank you so much in advance!
Hey, Kathrin. You shouldn’t need a lot, I’d say 20g should get you there.
Thank you so much :-)!
Reviving Dry Crumbled
I dried my starter in a flour mixture this summer. I received a new proofing basket for Christmas and want to bake again. This is my first time reviving dried crumble and I’m looking for suggestions.
The first day after feeding fresh flour and rehydrating, I didn’t see any activity. Last night I added more flour and water, but there was still very little activity overnight. I placed the jar near a fireplace today hoping to boost the activity since it is fairly cool in the house. There are bubbles and some growth, but it is slow.
Are there any suggestions for getting the starter back to where it used to be? This is the third night and it will once again be cool in the house.
Since I am almost certain this is a temperature problem, I decided to use a sous vide to maintain 80*F overnight. I stabilized the jar very well and am hopeful for a great recovery.
Sorry for the delay, Mark! Yes, with that warm of a temp I think it’ll spring back. I hope you’re back up and baking!
Hi Maurizio
thank you for useful information.
I want to ask you 2 things. I have only one starter. I feed two times a day in the room temperature. I’m feeding 1:2:2
For example:
9:00 am – I have 100g starter. 80g waste then feed my starter (20 starter + 50 flour + 50 water = total 100g)
3:00 pm – I make bread and use 80g starter… (total remaining 20g starter)
9:00 pm – feed my starter (20 starter + 50 flour + 50 water = total 100g)
This is my daily routine
Is this technique correct ? Because everybody uses mature starter. They get some from mature starter. Then mix flour and water. After peak time add to dough. What is the difference?
Next Question:
I feed my starter. After 6-7 hours, I add to dough. Because I want less sour.
I want to make dough. 12 hours after feeding. If I feed it the my daily routine, it will be sour.
What should I do ? I want base sour.
Should I feed higher? 1:5:5 or less or more
Should I use cold water for starter?
Should I lower room temperature?
Should I add honey or sugar to my dough?
Thank you
Hey, Kenan! Yes, your approach works totally fine. What you’re doing is using your starter directly in a dough mix, which works well. Some bakers—myself included—usually make what’s called a levain (or leaven) which is kind of like an off-shoot of your starter intended for just one bake. Check out my post on the differences and similarities between a starter and a levain for more information.
I’m working on a post on how to make your bread more (or less) sour, it should be out here soon. But in general, I like to use my starter/levain when it’s more ripe (longer after feeding). Also, using more whole grains in the starter/levain and the dough will help bring more sourness.
Adding honey or sugar isn’t strictly necessary.
I hope this helps. Be on the lookout for my post on sourness!
I read from time to time that some bakers claim they are able to feed their starters once every 24 hr and leave it out at room temp.
It would be great to be able to feed only once a day, but for the life of me, I am unable to let it ferment that long without serious over-fermentation. Maybe if I lived in Alaska 🙂
Have you been able to maintain your starter at room temp using a 24 hr cycle? If so, what feed ratio and temp are you using?
Bravo, for such an excellent post.
Thanks for sharing your passion with us…
Danny
OH! Others may be interested.
My refrigerated starter is fed once a week. I have found that with these relatively frequent feeding that an active levain can be built straight out of the fridge, especially when fermented overnight. If a quicker levain is called for, use warm water to jump start it.
A real convenience.
Hey, Dan! I also find my starter is a bit acidic if I leave it for 24 hours with only a single feeding. To get that to work, I’d likely leave a very, very small amount of starter in the jar (in the summer, maybe just the residual on the sides!), give it plenty of flour, and reduce the hydration of the starter to 50-65%. The stiff consistency will give you more leeway in refreshment, and it should prevent it from becoming super broken down and acidic.
Hi Dan,
I am new to sourdough bread making and feed my starter every 24 hrs. I first started leaving the starter mix undisturbed for 48 hrs. After that, I will feed it once a day using 1/4 cup of all purpose flour, 1/4 of whole wheat, 1/4 cup water at room temperature and 1/4 cup of the starter. Mix it all together in a clean jar and leave it a room temperature. It took me 10 days to have an active starter using this method.
My starter is active and lively. I’ve been baking with it for 3 days now. I put it in the refrigerator 6 hours after feeding it was bubbly and doubled in size. I’m just wondering would that be okay that I let sit it out in room temperature for 6 hours before refrigerating it? Thank you
It will, but keep in mind the longer it’s out and fermenting, the less “runway” it’ll have in the fridge before it fully ferments all the food (flour) given.
Hi! yesterday i dried my starter using the dry crumble method. I let it sit out for a few hours and then put it into a jar. However, it was kind of moist/damp. Not wet necessarily but not 100% dry either bc the dried crumble is still holding onto its shape. Today, i checked it again and it is still like that. Did i do something wrong? Did i completely kill my starter?
I doubt you killed it, but take it out of the jar and put on a flat surface (plate or whatever), let sit out until it is completely dry. If you want to save dry starter, it needs to be completely dry before sealing it into a container; moisture in a sealed environment will mold.
Sounds totally fine to me, Jessica! Just try to keep it as dry as possible to avoid mold from forming in the jar.
What is the revival process if I just want to feed it and stick it back in the fridge? (i.e. not going to bake with it)
I like to take it out for a few hours on the counter, give it a refreshment, let it sit out 30m to 1hr, then pop it back into the fridge.
Ciao Leo!
I recently crumbled my starter with whole wheat flour and put it away for a few days. I went back to it this morning to check on it and the crumble had a sour smell, not off or bad, but just sour, and there was a lot of gas buildup in the jar itself. It sounded like a beer can when I opened it. Is this normal?
Thanks,
Dom
I’m no expert but sour is how it is supposed to smell. If it’s not an off smell, it’s probably just as it should be
Sounds totally normal, Dom!
Hi
I am a very new baker. just been using a bread machine. However, I am in the process (day3) of making a sour dough starter. Now I wont hand bake that often and I did not realise when I started the starter I would have to keep feeding it so often. Is there a way I could maybe feed it less and keep in the fridge until I want to use it, maybe once or twice a week. To be honest I ma getting a bit confused by all the feeding regimes I have read on your website. Also can the starter be used in a bread machine? Finally I am not sure how to use it in bread recipe or how much to use? Very best wishes Tim
Hey, Tim! Sorry about all the confusion. I’d say check out my weekend baking schedule guide, this will be perfect for you: keep your starter in the fridge most of the week then take it out on the weekend to bake. You can adopt this schedule once your sourdough starter is rising and falling predictably each day — it’s established. Happy baking!
Hi Maurizio! I need to send some starter across the country and was planning on dehydrating and breaking into shards. I’m not clear on what state my starter should be in when I go to dehydrate. Can I use my discard or should I be drying ripe starter?
Hey, Kara. Yes, use your ripe (mature) starter to dry into shard — you want maximal population of yeast and bacteria. Your discard and ripe starter are really the same thing, so either will work! Be sure to thoroughly dry it out so no moisture remains.
Hi Maurizio, I just spread some leftover, very active starter on a dehydrator tray. I had two empty trays over the base of the dehydrator and put the starter to dry on the top (three from the bottom) tray. My dehydrator has a fan on it also. the lowest temp I can set it at is 95 degrees. It dried in 24 hours and I put some in storage and was going to send some shards to a friend out of state. Was that too hot? Are the shards any good?
Hey, Marcy. This is a great idea. I believe at 95°F or so things should be just fine (yeast/bacteria start running into issues around around 130°F+). I haven’t tested this firsthand, though, but if it were me I’d send these to my friend, they’ll likely come right back to life.
Hi Maurizio.
My daughter is learning SD, but unfortunately, she lives in another state, so me providing “hands on” is not possible. She has made your waffles for her first recipe. Now she would like to make bread. She doesn’t have a mixer, so it will be by hand. She isn’t a baker, so is not familiar with slap and fold techniques. Can you 1) recommend a beginner loaf recipe (they don’t care for extreme sour, high hydrated, etc.)? Also 2) Do you have your recipes designated as “beginner” recipes? Is that possible?
Thanks,
Marcy
Dr. Hammelman sounds a cautionary note in his appendix on sourdough maintenance:
Has this possibility ever concerned you? It sounds as if we all as a rule do not hesitate to put the culture in the refrigerator (I like the idea of calling it the chef as above), but these are certainly below 8°C.
Nick — it does concern me and I frequently mention here on my site I don’t like to keep my starter in the fridge for longer than a week or so. I’ve found it to be just fine for around that time, and with a few refreshments at warm temperatures, it’s back to normal. I personally bake very often so my starter only sees the fridge when I’m traveling, but when I have to leave that’s my only option. When returning from my trip, it usually takes my starter 2-3 refreshments to get back up to speed (through rebuilding yeast/bacteria population balance).
Ideally I’d like to never use the fridge, but it’s a handy tool to keep the culture alive and well while away, or taking a baking break, and sometimes we have no choice!
So it sounds as if there is a little more breathing room than Professor Calvel lets on. I’m a weekend baker, these days sometimes every-other weekend, and my culture has gotten a bit underwhelming (though a lackluster culture can still make some pretty good bread). I’m thinking of trying the technique mentioned in the same appendix of using 2% salt to retard the culture at room temperature, lasting about 2 days between feedings.
It’s good to know that the odd week in the fridge won’t make-or-break. For a longer trip I might just ask the bakery nearby for a new culture; they’re happy to give some away. I’ve rarely had my culture in tip-top shape, but I’d like to see what’s possible. Thanks for the response!
If it’s become a little sluggish keep it at room temp for a week (no salt) and give it regular feedings to perk it back up. Then I’d say give the salt method a try, it’ll work quite well, just be sure not to use too must salt. Adjust the percentage as needed.
Another approach is to convert your starter to a stiff starter (50-65% hydration) which seems to have more tolerance for changing the feeding interval. Additionally, the reduced water can help reduce activity.
Hope that all helps and keep me posted on what you find works, I’m very interested in this!
Update: I got a new starter from a bakery a month ago. It came to me about 125% hydration and all white flour, so I’ve maintained it that way. It hasn’t entered the fridge yet; I’ve occasionally used a bit of salt to retard the activity. It’s worked well but I did find it was eating up a lot of flour; I was feeding about 5 oz a day. So I was glad to see your recent post on maintaining a smaller culture.
Then, this article appeared in the local paper over the weekend. Lost Bread Co are wizards of all manner of grain here in Philadelphia, and I was a bit scandalized at their suggestion that the fridge could be embraced for long periods. I even saw them at the farmer’s market on Saturday, giving away starter and care sheets. I’ll summarize their approach:
– starter consists of whole grain or spelt flour, not white (makes it hardier?)
– 60 percent hydration (decreases activity)
– 4 percent salt (well, 2g salt to 50 g starter and 50 g flour) (should really decrease activity)
They claim it keeps in the fridge 2-3 weeks without feeding, though they do recommend refreshing with at least one feeding at room temperature prior to use if it’s been more than a week.
It all seems crazy but like it just might work. I may give it a shot.
Sounds like an interesting approach. I’ve actually never considered adding salt to the starter before placing it in the fridge, that would slow activity even further. I too like to use a lower hydration when placing my starter in the fridge. Perhaps the added whole grains increases the buffering capacity of the mixture, which would decrease the overall acidity in the mixture, especially in long periods.
I am sure it would work, but what I’d want to pay attention to is how the starter responds when coming back to life and how many refreshments it needs before getting back up to full strength…
Hi Maurio, I tried storing starter for 5 days in the fridge. The top 5mm turned dark, but it smelled OK. Threw out the top. Then noticed when I added rye flour it smelled earthy. Turns out the rye flour smells earthy. Even a new bag of the rye smells earthy. I recently bought some more that does not smell earthy.
Still using the earthy rye. The starter is going great, but I am worried if it is safe to use.
Do you think the earthy smell of the rye indicates mold our does this sometimes happen?
BTW my relatives, including one from SF can’t get enough of the beginners bread!
Thanks
John
John — just replied to your email!
Got it. Thanks!
Hi Maurizio, how are ya? I’ve been using your method for longer term fridge storage and I can see there is a good amount of bubbles still in the starter and a lovely fragrance still, after two weeks in the fridge with a loosely covered jar. I noticed a thicker layer on top though with a bit of fuzz. It wasn’t green or mouldy as such but I scraped that off and threw it out then stirred the starter and put it back in the fridge. it looks and smells great still but just wondering if I am safe to use it still? I should be baking this weekend so I’ll be trying to bake once a month and just keeping the starter in the fridge for 3 weeks at a time. Also – is it ok to just stir the starter once a week while in the fridge to stop it from getting frosty on top?
Hey, Frank! Yeah, that should be totally fine. As long as you didn’t see any signs for traditional mold (which I highly doubt), it’s ok to pour that off or even just stir it back in. Happy baking!
Thanks Maurizio! I took the starter out of the fridge this morning and have left it out to get back up and running. It had a ever so slightly acidic smell so I’m guessing it might need a feeding soon. I want to get it up to strength for a bake this weekend 🙂
I have a question about dehydrating the starter. Once it is in shards, do you think I could throw it in a food processor it to break it down even further making it easier to bring back? I will just give it a try and see. I have several friends who keep killing their starters and I keep giving them some of mine but I thought what if I gave them some that they could reconstitute rather than having to make a trip to my place.
That should work just fine. The key is to be sure everything is super dry — no wetness anywhere!