
So many intangible inputs get mixed into our sourdough starter each day besides the raw, physical ingredients: the time needed to mix, attention, observation, and perhaps a little worry now and then—all the resources constantly tugged at, and contributed to, by daily life. At first glance, this list might seem like a lot of fuss needed to keep a small, bubbling culture going. But really, it’s a smidgen of time in the day, and I think, at least, the resulting bread is always justified.
There’s undeniably a lot of value in maintaining a healthy and regularly fed sourdough starter, but sometimes we do need a vacation, don’t we? Luckily for us, a starter is not only incredibly resilient but it also can be sent into “low power mode” by following a few tips on how to store a sourdough starter for a longer period of time.
In the past, I’ve talked about placing a starter in the fridge for around a week to reduce required maintenance, and this is always a valid option. However, what if we’re going to be gone longer than a week? Or two weeks? Or a month? I’ve experimented over the years with ways to store my sourdough starter and have found the following methods to all be effective means for storage and quick revival.
But first! If you don’t yet have a sourdough starter read through my guide on creating a sourdough starter in 7 steps and then head back here to pick up where you left off.
How to Control Sourdough Starter Fermentation
Control isn’t a word I like to use lightly regarding natural fermentation. Rather than control, I think of it as guiding fermentation in a certain direction. A seemingly small semantic difference but an important one. It’s a facet of baking I didn’t fully appreciate until I had a better grasp of the factors that play into modifying fermentation activity in a dough (like temperature).
The table below outlines a few of these factors and how we can modify them to adjust fermentation activity. With this knowledge, we can adjust them to slow down our starter to accommodate our desired storage time.
| Increased Fermentation Activity (↑) | Decreased Fermentation Activity (↓) | |
|---|---|---|
| Hydration | Higher hydration (e.g. liquid starter) | Lower hydration (e.g. stiff starter) |
| Temperature | Higher temperature | Lower temperature |
| Percentage of Whole Grains | Higher percentage | Lower percentage |
| Inoculation (the percentage of ripe starter carried over at each feeding) | Higher percentage | Lower percentage |
| Salt (while not typically used in a starter, salt can be mixed in at a very low percentage to temper fermentation) | Lower percentage | Higher percentage |
Many inputs determine a sourdough starter’s vigor, not just the items above. The table also assumes we can modify each factor independently, which is sometimes not the case! Usually, they are related and intertwined—changing one might have subtle side effects on another. In the end, it’s best to try and isolate a single factor and make a change. Then, observe how your starter behavior was impacted: its smell, rise time, and visual cues.
With the above information, let’s examine how we can modify our starter to reduce maintenance feedings.
How To Store Your Sourdough Starter

The following sections are divided into several storage time durations. You should read through all the sections to understand how the above chart and fermentation-altering factors affect your starter’s timeline. If you’re having any issues with the processes below or with reviving your starter, scroll down to the troubleshooting section for more information.
How To Store Your Sourdough Starter For A Day Or Less
While not exactly storing, I’m referring to small adjustments you can make to change your starter’s daily feedings. If you do feed daily (either once, twice, or even more) then you’re likely already in an effective maintenance routine. But what if you’re going to be gone for the night and won’t come back in the morning? Or you just want to skip a feeding? Let’s take a look at how I’d modify my personal starter to accommodate that change.
I usually keep my starter somewhere warm, always in a proof box or the new Sourdough Home in the winter (see more on the importance of temperature when baking), with a refreshment early in the morning and one 12 hours later. If I expect to miss a refreshment, I mix my starter to a slightly stiffer consistency with a smaller ripe starter carryover (inoculation). For example, if my normal starter feed is:
| Flour | 100% (100g) |
| Water | 100% (100g) |
| Ripe starter | 20% (20g) |
I would modify to:
| Flour | 100% (100g) |
| Water | 80% (80g) |
| Ripe starter | 10% (10g) |
A small change, but not much more is needed. The reduced hydration and smaller carryover will slow fermentation activity. Additionally, you could instead use cooler water or keep your starter a few degrees colder to also slow activity.
It’s easy to just stick a starter in the fridge when we can’t get to a feeding. And while placing your starter in the fridge at around 38°F (3°C) isn’t a huge problem, why place your starter in a “stressful” situation? For me, the preferred option is to reduce hydration and inoculation when I need to do small, daily adjustments. You can play with the amount of carryover at each feeding and see how your starter reacts to the change. In some cases you might not even need to adjust the hydration, just the inoculation percentage will afford enough control.
But what if we’re going to be gone a week or more?
How To Store Your Sourdough Starter for Up to Three Weeks
Building on the comments above, a home refrigerator can be a very convenient place to store your starter for extended periods. However, I don’t like to leave my starter for more than three weeks in the fridge because it usually takes longer to revive with the additional care required. If I need a break for more than this time, I’ll opt for another method below (usually drying into crumbles).
Storing Your Sourdough Starter In The Refrigerator
You can see the consistency of my fully mixed starter prepared for the fridge in the images below. Notice the consistency is stiffer than when at 100% hydration. This reduction in hydration helps the starter hold up extremely well in the fridge.
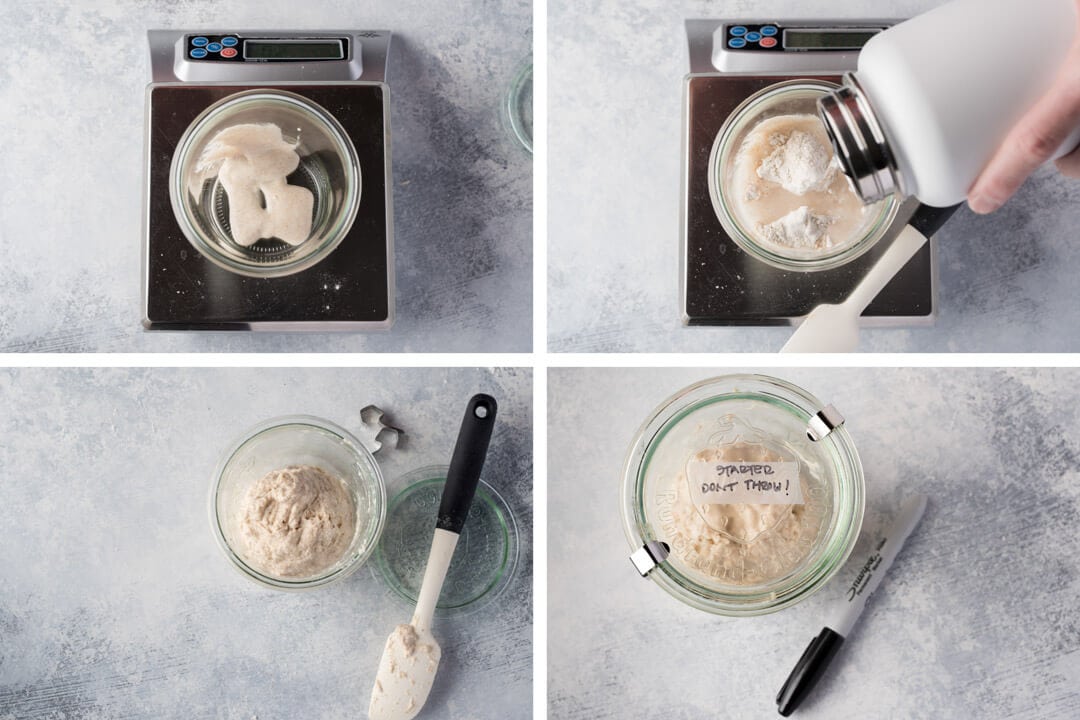
Take out a new, clean jar with a lid. To the jar add the 20g ripe starter and 100g flour (whatever flour you usually use for feedings). Then, add 80g room temperature water and stir until all dry bits are hydrated. Place a lid on top, and secure. Let the jar sit out on the counter for about an hour to let fermentation get started. Then, place it in the fridge somewhere near the back where it will go unnoticed (and no one will be tempted to throw it out).
How to Revive Your Sourdough Starter From The Refrigerator
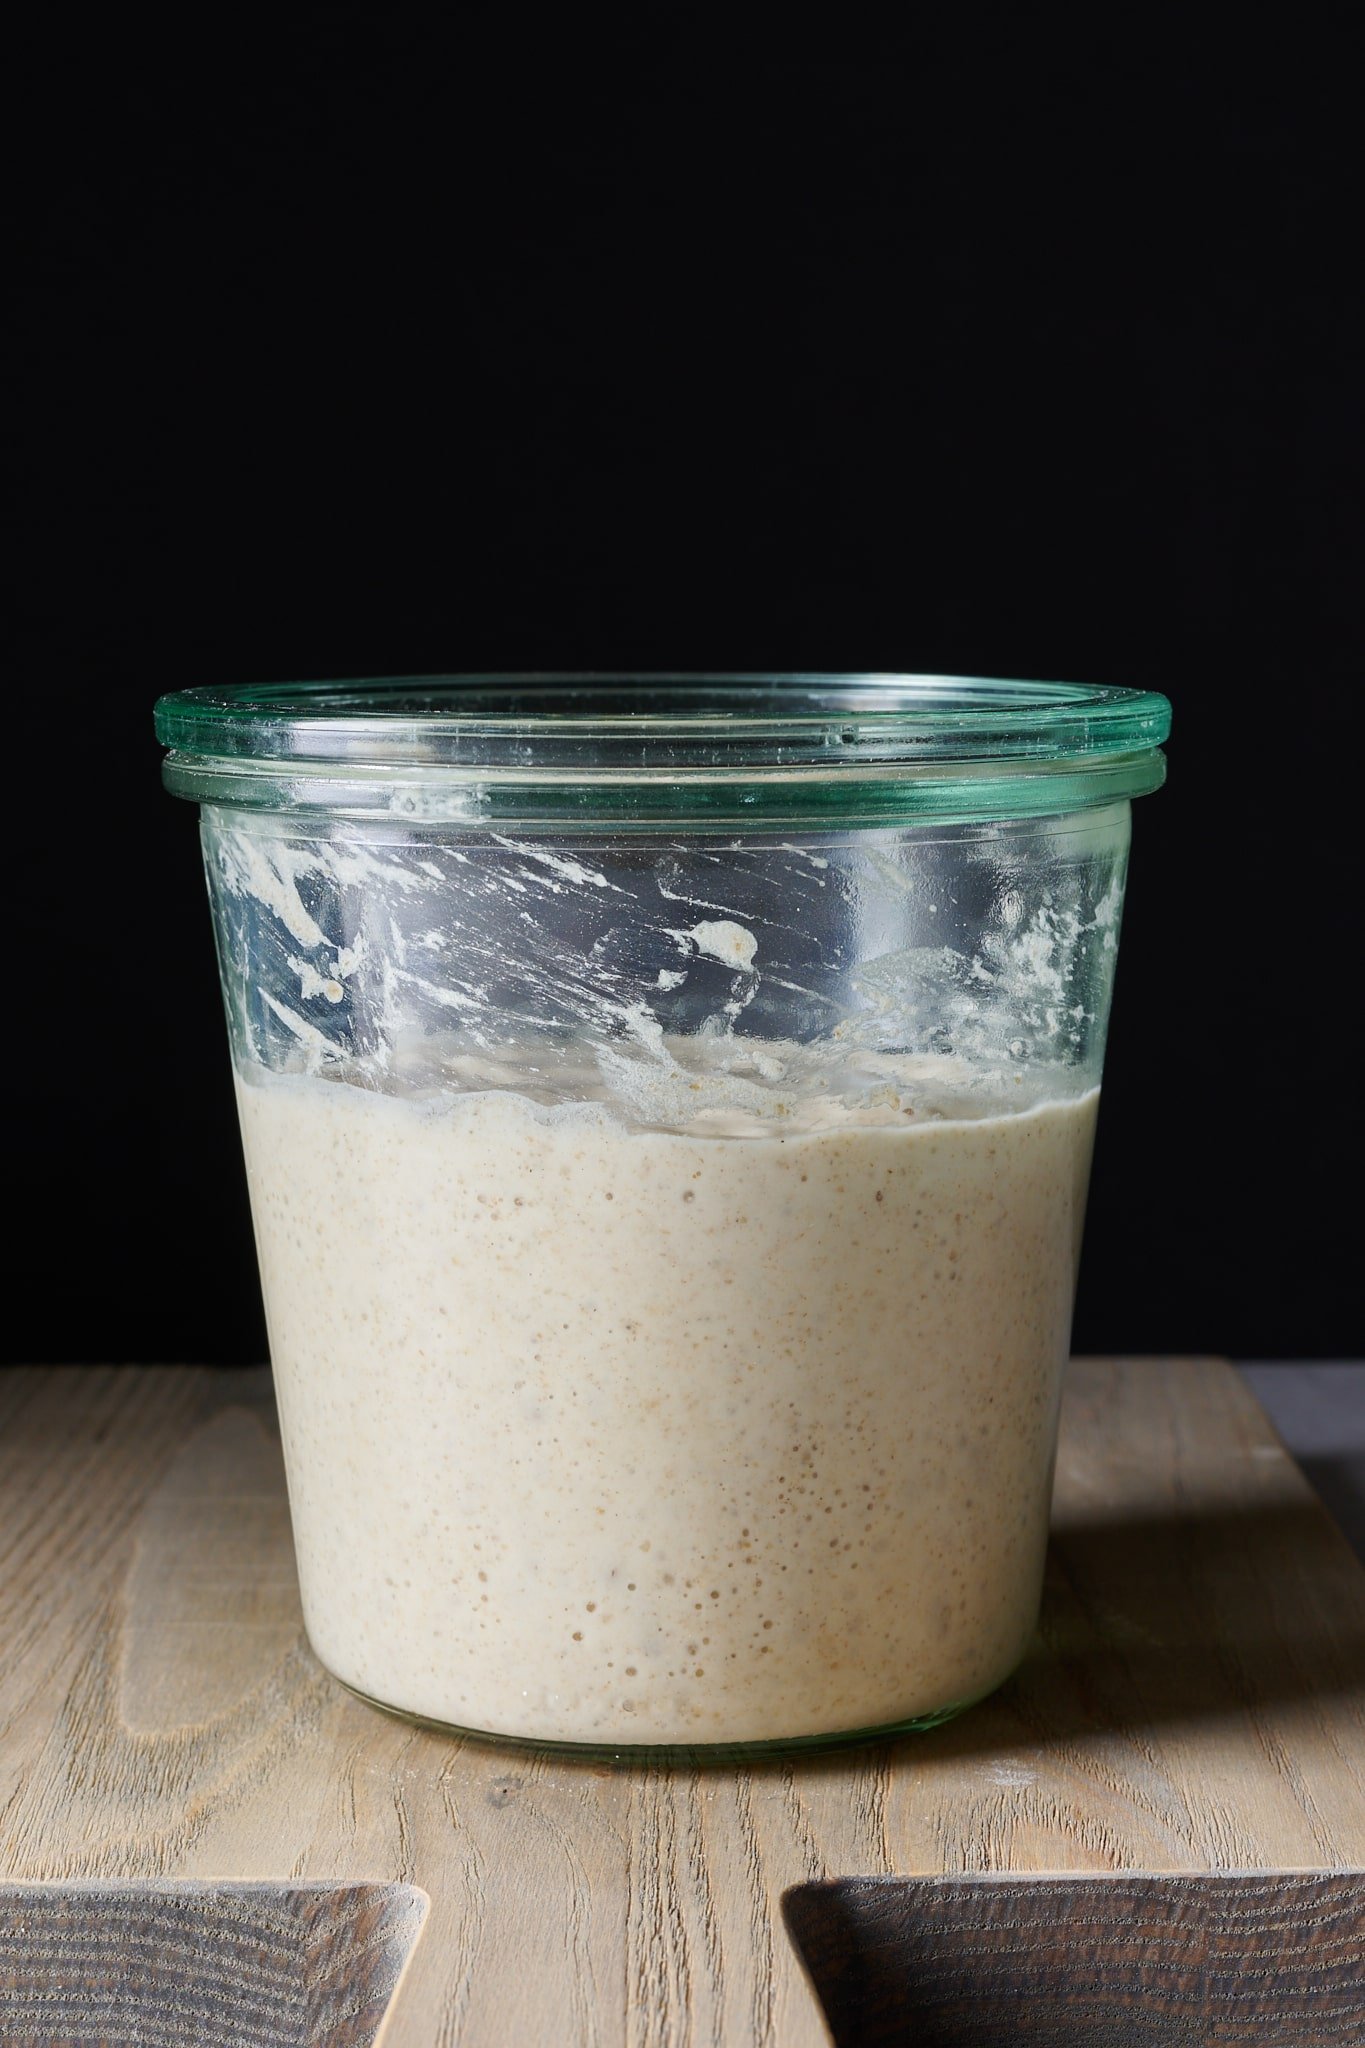
To revive, take your jar out of the fridge and let it sit on the counter for an hour or two to warm up. The mixture may or may not be bubbly like mine below, but either way, stir it so everything is reincorporated. Proceed with your normal starter feeding (discard down, add fresh flour and water) and place in a warm spot until it shows the signs it needs a refreshment. For my starter sitting at 78°F (25°C) this is usually around 12-14 hours later.
I prefer to do at least 2, preferably 3, regular feedings before using the starter to make a levain. I’ve rushed this in the past and, at least with my starter, it needs some time to get back up to full strength.
See my guide to storing a sourdough starter in the fridge for vacation for more tips on storing it for short periods.
How To Store Your Sourdough Starter For Long Periods
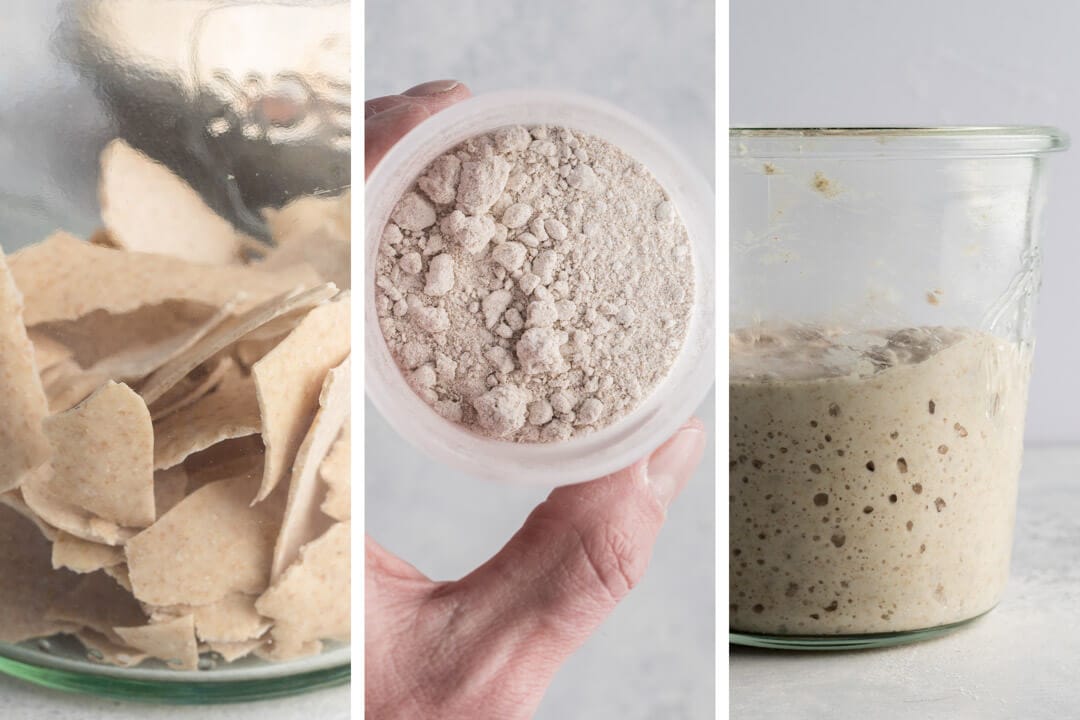
I use two methods to store my starter for long periods and usually opt for the first: crumbling and drying it out in flour. I’ve left my starter dried in my pantry and out of direct sunlight for up to 8 months (Update: I now have one stored for over two years!) without any issues.
Usually, I notice my starter springs back faster using this method, but both have proven equally effective. While these methods can be slightly laborious, especially the second, they’re handy options in your baker’s tool chest.
Moisture is the enemy of successfully storing a dried starter.
Additionally, these methods are excellent ways to ship or travel with your sourdough starter. If you have a friend that lives many miles away, dry your starter, seal it in a jar, and send it on its way. If no moisture enters the jar, it will reach its destination without issues. Then, point them back to this website to learn how to revive the now well-traveled starter.
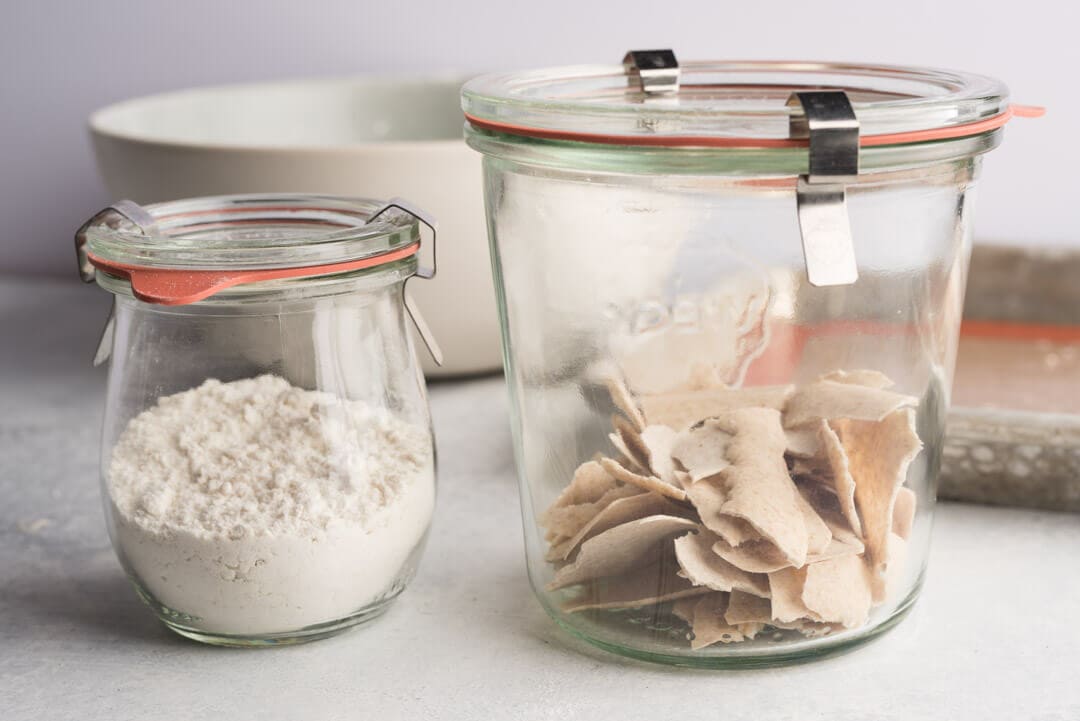
Moisture is the enemy of successfully storing a dried starter. To ensure your starter is truly hibernating, you must ensure the results are completely devoid of hydration and kept in a dry location. Once it’s dry, place the crumbs or shards in a container and seal it shut. I usually use a Weck jar with a rubber seal and clips to create an airtight seal.
These jars are designed for canning, so they’re perfect (here’s more about why I love them).
Storing: Crumble Into Dry Flour
This is by far my preferred method for long-term sourdough starter storage.
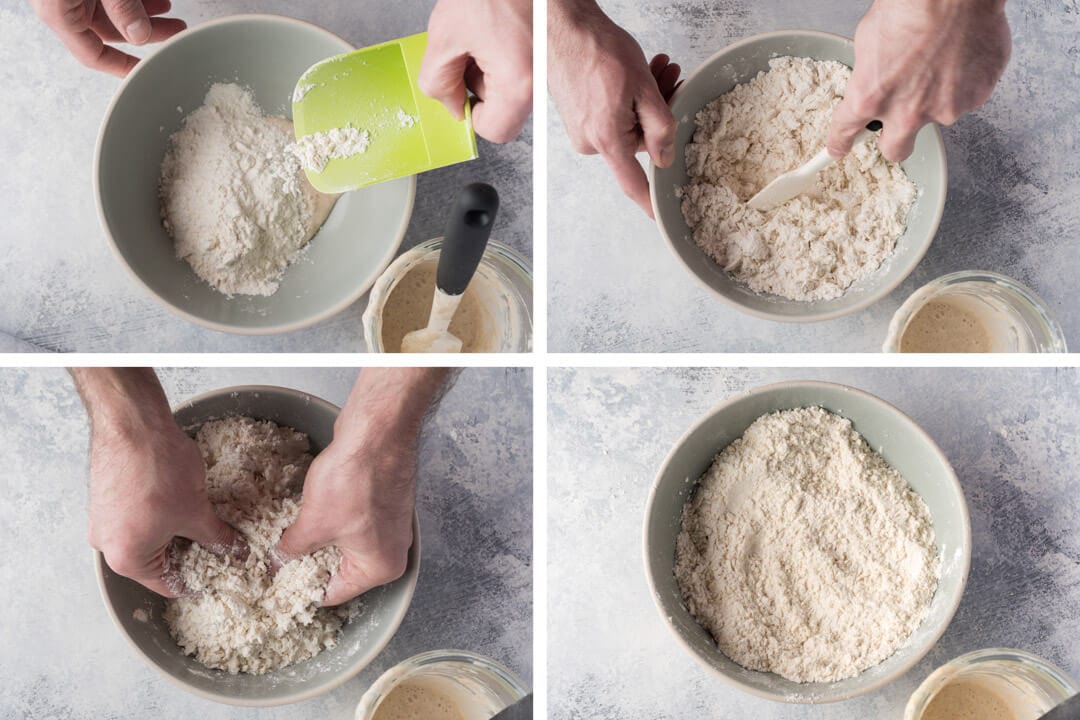
Place a large dollop of your ripe sourdough starter in the bottom of a large bowl. Cover the starter with lots of flour—you can use the same flour used for feedings or 100% white flour. First, using a spatula, mix everything until it’s fairly incorporated. After mixing, you’ll still see large lumps throughout. Next, use your hands to pinch through the mixture, seeking out large clumps to break them into small pea-sized balls. Continue doing this for several minutes, depending on the quantity of starter you poured into the bowl. If the mixture feels wet, keep adding flour as needed.
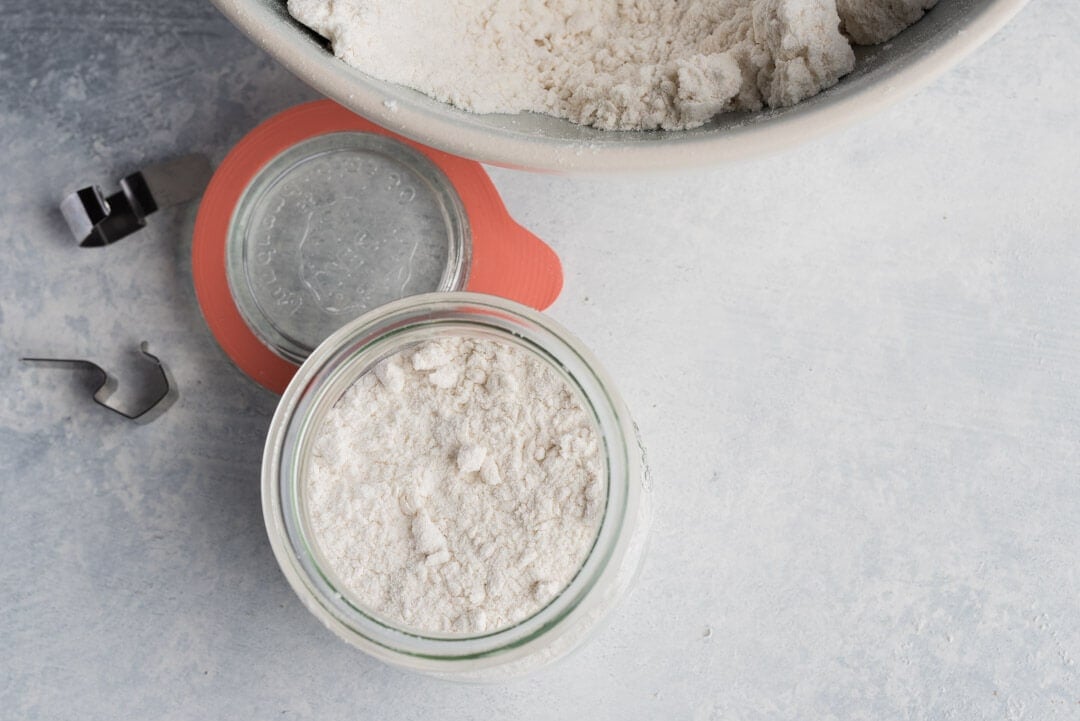
Once the entire mixture feels dry, let the bowl sit out exposed to dry air for an hour or so. Then, place the contents in a jar and seal it shut. You can spread the contents across multiple jars if you’d like to keep a few backups or give some away to friends. The key is to get enough of the mixture in each jar, so there’s a large sample of your dried ripe starter.
Keep the jar sealed in a dry area in your pantry away from light and moisture.
Reviving: Dry Crumble
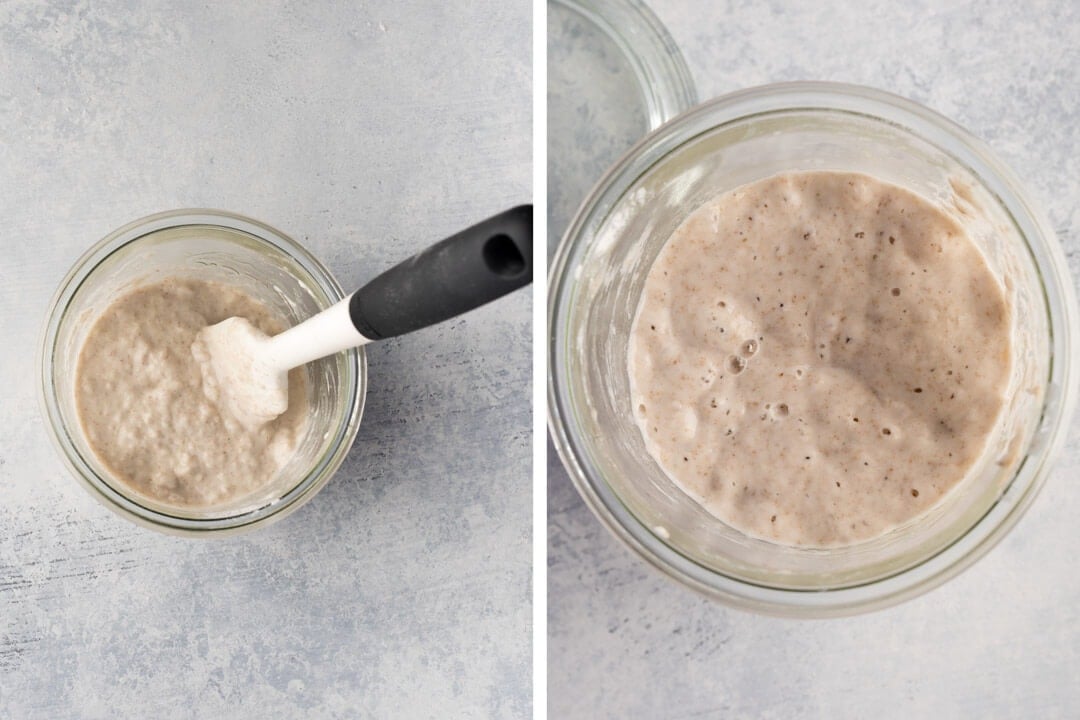
The crumbs from the above method won’t require any preparation before adding fresh flour and water. Without discarding any of the dried contents of the jar, add 50g of fresh flour and enough water to make the mixture easy to stir, then stir until no dry bits remain. The exact hydration of the mixture isn’t really critical, there just needs to be enough water to make the mixture easy to stir and feel about right to you.
Let everything sit until it looks like it needs another feeding, usually 12 to 24 hours, at warm room temperature. It’s important to try and keep the mixture warm during this time; between 78°F (25°C) and 82°F (26°C) would be ideal. Once you see activity in the mixture and it looks like it needs feeding, feed it with your typical flour and water ratio after that.
Above, the image at the left shows the mixture just after adding the stored starter, fresh flour, and water. You’ll notice it’s rather loose and highly hydrated with lumps present. Next, the image at right is after about 12 hours at 80°F (26°C)—plenty of activity and ready for the first real feeding.
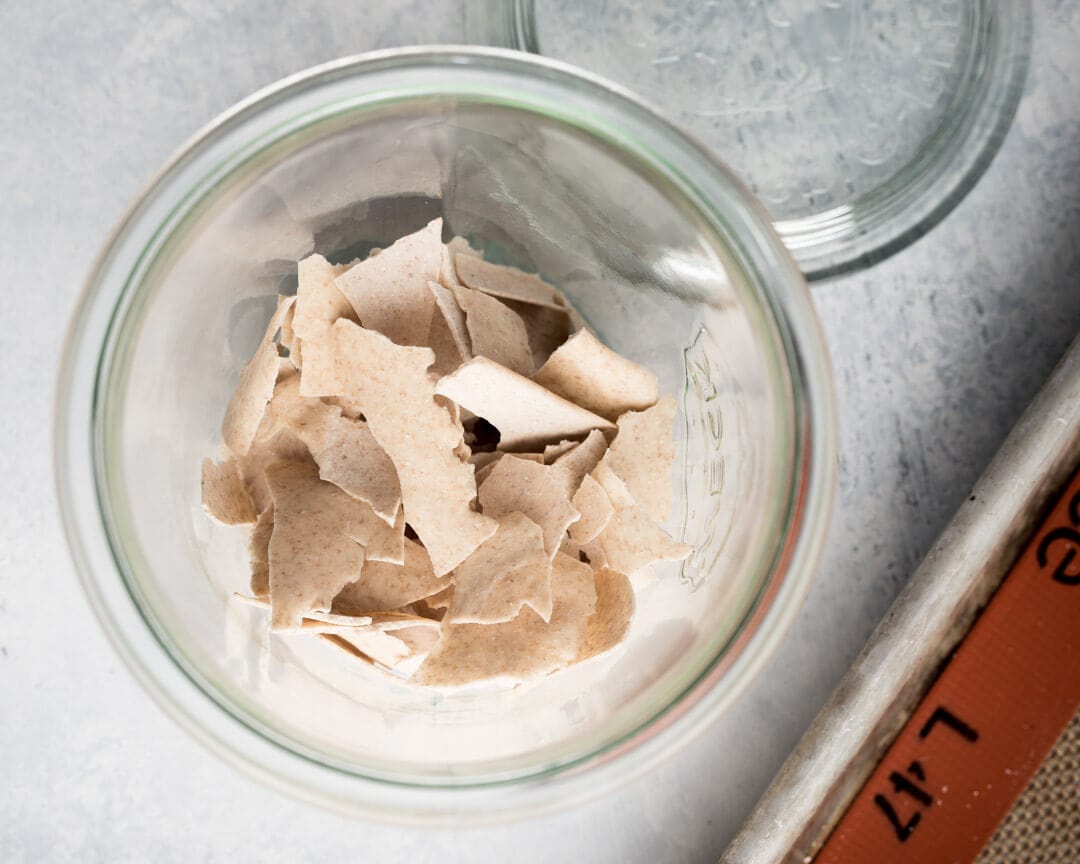
Storing: Spread, Dry, and Crack Into Shards
This method is similar to the above in that the starter is dried completely, but this takes it a step further by drying the starter itself into “shards.” The shards are then broken into small pieces and stored away from moisture.
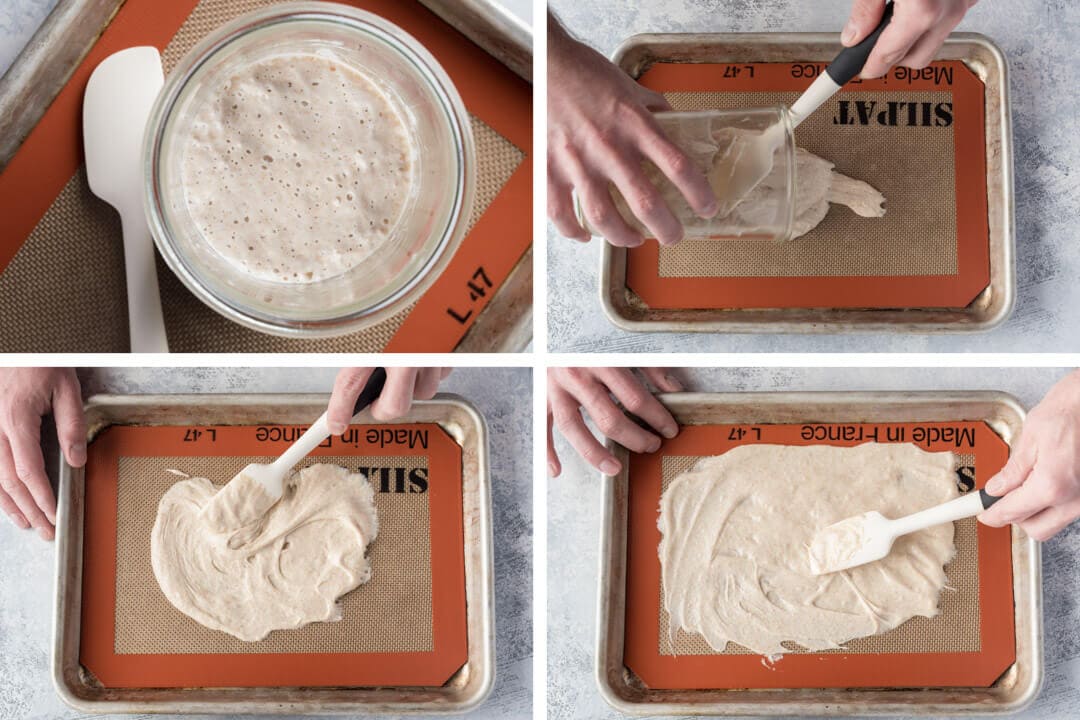
The easiest way to dry your starter is to use a baker’s quarter sheet lined with a silicone liner (or parchment paper).

Pour a large dollop of your sourdough starter out onto the silicone liner. Using a spatula, spread your starter out into a thin layer. The thinner and more even, the better, this way, it uniformly dries and begins to crack. Using a quarter sheet is handy because it fits nicely into my Brod & Taylor dough proofer, which speeds up the drying process considerably. Place the quarter sheet in the proofer on the bottom rack and turn the temperature controller to 76°F (24°C). If you don’t have a proofer, place the quarter sheet uncovered on your kitchen counter.
Leave the quarter sheet untouched for several days until the starter begins to crack and lift up off the surface. It will visually change from a dark color (where it was wet) to a uniform, light color. Once it looks completely dry, crack the pieces with your hands and place them in a sealed jar.
Reviving: Shards
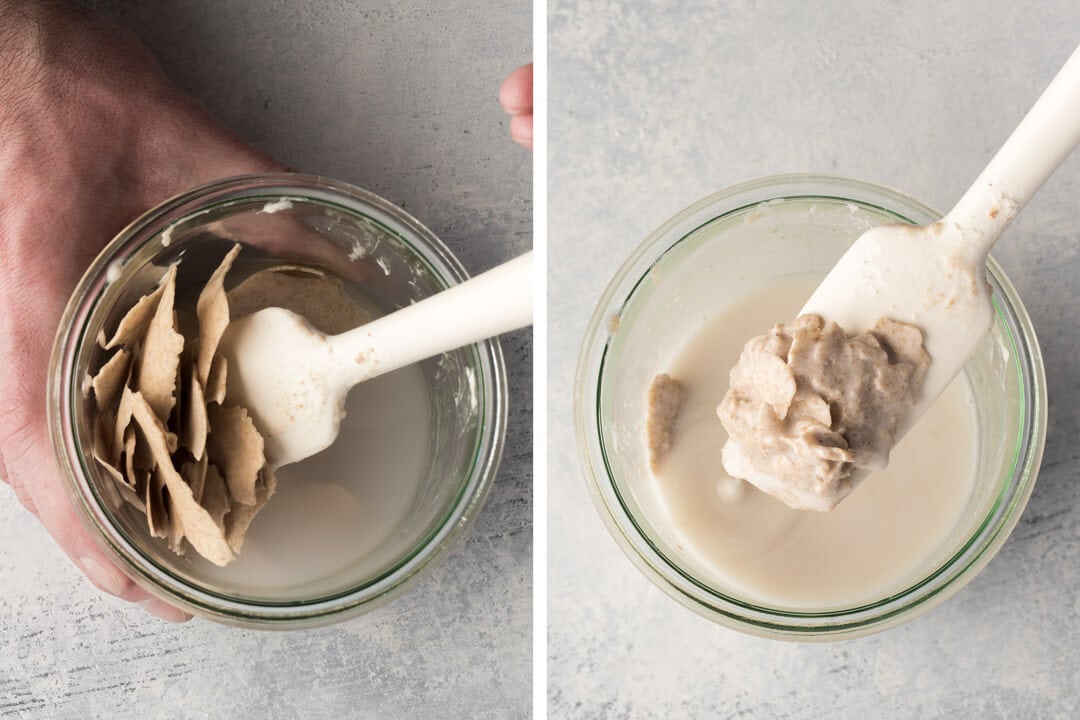
The shards need a little help rehydrating before we can add fresh flour and water. To rehydrate, add just enough warm water to cover. Let them sit in the water for an hour until soft and they start to break apart. Below, the image at the left is about 30 minutes into the soak and the image on right is after a full hour.
Next, without discarding any of the soaking mixture, add 100g fresh flour and about 90g water and stir completely. The result will feel overly wet due to the new water plus the water that was previously soaking. The mixture should feel close to 125% hydration.
Let everything sit until it looks like it needs another feeding, usually 12 to 24 hours, at warm room temperature. It’s important to try and keep the mixture warm during this time. A temperature between 78°F (25°C) and 82°F (26°C) would be ideal. Once you see sufficient maturity in the mixture, perform a feed with your typical flour and water quantities.
Sourdough Starter Storage FAQs
What should I feed my starter with when I revive it?
Use the same flour you normally use to do feedings.
What temperature should I keep the starter at when trying to revive it after storage?
Similar to when we are creating a new starter, it’s best to keep the mixture warm. If you can do 78°F (25°C) to 80°F (26°C) it will help expedite the revival process considerably.
My sourdough starter isn’t springing back to life, what can I do?
Start by picking up some good quality (organic if possible) whole grain rye flour. If you have a local source that mills rye I’d go with that first, and my second choice would be to order some online. I usually replace 50% of the flour I normally use for feedings with this rye flour.
Second, keep your starter nice and warm—78°F (25°C) to 80°F (26°C) if possible. Warm up the water used to do feedings, keep your starter insulated, or keep it in a proofer.
Finally, time your sourdough starter feeding so they are just when your starter ripens, not too early and not too late. If you feed too early you might reduce populations of bacteria/yeast before they can fully metabolize the mixture. If you feed too late, acidity will build in the mixture and will eventually create unfavorable conditions.
If you’re still having trouble, check out my top 21 sourdough starter problems (with solutions) ↗
What’s Next?
Of the many ways to store a sourdough starter the above have kept my starter healthy over the years, even with breaks now and then. They promote a quick recovery from storage, which means we can get back to baking as soon as possible. Armed with these new methods, don’t feel like your starter is keeping you from taking a break. They will ensure your starter perks back up in no time after it, and you, take a little rest.
Once your sourdough starter is up and running, head over and mix up a batch of my Beginner’s Sourdough for fresh bread this weekend! If you have more questions on sourdough starter maintenance have a look at my sourdough starter frequently asked questions or leave a comment below.


161 Comments
Cuando rehidrato las hojuelas, y se asienta, el líquido de encima se deshecha?
Agradezco muchísimo toda la ayuda que me has brindado ❤️
First of all, thank you for this wonderful website. I’m grateful I found it when I started this sourdough journey and can’t wait to return to making the amazing recipes once my starter is revived enough.
Because I didn’t trust myself, I chose redundancy and stored my starter both as flour crumble and as shards! After 4 months, I tried reviving them and had a far easier time with the shards. (My flour crumble smelled damp when I first opened the sealed jar. It then produced more odor than rise, and I tossed it.) The shards revived quickly and have now had 3 regular feedings. Is that enough to start using for levain, or should I keep it going longer?
Wow, this is incredibly helpful, thank you! Question: For the shard method, at what stage do you begin the drying process — when the starter is fed, or when it is hungry?
Ciao Maurizo! Love your book and all the essential knowledge you've shared there and on your sites to help make fabulous sourdough bread!
Quick question on storing and maintain starters? Is there a preference in using levain/liquid vs stiff starters for short-term (< 3 wks) storage? I (most unfortunately) don't have time to bake each weekend…but obviously want to have a starter ready for when I do.
I'm very familiar with and have used liquid starters for this for years, but just recently got turned on to stiff starters (less flour waste, easier to maintain). Wondering if there is a good route for storage here too.
Thanks again Maurizio for everything you do – please let me know if you're ever in the Seattle area. I'd love to buy you a good cup of coffee or tea and croissant!
Thanks for the kind words about the book! Both starter styles can work well for 2-3 week storage, but you're onto something with stiff starters – they tend to be more resilient during storage and, as you noted, require less maintenance. For your schedule, I'd suggest feeding your stiff starter at a lower ratio (like 1:2:2 or 1:3:3), letting it rise for about an hour at room temp, then refrigerating. When you're ready to bake, just pull it out and give it a couple feedings to revive. And thanks for the Seattle invite – love a good croissant! Have fun!
Interesting how a stiff starter can be stored. Feeding at a lower ratio like 1:3:3 f.e.? Is it still a stiff starter with 100% liquid? Thanks in advance for your reaction.
A question: how do you dry the starter – in a dehydrator or just left out at room temp? I couldn’t see instructions, above, unless I’ve missed something?
Hello maurizo i read the comment by wendy (two comments down) and just want clarification on if its fine to feed it once a week just like that without doing all the stuff in the article you mentioned
Yes, once a week is fine if you're keeping it in the fridge!
Help! I'm having real trouble getting my starter revived after using the Dry Crumble method to store it for 6 weeks. I'm using my proofer at a steady 76-78°F, and I've struggled to get any discernible activity – much less restore "Master Doughda" to its usual robust growth. My starter has been with us for almost 7 years, and would rest in the fridge for a week or two between bakes with no problem. Before the Dry Crumble, I'd fed 2x per day and had robust activity.
But the force is not feeling strong now.
Have tried several flour mixes – started with my usual 70% freshly milled wheat flour/30% Rye flour, tried 50/50 Rye/All Purpose, and even freshly milled some organic rye berries and went to a 70% rye/30% bread flour mix – but am not seeing much actitivity. Have tried feeding every 12 hours, but not much is happening. Tried waiting 24 hours between feeds, but not change. Very sour scent, some bubbles but no real growth.
Worried that Master Doughda is no more.
Ideas?
Oh no, David! Sorry to red this. I think you're doing everything I would, to be honest. I've used this method successfully for up to 2 yrs so I'm surprised this has happened. I'd keep doing what you're doing, using warmth, whole rye flour, and spring water. I'm hoping it comes back!
Thanks Maurizio – I decided to try a very regimented refresh with Master Doughda while simultaneously using your process to create a new starter in the same proofing box. After 12 and then 24 hours, very little activity for my old starter – while the new starter with freshly milled rye flour exploded with growth. So, sadly, I decided to not keep using more flour and just let Master Doughda end its days in favor of the new starter. Puzzling – but I have a young starter I’m excited to grow and use.
Very interesting. Well, hopefully some of MD crossed over to the new one. I would have combined them, or added a small bit! But anyway, onward and upward from here David!
Hi! I took a sourdough bread-making workshop and was told to keep my starter (given at the class) in the fridge and feed once a week. Then when I'm ready to start the baking process, take it out and bring to room temp and then start the levain process. You suggest keeping it out on the counter and feeding it twice daily. I can't keep to that schedule. So, can I continue what I'm doing with the once a week in the fridge sitch, or keep it on the counter and feed it daily? If the latter, how much do I feed it daily. I'm on my third loaf (1st using your beginner recipe/process in the oven as I type), and figure I'll make 1-2 loaves a week so need a feeding plan moving forward. Thanks!
Yes, you can absolutely leave it in the fridge during the week and feed it once a week. I talk about that schedule, here: https://www.theperfectloaf.com/weekend-baking-schedule/
Sorry if this has been covered: I started doing my sourdough bread, pizza crust, and more about 9 months ago with great success. I have a great starter and I bake about once a week. However, I head to the mountains for 3 months over the summer in my camper and want to store my sourdough. At what point should I put it into storage: 1. After the starter doubles in size. 2. Right after I feed it. 3. Somewhere in between 1 & 2? Thanks in advance! Much appreciated…
Hello, I used the crumble to flour method to try store my starter for about 10 months. I crumbled it and sealed it in an air tight plastic bag. After some time I noticed that there were yellow and blueish/greenish spots inside the bag. But they were not spreading like usual mold. I got a bit scared and thought that this is the end for my starter. But I mixed the bags of flour and continued storing them. The color changes did not spread after the mixing.
I have now started to try to bring the starter back to life. There was not much activity in the first days except that the smell was really strong, almost like some strong acid. After 7 days there has started to be more activity. For my surprise the smell is very similar to banana, but it still has a bit of that strong side smell especially if I leave it for too long without a feeding.
Do you have any thoughts on this? Do you also get these small color changes/spots when storing in flour? Is my starter still safe to use?
Thank you
Lauri