
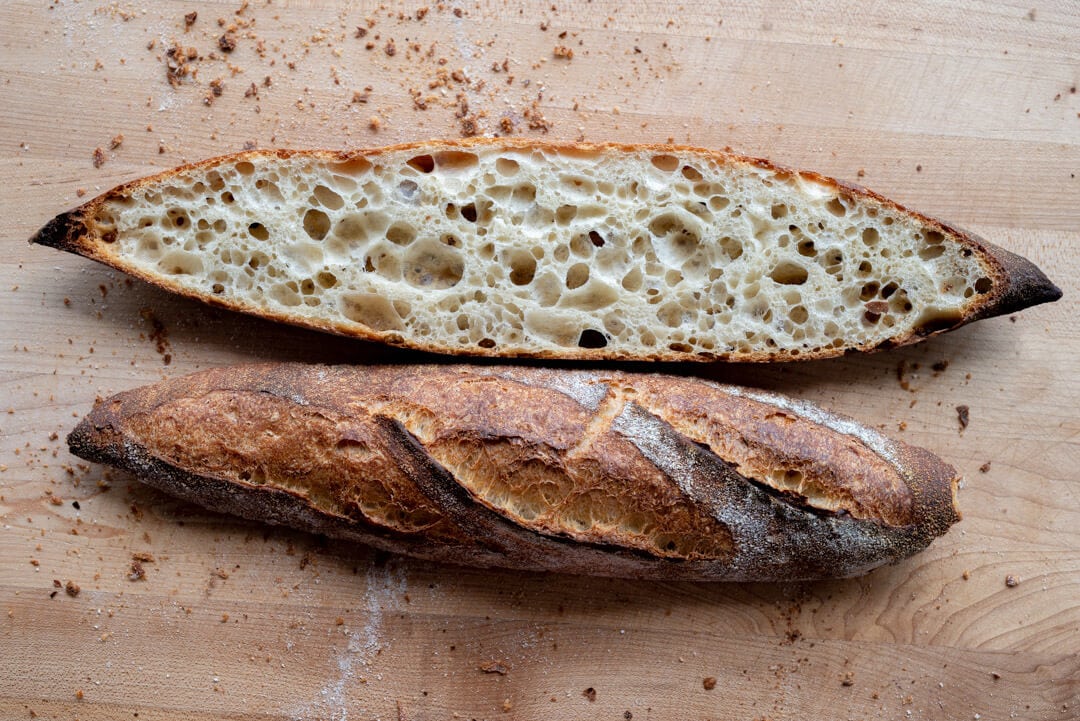
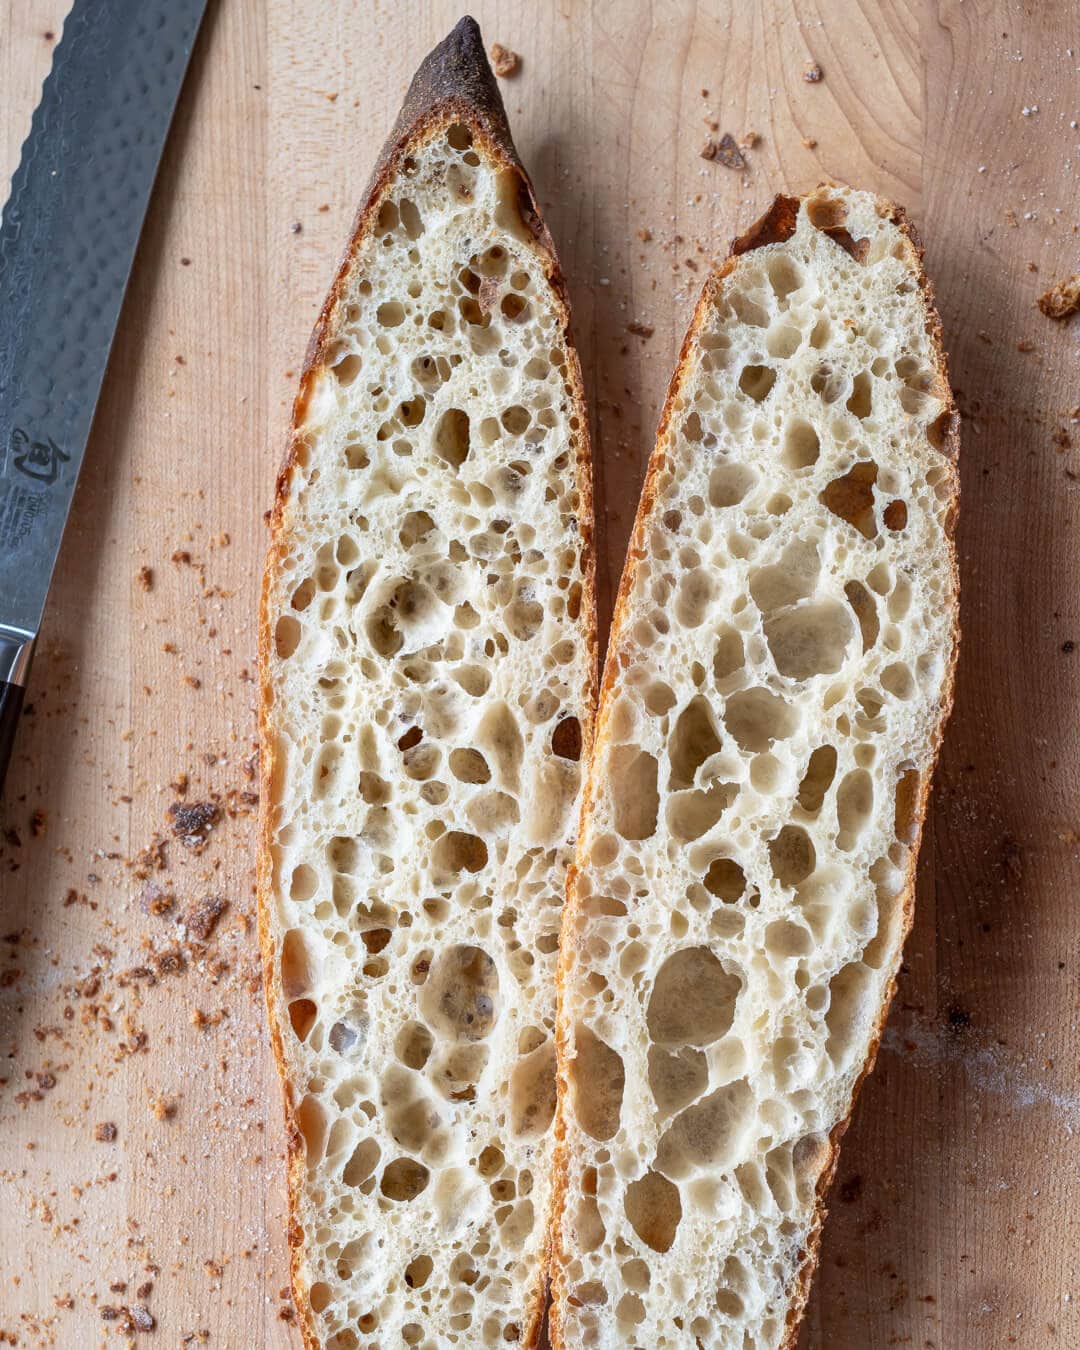
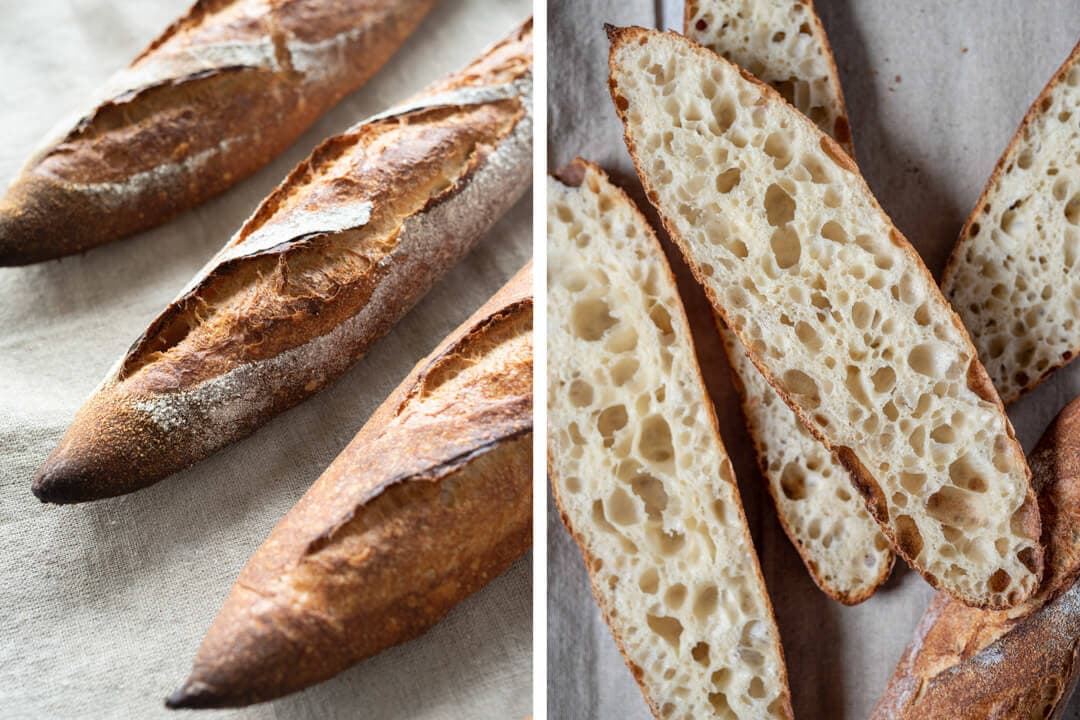
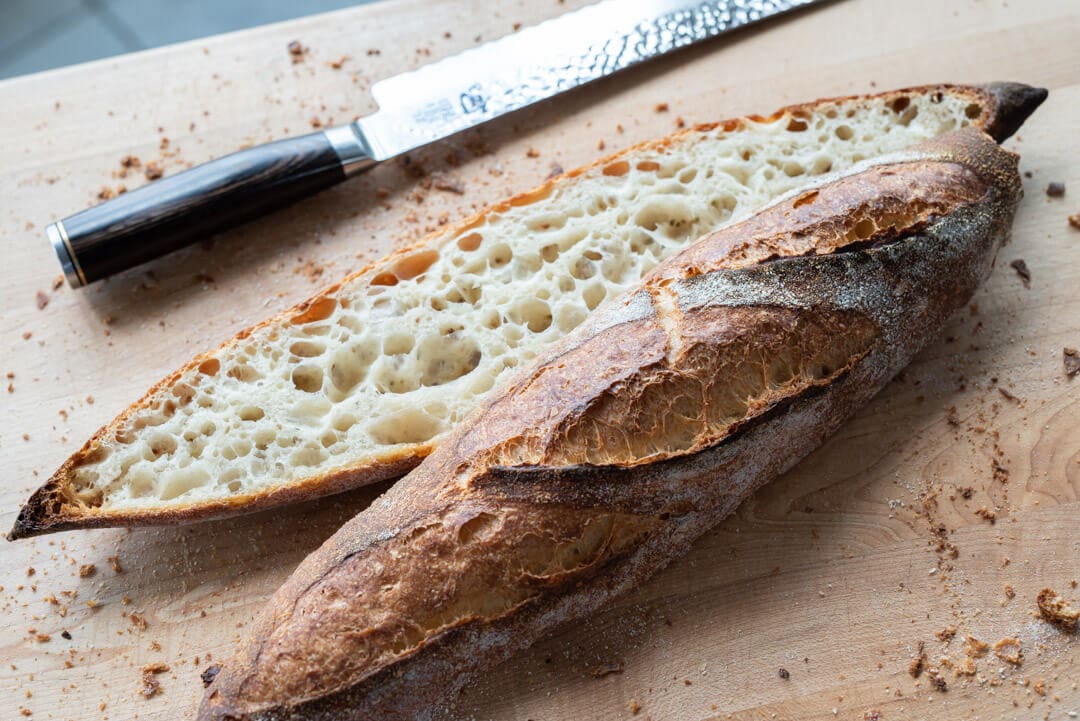
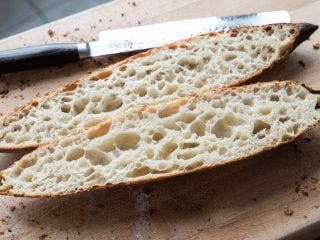
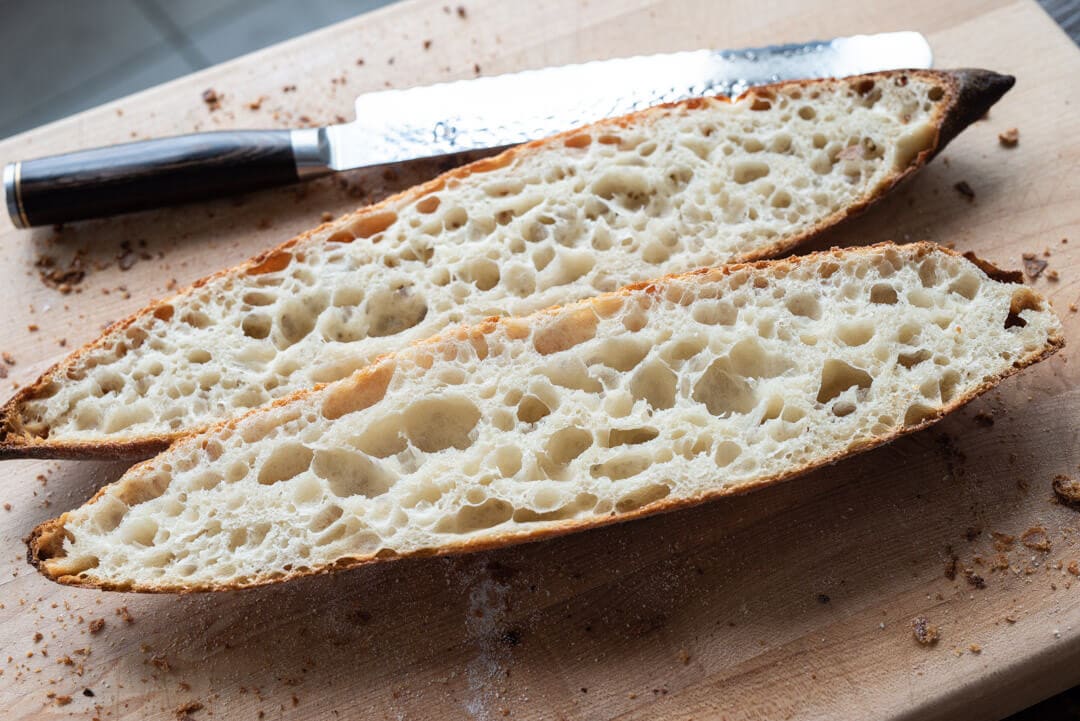
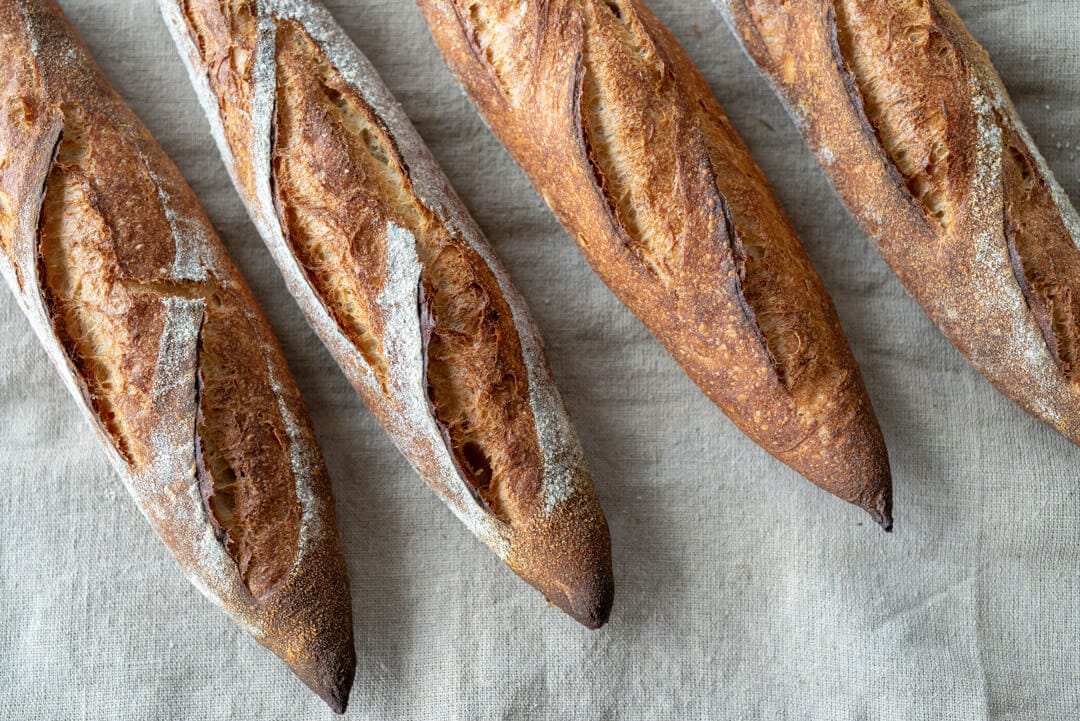
I’ve fallen hard for these pointy sticks. Their beautifully exaggerated shape starts with a thick center and transitions into dangerously sharp ends. Crust color ranges from the periphery of black to almost-too-light, a contrast that elicits stares. A creamy and tender interior that’s so porous it soaks the butter inevitably spread thick during moments of eager anticipation. A sourdough baguette recipe is a tricky thing, but when everything lines up just right, all your past shortcomings discovered in testing vanish in an instant.
As with many things with baking, they simply require practice.
These sourdough baguettes do take concerted effort and practice, but the results are absolutely worth the work. Ok, technically, these are demi-baguettes, given their shorter stature and reduced dough weight, but the nature of this bread holds to the ideal. The slender shape, thin crust, and delicate interior simply exude baguette, even if their specs are a little skewed.
I’ve been working on this recipe relentlessly, and if you follow me on Instagram, you know this, but all the work put into these revolves around the simple fact baguettes are just plain challenging.
I find that beyond the required attention to fermentation, flour selection, hydration adjustments, cold versus warm bulk decisions, and seeking that correct proof point, there’s the matter of coercing the dough delicately into the correct shape.
As with many things with baking, they simply require practice.
Their challenge stems from the fact that even small shaping mishaps will show themselves quite clearly in the end result. There’s a reason why many bakers consider baguettes to be one of the hardest breads to make. A benchmark of sorts. But even if the shape or the interior isn’t exactly perfect, they’re always delicious. Plus, the more you make them, the more the process slows down internally, and the more all the small adjustments add up to large improvements.
Because shaping these sourdough baguettes can be frustrating at times, I’ve written an entire guide to shaping baguettes—complete with a video (which is also included below) to help illustrate things in real time. Be sure to give that a read—and even a bookmark—for when you’re in the kitchen and need a helping (virtual) hand.
Let’s talk about flour.
Sourdough Baguette Flour Selection
In my early iterations of this formula, I worked in 10% spelt flour. My intention was to introduce more extensibility in the dough along with the classic and wonderful flavor of spelt. After many trials, I decided to drop the spelt mostly because, with medium-protein white flour and hydration at around 70%, coupled with a length autolyse, this dough had plenty of extensibility.
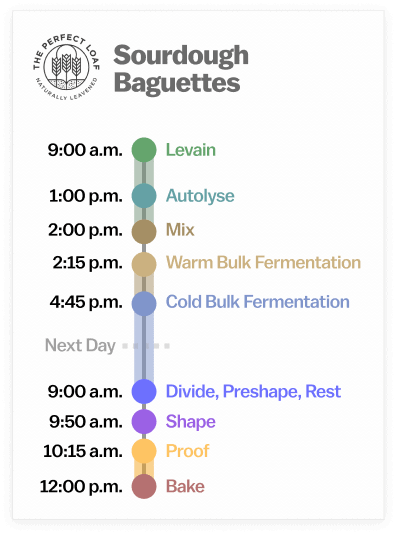
Baking Schedule
The entire process is split up over the course of two days. This affords you the option to bake the baguettes the next day when you want them—for breakfast, lunch, or even dinner.
Similar to my Kamut demi-baguette recipe, I utilized a short warm bulk fermentation followed by a longer, cold bulk fermentation. When I tested cold-proofing these baguettes in shape, the results always yielded a slightly thicker crust compared to a warm final proof. Further, a cold bulk also adds to the flexibility and convenience of this dough.
Sourdough Baguette Recipe
Update: I recently updated this sourdough baguette. It is now the same recipe that’s in my sourdough cookbook—and believe me, the results are significantly better than the previous version!
Vitals
| Total Dough Weight | 2,000 grams |
| Pre-fermented Flour | 6.5% |
| Hydration | 70.0% |
| Levain in the final dough | 17.4% |
| Yield | 6 x 325g sourdough baguettes (appx 14″ long) |
Total Formula
Note that this is the Total Formula which lets you know all the ingredients, in baker’s percentages, that you need for this recipe. Scroll down to the Method section for what you need in each step.
Desired dough temperature: 78°F (25°C) (see my post on the importance of dough temperature).
| Weight | Ingredient | Baker’s Percentage |
|---|---|---|
| 1143g | White flour (about 11.5% protein; Central Milling Artisan Baker’s Craft Plus) | 100.0% |
| 743g | Water 1 (Levain and autolyse) | 65.0% |
| 57g | Water 2 (Mix) | 5.0% |
| 21g | Salt | 1.8% |
| 37g | Ripe sourdough starter, 100% hydration | 3.3% |
Method
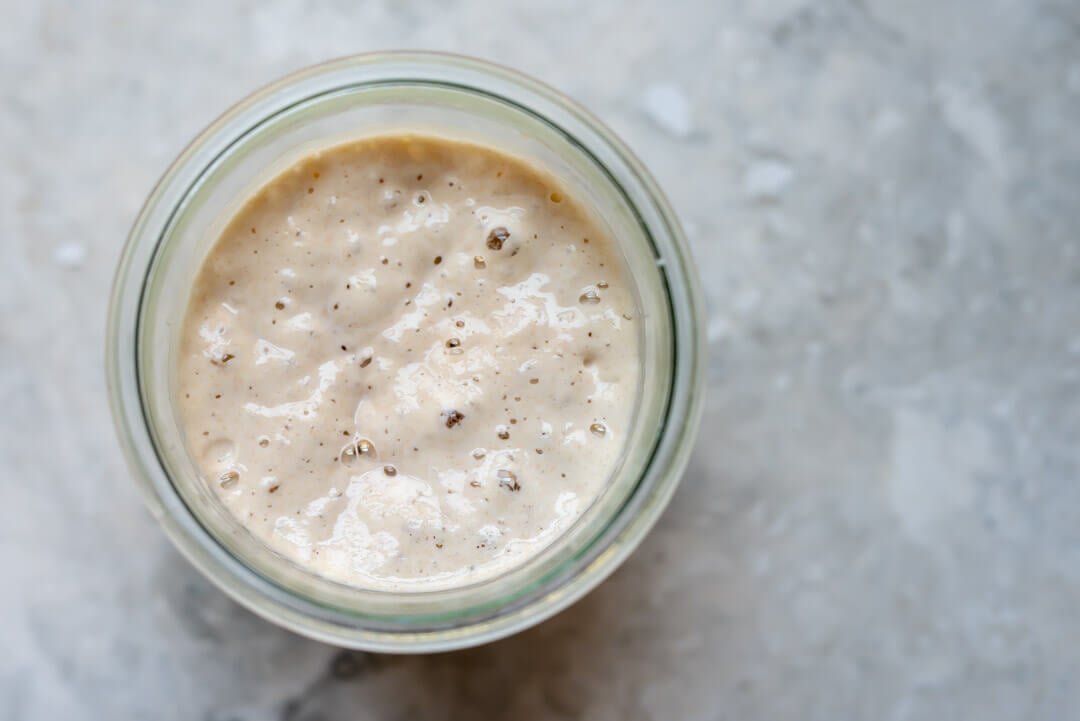
1. Prepare the levain – 9:00 a.m
| Weight | Ingredient | Baker’s Percentage |
|---|---|---|
| 74g | White flour (about 11.5% protein; Central Milling Artisan Baker’s Craft Plus) | 100.0% |
| 74g | Water 1 | 100.0% |
| 37g | Ripe sourdough starter, 100% hydration | 50.0% |
Use your sourdough starter when ripe, mix the above ingredients in a jar, and leave them covered at a warm temperature, 74-76°F (23-24°C), to ripen for 5 hours.
2. Autolyse – 1:00 p.m.
| Weight | Ingredient |
|---|---|
| 1068g | White flour (about 11.5% protein; Central Milling Artisan Baker’s Craft Plus) |
| 668g | Water 1 |
Warm or cool the autolyse water so that the temperature of the mixed dough meets the FDT (final dough temperature) of 78°F (25°C) for this recipe. Place the flour and water 1 in a large bowl. Use wet hands to mix until no dry bits remain; the dough will be shaggy and loose. Use a bowl scraper to scrape down the sides of the bowl to keep all the dough in one area at the bottom. Cover the bowl and place it near your levain for 1 hour.
When making sourdough baguettes, I like to use the autolyse technique to help gain extensibility in the dough and also reduce the total mixing time.
3. Mix – 2:00 p.m.
| Weight | Ingredient |
|---|---|
| 57g | Water 2 |
| 21g | Fine sea salt |
| 186g | Ripe levain |
Add the salt and levain to the top of the dough that was just in autolyse and use a splash of water 2 to moisten. With wet hands, mix thoroughly. Add the remaining water if the dough feels like it can handle it. Next, knead the dough for a few minutes using either the slap and fold technique or folds in the bowl. For this dough, I kneaded for about 5 minutes until the dough smoothed and became elastic.
With sourdough baguettes, I find spending a few more minutes developing the dough upfront helpful in achieving a more open crumb. A spiral mixer can help mix this dough quicker and more effectively.
Transfer the dough to a bulk fermentation container and cover.
4. Warm Bulk Fermentation – 2:15 p.m. to 4:45 p.m.
This warm bulk fermentation will last a total of 2 hours and 30 minutes. During this phase (of the two-step bulk fermentation phase), give the dough three sets of stretch and folds, starting 30 minutes after the beginning of bulk. After the last set, let the dough rest untouched until the full two and a half hours.
5. Cold Bulk Fermentation – 4:45 p.m. to 9:00 a.m. (next day)
After the warm bulk fermentation, place the covered bulk fermentation container in the refrigerator overnight.
6. Divide and Preshape – 9:00 a.m. (next day)
My baguette dough, when removed from the fridge, had plenty of activity but was not exceedingly gassy or risen. The dough was active yet relaxed.
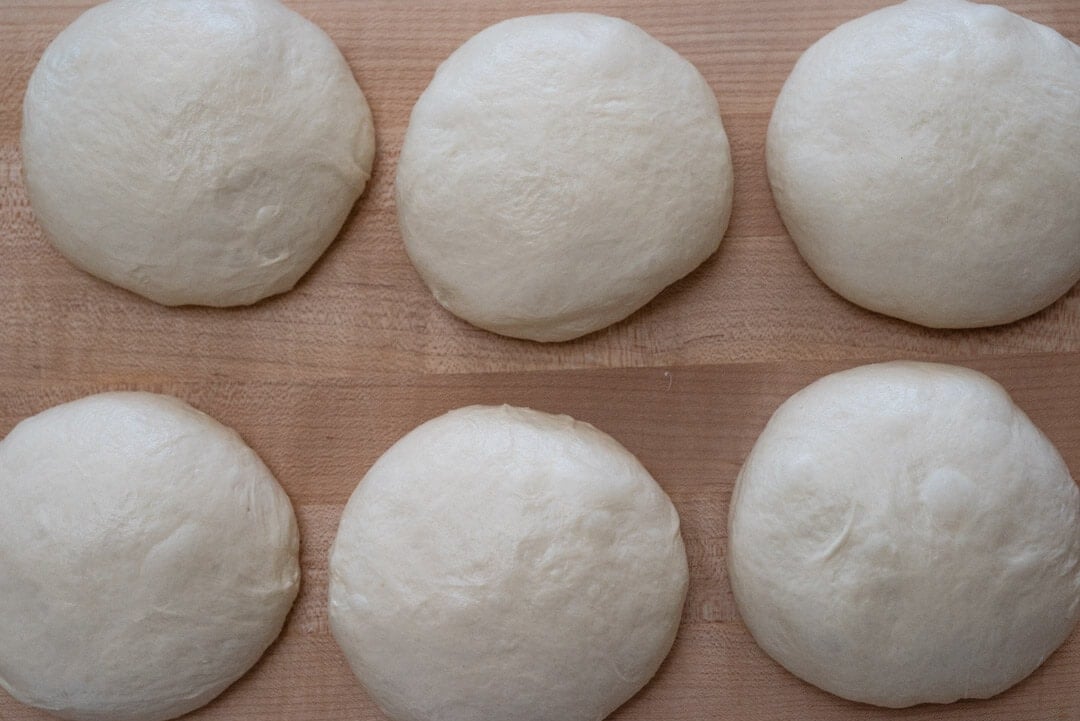
Gently scrape the dough from the bulk container to an un-floured work surface. The dough will feel cold, slightly damp, and firm. Divide into 325g pieces and preshape the pieces of dough into rounds (my preference) or rough tubes. Because the dough is cold and firm, very little bench flour is needed to pre-shape.
Let the preshaped dough rest for 35 minutes, uncovered.
7. Shape – 9:50 a.m.
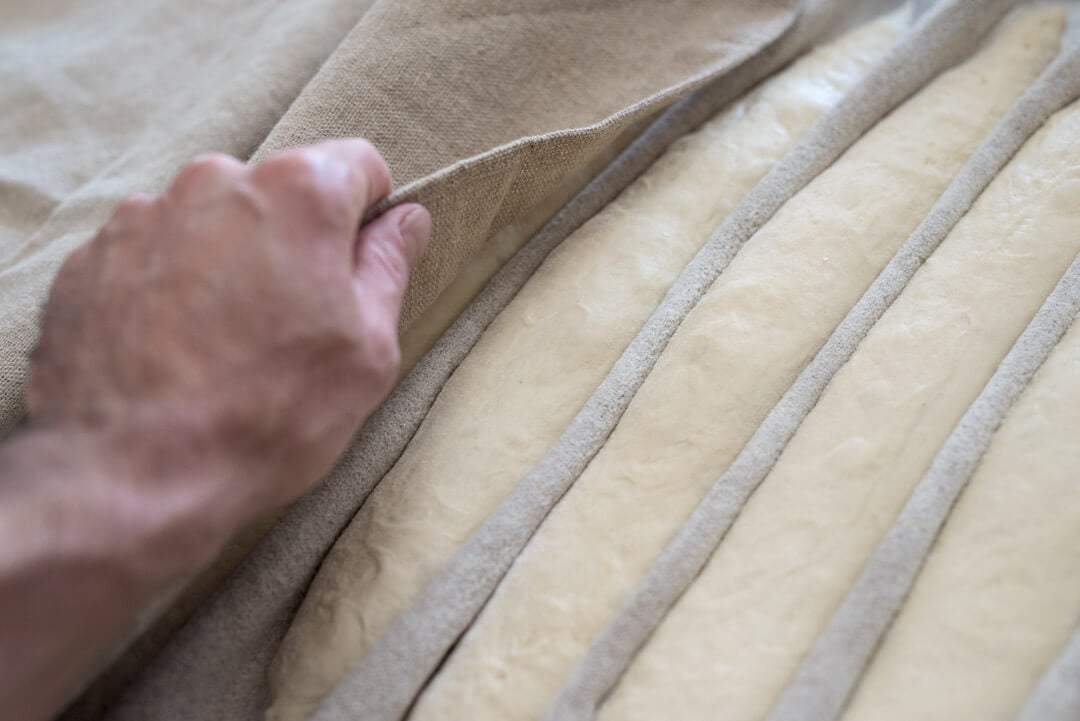
Prepare a board with a couche (aka baker’s linen) or a large kitchen towel and place this next to your work surface.
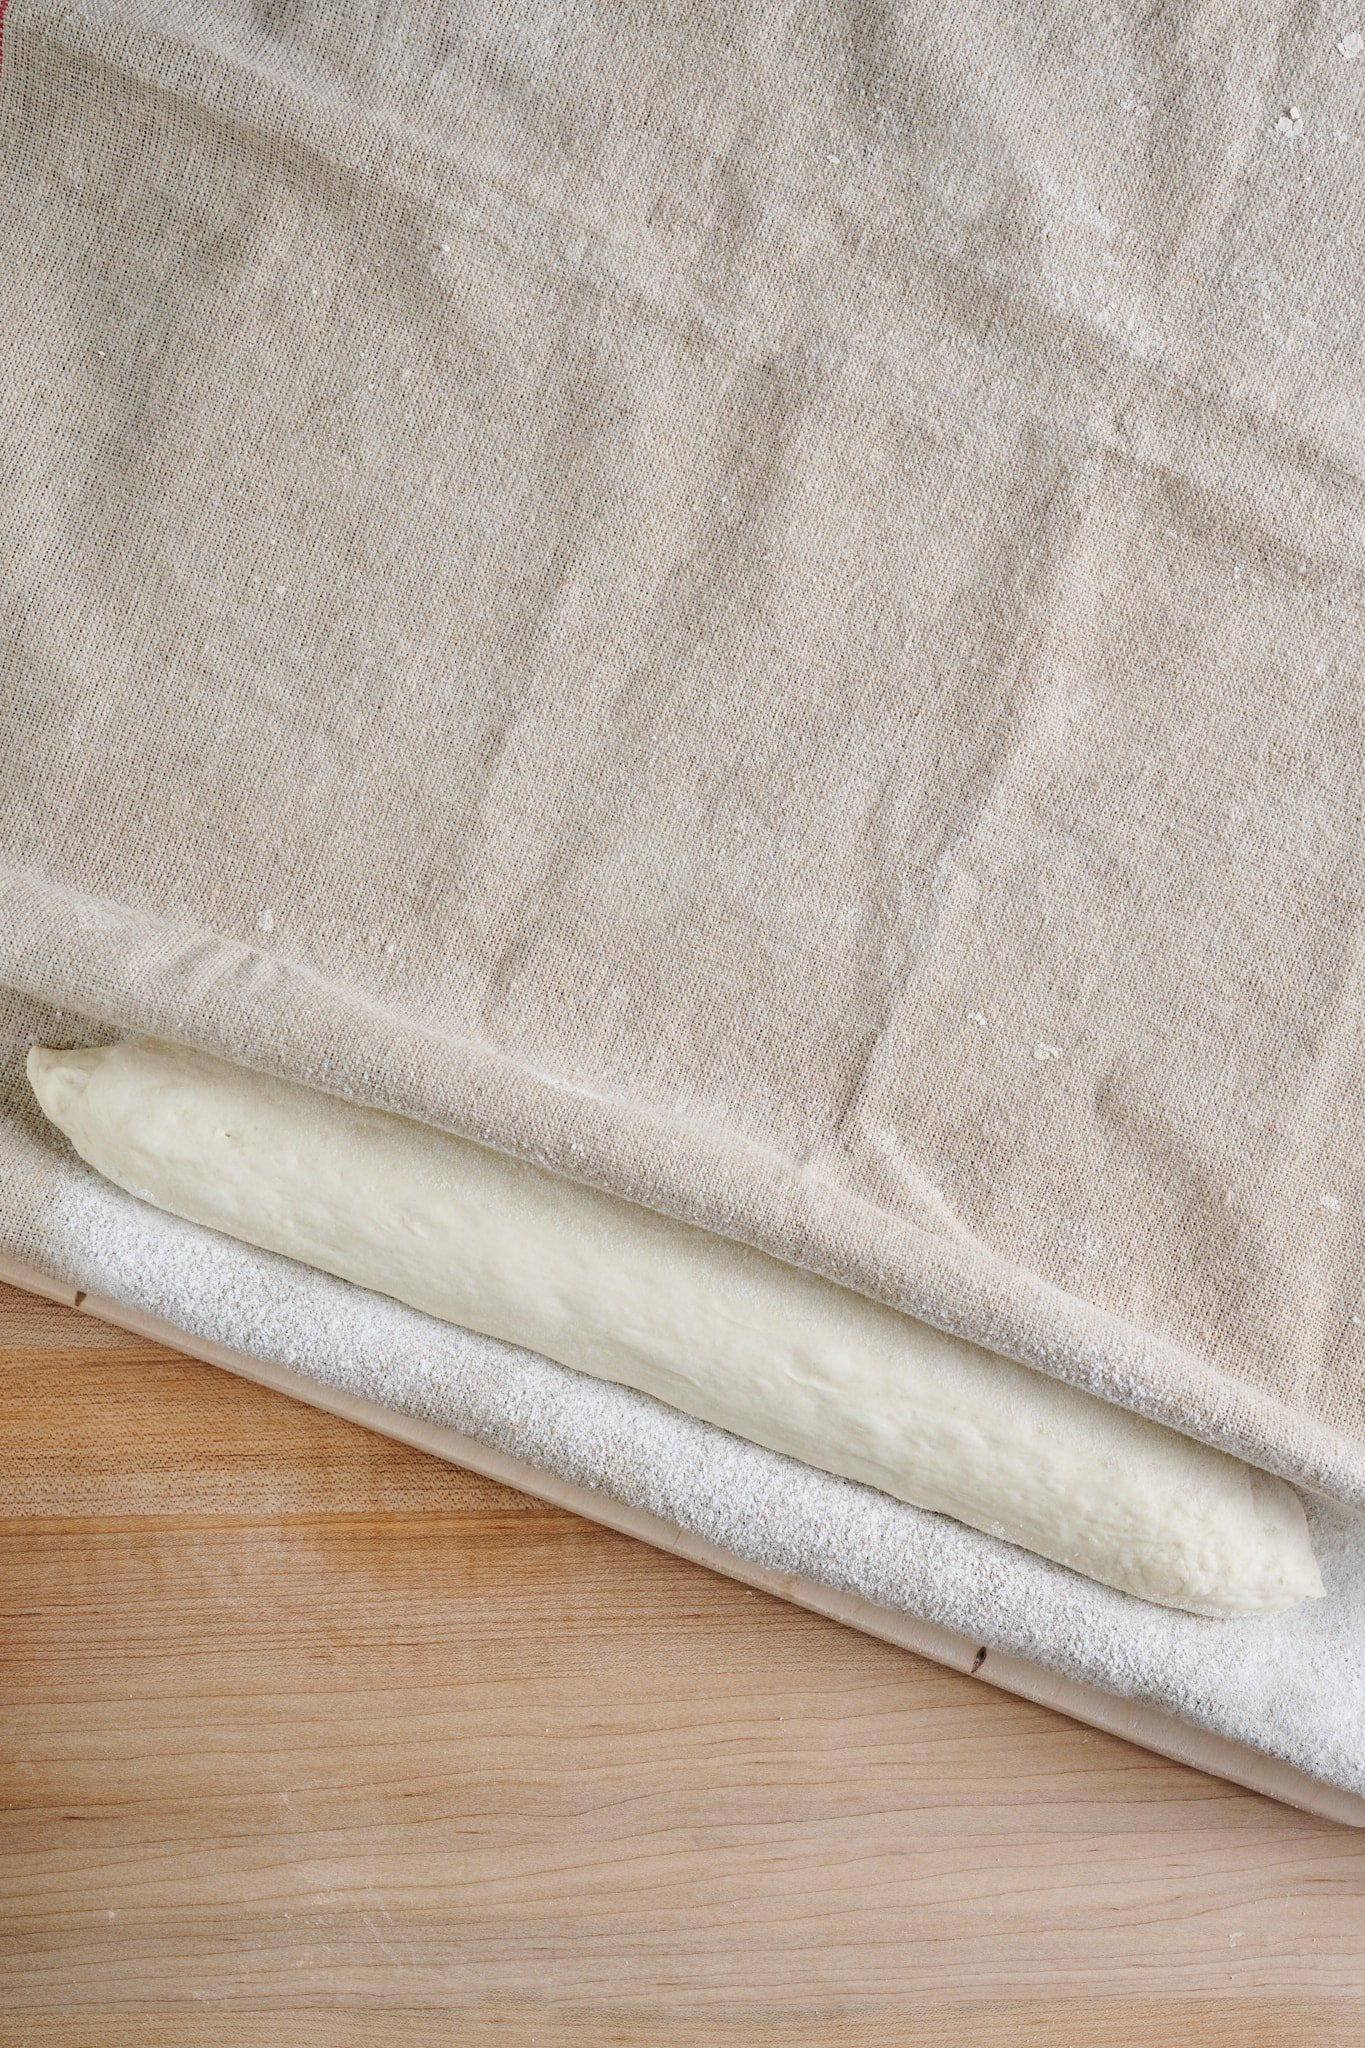
At one side, where you will start laying down shaped baguettes, roll a section so that it stands up by itself, creating a strong edge (see above). Then thoroughly and evenly dust flour on a 3- to 4-inch-wide strip down the couche, from farthest from you to nearest, where the first piece of shaped dough will sit.
After the preshaped rounds have rested for 35 minutes, shape each piece into a long baguette, approximately 14″ long for the home oven (or as wide as your baking surface).
Watch the quick video below for my step-by-step approach to shaping.
Once you’ve shaped a piece, place it in the flour-dusted channel on the couche, seam side up. Then, using both hands at the edges, pick up and drag a little of the couche toward the dough (like making a pleat in the couche) to form a matching wall of the channel to hold the dough while it’s proofing. Once the new wall is formed, it will look like the dough is nestled between two straight walls.
Flour a new strip down the couche on the other side of the newly formed wall in preparation for another piece of dough. Repeat this process for all the preshaped rounds.
Shaping baguettes requires practice through repetition (see my baguette shaping guide page for more instructions). Try not to get discouraged when shaping; take it slow and focus on one motion at a time.
8. Proof – 10:15 a.m. to 12:00 p.m.
Keep your proofing board away from drafts, as the dough can quickly develop a crust on the outside. It may help to drape the edges of your linen over the shaped baguettes or cover them loosely with plastic. If you cover it with plastic, be aware the dough may stick.
Proof the pieces until they pass the poke test, about 1 hour and 45 minutes at room temperature.
9. Bake – 12:00 p.m.
Preheat your oven to 450°F (230°C) for an hour with baking stone/steel inside.
If you only have one baking surface, divide the baking into two sessions. Bake three baguettes first, and chill the rest in the fridge for the second session.
Prepare a pizza peel with parchment paper matching the width of your baking surface.
Grab the end of the couche and pull it out, moving the piece of dough away from the rest. Then, using a dough transfer board (a smaller pizza peel or a small cutting board could also work), place the board inside the baguette (the side closest to the rest of the dough pieces). With the hand holding the couche, quickly flip the dough onto the peel by tugging up and slightly over the transfer board. The baguette should now be seam-side down on the transfer board.
Repeat until you have three pieces on the peel.
Score each baguette with three overlapping slashes (see below).
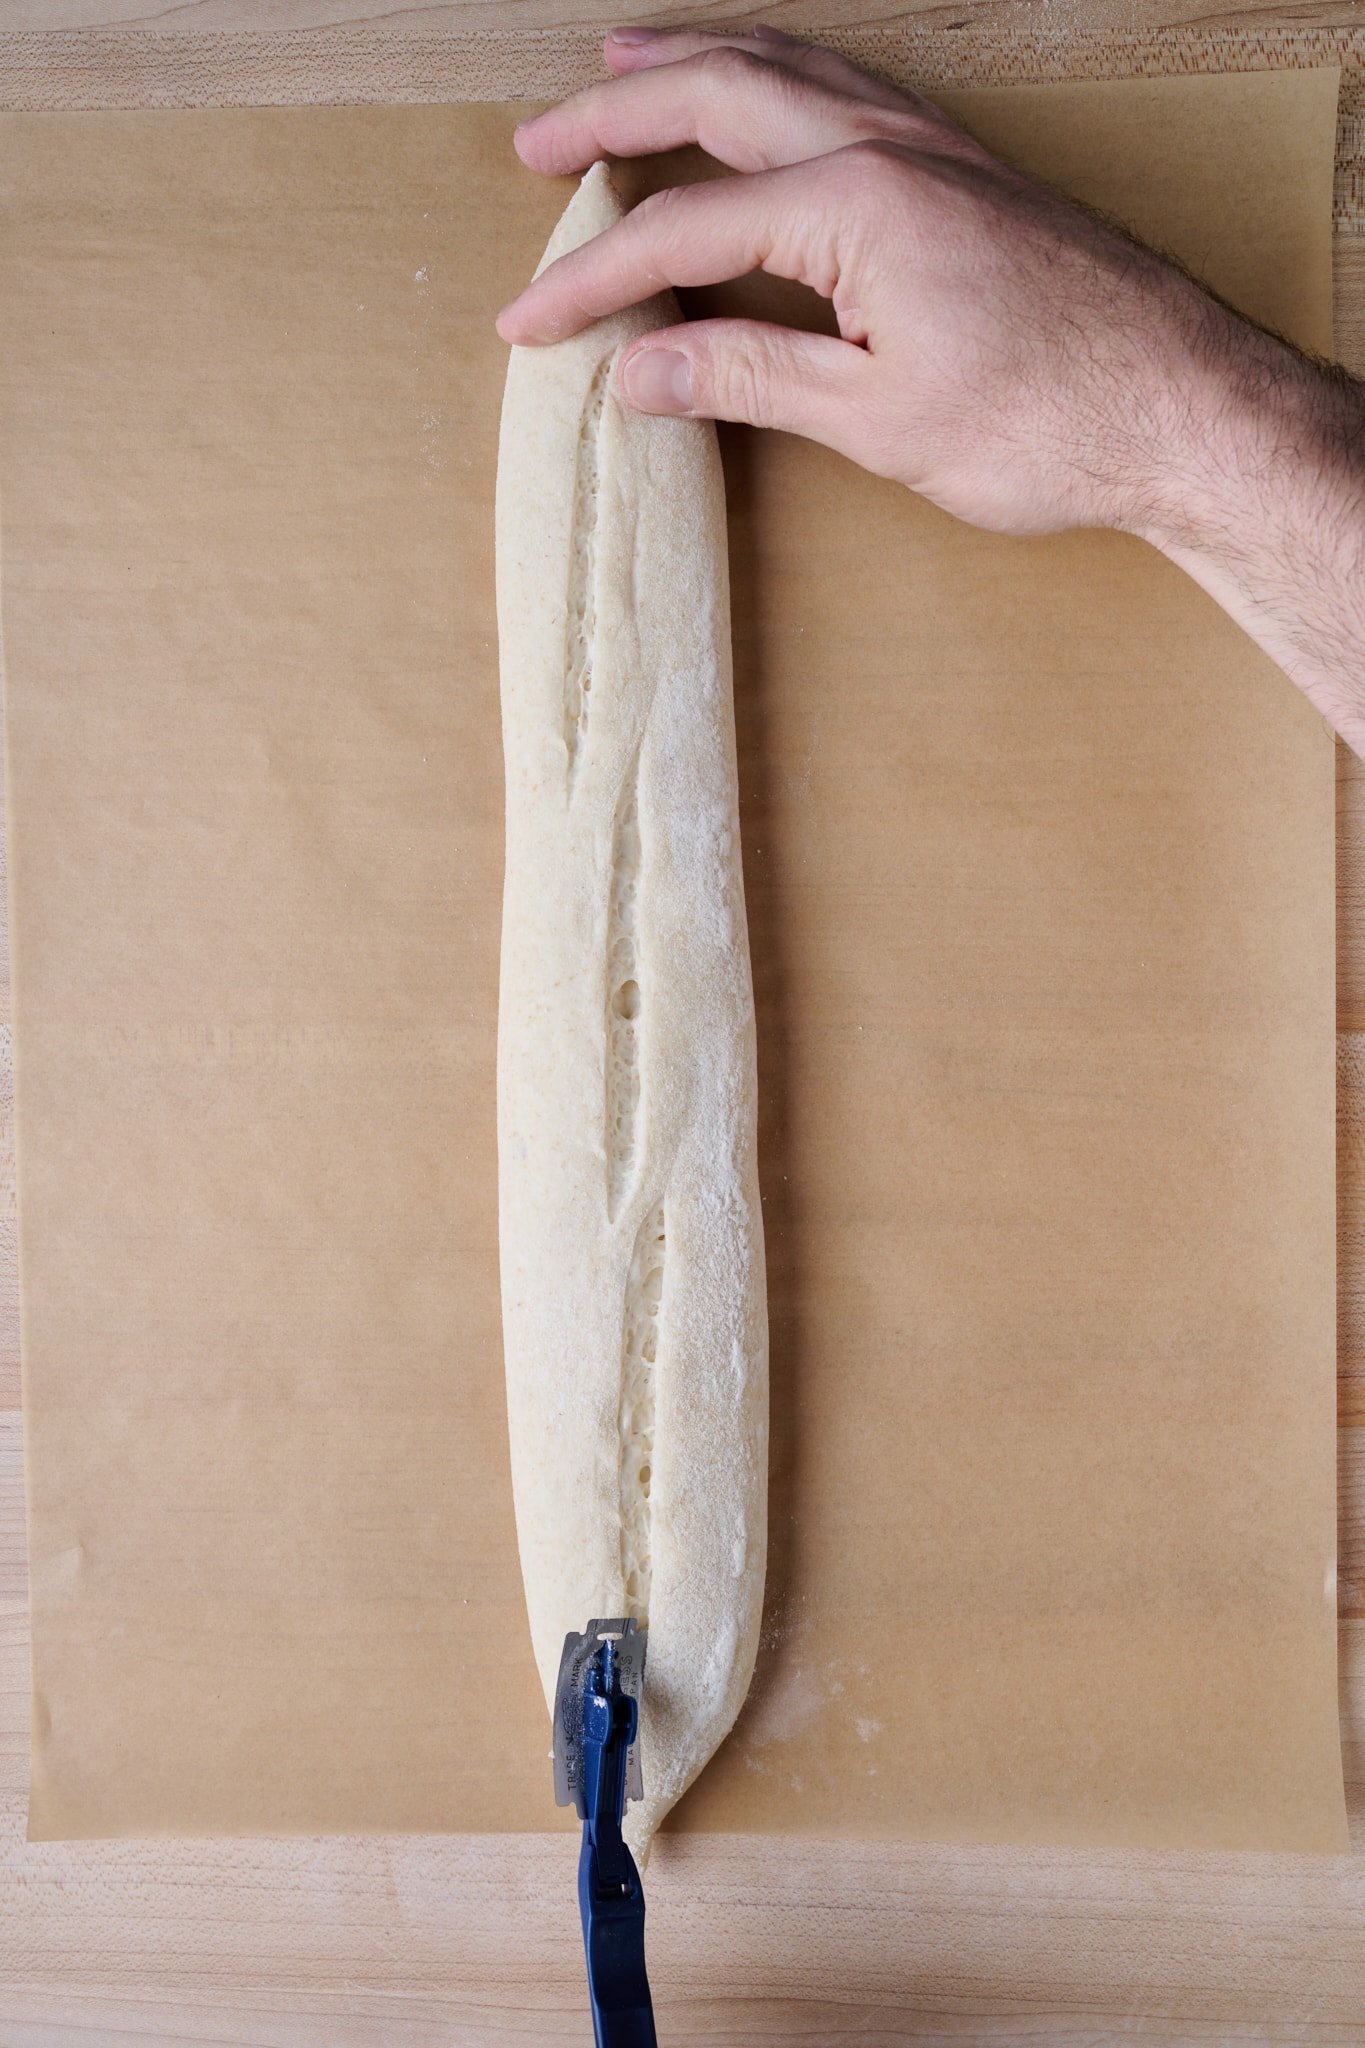
Transfer the dough onto the baking surface in the oven using the parchment paper. Next, steam the oven and bake for 20 minutes. Remove the steaming pans and bake for another 20-25 minutes until done.
Cool on a rack. Repeat the process for the remaining baguettes in the fridge.
I steamed my oven in my usual way, described here in my post on how to steam your home oven for baking.
Sourdough Baguette Recipe
- Prep Time: 24 hours
- Cook Time: 45 minutes
- Total Time: 24 hours 45 minutes
- Yield: 6 baguettes
- Category: Lunch, dinner, snack
- Cuisine: French
Description
These exquisite sourdough baguettes have a delicate wheaty flavor with malty notes from the caramelized crust. They’re perfect for breakfast (pan con tomate anyone?), lunch, or even just a snack with a spread of butter on top.
Ingredients
Levain
- 74g white flour (about 11.5% protein)
- 74g water
- 37g ripe sourdough starter, 100% hydration
Autolyse
- 1068g white flour (about 11.5% protein)
- 668g Water
Main Dough
- 57g water
- 21g fine sea salt
- 186g ripe levain
Instructions
- Levain (9:00 a.m.)
In a small bowl mix the Levain ingredients. Cover the jar and keep it at a warm temperature for 5 hours. - Autolyse (1:00 p.m)
In a mixing bowl, add the Autolyse ingredients until no dry bits remain. Cover the bowl and let rest for 1-hour. - Mix (2:00 p.m.)
Add the salt and levain to the top of the dough in autolyse and use a splash of the remaining water to moisten. With wet hands, mix thoroughly. Add the remaining water if the dough feels like it can handle it. Knead the dough for a few minutes using either the slap and fold technique or folds in the bowl until the dough smooths and becomes elastic. Transfer the dough back into the bowl. Transfer the dough to a bulk fermentation container and cover. - Warm Bulk Fermentation (2:15 p.m. to 4:45 p.m.)
This dough will require 2 sets of stretches and folds during bulk fermentation at 30-minute intervals. After the second set, let the dough rest, covered, for the remainder of bulk fermentation. - Cold Bulk Fermentation (4:45 p.m. to 9:00 a.m.)
After the warm bulk fermentation, place the covered bulk fermentation container in the refrigerator overnight. - Divide and Preshape (9:00 a.m., the next day)
Gently scrape the dough from the bulk container to an un-floured work surface. Divide into 325g pieces and preshape the pieces of dough into rounds (my preference) or rough tubes. Because the dough is cold and firm, very little bench flour is needed to pre-shape. Let the preshaped dough rest for 35 minutes, uncovered. - Shape (9:50 a.m.)
Prepare a couche and dust it with flour. Shape each piece of dough into a baguette shape. - Proof (10:15 a.m. to 12:00 p.m.)
Proof the pieces until they pass the poke test, about 1 hour and 45 minutes at room temperature. - Bake (12:00 p.m.)
Preheat your oven to 450°F (230°C) for an hour with baking stone/steel inside. Divide the bake into two sessions if you only have one baking surface. Bake three baguettes first, and chill the rest in the fridge for the second session. Prepare a pizza peel with parchment paper matching the width of your baking surface. Grab and end of the couche and pull it out, moving the piece of dough away from the rest. Then, using a dough transfer board (a smaller pizza peel or a small cutting board could also work), place the board to the inside of the baguette (the side closest to the rest of the dough pieces). With the hand holding the couche, quickly flip the dough onto the peel by tugging up and slightly over the transfer board. The baguette should now be seam-side down on the transfer board. Repeat until you have three pieces on the peel. Score each baguette with three overlapping slashes. Transfer the dough onto the baking surface in the oven using the parchment paper. Next, steam the oven and bake for 20 minutes. Remove the steaming pans and bake for another 20-25 minutes until done. Cool on a rack. Repeat the process for the remaining baguettes in the fridge.
Sourdough Baguette Recipe FAQs
Why are these scaled to 325g?
This dough weight makes for baguettes that fit my home baking surface at 14-inches long. It makes for a fatter baguette in the end, but one that’s perfect for the home oven.
Why is scoring difficult with baguettes?
One (of the many) reasons I like to do a cold-proof with almost all my other doughs is because scoring is much easier. When the dough is warm, it’s easy for your blade to drag and get stuck. My best advice is to use a new, super-sharp blade and make your cuts as smooth and fast as possible. If you notice you didn’t cut through the skin of the dough sufficiently in the first pass, lightly drag the blade inside the cut to give it a little help.
Why do cold bulk fermentation with baguette dough?
Doing two-day fermentation is a great schedule for home bakers (and pro bakers, too!), so I do like to use the fridge; it brings a little more flavor. This means you’d either have to do cold bulk or cold proof in shape. Doing the latter gives these a slightly thicker crust since the dough will be exposed to cold temps when they’re in their final shape. Therefore, I opt for cold bulk fermentation to keep a thin crust (it’s also easy to shape cool dough!).
What’s Next?
This sourdough baguette recipe results in exquisite delicate baguettes. The brittle crust grounds the eating experience and gives added body to the otherwise tender bread. It’s through this contrast that the bread is elevated to the next level—a baguette with a soft, flimsy crust would be a sad baguette indeed.
I’ve said it before, and I’ll probably say it a million times more: fermentation is a mysterious and beautiful thing. I hope you try this recipe and you show up to your next gathering with an armful of exquisite and incredibly delicious pointy sticks.
To continue with the baguette theme, try your hand at my green olive filoncini, which are kind of like an Italian version of baguettes‚ but twisted!
Or, if you’re looking for a large, crusty loaf, my sunflower and sesame sourdough has loads of flavor and are a go-to recipe when you want to impress.
Buon appetito!


455 Comments
Hey Maurizio! i’m finally trying this for the first time and already made an error…my levain is bubbling fine, that’s all good. But, i forgot to scroll down and realized the amount of flour should have been 75g less (the amount used for the levain). I added more water to compensate for the extra flour. Please tell me that the shaggy mass should be on the thick side. There are no dry bits but I don’t want to over hydrate. Will add my levain and salt in an hour. Wish me luck! UPDATE: mixed. Things feel good. I may end up with one extra baguette, who knows!?
Ha ha, hope it turned out okay, Nancy!
Hey Maurizio! i’m finally trying this for the first time and already made an error…my levain is bubbling fine, that’s all good. But, i forgot to scroll down and realized the amount of flour should have been 75g less (the amount used for the levain). I added more water to compensate for the extra flour. Please tell me that the shaggy mass should be on the thick side. There are no dry bits but I don’t want to over hydrate. Will add my levain and salt in an hour. Wish me luck!
Any thoughts on using one of the perforated baguette pans for this recipe? I’ve failed without using it due to deflating my dough on transfer, and I’ve failed with the pan due to it sticking. I feel like baguettes are out of my reach!
Ive never tried using them… I'd image they'd work okay!
I just made these. In my new Emile Henry baguette pan. I’m in love! I used starter I already had so started this recipe with mixing the ingredients.
Fantastic, Barbara. That's a great pan.
Oh my gosh, I followed the levain mix exactly, but it didn’t weigh the full amount needed when I combined it with the autolyse at the Mix stage. Has anyone else had this issue? I was about 20 grams short, so I improvised and just added that amount (20g) of my recently fed starter. I hope that solution doesn’t ruin the recipe. Any advice appreciated.
Yes, I have that issue with seemingly every one of his levain measurements…
I just make sure to make a larger levain than he calls for each time I try one of his recipes/formula’s…
I also just make up the difference with starter and it turns out fine…
And it's okay if the levain is a little short, I just do my best to scrape out everything from the jar.
Same with me and just added starter that I had on my counter. My baguette are cold bulk fermenting and will see the result tomorrow
Exactly 20gs short as well. I did just as you did to make up for the difference. How did they come out?
Same thing happened to me..I was 10 grams short!
It's okay to be a little short. What you did is good!
Rather than making 6 demi-baguettes I would like to make 3 larger ones. Is there anything in your recipe (such as cook time) that I should adjust? I’ve been following the recipe exactly but have started to reduce the amount of water because the dough is close to impossible to deal with – extremely sticky.
Everything will be the same, just longer bake time. If the dough is too sticky, try reducing the water in the recipe by 20g.
Hi! Tried this recipe and loveed the crumb and flavour. However, my crust turned out too hard- could literally knock somebody out with it. I reckon 230C was a bit too high for my oven so I reduced the temp in the second batch but still the same issue. Could be a steaming issue? I did do the hot towel as well as ice cubes so not sure how else to incorporate more steam. Would love to know how I can fix the crust? Thank you
Definitely go with a lower temp and shorter bake time!
Hi! I tried this recipe but did not get it to rise as well as expected. Would this be from using unbleached all purpose flour instead of a bread flour? My levin was nice and bubbly so I am going to rule that out as one of the issues. I just am not sure why it did not rise much. I also kept an very close eye on the temperature for the warm fermentation. Any ideas as to what the issue could be?
it could definitely be the flour, or it might have been that your dough needed more time to ferment, Kayla!
Hi. In your book, the proof is 1h45 and here is only 30 minutes. What’s the right time? Thank.
Hey Maurizio! If you wanted to bake these same day and not retard overnight, how much would the proofing times change?
It would be 1-3 hours on the counter instead. Usually with these, it's right at 2 hr for me at 74F.
First, thanks for your work on this recipe. I used the following flour: Baguettemehl T65 ,tradition francaise, with protein content of 11,4%, bought in a German online shop.
So far I had tried several recipes of sourdough baguettes, yours worked out perfect! I used my sourdough made from wholemeal rye flour. In the future this will be my standard instruction, although I had problems with the last 3 baguettes. I stored them cool during baking of the first 3, but they were slightly overfermented. And at the start (step3) I first thoroughly mixed only the salt into the autolyse dough followed by the levain after that, because I was afraid to kill the bacteria and germ with the high concentration of salt.
Best regards
Claudia, Frankfurt (Germany)
Amazing. So glad to hear these worked well for you, Claudia! Envious of those flour options, too 🙂 Happy baking!
What can I use in place of a couche? My kitchen is bursting at the seams lol. I’d rather not buy anything else if I can avoid it 🙂
A large, clean kitchen towel!
I did this recipe and mixed some flours-all purpose, bread and rye. Beautiful results! Great instructions. I feel like I am just slightly underproofeded. But I follow your times and guidance. Do you think that is due to the rye and bread flour needing a longer proof??
Fantastic. Rye should actually help speed things along a bit, but it really depends on lots of factors. You could try giving the dough more time on the counter before putting it in the fridge during bulk.
Wow! I have tried to make baguettes so many times and this recipe gave me the most success. Still need to work on shaping them a bit, but the crust was so pergectly crusty and the crumb just right. I had to use my daughter’s exact-o knife to score because I was out of blades for my lamé and my steaming system was imperfect, but overall they were beyond expectations.
Super glad to hear it worked well for ya, Anna! Thank you 🙂
Hi Mario!
So…I did my ferment a bit in reverse. I bulk fermented (warm) until it was ready for pre shape. I then shaped them, rolled out, and then placed in my pans and let cold ferment over night. My baguettes turned out fine, but I am curious if I should be more strict to your instructions. Just curious what the added value would be in the difference.
Love this site by the way and am excited to get your book.
A cold proof in shape I find results in baguettes with a thicker crust. I hope you love my book!
At 450, my baguettes were fairly charred after approximately 30 minutes in the oven.
Has anyone else had this issue?
I’m baking a second batch now and will try doing them at 400
Definitely drop the temp, sorry about that, Joe! Every oven and location is different, requiring adjustment.
Do you have an oven thermometer? My oven has almost 50 degrees discrepancy with the oven thermometer I bought.
Thank you, Maurizio. I’ve tried several baguette recipes in the past and each one produced something that somewhat resembled a baguette, but was not a true baguette…until now. I baked these yesterday and not only was it a fantastic baguette, but some of the best loaves I’ve ever baked. “Bakery worthy” said my wife. Your book and website continue to inspire me and improve my baking skills. Many thanks for your generosity in sharing your baking wisdom.
Amazing to hear that, so glad I could help!
Hi. I’ve asked for your book for Christmas. I’m so excited to do more with my sourdough. I couldn’t wait though so I tried your baguettes. I baked them this morning and, I was hoping I could attach a picture to show what I’m trying to describe, but they were more smooth and less rugged looking. I cut deep with a fresh blade and used a baguette baker for one batch and straight on the stone for the other with the steaming method. The cut didn’t open up a much as I thought so I don’t think it rose as well as I’d imagined. Have tried recipes in the past with the same result. The dough felt like a good texture so I was thinking I was on to some progress.
Thank you
Hey, Sarah! It’s possible there wasn’t enough steam in the oven. Baguettes need quite a bit… That would be my guess.
Thanks so much for asking for my cookbook, I think you’ll love it 🙂
(Sorry I don’t have a way to upload photos here, but we do in the membership through Discord. I’m working on something, though!)
Hi Maurizio, very keen to try this recipe! Only issue is I don’t have a baking stone. I was considering getting a flat cast iron griddle (perhaps like this one: https://www.kitchenwarehouse.com.au/product/lodge-logic-cast-iron-reversible-grill-43x24cm?gclid=Cj0KCQjw1OmoBhDXARIsAAAYGSH_ILBaQWK_A-LC8YZSe1Xq4BJmzMLQ1Ed7PyKs5MyZsYsl3X6S9RsaAkZVEALw_wcB ) so I can use it for other cooking purposes too. Do you think this would do a fine job? Is the main job of the baking stone just good heat retention? Thanks!
Yes, that’ll work, Michael!
Did you change the flour blend recently? I seem to recall a malted flour blend before? If so can you repost or send it? The flavor was fantastic.
You can certainly use a malted flour here, no problem. In fact, I usually do.
I’ve just made baguettes for the 1st time. Shaping went better than expected. My crumb is more closed with a few slightly larger holes. I’m very happy with it but wondering if this is due to over-proofing? I live in Asia, I cut the final proof down to about 25 min, I did the poke test and seemed ok. With the heat here everything moves so fast. Should I leave for a bit longer to get an open crumb or not?
Hmm. It could be over or even under, hard to say without seeing a photo! If you’re in the TPL Membership please post it to Discord so I can take a look!
I think there’s a mistake on your bulk ferment, it says to do warm ferment on the counter until 9am and then put it in the fridge for cold ferment? I feel like you meant 9pm but would just like to clarify so others don’t make the same mistake.
Hey, Cait! No the recipe is correct. You’re cold bulk fermenting overnight in the refrigerator. Take the dough out the next day at 9am and continue with the recipe.
I’ve baked with the previous recipe many times with some success. Curious what changed in this new recipe?
Very minor things, but all an improvement!
Help – my kitchen is pretty cold (NZ winter no central heating) can you provide more detail in what I’m looking for at the end of the bulk ferment? It seems with the cold proof plus bringing to temp the next day I shouldn’t push it as far as a normal loaf? Thanks!
You want to see a smooth and rounded top to the dough, it should be stronger and more elastic, and with some rise to it, perhaps around 30%.
Help! I started the Levain this morning before the update. Is there any way to get the original recipe? I was supposed to cold proof these to bake tomorrow. Thank you!
Hey! Here’s an archived version of the old recipe:
https://web.archive.org/web/20230602225348/https://www.theperfectloaf.com/sourdough-baguettes/
Next time, try the new one, you’ll love it. Let me know how both go!
You saved the day! Thank you!! Looking forward to trying the new one.