
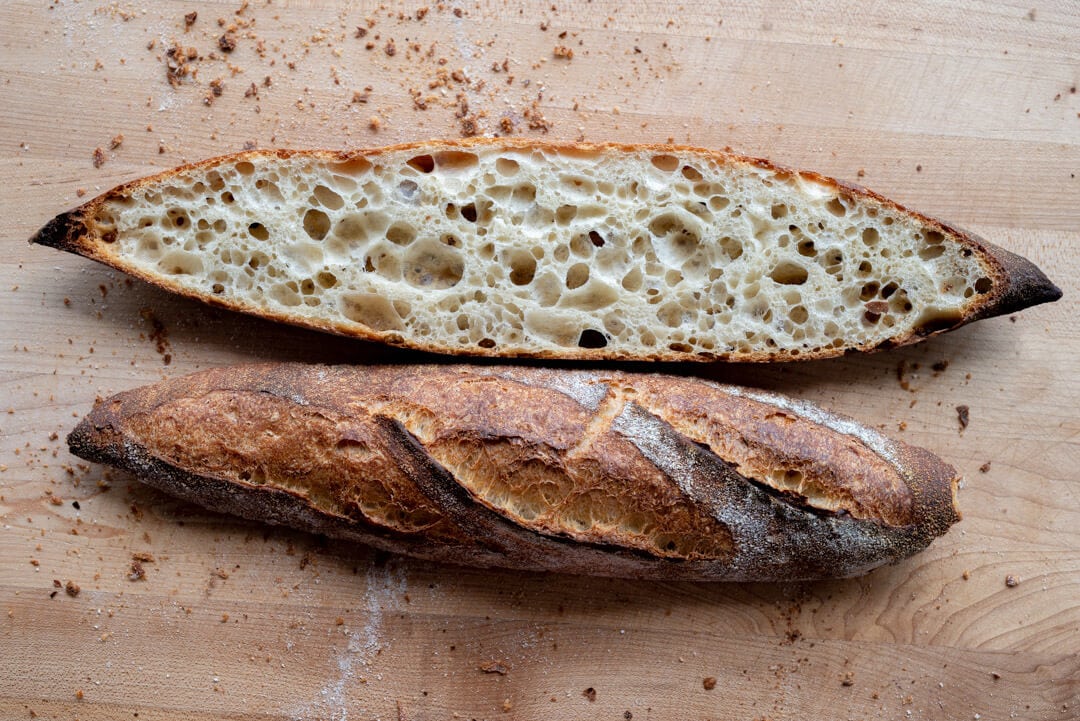
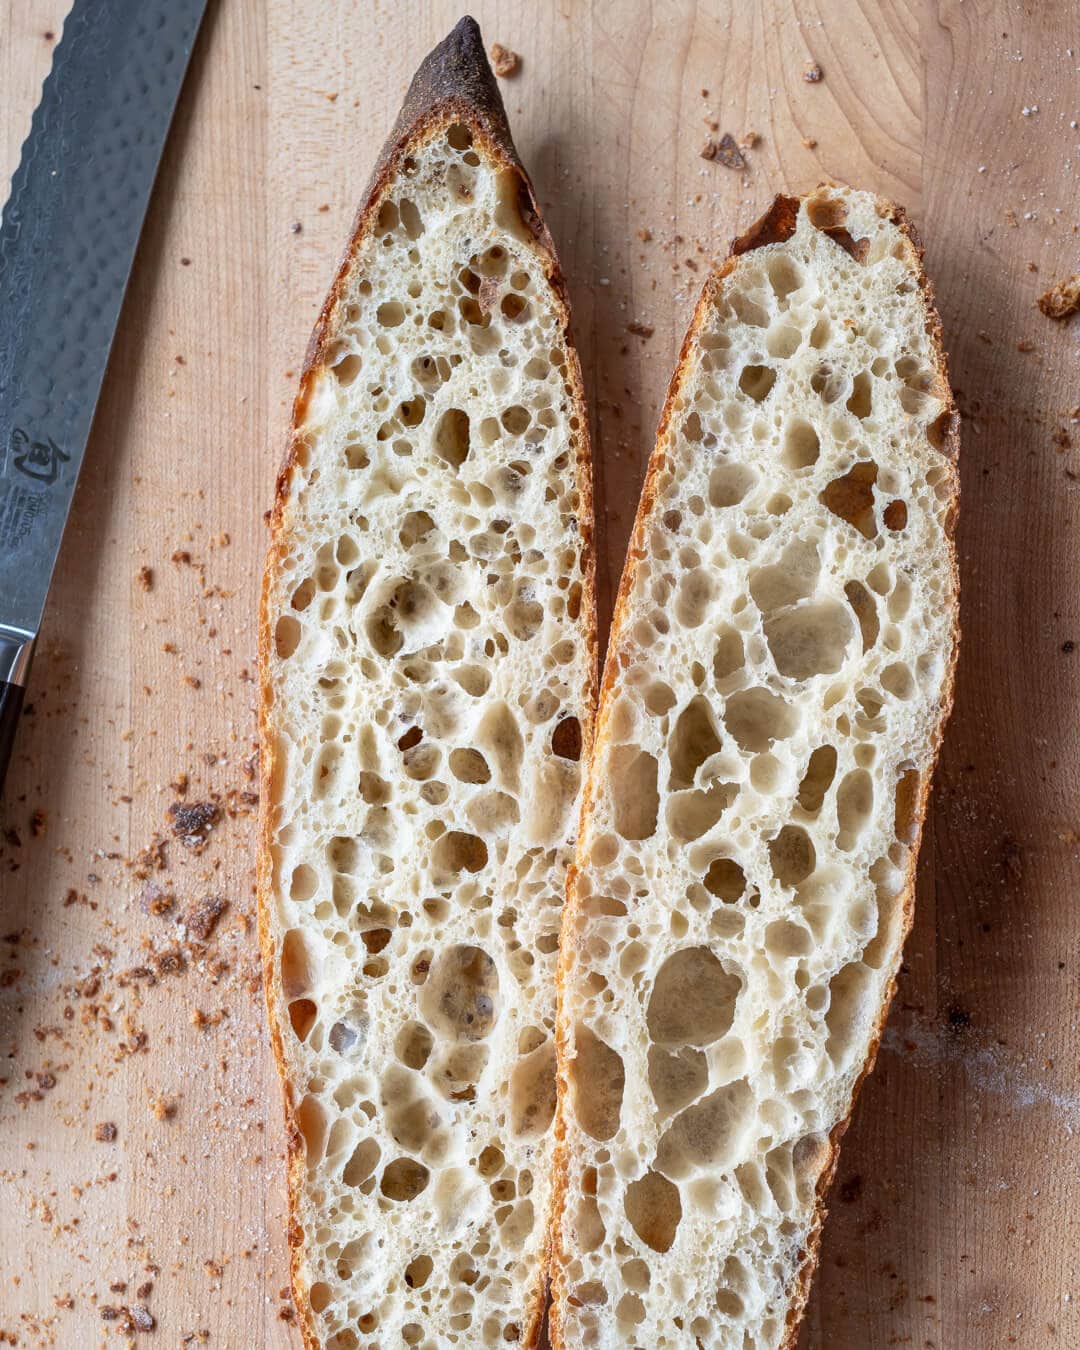
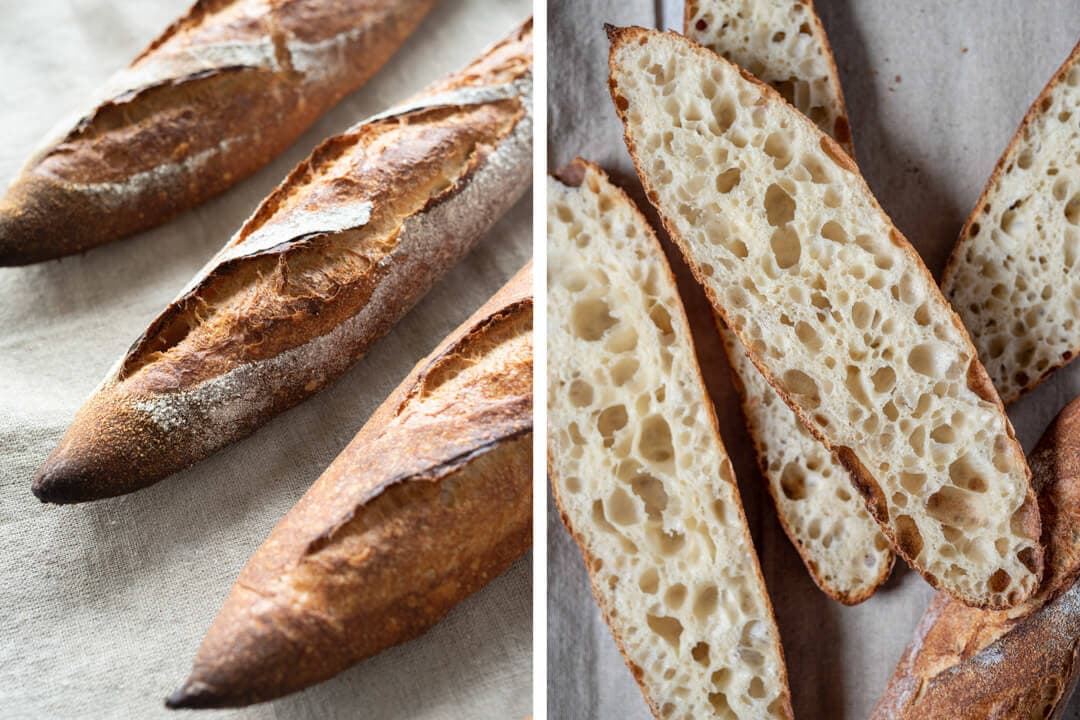
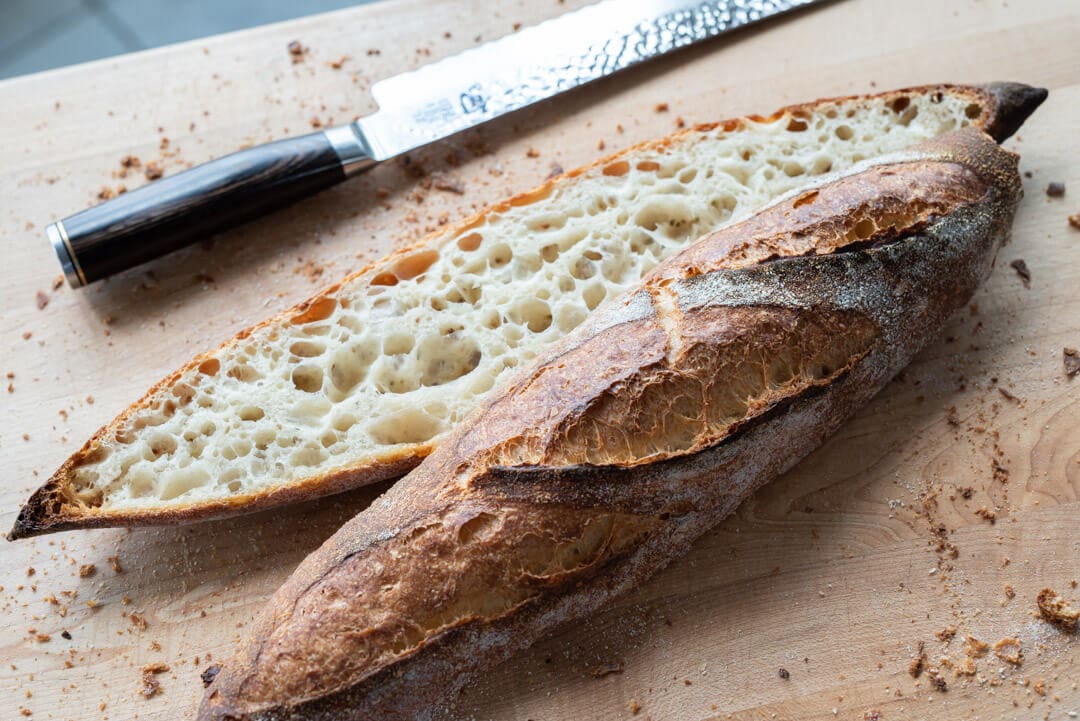
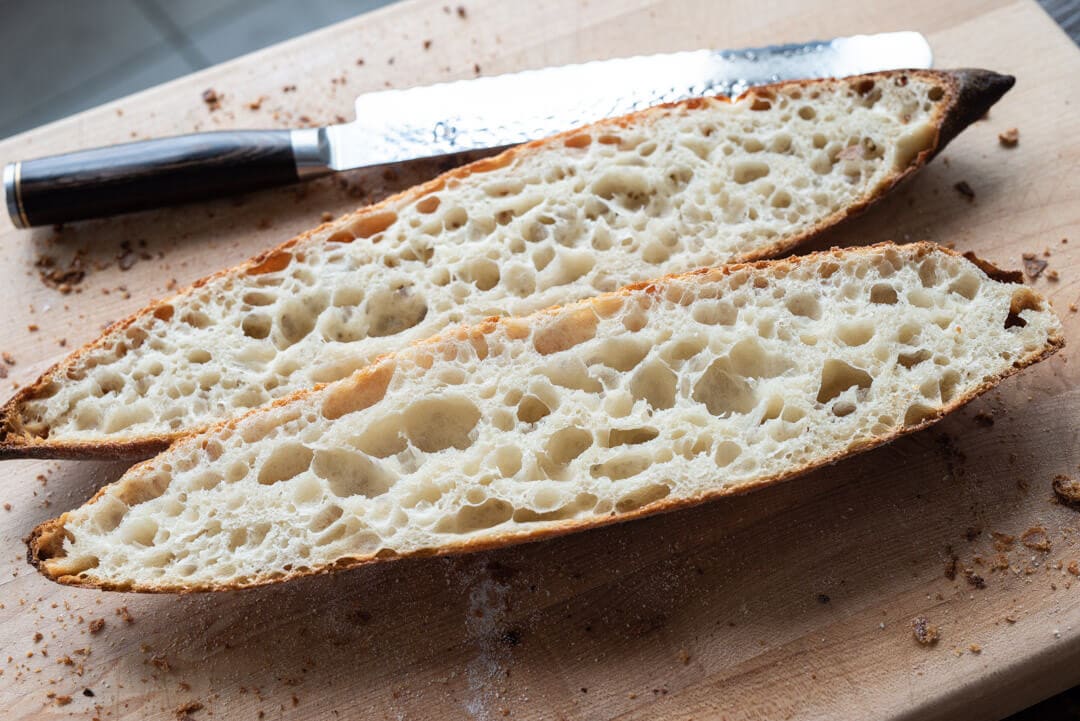
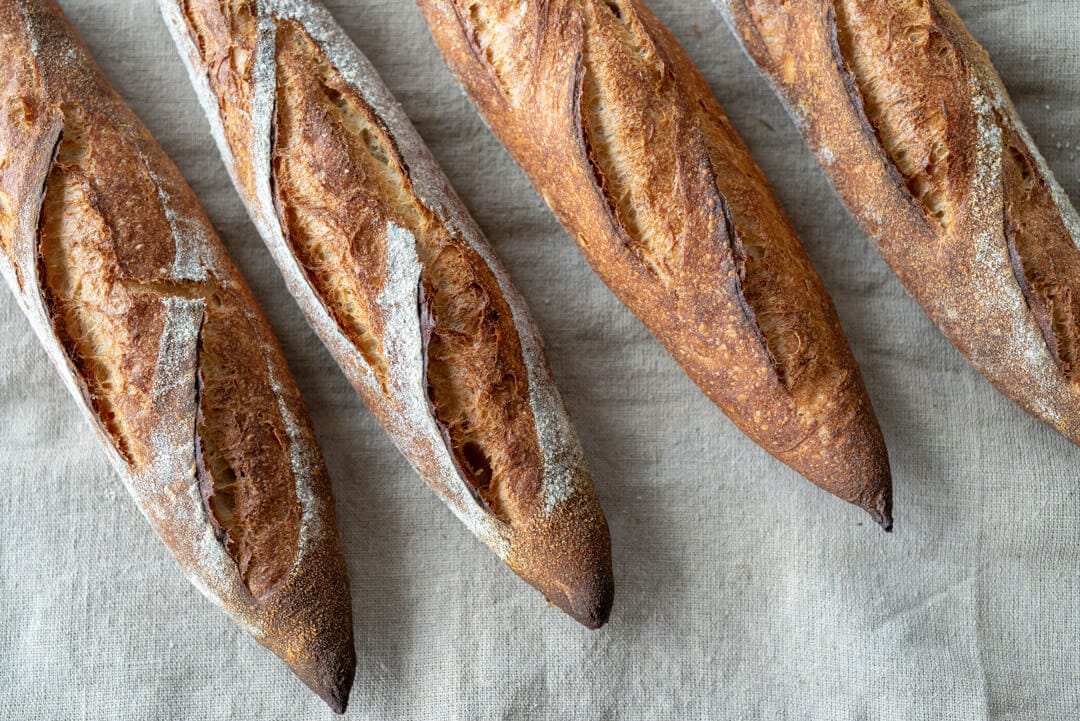
I’ve fallen hard for these pointy sticks. Their beautifully exaggerated shape starts with a thick center and transitions into dangerously sharp ends. Crust color ranges from the periphery of black to almost-too-light, a contrast that elicits stares. A creamy and tender interior that’s so porous it soaks the butter inevitably spread thick during moments of eager anticipation. A sourdough baguette recipe is a tricky thing, but when everything lines up just right, all your past shortcomings discovered in testing vanish in an instant.
As with many things with baking, they simply require practice.
These sourdough baguettes do take concerted effort and practice, but the results are absolutely worth the work. Ok, technically, these are demi-baguettes, given their shorter stature and reduced dough weight, but the nature of this bread holds to the ideal. The slender shape, thin crust, and delicate interior simply exude baguette, even if their specs are a little skewed.
I’ve been working on this recipe relentlessly, and if you follow me on Instagram, you know this, but all the work put into these revolves around the simple fact baguettes are just plain challenging.
I find that beyond the required attention to fermentation, flour selection, hydration adjustments, cold versus warm bulk decisions, and seeking that correct proof point, there’s the matter of coercing the dough delicately into the correct shape.
As with many things with baking, they simply require practice.
Their challenge stems from the fact that even small shaping mishaps will show themselves quite clearly in the end result. There’s a reason why many bakers consider baguettes to be one of the hardest breads to make. A benchmark of sorts. But even if the shape or the interior isn’t exactly perfect, they’re always delicious. Plus, the more you make them, the more the process slows down internally, and the more all the small adjustments add up to large improvements.
Because shaping these sourdough baguettes can be frustrating at times, I’ve written an entire guide to shaping baguettes—complete with a video (which is also included below) to help illustrate things in real time. Be sure to give that a read—and even a bookmark—for when you’re in the kitchen and need a helping (virtual) hand.
Let’s talk about flour.
Sourdough Baguette Flour Selection
In my early iterations of this formula, I worked in 10% spelt flour. My intention was to introduce more extensibility in the dough along with the classic and wonderful flavor of spelt. After many trials, I decided to drop the spelt mostly because, with medium-protein white flour and hydration at around 70%, coupled with a length autolyse, this dough had plenty of extensibility.
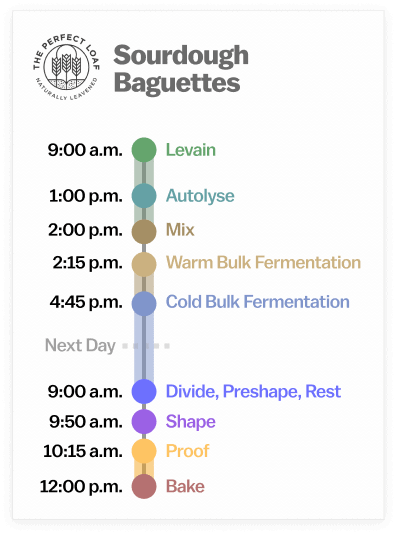
Baking Schedule
The entire process is split up over the course of two days. This affords you the option to bake the baguettes the next day when you want them—for breakfast, lunch, or even dinner.
Similar to my Kamut demi-baguette recipe, I utilized a short warm bulk fermentation followed by a longer, cold bulk fermentation. When I tested cold-proofing these baguettes in shape, the results always yielded a slightly thicker crust compared to a warm final proof. Further, a cold bulk also adds to the flexibility and convenience of this dough.
Sourdough Baguette Recipe
Update: I recently updated this sourdough baguette. It is now the same recipe that’s in my sourdough cookbook—and believe me, the results are significantly better than the previous version!
Vitals
| Total Dough Weight | 2,000 grams |
| Pre-fermented Flour | 6.5% |
| Hydration | 70.0% |
| Levain in the final dough | 17.4% |
| Yield | 6 x 325g sourdough baguettes (appx 14″ long) |
Total Formula
Note that this is the Total Formula which lets you know all the ingredients, in baker’s percentages, that you need for this recipe. Scroll down to the Method section for what you need in each step.
Desired dough temperature: 78°F (25°C) (see my post on the importance of dough temperature).
| Weight | Ingredient | Baker’s Percentage |
|---|---|---|
| 1143g | White flour (about 11.5% protein; Central Milling Artisan Baker’s Craft Plus) | 100.0% |
| 743g | Water 1 (Levain and autolyse) | 65.0% |
| 57g | Water 2 (Mix) | 5.0% |
| 21g | Salt | 1.8% |
| 37g | Ripe sourdough starter, 100% hydration | 3.3% |
Method
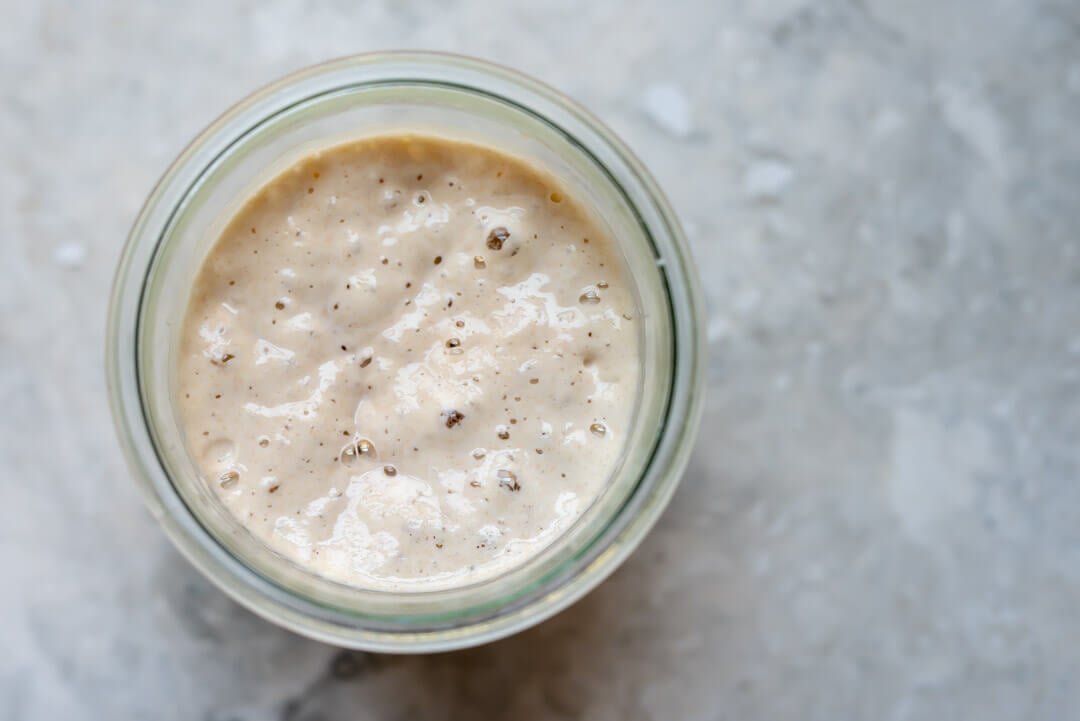
1. Prepare the levain – 9:00 a.m
| Weight | Ingredient | Baker’s Percentage |
|---|---|---|
| 74g | White flour (about 11.5% protein; Central Milling Artisan Baker’s Craft Plus) | 100.0% |
| 74g | Water 1 | 100.0% |
| 37g | Ripe sourdough starter, 100% hydration | 50.0% |
Use your sourdough starter when ripe, mix the above ingredients in a jar, and leave them covered at a warm temperature, 74-76°F (23-24°C), to ripen for 5 hours.
2. Autolyse – 1:00 p.m.
| Weight | Ingredient |
|---|---|
| 1068g | White flour (about 11.5% protein; Central Milling Artisan Baker’s Craft Plus) |
| 668g | Water 1 |
Warm or cool the autolyse water so that the temperature of the mixed dough meets the FDT (final dough temperature) of 78°F (25°C) for this recipe. Place the flour and water 1 in a large bowl. Use wet hands to mix until no dry bits remain; the dough will be shaggy and loose. Use a bowl scraper to scrape down the sides of the bowl to keep all the dough in one area at the bottom. Cover the bowl and place it near your levain for 1 hour.
When making sourdough baguettes, I like to use the autolyse technique to help gain extensibility in the dough and also reduce the total mixing time.
3. Mix – 2:00 p.m.
| Weight | Ingredient |
|---|---|
| 57g | Water 2 |
| 21g | Fine sea salt |
| 186g | Ripe levain |
Add the salt and levain to the top of the dough that was just in autolyse and use a splash of water 2 to moisten. With wet hands, mix thoroughly. Add the remaining water if the dough feels like it can handle it. Next, knead the dough for a few minutes using either the slap and fold technique or folds in the bowl. For this dough, I kneaded for about 5 minutes until the dough smoothed and became elastic.
With sourdough baguettes, I find spending a few more minutes developing the dough upfront helpful in achieving a more open crumb. A spiral mixer can help mix this dough quicker and more effectively.
Transfer the dough to a bulk fermentation container and cover.
4. Warm Bulk Fermentation – 2:15 p.m. to 4:45 p.m.
This warm bulk fermentation will last a total of 2 hours and 30 minutes. During this phase (of the two-step bulk fermentation phase), give the dough three sets of stretch and folds, starting 30 minutes after the beginning of bulk. After the last set, let the dough rest untouched until the full two and a half hours.
5. Cold Bulk Fermentation – 4:45 p.m. to 9:00 a.m. (next day)
After the warm bulk fermentation, place the covered bulk fermentation container in the refrigerator overnight.
6. Divide and Preshape – 9:00 a.m. (next day)
My baguette dough, when removed from the fridge, had plenty of activity but was not exceedingly gassy or risen. The dough was active yet relaxed.
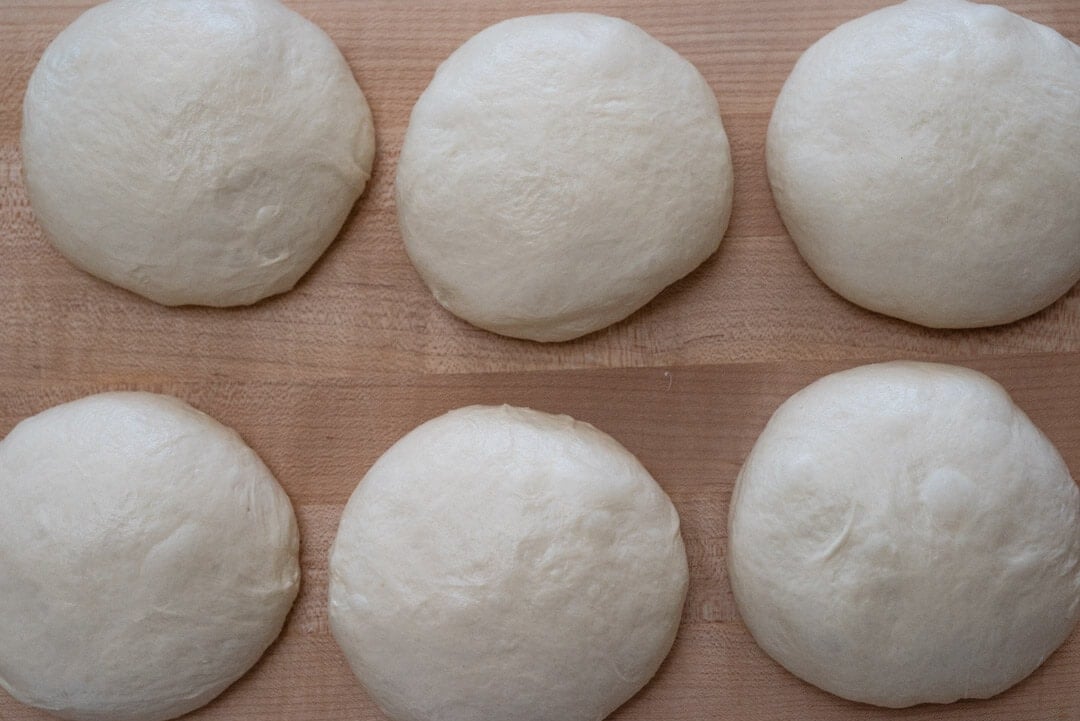
Gently scrape the dough from the bulk container to an un-floured work surface. The dough will feel cold, slightly damp, and firm. Divide into 325g pieces and preshape the pieces of dough into rounds (my preference) or rough tubes. Because the dough is cold and firm, very little bench flour is needed to pre-shape.
Let the preshaped dough rest for 35 minutes, uncovered.
7. Shape – 9:50 a.m.
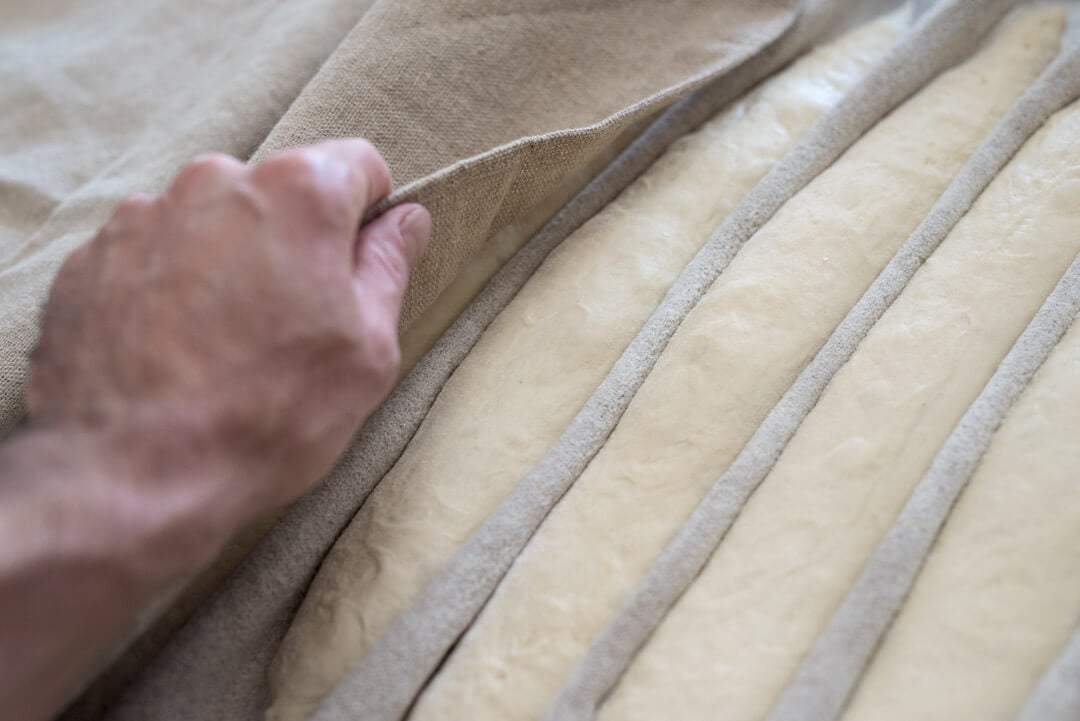
Prepare a board with a couche (aka baker’s linen) or a large kitchen towel and place this next to your work surface.
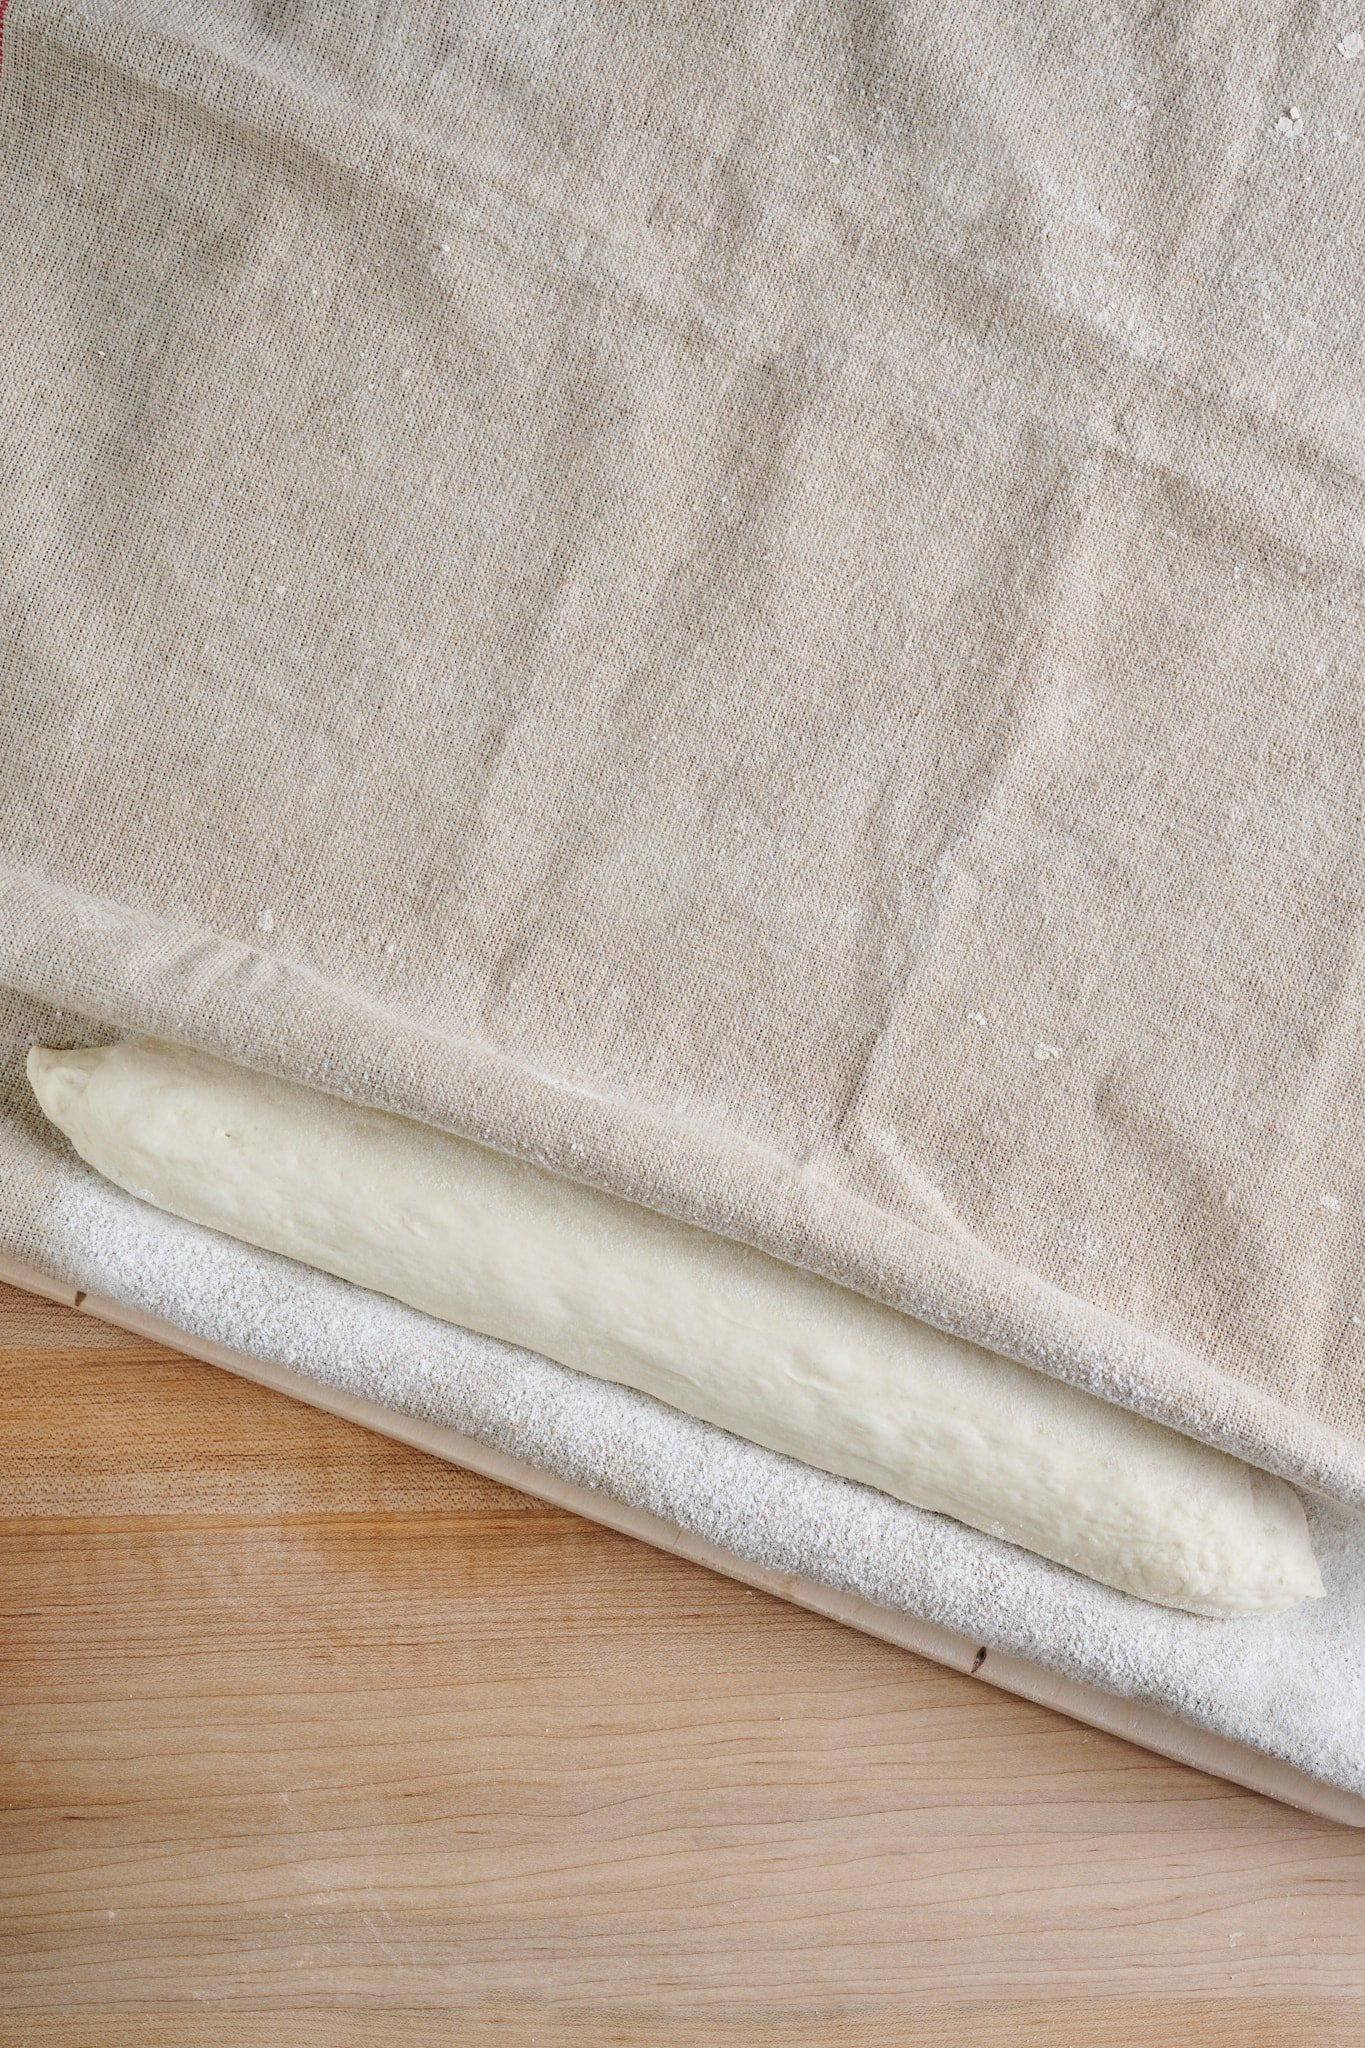
At one side, where you will start laying down shaped baguettes, roll a section so that it stands up by itself, creating a strong edge (see above). Then thoroughly and evenly dust flour on a 3- to 4-inch-wide strip down the couche, from farthest from you to nearest, where the first piece of shaped dough will sit.
After the preshaped rounds have rested for 35 minutes, shape each piece into a long baguette, approximately 14″ long for the home oven (or as wide as your baking surface).
Watch the quick video below for my step-by-step approach to shaping.
Once you’ve shaped a piece, place it in the flour-dusted channel on the couche, seam side up. Then, using both hands at the edges, pick up and drag a little of the couche toward the dough (like making a pleat in the couche) to form a matching wall of the channel to hold the dough while it’s proofing. Once the new wall is formed, it will look like the dough is nestled between two straight walls.
Flour a new strip down the couche on the other side of the newly formed wall in preparation for another piece of dough. Repeat this process for all the preshaped rounds.
Shaping baguettes requires practice through repetition (see my baguette shaping guide page for more instructions). Try not to get discouraged when shaping; take it slow and focus on one motion at a time.
8. Proof – 10:15 a.m. to 12:00 p.m.
Keep your proofing board away from drafts, as the dough can quickly develop a crust on the outside. It may help to drape the edges of your linen over the shaped baguettes or cover them loosely with plastic. If you cover it with plastic, be aware the dough may stick.
Proof the pieces until they pass the poke test, about 1 hour and 45 minutes at room temperature.
9. Bake – 12:00 p.m.
Preheat your oven to 450°F (230°C) for an hour with baking stone/steel inside.
If you only have one baking surface, divide the baking into two sessions. Bake three baguettes first, and chill the rest in the fridge for the second session.
Prepare a pizza peel with parchment paper matching the width of your baking surface.
Grab the end of the couche and pull it out, moving the piece of dough away from the rest. Then, using a dough transfer board (a smaller pizza peel or a small cutting board could also work), place the board inside the baguette (the side closest to the rest of the dough pieces). With the hand holding the couche, quickly flip the dough onto the peel by tugging up and slightly over the transfer board. The baguette should now be seam-side down on the transfer board.
Repeat until you have three pieces on the peel.
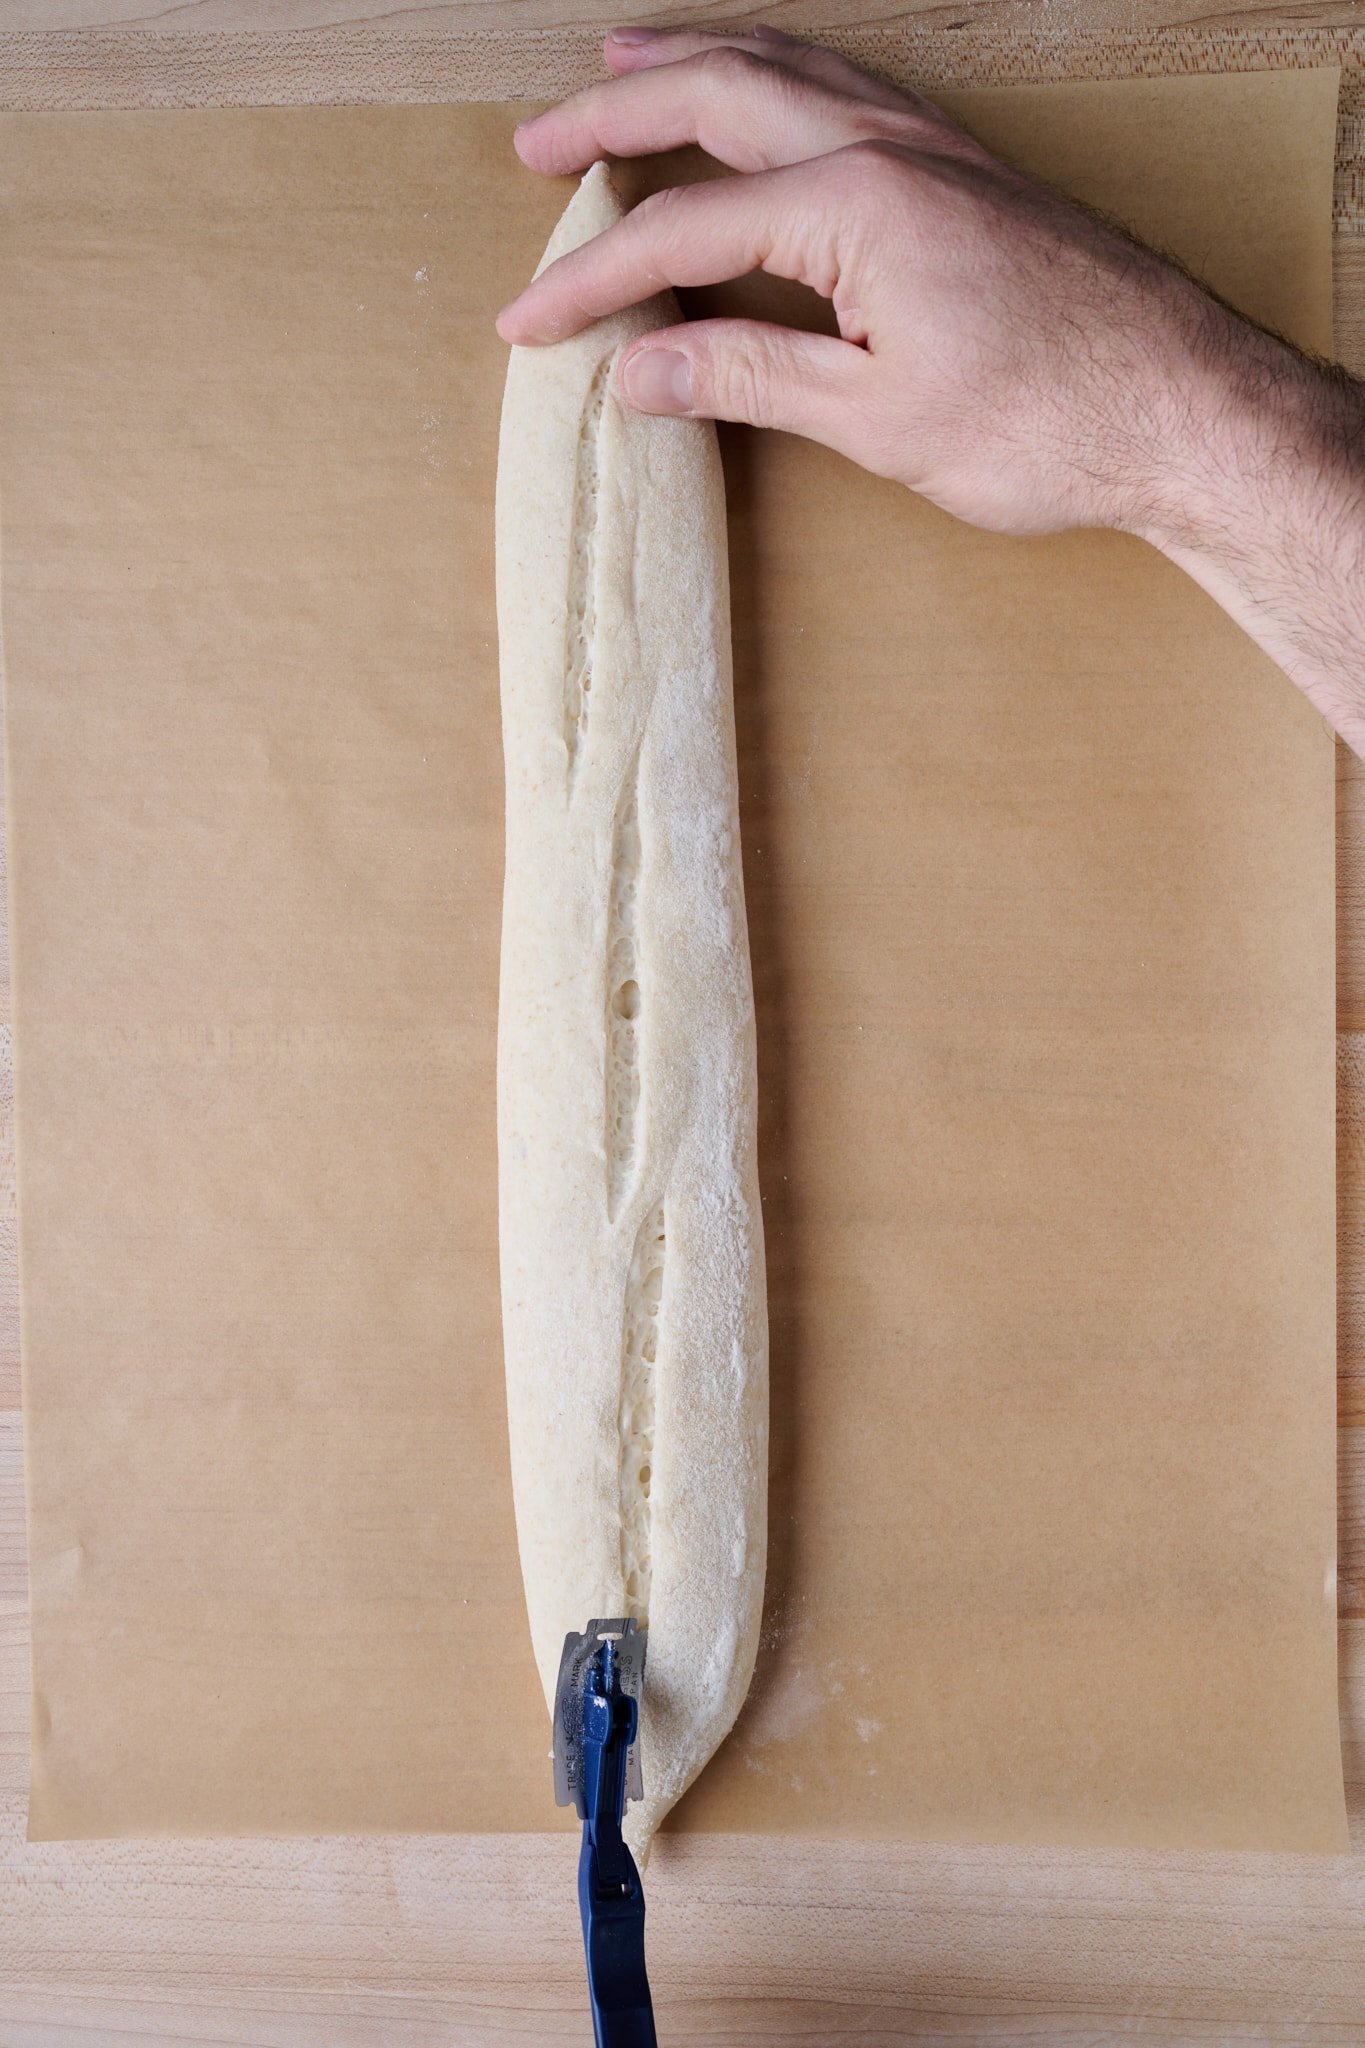
Score each baguette with three overlapping slashes (see below).
Transfer the dough onto the baking surface in the oven using the parchment paper. Next, steam the oven and bake for 20 minutes. Remove the steaming pans and bake for another 20-25 minutes until done.
Cool on a rack. Repeat the process for the remaining baguettes in the fridge.
I steamed my oven in my usual way, described here in my post on how to steam your home oven for baking.
Sourdough Baguette Recipe
- Prep Time: 24 hours
- Cook Time: 45 minutes
- Total Time: 24 hours 45 minutes
- Yield: 6 baguettes
- Category: Lunch, dinner, snack
- Cuisine: French
Description
These exquisite sourdough baguettes have a delicate wheaty flavor with malty notes from the caramelized crust. They’re perfect for breakfast (pan con tomate anyone?), lunch, or even just a snack with a spread of butter on top.
Ingredients
Levain
- 74g white flour (about 11.5% protein)
- 74g water
- 37g ripe sourdough starter, 100% hydration
Autolyse
- 1068g white flour (about 11.5% protein)
- 668g Water
Main Dough
- 57g water
- 21g fine sea salt
- 186g ripe levain
Instructions
- Levain (9:00 a.m.)
In a small bowl mix the Levain ingredients. Cover the jar and keep it at a warm temperature for 5 hours. - Autolyse (1:00 p.m)
In a mixing bowl, add the Autolyse ingredients until no dry bits remain. Cover the bowl and let rest for 1-hour. - Mix (2:00 p.m.)
Add the salt and levain to the top of the dough in autolyse and use a splash of the remaining water to moisten. With wet hands, mix thoroughly. Add the remaining water if the dough feels like it can handle it. Knead the dough for a few minutes using either the slap and fold technique or folds in the bowl until the dough smooths and becomes elastic. Transfer the dough back into the bowl. Transfer the dough to a bulk fermentation container and cover. - Warm Bulk Fermentation (2:15 p.m. to 4:45 p.m.)
This dough will require 2 sets of stretches and folds during bulk fermentation at 30-minute intervals. After the second set, let the dough rest, covered, for the remainder of bulk fermentation. - Cold Bulk Fermentation (4:45 p.m. to 9:00 a.m.)
After the warm bulk fermentation, place the covered bulk fermentation container in the refrigerator overnight. - Divide and Preshape (9:00 a.m., the next day)
Gently scrape the dough from the bulk container to an un-floured work surface. Divide into 325g pieces and preshape the pieces of dough into rounds (my preference) or rough tubes. Because the dough is cold and firm, very little bench flour is needed to pre-shape. Let the preshaped dough rest for 35 minutes, uncovered. - Shape (9:50 a.m.)
Prepare a couche and dust it with flour. Shape each piece of dough into a baguette shape. - Proof (10:15 a.m. to 12:00 p.m.)
Proof the pieces until they pass the poke test, about 1 hour and 45 minutes at room temperature. - Bake (12:00 p.m.)
Preheat your oven to 450°F (230°C) for an hour with baking stone/steel inside. Divide the bake into two sessions if you only have one baking surface. Bake three baguettes first, and chill the rest in the fridge for the second session. Prepare a pizza peel with parchment paper matching the width of your baking surface. Grab and end of the couche and pull it out, moving the piece of dough away from the rest. Then, using a dough transfer board (a smaller pizza peel or a small cutting board could also work), place the board to the inside of the baguette (the side closest to the rest of the dough pieces). With the hand holding the couche, quickly flip the dough onto the peel by tugging up and slightly over the transfer board. The baguette should now be seam-side down on the transfer board. Repeat until you have three pieces on the peel. Score each baguette with three overlapping slashes. Transfer the dough onto the baking surface in the oven using the parchment paper. Next, steam the oven and bake for 20 minutes. Remove the steaming pans and bake for another 20-25 minutes until done. Cool on a rack. Repeat the process for the remaining baguettes in the fridge.
Sourdough Baguette Recipe FAQs
Why are these scaled to 325g?
This dough weight makes for baguettes that fit my home baking surface at 14-inches long. It makes for a fatter baguette in the end, but one that’s perfect for the home oven.
Why is scoring difficult with baguettes?
One (of the many) reasons I like to do a cold-proof with almost all my other doughs is because scoring is much easier. When the dough is warm, it’s easy for your blade to drag and get stuck. My best advice is to use a new, super-sharp blade and make your cuts as smooth and fast as possible. If you notice you didn’t cut through the skin of the dough sufficiently in the first pass, lightly drag the blade inside the cut to give it a little help.
Why do cold bulk fermentation with baguette dough?
Doing two-day fermentation is a great schedule for home bakers (and pro bakers, too!), so I do like to use the fridge; it brings a little more flavor. This means you’d either have to do cold bulk or cold proof in shape. Doing the latter gives these a slightly thicker crust since the dough will be exposed to cold temps when they’re in their final shape. Therefore, I opt for cold bulk fermentation to keep a thin crust (it’s also easy to shape cool dough!).
What’s Next?
This sourdough baguette recipe results in exquisite delicate baguettes. The brittle crust grounds the eating experience and gives added body to the otherwise tender bread. It’s through this contrast that the bread is elevated to the next level—a baguette with a soft, flimsy crust would be a sad baguette indeed.
I’ve said it before, and I’ll probably say it a million times more: fermentation is a mysterious and beautiful thing. I hope you try this recipe and you show up to your next gathering with an armful of exquisite and incredibly delicious pointy sticks.
To continue with the baguette theme, try your hand at my green olive filoncini, which are kind of like an Italian version of baguettes‚ but twisted!
Or, if you’re looking for a large, crusty loaf, my sunflower and sesame sourdough has loads of flavor and are a go-to recipe when you want to impress.
Buon appetito!


455 Comments
Since the bread is best eaten the same day it is baked, what would be better, to freeze the loaves already raw or after baking? Thanks!
After baking.
I would love to print out the baguette recipe, how do I do this?
Working on getting the print function on this recipe!
Leslie—print function now added for these!
Hey there. Is there a printable version of this? Thank you!
I’m working on getting the print function on this recipe!
Print function now added to this recipe, James!
Hey Maurizio! I’ve made this recipe a few times now. Generally with good results but last time I rushed my cold fermentation and proofing and ended up with underproofed loaves. Question – what are your temperatures for the warm bulk and proof? Just room temp? It’s cold where I am! I see you have a target final dough temp of 79F. Thanks!
Warm room temp, yes. Usually for me, it’s around 74F. I try to hit the final dough temp of 78°F (25°C) or so, then keep it at warm room temp—that should set you up nicely!
I made this recipe from your book and was so disappointed in the crust. The loaves did not pop open at all. I had scored them as shown, and I also used the ice cubes and the wet dish towels to steam my gas oven. The taste was good as was the crumb, but the crust was so disappointing. Any tips? The loaves did not look that large when I put them in the oven and then there was no real “spring.”
Thanks!
With baguettes you need to really steam that oven! I like to have the oven very hot to start, so make sure it’s fully preheated (take the temp of the baking surface to be sure). Then, load the baguettes quickly, steam the oven, shut the door. Then, try this: 5 minutes later, steam it again with more ice in the bottom.
Gas ovens are *very hard* to steam because they have vents and won’t hold steam very well. Try a second steaming to get more in there, this should help you!
Hi Maurizio,
Lately, I have experienced crust problems with both baguettes and ciabattas which I had frozen. The baguettes were baked fully, but I had intentionally kept the crust light to avoid getting a too dark crust once I would thaw them and “revive” the crunch in the oven.
The baguettes were made with poolish and baked on a Pepita pizza stone (https://www.domital.it/en/product/fireclay-plate-pepita/) and steamed using the Da-sh Stoom tray (https://stoom.store/en/). I am rather sure I have not had this issue with my sourdough baguettes so far, but they were baked on the stone either covered with a roasting tray or with the hot towels and spray bottle method.
The ciabattas were made with my sourdough starter and I baked them with the hot towels and spray bottle method.
I do not have an infrared thermometer yet (and would appreciate your advice on which one to buy!) so I am not able to check the temperature of the pizza stone, but I wonder whether it is possible that it does not get hot enough. I am warming it up for 1 hr at 260C before baking, but also with regular loafs observe that they burst at the bottom where the seal from shaping is.
I have found this interesting scientific article on bread crust flaking, but I think that there the researchers investigate the phenomenon on partly-baked breads that are not as baked as mines: https://www.newfoodmagazine.com/article/1924/examining-crust-problems-of-frozen-bread/.
Looking forwrad to hearing your or other members’ thoughts/experiences on crust issues.
Best from the Netherlands,
Daniela
Thanks for all the comments and links, Daniela! Ive seen the Da-sh Stoom as well, would love to try that one day. I would say with that preheat time the stone is likely hot enough, though, baguettes really love a hot bake in the beginning 🙂
Thank you for this recipe (and I just bought your amazing book)! I have two questions:
1) If you drop the inoculation down to 50% mature starter, doesn’t that throw the baker’s percentage off? Or is 23.5 grams too little to make a difference?
And 2) I have an Emile Henry Baguette Baker. How do I calculate how long to bake covered vs. covered. In fact, I wonder this about baking in any Dutch oven. Are there guidelines? Thank you!
Hey, Doreen! So sorry for the late reply, I don’t know how I missed this comment. If you drop the inoculation down, you’ll need to let it ripen for 5 hrs (or until you see it properly ripe). That’s a small amount, but you could scale up the flour and water to make sure you have the same amount of total levain at the end. Hope that makes sense.
I almost always bake covered for 20 minutes, no matter what!
Hope this helps, let me know if you have more Q’s and hope you’re loving my book 🙂
I’m out of High Mountain.
Would a high protein whole wheat flour be a reasonable substitute, or would it defeat the purpose?
For example, Central Milling Whole Wheat Hi-Pro Fine.
It will definitely change this recipe! More whole grains will bring more sourness, but maybe that’s desired, and I think it would taste great. Though, it’ll also close the crumb a bit in these, too.
I have made these several times subbing King Arthur’s for the Central bread flour and the dough is very wet and sticky making it very hard to handle. The Baguettes have turned out ok but I would like them to have a little stronger sour dough flavor and be easier to shape. Any suggestions to make the dough less sticky?
Hey, Harry! I’d drop the hydration of the dough if it’s too sticky and hard to handle. Then, try mixing/kneading a bit longer as well, you want a stronger dough!
I don’t have malted flour or malt powder but I do have some barley malt syrup. Will that substitute and is there an amount would suffice?
What is the purpose of using malted flour at all?
I find the malt helps bring color to the crust, but you can skip it!
Hi Maurizio! I’m excited to try this recipe, but I don’t have malted flour. I do have diastatic malt powder. Could I use plain bread flour + malt powder to emulate the malted bread flour you use in this recipe?
Yes, you can add a small amount of diastatic malt powder to your flour!
Hi Maurizio 🙂 thanks for this recipe. Excited to try it tomorrow. Is it correct to say if I attempt the warm bulk is 3hrs and then pre shape for 30mins and then 1.45 shape before baking?
Side note – if I would like to bake bagels but don’t have the diastatic or barley malt what can I do? Finding those ingredients hard to find 🙂
Lastly, with my AP sourdough I find it doesn’t rise enough. Any suggestions?
Thanks!
You’re welcome, Jaimi! That sounds like it could be a good schedule, as long as the dough temps are close to the recipe here. But, as always, adjust those times based on how the dough looks and feels!
For the sourdough bagel recipe, you can use honey in place of the barley malt syrup.
With your AP sourdough, it’s hard to say! Usually with AP, I find the dough needs a reduction in water to get the same dough strength as with other flour choices. If the dough feels wet and sticky, a reduced hydration may help here!
Hope that helps, let me know how these all turn out 🙂
Thanks! It’s very cold in Canberra (Australia) where i’m living. So I adjusted my starter yesterday to the 20g old starter when feeding (I had been doing 50g but realised you only do 20) and it took like 20 hrs plus for it to start rising. Temps here are between 0 – 10 degrees during the day. I wonder where I need to make some adjustments for starter and the dough? because it’s a lot colder at the moment.
If it’s colder, use more starter/levain to offset the cold temps. Also, warming the mixing water will definitely help!
Ok so for the baguette levain would you increase the starter ratio in the levain to like 1.5:.75:.75? Is that even possible haha?
Or how can I decrease the ferment time given the temp here?
Yes, you can increase the amount of starter in the levain OR keep it warmer. Either work!
Hi Maurizio, Can you please tell me how the prosses will change if I want to use a Famag dough mixer?
Will work just fine in there! You’ll likely want to mix longer in the Famag, then do 1-2 sets of stretches and folds in bulk.
Maurizio Love your website has helped me a lot to improve my bread baking skills. Question about the Giusto’s Artisan Bread Flour you recommend for the Sourdough baguettes. You list it at 11.5% protein but their website list it at 13 to 13.5% protein. Has it changed since you started using it or is just a typo? Also what would the effect be if you used an all purpose flour instead of the Giusto’s Artisan Bread Flour?
Hey there! Sorry for the delay. Yes, it seems to have changed, although it doesn’t even list the protein pecentage on the site any longer!
I mixed my usual sourdough baguette recipe for a weekend dinner party a few days ago and it yielded a much wetter dough than usual. I did a search for high hydration baguettes and found this post. I followed your instructions for stretch and fold, overnight in the fridge, etc. and produced the best baguettes of my bread baking career! Note this was with 100% King Arthur all-purpose flour, so I’m sure they could be better, but I think the overnight cold bulk rise made a huge difference in the flavor, and I spent more time and effort creating steam (small oven so I threw in ice cubes and sprayed water every 5 minutes for the first 20 minutes).
I even thought I ruined the second batch: the dough was so wet it stuck terribly to my bread towel. I scraped it off, reformed and reshaped the loaves, gave them about 15 minutes and then threw them in the oven, and they actually came out delicious and not horribly misshapen! Don’t ask me how.
Thank you!
Glad to hear that, Susan! Yes, with KAF AP, I might reduce the hydration just a bit, although that’s pretty resilient flour and can sometimes hold up to higher hydration. Stick with this recipe, each time it gets better and better. Thanks for the comments and enjoy!
Love this recipe, Maurizio! The flavor is incredible. Question for you. The crust on my baguettes is really, really thick, and I’m wondering what I’m doing to create that. Is there a way to get a thinner crust?
Glad you like the flavor, Autumn! It might be you’re baking for too long, that’s usually what lead to a thick crust. Additionally, introducing more steam at the beginning of the bake will help keep that crust thinner.
Got it! Okay thanks. I’ll try a shorter bake time and more steam. Appreciate it!
Thanks for the wonderful recipe Maurizio! It has inspired months of bakes as I try to improve my baguette game. I’ve tweaked your recipe a bit to fit my flours/preferences and I’m starting to get to a place where I’m getting better and better results! I’ve found that dialing in the fermentation has been the most critical factor in improving my results.
Changes I made:
– Using 80% AP, 15% BF, 5% WW. Whole wheat added for taste.
– Decreasing hydration to 70% to improve handling (I use KA bread flour with less protein than CM High Mountain)
– Using an aliquot jar to determine the end of bulk. I put 30g of dough in a small beaker and wait for it rise 50%. This takes about 4.5/5hrs with my dough in the oven with the light on (~82F).
– After preshaping, let dough rest in fridge. Shape, then put back in fridge to proof for 45mins while the oven preheats. I find that keeping the dough cold helps me avoid overfermentation.
Here is the latest bake. Still have quite a ways to go with shaping & scoring, but I’m much more satisfied with my crumb now that I use an aliquot jar. Let me know if you have any tips or feedback 🙂
Hey, Willy! Looking great! I would say they might be even better with a little more fermentation time, both in bulk and proof. You’ll get more evenness throughout and a more open interior, along with a more creamy, soft texture! On the right track here, though (and great shaping)!
Have you every shortened the length of the baguettes and baked them in the Challenger?
I have not, Patrick, but that would work just fine!
Whoa, thanks for reporting that, Bashu! There’s definitely an error there, will take a look.
I was wondering if there’s a difference between using malted flour and plain bread flour? Like, does the malted flour just add flavor? Looking forward to trying these!
Hey, Addison! Sorry for the delay. See my post here on using malt in bread dough!
Hi Maurizio, since you mentioned these change texture quickly after baking, wondering if you’ve tried parbaking them and then freeze and finish another time to get fresh baguettes whenever? Thanks!
Hey, Jeannie! I have not, but that should work.
If I need to shorten the cold ferment to something closer to 10 hours, should I increase the amount of starter I use?
That’s the right idea, Jamie. But I feel like you’ll be just fine shortening it to around then as-is. If you’re a bit worried, I’d let the dough go 15 minutes more before placing it in the fridge to give it more room-temp fermentation time.
Hi Maurizio, thank you for a lovely and detailed recipe! I’m making the second batch of the baguettes right now, but noticed my oven doesn’t steam up for the second batch (there was plenty of steam for the first). I’m using lava rocks, and when I poured water over them after reheating the oven back up to 500C, not a lot of steam generated. Would you have any suggestions on how I can recreate the steam from the first batch for the second? Thank you!
Great, Melissa! And you’re very welcome. My feeling is the lava rocks were not heated again sufficiently. Give them more time to preheat, maybe 15 to 30 minutes, that way they’ll help generate that steam!
That makes sense, thank you!! I will try to be more patient and let the lava rocks heat back up for the second batch. The baguettes were delicious regardless! I still need to work on shaping, but the crumb and crust were lovely. Thank you again for sharing!
Hi Maurizio and thank you so much for your blog, you inspire me a lot … I am ISO the perfect baguette and I have tried a lot of recipes from books to blog to friends …. My perfect baguette should have a light texture with a thin crust so I don’t go with cold fermentation and stick to warm fermentation and same day bake. Still, I found that it is still very dense inside and I was wondering if adding a poolish to this recipe will help with the lightness of the baguette ? What do you think ? I would love to have your opinion on that ? Again, Thank you so much for sharing your passion, your tips ! How much I love this sourdough community !
Hey there! Sorry for the delay. Yes, adding commercial yeast will definitely get you closer to having a thinner crust, but I’ve found my sourdough baguettes are pretty close! The crust is definitely thicker when going with the fridge (whether it’s a cold bulk or retarded in shape), so a same-day, direct bake would be my suggestion there. In fact, I’m working on a new recipe here using just that method.
So in the end, I’d say a true, classic baguette with super thin crust is easier to achieve using commercial yeast, I find the flavor and texture of a baguette with sourdough-only suits my preferences. Either way works, of course, it just depends on how you want to go about it!
Hello Maurizio and thanks for your answer. I totally agree … meanwhile I was working on my baguette and I prefer the same day bake without yeast ! I put the dough on the fridge just for a few hours and it is really perfect !
I just checked on my dough after cold fermentation and it is not at all like your picture. Should I let it warm up and see if that helps it? It is still very firm with no bubbles on the surface.
Yes, I would let it proof for a bit on the counter and check again. Sounds like it might need some warm fermentation time.