
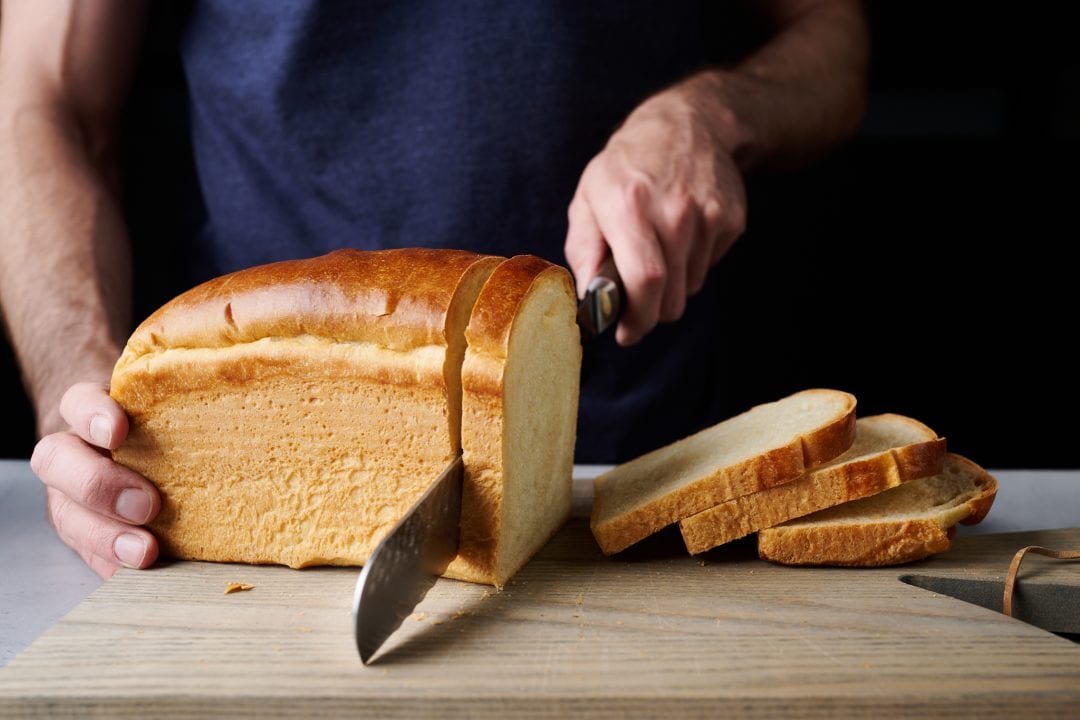
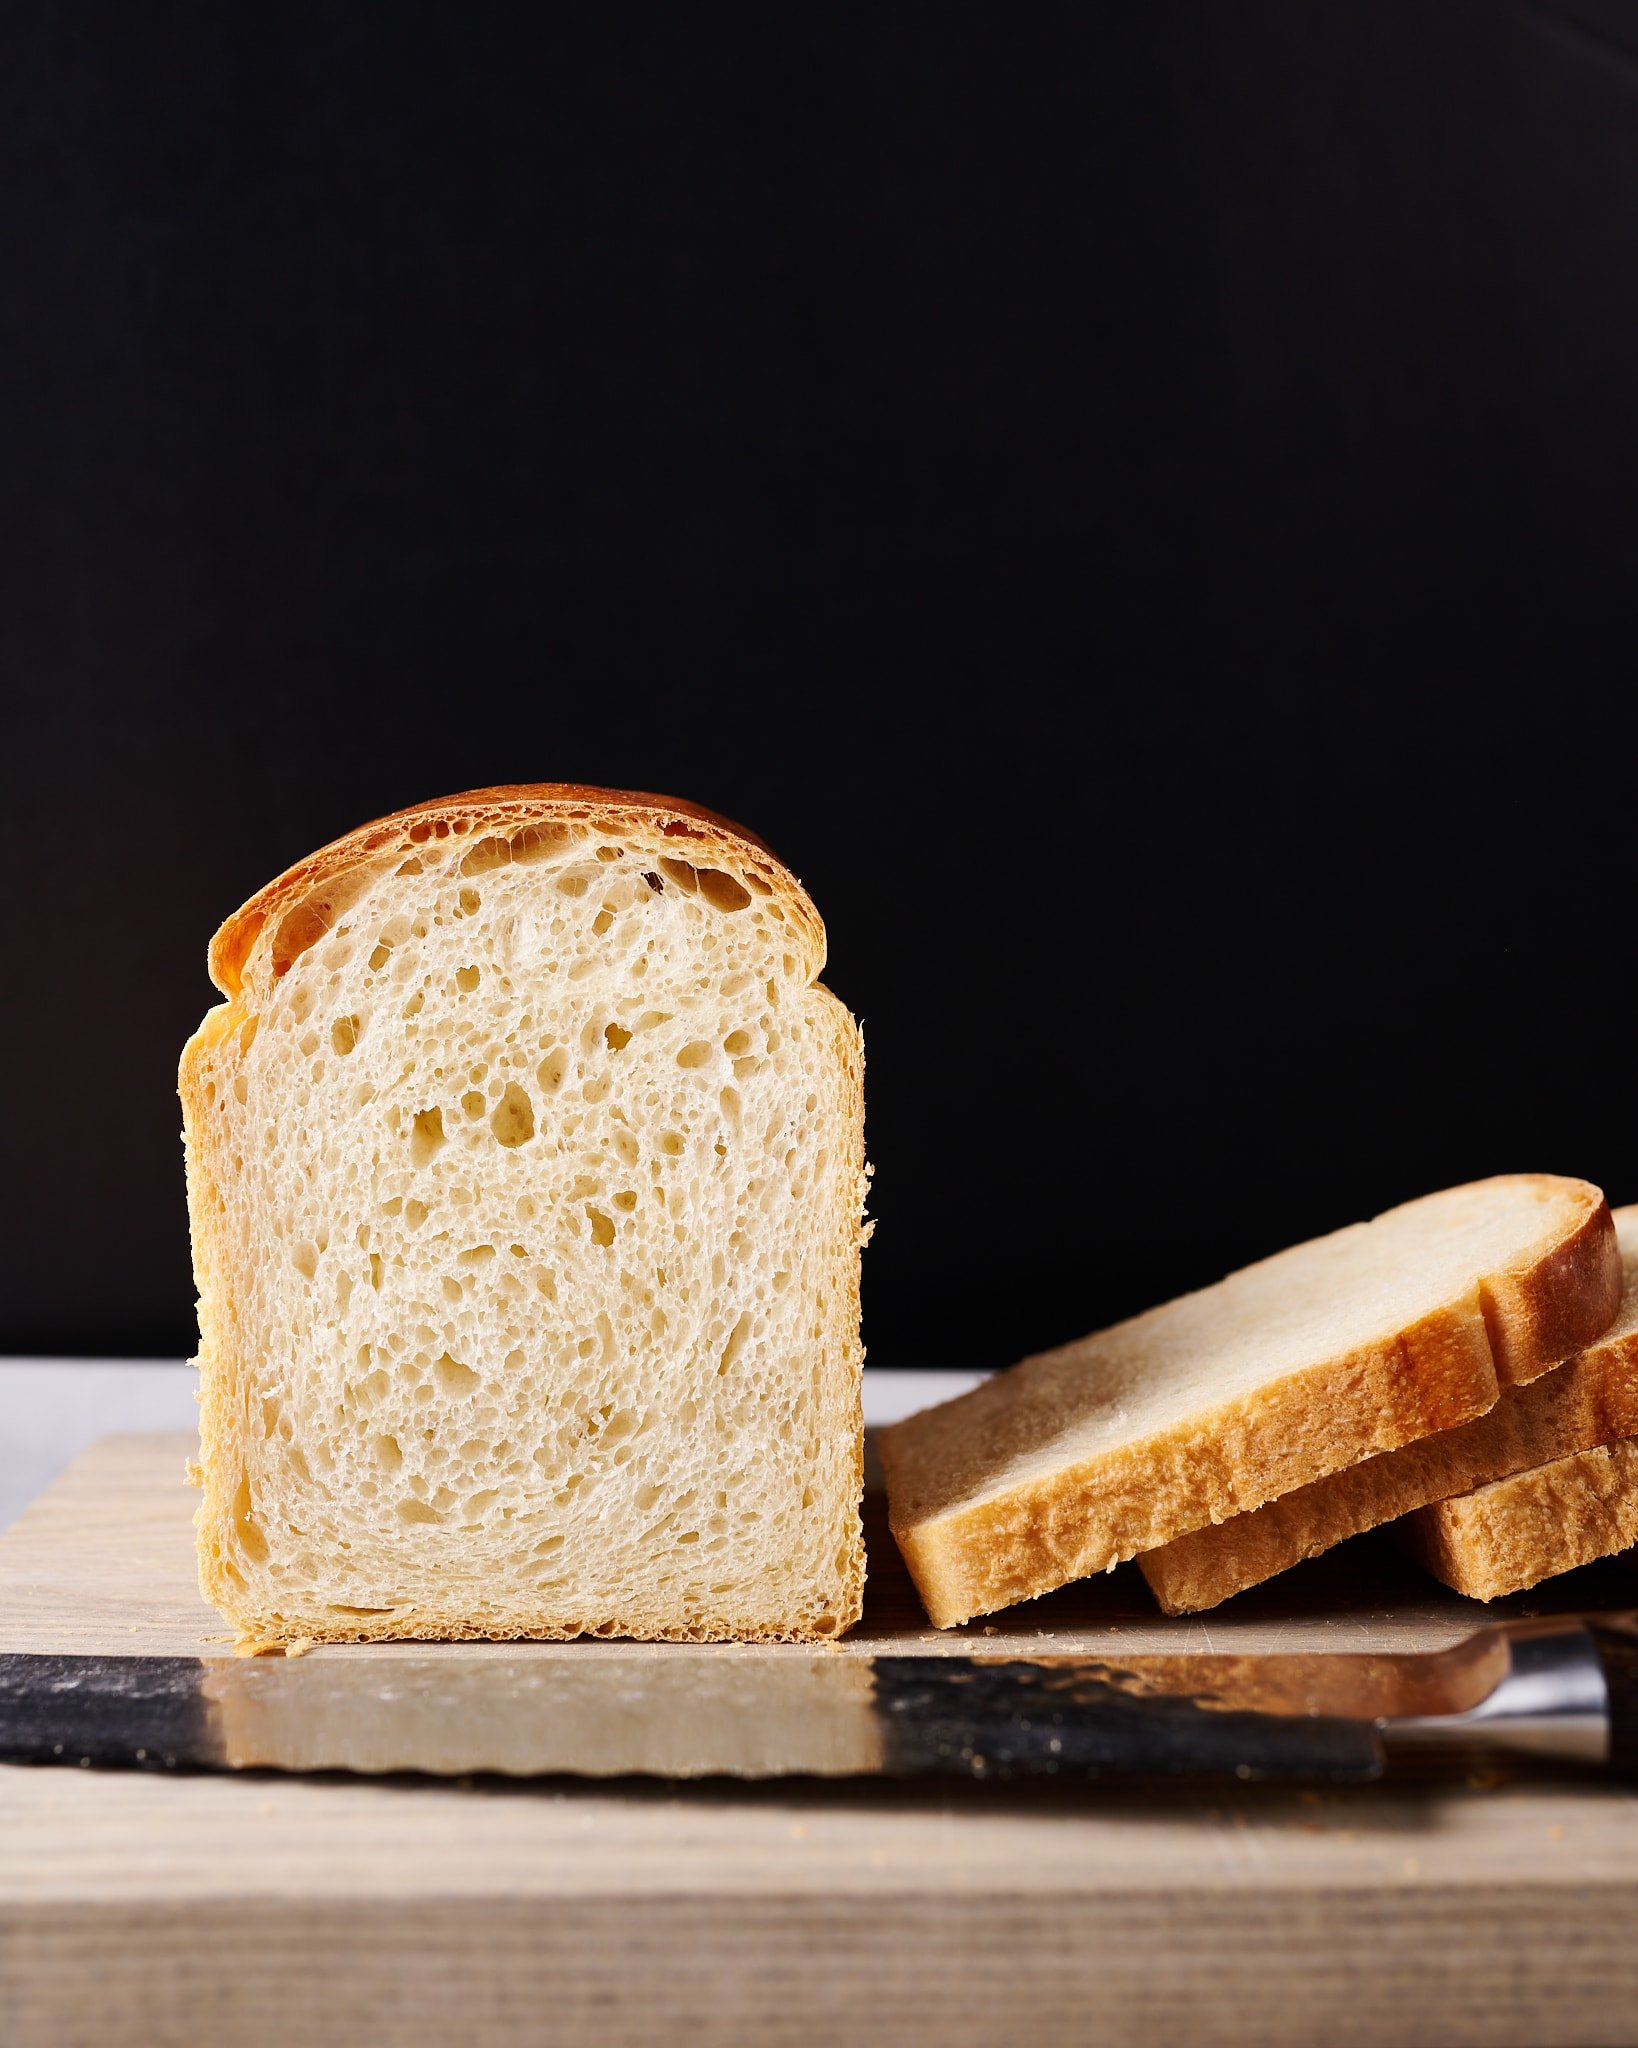
My sourdough pain de mie sandwich bread is pure white bread in all its glory–and it’s the toast lover’s best friend. Each slice is remarkably soft and light, with the thinnest possible crust, but when toasted, the slice crisps and frizzles in an absolutely ideal fashion. A few slices of this bread toasted within an inch of burning and served with a thick pat of butter on top might just be your new favorite breakfast. But there’s a depth of flavor to be found here, too, that sets it far apart from any supermarket white loaf: mild fermentation flavors and a touch of sweetness, all with the slightest hint of tang.
This style of bread is often called a Pullman Loaf, owing to the use of the Pullman pan, which purportedly was invented to be used in Pullman cars on a train to save space when baking. If you’re a frequent visitor here at The Perfect Loaf, you’ll know that the Pullman pan has pretty much supplanted all my other sandwich bread baking vessels. I love that bread baked in this pan has very straight sides, and that using the lid when baking results in a loaf that has an ultra-thin crust.
Sourdough Pain de Mie Video Walkthrough
Flour Selection
It’s rare for me to bake bread without any whole grain flour, but I make an exception with this recipe. In testing, I played with many flour blends, but in the end, I settled on using only all-purpose flour. By not using any whole grain flour in the dough (and the levain), you end up with bread that has reduced sourness and the lightest and most open interior possible.
Special Pans and Preparation
You can bake this bread in almost any pan that’s the right size, but I love the straight sides and nonstick liner of my USA Pan Pullman Loaf Pan (9″ x 4″ x 4″). If you slide on the cover before baking, you’ll end up with a loaf with four perfectly straight sides.
I’ve created a table of alternate pans with corresponding dough weights for each so that you can use what pan(s) you have and/or experiment with different sizes and shapes of loaves. Feel free to halve the recipe ingredients below to fit one pan, or even double the recipe and split it among 2 to 3 smaller pans.
| Pan (Dimensions in inches) | Total Dough Weight |
| 9 x 4 x 4 (Pullman pan shown in this post) | 800-900g |
| 8.5 x 4.5 x 2.5 (small loaf pan) | 600-700g |
| 9 x 5 x 2.75 (medium loaf pan) | 700-800g |
| 13 x 4 x 4 (large Pullman pan) | 1,100-1,200g |
Regardless of the pan you use, be sure to liberally grease the inside of the pan to ensure that the bread will come out cleanly after baking. Additionally, check out my post on shaping a pan loaf for tips on shaping, pans, and more.
Note: If using a large 13-inch Pullman pan, during shaping divide the dough into three equal-sized balls and shape them tightly. Then, place them into the pan side-by-side. Shaping the dough in this way (similar to how I shape a shokupan) will help prevent any sagging or collapsing while the loaf is baking.

Sourdough Pain de Mie Baking Schedule
This Pullman bread is baked the same day (except for the overnight levain that you make the night before) with a room temperature proof for a mild-flavored result. However, if you’re ok with a slight increase in sourness, feel free to retard the dough overnight by proofing it, covered, in the refrigerator right after shaping.
Sourdough Pain de Mie Formula
Note that this formula has been slightly modified since I first published it in 2019. I wanted to increase the fermentation activity in the dough, so I upped the pre-fermented flour percentage from 7.25% to 8.5%. This change ensures that bulk fermentation will be completed in around 4 hours, as listed in the recipe.
Vitals
| Total Dough Weight | 1,600 grams |
| Pre-fermented Flour | 8.5% |
| Levain percentage in final dough | 19.5% |
| Hydration (water only) | 48.0% |
| Yield | Two 800g loaves |
Total Formula
Desired dough temperature: 78°F (25°C) (see my post on the importance of dough temperature).
| Weight | Ingredient | Baker’s Percentage |
|---|---|---|
| 835g | White flour (11.7% protein; King Arthur All-Purpose Flour) | 100.0% |
| 184g | Whole milk | 22.0% |
| 100g | Unsalted butter | 12.0% |
| 376g | Water 1 (levain and autolyse) | 45.0% |
| 25g | Water 2 (mix) | 3.0% |
| 58g | Honey | 7.0% |
| 15g | Fine sea salt | 1.8% |
| 7g | Ripe sourdough starter, 100% hydration | 0.9% |
Sourdough Pain de Mie Method
1. Levain – 9:00 p.m., night before baking
Mix the following ingredients in a container and leave them covered at a warm temperature, 74-76°F (23-24°C), to ripen overnight.
| Weight | Ingredient | Baker’s Percentage |
|---|---|---|
| 71g | White flour | 100.0% |
| 71g | Water 1 | 100.0% |
| 7g | Ripe sourdough starter, 100% hydration | 10.0% |
2. Autolyse (with levain) – 8:30 a.m.
| Weight | Ingredient |
|---|---|
| 764g | White flour |
| 184g | Whole milk |
| 305g | Water 1 (autolyse) |
| 149g | Ripe levain (from step 1) |
NOTE: I’ve recently updated this recipe to be like my cookbook version, which produces an even better result! One of the changes is to include this autolyse step with included levain.
I use the autolyse technique for this recipe to help reduce the total mixing time required, but I also find it helps aid in the dough’s extensibility.
Warm or cool the autolyse water so that the temperature of the mixed dough meets the final dough temperature (FDT) of 78°F (25°C) for this recipe. Place the flour, milk, water, and ripe levain in the bowl of a stand mixer fitted with the dough hook. Mix on low speed until just incorporated. Cover the bowl and let sit for 30 minutes.
Typically, I do not autolyse with levain added, but with this dough, it helps make mixing the dough easier since there’s a large portion of water in the levain.
3. Mix – 9:00 a.m.
| Weight | Ingredient |
|---|---|
| 100g | Unsalted butter |
| 25g | Water 2 (mix) |
| 58g | Honey |
| 15g | Fine sea salt |
Note: If it’s cold in your kitchen, warm the milk in the microwave or over the stove to help meet the final dough temperature of 78°F (25°C). See my post on how to bake sourdough bread in the winter for tips on encouraging strong fermentation in colder temperatures. Conversely, if it’s starting to warm in your area, use the milk cold from the fridge and see my tips for baking bread in the summer.
First, cut the butter into ½-inch pats. Set them on a plate to warm to room temperature.
Put the honey and salt on top of the dough in autolyse and pour the water over it to help dissolve. Mix the dough on low speed until the salt and water are incorporated, then increase to medium speed and mix, stopping to scrape the sides of the bowl as needed, until the dough comes together and, while still shaggy, starts to cling to the dough hook, about 6 minutes.
Turn the mixer on low speed (STIR on a KitchenAid) and mix for 2 to 4 minutes until the dough gains more strength and begins to cling once again to the dough hook. Next, with the mixer running, add the room temperature butter, one pat at a time, waiting to add each pat until the previous one is fully absorbed. Adding all the butter will take 5 to 8 minutes. In the end, the dough will still be very soft, and it won’t altogether remove from the sides of the bowl. Transfer the dough to a bulk fermentation container and cover.
4. Bulk Fermentation 9:15 a.m. to 1:15 p.m. (4 hours)
At a warm room temperature, 74-76°F (23-24°C), bulk fermentation should take about 4 hours. If your kitchen is cooler, place your bulk container in a small home dough proofer, or extend the bulk fermentation time to give the dough more time to ferment. The dough is ready when it is smooth, puffy, and well-risen.
Give this dough three strengthening sets at 30-minute intervals. The first set starts 30 minutes after the start of bulk fermentation. Give the dough a series of stretches and folds for the first set. Wet your hands, grab one side, and stretch it up and over the dough to the other side. Next, rotate the bowl 180° and perform another stretch and fold (this forms a long rectangle in the bowl). Then, rotate the bowl 90° and do another stretch and fold. Finally, turn the bowl 180° and do one last stretch and fold. The dough should be neatly folded up in the bowl.
Set a timer for 30 minutes, and perform the remaining two sets at 30-minute intervals. Then let the dough rest, covered, for the remainder of bulk fermentation.
5. Divide and Preshape – 1:15 p.m.
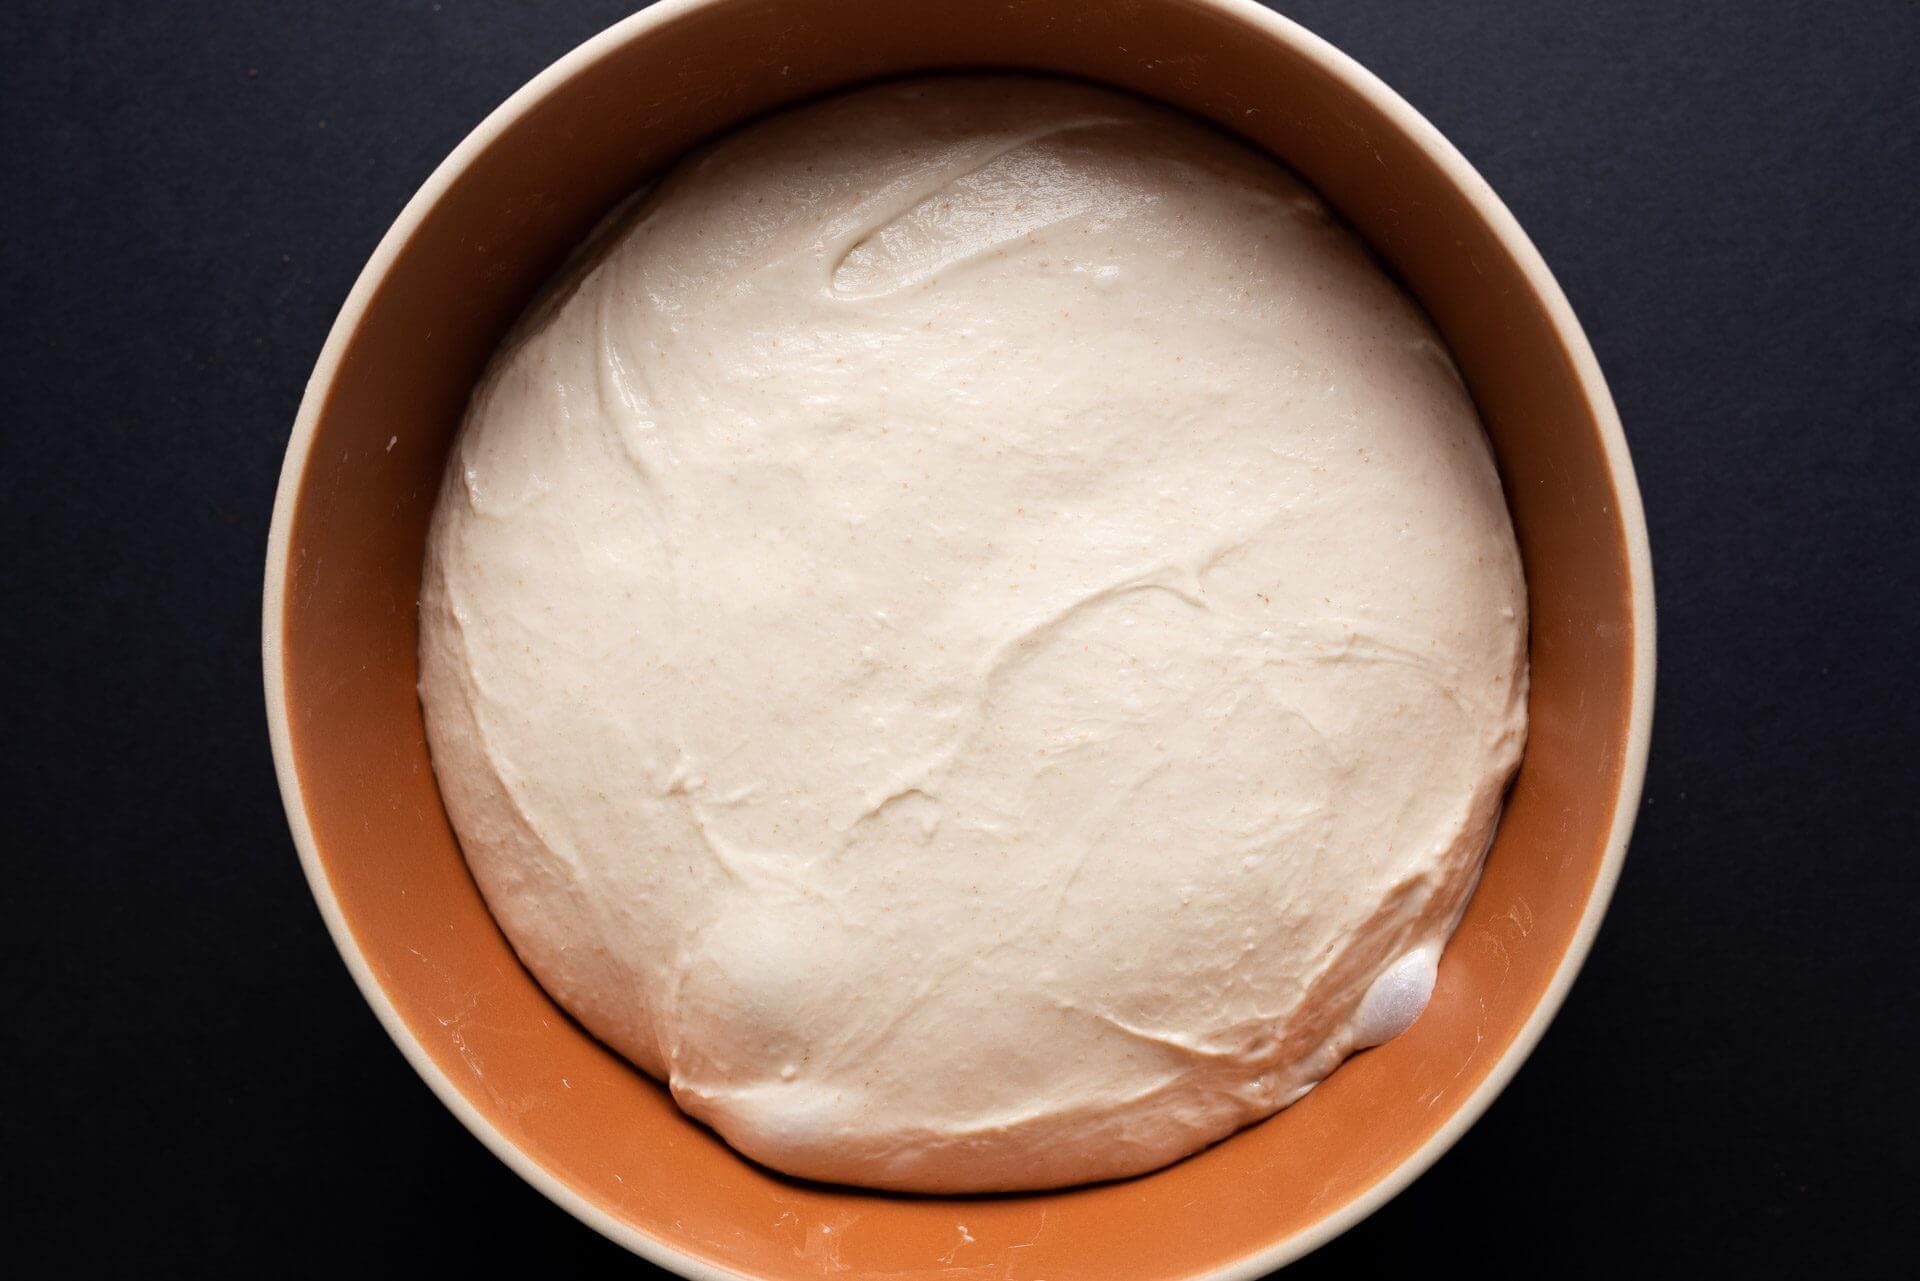
At the end of bulk fermentation, the dough will have risen in the bulk fermentation container (perhaps around 40% volume increase), be smooth and elastic, have bubbles on top, and a domed edge where the dough meets the bulk container. If the dough is not showing these signs, give it an additional 15 minutes and check again.
Fill a small bowl with water and place it next to your work surface. Scrape the dough onto a clean counter. Using a bench scraper in your dominant hand and the other hand wet, divide the dough in half. Then, preshape each piece of dough into a moderately tight round.
Let the dough rest, uncovered, for 30 minutes until it has relaxed and is ready to be shaped.
6. Shape – 1:45 p.m.
Grease two 9 x 4 x 4-inch Pullman pans with neutral oil.
I shaped these loaves as shown in my guide to shaping a pan loaf. Lightly flour the work surface and the top of a rested round. Using a bench knife, flip the round over onto the floured work surface. Fold the left and right sides of the dough toward the middle with a slight overlap. Then beginning at the side of the dough farthest from you, begin rolling the dough down to form a tight cylinder. Scoop the dough up with your bench knife and drop it into one of the prepared Pullman pans, seam side down. Repeat with the other piece of dough.
Cover the pans with a large, reusable plastic bag and seal.
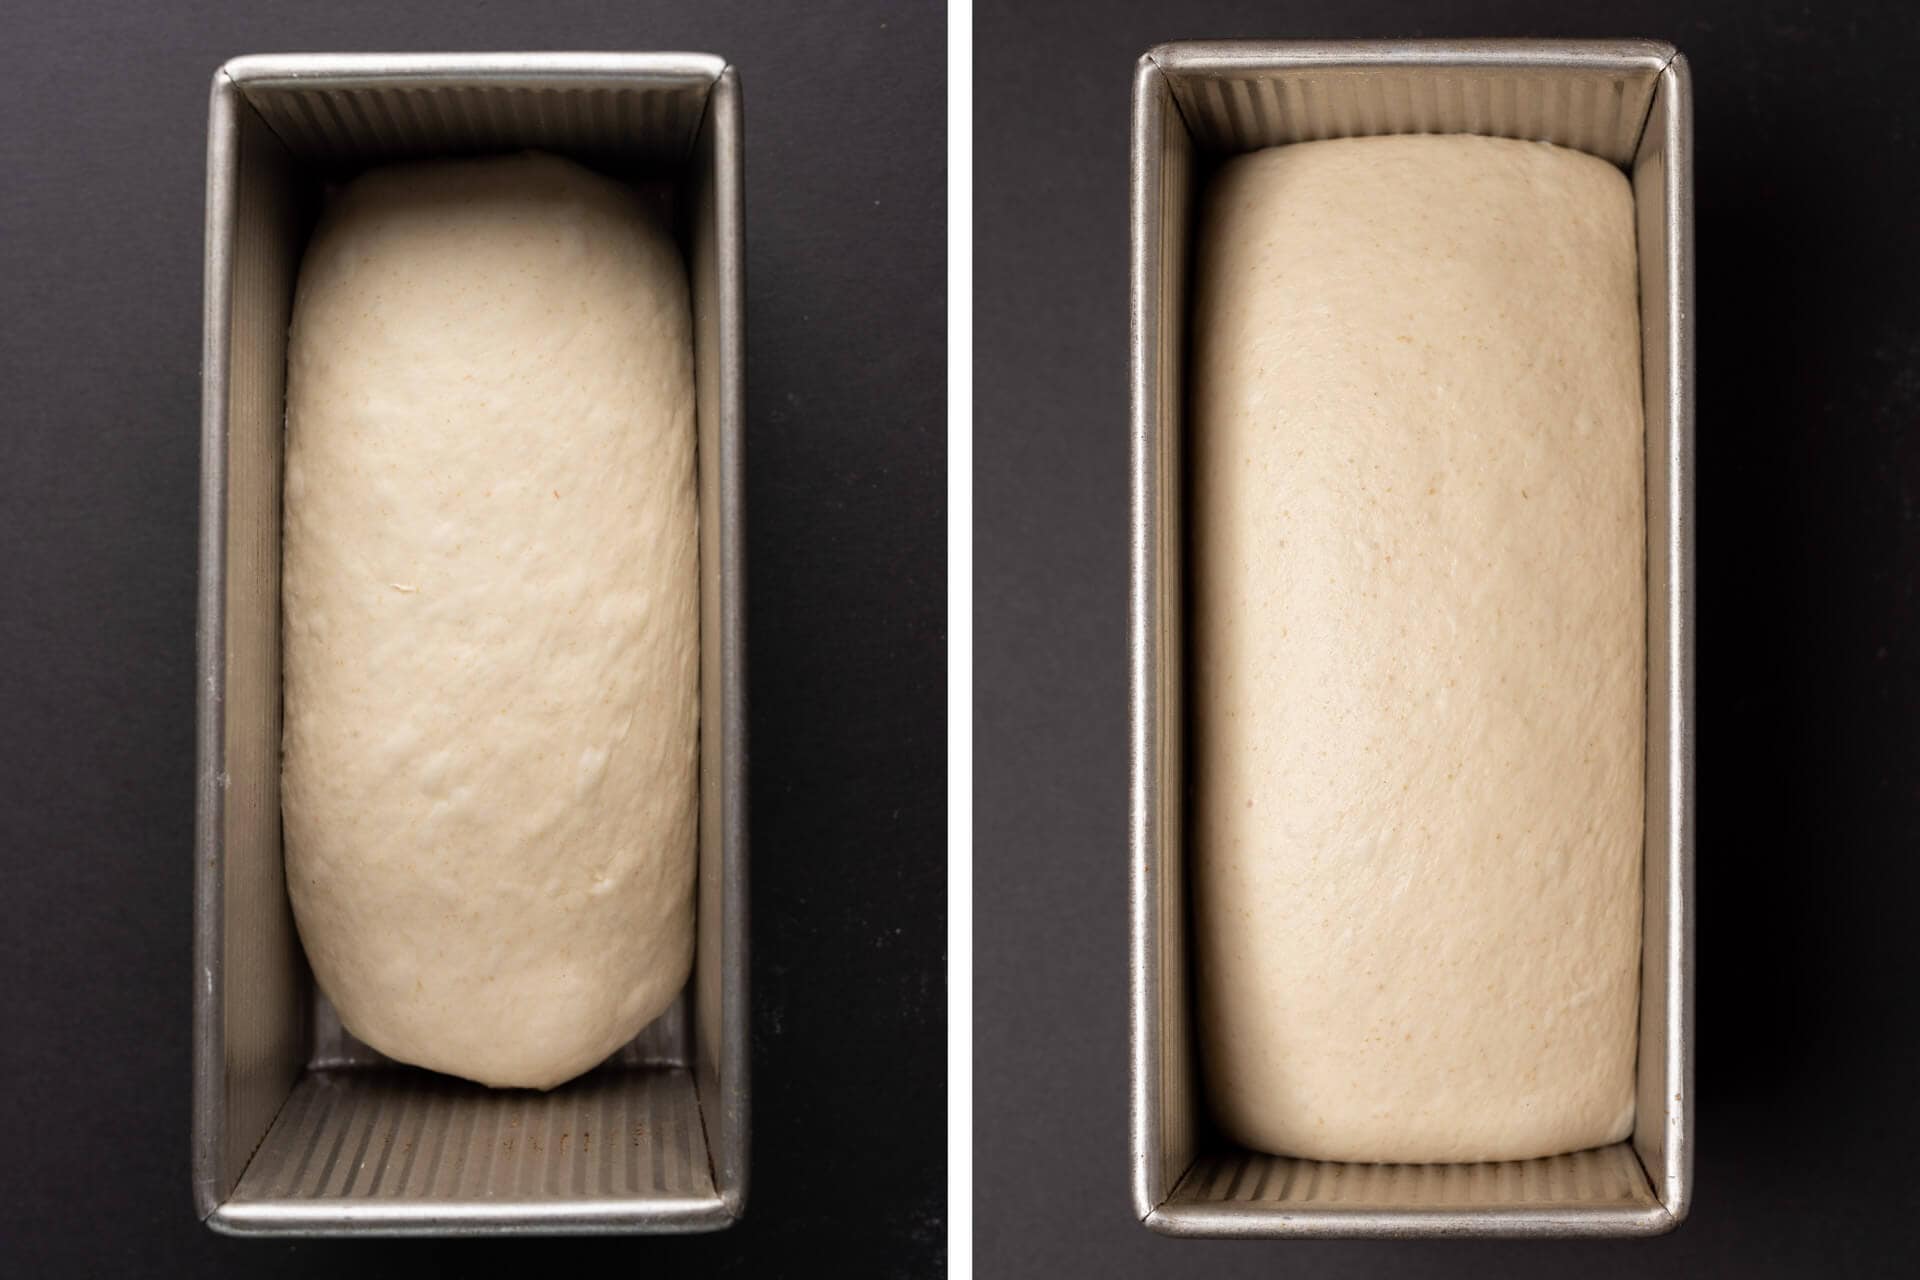
7. Proof – 2:00 p.m. to 4:45 p.m.
Be sure to give your dough the time it needs to fully proof; your dough might need more time if your kitchen is cold
At warm room temperature, 74-76°F (23-24°C), this dough should take 2 hours and 45 minutes to 3 hours to fully proof. If your kitchen is cooler, expect it to take longer.
When fully proofed, the dough should rise almost to the rim of the Pullman pan.
8. Bake – 4:45 p.m.
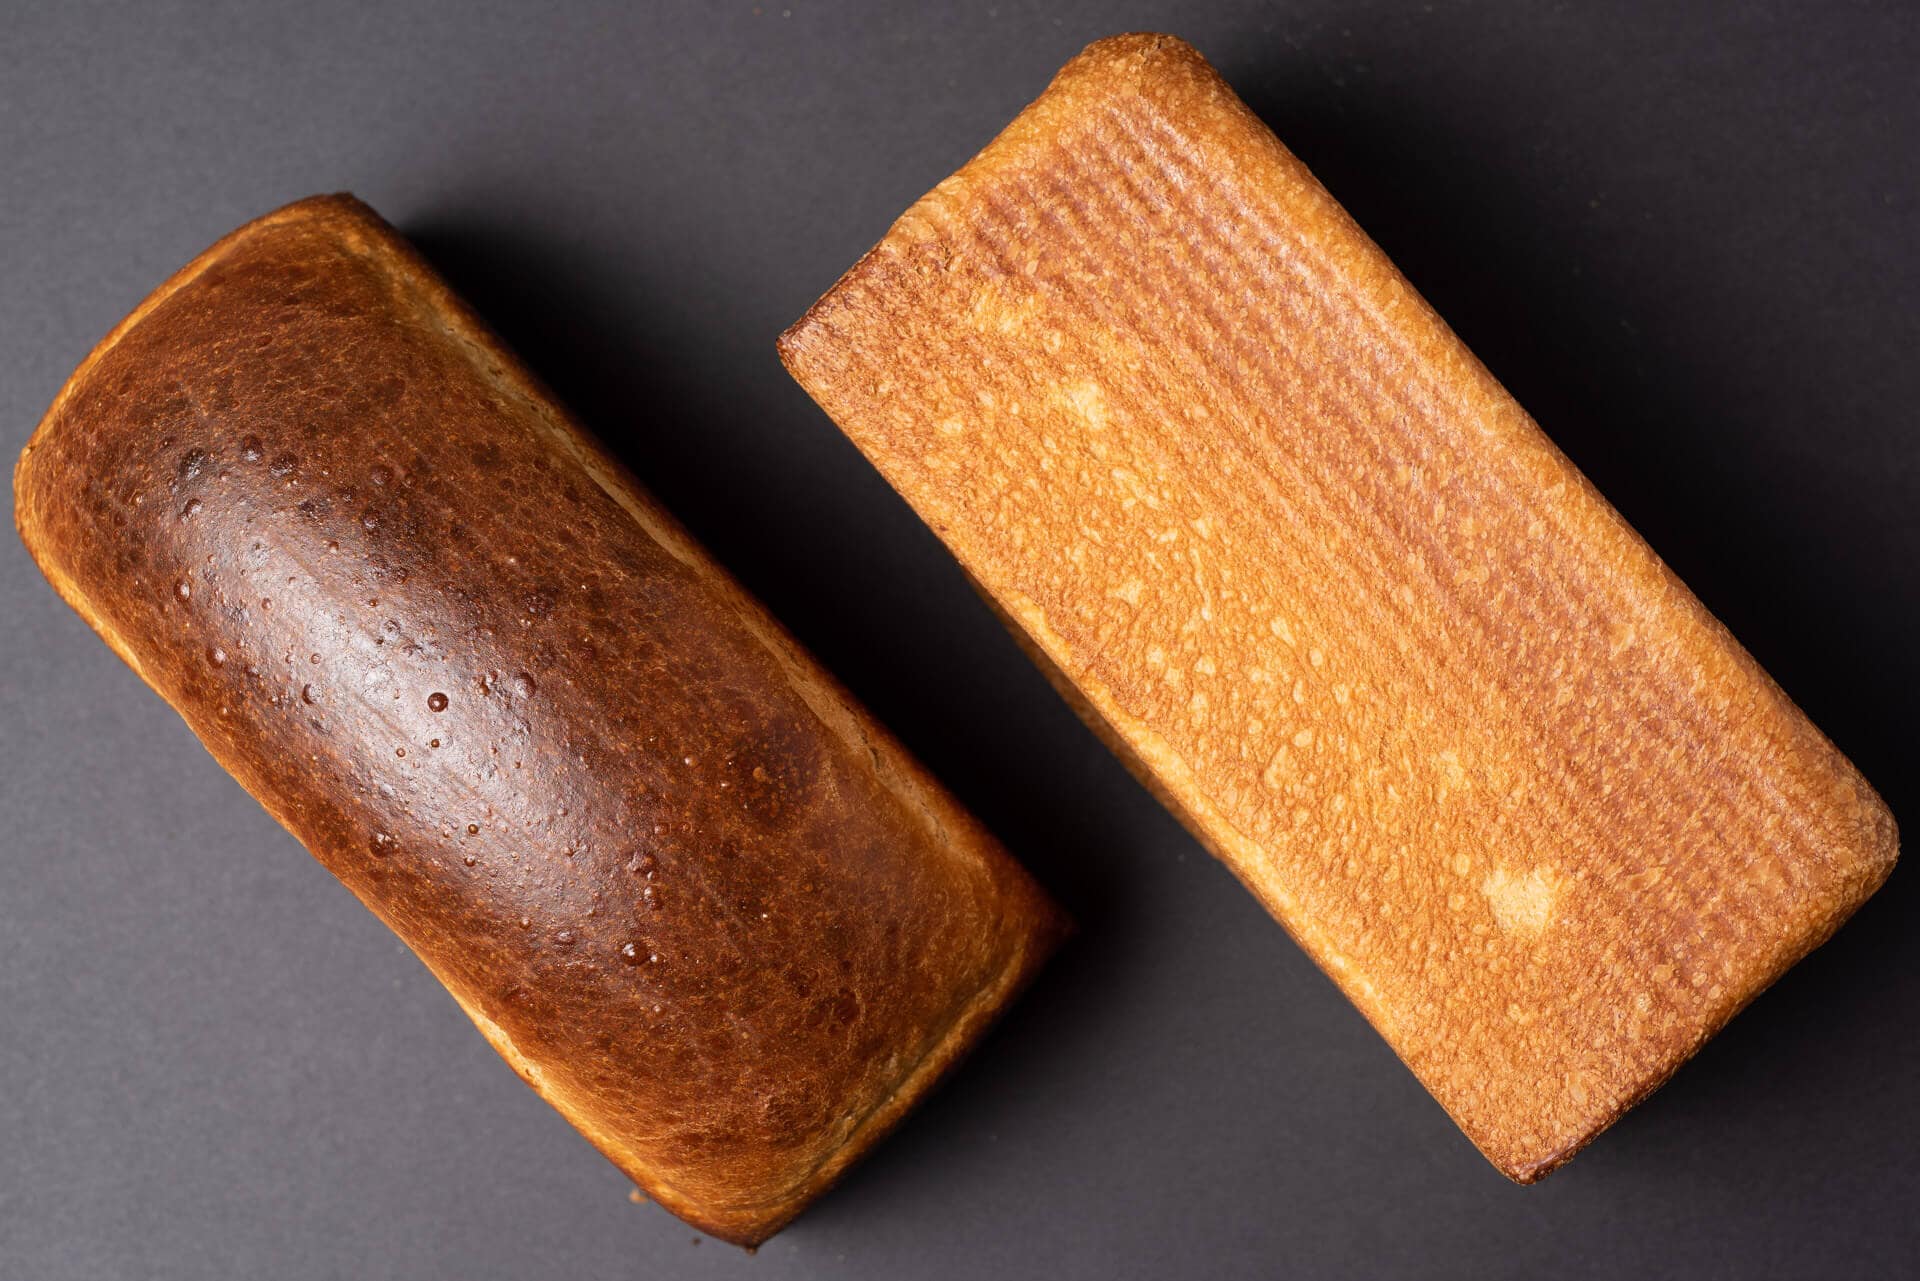
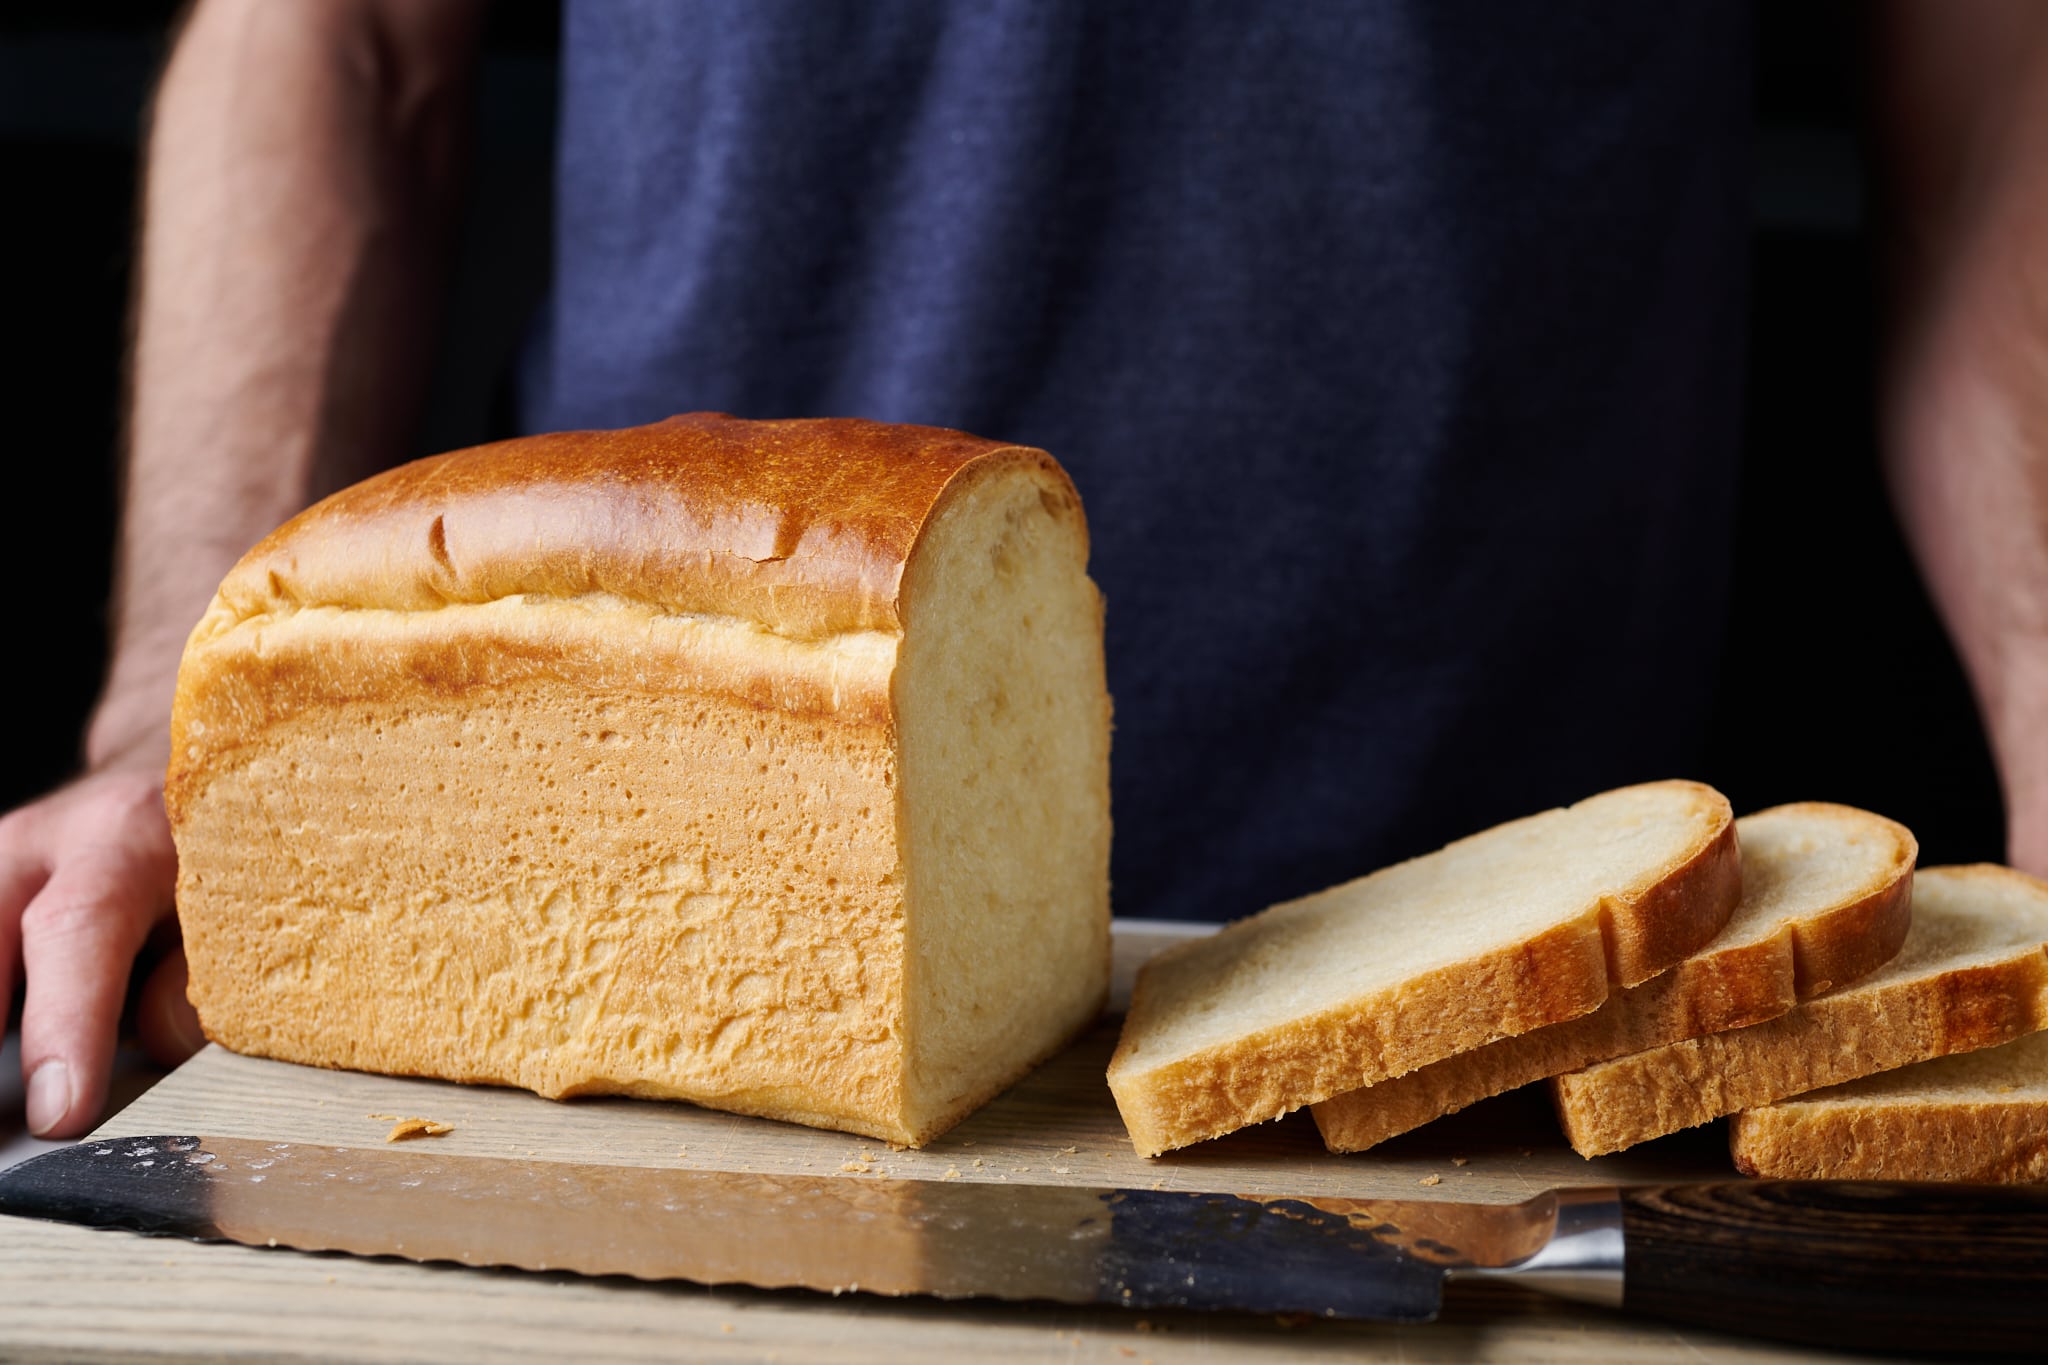
As you can see above, this loaf can take one of two different forms:
- On the left, I didn’t use the lid and the dough rose naturally in the oven. I brushed the top of the dough with a simple egg wash (about 1 teaspoon of whole milk whisked with one egg) before baking. See my guide to topping bread dough for more details.
- On the right, I slid on the snug lid of the pan before baking, and no egg wash was used.
Place an oven rack in the bottom-third of the oven, and preheat the oven to 425°F (220°C).
Place the pan into the oven and bake for 15 minutes. Reduce the oven temperature to 350°F (175°C) and bake for an additional 30 to 35 minutes. If using the lid, the crusts should be a light golden brown; if baking without the lid, the top crust will be a deep golden color. The loaves should have internal temperatures of around 200°F (93°C). If the temperature is lower, slide the covers back on (or not), return the pans to the oven, and bake 5 minutes longer. Then check the internal temperature again.
Remove the pans from the oven, uncover, and let the loaves rest in the pan for 10 minutes. Then, turn the loaves out onto a wire rack and let cool completely, 1 to 2 hours.
This sourdough pain de mie will stay soft and moist for up to a week if the bread is stored properly.
Print
Pain de Mie Sandwich Bread
- Prep Time: 20 hours
- Cook Time: 45 minutes
- Total Time: 20 hours 45 minutes
- Yield: 2 loaves
- Cuisine: American, French
Description
My sourdough pain de mie sandwich bread is pure white bread in all its glory–and it’s the toast lover’s best friend. Each slice is remarkably soft and light, with the thinnest possible crust, but when toasted, the slice crisps and frizzles in an absolutely ideal fashion.
Ingredients
Levain
- 71g white flour (medium-protein white flour or all-purpose flour)
- 71g water
- 7g ripe sourdough starter, 100% hydration
Autolyse
- 764g white flour (medium-protein white flour or all-purpose flour)
- 184g whole milk
- 305g water 1
- 149g ripe levain
Main Dough
- 100g unsalted butter
- 25g water 2
- 58g honey
- 15g fine sea salt
Instructions
- Levain – 9:00 p.m. (overnight)
Mix the levain ingredients in a jar and leave them covered at a warm temperature, 74-76°F (23-24°C), to ripen overnight. - Autolyse – 8:30 a.m.
Warm or cool the autolyse water (see page 138 on how to calculate) so the temperature of the mixed dough meets the DDT for this recipe. Place the flour, milk, water, and ripe levain in the bowl of a stand mixer fitted with the dough hook. Mix on low speed until just incorporated. Cover the bowl and let sit for 30 minutes. - Mix – 9:00 a.m.
Cut the butter into ½-inch pats. Set aside. To the bowl holding the autolyse dough, add the honey, salt, and water. Mix on low speed (STIR on a KitchenAid) for 2 to 3 minutes until the ingredients come together and no dry bits remain. Next, mix on medium speed (2 to 3 on a KitchenAid) for 4 to 5 minutes until the dough smooths and begins to cling slightly to the hook. Turn the mixer on low speed (STIR on a KitchenAid) and mix for 2 to 4 minutes until the dough gains more strength and begins to cling once again to the dough hook. Next, with the mixer running, add the room temperature butter, one pat at a time, waiting to add each pat until the previous one is fully absorbed. Adding all the butter will take 5 to 8 minutes. Transfer the dough to a bulk fermentation container and cover. - Bulk fermentation – 9:15 a.m. to 1:15 p.m. (4 hours)
At a warm room temperature, 74-76°F (23-24°C), bulk fermentation should take about 4 hours. Give the dough 3 sets of stretches and folds at 30-minute intervals where the first set is 30-minutes after bulk fermentation start. - Divide and preshape – 1:15 p.m.
Scrape the dough out of the bulk fermentation container, divide it directly in half, and preshape each half into a taut round. Let rest for 30 to 35 minutes. - Shape – 1:45 p.m.
Shape one round into a tight tube, and place in the pan seam side down. Repeat with the other piece of dough. Cover the pans with a large, reusable plastic bag and seal. - Proof – 2:00 p.m. to 4:45 p.m.
At warm room temperature, 74-76°F (23-24°C), this dough should take 2 hours and 45 minutes to fully proof. If your kitchen is cooler, expect it to take longer. - Bake – 4:45 p.m.
Place an oven rack in the bottom-third of the oven, and preheat the oven to 425°F (220°C).
Place the pan into the oven and bake for 15 minutes. Reduce the oven temperature to 350°F (175°C) and bake for an additional 30 to 35 minutes. The loaves should have internal temperatures of around 204°F (95°C). Remove the pans from the oven, uncover, and let the loaves rest in the pan for 10 minutes. Then, turn the loaves out onto a wire rack and let cool completely, 1 to 2 hours.
Notes
Use the Pullman pan lid for a thinner crust.
Pain de Mie FAQ
Why do Pullman loaf pans have lids?
The lids help ensure that the resulting loaf has the thinnest possible crust.
How do you unmold a loaf made in a Pullman pan?
If you’ve sufficiently greased your pan, the loaf should simply fall right out when you turn the loaf pan over and knock on the bottom. If the bread is stuck at any point on the sides, use a thin plastic spatula (to avoid scratching the pan) to help gently release the sides of the loaf from the pan.
Do I need to grease a Pullman tin?
If your tin does not have a nonstick liner, then yes, you should grease the interior with a neutral-flavored oil. Even if it has a nonstick liner, greasing the interior will ensure that the loaf will come out easily after baking.
Can I mix this dough by hand?
Yes, but adding in the butter can be challenging. I’d follow the same mixing procedure above but knead the dough using slap and fold or folds in the bowl.
Why is my loaf rising erratically and splitting at the top when it’s baked?
This can be a sign of under-proofed dough. Make sure you give the dough sufficient time in bulk fermentation and proof. If your kitchen is cool, your dough might need more fermentation time!
Can I use white sugar instead of honey?
Yes; in fact, that’s actually more traditional than my approach. I would say start with 5% sugar in the dough and adjust up/down to your liking. Note that high percentages of sugar can impede natural fermentation, so the dough might require more time in bulk fermentation and/or proof.
Can I proof this dough overnight in the fridge?
You certainly can, just know that the result might be a bit sourer than what I intended here. Fermentation will continue in the fridge overnight, even though dramatically reduced, and will likely lead to more of that signature tang that you get with natural leavening.
Can I halve this recipe and bake only one loaf?
Yes! Halve all the ingredients in the recipe above (as described in my guide to baker’s percentages) and proceed as indicated.
How much dough goes into a large Pullman loaf pan?
To bake this sourdough Pain de Mie in the large Pullman pan (13” long), I would scale the dough up to 1200g per loaf. When shaping, divide the dough into three equal-sized balls and shape them tightly. Then, place them into the pan side-by-side. Shaping the dough in this way will help prevent any sagging or collapsing while the loaf is baking.
Why are the sides of my Pain de Mie caving in?
Sinking or caving in at the sides can be from a few things. First, try decreasing the dough’s hydration to suit your flour better. I would leave out 20g of water or milk and see the result. Second, let the dough cool in the pan for 5 to 10 minutes before removing it to give it more time to set when it’s out of the oven. Finally, several bakers have reported that the loaf needed to be baked longer to ensure it’s fully baked through and set—try baking 5 to 10 minutes more.
What’s Next?
For a real treat, use this pain de mie, sliced thick with your favorite bread knife, as a base for French toast on the weekend—you won’t regret sacrificing some toast for this treat.
For another super-soft pan loaf, check out my sourdough shokupan (Japanese milk bread) which uses the tangzhong technique to bring even more tenderness to the crust and crumb.
Buon appetito!
Last updated March 13, 2025: The starter weight was incorrectly reported as 8g when it should have been 7g.


702 Comments
Exceptional. I found the formula, as followed to the letter, worked amazingly well. Consider; Canada winter, cold and dry. House is set to 18C. Oven used as proof box, just with light on as I am fortunate to have an ambient of 25C. Milk was scalded, all other ingredients placed in oven to warm. Vessel was a 9×5 loaf pan.
It is now in bread rotation in our house!
So glad you guys like this one!
Can I bake my sourdough sandwich loaf in my toaster convection oven? If yes, can a good soul let me know the temperature? It’s an electric over with heating elements at the top and bottom and I cannot choose either be element. Thank you.
Joan,
I am sure the final product will not be to your liking. A dried yeast driven loaf, such as a Farmers White may be doable with your constraints. Less temperamental all around and can bake well at 350-375, although one does wonder about the rise in the confines of your equipment.
Should work as long as you can get the temp up…
I have that problem with really wet dough as well, but the humidity here is 93% most of the time when I check and I’m only about 35 feet above sea level. My proofing takes 12 – 16 hours to rise to the 1/2″ from top of pan level. The bread is quite tart from the long proofing time. I’m starting to reduce my water amount. Today is my 3rd time to try this, 1st time the result with the posted proofing time was a dense loaf I turned into croutons, 2nd time was the right texture but tart from a 16 hour proof, today it took 12 hours to proof. I just took the loaf out of the oven and it looks right, nice and brown with a hard crust on top which I’ll fix with butter. Tomorrow I’ll drop the water to 40% and see how that works on reducing the wet dough long proof issue. It’s a journey.
Update: Made a loaf Xmas and the humidity was only 70%. Still dropped the water content to 40% in the dough. It was much more manageable and didn’t splatter on my appliances, but in the end, it still would have taken 12 hours in my homemade proofing chamber. I lost patience and at 10 PM, I baked it and it was just shy of filling the pan. I’m taking notes, but I’ll have to abandon this for a month while I get accustomed to eating sandwiches 50 meals in a row.
Ahh, wow, yeah that’s very high humidity! A drop in hydration will absolutely help your dough be less sticky, stronger, and much more manageable.
P.S. You can always freeze your loaves!
I made this successfully the 2nd try! It is slow to rise! One thing I noticed was my dough was a a lot moister than yours when ready for bulk fermentation. I am making this a 3rd time today, and my dough is still moister (tackier). How can I fix this?
Reduce the liquid added to the dough to help give it more strength!
What could be the cause of bread slightly sink from sides and top after it has been baked?
Could it:
-Shaping?
-Hydration?
-Gluten development?
-Proofing?
-Other?
Usually this is either over hydration or overproofing! It also helps to let the dough cool for 5-10m in the pan before removing.
Can we par bake this and freeze the product for about a week before the final bake?
Thanks!
Others have reported this works well though I have not tried it!
Thank you, Maurizio! I am a huge fan!
making this for the second time now, the first time was absolutely delicious but I shaped too early and tried to make up the rest of the ferment in my 10″x5″ pan which led to a big air pocket right under the crust. not having heated the milk, nor checking the desired dough temp, and just going off baker’s intuition for the bulk ferment, i’m running around 9-10 hours and still not feeling ready to shape. I can see from maurizio’s replies here in the comments that i’m probably in for a tangier flavour than the recipe intended since I started with cold milk.
for those asking about bread flour, i used mostly bread flour with a little bit of AP the first time and it was great, this time around i’m using mostly AP with a little bit of bread flour. the recipe seems to be pretty forgiving but i’ll probably try this following recipe notes a little more accurately next time to compare to the intended result.
TL;DR – a tasty recipe that’s forgiving of modifications if you follow the look/feel of the dough rather than the clock. will definitely make often.
Amazing, thanks for all the comments and suggestions, Dani!
BTW, the USA Pullman Pan you show, has a special coating that most do not that helps prevent sticking. They are the best.
Correct, I love these pans.
Another wonderful bake.
A couple of comments?
A French Pan de Mie would most likely have no sugar on honey. But, if that’s the bakers choice no harm. It’s just not quite authentic, but neither is the flour we use unless you can get T55.
Secondly and much more importantly. Scald the milk. This reduces the loaf volume lowering effect milk has, but it still allows the casein in the milk to give a lovely soft mouthfeel. Pasteurised milk still needs scalding. See Michel Suas for example.
Pro. bakers use dried milk which does not need scalding.
As always a lovely bake and great instructions. I recommend your website to folk quite a lot.
Kevin. Great tip on scalding – I’ve often wondered about that but forgot to do the research. Thanks. Yes, this is absolutely a great site.
Thank you, David 🙂
Great tip on scalding, I should try with this one (I do it with others)!
And thank you so much for spreading the word about my site and the kind words, Kevin! Happy holidays 🙂
Hi could you use bread flour instead of AP?
No one else has replied… So…
A.P flour is vey variable. King Arthur’s A.P. seems very strong on paper.
Bread Flours tend to develop much more elastic gluten networks and the crumb tends to be tougher. That’s great for a French style bread, but with a sandwich loaf we want soft.
True French T55 flour is really rather soft and has protein levels more typical of an American A.P, flour.
So yes you can, but is it ideal?
Hope this is useful.
thanks Kevin. I might try both and see which I prefer
I would go AP flour as well!
I love all your recipes and have been looking for a sourdough loaf bread! I only need one loaf and I see you can halve the dough but I have 9x 5 loaf pan. Can that work? Or should i just order the pullman pan?
i made mine in a 10×5 and it worked fine. he mentions that the pullman will give you a thinner crust but if you eggwash it it looks more like a traditional sandwich loaf
Yes, will work just fine, Lisa.
This is a great recipe. I used a stiff starter, and made half, but used 8 TBSP butter. I make cinnamon swirl bread with it. It’s a great base for other additions. It does take all day to rise, and sometimes I leave it in fridge overnight, and it’s not too sour.
Fantastic mods, Stef!
Can I convert this recipe into raisin Cinnamon bread as well by adding the inclusions ag S & F’s?
Yes, I’ve done this with success.
I am not having much success getting the increase during bulk, but letting the dough proof for much longer (about 6 hours) until an hour below the rim and responding properly to the poke test yields a nice loaf. I’m not sure why I’m not getting the rise during bulk. Final dough temp was 78, and going in and out of the oven with the light on kept the temp between 76 and 79 during bulk.
It’s very dependent on your starter and when you use it. You could try adding more starter/levain to the mix to help speed things along!
Can I substitute the milk? My son is very allergic even if baked? Do I just increase the water instead? I plan on using vegan butter.
Yes, you can use water in place of the milk, though the resulting dough wont be as soft and tender. You could also swap the milk for any full-fat nut milk or oat milk.
I made this yesterday and though it did not come out perfect, it definitely came out very good. I think I learned a couple of things in the process I can do better. My dough was definitely not as strong as the one in your video, but I believe I can improve. I am not an experienced baker, in fact this was my first try at baking bread. I’ve made biscuits for years, but not bread. One of my friends swears this is the best bread they ever tasted. Really boosted my confidence. I wish to sincerely thank you for taking the time to make the video. I read the recipe over but doubt I would have tried to undertake this without actually seeing the video. As I said, I’m not experienced, so I really appreciate your time in helping people like me.
Fantastic, Kenneth! This will 100% get easier for you after you bake a couple times. Glad the video helped, I hope to do more for each recipe here. If you get to making this again, let me know how the next attempt goes!
Made this recipe again yesterday, with a couple of tweaks. When I made it the first time (just a couple of days ago — it disappeared fast) I was struck by the similarities with Stella Culinary’s brioche hamburger buns, which I made last summer. So I applied some of chef Jacob’s method to this loaf: add a 30 minute autolyse after mixing all the ingredients, and knead on medium speed for 15 minutes(!) after incorporating the butter. The transformation of the dough is remarkable. There was no need for stretch and folds, and the dough rose beautifully in the pan. (1200 g loaf in a 13″ pan.) Photos of the results: https://photos.app.goo.gl/zbFrTgR9qcveiNnx7 The side view shows the degree of oven spring.
Just fantastic. I have to agree, this is a seriously beautiful dough to work with! That longer mixing time is the other way to go, and totally fine as well. Glad it worked out for you!
Wow, what a great loaf! I scaled to 1200 grams for my 13″ Pullman pan and divided (really unevenly, it turned out!) in three sections as you suggest. The smallest portion I put in the middle between the two larger portions, and it worked out fine.
As others have noted, the rise is very slow. I gave an extra hour to the final proof in my Brod & Taylor, and was prepared for disappointment when the dough had hardly reached halfway up the pan. But into the oven it went anyway, and lo and behold, when I took the lid off after baking I had a perfectly filled pan and a perfectly square slice. (The side of the loaf showed a marked colour delineation between the pre-baked rise and the oven-spring rise. I’ve never seen that before.)
The crust is soft because of the butter and pan lid, which is fine with me. The flavour is wonderful, just a hint of typical sourdough tang; the texture is wonderfully spongey, like fresh brioche (thank you, butter!). Two-thirds of the loaf is gone after 36 hours in a household of two seniors!
I’ll definitely be making this recipe again, often.
PS: I have made many loaves from various recipes in my https://www.usapan.com/ Pullman pan and am fully satisfied with the non-stick coating and the well fitted lid. (Some commenters elsewhere complained that their lids were too tight and scraped the coating, but I found that squeezing the sides of the pan very slightly allows the lid to move effortlessly.) Highly recommend this brand.
Can you share the measurements you used? I’m trying to figured it out.. but can’t ahahah
Sure, no prob.
For 13″ Pullman (g):
627 White flour (11.7% protein)
152 Whole milk
82 Unsalted butter
269 Water
48 Honey
12 Fine sea salt
Levain
62 White flour
62 Water
7 Ripe starter, 100% hydration
1200 Total weight
Maurizio, what temp do you recommend for proofing this bread in the Brod & Taylor Proofing Box? And do you cover the bowl inside the proofer, or leave it uncovered?
Thanks. I love your recipes.
-Sally
I set mine for 76, and upped it to 78 and then 80 when the rise was so slow. Never got the dough past the half-way point, but it still filled the pan when baked. I always put water in the B&T tray and never cover my dough; it always stays moist. (I have found it necessary to lower the temp setting a few degrees and then raise it to cause the heating element to come on initially. There’s always a bit of condensation on the bottom of the pan or proofing container, so I know the air is moist within the proofing box.)
I usually do 76-78F for this bread!
This recipe seems seriously flawed. The levain is essentially fed at a 1:10:10 ratio and you only allow for 12 hours for it to peak. That’s not enough time. And that has got to be why 13.5 hours AFTER I started bulk fermentation (at 74 degrees) my dough has still only risen by about 3%. Now it’s 10:30 pm and I have to refrigerate this dough and then pull it out to continue the bulk process tomorrow. By the time the dough has risen to 40%, will the milk in the recipe have gone sour?
Please fix this recipe. You clearly have multiple people in the comments asking why the dough didn’t rise in the 4 hours you suggest it should. A little feedback would help, but you haven’t responded to anyone who is asking WHY ISN’T MY DOUGH RISING??!
Hi Liza, I followed the recipe exactly (although my FDT might have been a few degrees high) scaled to 1200 g, and also experienced a very slow rise to only about halfway up the pan, even after bumping up my proofing box temp to 80 — but it baked up perfectly. See my comments above. Hope your bake turns out fine nonetheless.
Thank you for the comments!
Hey, Liza! Sorry for the delay. A lot of the slow rise you’re seeing is because the temperature of your dough is 74F, I state it should be at 78F—that’s a big difference for fermenting dough! If you give this a try again (please do!), try hitting that warm temp by warming your mixing water so it gets there.
Also! Another thing you can do is increase the amount of levain you’re making to speed things up. You could do a 2:10:10 if that works better for your starter.
Successfully making this bread comes down to hitting those temperatures, using a very ripe starter and levain, and giving the dough a little more time if needed (though 13 hrs is way too much, it should not take that long).
Let me know how the next attempt goes, I guarantee you’ll love this loaf 🙂
Hi Maurizio,
I was wondering if you have any thoughts on why the large loaf might go concave on the sides even when I shaped it like shokupan? I followed the recipe pretty exactly. Dough was always within 1 degree of your DDT. I used my ankarsrum mixer and mixed until it had the texture of yours. I put 1188 grams in the long pullman and 396 grams in a tiny pullman. Both had a smidge of concave but the long loaf more. When I took them out of the over internal temperature was like 208-210. I am wondering if I didn’t shape tight enough? Should I try an extra 50 – 100 grams of dough in the long pan? Take it out of the pan sooner so it doesn’t keep steaming in there?(I do think I left it in closer to 15 minutes before I turned it out). Thanks for your thoughts if you have time to answer.
Usually a concave issue like that is because the dough might have been a touch over hydrated, it wasn’t baked long enough (I dont think this is the case since you listed 208F), and most likely, it wasn’t left to cool long enough in the pan when removing. If you’re using the pan lid, remove that, but let the dough cool a bit more in the pan.
Also, if you are using that very long 13″ pan, you might want to try dividing the dough up into three bals, shaping those tightly, then place them side by side in the pan. This will help provide structure to the middle. (Do this only if you keep seeing this issue!)
Hey Maurizio, I’ve been making this bread for a few years now and it’s a big hit with my wife and kiddos…thanks! I remember back in the day this recipe used an autolyze, but now having upped the starter % that step has been eliminated…for some reason using both methods it has always been a really slow riser for me? The last two bakes I’ve upped the starter to 12grams and it’s sped it up a bit, but still quite slow…generally 5.5 hours bulk and 4-5hours proofing in the pullman pans.
I’m trying to determine what’s creating the slowness in rise…I’m proofing at 78F, finished mix temp is 79F, and I’m using the organic Costco branded AP flour that I believe is from Central Milling. I feed my starter every morning and make the levain at 9pm. It passes the float test when I start mixing at around 8am. I’m using my Famag mixer at speed 1 for low and speed 4 for medium and using the max recommended times (ie 3mins for the initial mix, 5 mins for the medium speed mix, 3 mins for the slow strength building mix, and then 8 mins to fully mix in the butter) F
Perhaps my starter is not as active as yours? I see you do twice a day feedings… Maybe I’m not building enough tension? I’m making a batch right now and the dough seemed kind of slack after bulk? May try upping the mixing speed to 2 for slow and 5 for medium.
I would love to get it on your schedule as I’m sick of baking these around 7 or 8 at night. Any ideas on what I could tweak to speed up the fermentation?
Thanks,
Matt
I had the same issue today. It has been 6 hours for bulk and it hasn’t risen one centimeter. So do I just keep letting it rise? Also, he doesn’t indicate how much of a rise we are going for in the bulk, so I don’t have any idea when bulk should stop, now that I’ve gone past the recommended 4 hours.
I’d say it’s around 30-40% volume increase!
Matt—sorry for the delay! I’d say if you’re seeing lots of sluggish dough problems try increasing the amount of levain you add to the dough to help speed things up. I also recommended to @lizamartinnewmanshaw:disqus to build the levain at 2:10:10 so it ripens faster.
Love your info as well ! Can I use half All Purpose and say half Einkorn / Hard Red Wheat with the same results?
Thank you, Phil! Using AP, sure, but adding that much Einkorn will make the loaf a little more dense (but more flavorful to be sure)!
Excellent Thanks!
Looking forward to trying this loaf recipe…..
One question…I am scaling down form 1600grams to 1200grams for a 13” pullman pan……
I understand the scaling formulas for the overall recipe, but do I also scale the levaine as well?
Thanks
Phil
Love your site, thank you from a new hobbyist baker.
Not to be that guy, but noticed a typo, “great” should be “grease” in this answer:
“Do I need to grease a Pullman tin?
If your tin does not have a nonstick liner, then yes, you should great the interior…”
Hah! I appreciate “that guy.” Thank you, will fix 🙂
your recipe lists ferment and proof times, but could you also give volume? Like, should bulk ferment double in size, for instance?
Hey, Angela! I don’t typically go by volume increase because it is so highly dependent on the flour you’re using (and this changes quite a bit from baker to baker). I do list all of the other signs to look for when dividing, though!
Not providing any indication of how much the dough should rise during bulk makes this recipe very difficult. I’ve gone 6 hours and it hasn’t risen one iota. So do I keep going and allow to rise more? If so, by how much? It feels impossible to know what to do next.
Hey, Liza – Sounds like you might want to find another recipe to try. This one clearly isn’t working for you.
Hi Liza, what kind of results do you get from your starter when making a regular sourdough loaf? How often do you feed it? It sounds to me like you’ve got a weak starter that just isn’t performing in a reasonable time. I feed my starter with a 50-40-10% mix of AP, fresh-milled red Fife, and rye flours and get good action from it at room temp of about 72 deg. F. over 12 hours. Making the levain from AP flour plus a bit of this mixed starter produces strong activity by morning, and good results from the recipe.
Hope this helps!