
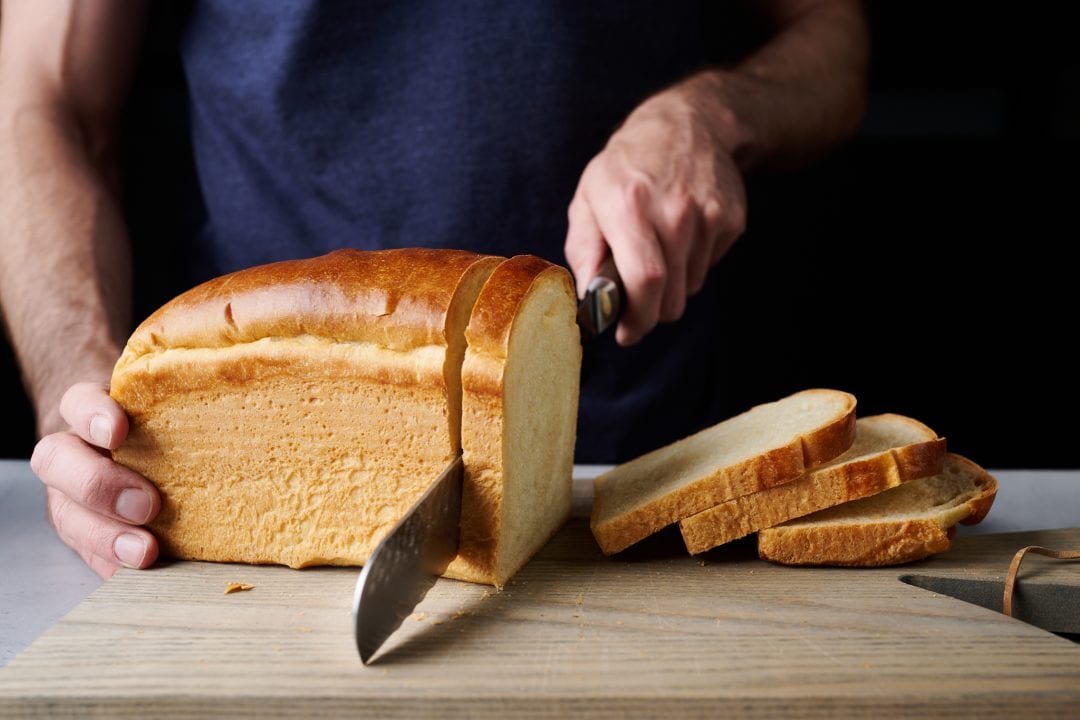
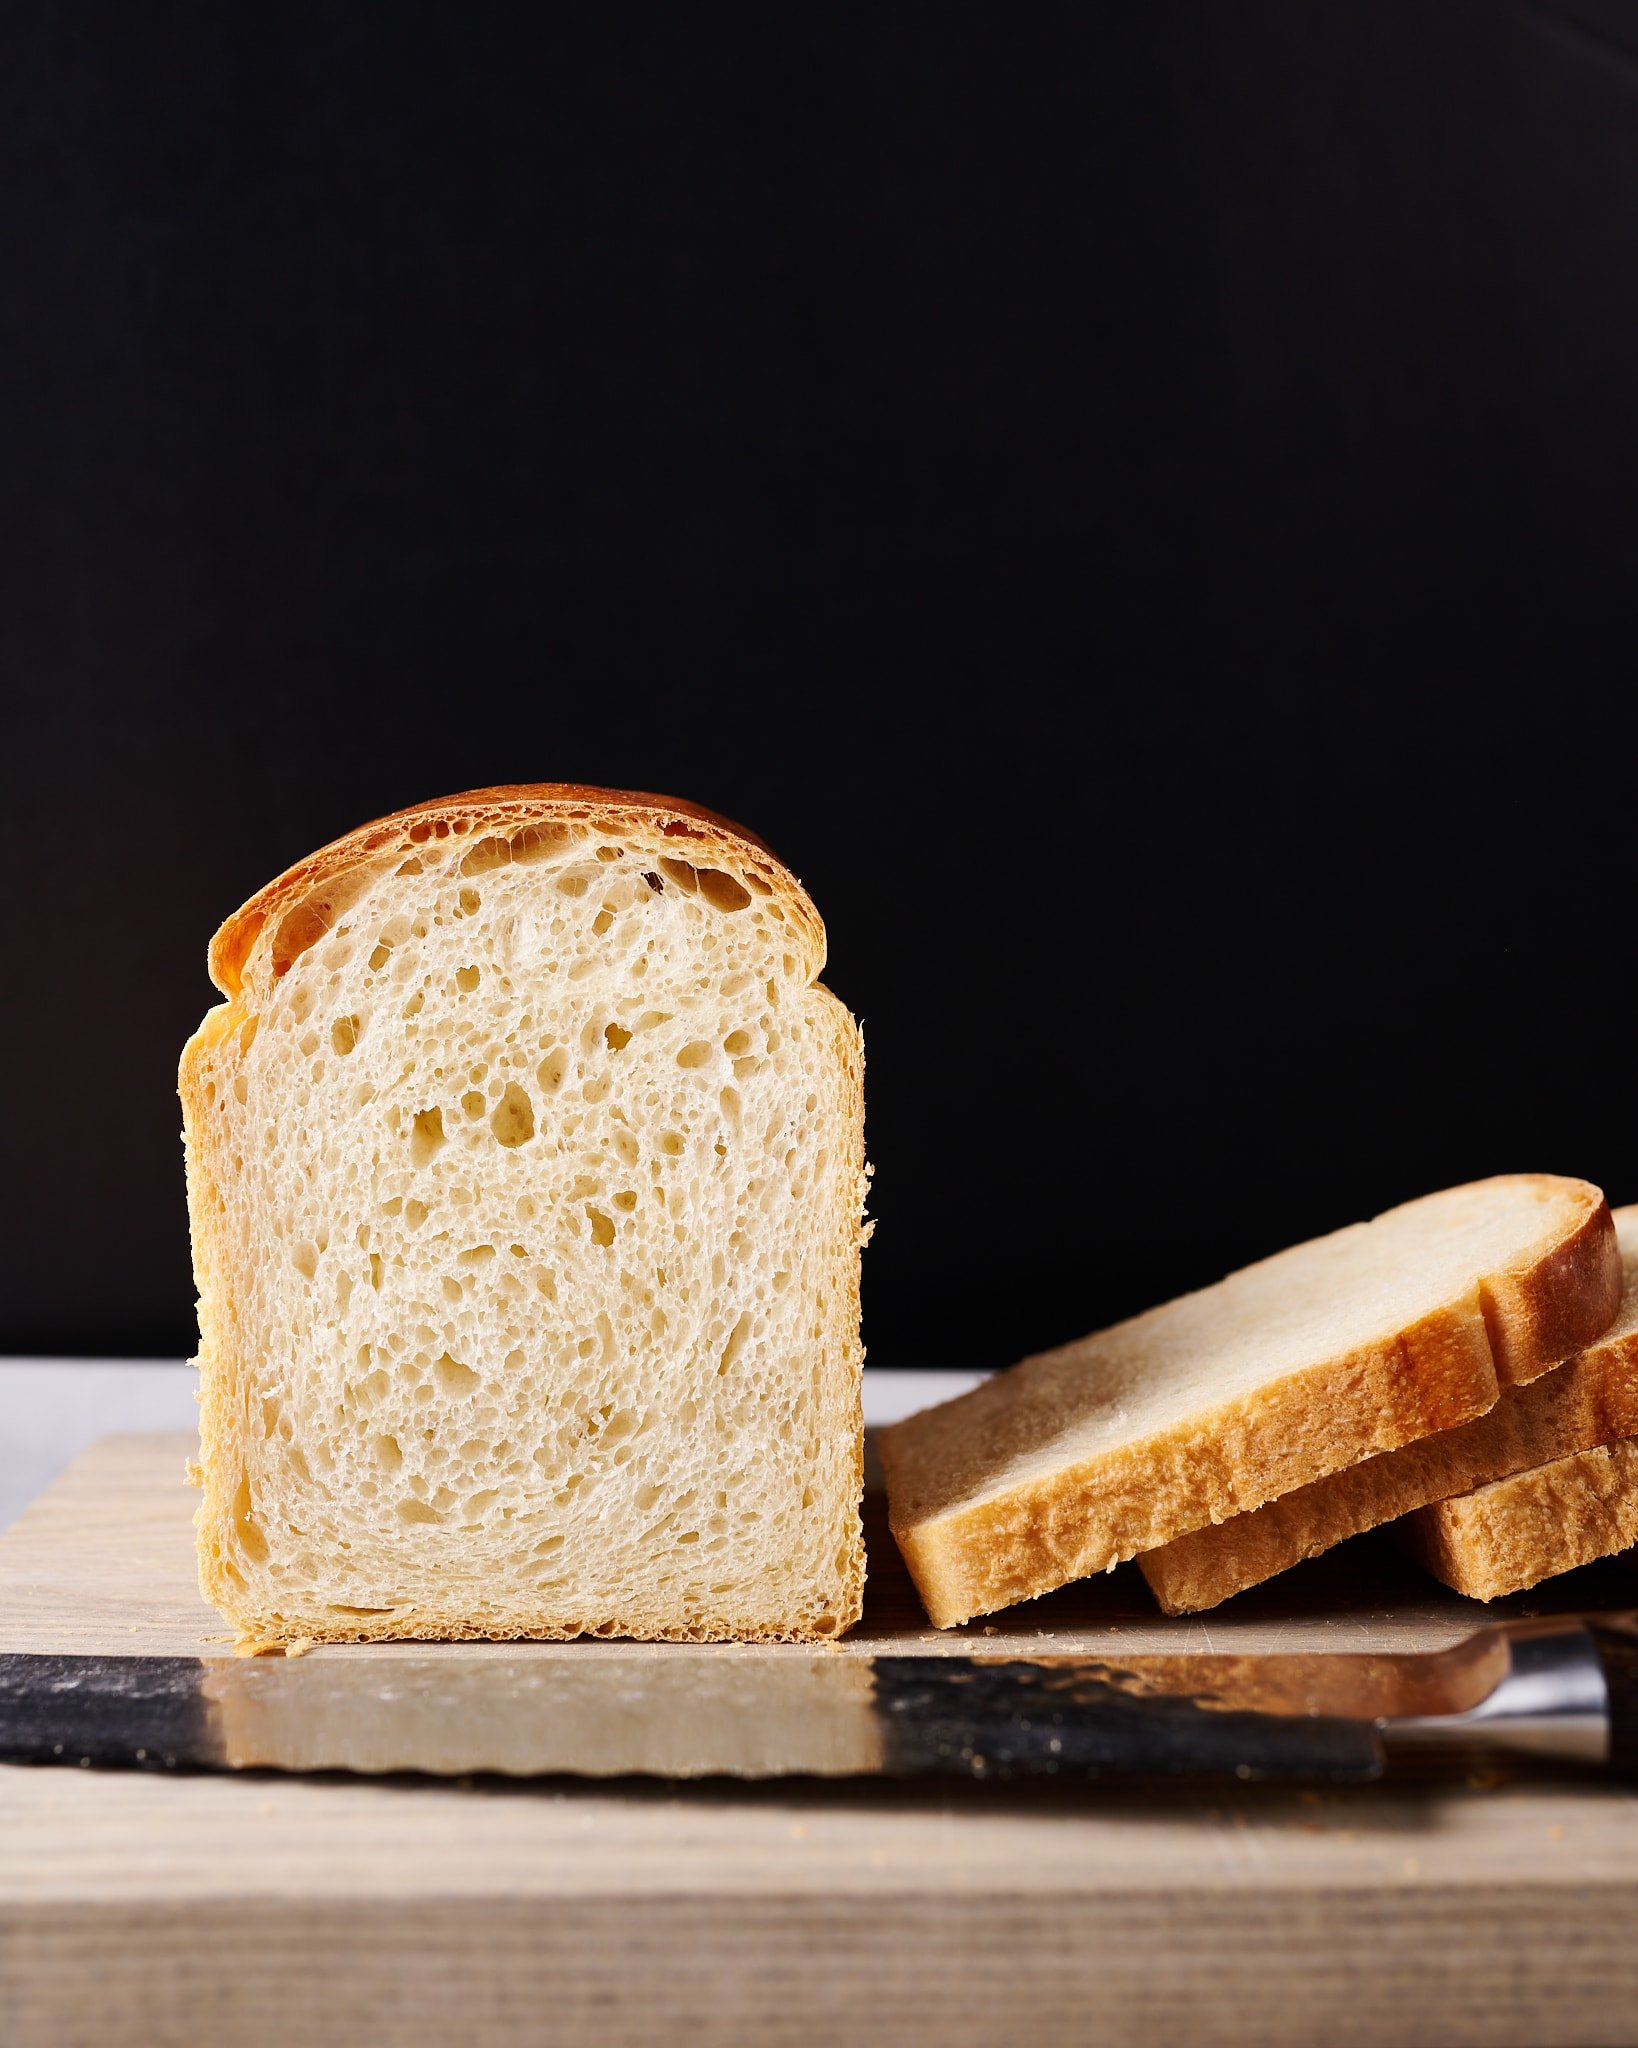
My sourdough pain de mie sandwich bread is pure white bread in all its glory–and it’s the toast lover’s best friend. Each slice is remarkably soft and light, with the thinnest possible crust, but when toasted, the slice crisps and frizzles in an absolutely ideal fashion. A few slices of this bread toasted within an inch of burning and served with a thick pat of butter on top might just be your new favorite breakfast. But there’s a depth of flavor to be found here, too, that sets it far apart from any supermarket white loaf: mild fermentation flavors and a touch of sweetness, all with the slightest hint of tang.
This style of bread is often called a Pullman Loaf, owing to the use of the Pullman pan, which purportedly was invented to be used in Pullman cars on a train to save space when baking. If you’re a frequent visitor here at The Perfect Loaf, you’ll know that the Pullman pan has pretty much supplanted all my other sandwich bread baking vessels. I love that bread baked in this pan has very straight sides, and that using the lid when baking results in a loaf that has an ultra-thin crust.
Sourdough Pain de Mie Video Walkthrough
Flour Selection
It’s rare for me to bake bread without any whole grain flour, but I make an exception with this recipe. In testing, I played with many flour blends, but in the end, I settled on using only all-purpose flour. By not using any whole grain flour in the dough (and the levain), you end up with bread that has reduced sourness and the lightest and most open interior possible.
Special Pans and Preparation
You can bake this bread in almost any pan that’s the right size, but I love the straight sides and nonstick liner of my USA Pan Pullman Loaf Pan (9″ x 4″ x 4″). If you slide on the cover before baking, you’ll end up with a loaf with four perfectly straight sides.
I’ve created a table of alternate pans with corresponding dough weights for each so that you can use what pan(s) you have and/or experiment with different sizes and shapes of loaves. Feel free to halve the recipe ingredients below to fit one pan, or even double the recipe and split it among 2 to 3 smaller pans.
| Pan (Dimensions in inches) | Total Dough Weight |
| 9 x 4 x 4 (Pullman pan shown in this post) | 800-900g |
| 8.5 x 4.5 x 2.5 (small loaf pan) | 600-700g |
| 9 x 5 x 2.75 (medium loaf pan) | 700-800g |
| 13 x 4 x 4 (large Pullman pan) | 1,100-1,200g |
Regardless of the pan you use, be sure to liberally grease the inside of the pan to ensure that the bread will come out cleanly after baking. Additionally, check out my post on shaping a pan loaf for tips on shaping, pans, and more.
Note: If using a large 13-inch Pullman pan, during shaping divide the dough into three equal-sized balls and shape them tightly. Then, place them into the pan side-by-side. Shaping the dough in this way (similar to how I shape a shokupan) will help prevent any sagging or collapsing while the loaf is baking.

Sourdough Pain de Mie Baking Schedule
This Pullman bread is baked the same day (except for the overnight levain that you make the night before) with a room temperature proof for a mild-flavored result. However, if you’re ok with a slight increase in sourness, feel free to retard the dough overnight by proofing it, covered, in the refrigerator right after shaping.
Sourdough Pain de Mie Formula
Note that this formula has been slightly modified since I first published it in 2019. I wanted to increase the fermentation activity in the dough, so I upped the pre-fermented flour percentage from 7.25% to 8.5%. This change ensures that bulk fermentation will be completed in around 4 hours, as listed in the recipe.
Vitals
| Total Dough Weight | 1,600 grams |
| Pre-fermented Flour | 8.5% |
| Levain percentage in final dough | 19.5% |
| Hydration (water only) | 48.0% |
| Yield | Two 800g loaves |
Total Formula
Desired dough temperature: 78°F (25°C) (see my post on the importance of dough temperature).
| Weight | Ingredient | Baker’s Percentage |
|---|---|---|
| 835g | White flour (11.7% protein; King Arthur All-Purpose Flour) | 100.0% |
| 184g | Whole milk | 22.0% |
| 100g | Unsalted butter | 12.0% |
| 376g | Water 1 (levain and autolyse) | 45.0% |
| 25g | Water 2 (mix) | 3.0% |
| 58g | Honey | 7.0% |
| 15g | Fine sea salt | 1.8% |
| 7g | Ripe sourdough starter, 100% hydration | 0.9% |
Sourdough Pain de Mie Method
1. Levain – 9:00 p.m., night before baking
Mix the following ingredients in a container and leave them covered at a warm temperature, 74-76°F (23-24°C), to ripen overnight.
| Weight | Ingredient | Baker’s Percentage |
|---|---|---|
| 71g | White flour | 100.0% |
| 71g | Water 1 | 100.0% |
| 7g | Ripe sourdough starter, 100% hydration | 10.0% |
2. Autolyse (with levain) – 8:30 a.m.
| Weight | Ingredient |
|---|---|
| 764g | White flour |
| 184g | Whole milk |
| 305g | Water 1 (autolyse) |
| 149g | Ripe levain (from step 1) |
NOTE: I’ve recently updated this recipe to be like my cookbook version, which produces an even better result! One of the changes is to include this autolyse step with included levain.
I use the autolyse technique for this recipe to help reduce the total mixing time required, but I also find it helps aid in the dough’s extensibility.
Warm or cool the autolyse water so that the temperature of the mixed dough meets the final dough temperature (FDT) of 78°F (25°C) for this recipe. Place the flour, milk, water, and ripe levain in the bowl of a stand mixer fitted with the dough hook. Mix on low speed until just incorporated. Cover the bowl and let sit for 30 minutes.
Typically, I do not autolyse with levain added, but with this dough, it helps make mixing the dough easier since there’s a large portion of water in the levain.
3. Mix – 9:00 a.m.
| Weight | Ingredient |
|---|---|
| 100g | Unsalted butter |
| 25g | Water 2 (mix) |
| 58g | Honey |
| 15g | Fine sea salt |
Note: If it’s cold in your kitchen, warm the milk in the microwave or over the stove to help meet the final dough temperature of 78°F (25°C). See my post on how to bake sourdough bread in the winter for tips on encouraging strong fermentation in colder temperatures. Conversely, if it’s starting to warm in your area, use the milk cold from the fridge and see my tips for baking bread in the summer.
First, cut the butter into ½-inch pats. Set them on a plate to warm to room temperature.
Put the honey and salt on top of the dough in autolyse and pour the water over it to help dissolve. Mix the dough on low speed until the salt and water are incorporated, then increase to medium speed and mix, stopping to scrape the sides of the bowl as needed, until the dough comes together and, while still shaggy, starts to cling to the dough hook, about 6 minutes.
Turn the mixer on low speed (STIR on a KitchenAid) and mix for 2 to 4 minutes until the dough gains more strength and begins to cling once again to the dough hook. Next, with the mixer running, add the room temperature butter, one pat at a time, waiting to add each pat until the previous one is fully absorbed. Adding all the butter will take 5 to 8 minutes. In the end, the dough will still be very soft, and it won’t altogether remove from the sides of the bowl. Transfer the dough to a bulk fermentation container and cover.
4. Bulk Fermentation 9:15 a.m. to 1:15 p.m. (4 hours)
At a warm room temperature, 74-76°F (23-24°C), bulk fermentation should take about 4 hours. If your kitchen is cooler, place your bulk container in a small home dough proofer, or extend the bulk fermentation time to give the dough more time to ferment. The dough is ready when it is smooth, puffy, and well-risen.
Give this dough three strengthening sets at 30-minute intervals. The first set starts 30 minutes after the start of bulk fermentation. Give the dough a series of stretches and folds for the first set. Wet your hands, grab one side, and stretch it up and over the dough to the other side. Next, rotate the bowl 180° and perform another stretch and fold (this forms a long rectangle in the bowl). Then, rotate the bowl 90° and do another stretch and fold. Finally, turn the bowl 180° and do one last stretch and fold. The dough should be neatly folded up in the bowl.
Set a timer for 30 minutes, and perform the remaining two sets at 30-minute intervals. Then let the dough rest, covered, for the remainder of bulk fermentation.
5. Divide and Preshape – 1:15 p.m.
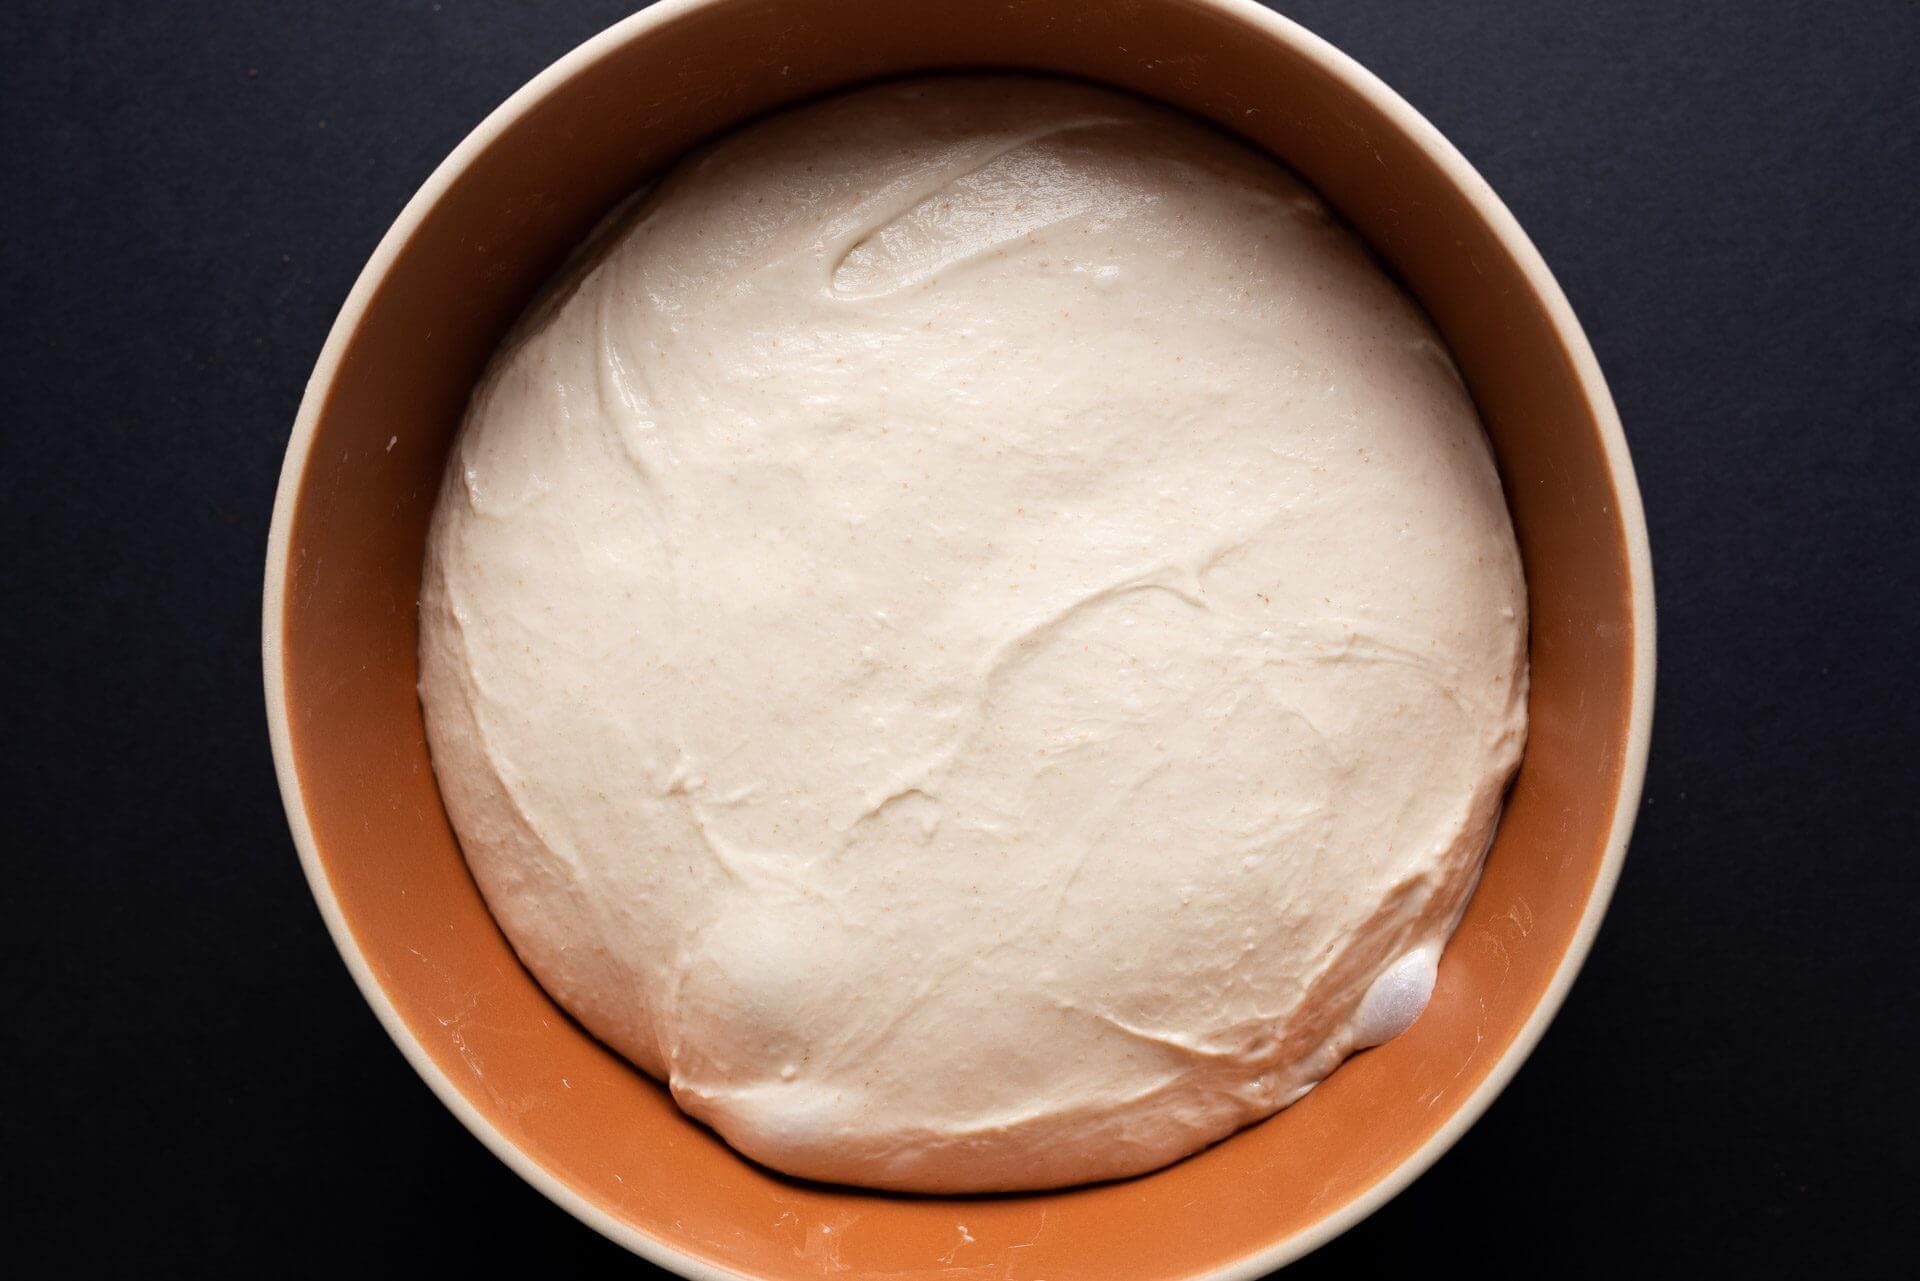
At the end of bulk fermentation, the dough will have risen in the bulk fermentation container (perhaps around 40% volume increase), be smooth and elastic, have bubbles on top, and a domed edge where the dough meets the bulk container. If the dough is not showing these signs, give it an additional 15 minutes and check again.
Fill a small bowl with water and place it next to your work surface. Scrape the dough onto a clean counter. Using a bench scraper in your dominant hand and the other hand wet, divide the dough in half. Then, preshape each piece of dough into a moderately tight round.
Let the dough rest, uncovered, for 30 minutes until it has relaxed and is ready to be shaped.
6. Shape – 1:45 p.m.
Grease two 9 x 4 x 4-inch Pullman pans with neutral oil.
I shaped these loaves as shown in my guide to shaping a pan loaf. Lightly flour the work surface and the top of a rested round. Using a bench knife, flip the round over onto the floured work surface. Fold the left and right sides of the dough toward the middle with a slight overlap. Then beginning at the side of the dough farthest from you, begin rolling the dough down to form a tight cylinder. Scoop the dough up with your bench knife and drop it into one of the prepared Pullman pans, seam side down. Repeat with the other piece of dough.
Cover the pans with a large, reusable plastic bag and seal.
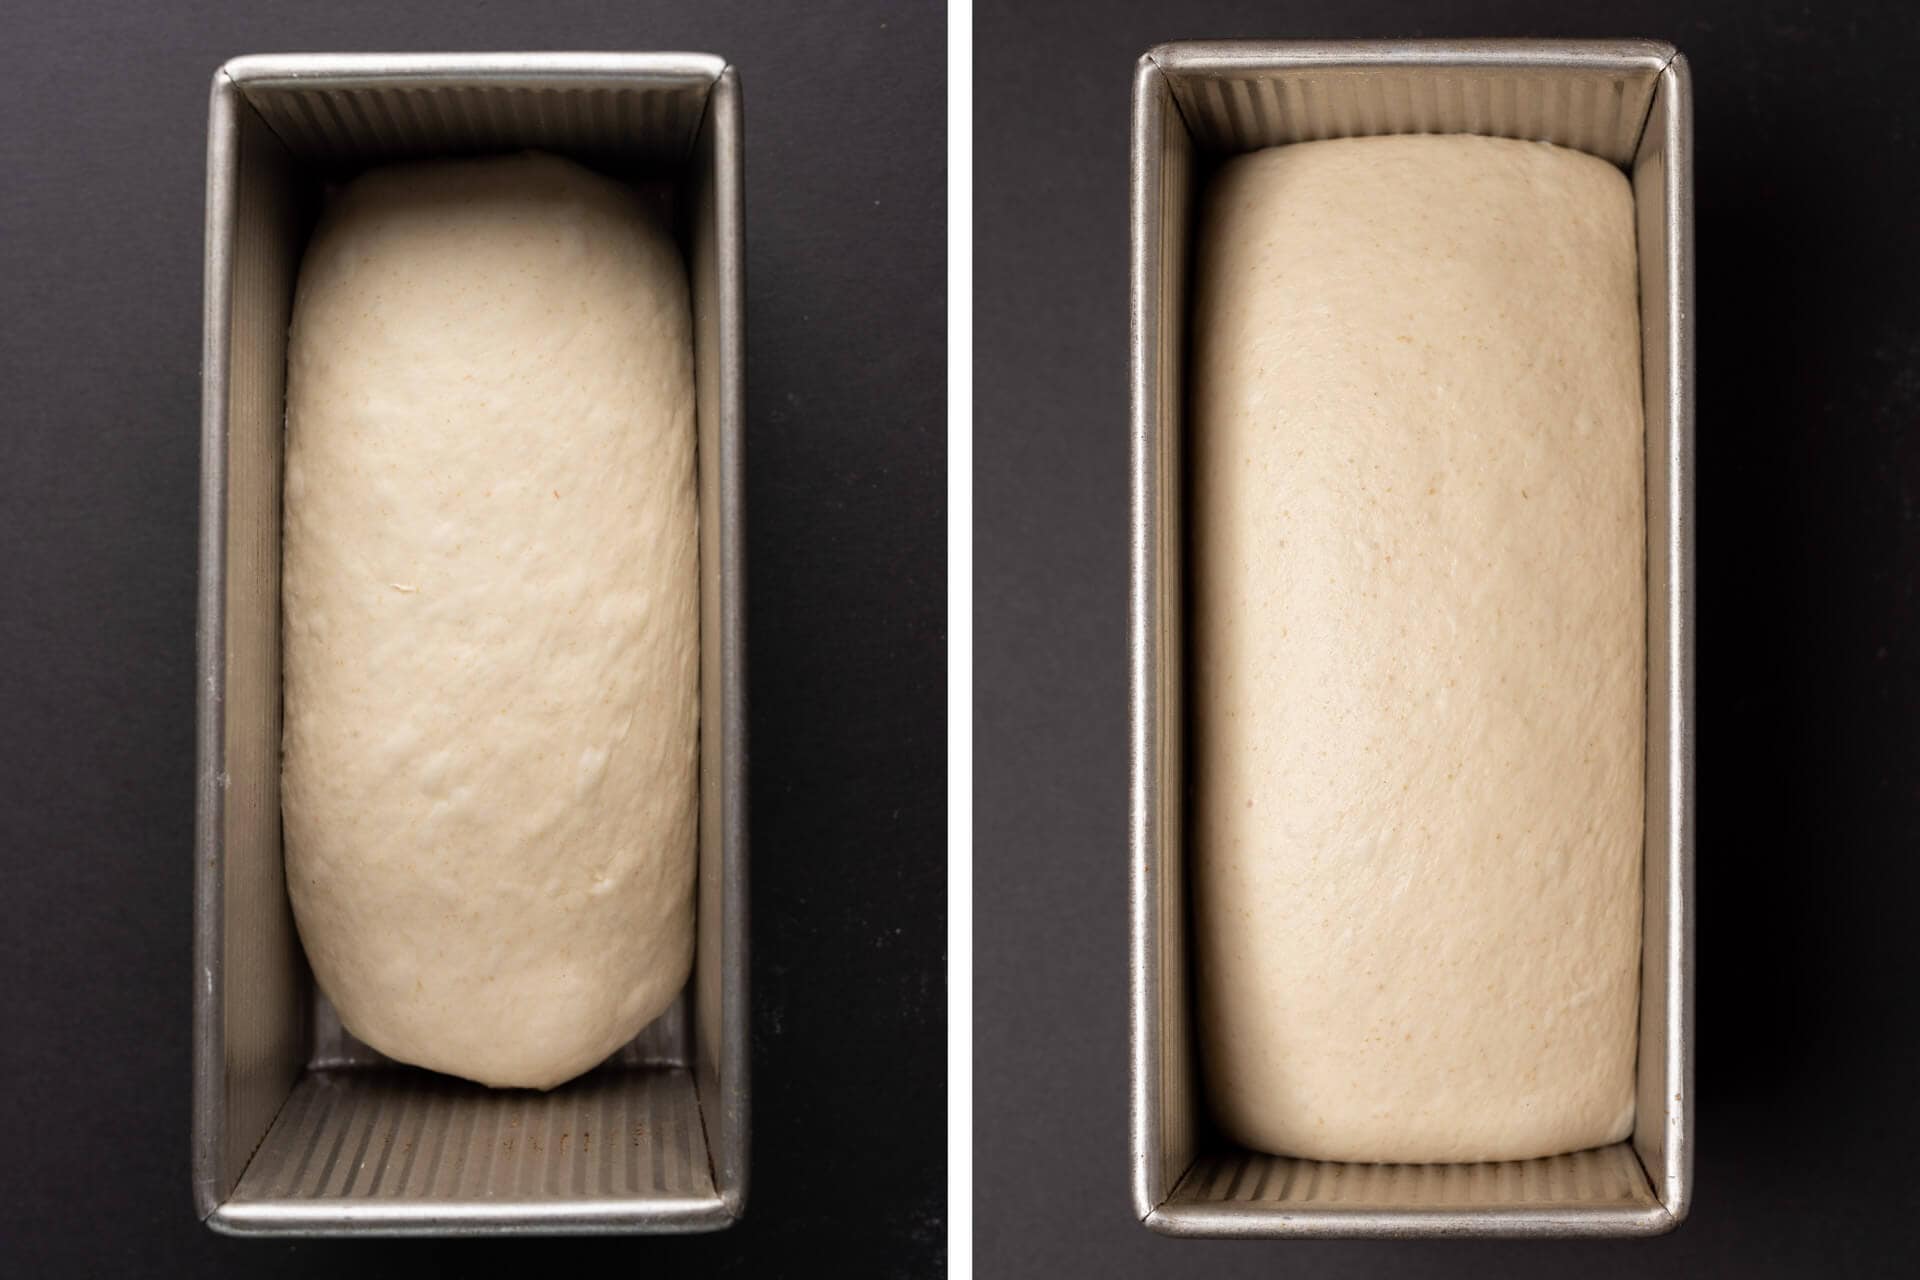
7. Proof – 2:00 p.m. to 4:45 p.m.
Be sure to give your dough the time it needs to fully proof; your dough might need more time if your kitchen is cold
At warm room temperature, 74-76°F (23-24°C), this dough should take 2 hours and 45 minutes to 3 hours to fully proof. If your kitchen is cooler, expect it to take longer.
When fully proofed, the dough should rise almost to the rim of the Pullman pan.
8. Bake – 4:45 p.m.
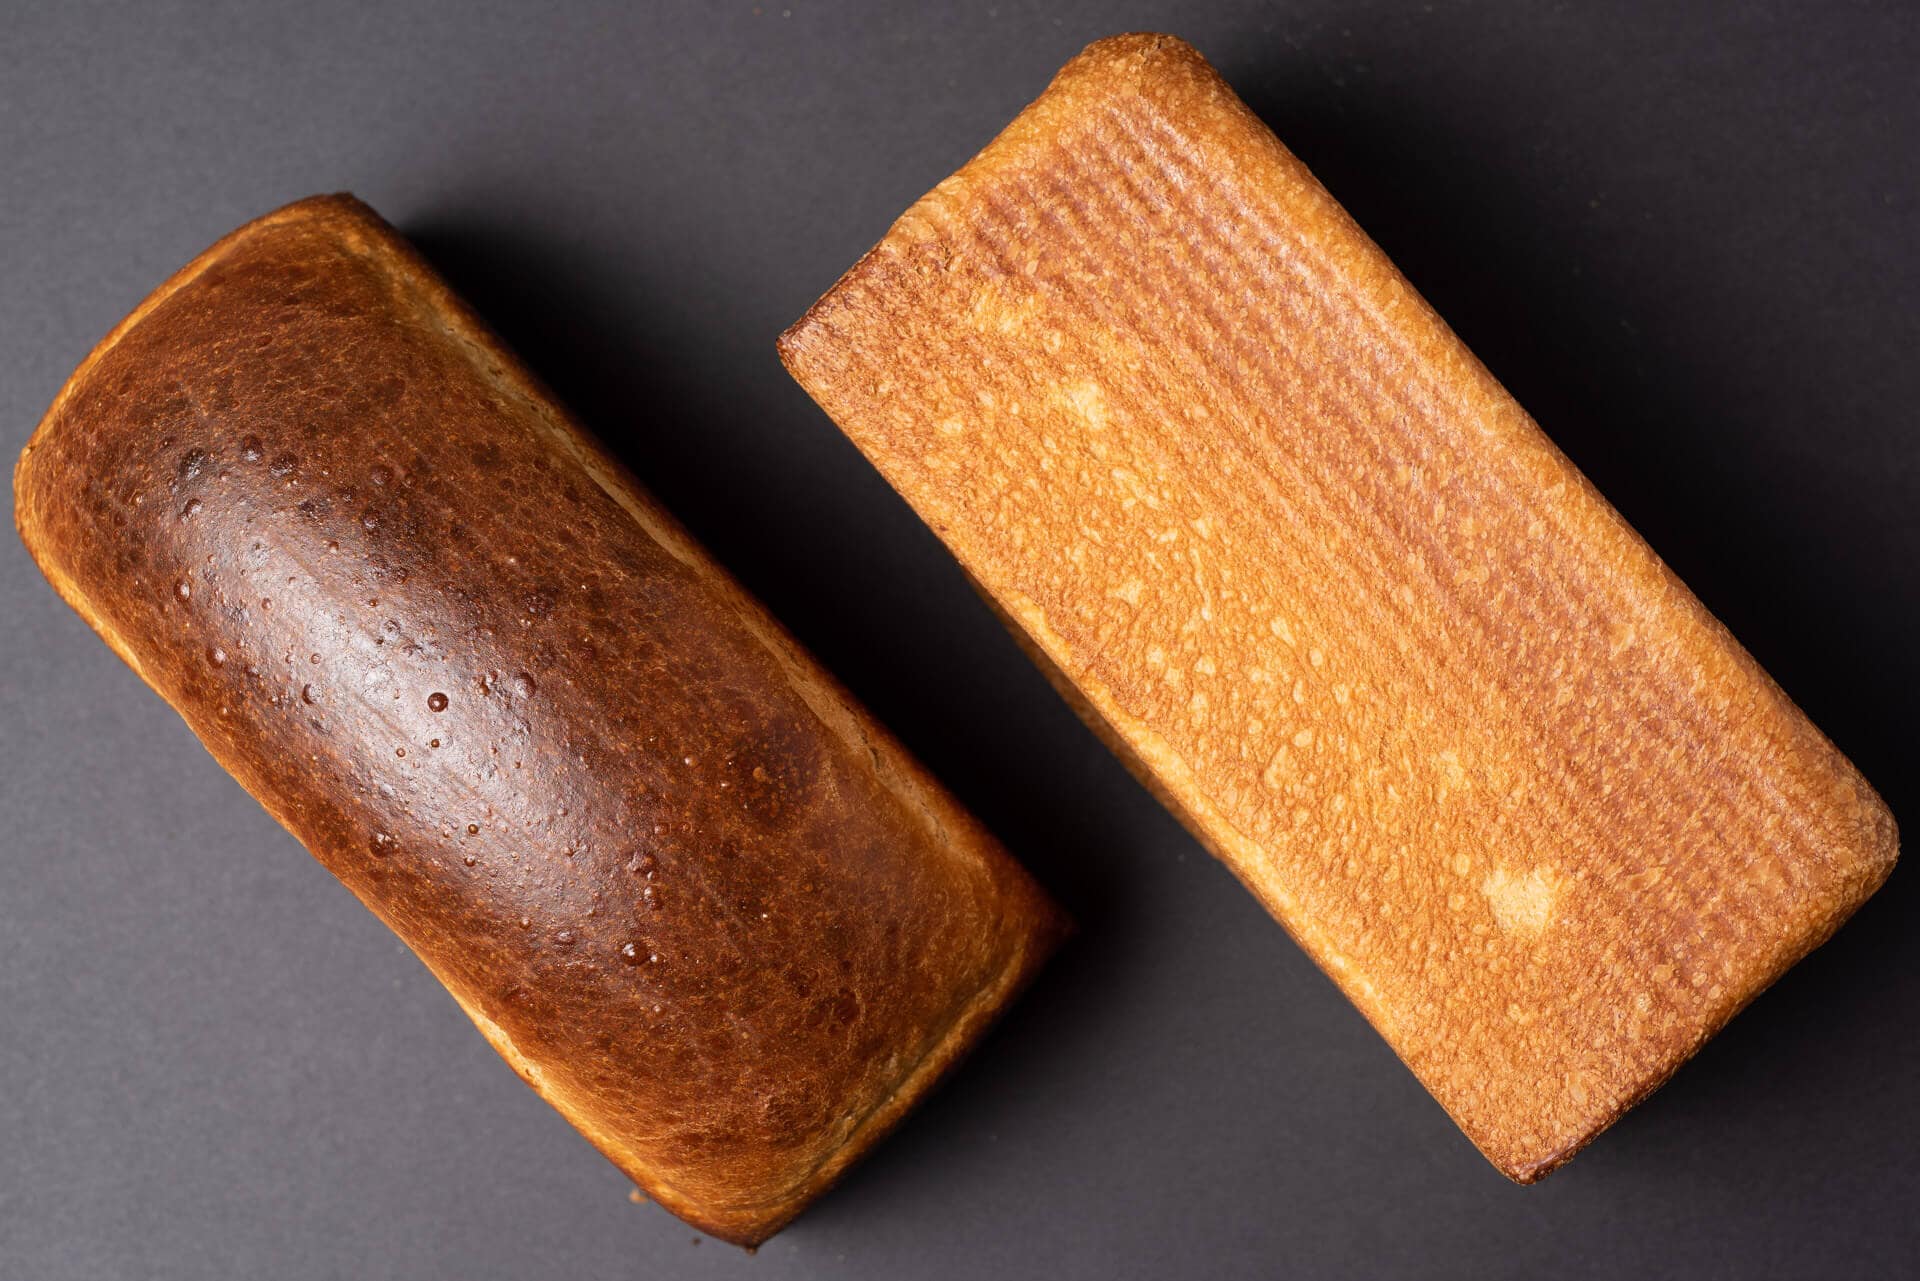
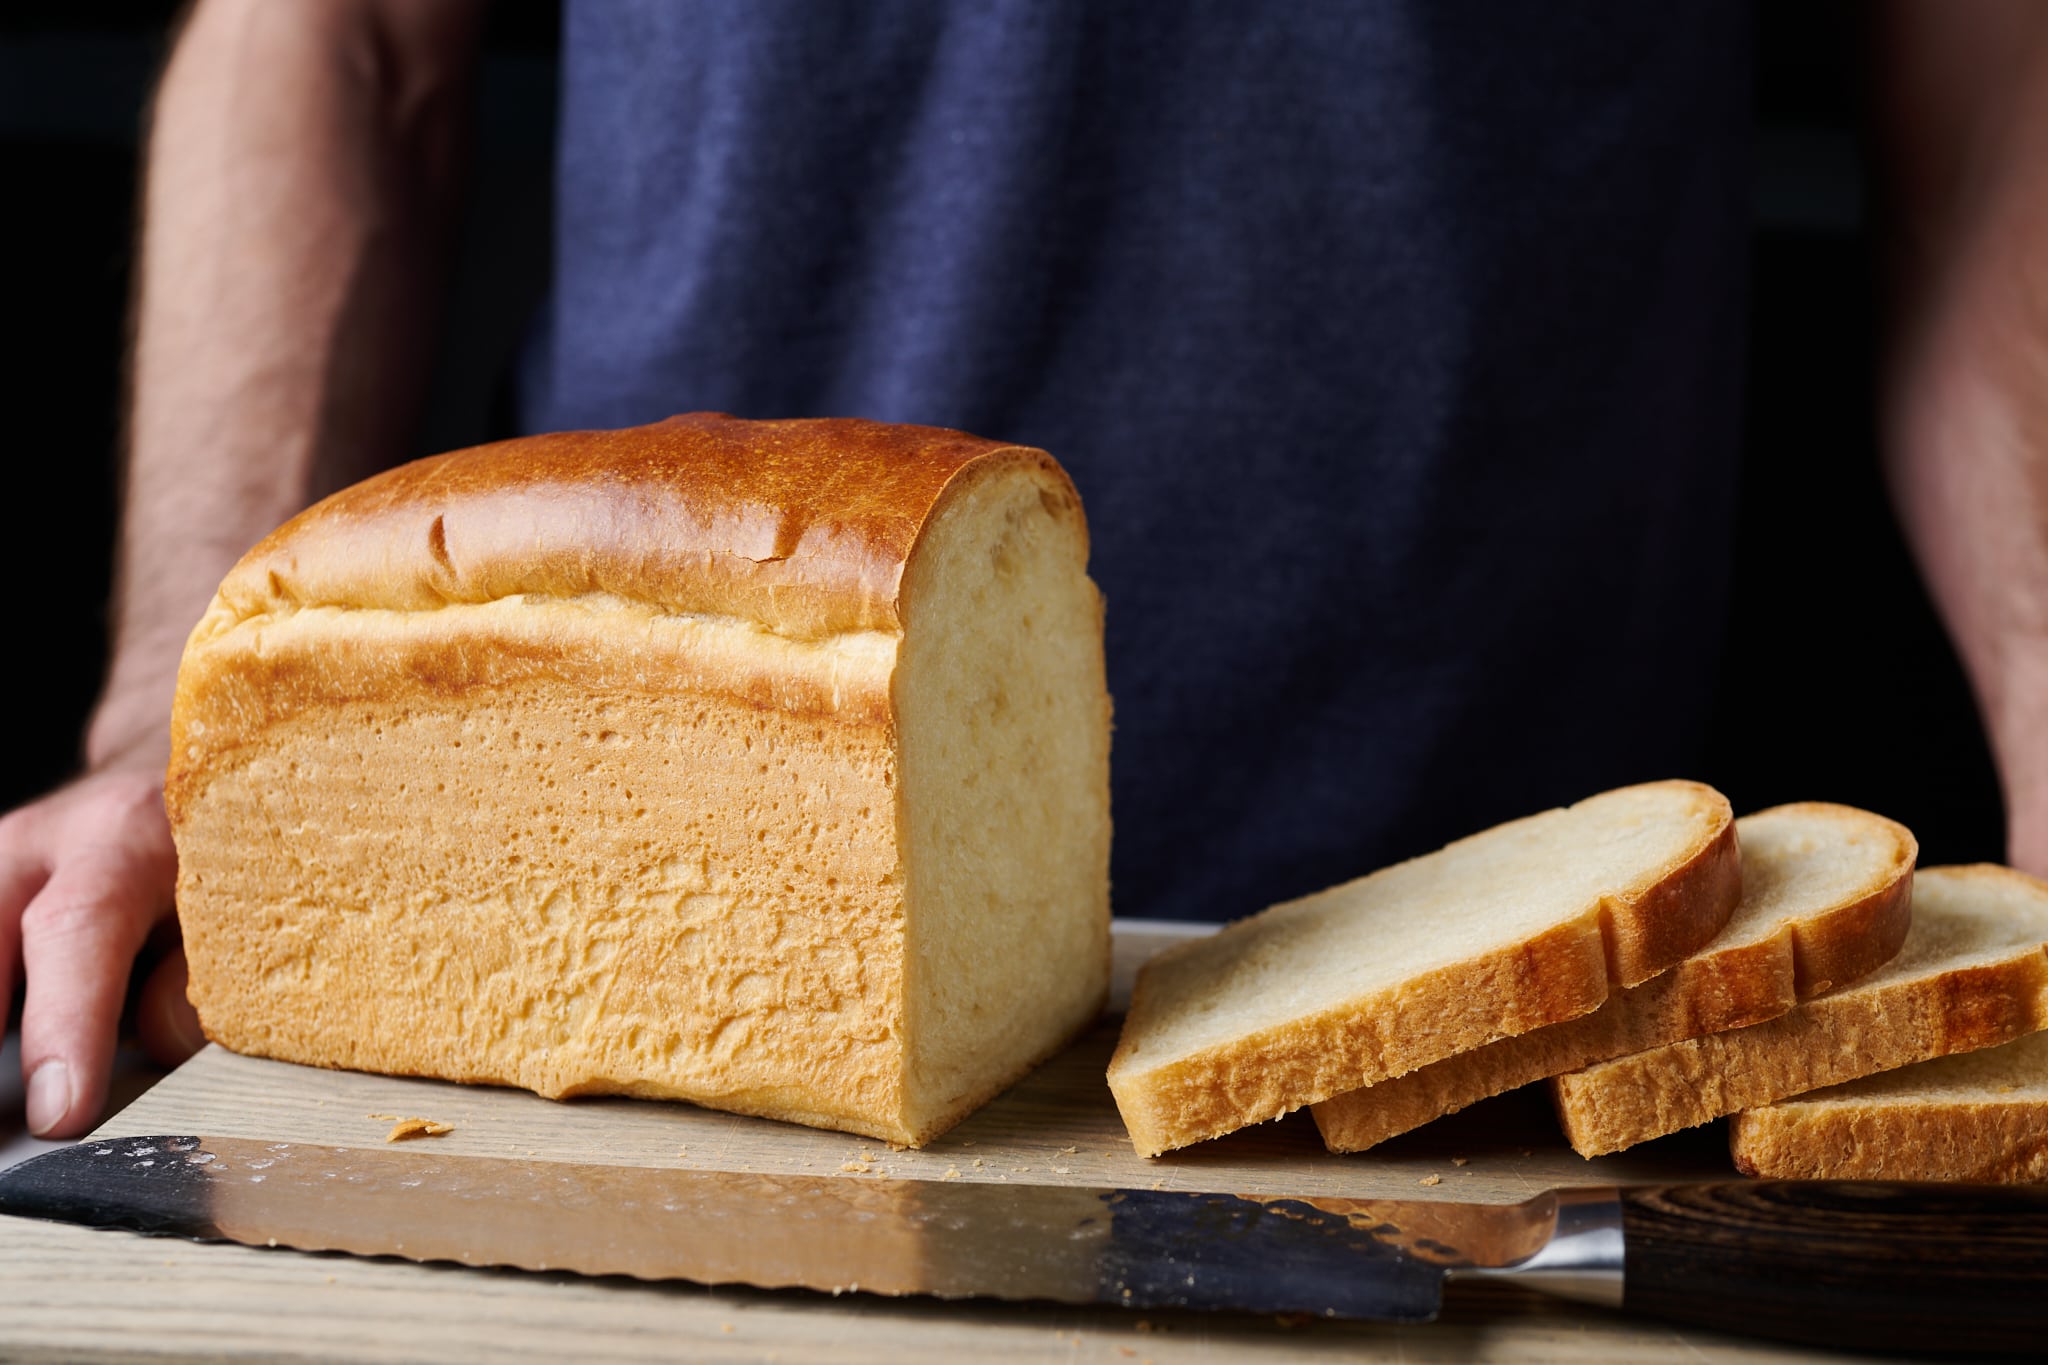
As you can see above, this loaf can take one of two different forms:
- On the left, I didn’t use the lid and the dough rose naturally in the oven. I brushed the top of the dough with a simple egg wash (about 1 teaspoon of whole milk whisked with one egg) before baking. See my guide to topping bread dough for more details.
- On the right, I slid on the snug lid of the pan before baking, and no egg wash was used.
Place an oven rack in the bottom-third of the oven, and preheat the oven to 425°F (220°C).
Place the pan into the oven and bake for 15 minutes. Reduce the oven temperature to 350°F (175°C) and bake for an additional 30 to 35 minutes. If using the lid, the crusts should be a light golden brown; if baking without the lid, the top crust will be a deep golden color. The loaves should have internal temperatures of around 200°F (93°C). If the temperature is lower, slide the covers back on (or not), return the pans to the oven, and bake 5 minutes longer. Then check the internal temperature again.
Remove the pans from the oven, uncover, and let the loaves rest in the pan for 10 minutes. Then, turn the loaves out onto a wire rack and let cool completely, 1 to 2 hours.
This sourdough pain de mie will stay soft and moist for up to a week if the bread is stored properly.
Print
Pain de Mie Sandwich Bread
- Prep Time: 20 hours
- Cook Time: 45 minutes
- Total Time: 20 hours 45 minutes
- Yield: 2 loaves
- Cuisine: American, French
Description
My sourdough pain de mie sandwich bread is pure white bread in all its glory–and it’s the toast lover’s best friend. Each slice is remarkably soft and light, with the thinnest possible crust, but when toasted, the slice crisps and frizzles in an absolutely ideal fashion.
Ingredients
Levain
- 71g white flour (medium-protein white flour or all-purpose flour)
- 71g water
- 7g ripe sourdough starter, 100% hydration
Autolyse
- 764g white flour (medium-protein white flour or all-purpose flour)
- 184g whole milk
- 305g water 1
- 149g ripe levain
Main Dough
- 100g unsalted butter
- 25g water 2
- 58g honey
- 15g fine sea salt
Instructions
- Levain – 9:00 p.m. (overnight)
Mix the levain ingredients in a jar and leave them covered at a warm temperature, 74-76°F (23-24°C), to ripen overnight. - Autolyse – 8:30 a.m.
Warm or cool the autolyse water (see page 138 on how to calculate) so the temperature of the mixed dough meets the DDT for this recipe. Place the flour, milk, water, and ripe levain in the bowl of a stand mixer fitted with the dough hook. Mix on low speed until just incorporated. Cover the bowl and let sit for 30 minutes. - Mix – 9:00 a.m.
Cut the butter into ½-inch pats. Set aside. To the bowl holding the autolyse dough, add the honey, salt, and water. Mix on low speed (STIR on a KitchenAid) for 2 to 3 minutes until the ingredients come together and no dry bits remain. Next, mix on medium speed (2 to 3 on a KitchenAid) for 4 to 5 minutes until the dough smooths and begins to cling slightly to the hook. Turn the mixer on low speed (STIR on a KitchenAid) and mix for 2 to 4 minutes until the dough gains more strength and begins to cling once again to the dough hook. Next, with the mixer running, add the room temperature butter, one pat at a time, waiting to add each pat until the previous one is fully absorbed. Adding all the butter will take 5 to 8 minutes. Transfer the dough to a bulk fermentation container and cover. - Bulk fermentation – 9:15 a.m. to 1:15 p.m. (4 hours)
At a warm room temperature, 74-76°F (23-24°C), bulk fermentation should take about 4 hours. Give the dough 3 sets of stretches and folds at 30-minute intervals where the first set is 30-minutes after bulk fermentation start. - Divide and preshape – 1:15 p.m.
Scrape the dough out of the bulk fermentation container, divide it directly in half, and preshape each half into a taut round. Let rest for 30 to 35 minutes. - Shape – 1:45 p.m.
Shape one round into a tight tube, and place in the pan seam side down. Repeat with the other piece of dough. Cover the pans with a large, reusable plastic bag and seal. - Proof – 2:00 p.m. to 4:45 p.m.
At warm room temperature, 74-76°F (23-24°C), this dough should take 2 hours and 45 minutes to fully proof. If your kitchen is cooler, expect it to take longer. - Bake – 4:45 p.m.
Place an oven rack in the bottom-third of the oven, and preheat the oven to 425°F (220°C).
Place the pan into the oven and bake for 15 minutes. Reduce the oven temperature to 350°F (175°C) and bake for an additional 30 to 35 minutes. The loaves should have internal temperatures of around 204°F (95°C). Remove the pans from the oven, uncover, and let the loaves rest in the pan for 10 minutes. Then, turn the loaves out onto a wire rack and let cool completely, 1 to 2 hours.
Notes
Use the Pullman pan lid for a thinner crust.
Pain de Mie FAQ
Why do Pullman loaf pans have lids?
The lids help ensure that the resulting loaf has the thinnest possible crust.
How do you unmold a loaf made in a Pullman pan?
If you’ve sufficiently greased your pan, the loaf should simply fall right out when you turn the loaf pan over and knock on the bottom. If the bread is stuck at any point on the sides, use a thin plastic spatula (to avoid scratching the pan) to help gently release the sides of the loaf from the pan.
Do I need to grease a Pullman tin?
If your tin does not have a nonstick liner, then yes, you should grease the interior with a neutral-flavored oil. Even if it has a nonstick liner, greasing the interior will ensure that the loaf will come out easily after baking.
Can I mix this dough by hand?
Yes, but adding in the butter can be challenging. I’d follow the same mixing procedure above but knead the dough using slap and fold or folds in the bowl.
Why is my loaf rising erratically and splitting at the top when it’s baked?
This can be a sign of under-proofed dough. Make sure you give the dough sufficient time in bulk fermentation and proof. If your kitchen is cool, your dough might need more fermentation time!
Can I use white sugar instead of honey?
Yes; in fact, that’s actually more traditional than my approach. I would say start with 5% sugar in the dough and adjust up/down to your liking. Note that high percentages of sugar can impede natural fermentation, so the dough might require more time in bulk fermentation and/or proof.
Can I proof this dough overnight in the fridge?
You certainly can, just know that the result might be a bit sourer than what I intended here. Fermentation will continue in the fridge overnight, even though dramatically reduced, and will likely lead to more of that signature tang that you get with natural leavening.
Can I halve this recipe and bake only one loaf?
Yes! Halve all the ingredients in the recipe above (as described in my guide to baker’s percentages) and proceed as indicated.
How much dough goes into a large Pullman loaf pan?
To bake this sourdough Pain de Mie in the large Pullman pan (13” long), I would scale the dough up to 1200g per loaf. When shaping, divide the dough into three equal-sized balls and shape them tightly. Then, place them into the pan side-by-side. Shaping the dough in this way will help prevent any sagging or collapsing while the loaf is baking.
Why are the sides of my Pain de Mie caving in?
Sinking or caving in at the sides can be from a few things. First, try decreasing the dough’s hydration to suit your flour better. I would leave out 20g of water or milk and see the result. Second, let the dough cool in the pan for 5 to 10 minutes before removing it to give it more time to set when it’s out of the oven. Finally, several bakers have reported that the loaf needed to be baked longer to ensure it’s fully baked through and set—try baking 5 to 10 minutes more.
What’s Next?
For a real treat, use this pain de mie, sliced thick with your favorite bread knife, as a base for French toast on the weekend—you won’t regret sacrificing some toast for this treat.
For another super-soft pan loaf, check out my sourdough shokupan (Japanese milk bread) which uses the tangzhong technique to bring even more tenderness to the crust and crumb.
Buon appetito!
Last updated March 13, 2025: The starter weight was incorrectly reported as 8g when it should have been 7g.


702 Comments
I'm having issues with tunneling on the tops if the loaves. Maybe 2 in every 4 loaves are tunneling or have a large or small air bubble that compromises a few slices.
I've tried tightening the shaping and degassing well, longer proofing/shorter proofing. But I still can't get reliable loaves.
i shape and proof at RT until it's risen to around half of the pan. Then cold proof for 10-12 hrs. Pull it and let it rise at RT until it's to the top of the pan. This could take quite a few hours at RT.
Levain is always strong and ripe. I bake daily as a cottage baker so all my starters are fed daily and have been maintained for 5+ years.
Ive yet to find a reliable solution to this constant frustration. Other than that, the crumb and taste is perfect. Hoping you've had the problem and have a solution. Thxs!
Is it possible to use olive oil instead of butter? Substituting 3/4 the amount of butter and adding a little more milk?
This bread really is geared for butter! But, I have a bunch of other sandwich loaves here that call for olive oil, I would try one of those first!
Check out this one (no butter, only OO):
https://www.theperfectloaf.com/sourdough-sandwich-bread-with-pre-cooked-flour/
I am a great cook but I am new to baking. I got this recipe from a relative who makes sourdough but I do not have sourdough starter. And as someone who doesn't bake it seems quite complicated. I'd love to try it as it is supposed to be delicious but is there a way I can do this without sourdough? A conversion for using packaged yeast instead? Or if not do you have a good, reliable recipe that I can try for white bread? Thanks!
I'd say around 1-2% instant yeast should work for this recipe. But it's just a guess!
Hey Maurizio,
In your book, the duration for the levain says 12 hours but directions for the levain say to mix it and then “store it in a warm place for 5 hours.” This extra sentence at the end confuses me – I think maybe it doesn’t belong there. Can you help clarify this for me? Thank you!
I was coming here because of that too! Since the levain has a 12 hour/overnight timeframe in this web version of the recipe I’m guessing it is 12 hours, not 5. I’m going to edit it in pencil in my book. 🙂
Yes, it’s definitely 12 hours. This is also included in errata https://www.theperfectloaf.com/cookbooks/the-perfect-loaf-cookbook-errata/
It's 12, sorry about the typo 🙂
It's 12 hours, sorry about the typo in the book!
Hi Maurizio, My dough is much wetter than your dough does after autolyse. I think that that this is could be due to the lower the protein content of my all purpose flour (9.3 %). Can you please tell me the protein content of your flour so that I can blend a bit of strong flour to achieve a similar protein content, or should I just add some extra all purpose flour to get a good initial dough consistency?
In Maurizio’s cookbook, the white flour for both the levain and the dough are listed as 11.5%. I hope this helps!
Hi Laura, Thanks for your reply. The all purpose flour that I used had a much lower protein content (only 9.3 %), which explains why my dough wasn't able to support the same hydration. I used a 50:50 blend of all purpose flour (9.3 % protein) and strong flour (14.1 % protein) for the next batch and it was much better 🙂 https://uploads.disquscdn.com/images/9989fb615f0d94933dd9c16e1037b222b057e8a33a3884df15143af5087b9245.jpg
That’s awesome to hear.
(9.3 + 14.1) / 2 = 11.7%
Which is only 0.2% different than 11.5% so I’m not surprised (but pleased to here) it worked a lot better on the second try!
These look fantastic, nice work Alan!
Love this bread. Soft, and stays fresh long. The only problem – mine always spreads to the sides when baking like a "mushroom" hat. Wondering if I need to roll tighter. Sometimes it rippes/explode on one side as well.
The ripple / explosion can mean the dough is underproofed, or the egg wash isn't fully covering the top!
I think with the modification to this recipe adding the autolyse the note about the milk temperature is now in the wrong place. It’s in Step 3 but seems to belong in Step 2.
Will fix this Andrew!
I divided the recipe in half and made one loaf in my pullman pan. I love sourdough sandwich bread. I started a little too late and after 4-hours my dough had bubbles and was moving like Jello but really didn't rise that much. It was a wet dough and hard to shape but I got it into my pan for a rest in the refrigerator. The next morning, I took it out and let it continue to rise in the pullman before baking. It had a mild tang and was delicious, but I didn't get a large slice of bread. I am still learning.
Keep at it Terry!
Do you have any recommendations to make this recipe vegan?
Swap out the butter for any vegan butter!
Sounds awesome Jonathan! Glad you're liking this one.
What am I going wrong? I've tried 3 times to make this loaf, and it always ends up dense and not very risen
Hey Beth! Sounds like it's underproofed to me. Try giving the dough 30min longer in bulk fermentation, then see how the dough looks and feels. It might need an hour or more in final proof, too!
This was first time making this everyday bread! I just pulled it out of the oven, but what a labor of love… started late, didn’t have the right flour, had to “make” milk from powdered milk and becaue I’m in Alaska it’s still chilly here and it took longer than normal to autolyse and rise in the pans. Even with all that, it still looks and smells amazing! Can’t wait to cut into it and put a big slab of butter on it! Thanks Mario for all the recipes and an amazing book!
Great work on all the adjustments to suit your climate, Michelle! (It's 100F here today and I'm jealous of your cool weather 🙂).
Let me tell you this is my family's every week bread. it has the best taste, smell, its a perfect white bread Maurizio! Your recipes are the best, never failed to me. I started making your recipes from the web but i have your book since December. You are my go to baker. Greetings and best wishes from Argentina!
Means so much to hear that, thank you Iara!
https://uploads.disquscdn.com/images/82504df5659bd5b8a07c5c2018cd7342072e7f8290431167a5098e1b7c4040ab.jpg
I'd be so happy if I could make bread that looked like that! CHEERS
https://uploads.disquscdn.com/images/bb4a4f6fbf7f0d28f3be51c1b64099f10096f565824baa5b67055d8347e4ef31.jpg I made this loaf yesterday and it turned out beautifully! I only had low fat milk so I added some heavy cream to it.
Oh it came out great Carla! Beautiful crust and lovely interior 🙂
Can you provide a link to the original recipe?
I made this bread for the first time last night, and it won't be the last. I love this bread! It has a great crumb, bakes beautifully and is so good! I also used my Pullman loaf pans for the first time and love the results. I made kimchi grilled cheese sandwiches with it last night and it held up beautifully.
So glad it turned out well for ya, Kathy! Thanks for the comments 🙂
I only have one starter which is always fed with a 50/50 bread/whole wheat flour.
Would it be alright to simply feed the levain with AP flour the night before?
Nope you can just use it as is! If you want to try to make the flavor more mild (less sour), then yes, using all AP will get you there.
Why are we baking the bread in the bottom third of the oven. Will it make that much difference if I bake the loaves on the middle rack?
Totally fine in the middle, Dan.
The instructions in this recipe are impeccable. I’m using my favorite sourdough recipe, with your thoughtful and precise instructions to modify it for the Pullman loaf pan. Thank you!
Can I use buttermilk?
Absolutely. You'll get a richer flavor for sure.
Can this go into the oven straight from a cold overnight proof?
As long as the bulk fermentation was far enough, yes!
Hi! Is the whole milk supposed to be room temperature?
It can be, it's up to you. If you're using a stand mixer to mix the dough, it often heats it up enough to offset the fridge temp milk (and in fact, using it from the fridge helps the dough from getting too hot!).
I just baked this today – one loaf (half recipe). Excellent! So flavorful and my husband loves it.
I live in France and don't usually use whole milk but I do have tons of cream. So instead of whole milk I used half cream and half whey (from my fresh sheep ricotta). I'm an avid pain au levain baker so I have plenty of experience with that but this Pullman loaf is new to me. But let me tell you something….it was devine! I let it bulk ferment for a little over 6 hours (I've never tested dough temperature…i'm not that scientific…I just go by look and feel), then shaped it and let it proof overnight in the fridge. I baked it this morning and it's pure heaven. Light (and I even used a heartier flour…a T65 stone milled flour from a local farmer), slightly tangy, a touch of butter and sweetness. I will definitely be making this again.
I've been reading your blog for over a year now and this is the first recipe I've tried. Well done!
Vivianne, I'm thrilled to hear about your success with the Pullman loaf! Your substitution of half cream and half whey from sheep ricotta sounds absolutely amazing – what a wonderful way to add richness and flavor. Using that local T65 stone-milled flour was a great choice too. Those heartier, freshly milled flours add so much character to enriched doughs while still giving you a light texture.
Keep baking and let me know if you try any other recipes!
I made this bread in a Pullman pan today and it turned out perfect! I love Maurizio’s recipes and have his book. His recipe for “Best Sourdough” is my favorite for batard loaves, and his step by step instructions have improved my bread baking and shaping abilities. Today I read again about the importance of dough temperature and warmed my water according to his cheat sheet. I use a Brod and Taylor proofer, and that has been instrumental in keeping my dough (and fed starter) at the correct temps. I also make Maurizio’s pancakes with leftover sourdough.
Hey Judy thanks so much for all the kind words, really means a lot everything has been working for you! Appreciate you getting my cookbook 🙂 Happy baking!