
I love rye and almost always blend a little bit into my country bread formulas. I find that it improves the flavor by adding some earthy spiciness, it improves the texture by making it a little more tender, and it improves the fermentation because the yeast and bacteria feed voraciously on it. I also love dark, whole-grain rye recipes, although those tend to require some different handling than wheat dough due to the different composition of the grain.
This deli rye loaf is a great in-between. It has enough rye for a noticeable rye flavor without being as intense as a bread with mostly or all rye flour. A little bit of scalded rye (similar to tangzhong) makes it extra tender and helps it last beautifully for up to a week. The addition of caraway is a divisive topic; bakers tend to be all-in on one camp or the other. If you’re a can’t-stand-caraway kind of person, leave it out.
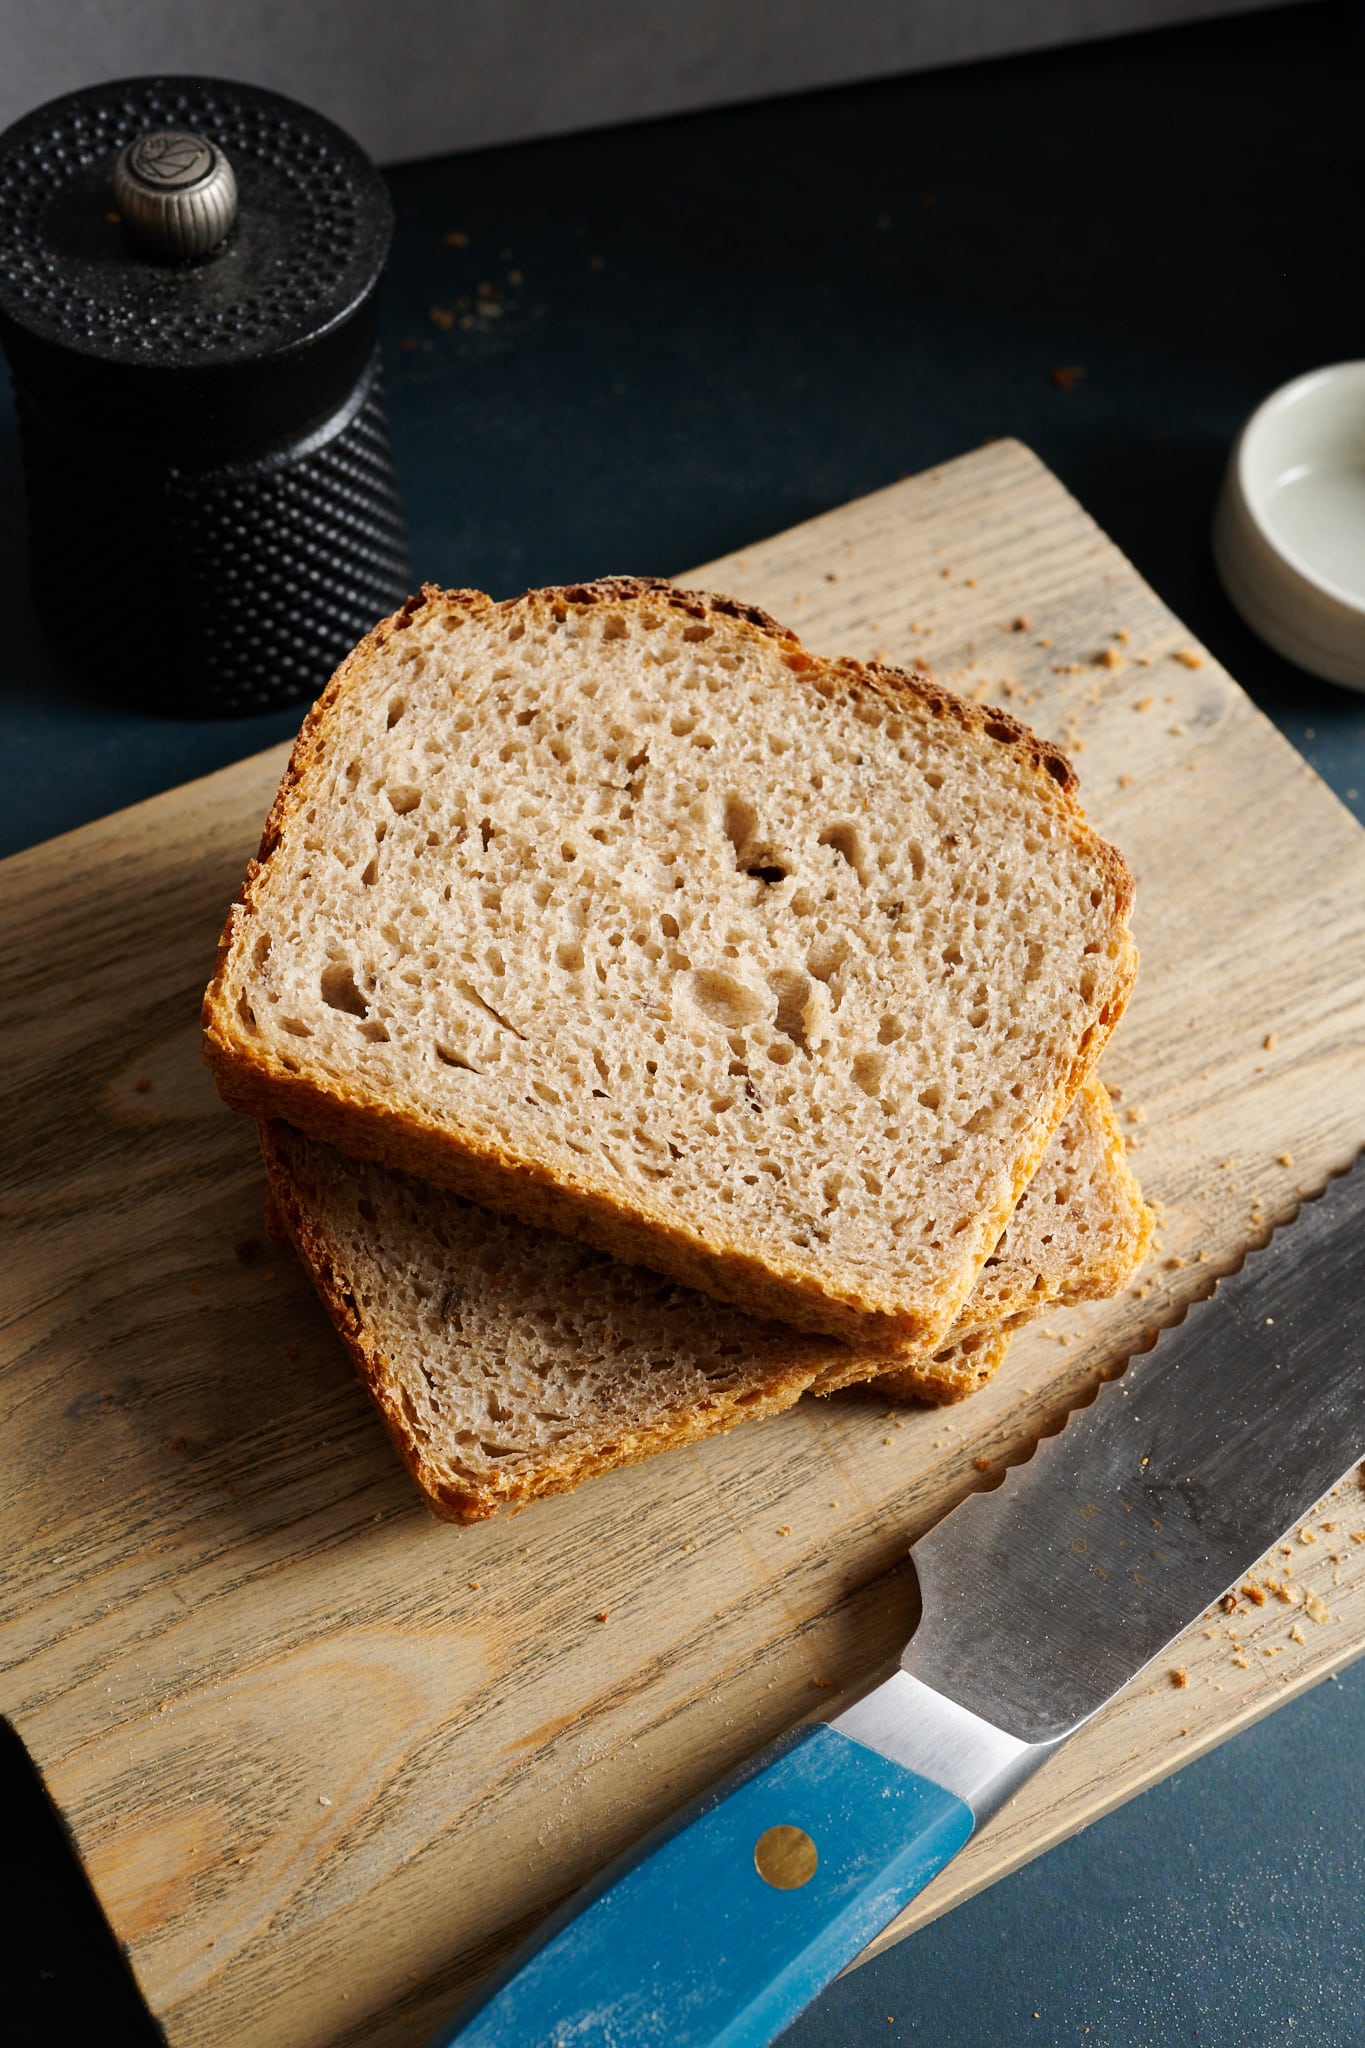
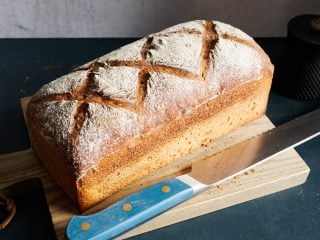
This bread just begs to be made into a ham, roast beef, or leftover Thanksgiving turkey sandwich.
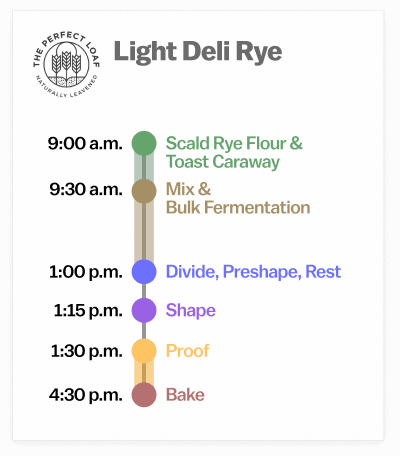
Baking Schedule
This light deli rye sourdough bread can be made all in a single day. Alternatively, the dough can be proofed in the refrigerator (retarded) overnight and baked the next day in the morning, afternoon, or evening.
Light Deli Rye Bread Recipe
For tips on calculating baker’s percentages or modifying this formula, see the guide to baker’s percentages (baker’s math).
Vitals
| Total dough weight | 1600 grams |
| Sourdough starter in final dough | 15.0% |
| Hydration | 77.0% (Not including the water used to scald the rye.) |
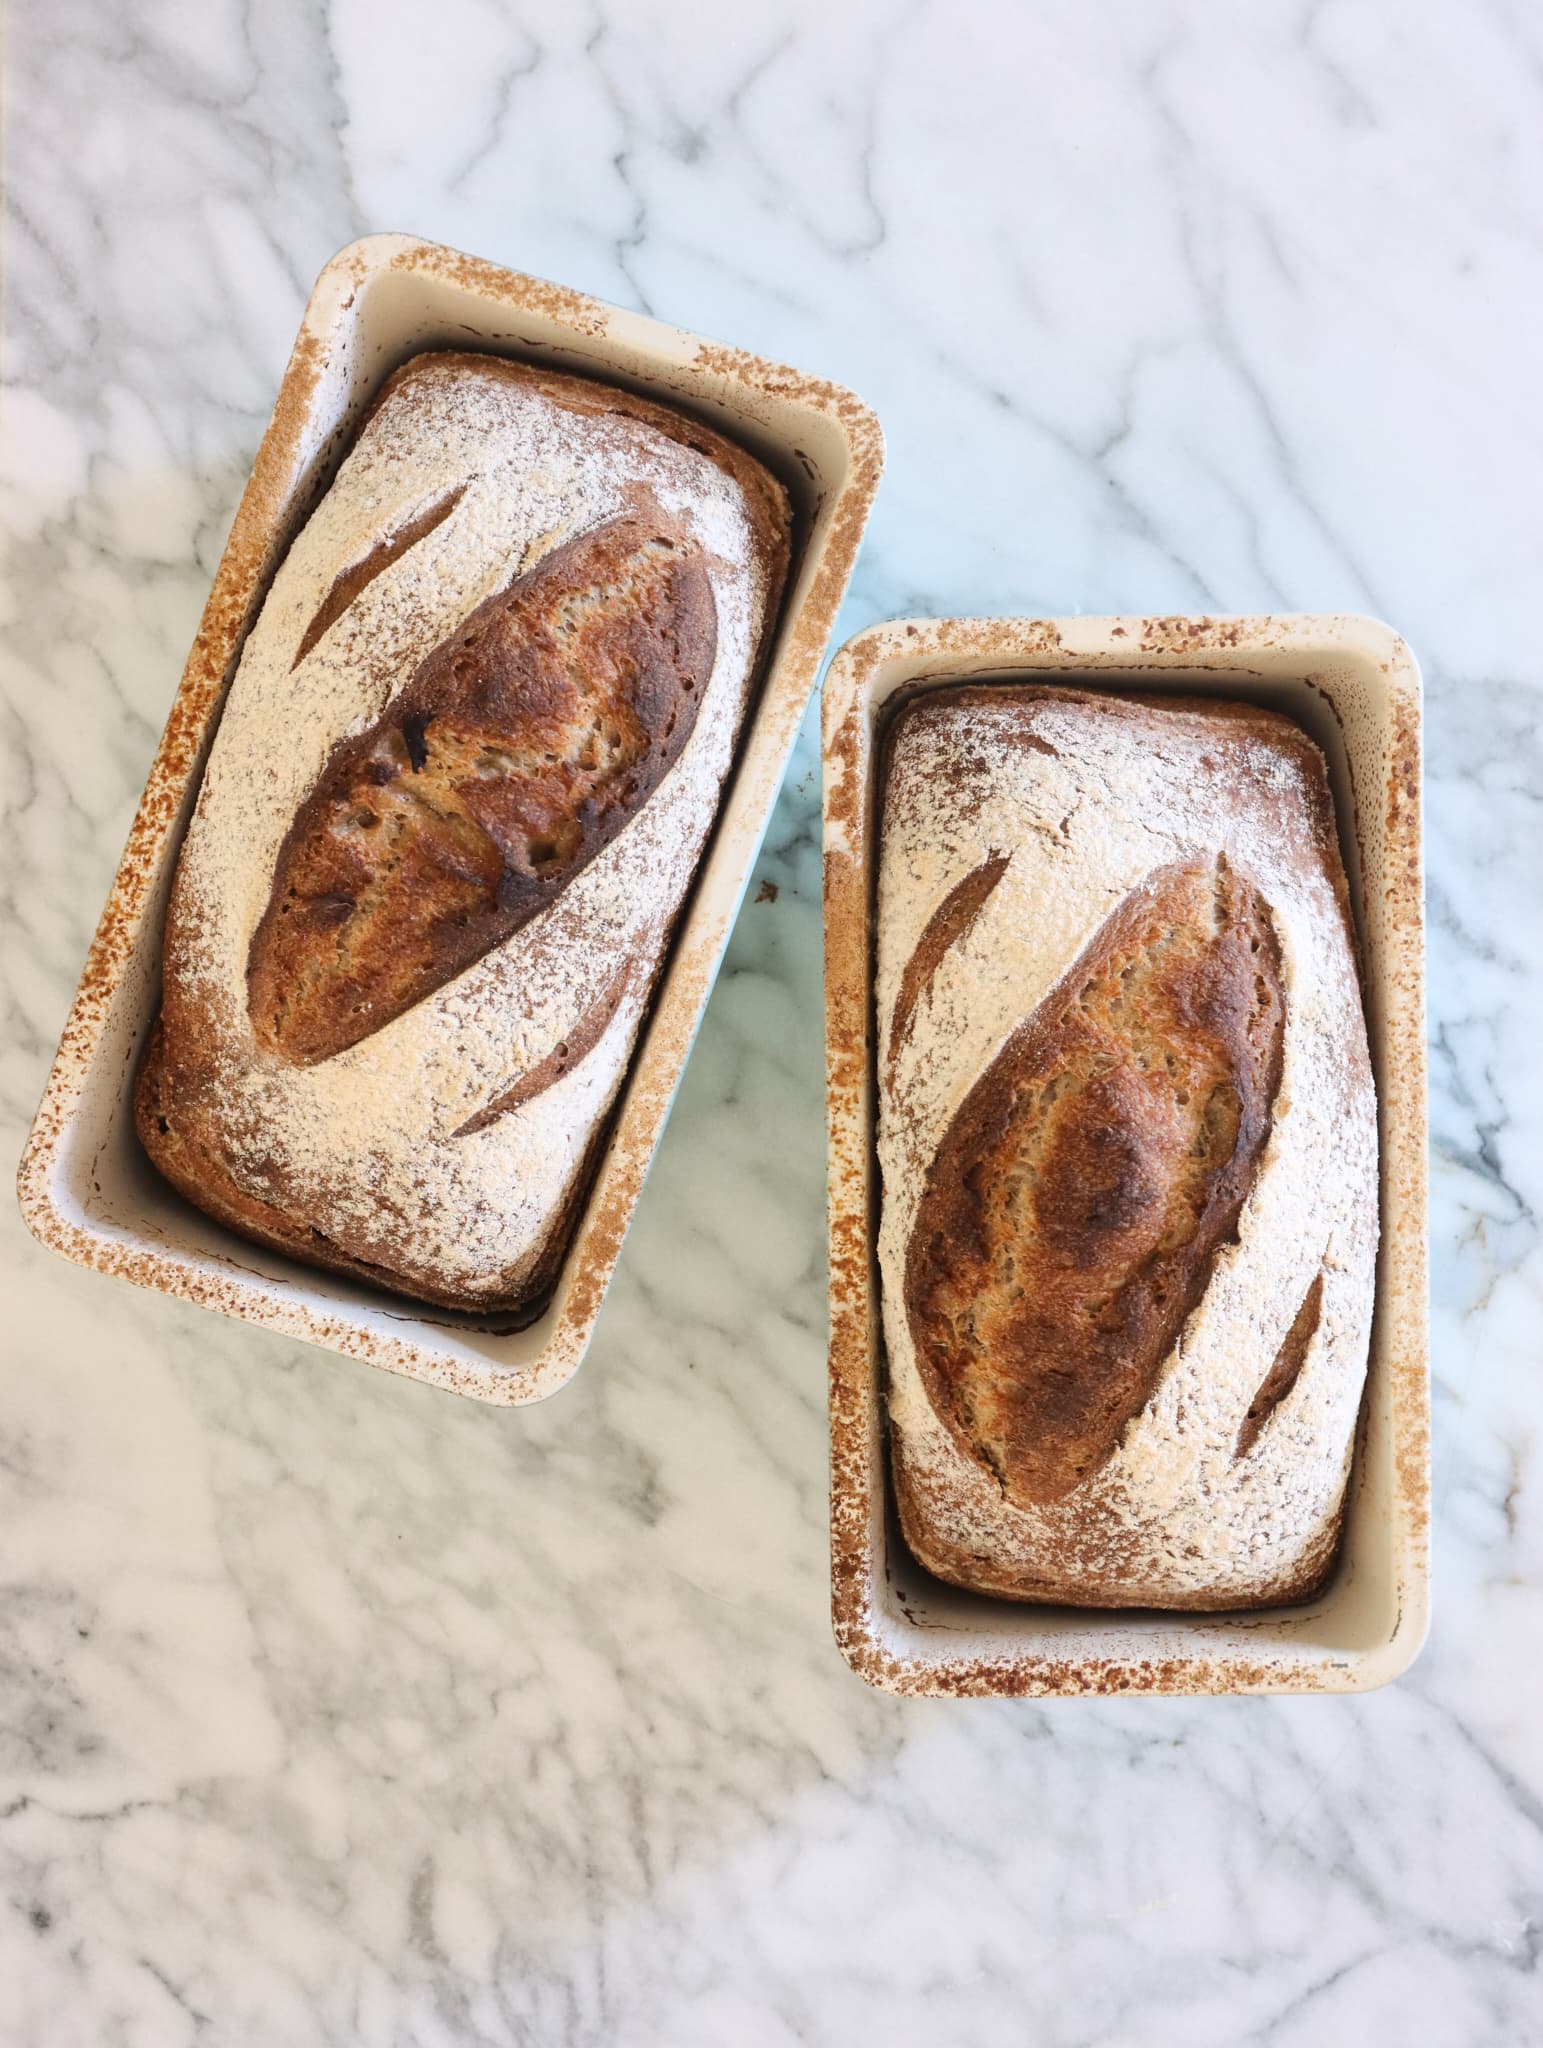
| Yield | Two 800g pan loaves |
Total Formula
Desired dough temperature: 78°F (26°C) (see my post on the importance of dough temperature).
| Weight | Ingredient | Baker’s Percentage |
|---|---|---|
| 639g | Type 85 flour (Cairnsprings Trailblazer Bread Flour) or High-protein white bread flour (King Arthur Baking Bread Flour) | 80.0% |
| 160g | Whole grain rye flour | 20.0% |
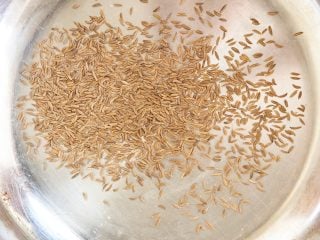
| 6g | Lightly toasted caraway seeds (optional) | 0.75% |
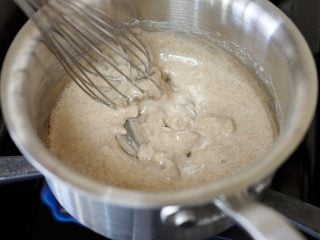
| 40g | PORRIDGE: Whole grain rye flour and water (20g whole grain rye flour and 60g water, cooked) | 5.0% |
| 615g | Water (Mix) | 77.0% |
| 20g | Fine sea salt | 2.5% |
| 120g | Ripe sourdough starter, 100% hydration | 15.0% |
Additional ingredients
Neutral oil for greasing pan
Bread flour for dusting the top of the dough
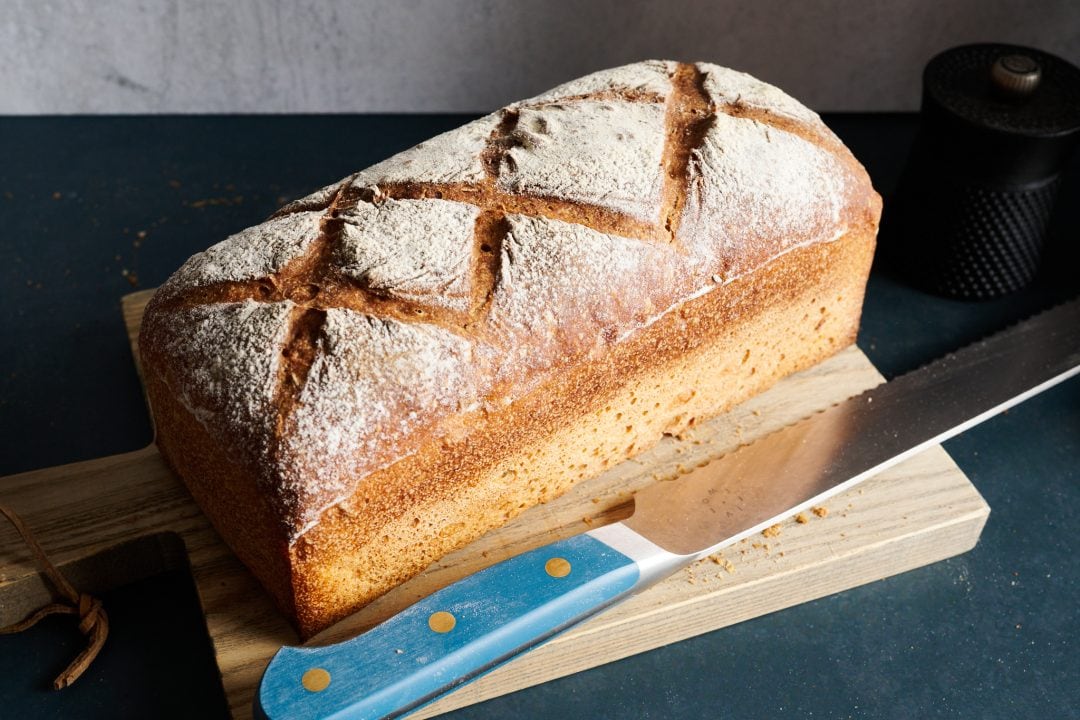
Light Deli Rye Bread
- Prep Time: 6 hours
- Cook Time: 40 minutes
- Total Time: 6 hours 40 minutes
- Yield: 2 loaves
- Category: Lunch
- Cuisine: American
Description
This loaf has a great balance of wheat and rye flours. It has a bit of rye flour and scalded rye to add flavor and tenderness, but not so much that the dough is difficult to handle or the flavor of the rye is overwhelming. It makes a perfect sliced bread for ham, roast beef, or leftover Thanksgiving turkey sandwiches.
Ingredients
Scalded Rye Flour Porridge
- 20g Whole Grain Rye Flour
- 60g Water
Main Dough
- 639g Type 85 Bread Flour or high-protein white bread flour
- 160g Whole grain rye flour
- 6g Lightly toasted caraway seeds (optional)
- 615g warm water
- 20g Fine sea salt
- 120g Ripe sourdough starter, (100% Hydration)
- All of the rye porridge
Instructions
- In a small saucepan over medium-low heat, combine the whole-grain rye flour and water. Cook for 3-5 minutes, stirring often, until the mixture has thickened and is glossy. Remove from the heat and let cool.
- Toast the caraway seeds by pre-heating a skillet and shaking the seeds in the hot skillet for about 30 seconds, or just until fragrant.
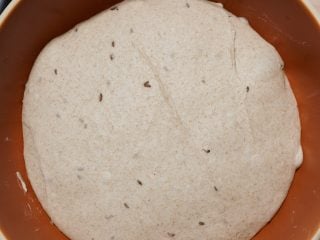
- In a medium mixing bowl (or in the bowl of a stand mixer fitted with the dough hook attachment), combine the water, sourdough starter, cooled scalded rye, caraway seeds, salt, and flour. Mix until everything is combined. Cover with a clean dish towel and let rest in a warm, draft-free spot for 20 minutes.
- Knead the dough in the bowl. To do so, lift up one side, fold it over the middle and press down. Rotate the bowl a quarter-turn and repeat. Continue lifting and folding for about 5 minutes.
- Let the dough rest, covered with an airtight cover, for three hours in a warm spot—the dough temperature should remain about 78°F (26°C). During this time, give the dough two sets of stretches and folds, one set after 1 hour and a second set after 2 hours.
- After three hours, the dough should have risen noticeably and have bubbles on top and throughout.
- Scoop the dough from the bowl onto a clean work surface. Divide in half and round gently into balls. Let rest on the worksurface for 15 minutes.
- Prepare two 1 lb bread loaf pans (8.5 x 4.5 inches) by liberally coating them with a few tablespoons of neutral oil. Alternatively, a 9 x 4-inch Pullman pan can also be used.
- Shape the loaves. To do so, flour the tops of the rested rounds. Use your bench knife,flip one over so the floured side is down. Pat and stretch the dough into a long oval shape, with the shorter sides closest to and farthest from you. Starting from the top of the loaf, use your fingertips to roll the dough down towards you until it is all rolled into a log shape. Pinch the bottom seam shut. Place the dough, seam-side down, into the prepared pan. Repeat with the other round.
- Loosely cover with a clean dish towel and let the dough proof for about 3 hours. (Alternatively, you can place the loaves in the refrigerator and bake them the next day.) During this time, preheat an empty oven with a rack in the middle to 460°F (238°C).
- After about 3 hours, the dough should have risen noticeably, just touch the rim of the 1 lb. pan, and spring back slowly when pressed. If the dough hasn’t risen or still feels dense, give it more time to proof. To prepare for baking, lightly flour the top of the loaves and score decoratively.
- Bake the loaves for 40 minutes at 460°F (238°C) until the loaves are golden-brown all over.
- Remove the pans from the oven and let cool briefly. Remove the loaves from the pans and let cool on a cooling rack until cool to the touch. These can be eaten once fully cooled, but they are best the next day.
Notes
To make only a single loaf, halve all of the ingredients.
The caraway seeds can be left out or substituted for fennel seeds.
This bread can be made in a traditional 1 lb. pan or a 9 x 4-inch Pullman pan. For additional pans and shaping techniques, see the guide to pan loaves.
Light Deli Rye FAQs
Can I substitute caraway seeds for something else?
Fennel seeds can be substituted for the caraway for this light deli rye sourdough bread.
What does scalding rye flour do?
Scalding the rye flour causes the starch molecules to burst and gelatinize. When you add scalded flour to a dough, you get structure and texture from the gelatinized starch instead of from gluten (which rye is low in anyway). The scalded flour also locks in more moisture, which helps keep the loaf softer for longer.
What’s Next?
For sourdough bread with a higher percentage of whole rye flour, check out Rye Sourdough and Smørrebrød (rye bread with recipes for open-faced sandwiches).
Making this bread during the holidays? Check out the Bread Baker’s Gift Guide for the best tools to gift (or for yourself!).


90 Comments
Yum! What a delicious sandwich rye. I waited an entire day before slicing and it was worth the wait. More substantial than a white sandwich loaf, nice and tangy. This was my first try at a rye sourdough and I read through the comments before starting – and was glad I did. It needed a full 4 hours in bulk (cold kitchen) and an overnight stay in the fridge. There wasn’t much of a rise out of the fridge, but a couple of hours on the counter gave me enough rise to put the loaves in the oven where I did get spring. After reading the notes about burnt flour, I set the over to 450 and checked the loaves after 30 minutes. Perfect. This will be a regular rotation!
I'm with you, Susan, this has such a lovely flavor!
I made this new deli rye and I was surprised how well it turned out because I had to add a s**t ton more flour. The dough was so wet during the initial mixing. I ended up adding about 500 grams more flour (both some rye flour and more bread flour) to make it a dough instead of a batter.
But to my surprise, it actually turned out just fine and the taste is incredible! Perhaps the recipe should say to add water in 2 batches. Wonder if anyone else had this issue?
Yes. The first time I made this it was so over hydrated and mostly unworkable (altho the loaves came out so tasty). So wet that it was impossible to score the tops and produced some interesting ‘explosions’ while baking. Making it again today and adding as much flour as necessary. Also lengthening the bulk ferm and proofing times.
Thanks, Allen!
Great tips here, Nina. Yes, definitely related to your flour, and rye has a lot of variability!
I have had good luck with same day bakes with this bread. As the temperature has cooled, I warm up the oven a bit and make it my proofing box and it works just fine. When we were baking over the holidays I had to warm up the dryer and proof the bread there because the oven was too busy!
I hear you on busy holidays!
This is the best recipe ever!! I read all the other comments and accordingly did a 5 hour bulk plus an overnight cold proof. The loaves came out perfectly. This is definitely the best rye bread I’ve ever eaten, and I was raised on deli rye. Can’t wait to make a vegan Reuben sandwich with this bread. Thank you, Maurizio!
Nice mods Marie and so glad you liked this recipe from Jen, it’s a keeper. I’ve since updated the recipe to include a longer bulk, too.
Enjoy and thanks for the comments!
I reduced the water to 565g and it was very easy to handle. Nice flavour with caraway seeds. I also used my cast iron bread pans and the two loaves cooked beautifully. Took much more time to proof though.
Nice modifications, Anne! If you find the dough very sluggish, next time add a bit more starter to help move it along.
Thanks for sharing this recipe Maurizio. It is my wife’s new favorite. I get to make it for is once a week!
My first few tries had mixed results. Lopsided rising, dense etc. I went from room temp proofing to overnight cold proofing. That improved things a bit.
Yesterday, I put the loaf in the fridge at 3:30pm (2°).
Since I couldn’t sleep, I got up and threw the pan in the oven and at 2:40am, had a perfectly risen, fluffy loaf!
It seems that around here (equator, 2,150m elevation, 70% humidity, 22°C, pretty mich year-round ) 11-12hrs works well.
Happy holidays!
So glad you guys liked this one! Jennifer developed this recipe and it’s a winner. Nice work on the modifications! Happy holidays 🙂
I’ve made this bread three times and it is delicious. The first time, I was disappointed by the denseness. It never got enough rise. The last two times, I made a hybrid bread and added 1/8 tsp instant yeast and put the loaves in the fridge over night. This really helped. It’s still a pain to score, but no matter. The result has a very nice tang and adequate loft. I don’t make a lot of pan breads, but we love rye bread sandwiches and toast. This one is a keeper. I’ll keep tweaking!
Nice work, Jocelyn! I’ve found this dough does take a bit longer to get going.
Not too happy with the recipe. Hydration is near 80% when you include the 100% hydration starter and the water in the porridge. Not sure why it needs to be that wet/difficult to handle. the one hour proof provided very little rise and will let it go for the rest of the afternoon if need be. Just didn’t seem to build up enough structure with the instructions provided but with a large active starter and a good 3 hour bulk ferment at 78*, it should have risen a lot more. Have mine in a proofing box at 78* and it’s just not rising as much as it should. Thoughts??
Allen
Hey, Allen! Sorry to hear about the trouble. I think this dough does take longer to rise, especially if it’s cold in your kitchen. I would go for a good 4 hr bulk at 78F.
Hi Maurizio. In the end, I just let it proof and the bread came out pretty good. It was still too soft to score with my lame so it kind of erupted in different places. I’ll try it again with a lower hydration and an intentional longer proof.
Peace,
Allen
My oven temperature is quite accurate, and when baking in Pullman pans at 460F, the flour topping was already starting to darken severely at the 20-minute mark and ended up being burned and bitter over very dark tops well before the suggested baking time of 40 minutes was up. I pulled the loaves after baking for around 30 minutes at 460F and the internal temp was already at 210F. The exterior color of the sides and bottoms of my loaves also ended up beyond “golden” and heading into the “caramelized” zone.
Both loaves had good oven spring however (after a much longer proofing time in the pans). The crumb was well-developed, soft and luscious, but sturdy enough for sandwiches and tasted surprisingly sweet because of the addition of whole rye.
I like working with high-hydration mixes because they reward me with great crumb texture and oven spring after proper shaping. But I was a bit surprised at how these loaves were so soft after shaping that they were quite difficult to score properly, even with a very sharp lame.
Next time, I will bake this mix at standard Pain de Mie temps/times (425F/55 min, then 375F/30-35 min) using a Pullman top on one of the pans and an egg wash the open pan to bring some color to the top instead of a bitter, burnt flour topping. I’ll let you know how it goes.
On my second try, I used the lids on my pullman pans and reduced the baking time to 30 min at 425, then another 10-15 min at 375, until the interior temp reached about 205-210F. This resulted in a better (but still dark) crust color all around, but the crust was still not as tender as my regular sandwich bread. Next time I will likely swap the temp/time (starting at a lower temp for the initial bake and then finishing at a higher temp to color the crust) and see if that helps.
My quest for the “perfect” rye sandwich bread continues.
Nice work with those mods, Dino. Strangely, I was able to bake for the exact time and temp listed with no problem. I wonder if it’s a difference in oven and elevation…
Late to trying this recipe. I have an LG oven. Burnt tops on two tries. Bread is still incredible. Will lower l the oven rack and temp a touch. My kitchen is cold in the winter, it took a few extra hours in a microwave with a bowl of hot water to get the loaf to proof.
Hello, Can medium rye flour be substituted for whole grain rye, please.
Yes, you can !
What is whole grain rye bread, I have rye, and pumpernickel.
Whole grain rye flour means it’s not sifted and is whole, dark rye.
Is there a way this bread can be made without the sour dough .Don’t seem to have much luck with sourdough baking. Can i just use yeast and m
follow this recipe
You certainly can. I would add equal parts flour and water to cover the amount of sourdough starter used.
I purchased the recommended Pullman pans but for this recipe it looks like the lids are not used. Could you confirm and/or advise on using or not using the lids for this recipe. Does the recipe instructions change if the lids are used. I was thinking of using the lid on one loaf and leaving it off for the second loaf. Cheers.
I did not use the pullman pan lids for the first batch I baked and topped the crust with flour as directed in the recipe. Following the recommended 460F (!!!) baking temp for 40 min, both the flour topping and crust were burned at the 20 min mark and were tough and bitter tasting.
On my second try, I used the lids on my pullman pans and reduced the baking time to 30min at 425, then another 10-15 min at 375, until the interior temp reached about 205-210F. This resulted in a better (but still dark) crust color all around, but the crust was still not as tender as my regular sandwich bread. Next time I will likely swap the temp/time (starting at a lower temp for the initial bake and then finishing at a higher temp to color the crust) and see if that helps.
My quest for the “perfect” rye sandwich bread continues.
I do not use the lids for this recipe (only if you want a perfectly square loaf)!
Thank you, since I entered my comment I’ve tried it both ways aiming for a 204F internal temp and the results have been fantastic. I’ve made four loaves so far using it as my sandwich/toast bread.
My first sourdough bread bake since finding the Perfect Loaf! Although mine came out looking a little darker on the edges ( no oven thermometer ) I was so pleased with the results. It was a wet dough but not impossible. The crust was right up there with breads I’ve loved from fancy bakeries like Poilane!!!
Ate more than I expected and look forward to more recipes.
Thanks for all the info and recipes… Awesome!
So glad you liked this one!
I just put the dough for the three hour rest. It was definitely very sticky and I am glad I put on gloves. I had to use some flour sprinking during the kneading, because it wasn’t working very well with just gloves. I will let you know how the proofing ends up.
9:35 pm: It definitely takes longer than one hour for the loaves to rise. In the oven now.
I made this yesterday. I was somewhat surprised at how loose it was for handling. Thank heavens for a mixing bowl to confine it. It took about 4 hours longer to reach full time, but that’s because my kitchen isn’t very warm.
I baked it as a two part pull-apart in a tin. It’s a lovely loaf, soft, with a consistent crumb, and a lilting rye flavour cuts across the caraway. I will definitely be baking it again.
Thank you for developing and sharing the recipe.
Nice work with the modifications to suit your kitchen, Wendy! Glad it worked out well for you 🙂
This is really great. Crushes a similar recipe for rye kochmehl bread in the last Tartine book. That said, I’m doing the mix 3m rest 3m x3 method from said book. Maybe that’s why I’m having no trouble with unmanageable wet dough? Anyway Maurizio + Jen = modern bread version of rock supergroup à la Travelling Wilburys, amiwrong?
Ha ha, thanks so much, Everett. Yeah, your longer mixing there is definitely helping, nice work!
I made this today and totally agree with Trish. Followed the recipe as written. All proofing at ~76 deg f. 4 hour bulk proof. After 3 hours in the final proof, the poke test produced an instantaneous spring back. I let it go to 4 hours, and the oven is heating up as I write this. Loaves finally reached to the top of the pan. Poke test still shows vigorous spring back. We’ll see how they bake up. Thanks for giving us this recipe to try.
The bread was wonderful and had a great crumb and flavor – WHY did it take 4 hours to rise?? What can be done to the recipe to speed up the rise??? I also agree with several other comments about the dough being very wet. A challenge to handle!
I’m going to rework the recipe a bit to include a longer final proof time. It sounds like most bakers have needed more time in proof as well. I would say 3-4 hours is probably more suitable!
Does this require steam for baking? It’s not indicated, but I find that surprising. Or perhaps it’s not expected to spring all that much as long as it’s properly proofed
Not super necessary for steam with this recipe, there’s not a whole lot of rise given the percentage of rye.
Thanks to Jen and Maurizio for this recipe! The results are delicious, but what a process! The dough was extremely wet and very hard to manage. (I am so spoiled by Maurizio’s TPL blend. It behaves!) Every stage required longer than the recipe stated, which could be the temperature in my kitchen, but also, because rye, which among other things, doesn’t rise to the extent that wheat does. I misunderstood the instructions and used one 9″x4″ pullman instead of the two smaller loaf pans. Fortunately, I baked without the top, so it came out perfectly, and nice and high, instead of oozing all over the oven! For those who don’t care for either caraway or charnushka/nigella seeds, I’ve always used dill seeds in my rye bread instead, and I get the same great Jewish rye flavor and aroma in the end product. Next time I bake this, and, yes, there will definitely be a next time, because it was worth the effort, and rye bread is never easy anyway, I think it’s a perfect candidate for my Backrahmen.
Amazing, thanks for the comments, Anne! Great job with the modifications. I’m going to update the recipe to include a longer final proof time, I think y’all are right, it needs a bit more (I’ve found this in testing here, too)!
Thanks, Maurizio. I am going for a third try today, and I am going to use some of the modifications that you and others have suggested: overnight in the refrigerator, less water, more starter. Fingers crossed that I can get two full-sized loaves this time!
Report back on how it goes for you, Anne! I also updated the recipe up there to include a longer final proof time, which I think is appropriate for most bakers.
Thanks, Maurizio,
I am happy to report that attempt #3 is a modified success –
a triumph if you factor in that attempt #2 ended in the compost can! I tried baking it in my wooden bread baking frame, and it was a disaster.
Yesterday, I used Cairnspring whole grain rye instead of the
KAF white rye that I used previously, I doubled the starter, reduced the water
to 568g as suggested by Anne E above, and ended up proofing it for 12 hours in the
refrigerator before baking as suggested by several others.
After the two folds, the dough fermented for 5 hours before it looked and felt OK. I never did get
the “bubbles,” but the dough was clearly ready for the next step. I divided the dough, and let the balls rest for 15 minutes before shaping and placing in the loaf pans. Up to this point, all was well. Then, I left them to rise for one
hour, but found zip; in fact, the dough looked dead. So, I turned off the pre-heating oven, and put the loaves into the refrigerator for an overnight rest.
Once again, 12 hours later, I found that it looked as though nothing had happened. There was no rise and no proof of life. Pun intended. However, after baking, the loaves rose just to the top of the pans, they
are essentially sandwich loaves, and they each have a Mohawk because I couldn’t reach into the loaf pans to score them before baking!
They are not beauties, but they are edible. Good news, in fact: the bread is quite delicious, the crumb
and the crust are both just right. I am going back to the KAF white rye, though, because these loaves are more on the pumpernickel side for my taste; I prefer the lighter deli rye flavor. I may add back some of the water as well.
In the meantime, I’m going back to my house bread, i.e., Pane
Siciliano for the foreseeable future!
I’m not sure if I made mistake. The dough is much more wet than the typical sour dough that I have made using the beginner recipe. Should I start over?
Thanks
It was wet when shaping for me. Ok though thru the process. Not sure I would recommend for a beginner
It’s definitely a wet dough, Dean! Stick with it, once you get it into the pan it’ll be alright 🙂
Made this today, tho won’t taste till tomorrow. Personally I think it needs more time for final proof. One hour was not enough. I did 3hrs at 26C in the proofer and think it could have done with more time. I had to use a bit of my sponge from the overnight pancake recipe as didn’t have enough starter, the kitchen smells wonderful. I used 4g of caraway as not really a fan, but wanted to try. Wish I could add photos
I agree, it needs more proof time—will be updating the recipe after more tests here! I hope it turned out well for you and you enjoyed, Trish.
In subsequent bakes I have also reduced the hydration as its easier to handle.
I made these yesterday and baked them today and they turned out so beautifully!! Since I haven’t had any luck finding Type 85 flour here in Germany I often use Cuoco flour (Caputo) when your recipes call for high protein bread flour or even organic Manitoba flour. I augmented the recipe by 20% and put the loaves, once formed and placed in the pans, into the fridge overnight. However, when I got them out this morning they had hardly risen at all so I left them to continue proofing on the counter until they were about 1 cm below the rim of the pan (that took another 7 hours!). Baked them with steam at 230 degrees celsius for 25 minutes (not having preheated my oven) and another 30 minutes at 200 degrees celsius and they turned out perfect. Even though I decided against scoring they didn’t burst. Thanks so much for this recipe, Jennifer!
Amazing, thank you for all the details, Calli! My dough took a little longer to rise in proof here, too, but it’s been rather cold. Really like your adjustments and how you modified to suit your dough. Enjoy!
Hey @Calli, same problem here with finding something close to Type 85 flour, but you may want to check this flour from Caputo. It has very similar ash content https://www.mulinocaputo.it/prodotti/tipo-1/?lang=en
If one 9×4 inch Pullman pan is used, does this recipe make one or two loaves?
You can put 800g in each Pullman pan (1600g would be too much for a single 9×4 pan).
Do you leave the cover off if using the Pullman pans? I just received the pans from your recommendation.
Very excited to give this a try!
Report back how you like it, this is one delicious loaf!