
I could probably pull out hundreds of gems from Hamelman’s essential reading, Bread, and each time I go back to reference something my eye catches one that strikes a chord. Attentiveness, now that is an essential thing with baking. You don’t realize just how vital it is to step back for a second and observe what you, and the dough, is doing from time to time. Does it look alive and puffy? Does it look like it has enough strength? Are you mixing to sufficient development and enough rise during bulk fermentation? In this post on country sourdough with less levain and a longer autolyse we’ll look at all of this.
First learn the basics—good mixing techniques, proper fermentation, and skillful baking. How do you learn these? By repetition and attentiveness. Make sure patience is part of your ingredient list.
Jeffrey Hamelman
Baking can be a haphazard endeavor: you can measure out the ingredients, throw them into a bowl, get your hands dirty, and watch as the magic happens later in the oven. You’ll get good bread, better than what you’d get in most grocery stores in those plastic bags for sure. But when does good bread become great bread? I believe it comes with a little time, some practice, gathered experience, attentiveness, and if you are lucky, hands-on instruction. If you’re like me and have never had formal baking training, most of these things have to come from within, from your practice & process.
When it comes down to it, baking is a personal thing. I’ve read many places and listened to many talks where bakers can be quoted saying something of the sort: “no two bakers bake alike.” Reading books on baking and flipping through many pictures of those open crumb loaves with nice dark glistening crusts, you start to tell yourself “hey I can do the same thing right from home.” Well maybe you can, maybe you can’t, but the important thing is to find your process and your method, and make bread how you like it. That’s great bread.
There are so many variables to baking it’s impossible to lay down a set of rules that, when followed, will result in the same loaf each time. It just won’t happen. The best we can do is increase the consistency of creating great bread. Every loaf won’t be the same, every crust won’t shine the same way, and every crumb structure won’t line up the same way, but we do our best to stay consistent and make the most excellent bread we can. And in the very end of things, bread is bread; it’s a staple of food that’s been around for almost as long as we have. It’s meant to provide sustenance and nourishment, not sit on the wall like art.
With all that said, I still search… I still work at my process and my technique. I always read and research. That’s part of the fun for me as a home baker; it’s a science experiment that never ends and one that makes me and others around me happy to eat the results.
In this entry, I baked upwards of 8 loaves over the past few weeks with the following process in search of that great bread. Testing, reading, experimenting and talking bread with some of you out there (hat tip to the ever-helpful Margie). All this research and experimentation has produced some of the best loaves I’ve churned out yet. The following entry catalogs my findings with increased autolyse time, decreased pre-fermented flour, and building more strength at the front of the process instead of later during bulk fermentation.
An excessive use of yeast will always be to the detriment of the finished product. Rather than giving your bread a lot of yeast and a little bit of time, reverse that and give them a little yeast and a lot of time. The results will be worth the change made.
Jeffrey Hamelman
Thoughts on increasing autolyse
As mentioned in my whole wheat post increasing your autolyse time will change the way your dough feels when you start to mix as you’ll notice it has elasticity and strength early on even before intensive mixing/kneading. It starts the gluten formation process early and begins to smooth the dough, but it also helps bread with a higher percentage of whole grain to fully hydrate before fermentation begins.
Reducing levain
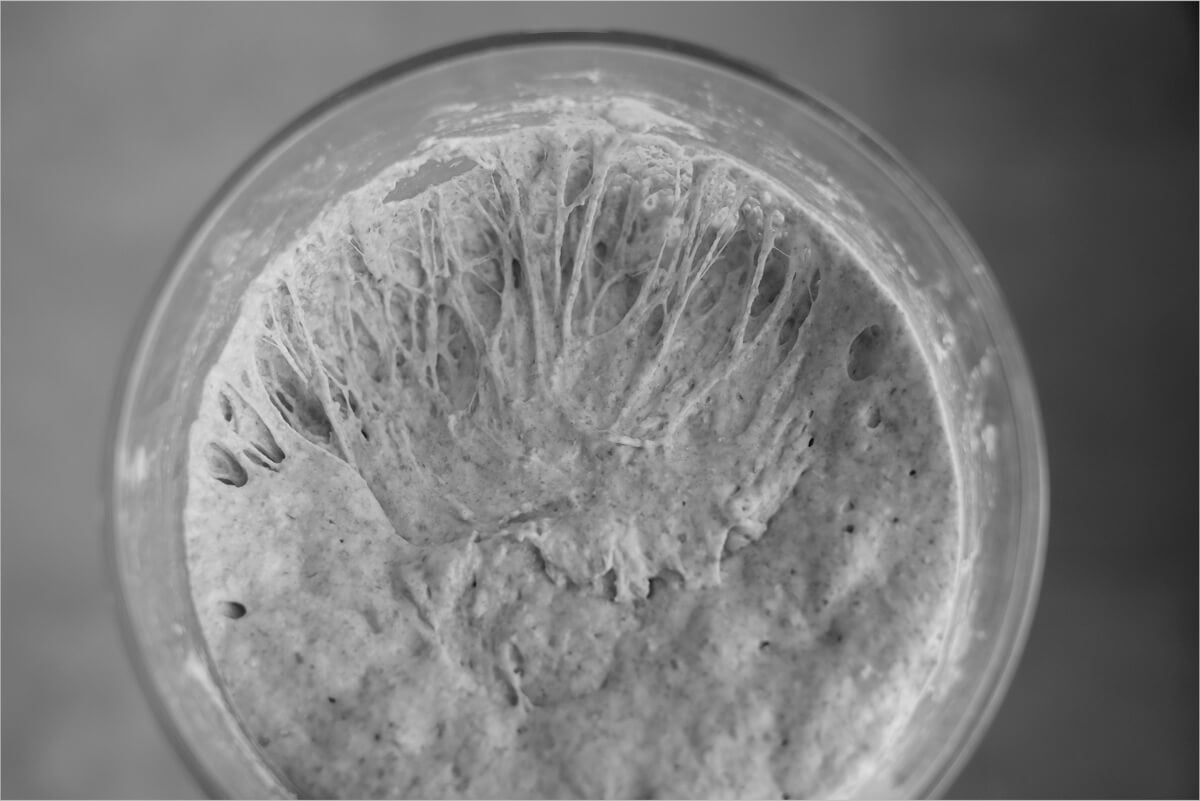
When I started out baking, and you can see this in many of my beginning Tartine posts, I would typically increase the levain percentage sometimes all the way up to 25%. This was partly to compensate for my starter not having enough strength, but also because I had this idea in my head that more levain means a more open crumb. That’s not true, as it turns out. I’ve found that with only 15% levain (that’s 150g) I get just as much rise and fermentation activity with the possibility of having a more open crumb. It may mean you have to let the fermentation go just a bit longer, but it will be worth it to take your time and let your baking assistant (read: starter) leaven that dough and build up some exceptional taste.
First, if you’re brand new to baking sourdough, you might want to check out my Beginner’s Sourdough recipe, it has longer in-depth explanations on every step in the baking process!
Prepare the levain – 6:30 a.m.
Prepare the following right after you get up in the morning:
| Weight | Ingredient |
|---|---|
| 25g | Ripe starter |
| 50g | Giusto’s whole wheat flour |
| 50g | Giusto’s artisan bread flour (medium protein bread flour at 11-12% protein) |
| 90g | Water |
Keep it in a warm area in your kitchen for about 6 hours if your kitchen is around 78°F (26°C) if it’s a bit cooler where you are you might need to go a little longer. Watch your levain and read the signs: smell, bubbles on top, volume.
Autolyse & Mix – 9:30am
We’re going for a 3 hour autolyse for this bake. You might want to experiment with autolyse times to suit your flour and preference — I’ve found an autolyse really helps with doughs that have high whole grain percentages or high amounts of strong high protein flour. Take notice how different the flour feels when you autolyse for an extended period like 3 hours versus a short 40 or even 60-minute duration. It’s quite astonishing.
Note that this autolyse is without any levain (or salt) added to it as your levain isn’t even ready yet—it is only flour and water. We start the autolyse 3 hours before we anticipate our levain to be ready. You should be good to go doing this at 9:30 a.m. and if your levain isn’t ready at 12:30 p.m. or so no worries, keep the autolyse going until it is ready.
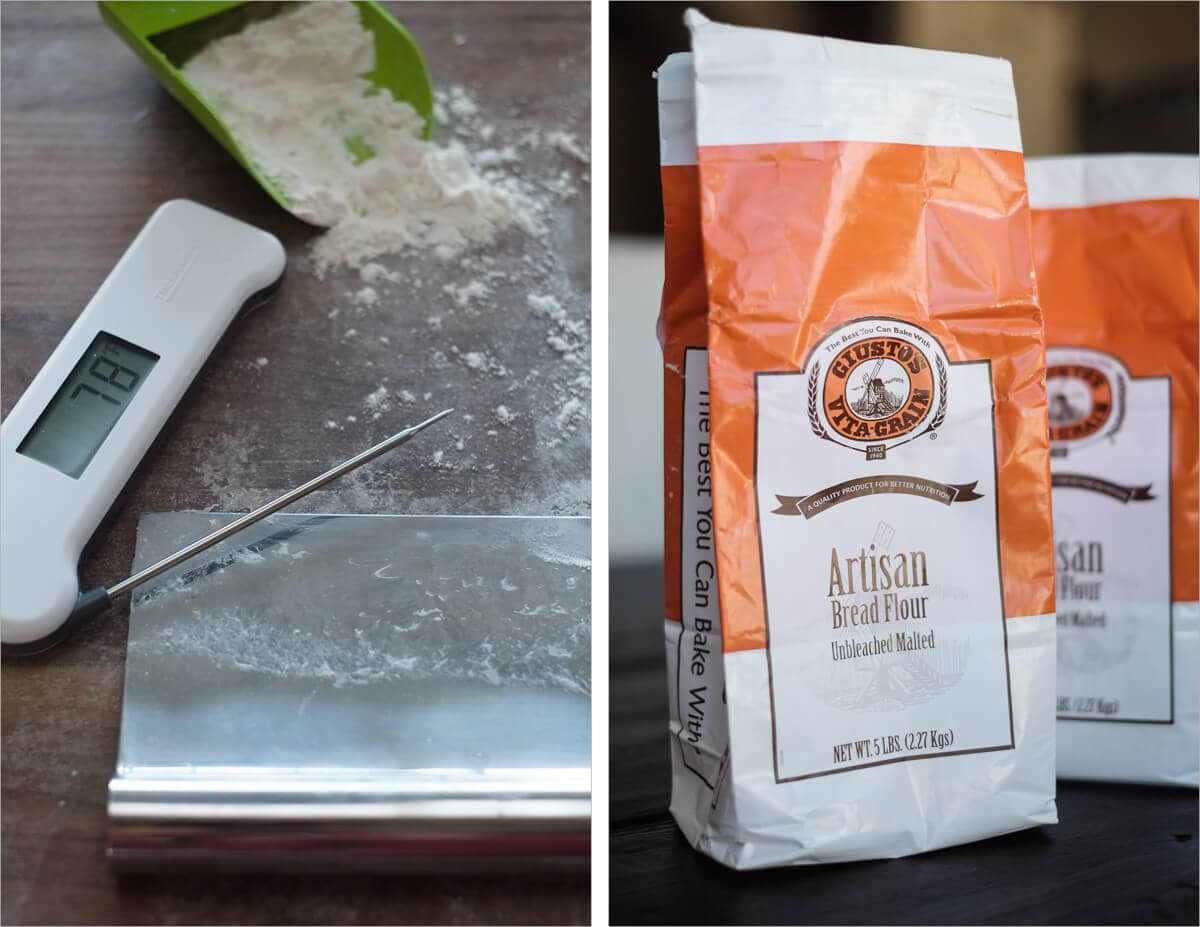
By the way, I just recently picked up a Thermapen after many days contemplating the purchase. Wow. I can’t believe I’ve been baking this long without this thing; it’s a real piece of equipment. No longer do I have to wait for the cheaper thermometer to settle down and finally arrive on a temp, this thing is instant!
Ingredients:
Gather the following:
| Weight | Ingredient | Baker’s Percentage |
|---|---|---|
| 100g | Giusto’s whole wheat flour | 10% |
| 900g | Giusto’s Artisan Bread Flour | 90% |
| 800g | Water | 80% |
| 20g | Fine sea salt | 2% |
| 150g | Ripe levain | 15% |
Perform the following for the autolyse:
- In a thick bowl add your 900g white bread flour and 100g whole wheat flour
- Add 700g of your water (the rest, 100g, is reserved until later when we add in the levain & salt after the autolyse)
- Mix these ingredients by hand until incorporated. Remember at this stage we are not looking for any gluten development really, make sure all the dry bits of flour are hydrated
- Cover with wrap and keep near your levain for 3 hours or so
Mix after your 3 hour autolyse – 12:30 p.m.
First, a little info on my new mixing experiment I alluded to earlier…
I mentioned, in the beginning, we were going to develop the dough a little bit farther at mix than usual. The goal is to develop the gluten in the dough early instead of later, just enough so it has enough strength to hold onto any gases produced during fermentation. Enough so that we only need two or three more normal sets of stretch and folds during bulk (instead of the typical 6). What does this mean for us and the dough? Well, this means we would leave our dough untouched in the bulk container for much longer near the end. My thoughts and the thoughts of many books & bakers out there is that if you’re looking for a more open crumb, you want to handle the dough even less towards the end of bulk.
After reading posts online, and discussions with a few other bakers out there, I’ve been experimenting with different mixing techniques. Lately, I’ve been successfully using the “slap and fold” method publicized by Richard Bertinet. This method is a great way to develop the gluten in your higher hydration dough. I’ve done it many times now, and it does take practice — at first, it’s tricky as the dough breaks apart, sticks to your hand, and generally acts like a savage animal. With each successive attempt, it gets easier and easier as your confidence builds. At every, well, slap and fold, the dough just starts to feel stronger and stronger, it begins to take on some cohesion and a subtle sheen on the outside. You need to work it until you get to this level, which for me was around 6 minutes in total.
If you’re not interested in trying a new mixing technique, you can do the same method as you would during stretch and folds at bulk time. Grab under the dough and fold it back over itself, then turn the bowl a bit and repeat. Keep doing this until the dough comes together and starts to feel a little bit stronger and a bit more sticky. You’ll notice how it starts to get a little harder to stretch out and fold over.

Now, let’s get started.
Add your 150g levain to the top of your dough and cut it in with your hand. It will kind of break apart but then come back together again after some mixing. Use a little of your 100g water reserve to get things going. Once this is mixed in, add your 20g salt on top and repeat. If it feels like your dough is super sloppy and breaking apart, don’t add the entire 100g reserve.
Now is the time to do your slap & fold (or your preferred mixing technique) to the point where the dough starts to show a bit of strength to it. Stay attentive and watch as you’re proceeding with the mix, the dough will change right in front of your eyes. After mixing the following were my measured temperatures:
| Final dough temperature: | 76°F (24°C) |
Bulk Fermentation – 12:40 p.m.
Transfer your dough to a clear container to be used during bulk fermentation and let rest for the first 30 minutes. After the first 30 minutes do a few sets of stretch and folds until the dough feels and looks strong enough. For me it was:
- 1:10 p.m. – Turn Set 1 (reach under with one hand and pull up and over to the other side, rotate your bowl and do this four times for a set)
- 1:40 p.m. – Turn Set 2
- 2:10 p.m. – Turn Set 3
At this point the dough started to hold its shape in my container— it was holding together a little bit in the center of the bowl, and you could see some defined lines and edges. It is possible one more set would have worked out just fine, but I decided to stop and let the dough rest untouched for the rest of the bulk step.
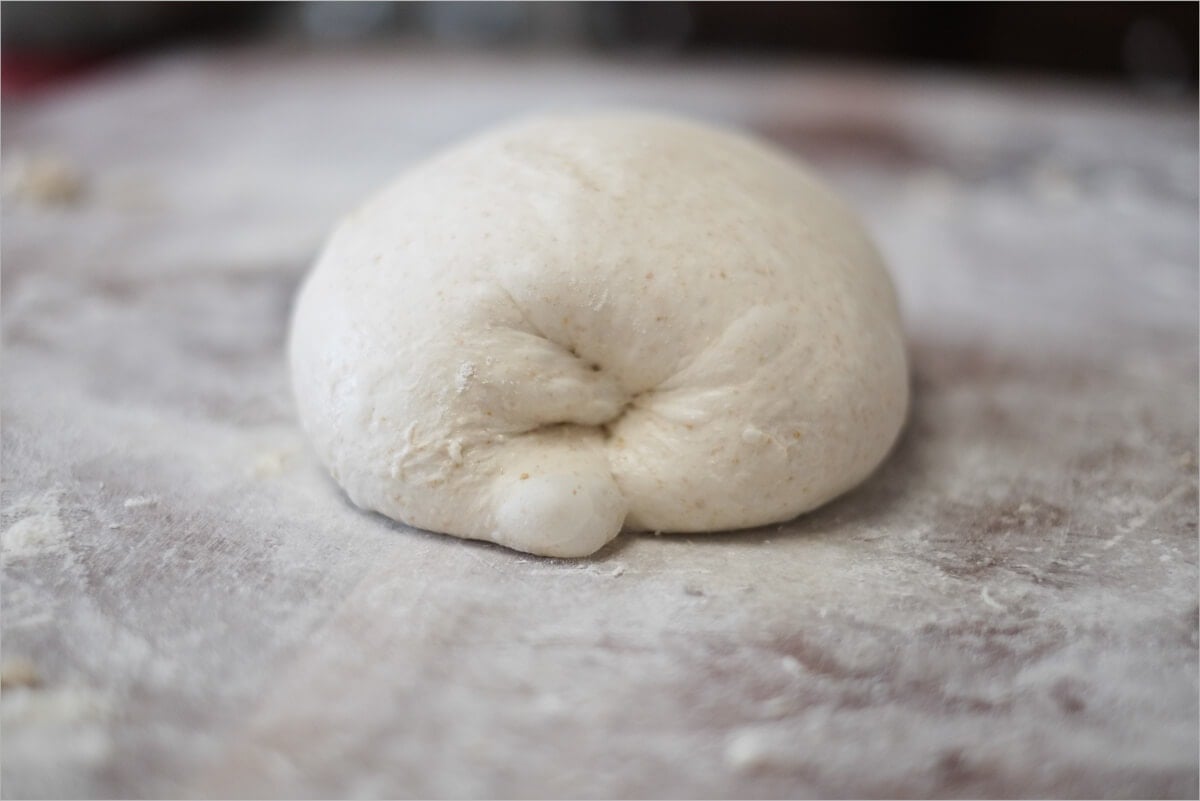
Pre-shape – 5:10 p.m.
Take the dough out of the container onto your work surface. Divide into two halves and lightly spin the dough in little circles across your work surface with your bench knife in one hand and your other empty hand—kind of like turning a car’s steering wheel. Let this pre-shape rest, covered with a damp towel or inverted bowl, for 20 minutes. My dough had a nice taut skin on the outside with bubbles just wanting to escape but couldn’t quite make it out of the gluten jail I’ve built for them. Sorry guys.
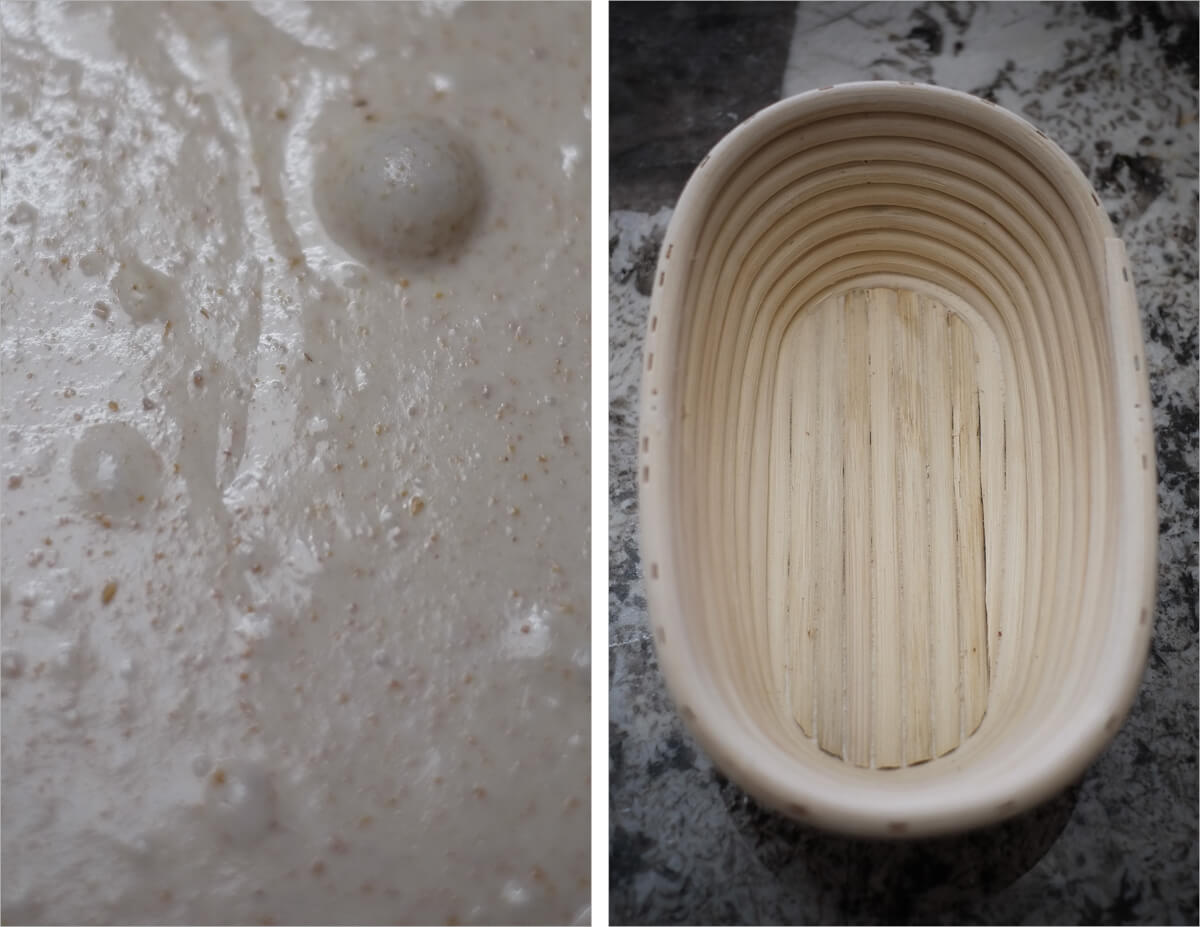
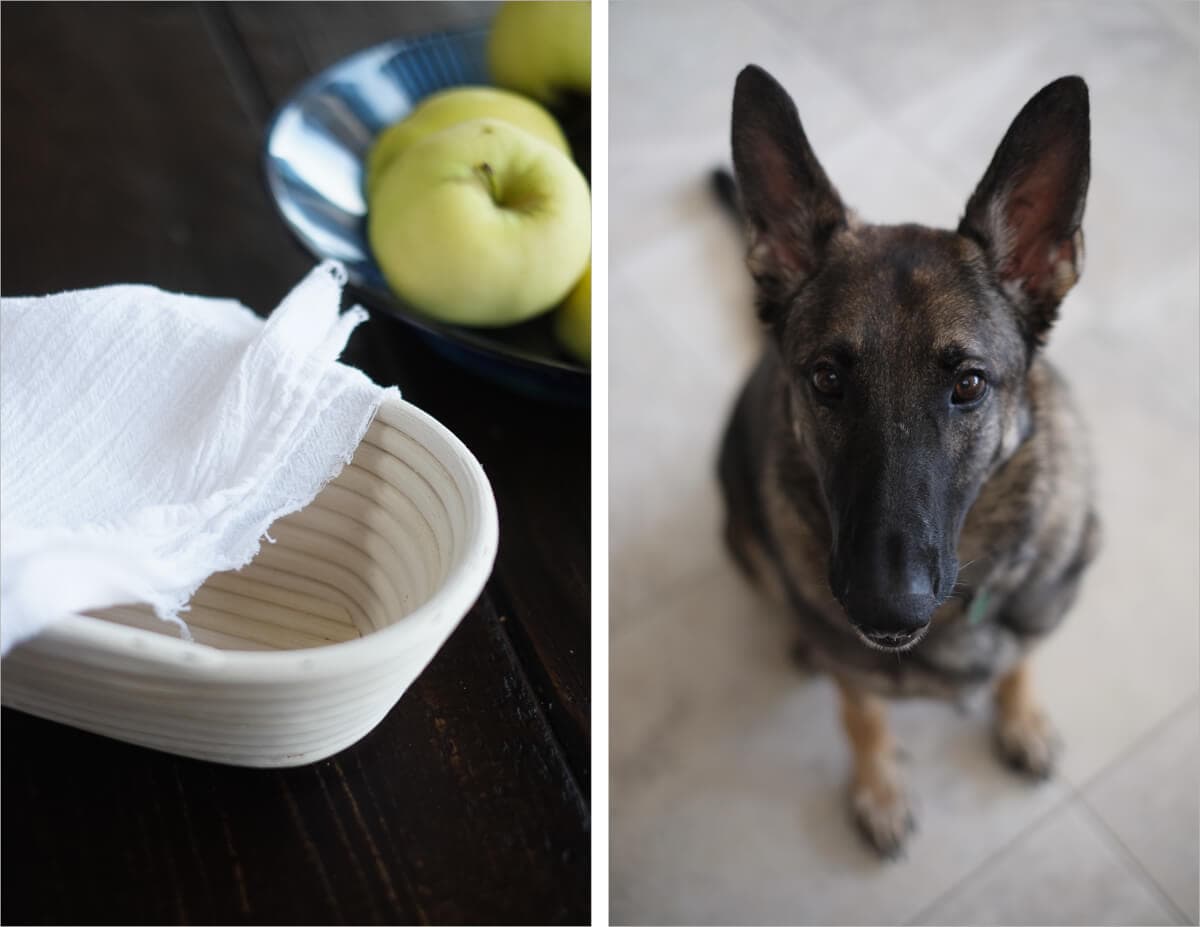
Lightly dust your proofing bannetons with white rice flour in preparation for the next step. If you don’t have bannetons, you can just use any small bowl around your kitchen.
Shape + Proof – 5:30pm
Shape each half of the dough as you’d like (I chose batards, I can’t get enough of that shape). You want a gentle and confident hand here to shape in as few touches as possible but still get that taut skin on the outside. I know that’s easier said than done, especially at this high of hydration. Practice!
After shaping, I let my two batards rest on the counter for 2 hours at room temperature (around 76°F/24°C, a little on the warm side even). Because we’ve reduced the amount of levain from the typical 20% to 15%, we give these a little extra time here to develop flavor, gas, and even some strength. More time is always a better thing when making bread. Don’t rush things but keep an eye on your dough, you don’t want it to go to full proof otherwise you won’t get any oven spring in the morning.
After about two hours on the counter, place your baskets in plastic bags and into the fridge to proof overnight, we will bake these in the morning.
Score + Bake – 8:30am
See my post on baking with a Dutch oven (or combo cooker) for a more in-depth discussion on the baking process below.
In the morning, preheat your oven to 450°F (232°C). I usually leave the shallow side facing up on the left, and the deeper side on the right facing down but I’m also left-handed.
After one hour, take one of your baskets out of the fridge and cut a piece of parchment paper to place on top. Take your peel and then put it on top of those two and quickly invert it, so the dough is now resting on the parchment paper and the peel. If, like me, the dough had risen over my small banneton and I couldn’t rest the pizza peel on top without squishing the dough. No worries just use your hands and quickly turn the banneton over and lightly drop your dough onto the peel. Don’t squish, compact, drop, smash, bite, lean on or punch down your dough.
Score the top of the loaf with your desired pattern. If you’re following my lead with the typical “crescent” slash, make sure it’s very horizontal to the dough, move quickly, and score rather deeply.
Take out the shallow side of your Dutch oven and drag in your dough. Quickly place the pan back in the oven, cover with the deep side, and bake for 20 minutes. After 20 minutes, open the oven and take off the deep lid of the Dutch oven (set it next to the other half inside the oven). Then, bake for an additional 35 minutes or so, until the bread is to your desired doneness.

When your finished, the loaf should almost float in your hands. It will be very light, airy, and with a crackling crust.
Conclusion
I’m impressed with this Giusto’s Artisan Bread flour. I have a few more millers (some with organic flour) I’m going to try here coming soon, just for comparison and experimentation, but this is my leading favorite.
“Don’t rush your bread,” I could hear Chad Robertson or Jeffrey Hamelman tell me right now. Well, I think their whispers are correct. A long autolyse, a healthy mix, a lengthy bulk with low levain, and a long overnight proof led to a great bake. And while I don’t think a lengthy autolyse is good for every bread and every style of baking, it sure worked with this loaf.
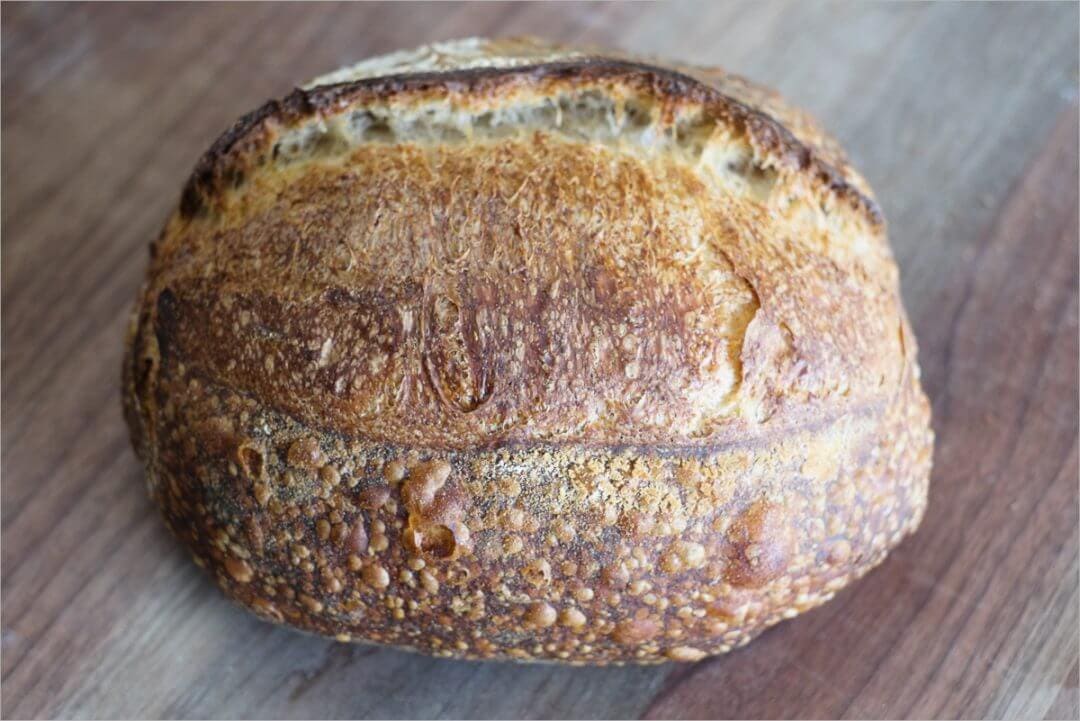
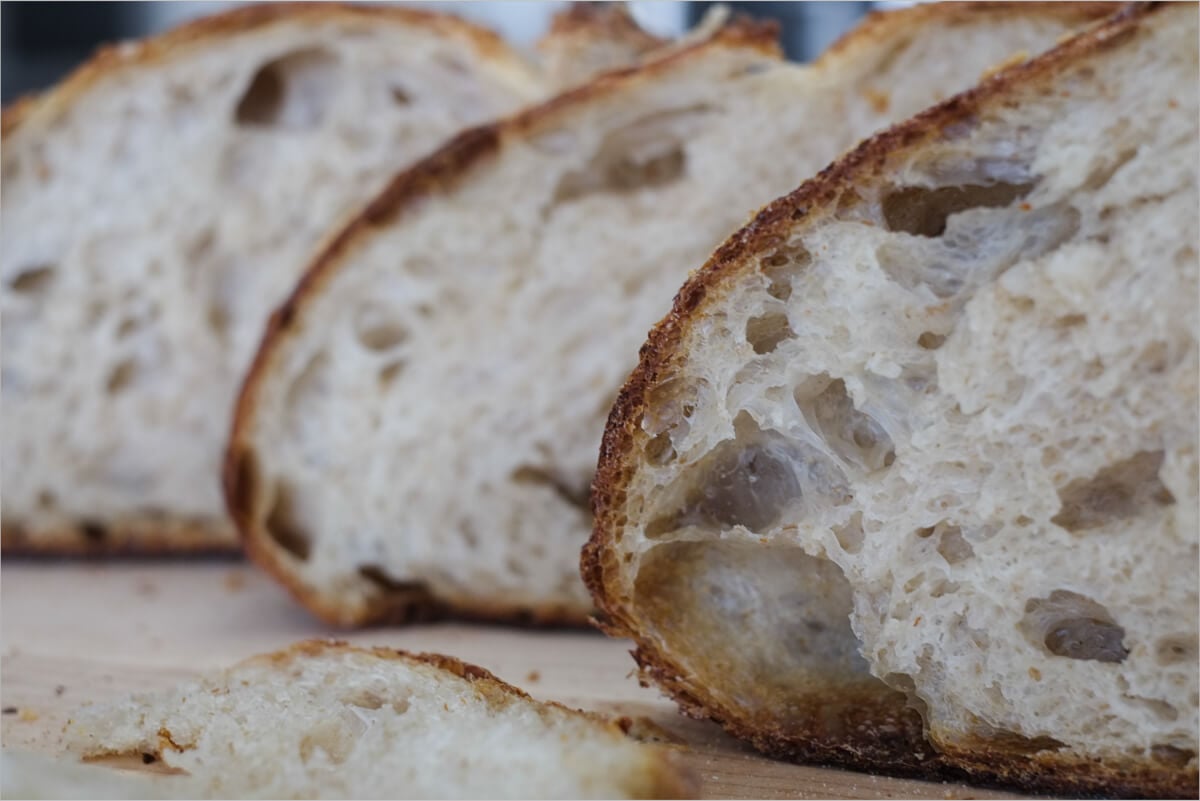
Crust
Thin, cracks abound, crunchy and yet somehow soft. The colors were eye-catching and ran the gamut from dark at the flat areas to super light in the fissures. The bottom of the loaf was cooked well, almost too well. It might do to turn the heat down just a tad near the end, for my oven at least.
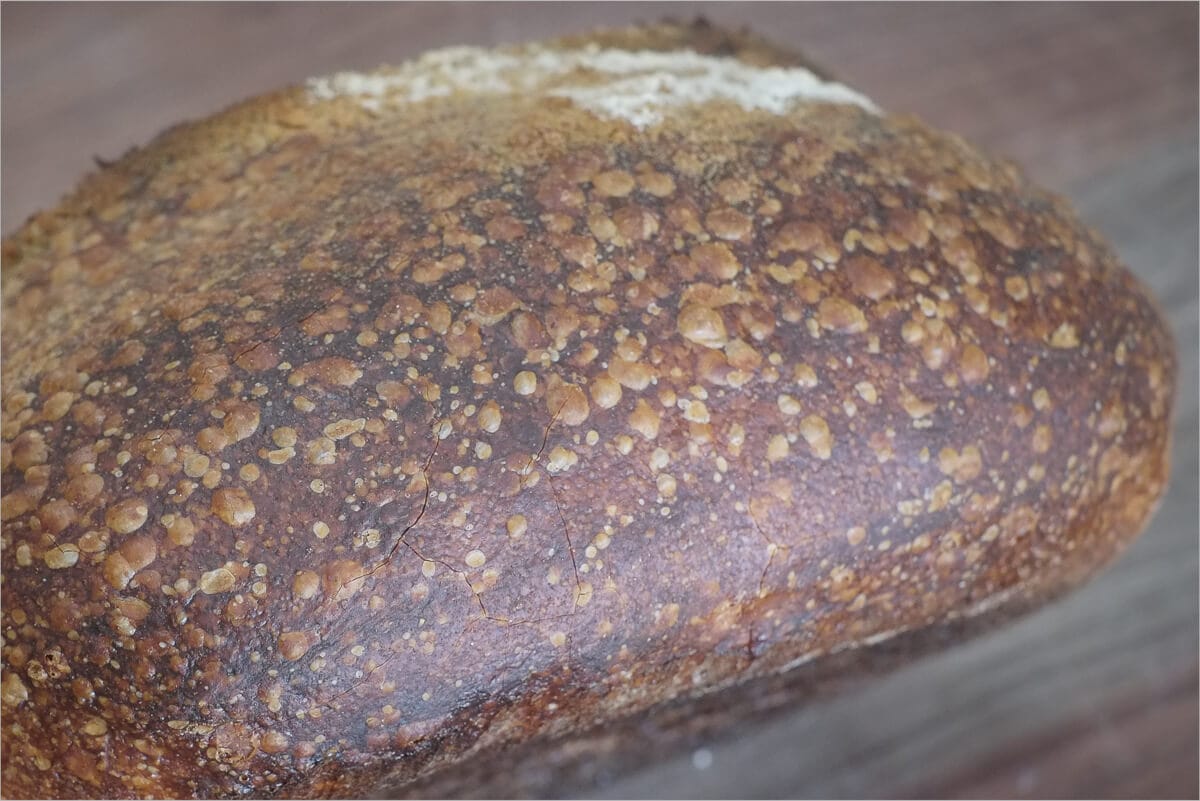
I took so many pictures of the final loaves that I couldn’t quite decide which were the best to post, and thus the abundance you see here. I can’t get over the look these–the colors, the detail–they have that texture that seems to defy my camera — almost too much detail going on.
Now that’s some movement, wouldn’t you say? Awesome! It almost looks like the surface of some unexplored distant planet.
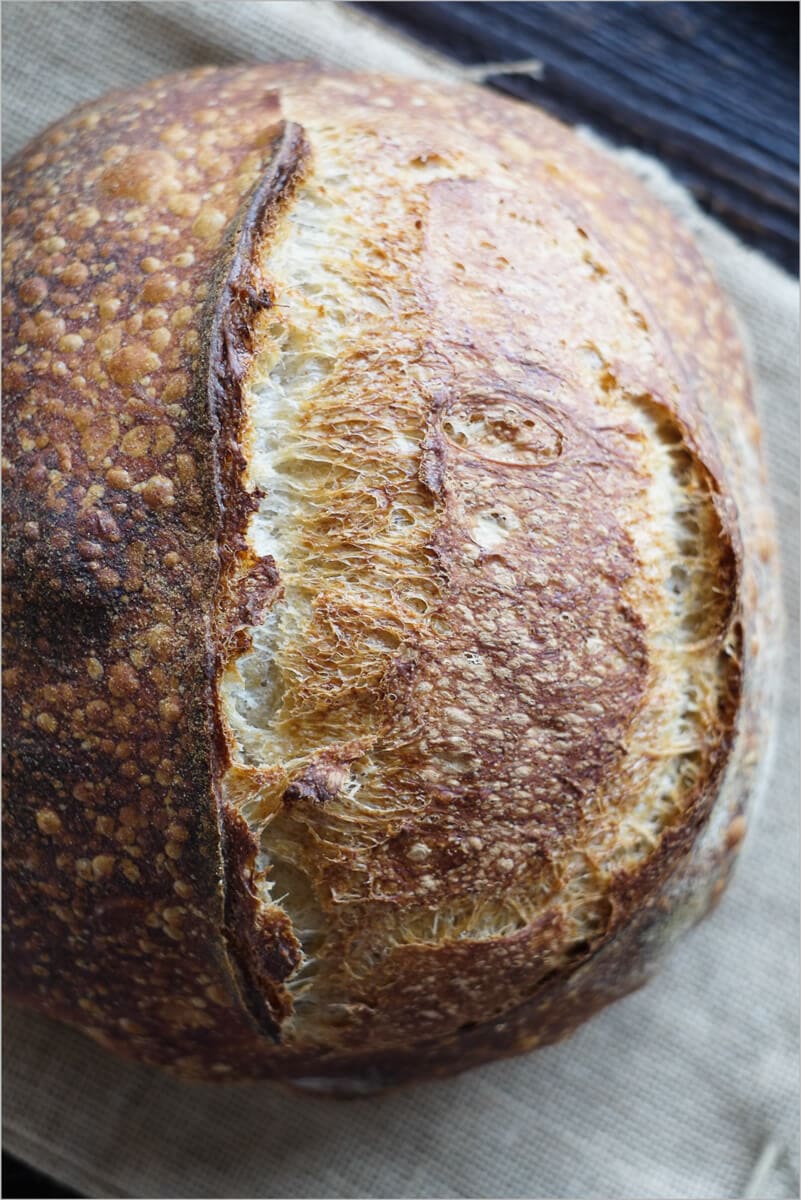
Crumb
Soft, light and open. Holes all over the place: some large, some small, but very scarce are the areas that were just dense dough. I could do with some more of the large variety, and I’m confident I’ll get more of those as I practice with this method. The reduced levain and longer duration without any interaction helped open things up and create a more airy crumb than I’ve previously been able to achieve. All while keeping the sourness to an absolute minimum.

Taste
The best tasting white country loaf I’ve ever made. No doubt about it. The reduced levain, increased autolyse time and high-quality flour have helped to make these loaves some of the greatest I’ve produced. There was the subtlest of sour flavor present, so subtle that my family asked if these were even sourdough loaves. I’ve mentioned it before, but this is how I like bread.
I don’t know how many loaves of bread I’ve tossed into, and pulled out of, my oven at this point but I can say to me this is great bread — what does great bread mean to you?
If you use this recipe, tag @maurizio on Instagram so I can take a look!


245 Comments
I’m about to embark on my first Tartine loaf after making a few okay loaves with various recipes. I’m curious whether it’s possible to half his or your modified Tartine recipe as I’d like to just make one loaf. I’ve been reading lots of books and blogs and read somewhere that simply doubling a recipe won’t always work so I was wondering whether you’ve tried making a smaller batch halving the ingredients and whether that works? Thanks for all the great recipes, I’m looking forward to trying them out!
Bec, you’re welcome I’m glad you’re here at my site! Yes, you can absolutely half this recipe (and all the ones here) with no problem whatsoever. Just do exactly that: take half of everything and you’ll end up making one loaf instead of two.
Let me know how it goes, happy baking!
It went pretty well actually! Well, except for the first attempt where the loaf was ready to shape and I had it in the oven as it’s very cold at the moment so I was trying to keep the dough at 25-27 degrees and I forgot that I turned the oven on and the dough started to cook… Ah dear, that’s what happens when you multitask and get distracted! At least loaf number two was a winner. Not as crisp as we would have liked but I think it just needed more time in the oven.
Sounds good to me! Things will just continue to get better and better each bake. And trust me, we all have either forgotten a loaf in the oven or heck, one time I accidentally turned the often off and thought “wow this sure is taking a long time to bake”!
You’re very welcome, glad it turned out so nice!
I have been loving your blog and recipes. This is what I’m making today (well primarily made today). I just finished the shaping and its resting before it goes in the fridge for the night. Can’t wait to bake it! Thank you for all your work and research!
Thanks so much, glad you’re liking the recipes. I’d love to hear how the loaf turns out, this is still my go-to process for making my “typical” sourdough, it yields such a great loaf of bread!
Happy baking!
Hi Maurizio:
Your site inspired me to bake bread. Never done it before. Everything turned out great on the first bake (chewy hard crust, pretty good holes) but the second loaf (which was slightly smaller due to me never having worked with dough before) had a dense kind of quality near the lower center portion. I baked it five minutes longer than the first as an experiment so just a bit confused why this would have happened?
Anyways I am hooked and going to try for some weekly bakes. In theory could you cut this recipe in half and just make one loaf?
cheers
SO glad to hear my site has inspired you! Baking naturally leavened sourdough doesn’t have to be as complicated as many think and it’s incredibly satisfying to make such good bread at home.
That “dense center” you describe is hard to eliminate, in my experience it’s caused by many factors and just not a single thing. Sufficient fermentation, gentle shaping, a full proof, and a proper score before baking will impact that area. Additionally, a very hot oven when baking helps your loaves spring higher and reduce that compacted area. As you continue to bake you’ll notice it will get smaller and smaller, or go away, as you get more confident and experienced.
Yes, you can safely cut everything in half here and bake only a single loaf at a time — makes for less bread and easier mixing!
Happy baking, Yamnuska!
Thanks. Just weird that the first baked loaf didn’t have that at all, and the second did (and was baked five minutes longer). My only guess is that I opened and closed the oven more during that bake to rap on the bread. Like I said I have never baked before and have heard you wanted a hollow sound. I ordered your reading list books and plan on studying once they arrive.
Thanks for the information. I am going to keep on trying. And thanks again for the excellent site.
cheers
Right on, have fun with those books they are really great. Keep me posted on your progress!
Great idea sticking to this recipe until you nail things down. Each chance I get I practice more, and more, and more with this recipe.
A) Yes, everything you posted in 1, 2 & 3 sounds good — whatever works for you there with flour and dusting is just fine. I just try to use as little as possible while still allowing me to work with the dough comfortably.
B) When he says “all purpose” he’s really indicating between 11-12.5% or so protein levels, which I totally agree with. Flour with these protein levels taste better (in my opinion) and produce excellent bread. So in short, way to go Ken!
C) Using a mixer is just fine, I have one in fact but just prefer to mix things by hand. Mixing to a “medium” gluten development is really the goal, just know that if you mix farther you can do fewer stretch and folds during bulk. It’s all moving towards the same goal: just enough gluten development to hold shape and trap gas, but not so much as to prevent the dough from expanding fully. This is something that comes with experience and I myself am constantly playing with this level 🙂
Glad the flavor turned out spot-on! Yes, it takes practice but it’s SO worth it. Thanks for the feedback!
Maurizio
Looks like you´re doing such a great community effort here, what a great job with all this info sharing and helpful discussions.
As with you, I am also a homebaker with no formal training and I´ve been striving for *consistency* for the past 5 years, trying to master every little piece of the process. I agree with you that´s the fun part, though sometimes frustrating (which makes it more rewarding!).
Your great posts raised my attention towards my bulk fermentation and from there to many other things! I also like the concept of a lower levain percentage. I tried that last time and it looked like I´ve rushed things a bit. 3 hours of bulk in total (75°F) and some little bubbles showing up, 15 hours of cold proofing. Ended up with decreased volume. Looked like “extensibility” issue as well, dough appeared to be too strong/tight to expand (I´ve noticed that during shaping). Looking forward extended autolyse and more hydration next time, but I am first worried about my starter maturity as, apparently, more bulk or proofing time was not going to help much. It seems to me that lower levain innoculations also help not to misguide whether my wild yeasts are in full potential or not. My previous formulas used up to 25% of levain, and I used to feed my starter by just doubling up its current amount of fermented flour, which is too low compared to the feedings I´ve seen lately. My refrigerated proofing shows very low rising (maybe 10%) in the fridge under ~40°F. Hammelman says at these temps a 16 hour proof would suffice. The thing is, I never feel the “poke test” right on a cold dough, so I rely on my eyes and it doesn´t look proofed enough, it´s almost as small as when I´ve put it in the fridge. I always end up sending to the oven and hoping for the almighty oven spring. Sorry for all this “intro”, but that helps with my questions below…
Do you keep your starter in the fridge? If so, how many times do you feed it after taking it out? And whats the ratio of stiff starter used in each refreshment? Looks like 20%? I understand it should rise and fall predictably. On a hypothetical example under about 75°F, do you have any guesses of how much time would it take for a refreshed starter (lets say 300g 50% whole-wheat, 50% hydration) to peak on a mature-readytouse-level? And regarding your “2 hours room temp proof” before going to the fridge… how much rise do you usually get in this phase?
Last, how do you store your starter in the fridge? If so, is it right after feeding it, so it lasts for longer? Or wait for some fermentation activity at room temp and refrigerate it in a more “alive” state?
Man I´m sorry for writing too much. Take your time please, I will surely appreciate any commments.
Happy baking!
Claudio
Claudio,
You’re welcome, I’m glad you’re finding my posts helpful! Consistency is key with baking, and it takes a lot of practice to be able to adapt to the ever changing environment to create a consistent result. But yes, fun & frustrating 🙂
You are correct to not believe the poke test when from the fridge. I used to use this test quite a bit but after trials, and just thinking logically about it, the poke test can product incorrect results when doing cold proofs overnight. Think about this: when the dough is resting in the fridge for 14-20 hours of course the dough is going to tighten up and spring back slowly! So I’ve stopped using the poke test to determine when the dough has finished proofing and instead rely on my intuition on how much levain the formula calls for, how much whole grain flour is used, and how long/hard the bulk was.
I hardly, if ever, keep my starter in the fridge. Since I bake so often I feed it at least once a day, every day. I only resort to the fridge if I am going to be on travel and cannot attend to my starter for a few days or a week+. If I end up refrigerating my liquid starter it usually takes a day or two for mine to get back up to full potential with reduced acid load. My recent switch to a “stiff” starter might show different results, but I can’t speak to that yet as I have not refrigerated it. I expect it will need less time to get up to speed (for many reasons).
My “new” stiff starter, given the temperatures right now in my kitchen (70F), I feed 30g starter, 80g ww flour, 49g water. This can last 24 hours before needing refreshment, but if I’m baking I’ll feed once in the morning and once in the evening before bed. It’s very difficult for me to answer your hypothetical question above. You can definitely answer this yourself if you just look at your starter and read the signs for when it needs refreshment. If it’s a stiff starter you will no longer see a “dome” on top, it will be flat (or even sunken down). For a liquid starter it will have started to fall in the container.
For my 2 hours room temp before proof, I’ll typically get 10% rise or so, depending on many factors. I adjust this time based on how long/hard the bulk was and the current temp in my kitchen. I’ve been experimenting with this time some so I’ve been changing it quite a bit…
If I am going to stop my starter in the fridge I will wait about 30 minutes after feeding before placing in the fridge. This is to let your starter get going just a bit before slowing down.
I hope those answers help, let me know if you have any other questions!
Hello Maurizio
Thank you so much for your answers. They all served as good guidance/parameters for me. That really helped.
My latest experience was to bake bread with a new starter, so I´ve raised one from scratch. After about 5 days of feeding it looked in good shape. Just by the smell of it, I was feeling very optimistic. That fruity aroma was almost absent in my old starter, even after many feedings outside the fridge. The afterwards acidity is also lighter and there is some real yeasty smell on it, reminds a bit like “fresh” beer. Anyway, apart from smell, I could not see other differences to my old starter, which was bulk fermenting my doughs decently (but poor oven spring). But I am sure that from a microbial standpoint, I have a pretty different set of bacteria and yeast on my old refrigerated starter.
The new starter produced an incredible loaf. Great shiny/bubbly crust and better oven spring. The distribuition of alveoles throughout the crumb evidenced a nice fermentation. And I used the same formula and procedures I´ve been using and trying to correct/adjust so much before realizing that the main problem was with the levain. Actually, at this time I´ve felt like my shaping was worst than ever. As you and Chad/Tartine pointed out, managing fermentation is the thing!
My next test is to refrigerate the new starter and attempt similar results later on. I am going to reduce the amount of days on the fridge and try to pinpoint a maximum interval of refrigeration without loosing much of its original characteristics. I believe that lactobacillus sanfranciscensis does not survive, so ideally I´d rather be feeding everyday but unfortunatelly I can´t. But now I know that sometimes we can just raise a new starter, that´s for sure easier than “repairing” an old one with many feedings, which I tried before and now I have the feeling I was just reawakening and promoting the “inferior” (at least for breads) microflora that was established on the old refrigerated starter.
I hope to have brought some interesting facts here for future reference, might be useful for home bakers troubleshooting.
Thanks again for everything.
Cheers from Brazil!
Cláudio
Claudio,
Not a problem, I’m glad my comments helped out. It sounds like you are onto something there with your new starter. You’re right, sometimes it’s easier to just start a new starter than spend the time reviving an old one. I do have my original starter, still going strong, since I started baking many years ago but I’ve created new ones along the way from time-to-time with great results.
Refrigeration can be a tricky thing… You don’t want to leave it too long as acidity levels can get quite high. I think you’re on the right track though, you need to find the right ratio of flour/water/starter so it will last by the time your next feeding (or usage) out of the fridge. We do the same thing when it’s on the counter, right?
I look forward to hearing from you again — sounds like you’re making some great bread down there in Brazil!
Ciao,
Maurizio
Don’t feel inadequate, we are all learning here trust me! Glad the recipe worked out so well for you. Let me answer each in turn:
1. For each turn set, you definitely don’t want to tear, rip or break the dough when lifting and stretching. Grab it with one or two hands gently (kind of like when people make that talking gesture with their hands, a pincer if you will) pull up and over. Stretch it up just until you start to feel resistance but don’t tear it.
2. I use flour on my bench when preshaping, but just enough to keep the dough from sticking. I lightly dust my work surface and my hands.
3. For the final shape there are many, many ways to do it. If you are shaping a boule lightly dust the bench and the top of your pre-shaped round, then flip it over so the floured top is resting on the counter. Then fold it up like a letter: take the top and stretch it away a bit and fold it back down over to about 2/3 the height. Do this similarly for the right side, left side and then finally the bottom. When you do the bottom fold all the way up and over the top so now what was on the bottom is now on top. You can then gently spin the dough to create a bit more tension and finalize the boule shape. I really need to post a video of this 🙂
You’re very welcome, I’m glad I could help in any way possible! And yes, I need to put up videos, I hope to do that soon. I’m getting a camera that will let me do so!
Cheers and can’t wait to hear how things continue to go for you — happy baking!
Thanks for the quick reply! Yes I would call the crumb chewy, and after some more reading on your site, it appears I might not be getting a full 30-40% bulk rise and is likely contributing to the crumb being a little dense, moist, and chewy. I’m going to pay attention this weekend and make sure I’m getting a full 30-40% bulk rise before shaping. Since my beggining in November, my house has been a little cold (usually 68-69), and I didn’t really give that much consideration as I was getting SOME rising and bubbles during the bulk, I now see that that would have been helpful info to give you. I will make sure to wait till 30-40%.
I’m able to get to about 56 minutes total cook time before the crust starts to get really dark, but I always check the internal temp and it’s usually right at 210 when I pull, so I doubt that’s the problem.
I know changing multiple things at once isn’t really a good thing, But I feel these might all have positive inpact:
1) Reduce levain from 30% to 15%
2) Mix Dough with 85 degree water instead of 75 degree
3) increase Autolyse from 1hr to 3hrs
4) Slap and Fold instead of just mixing enough to incorporate
5) Check to insure 30%-40% bulk rise
6) Keep hydration at 75% to at least keep one thing constant
Thanks for all your help! I’ll report back after the next bake!
Cheers!
Jerad
Attaining a full bulk is very important, as you mentioned. You really want that dough to be expanded, airy (kind of jiggly), and have some strength to it. A good starting point is like you said, 30-40%. 68ºF is chilly! That will definitely slow things down quite a bit. Typically, assuming your starter is strong and healthy, it will take your dough about 4 hours to complete bulk at 78-80ºF.
If the internal temp of your bread is 210ºF then you’re right, it’s baked out properly.
Keep in mind if you reduce your levain by 50% to 15% your bulk will take longer (assuming temps are the same), however, if you do increase your water temp by 10º that might offset it. Take temperature of your dough after you mix that water, you want it to be around 78ºF (that’s “optimal”) for this bread. If it’s a bit lower you can use a little warmer water next time.
Everything else sounds spot-on! Let me know how it goes — happy baking!
Hello Maurizo,
I’m really glad I found your site, as I’m pretty sure you’ve touched on a few things that will help my bread. I started baking bread about 4 months ago after being gifted a copy of Tarine Bread, from my wife. Along with the guidance from another very helpful blog “Girl Meet’s Rye” formerly “the Tartine Bread Experiment”. I’ve turned out about 20 loaves since the beginning, and while they are improving, I’m still not entirely content with how overly moist the crumb is, though the crust is nice and crisp. The strange thing is, the crumb LOOKS really nice, some big holes and some small, but it is just a bit too moist.
After reading this post, I think a large part of it could be due to the fact that I’m not working the dough enough in the beggining. All I really do is mix it together loosely to incorporate (KABF and BRMWW), allow a 1hr autolyse, add the salt, and then begin the 7 folds over 4hrs. For final ferment, I’m doing a 2hr room temp, followed by 8-12hrs in the fridge, as my fridge is too cold at 38F. At this point, my 1K loaves are only filling the round Boule banneton about 75-80% of the way by the time I pull them out of the fridge to bake. I’m not sure if that is normal….
Anyway, I’m looking forward to doing another loaf this weekend, employing the new slap and fold method, along with a 3 hour autolyse. Now that I think of it, maybe I should reduce my levain amount too….I’m currently using 30%. I’m hoping that these changes will result in a stronger dough, that will have better rising possibilities and a less moist crumb. Does it sound to you like these changes might target the problem I’m having?
As for my starter, It seems great! it rises very predictably, and I feed it every 12hrs with BRM dark rye flour as reccomended by the Girl Meets Rye blog.
Cheers,
Jerad
Girl Meets Rye is a great blog! I started reading Francis’ posts a long, long time ago when it was named The Tartine Bread Experiment — she’s a great writer and cook!
If you’re crumb is too moist (would you say “chewy”? That can be a sign of under baking) try baking them a little bit longer each time. If you find they are burning, turn the temperature down 5-10ºF and see if you can extend the bake. It could be that you’re not fully cooking out all the water from the dough. You could also try reducing hydration 5-10% next bake.
The rest of the details in your question look really spot-on. If you’re getting a nice and open crumb, the taste is great (albeit a bit moist), and the loaves are rising well then I’d say you’re doing very well and wouldn’t worry too much about the amount they fill the bannetons.
It sounds like you’re starter is strong and working well, no need to change anything there.
Good luck, let me know how this next bake turns out!
Ok….I think I am OVER THE MOON as I’m typing….I’m so Haaaaaaapppppy it’s unreal (for a loaf of bread – crazy!!!). But first, let me tell you, I have ventured on this bread for over 14 months and I am not lying. I’d started the journey several weeks before Thanksgiving of last year and if I have to give you a rough estimate of how many loaves that came out miserably during these 14 months, I would say probably at least 27 loaves…
Your blog, your help, your encouragement has ALL made this possible for me, for sure. I don’t know if there’s a way for me to post a few images of my fresh baked loaves for you to see, but this is a GIANT success for a person like me. I’ve tried MANY suggestions, searched high and low for solutions, tips, etc. I was still baking the most miserable loaves of bread you’ll probably see around. I basically cried, and my husband gave up trying to “encourage” me because he saw how miserable I felt after each loaf…
A HUGE Thank You to you, Maurizo! Please accept my sincere gratitude from a stranger in cyberspace, but you just do not know how happy you’ve made me feel! THANK YOU, THANK YOU, THANK YOU!
I’ll have to post later of what I did to fix it, but I followed your advice and did 2 things: fixed my levain, testing it to make sure it floated, and adjust my fridge’s temperature. And oh, there were several more minor things I adjusted after re-reading your many posts. I’m running out to the door, but want to send this to you right away…..I’m in heaven! It’s going to be a Much better year for me trying to learn how to get better at baking bread! I still need to improve on many things, but this is Such a GREAT start!
Sorry for all the caps….Truly I am happy and Thanks So Much!!!
AWESOME! I’m really glad to hear my suggestions helped, that’s why I started this site 🙂 Trust me, I know just how frustrating it can be to get good loaves out of that oven! Once a few things “click” with baking sourdough bread you’re off to a good start and it sounds like you’re right there. Once you make good loaves you’ll never have to buy “plastic” bread from the store again.
I’m really happy for ya — I can’t wait to hear more on how things progress. Happy baking, Adelina!
Hi, Maurizio –
So I want to quickly tell you what had helped me with my bread, and ALL of the below are key points you had mentioned in your posts:
Longer Autolyse
Work the dough really well in the beginning, then be gentle with it after the 2nd S&F of bulk fermentation, and shaping the loaves
I also added the 4th S&F as I felt that my dough wasn’t “there” yet
Check the levain to make sure it is ready, and not rely on how many hours it fermented
Reduce the starter amount. I, too, enjoy a loaf with just a right amount of sourness
Then the many other things you mentioned in your post about watching the dough, feeling it, touching it, etc. I think details are key to know
The 2-hours room temperature resting period prior to putting it in the fridge
Fridge’s temperature
So those are the things I have changed to get better loaves of bread, and Thank You So Much!
I’m not saying my loaves are great, but I now understand things a little better!
And yes….I’m waiting patiently for my levain to “age” properly and will bake more loaves soon!
Have a great weekend!
Adelina
Adelina-
Sounds like you’re starting to build up that intuitive sense for your dough and how it’s progressing! That’s great news. Baking requires sensory attentiveness, just like you commented, you want to watch for strength, smell the dough, observe fermentation and how it’s progressing — great job!
You’re on your way now, let me know how it goes after a little while and if you have any more questions!
Hi, Maurizo-
Honestly, I didn’t think you had time to answer my post/ individual questions, so I’m overly excited to hear from you! I’m attempting to answer your questions below:
1. The first thing I want to ask you is whether your starter shows vigorous activity: does it rise and fall in a predictable manner? Adelina: yes, I think my start did show activity with bubbles, rise and fall and I tried to feed my starter at least 3 times prior to using it. Meaning, I would feed it twice/ day at least 2 days prior to using it to make the levain.
Also, when preparing your 7.5 hour levain, does it look and smell like it’s ready to be used in the morning (small bubbles on top, it has risen and smells slightly like ripe fruit)? Adelina: Yes, my levain did have a strong “vinegar” smell to it and I “pulled” the skin layer of it (just like you did, as shown from one of the images you posted here).
Have you tried performing a “float test” with your levain to make sure it is strong enough? Adelina: No, I didn’t do the float test, and I’ll be honest with you, for some unfortunate reasons, my levain has never passed the “float test”.
2. Performing another final shape to give the dough more strength should be fine here. Adelina: ok, I’ll keep this in mind.
3. Before your shaping and proofing in the fridge, did you notice at least a 30% rise in the dough during its bulk fermentation phase? Adelina: This is where I started seeing the issue. My dough didn’t rise much during its bulk fermentation. If I have to give you a rough estimate, it might give me about 10-15% rise. I had my home’s temperature around 74-75F the day I baked.
You should see bubbles along the outside, that 30% rise, and other signs like a stronger dough in the container (it will hold its shape more with clear defined edges). Adelina: While I did the S&F, I saw maybe 2 bubbles and nothing more… I think my dough could have been stronger in the container, but it did hold its shape.
4. Taking your loaf out before baking is fine but I do find it easier to score cold dough. Did you cover your proofing baskets with plastic wrap while in the fridge overnight? Adelina: Yes, I covered the dough with plastic wrap, then tied the bowl with another grocery plastic bag. Do you think my fridge’s temperature is too cold, at 34F? I’m thinking maybe I should adjust it to 41F.
Tonight, I’m going to prepare the levain, and give this another try. I’ll post my updates and adjust a few things you mentioned.
Thank you!
Adelina,
Of course, no problem! Thanks for the clear replies, I’ll try to expand on them below:
1. You mention your levain has a strong vinegar smell but does not pass the float test. Would you mind trying an experiment? Try making your levain like you would the night before, but instead do it early in the morning. After about 4 hours try taking a small amount of it and drop it into a glass with lukewarm water to see if it floats. If not, try again in 2 hours. When you take a pice of levain out try not to smash or mangle it too much, just take a spoon and scoop a little bit. My thought is that your levain might be fermenting too fast and after 7.5 hours it’s past due.
3. A bulk rise of ~30-40% is a general rule, and to be honest isn’t really that great of an indicator but it’s a good start for people just starting out. You really want to try to get it to this point. You might need to let your bulk go longer than 4-5 hours until you reach that amount of rise. At those temperatures 6 hours would not be uncommon for me. Again though, it might lead all the way back to the fact that your starter is not floating, we want to fix #1 first! You definitely want to see some bubbles on the outside (when you look through your clear bulk container). This lets you know a) your dough is strong enough to hold gasses, and b) fermentation is happening.
4. Yes, 34ºF is too cold, optimal temps would be around 40-42ºF. If you don’t want to adjust your fridge (careful, you might spoil food in there!) leave your dough out on the counter at room temp for about 2 hours before placing into the fridge to let proofing proceed faster. This is what I do in the winter.
Let me know how it goes!
Hi, Maurizio –
I’ve been in love with your post and given the extra days off, I wanted to experiment this recipe that’s called for long autolyse. I used KA’s whole wheat and bread flour and all the measurements were followed exactly per instructions. Prior to placing the loaf into the pre-heated oven, I noticed that it did not rise at all. This isn’t my first time attempting to bake a country loaf, but honestly, I have not had much successes. There were a few things I did differently: 1/ I let the levain ripe for 7.5 hours, and this was done by accident. 2/ After the final shaping, I quickly shaped the loaves again as after 2 hours of resting on the counter, they started to relax almost to a flat shape, but the shape was still there. I thought about not touching it as instructed, but then I was tempted so I quickly re-shaped the loaves by cupping them on my hand and turned them around, trying to get a tighter loaf. 3/ The loaves were rested in the fridge, set at 34F from 11 p.m. until 8:30 a.m. I pre-heated the oven to 500F, and upon checking on the loaves, I noticed they did not rise at all. So then I decided: 4/ to take the loaf out from the fridge and let it sit on the counter while the oven was pre-heating for one hour. I also noticed that scoring was difficult to make a clean cut – the loaf had a “leathery” outer shell. 5/ Based on my prior experiments, I’ve also decided to bake the loaf at 450F for the first 30 minutes. For some reasons, if I bake the loaf at 500F, I think the heat sealed the loaf too quickly and I always get a very, very thick crust and the texture is gummy.
The loaf did not rise well – very, very minimal oven spring.
I’m not an experienced baker in any way, but my main problem always seem to come down to: 1/ poor oven spring, 2/ loaves that rest in fridge always stay the same – they do not rise at all, 3/ very thick/ dark crust, and too “leathery” to take a bite into.
I’m hoping you can give me some feedback’s!
Thank you!
Adelina, thanks for the comments on my post!
1. The first thing I want to ask you is whether your starter shows vigorous activity: does it rise and fall in a predictable manner? Also, when preparing your 7.5 hour levain, does it look and smell like it’s ready to be used in the morning (small bubbles on top, it has risen and smells slightly like ripe fruit)? Have you tried performing a “float test” with your levain to make sure it is strong enough?
2. Performing another final shape to give the dough more strength should be fine here.
3. Before your shaping and proofing in the fridge, did you notice at least a 30% rise in the dough during its bulk fermentation phase? You should see bubbles along the outside, that 30% rise, and other signs like a stronger dough in the container (it will hold its shape more with clear defined edges).
4. Taking your loaf out before baking is fine but I do find it easier to score cold dough. Did you cover your proofing baskets with plastic wrap while in the fridge overnight? This will prevent that thick leathery crust from forming.
My main concern here is fermentation, it sounds to me like your starter might need a bit more strength to get that dough to rise. If your dough doesn’t seem to rise at all during your proof try leaving them out, after final shaping and in their baskets covered in plastic, for an hour before placing into the fridge.
I hope that helps, let me know how it goes!
I wish there was a lot more sourdough flavor, but it is a wonderful bread! I also love you choice in dog breeds:o) I have two of them.
Mary, you can adjust the amount of sourness in the bread by either adding more leaven to your mix or using your leaven a little later after preparing it. Additionally, you could let your dough ferment longer in the fridge or leave it out on the counter a bit before putting it in for the night. The more your dough ferments the more sourness your starter will produce!
German Shepherds are incredible dogs, aren’t they!? That said, they are a TON of work, but in a good way 🙂
Thanks! The German Shepherds -yep a ton of work, but having two actually reduces the work – they work energy off with each other:o)
That’s exactly what I’ve heard and we’ve been thinking of getting another one. Sometime soon I hope, she’s starting to get in good shape and it just means more running for me 🙂
What happens here is they run each other ragged – awesome and less work for me! I’m not sure what i would do without them, but i sure could do without all the shedding.
Well…I tried this recipe and learned a bunch in the process. The loaves did not turn out well, but I know why. Two key things hurt me:
1) House was quite cold
2) I was pressed for time
When things slow down in a cold house the last thing you need is to be rushed. Oh well. Still fun to experiment.
Observations:
1) I gave the young levain 6 hours, but it probably needed 8. I knew it wasn’t ready, but had to move the process along. Cold house and only semi-active starter were working against me. Both are fixable.
2) Bertinet’s slap and fold method is easy and fun (have been doing this for years). But I blew it with my 4 stretch and folds. I tend to REALLY stretch (think pizza dough gravity stretches), and this likely breaks gluten strands along the way. Again, fixable with a more gentle approach.
3) Had to rush the bulk ferment. In a cold house (65 degrees) this won’t work. I put the bagged loaves in the fridge after a couple hours in the bannetons, but they were too dense. They didn’t feel lively enough. Fixable.
4) Approx 20-30% rise overnight, but should’ve left on counter to rise more before baking. Fixable.
End result – beautiful looking loaves (nice blisters; nice color; nice ears), but way too dense and gummy inside. My crumb was crummy.
Next time I try this, I will do it right. Starter will be active. Will use proper flour (only had AP on hand this time). Will allow for more time in a cold house (maybe proof in oven with light on). Will use lighter touch with stretch & folds.
But there is one part I am unsure how to fix. My bottoms are hard and overcooked. Always. Cooking in La Cloche placed on a stone in the bottom part of oven.
Regardless, thank you for giving me fun chemistry experiments to try.
Ah yes, those are two things that will kill it: time and temperature… two of the most important ingredients for your bread.
Your approach for the next attempt is right on, you have an intuitive sense for that needs fixing. I highly recommend the oven with the light on, that’s what I’m currently doing as my house is around 68ºF consistently, at that temp it will take forever to get things going (unless you mix with warmer water).
Does heat come from the bottom in your oven? Perhaps you could try raising up a notch in there? Or, maybe a baking stone to regulate temperature a bit? Sometimes this will happen to me as well, and it is frustrating. What I’ll do sometimes is take the shallow part of my Dutch oven and put it inside the deep side to help insulate and regulate the temperature a bit.
You’re welcome, thanks for the feedback! Let me know how it goes, good luck 🙂
Curious why you don’t bag your proofing loaves for that two hour rest prior to refrigeration. I live at altitude and my loaves tend to dry out when airing on the counter. I rest AND refrigerate in a big ziploc that fits over my bannetons.
TR,
Exactly, I do! Once I finish shaping the dough and they are in their bannetons I place them each into large plastic bags closed with a rubber band. Otherwise, like you mentioned, they will dry out rather quickly.
Maurizo, I just gave this a shot – but I’m working from no prior successes. You write inspiring stuff, so I just went ahead and tried (starting with your starter, logically). When you do the slap and fold, do you use a floured surface? I followed everything carefully, but had to auto-lyse for 4 hours because of errands. After mixing in the levian, the dough was still sloppy wet. I didn’t even add the 100g water. I tried to slap and fold but I was working with the Blob! Thanks for including the video, I checked it out 2-3 times and enjoyed the Frenchman’s voice soothing me while I wrestled the blob. I ended up having to add 125g more flour (in 50g increments) to get the thing to hold together after about 15-20 minutes of slap-fold-sweating. It’s proofing now, so I’ll follow up, but I was curious if you have an idea what may have gone crazy with my glutinous alchemy.
David, it’s best to just dive right in 🙂
No to the floured work surface question, the stretch and fold is performed on a dry work surface. Yes, it gets very sticky, and yes, very messy. It will eventually come together though, with some practice. You should know that the video shows his video probably around 70% hydration, which is much lower than where I currently am. At higher hydrations I think the stretch and fold method really starts to get challenging, and depending on how high you go it might not even be possible.
Next time I suggest you try your mixing in the bowl if your dough is wet like you describe. Just make sure you mix the dough sufficiently and it starts to get a bit smooth, you’ll notice a little strength developing and the dough will change from when you start mixing.
What type of flour are you using? Are you using something with decent protein levels (like bread flour)? If you have access, I’d suggest starting out with something like King Arthur Bread Flour, it has high protein levels and you’ll notice that dough strengthen up right away.
Additionally, perhaps if things are still super slack and the Blob returns despite all the above, reduce your autolyse time to 40 minutes or so, this will reduce the slackness in the dough. It’s a good starting point.
Let me know how it works out! Sometimes alchemists struggle to coerce that gold out of simple ingredients 🙂
Round two! \ringsbell I’m using Hovis super strong premium bread flour, it’s what I have reliable access to in London. I will reduce my autolyse time today, and replace my spring-loaded kitchen scale with a proper digital scale. Changing two things at once, never a good idea, but if one of them works I’ll just stick with both. Thanks for responding, and I’ll keep reading, slapping, and folding.
Get in that ring and wrestle that dough into submission! I think those changes you are making are fine, and the flour sounds like a good choice. Remember to add water in slowly in increments to avoid having a sloppy mess.
Keep me posted & good luck!
Hi David-
I’m also in London and have struggled to make these loaves – with the dough always being way too sloppy and sticky. But – I made one change that fixed everything, and that is that I stopped using British flours. I bought Canadian & Very Strong Bread Flour from Waitrose, and it made a dough that could be manipulated without sticking, and even the tensioning rolls were easy. What I found out after doing quite a bit more research is that US flours are generally drier that UK flours (by about 2% by weight) for climactic reasons, and if you use UK flour with a recipe that is designed for US flour, it will be too wet. Try this flour (Waitrose or Ocado), follow Maurizio’s recipes, and I think things will be better for you. Let me now what happens.
You’re very welcome! I’ll sometimes do an extended autolyse like that as well, it seems the more time you give your bread the better the result 🙂
Happy baking & thanks for the comments!
I’ve done a longer autolyse for my whole wheat dough (sometimes up to overnight) and have tried a few times with white, but I do want to revisit this. You’re right, the longer I autolyse the more extensibility the dough gains, which is great for that nice rise. When I do these longer autolyse I never add levain/salt, that would be a very long kickstart to fermentation.
After you perform your 8 hour autolyse, do you do any extra strengthening (slap & fold, kneading, etc.) after your mix?
Thanks for the suggestion!
My next bake I’m going to try for 50%, will let you know how it goes. 200% seems way too much!
Got to be that sugar in there! I’ll have to look up the recipe and give these a shot.
That’s EXACTLY what I’ve seen when doing slap & fold: the dough comes together, strengthens, and then falls apart — almost in this continuous cycle. What I’ve done is what you mentioned, I S&F until it comes together, rest, do it again, rest, and so on for 3-6 mins or so.
I’ve seen those pictures you posted and yes, it seems like way too much of a rise overnight for a normal home fridge. I have a feeling, since he’s in SF, he just leaves them out overnight where it’s probably around 40ºF. My fridge at home is around 35ºF and that’s just too cold to get much action. It will rise, for sure, but not like he talks about and shows in his images. That’s why I’ve been leaving mine out a little bit before popping into the fridge at night.
I’m going to continue with the slap & fold and see where it takes me, I have a few more things to try for the next writeup 🙂
Cheers!
Not a bad idea at all, almost a half & half approach. It’s getting cooler here now too, I might have to start incorporating the levain earlier…
I go for between 40-50% as well. 200% seems crazy to me, don’t you think? I would think by that point there would be very little happening at final rise and shaping might be a little more challenging.
It’s probably worth a try though, his bread does look great (tastes great too, I’ve had it). Let me know how it goes, if it works out for you I’ll have to give it a shot soon 🙂
The crust was incredible! I too love those blisters, you have to be careful when taking it out of the oven because they just crackle and snap at the slightest pressure — just awesome.
That sounds like an excellent technique. How long do you typically autolyse for and how long do you do this mixing? When I first tried slap & fold I think I mixed for too long as the dough started to almost come apart (it was, however, only really like 8 minutes). I was confused by this and have since stopped short of that point. If you watch videos out there you’ll see their dough does eventually strengthen up and become very smooth.
The happy mistakes are where I’ve learned the most!
trying your method now… i also read and reread hammelman, forkish, etc and glean something new all the time. I have been using 1000g flour, about 800g water and 400g 100%hydration starter so this is very different.. excited!
Wow that’s a lot of levain! I’m eager to hear how it turns out, good luck!
OK Bread out of oven and cooled! I baked about 10 minutes less than you, bread was 210 degrees on the inside and looked quite dark. The crust was super crackly, with blisters etc. The crumb looks alot like yours..but not quite as big holes. I suspect my final shaping is still a bit too rough in the way I handle the dough…. Delish, non the less. The 400g of starter I was refering to is my normal recipe and it comes out great… very similar, but less time in the bulk ferment.
Excellent! Sounds like you got that good crust goin’ on also — gotta love that. I did find I could have baked a little less this go around.
Time for some eggs and toast 🙂 Enjoy!
Thank you!
Also, what were the things you changed with each of the 8 loaves, & why?
Do you think this is a do-able bread for an average baker?
With each successive loaf I kept trying to increase strength up front. I first started just mixing longer with my usual “pincer method” (as described by Forkish) and then eventually settled on the slap & fold. I think the S&F method really helps build strength rather quickly. It’s kind of like kneading but not really (I’m not sure you could do a traditional knead on high hydration dough like this).
I also started out with 12% levain and then worked up to 15%, which I think is a good amount for my starter. By the end of bulk I get some nice vigorous fermentation going and by morning my dough had risen quite a bit in the basket.
Yes I think this is do-able for any baker! If you don’t want to try the slap & fold you can just try to strengthen things at the beginning using any mixing technique. Or you could even just increase the number of stretch and folds you do at the beginning of bulk during the 1st, 2nd, and 3rd turns. I think the real key here is to try to touch the dough as little as possible towards the end of bulk (preferably not touching at all).
Fantastic, as usual. What were the thoughts of going to a 90% levain? Do you think this flour is more thirsty? I think the CM is. Interesting adding the counter bulk time. 16-18 hours looks like the right amount. Thanks for the hat tip:)
Was this your bake with your brother?
You mean 15% levain? I’ve read many places where bakers say, including that quote from JH I wrote up there, lower levain not only increases taste, but also helps open up your crumb. My thought is that it reduces the speed at which fermentation happens (naturally) which means you can spend more time letting your dough rest during bulk & proof. This should increase flavor and strength slowly.
This wasn’t with my brother, he wasn’t yet here. Sadly he didn’t have enough time to stay yesterday during my entire bake but we got some pointers in!
Another great write up. I love a bold crust as well. Thanks for the post!
Bake dark — the only way! Thanks, I appreciate that.