
I’ve baked this loaf, or some variant of it, so many times I’ve lost count. This bread was born when I first got my hands dirty with flour and water. Its parent—if you could call it that—was originally Chad Robertson’s Tartine loaf with his liquid levain, brought to life, not with intensive kneading, but rather a series of folds during bulk fermentation.
My best sourdough recipe has grown since then. It has developed a personality of its own as I’ve expanded my baking repertoire and investigated the many facets of baking naturally leavened sourdough. It’s taken on and lost traits from many great bakers out there, borrowing from their inspiration and giving me a direction to raise this bread into something of my own. This bread is one that doesn’t entirely taste like anything else I’ve had, and yet, still employs many of the same processes and ingredients.
That’s one of the greatest things about bread: it can taste and look dramatically different just by changing the two hands that create it. Calling this post “my best sourdough recipe” is a lofty claim, but honestly, I do believe this is the best bread I’ve made thus far.
I sometimes revisit a discussion I had with a few readers of this site and their comments: “bread is just bread, it’s something to be eaten and is something life-giving, isn’t that enough?” I agree, but when something becomes a passion for you it’s important to set lofty goals and get excited when breakthroughs are made. Isn’t that the definition of a craft and the relentless honing required?
I’ve taken my best sourdough recipe from its most nascent form to its current stage and can trace through the years each change to its formula or process — and I’m sure I’ll be changing things well into the future as it continues to evolve — a work-in-progress.
Yes it’s excessive in some way, but there’s an excessiveness to ambition as well.
John Mayer
Maybe the actual recipe for this bread isn’t the most important part, but rather, the lessons and insights learned along the way as I continually hone my baking proficiency. I’m not claiming this recipe will yield the perfect loaf every single time, but I dare say it comes the closest for me—and that’s exciting.
This bread is the bread that I want to make the most often, the one my family asks for the most often, and the one I share most often. I have a special place for whole wheat bread, and taste-wise, it might make me want to call that my favorite one day, but the versatility of this bread is pretty hard to beat. In fact, I bake this so often that my freezer has an entire shelf lined with pre-sliced loaves wrapped and in bags labeled pane perfetto.
While the actual formula for my best sourdough recipe is simply a mix of flour, water, salt, and levain, there are many nuances here to pay close attention to; here are a few key things to successfully making this bread:
- An active starter
- An autolyse
- A high hydration
- Sufficient dough strength
- A warm and complete bulk fermentation
- A long, cold proof

Before writing this post, I pulled out my trusty notebook (or use my free baker’s note sheet!) and paged through the handwritten (and flour-ridden) pages to find any scribbled “ah-ha” moments or little notes jotted down in the margin, along with a few curse words peppered throughout, and have bundled them up into this entry (sans curse words to keep it clean). A compendium of sorts containing my insights, breakthroughs, and ah-ha moments.
My best sourdough recipe doesn’t require an exotic blend of hard-to-find flour, a complicated multi-step levain build, or the use of a mechanical mixer. It’s built around making this bread in your home kitchen.
My best sourdough recipe is very highly hydrated and can be challenging. When mixing, be watchful for the signs and adjust the dough hydration to suit your environment and flour. If you’re not used to working with high-hydration dough, please start with hydration somewhere in the middle and slowly work up.
Flour Selection
I’ve tried a lot of flour out there (and am an avid user of freshly milled flour), indeed not everything there is, but I’ve ordered enough now that the UPS guy thinks I might have a bakery in my backyard. I have baked some great bread with Hayden Flour Mills, Central Milling, and Giusto’s. I’ve also had great success with King Arthur Baking high-protein white flour.
I have consistently made incredible loaves with Giusto’s flour; I only wish it were organic. Nevertheless, I find myself ordering a box of it here and there and enjoying the results every time. Of course, as I mentioned before, try whatever is local first (sadly, my source for local, organic flour is no longer available) and whatever you like.
When trying new flour, remember to hold back more water than you might otherwise, and then slowly add it in at the end of mixing or throughout bulk fermentation. Now, on to my best sourdough recipe.
Watch Me Make This From Start To Finish
I absolutely love this bread and make it often, but it can be challenging for first-time bakers. Be sure to watch my YouTube video below for a look at how I handle the dough and every step of the process.
If you’re brand new to baking sourdough, check out my Beginner’s Sourdough Bread recipe; it has in-depth information on every step in the baking process. Then come back and bake this!
My Best Sourdough Recipe
Vitals
| Total Dough Weight | 1,800 grams |
| Pre-fermented Flour | 6.4% |
| Levain percentage in final dough | 17.1% |
| Hydration | 85.0% |
| Yield | Two 900g loaves |
Total Formula
The target final dough temperature (FDT) is 78°F (25°C). This dough loves a warm ambient environment. Try to keep the dough at the listed temperatures if possible; use your oven with its light on inside, your microwave with a bowl of steaming water, or a proofer. I use my instant-read thermometer to check the dough temperature periodically throughout bulk.
For more information on how to calculate DDT, monitor temperature, and maintain temperature have a look at my post on The Importance of Dough Temperature in Baking.
| Weight | Ingredient | Baker’s Percentage |
|---|---|---|
| 852g | Medium-protein bread flour (~11.5% protein, Giusto’s Artisan Bread Flour) | 90.00% |
| 94g | Whole wheat flour (Giusto’s Organic Stoneground Whole Wheat) | 10.00% |
| 710g | Water 1 | 75.00% |
| 95g | Water 2 | 10.00% |
| 17g | Salt | 1.80% |
| 30g | Ripe sourdough starter (100% hydration) | 3.20% |
As I mentioned above, my best sourdough recipe is an extremely high hydration. If this is your first time working with this recipe, reduce the total water or hold water back during mixing to ensure your dough can handle the addition. The amount of water your dough will handle will vary based on your particular flour and environment—play it safe the first few bakes and work the water up gradually once you get a feel for the dough.
My Best Sourdough Recipe Method
1. Levain – 9:00 a.m.
Build the liquid levain in the morning and store somewhere warm around 77-80°F (25-26°C) ambient for 5 hours.
| Weight | Ingredient | Baker’s Percentage |
|---|---|---|
| 30g | Ripe sourdough starter (100% hydration) | 50% |
| 30g | Medium-protein bread flour (~11.5% protein, Giusto’s Artisan Bread Flour) | 50% |
| 30g | Whole wheat flour (Giusto’s Organic Stoneground Whole Wheat) | 50% |
| 60g | Water | 100% |

If you haven’t yet read through my post on my sourdough starter maintenance routine, check it out for some helpful hints on what to look for when your sourdough starter and levain are ripe and ready to use.
2. Autolyse – 12:00 p.m.
This highly hydrated dough can be mixed by hand or with a mechanical mixer (like a home spiral mixer). Either one will yield great results, but here, I’ll discuss mixing this dough by hand.
Mix the flour and water in a bowl until all the dry bits are incorporated, then cover. Ensure all the dry flour is hydrated—store near levain (we want the dough’s temperature to remain warm).
| Weight | Ingredient |
|---|---|
| 822g | Medium-protein bread flour |
| 64g | Whole wheat flour |
| 650g | Water 1 |
3. Mix – 2:00 p.m.
| Weight | Ingredient |
|---|---|
| 95g | Water 2 |
| 17g | Fine sea salt |
| 151g | Ripe liquid levain (see above) |
Add the ingredients to your dough in the mixing bowl that underwent an autolyse. Add the water slowly, in stages, while you’re mixing, and stop adding water if the dough feels excessively wet or soupy at any point.
Perform folds for about 2-3 minutes in the bowl. Grab under one side, pull up and over to the other side, then rotate the bowl a bit and repeat. I do this probably 30 times or so (it goes fast and easy). In the end, the dough should still be shaggy, but it will be more smooth and will start to hold itself together more in the bowl.
If you’re a fan of the slap & fold mixing technique I’ve described in the past, you can do this but be aware that it is difficult at this hydration. It’s best to first slap and fold the dough without adding all the reserved water to get the dough smooth and strong. Then, return the dough to the mixing bowl and slowly add the remaining water while folding the dough.
I find that the correct level of dough strength at this point is important. You want the dough to be smooth, elastic, and strong, but it doesn’t have to be fully developed, and it will still be shaggy. We will continue to strengthen the dough through stretch and folds in bulk fermentation.
Transfer dough to a tub or thick-walled bowl for bulk fermentation.
5. Bulk Fermentation – 2:15 p.m. to 6:15 p.m.
At 78°F (25°C) ambient temperature, bulk fermentation should go for about 4 hours. Perform six sets of stretch and folds during the bulk. The first three are at 15-minute intervals, and the last three are at 30-minute intervals. After these folds (2 hours and 15 minutes have gone by), let the dough rest for the remainder of bulk fermentation.
I stretch and fold more vigorously at the beginning of bulk than usual since it is extraordinarily slack and extensible (due to this recipe’s high hydration and autolyse). Pick up one side of the dough with both hands and pull it up, just before tearing, and fold it over to the other side. Rotate your container and repeat 4 or 5 times. That is one set.
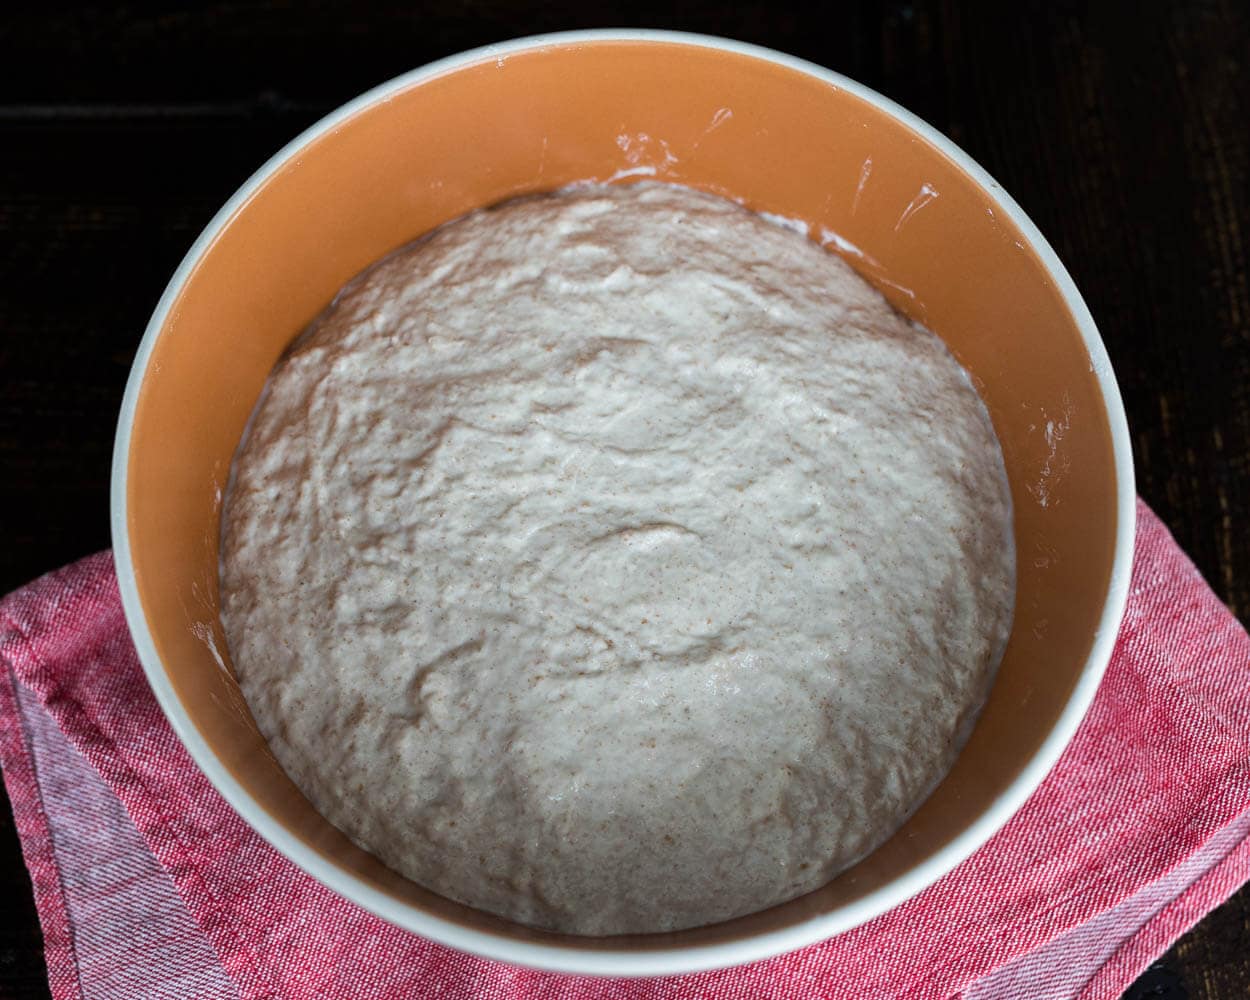
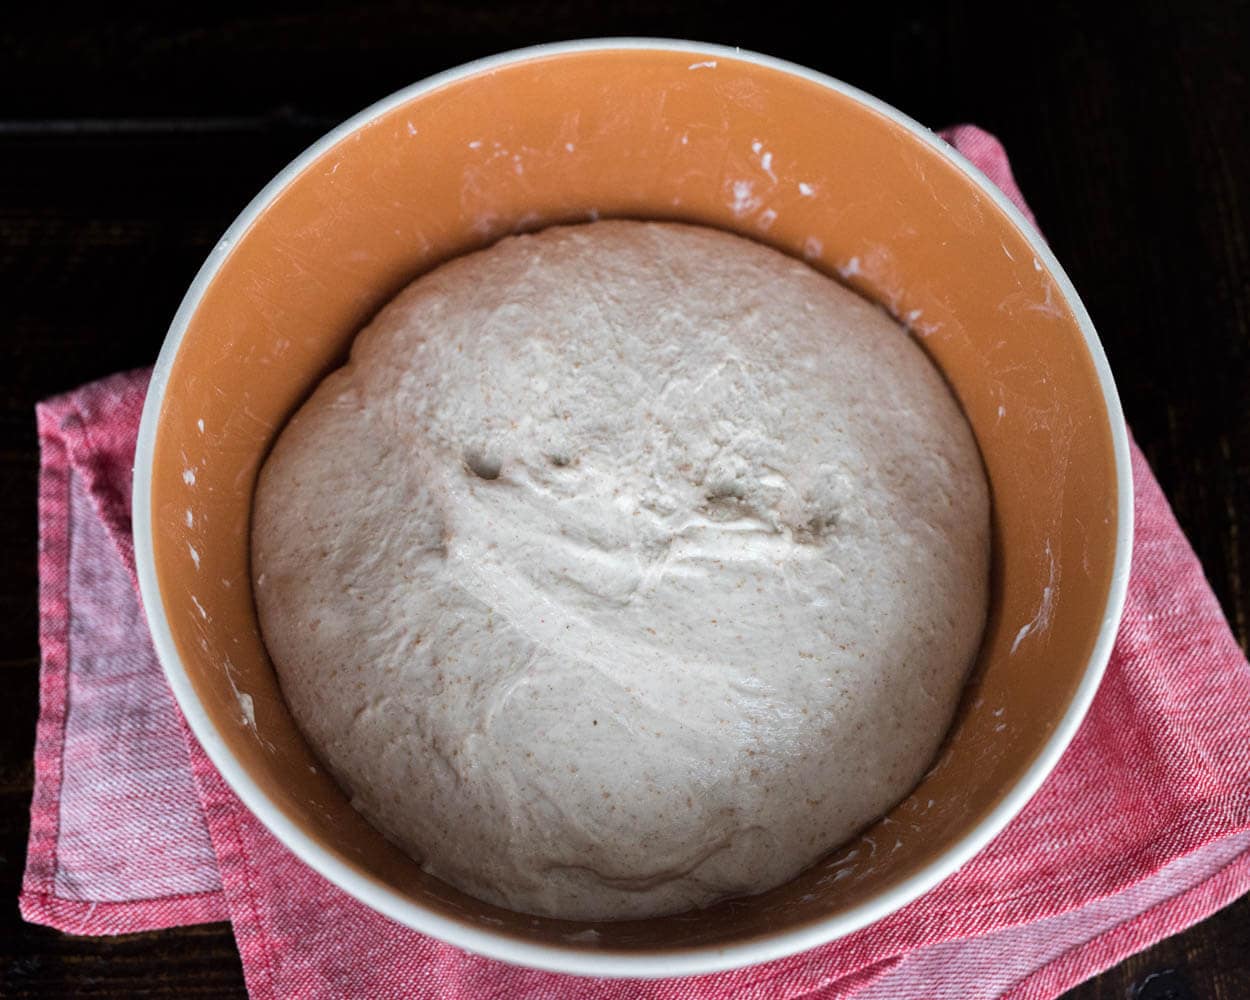
Above, you can see my best sourdough recipe dough halfway through bulk, after about 2 hours. There is no significant rise as of yet, but the edges are beginning to dome downward, and the dough’s texture is smoothing out slightly. We still have several more folds to do and more strength to build.
It is essential that the dough is kept near 78°F (25°C) as much as possible (minor fluctuations up and down are ok). If temperatures dip down too far, you might have to extend the bulk fermentation duration to compensate, and vice versa. Use your judgment, the signs described below, and be flexible.
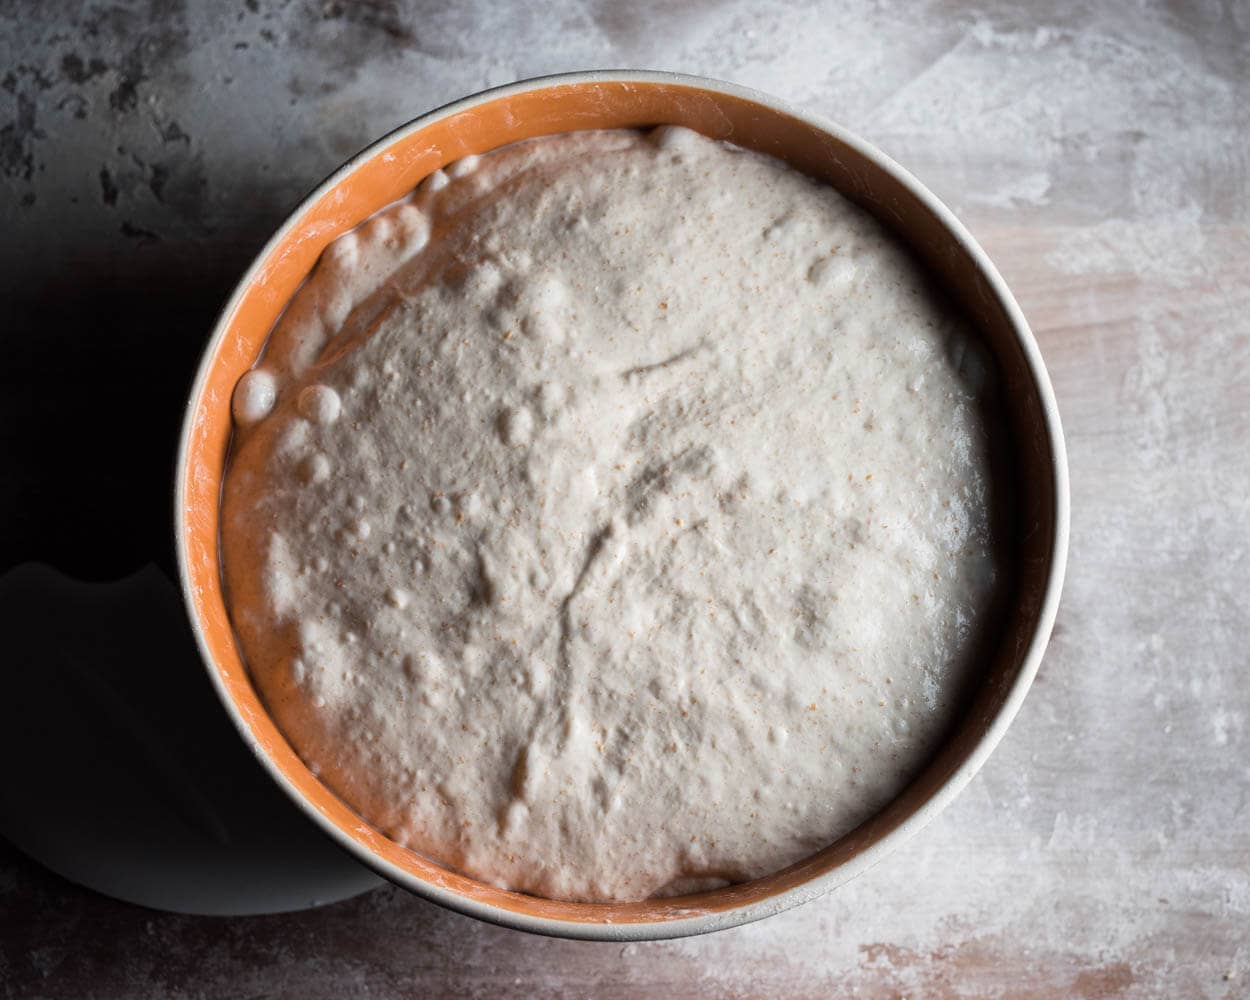
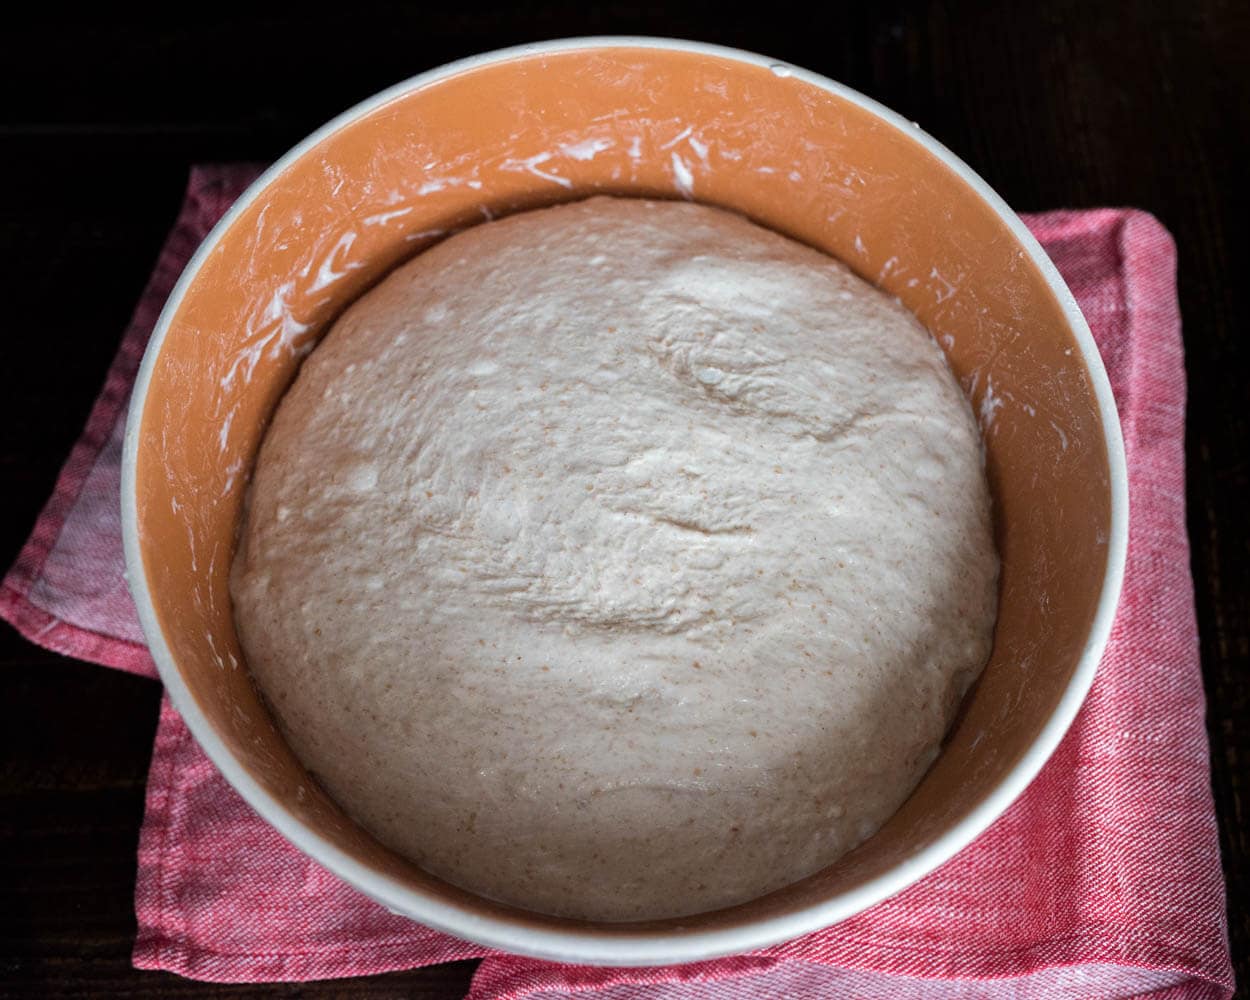
At the end of bulk, your dough should look very gassy, with some bubbles here and there, and the edges where the dough meets the bowl should be slightly domed. You can see all these signs in the image above.
When you gently shake the bowl, the entire mass jiggles from side to side—very alive. You’ll also notice that compared with the photo at the beginning of bulk, the dough is smoother and holds its edges, folds, and creases more readily (most of the bumps and ridges you see are due to trapped gasses from fermentation).
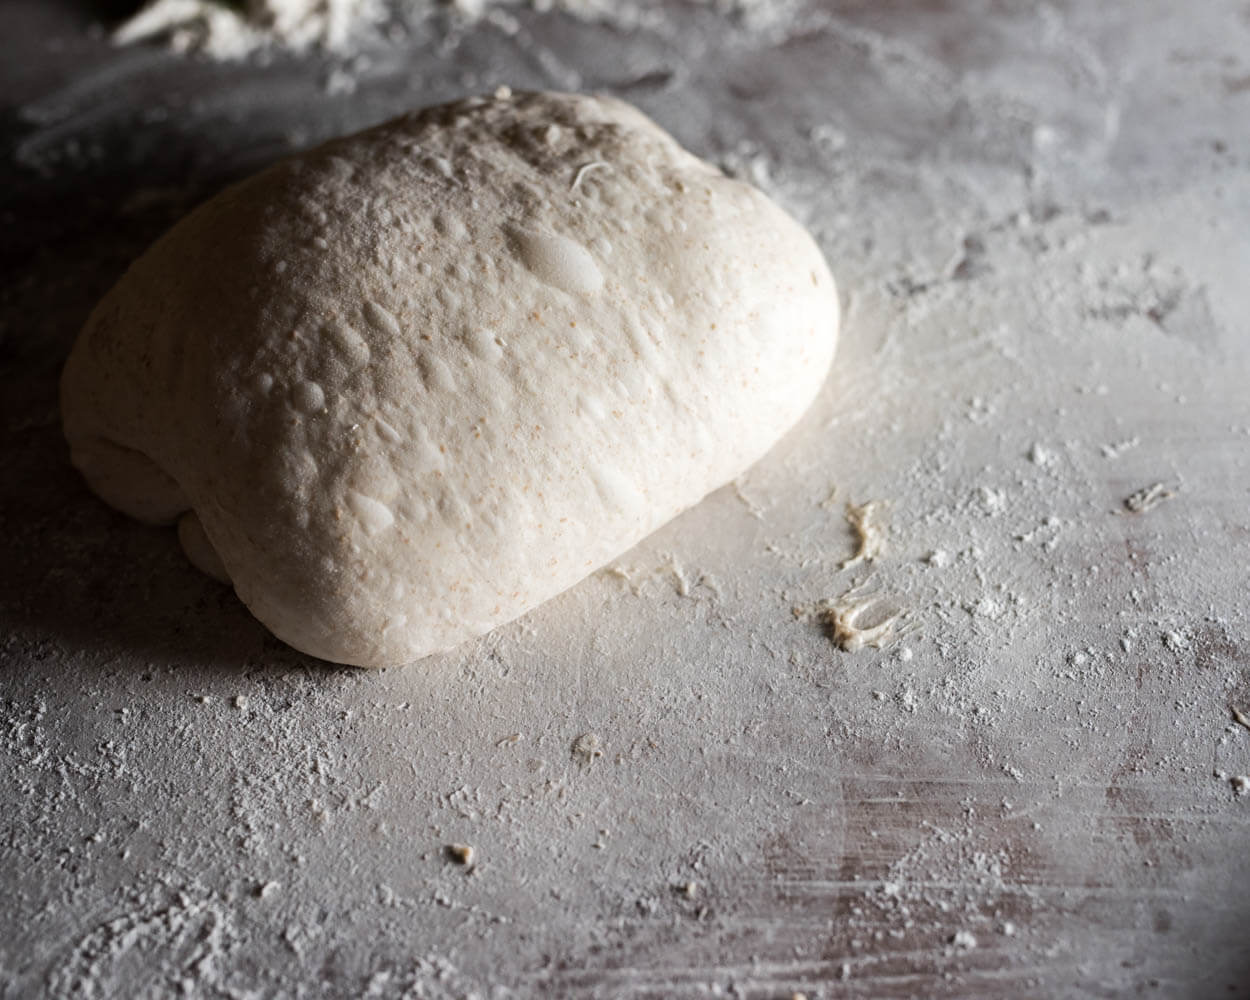
6. Divide & Preshape – 6:15 p.m.
Divide the dough into two halves and gently preshape each piece of dough into a round. Then, let the dough rest for 30 minutes, uncovered. Act quickly when handling this dough and rely heavily on your bench knife. I try to use my hands as little as possible when dealing with the dough at this point.
7. Shape – 6:45 p.m.
Lightly flour the top of your dough rounds and flour the work surface. With this recipe use a little more flour on the surface than normal, the dough will be extremely sticky and wet. Flip each round and shape into a batard (see notes below) or boule, whatever your preference.
Here’s a video of how I shape a bâtard. With this dough, be sure to use the “slack dough” shaping method since the dough is such high hydration.
I prefer to shape these as batards, and my shaping method is as follows:
- Flip pre-shaped round
- Fold the bottom up to about halfway
- Fold the left side over to about 3/4 to the right
- Fold the right side over to cover left
- Stretch top up & away from the center and fold down to about half (you’ll now have a “letter”)
- Grab a little of the dough at the sides near the top and stretch it over the center, so the dough crosses. Imagine lacing up a shoe where you first grab your laces and cross them over
- Repeat three times from top to bottom (the result will look like a laced up shoe)
- Take the bottom and gently roll the dough up to the top and try to seal it slightly when done rolling
Alternatively, if the dough feels pretty strong, you could shape it by “cinching” up the dough. For more instruction on how to shape this dough as an oblong loaf, see my post on how to shape a batard (with video!).
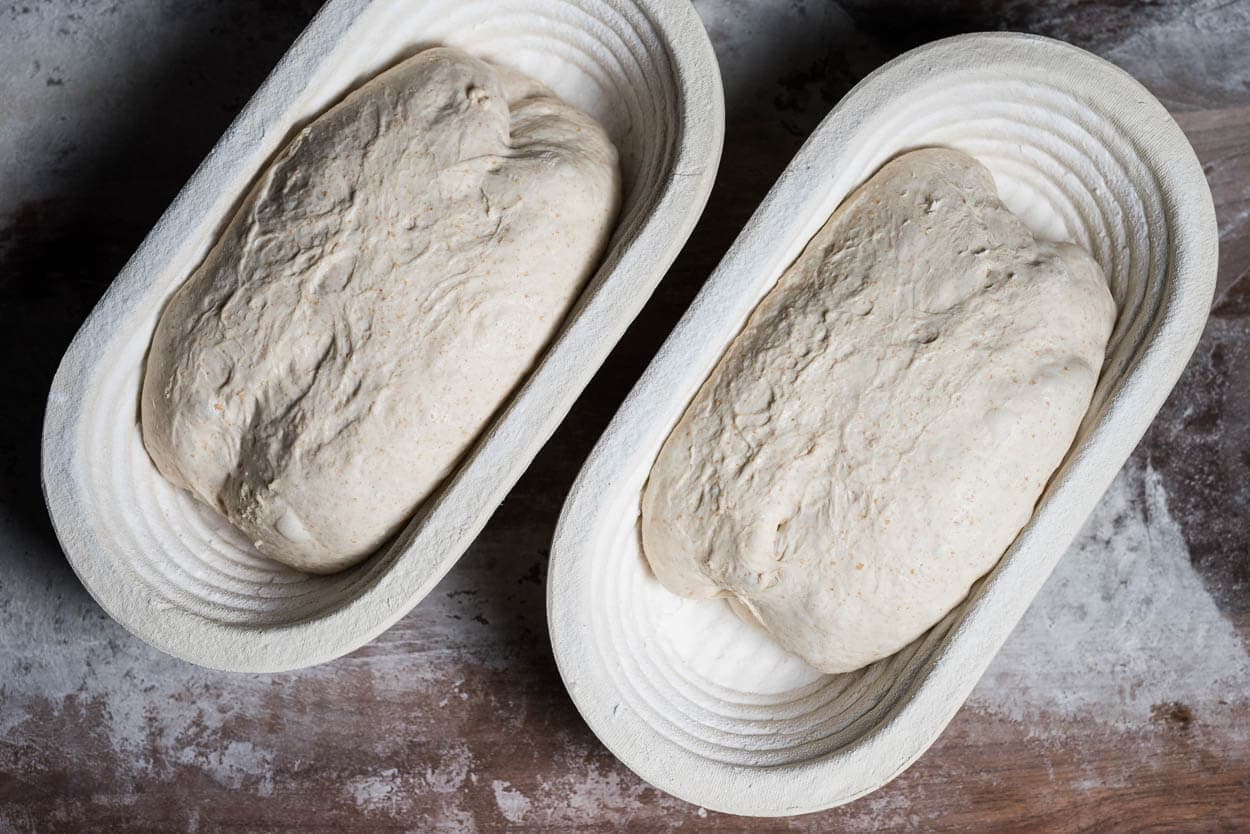
After shaping, let the dough rest on the bench for a few minutes and then place it into a banneton that is lightly dusted with white flour. You’ll see above my bannetons give the dough plenty of room to relax and expand in the fridge overnight. If your proofing container is on the smaller side, and you find your dough almost spilling over the edges, it might be time for a larger basket.
8. Proof – 7:25 p.m. to 9:00 a.m., the next day
Cover your banneton with plastic and place it in the refrigerator at 38°F (3°C) overnight.
9. Bake – Next Morning: Preheat oven at 8:00 a.m., Bake at 9:00 a.m.
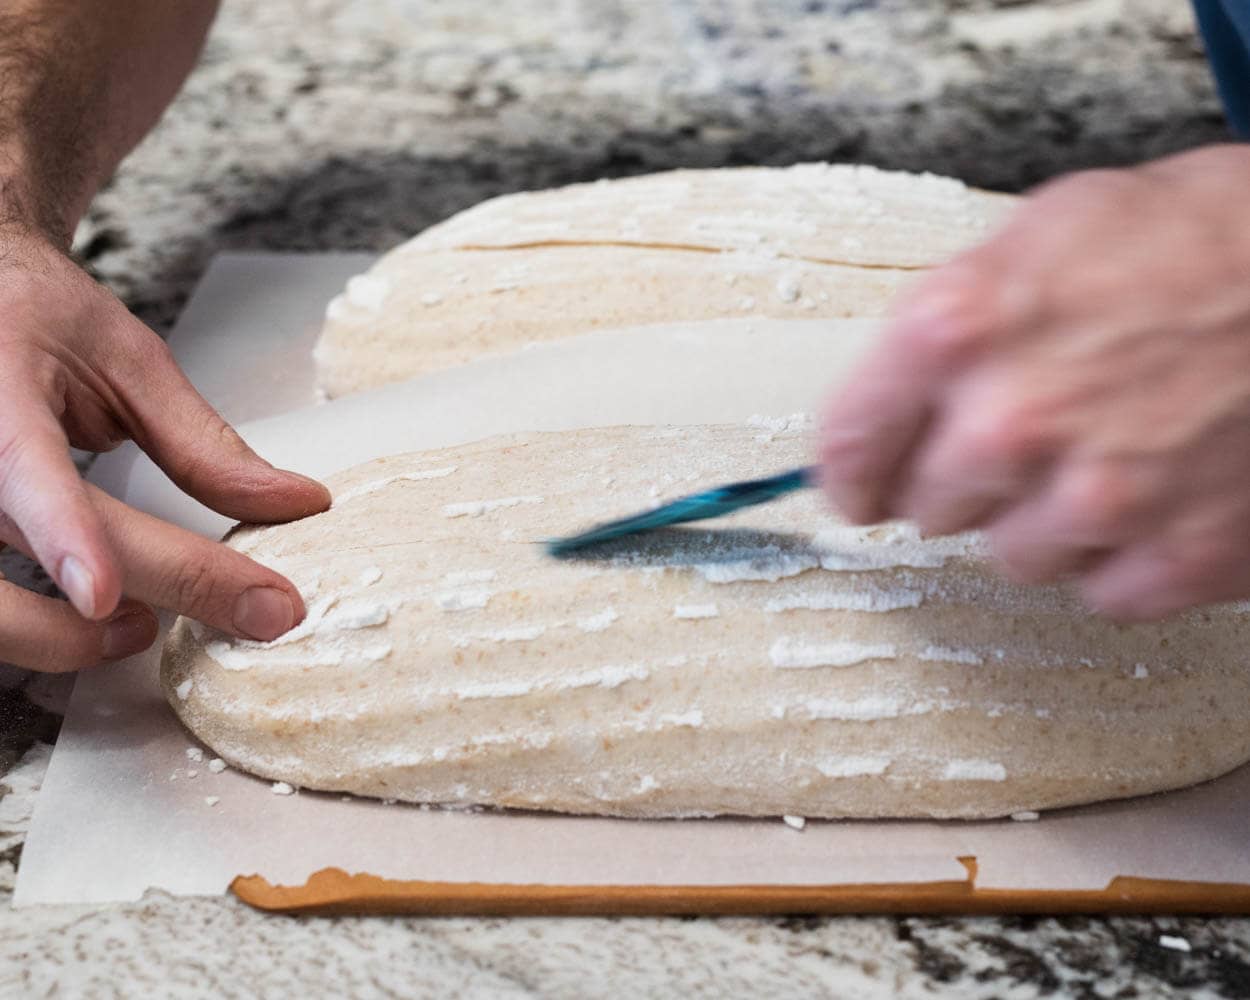
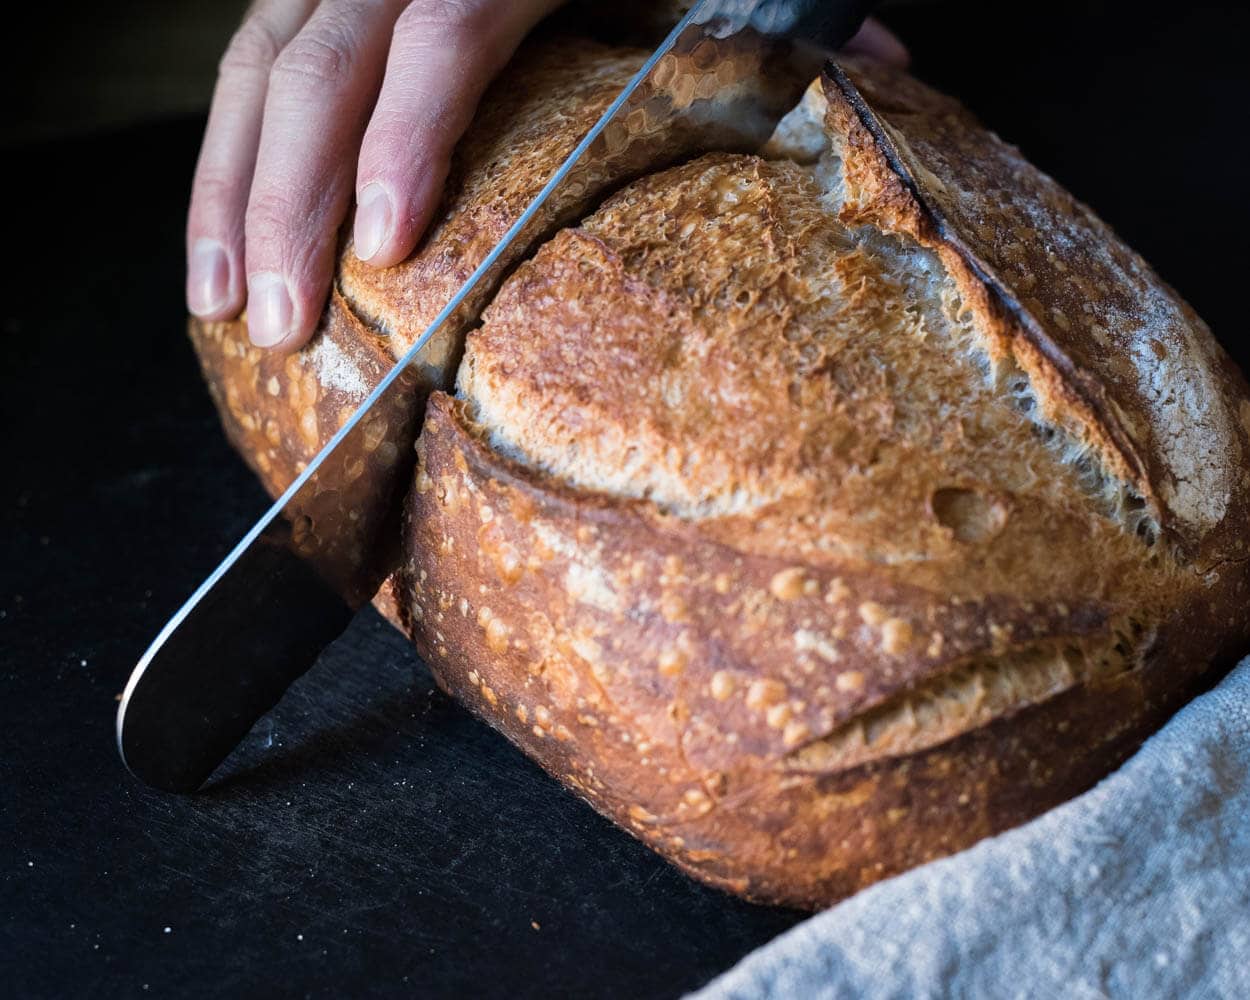
Preheat your oven to 450°F (230°C). Remove the dough from the fridge (there’s no need to let the dough come to room temperature) and uncover. I scored the dough with a single, long slash to get that dramatic opening when baked. I keep the blade at a reasonably shallow angle so the taut skin created during shaping will “peel” back as the loaf rises.
I steamed my oven in my usual way, described here in my post on how to steam your home oven for baking. But you can also bake in a pot or Dutch oven.
Bake for 20 minutes with steam, then remove your steaming pans if baking on a surface or Dutch oven/combo cooker lid. Then, bake for an additional 30 minutes until done to your liking. I like to bake rather dark, so I sometimes extend this second half of baking until I get the crust I’m looking for.
Once your loaf is done, remove and let cool on a wire rack for 1-2 hours. See my post on the best way to store the bread after it’s baked for a few tips on keeping it on the counter and freezing if you think you won’t get through both loaves in a week.
Conclusion
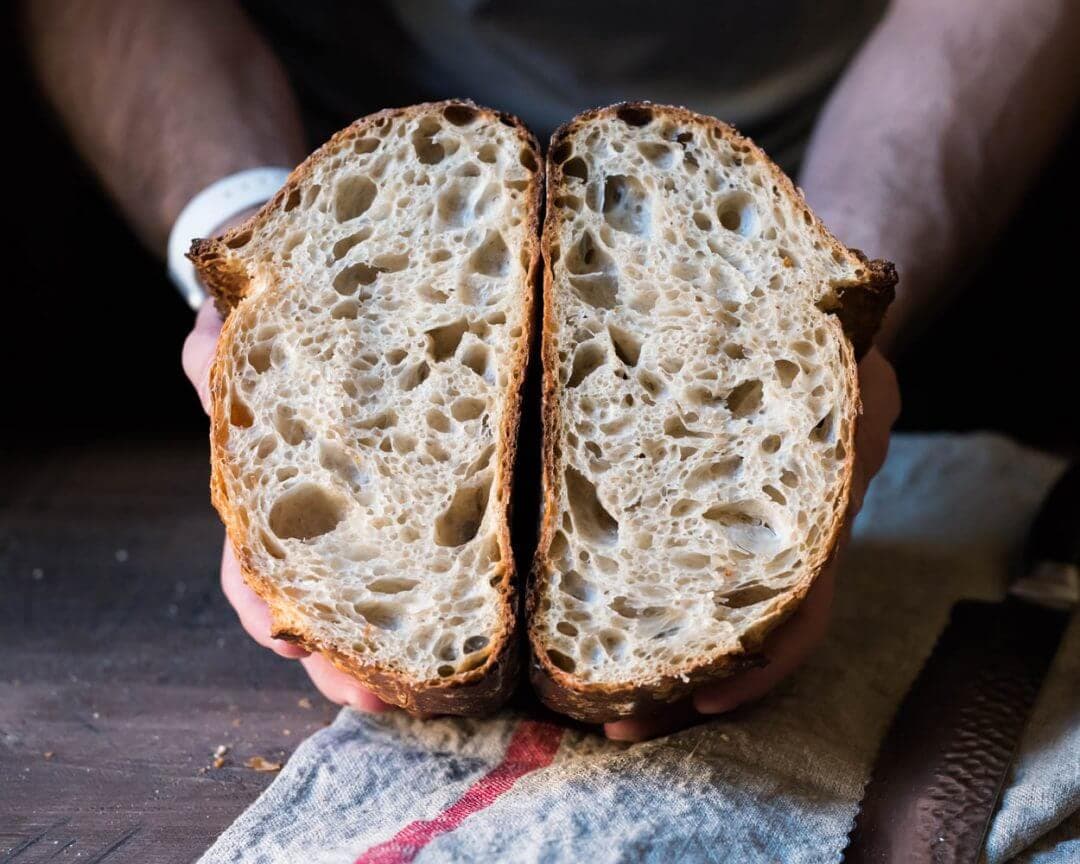
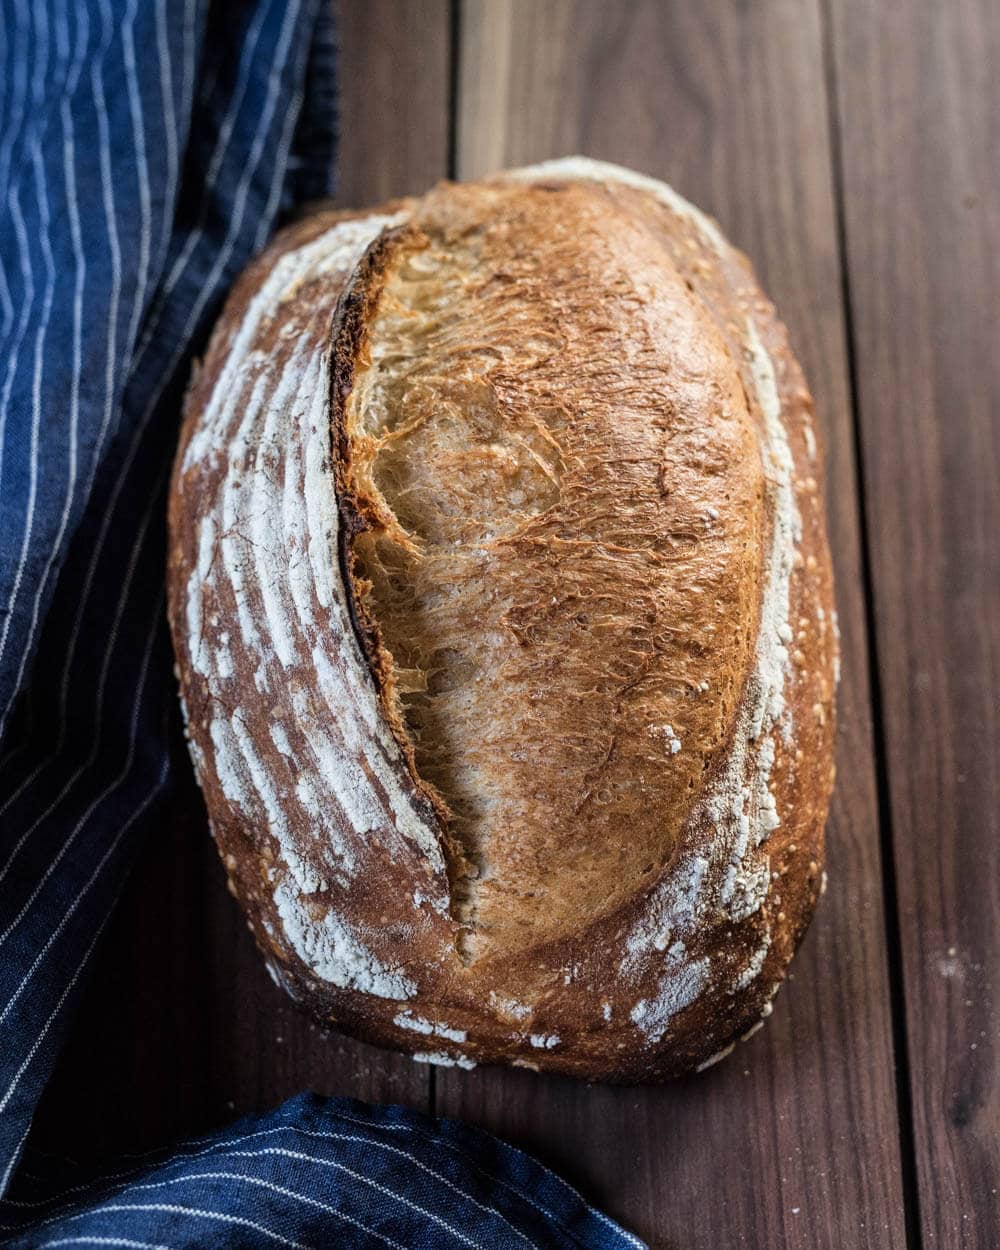
It’s hard to put into words just how much I enjoy this “my best sourdough recipe.” I bake it almost every week (sometimes multiple times if baking for friends and family), and yet every time I pull it from the oven, I smile. The crust color, the open and light interior, only the smallest perception of sour notes, and the way it crunches when toasted. I could go on and on.
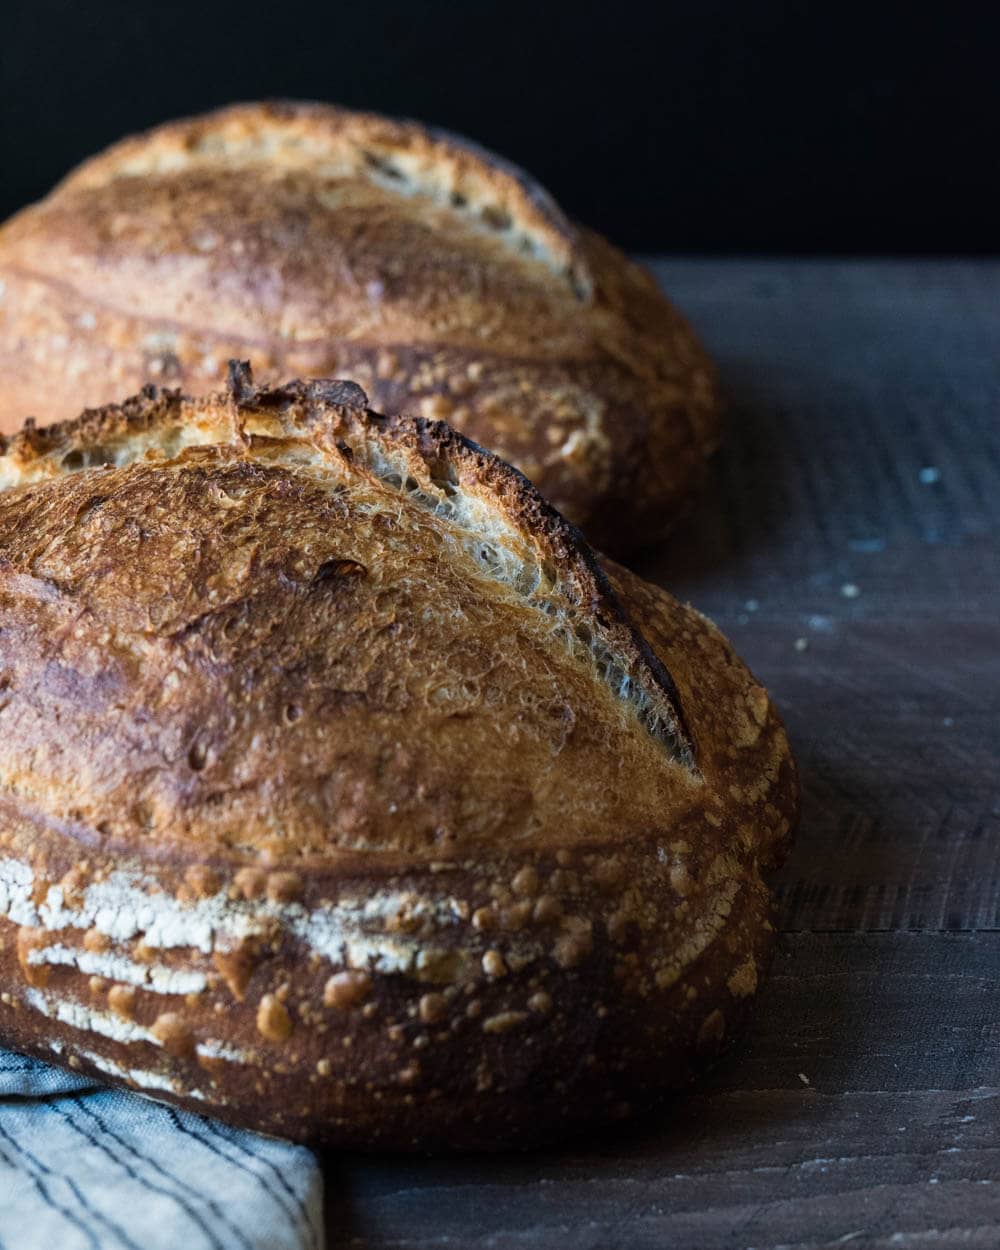
The photos to follow are the results of scattered recent bakes that all followed this process exactly and have a slightly different outcome. You’ll notice some are a bit darker, some have more or less flour on them, some expand differently in the oven, and some are taller and some are shorter—that’s the nature of baking.
With baking, every single bake is different no matter how consistent you try to be. It’s the same with my Dad and his Italian restaurant, and the reason I’ll sometimes get a call in the middle of the afternoon: “hey, the pizza dough is incredible today, you should head over and grab some.”
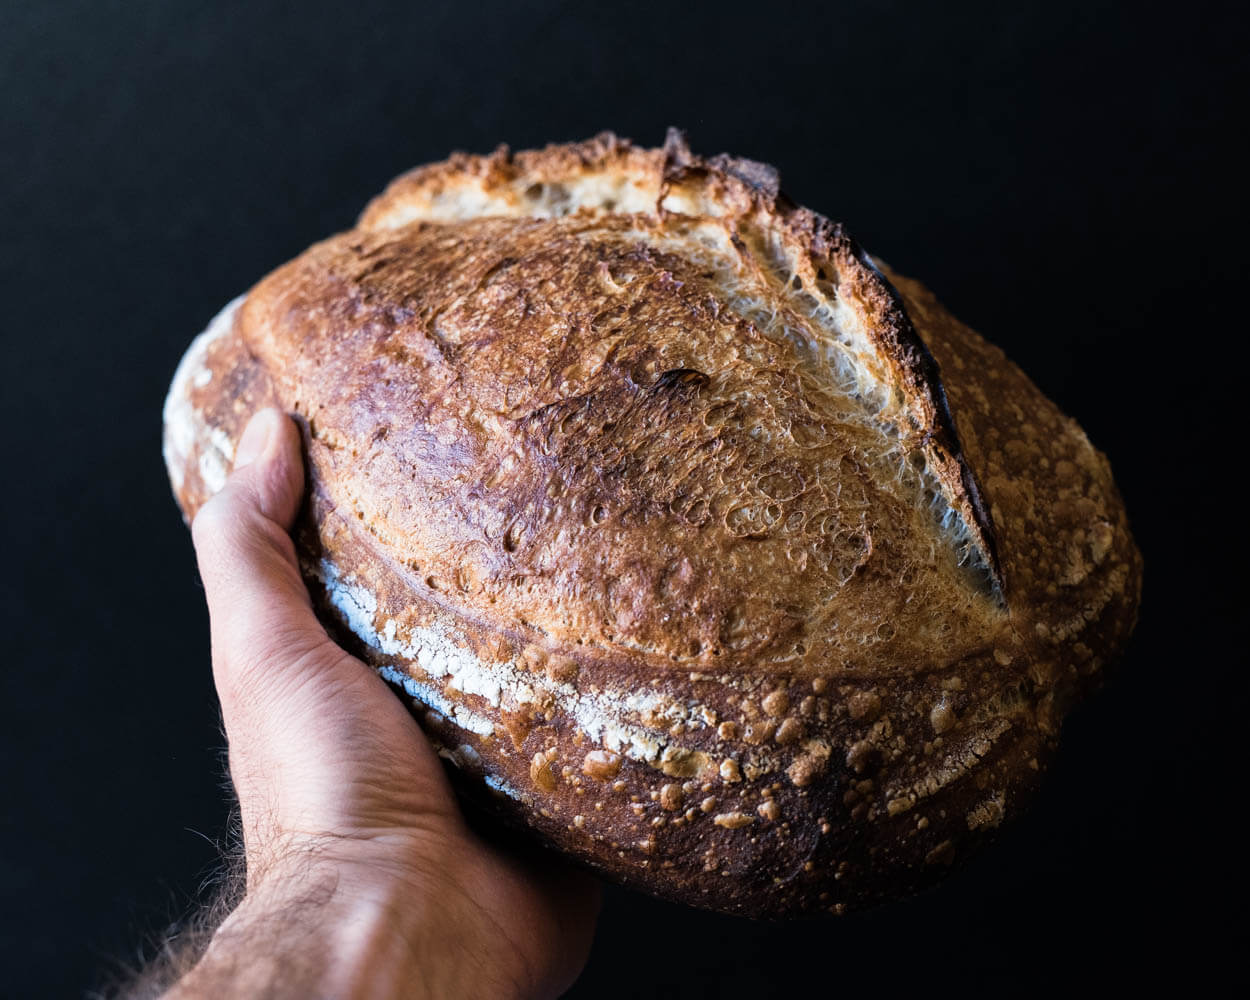
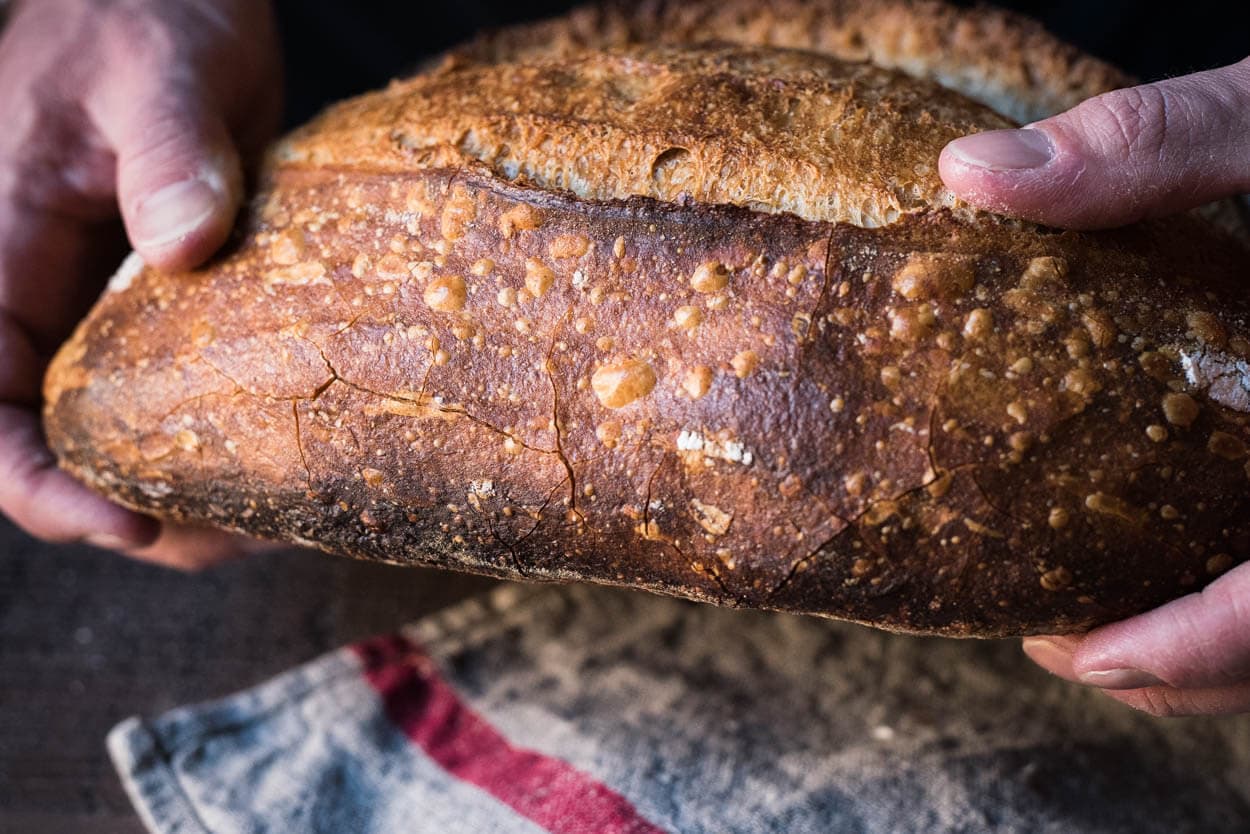
Crust
As a kid, I was known to take slices of bread, cut out the center, and eat the crust. It used to anger my family because they’d reach into the breadbasket only to find slices of only the soft parts. That’s how much I love the crust! Can you blame me, though?
I enjoy bread with a chunky, chewy crust, but this bread with its delicate and cracker-like crust takes the top spot for me. Even though I bake these rather dark, the crust remains thin and brittle, crackling under the slightest pressure. I love using the “heel” (the very end) of this bread to eat soup or combined with hefty slices of cheese. It’s delicious.
Crumb
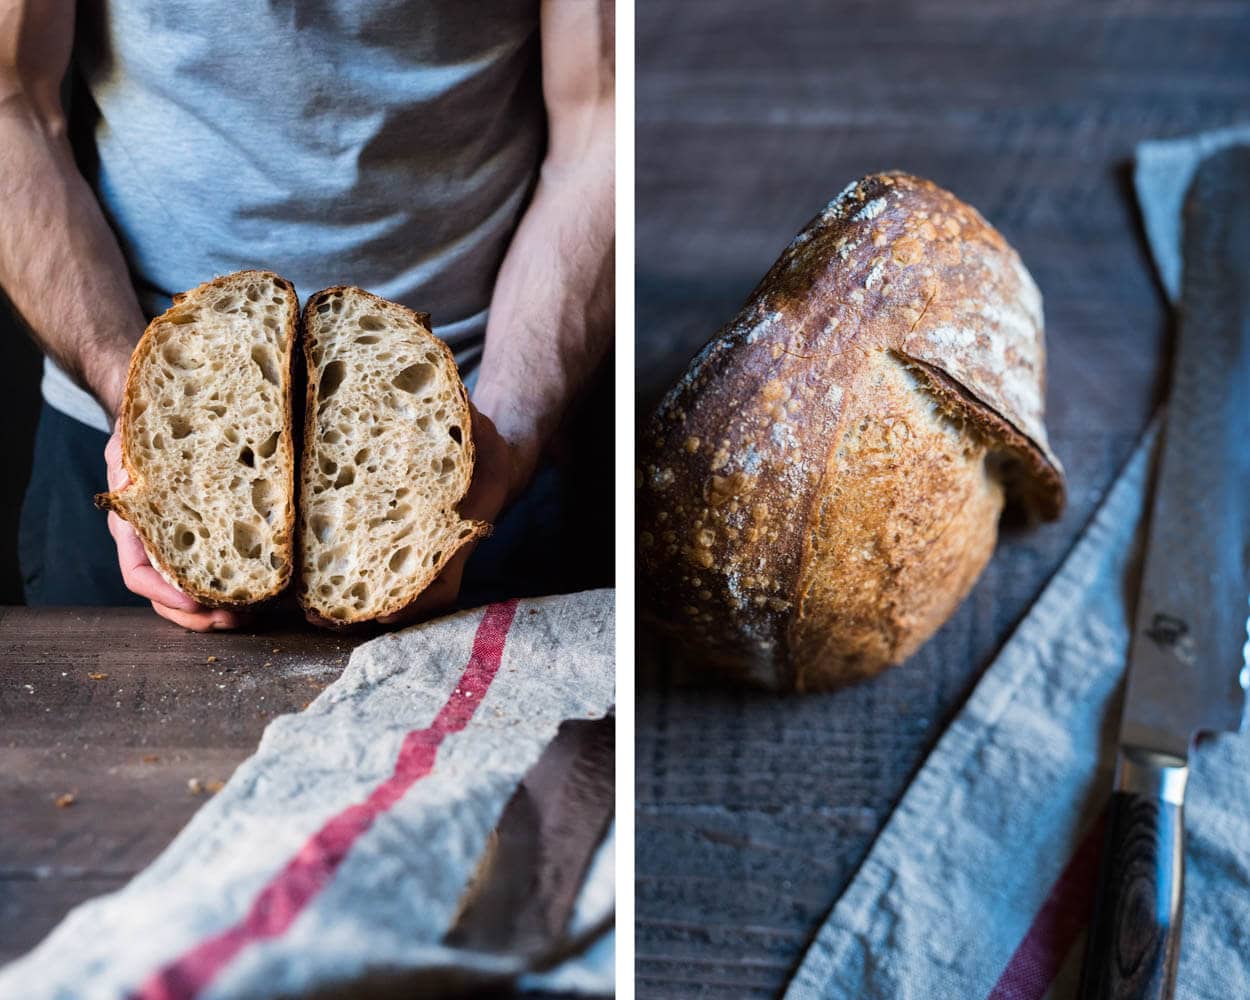
I think there’s a balance to be had with bread like this. It’s possible to let the crumb open up too much, but for me, this is just right. Scattered open areas with that translucent webbing spanning from wall-to-wall, a dynamic movement to these areas, almost show you how shaping was carried out.
Taste
This bread has an almost imperceptible hint of sour, and because of this, the wheat flavors from the flour come forward. It has an incredibly tender, soft crumb that almost dissolves in your mouth. It’s one of those rare foods whereupon taking that first bite your mouth begins to water.
In the end, bread is just bread. But it’s also the staff of life and has been for thousands of years. It’s is also more than the sum of the ingredients you add to the mixing bowl. It’s how it makes you feel when you give some to a friend, and they grin ear-to-ear as they take a big bite. It’s the knowledge that you created this thing over a few days that once was a lump on your counter and is now an incredibly delicious food meant to be shared. To me, this is real bread and my best sourdough recipe to date.
Buon appetito!
Print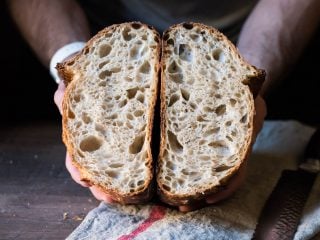
My Best Sourdough Recipe
- Prep Time: 24 hours
- Cook Time: 55 minutes
- Total Time: 24 hours 55 minutes
- Yield: 2 loaves
- Category: Sourdough, Bread
- Cuisine: American
Description
This sourdough bread is one of my favorite recipes. It’s a highly hydrated dough that results in a loaf with an open and lacey interior contrasted by a thin, crispy crust.
Ingredients
Levain
- 30g medium-protein bread flour
- 30g whole wheat flour
- 60g water
- 30g ripe sourdough starter
Main Dough
- 822g medium-protein bread flour
- 64g whole wheat flour
- 745g water
- 17g salt
- 151g ripe levain
Instructions
- Levain (9:00 a.m.)
In a small container, mix the levain ingredients and keep at 78°F (25°C) for 5 hours. - Autolyse (12:00 p.m)
In a medium mixing bowl, add 822g medium-protein bread flour, 64g whole wheat flour, 650g water, and mix until no dry bits remain. Cover the bowl and let rest for 2 hours. - Mix (2:00 p.m.)
To the mixing bowl holding your dough, add 95g water (holding back any as necessary if the dough is too wet), 17g sea salt, and the ripe levain (from step 1). Pinch and mix all the ingredients together and do folds in the bowl for 2 to 3 minutes until the dough smooths and is cohesive. Then, transfer your dough to a bulk fermentation container and cover. - Bulk Fermentation (2:15 p.m. to 6:15 p.m.)
Give the dough 6 sets of stretch and folds. The first three sets are at 15-minute intervals, and the last three sets are at 30-minute intervals. - Divide and Preshape (6:15 p.m.)
Lightly flour your work surface and scrape out your dough. Using your bench knife, divide the dough in half. Lightly shape each half into a round shape. Let the dough rest for 30 minutes, uncovered. - Shape (6:45 p.m.)
Shape the dough into a round (boule) or oval (batard) and place it in proofing baskets. Cover the baskets with a reusable plastic bag. - Proof (7:25 p.m. to 9:00 a.m. the next day)
Cover proofing baskets with reusable plastic and seal them shut. Then, place both baskets into the refrigerator and proof overnight. - Bake (Preheat oven at 8:00 a.m., bake at 9:00 a.m.)
I steamed my oven in my usual way, described here in my post on how to steam your home oven for baking. But you can also bake in a pot or Dutch oven. Preheat your oven with a combo cooker or Dutch oven inside to 450°F (230°C). Remove your dough from the fridge, score it, and transfer it to the preheated combo cooker. Place the cooker in the oven, cover with the lid, and bake for 20 minutes. After this time, remove the lid (you can keep it in the oven or remove it) and continue to bake for 30 minutes longer. When done, the internal temperature should be around 208°F (97°C). Let the loaves cool for 2 hours on a wire rack before slicing.
Notes
This is a very highly hydrated dough. Don’t add in all the reserved water during mixing if it feels like the dough is becoming overly weak, slack, or soupy.
What’s Next?
If you want more help getting an open crumb with this bread, I’ve created a 100+ page book with step-by-step instructions. Learn the best flour to use, the right fermentation schedule, and all my tips in my Bread Baker’s Handbook.
Are you a TPL Member? If so, the handbook is free for you!


2,142 Comments
Hi Maurizio, hope you’re well! This might be a very basic question, but do you sift your flour (if using store bought) before mixing? Why or why not? I’ve noticed that sifting can make a huge difference in the texture of roti for example, and was wondering if it makes a difference for sourdough. Many thanks!
Hey, Reshma! I don’t sift my flour, there’s no need for me to do this for the type of bread I’m making and the flour I have available. Sifting removes the larger bran/germ pieces in the flour, making it more and more “white.” It would definitely make the texture lighter and likely more open, but at the expense of flavor and nutrition (in my opinion). Sifting is totally fine, it just depends on what you’re after!
When I mill my own flour fresh I sometimes sift the result if I want fresh milled white flour or higher extraction. Usually, though, when I do mill I just use the flour at 100% extraction (meaning, no sifting).
Hope that helps!
Maurizio, thanks for the terrific blog. I have been using King Arthur bread flour, which you rightfully point out might have too much protein. I am going to try your recipe using King Arthur AP which is 11.7% protein, about what most bread flours contain. What I am curious about is the malt. I have seen several sourdough recipes that call for adding malt syrup. I have not found malted flour locally. I have malt syrup in my fridge, would that work in your recipe? I have also looked for malt powder local and have not found any. The recipes I have call for a single table spoon for an 1800g batch. Then the question is, when to add it? I thought about adding to the levain as I think the yeast would love it as it is largely sugar. But you don’t added malted flour until the dough is mixed. Do you think the syrup would be a good substitute and when should I add it? Then again, having read your blog, instead of asking I should probably just throw some into the levain this week and into the dough next week and see what works best. Taking your lead in experimenting.
You’re very welcome! I actually like to use King Arthur AP for most baking applications, perhaps with a small percentage of their Bread Flour if more strength is needed. I don’t have a lot of experience in using malt syrup as I always used diastatic malt powder. My feeling is you could use a little more syrup than the powder I call for as the syrup probably has some water added, but maybe try a 1-to-1 replacement and see how it goes. If your resulting loaf is overly chewy, reddish in color or gummy inside dial back the syrup next time (these are the typical symptoms I see with bread that’s made with too much malt).
As for when to add it, I’d side with adding it in the main dough mix instead of the levain.
Hope that helps and I hope the experiments went well!
Thanks! I baked a batch following your recipe yesterday. I used Bob’s Red Mill Artisanal Bread Flour as it is malted. From reading the labels, nearly all commercial flour is malted, even if it doesn’t say so on the label. The crust and crumb were terrific, but the dough was really slack; almost a stiff batter instead of a dough. Next time I will have to work it a bit more to build the gluten and cut back a bit on the water. Again, thanks for a terrific blog.
Hi Maurizio, I’ve been baking this loaf for the past few weeks and really loving it. Quick question – why do you preheat your oven for 1.5 hours as opposed till when the preheat light goes off (which means it’s reached the desired temperature which might just take 30 min?)
Glad to hear that! I preheat my oven for longer because I want to ensure my baking stones (or Baking Steel) fully preheats. While the interior of the oven might have reached the desired temp, I still want to ensure my thick stones/steel does as well.
Hope that helps!
Congratulation for your Website and thanks for sharing your knowledge!
I´m using a 11,6% protein white flour, bulk fermenting 7,5 hours aprox, at about 18 C° (just when I get to see the signs of fermentation readiness). After retarding the dough for 8 – 12 hs, when ready to bake in a dutch oven, my dough does spreads and makes it difficult to score. Loaf comes out acceptable but far from my desired result.
I would appreciate any advice. Thanks again.
Thanks, Santiago! It’s hard to say what’s happening there but usually spreading like that is due to one (or more) of three things: 1) your dough might be over proofing with that long of a bulk and proof, 2) your dough might need more strength through stretch and folds or kneading, or, 3) your dough is over hydrated and thus the spreading.
I’d first try to determine if the dough is over proofing. There are a few indicators your dough could be going over: sluggish rise in the oven, the score on top of the dough might not open with a nice “ear” and instead just kind of fuse together, the interior will have lots of small holes and perhaps one or two large ones near the top (but no dense areas of unfermented flour), and finally the loaf could be a little on the sour side. If this seems like it fits, try dialing back that proof time (or bulk) by a few hours and see if that helps.
From there, the other two are both related to dough strength. If you reduce the hydration of the dough it’ll be stronger, or you could knead for a longer period to help build more strength in the dough. Since this recipe is very high hydration, your flour (which is slightly lower protein at 11.6%) might not support this amount of water. I’d think about reducing the hydration here, to perhaps 80%, and see if that helps the next go.
Hope that helps!
Hi Maurizio:
Wonderful Website, and “My Best Sourdough Recipe” is my new favorite bread, replacing Ponsford’s ciabatta. I’ve made your loaf 4 times now, and the results are great, delicious, crackly crust and very open crumb! My friends are raving. Thank you for all the research that went into refining this recipe.
I have one issue, though, that drives me bonkers. I have new bannettons with linen covers, and no matter how heavily I flour them (tried rice flour, a.p. flour, bread flour) the dough clings to the linen like super glue. It takes me 5 minutes to slowly peel, scrape, gravity-feed and implore them out of the basket. The linen is wet-looking when the dough finally gets out, and the shape of the loaf suffers from so much messing-with. I’ve tried flouring and using the underlying cane basket without the liner: same sticking problem. It’s still a great loaf, but the part that touched the linen or bare basket is stretched. I’ve looked web-wide and see many people say “don’t oil a banneton” I don’t what to try next, unless it’s proofing them in a ceramic bowl. Any thoughts? Maybe flouring the side of the dough that will be plopped into the basket?
You bet, glad to hear it’s working out so well for you! Linen can actually work against you sometimes, especially when working with very wet doughs like this. I’d recommend you try out some simple cotton liners (you can find them online, or just use a clean kitchen towel) that’s lightly dusted with 50% white rice flour and 50% white flour. Dust it well if you have to, enough to ensure it removes cleanly. The cotton liners should work really well, if there is any sticking you can always easily peel off the liner when the dough is on your peel for loading — then next time just dust more liberally with flour.
When using a bare basket, you really need to flour those with a recipe like this. I’d actually prefer to just use liners with wet dough like this, they are much easier to clean.
Hope that helps!
Thanks! Latest bake was much, much better, the dough exited the banneton far easier than before. Your advice was right on. I SATURATED the liners with the rice/ap flour, working it in like crazy, and then coated the raw loaf again with flour. This recipe is so wet, I just needed to use more, more, more flour. Cheers.
Right on, sounds like that worked well then! You could always dial back the hydration, too, if that helps. Happy baking!
Hey Maurizio,
I’ve been trying to obtain a good rise with a dough recipe similar to this (in fact, it’s just a 87% hydration dough with freshly milled 75% extraction flour). However, for the life of me, I can’t get a good oven spring when I retard the dough for proofing. When I do a 2 hour room-temperature proof, the loaf is fantastic. However, when I retard it in the fridge at 37 degrees (+- 1 degree) I don’t get the same rise.
I’ve tried decreasing and increasing the time in the fridge (from 6 to 20 hours) as well as the time between shaping and going in to the fridge (between 15 and 90 minutes) and cannot get the same rise I get from a room temp proof. I’ve experimented with dozens of retarded loafs with no success.
Any ideas what might be going on? One of my theories is that the cold temperature increases the viscosity (decreases extensibility) and hence the dough doesn’t rise as much. If this is the case, letting the dough warm up a bit before baking may help. Also, is it fair to assume that the oven spring is only a result of the expansion of air inside the bubbles (i.e. pV=nRT)? Or does yeast activity play a role in oven spring?
Any help would be greatly appreciated!
Best,
John
Hey, John! Sounds like you’ve done a bit of experimentation which is great. I almost always cold proof my doughs and get great oven spring, so this is interesting. 37°F is very cold so I would say try leaving your dough out a bit before retarding it to the fridge. Even 15 minutes out on the counter after shaping will be enough time to let it get a head start before being essentially stoped in its tracks in that cold house fridge.
Also, make sure you’re wrapping your entire dough and basket in plastic when you place it into the fridge. If the dough dries out and forms a tight skin on the outside in the fridge it definitely will not rise very well in the oven.
Regarding your air bubble question: I’ve ready various sources that state the expansion in the oven is due to increased fermentation activity when exposed to heat, but also sources that say it’s mostly the bubble itself expanding in the oven. I feel like it’s probably a bit of both.
I hope this helps — please let me know if any of the above works, I’m very curious!
I’m not Maurizio, and likely do not have as much experience with his recipe, but if I can help a fellow baker, then…I’ll try. :). Yeast activity and gluten development both play a role in final oven spring. The more gluten that gets developed, the smaller the air pockets of CO2 from fermentation, thus…smaller, more regular and numerous –OR–less gluten=larger, less regular, and less numerous air pockets in the final dough. Colder temp from cooler vs hot, hot oven usually means more aggressive steaming, which can mean more aggressive and unpredictable oven spring as well, though I’ve not had trouble baking this recipe straight from the fridge before…except for when I baked it covered. I never cover it when I bake it anymore. Btw…this is my favorite sourdough recipe. :). My guess without getting a peek at your dough would be that your flour is not capable on its own of producing the necessary gluten to hold all that gas while proving for so long. Is it possible that your flour is either not high enough in protein or not milled finely enough? I would say to try your high hydration recipe with a commercial bread flour (tried and tested) and go from there! Just trying to help you troubleshoot, because this is a recipe worth making well, it is so good!
Maurizio, Lo dispero! This was my last chance to get it right before my wife will ask that I go back to simple yeast breads. Alas, I am on my way to another disappointment with this batch.
I simply cannot get the dough to the point you have in your pictures for late in the bulk fermentation. It looks GREAT when I have folded it, but when i come back at the 30-minute interval, it has slumped back to the appearance of your first bowl picture.
I have followed your recipe EXACTLY, with only two exceptions: I am using King Arthur bread flour for the bulk of the dough (all i can get locally) and I have, at your recommendation, backed off on the hydration a bit.
When I fold the dough, it is wonderful texture — I have a thin windowpane stretch when i fold it. I’m afraid I’m on the path to so many others, where it comes out from overnight proofing with little structure and just slumps when on the oven stone.
Maybe gravity is stronger where I live.
You have been amazingly patient, but I am at a loss at this point.
Have you tried reducing the hydration of the dough? Drop down even further (maybe 75%?) and see if your dough feels stronger (it will) and holds its shape more readily. This should help immensely. It’s also possible your dough just doesn’t have enough fermentation activity in there. Make sure that starter and levain are performing very well before attempting the next go.
On another note, the dough should, and will, relax after you do a set of stretch and folds and come back after 30 minutes. This is the nature of dough, it wont sit balled up in the middle.
This dough is VERY slack. Very. It will not hold shape for long. I also have used King Arthur bread flour ( and have used other flours successfully). Slack dough should still have gluten development, and that can be difficult to see in a loose dough sometimes. The best way I can describe it is that when you try to knead or shape the dough, it feels like it’s kinda…fighting you…maybe not a lot, but it should feel like a solid unit…and it should move like a united blob. Like a jolly plump belly almost… Lol… Mine always looks fairly flat on the stone (but definitely looks like it has a bit of surface tension…it should look like it’s fighting gravity some…), but always puffs up. I have personally had the best luck not covering this recipe at all when baking it. Make sure your oven temp is correct…(put a thermometer in your oven to make sure it is accurate…). Best advice I have is to keep the dough at the right temp…I keep my dough in metal bowls, and those bowls of dough in warm water if my kitchen is not warm enough. You can feed your starter at night, and see if a spoonful will float in a cup of water when you wake up…this is a test some people use, if it floats, it is said to be ready to use! Best of luck! I also preheat my stone and drop the dough right on it when it’s very hot, the stone never leaves the oven. Gotta be quick! 🙂
Please tell me if you take your dough right from the refrig after the retard period and put it into the oven. It seems strange to me that it doesn’t rise some. I have made one good loaf but am working on another now hoping that it is more sour. I left my starter in the refrig for a week with several feedings hoping to make it more sour.
I do take my dough straight from the fridge to the oven! If the dough is ready to go into the oven you can put it in at any time (straight from the fridge or not). Check the dough before you bake and see how it feels and looks — if it looks ready to bake go for it, if you think it needs more room temp fermentation time take it out and let it sit on the counter a bit of time before baking.
Hope that helps!
Thanks, I want more sour and more holes like yours!
Hi maurizio
Can i put the dough in the fridge after the bulk fermentation? I found out that it is more easy to me to work and preshape and fold a cold dough.
Hey there! yes, you can definitely put the dough in the fridge during bulk. I’d suggest placing the dough midway through bulk in the fridge, perhaps after you’ve given it your sets of stretch and folds. Then, the next day take it out and preshape the dough. Let it rest on the bench for perhaps an hour, and then shape and proof the dough on the counter until its ready to bake. Hope that works out for you! I am working on a post here about “cold bulk” and hope to have it up soon. Happy baking!
Thanks a lot 🙂
Hi Maurizio,
I made the sourdough starter as you wrote in the article and it came out exactly the way you explained it each step of the way.
I then followed your “best sourdough” recipe to a t and for some reason my bread is coming out super dense. The dough before going into the oven looked just like yours with all the little bubbles in it but when it went into the oven, it came our really dense and heavy like a brick of coal. Almost as if the dough had too much gluten or was too wet. I bake in a conventional oven if that matters.
Any idea what the problem could be?
Hi, Johnny! Glad to hear your starter is up and working very well. There could be many reasons for that to happen, it’s hard to diagnose exactly what the issue is without more information. If it comes out very dense it could be because there either isn’t enough fermentation (under proofed) in the dough OR there’s too much (over proofed).
First, make sure your starter is in good working order: it rises and falls predictably after you feed it and it shows signs (smell and visual) of good fermentation.
If your dough doesn’t rise much during bulk fermentation and there are little to no signs of fermentation, give it more time in bulk or keep the dough warmer next time. You want to see bubbles form here and there, the dough should rise, and when you tug on the dough mass it should show some signs of resistance to being pulled (elasticity).
If you’re getting good rise during bulk fermentation and the dough shows signs of strong fermentation (as in my pictures above) you could be over proofing. In that case I’d recommend reducing the final proof time by several hours and see if that helps. If it does help, but the loaf still isn’t great, reduce further until you find the right proof point for the dough.
Take a look at my photos during the whole process above, and with other posts at my site to get a feel for how the dough should look at each step of the process.
Also, I suggest if you haven’t already, have a look at my Beginner’s Sourdough recipe and give that one a try before this recipe. It has more pictures and illustration on how the whole process should look the entire way.
I hope that helps!
Hi Maurizio, first of all, what a beautiful website!
I’m a home baker from Belgium. I’m having trouble with my sourdough bread. My starter is very active (no problem there) and I follow your steps meticilous. My dough never becomes smooth or bubbly after the bulk fermentation. It stays a wet mess. I even reduced the water % to 60.
What can be the problem?
Thanks Tom, I appreciate that! Reducing the hydration was a good move, that’s what I would have first suggested. Are you sure your starter is strong and rising and falling predictably? You need to make sure you have sufficient fermentation in your starter before you begin baking. Additionally, you can use the “float test” with your levain to ensure it has fermented enough to leaven your bread: when you think your leaven is ready to mix into your dough, take a small amount and drop it into a glass of room temperature water. If the bit of leaven floats on top that’s a good sign things are probably ready to mix. If it sinks to the bottom, give it more time until it floats.
You said your starter was active, so the above may not apply but I like to recommend that test to people anyways. If everything looks good at that point it may be that your dough is not strong enough. You could be working with flour that has low protein percentage and, in addition to much lower hydration, you might need to do additional kneading upfront or more sets of stretch and folds during bulk fermentation to give it more strength. These physical actions strengthen the dough, in concert with fermentation, and by the end of bulk the dough should be smoother and have more defined ridges to it.
One last thing you could try if the above doesn’t work is try with a different brand or type of flour and see if that helps. As I said, if the protein percentage is very low it can be difficult to get strength in a dough.
I hope this helps!
Hello again Maurizio I hope this message finds you well, Ive since produced many beautiful springy loaves, I found that it was my starter that was weak. I got it into an 8 hour feeding schedule and know it rises high as can be! Another question though if I may?
Iam about through this 50lb bag of Bakers Special, which has the same protein content of the T70(12.5%), just isnt malted, so I was using diastatic malt powder to make up for it and help with the slow ferment. My next shipment is the straight T70 malted itself! Now when using this flour should I also add diastatic malt powder? Will it make a difference? Iam out of the powder and was wondering if when using a malted flour would it even be necessary?
Thanks again man for all the great info, I read your blogs daily, I feel the same way haha, when iam not baking Iam thinking about baking. So true man, stay safe and happy baking!
That’s really great to hear Kameron! Sorry for the late reply to your message. You don’t usually need to use malted flour if your flour already has some and I would omit it on your next bake with the T70. If you add too much malt it’s possible the end baked product will be a little gummy and chewy — not desirable.
You’re very welcome and baking awesome bread at home sure is addicting, isn’t it!? Happy baking!
Hi Maurizio! Just discovered this blog, and I’m loving some of the recipes on paper, but have a question for you regarding salt. It turns out I’m very sensitive to sodium and it does bad things to my blood pressure. I managed to successfully bake some Tartine recipes with a much, much lower salt content (I did the whole wheat version by the book except for 8g of salt for two loaves vs 20g and it came out great). I tried something similar here, reducing the salt to 10g, but wound up with a soggy, shapeless mess that got some rise during the bake, but not great, and they sure don’t look very pretty.
Any general tips you might have for reduced salt bread baking?
Hey there! Thanks so much, glad you’re enjoying my website 🙂 There are a couple of things that could have happened here with my recipe using less salt. First, it’s possible fermentation activity was higher than you expected and with reduced salt the dough might have over proofed on you. Second, salt also acts to tighten up the dough and with less salt.
I’d suggest, if you’re willing, try my recipe again but drastically reduce the hydration to suit. Perhaps somewhere around 75% hydration to start and then work things up if the dough behaves better and bakes up nice for you.
I hope this helps and sorry for the late reply!
Thanks so much for the reply! Your suggestions are more or less what I was expecting to hear, so I actually did take another crack at it since writing. On the off chance you’re interested, I’ll let you know what I did- I upped the salt from what I tried before to about 14g, and in addition to the flour in your recipe, added about 100g of high extraction whole wheat, and maybe 80g H20, so an overall slight reduction in hydration, esp with that whole wheat. Happy to report it came out beautifully!!! Probably the best over spring I’ve ever had on a loaf. I’ll be taking a crack at your 95% whole wheat next, very interested to give that a try.
Thanks again for this blog. Turn it into a book! 🙂
That’s fantastic! Sounds like your modifications were spot on there and also very interesting to know a heavy reduction in salt is totally possible. I’ll have to try this out sometime over here, I’d also be interested in the taste differences.
A book… perhaps one day 🙂 Thanks again and happy baking!
Hi Maurizio
Sorry this is a bit off topic but I’ve been making a lot of bread using yeast, I know you mainly work with sourdough but this could be a thing with al bread.
I use the fold method folding 4 times every 20 minutes. For an hour, I leave it to prove for about an hour, then shape it leave it for further 40/45 minutes.
I preheat oven and cast iron pot 230 degrees. Drop bread in and cook for 40/45 minutes. Internal temp after cooking is 96/206 degrees.
My problem is that sometimes the bread has a very slight rubbery texture.
Would you have any ideas what is causing this
I use 68% water and good flour
Thank you
That texture could be due to several things… Most notably I see this texture when I use flour that has too high of a protein percentage and thus results in a chewy baked loaf. I’d suggest trying a different brand of flour for the white portion of this recipe and see if that helps with the texture.
Other things could be an under baked loaf (but it sounds like your internal temps are good) or too much diastatic malt added.
Many thanks for your thoughts on this I will try a different flour.
Sorry taken so long to thank you
Here’s something that might interest you – apparently there is a Tuscan style bread that is completely saltless! I actually tried making a saltless whole wheat bread. The taste was… interesting.
Yes, I’ve had this bread when traveling out in Italy! It has a very different texture and taste, for sure. In my opinion this bread is more of an accompaniment to other food rather than something to take center stage. I also recall it being rather crusty and hard! Interesting, indeed 🙂
Hi Maurizio, it’s winter here (in Australia) at the moment, and I can’t get my ambient temp as high as you recommend. It ranges from about 18-20C (64-68F). Would I do a longer bulk fermentation or change the number/timing of the stretch and folds? Thanks!
Hey, Casey! Whew, I kind wish we had those temps out here right now… It’s been well over 95ºF! Have you tried warming the water you’ll be using for your dough mix? You can heat it up in the microwave up to 100ºF if necessary (I usually do about 90ºF in the winter) and that should help quite a bit. Then keep that dough insulated and somewhere warm through bulk to keep that temp up.
But, yes if you aren’t able to get the temp up it means you’ll have to extend bulk until the dough is ready. At those temps it might take several more hours… It’s hard to say exactly but watch that dough and forget about the clock 🙂
Hope this helps and happy baking!
Hello Maurizio,
What type of disposable banneton is the one you’re using in the pictures at step 8, Rest & Proof?
Thanks!
Hi! These are not really disposable, they are meant to be reused. They are wood pulp bannetons I purchased online from Breadtopia.com.
Are you sure the bags are sealed completely shut? I use a rubber band and fold the opening over several times before securing it. I’m sure it is, but that’s the first thing I have to ask 🙂
Yes, it’s possible the towel is drawing moisture out of the dough but it should not be so significant that a dry skin forms on the dough! I almost always use towels in my baskets nowadays (because they are easier to clean) and rarely see a significant skin on my dough — you can see how it looks in the pictures above where I’m scoring. Just as a test have you tried not using the towel? Just be aware it can be tricky with very wet dough in a basket that’s not sufficiently dusted with flour.
I’m about ready to quit! No doubt you, Marurizio, know a lot about this, but something is getting lost in translation when I try to do it. The latest is the dough will not hold any shape. I’ve actually gone to a lower hydration to try to give it some structure. When I shape it, it seems fine, but then after being in the fridge overnight it comes out like — well — the same slumpy feeling a surgeon must see when he removes someones liver. No, mine is worse. I decided to cook it on a stone this time and it is now a sourdough ciabatta.
What am I doing wrong?
There are a few things that could be causing this slack dough in the morning when baking. The first is that your dough doesn’t have strong enough fermentation through bulk. Make sure your starter is strong, reliable and very active when you make your levain. From there focus on your dough temperatures, you want to hit that “final dough temp” and keep the dough there through bulk so there’s sufficient activity.
Second, it’s good that you reduced hydration, that usually helps add strength to the dough and that’s the first thing I look at as this recipe is highly hydrated. As @plutek:disqus mentioned below, it’s very possible the opposite of what I recommended above is happening: your dough could be over proofing in the fridge overnight and this will cause a complete breakdown, causing serious spread in the oven. You could try reducing your proof time in the fridge by 2-5 hours (depending on how long you’re leaving it in there) and see if that helps. Over proofed dough will usually be visibly very active with bubbles on top and all over and it will be weak to the touch. Turning it out of your baskets will cause it to spread quickly and slashing will be slightly difficult as the blade will drag, from there you’ll usually see more spreading and no visible “ear” where you slashed, it will sort of fuse together.
Don’t give up! We’ll get you there, it might just take a few more tries to really figure out what’s happening with your dough.
I’m confused on dough strength during bulk rise. My dough is SO strong I can practically lift the whole mass out of the bowl when I lift up one corner to fold. I can also stretch it to the point where it is very thin, almost translucent when I stretch it. I can’t imagine it being most stronger. Still, even after doing a nice job forming a ball during shaping, it does not hold that shape.
That sounds like a very strong dough indeed. No need for more strengthening there. This further tells me you might be over proofing your dough — this is the only way you’d see a significant slackening in the morning during baking!
Hi Maurizio,
For the bulk cold fermentation of the dough in the fridge the night before, do you completely wrap your banneton in plastic wrap or only the top? I’m not sure if I only wrap the top that the sides will dry out through the banneton itself or pick up flavors from my fridge.
Thanks!
Hey, Eric! My baskets are completely wrapped in plastic so no air can reach the dough. If your fridge is not humid enough, which is almost always the case, plastic bags (I have links to the ones I use on my Tools page at the top) are necessary.
Hi Maurizio,
I discovered your website earlier this year, originally attracted to the photos as much as anything. Since then, following your great instructions I’ve grown my own starter and successfully bake bread on a regular basis – and particularly love this recipe. So thanks for the inspiration, my enthusiasm for sourdough baking has spread amongst some of my friends as well which is fun.
Today I tried baking an experimental recipe, based on your recipe above, and it came out so well I wanted to thank you, and share with you. The additional ingredients were cocoa (for colour), toasted pumpkin and caraway seeds, freshly ground coffee, molasses and vegetable oil; and I swapped out the wholemeal flour for rye. The result is a very dark, moist and flavoursome bread with a nice crunchy crust and good open crumb, a little bit reminiscent of a dark European rye but much lighter in texture.
I have some photos of the result, but not sure how to share those…
Hey, Christine! Really glad to hear your baking journey has gone so well thus far. I think you are the one who shared your photo with me on Instagram? Your loaf sounds so delicious, definitely a set of ingredients I haven’t thought of using — I love that. I also really like the fact that my recipe has proven to be a springboard for you to develop your own, and it turned out great! That’s awesome.
Thanks so much for sharing, I might have to try this combination myself!
Hi Maurizio,
Your blog has changed my life but in the past few days my bread is driving me crazy. I’ve had great success in the past few weeks with this bread estimating quantities but since measuring on a scale I’m struggling. I measured everything exactly and followed your recipe to the T but my boules spread out immediately on the tray and the interior was very gummy with dense patches after baking. Today, I decreased the hydration by 10% which solved the gumminess and tasted delicious but I’m struggling with an uneven rise and this loaf also burst open at the base due to this expansion (https://goo.gl/photos/gngmaVkeWpoW9dc76). I scored as deeply as I could with a blade and baked with a tray of boiling water in the oven, as well as spraying the boules before putting them in, and again after 5 and 10 minutes of baking. Do you have any suggestions for how I can improve the rise and encourage the loaves to keep their shape?
Many thanks,
Alison
Alison, wow thank you! Yes, sometimes bread can be frustrating 🙂 Your pictures look interesting, it almost looks like a shaping issue there with the dough. You really want to try and get a nice, taut surface on the dough when shaping to ensure your loaf springs up where you score it. If your loaves spread too fast and don’t hold their shape that again could be due to insufficient strength when shaping or it could be that your dough doesn’t have enough strength coming out of bulk. Make sure you do enough sets of stretch and folds so your dough is strong by the last one: it should kind of hold its shape after you do the set and slowly relax out by the end of bulk.
Reducing the hydration was a good move as that sometimes can cause gumminess (it could also be from under proofed dough). Also, reducing hydration can strengthen the dough in a way, which probably helped.
I’d suggest first ensuring your getting ample fermentation in the dough with a strong starter and levain, and then focus on dough strength during bulk and shaping.
Hope this helps!
I just noticed another detail in your note back to Alison. You said the loaf should spring up during scoring. Mine has not such response, even looks like it might deflate if I cut too deeply.
I think he means the loaf should spring up where you score during baking! Not immediately as you score, that would be an incredible response. I think it is normal for a dough to seem to relax after scoring, as you’ve effectively cut through the surface tension. If you struggle with pancake-breads, perhaps try baking in a form (any deep oven proof form will do) to start with? Getting a good spring has a lot to do with you oven and how you use it, which takes practice. I know mine ventilates air rapidly, so even with a water tray and steaming the breads quickly dry out and lock out further spring.
No, the loaf will not spring up directly after scoring but that area you cut open will be the spot the loaf opens up when baked in the oven. That cut is what directs the “energy” left in your dough to open through. Think of the dough waiting to be baked as a very tight, thick balloon. If you didn’t cut the dough it would expand, expand, expand until it ruptures somewhere undefined. However, if you cut the thick skin on the dough when the loaf expands up under heat it will open at that cut.
Alison, I feel your pain.I have exactly the same issue. I’ve reduced hydration, I lost count how much I did the folds, but still my loafs do not hold shape. I don’t know how anyone shares photos here, but backing my on a stone, the final baked shape is worth a comedy skit.
I’m really starting to feel like your dough is over proofing overnight. If you’ve given your dough many folds and it shows plenty of strength (after your last fold the dough will have clear edges and be folded up in a tight ball) try reducing that proof time significantly and see if your dough springs up next bake.
Thanks. However, if I reduce the proofing time, how does the loaf rise at all? Or is it not supposed to rise during proofing?
it’s hard to answer that because it depends on a lot of factors. When placing the dough in a home fridge for the proof you won’t see too much rise in the dough as the temps in there (around 38ºF) are really cold and slow things down considerably. This is ok, though! Even if the dough looks lifeless in the morning bake it anyways, it may surprise you when it springs up in the oven.
Hi Maurizio,
First, thank you for creating this great resource! I have Bread Maker’s Apprentice, Bread, Tartine Bread, and Flour, Water, Salt & Yeast, and this site is more comprehensive and useful than them all.
A question about storage and aging. I usually just let my loafs sit on the counter. I’ve found that my bread that is retarded overnight is more sour than the ones that undergo room-temperature proofing, but only right after they’re baked. Once the loafs are a day old, I have trouble distinguishing between the two, and both are equally (and more) sour.
Have you experienced that naturally leavened bread get more sour as it ages? Is there a better way to keep the loafs fresh?
Thanks,
John
Wow John, thanks so much I really appreciate the kind words! Those are all awesome books, I have them all as well.
Sometimes I do find the bread gets a little more sour as it ages, but I’m not sure what’s the cause of that. With some bread, notably whole wheat, I actually like them more 2+ days after baking, I find their flavor develops more somehow and I really enjoy that.
I usually keep my bread on the cutting board crumb-side down after it’s cut. The crust pretty much is the perfect “bag” if you will, keeping the loaf moist on the inside for quite a while. If it’s overly dry in your area you could use a paper bag or bread box to keep the bread after a few days (that’s what I do here, it’s very dry).
That’s the way I do it at least! I hope that answers your question. Thanks again and happy baking!
Hey Maurizio! Great blog you have here and awesome to see your perspectives on things – so many around on the web!
One question I have is on doing bulk fermentation in the fridge overnight. Do you think that works out well? Or does it hinder flavor and the bulk ferment should be done at warmer temperatures? I’ve tried it for the past few loaves and it’s great to shape them in the morning then do a final proof at room temperature before baking. I haven’t gotten a super open crumb like yours although it’s still really soft inside. Would love to get even better and achieve your crumb although the breads are pretty good now! More crust to bread ratio would be awesome. 🙂
From your experience, is there an effect on flavor when bulk fermenting in the fridge? And how about the crumb?
Thanks a lot. 🙂
Thanks, Jeremy! Yes, doing an overnight cold bulk can work really well, there are many bakers who take this approach. I think it will work equally well as my cold proof method, it will just take some adjustment to that style. I’ve actually been working on cold bulking lately and hope to have a post here soon about my findings, I think it’s a fantastic way to make bread (and really helps when using large percentages of fresh milled whole grain flour).
Hope that helps and keep an eye out for my post! Happy baking 🙂
haha that’s awesome!
Thanks so much. 🙂
Sorry I did not get to see your reply earlier! I’ve actually been visiting this blog almost daily for reference. 😀
Thanks for doing what you do! It’s good to have people like you around. 🙂
I’ve tried slowing down my bulk ferment but it seems that the dough gets more slack over time until it’s super extensible but not elastic, so it becomes REALLY flat when I’m shaping it. It’s odd considering that fermentation should strengthen the dough? It actually looked stronger near the beginning after the slap and folds and first couple of folds in the container!
Will be keeping an eye out for your post. 🙂
You bet, I’m happy to help! Yes, that’s definitely strange. The dough should strengthen up through bulk and at around 3-4 hours start to show signs of that strength and more elasticity. If the dough does get more slack through bulk, and the temperatures are reasonable (76-82ºF), try preshaping and shaping it tight and see how that goes. It might just be the amount of water in the dough or it’s not strengthened enough upfront and/or through bulk.
Do know that the dough will definitely still be sticky during preshaping! At this hydration it’s challenging even with the proper strength in the dough 🙂 You could always try dialing back the water, too, and see if that helps.
I noticed you dont spray the loaves with water before putting them into the oven to bake. Is this due to the high hydration of the dough already? I find when I spray them I dont get the beautiful white lines of flower either, they turn more golden and cooked. Is this relevant? Also, should I allow the loaves to rise before putting them straight into the fridge? If I refrigerate them right after placing them in my brotform I find they dont rise much in the oven. How can I get better oven spring after the day long cold ferment, is it possible? I was also wondering, I see you use Central Milling T70 but also prefer Guistos Bread flour. I have both T70 AP and Central Milling Bakers Special Bread Flour(I live 100 miles from Petaluma) in 50lb bags but no Guistos. So should I use Central Millings T70 or their bakers special bread flour? I love your breads man thank you so much!
I do actually spray my loaves right after I load them, usually. I use a hand mister to do a good dousing inside the oven. Yes, spraying like this will knock off some of the flour on the crust so you will get more of a golden, shiny loaf instead of one with decorative flour marks — it’s all up to you.
I do not let them rise at all before baking — straight from the fridge to the oven for me. The only time I’ll do this if I have a schedule constraint and the dough doesn’t look fermented enough, then I will let them sit at room temp to proof as long as possible before baking.
If you’re getting a lack of oven spring it could be due to over proofed dough, excessive hydration for the flour you’re using, insufficient scoring (or too much), or insufficient dough strength and shaping. I know, that’s a lot of things! I’d usually start with reducing the proof time and see if that helps. There’s a continuum of proofing: at one end the under proofed state you’ll see insane oven spring but the interior will be full of huge gaping holes and dense spots, at the other end over proofed dough will have a lack of spring but a very tender interior with lots of small holes and no dense areas. Finding that perfect spot in the middle is always the challenge 🙂
I’ve never tried their Baker’s Special flour, that’s something I’ll have to pay with! T70 is a great flour as is their T85 but it’s all up to personal preference on that one! Since you’re so close to the source I’d be very tempted to use all CM flour 🙂
Hope that helps and thanks!
Hi! ive been making this bread for some time with pretty great results, the only complaint i get time and time again is about how thick the bottom crust is. I bake in a cast iron dutch oven keeping it covered at the beginning and uncovering half way through. Is it possible that the bottom of the pot is cooking the bottom of the bread to quickly? any ideas how to reduce the thickness on the bottom?
Do you start it in a cold or hot dutch? Do you use parchment paper, I would recommend it? I find baking stones work better for these types of bread, I get a much better bottom crust. 😀
Hey! I agree with the comments by @disqus_uxS742IOPR:disqus below, I typically get much better results for this type of bread using baking stones or a baking steel. However, a Dutch oven still works really well! You can use parchment paper and even coarse cornmeal or bran on the bottom of the loaves to help insulate them a bit. Also, if your heating element for your oven is at the bottom, try raising your rack so the Dutch oven isn’t so close, it might be getting too hot.
Hope that helps!
That’s great to hear! It’s most likely the fact that your environment is more humid coupled with the flour you’re using. That’s not really a problem, just lower the hydration of my recipe until the dough feels right to you (you could always compare your dough to my images above), work it back up slowly if you desire.
Good question on keeping the bulk container uncovered — no I always keep my container covered. I uncover to do folds and then cover again.
So yea, I would reduce hydration in the dough to suit! Hope that helps, happy baking 🙂
It is an incredible adventure indeed! Hope the bake went well 🙂
Yes, hydration is definitely going to be relative to your environment and your flour — essentially you need to really adjust as necessary. 75% hydration for you might very well be close to 85% for me!
I’m not sure what you mean by “free-form” but the loaves shown here are shaped and baked like a hearth loaf, that is no tins or molds used. The tight shaping of the dough is enough to keep them in shape when baked on a deck.
I feel like you should reduce hydration even more if the dough just doesn’t feel like it comes together. One other thing: strong fermentation in the dough and your starter/levain is very critical for this recipe (and all bread recipes, really!). Fermentation not only creates rise in the dough but it also strengthens the dough through organic acids produced as a byproduct. Make sure there’s plenty of activity in the dough (as you can see in the photos above).
Sorry this has been such a challenge, but that is baking, after all 🙂
Whoa! 6 hours at 30ºC is a very, very long time at that temperature. If you’re using the levain percentages I’ve listed here your dough will likely be over proofed by the end of bulk. I’d cut that down to a strict 4 hours at that temperature!
Yes, things will be very different between commercially yeasted dough and sourdough. It’s the same thing for me but in the opposite: when I see commercially yeasted dough i’m always in shock at how gassy and active the dough looks — it’s startling.
Try cutting that bulk back a few hours and see how things look!