
Wrinkled fingers and toes, sand in every nook and cranny, lunch sacks with empty oil-stained white baker’s paper, and serpentine hair that could pass as a sun-bleached mop head—all signs of a successful outing to the beach. Our daily trips to the Adriatic’s cool, blue waters were welcome escapes from the city heat during family visits to Southern Italy. Our little beach— perhaps with a bit of fantasy I like to think it was just ours—was a short drive away in a small stick-shift car packed to the brim with people. Family car after family car, we’d speedily caravan through the small towns toward our respite. The few, yet crucial, stops along the way had a single purpose: to fill our sacks with baked goods meant to sustain our time away. My favorite among these, by a long measure, was a simple sourdough focaccia.
With hardly a second thought, we’d buy several full sheet trays of the golden bread. The baker would cut the thick slabs into manageable pieces and wrap the entire thing in the white paper, sealed shut with a shiny sticker— conceivably an attempt to elevate the humble, yet utterly otherworldly, snack.
You see, focaccia is a rustic and simple affair: it’s a slab of naturally leavened dough topped with simple ingredients, any vegetable in season, olive oil, and salt. Some focaccia are soft, and some are crispy (my preference), sometimes thick and sometimes thin. There are as many variations across Italy as there are dialects. The beauty of this bread is that you can make it with little effort. First, mix the dough in the morning, then let it rise during the day, and finally bake it just before dinner. If you have a ripe sourdough starter, salt, and olive oil, you’re hours away from golden focaccia—and all the wonderful olfactory impressiveness therein—baking in your home oven.
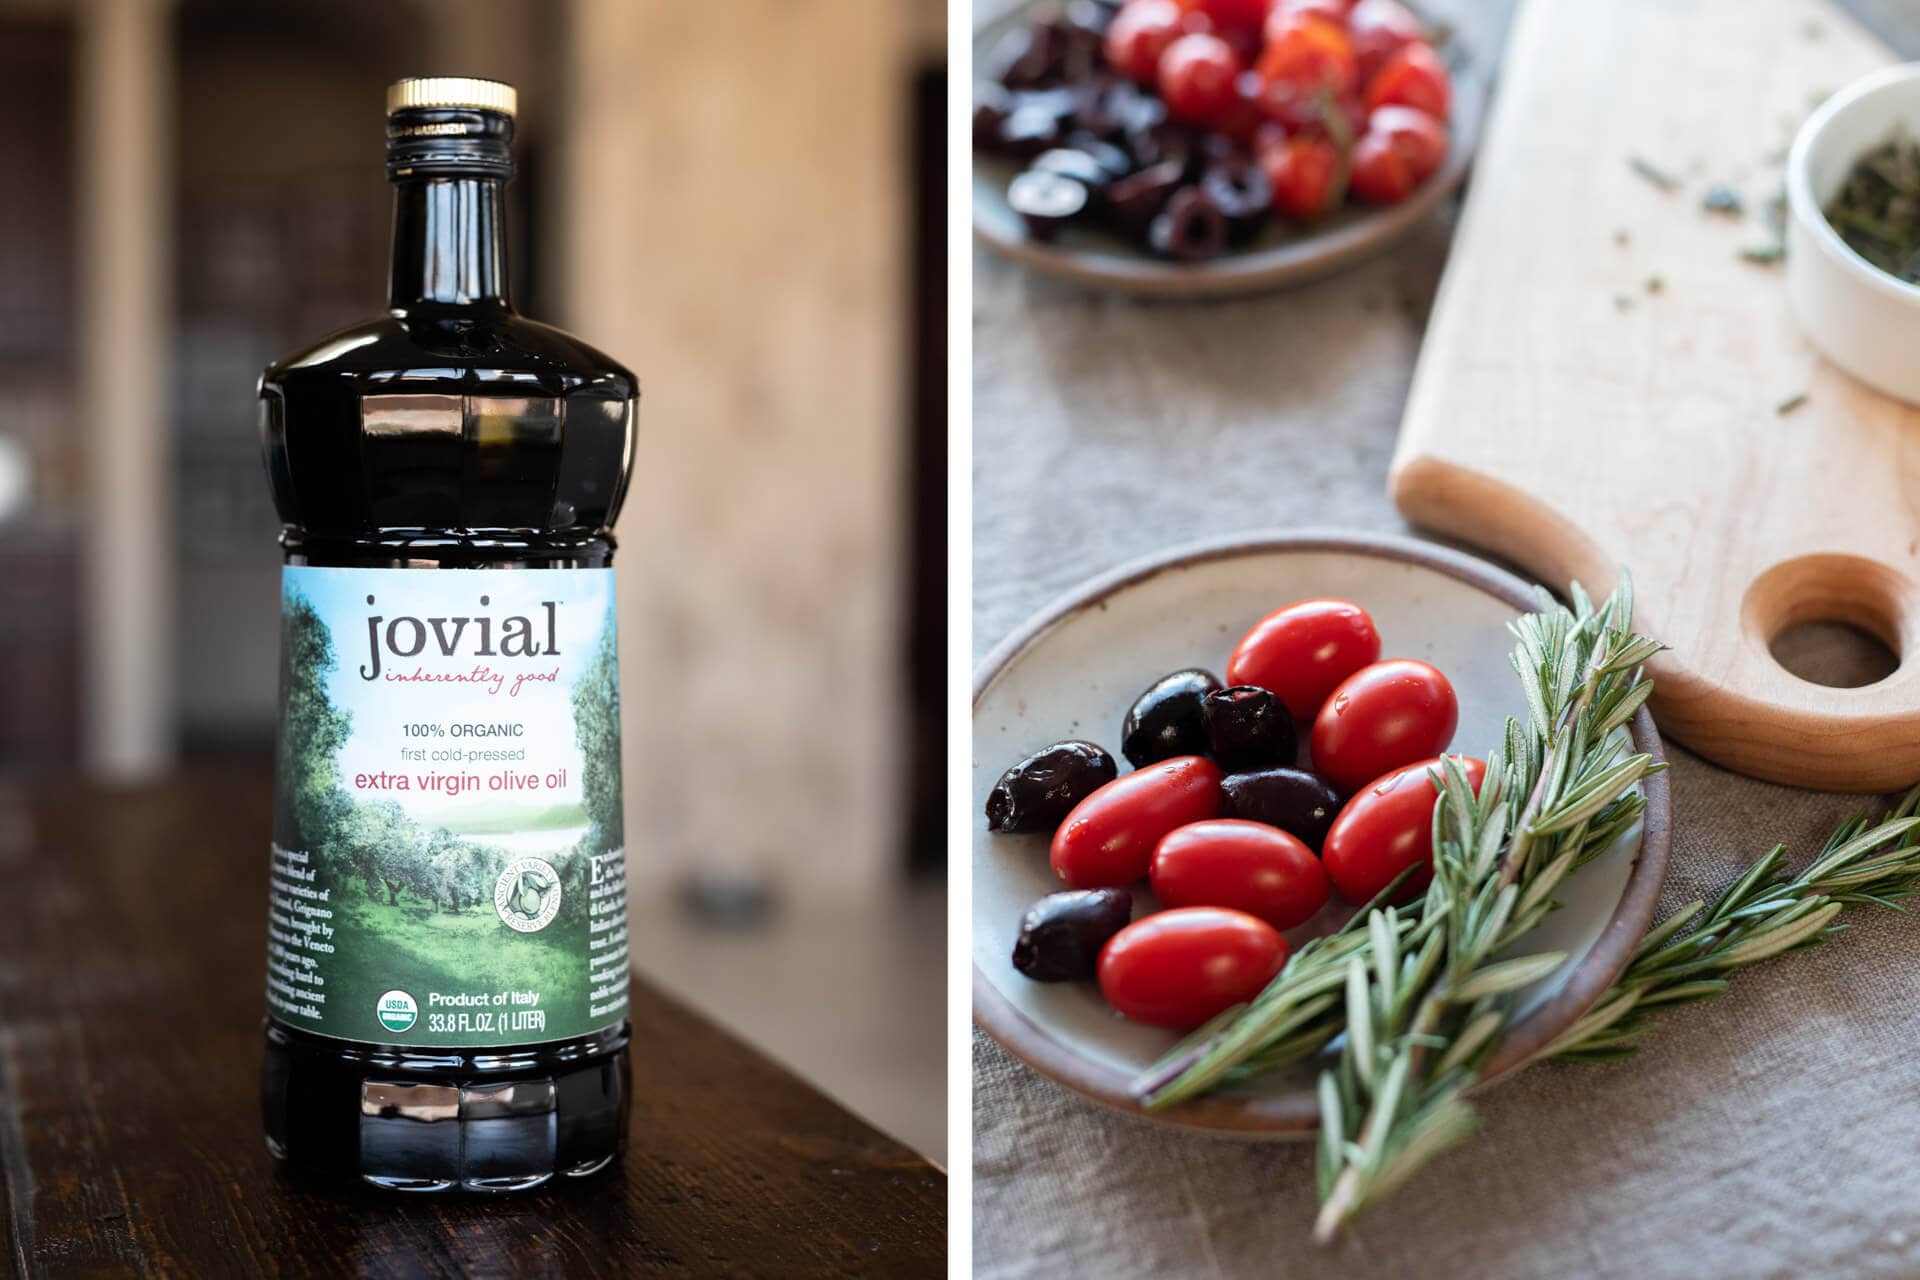
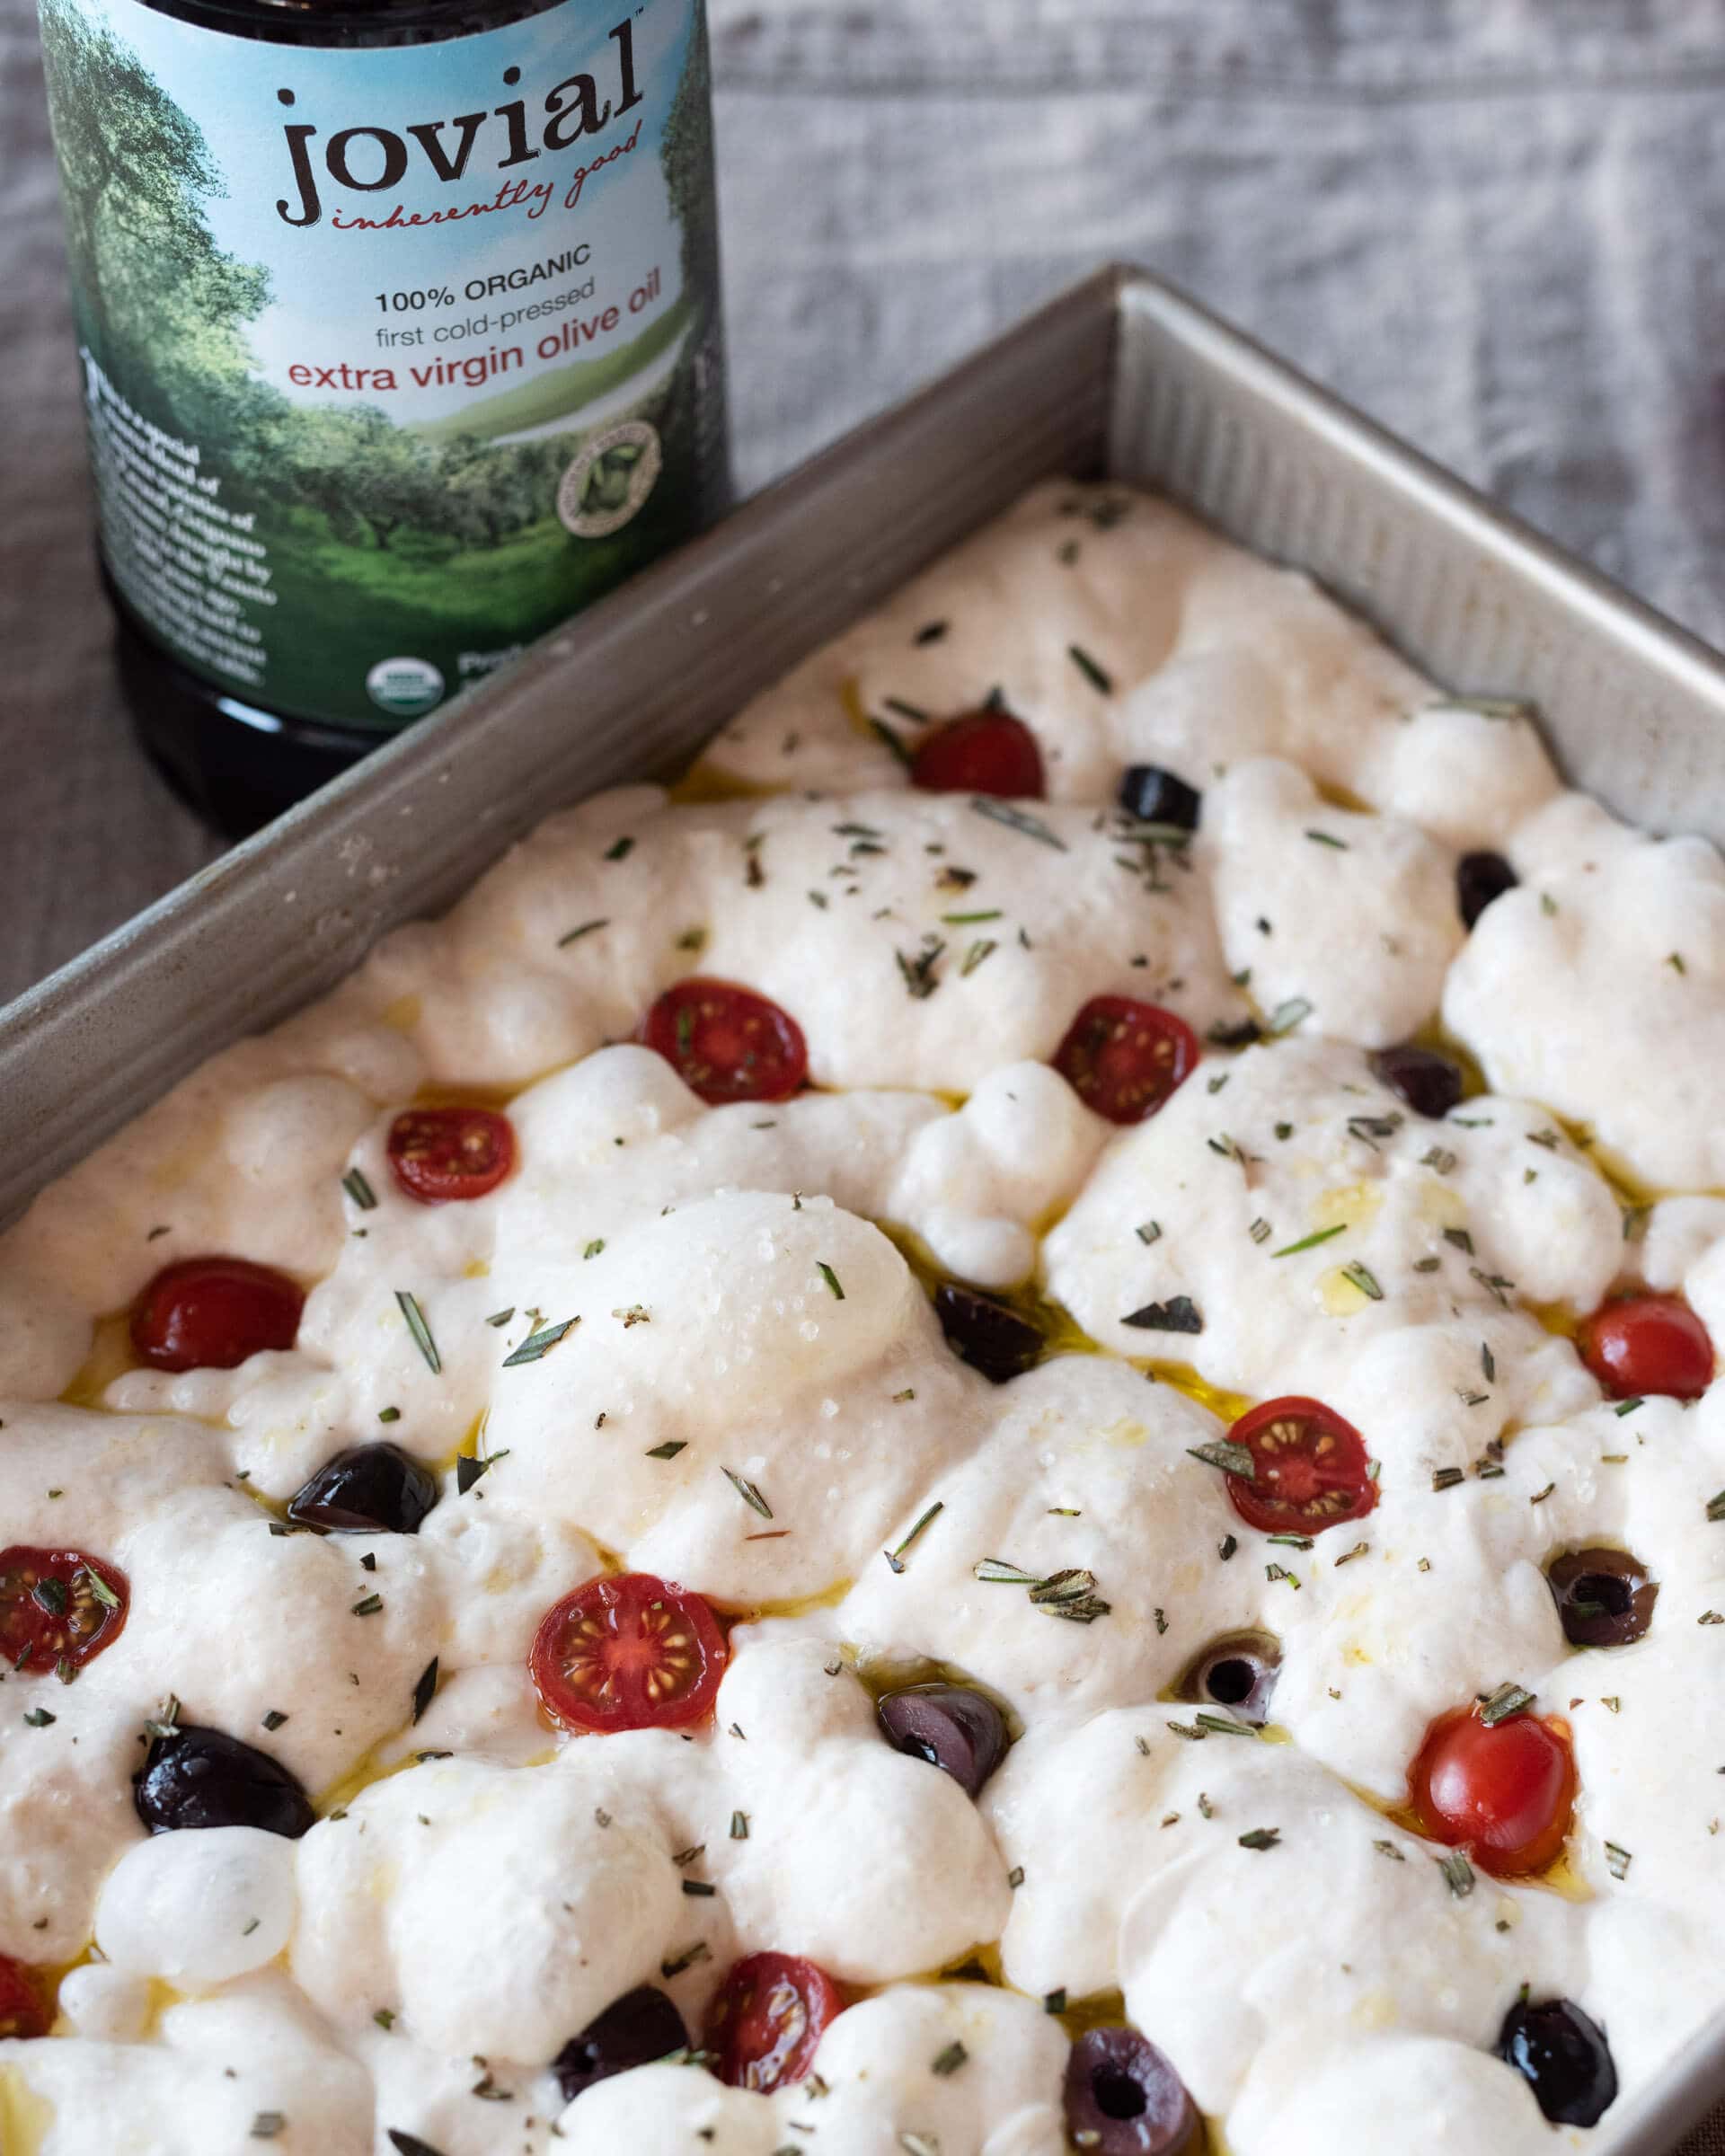
Because sourdough focaccia has so few ingredients, the ones you use should be of the utmost quality. Use vegetables in season and the highest quality olive oil you can find. In this post, I worked with Jovial’s Olio Nuovo, a fresh-pressed olive oil from the Valpantena area of Northern Italy. It isn’t easy to source exclusively fresh-pressed olive oil. Usually, this oil is blended with aged oil, balancing the flavor profile to make it consistent with other offerings throughout the year. This fresh oil has a delicate flavor but a balanced, upfront fruitiness as well. If you’ve never had the chance to try an oil like this, you’ll be pleasantly surprised.
Flour Selection
With this naturally leavened focaccia, I wanted little sourness in the result. While I typically include whole grains in most of my recipes, I wanted the flavor of this classic bread to be mild so the taste of the olive oil and fresh toppings pop. Removing all the whole grain flour from initial trials hit the spot.
For this formula, I blended 30% high protein flour (about 13% protein) with 70% all-purpose flour (11-12% protein). The high protein flour helps give this highly-hydrated dough strength and structure—and 30% is just enough.
Focaccia Toppings
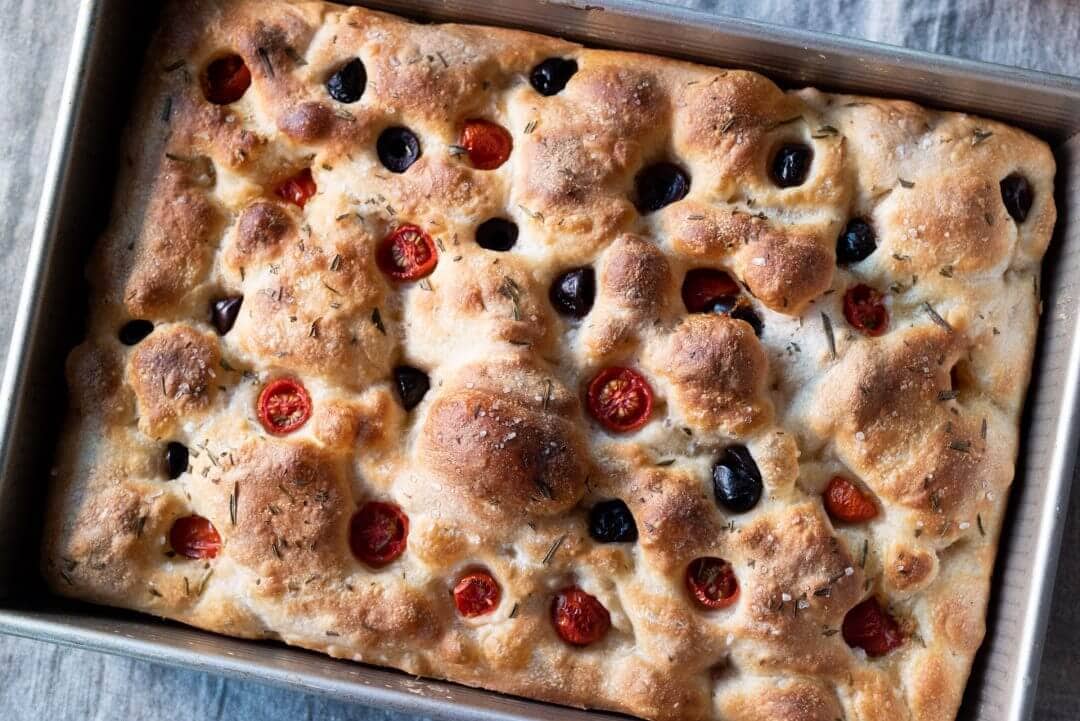
This simple sourdough focaccia can be topped with just about anything you can imagine. My favorite is rosemary, chopped cherry tomatoes, pitted kalamata olives, coarse sea salt, and good quality olive oil. Traditionally, Ligurian focaccia (and as shown in the recent Salt Fat Acid Heat episode on Netflix) is topped with a salty brine. Instead, I love dusting the top with coarse sea salt: the chunky crystals bring unexpected pops of flavor.
Here are a few more ideas:
- Tomatoes, capers, oregano, garlic, olive oil
- Thinly sliced Yukon gold potatoes tossed with coarse salt. Let the potatoes drain over a colander for 15 minutes to help remove some water. Then top in addition to coarse sea salt, fresh thyme, and olive oil
- Sliced and olive oil-marinated red onions, brined olives, and fresh chopped tomatoes
- Grated hard cheeses of all kinds (parmesan, pecorino, etc.), rosemary, olive oil
A Simple Sourdough Focaccia Recipe
Special Equipment
For this sourdough focaccia, you will need a round or rectangular pan for baking. I like to use a deep pan (as opposed to a baking sheet) so the focaccia doesn’t dry out too fast in the oven. My preferred pans:
- 9″ x 13″ USA Pan Rectangular Cake Pan
- Two 10 x 2.25″ LloydPans Round Pans (use the same dough weight as in this recipe, just divide in half and place each half into one pan)
Both pans have a nonstick interior, and they conduct heat exceptionally well, imparting a beautiful crust on the naturally leavened focaccia.
Vitals
| Total Dough Weight | 1,200 grams |
| Sourdough Starter | 19.00% |
| Hydration | 76.00% (78.00% with olive oil) |
| Yield | One 1200g focaccia |
Total Formula
This table shows the entire quantity and baker’s percentages for each ingredient. If you’d like to make two large focaccia (or four smaller ones), double everything in the table below.
There’s no specific levain build for this focaccia, just use some of your sourdough starter when it’s ripe (when you’d normally give it a refreshment). See my post on the differences between a levain and sourdough starter for more information on the two preferments.
Target final dough temperature (FDT) is 76°F (24°C).
| Weight | Ingredient | Baker’s Percentage |
|---|---|---|
| 423g | All-purpose flour (King Arthur All-Purpose Flour) | 70.00% |
| 181g | High protein bread flour, malted (King Arthur Bread Flour) | 30.00% |
| 12g | Extra virgin olive oil (Jovial Olio Nuovo Organic Olive Oil) | 2.00% |
| 459g | Water | 76.00% |
| 11g | Salt | 1.80% |
| 115g | Sourdough starter (100% hydration) | 19.00% |
Method
Mix – 9:00 a.m.
This dough can be mixed by hand (I would use the slap and fold technique) or with a stand mixer like a KitchenAid or Famag spiral mixer.
To the bowl of a stand mixer fitted with the dough hook attachment, add both the flours, water, salt, and ripe sourdough starter (hold back the olive oil until later in mixing).
Mix on speed 1 for 1 to 2 minutes until incorporated. Then, mix on speed 2 for 5 minutes until dough strengthens and clumps around the dough hook. Let the dough rest in the mixing bowl for 10 minutes.
Next, turn the mixer on to speed 1 and slowly drizzle the olive oil into the bowl while mixing. Once all of the olive oil is absorbed, turn the mixer up to speed 2 for 1 to 2 minutes until the dough comes back together.
Transfer your dough to a bulk fermentation container and cover.
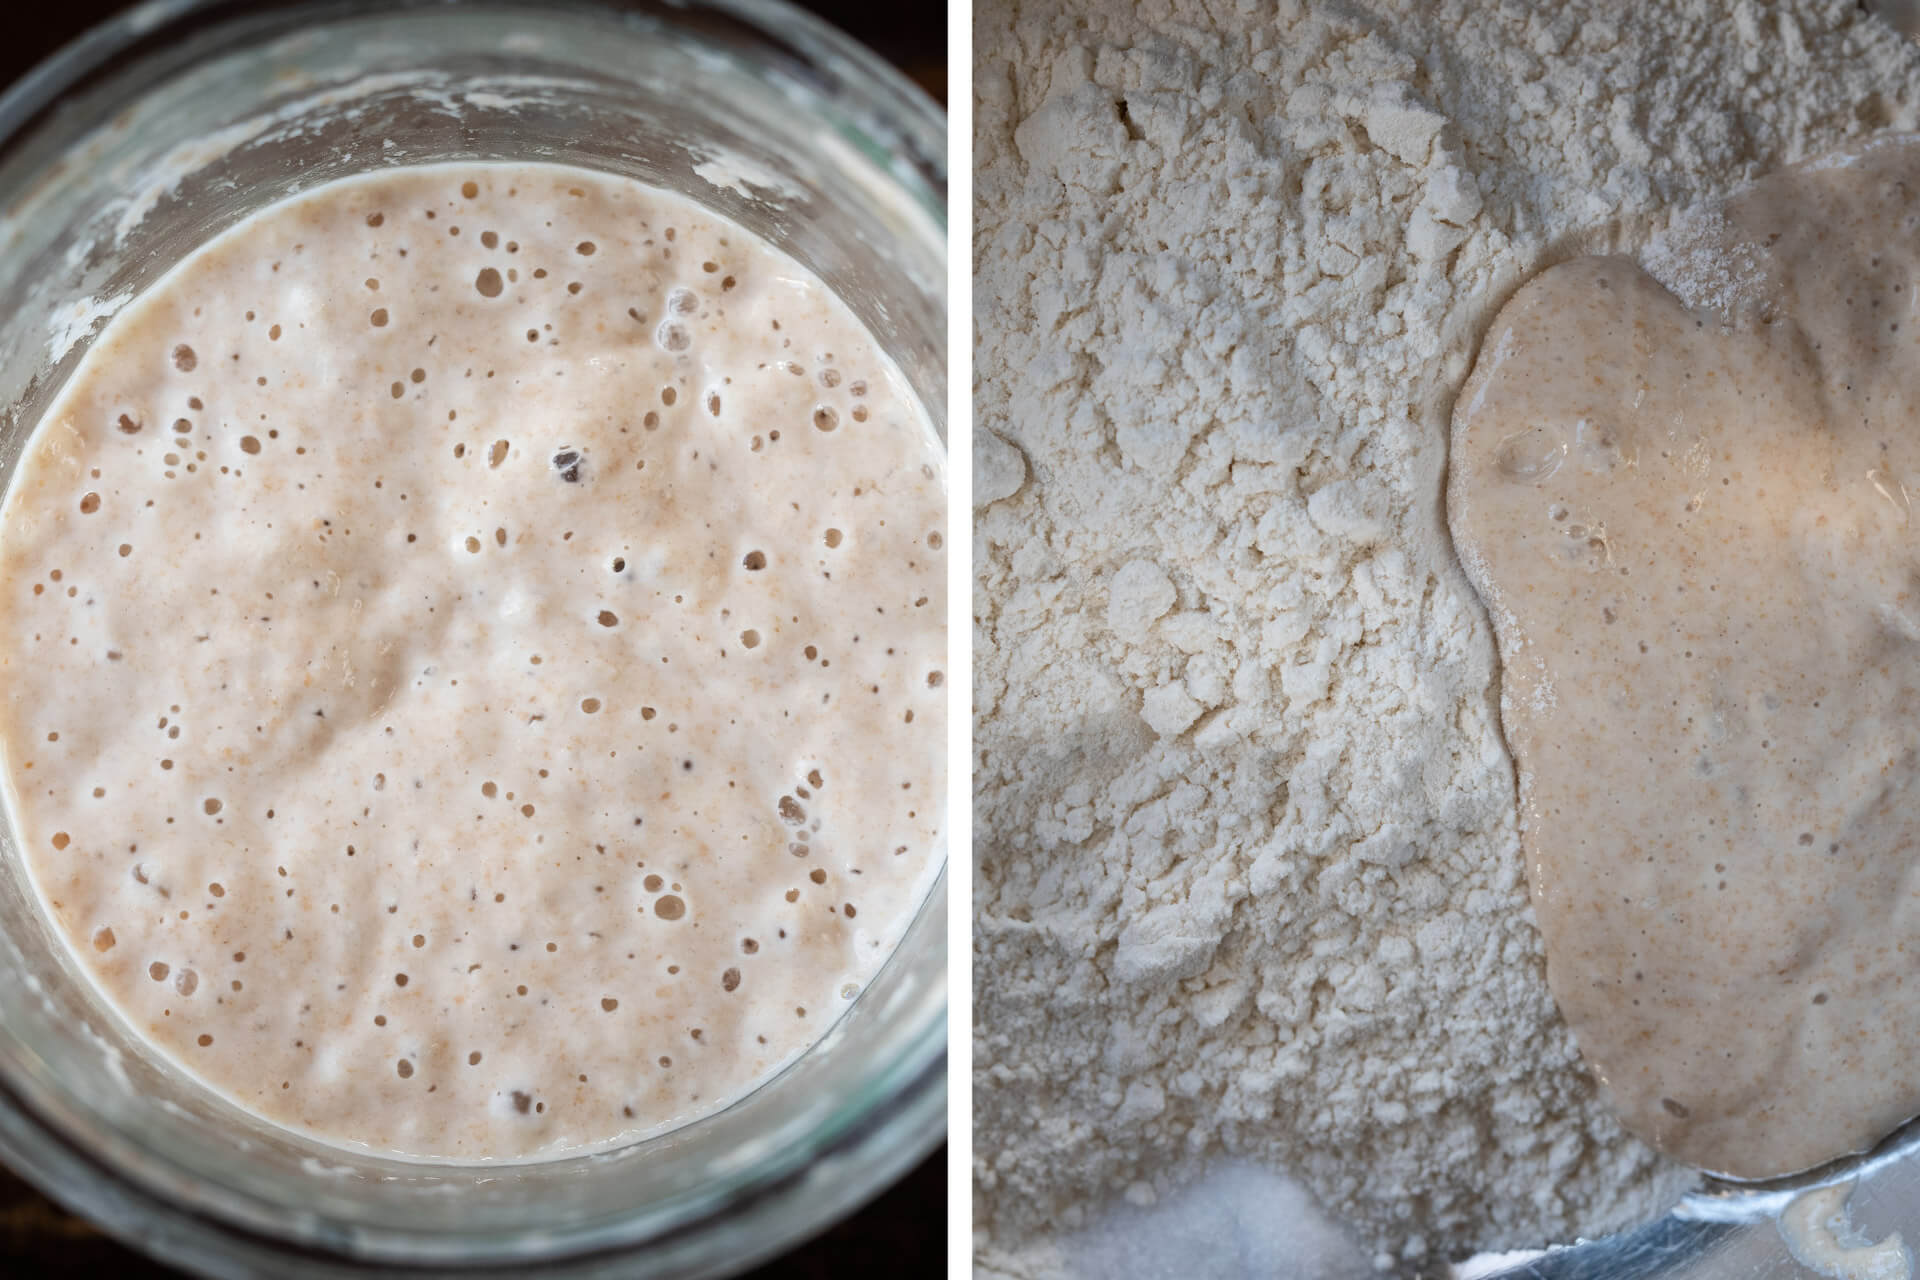
This highly hydrated and enriched dough is wet and loose, it won’t strengthen to the same degree as a typical bread dough.
As you can see below on the left, the dough is still very wet and chunky immediately after mixing. However, it’s not falling apart or soupy. Please resist the temptation to add more flour at this point. As you can see below in the image at the right, by the middle of bulk fermentation, it’ll strengthen after several sets of stretch and folds (see my guide on how to stretch and fold sourdough for more information).
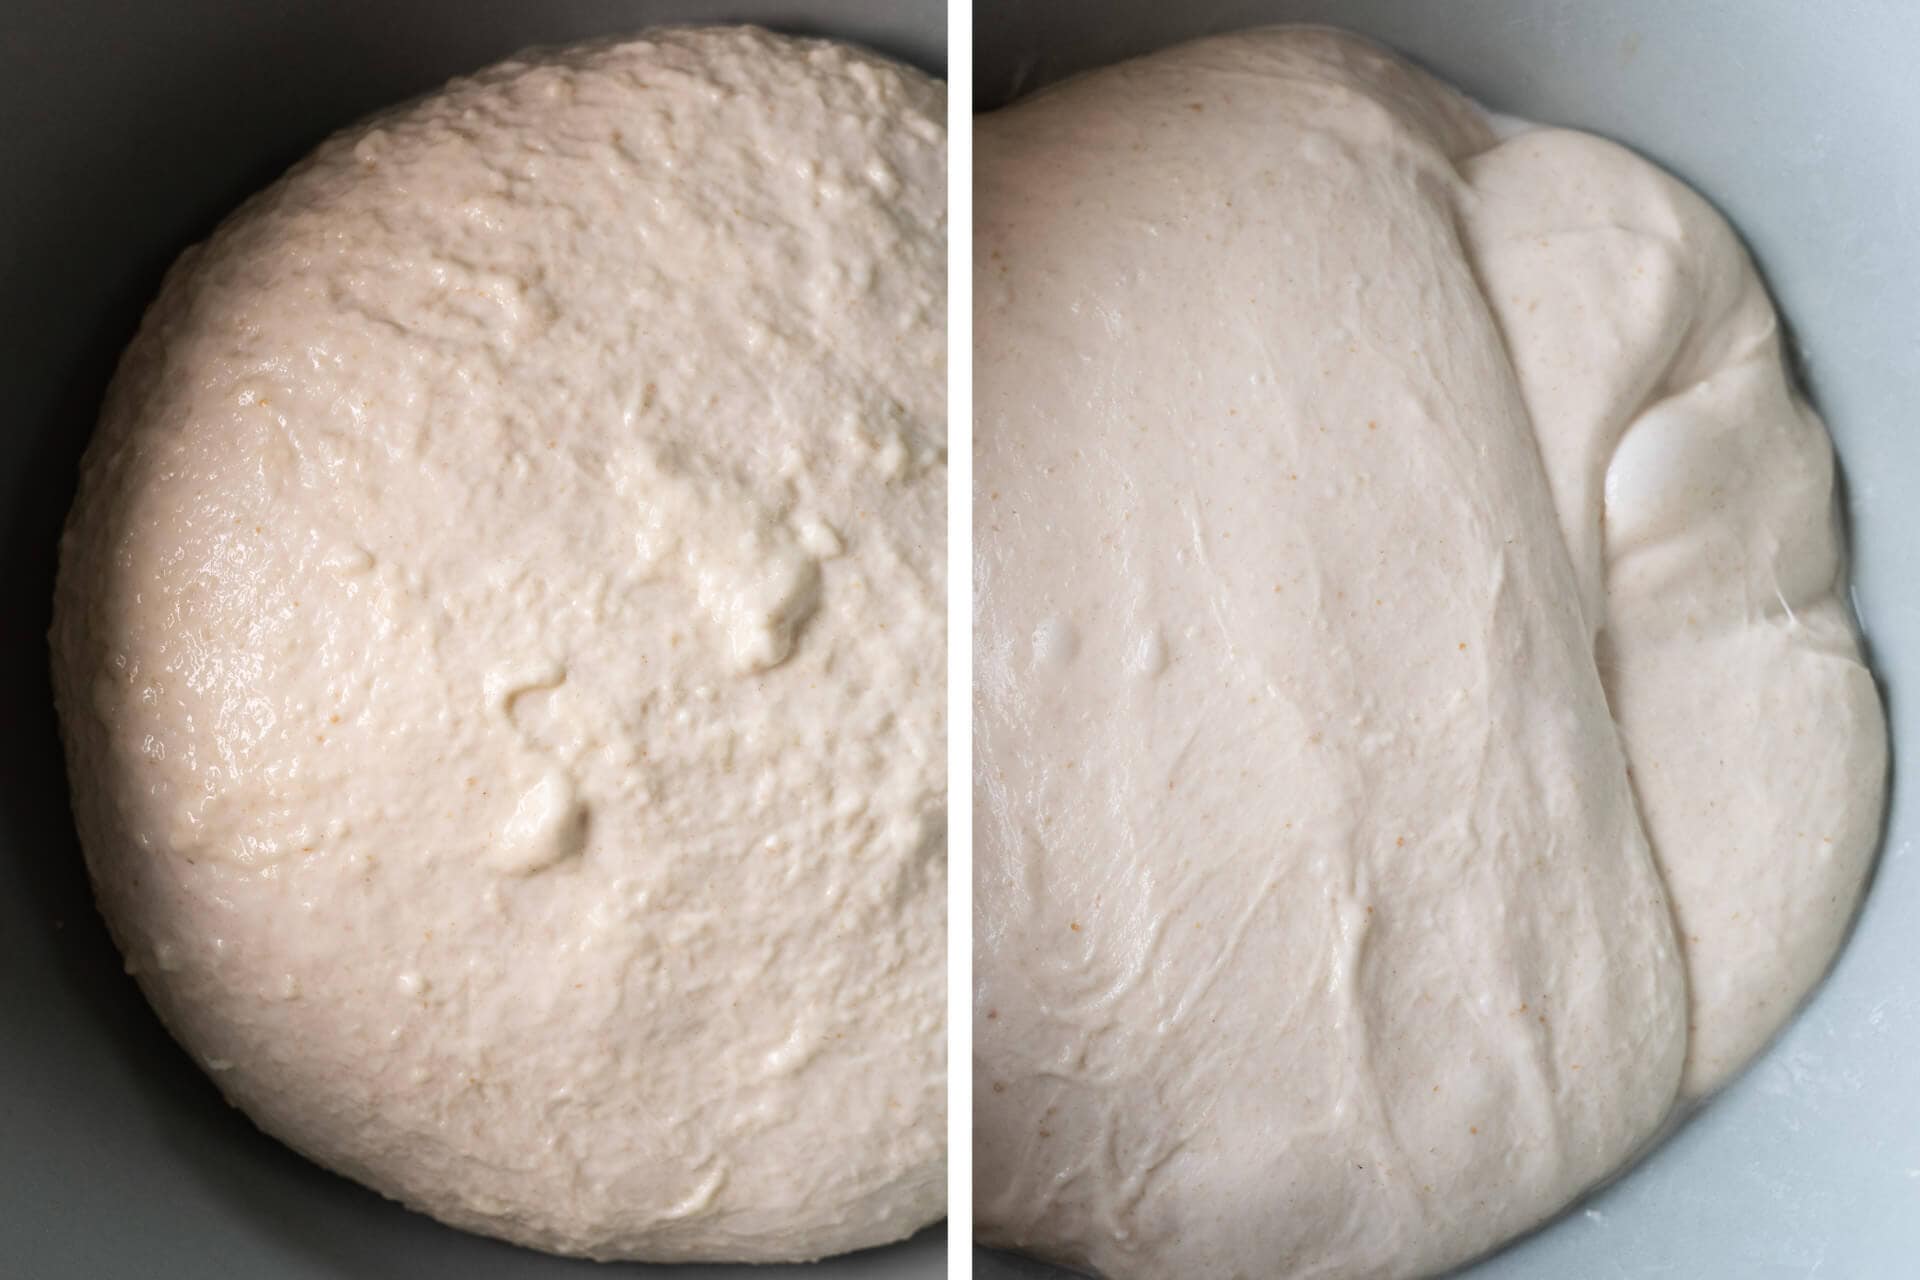
Transfer the dough to a covered container for bulk fermentation.
Bulk Fermentation – 9:15 a.m. to 11:15 a.m.
Give the dough 4 sets of stretches and folds (fold a side of the dough up and over to the other side, and then rotate the container to perform 4 folds per set), starting 30 minutes after mixing, and a set every 30 minutes after that.
Proof – 11:15 a.m. to 3:15 p.m.
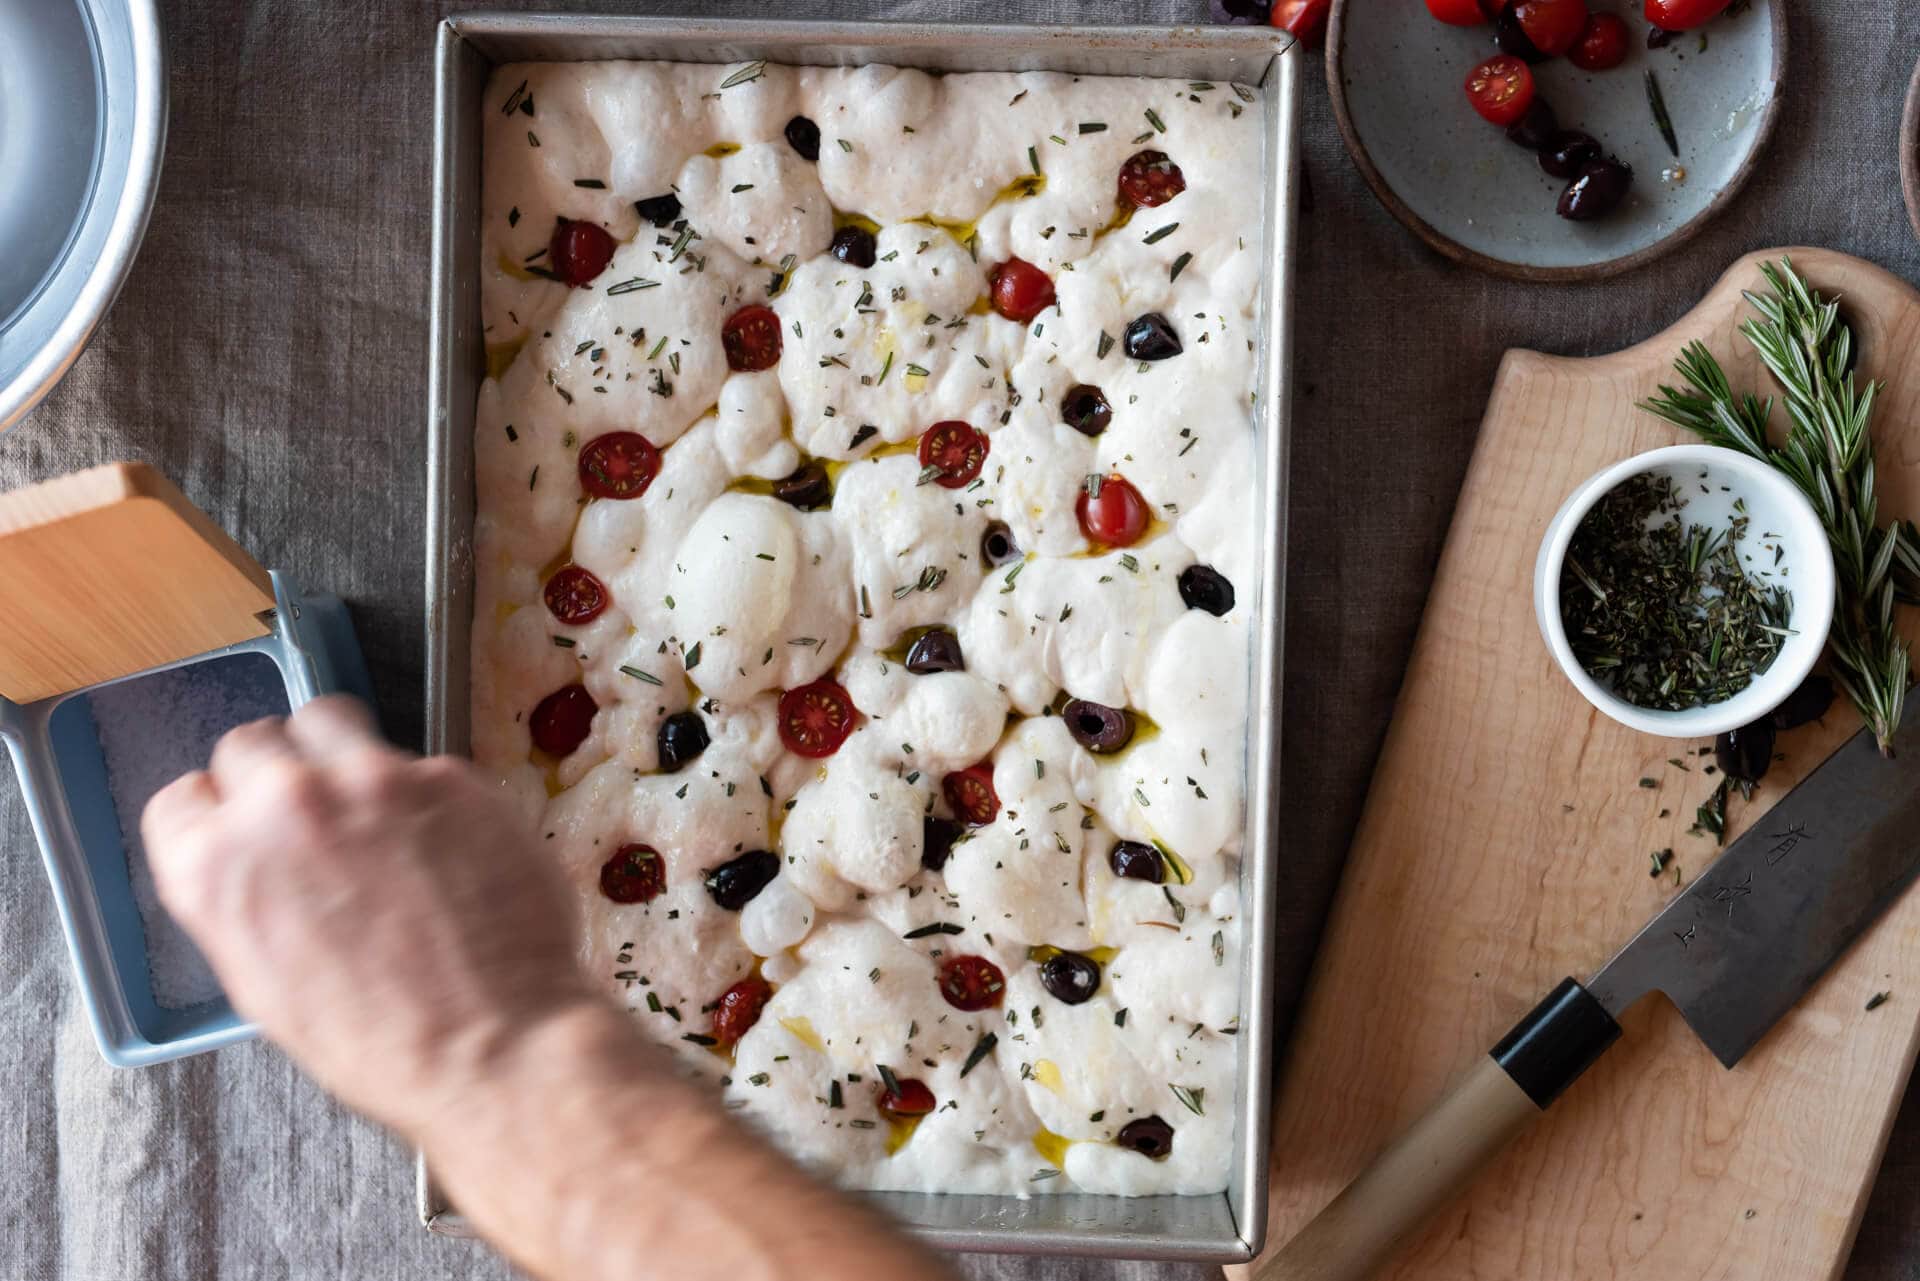
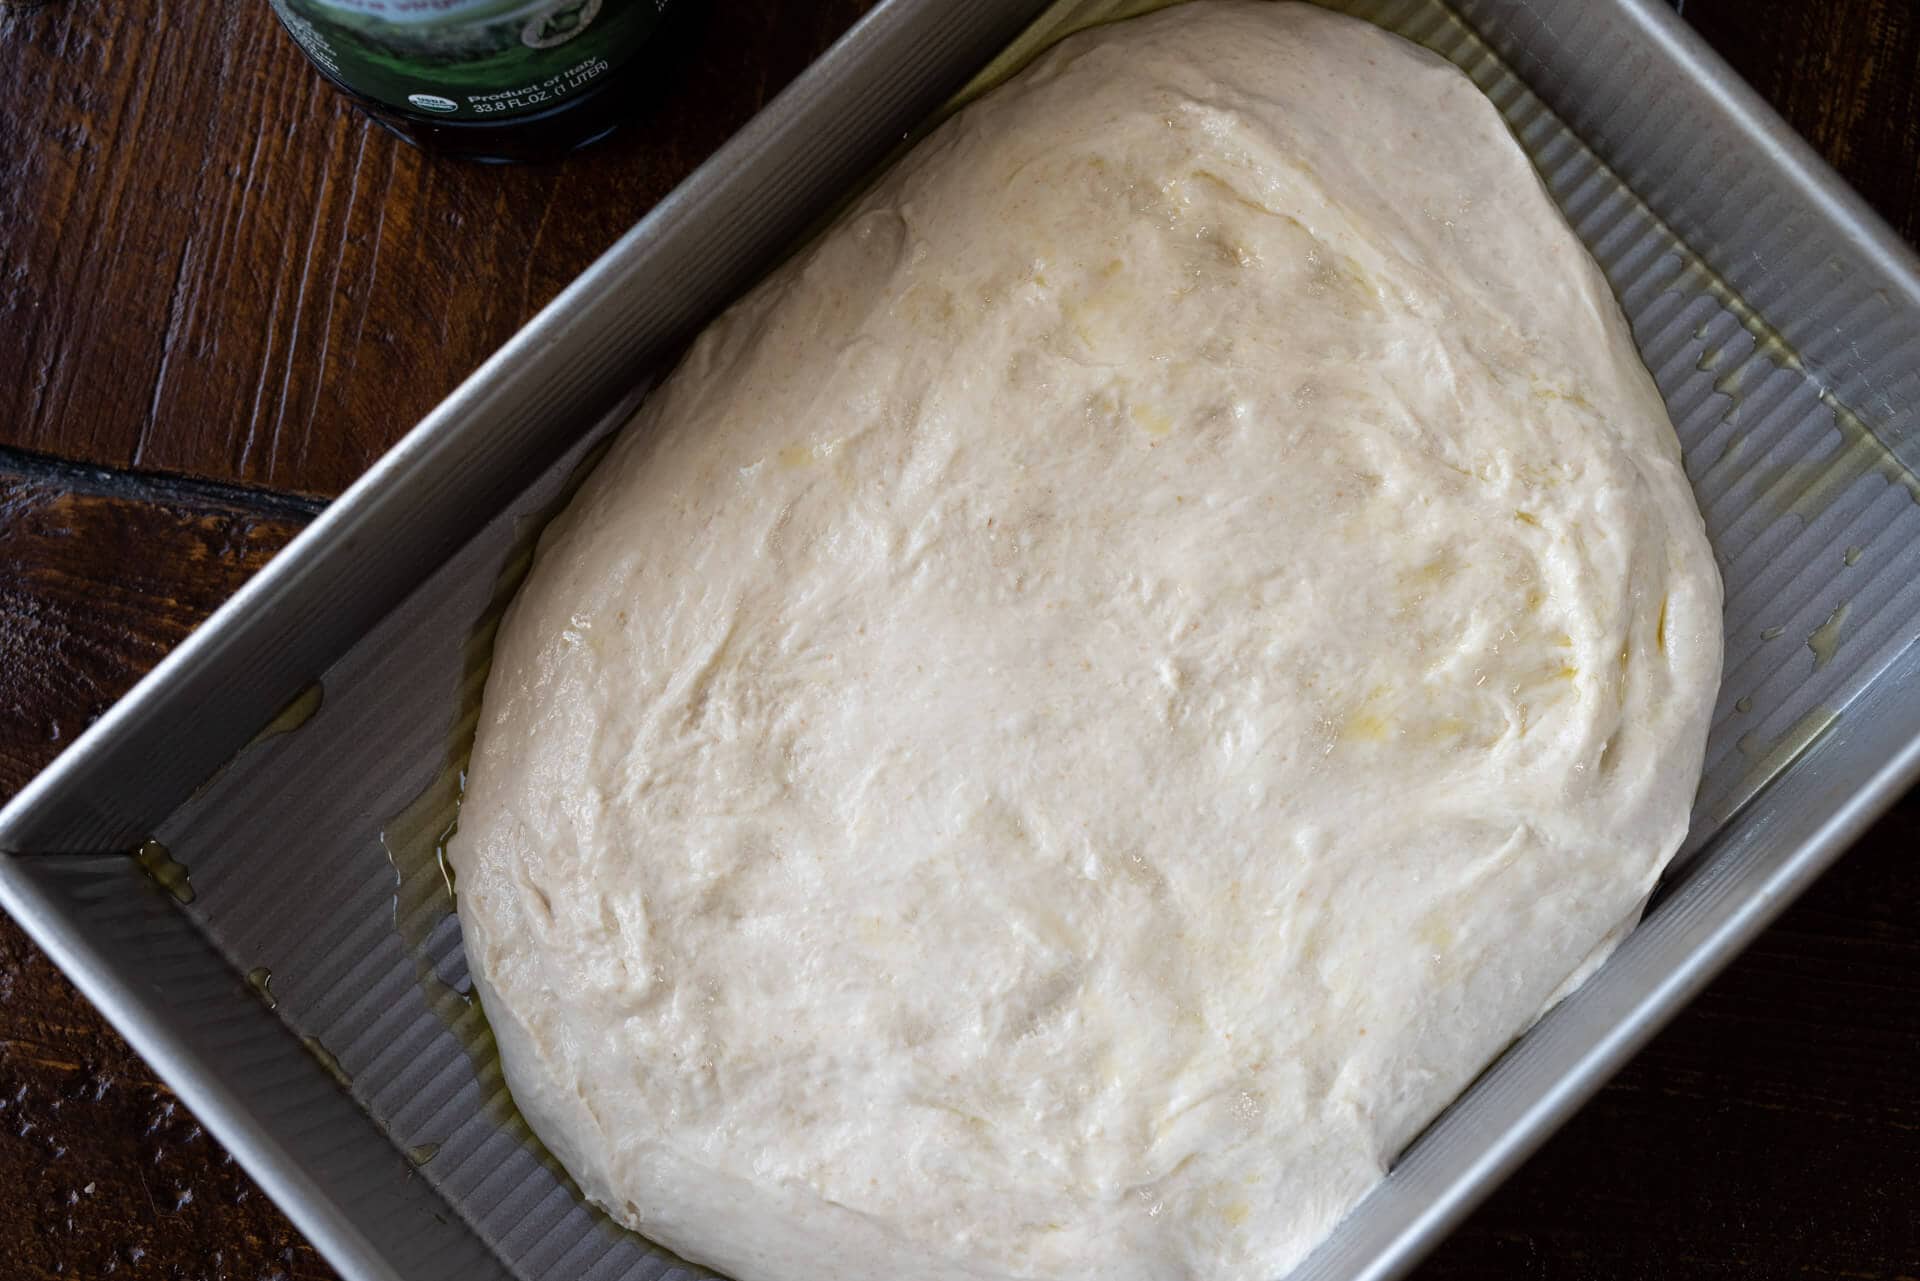
Transfer the dough to a deep rectangular pan that’s been greased with olive oil. If you don’t have a pan with a silicone liner, make sure to heavily oil the pan’s interior so the focaccia doesn’t stick during baking.
At 76-78°F (24-25°C), the dough will proof for 4 hours. This time period is flexible and dependent on the temperature: if it’s cooler, let it proof longer, and conversely, if it’s warm, you might be able to bake sooner.
Every 30 minutes for the first hour, uncover the pan and gently stretch the dough with wet hands to the pan’s edges to encourage it to fill the pan. The dough will naturally spread out during this proofing period, so it’s unnecessary to spread the dough aggressively. Once the dough is mostly spread to the edges, cover the pan and proof for 4 hours.
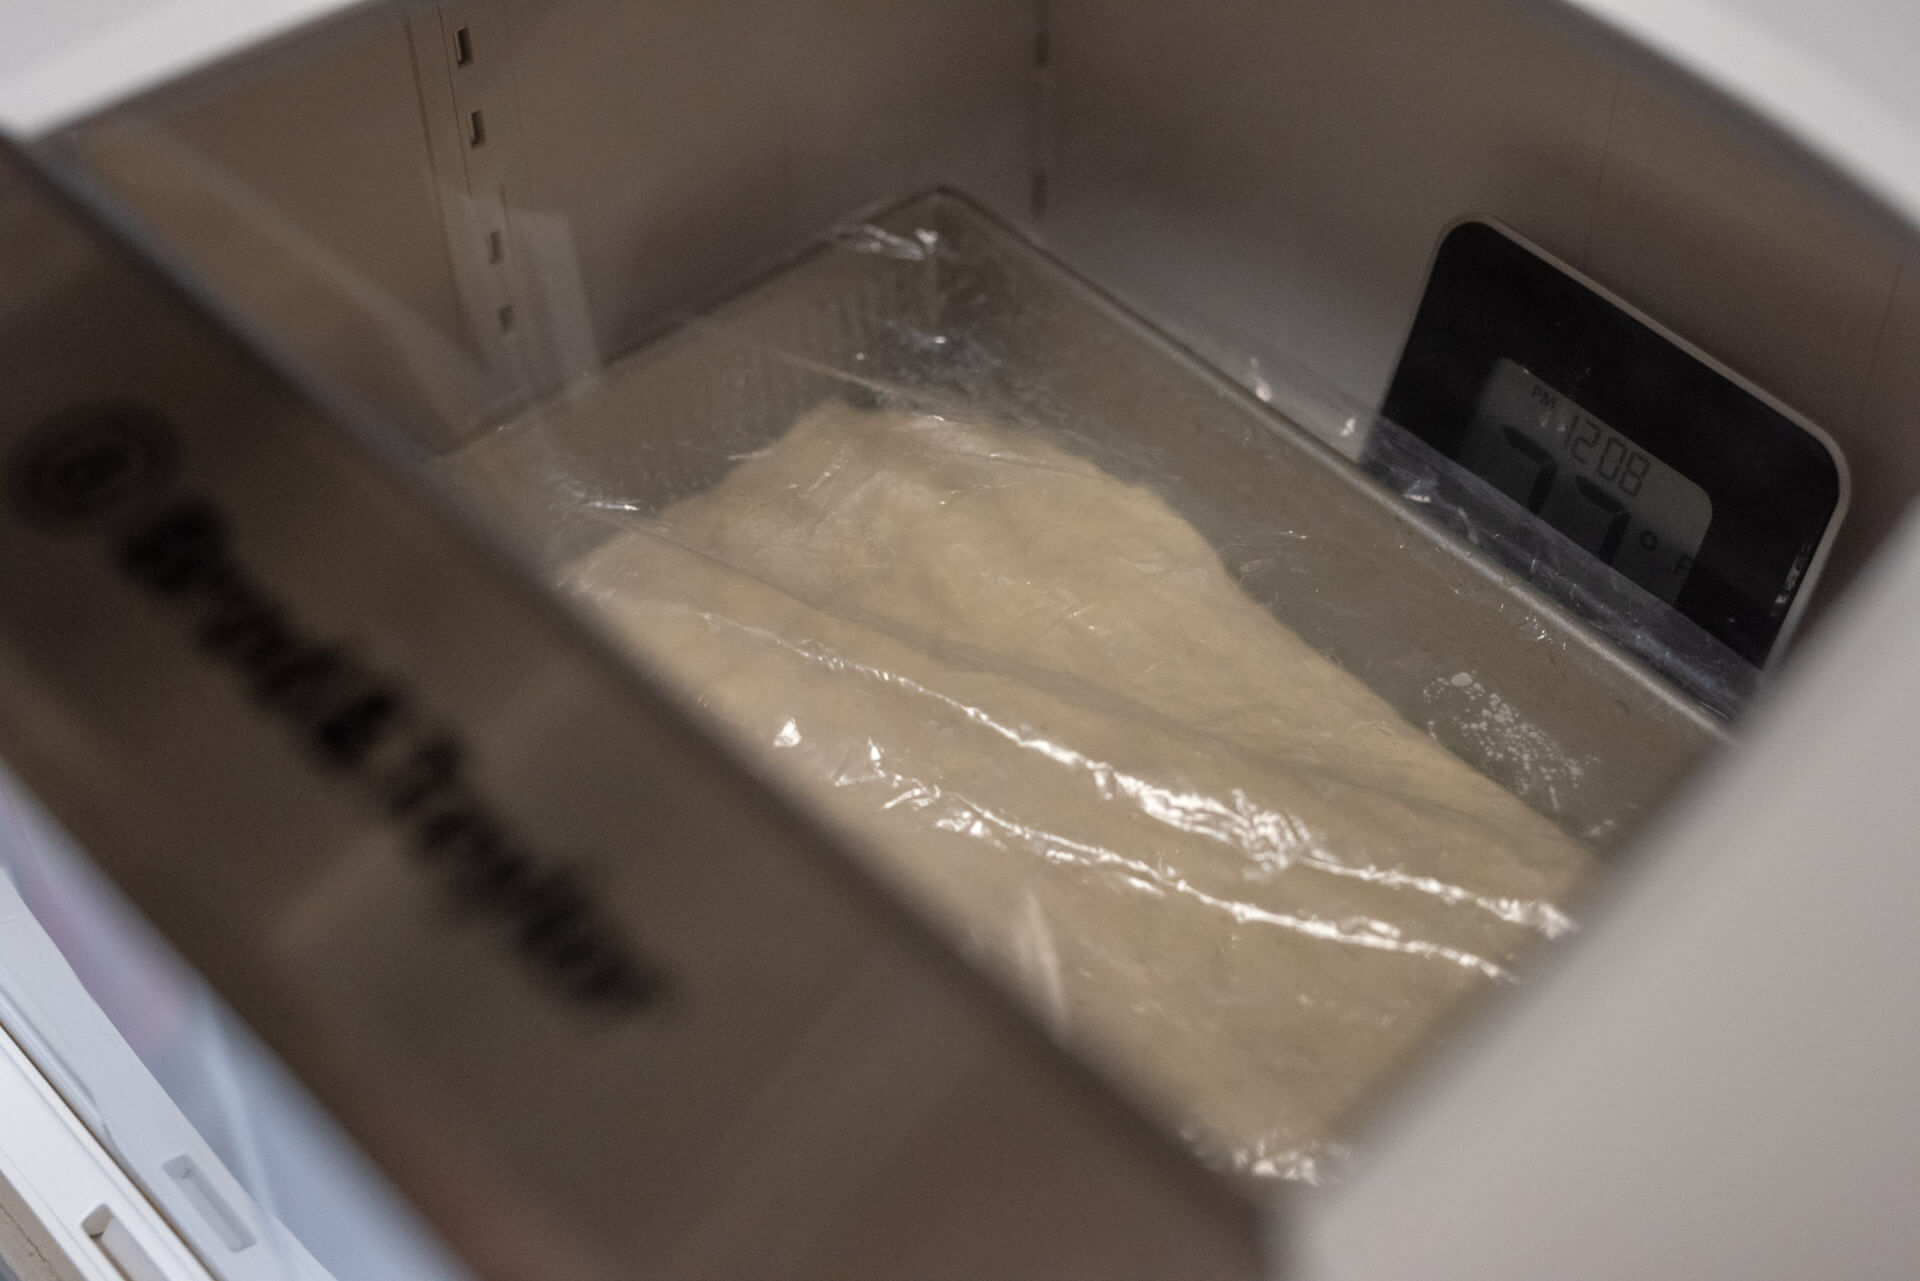
OVERNIGHT OPTION: After two hours in proof, cover the rectangular pan with an airtight cover and transfer to the fridge. The next day, take out the dough and let it come to room temperature, and continue with the Top & Bake step below.
The rectangular pan I use fits perfectly inside my B&T Dough Proofer. I keep it inside the proofer, covered with reusable plastic, and set to 78°F (25°C) until ready to bake.
About 30 minutes before you anticipate the sourdough focaccia dough being ready, preheat the oven to 450°F (232°C) with a rack placed in the bottom third (a baking stone is not necessary).
Top & Bake – 3:15 p.m.
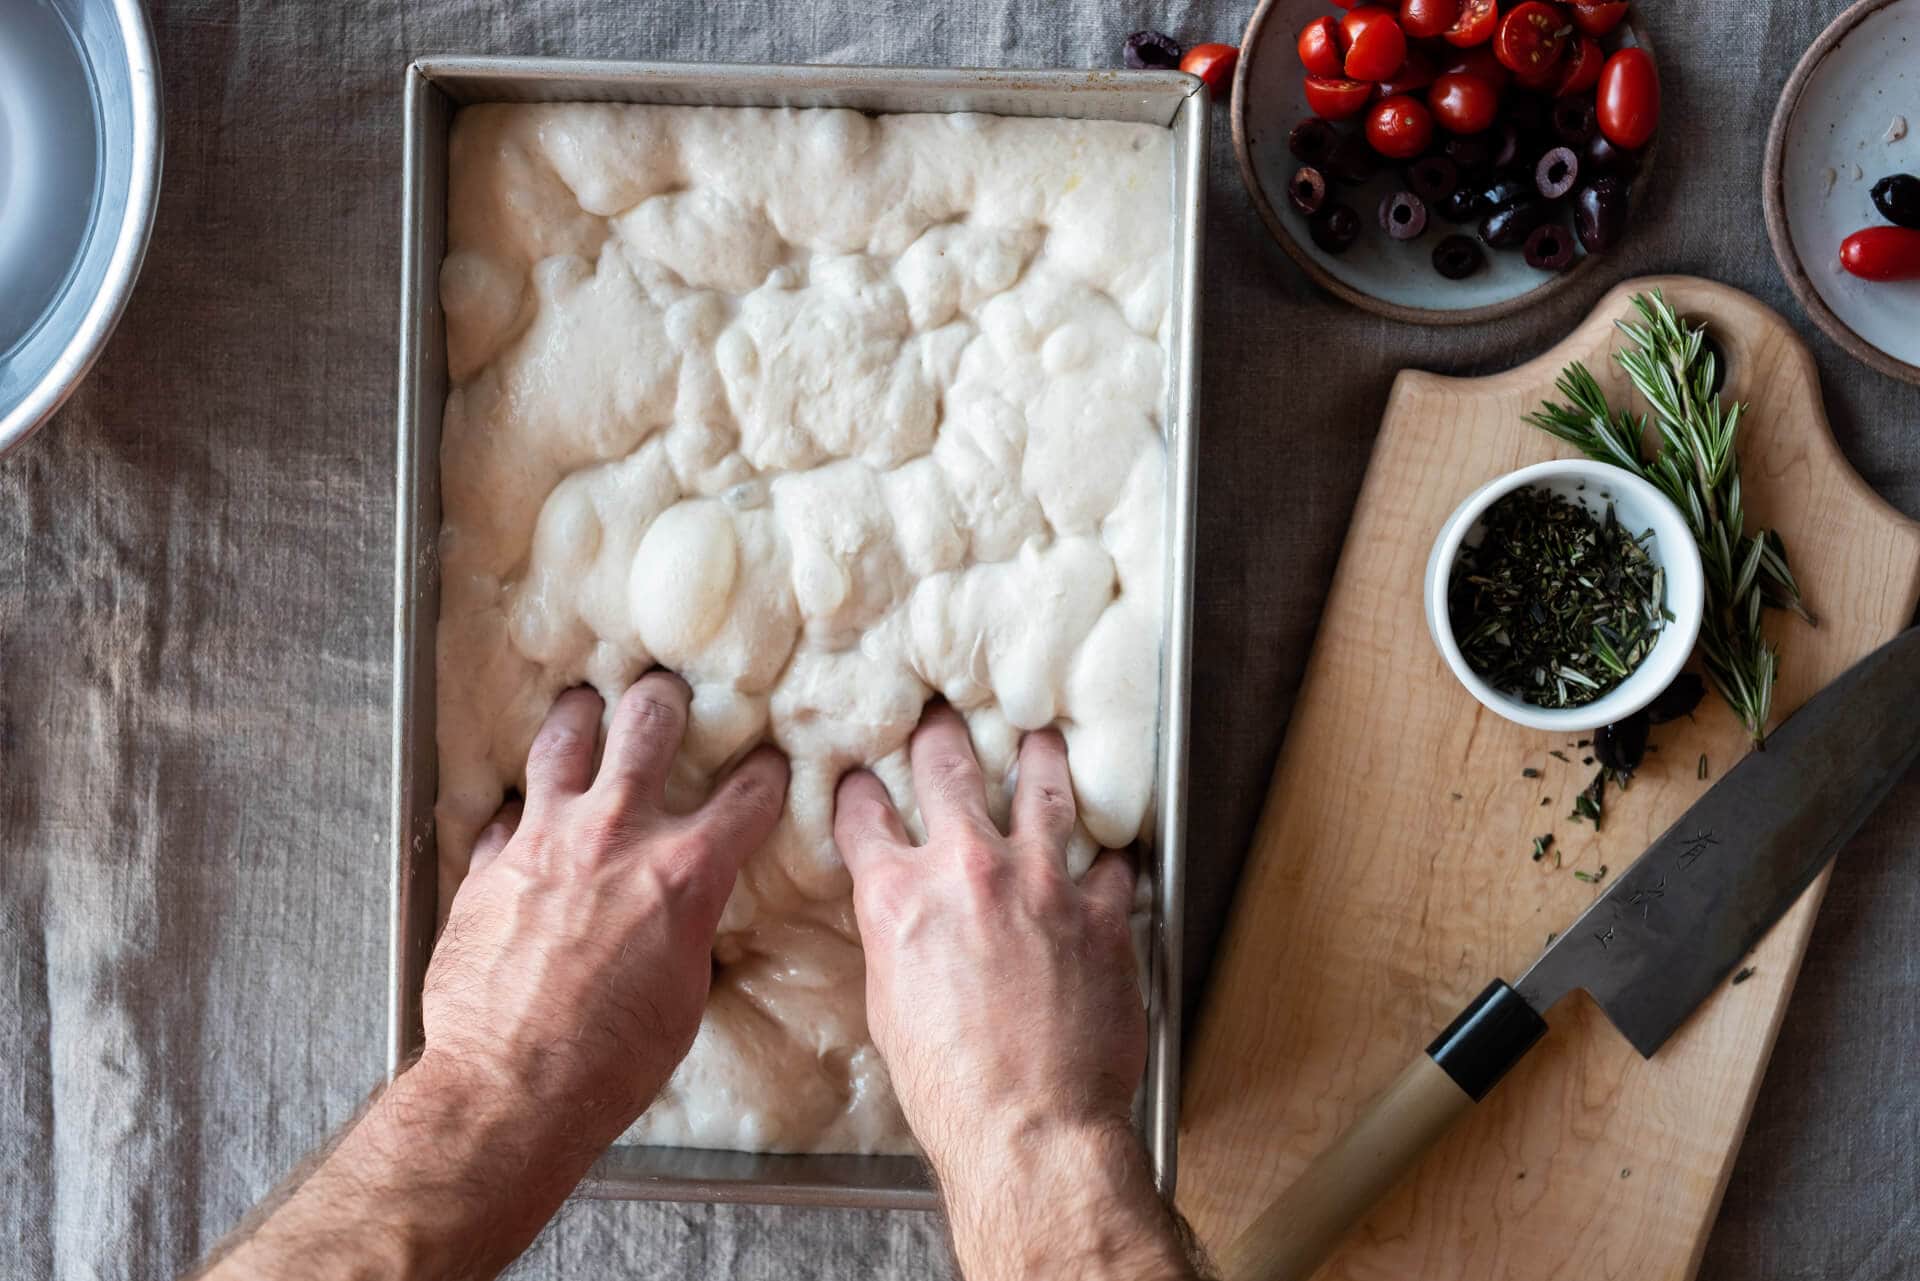
First, dimple the unadorned dough with wet fingers. Make sure the dimples are evenly spaced and go all the way down to the bottom of the pan. Then, drizzle on 1-2 tablespoons of your extra virgin olive oil and sprinkle with herbs and coarse sea salt. If using other toppings, add them now as well—I like to press them into the dough gently.
Bake the focaccia in the oven at 450°F (232°C) until deeply colored on top, about 30 minutes. Rotate the pan front-to-back halfway through this time. Keep an eye on it during the last 5 minutes and pull it out if it’s coloring too quickly, or leave it in longer if you’d like it a little darker.
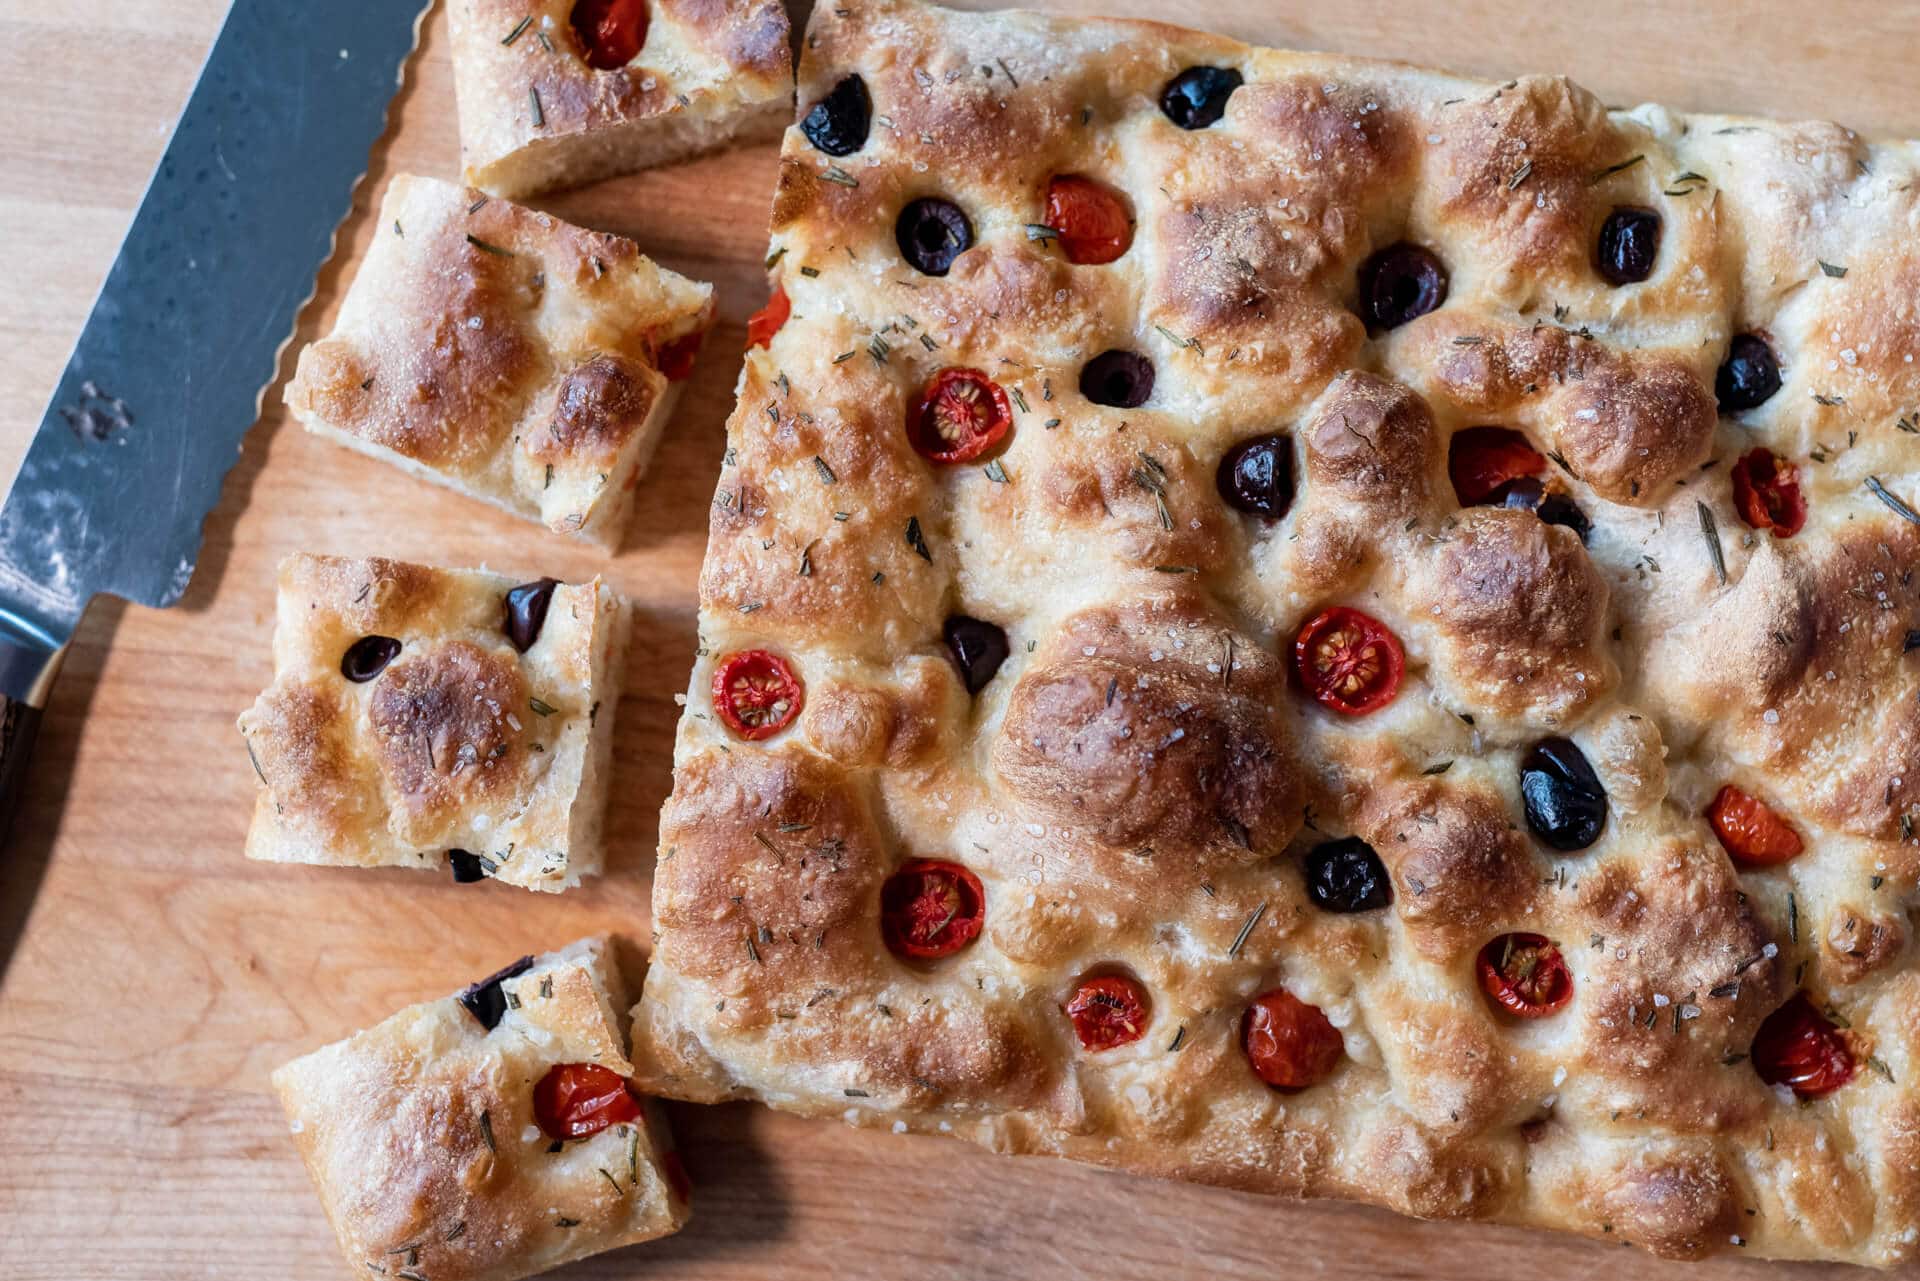
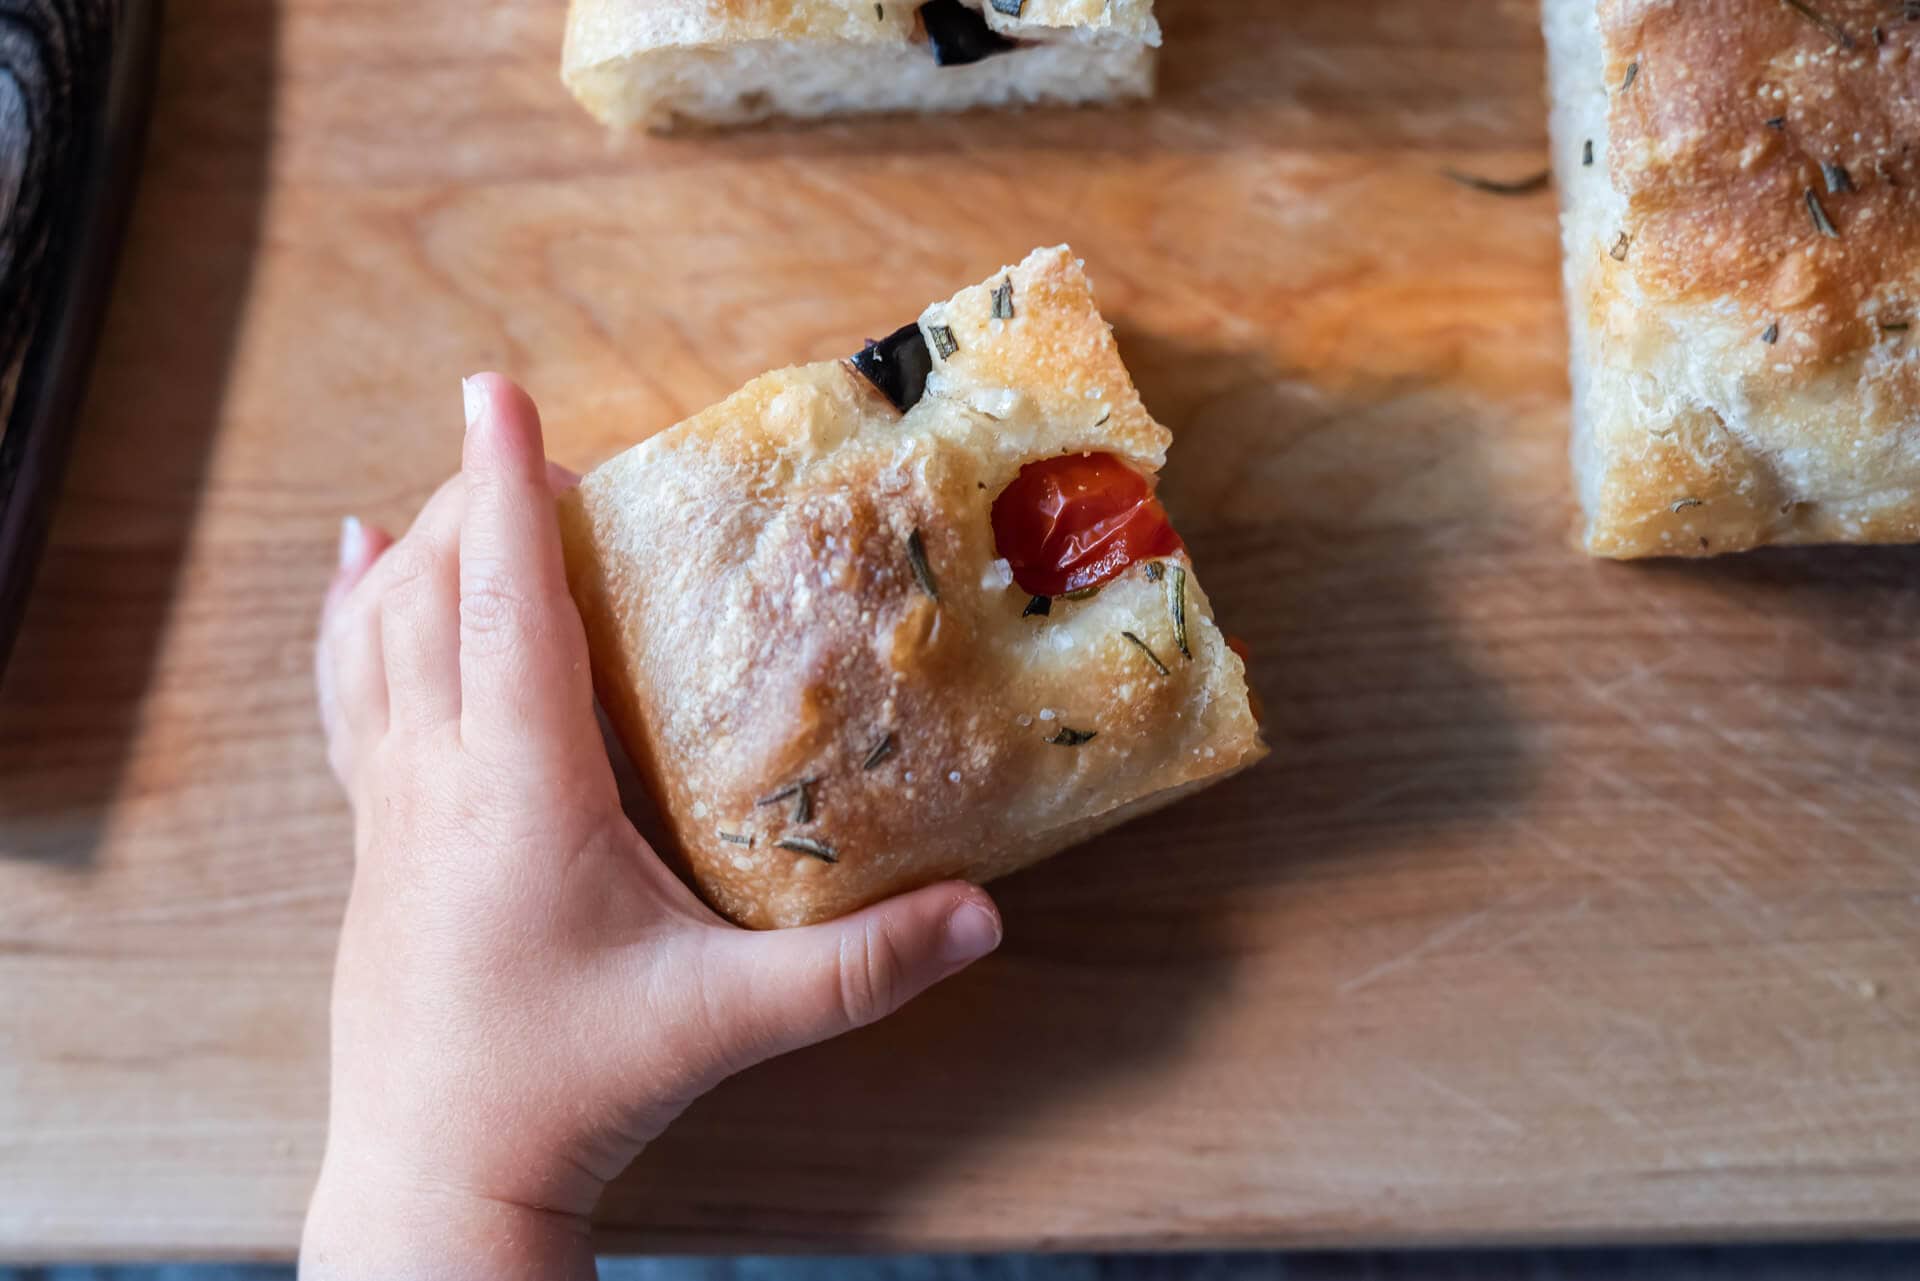
Let the focaccia cool a few minutes in the pan, then transfer to a cooling rack. It’s fantastic warm from the oven, and best on the day of baking, but it’ll keep well for a couple of days loosely wrapped in foil (reheat under the broiler before serving).
Conclusion
When I topped the pillowy focaccia dough, the aroma of fruity olive oil and chopped rosemary was captivating. Once the pan was slid into the oven, my house gradually filled with the most intoxicating perfume as the dough rose high and the edges began to crisp. The melange of baking dough, toasted herbs, olive oil, and briny olives had me checking the oven frequently—as if checking on it would expedite things. Sit tight, wait for it to finish, I told myself as I gently slapped my hand from opening the door yet again.
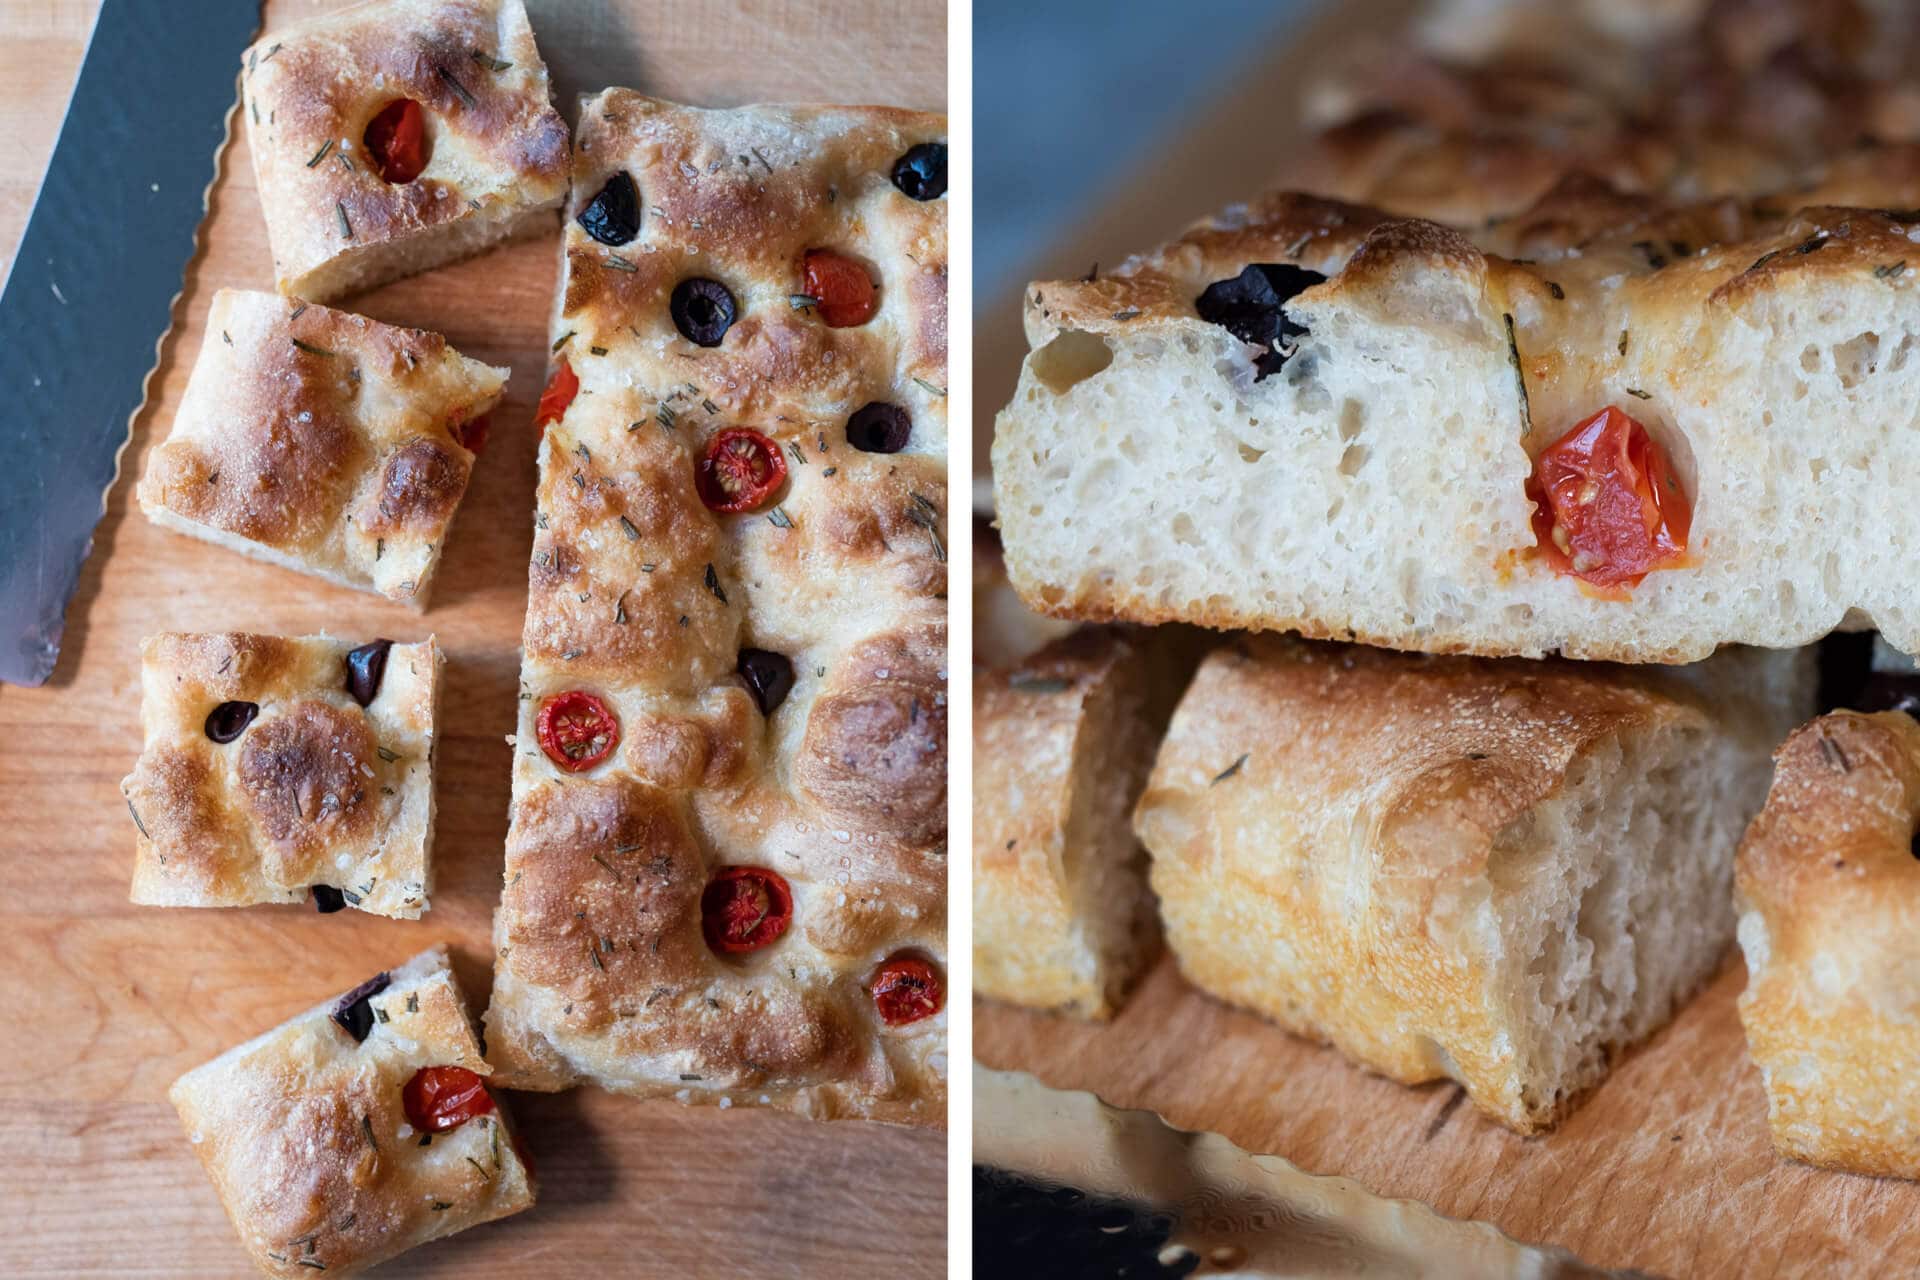
Thanks to the copious addition of high-quality olive oil, both in the mix and on top of the dough, causes the dough to turn crispy and take on a beautiful golden hue. Biting through a slice first provides a faint resistance, then gives way to a soft and ultra-tender interior. A perfect mix of flavors and textures—an experience best savored, as if you’re at the beach without an agenda.
This simple and rustic sourdough focaccia, made with a naturally leavened dough and topped with just the right balance of ingredients, brings me right back to the blue waters of the Adriatic; the sun in my eyes and thick, crunchy slices of bread eaten with haste. The only things absent are the beautiful white wrapping paper and all those little bits of sand that seem to work their way into just about everything—yea, I can do without that.
If you’re looking for more focaccia-goodness, check out my sourdough focaccia Pugliese which has potato added into the dough, for even more chew, softness, and deliciousness.
Thanks so much to Jovial for supplying me with their wonderful olive oil and sponsoring this simple sourdough focaccia recipe! As usual, the content and opinions here are my own.
Print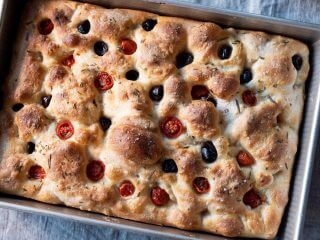
A Simple Sourdough Focaccia
- Prep Time: 6 hours
- Cook Time: 30 minutes
- Total Time: 6 hours 30 minutes
- Yield: 1 focaccia
- Cuisine: Italian
Description
This easy to make and delicious focaccia comes together all in one day using your already ripe sourdough starter. Top with tomatoes, olives, rosemary, and coarse sea salt—or, really, anything you have in the kitchen that’s fresh and sounds delicious!
Ingredients
- 423g all-purpose flour
- 181g high-protein bread flour
- 12g extra virgin olive oil
- 459g water
- 11g salt
- 115g ripe sourdough starter
Instructions
- Mix (9:00 a.m.)
This dough can be mixed by hand or with a stand mixer (like a KitchenAid). To the bowl of a stand mixer fitted with the dough hook attachment, add both the flours, water, salt, and ripe sourdough starter (hold back the olive oil until later in mixing). Mix on speed 1 for 1 to 2 minutes until incorporated. Then, mix on speed 2 for 5 minutes until dough strengthens and clumps around the dough hook. Let the dough rest in the mixing bowl for 10 minutes.Next, turn the mixer on to speed 1 and slowly drizzle the olive oil into the bowl while mixing. Once all of the olive oil is absorbed, turn the mixer up to speed 2 for 1 to 2 minutes until the dough comes back together. Transfer your dough to a bulk fermentation container and cover. - Bulk fermentation (9:15 a.m. to 11:15 a.m.)
Give the dough 4 sets of stretch and folds at 30-minute intervals, where the first set starts 30 minutes after the start of bulk fermentation. - Proof (11:15 a.m. to 3:15 p.m.)
Liberally oil the inside of a 9×13″ rectangular pan or two 10″ diameter circular baking pans. Gently scrape the dough out of the bulk fermentation directly into the rectangular pan (or onto a work surface, divide in two, and place each in a circular pan).The dough will proof in the pan for 4 hours. Every 30 minutes for the first hour, uncover the pan and gently stretch the dough with wet hands to the pan’s edges to encourage it to fill the pan. The dough will naturally spread out during this proofing period, so it’s unnecessary to spread the dough aggressively. Once the dough is mostly spread to the edges, cover the pan and let it proof for the remainder of the 4 hours. About 30 minutes before the end of the 4-hour proof period, preheat your oven to 450°F (230°C) with an empty rack in the bottom third. - Top & Bake (3:15 p.m.)
When your oven is preheated, dimple the top of the dough all over with wet fingers. Then, liberally drizzle on olive oil to cover the surface of the dough. Spread on chopped herbs and coarse sea salt. Bake until golden on the top and bottom, about 30 minutes. Let the focaccia cool in the pan, then transfer to a cooling rack. It’s wonderful straight from the oven, and best the day it’s baked.
Notes
Overnight proof option: mid-way through the 4-hour proof, place the covered pan with dough in the refrigerator to proof overnight. The next day, take the dough out, bring it up to room temp, finish proofing until well-risen and bubbly, and continue with the Top & Bake step.
If you use this recipe, tag @maurizio on Instagram so I can take a look!


724 Comments
Delicious. We made the rosemary tomato variety. I didn’t “resist the urge to add more flour” and glad I didn’t, because it was just barely not-hydrated enough. But came out great. I am going to try making it a bit thinner next time on more of a jelly roll pan.
Glad to hear it worked out well for you, Ariela! Finding the right pan is a bit of a challenge. The deeper pans keep the focaccia a little more moist, but a thinner pan will lead to a crunchier result.
Hiya, thanks for the recipe! However every time I make focaccia (once with this recipe and once with another) the dough has been incredibly wet, impossible to handle and just turning into bubbly slop by the end! Do you know of any reason this could be happening or how to fix it without wasting the whole thing? I’ve double checked all my measurements etc and am baffled ☹️
Hey, Francesca! Typically focaccia is pretty highly hydrated, but ultimately, it comes down to the flour you’re using. It sounds like you should reduce the hydration—add less water when mixing. I’d say try dropping it 10% (which is significant) and see how the next batch turns out. The hydration of a recipe is always dependent on the flour you’re using, and sometimes you need less water (and sometimes more!).
Thank you! I’ll give it a try
Thank you for this recipe! I have been making it every couple of weeks for almost a year. I like to make a double batch in a 9×13 pan and slice it into a couple of “loaves”. It is so delicious, and keeps well for toast for several days after. When there was no bread flour to be found a couple of months ago, I omitted and used only all purpose. The rise was not quite the same but it still tasted amazing. I don’t usually comment on posts but really just wanted to say thank you!
That’s awesome to hear, Hannah! Yes, I’ve used only AP flour as well, and it’s still great but a little mix of bread flour does help give it some volume. Thanks so much for the comments and happy baking 🙂
Hi! I am wanting to make pizza with this dough. Do you think it would work if when it’s done proofing I top it with sauce, cheese etc and then bake, or is there something special you think I need to do with it?
That’ll work, Mackenzie!
Thank you Maurizio!
Hello Maurizio!! Thanks a lot for the awesome blog you have! I was wondering if I want to make sourdough focaccia (as a home-bakery business) do you think I could cold proof the dough as whole in a plastic container then on the day of bake, divide it in the separate disposable single trays, proof it 2 more hrs then top and bake it? Would that work? I am trying to figure out how I can use less fridge space.
Thank you!
Hey! You’re very welcome. What I’d likely do is do bulk fermentation partly in the fridge. After 2 hours at room temp, I’d put the dough into the fridge to finish proofing. The next day, take it out, divide, and let the focaccia finish proofing in each of their own containers.
Just made this recipe yesterday to celebrate! Put some veggie sausages in the shape of 46 on top and surrounded it with Kalamata olives and split cherry tomatoes. 🙂 Of course sea salt and rosemary as well. So delicious! 🙂 Love this recipe so much. Thanks Maurizio!
Thanks so much for the feedback, Kiki! Your version sounds delicious 🙂
Love your focaccia recipe! I’ve made it several times now and I make a little saltwater brine and pour it over the top before I pop it in the oven. It’s adds a wonderful flavor to the finished bread! Thank you for sharing your wonderful recipes!
So glad to hear you like it, Stefani! Yes, that brine is magic 🙂 Thanks for the feedback and happy baking!
Thanks for the recipe, Maurizio. I hadn’t made one before and I thought- I’ll pop into TPL and check out what you did. Your attention to detail and that you start from your own point of curiosity each time really makes your website a super valuable resource. Next time I’ll look before I start and use all-purpose as part of the mix! Oops. Fabulous- I didn’t even think of that! It all worked out very well as I pushed pushed the hydration and eaters were very happy. : ) Team Perfect Loaf!
Thanks, Berty! I really appreciate that. I just love this focaccia, I make it *so* often—in fact, it’s on the plan for this weekend 🙂 Happy baking!
What total proof time is recommended if the temperature is 70 Fahrenheit (21 Celsius)? (I cannot get my kitchen any warmer this time of year!)
It really depends on the final temperature of your dough at the end of mixing! If your dough is also 70F, I’d expect probably 2 more hours or so, generally. Warm the water you’re using for mixing to get your dough to the right temperature (I list the FDT in the recipe), then try to keep the dough warm and you’ll probably only need to extend a little bit!
I tried this focaccia once in my old, cheap roasting pan (definitely NOT non-stick) and ended up having to scrape the edges away from the pan. Any thoughts or suggestions as to how it might bake up in a glass pyrex dish instead?
Hey, Lauren! Glass will probably work a little better, but you might still see sticking. I’d recommend lining your pan with parchment paper to make sure it removes cleanly!
Grazie mille Maurizio! Love your site and recipes and stories!
Thank you, Lauren!
Can pyrex handle the 450 degrees? I have both clear or dark/which would you use? Or I have a LARGE turkey sized roasting pan………non stick. too big?
I think those pyrex dishes are only rated to around 425°F degrees or so, but you’d have to check with them (or online) to verify. You could us a baking sheet (like for cookies) as well, but you’ll get a slightly crisper crust!
thanks! just mixing the dough now for the overnight rise
For the flour in this recipe, any typical white flour used for baking bread will work. I like a blend of medium protein white flour (which here is about 11%) and a higher protein flour (12-13%), but it can be hard to find high protein at times. If this is the case, just use all medium protein flour, but reduce the hydration in the recipe by 10% to help offset the lower protein in your flour. Since you’re outside of the USA, I’d recommend starting with a lower hydration anyway, perhaps start with 10% less regardless.
Does the baking pan leak?
No, it does not!
I baked this last night and topped it with olive oil, minced garlic, minced basil and salt. Even my wife admits its the best focaccia ever.
That’s wonderful to hear! I haven’t used minced garlic, but that’s a great idea. I’ve done so many combinations now, the ideas are endless. Enjoy 🙂
Hi Renata, I am in the same situation in Switzerland where I live. I have found if I try as closely as possible to have the same protein level (it usually says it on the packet of flour) as Maurizio mentions then my results turn out great! I have made lots of his breads now following this and they have been delicious.
Really happy to hear that, Kimily 🙂
Thank you for this amaaaaazing blog..This is the first sourdough recipe I made and it was a hit … this time I made two batches… i was wondering if its possible to proof my focaccia in the fridge for longer than a night? (How far can I push the proofing phase before its ruined?)
You’re very welcome! Glad to hear my recipes are working so well. I’d say if you put it in the fridge early before it’s very well proofed, you could likely push it to two days, but I haven’t tested this. Expect less rise and more sourness. If I was going to do two days in the fridge, I’d probably just opt to make it that second day (all in one day), instead!
Hi Maurizio, I’ve followed this recipe several times with good results but have recently acquired a Brod & Taylor proofer that I’m excited to use. I’m wondering if I should use it to temperature control during bulk fermentation as well, or just during the final two hour proofing? You don’t mention an ideal temperature for the bulk fermentation stage. Thank you!
Yes, you can absolutely use it for the bulk fermentation and proofing steps. For bulk, I usually keep it around 76-78F (24-26C).
Thank you for responding. I tried it at 78 F and it turned out very well! 🙂
Hi Maurizio,
I love your blog! I have made sourdough loaves multiple times from your recipes and I look forward to trying the focaccia.
So just to clarify: once I go through bulk fermentation and put the dough in the fridge overnight, the next day I warm the dough back up to room temperature and go through proofing for 2 hours you mention, right? I wasn’t sure if putting the dough in the fridge replaces the proofing process in any way. Also, how long does it take for the dough to come back to room temperature?
Not Maurizio, obviously, but all of this will depend on the conditions inside your kitchen. The proving time will vary greatly with temperature (and altitude, for that matter), and it generally takes mine closer to 3 hours to fully prove in my kitchen in Dallas, Texas. Just watch it for the signs that it’s ready – bubbly, soft texture, etc. I’ve found that a great deal of the trick to naturally leavened baking is learning the techniques and how things should look and feel – which Maurizio is fantastic at explaining – then paying attention to your dough. The babka recipe, for example, takes almost twice as long to prove in my kitchen as it does in Maurizio’s, but the result is absolutely fantastic.
Thanks for the comments, Nathan, and you’re exactly right! Adjust as needed based on your starter and environment (temperature being extremely important). Happy baking 🙂
I’ve made this recipe now easily half a dozen times over the past 2 months. Only the first time did I get a good rise during the proof. Flour brands the same. Olive oil the same. Only difference is it is now warmer. What might be happening? Starter was strong and mature. Compared past peak starter to mature and similar. I also tried today with the updated recipe to 76% hydration. FDT is 75.9F. Just let it keep proofing?
Hey, Amy! It could be over hydration, reducing is a good idea. But yes, in general, give the dough the time it needs to fully proof. Before you dimple it, the dough should be very light and fluffy, well-risen, and look alive in the container. If it’s still dense, give it more time to proof.
I made this today (with an overnight retard to avoid having a really hot house last night) topping with lightly macerated peaches, plums, and rosemary. Drizzled with honey before baking. I have made this many times with traditional toppings and was a little hesitant to go with sweet topping but it’s wonderful. Highly recommend for anyone dealing with sudden abundance of fruit this summer.
Gosh, that just sounds wonderful to me, Kris!
I am making this for the second time. First time it was perfect, although my olive oil was not up to par and it had a slightly off flavor. Texture was incredible. I too had some issues getting the proper rise. All I did was wait it out. Eventually it looked just like the pictures. I am guessing my starter was not quite at its peak. I generally don’t do such a great job managing that since I am not on a regular baking schedule, but by giving it more time it seems to compensate. Thanks for the awesome recipes.
Glad to hear it worked well for you, Samuel. Yes, the flavor of the OO really comes through in this recipe, which can be good (or bad!). Great job adjusting the timeline as needed for your dough that day!
Hi Maurizio! I’ve been doing your focaccia for several months now. There were only 2 or 3 times I had bubbles before the bake, otherwise the taste is great. Still trying to figure out why is it so hard to get the bubbles. What are the most common reasons for this?
And another thing. Not sure, but I think when I use KitchenAid the dough is much more loose, soupy, no chance of adding the reserved water. When I mix it by hand, it’s more firm. I have done like this yesterday, with KA, I will repeat it today, with the same flours, but by hand, to test this “problem”. I will get back to you
There is a slight difference when mixing by hand.
And again focaccia didn’t rise in the oven, no bubbles. :/ Is it because it’s sooo hot, 28°C room temp?
I’m not maurizio, but it could be many things.
-If the dough is not well developed there won’t be enough gluten to trap the gas, and then there won’t be any bubbles.
-It could also be your starter. if it’s hot you’re probably going to
need to feed your starter 2 or 3 times a day. If you let your starter
sit too long with out feeding it will become weak. A weak starter means
the yeast won’t be active and there won’t be any gas to catch.
-It helps to follow the guidelines listed here, and to take your own notes. How long do you let the dough bulk and poof, and at what temp. some bakers choose to take the temperature of the dough. If you haven’t been taking notes. I think you’re fine to follow the instructions here at 28c. If you have problems i would make sure you’re feeding your starter adequately and developing the dough well enough.
– You could also just not be following the directions at all. Make sure you’re allowing the dough enough time to ferment. The recipe here has a 3 hour bulk ferment and a 3 hour proof. That’s 6 hours on the counter before it goes into the oven.
I’ve made this focaccia 3 or 4 times now. I go between this recipe and another simpler recipe that uses cold, unfed starter discard straight from the fridge. I like them both for different reasons: this one has a well developed flavor but for some reason I can’t get quite as good a rise and bubbly interior structure. The other one rises insanely well and has a gorgeous structure but the development of the flavor doesn’t quite match this one. I’m going to keep tinkering to combine aspects of both to see if I can get the perfect focaccia from my kitchen. Thanks!
What recipe did you use with the unwed starter?
i’ve made this recipe with a week’s worth of discard a few times and it turned out perfectly. Discard is pretty lively as i refresh my starter twice a day.
Hi Maurizio,
Firstly thank you for all your wonderful hard work and tips with regards to everything Sourdough,
I’m looking forward to making my first Focaccia, but am a little confused regarding the Starter:
I’m currently feeding my starter every 12 hours (8am and 8pm) 50% Ap and 50%Wholewheat,
Its looking strong and bubbly, peaking at around 5 hours,
If I am to mix my formula at 9am, When would I give my starter its last feed ?
Does the starter need to be mixed with the other ingredients just before peaking ?
two hours later,
I’ve just read your notes on starter maintenance etc, I see if I increase the ratio it should peak around 12 hours
So feed night before around 9pm 1:5:5
Please let me know if this is correct
I’ve made focaccia from this recipe few times already and it always turns out amazing! I wonder tho, why when I transfer the dough to the pan it stretches by itself covering whole pan already by 30-60 minutes of proofing. What could be the reason for that?
Maybe you have warm room, so it rises quicker? I would assume that it’s not a bad thing.
I just made this as my first actual sourdough bread recipe (discard doesn’t count) and it was honestly soooo good. It had a really nice crust all around and it was really airy inside because of how much it rose in the oven. I topped it with rosemary, olives, and tomatoes and my family literally devoured it. Thanks so much for posting this!
Fantastic, Hafsa! Happy to hear you guys enjoyed it so much — happy baking!
Discard includes active sourdough yeast culture. How does it not count?