

My dad often tells the story of when he first opened his Italian restaurant in Albuquerque after having moved from Italy. Time and time again, he tried to get the city to permit him to install an indoor wood-fired pizza oven. But they made the task an impossibility, citing a laundry list of regulatory violations and requiring numerous meetings and inspections. These days, it seems the city has warmed to the idea, although I’m sure it’s not easy. Thankfully, as home bakers, we don’t need any permits and have more options, since many companies now make wood-fired pizza ovens for home use. I’ve long wanted one of these models, and at the end of last year, I finally got my grail and have been cranking out wood-fired pizzas ever since.
It’s hard to capture in words the delicious kaleidoscope of flavors and textures of pizza cooked with live fire. The high-heat and burning wood gives the pizza a shockingly thin and crisp crust, an interior that’s supple and chewy, and a slight kiss of smokey flavor. To me, this is how pizza should have always been cooked–it’s a return to the original, if you will.
Before we dig into making a pizza, let’s first go over some high-level information on using a wood-fired oven (a larger guide to this is coming soon!), then we’ll look at the wood-fired sourdough pizza dough recipe, and finally some common pizza-related questions.
Note: If you’re looking to make pizza in a home oven at a lower heat, see my home oven sourdough pizza dough recipe.
How to make pizza in a wood-fired oven
What is a wood-fired oven?
A wood-fired oven is just that: an oven heated by wood burning inside of it. Some wood-fired ovens have a very thick masonry mass to them; that is, their sidewalls, top (dome), and bottom (floor or deck) are made from a thick material (usually, brick) that retains significant heat. Other ovens use a material that doesn’t retain heat for as long but can heat faster.
Within this broad definition, there are many styles of ovens, from high dome to low dome pizza-specific ovens, general-purpose cob ovens, and everything in between.
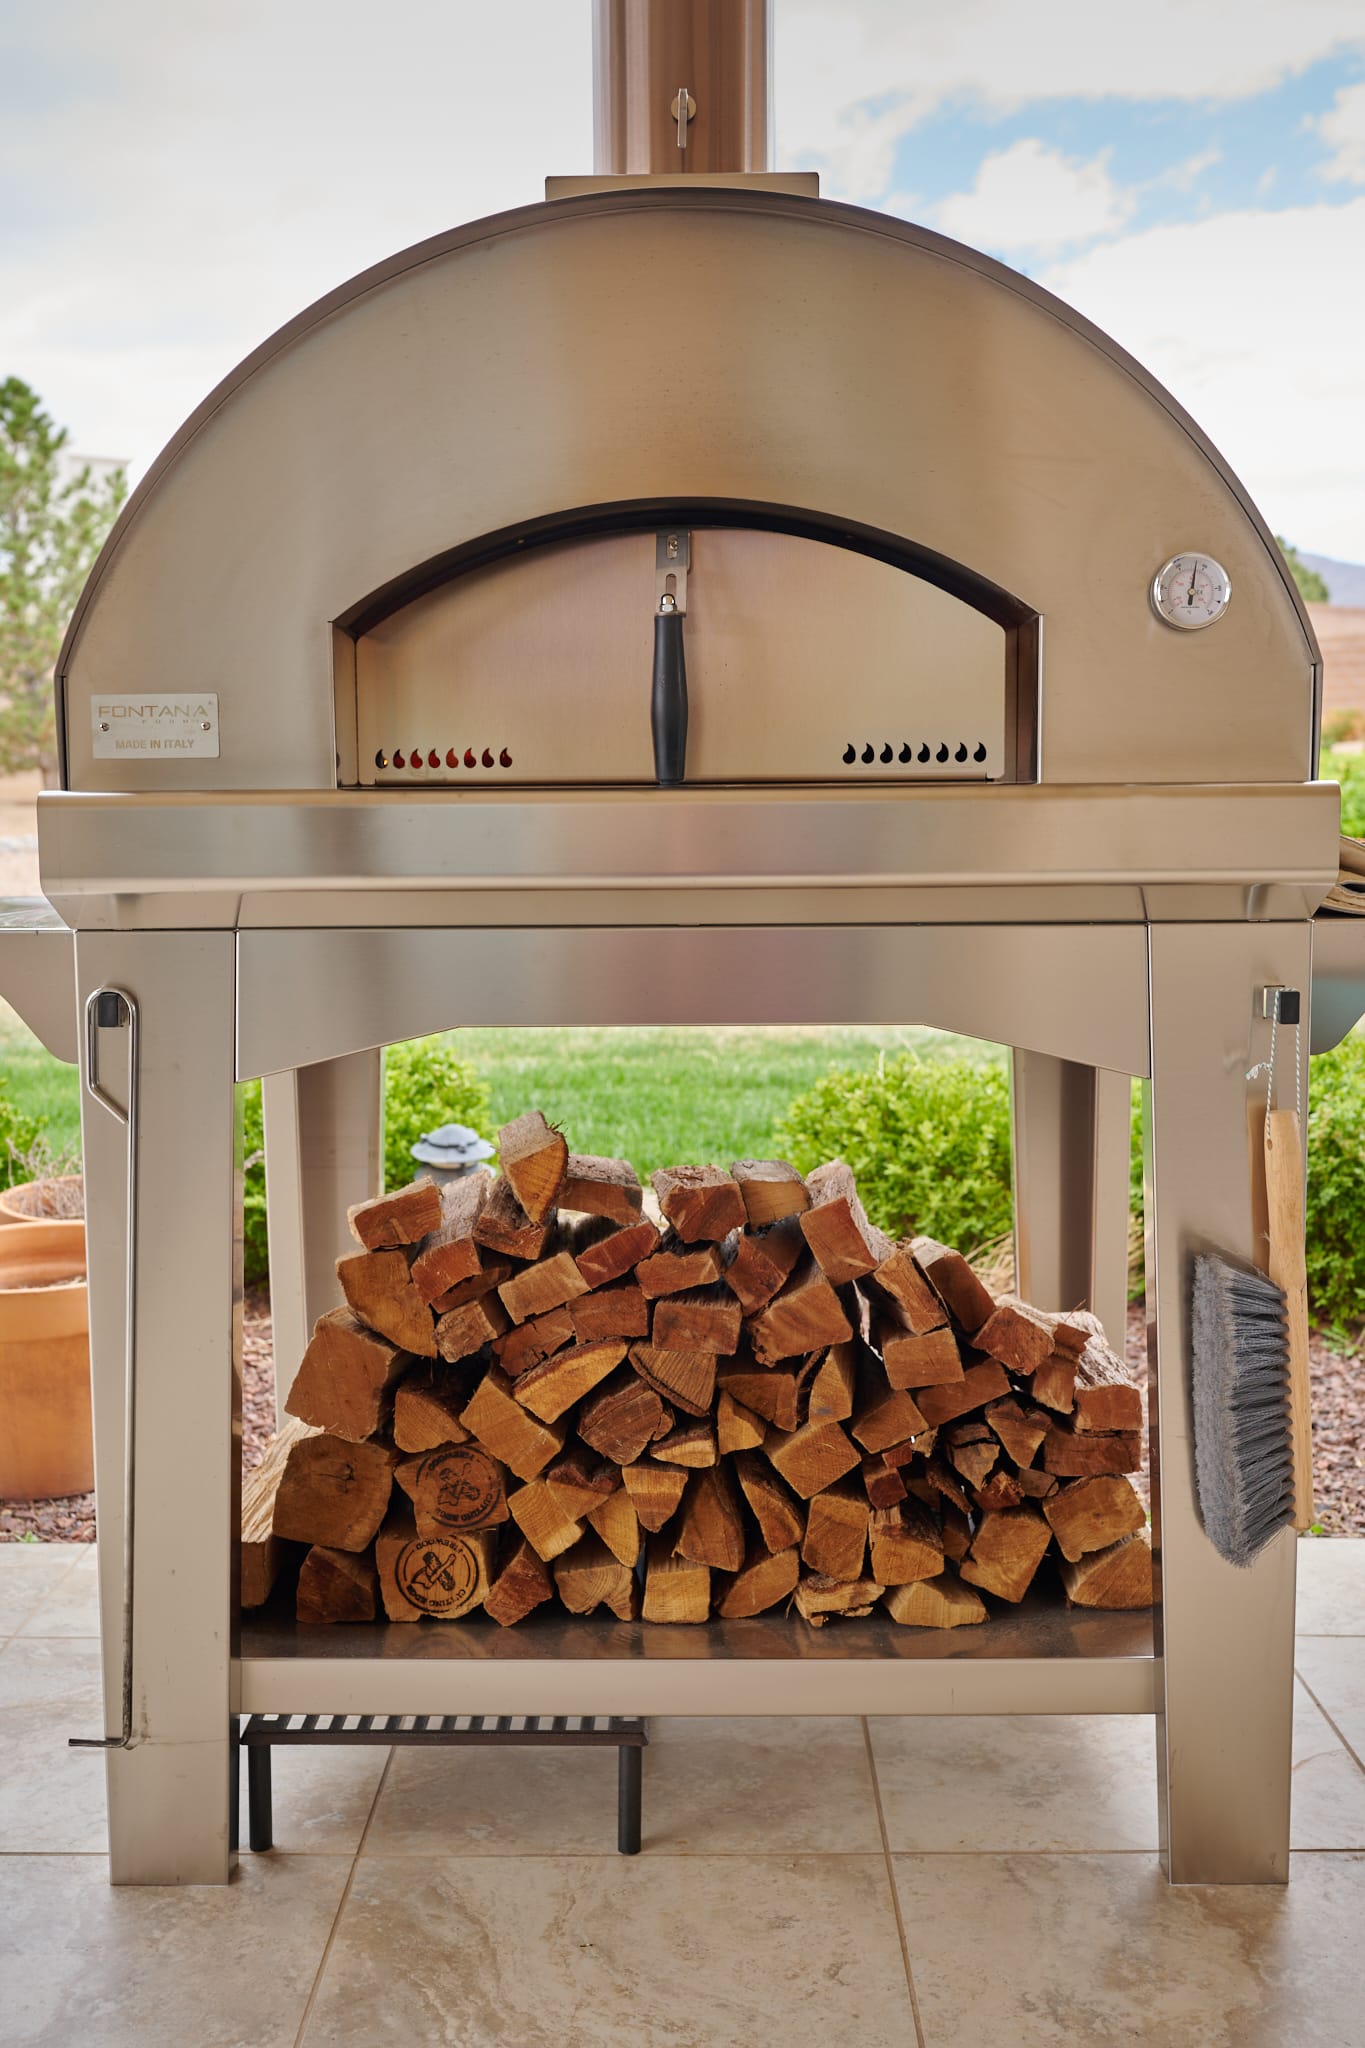
My oven, which was given to me by Fontana Forni (who is partnering with me on this post), is a Fontana Forni Marinara Wood Pizza Oven made in Italy. This oven is unique in that the floor is made of very thick brick that retains significant heat for hours after proper firing (heating up), but the top and sides are made from high-quality steel that has less heat retention but gets hot fast. This combination makes it possible to sufficiently fire the oven in as little as 30 to 45 minutes, whereas a wood-fired oven with more masonry mass would take up to several hours to heat up fully. And thanks to the thick floor, which retains significant heat for several hours, it’s possible to bake sourdough bread, desserts, and pastry with the residual, reduced heat of the oven.
The solid construction of this oven makes operating it a treat, and with the included front door and damper control, I’m able to manage the heat inside not only to cook exceptional pizza, but a variety of other foods as well. One of my favorites lately has been my sourdough focaccia Pugliese which has potato added to the dough for a little extra chew.
How to fire (heat) a wood-fired pizza oven
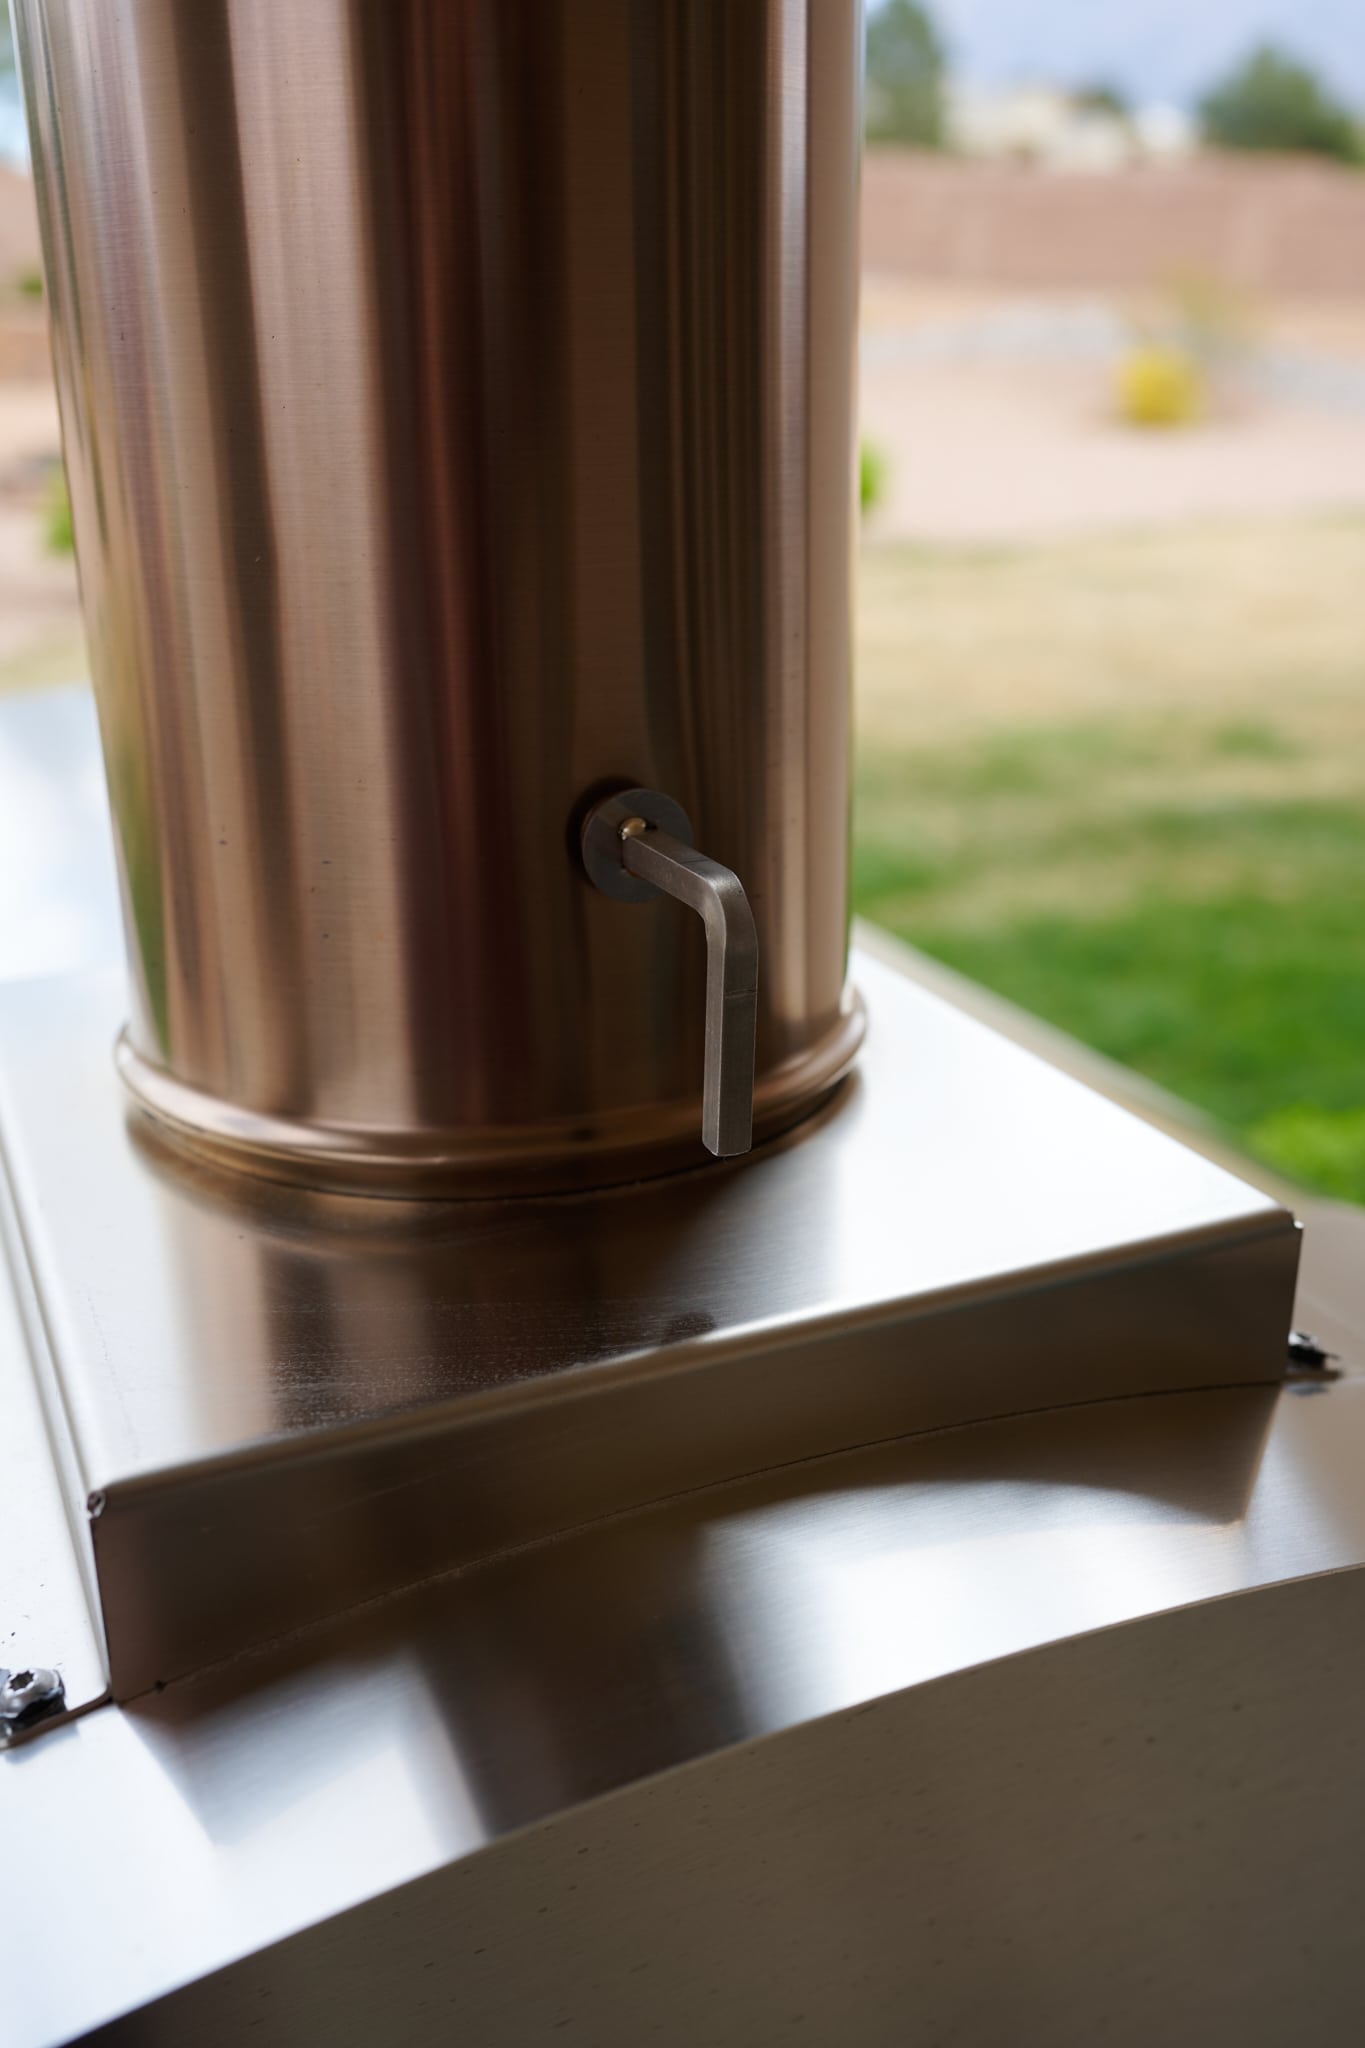
First, be sure the damper is open. On the Fontana, this means the handle of the damper is in a straight position, perpendicular to the ground.
A trick for remembering which way the handle should face when open or closed is to think of the straight handle as “smoke flow.” So, if the handle points to the inside of the oven and to the sky, that means that the damper is open, and smoke will flow from inside the oven out the top.
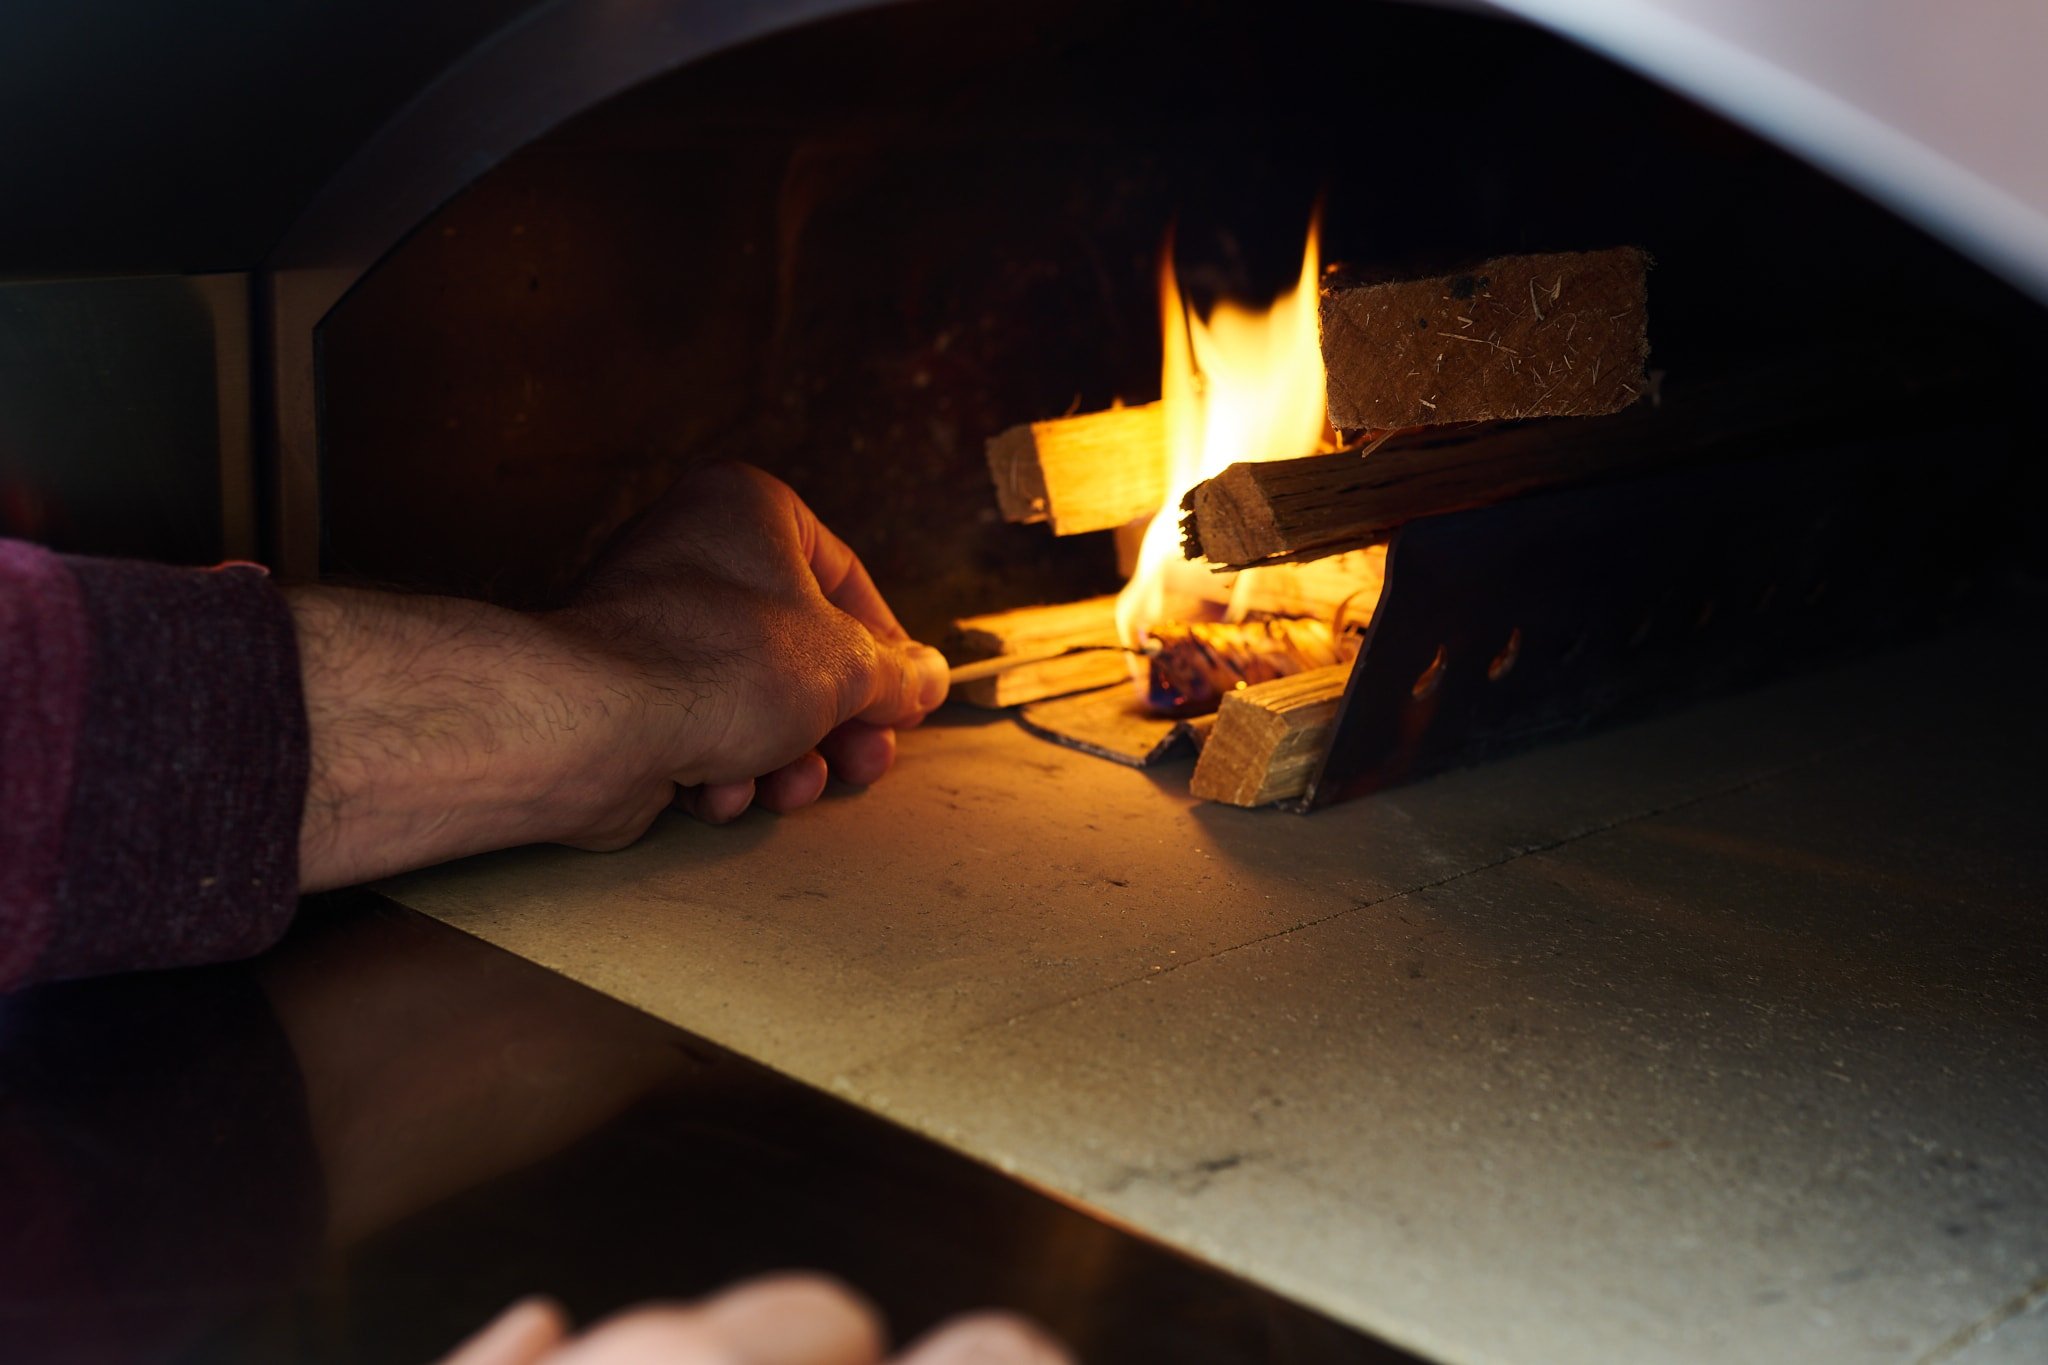
With a wood-fired oven, you often build a fire in the middle of the floor, and you then push it to the left or right once the floor beneath it has been sufficiently heated. But I’ve found with my Fontana oven that it’s not necessary to do this, and I simply start the fire off to the left behind the steel wood holder (a removable piece that helps keep the fire neat and away from any cooking pizza).
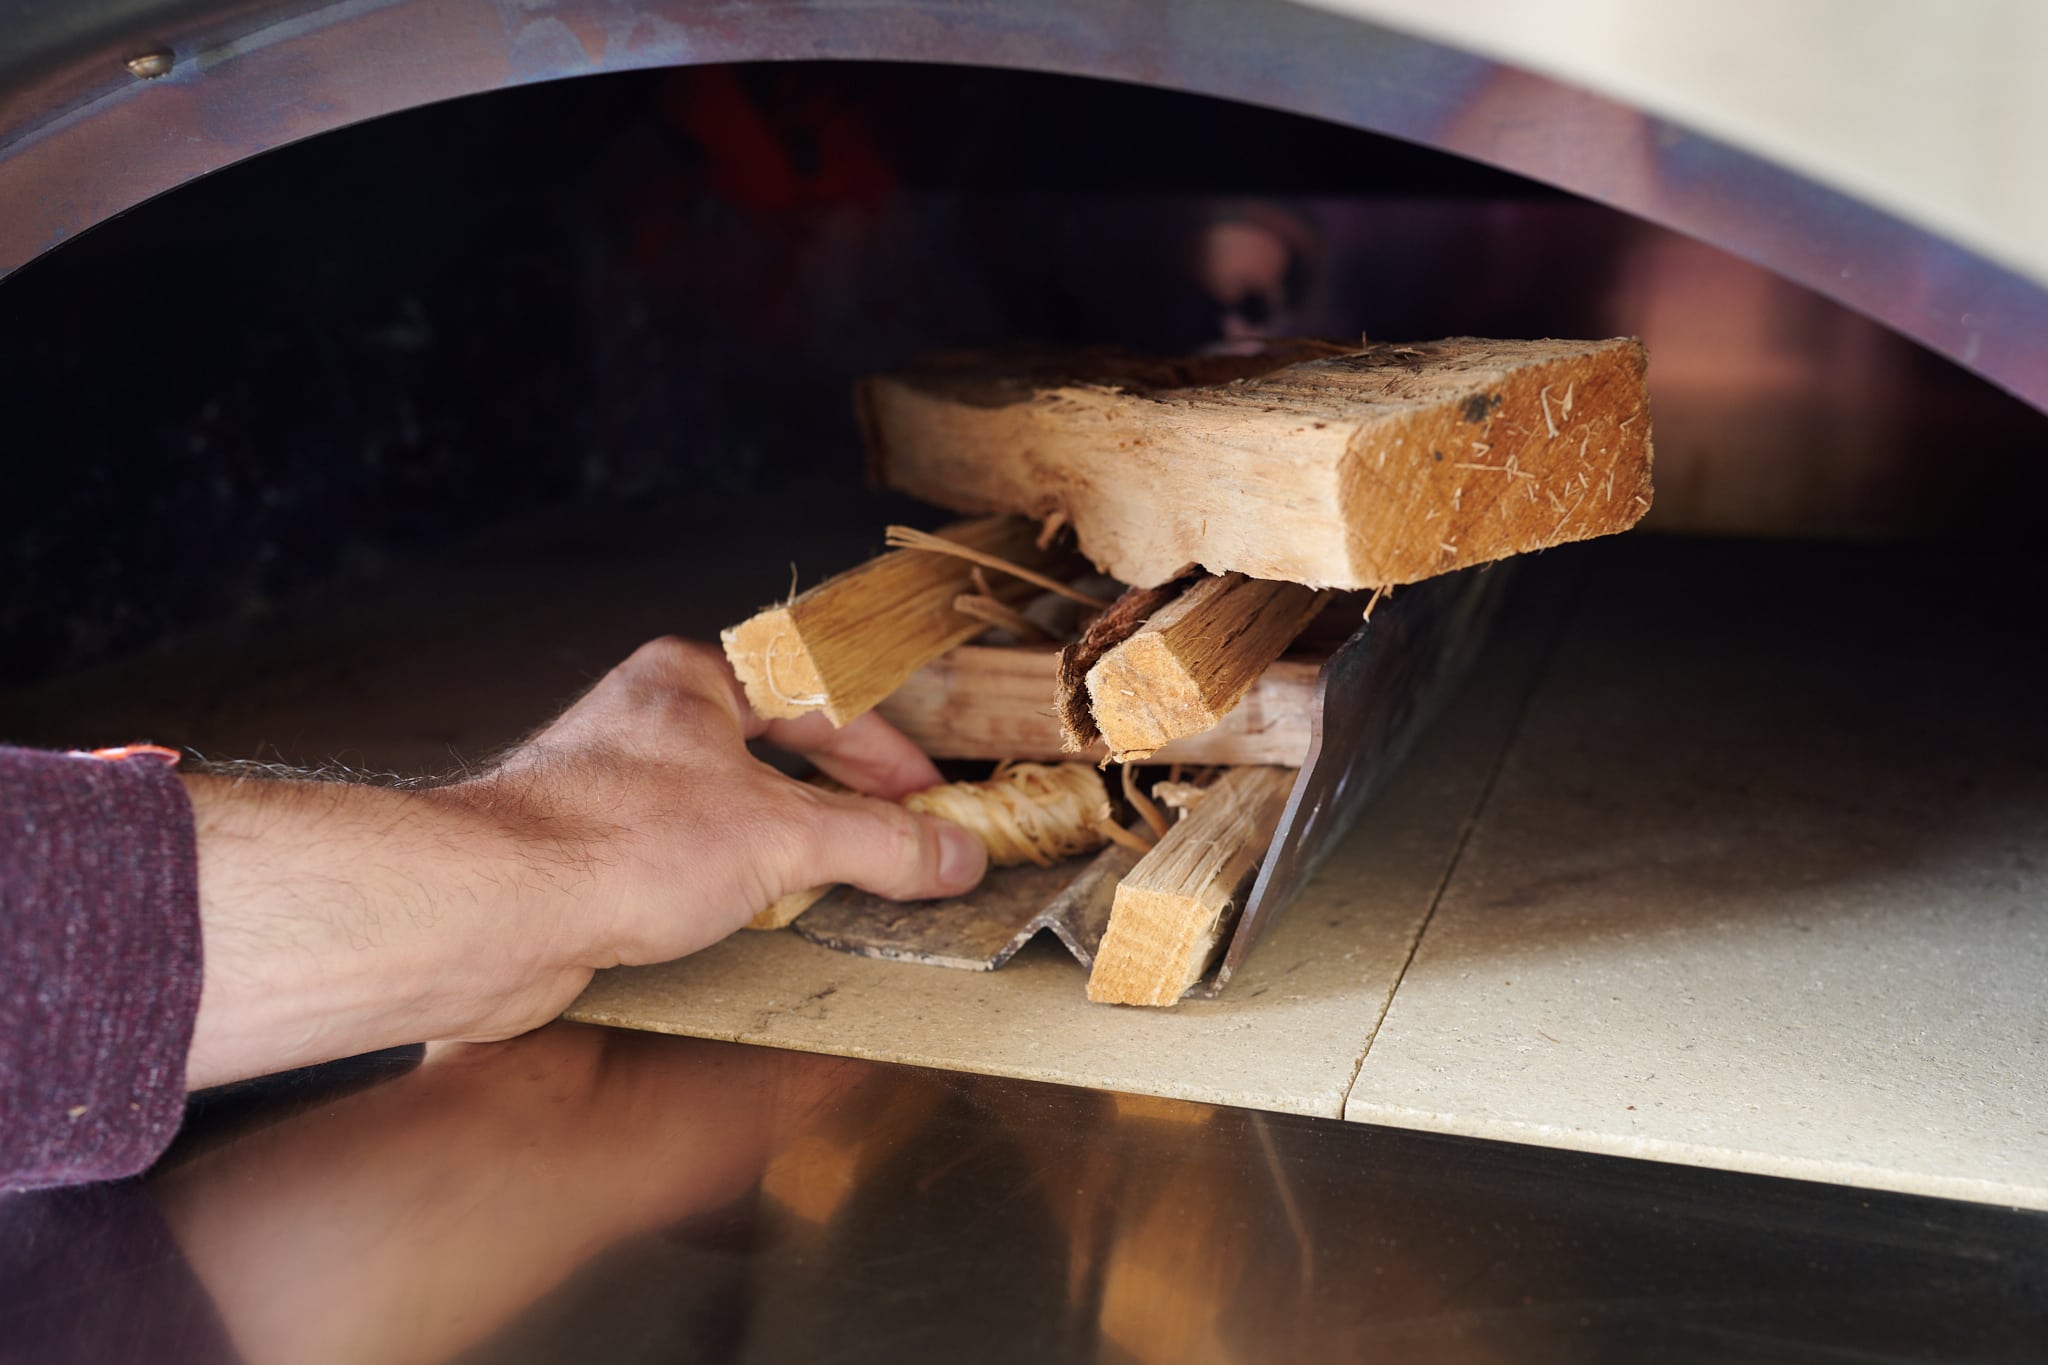
I first construct what’s called a “log cabin” with small pieces of wood (kindling): Stack thin pieces of wood in a number sign orientation (“#”), and then stack more pieces in this fashion until you have a few layers. Then fill the middle of the cabin with tinder: branches, clean brown paper, or a natural firelighter. Finally, place one medium-sized piece of wood across the top. Light the tinder you’ve placed in the middle of the cabin. Once the fire starts, close the door, making sure to leave it ajar to allow air to flow into the oven.
For a stronger and cleaner fire, it’s important to have sufficient airflow.
Let the fire burn for 5 to 10 minutes. Check it, adding a piece or two of wood to the top of the cabin as necessary to continue to heat the oven. Be sure that you always have ample airflow inside and around the logs in the fire, which will reduce smoke and encourage optimal burning of the wood.
Let the oven heat for 30 to 45 minutes; during this time, add pieces of wood as necessary until the oven floor reaches your desired temperature for cooking pizza (more on this soon). Check the ambient temperature in the oven as well; it should be around 650°F (340°C) for the style of pizza in this recipe.
A quick intro on how to manage heat in a wood-fired oven for cooking pizza
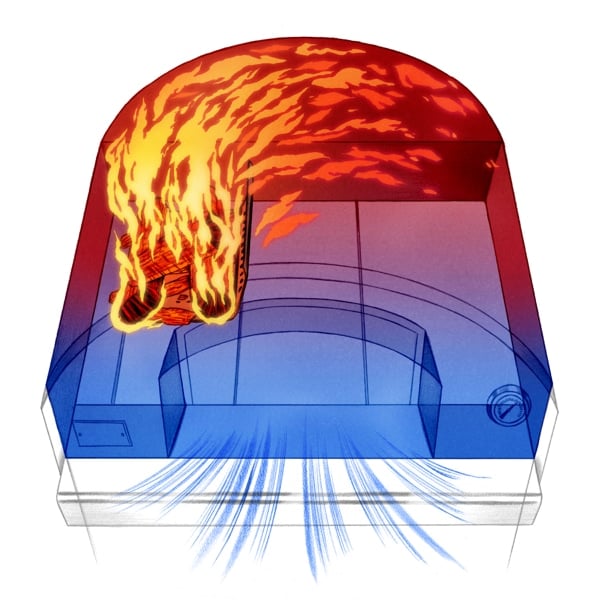
The thermodynamics of a wood-fired oven are pretty straightforward. The area closest to the open door will be cooler (since this is where air rushes into the oven to fuel the fire—a good thing), the area near the fire will be hotter, and as you move through the oven away from the fire the intensity of heat is reduced. I notice a small uptick in heat near the far right wall of the oven as well.
Managing heat in a wood-fired oven is accomplished by controlling the intensity of the fire, removing or closing the front door, and controlling the damper. The following sums up how I use the door and damper to manage heat in the oven:
| Oven Hardware | Effect on Oven Temperature |
|---|---|
| Close damper (handle is horizontal) | Increases (retains heat) |
| Open damper (handle is vertical) | Decreases (loses heat) |
| Close door (usually slightly ajar) | Increases (retains heat) |
| Remove door | Decreases (loses heat) |
When the fire begins to burn low, I use my pizza turning peel to add a single log to the top of the pile. Be sure when doing this that the log doesn’t completely smother the fire, but rather, it’s propped up to allow ample airflow below (I’ll usually lean it on the steel wood holder holding the ashes in the oven).
What temperature should I cook my pizza?
When cooking pizza in a wood-fired oven you must consider two things: the oven’s floor temperature and ambient temperatures. The floor temperature will dictate how fast the bottom of the pizza cooks, and the ambient temperature dictates how fast the edge of the crust (cornicione) and toppings cook.
I like to cook my wood-fired sourdough pizza dough with a floor temperature of 600-700°F (315-370°C) and a reduced fire with just a few active flames. I use an IR thermometer to accurately measure the temperature of the floor in the area where I cook my pizza (more on this in a minute). At this temperature and fire intensity, the result is a pizza that’s crisper and firmer than a Neapolitan-style pizza (which is softer and floppier since it’s cooked faster at a much higher heat).
How do you cook sourdough pizza in a wood-fired oven?
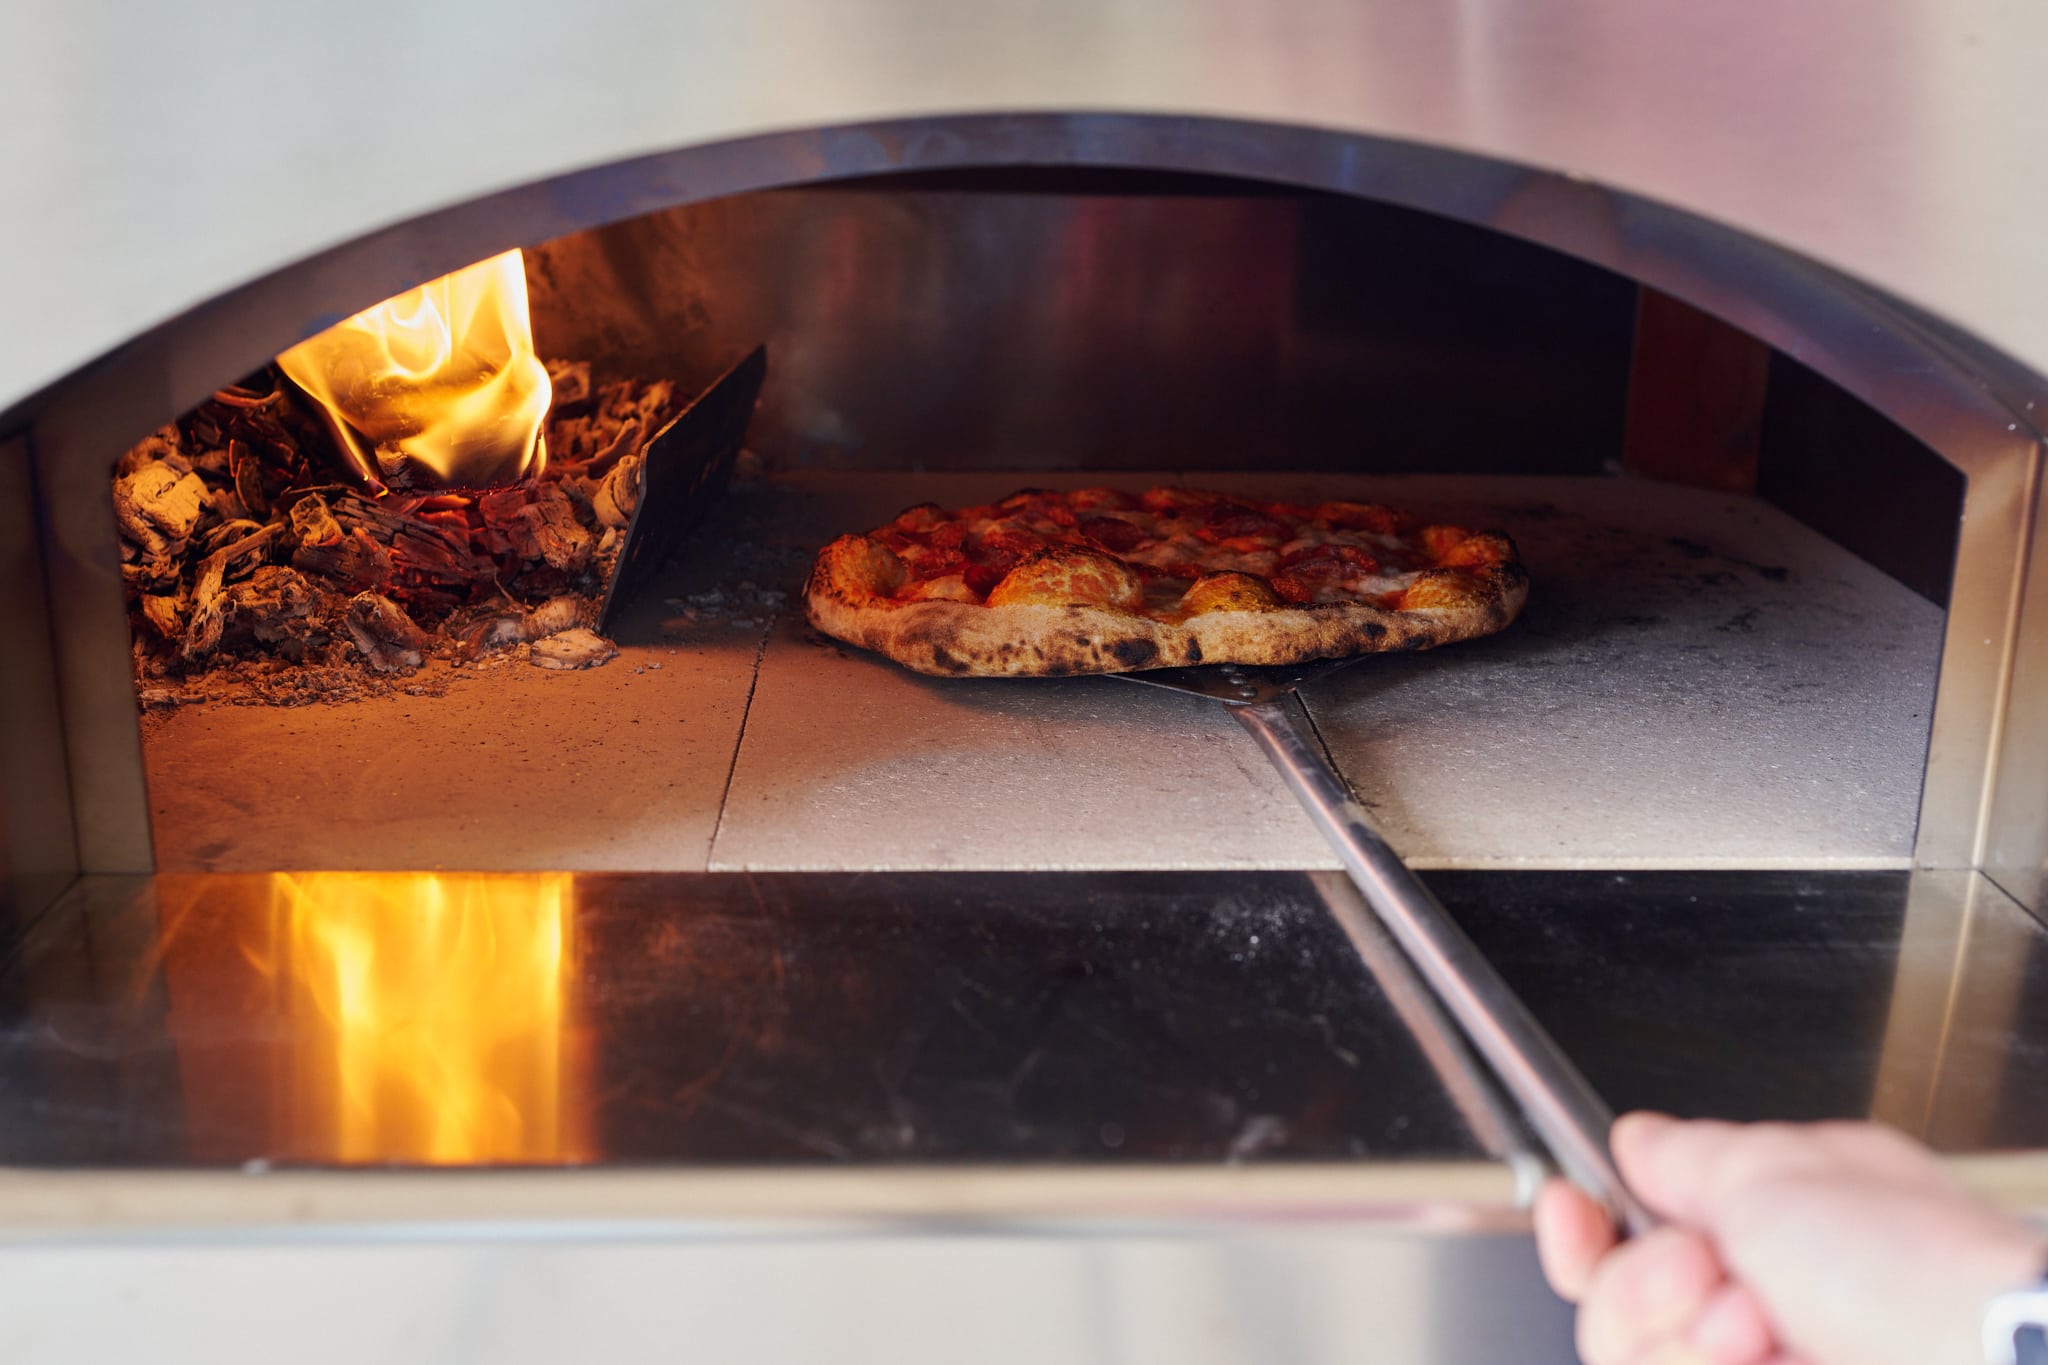
Before placing dough into the oven, be sure to sweep any ashes that may have fallen over onto your active cooking surface. Use a brush that can withstand the heat of the oven; I like to use the metal wire brush that came with my oven to quickly sweep the ashes over to the left of the oven near the fire.
Remember to monitor the heat as you cook your pizzas. I almost always keep the damper completely open the entire time. I keep the door in place and slightly ajar when preheating the oven or between cooking pizzas. When I slide pizza dough into the oven, I do not replace the door until I remove the fully cooked pizza.
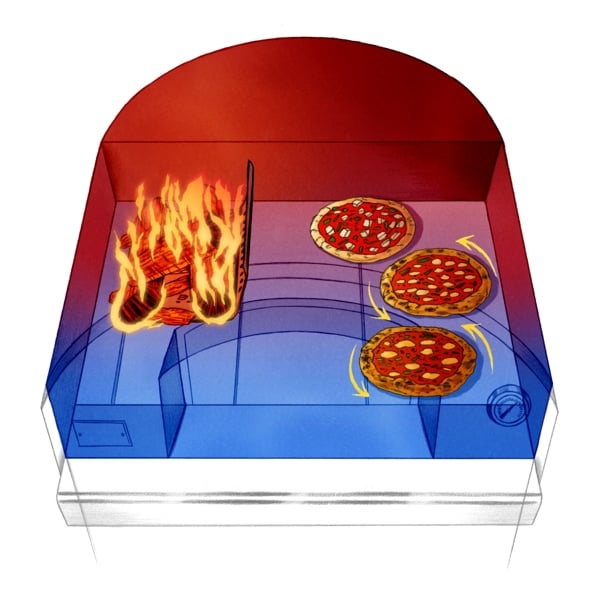
When it is time to cook the pizza, I first load the dough in the back near the flames, where the floor and ambient temperatures are hottest. Then, I rotate the pizza periodically to ensure even cooking. I’ll usually do 2 to 4 rotations of the pizza during its total cook time, around 4 to 6 minutes. Each time I rotate the pizza, I move it slightly closer to the oven opening, thus gradually moving it to cooler and cooler parts of the floor as it gets closer to the oven opening.
In some cases, the pizza needs a few more minutes to even out the cooking of the bottom crust and the toppings:
- If the bottom crust is well-colored, but the toppings are not, lift the pizza off the floor and let it cook suspended in the oven until finished.
- If the toppings are finished cooking but the bottom crust is not, consider rotating the pizza to the back-right of the oven to a new area where the floor is hottest (but keep a close eye on the pizza at this point; this is a harder situation to correct)
What wood do I like to burn in my wood-fired oven?
It’s very hard to find high-quality wood appropriate for cooking (which should be a dry, no-sap hardwood like oak) here in my city, so I’ve been sourcing my wood from Cutting Edge Firewood. It’s top-quality, though expensive with shipping. Their wood is well seasoned, very dry, and free from pests, and it lights almost immediately.
What type of flour is best for pizza dough?
Depending on your preference, you can use a wide range of flour for your pizza. I like to use primarily “Tipo 00” flour, an Italian classification of flour that’s white and low extraction (meaning it’s the whitest and finest flour in Italy). My go-to flour brand for this is Caputo from Italy (I like their “blue bag” pizzeria offering, which is medium protein), but I also like Central Milling’s 00 Pizza Flour.
In this recipe, I also like to add a small percentage of durum flour, which brings an extra level of crispness to this pizza dough (in the same way it does with my Pane Siciliano, which is made from 100% durum flour).
Can you freeze sourdough pizza dough?
Yes, you can freeze your sourdough pizza dough. I do notice, however, that the longer the dough stays in the freezer, the less rise you’ll get. The super-cold environment is harsh on wild yeast and beneficial bacteria, and in the end, compromises the amount of rise in your dough. However, the pizza is still quite delicious, and freezing one or two pizza dough balls is very convenient!
To freeze your sourdough pizza dough: after dividing the dough and shaping it into balls, place a single ball into a small container with an airtight lid (I like to use a 4-cup glass container to hold a single pizza dough ball). Then place the covered container into the freezer.
How long can you freeze sourdough pizza dough: The dough seems to last just fine between 1 to 2 weeks in the freezer (if you’ve frozen longer, I’d love to hear how it works for you in the comments below!).
To defrost your frozen sourdough pizza dough: At least one, or even two, days before you want to make pizza, take the frozen dough balls in their individual containers out of the freezer and place them in the refrigerator to thaw overnight. The next day, put the dough, still in the containers, on the counter to finish proofing before cooking.
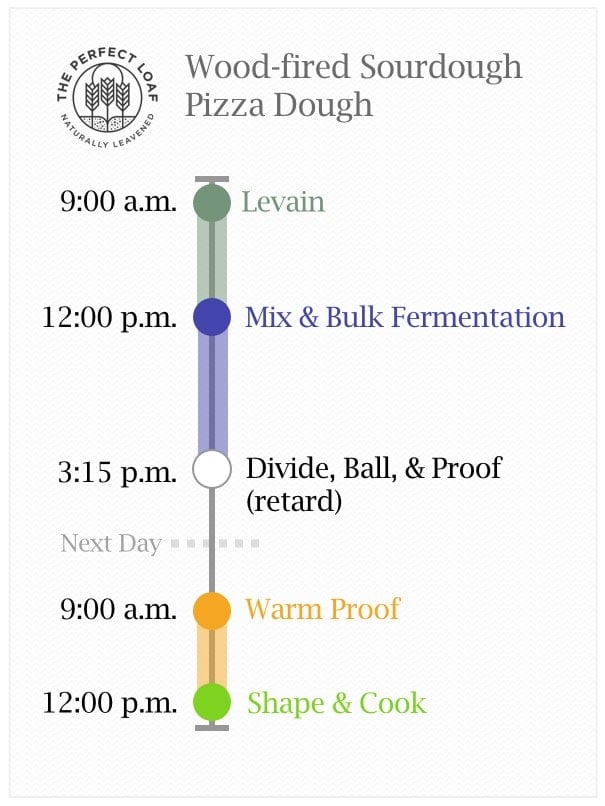
Wood-fired sourdough pizza cooking schedule
This two-day wood-fired sourdough pizza dough has flexible timing, but I like to mix it on day one, let it bulk ferment, then divide and ball the dough. Then, I place the dough into the fridge to rise overnight, which helps build flavor and promote further enzymatic activity, making it easy to open for topping and cooking on day two.
Another option is to leave the dough in the fridge another day, or even two, after balling. You can have a two, three, or even four-day pizza dough—whatever is most convenient. Additionally, if you use separate containers to hold the balled pizza dough, you can remove one or two on day two, leave the rest in the fridge for subsequent days, and use it for pizza or even focaccia.

Wood-fired sourdough pizza dough formula
Vitals
| Total dough weight | 1,140 grams |
| Pre-fermented flour | 5.0% |
| Hydration | 62.0% |
| Levain in the final dough | 15.8% |
| Yield | Four 280g pizzas |
Total formula
Desired dough temperature: 78°F (25°C) (see my post on the importance of dough temperature).
| Weight | Ingredient | Baker’s percentage |
| 607g | White flour (about 12.5% protein; Caputo Pizzeria Soft Wheat Flour Type 00) | 90.0% |
| 34g | Whole wheat flour (Central Milling Hi-Pro Whole Wheat) | 5.0% |
| 34g | Durum flour “extra fancy” (or swap for more white flour) | 5.0% |
| 391g | Water 1 | 58.0% |
| 27g | Water 2 | 4.0% |
| 14g | Fine sea salt | 2.1% |
| 34g | Ripe sourdough starter, 100% hydration | 5.0% |
Additional ingredients
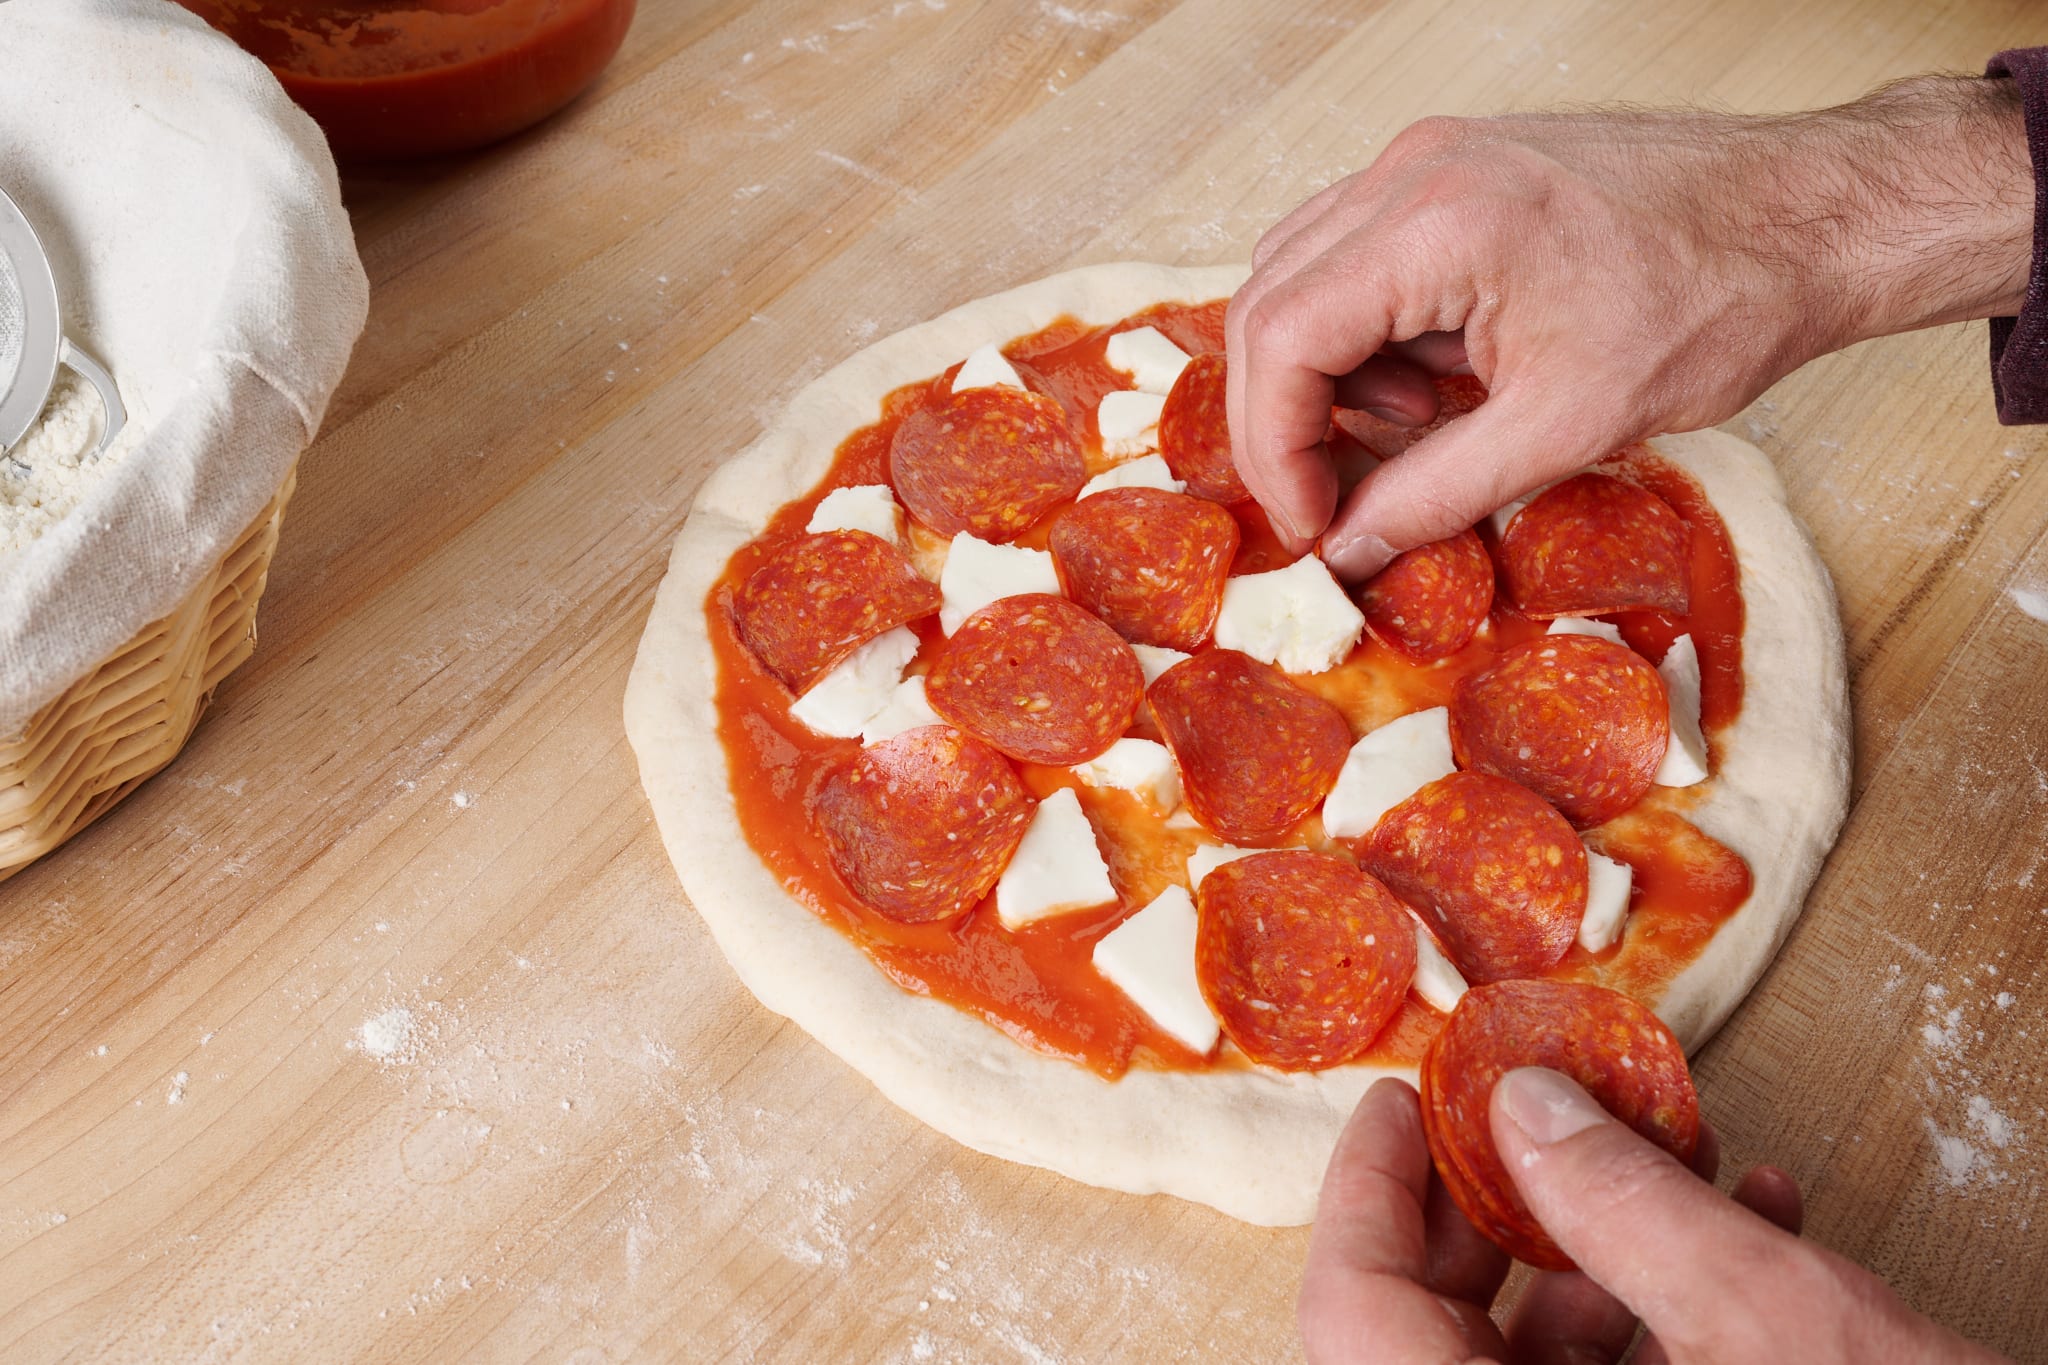
Pizza toppings of your choice (such as fresh mozzarella cheese, tomato sauce, fresh basil leaves, olive oil, etc.)
Wood-fired sourdough pizza dough method
1. Prepare the levain – 9:00 a.m.
Mix the following ingredients in a jar and leave them covered at a warm temperature, 74-76°F (23-24°C), to ripen for 3 hours.
| Weight | Ingredient | Baker’s percentage |
| 34g | White flour (about 12.5% protein) | 100.0% |
| 34g | Water | 100.0% |
| 34g | Ripe sourdough starter, 100% hydration | 100.0% |
2. Mix – 12:00 p.m.
Mix this dough to full development for the best results. I used my Famag spiral dough mixer, but you could also use a KitchenAid stand mixer, or mix it by hand using the slap and fold technique.
Note: You might wonder why this dough doesn’t have an autolyse step. While you can certainly autolyse this dough for 15 to 30 minutes if you’d like to help reduce the mixing time, I don’t find that this extra step makes a significantly better pizza.
| Weight | Ingredient |
| 573g | White flour (about 12.5% protein) |
| 34g | Whole wheat flour |
| 34g | Durum flour |
| 357g | Water 1 |
| 27g | Water 2 |
| 14g | Fine sea salt |
| 101g | Ripe levain (from Step 1) |
To the bowl of a stand mixer fitted with the dough hook attachment, add the flour, water 1, and ripe levain. Mix on low speed for 2 to 3 minutes until the ingredients come together and no dry bits remain. Increase the mixer speed to medium (I use #6 on the Famag) and mix for 3 to 4 minutes until the dough begins to smooth.
Let the dough rest in the bowl for 10 minutes, covered.
Add the salt and water 2 to help it dissolve. Mix on low speed for 2 minutes until the salt is incorporated. Then, increase the mixer speed to medium and mix for 4 to 5 minutes until the dough clumps around the dough hook and is smooth and elastic.
Transfer the dough to a bulk fermentation container and cover.
3. Bulk fermentation – 12:15 p.m. to 3:15 p.m. (3 hours)
At a warm room temperature, 74-76°F (23-24°C), bulk fermentation should take about 3 hours. At the end of this time, the dough will have risen moderately and be smooth with a few scattered bubbles. The dough will not be very well fermented at this point as compared to other sourdough bread doughs.
Due to the level of mixing and hydration of this dough, it does not require any stretches and folds during bulk fermentation.
4. Divide, ball, and cold-proof (retard) – 3:15 p.m. (overnight)
Grease a pizza dough tray, half sheet pan, or four individual 4-cup glass containers with olive oil.
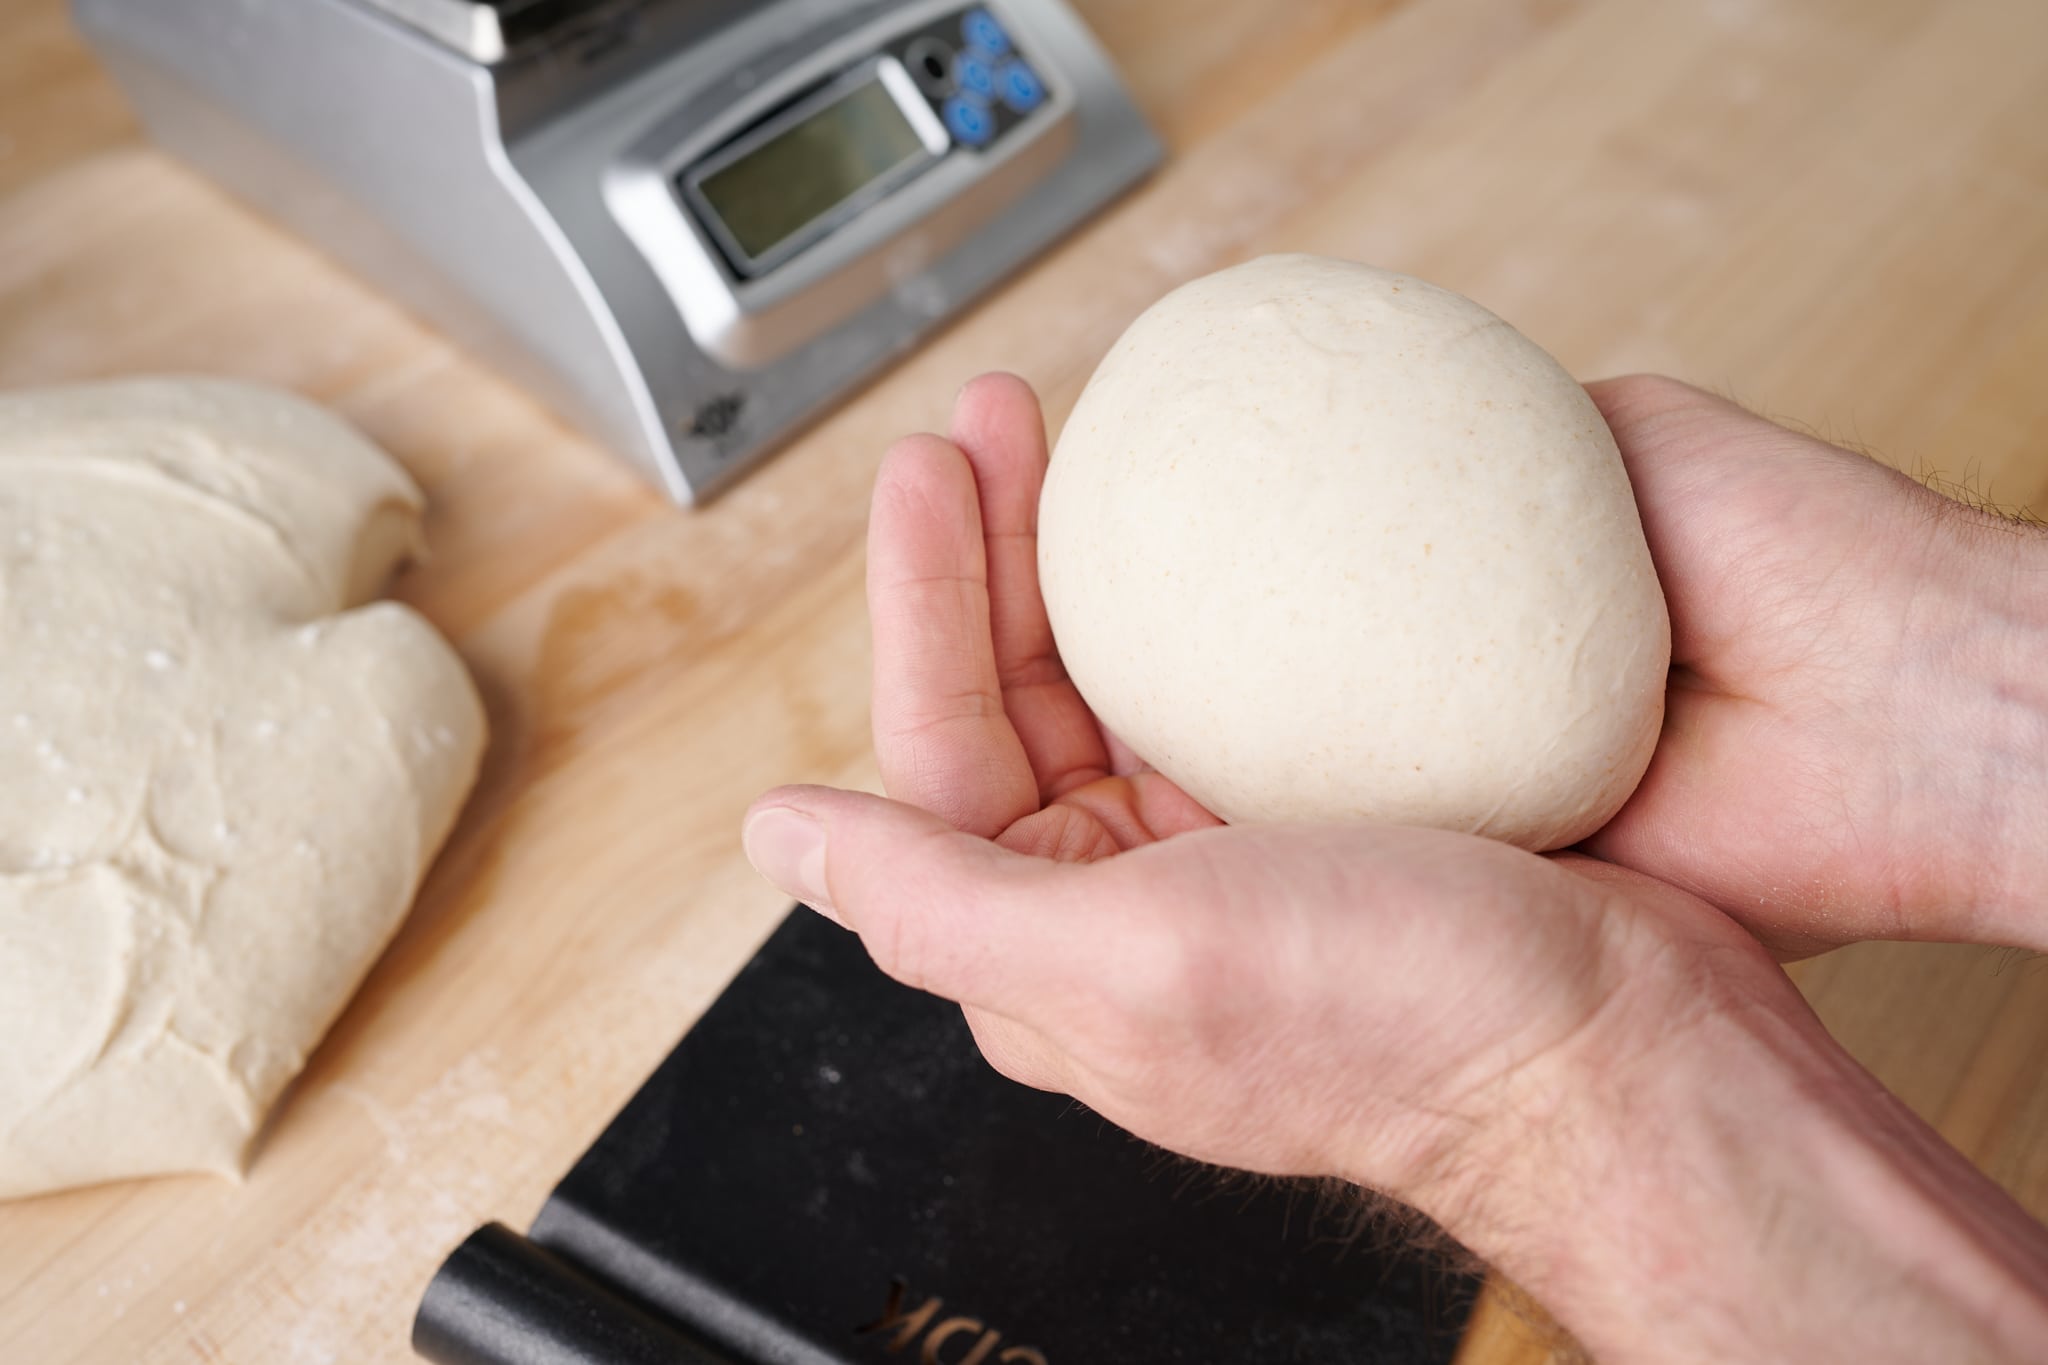
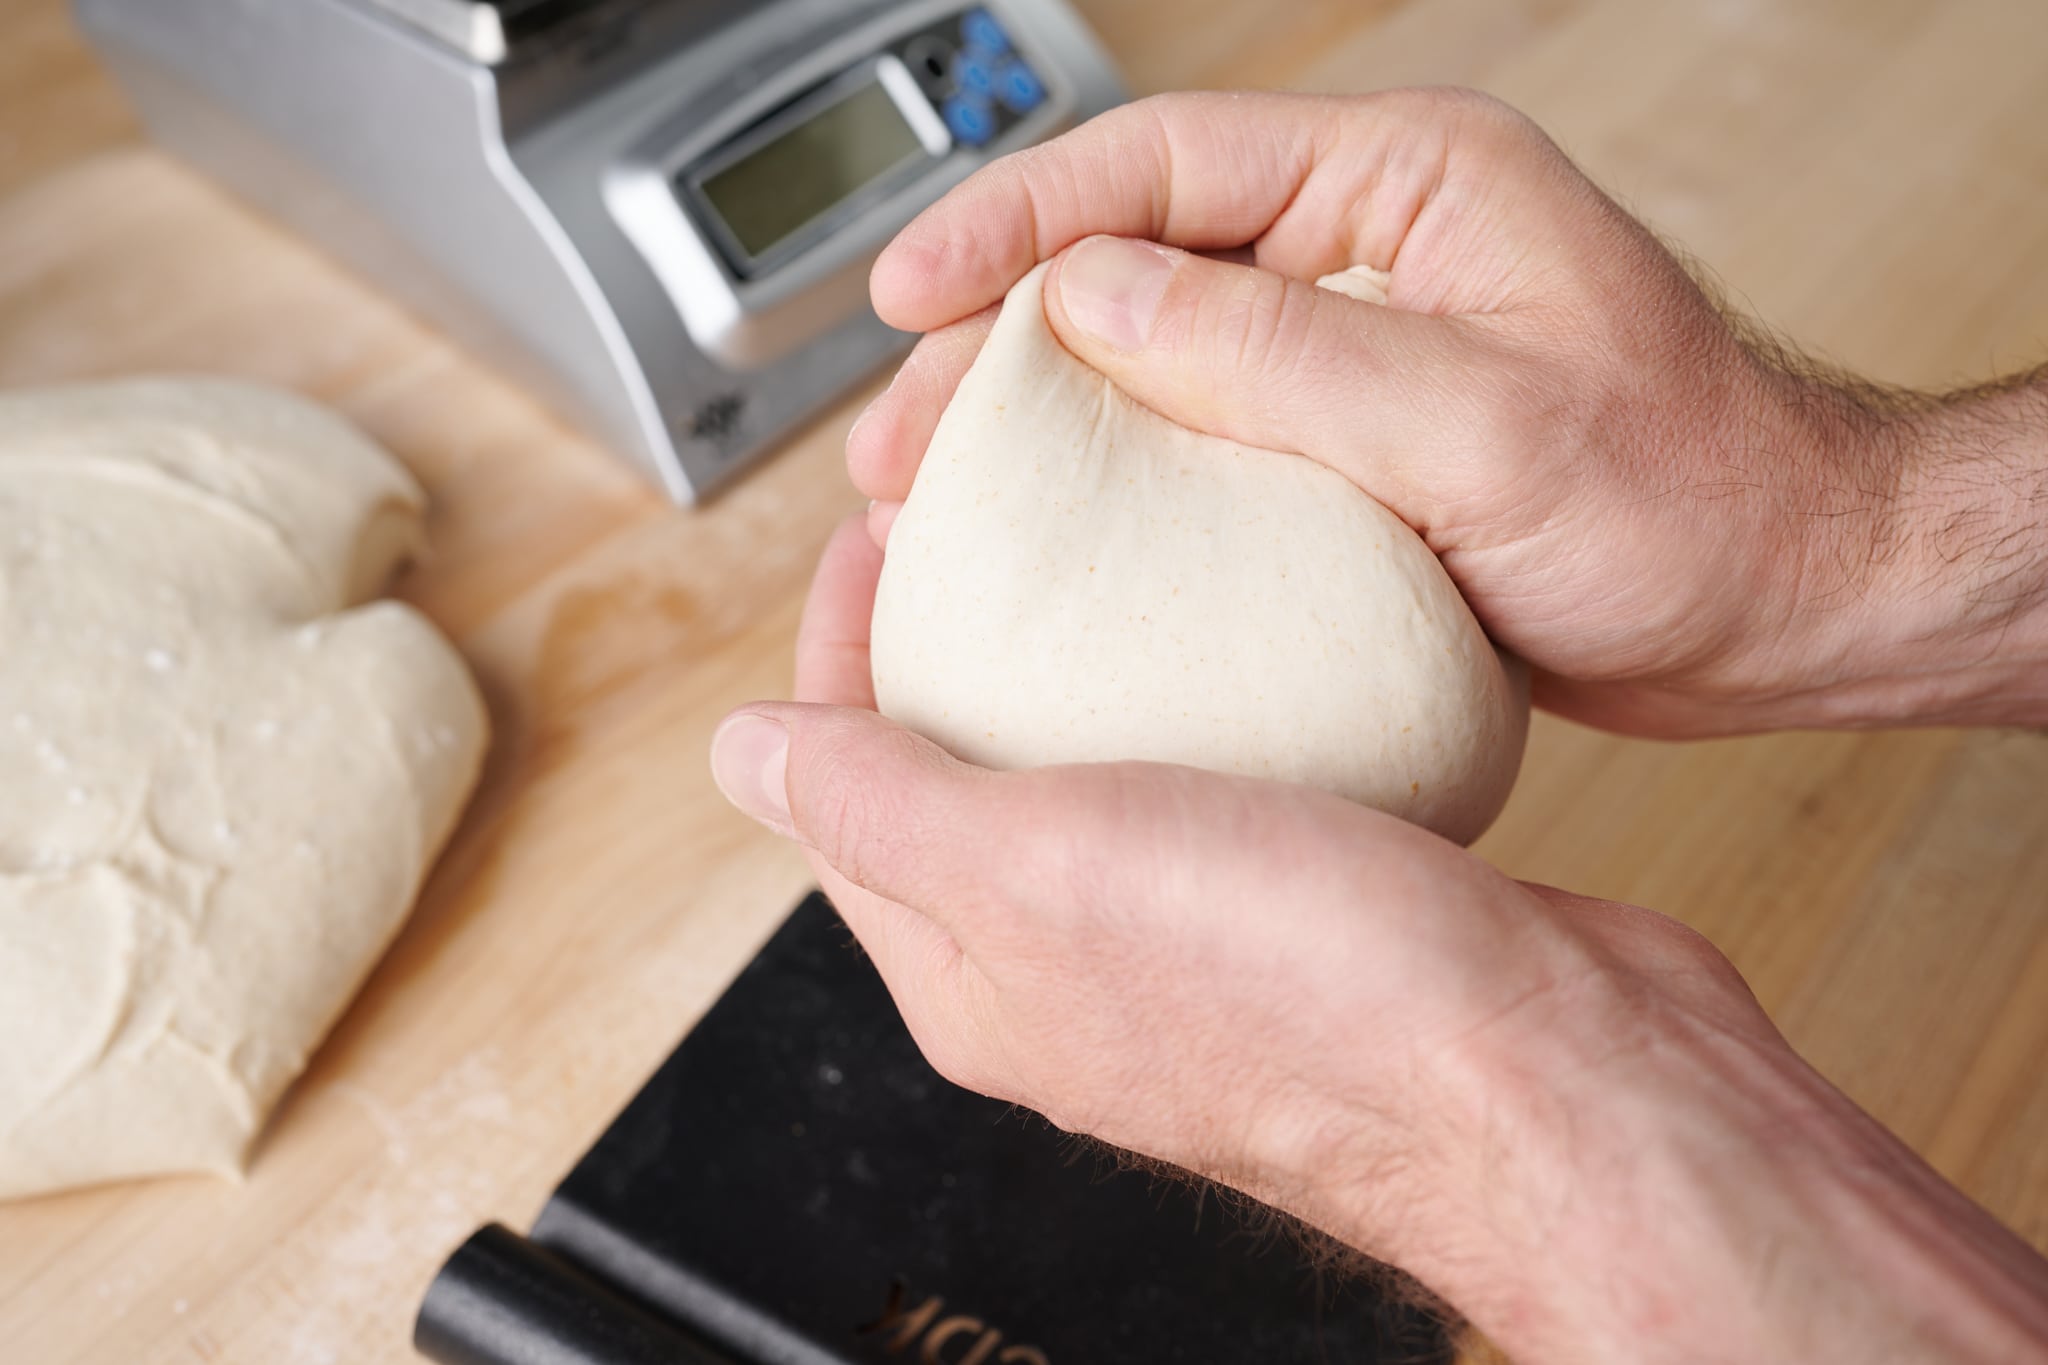
Gently scrape the dough out to a clean work surface. Using floured hands, divide the dough into four equal portions, each weighing 280 grams. Preshape each piece into a very tight ball with no seam on the bottom. I like to pick up the dough and form a ball in my hand. After shaping, place each ball into the prepared dough tray with even spacing between, or into a single container.
Cover the dough with a lid or reusable wrap. Place into the refrigerator overnight or up to 2 days.
5. Warm proof – 9:00 a.m. to 12:00 p.m.
Take the dough out of the refrigerator and let it finish proofing at room temperature for 3 hours before shaping and cooking. At the end of proofing, the dough should be soft and puffy.
6. Shape and cook – 12:00 p.m.
Preheat your high-heat wood-burning oven until the floor of the oven reaches your desired temperature (again, I prefer around 650°F/340°C, which takes about 30 to 45 minutes).
While the oven is heating and the dough is proofing, prepare your pizza sauce and any other toppings.
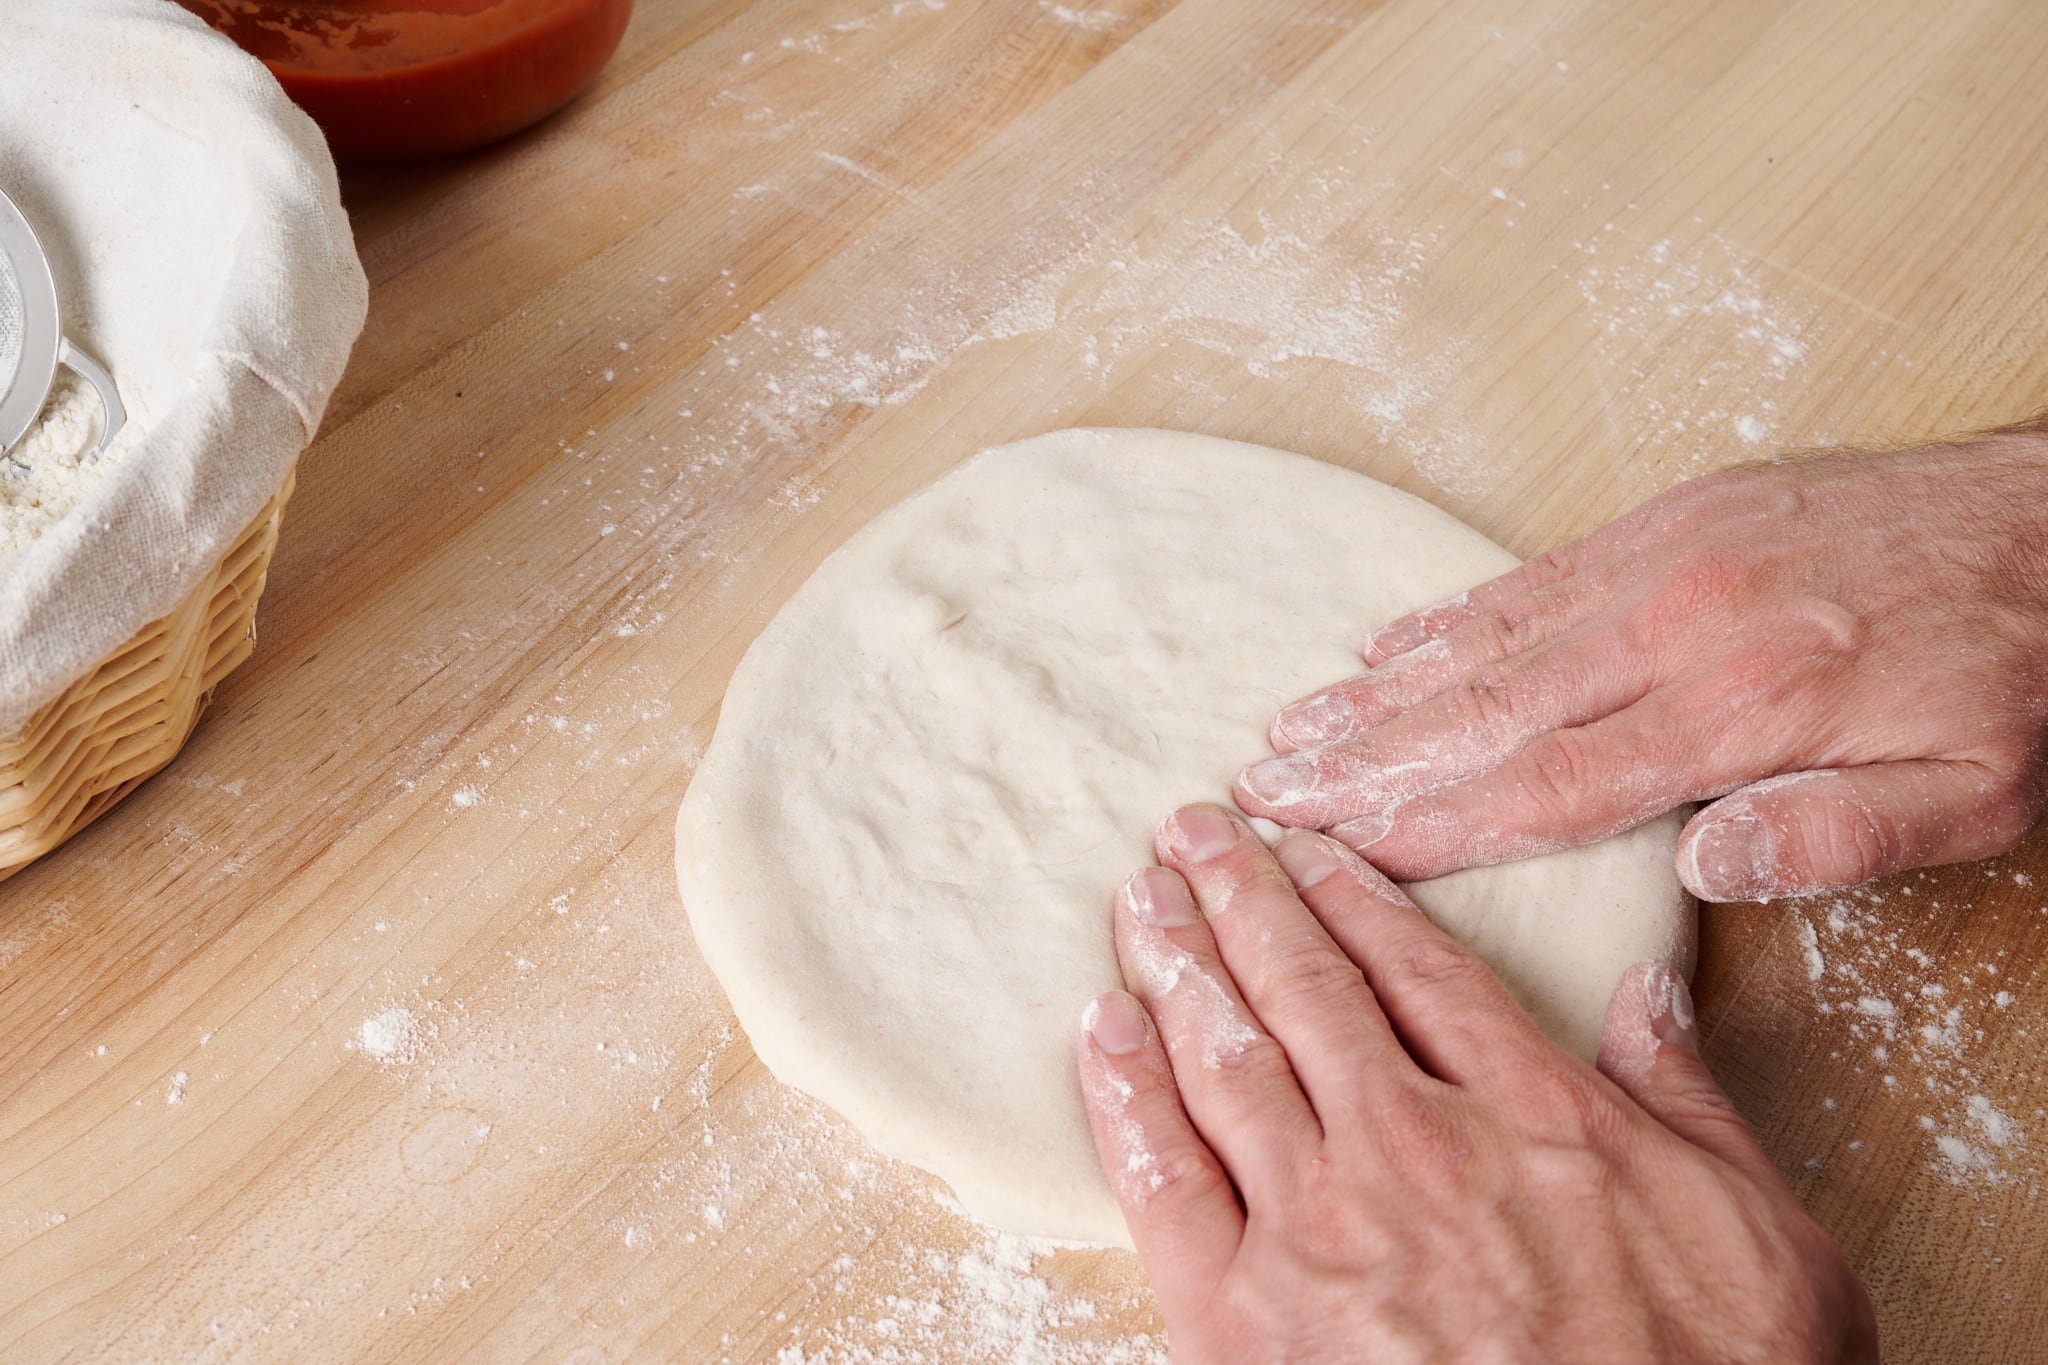
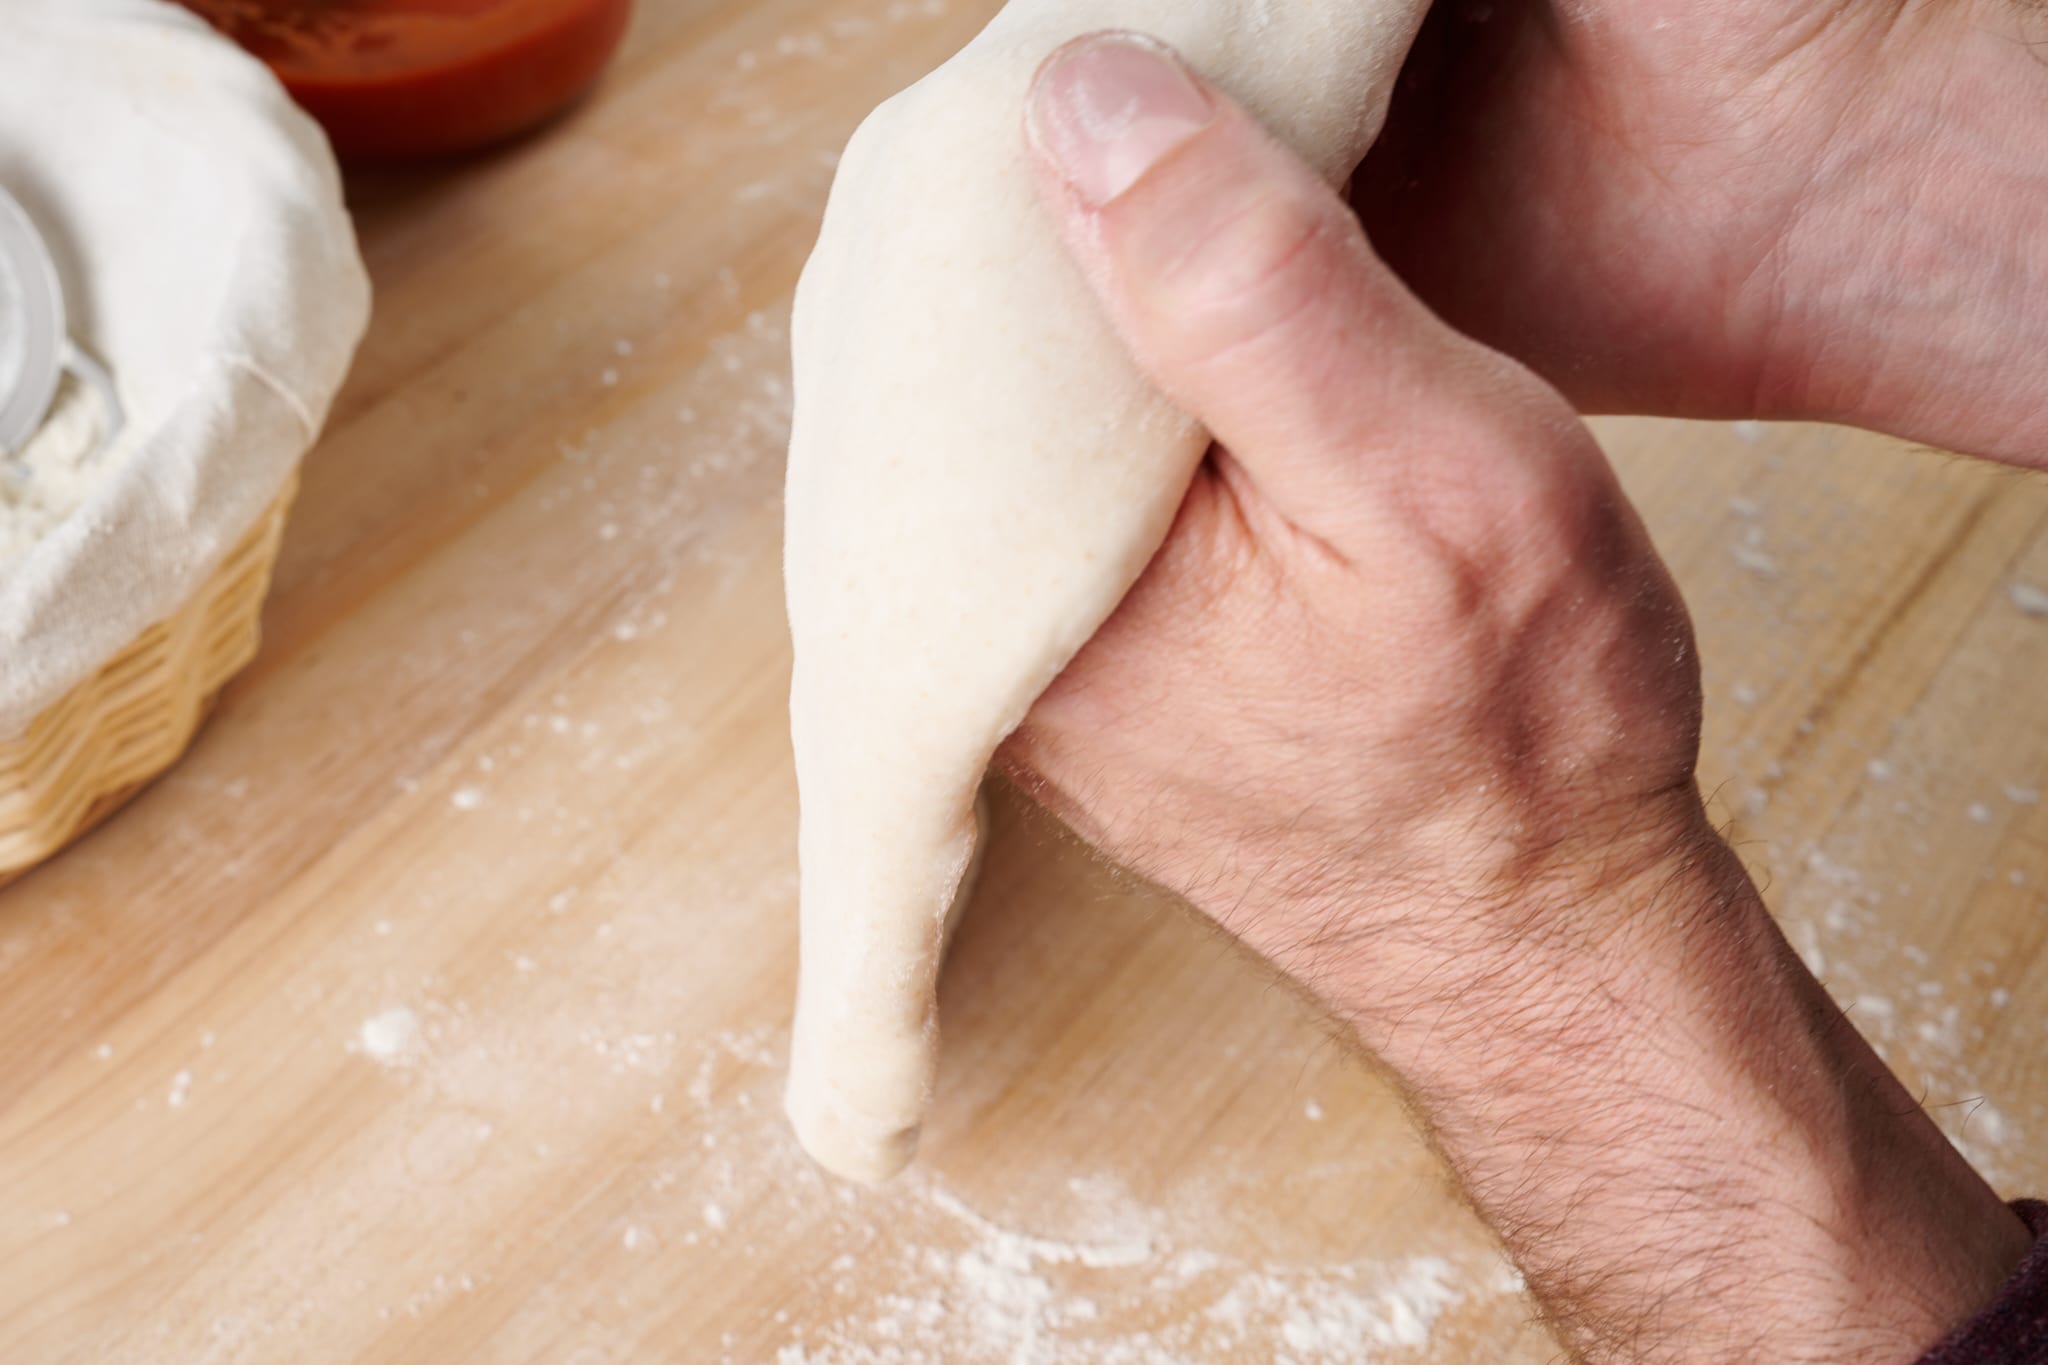
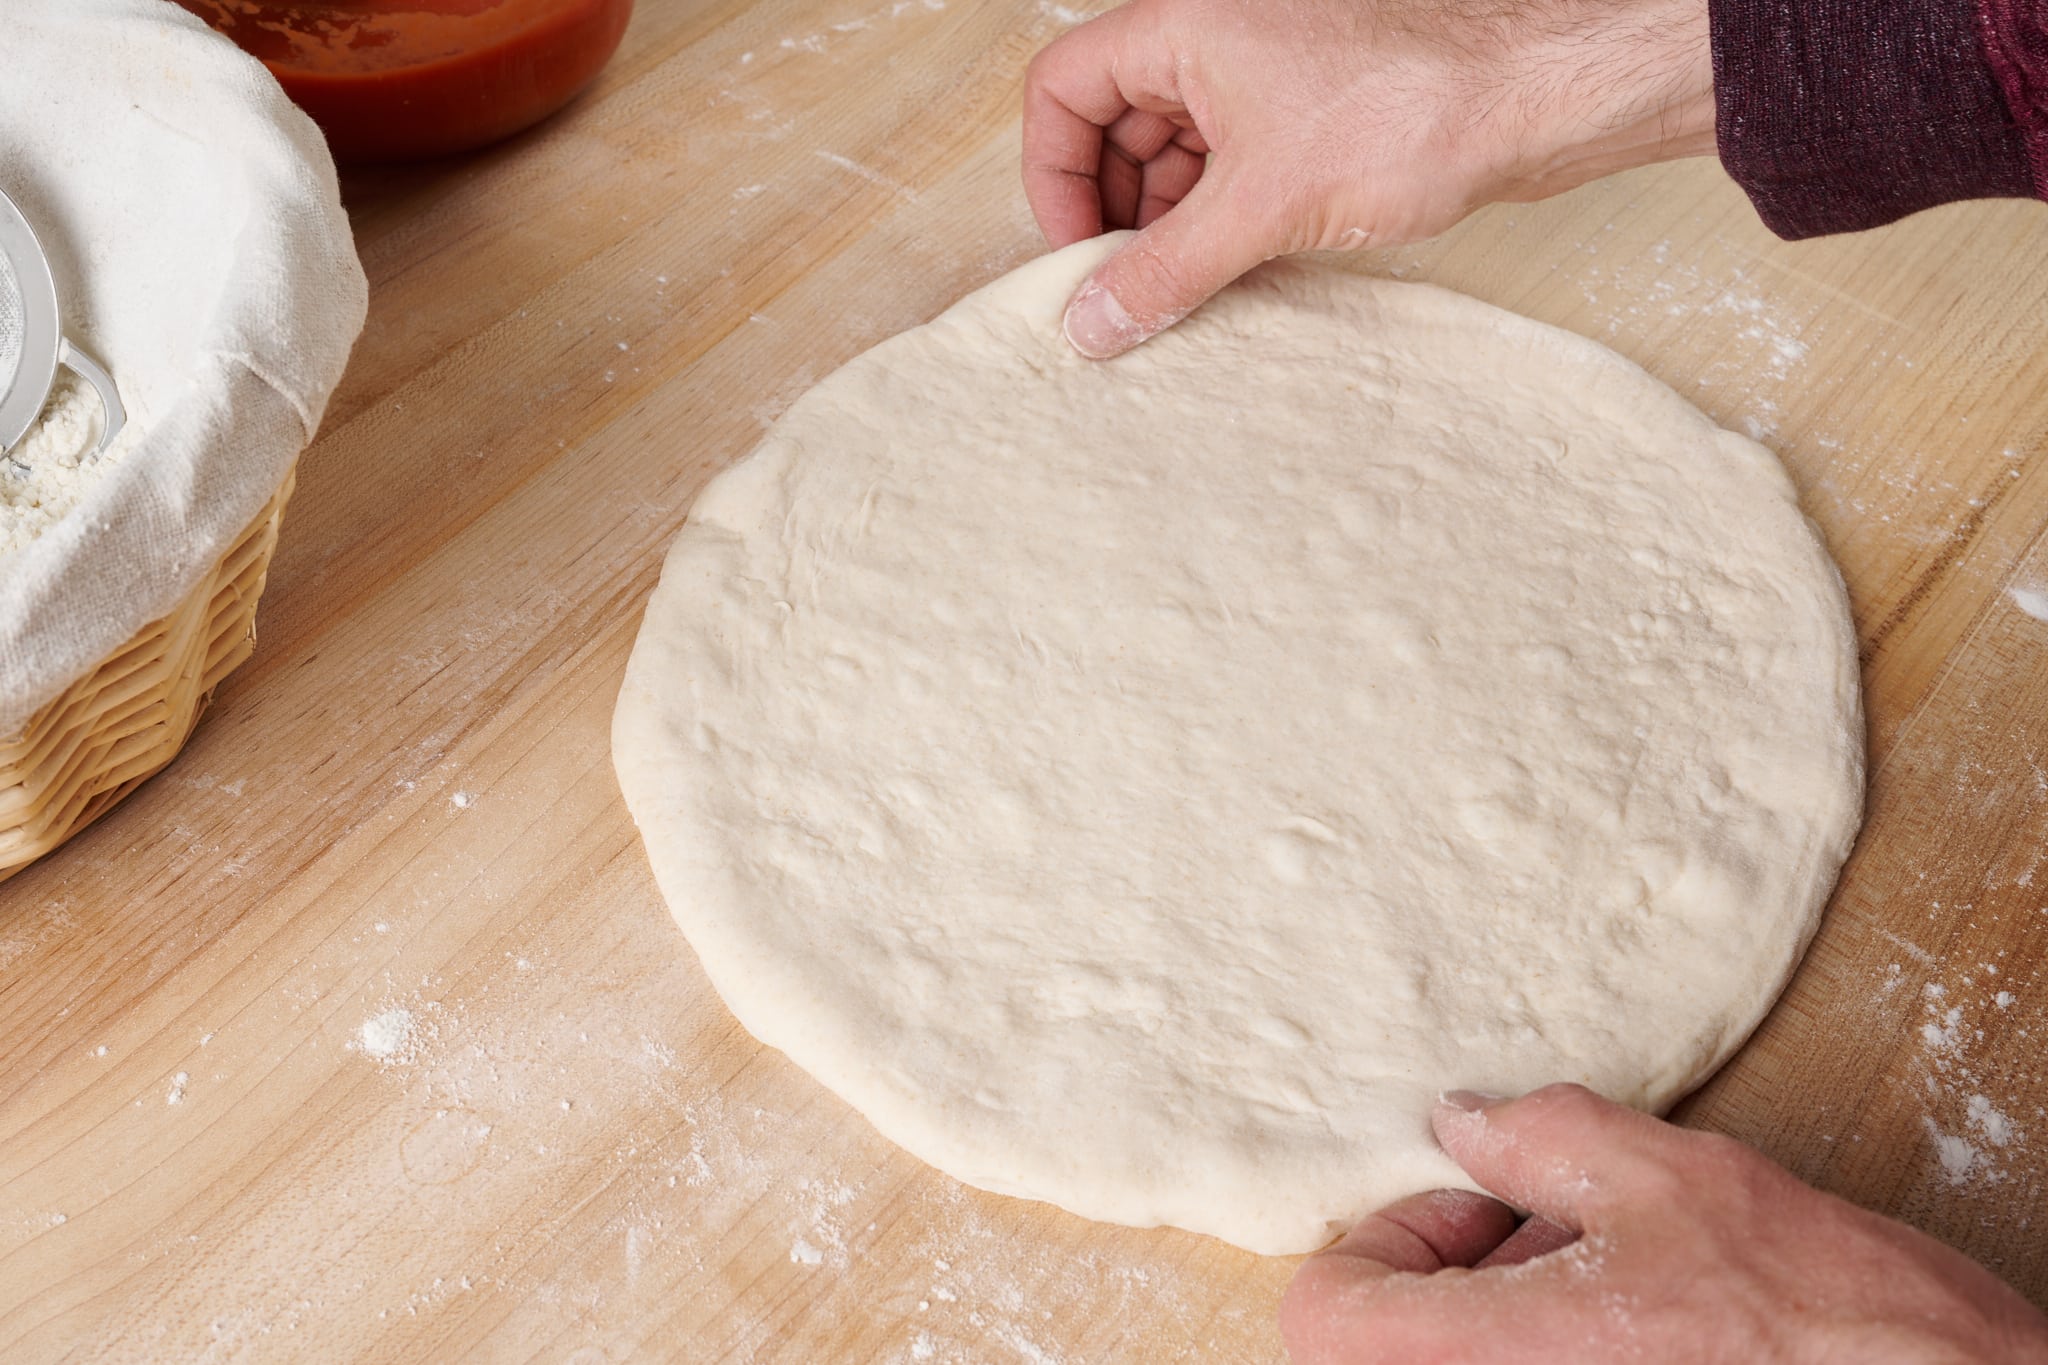
Flour a work surface and the tops of the dough balls. Using a spatula, scoop up one dough ball and flip it over onto the floured work surface. Sprinkle flour on top and use your hands, shaped like an inverted “V,” to press out the dough from top to bottom. Rotate the ball and press it out again. Then, flip the dough over and again, with your hands shaped like an inverted “V,” press the dough out. Next, pick up the dough with your hands, make fists, and drape the dough over your knuckles. Gently and slowly, pull your hands apart to stretch the dough. Rotate the dough over your hands and continue to stretch in this way a few more times until the dough has spread to about 10-inches in diameter. Lay the dough back on the work surface.
Top the dough with sauce, cheese, and any toppings suitable for cooking in the oven. Slide the dough onto a pizza peel, and then slide it into the oven.
See my guide to stretching pizza dough for an in-depth look →
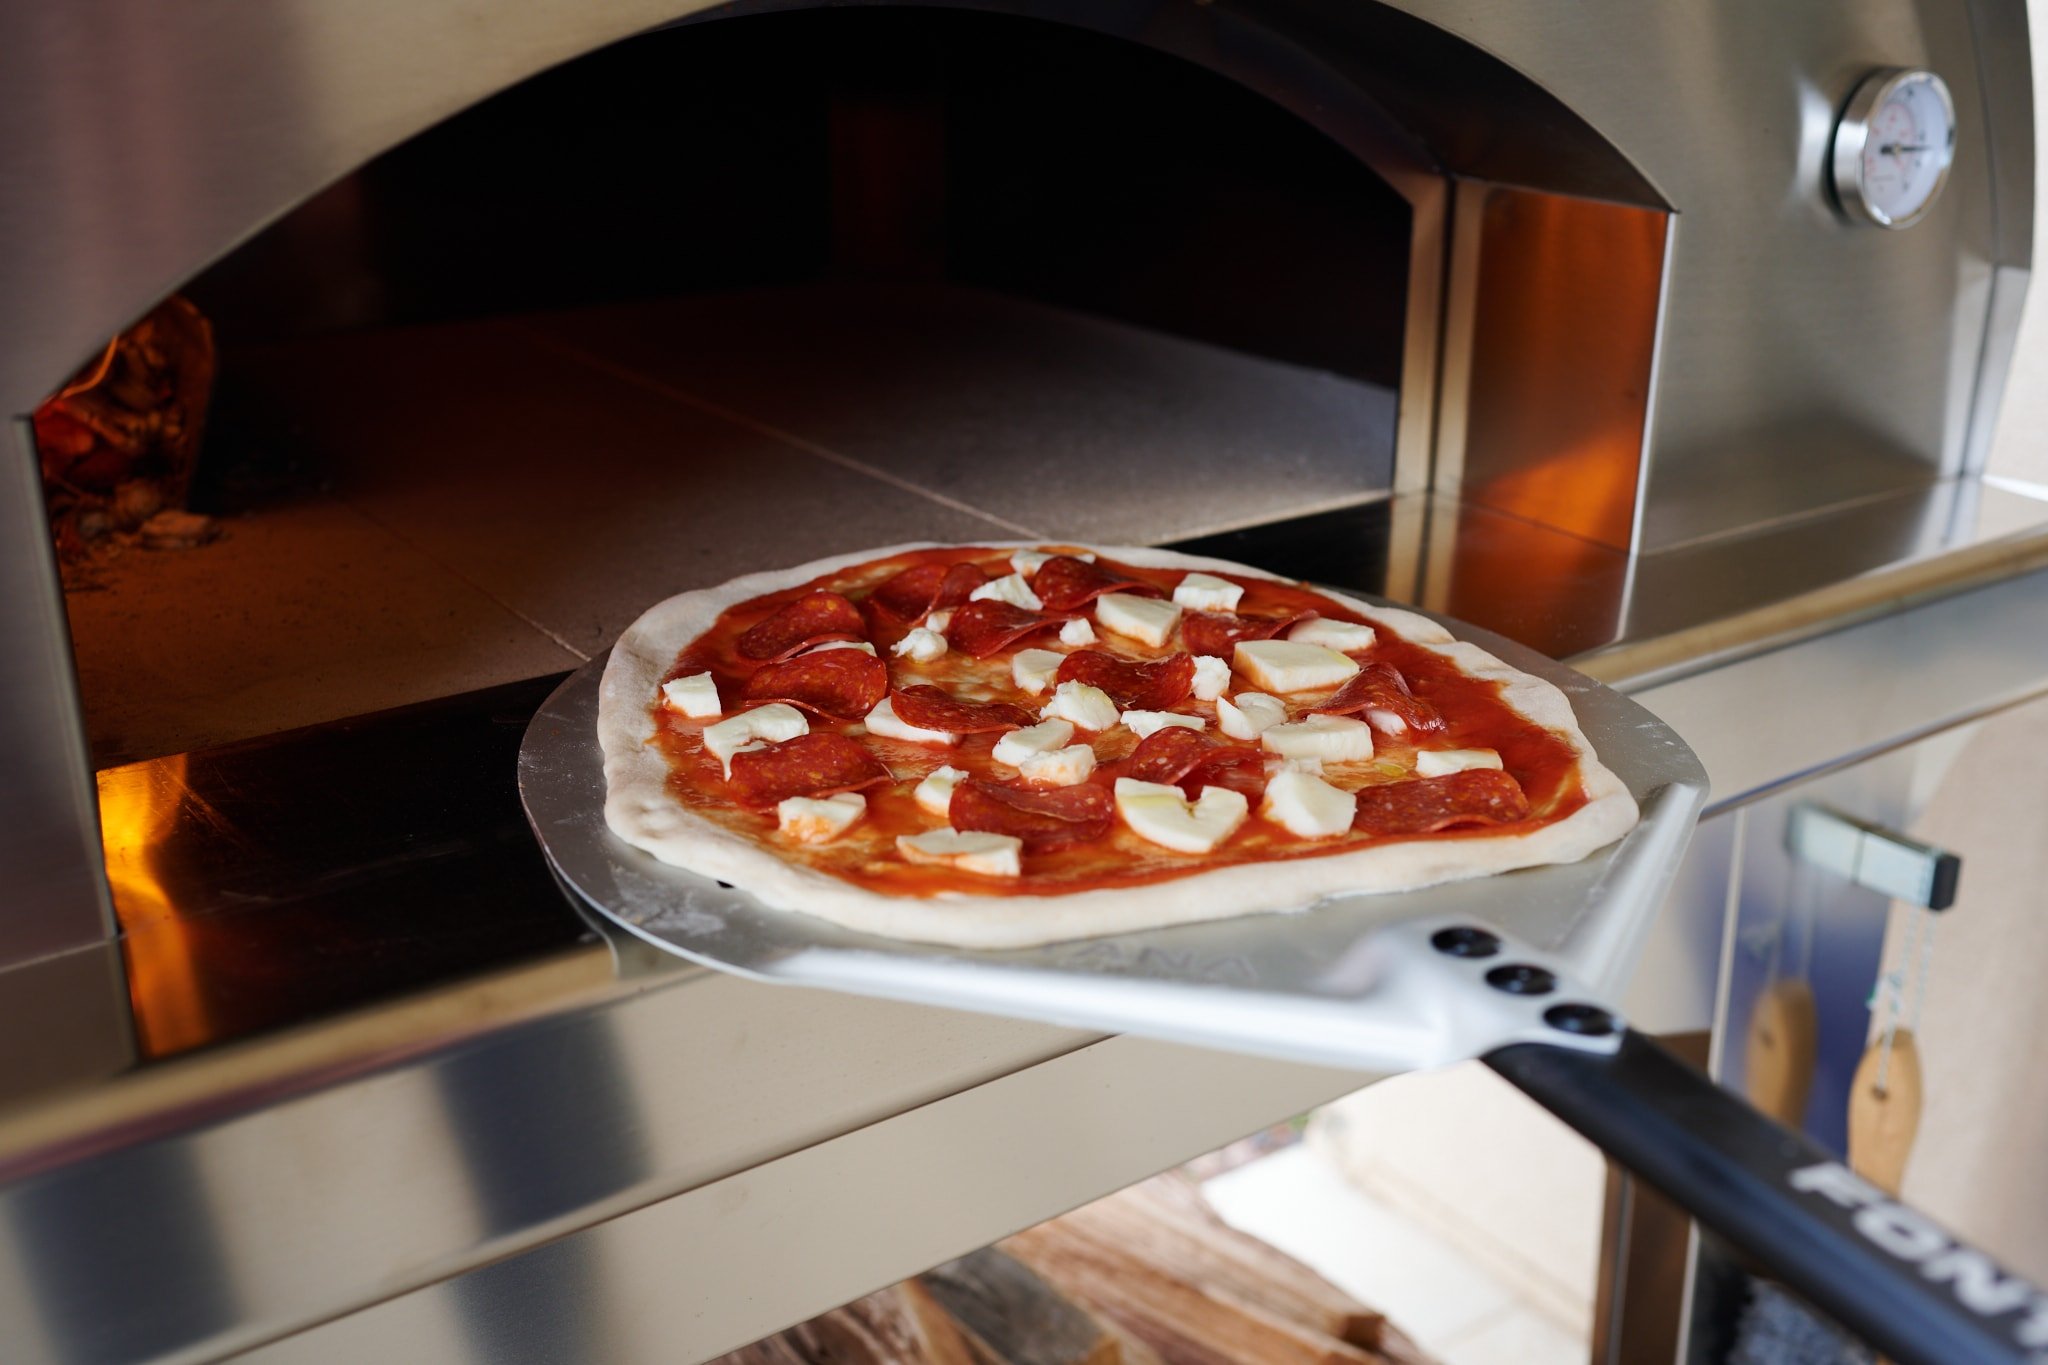
Cook the pizza for 5 to 8 minutes, depending on the intensity of the fire in your oven. Rotate the pizza periodically to ensure even cooking along the crust and bottom. When cooked, remove the pizza from the oven to a plate, cut, and enjoy. Repeat with the remaining dough balls.
Print
Wood-Fired Sourdough Pizza Dough Recipe
- Prep Time: 27 hours
- Cook Time: 5 minutes
- Total Time: 27 hours 5 minutes
- Yield: 4 pizzas
- Category: Pizza, Sourdough
- Cuisine: Italian
Description
A delicious (and dare I say healthier) recipe for a wood-fired sourdough pizza dough. This pizza will be your new favorite for high-heat cooking with a crispy crust, tender interior, and incredible depth of flavor.
Ingredients
Levain
- 34g white flour (about 12.5% protein)
- 34g water
- 34g ripe sourdough starter, 100% hydration
Main dough
- 573g white flour (about 12.5% protein)
- 34g whole wheat flour
- 34g durum flour (“extra fancy”)
- 357g water 1
- 27g water 2
- 14g fine sea salt
- 101g ripe levain
Instructions
- Levain – 9:00 a.m.
Mix the levain ingredients in a jar and leave them covered at a warm temperature, 74-76°F (23-24°C), to ripen for 3 hours. - Mix – 12:00 p.m.
To the bowl of a stand mixer fitted with the dough hook attachment, add the flour, water 1, and ripe levain. Mix on low speed for 2 to 3 minutes until the ingredients come together and no dry bits remain. Increase the mixer speed to medium (I use #6 on the Famag) and mix for 3 to 4 minutes until the dough begins to smooth. Let the dough rest in the bowl for 10 minutes, covered. Add the salt and water 2 to help it dissolve. Mix on low speed for 2 minutes until the salt is incorporated. Then, increase the mixer speed to medium and mix for 4 to 5 minutes until the dough clumps around the dough hook and is smooth and elastic. Transfer the dough to a bulk fermentation container and cover. - Bulk fermentation – 12:15 p.m. to 3:15 p.m. (3 hours)
At a warm room temperature, 74-76°F (23-24°C), bulk fermentation should take about 3 hours. The dough does not require any sets of stretches and folds. - Divide, ball and cold-proof (retard) – 3:15 p.m. (overnight)
Grease a large dough tray, half sheet pan, or four individual 4-cup containers with olive oil. Scrape the dough out to the counter and divide it into 280g pieces. Shape tightly into balls and place in the proofing container(s). Cover and place into the refrigerator overnight (or up to 2 days later). - Warm proof – 9:00 a.m. to 12:00 p.m.Take the dough out of the refrigerator and let it finish proofing at room temperature for 3 hours before shaping and cooking.
- Shape and cook – 12:00 p.m.
Preheat your high-heat oven until the floor of the oven reaches your desired temperature (I prefer around 650°F/340°C). Prepare your pizza sauce and any other toppings. Flour a work surface and the tops of the dough balls. Scoop up one dough ball and flip it over onto the floured work surface. Sprinkle flour on top and use your hands, shaped like an inverted “V,” to press out the dough from top to bottom. Rotate the ball and press it out again. Then, flip the dough over and again, with your hands shaped like an inverted “V,” press the dough out. Next, pick up the dough with your hands, make fists, and drape the dough over your knuckles. Gently and slowly, pull your hands apart to stretch the dough. Rotate the dough over your hands and continue to stretch in this way a few more times until the dough has spread to about 10-inches in diameter. Lay the dough back on the work surface. Top the dough with sauce, cheese, and any toppings suitable for cooking in the oven. Slide the dough onto a pizza peel, and then slide it into the oven. Cook and repeat with remaining dough.
Notes
After balling the pizza dough, it can be left to finish proofing on the counter for same-day pizza, retarded overnight, or even left up to 2 days later.
If you don’t have durum flour “extra fancy,” you can use white flour in its place.
Wood-fired sourdough pizza dough recipe FAQ
Can I freeze my pizza dough?
Yes, you can freeze your pizza dough. After dividing the dough and shaping it into balls, place a single ball into a small container with an airtight lid (I like to use a 4-cup glass container to hold a single pizza dough ball), then place the covered container into the freezer. The dough will keep for up to 2 weeks.
Can I use parchment paper to help transfer my pizza dough?
Because of the high temperature in a wood-fired oven, using parchment paper is a hazard. Please do not use it.
What is the best wood for a pizza oven?
Dry, pest-free hardwood that has no sap is best to use in a wood-fired pizza oven. Species such as oak or pecan burn hottest and usually cleanest (less black smoke). Additionally, these wood species impart only a small amount of flavor. Wood such as hickory can be used, but it may impart too much “smokey” flavor to the pizza.
Why is my pizza hard to transfer into the oven?
If your dough is difficult to transfer from the pizza peel to the oven, it might be over hydrated, under strengthened, over-proofed, or require more flour on the dough when shaping.
Some people like to use fine semolina to dust their pizza peel. This type of flour is a bit coarser than traditional wheat and the small, spherical shape almost acts like ball bearings to help the dough slide off the pizza peel.
Is sourdough pizza healthier than other pizza?
While I wouldn’t call pizza a healthy food, many studies have shown that the lengthy process of natural fermentation naturally breaks down gluten and makes the nutrients in the grain more available to the human body. So, in that sense, yes, sourdough pizza is “healthier” than others.
What is the difference between a Neapolitan pizza and regular pizza?
Neapolitan-style pizza is cooked at very high temperatures and results in a pizza that’s extremely soft and just barely cooked. Other styles of pizza, like New York-style pizza, are cooked at a lower temperature for pizza that’s sturdier with more structural rigidity and more chew.
Is there a difference between pizza dough and bread dough?
For my style of pizza and bread baking they’re rather similar. The differences are that my pizza dough typically has a higher salt percentage and reduced hydration (less water to flour in the recipe). That said, there are so many varieties of bread and pizza the lines are blurred! In fact, I’d say that if you are armed with a good bread dough recipe, you can always pivot and use some of that dough to make pizza and it would be quite delicious.
Can I use this sourdough pizza dough recipe in any high-heat oven (any oven capable of reaching over 600°F/315°C)?
Yes, this wood-fired sourdough pizza dough recipe will work in many high-heat ovens, including any Ooni or Roccbox oven.
Can you bake a loaf of bread in a pizza oven?
Absolutely. Stay tuned, I’ll have recipes for this soon 🙂
What’s Next?
If you find yourself cooking pizza in your home kitchen, have a look at my home oven sourdough pizza dough recipe perfect for cooking at lower heat. Or, do a complete 180°, and make sourdough pizza in a pan or make a crispy, cheesy, sourdough calzone.
Check out my ultimate guide to sourdough pizza for a roundup of my favorite pizza recipes, guides, and tools.
Buon appetito!


124 Comments
I am not a pizza pro. in fact most of my pizza making has resulted in less than perfect pies. Many time I am left with a sticky mess on my peel that wont even release properly.
Yesterday I made these Wood-Fired pizzas I felt like I am professional! Well maybe not quite that good.
I was able to stretch the dough without tearing or making a terrible mess. Perfectly round pies with no spring back. Easy to get on the peel and release in the oven. Beautiful crust and taste.
This was the revelation I have been seeking for years.
I am so happy to have bought our Alfa oven and will be using it every week from now on.
Muchas gracias Mario!!!!!
Amazing to hear this, Ray! So glad my recipe worked for you. That’s a really nice oven you have, too. You’re on your way now—enjoy 🙂
Is there any reason you don’t mention using this in a regular oven? I know you have a different recipe for that, but this one works well. I’ve used it several times in my pellet smoker with a pizza oven insert. Temp can reach 750. I made a batch yesterday for cooking tonight, but 9-year old granddaughter wanted pizza last night, so did one as a same day in a 500 degree oven with a pizza steel and it was terrific! This may become my all-round go to recipe.
Amazing, Roger, glad to hear it. Yes, this dough will work in a regular home oven, but it really shines at higher heat, too. That said, with a proper pizza steel, you can actually get up to around 600F in a home oven most times, which is a great temp. Glad you’re enjoying this one!
Please clarify…. Recipe calls for 607g of White flour (about 12.5% protein; Caputo Pizzeria Soft Wheat Flour Type 00); 34g Whole wheat flour (Central Milling Hi-Pro Whole Wheat) and 34g Durum flour. If I use the Caputo 00 flour, instead of the white flour 12.5% protein, do I still use the 34g of central milling whole wheat, since the 00 flour is wheat already, or just more of the 00 flour?
I would swap the White flour in my reicpe for Type 00, then keep the rest the same if you have those flours!
HELP! I must have done something terribly wrong, as my crust came out way too chewy. I am not certain what I did wrong. I did use Semolina flour, not realizing I needed fine Durum flour. I also used the 4% protein Caputo Pizzeria Soft Wheat Flour Type 00 (in place of the 12.5% protein white flour and wheat flour). The oven floor was the right temp, between 600-700 degrees. Could it be my flour? You talked about the Tipo 00 flour, but the recipe called for 12.5% protein; that flour is only 4%. I know the Semolina is not a fine durum. Maybe that was my problem? We live in south Texas where it is very humid and hot: yesterday it was 95 degrees with a heat index of 108. I have a Chicago Brick Oven CBO-1000, and it is outdoors. Could it be the high ambient temp of oven air, or the humidity affecting things? Ugh! I loved the ease of this recipe, and want to do a MOD style 4th of July party, but I don’t want to serve chewy pizza. Can you help? Maybe it is something simple like brushing on olive oil before we loaded pizza toppings?
The Tipo 00 flour you’re using is most certainly higher than 4% protein (that’s way too low!), but it might be lower than 12.5%—and that’s okay! Usually, with that type of flour, you have to reduce the hydration, so I’ve found. I would hold back water next time, which will help your dough cook out faster.
I’d also wonder if the dough is properly fermented. If your dough is underproofed it can come across as gummy when eating. Be sure you’re following the temperatures and timeline in the recipe and look for the signs of fermentation I talk about (and show) at each step!
Sorry for the split post!
I should have said that I fed my starter at 9.00pm last night. Right now (9.00am) it is at full height. Do I feed or leave till 3.00pm?
Yes, I would feed it again!
Thanks Mario. I noticed that I can store in the fridge for up to 2 days so that does solve the problem. Missed that the first read. Looking forward to firing up the Alfa wood burning oven tonight!
I love this recipe. I’ve swapped out the 00 flour for bread flour in a pinch. Used the equivalent weight of fresh starter in place of the levain and completely bungled the cold proof/balling procedure (actually did it in reverse lol), and this dough hasn’t failed me once. I do find that frozen dough doesn’t cook up as nicely as fresh..it tends to be a bit flat with a lot less rise. I also find that this dough responds well to an even higher floor temp (800+). Keep the wood fired oven recipes coming!
Amazing, thanks so much for the feedback, Kristin! On the freezing: yup, hasn’t reliably worked for me here (which is why I don’t recommend it here, or in my new pizza book coming out!).
I am a big fan Mauricio of all the information you give to people. I own a Fontana forni oven – gas powered. maybe this was just me, but I learned very quickly ovens like this have a learning curve. that’s it. I have now invested in the RM 2020 and I made my first set of pizzas in it which were really really wonderful. I especially found the Teflon mats easy to put the pizza on while assembling which for me was a game changer. I’m wondering if I can use wood in my gas powered pizza oven however I am enjoying the RM 2020 so much and the pizza it made was absolutely gorgeous. I Just loved that it was so forgiving.
Thanks Marion really appreciate the comments. Great idea with those mats, I need to try them with my pizza in the RM!
Maurizio, I’m interested in getting a lighter, softer edge and texture to my pizzas. The recommendations I’ve seen suggest hydration in the 65%-67% range. Other than increasing the water, and maybe adding in an autolyse step, are there any other changes you would suggest? I’m also considering a Caputo Blue/KA bread flour mix for the flour. FYI, I’m cooking in an OONI oven. Typically 1:30 to 2:00 minutes for done, any longer is not good. Interested in your suggestions. Thanks – Louis
I tried to skim the comments for an answer to my question, but did not see it? Apologies if this is a duplicate…. After freezing dough and thawing in refrigerator, is it advisable to let it proof/rise before assembling for grill?
I tried to half this recipe to make only 2 pizzas but the crust ended up being rather flat and a bit dense. Do I need to reduce my mixing time when scaling down?
The dough recipe I use is very similar but didn't have any semolina. I tried your idea and used 40g semolina, 40g ground hard white winter and 420g Caputo 00. Definitely a crispier crust cooked with the iron skillet stove top 6 minutes and 4 minutes under a broiler. I have yet to have better pizza with this method! Thank-you for the great idea!!!!!
@maurizioleo:disqus if I wanted to avoid retarding after balling up the dough, how long do you think the dough balls would need to prove at room temperature similar to the bulk phase?
The thickness matters here. If you're looking for the same thickness, I'd probably shoot for 295 to 325 for 14 to 16" pies.
Napoli Workflow workaround?
Have had amazing success with this recipe and my Ooni oven. I’m writing with a different lament:
Before Ooni , In summer I would cook pizzas on my Weber Genesis II By Par-baking my pizza doughs with a coating of oil right on the grills, which then allowed me to dress all five of my pizzas in advance and cook them one after the other on the grill. This enabled me to have dinner with my family, and I would only have to pop up every eight minutes or so to take a pizza off and put another pizza on.
With my Ooni, there is no par cook possible (I assume). So I am left to stretch out the pizza dough, put the toppings on, and then throw it in the oven, where I have to pay full attention for the three minutes it takes to cook it. Deliver it to the table, rinse and repeat. The problem I have now, is that when I’m cooking Neapolitan style pizza, I don’t get to eat with my family. I’m basically cooking the entire time.
So here’s my question: is there a way to prep the dough in a way that I could stretch out the pies in advance so I only have to dress them and then pop them in the Ooni as a way to speed up my workflow? (for example, a much lower hydration that would result in a tougher, more resilient dough?) Otherwise, the only time I feel like using my Ooni is if I’m having a pizza party and I will have friends hanging out with me While I’m cooking!!! (on the other hand, your high heat dough pizza comes out so amazing on the Ooni, that I don’t wanna go back to my barbecue method…).
Sorry for such a long post! Sharing it here in case others are experiencing the same…
Thanks for everything,
Ariel
Hello! Looking to try this recipe, but as I was preparing to scale it up I noticed the the chart in the post about the total formula which contains the bakers %, the recipe is not the same as it is at the bottom. The chart shows 606g flour and the recipe calls for 573. The water totals are different, and the starter culture is very different… 34g vs 101g. Which is right? Thank you!
Ah… Levain vs sourdough starter now I see why the difference! Sorry!
No worries Molly, sorry for the confusion!
I am considering upgrading my pizza making to an outdoor oven and wondered if you had any thoughts on how the oven prep and final pizza come out with a propane vs. wood-fire oven. In your wood-fire oven do you ever make more than one pizza at a time or do you need the space for rotating them through as they cook?
I only have a Weber gas grill. Can this be adapted to be cooked on a gas grill?
Yes, it absolutely can. Put a Baking Steel or stone in there and heat that as hot as you can 🙂
How have I missed this recipe on here until now?! We got an Ooni karu at the end of the summer and have been experimenting with every kind of pizza dough. We are Detroit style lovers so have been making the Alexandra Stafford Detroit dough recipe in the ooni (it’s been a real challenge to figure out a good cooking method for our preferred toppings as I find the ooni recipes/methods lacking in detail, if you ever do a post on that I would be forever grateful). Would also love if you did a post on baking bread in the residual heat, so far we’ve only done some naans while we’re getting everything up to temp (we live in Edmonton so it’s regularly below -20 C here and takes a little while to get everything fired up). Also getting the timing right to have a bread dough ready to go post pizza is a challenge I haven’t worked out yet.
Right on, Quincy. I have made this dough in the Karu and it's fantastic. I hope you like it. Have you seen my Detroit recipe?
https://www.theperfectloaf.com/sourdough-detroit-style-pizza-recipe/
Hi Maurizio. I generally use Caputo (but the red bag) for my pizza in my Ooni which works great…but I do have a question…Lately, I have been milling my own flour. What mix between hard/soft wheat would you recommend? How much hydration would I need to increase to, and would you recommend ALSO doing an autolyze? And if it is in your book – shame on me!!! I love it, but haven't fully gone through it yet!! Thanks!
Hey Sharon! I would go with hard wheat, it'll have more protein and result in a taller crust. It's hard to say on hydration because it's so specific to the flour, but generally with fresh flour, you'll need to increase the hydration (especially if you're making the pizza in a home oven, like I do here ).
This is an excellent recipe ! I have been working on sourdough bread and pizza dough for over 2 years. These are the best recipes I have found and your explanation is also excellent! Thank you !
Ahh thanks so much Deb, really glad to hear that 🙂
This recipe is legit. Even with an extra 1-1.5 hours on the proof, It baked just fine in a home oven @ 550F with a stone.
So glad it worked for ya, Steven!
I apologize in advance for this somewhat sinful question: Can this recipe be made with instant yeast? If so, would the process be the same? Thank you so much in advance, and I love your content!
You can definitely. And yes, it would be very similar though you'd have to figure out how much yeast to use to make it fit. Definitely possible. Or, do a combination of sourdough and yeast, like this:
https://www.theperfectloaf.com/hybrid-dough/
Hi, I made this dough and have a question. I used 00 flour, and whole wheat. It was lovely until I added the second batch of water. It was too hydrated to come back together. So I added 30 grams of 00 flour and it came back together beautifully. It rose just fine in a 80 degree oven and now it’s in the frig. The hydration was too much. Is it because of the 00 flour? And guidance appreciated.
It sounds like that much water is too much for the flour you're using, which is totally fine. I would not add that second bit of water!
Thanks. I used 00 flour.
I used this dough in my Ooni Koda last night and it was great. Even the 19-year-old birthday boy commented on how great the crust was. Great recipe! Your book arrives today and I can't wait to delve into it.
Oh so glad to hear that, Rebecca. Yes, this dough is just perfect for that oven (I have one and love it).
Let me know what you think of my book once you flip through, thank you for getting it! Happy baking 🙂
in some of your other recipes you use diastatic malt powder. Why don’t you use in this recipe?
I use it often when I find I need more color in the crust. You could definitely use it in this recipe no problem! It all depends on how I'm seeing the flour perform, when I created this recipe it was coloring just fine 🙂
Here's a bit more about how I use malt:
https://www.theperfectloaf.com/what-is-diastatic-malt-powder/
I'm just starting out with sourdough and bread making in general. Your Levain calls for ripe starter, and then says to leave it for 3 hours to ripen after adding more flour – why does the starter need to be ripe if you are effectively feeding it and then giving it time to ripen? I usually feed my starter in the AM and so it would be useful for me to use sourdough discard as the starting point. Perhaps if made with discard, the Levain would need more than 3 hours to sufficiently ripen?
Are there any rules-of-thumb for how much sourdough starter (percentage) is needed for a given dough?
Hey Tom! What I'm doing is taking some of the ripe starter (when you'd normally feed it in the AM) and making a small offshoot—the levain—which you'll use completely in that dough. There are a bunch of reasons I do this, but because of the amount of ripe starter I'm using with respect to the flour (they're equal, or 100%), the levain will ripen very fast, in 3 hrs. I like doing this for pizza because it amplifies yeast activity for more volume in your crust.
Here's more on making these off shoots and why I like them:
https://www.theperfectloaf.com/what-is-a-levain-and-how-is-it-different-from-a-starter/
Thank you for the reply. I should dig deeper into your website – so much information! And, I just ordered your book. I guess I'm still not grasping the distinction between fresh, ripe, mature – all these terms. I only feed my starter once per day (in the morning / perhaps this is wrong), and at this time, it has fallen back to its smallest volume. So, this isn't what I think you call "ripe" – it's well past ripe. But, I see you feed twice a day, so maybe you are thinking I do as well? More to read…