
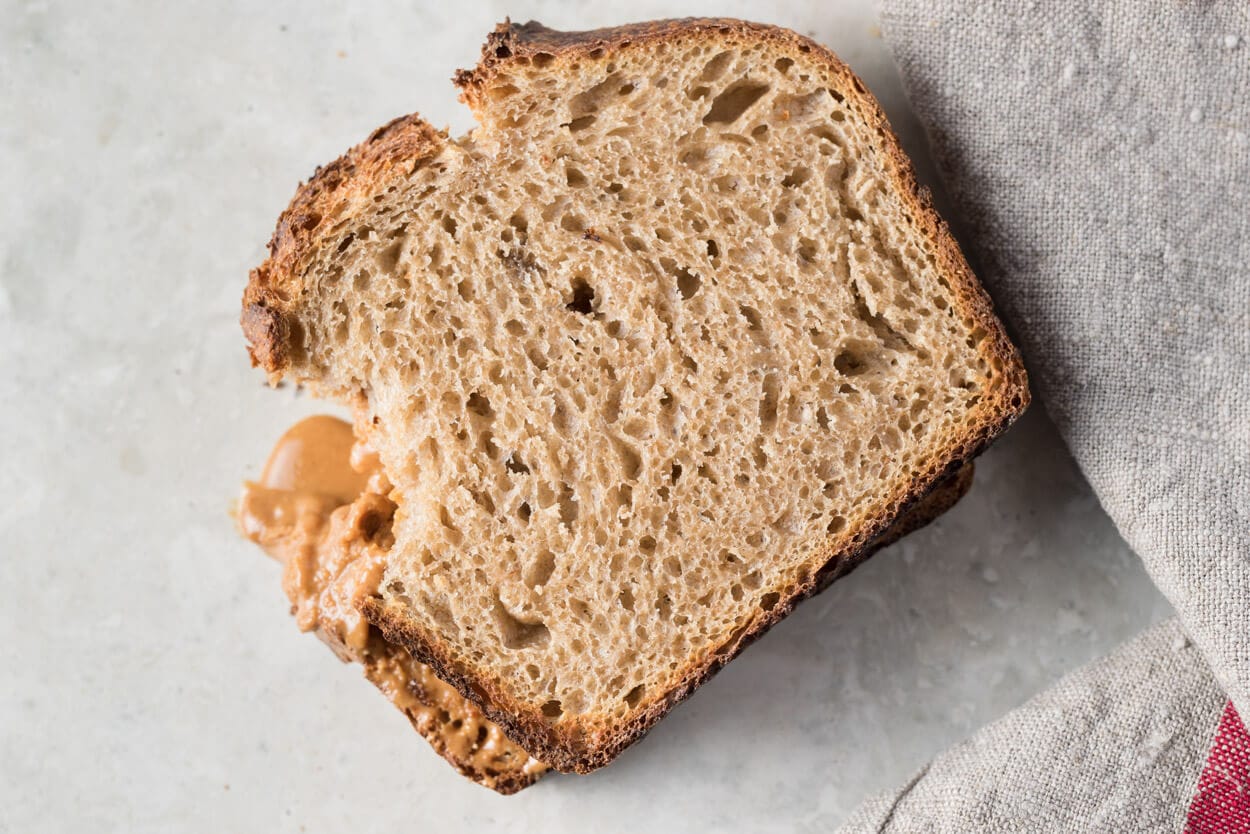
As a kid, I recall more often than not eating baguettes brought home from my Dad’s restaurant, usually procured through a late-night call asking for “some bread for tomorrow.” On the weekends my Mom and Grandmother would slice these baguettes at a super slanted angle and make French toast, probably one of the perfect bread for such a thing, but aside from these baguettes we also had a sack of pre-sliced whole wheat bread—which coincidentally also makes excellent French toast in a different sort of way. It was always whole wheat (even before that was the in thing to buy), and it was mostly just a vehicle for peanut butter & jelly, cinnamon & sugar, straight butter, or whatever other bright things kids can dream up. I always preferred the baguette with its wonderfully crunchy crust. But, there’s a special place for a PB & J sandwich—especially now with this whole wheat sourdough sandwich bread—that has so much peanut butter when dropped it would always land on the peanut butter side.
“Why don’t we ever have good ol’ sandwich bread?”, I heard my wife recently whisper to herself in the kitchen. This wasn’t the first time I’ve listened to such a statement, and scattered comments like these got me thinking back about that sliced bread (and baguettes too, and I just posted a recipe for baguettes!) I had as a kid. Nostalgia turned to motivation as I felt urged to develop a pan loaf with many of the same characteristics but 100% sourdough, and with somewhere around 98% fewer ingredients—you know, just flour, water, salt, and yeast.
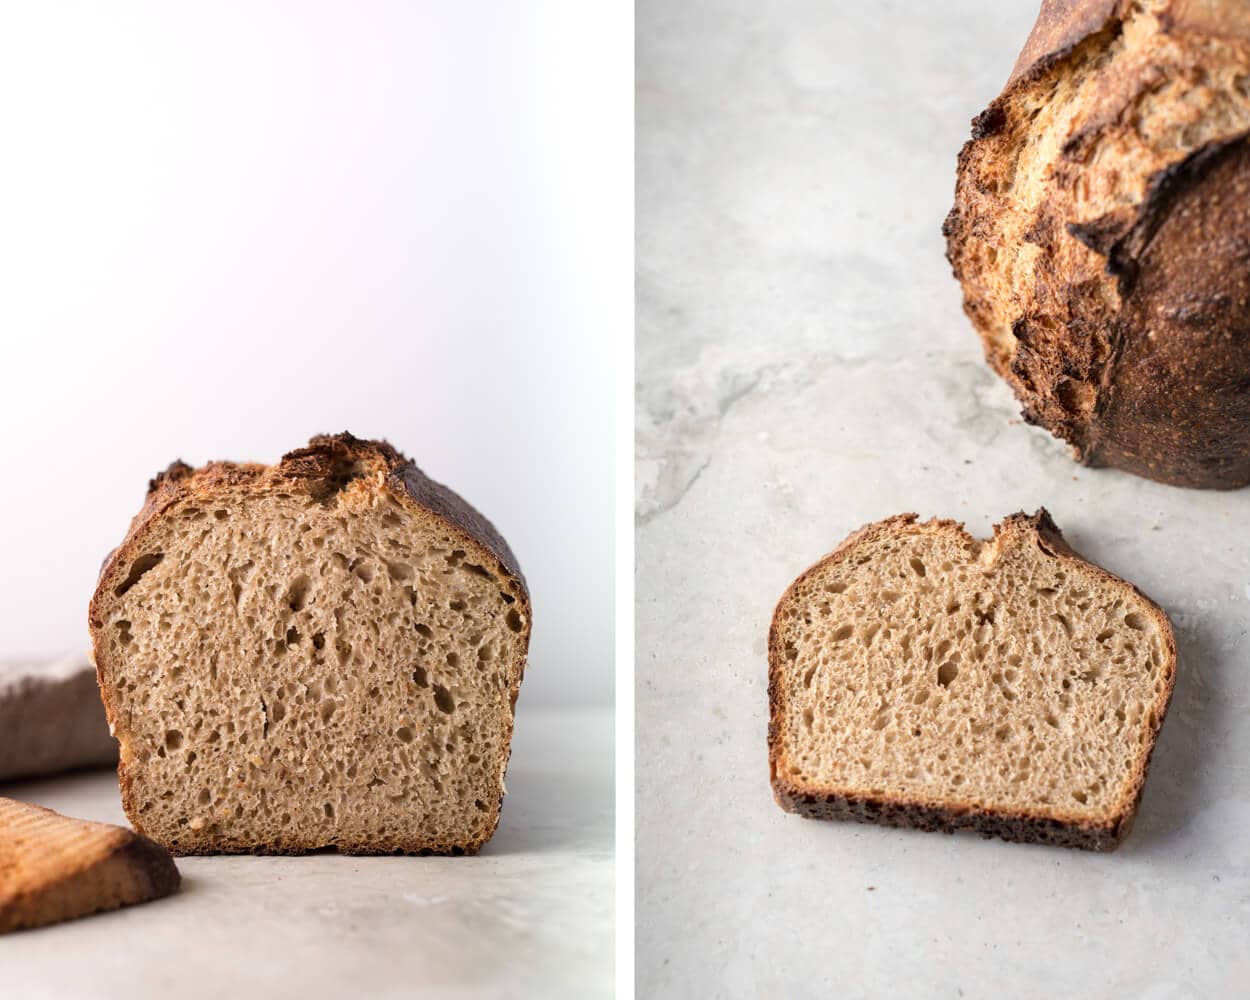
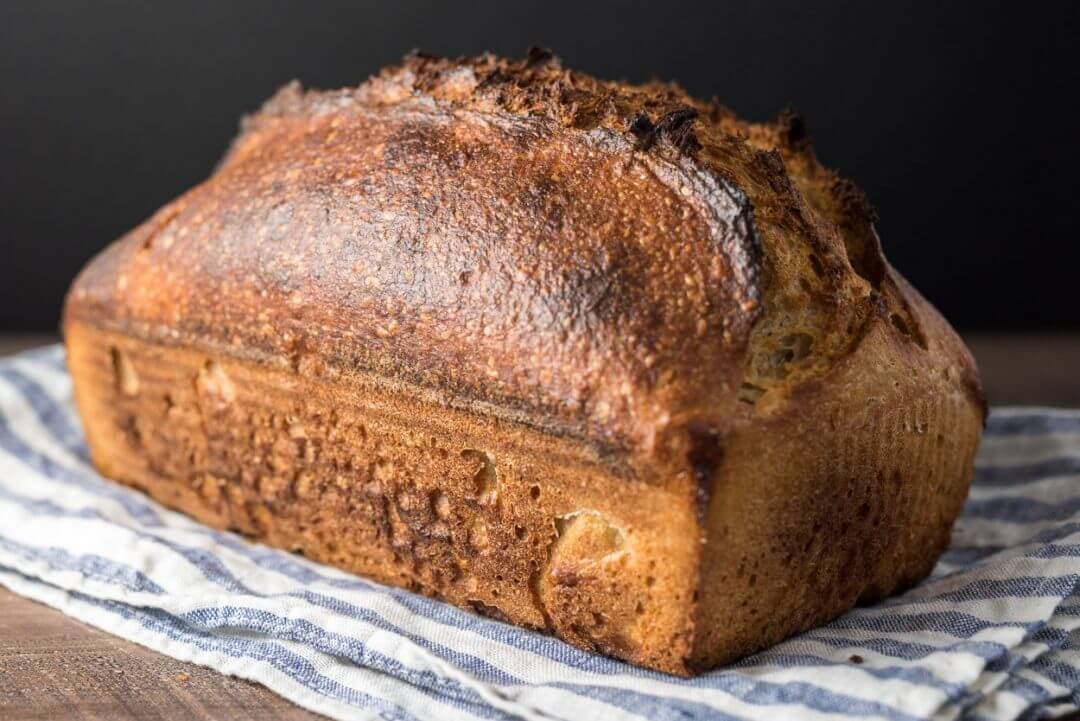
The perfect sandwich bread to me is related to that sacked bread from the supermarket, but only in the most remote way possible—perhaps only in the fact that it’s square-ish and sliced. I want a thin and shiny crust with a moist and light interior, a slightly sweet taste not from honey or sugar but from the whole grain itself. And that’s important: I want to taste the grain in this bread, not some strange flavor masked by something sweet. The interior should be tight but still light and well fermented, coaxing out maximal flavor from the grain. As far as aesthetics go, you can alter the way this bread rises and opens (or doesn’t open) at the top to suit your taste. I still prefer to impart my signature rustic feel and dark bake, but the final tweaks are up to you.
But first, let’s talk about flour.
Flour Selection

I chose white whole wheat for this recipe because I love the sweet flavor of it, especially compared to red whole wheat which can have a slight bitterness that sometimes pushes through. For the bakes leading up to this post, I used Grist & Toll Star White Whole Wheat. I’ve found the flour to be quite strong (regarding protein) with no gummy flavor to it, which is nice. I recommend using white wheat (King Arthur White Whole Wheat will work well, too) for this recipe but if you don’t have any on hand red wheat will work just fine — the flavor profile will be slightly different but still in the same vein. The small amount of red whole wheat was mostly used to build my levain (per usual) but also because it does add a slightly sharp flavor to the bread, just enough to balance out the sweetness. If you’re more a fan of the white wheat, sub the 10% red for white in the formula below.
If you remember, my recent Spelt Sourdough entry also used type 85 flour, and I explained there that this could be approximated by mixing 65% white bread flour with 35% whole wheat. In this formula, I’m only using a small percentage so again, feel free to mix whole wheat & bread flour to get the desired quantity or sub it out for another blend.
In the end, I like the flavor and characteristics imparted by these flour choices, but it is flexible. I know sometimes we want to bake bread with what we have in our pantry and not have to go out and buy special flour—by all means, experiment (and please let me know how your modifications turn out)!
Whole Wheat Sourdough Sandwich Bread Formula
A word of warning upfront: this formula has a very high hydration; the structure of the pan helps keep this dough together and permits me to push water as far as the flour will take it. This amount of water imparts a significantly moist and soft texture to the interior that is typical of sandwich bread, and the results are definitely worth the added hardship of dealing with such a wet dough.
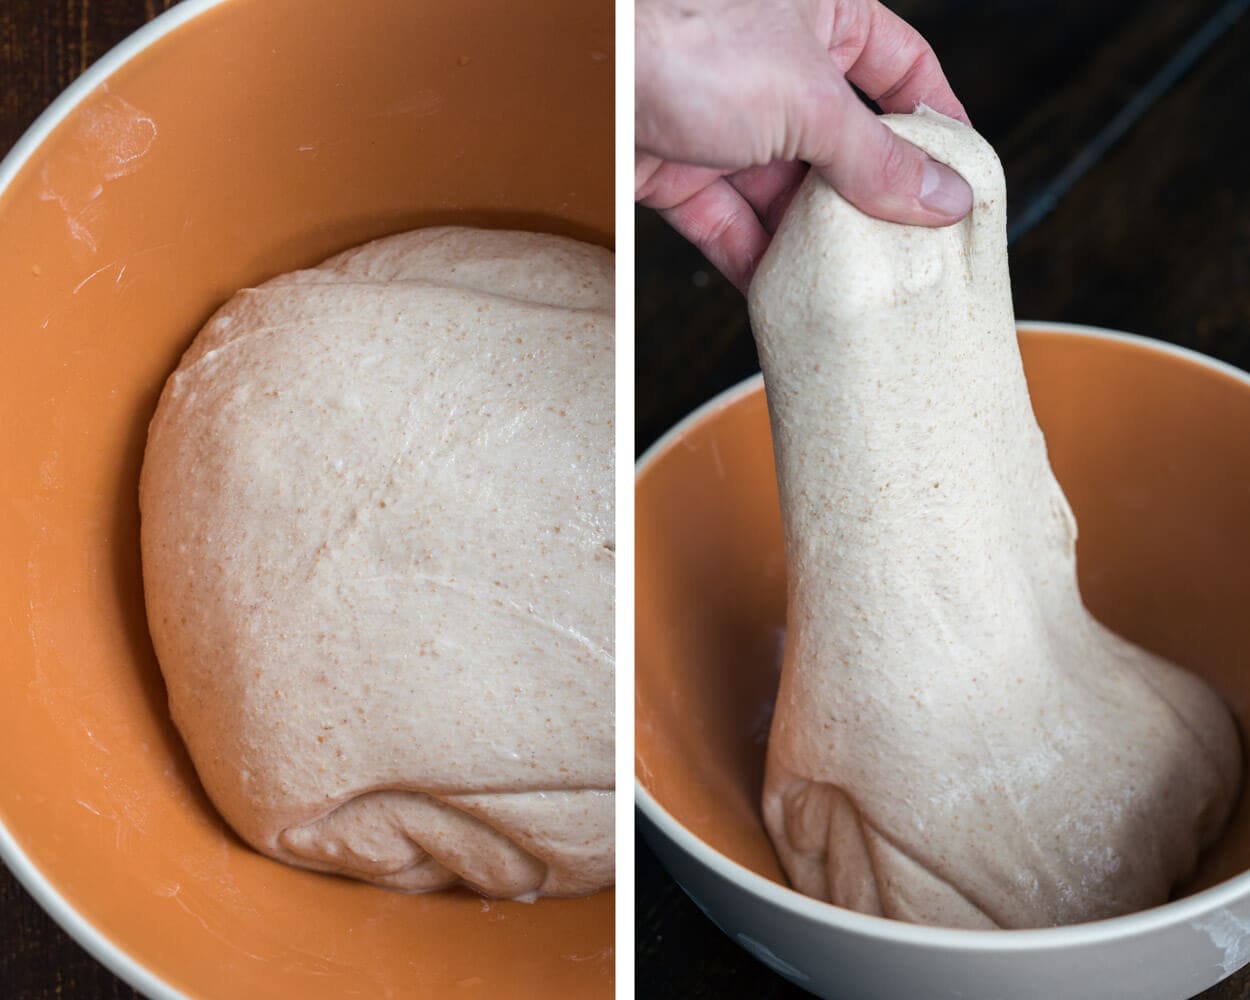
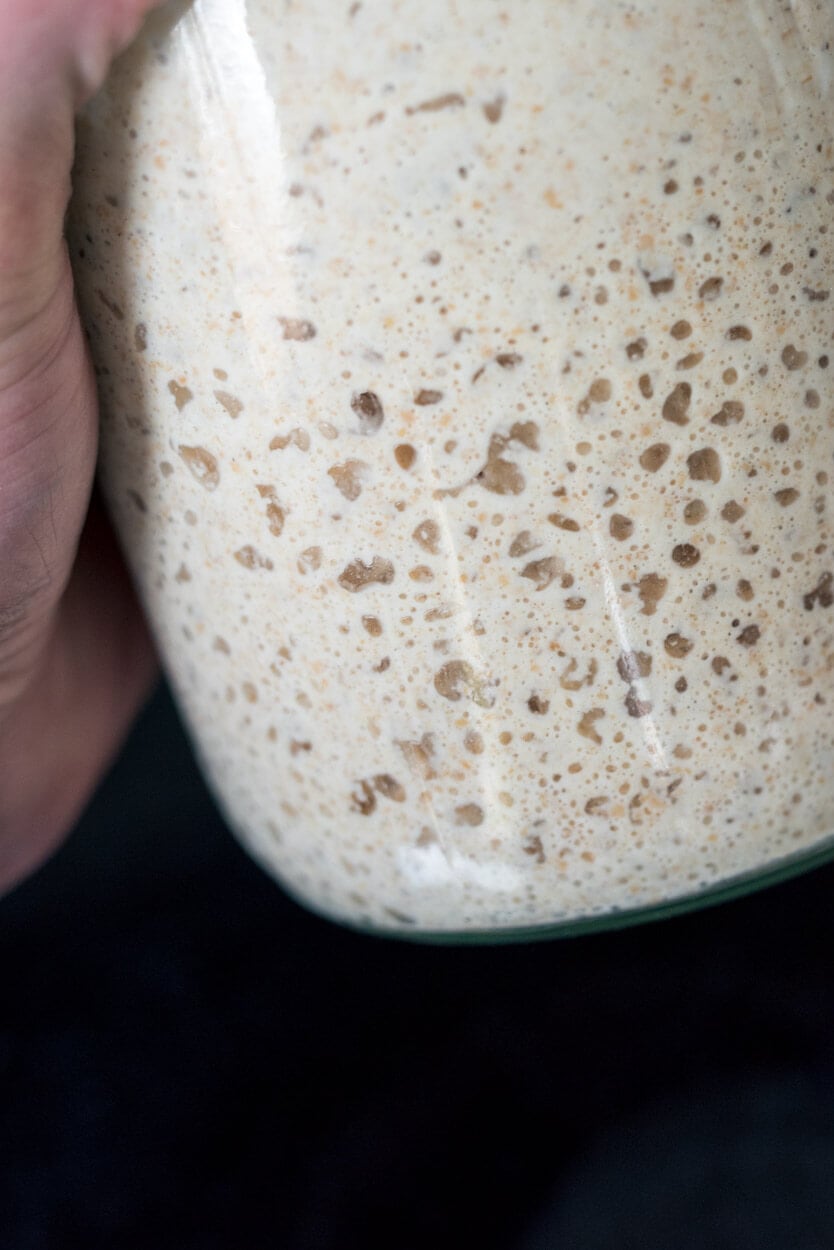
Keep in mind that your flour will act differently with all this water added so hydrate accordingly. Start with a lower percentage and work your way up until you find the perfect point for your flour mix. The dough should be wet looking, extensible, and very soft, but it should not be overly “soupy” or falling apart—if this happens hydration is too high for your flour. You can see below what my dough looked like right after mixing. After a bit of practice, this bread becomes easy to make, and you can double the formula to make two pans at a time. I see myself making this bread reasonably often, freezing one loaf and using the other, this way we always have sliced whole wheat sourdough sandwich bread at the ready.
Vitals
| Total Dough Weight | 1,200 grams |
| Pre-fermented Flour | 5.00% |
| Hydration | 90% |
| Yield | One loaf in a 9” x 5” x 2.75” pan |
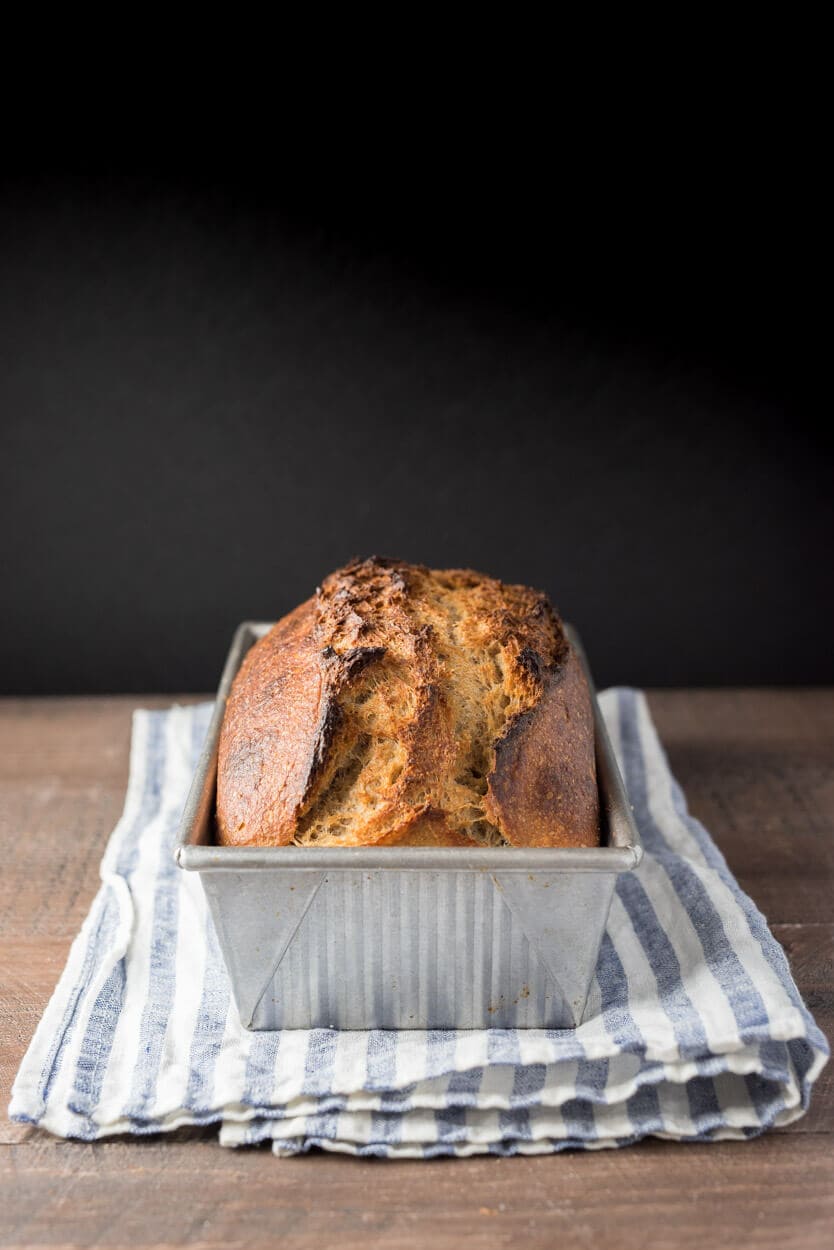
The USA Pan used for this bake has a silicone coating, and while I lightly oil the pan with olive oil I don’t think it’s necessary—I have yet to have anything stick to this thing. It’s heavily used here in my kitchen mostly for my sourdough banana bread but now also traditional sandwich bread and even sourdough tea cakes.
Levain Build
| Weight | Ingredient | Baker’s Percentage |
|---|---|---|
| 15g | Ripe liquid starter (100% hydration) | 50% |
| 15g | Giusto’s Stoneground Whole Wheat | 50% |
| 15g | Central Milling Type 85 | 50% |
| 32g | Water | 100% |
I used half Central Milling type 85, and half Giusto’s whole wheat for the levain build, but you can change this up if you’d like (e.g., use 100% whole wheat or 100% white whole wheat) just keep an eye on its fermentation rate as a higher percentage of pure whole wheat will peak much faster.
Dough Formula
After a few trials, I arrived on a final dough weight of 1200 grams for my bread pan. The resulting bread was nicely sized and perfect for what I’m looking for, but I think it could be pushed even further, perhaps somewhere around 1300-1400 grams if you want an even taller loaf, one that rises and slightly spills over the edges.
Note that the baker’s percentages listed below are with respect to the final dough ingredients and do not take into account the levain.
The target final dough temperature (FDT) is 75°F (24°C).
| Weight | Ingredient | Baker’s Percentage |
|---|---|---|
| 463g | Grist & Toll Star White Whole Wheat | 78.95% |
| 77g | Central Milling Type 85 | 13.16% |
| 46g | Giusto’s Stoneground Whole Wheat | 7.89% |
| 524g | Water | 89.47% |
| 12g | Fine sea salt | 2.11% |
| 77g | Ripe, liquid levain | 13.16% |
Method
1. Levain – 9:00 a.m.
Build the liquid levain in the morning and store somewhere around 78°F (25°C).
2. Autolyse – 1:00 p.m.
For the autolyse, mix flour and water (reserve 100g of the total water for later mixing) in a bowl until all dry bits are hydrated. Cover bowl and store somewhere warm (around 78°F/25°C) for 2 hours.
3. Mix – 3:00 p.m.
Due to the high hydration of this dough, it’s helpful to build some strength at the start of mixing before adding in the reserved 100g of water.
Add the mature levain and about 25g of the reserved water, mix thoroughly by hand to incorporate, and then slap and fold for about 6 minutes, just until the dough starts to show signs of a smooth surface and holds its shape on the counter. If you aren’t comfortable with this method or don’t like it, you can perform stretch and folds in the bowl until your dough tightens up and is slightly hard to stretch out and fold over—close to medium development.
When finished sprinkle the salt on top of the dough and use the remaining 75g of water (or less if the dough is starting to feel too wet and falling apart) to help dissolve. Pinch through a few times and fold the dough over itself to help incorporate. Keep folding the dough until all the water is absorbed and it comes together; it will end up slightly sticky.
Transfer dough to a tub or thick-walled bowl for bulk fermentation.
4. Bulk Fermentation – 3:20 p.m. to 7:00 p.m.
At 78°F (25°C) ambient temperature bulk fermentation should go for a little less than 4 hours. Watch the dough! With this much whole grain, it’s possible your dough could ferment faster than mine.
Perform five sets of stretch and folds during the bulk, spaced out by 30 minutes (the first set starts 30 minutes after you finish mixing). After the fifth set of stretch and folds, performed gently, let rest for the remainder of bulk. The dough will not rise an incredible amount, but it should be slightly jiggly and some bubbles on top and sides. You want to see a slightly convex edge between the dough and the bowl.
5. Pre-shape – 7:00 p.m.
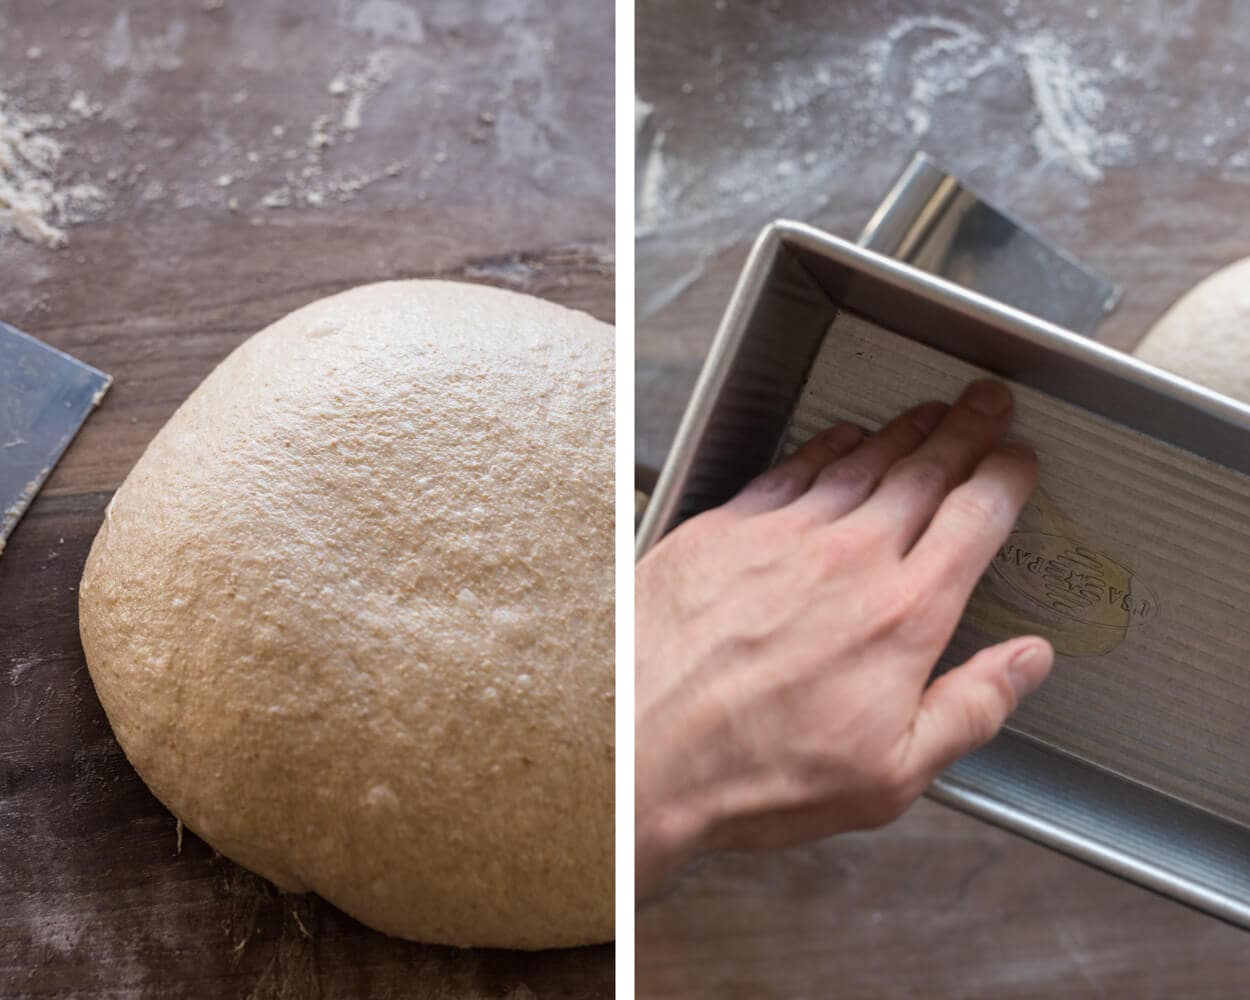
Sprinkle a light dusting of flour on your bench and dump out the dough. Shape into a single round mass and let rest 20 minutes uncovered. Because this dough is highly hydrated, rely mostly on your bench knife and try to touch the dough as little as possible. I use my knife to pick up and pull the mass around in a circle, forming a relatively tight skin on the dough. Using a little olive oil lightly oil the baking pan.
6. Shape – 7:25 p.m.
Shaping this dough can be challenging. The good news is it’s pretty hard to mess it up, just form it as best you can into a “tube” the width of the baking pan and get it in there with as much tension on the surface as possible. The structure of the pan will force your dough to rise upward whereas with a hearth loaf we’d have to ensure a proper shape so there’s no spreading in the oven.
Moderately flour the top of the dough and flour the work surface. Flip the resting round over onto the floured surface and fold the side edges at the top up and over to the middle (imagine a round bottom that tapers up to a point at the top, it will look like an inverted diamond of sorts). With floured hands take the point at the top and start to roll the entire mass of dough downwards, with each roll pushing the dough with your thumbs inward toward the bench—imagine rolling up a beach towel. At the end of this, you’ll have a tube that has essentially been rolled downward. Transfer to your oiled pan with the seam on the bottom.
An alternative shaping method that might be easier to perform is to just fold the sides slightly up and over towards the middle, then roll up the dough tightly. It won’t be as spread out to the sides, but the dough should relax in the pan overnight.
For more information and photos on shaping, proofing, and scoring pan loaves check out my guide to shaping pan loaves.
7. Rest & Proof – 7:30 p.m.
Cover your pan with plastic and then retard in the refrigerator at 38°F (3°C) for 10-14 hours. Even at such cool temperatures this dough can quickly overproof so keep an eye on it in the fridge in the morning.
8. Bake – Next Morning: Preheat oven at 6:00 a.m., Bake at 7:00 a.m.
Preheat oven for one hour at 450°F (230°C).
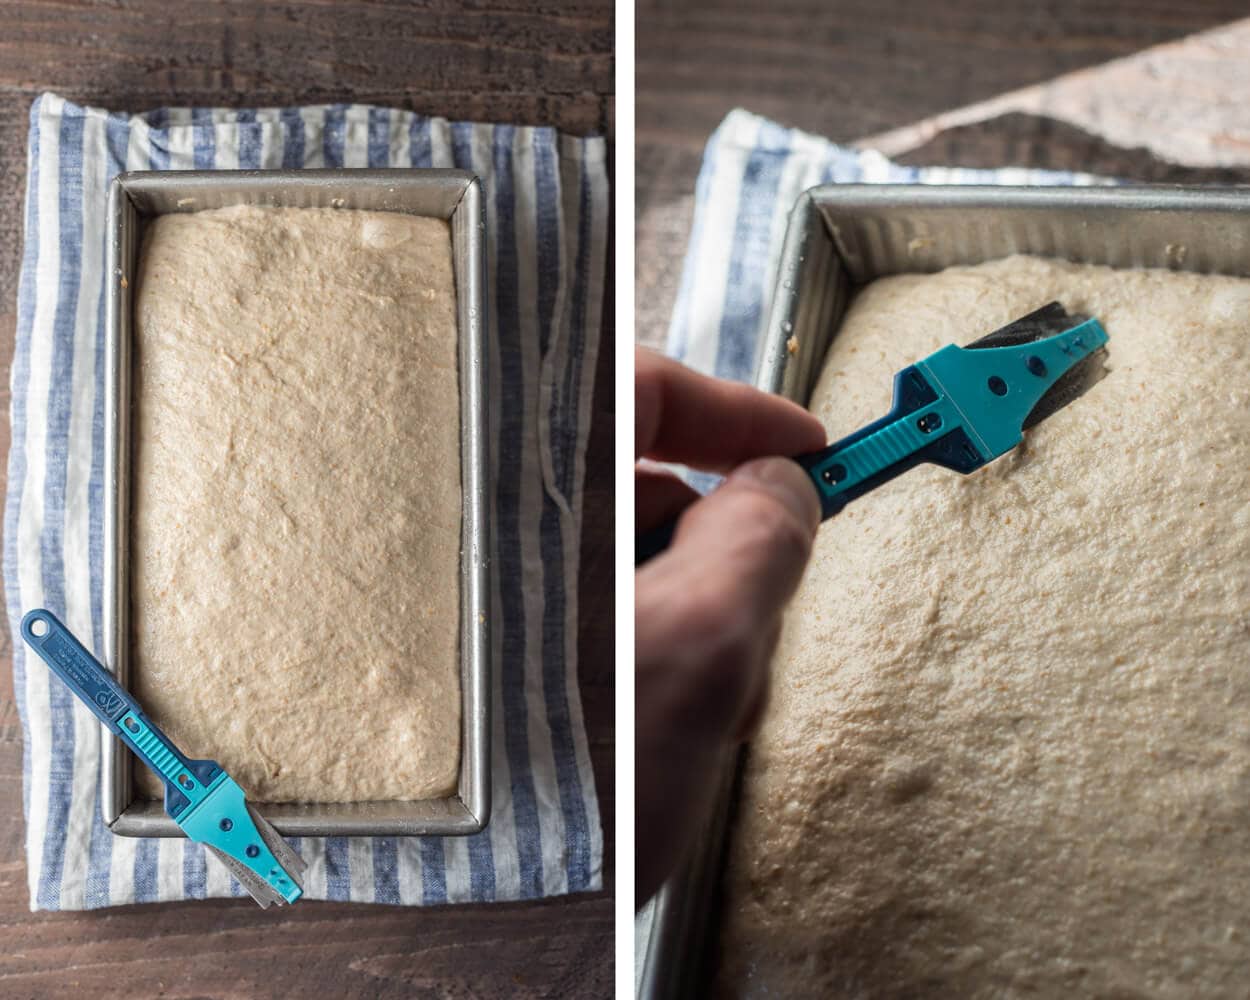
I did a very rough score on the top of the dough before placing into the oven. If you choose not to score at all, you’ll most likely get a taller loaf, and depending on how tight you shaped your dough, there may be more or less of a rupture on top. In the future, I’d like to play with an even longer proof in the fridge with no score at all. This should yield an even more tender crumb and hardly any dramatic fissure.
Spritz the top of the dough in the pan with a hand mister and place it into the oven. Bake for 20 minutes at 450°F (230°C) with steam, and an additional 30 minutes at 450°F (230°C) without steam. Then, turn the oven down to 425°F (220°C) and bake for an additional 15-20 minutes until done (the internal temperature on my loaf was 205°F/96°C).
I steamed the oven in my usual way, described here in my post on how to steam your home oven for baking. While this extra steam might not have been necessary, I wanted to ensure maximal rise and a thin & crisp crust. Remove from the oven and let cool in the pan on a wire rack until cool enough to remove the bread from the pan, then remove and let cool directly on the wire rack for a few hours.
If you cut this bread too soon, the interior may not be wholly set so give it a little time to relax (here’s why).
Conclusion
With only four ingredients this healthy bread is a daily bread that has a mellow, sweet taste. The crust is supple but not mushy, and the keeping qualities from sourdough mean we’ll be done eating this entire thing well before any threat of spoilage. This is unmistakably bread that can be made every week to satisfy those old fashion sandwich cravings (perfect for kids, too).
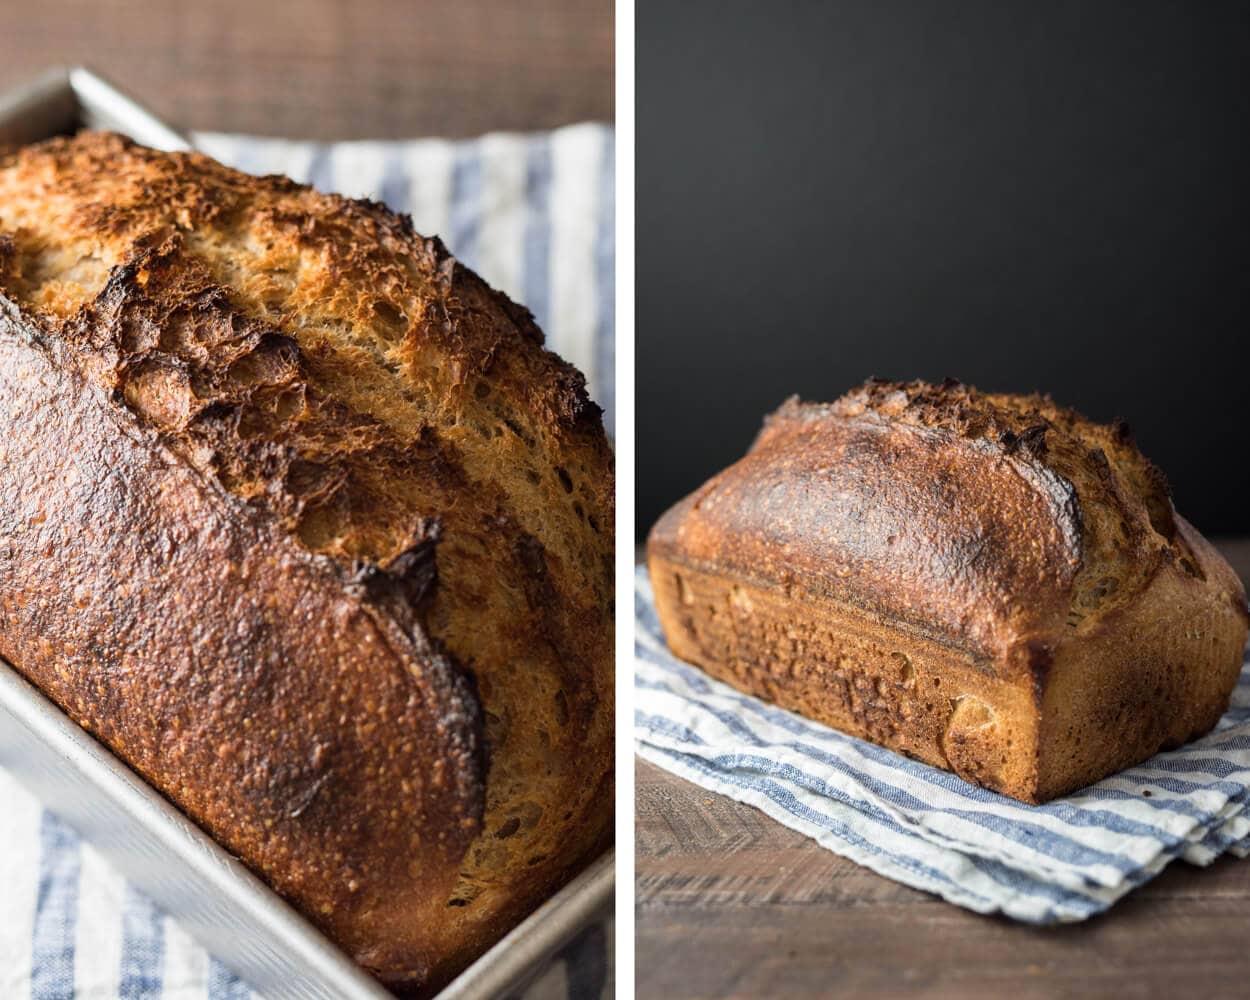
Crust
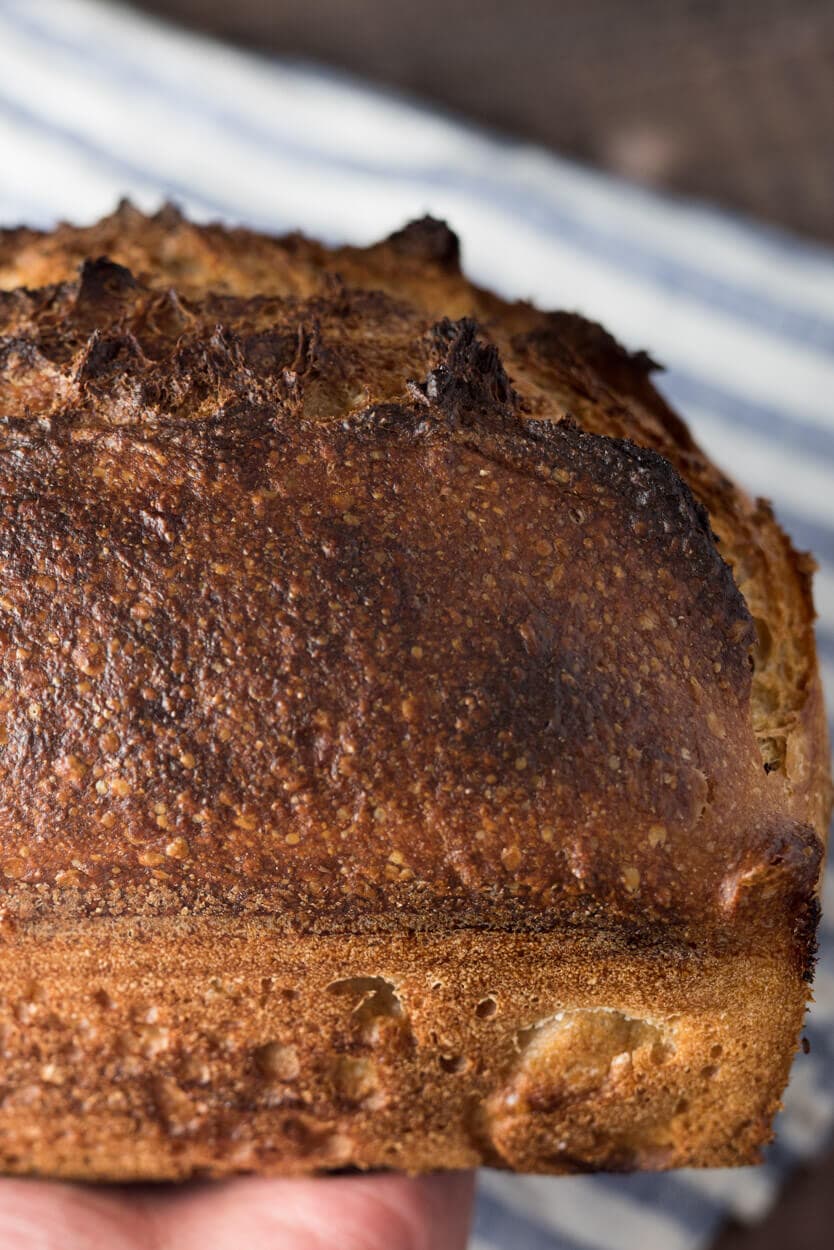
The crust is killer. The intense caramelization is so appetizing it makes your mouth water before you even have a bite. You can see lots of little blisters on the surface of this loaf (thanks in part by the extra steaming in the oven) that provide a little crunch when toasted, a perfect contrast to the incredibly tender crumb inside.
Crumb
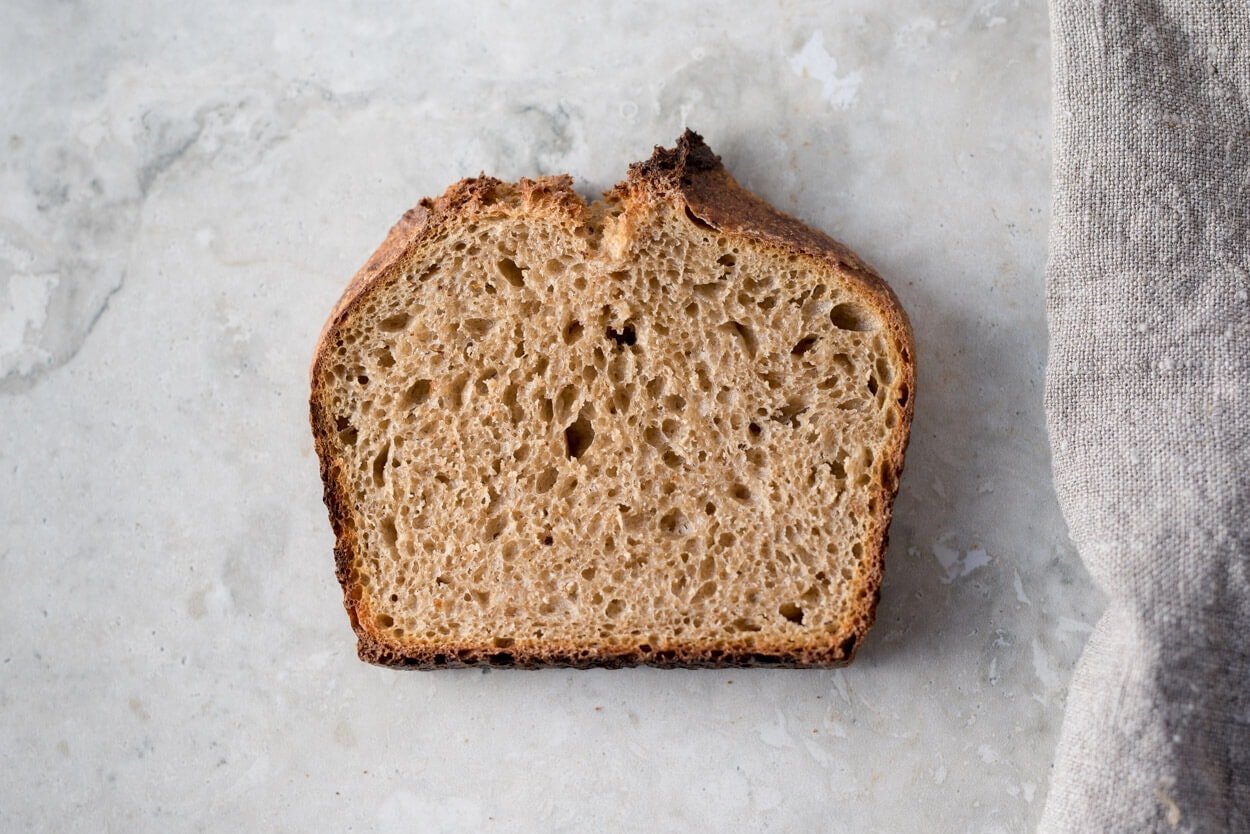
Bread like this asks for a certain level of tightness; it needs to hang on to all those fantastic ingredients you’ll be sandwiching in there. The high level of whole wheat helps ensure a fairly closed crumb but more important is the full scale of fermentation. You’ll notice no dense areas, no gummy sections; everything is well fermented and very tender. If you recall at the start that was one of the criteria I had for this bread and it’s readily satisfied.
Taste
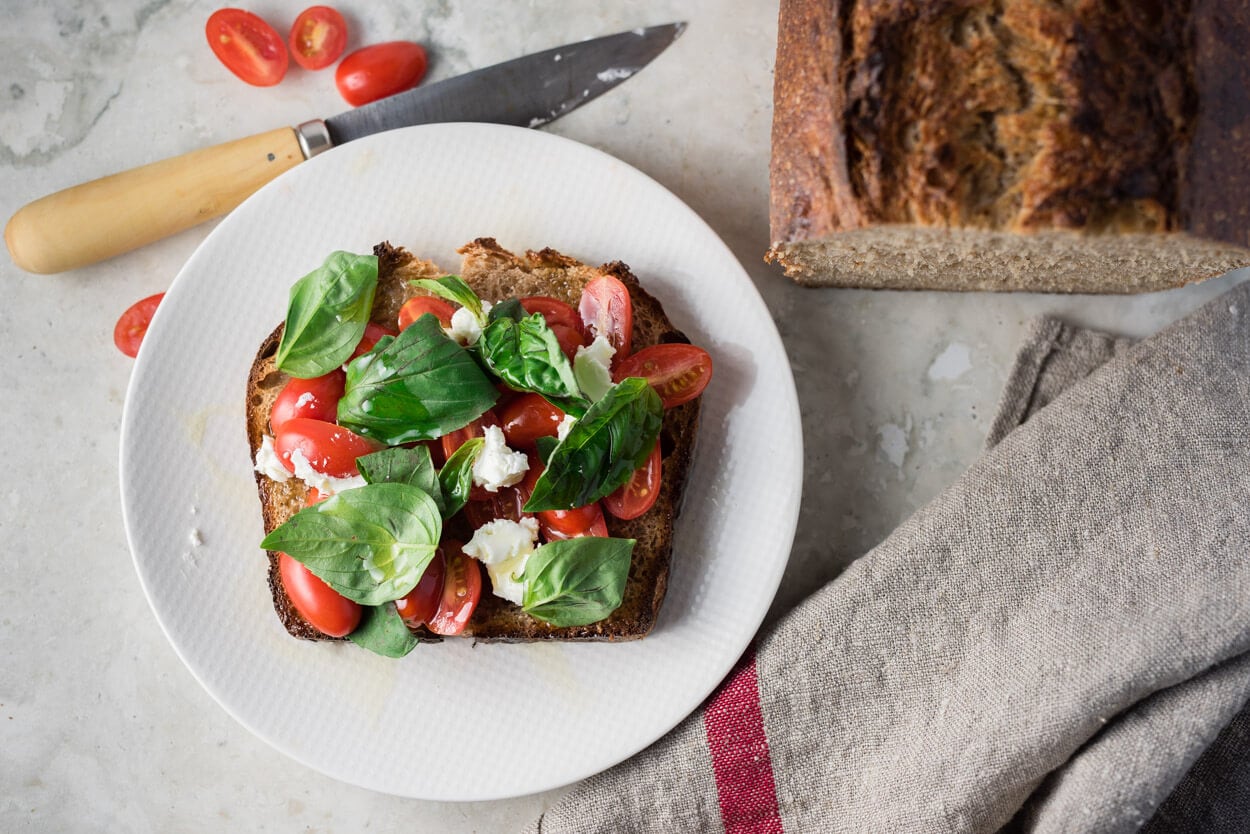
Channeling my smørrebrød history, I made an open-faced sandwich with ripe tomato, basil, goat cheese, and extra virgin olive oil—just perfect for this bread after heavy toasting. Sweet, soft, mellow and contrasting. All part of a bite and all contributing to the grin on my face. I’ve come to enjoy the flavor of Grist and Toll’s Star White Wheat, and I can’t wait to try this recipe with a few other varieties I have, including my own fresh milled white wheat berries. I don’t think you could go wrong with using red wheat instead of white, but as I mentioned previously white wheat has a slightly sweet and more subdued taste that works well with bread like this.
Well, there you have my take on a whole wheat sourdough sandwich bread. I feel like I’ll be tweaking this bread into the future as I already have a few things I’d like to try out: use a large percentage of freshly-milled flour, push fermentation even further (perhaps 2-4 more hours for the final proof), and finally increase the dough weight to 1400 grams to see just how high I can get this bread to climb. Some other welcome additions could be a seed or cornmeal topping and heck, even a little cornmeal mixed into the dough to add another level of sweetness.
Oh! I’d be remiss if I talked so highly about that thick slathering of peanut butter and leave without proof. Once this loaf cooled I was waiting knife-in-hand and it was the first thing I concocted, even the photo couldn’t wait.
Buon appetito!
If you use this recipe, tag @maurizio on Instagram so I can take a look!


274 Comments
Hi, I don’t understand the “ripe liquid starter” as an ingredient in the “Levain build” for this recipe. I have a (regular) sourdough starter which I built from your formula. Am I not using that? Thanks for the help!
If I can be so bold to answer for Maurizio, he is referring to his normal starter (liquid, 100% hydration , equal parts flour to water) vs a “stiff” starter (less water than flour)
Thanks, Michel!
Thank you both. I guess I hadn’t seen it referred to as “liquid” starter in the past. So, I just wanted to be sure it wasn’t something different. Makes sense though!
Yes, it’s my normal starter! The one you created from my guide here.
Hi there! I recently got a bread very similar to what you have here but it had wheat berries in it. Do I soak the wheat berries in hot water overnight and just add to the dough to give it that texture, flavor, and added protein? Thanks and I love your website!
Hey, Carol! Yes, soaking the wheat berries is good, but honestly, I would probably crack them (with a grain mill) very coarsely, or simmer them just until tender on the stovetop, then let cool. You can try just soaking them, but I worry they’ll still be too toothsome!
Can I add about 50g of honey without needing to make adjustments elsewhere? I would like the extra sweetness, but mostly, I like how honey helps to increase the “shelf life” of the bread, as it usually takes us about 7 to 8 days to get through a whole loaf.
Should be just fine 🙂
I tried baking this recipe today. It looked good but is tough and heavy. The crust is very hard! Not sure what happened. I my not have had enough steam?
It sounds like perhaps your dough was slightly underproofed. There are a few indicators your dough could be under: explosive rise in the oven, dense spots in the interior with potentially scattered large holes, and a gummy texture to the interior.
Make sure to build your levain from a starter that’s strong and mature (meaning it’s risen to it’s peak height before you take some to use). From there, bulk fermentation is very important! Make sure your bulk fermentation goes sufficiently far, you want the dough to look smooth, it should have risen considerably, and have bubbles here and there — it should look alive. If you tug on the dough a bit it should offer resistance to your tugging, it’ll feel stronger. Give the dough the time it needs in bulk fermentation! If you have to give it another 30m or hour to see these signs, do so. It’s important for this step to go sufficiently far for the dough to have enough fermentation activity before its proof.
Check out my guide to proofing for a bit more help, too:
https://www.theperfectloaf.com/guides/proofing-bread-dough/
Hello! I just made this recipe – dough is in the fridge for the night as I type. In fact, I’ve tried a few of your recipes and one issue I almost always have is that my dough is sticky and hard to handle. For this recipe, my dough was SO sticky. I could hardly even shape it to get it into the loaf pans. I basically had to just plop it in there. There was virtually no tension on the top. Any thoughts on why this might be an ongoing issue for me? Thanks!
It sounds like your dough is most likely over hydrated—your flour likely isn’t able to take on quite a much water, and that’s ok! Try reducing the hydration by 5% and give it another go—the reduced water should bring strength to the dough and you’ll feel it immediately. Once you find a suitable hydration, you can try to push it back up (if desired), but as you do, take note of how the consistency of the dough changes: the dough will start to slacken out as you add more and more water, this means you’ll likely have to mix more upfront or add another set or two of stretch and folds during bulk fermentation.
Generally, with an increased hydration, you need to mix longer to develop the gluten in the dough to sufficiently support the water added, but this only goes so far. At some point, the flour you’re using just isn’t able to take on any more water and you’ll essentially have a weak and slack dough. It’s always best to start conservatively and work your way up with hydration as you feel out your flour. This is typically why I recommend holding back water during mixing, adding it in as the dough handles it.
Try to keep everything else as consistent as possible and let me know how the next attempt goes!
I used this as a reference, didn’t follow exactly but 500g white whole wheat, 100g rye, 50g whole wheat, 150g white bread flour, the 80% hydration (?!) the very fresh levain, and the couple hours rest after mixing the flours with most of the water. Then into mixer with dough hook for 8 minutes, then followed recipe from that point. Glorious. This came out so good. Rose enough I was afraid there would be big holes in it but nope, evenly fermented sandwich bread.
My oven heats from the top so I just toss ice cubes in, spray water from a bottle, slam it shut and hope for the best.
And I loosely tented it with foil for the last 20 minutes as it was getting too dark (always have to do this, probably because oven heats from the top.)
Fantastic, Robin! Great work there and nice use of the foil tent, yes, with top-heating you’d likely need to do that often. Easy enough. Thanks for the comments and happy baking!
Wow, you’re way up there! You’ll definitely have to bake longer at that altitude. You might already know all these tips, but check out my guide to baking at high altitude for a few more!
Excellent, Allen! Thanks for reporting back 🙂
Hi Maurizio, I’m baking this bread and I found that I m lacking white ww flour. Can I use ww flour instead? Thank you in advance.
Yes, absolutely!
Hi Maurizio,
I gave this recipe a try last weekend. I’m pretty happy with my first attempt – I likely rushed the proof though! I used an egg wash instead of baking with steam (for some reason I just find this easier for me). I found the crust to be too dark for the families liking, and I had to take it out before the internal temp reached 205 (I think it landed at around 195). It still turned out, but if I want a lighter crust, can I reduce the temp to 400 or 425 and just bake for longer? Would this alter the result in other unexpected ways? I’m starting to really like the utility of a pan loaf for daily bread. What are your thoughts on trying this recipe but converting it for the tangzhong method? Will tangzhong always yield a better pan loaf? Sorry for all the questions – I’m trying to soak up all of the info as best as I can. Thanks!
Yes, for a lighter crust reduce the baking temp and just bake a little longer! This recipe can work well with tangzhong 🙂 Check out my recipes page where I have a few tangzhong recipes!
Hey Maurizio,
I’ve made this recipe in a batard shape several times with great success. However, on my last bake, rather than do an overnight fermentation I opted for letting the dough sit at room temp for approx. 2 hours. I then loaded the loaves into the oven and got a very flat loaf. Would the is be due to too high of hydration, improper shaping of the loaf, or a combination of the two?
Thank you for your help.
Hey, Bryce! Could be a combination of the two. If you didn’t shape the dough tightly enough, it might have just spread instead of spring up. This is a very highly hydrated dough which requires significant strengthening and a tight shape to ensure it’ll spring in the oven when not baked in a pan. I think your guess is spot on here!
Thank you for your help! What would you recommend then in order to give more strength to the dough?
I would probably try reducing the hydration of the dough, maybe just 2-5% to start. You can also try kneading the dough upfront or giving it more sets of stretches and folds—all of these will lead to a stronger dough.
Awesome recipe! I love the flavor and texture. 🙏
So glad to hear that, Anne!
In the middle of making a double batch of this on my first try. Question: can you bake two loaves in the oven at the same time or no? Adjustments to timing and oven setting? Thanks!
Yes, you can absolutely bake two at a time (I do this often). You shouldn’t have to adjust anything as long as your oven can keep its temp up. Bake till they look done!
Thanks!
Hi Maurizio,
I’m in the middle of making the Whole Wheat Sourdough Sandwich Bread. So far so good, but I noticed the times in the steps don’t account for a rest time. 5. Pre-Shape 7:00 p.m., with a rest of 20 minutes, but 6. Shape is at 7:05. I’m all for time travel, but haven’t figured it out yet ;).
Great site! Just found it today.
Hey, Margaret! Sorry for the delay and thanks for the feedback. Fixing the typo now. Thank you for the comments and I hope the loaf turned out great!
Hi Maurizio,
I’ve really enjoyed baking with your recipes and this one is my favorite. I was looking to change things up with the shaping of this loaf and was wondering a batard shape would work?
Thank you for your help!
Glad to hear that, Bryce! Yes, this should also work well as a batard or boule!
I had to take loaf out with 15 minutes to go in the 30 minute non-steam baking phase because it was already so dark on top, with some black patches. So total baking time 35 min?! I was worried that it would burn completely. :(Not sure what went wrong). I reduced temp to 400 after the initial 20 min at 450 but it still got very dark very quickly. Hmmm
Definitely start out at a lower temp next go, I’d say 400 or 425F. For “sensitive” pan loaves I usually go with 425F for the beginning 15-20m of bake time.
Hi Maurizio,
When I took the dough out of the fridge the next morning (after about 13 hrs), it was spilling all over the sides of my loaf tin 🙁 Is this because I left it in the fridge too long and the dough over-proofed? How can I salvage the dough if this happens again? Thank you!
Yes, very possible. It might also be that your pan can’t take as much dough, you could try reducing the total dough weight to fit your pan!
Thanks for that feedback, Jack! The Pain de Mie is a super special bread, I agree 🙂
I made this bread and I’m surprised by how well it went given I’m pretty new to this. I didn’t score it but I’m thinking I should have, it has a rather dramatic fissure and the bread is continuing to rise out of the fissure, haha. Would a score make a more even rise? Do I need more steam? Any suggestions for how to get it to rise more evenly? Only the middle will really make good sandwiches like this.
Glad to hear it went well, Kali! It might be your dough was slightly underproofed. If you find it has very dramatic rise in the oven, try proofing it for longer next time to help reduce that explosive oven spring.
Has anyone made this recipe with using just KA whole wheat? I’m currently on a mandated 2 quarantine in Korea and have no access to anything other than KA whole wheat.
I have before and it worked very well!
I used park whole wheat (hard red spring wheat) instead of white wheat flour, a mix of white and whole wheat for the 85, and used rye instead of whole wheat. I kept the hydration to 90% since it’s so hot and humid where I am. I baked it in a 8.5 x 4.5 x 4.5 pan and it turned out fantastic. The crust is chewy and the crumb is spongy and just dense enough. A very lovely loaf and will be my go to for a sandwich loaf from now on!
Super happy to hear that, Caroline! I like your substitutions, I’ve also made this with hard red and it was very good. Happy baking!
I have a 12” Pullman pan, a little bit bigger than the 9” one specified in this recipe. Would you recommend scaling up by a 4:3 ratio? I got a good final product even though the pan was much longer than needed for the amount of dough. Thanks!
Would it be possible to do this same day, and if so, how much proofing on the countertop should be done? I’m especially interested in trying to minimize the sourness and because we have very limited fridge space most of the time.
Hi Maurizio. I’m trying this recipe today. I have one question, perhaps a naive one: Many recipes involving overnight refrigeration ask you to wait 3 or 4 hours to bring the bread to room temperature again. In yours, do I simply take the bread out when I go to heat up the oven? (i.e.1 hour before?) Also do you or anyone have any tips (perhaps some videos) on working with high hydration doughs? I’m getting better at it but still always feel like I can’t fully get past the stickiness factor.
Have you tried wetting your hands while handling the dough? This always helps me. Also working gently and quickly when shaping.
I almost always bake straight form the fridge! Check out my guides page, I have a few shaping videos up there to help. High hydration does take practice!
I am trying the Whole Wheat Sourdough Sandwich Bread receipt today. It turned out very good. Just a question about the baking time. I reduced it to about 40 minutes. I felt hesitate to bake any longer as the crust is rather dark and the internal temperature is over 205F. But you mentioned in the receipt that longer baking time is crucial.
I’ve updated the post to use a lower bake temperature to help reduce this!
Hi Maurizio – I’ve been really enjoying this recipe. My wife is pregnant and is trying to only eat 100% whole wheat breads and this one’s been a constant companion. One question – I noticed today that the Levain build totals 125 g and then the Dough build section calls for 73 g liquid levain. Is that a mistake? Should I be tossing 42g of my levain?
Thanks!
I was curious about this too
I’ve updated the post to eliminate this excess.
Thanks for the feedback, Sam! I’ve updated the post to eliminate this excess.