
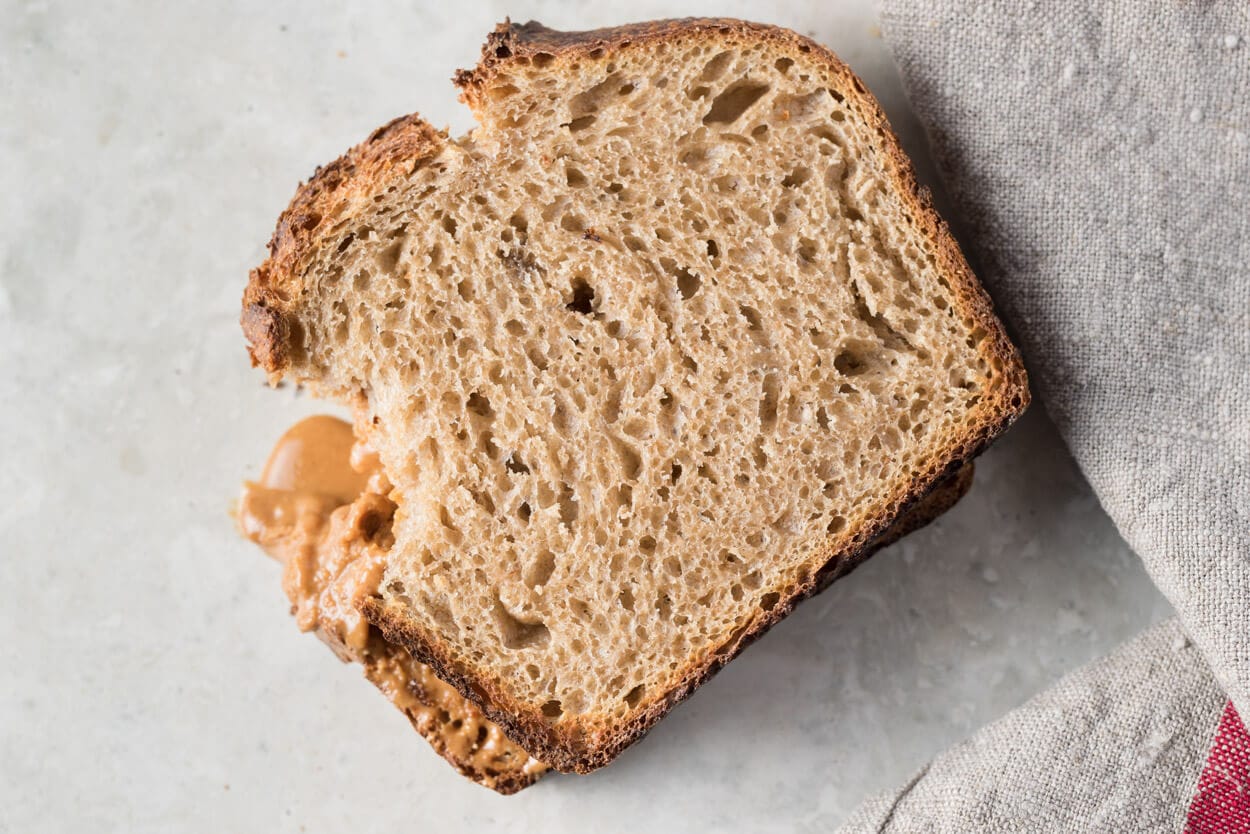
As a kid, I recall more often than not eating baguettes brought home from my Dad’s restaurant, usually procured through a late-night call asking for “some bread for tomorrow.” On the weekends my Mom and Grandmother would slice these baguettes at a super slanted angle and make French toast, probably one of the perfect bread for such a thing, but aside from these baguettes we also had a sack of pre-sliced whole wheat bread—which coincidentally also makes excellent French toast in a different sort of way. It was always whole wheat (even before that was the in thing to buy), and it was mostly just a vehicle for peanut butter & jelly, cinnamon & sugar, straight butter, or whatever other bright things kids can dream up. I always preferred the baguette with its wonderfully crunchy crust. But, there’s a special place for a PB & J sandwich—especially now with this whole wheat sourdough sandwich bread—that has so much peanut butter when dropped it would always land on the peanut butter side.
“Why don’t we ever have good ol’ sandwich bread?”, I heard my wife recently whisper to herself in the kitchen. This wasn’t the first time I’ve listened to such a statement, and scattered comments like these got me thinking back about that sliced bread (and baguettes too, and I just posted a recipe for baguettes!) I had as a kid. Nostalgia turned to motivation as I felt urged to develop a pan loaf with many of the same characteristics but 100% sourdough, and with somewhere around 98% fewer ingredients—you know, just flour, water, salt, and yeast.
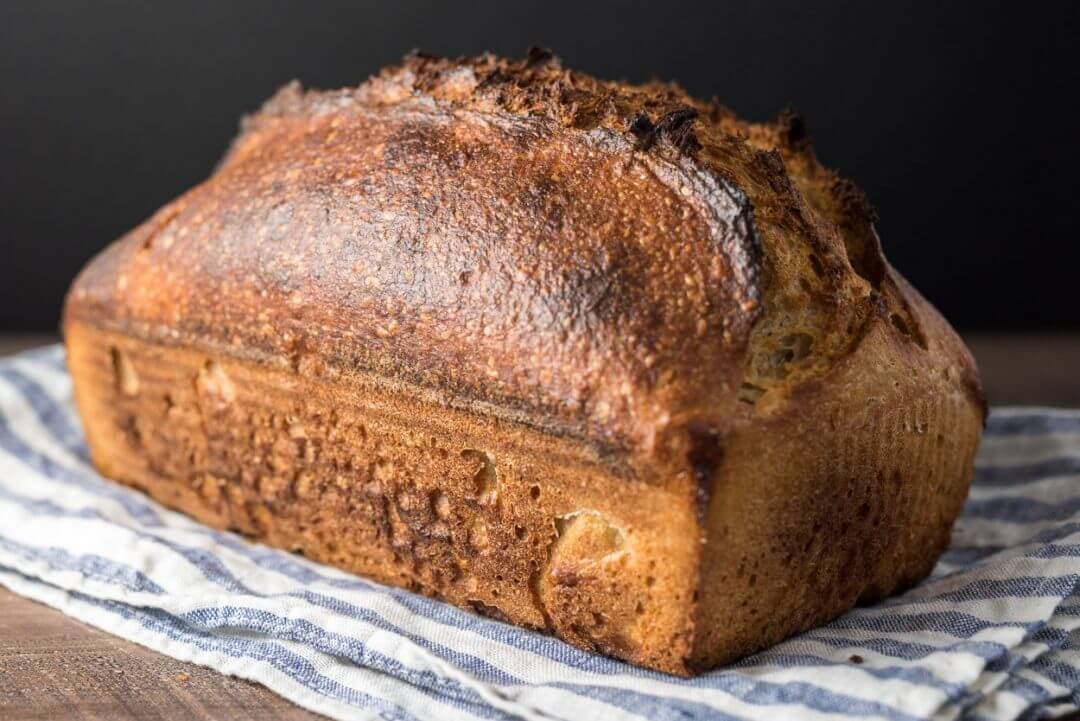
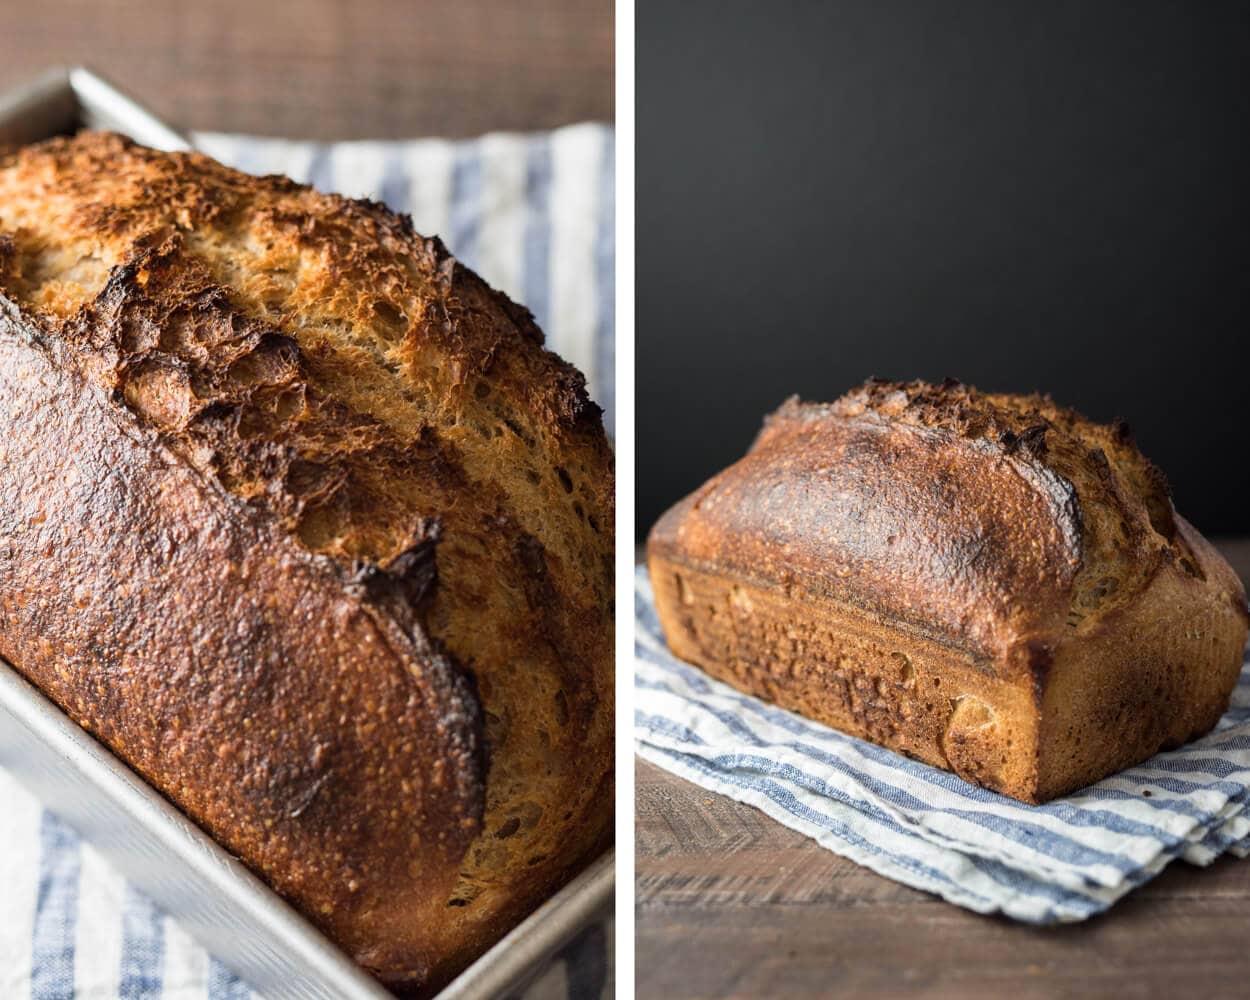
The perfect sandwich bread to me is related to that sacked bread from the supermarket, but only in the most remote way possible—perhaps only in the fact that it’s square-ish and sliced. I want a thin and shiny crust with a moist and light interior, a slightly sweet taste not from honey or sugar but from the whole grain itself. And that’s important: I want to taste the grain in this bread, not some strange flavor masked by something sweet. The interior should be tight but still light and well fermented, coaxing out maximal flavor from the grain. As far as aesthetics go, you can alter the way this bread rises and opens (or doesn’t open) at the top to suit your taste. I still prefer to impart my signature rustic feel and dark bake, but the final tweaks are up to you.
But first, let’s talk about flour.
Flour Selection
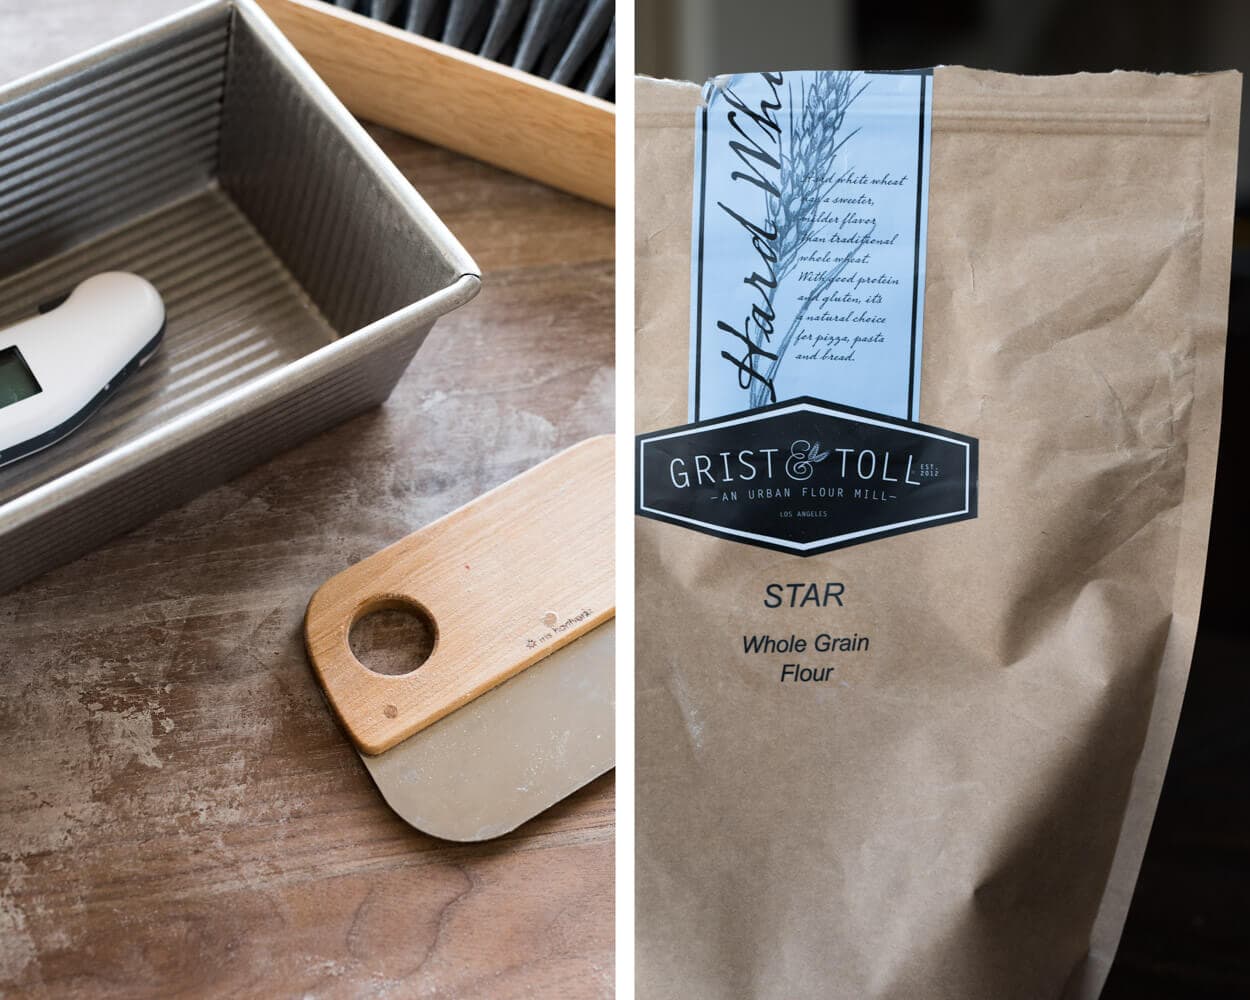
I chose white whole wheat for this recipe because I love the sweet flavor of it, especially compared to red whole wheat which can have a slight bitterness that sometimes pushes through. For the bakes leading up to this post, I used Grist & Toll Star White Whole Wheat. I’ve found the flour to be quite strong (regarding protein) with no gummy flavor to it, which is nice. I recommend using white wheat (King Arthur White Whole Wheat will work well, too) for this recipe but if you don’t have any on hand red wheat will work just fine — the flavor profile will be slightly different but still in the same vein. The small amount of red whole wheat was mostly used to build my levain (per usual) but also because it does add a slightly sharp flavor to the bread, just enough to balance out the sweetness. If you’re more a fan of the white wheat, sub the 10% red for white in the formula below.
If you remember, my recent Spelt Sourdough entry also used type 85 flour, and I explained there that this could be approximated by mixing 65% white bread flour with 35% whole wheat. In this formula, I’m only using a small percentage so again, feel free to mix whole wheat & bread flour to get the desired quantity or sub it out for another blend.
In the end, I like the flavor and characteristics imparted by these flour choices, but it is flexible. I know sometimes we want to bake bread with what we have in our pantry and not have to go out and buy special flour—by all means, experiment (and please let me know how your modifications turn out)!
Whole Wheat Sourdough Sandwich Bread Formula
A word of warning upfront: this formula has a very high hydration; the structure of the pan helps keep this dough together and permits me to push water as far as the flour will take it. This amount of water imparts a significantly moist and soft texture to the interior that is typical of sandwich bread, and the results are definitely worth the added hardship of dealing with such a wet dough.
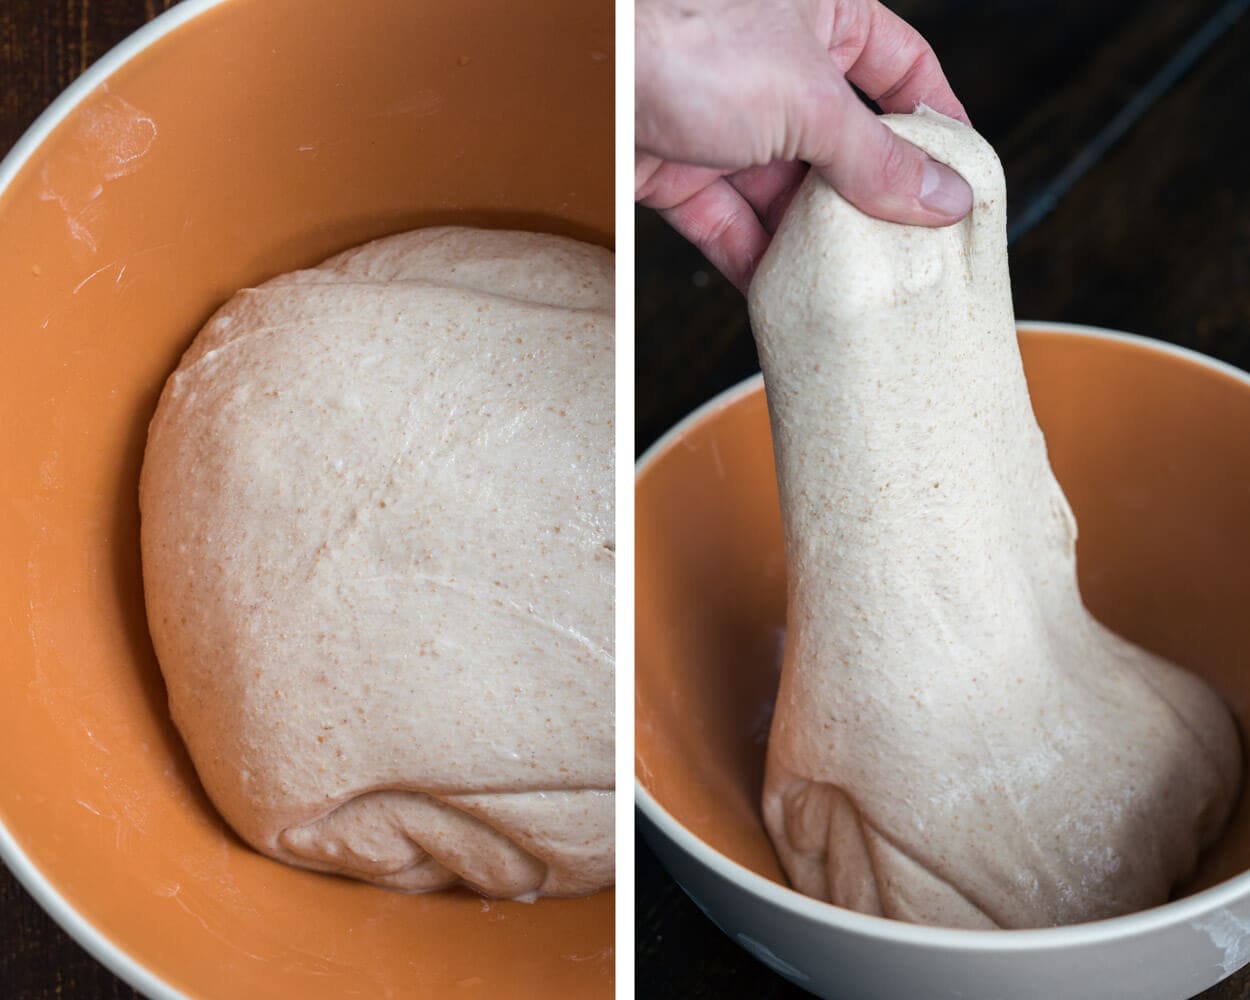
Keep in mind that your flour will act differently with all this water added so hydrate accordingly. Start with a lower percentage and work your way up until you find the perfect point for your flour mix. The dough should be wet looking, extensible, and very soft, but it should not be overly “soupy” or falling apart—if this happens hydration is too high for your flour. You can see below what my dough looked like right after mixing. After a bit of practice, this bread becomes easy to make, and you can double the formula to make two pans at a time. I see myself making this bread reasonably often, freezing one loaf and using the other, this way we always have sliced whole wheat sourdough sandwich bread at the ready.
Vitals
| Total Dough Weight | 1,200 grams |
| Pre-fermented Flour | 5.00% |
| Hydration | 90% |
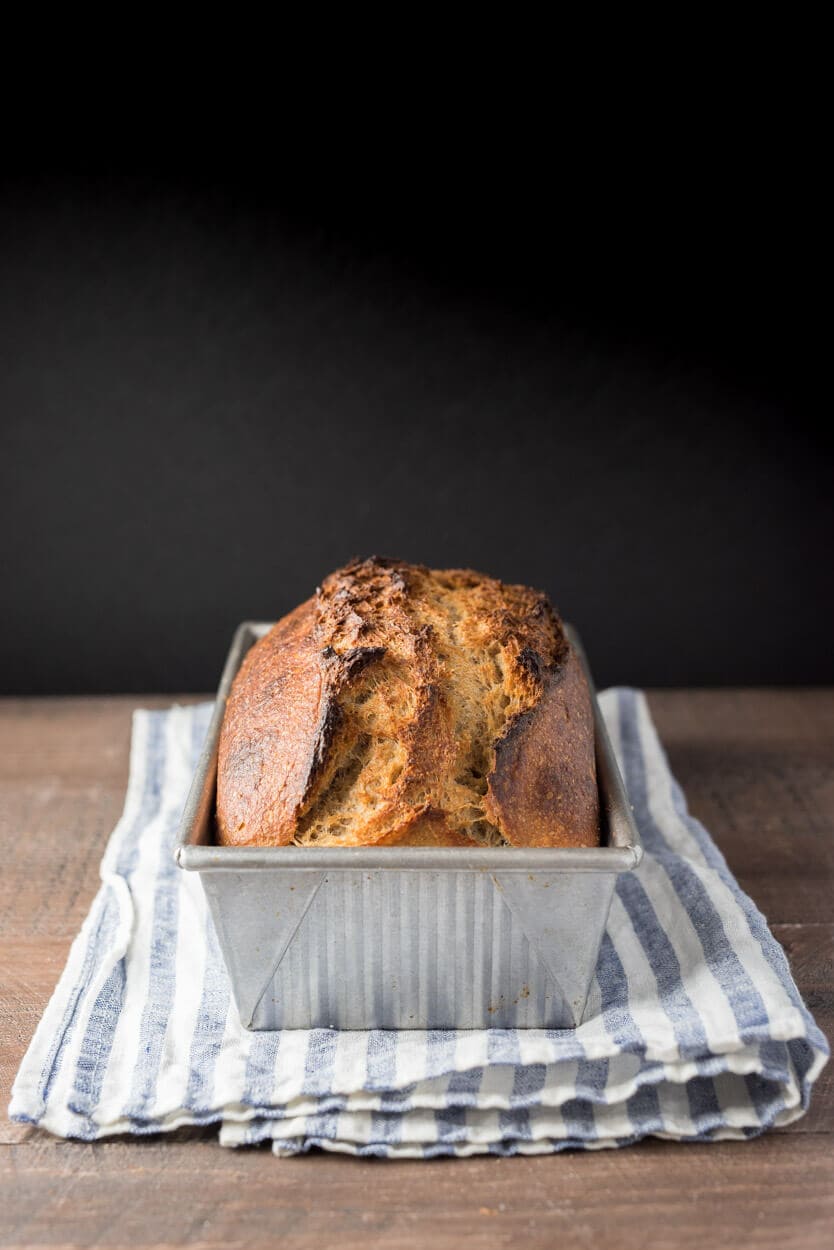
| Yield | One loaf in a 9” x 5” x 2.75” pan |
The USA Pan used for this bake has a silicone coating, and while I lightly oil the pan with olive oil I don’t think it’s necessary—I have yet to have anything stick to this thing. It’s heavily used here in my kitchen mostly for my sourdough banana bread but now also traditional sandwich bread and even sourdough tea cakes.
Levain Build
| Weight | Ingredient | Baker’s Percentage |
|---|---|---|
| 15g | Ripe liquid starter (100% hydration) | 50% |
| 15g | Giusto’s Stoneground Whole Wheat | 50% |
| 15g | Central Milling Type 85 | 50% |
| 32g | Water | 100% |
I used half Central Milling type 85, and half Giusto’s whole wheat for the levain build, but you can change this up if you’d like (e.g., use 100% whole wheat or 100% white whole wheat) just keep an eye on its fermentation rate as a higher percentage of pure whole wheat will peak much faster.
Dough Formula
After a few trials, I arrived on a final dough weight of 1200 grams for my bread pan. The resulting bread was nicely sized and perfect for what I’m looking for, but I think it could be pushed even further, perhaps somewhere around 1300-1400 grams if you want an even taller loaf, one that rises and slightly spills over the edges.
Note that the baker’s percentages listed below are with respect to the final dough ingredients and do not take into account the levain.
The target final dough temperature (FDT) is 75°F (24°C).
| Weight | Ingredient | Baker’s Percentage |
|---|---|---|
| 463g | Grist & Toll Star White Whole Wheat | 78.95% |
| 77g | Central Milling Type 85 | 13.16% |
| 46g | Giusto’s Stoneground Whole Wheat | 7.89% |
| 524g | Water | 89.47% |
| 12g | Fine sea salt | 2.11% |
| 77g | Ripe, liquid levain | 13.16% |
Method
1. Levain – 9:00 a.m.
Build the liquid levain in the morning and store somewhere around 78°F (25°C).
2. Autolyse – 1:00 p.m.
For the autolyse, mix flour and water (reserve 100g of the total water for later mixing) in a bowl until all dry bits are hydrated. Cover bowl and store somewhere warm (around 78°F/25°C) for 2 hours.
3. Mix – 3:00 p.m.
Due to the high hydration of this dough, it’s helpful to build some strength at the start of mixing before adding in the reserved 100g of water.
Add the mature levain and about 25g of the reserved water, mix thoroughly by hand to incorporate, and then slap and fold for about 6 minutes, just until the dough starts to show signs of a smooth surface and holds its shape on the counter. If you aren’t comfortable with this method or don’t like it, you can perform stretch and folds in the bowl until your dough tightens up and is slightly hard to stretch out and fold over—close to medium development.
When finished sprinkle the salt on top of the dough and use the remaining 75g of water (or less if the dough is starting to feel too wet and falling apart) to help dissolve. Pinch through a few times and fold the dough over itself to help incorporate. Keep folding the dough until all the water is absorbed and it comes together; it will end up slightly sticky.
Transfer dough to a tub or thick-walled bowl for bulk fermentation.
4. Bulk Fermentation – 3:20 p.m. to 7:00 p.m.
At 78°F (25°C) ambient temperature bulk fermentation should go for a little less than 4 hours. Watch the dough! With this much whole grain, it’s possible your dough could ferment faster than mine.
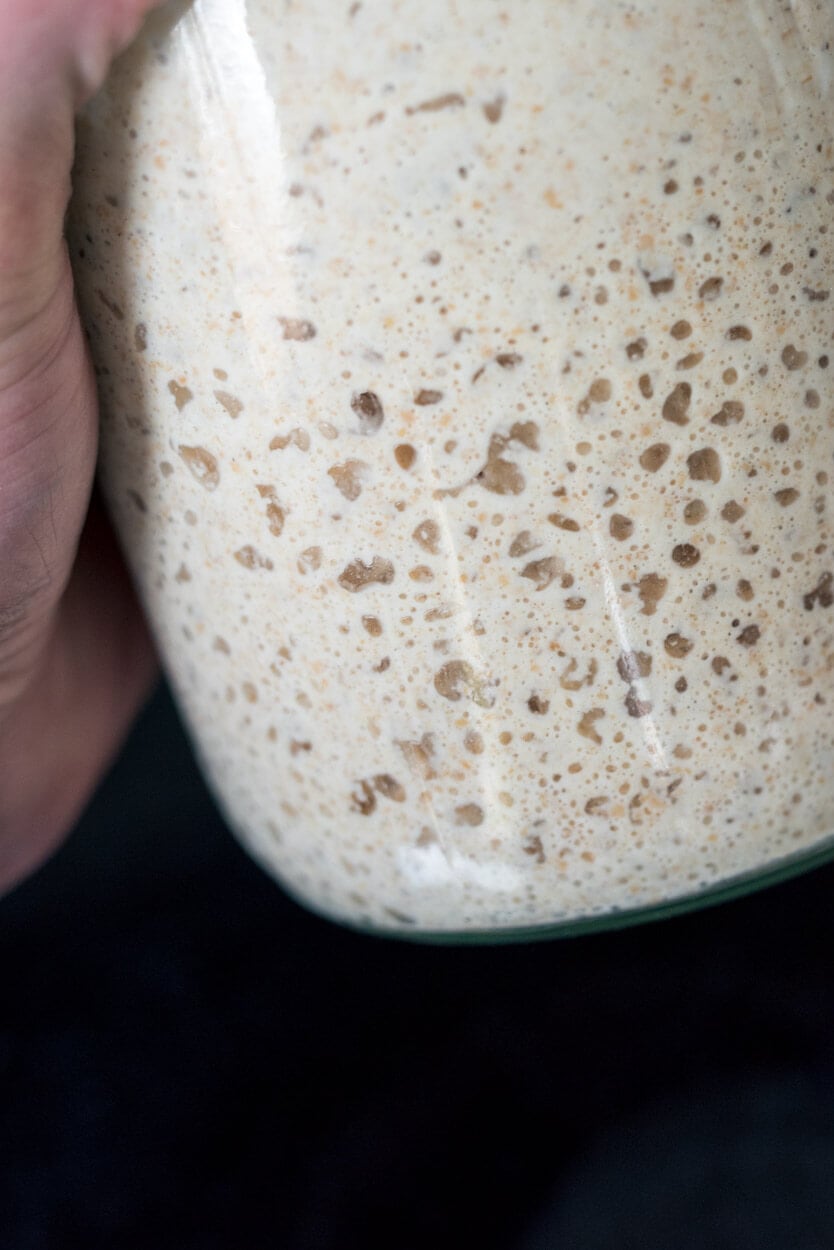
Perform five sets of stretch and folds during the bulk, spaced out by 30 minutes (the first set starts 30 minutes after you finish mixing). After the fifth set of stretch and folds, performed gently, let rest for the remainder of bulk. The dough will not rise an incredible amount, but it should be slightly jiggly and some bubbles on top and sides. You want to see a slightly convex edge between the dough and the bowl.
5. Pre-shape – 7:00 p.m.
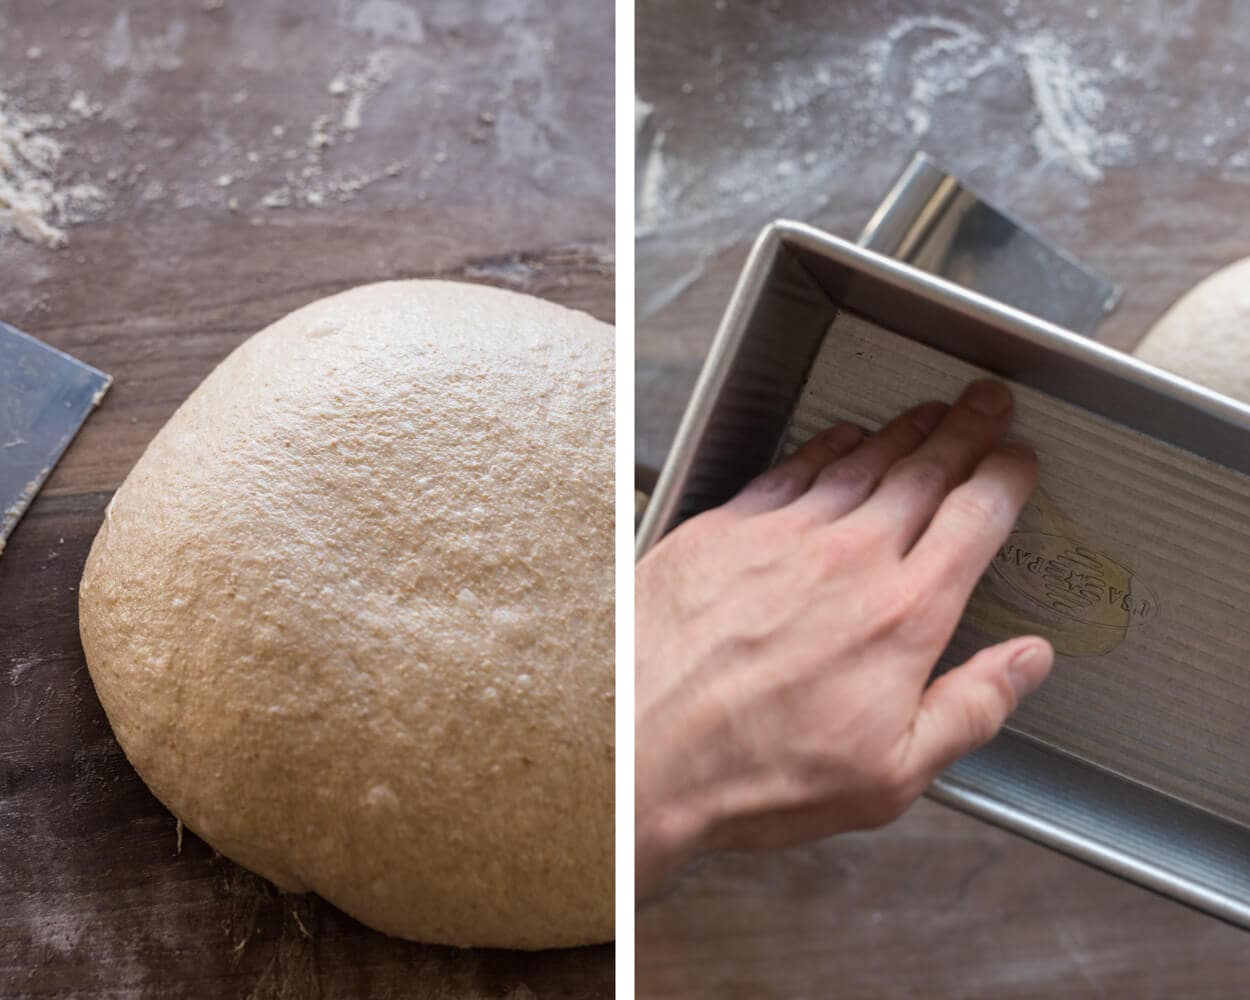
Sprinkle a light dusting of flour on your bench and dump out the dough. Shape into a single round mass and let rest 20 minutes uncovered. Because this dough is highly hydrated, rely mostly on your bench knife and try to touch the dough as little as possible. I use my knife to pick up and pull the mass around in a circle, forming a relatively tight skin on the dough. Using a little olive oil lightly oil the baking pan.
6. Shape – 7:25 p.m.
Shaping this dough can be challenging. The good news is it’s pretty hard to mess it up, just form it as best you can into a “tube” the width of the baking pan and get it in there with as much tension on the surface as possible. The structure of the pan will force your dough to rise upward whereas with a hearth loaf we’d have to ensure a proper shape so there’s no spreading in the oven.
Moderately flour the top of the dough and flour the work surface. Flip the resting round over onto the floured surface and fold the side edges at the top up and over to the middle (imagine a round bottom that tapers up to a point at the top, it will look like an inverted diamond of sorts). With floured hands take the point at the top and start to roll the entire mass of dough downwards, with each roll pushing the dough with your thumbs inward toward the bench—imagine rolling up a beach towel. At the end of this, you’ll have a tube that has essentially been rolled downward. Transfer to your oiled pan with the seam on the bottom.
An alternative shaping method that might be easier to perform is to just fold the sides slightly up and over towards the middle, then roll up the dough tightly. It won’t be as spread out to the sides, but the dough should relax in the pan overnight.
For more information and photos on shaping, proofing, and scoring pan loaves check out my guide to shaping pan loaves.
7. Rest & Proof – 7:30 p.m.
Cover your pan with plastic and then retard in the refrigerator at 38°F (3°C) for 10-14 hours. Even at such cool temperatures this dough can quickly overproof so keep an eye on it in the fridge in the morning.
8. Bake – Next Morning: Preheat oven at 6:00 a.m., Bake at 7:00 a.m.
Preheat oven for one hour at 450°F (230°C).
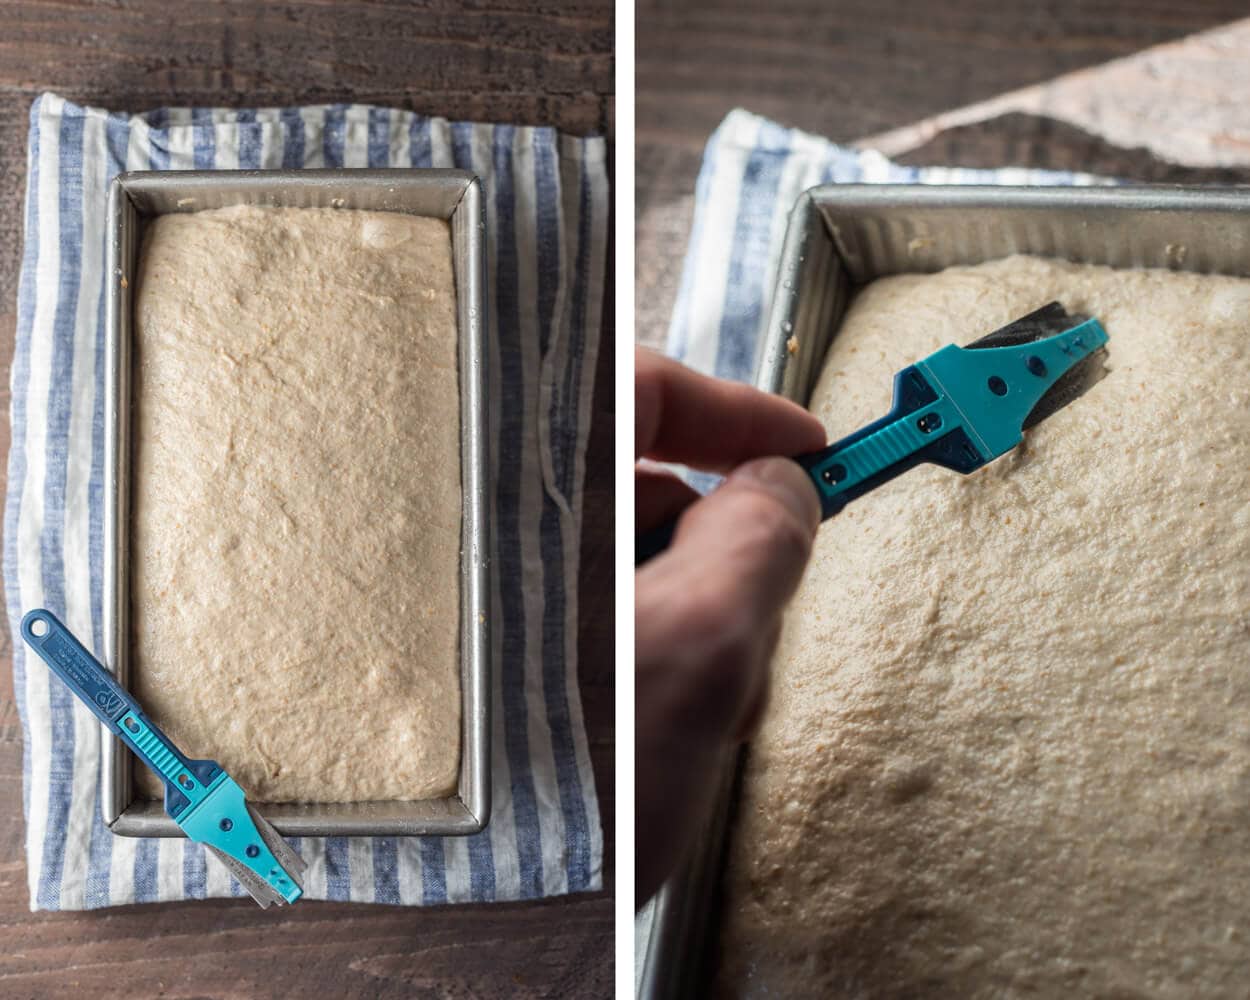
I did a very rough score on the top of the dough before placing into the oven. If you choose not to score at all, you’ll most likely get a taller loaf, and depending on how tight you shaped your dough, there may be more or less of a rupture on top. In the future, I’d like to play with an even longer proof in the fridge with no score at all. This should yield an even more tender crumb and hardly any dramatic fissure.
Spritz the top of the dough in the pan with a hand mister and place it into the oven. Bake for 20 minutes at 450°F (230°C) with steam, and an additional 30 minutes at 450°F (230°C) without steam. Then, turn the oven down to 425°F (220°C) and bake for an additional 15-20 minutes until done (the internal temperature on my loaf was 205°F/96°C).
I steamed the oven in my usual way, described here in my post on how to steam your home oven for baking. While this extra steam might not have been necessary, I wanted to ensure maximal rise and a thin & crisp crust. Remove from the oven and let cool in the pan on a wire rack until cool enough to remove the bread from the pan, then remove and let cool directly on the wire rack for a few hours.
If you cut this bread too soon, the interior may not be wholly set so give it a little time to relax (here’s why).
Conclusion
With only four ingredients this healthy bread is a daily bread that has a mellow, sweet taste. The crust is supple but not mushy, and the keeping qualities from sourdough mean we’ll be done eating this entire thing well before any threat of spoilage. This is unmistakably bread that can be made every week to satisfy those old fashion sandwich cravings (perfect for kids, too).
Crust
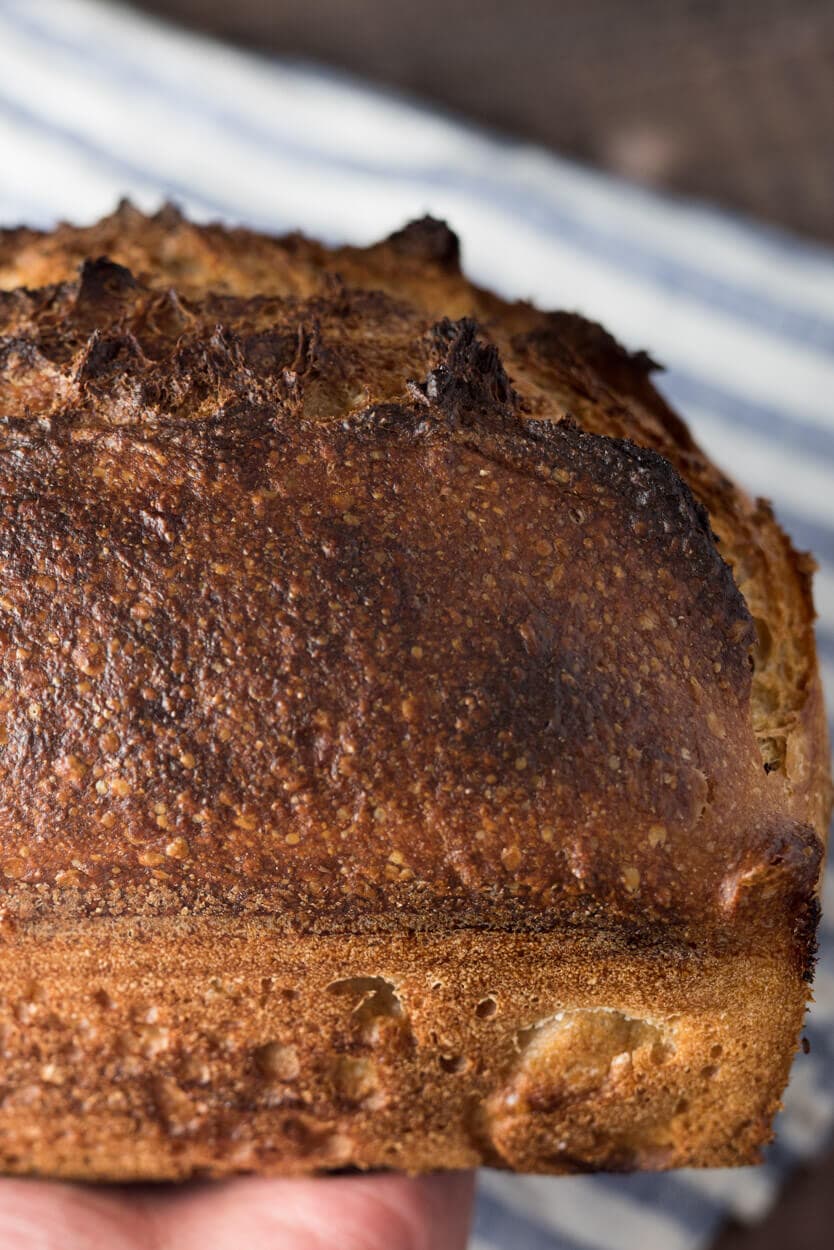
The crust is killer. The intense caramelization is so appetizing it makes your mouth water before you even have a bite. You can see lots of little blisters on the surface of this loaf (thanks in part by the extra steaming in the oven) that provide a little crunch when toasted, a perfect contrast to the incredibly tender crumb inside.
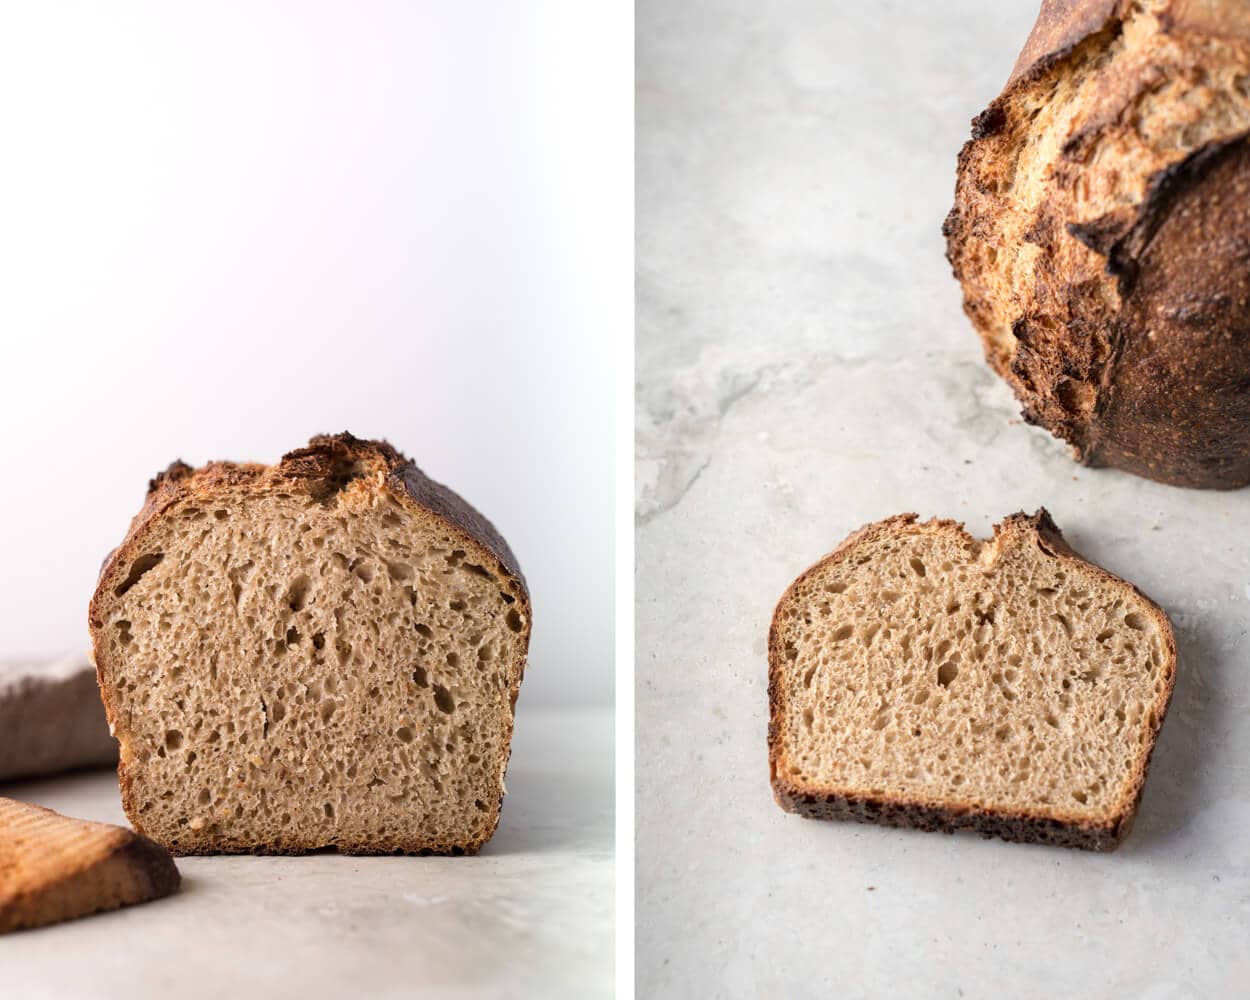
Crumb
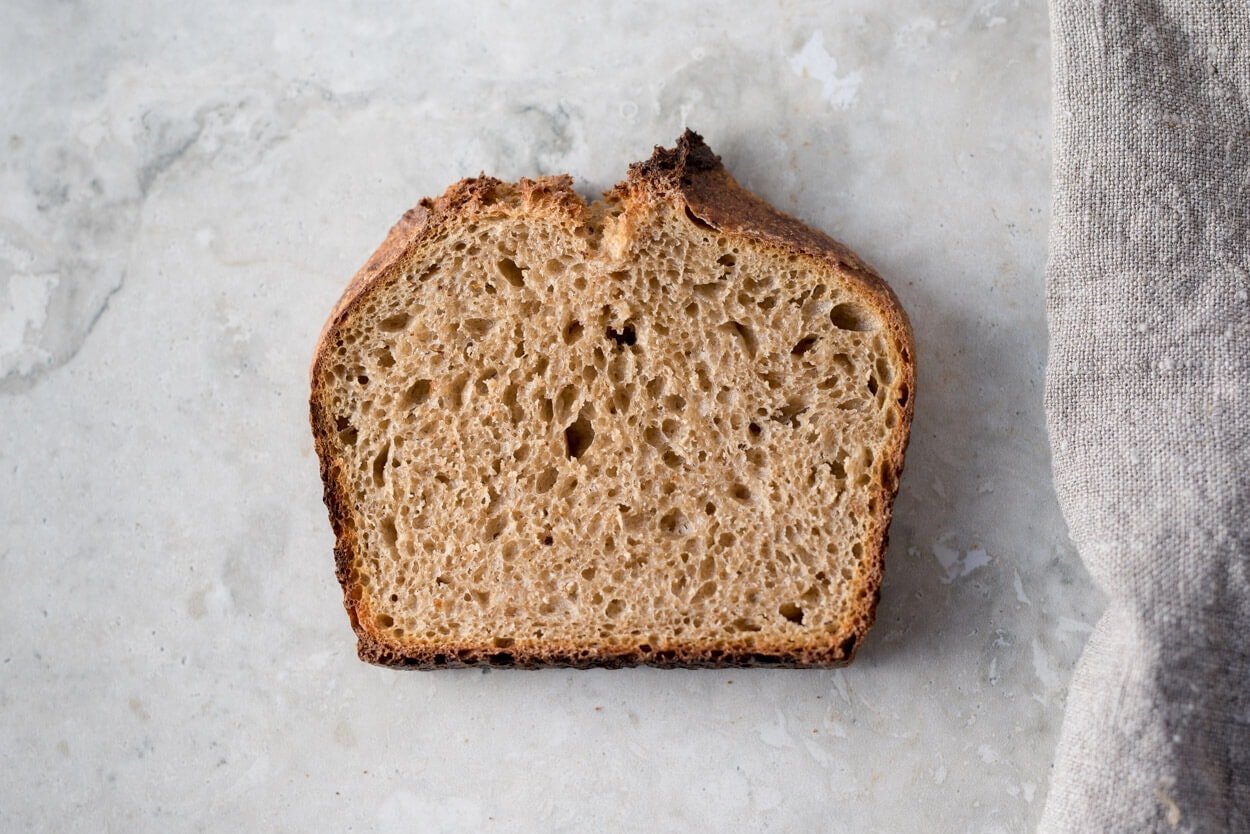
Bread like this asks for a certain level of tightness; it needs to hang on to all those fantastic ingredients you’ll be sandwiching in there. The high level of whole wheat helps ensure a fairly closed crumb but more important is the full scale of fermentation. You’ll notice no dense areas, no gummy sections; everything is well fermented and very tender. If you recall at the start that was one of the criteria I had for this bread and it’s readily satisfied.
Taste
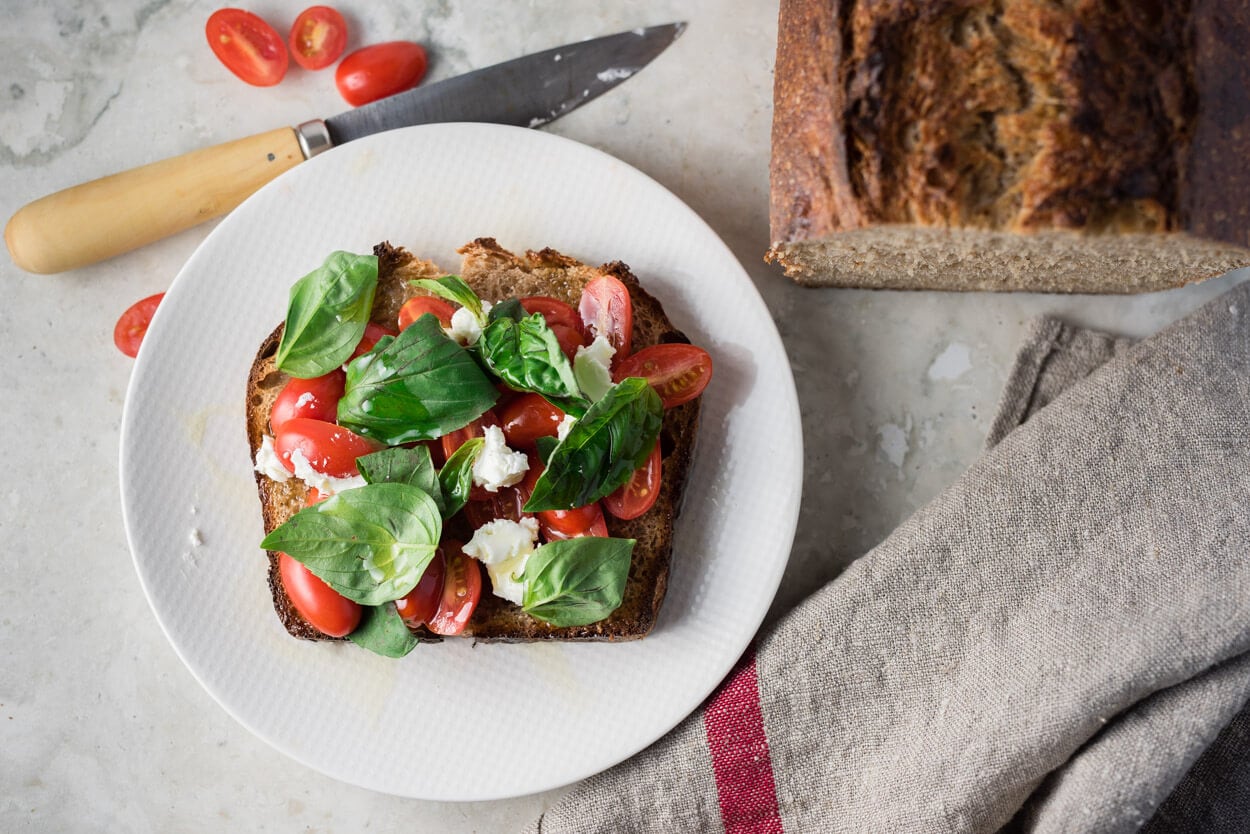
Channeling my smørrebrød history, I made an open-faced sandwich with ripe tomato, basil, goat cheese, and extra virgin olive oil—just perfect for this bread after heavy toasting. Sweet, soft, mellow and contrasting. All part of a bite and all contributing to the grin on my face. I’ve come to enjoy the flavor of Grist and Toll’s Star White Wheat, and I can’t wait to try this recipe with a few other varieties I have, including my own fresh milled white wheat berries. I don’t think you could go wrong with using red wheat instead of white, but as I mentioned previously white wheat has a slightly sweet and more subdued taste that works well with bread like this.
Well, there you have my take on a whole wheat sourdough sandwich bread. I feel like I’ll be tweaking this bread into the future as I already have a few things I’d like to try out: use a large percentage of freshly-milled flour, push fermentation even further (perhaps 2-4 more hours for the final proof), and finally increase the dough weight to 1400 grams to see just how high I can get this bread to climb. Some other welcome additions could be a seed or cornmeal topping and heck, even a little cornmeal mixed into the dough to add another level of sweetness.
Oh! I’d be remiss if I talked so highly about that thick slathering of peanut butter and leave without proof. Once this loaf cooled I was waiting knife-in-hand and it was the first thing I concocted, even the photo couldn’t wait.
Buon appetito!
If you use this recipe, tag @maurizio on Instagram so I can take a look!


274 Comments
Hello, thanks for the great post. I’m planning to make this recipe, and the details are very appreciated.
I wonder if I can use some oat flour (home-grounded traditional oat flakes) instead of the whole wheat..? I was thinking of replacing the red whole wheat flour. Do you think that would work..?
Thank you.
Howdy:
Instead of steaming the loaf, do you think it would achieve the same results if you put the loaf inside an oblong-shaped covered clay cooking vessel?
Debora
Hi Maurizio,
I’m planning on giving this one a shot, but I had some questions if you don’t mind me picking your brain.
I thought about incorporating some seeds (soaker method, as you have it for your rye recipe), but I’m worried about over hydration. I was thinking of dropping the overall hydration to about 85-90% to account for the extra moisture coming from the seeds. I currently only have access to run-of-the-mill (pun intended) KAF whole grain flour.
My second question is for the actual bake. Are you baking with steam, per your usual method? Or does the Pullman work well alone? The reason I ask is because my oven is not setup in that I can bake with steam easily. The heating element is on the bottom. What would you recommend?
Thanks for your work!
Hi Maurizio! I was wondering, you say preheat for an hour at 500 but then bake at 450. Is this intentional? Do you turn down the heat as soon as you put the loafs in the oven? Want to make sure thank you!
I’m not sure if you’ll see this in time, but I’ll give it a shot. I made the dough for this and I’m getting ready to bake in about an hour. Unfortunately, I’m a college student, so I don’t have a pizza stone, dutch oven, or an otherwise extra-hot surface to put the loaf pan on. It occurred to me that putting the loaf pan in a water bath might be able to provide an extra-hot surface for the pan AND achieve steam. Thoughts on whether this is feasible? Thanks!
Hi Maurizio! I absolutely love this bread. I have a bit of an opposite question to what Steph T just asked. I love the sourness of this loaf and have found myself wondering why it is so noticeably and repeatedly more sour than the others I bake. I would love to oomph up the sourness of my other loaves. I most commonly use your “My Best Sourdough” recipe as my base and tweak from there. Per loaf, that recipe would be about 8.5% levain opposed to the 13% levain here. Do you think that is the main difference? I’m retarding them roughly the same amount of time, the pan loaf usually slightly shorter. The flour type percentages are always similar. The only other significant difference between the recipes is the hydration. Wondering how much hydration may play a factor or if I should just experiment with a higher levain percentage. Thanks as always for your resources!!
Pleased to hear that, Keith! I’ve actually been experimenting more with pan loaves and should have some more recipes with pans coming soon — they’re so fun and delicious.
Yes, a higher pre-fermented flour (the levain) percentage could lead to a more sour loaf. Additionally, you could try using some rye flour in your levain and also the final dough mix. Rye helps increase acetic acid production for a more sour flavor. I wouldn’t go overboard on the rye, though, as the more you include the more dense your loaf will be. It’s up to you on the percentage, but even 5% plays a big role.
Finally, if you can try to push the cold proof in the fridge. There’s a limit of course, but if you could go even a few more hours you should notice more sourness.
Those are a few ideas to try the next go and see if you get a more sour result. Hope that helps and thanks for the kind words!
I’m excited for more pan loaf recipes. I’ve tried once to use your Best Sourdough recipe (but with only white flour) in a pan, but it looks like I need a larger loaf. I’m not sure I can go to that high of a hydration with my flour, since it already feels soupy at 87%, but I look forward to seeing your white flour pan recipe.
Thanks, Steph! Glad to hear the bake went well, despite the small additional sourness. Yes, generally (and assuming a few other things) longer time in the fridge at cold temps when proofing will mean a more sour loaf. Try the reduced proof time and see if that helps. Additionally, you could try making the levain out of all white flour instead of using whole wheat (or as I say here, Type 85). This should help reduce acidity further.
I do have plans to make an all-white sandwich loaf, stay tuned! A touch of honey is, well, a nice touch, as well 🙂
Happy baking!
Hi Maurizio!
This looks so good! I’ve been craving a homemade regular whole wheat sandwich loaf lately! I have a question about the levain. On Fridays (the only day I can bake sourdough) I have to leave for school at 7 am and will not be able to bake until like 4:45 pm. Do you recommend I just use a smaller amount of starter in my levain in order to have it ready by the time I am available? If so how much?
Also, if I do not have T85 flour, what would be a good substitute? Thanks so much for your recipes and help!
Yes, use a smaller amount of mature starter to build your levain — this will lengthen the time between when you mix and when it’s ripe and ready to use. The exact time will be variable based on the flour you’re using (more whole grain speeds things up) and the ambient temperature (warmer is faster). Generally I like about 10-12 hours for maturity when using 20% starter in my levain mix (assuming around 76-78°F ambient).
If you don’t have T85 you could do a mix of white flour and wheat flour: half and half. That should get you close!
Hope this helps and happy baking!
Hello Maurizio. I am confused. In this comment you say 20% starter in levian yet recipe says 50% bakers percentage. Is 50% a typo?
Hi Maurizio, Im continuing my journey with sourdough through your wonderful recipes and insight. Ive just made the Whole Wheat Sourdough Sandwich Bread on Sunday last and it has come out exactly in colour & texture as per your instructions ( the flavour is wonderful ) I changed some of the flour listed as its not available here ( Dublin `Ireland) I substituted the Giusto’s for Malted flour & didn’t have the diastatic available though given the colour & moistness not sure it would need it ? . I had as you predicted a lot of work on the very wet dough but I found the slap and fold at the beginning really helped ( though closer to 10 than 6 mins ) .
Could I ask you if you have ever used Miso in this recipe as I think it would be amazing as it has the texure to complement it. If so could you share how this could be done ? thanks again
Hey, Damian! Your modifications sound great. The diastatic malt is totally optional and probably not needed for this recipe since it’s mostly whole wheat anyways.
I’ve never used miso in this recipe, sounds delicious, though! I’ve actually never worked with miso at all, it sure would be a fun experiment. If you do try it out, please let me know how it goes.
Happy baking!
Thank you for your website! I’m very much a beginner. I’ve struggled with my starter but have finally arrived at a beautiful starter that smells like it should and rises and falls predictably every day as u describe. But I want to make bread now! I’ve tried the beginner sourdough and this recipe and the results have been tragic. Unfortunately where I live in Cincinnati, they don’t have a hockey team otherwise my bread slices could be used as hockey pucks!! My husband says he can use my loaves to weigh down our pool cover! In this recipe, when I mixed the leavin with autolyse, you talk about “slap and fold” or “stretch and turn” but my dough, at that point, was so wet and sticky that I can’t handle it at all. I tried to put it on a board with flour but in order to handle the dough at all, I ended up adding a tremendous amount of flour just to handle it. I’m so confused! Help! One thing that I did notice is that you say to cover the leavain and I used a towel. There was a “crust” covering my leavin after the allotted time. Is this a problem? What do u cover your leavain container with?
You bet, Karen, and welcome! When you make your levain feel free to cover it with a plastic lid if you have one. Sealing it like this will help the crust from preventing.
Sorry to hear about the horrible bake! It sounds like your flour and/or environment dictate the need for less water in your mix. I’d reduce the hydration of my recipe above by 10% and give it another go. Even after reducing it 10%, hold back some of the water (perhaps 100g) during mixing and add it in only if it feels like the dough can handle it.
With baking hydration adjustments are almost always needed and we have to be cognizant of that as we’re mixing. It doesn’t mean it has to make things more complicated, it’s just a small adjustment we have to do each time we bake (kind of like adjusting the liquid in a pancake batter!).
Hope this helps and good luck on the next go — let me know how it goes!
Update: I tried your steaming at home method but with salt blocks that I had on the bbq (still haven’t purchased pizza stones). It all worked like a charm- Thanks so Much Maurizio! I really can see the change in results following your guidance (for bread and steam).
Excellent! Salt blocks, interesting and what a great idea. Thanks again for the updates on all of this! Happy baking ????
I made this recipe and have received rave reviews which I thank you for Maurizio! One thing I am wondering about is steaming: I don’t have a pizza stone or the set up you suggest yet, so I tried the following: 1 baked them separately. 1st one, I put directly on the oven separation shelf (it’s well insulated to separate the top and bottom ovens) so I thought that may substitute okay. Secondly, I used my big roasting pan upside down over top of the bread, with no steam container for this one. Result: nice rise, open texture. 2nd bread, I also placed on same shelf but this time I added a steaming container of boiling water, then again placed the roasting pan upside over top to trap the steam inside with the bread. Result: less rise, still open texture but a wee bit denser. My next bake I plan to get the home steaming set up going that you have outlined and try again. It is a bit challenging doing this at home!
It is challenging, and requires a little more effort, but I find the results totally worth it! Thanks for posing an update and your results, that helps me (and others) when testing things in the future!
Just tried this loaf yesterday, and it is delicious toast for breakfast today with some homemade butter! But when I cooked it last night the crust was starting to burn and I couldn’t do the last 15-20 minutes at a lower temperature. It seems cooked through, any ideas what happened? Is it possible I had too much steam? Thanks so much for all the great advice and recipes, I will be trying this one again ????.
Excellent, really glad to hear that. It’s possible my listed temperatures are a bit to high for your oven/environment — you could try reducing the max heat by 15-25°F and see if that helps you bake longer without burning.
You’re welcome and I hope this helps — happy baking!
Love this recipe. Thanks, Maurizio! I used red whole wheat and got a pretty strong-tasting wheaty loaf, so I want to try this out with white whole wheat. I do a lot of heavily whole wheat baking, but like you say, there’s just something about mellow sandwich bread. My 9″x5″ loaf pan is shallow, so I lined it with a tall sheet of parchment to guide the loaf upwards. That probably wasn’t necessary since this bread had a lot(!!) of strength despite the hydration level, but the loaf looked great, so I’m not complaining. Also, I’m lazy, and dumping a loaf in a pan for an overnight proof takes fewer steps than getting out the pizza peel and wrestling a loaf into the Dutch oven…Different pros and cons on the final bread product in both of those cases. Thanks again!
Right on, thanks for the update! yes, a loaf of pan bread sure is satisfying, both in making it and eating it 🙂 Glad it worked out well for ya!
Really appreciate this! After spending a couple months trying to form a decent 100% whole grain loaf in the dutch oven, I followed your 100% hydration technique in the bread pans with whole stone-ground red fife. Surprisingly good oven spring — my crumb was more open, and the bread is good but maybe slightly too gummy. I had a dark crust at 190C, so I pulled it out of the oven. I also sliced into the first loaf (did two at the same time) after 2.5 hrs and perhaps could’ve let it rest longer. Next time will try the lower temperature and longer bake as you suggest. (Also, I didn’t do all the stretch and folds during bulk fermentation, as I had to leave the house). Overall, though, a really good result for the first time with a bit of room for improvement. Thank you, Paul
That’s great, Paul! I’ve found with the Red Fife I’ve baked with it usually needs a slightly lower hydration than other hard red. You might want to try reducing the hydro as well if you find the interior is still a bit gummy after baking.
Happy baking!
I reduced hydration to 95% and let cool right down to room temp before slicing. No gumminess, just a nice, glossy crumb!
Fantastic!!
Good morning, novice bread baker here with some questions on your recipe. I’ve just gotten into sourdough baking starting with the Tartine recipe that’s seemingly everywhere. Similarly to your intro on this page, my wife wanted me to try something in a pan so we could have more uniform slices, so i tried this out. I’ve not had much success unfortunately, but I’m also super new to this and need some questions answered if you don’t mind… First one, is that I’m confused about the process surrounding adding the salt. So I went through and did the slap and fold you suggested after seeing some vids on how to do it, and it seemed to really help my dough firm up and get a skin on it like I expected. But then the recipe has me wait a while and add more water and the salt, cutting it through with my fingers to incorporate it fully. I can understand that adding salt at the start with the flour would inhibit the yeast action, but it seems to me too that adding it later means I’m undoing the strengthening work I did with the slap and fold, afterwards my dough sort of becomes a batter almost that never seems to recover any muscle. For comparisons’s sake, I saw that the King Arthur website’s basic sourdough recipe has the salt go in with the flour at the start, though they’re the only other place I’ve seen that does it that way. So after the folding-in-the-bowl fermentation I tried slap and fold again to rebuild some tension, but then the dough just wanted to come apart, I had to give up and mostly shovel it into my pans. So despite good yeast action (I had lots of bubbles after baking) I got no oven spring and it was still very wet in the center, despite probe temping showing a proper 205 degrees. Where do I get the structure I need to make a dough instead of a batter? Thanks much in advance, and I’m really enjoying your blog! PS: I used a regular whole wheat starter and all King Arthur White Whole Grain in the recipe hoping for more “lightness” from it that previous heavy, squat loaves.
Hey! What you’ve experienced with the delayed addition of salt is exactly what I experience: the dough kind of falls apart. However, after you mix a bit more it will come back together in a cohesive mass. It’s a delicate balance, though, as like you said it can break apart more later especially when adding more water.
With that said, there is no reason you can’t add the salt at the beginning of mixing, things will work out just fine all the same. I prefer to delay the addition because adding salt tends to tighten up the dough, making it harder to mix. However, if you’re not experiencing this go ahead and add it all at the beginning!
I would suggest you also reduce the water by 5-10% on this recipe and see how the dough reacts next time. It sounds like it might be a bit high for your flour, which is not a problem it’s just something we have to adjust for (this adjustment happens all the time based on the flour, which changes by the bag).
So, reduce the water a bit next go and go ahead and add the salt in at the beginning when you ad the levain, the dough will turn out just fine. Let me know how it goes and I hope this helps!
Hey there Leo, thanks for the reply, sorry for taking so long myself, I’ve been camping! So I did try again later with adding the salt with the flour right away, and really doing the water by eye and feel. I had a lot more luck, I was able to make a more firm dough that I could handle properly and make proper loaves out of. I had a decent rise and an all right oven spring as well, I was super excited! Here’s where the hard lesson comes in… I tested the internal temp with a probe thermometer and it was right on 205 degrees and all, but the probe was covered in doughy schmutz. From other baking like cakes and such, I knew that most things get tested with a toothpick or knife blade, and you want ’em to come out clean. Well I thought the same held for bread 🙁 So I baked it to death trying to get the center to be not gummy. I realize I probably had great loaves that would have dried out properly if I’d took them out and left them alone for a few hours. Oh well, maybe someone else will read this and learn the lesson easier than I did! I had such luck right up till the end though, that I’m going to try again and I think it’ll work out all right. Thanks much for the help and I’m sure I’ll bother you again in the future!
With bread you’ll usually not pass the “toothpick test” as the internal crumb is still setting after/during baking — this is the reason why most recipes say to let the bread rest for some time after finishing baking (although I know it’s hard and fresh, warm bread is one of life’s greatest pleasures!).
You’re very welcome! Yes, keep me posted on how it’s going 🙂
Hi Maurizio, I have tried some of you recipes and they have turned out well – thanks for sharing your recipes. As I am still learning about sourdough, I wanted to learn how to calculate the sourdough starter amount in the Levain, i.e. is there a formula for calculating the percentage of starter that works well in the levain. Example – if the levain amount is 73 gm at 100% hydration ( as in the recipe above). How do we distribute this and what do we consider to decide the starter amount. . Would the following work – 15 gm – starter , 30 gm water , flour – 30 flour . thanks
You’re very welcome and I’m glad to hear that!
Per your example: 15g starter, 30g water and 30g flour you’ll have 50% starter. You get this by 15g starter / 30g flour * 100 = 50%. Everything is related to the total flour amount.
For more, check out my Beginner’s Sourdough post where I discuss Baker’s Math in more detail.
Hope that helps!
Thanks Maurizio for your reply. I think I was not clear in writing my question. If a recipe specifies the quantity of Levain and does not mention how much starter in levain.
How do we decide how much starter to put into the Levain, when the starter amount is not specified. TIA .
Unfortunately there’s no real answer to that question. You can use any amount of mature starter to create a levain, it depends on what you’re after. For example, lately I’ve been making a levain that’s 100% starter, 100% flour and 100% water — this ripens in about 3-4 hours at warm temperatures. Another alternative could be 20% levain, 100% flour, 100% water that will ripen overnight after 12 hours at room temperature.
The starter amount is variable and up to you. If you’re doing a recipe for the first time just make the levain with any starter amount and use it when it’s ripe and ready to go.
Hope that helps!
Thank you once again especially for your patience. Your answer is really helpful in demystifying starter and levain for me.
I have tried so many sourdough recipes. None have turned out yet, but I am slowly learning and tweaking my recipes. I am desperate to create a sandwich loaf. Ramadan is coming up and we live on breakfasts of peanut butter and jelly, but I refuse to go back to my old habit of store bought refined grains =(. My long standing starter just recently somehow began growing mold on top – yuck and weird! So I am starting from scratch with this one. Here are my questions before I begin this loaf. Do you use your firm starter or your soupy starter for this loaf and does it matter which I use? Also, I am currently using SPROUTED rye for my starter. Will that make a difference in the texture of my final loaf? Should I create this new starter out of something else? I also do not have any whole white wheat, but I do have einkorn. Will this work as well? Could I use all einkorn, or would there be adjustments that would need to be made to do that? The options I have in my pantry right now are sprouted rye, sprouted spelt, einkorn, unbleached white (out of hard red) and oat flour.
You could use any hydration starter, really. Just make sure you account for the hydration difference in the final mix (if using a stiff starter you could add a little more water).
I’ve never made or maintained a starter with sprouted flour but it should work just fine. It might be a touch more active so keep an eye on it and refresh it when necessary.
You could use einkorn which is known to typically be a little on the weak side in terms of dough strength, I would probably try this recipe with reduced water (5%?) if using einkorn just to make sure I’d be able to handle the dough. That’s the good thing about a tin loaf though, if things get crazy just do whatever you have to do to get it into the tin 🙂
I’d also be tempted to try this with a combination of sprouted spelt and einkorn — that would be delicious! For that, though, I’d certainly reduce the hydration, perhaps 10-15%.
Hope that helps!
Thank you so much! I realized my sprouted rye has gone rancid, because my new starter smelled terrible day two also 🙁 tried with spouted spelt but not liking the results with the hooch that forms so quickly. I did purchase King Arthur whole white wheat, and I planned to try the type 85 with part einkorn all purpose and part whole white wheat. Do you think I should use regular unbleached all purpose instead of einkorn for more strength? Maybe after I get at least one loaf correct I can try experimenting with other flours too 🙂
Yes, I’d say that’s a great approach. Use some AP for a bit until you get the hang of things, then sub in the einkorn once all the other pieces are in place 🙂
Well for some reason I was never able to get my rye starter going again, even after buying new flour and sanitizing my containers and utensils. Any ideas on that? Anyway, I ended up just buying a starter, which is a San Francisco starter. However, it is very different than what I am used to and I am having to get used to it to be able to tell when it has peaked. It occurred to me today that this starter may not work for this bread! Will a SF starter work in this recipe?
First attempt = failure 🙁 I didn’t make a slash in it because I was hoping for the taller loaf. I think maybe my seam wasn’t down because it looks like it rose from the seam on one side instead of breaking open across the top. It’s also gummy inside! 🙁 As have all of my loaves been. I used KA whole white wheat and then used more of that and some AP flour for the 85 blend. Made sure my sponge was floating. Dough looked beautiful and handled the way you said. Cooked to internal temp of 205. Even had pan of hot water in the oven for more steam during steaming time. The crumb looks perfect, it’s just gummy :'(
Sorry to hear that!! A gummy interior can be due to either over hydration, under proofing, or insufficient bake time. Next time you try this you could try reducing the water just a bit, perhaps 5% of the formula. From there I’d suggest you really try to push that bulk fermentation, you want to see quite a bit of activity in the dough! If the dough ruptures dramatically on top that’s usually a sign it was under proofed and could use more time fermenting (plus it tastes better!). You could also try reducing the bake temperatures and bake a little longer, close to 208ºF or 210ºF to really ensure there’s no unbaked section in the middle.
I hope this helps next time! As with most things baking, it usually takes a few tries to really dial things in.
Hi. I made a similar bread, but i use half spelt sour levain and half wildyest from apricot. The finely bread 800 grams become to be 14 cm height. Its more than dubbel upp from the baking pans top.
Wow, that’s quite the rise! If you’re going to go with that same flour mixture you could reduce the amount of flour or let the dough proof longer to breakdown the gluten structure a bit more (for an even more creamy interior). Sounds delicious, though!
Hi Maurizio!
I’m not the hugest fan of whole wheat bread — was wondering how I can tweak the recipe to get a white sourdough sandwich loaf? I recently had one at Model Bakery in Napa and it was beyond delicious — I’m trying to make it at home! Any ideas you have would be great!! Thank you!
I like the idea of a really soft white sandwich bread — I’ll add this to my list of things to bake (and share here at my site)! You could always just change this recipe to use 100% white flour if you’d like. The texture might not be as soft and sweet as what you’re looking for (I’m not sure what Model Bakery’s bread is like) but I’ll work on this!
Thank you!! I’ll check back soon 🙂
Hi Maurizio, I can´t find all the different flours you use, I guess that´s why I don´t get those large holes, well I have to work with what I have. I have a question though, what to do with the rest of the levain? for instance in this recipe you call for 125 g levain and only use 73 g or what happens if I use all of it? my concern is that I have a lot of starter in my fridge and want to use it somehow, I already made your 3 recipes for leftover starter but I have more than that, sorry for taking your time for a dumb question and thank you for all you give and teach
You’re very welcome! I like to make a levain that has just a little extra just in case, there’s nothing worse than finding our your levain build was a little less than what you really need! You can always scale back the amount of levain you make to fit this recipe. If you find you can make a build that gives you exactly 73g then stick with that! I have some more recipes coming soon that will have some more ideas on what you can bake in the kitchen with leftover starter — stay tuned!
Hey Maurizio again. So I’m in the autolyze process of this recipe right now. I was about 30 minutes in when I realized that I didn’t mix in a portion of my flour… I changed your recipe up a bit and added a small percent (7%) of rye flour and this is the one I didn’t add (the kids are crazy around here) until after the dough had been autolyzing for 30 mins.
Would you think this have any ill effects on the final outcome? I wanted to get the rye in there so it was part of the autolyze. Either way, it’s in there now lol!
Hah! I could see that happening around here too… No biggie, the bread will turn out just fine!
Hi Maurizio, a random and simple question but one that i want to make sure i do right. When you take the internal temp of a loaf of bread like this one (or any loaf for that matter), where do you insert your temp probe? I just do not want to take away from the integrity of the crumb and also take away from the appearance on the crust with a hole in it haha! Thanks!
-Eric
Hi, Eric! I will usually stick the probe right inside the “ear” of the loaf — the area where it has opened up from the score. If you find a good spot you won’t even see the hole afterwards. I’ll insert the probe there until it’s about midway into the loaf.
Hope that helps, and I totally understand the desire to keep the loaf pristine!
Hi Maurizio.. Well, I tried the pan loaf twice now – last week and this week. The first time I was doing too much and didn’t read the instructions well enough – I ended up using dark whole wheat for the white whole wheat and make a fairly nice looking brick! It actually looked pretty good, and with a fairly strong toast was fine to eat.. Here’s that attempt: http://www.thefreshloaf.com/node/51026/100-hydration-whole-wheat-sandwich-loaf This week I tried again and followed the instructions spot on. I get my flour from a local mill, and used 50/50 whole wheat and unbleached white for your type 85 flour. I had to go out for a dinner, so after about 2.5 hours of bulk and 4 s/folds put it into my cold cellar at about 55 degrees. When back from dinner about four hours later, I shaped it and put it in the fridge for the night. It handled well through the slap and folds, stretch and folds, and shaping. It was a fairly ok log with some surface tension when i put it into the pan. It all looked good. But there was no really rise – I didn’t get a double in the bulk or over night. You say in your description this bread doesn’t rise much – but maybe I need to leave it out at room temp in bulk and get to a double in size before shaping? Here’s this week’s attempt: http://www.thefreshloaf.com/node/51137/100-hydration-whole-wheat-sandwich-loaf-redux (not sure why i go the ‘dog’s head’ volcanic eruption – happened after I took out the steam). It’s obviously lighter than my first attempt, but both are wet to gummy and don’t look light and fluffy like yours does.. any advice? thanks!! Bake happy.. !
I just realized I used the wrong flour. I had read somewhere online that I could “make” white whole wheat by sifting out the bran from whole wheat flour – so that’s what i did and used. Someone replied on TFL site telling me they are not the same and explained the difference – a problem with believing what you read online! So I’ll get some white whole wheat flour this week and try again next weekend. But if you could still tell me about the rise you expect during the bulk fermentation – should it double during those four hours? And I’m curious, looking at your baked loaf – it almost seems like you score in the shape of a capital letter “I” across the loaf – meaning a long slash for the length and then a small score across the top and bottom edges of your pan – or so it seems from the way your loaf splits open at the ends.. Thank you again for your incredible site! Truly remarkable..
Frank — the comments on The Fresh Loaf are correct, you can’t make white whole wheat by sifting. As they said it’s a completely different type of wheat from red wheat. That said you could use either red or white, just make sure it’s *whole* and nothing sifted out. If you sift out some of the bran/germ (and thereby get closer to “white flour”) it will likely be able to take on less water and be more gummy in the end.
I don’t really use the amount the dough rises as a good indicator for when to end bulk fermentation. I find the rise can be misleading, especially when you have a very wet dough that’s mostly whole wheat like this one. I typically like to shoot for around 3.5-4 hours at 76-80F dough temperature and stop bulk when the dough looks like it’s jiggly in the container, has some bubbles on top and the sides and looks smoother and stronger. Keep an eye on the dough after 3 hours into bulk and make the call based on how it looks and feels. I know these are general terms but there are a lot of variables at play (the most important being dough temperature)!
I scored this with a single long slash, it just looks like an “I” because of the way it opened naturally. Lately I’ve been proofing this dough longer and longer so the dramatic oven spring is reduced.
Hope this helps, happy baking!
Hello. I live in India and I was searching hard for a whole wheat sourdough pan bread recipe. So I had to give this one a try. I am fairly new to baking and you have explained your method very thoroughly for a novice like me to follow. I made a few adjustments to your method but still got amazing results (as compared to my previous attempts).
a) I used atta flour as that is very readily available in India (we mostly make chapatis out of it)
b) I lowered the hydration to around 86% otherwise the dough becomes really unmanageable for me.
c) I did the second proofing at room temperature (impatient me :))
d) I had no method of inducing steam in the oven. So I sprayed some water on the bread before putting it in the oven , inverted a similar sized bread pan over the original pan and fixed it in place using binder clips. And I miraculously got a nice oven spring ! I was earlier worried that the bread is not rising too much during the second ferment , maybe your measurements are such that it doesn’t crown the pan while rising.
e) Lastly my bread browned a bit faster than I would have liked. The inners were a little gummy (only a little) . Will try it this weekend with a reduced temperature during the bake without steam.
Thank you so much for this great recipe !
Really awesome to hear that, Ravi! I’m glad you started with a lower hydration, it’s a good idea to do so until you test out your flour a bit to see what works. I’ve used atta before (my wife is Punjabi, born in USA) to make chapatis but I actually haven’t tried making bread with it, yet.
Thanks so much for the feedback and happy baking!