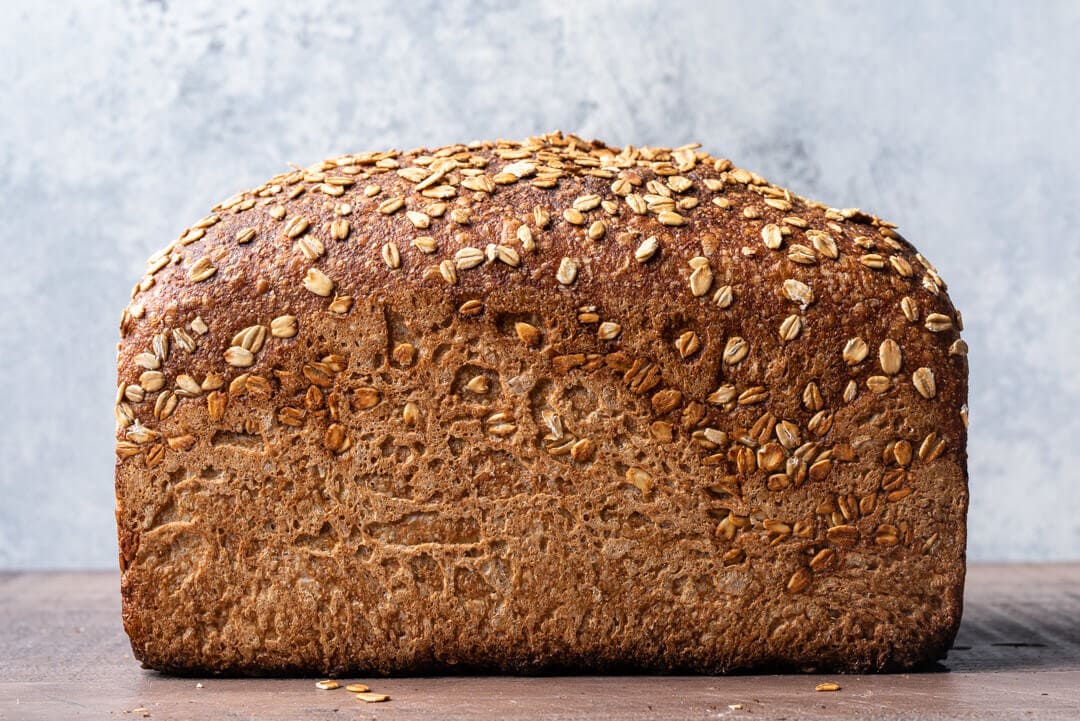
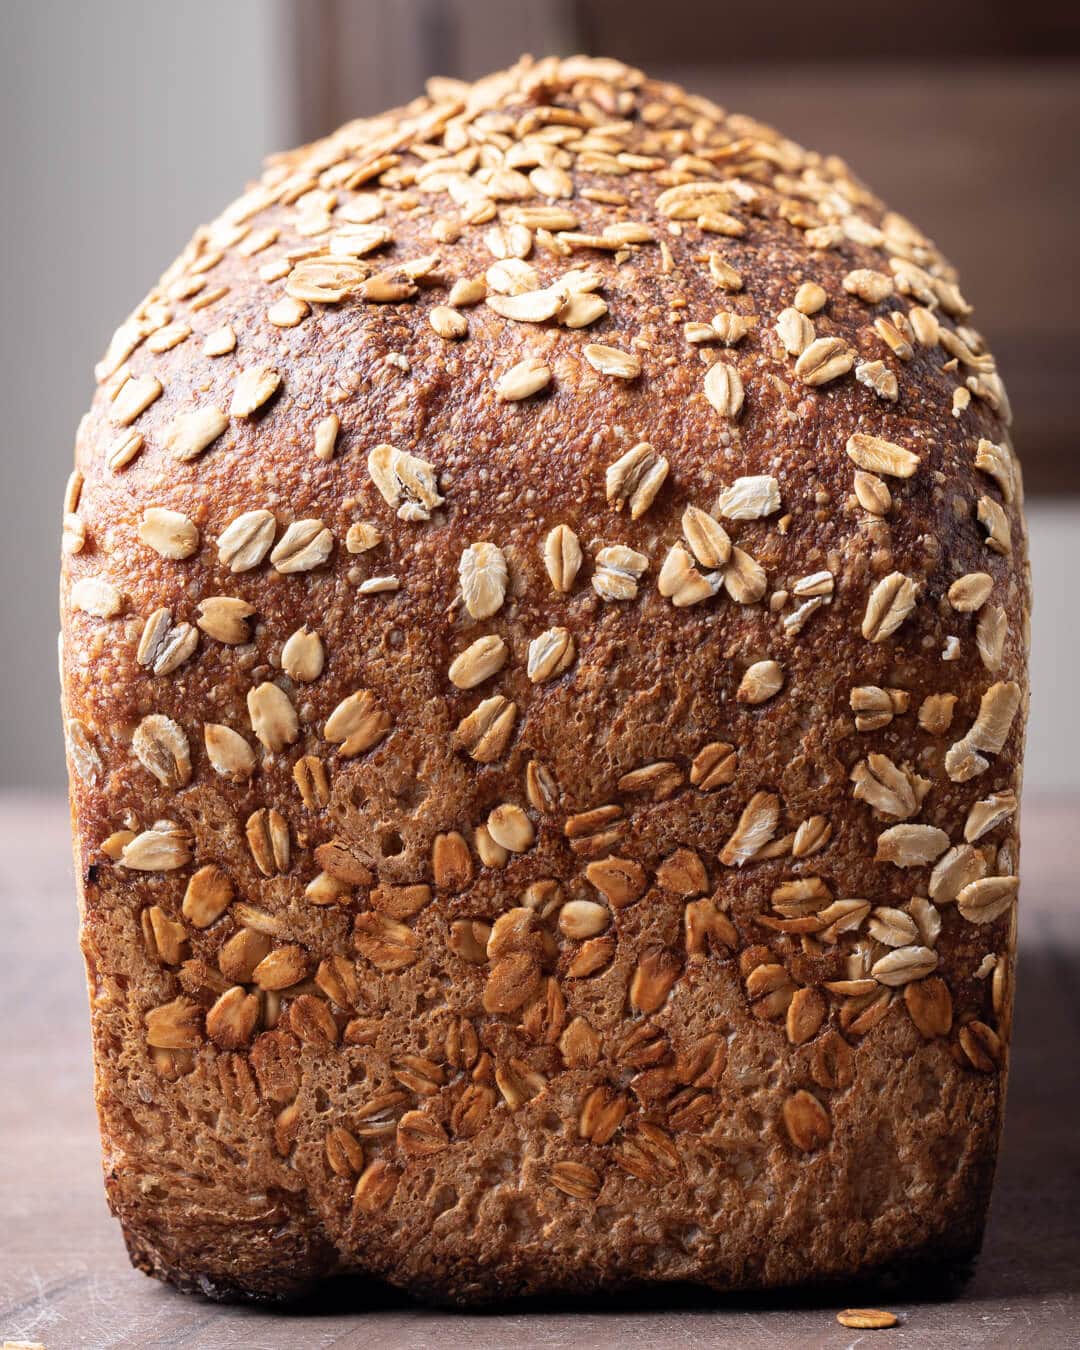
A splendid, gentle top curve from dough that’s proofed just enough. Just enough to still have “energy” to expand upward in the oven, but not so much that it causes an erratic fissure due to the lack of scoring. A balance. Add to that a striking exterior color from a bold bake, the enticing aroma from freshly milled flour, and a speckled oat topping—all contributing to a truly wonderful bread. But beyond all this, it’s one that’s meant to be eaten in thick slices carved from the loaf with a spread of soft butter, toasted and topped with fresh preserves, or used to cobble together a sandwich piled a little too high.
When baking this whole-grain wheat and spelt pan bread I could have sworn the kitchen smelled of honey… Or perhaps it was my eagerness to eat the result. When you go the distance from raw berries, freshly milled flour, to baked bread—all the while controlling each part of the transformation (or as much control as we’d like to think we have over fermentation)—it’s easy to get a little antsy, impatient, and, frankly, hungry.
At 100% fresh milled whole grain, and naturally leavened, this loaf is truly healthy fare. When making loaves like this sometimes I feel the need to mix-in seeds or nuts for even more nutrition, and that’s certainly possible here, but for me and this flour blend, this is just right. It’s fun to dredge up the simple and humble bread tin, to discover anew the appeal of confining bread to rise and bake in a single vessel. The tin can be an enabler to push the limits, to be more adventurous with hydration, grain types, and mix-ins. Chances are no matter what you do, as long as you can “get it into the tin,” your bread will bake up just fine.
Let’s have some fun.
Flour Selection
After trying a myriad of different grains in pan bread formulas, white wheat has to be among my favorites. The mild flavor works so well in this bread, and by adding in a touch of spelt, there’s an additional added layer of flavor. Spelt is almost always my go-to choice when I want to add in something special, something unexpected, something I can tell people: “oh that taste? That’s spelt.” I love it. However, feel free to sub out the spelt for whatever you have on hand. Because the white wheat is milder, you could change the 30% or so spelt to Khorasan, einkorn, or even more traditional red wheat.
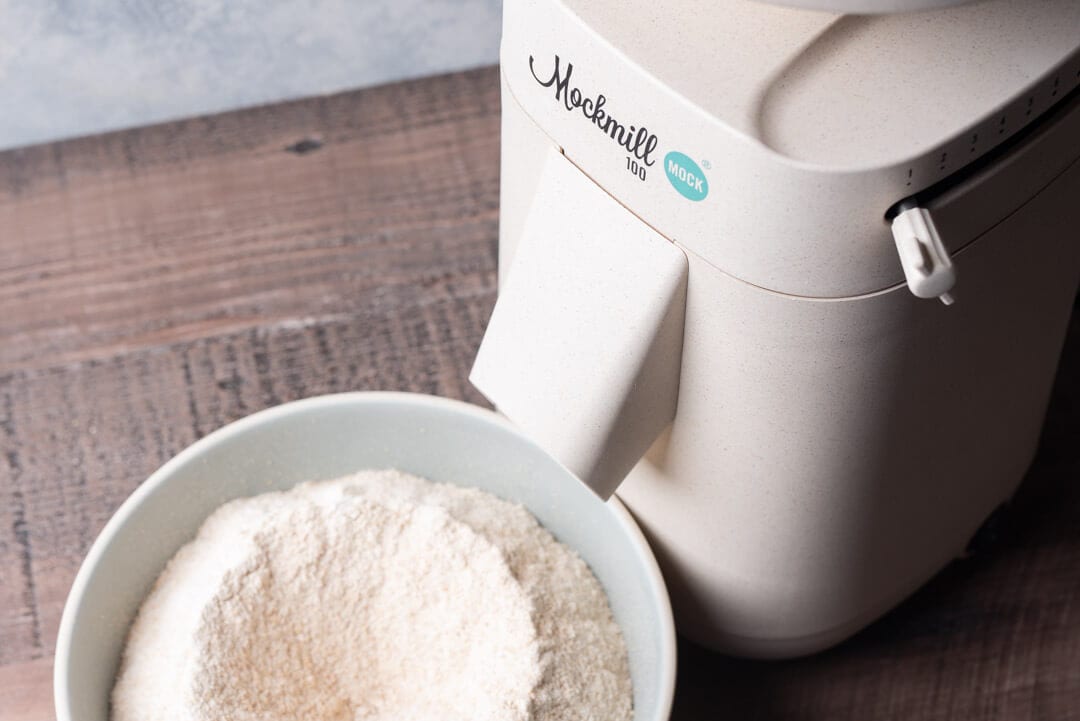
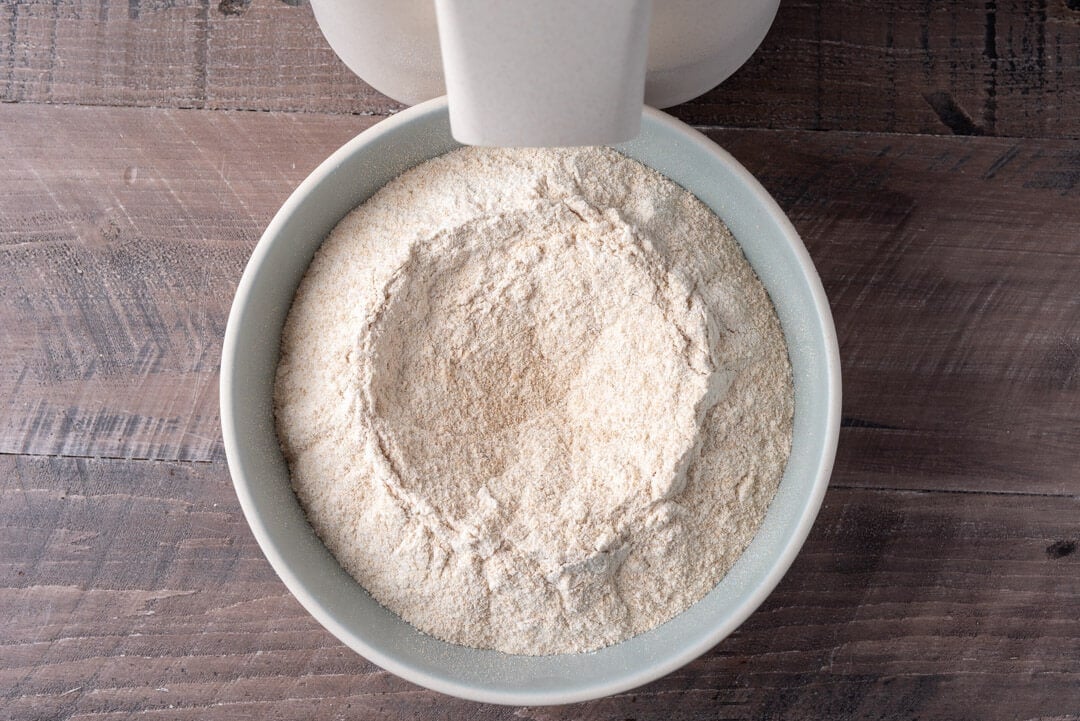
I used fresh milled organic whole white wheat (sourced from Breadtopia), as described below, but you could also use the excellent organic white wheat from King Arthur Flour. Their flour is also delicious when used in sourdough waffles and many other bread here at my site. I milled the white wheat and spelt in my Mockmill 100 home mill. I haven’t talked much about this mill yet, but I’ve been using it in my kitchen for a while, and I can safely say it’s a workhorse. It mills superbly fine flour, is built to last, and is priced exceptionally well. With mills like this, it’s easy for everyone to start milling fresh and healthy flour right from home.
For both the white wheat and spelt I mostly set the mill the finest level and turned it on. The result was freshly milled flour with a captivating aroma brimming with possibility.
Whole Grain Wheat and Spelt Pan Bread
This recipe yields a large loaf of bread: at 1400g it’s almost as large as my imposing Einkorn miche. If you are worried about fitting the dough in your pan, scale the formula down to a smaller loaf, or split it into two 700g loaves.
In a previous sandwich bread post, I was able to comfortably fit 1200g in a 9” x 5” x 2.75” pan—use this as a gauge for whatever pan you’re using.
In this recipe, I’m using Campbell’s Bread Pan; the dimensions are 8.85″ x 4.7″ x 4.7″ deep (235mm x 120mm x 120mm deep).
Vitals
Total Dough Weight
1400 grams
Pre-fermented Flour
4.00%
Hydration
88%
Yield
One 1,400 gram pan loaf (or two 700 gram pan loaves)
Levain Build (Stiff)
I’ve come to rely on a stiff levain build when making bread with large percentages of freshly milled flour. The stiff levain, which can be anywhere from 50%-65% hydration depending on your starter and flour, brings loads of flavor to the resulting bread. I’ve also found that a stiff levain has a larger readiness window when it can be mixed into a dough.
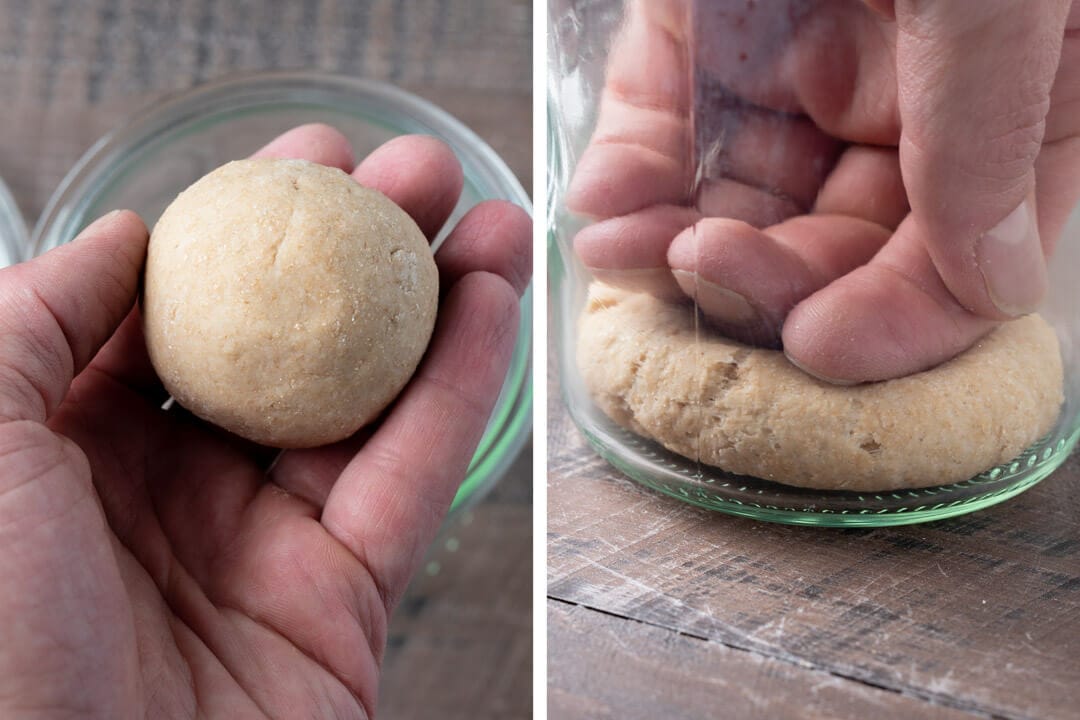
To make the stiff levain, I usually mix everything up with my plastic spatula, then knead it by hand when it becomes hard to stir. Then, I shape it into a ball and press it down into the bottom of a 1/2 liter Weck glass jar. Pressing the levain down like this helps me visually inspect when it’s ready to be used: I look for a leveling off of the “dome” that is created as it’s ripening. Additionally, you’ll see significant aeration at the sides, and, if you gently poke at the top, it’ll give readily under pressure. At 50% inoculation (the percentage of ripe starter used to build the levain) my levain was ready to be mixed into the dough after 5 hours at 78-80°F (25-26°C).
Note that the baker’s percentages listed below are with respect to the final dough ingredients and do not take into account the levain.
Weight
Ingredient
Baker’s Percentage
480g
Fresh Milled Hard White Winter Wheat (100% extraction)
68.75%
218g
Fresh Milled Spelt (100% extraction)
31.25%
625g
Water
89.58%
14g
Salt
1.98%
58g
Ripe, stiff levain (see above)
8.33%
Method
1. Stiff Levain – 10:00 a.m.
Build the levain (everything listed in the Levain Build section above) and store somewhere around 78°F (25°C) ambient until ripe, about 5 hours.
At this time it might be convenient for you to mill the required white wheat and spelt. Milling this early in the schedule also gives the flour time to cool down.
2. Autolyse
Due to the high percentage of freshly milled flour, there’s no need to use the autolyse technique with this recipe.
3. Mix – 3:00 p.m.
Add the called-for flour to a mixing bowl. Break up the ripe, stiff levain on top of the flour and add all but 100g of the water. Mix by hand until well combined.
The mix will be very wet and almost look like it won’t hold together. Perform folds in the bowl to add a little strength for about 5 minutes. Mixing in the bowl keeps things clean, and with dough this highly hydrated, it can be challenging to perform a mixing technique like slap and fold (see my guide to the slap and fold technique here) on the counter.
Add the salt to the top of the mixed dough and mix to incorporate. After this mixing, assess the dough. Does it look like it can handle the remaining 100g of water? Add the water if so, if not, omit the remaining water. Then, next time add the water if you find the dough was just fine by the end of the bake.
Transfer the dough to a tub or thick-walled bowl for bulk fermentation.
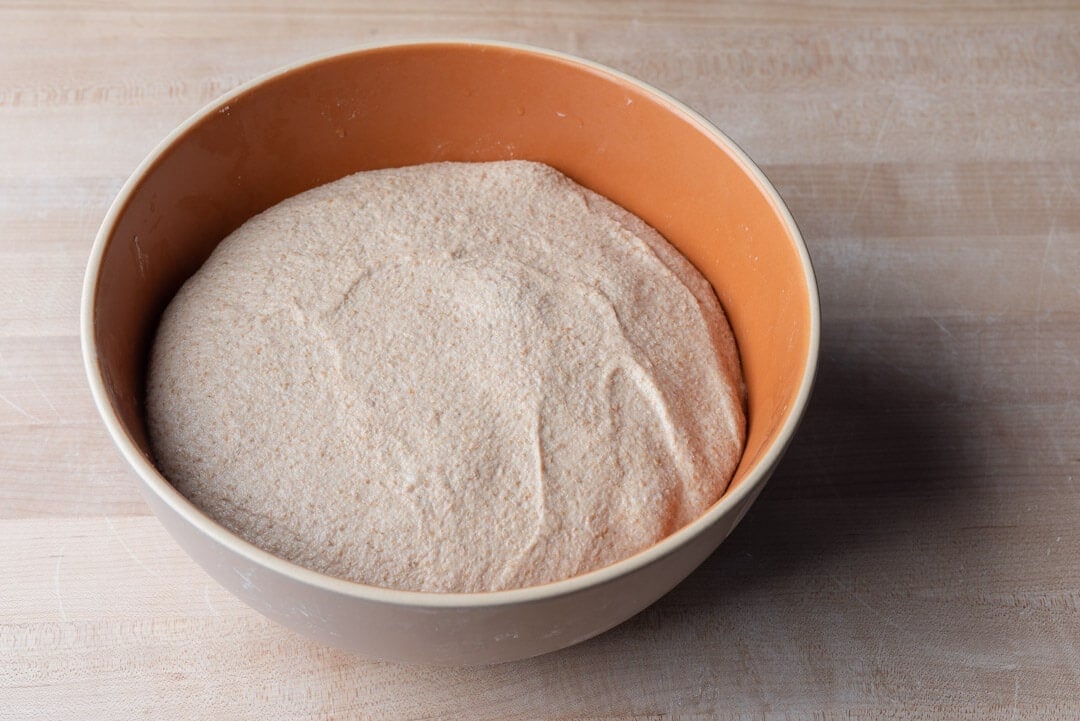
5. Bulk Fermentation – 3:00 p.m. to 6:30 p.m.
At 76-80°F (24-26°C) ambient temperature, the dough should be ready to divide after around 3 hours and 30 minutes.
Perform a total of 3 sets of stretches and folds during the bulk, spaced out by 30 minutes (the first set will take place 30 minutes after starting this step). To perform a set, with wet hands grab one side of the dough in the bowl stretch up and fold over to the other side. Do this four times at each direction (North, South, East, West).
After the last set, let the dough rest for the remaining bulk fermentation time.
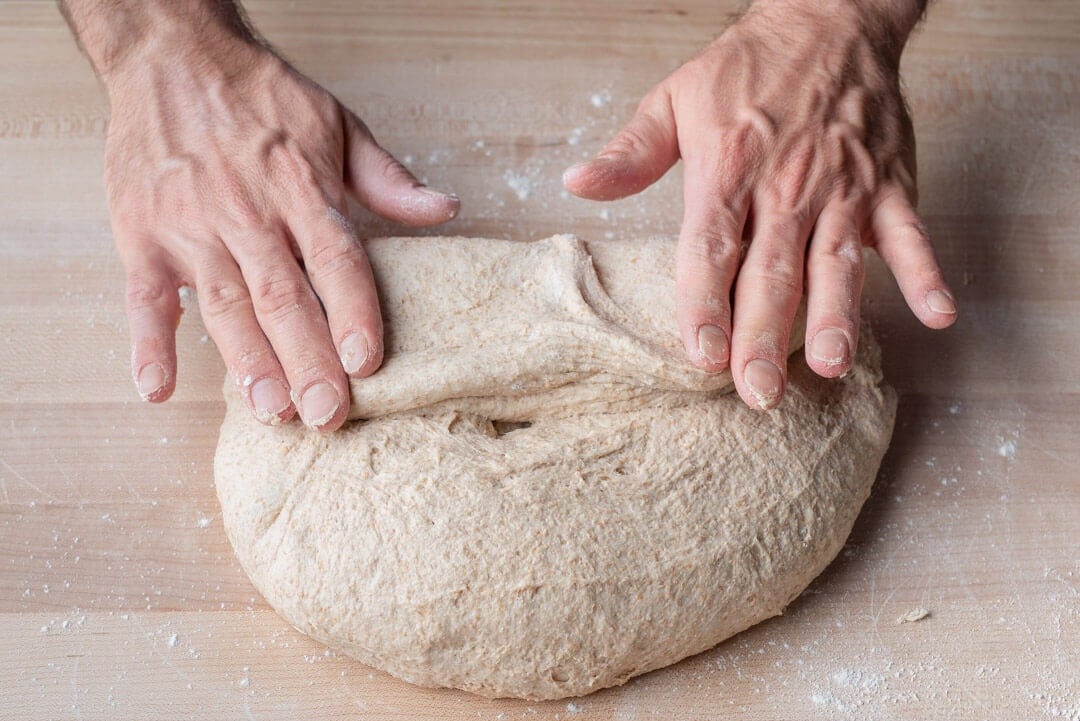
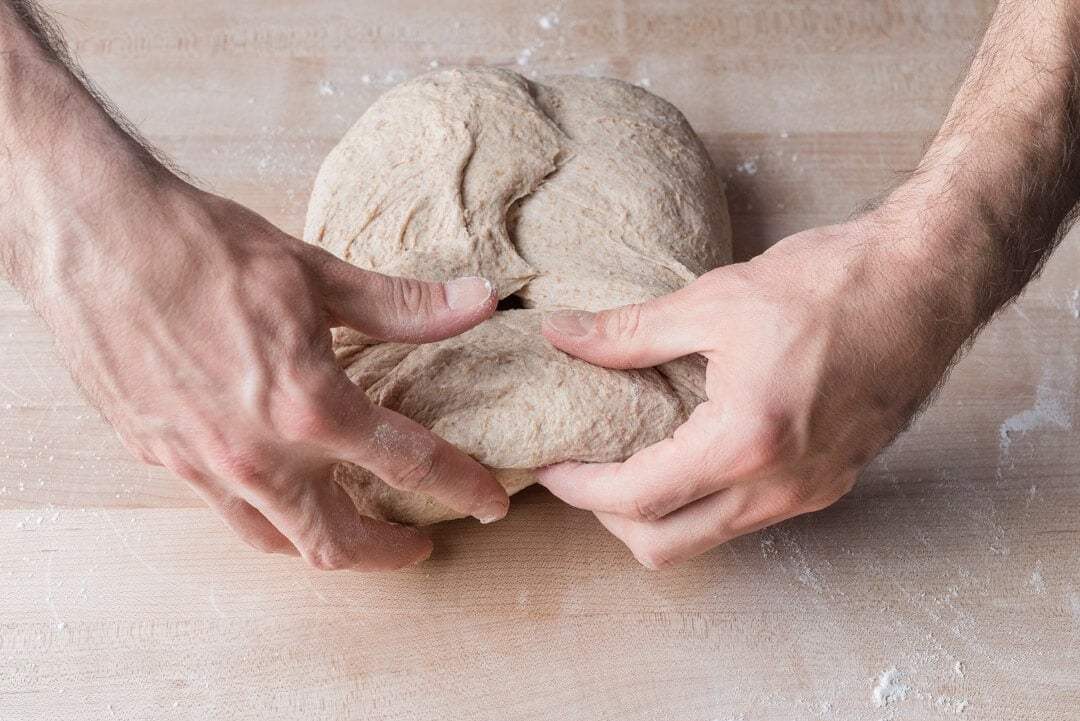
6. Divide & Preshape – 6:30 p.m.
At the end of bulk fermentation, the dough will look slightly wet and be sticky to the touch, but it will be well risen and smoother than right after mixing (see the picture, below). Dump the dough from the bulk container to an un-floured work surface. Because this recipe only makes a single, large loaf, there is no need to divide the dough. Gently turn it on the bench with your hand and a bench knife to coerce it into a round.
Let the dough rest for 30 minutes, uncovered. Keep an eye on the dough. If it starts to spread quickly into a thin pancake, skip the remaining resting time and proceed directly to shaping.
7. Shape – 7:00 p.m.
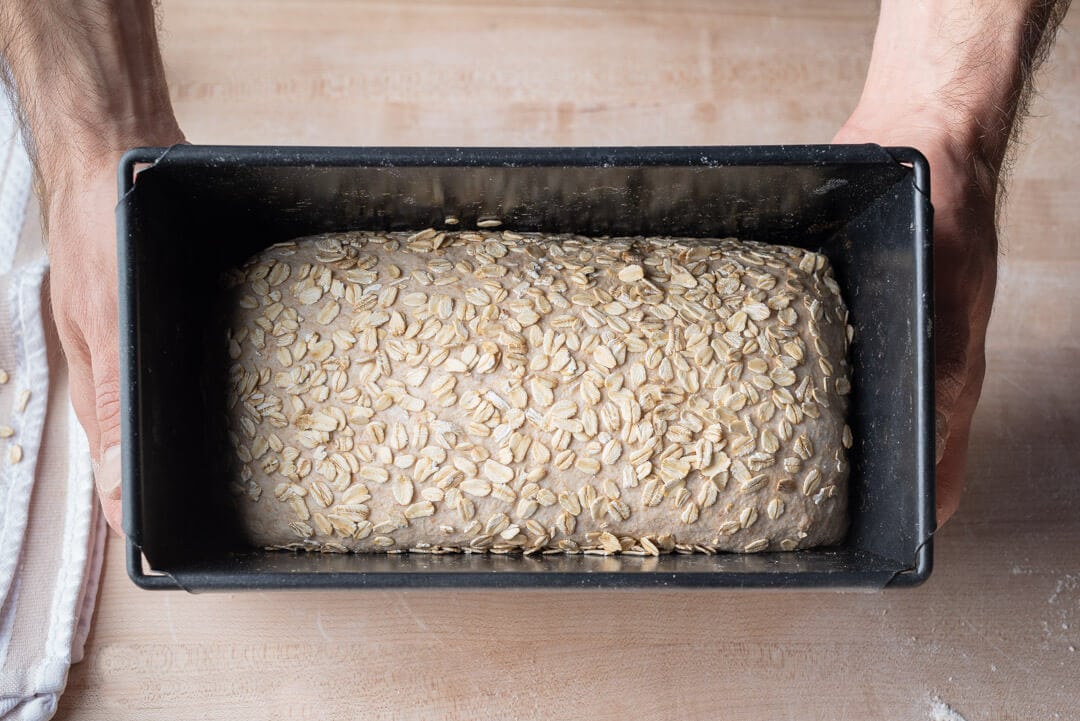
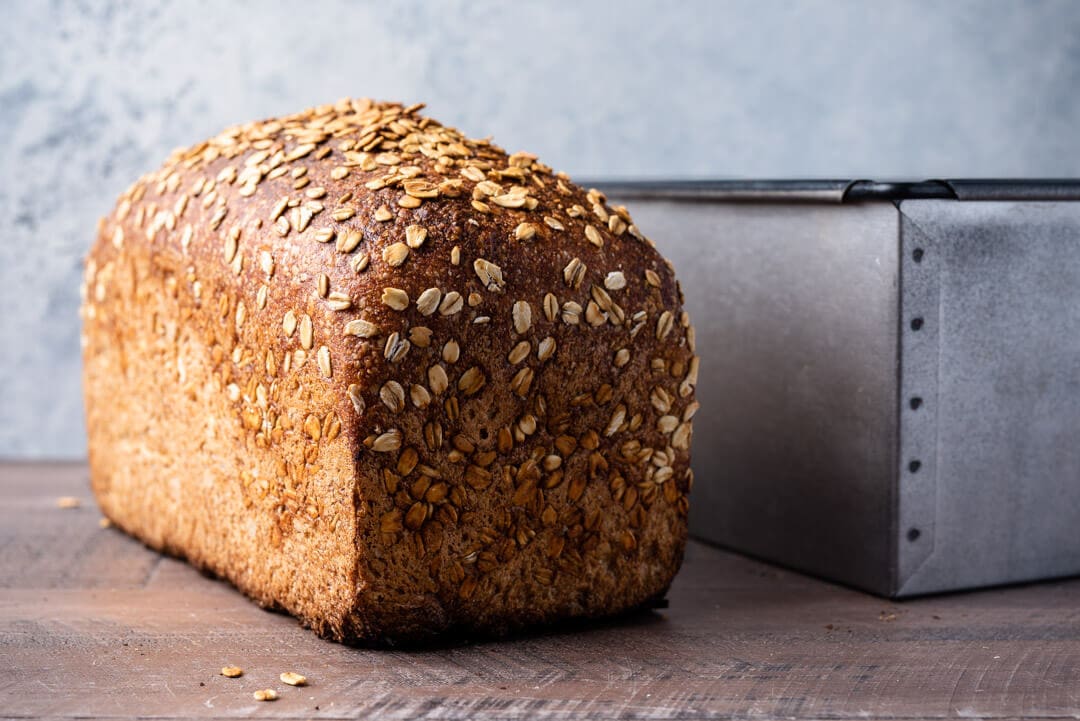
For this recipe, I’m using Campbell’s Bread Pan, which results in bread with beautifully straight sides, a tall rise, and a golden crust. If you don’t have this pan, you can divide the recipe in half and bake each in a Pullman pan or other standard loaf pan.
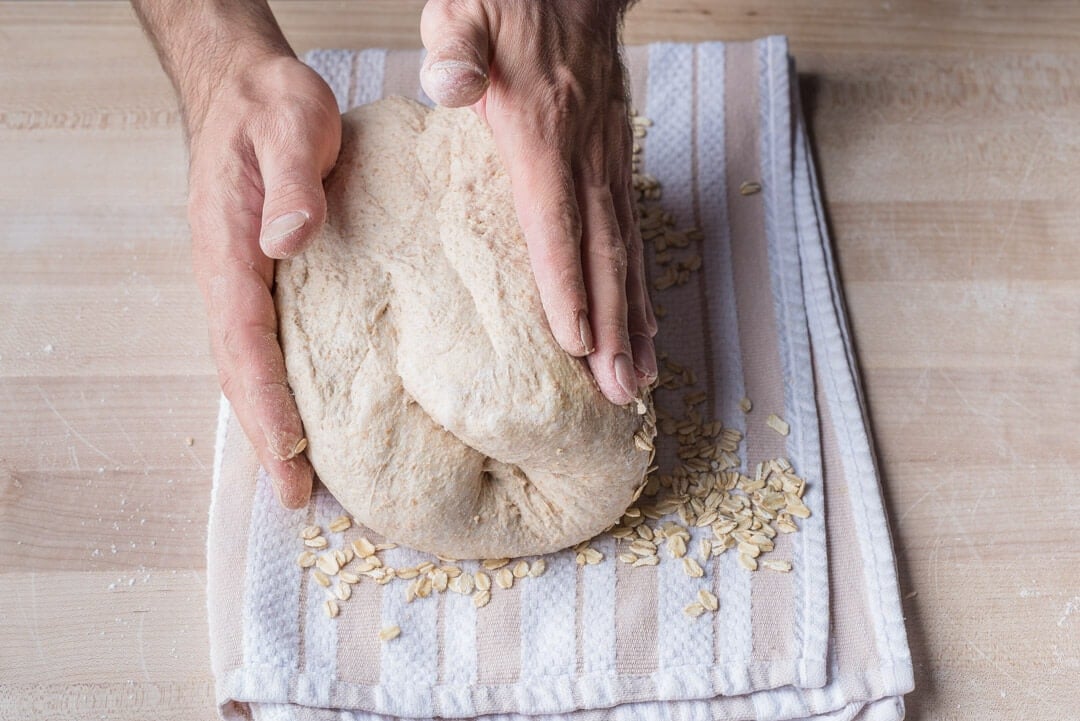
I love topping these loaves with raw, rolled oats: they crisp up in the oven and provide little bursts of toasted nut flavor when eating each slice. Lay a kitchen towel out next to your work area and spread a thin layer of thick rolled oats on top.
Lightly flour the top of your rested, and relaxed, dough round on the work surface. Using a bench knife and your hand, flip the round over. Fold the bottom up to the middle. Then fold each side, left and right, over to the other to form what looks like an open envelope in front of you. Then, grab the top and fold it up and down to just above the middle. Using both hands, grab the new top and gently roll it down into a long tube (imagine rolling down a beach towel or yoga mat).
Using your bench knife and a floured hand, scoop up the shaped tube and invert it onto the towel with oats (the seam will be facing up, see below). Grab the tube with each hand and gently rock it back and forth, so the oats stick to the outside.
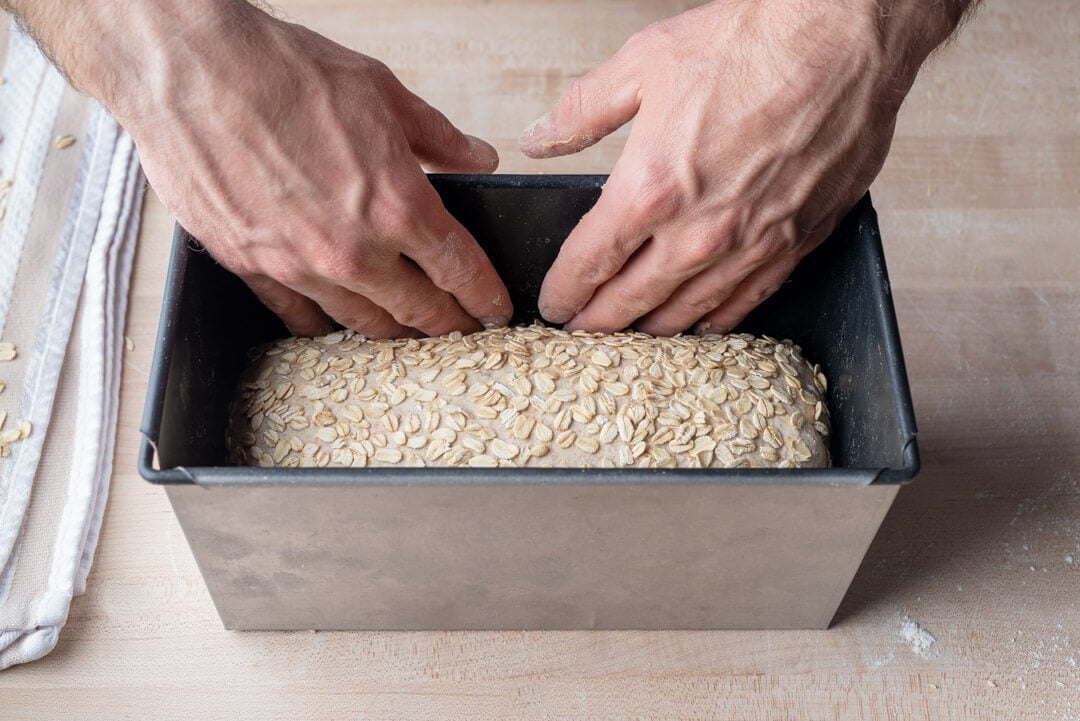
Finally, transfer the tube of dough to the pan. At this point you should be able to just drop in the dough, but if you have trouble don’t fret. Once you drop it in use your fingers to tuck the dough down at the sides. You want a smooth top on the dough when it’s in the pan so it rises uniformly.For more information on shaping, proofing, and scoring pan loaves check out my guide to shaping pan loaves.
8. Proof – 7:30 p.m. to 8:30 a.m. (the next day)
Cover the pan in an airtight reusable plastic bag and place it into the fridge overnight.
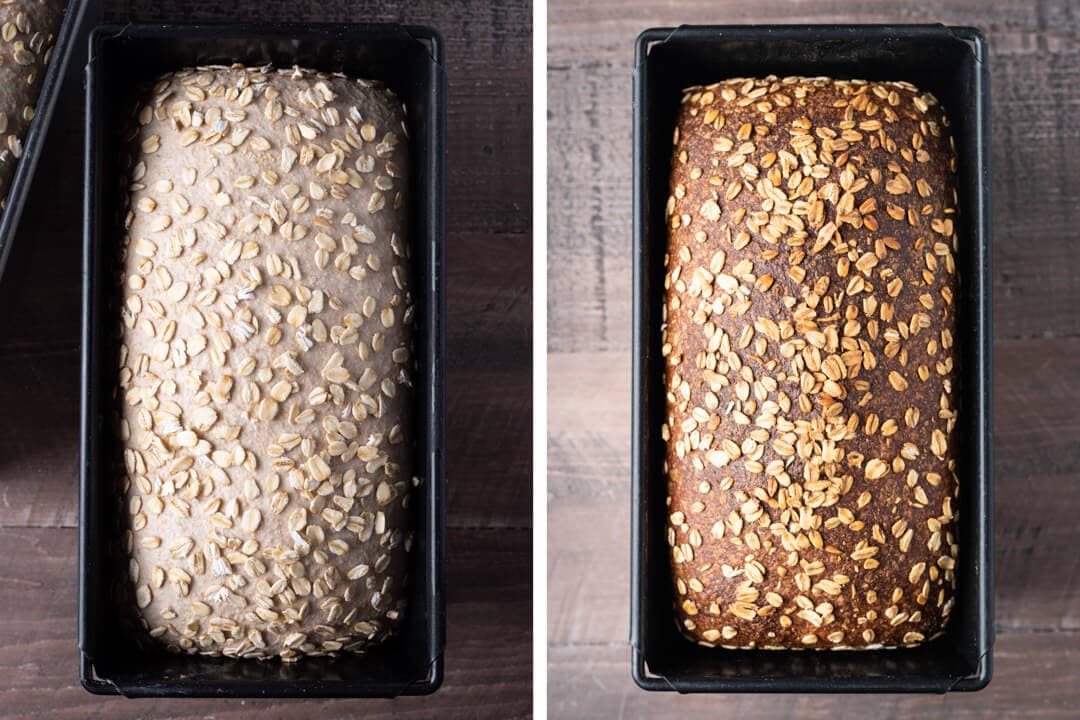
9. Bake – Preheat oven at 7:45 a.m., Bake at 8:30 a.m.
Preheat your empty oven to 450°F (230°C). There’s no need for baking stones since the dough is in a pan.
I steamed my oven in my usual way, with one deviation: I didn’t use the pan with lava rocks because there was plenty of steam with only the soaked & rolled towels. See my post on how to steam your home oven for more details.
At the end of the bake, return the loaf to the oven without the pan to fully color the exterior.
Once you’ve preheated the oven, place the pan with soaked towels and the pan with your dough inside. Bake for 30 minutes. After 30 minutes, turn the oven down to 425°F (220°C), remove the steaming towels, rotate the pan 180°, and bake for 25 minutes. After this time the top should be well colored, remove the pan from the oven using oven-safe mitts. Carefully remove the loaf from the pan and return the loaf to the oven to bake for an additional 15-20 minutes at 425°F (220°C). I like to do this final bake outside of the pan to add more color to the exterior. If you find the top of the loaf starts to darken too much, tip it to the side and bake until your liking.
It’s essential with a high hydration pan bread that the loaf is fully baked out. Otherwise, you’ll have a gummy result. The outside should be colored a dark mahogany, and the interior temperature should read around 210°F (99°C). Finally, let this bread rest at least a few hours, possibly even overnight depending on when you baked, to ensure the interior is fully set.
Conclusion
With whole grain wheat and spelt pan bread like this, it’s pretty hard to justify buying anything in a plastic bag at the market. Aside from the extra time needed to mill the grain, this is a relatively straightforward formula that you could work into a weekly routine without issue. I’d venture to say pan bread might be some of the most baked around here—everyone needs good old fashioned toast, right?
Crust
Thin and crunchy. This crust is not what you’d find from bagged sandwich bread: it has some bite to it, but it’s not overly harsh or hard. To me, it’s just right. The oats add unexpected crunch and little pockets of toasted oat flavor, a nutritious addition that isn’t necessary, but welcome.
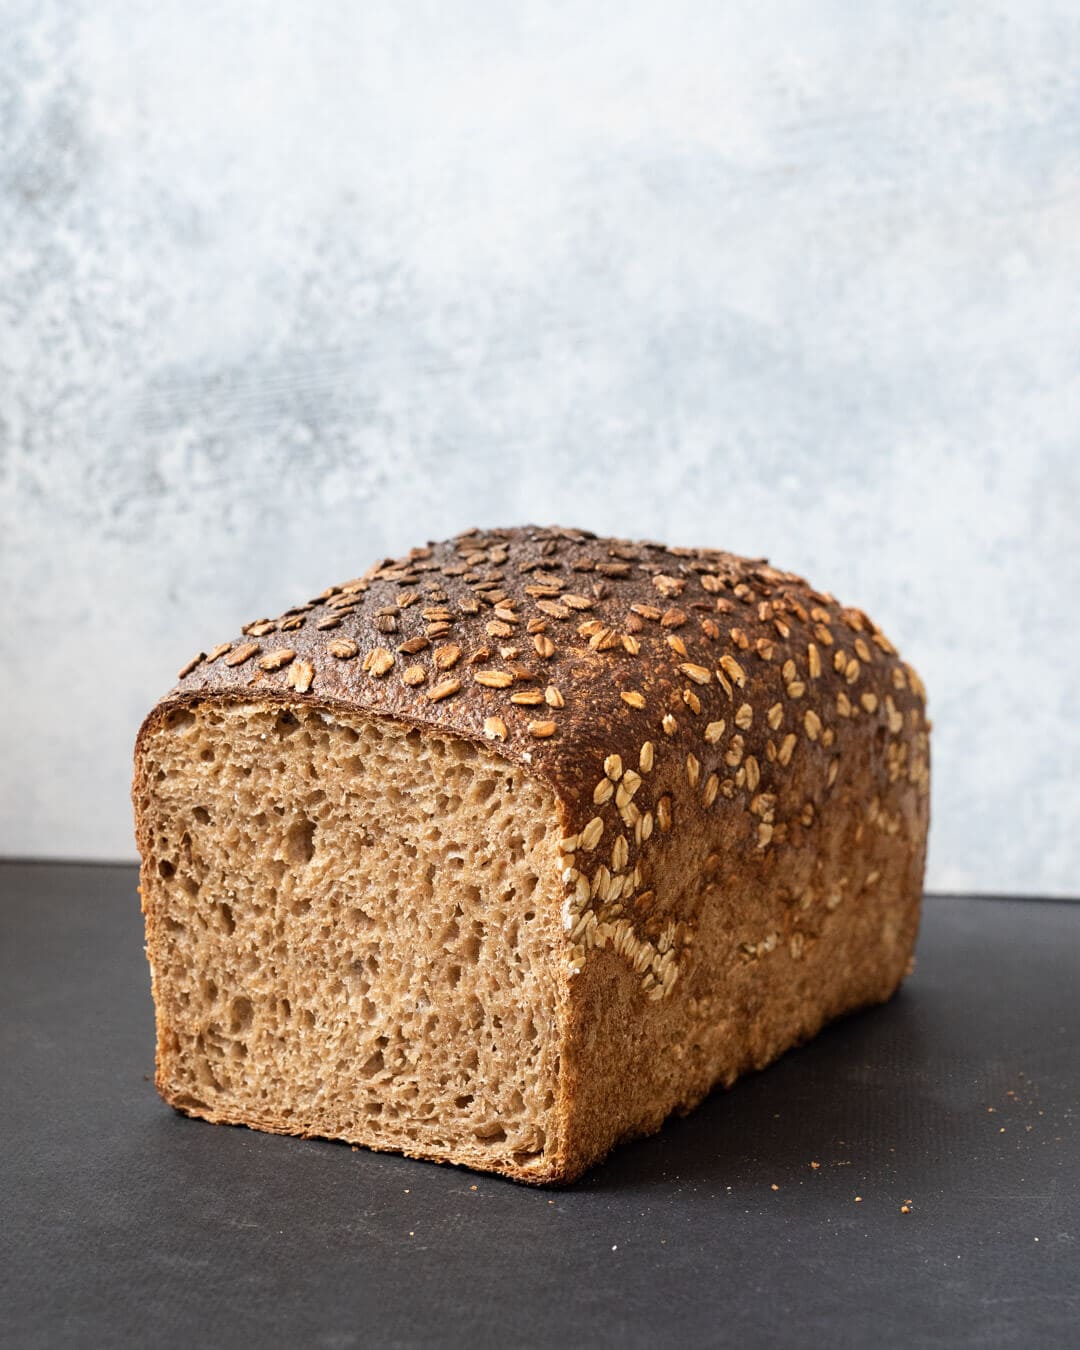
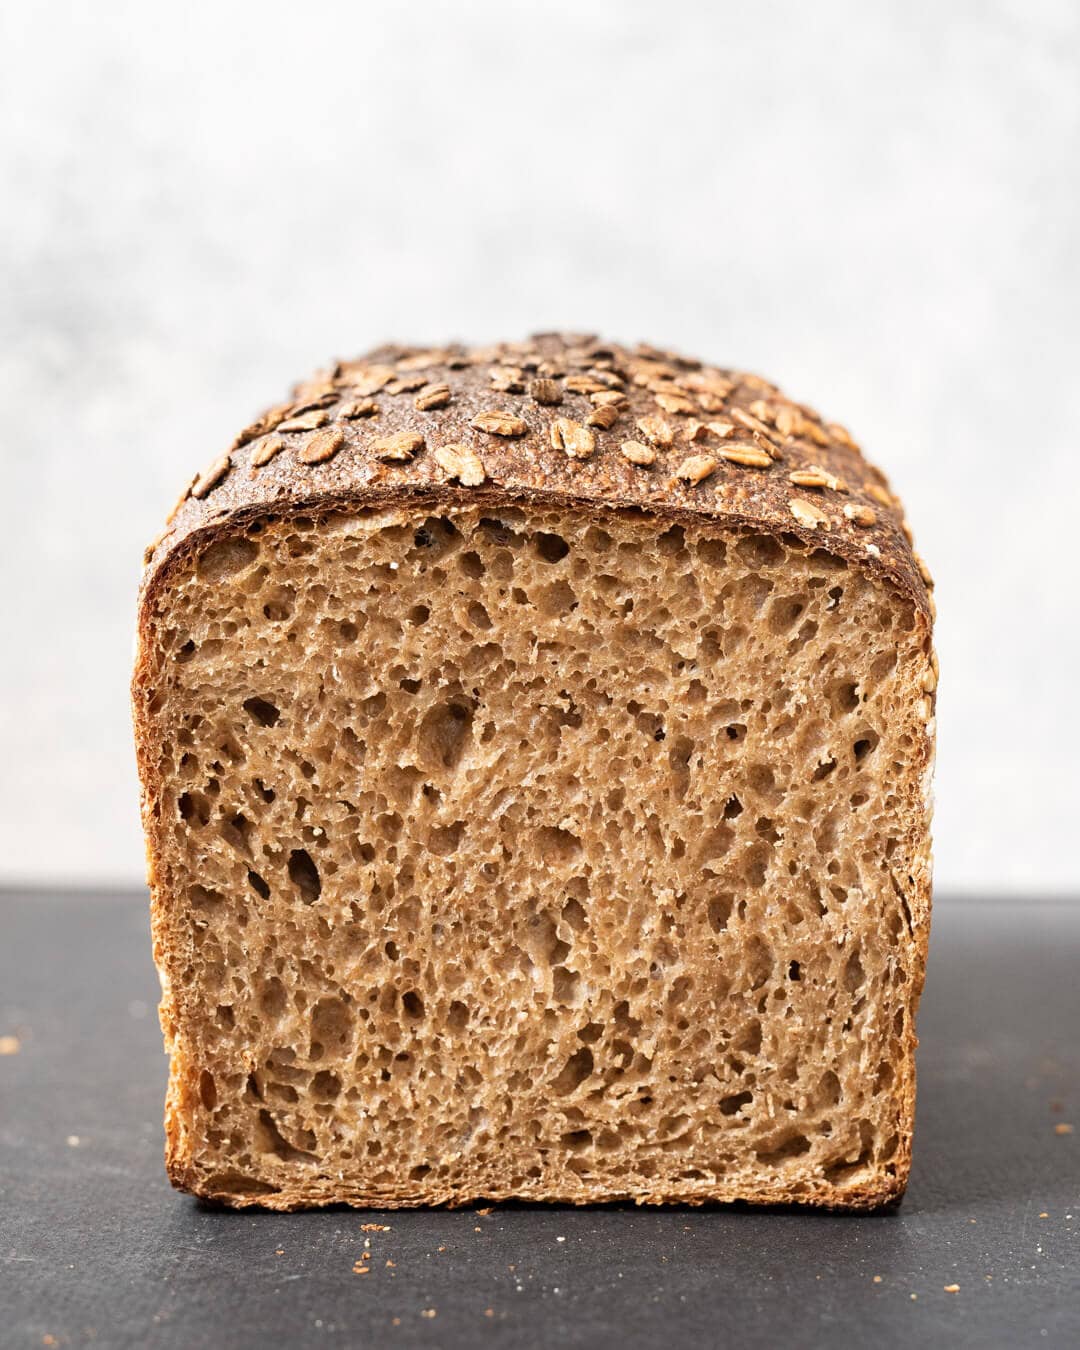
Crumb
A magnificent interior for 100% fresh milled whole grain. The high hydration helps here but so does a gentle and effective final shape. It can be a challenge to retain the open structure of this dough when first topping with oats and then finally into the pan. But, as long as you get it into the tin, this bread always bakes up nice.
With bread like this, I’m not looking for a super open interior, we need support for butter and jam, right?
Taste
There’s a subtle note of sourness in this bread that’s typical of most naturally leavened bread, but it’s so subtle it just adds depth of flavor. If you find yours is sour focus on your starter maintenance: feed it regularly and perhaps next time use it a bit sooner. Additionally, you could also try making the levain with half white flour and half whole wheat, to make things even milder.
The mild flavor of white wheat and pronounced spelt are in just the right balance with this whole-grain wheat and spelt pan bread. You can tell it’s whole grain, but it’s not overwhelming. It brings wonderful flavor to sandwiches and toast rather than just performing the backseat task of delivering other ingredients.
Whole Grain Wheat and Spelt Pan Bread Troubleshooting
Why is the inside of my bread gummy?
As I mentioned in the Bake section above, this loaf must be fully baked. If you have an instant-read thermometer, ensure the interior registers at least 205°F (96°C) before removing it from the oven. If you find it’s burning before reaching this temperature, you might want to try reducing the heat to allow for a longer bake.
It’s also possible your dough is under proofed, which can lead to a dense and gummy interior. Make sure you do a complete bulk fermentation and final proof.u003cbru003eFinally, try to wait at least several hours, preferably overnight, before slicing this loaf. Due to the high water content, cutting too early can result in gummy slices.
Why is my crust thicker than yours in the photos?
If the crust is too thick, reduce the bake time when the loaf is returned to the oven without the pan. Additionally, you could try steaming the oven a bit more or spritzing the top of the loaf with water just as you load it into the oven.
Maurizio Leo is the creator of the independent sourdough baking website The Perfect Loaf. His cookbook, The Perfect Loaf — The Craft and Science of Sourdough Breads, Sweets, and More, is a James Beard Award-winner and a New York Times bestseller. He lives in Albuquerque, NM, with his wife and two sons, where he's been baking sourdough for over a decade. He's been labeled "Bob Ross but for bread."
Do sourdough posts like this help you in your baking? Join The Baker’s Corner for only $60 a year, and get:
Come chat with me and other bakers and get baking help
Remove all ads on website
Get my bakers tools & discounts
Get the full recipe archive in editable spreadsheets
Great post. I made this, followed the recipe as close I could. My flour was 70% fresh milled Hard Red (all I have), 30% spelt (flour from grocery store). I scaled the recipe to 1800g total, split between two standard loaf pans.
The end result was very flavorful and moist, without being gummy. However, both loaves had a massive peak/rupture near the middle, and were more shaped like mountains. They were quite dense and a closed, but even, crumb. Almost like a Rugbrød.
Any immediate thoughts what this could be (I put on Instagram)? I baked them cold from the fridge, and the finger poke test certainly had bounce back. My oven steaming was via ice. This was my first ever bread with my new Mockmill 100, however, and I’m looking forward to many more.
Nice adjustments, Dustin. I like to do 900g in my 9x4x4 Pullman pans, perfect. My gut take would be they’re likely under proofed. I just replied to @samuelkimerling:disqus, above, and he had the same issue with the hump in the middle. That’s almost always a case for under proofed dough!
You might have to give the dough a little additional time in bulk fermentation. Just judge it based on how the dough is progressing, leaving it until it looks like the photos I show in the recipe and the description I give in the writeup. It’ll work well!
Do you think this would work with using a portion of the whole wheat and hydration as pre-cooked flour? My kids just go crazy for the soft interior of the Yudane bread.
Andra—yes, it certainly would. You’d have to calculate how much water & flour to move from the main dough to the pre-cooked roux, I tend to stick around 5-8% or so (as I talk about on my tangzhong guide ).
Coincidentally I just baked some bread using tangzhong again; recipe coming here in the next week or so 🙂
I used the technique of spraying my loaf pan with canned spray oil then adding a long sheet of parchment paper on top of the oil with large wings of paper hanging out for easy lifting and removal. Worked perfectly.
i’ve tried this bread today and it looked good till the moment of dumping it out of the pan. it completely stucked to the pan to the sides and the bottom! any ideas?
Ah, bummer! I’d say if you’re getting serious sticking issues, try using parchment paper to line the pan to help removal. Oiling or buttering it will also work well!
Hello! Can’t wait to try this recipe, milling flour with my MockMill 100, which I LOVE!!! When using the Weck jar for your starter and levain, do you seal the lid on at all? Thank you in advance!
Hi. I’m new to sourdough and finally have what I think is a reliable and strong starter. I’m hoping to bake a cinnamon raisin pan loaf for my dad (the store has been sold out and it’s his favorite snack) and am wondering which of your pan loaf recipes would be the best fit. This one or maybe the pan de mie? Thank you!
You state that you don’t feel the need to autolyse this dough due to the amount of freshly milled flour used. I only have access to store bought flours as of now. In that case, would you suggest giving the dough an autolyse after all?
Hi Maurizio! I love your website and recipes. I have made this one numerous times, a few in a bread tin and a few in a cast iron dutch oven. I love the taste and am using all freshly milled wheat/spelt, as called for in recipe. My issue is that I am not getting the rise I want. I get large pockets of air in a loaf (too large in my opinion) without a nice even rise. Any advice on why this could be and what I could try? Thank you!!
I am fairly new to bread baking (this is my 5th bread bake) and I think this may be my first total failure. Maybe you can help me learn a little more through this. The big changes I made was the use of store-bought flour (not fresh milled) – a whole white wheat and whole grain spelt – and I autolysed the flour when I put the levain together (I figured whole grain, why not autolyse?). I kept waiting for the dough to set up, but it never did. It remained soupy despite an additional set of folds during bulk and when I shaped. I only used about half of the reserved 100 grams of water. Do you think it was because my store bought flour wasn’t able to handle near as much water? Did the autolyse break down the gluten? Is the amount of gluten in white wheats highly variable?
I am thinking of making a loaf today and I want to try your recipe. My sourdough starter is 50% hydration at the moment and I am thinking to jump in and try it as it is. I am thinking to start mixing a couple hours sooner so the starter is just three hours old. I might need to reduce the amount of water added. I don’t know if you’ll see this but I am wondering if my reasoning is correct. Or is there any thing else I should take into consideration?
If your starter is 50% hydration you just might need to add a bit of water when making the levain. I would mix up the levain with whatever hydration you typically keep for your starter. Alternatively, just use a part of your stiff starter directly in the dough mix (using it as a levain) when it’s nice and mature. Either way will work well!
No worries. I also keep a 100% hydration starter, so you should be right on track here to make the stiff levain with that as I did. However, if you’d like to skip making a levain you could also do this, just reduce the hydration of the dough mix a bit to compensate for the extra water in the preferment.
My recommendation for this bread is to make the levain, though.
Either way, happy baking!
Hello Maurizio. Physical Isolation is pushing me to try new breads, so there’s a silver lining. I’m about to make my first loaf bread! I’m wondering if its possible to substitute amaranth or kamut flour for spelt and if I’d need to make any adjustments or if it would be an even swap? I’ve never used either of these but have had some in my pantry for a long time now. Thanks!
I know the feeling, I think we’re all challenging ourselves in the kitchen because of this — a chance to grow, a chance to learn. I would say with Kamut, yes, but amaranth I’d be hesitant to go all in with a high percentage without testing things first. I’d likely start at 5% amaranth and then work up as desired. Kamut is a familiar grain for me and I’m confident using it just as with spelt, I wouldn’t hesitate to use a higher percentage. As always, though, the hydration will need adjustment so be mindful.
Thank you so much for the swift reply! You are always so generous with your time and sharing your knowledge with us! Truly appreciate it. Take good care!
I have been baking your basic sourdough since September (with fantastic results!) and decided to try your White/wheat and spelt loaf bread. It is a beautiful color (have not cut into it yet) but I got a split down the length of the loaf. I noticed you did not use a lame to score this loaf, but looks like maybe I should have? Any suggestions why my loaf split? Thanks Eeek! I also could not get the loaf out of the pan for the last 20 minutes of baking!
Usually a large split is because of under proofed dough. A score might have helped, but I’d say give it a bit more time (maybe 30 minutes to 1 hr) in proof and see if that helps!
When I made this bread last year I gave it 5 out of 5 stars. Last week my starter was healthy, doubling in size every 12 hours at 72f. Faithfully following directions the dough seemed to come together nicely. I was able to use all but 25g of the extra 100g initially held back. though the 3rd stretch and fold during balk fermentation, at 80f, I was feeling quite confident.when I came back 2 hours later the dough had not risen. Emptying it onto the counter it almost soupy, as if it had suddenly become ultra hydrated, or the gluten had broken down. Any ideas? Thanks
That’s interesting. I’m wondering if there was an issue with the flour you’re using. Assuming everything was going well for the first part of bulk fermentation (it was starting to rise, strengthening, smoothing out), it almost sounds like something I’ve been discussing with another baker recently, a form of gluten breakdown as you suggested. While I’ve not actually encountered this myself, it’s possible as the acidity builds in the dough protease activity is increased which accelerates the breakdown of gluten. This could be due to your flour, an over-acidic starter/levain, or some combination of both. If you’re using a new batch of flour, you might want to try substituting that out for another bag you have in the pantry, just to see if it happens again (try to keep everything else as consistent as possible). It sounds like you’re maintaining your starter well, but be sure to not let it sit in an overly-acidic state for too long, feed it when it’s ready.
Let me know how it goes. I know issues like this are frustrating and I hope my suggestions help, it may not fix your issue but we’ll track it down!
Turned out better this time.Interestingly it had not risen at all at the end out the bulk fermentation. Put it in the frig over night then let it sit out on counter for 4 hours. by then it did rise. Mine split open while yours did not. Maybe my yeast was overly active, or I put it in the oven too early?/Users/hallkern/Desktop/IMG_5010.jpeg
Not shore how to add photo.
That’s great! Yes, if you got a split it’s likely because the dough needed a bit more fermentation. It can be hard to judge these pan loaves, but I like to push them until the top is very, very soft and showing signs of full fermentation!
Thank you so much for this recipe, it’s become my staple sourdough recipe and I bake 4 loaves a month. My question is, can I store the dough in the fridge for longer than 12 hours? I.e. Can I make a double or triple batch and store it in the fridge for several days and pull off small amounts of dough to bake fresh each time I want bread? Thanks!
Super awesome to hear that, Tosin! You could certainly push the proof time, just know that the longer you leave it in the fridge the more sour the flavor (generally) and the more squat the loaf (less oven spring due to gluten breakdown over time). I’d say try pushing it one more day and see how it bakes up: you might be happy with the added sourness and more tender interior. Hope that helps!
Hello! Love love love your website! It has helped me so much! I made this loaf and the crust was so thick and hard, so I’m going to try steaming longer like you suggest, but I want to half the recipe since it’s such a huge loaf. How do you suggest adjusting the baking with a small loaf? Should I reduce the temperature or the time? Or both? Thank you so much for all the research and effort you put into this website. You’ve taught me so much!
Hey, Elise! I’d likely reduce the total duration of the bake. The best advice I can give with pan loaves and baking, though, is to use a thermometer to determine when the loaf is fully baked. There’s nothing worse than cutting into one and finding a gummy interior! Test the interior temp and ensure it’s over 208F, then pull it from the oven. Let me know how it goes and happy baking!
I made this one again recently (Whole Grain Wheat and Spelt Pan Bread) but it didn’t rise at all during the bulk fermentation and hoping that you have some suggestions to understand why. It did rise some in the pans while proofing in the frig and baked up with a nice oven spring to a total height of 3 1/2″ tall in a standard 8 1/2″ x 4 1/2″ x 2 1/2″ loaf pan. However, it didn’t rise at all during the fermentation stage with not much bubbles showing through the clear, square container and the surface was smooth (no bubbles on top). This fermentation started in an 77-80 degree F oven. After about 2 hr 30 minutes, I cranked it up to 83 degree F. Finally after 4 hr 30 min total fermentation time, no rise and other plans, I moved on the shape and proof.
A little more background…the levain started with a mature starter (AP flour — HEB organic — with a little rye — Bob’s Red Mill organic dark, 100% hydration) that was nicely bubbly. The levain more than doubled and domed nicely after 5 hours and went to mix.
The wheat was KAF white whole wheat. Spelt was One Degree Organic, sprouted.
The formula was converted to 75% hydration and 8 1/2″ x 4 1/2″ loaf pan, enough for 2 loaves for a total 2154g dough weight.
Still tastes wonderful.
Any thoughts on why there wasn’t any rise at all during the extended fermentation while it seemed to rise nicely in the oven?
That’s definitely strange. It sounds like temperatures, hydration, and starter strength were all there. I’ve sometimes seen issues when using sprouted flour so I’m wondering if the flour lacked sufficient/proper gluten to allow the dough to rise as much as you’d expect. I might try this recipe again and swap out the sprouted flour for something else (whole grain spelt, or whole grain whole wheat would work) and see how the dough responds. Really hard to say!
I have the coated one, it makes removal easier as it’s nonstick. If you get the uncoated, you’ll have to grease the pan (oil or butter or parchment paper)—either way works!
Hi. To grease or not to grease? I made the pan bread recipe, but was wondering if I should have greased the pan. It stuck so completely that I had to pry the loaf out of the pan, which of course ruined the bread. I used a USA Pullman pan minus the top. Thoughts?
It sounds like you definitely need a little grease on your pan. I’ll update this post to indicate it’s a good idea if you’re not sure if your dough will release cleanly! I believe the pans I use have a nonstick surface. Sorry about that!
Had the same thing happen to me this morning. Wish I’d greased the pan, however, I’m intrigued by your custom pan. Did you order yours with a specific angle to the walls? I’ll check out the link you added in an earlier comment.
This looks like such a glorious loaf! I’m not new to baking or sourdough, but I’m just getting back into it and taking it more seriously, thanks in part to your website. (I essentially took a maternity leave from baking — my sourdough didn’t survive my second pregnancy and newborn months!) I just finished making a new starter according to your instructions and I’m so thrilled to see it come to life. This recipe is high on my list of first things to make with it. Anyway, I do have a question after all that intro. This seems to be an artisan loaf in a pan, in a manner of speaking — with the high temp, steaming, and crunchy crust. That sounds awesome, but is it also an option to do a more plain, American country-style bake, something like 350 for 45 minutes with no steam? That would be more manageable for me to make every week or more as my family’s bread supply. Perhaps in that case I should take it out of the fridge and let it rise a bit more in the pan? I would love to hear your thoughts. I’ve been hunting a long time for the perfect 100% whole wheat bread recipe and your pictures are the best I’ve seen anywhere.
If you have two of the same or very similar pans, you can place second one as a lid. It would trap the steam in similar way dutch oven does. You can even preheat the top pan with the oven. No additional steaming is required this way, maybe only spritz the bread lightly with water just before placing it in the oven. However, if the pans are the same, they have the tendency to slide, so I make kind of bumpers using aluminium foil to prevent that. After 30 minutes just remove the top pan from the oven and that’s it. This method really simplified baking of pan loaves for me.


159 Comments
Great post. I made this, followed the recipe as close I could. My flour was 70% fresh milled Hard Red (all I have), 30% spelt (flour from grocery store). I scaled the recipe to 1800g total, split between two standard loaf pans.
The end result was very flavorful and moist, without being gummy. However, both loaves had a massive peak/rupture near the middle, and were more shaped like mountains. They were quite dense and a closed, but even, crumb. Almost like a Rugbrød.
Any immediate thoughts what this could be (I put on Instagram)? I baked them cold from the fridge, and the finger poke test certainly had bounce back. My oven steaming was via ice. This was my first ever bread with my new Mockmill 100, however, and I’m looking forward to many more.
Nice adjustments, Dustin. I like to do 900g in my 9x4x4 Pullman pans, perfect. My gut take would be they’re likely under proofed. I just replied to @samuelkimerling:disqus, above, and he had the same issue with the hump in the middle. That’s almost always a case for under proofed dough!
Great, thanks for the follow-up. I’ll try again relatively soon and really push the fermentation and proof.
Hi Maurizio, what adjustments would i have to make to the recipe (if any) if i were to use store bought and not freshly milled flour?
You might have to give the dough a little additional time in bulk fermentation. Just judge it based on how the dough is progressing, leaving it until it looks like the photos I show in the recipe and the description I give in the writeup. It’ll work well!
Do you think this would work with using a portion of the whole wheat and hydration as pre-cooked flour? My kids just go crazy for the soft interior of the Yudane bread.
Andra—yes, it certainly would. You’d have to calculate how much water & flour to move from the main dough to the pre-cooked roux, I tend to stick around 5-8% or so (as I talk about on my tangzhong guide ).
Coincidentally I just baked some bread using tangzhong again; recipe coming here in the next week or so 🙂
May I know what loaf pan is this? It looks different from the USA Pan. I mean, the color is darker inside.
It’s a non-stick pan from Rackmaster UK.
I used the technique of spraying my loaf pan with canned spray oil then adding a long sheet of parchment paper on top of the oil with large wings of paper hanging out for easy lifting and removal. Worked perfectly.
Yes, that will work very well! I do the “sling” method as well, especially with quick breads like my sourdough banana bread. Thanks for the tips, Jan!
Thanks for the comments, Brian! I’ll work on more videos soon!
Do you buy/have an airtight container for every single one of your different types of flour?
Do you have/buy an air tight container for each one of your different flours?
I do! I use the Oxo ones listed on my baking tools page. I’m an organized person 🙂
i’ve tried this bread today and it looked good till the moment of dumping it out of the pan. it completely stucked to the pan to the sides and the bottom! any ideas?
Ah, bummer! I’d say if you’re getting serious sticking issues, try using parchment paper to line the pan to help removal. Oiling or buttering it will also work well!
Hello! Can’t wait to try this recipe, milling flour with my MockMill 100, which I LOVE!!! When using the Weck jar for your starter and levain, do you seal the lid on at all? Thank you in advance!
Awesome, Rebecca! Working with freshly milled flour is a new avenue for flavor and nutrition. I do not seal the lid, I just rest the glass lid on top.
Hi. I’m new to sourdough and finally have what I think is a reliable and strong starter. I’m hoping to bake a cinnamon raisin pan loaf for my dad (the store has been sold out and it’s his favorite snack) and am wondering which of your pan loaf recipes would be the best fit. This one or maybe the pan de mie? Thank you!
Yes, I would use my pain de mie recipe and roll in a cinnamon filling—sounds awesome to me!
You state that you don’t feel the need to autolyse this dough due to the amount of freshly milled flour used. I only have access to store bought flours as of now. In that case, would you suggest giving the dough an autolyse after all?
You could if you’d like, but not necessary.
My slightly Bread never grows as high as yours. Could I add a little yeast, or is that negating the health?
Hi Maurizio! I love your website and recipes. I have made this one numerous times, a few in a bread tin and a few in a cast iron dutch oven. I love the taste and am using all freshly milled wheat/spelt, as called for in recipe. My issue is that I am not getting the rise I want. I get large pockets of air in a loaf (too large in my opinion) without a nice even rise. Any advice on why this could be and what I could try? Thank you!!
I am fairly new to bread baking (this is my 5th bread bake) and I think this may be my first total failure. Maybe you can help me learn a little more through this. The big changes I made was the use of store-bought flour (not fresh milled) – a whole white wheat and whole grain spelt – and I autolysed the flour when I put the levain together (I figured whole grain, why not autolyse?). I kept waiting for the dough to set up, but it never did. It remained soupy despite an additional set of folds during bulk and when I shaped. I only used about half of the reserved 100 grams of water. Do you think it was because my store bought flour wasn’t able to handle near as much water? Did the autolyse break down the gluten? Is the amount of gluten in white wheats highly variable?
I am thinking of making a loaf today and I want to try your recipe. My sourdough starter is 50% hydration at the moment and I am thinking to jump in and try it as it is. I am thinking to start mixing a couple hours sooner so the starter is just three hours old. I might need to reduce the amount of water added. I don’t know if you’ll see this but I am wondering if my reasoning is correct. Or is there any thing else I should take into consideration?
If your starter is 50% hydration you just might need to add a bit of water when making the levain. I would mix up the levain with whatever hydration you typically keep for your starter. Alternatively, just use a part of your stiff starter directly in the dough mix (using it as a levain) when it’s nice and mature. Either way will work well!
Oh man, I goofed up that question. I do a 100% hydration starter, not 50%!! I don’t know where my brain went today.
No worries. I also keep a 100% hydration starter, so you should be right on track here to make the stiff levain with that as I did. However, if you’d like to skip making a levain you could also do this, just reduce the hydration of the dough mix a bit to compensate for the extra water in the preferment.
My recommendation for this bread is to make the levain, though.
Either way, happy baking!
Hello Maurizio. Physical Isolation is pushing me to try new breads, so there’s a silver lining. I’m about to make my first loaf bread! I’m wondering if its possible to substitute amaranth or kamut flour for spelt and if I’d need to make any adjustments or if it would be an even swap? I’ve never used either of these but have had some in my pantry for a long time now. Thanks!
I know the feeling, I think we’re all challenging ourselves in the kitchen because of this — a chance to grow, a chance to learn. I would say with Kamut, yes, but amaranth I’d be hesitant to go all in with a high percentage without testing things first. I’d likely start at 5% amaranth and then work up as desired. Kamut is a familiar grain for me and I’m confident using it just as with spelt, I wouldn’t hesitate to use a higher percentage. As always, though, the hydration will need adjustment so be mindful.
Wishing you good health, Greg, and happy baking.
Thank you so much for the swift reply! You are always so generous with your time and sharing your knowledge with us! Truly appreciate it. Take good care!
I have been baking your basic sourdough since September (with fantastic results!) and decided to try your White/wheat and spelt loaf bread. It is a beautiful color (have not cut into it yet) but I got a split down the length of the loaf. I noticed you did not use a lame to score this loaf, but looks like maybe I should have? Any suggestions why my loaf split? Thanks Eeek! I also could not get the loaf out of the pan for the last 20 minutes of baking!
My loaf did the same thing, so I’m interested to know as well 🙂
Replied above!
Usually a large split is because of under proofed dough. A score might have helped, but I’d say give it a bit more time (maybe 30 minutes to 1 hr) in proof and see if that helps!
When I made this bread last year I gave it 5 out of 5 stars. Last week my starter was healthy, doubling in size every 12 hours at 72f. Faithfully following directions the dough seemed to come together nicely. I was able to use all but 25g of the extra 100g initially held back. though the 3rd stretch and fold during balk fermentation, at 80f, I was feeling quite confident.when I came back 2 hours later the dough had not risen. Emptying it onto the counter it almost soupy, as if it had suddenly become ultra hydrated, or the gluten had broken down. Any ideas? Thanks
That’s interesting. I’m wondering if there was an issue with the flour you’re using. Assuming everything was going well for the first part of bulk fermentation (it was starting to rise, strengthening, smoothing out), it almost sounds like something I’ve been discussing with another baker recently, a form of gluten breakdown as you suggested. While I’ve not actually encountered this myself, it’s possible as the acidity builds in the dough protease activity is increased which accelerates the breakdown of gluten. This could be due to your flour, an over-acidic starter/levain, or some combination of both. If you’re using a new batch of flour, you might want to try substituting that out for another bag you have in the pantry, just to see if it happens again (try to keep everything else as consistent as possible). It sounds like you’re maintaining your starter well, but be sure to not let it sit in an overly-acidic state for too long, feed it when it’s ready.
Let me know how it goes. I know issues like this are frustrating and I hope my suggestions help, it may not fix your issue but we’ll track it down!
Turned out better this time.Interestingly it had not risen at all at the end out the bulk fermentation. Put it in the frig over night then let it sit out on counter for 4 hours. by then it did rise. Mine split open while yours did not. Maybe my yeast was overly active, or I put it in the oven too early?/Users/hallkern/Desktop/IMG_5010.jpeg
Not shore how to add photo.
That’s great! Yes, if you got a split it’s likely because the dough needed a bit more fermentation. It can be hard to judge these pan loaves, but I like to push them until the top is very, very soft and showing signs of full fermentation!
Thank you so much for this recipe, it’s become my staple sourdough recipe and I bake 4 loaves a month. My question is, can I store the dough in the fridge for longer than 12 hours? I.e. Can I make a double or triple batch and store it in the fridge for several days and pull off small amounts of dough to bake fresh each time I want bread? Thanks!
Super awesome to hear that, Tosin! You could certainly push the proof time, just know that the longer you leave it in the fridge the more sour the flavor (generally) and the more squat the loaf (less oven spring due to gluten breakdown over time). I’d say try pushing it one more day and see how it bakes up: you might be happy with the added sourness and more tender interior. Hope that helps!
Hello! Love love love your website! It has helped me so much! I made this loaf and the crust was so thick and hard, so I’m going to try steaming longer like you suggest, but I want to half the recipe since it’s such a huge loaf. How do you suggest adjusting the baking with a small loaf? Should I reduce the temperature or the time? Or both? Thank you so much for all the research and effort you put into this website. You’ve taught me so much!
Hey, Elise! I’d likely reduce the total duration of the bake. The best advice I can give with pan loaves and baking, though, is to use a thermometer to determine when the loaf is fully baked. There’s nothing worse than cutting into one and finding a gummy interior! Test the interior temp and ensure it’s over 208F, then pull it from the oven. Let me know how it goes and happy baking!
Hello Maurizio,
I made this one again recently (Whole Grain Wheat and Spelt Pan Bread) but it didn’t rise at all during the bulk fermentation and hoping that you have some suggestions to understand why. It did rise some in the pans while proofing in the frig and baked up with a nice oven spring to a total height of 3 1/2″ tall in a standard 8 1/2″ x 4 1/2″ x 2 1/2″ loaf pan. However, it didn’t rise at all during the fermentation stage with not much bubbles showing through the clear, square container and the surface was smooth (no bubbles on top). This fermentation started in an 77-80 degree F oven. After about 2 hr 30 minutes, I cranked it up to 83 degree F. Finally after 4 hr 30 min total fermentation time, no rise and other plans, I moved on the shape and proof.
A little more background…the levain started with a mature starter (AP flour — HEB organic — with a little rye — Bob’s Red Mill organic dark, 100% hydration) that was nicely bubbly. The levain more than doubled and domed nicely after 5 hours and went to mix.
The wheat was KAF white whole wheat. Spelt was One Degree Organic, sprouted.
The formula was converted to 75% hydration and 8 1/2″ x 4 1/2″ loaf pan, enough for 2 loaves for a total 2154g dough weight.
Still tastes wonderful.
Any thoughts on why there wasn’t any rise at all during the extended fermentation while it seemed to rise nicely in the oven?
Cheers,
James
That’s definitely strange. It sounds like temperatures, hydration, and starter strength were all there. I’ve sometimes seen issues when using sprouted flour so I’m wondering if the flour lacked sufficient/proper gluten to allow the dough to rise as much as you’d expect. I might try this recipe again and swap out the sprouted flour for something else (whole grain spelt, or whole grain whole wheat would work) and see how the dough responds. Really hard to say!
He’s just put them online: http://www.rackmaster.co.uk/dough-knife
I reached out to them and they quoted me a coated and uncoated version. Which one did you buy? And what difference does it make? Thank you!
I have the coated one, it makes removal easier as it’s nonstick. If you get the uncoated, you’ll have to grease the pan (oil or butter or parchment paper)—either way works!
Thank you!!!
Hi. To grease or not to grease? I made the pan bread recipe, but was wondering if I should have greased the pan. It stuck so completely that I had to pry the loaf out of the pan, which of course ruined the bread. I used a USA Pullman pan minus the top. Thoughts?
It sounds like you definitely need a little grease on your pan. I’ll update this post to indicate it’s a good idea if you’re not sure if your dough will release cleanly! I believe the pans I use have a nonstick surface. Sorry about that!
Had the same thing happen to me this morning. Wish I’d greased the pan, however, I’m intrigued by your custom pan. Did you order yours with a specific angle to the walls? I’ll check out the link you added in an earlier comment.
This looks like such a glorious loaf! I’m not new to baking or sourdough, but I’m just getting back into it and taking it more seriously, thanks in part to your website. (I essentially took a maternity leave from baking — my sourdough didn’t survive my second pregnancy and newborn months!) I just finished making a new starter according to your instructions and I’m so thrilled to see it come to life. This recipe is high on my list of first things to make with it. Anyway, I do have a question after all that intro. This seems to be an artisan loaf in a pan, in a manner of speaking — with the high temp, steaming, and crunchy crust. That sounds awesome, but is it also an option to do a more plain, American country-style bake, something like 350 for 45 minutes with no steam? That would be more manageable for me to make every week or more as my family’s bread supply. Perhaps in that case I should take it out of the fridge and let it rise a bit more in the pan? I would love to hear your thoughts. I’ve been hunting a long time for the perfect 100% whole wheat bread recipe and your pictures are the best I’ve seen anywhere.
I used to bake with this recipe until I didn’t have time for all that kneading anymore. https://www.sourdoughhome.com/index.php?content=100percentwholewheat
Thank you!!
If you have two of the same or very similar pans, you can place second one as a lid. It would trap the steam in similar way dutch oven does. You can even preheat the top pan with the oven. No additional steaming is required this way, maybe only spritz the bread lightly with water just before placing it in the oven. However, if the pans are the same, they have the tendency to slide, so I make kind of bumpers using aluminium foil to prevent that. After 30 minutes just remove the top pan from the oven and that’s it. This method really simplified baking of pan loaves for me.