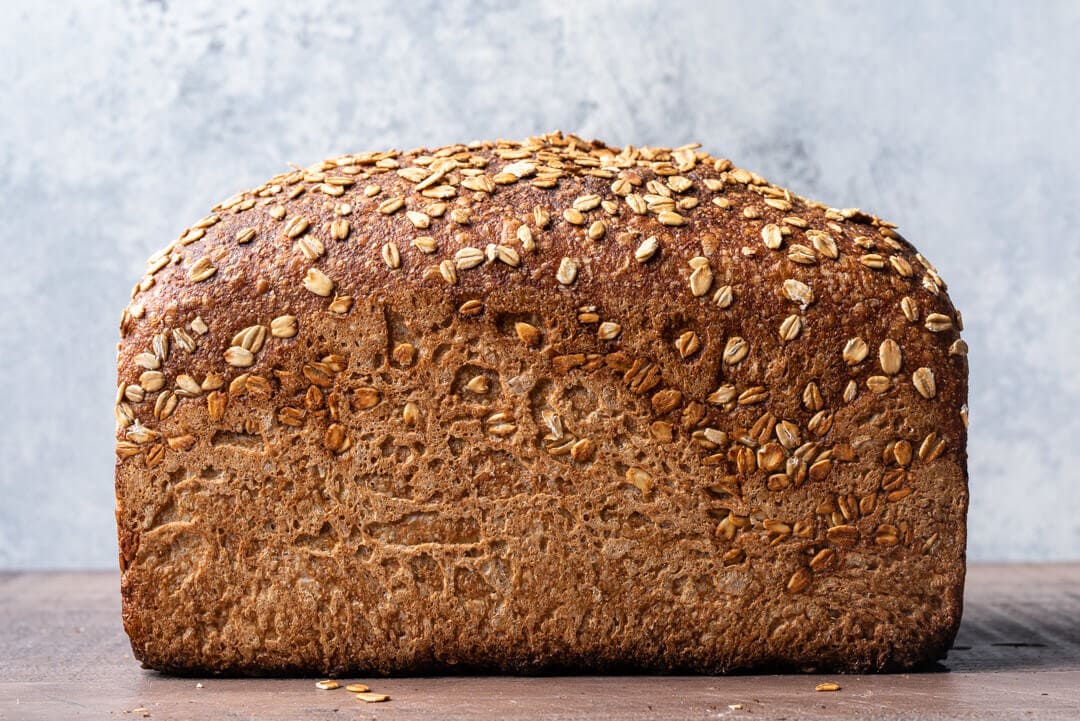
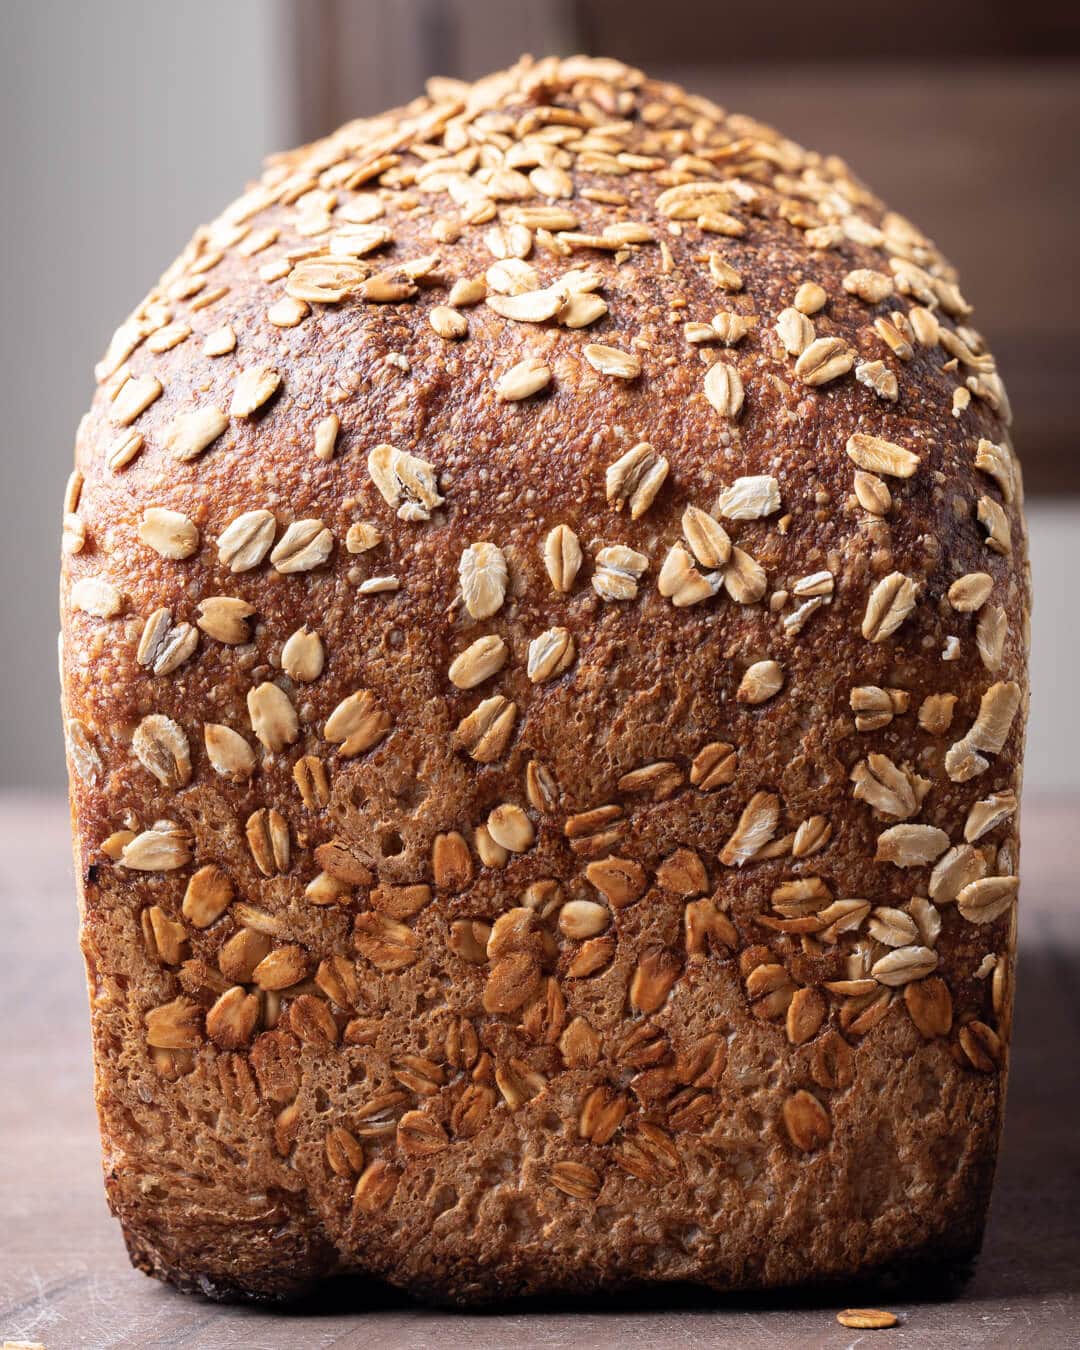
A splendid, gentle top curve from dough that’s proofed just enough. Just enough to still have “energy” to expand upward in the oven, but not so much that it causes an erratic fissure due to the lack of scoring. A balance. Add to that a striking exterior color from a bold bake, the enticing aroma from freshly milled flour, and a speckled oat topping—all contributing to a truly wonderful bread. But beyond all this, it’s one that’s meant to be eaten in thick slices carved from the loaf with a spread of soft butter, toasted and topped with fresh preserves, or used to cobble together a sandwich piled a little too high.
When baking this whole-grain wheat and spelt pan bread I could have sworn the kitchen smelled of honey… Or perhaps it was my eagerness to eat the result. When you go the distance from raw berries, freshly milled flour, to baked bread—all the while controlling each part of the transformation (or as much control as we’d like to think we have over fermentation)—it’s easy to get a little antsy, impatient, and, frankly, hungry.
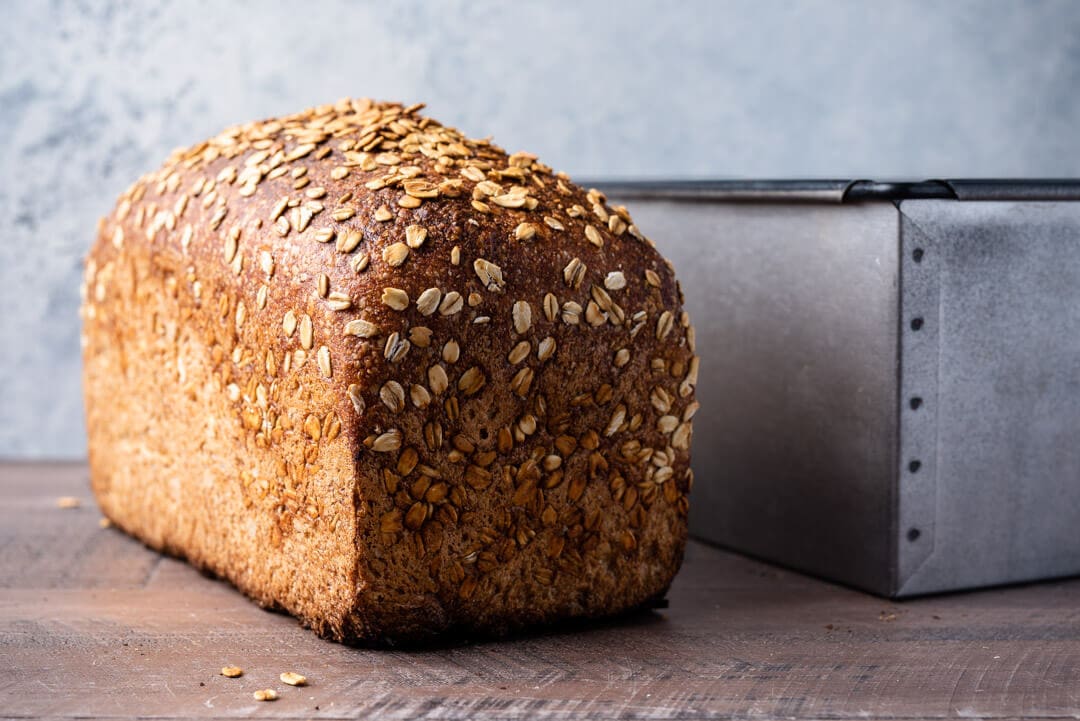
At 100% fresh milled whole grain, and naturally leavened, this loaf is truly healthy fare. When making loaves like this sometimes I feel the need to mix-in seeds or nuts for even more nutrition, and that’s certainly possible here, but for me and this flour blend, this is just right. It’s fun to dredge up the simple and humble bread tin, to discover anew the appeal of confining bread to rise and bake in a single vessel. The tin can be an enabler to push the limits, to be more adventurous with hydration, grain types, and mix-ins. Chances are no matter what you do, as long as you can “get it into the tin,” your bread will bake up just fine.
Let’s have some fun.
Flour Selection
After trying a myriad of different grains in pan bread formulas, white wheat has to be among my favorites. The mild flavor works so well in this bread, and by adding in a touch of spelt, there’s an additional added layer of flavor. Spelt is almost always my go-to choice when I want to add in something special, something unexpected, something I can tell people: “oh that taste? That’s spelt.” I love it. However, feel free to sub out the spelt for whatever you have on hand. Because the white wheat is milder, you could change the 30% or so spelt to Khorasan, einkorn, or even more traditional red wheat.
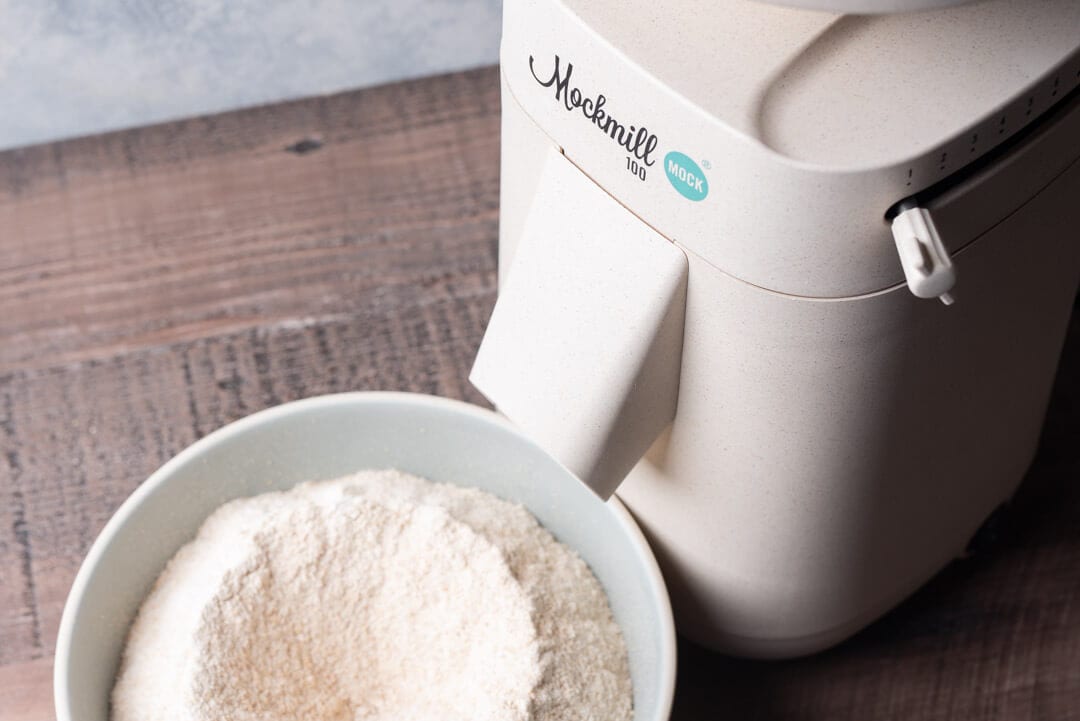
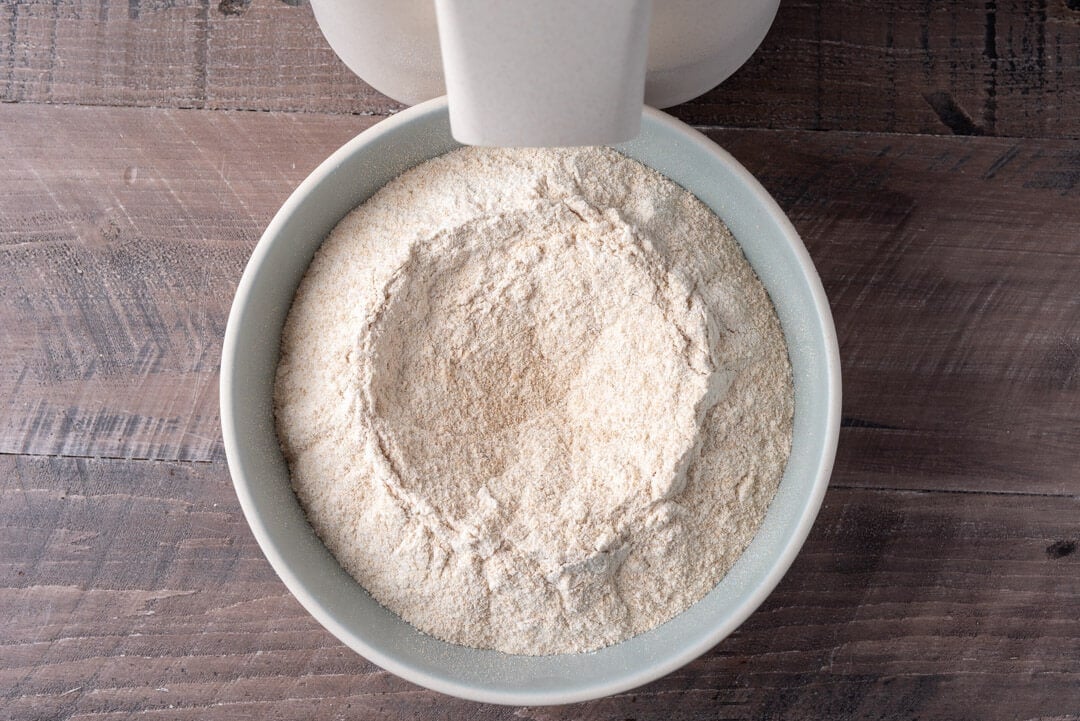
I used fresh milled organic whole white wheat (sourced from Breadtopia), as described below, but you could also use the excellent organic white wheat from King Arthur Flour. Their flour is also delicious when used in sourdough waffles and many other bread here at my site. I milled the white wheat and spelt in my Mockmill 100 home mill. I haven’t talked much about this mill yet, but I’ve been using it in my kitchen for a while, and I can safely say it’s a workhorse. It mills superbly fine flour, is built to last, and is priced exceptionally well. With mills like this, it’s easy for everyone to start milling fresh and healthy flour right from home.
For both the white wheat and spelt I mostly set the mill the finest level and turned it on. The result was freshly milled flour with a captivating aroma brimming with possibility.
Whole Grain Wheat and Spelt Pan Bread
This recipe yields a large loaf of bread: at 1400g it’s almost as large as my imposing Einkorn miche. If you are worried about fitting the dough in your pan, scale the formula down to a smaller loaf, or split it into two 700g loaves.
In a previous sandwich bread post, I was able to comfortably fit 1200g in a 9” x 5” x 2.75” pan—use this as a gauge for whatever pan you’re using.
In this recipe, I’m using Campbell’s Bread Pan; the dimensions are 8.85″ x 4.7″ x 4.7″ deep (235mm x 120mm x 120mm deep).
Vitals
Total Dough Weight
1400 grams
Pre-fermented Flour
4.00%
Hydration
88%
Yield
One 1,400 gram pan loaf (or two 700 gram pan loaves)
Levain Build (Stiff)
I’ve come to rely on a stiff levain build when making bread with large percentages of freshly milled flour. The stiff levain, which can be anywhere from 50%-65% hydration depending on your starter and flour, brings loads of flavor to the resulting bread. I’ve also found that a stiff levain has a larger readiness window when it can be mixed into a dough.
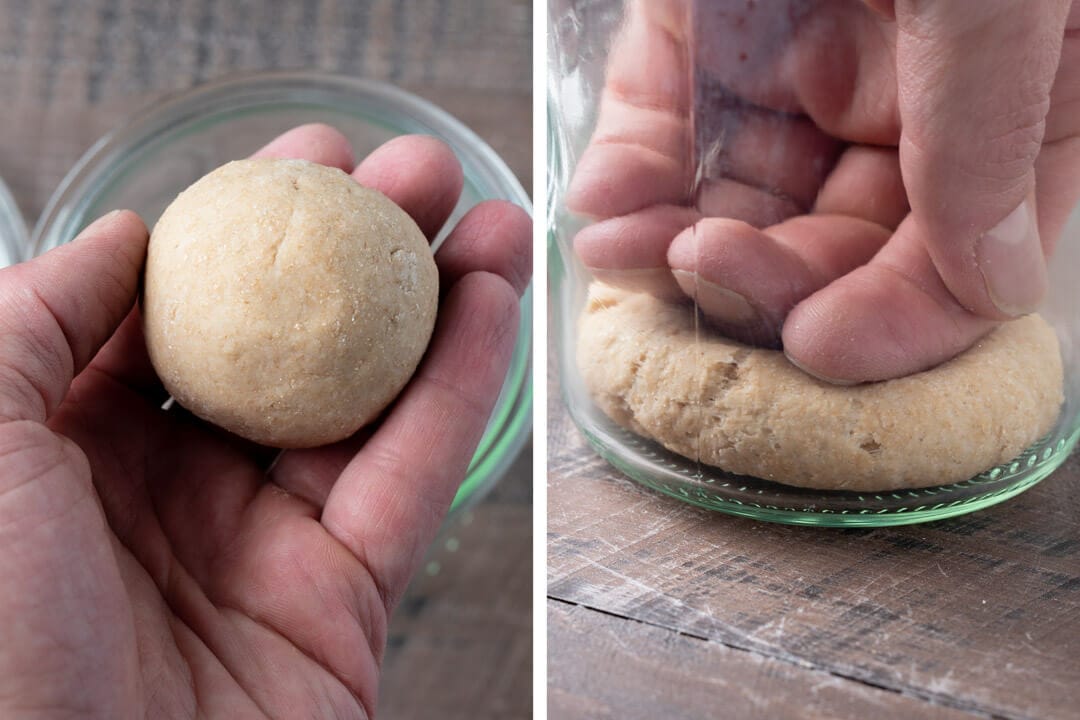
To make the stiff levain, I usually mix everything up with my plastic spatula, then knead it by hand when it becomes hard to stir. Then, I shape it into a ball and press it down into the bottom of a 1/2 liter Weck glass jar. Pressing the levain down like this helps me visually inspect when it’s ready to be used: I look for a leveling off of the “dome” that is created as it’s ripening. Additionally, you’ll see significant aeration at the sides, and, if you gently poke at the top, it’ll give readily under pressure. At 50% inoculation (the percentage of ripe starter used to build the levain) my levain was ready to be mixed into the dough after 5 hours at 78-80°F (25-26°C).
Note that the baker’s percentages listed below are with respect to the final dough ingredients and do not take into account the levain.
Weight
Ingredient
Baker’s Percentage
480g
Fresh Milled Hard White Winter Wheat (100% extraction)
68.75%
218g
Fresh Milled Spelt (100% extraction)
31.25%
625g
Water
89.58%
14g
Salt
1.98%
58g
Ripe, stiff levain (see above)
8.33%
Method
1. Stiff Levain – 10:00 a.m.
Build the levain (everything listed in the Levain Build section above) and store somewhere around 78°F (25°C) ambient until ripe, about 5 hours.
At this time it might be convenient for you to mill the required white wheat and spelt. Milling this early in the schedule also gives the flour time to cool down.
2. Autolyse
Due to the high percentage of freshly milled flour, there’s no need to use the autolyse technique with this recipe.
3. Mix – 3:00 p.m.
Add the called-for flour to a mixing bowl. Break up the ripe, stiff levain on top of the flour and add all but 100g of the water. Mix by hand until well combined.
The mix will be very wet and almost look like it won’t hold together. Perform folds in the bowl to add a little strength for about 5 minutes. Mixing in the bowl keeps things clean, and with dough this highly hydrated, it can be challenging to perform a mixing technique like slap and fold (see my guide to the slap and fold technique here) on the counter.
Add the salt to the top of the mixed dough and mix to incorporate. After this mixing, assess the dough. Does it look like it can handle the remaining 100g of water? Add the water if so, if not, omit the remaining water. Then, next time add the water if you find the dough was just fine by the end of the bake.
Transfer the dough to a tub or thick-walled bowl for bulk fermentation.
5. Bulk Fermentation – 3:00 p.m. to 6:30 p.m.
At 76-80°F (24-26°C) ambient temperature, the dough should be ready to divide after around 3 hours and 30 minutes.
Perform a total of 3 sets of stretches and folds during the bulk, spaced out by 30 minutes (the first set will take place 30 minutes after starting this step). To perform a set, with wet hands grab one side of the dough in the bowl stretch up and fold over to the other side. Do this four times at each direction (North, South, East, West).
After the last set, let the dough rest for the remaining bulk fermentation time.
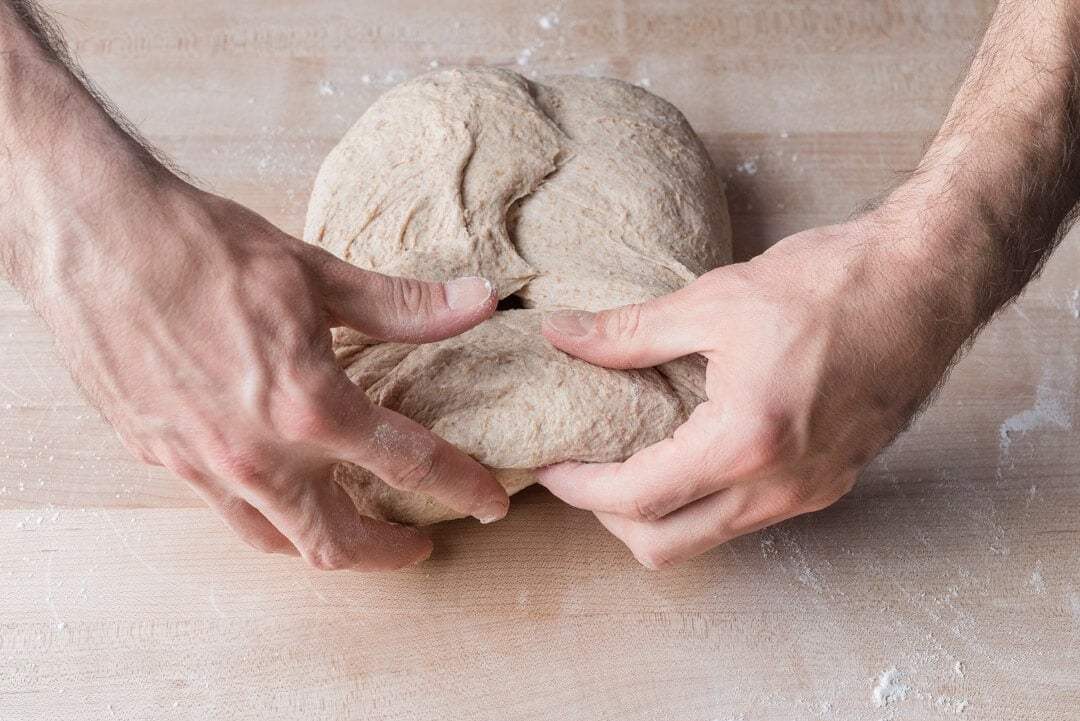
6. Divide & Preshape – 6:30 p.m.
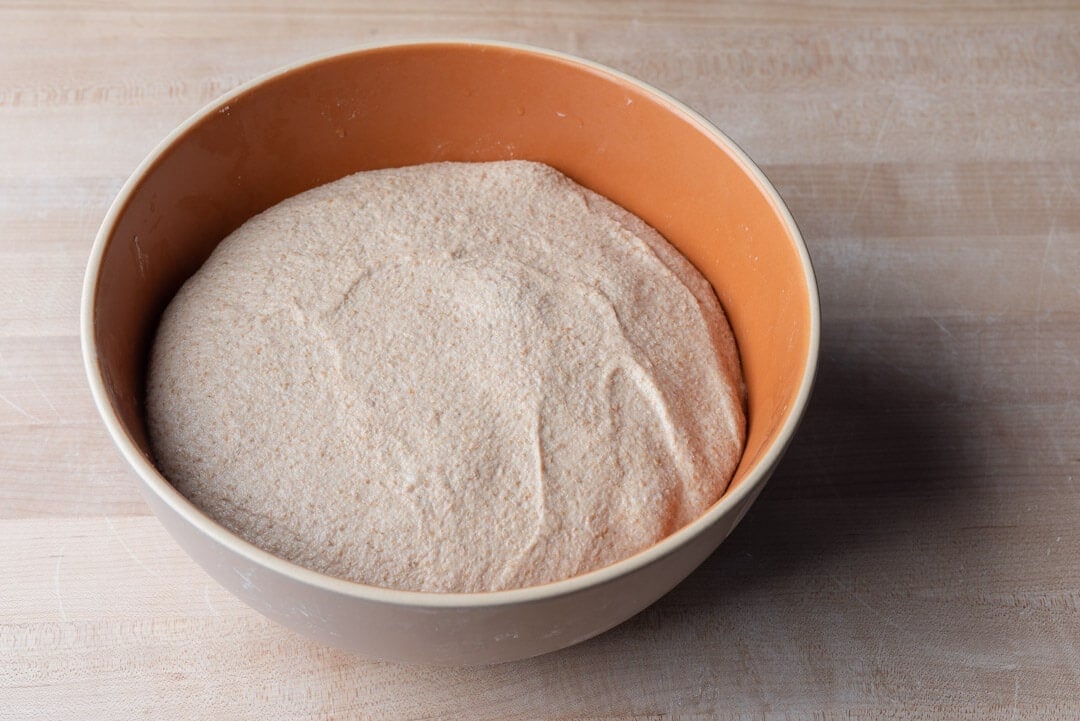
At the end of bulk fermentation, the dough will look slightly wet and be sticky to the touch, but it will be well risen and smoother than right after mixing (see the picture, below). Dump the dough from the bulk container to an un-floured work surface. Because this recipe only makes a single, large loaf, there is no need to divide the dough. Gently turn it on the bench with your hand and a bench knife to coerce it into a round.
Let the dough rest for 30 minutes, uncovered. Keep an eye on the dough. If it starts to spread quickly into a thin pancake, skip the remaining resting time and proceed directly to shaping.
7. Shape – 7:00 p.m.
For this recipe, I’m using Campbell’s Bread Pan, which results in bread with beautifully straight sides, a tall rise, and a golden crust. If you don’t have this pan, you can divide the recipe in half and bake each in a Pullman pan or other standard loaf pan.
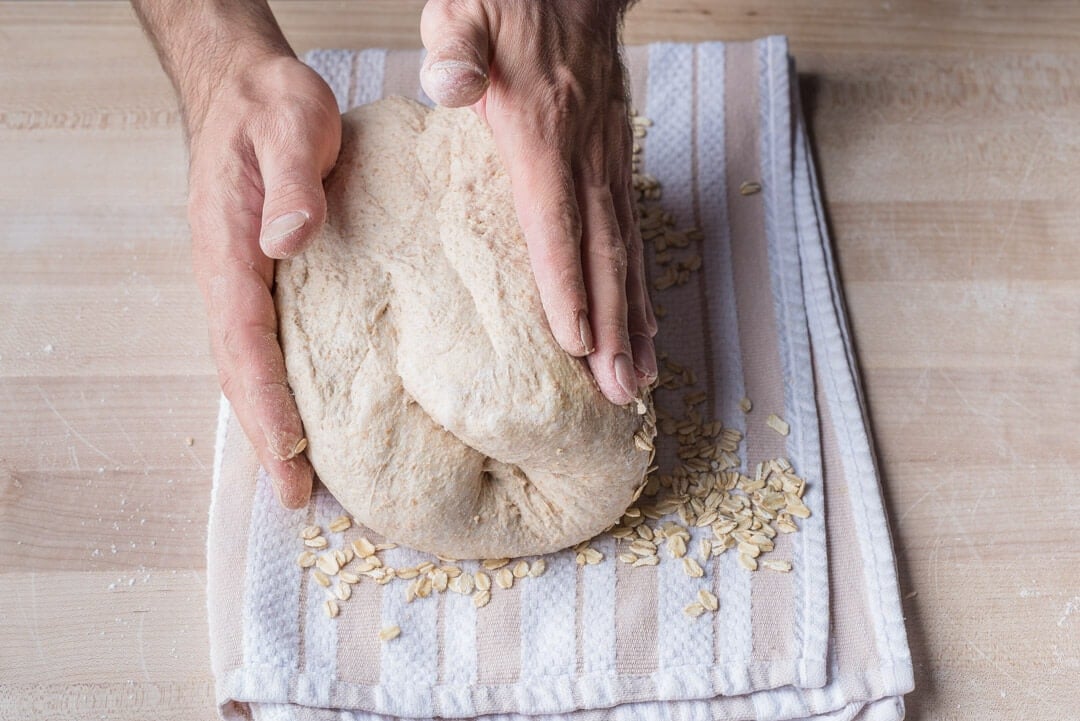
I love topping these loaves with raw, rolled oats: they crisp up in the oven and provide little bursts of toasted nut flavor when eating each slice. Lay a kitchen towel out next to your work area and spread a thin layer of thick rolled oats on top.
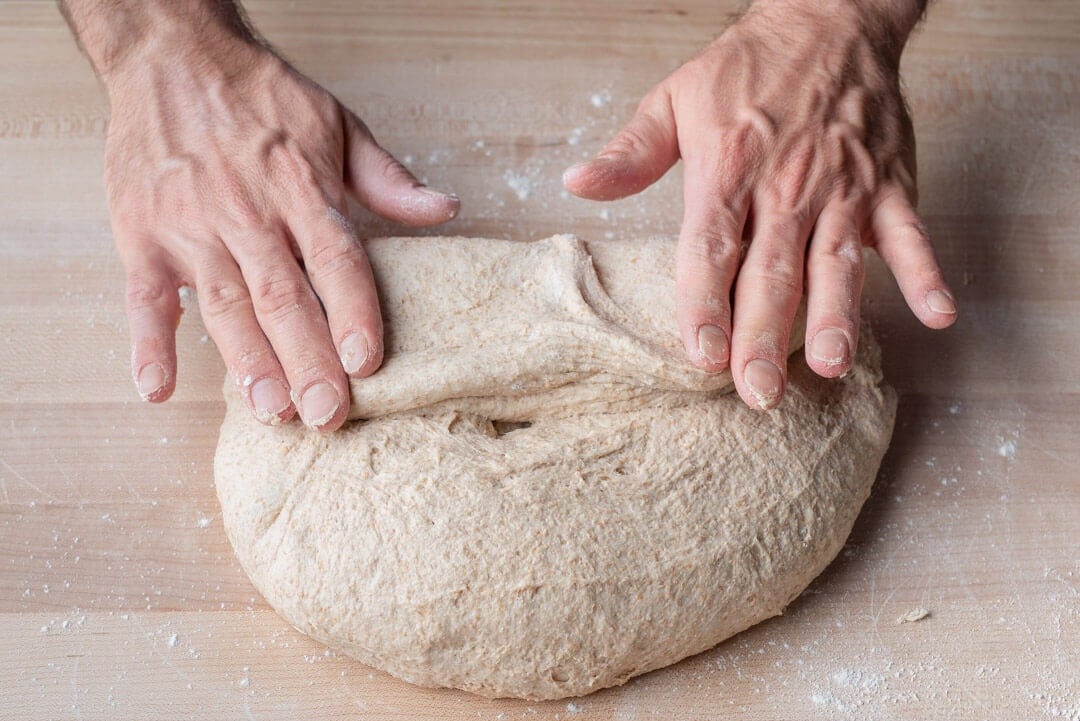
Lightly flour the top of your rested, and relaxed, dough round on the work surface. Using a bench knife and your hand, flip the round over. Fold the bottom up to the middle. Then fold each side, left and right, over to the other to form what looks like an open envelope in front of you. Then, grab the top and fold it up and down to just above the middle. Using both hands, grab the new top and gently roll it down into a long tube (imagine rolling down a beach towel or yoga mat).
Using your bench knife and a floured hand, scoop up the shaped tube and invert it onto the towel with oats (the seam will be facing up, see below). Grab the tube with each hand and gently rock it back and forth, so the oats stick to the outside.
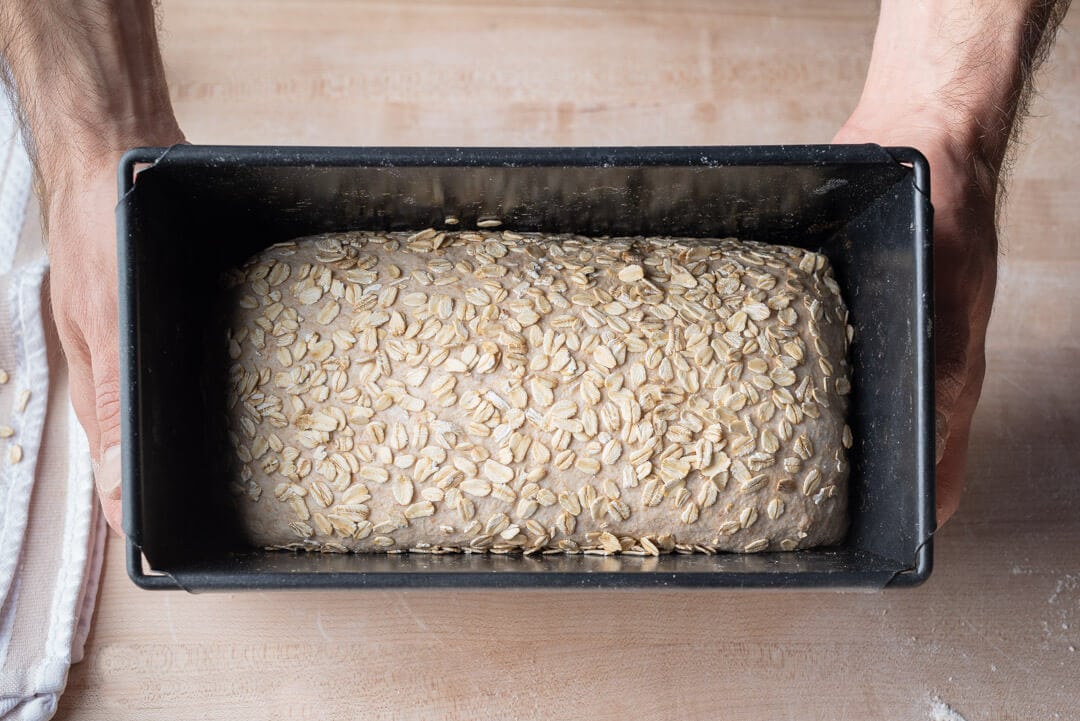
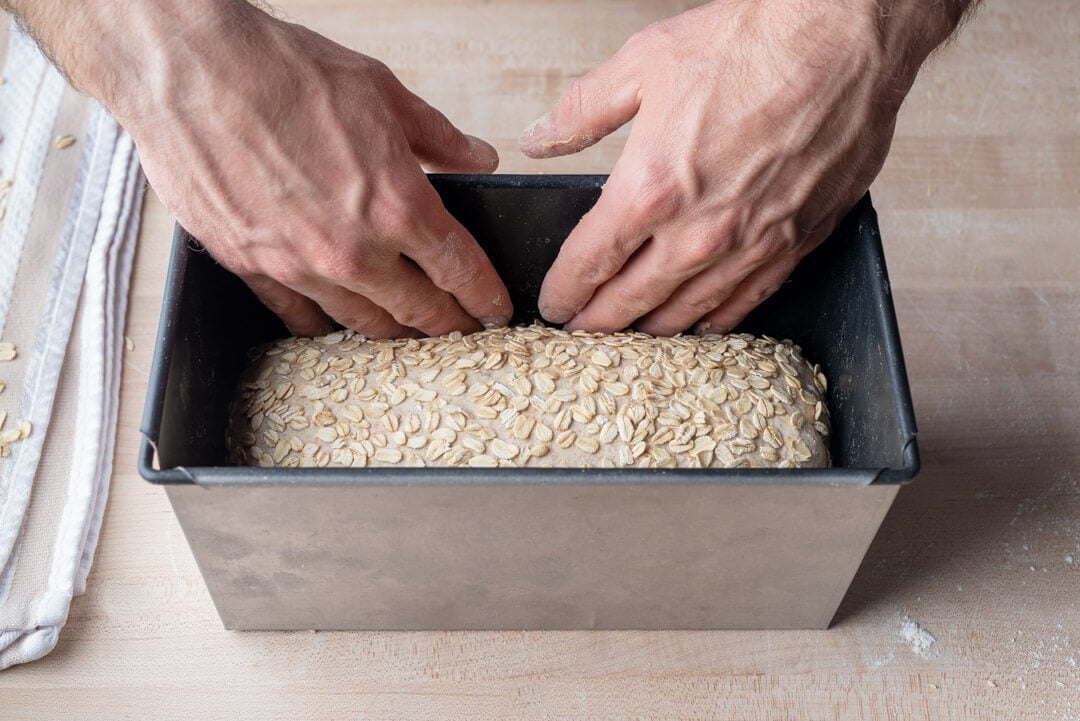
Finally, transfer the tube of dough to the pan. At this point you should be able to just drop in the dough, but if you have trouble don’t fret. Once you drop it in use your fingers to tuck the dough down at the sides. You want a smooth top on the dough when it’s in the pan so it rises uniformly.For more information on shaping, proofing, and scoring pan loaves check out my guide to shaping pan loaves.
8. Proof – 7:30 p.m. to 8:30 a.m. (the next day)
Cover the pan in an airtight reusable plastic bag and place it into the fridge overnight.
9. Bake – Preheat oven at 7:45 a.m., Bake at 8:30 a.m.
Preheat your empty oven to 450°F (230°C). There’s no need for baking stones since the dough is in a pan.
I steamed my oven in my usual way, with one deviation: I didn’t use the pan with lava rocks because there was plenty of steam with only the soaked & rolled towels. See my post on how to steam your home oven for more details.
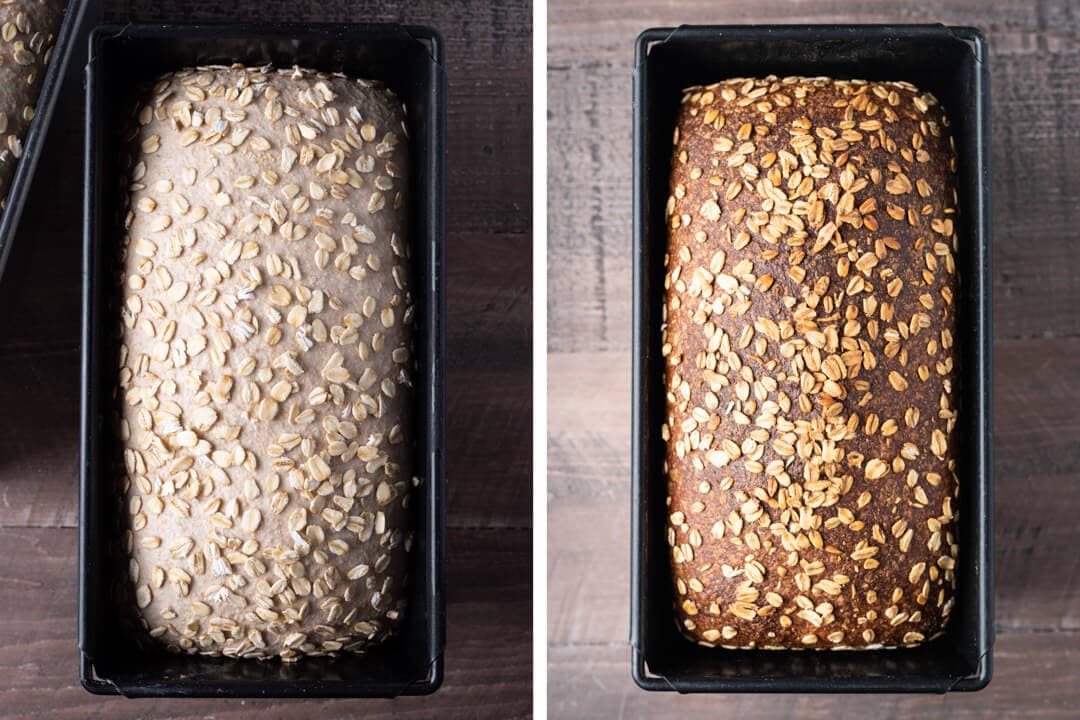
At the end of the bake, return the loaf to the oven without the pan to fully color the exterior.
Once you’ve preheated the oven, place the pan with soaked towels and the pan with your dough inside. Bake for 30 minutes. After 30 minutes, turn the oven down to 425°F (220°C), remove the steaming towels, rotate the pan 180°, and bake for 25 minutes. After this time the top should be well colored, remove the pan from the oven using oven-safe mitts. Carefully remove the loaf from the pan and return the loaf to the oven to bake for an additional 15-20 minutes at 425°F (220°C). I like to do this final bake outside of the pan to add more color to the exterior. If you find the top of the loaf starts to darken too much, tip it to the side and bake until your liking.
It’s essential with a high hydration pan bread that the loaf is fully baked out. Otherwise, you’ll have a gummy result. The outside should be colored a dark mahogany, and the interior temperature should read around 210°F (99°C). Finally, let this bread rest at least a few hours, possibly even overnight depending on when you baked, to ensure the interior is fully set.
Conclusion
With whole grain wheat and spelt pan bread like this, it’s pretty hard to justify buying anything in a plastic bag at the market. Aside from the extra time needed to mill the grain, this is a relatively straightforward formula that you could work into a weekly routine without issue. I’d venture to say pan bread might be some of the most baked around here—everyone needs good old fashioned toast, right?
Crust
Thin and crunchy. This crust is not what you’d find from bagged sandwich bread: it has some bite to it, but it’s not overly harsh or hard. To me, it’s just right. The oats add unexpected crunch and little pockets of toasted oat flavor, a nutritious addition that isn’t necessary, but welcome.
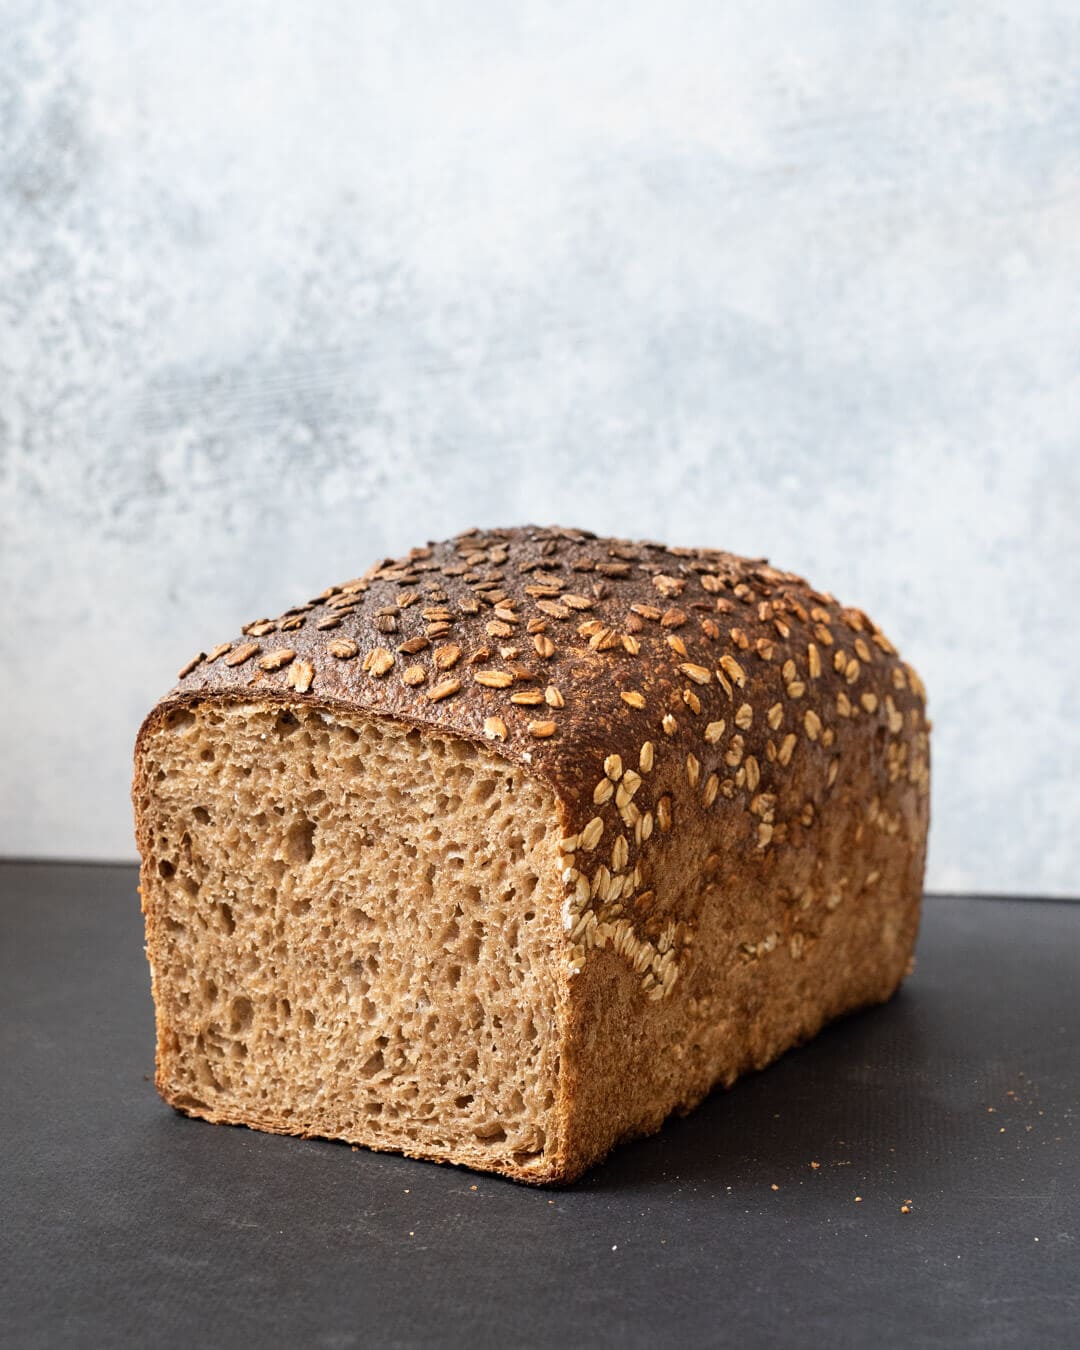
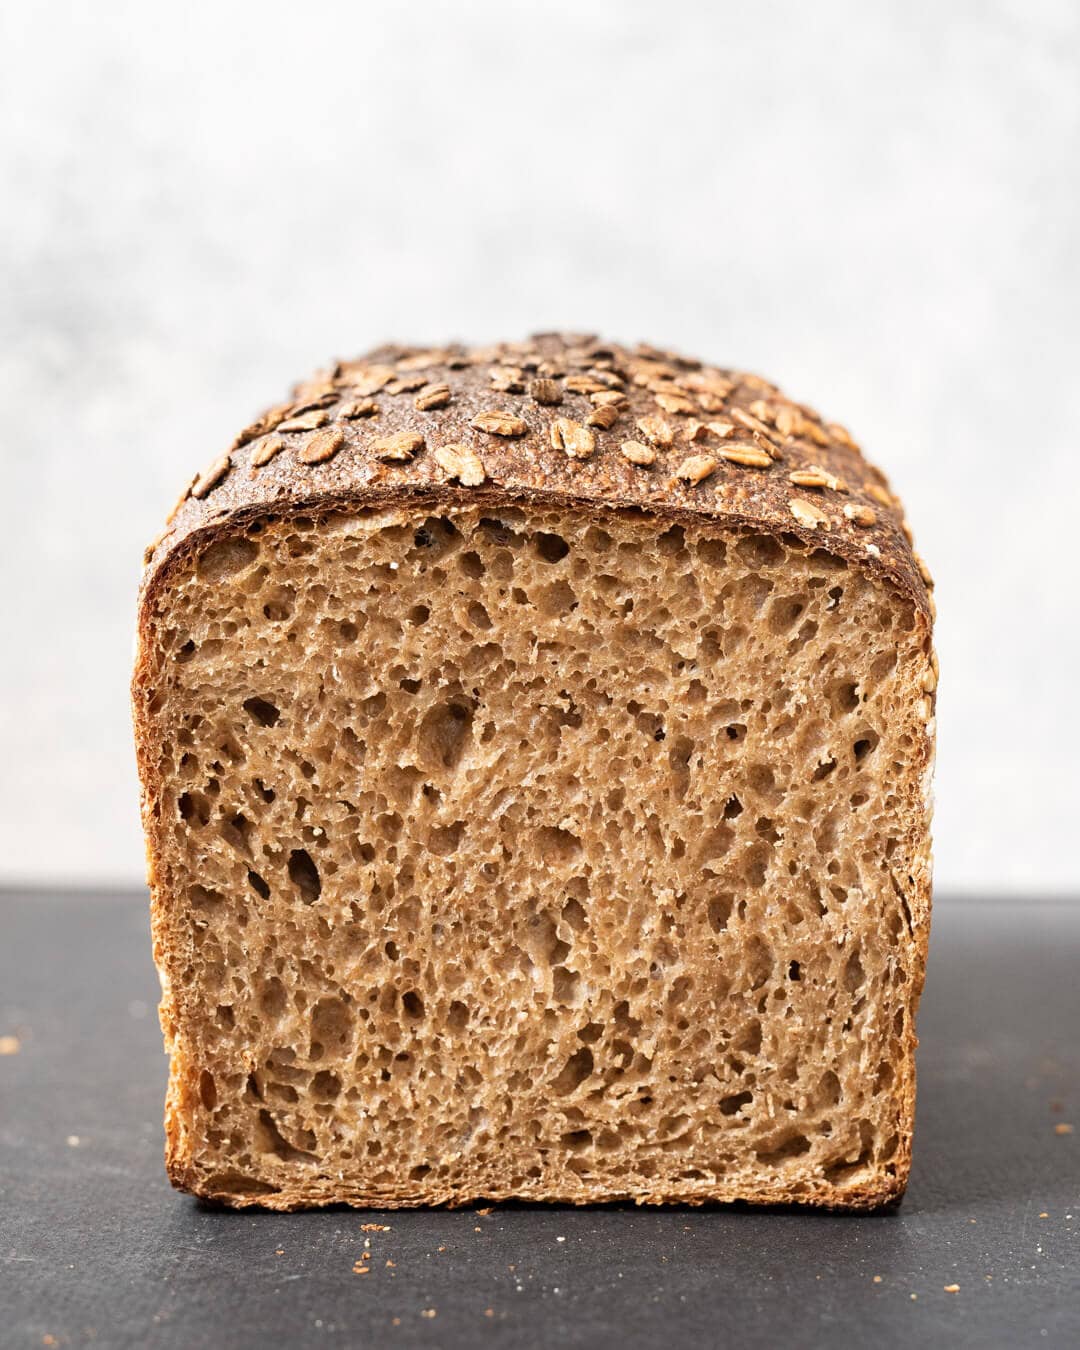
Crumb
A magnificent interior for 100% fresh milled whole grain. The high hydration helps here but so does a gentle and effective final shape. It can be a challenge to retain the open structure of this dough when first topping with oats and then finally into the pan. But, as long as you get it into the tin, this bread always bakes up nice.
With bread like this, I’m not looking for a super open interior, we need support for butter and jam, right?
Taste
There’s a subtle note of sourness in this bread that’s typical of most naturally leavened bread, but it’s so subtle it just adds depth of flavor. If you find yours is sour focus on your starter maintenance: feed it regularly and perhaps next time use it a bit sooner. Additionally, you could also try making the levain with half white flour and half whole wheat, to make things even milder.
The mild flavor of white wheat and pronounced spelt are in just the right balance with this whole-grain wheat and spelt pan bread. You can tell it’s whole grain, but it’s not overwhelming. It brings wonderful flavor to sandwiches and toast rather than just performing the backseat task of delivering other ingredients.
Whole Grain Wheat and Spelt Pan Bread Troubleshooting
Why is the inside of my bread gummy?
As I mentioned in the Bake section above, this loaf must be fully baked. If you have an instant-read thermometer, ensure the interior registers at least 205°F (96°C) before removing it from the oven. If you find it’s burning before reaching this temperature, you might want to try reducing the heat to allow for a longer bake.
It’s also possible your dough is under proofed, which can lead to a dense and gummy interior. Make sure you do a complete bulk fermentation and final proof.u003cbru003eFinally, try to wait at least several hours, preferably overnight, before slicing this loaf. Due to the high water content, cutting too early can result in gummy slices.
Why is my crust thicker than yours in the photos?
If the crust is too thick, reduce the bake time when the loaf is returned to the oven without the pan. Additionally, you could try steaming the oven a bit more or spritzing the top of the loaf with water just as you load it into the oven.
Maurizio Leo is the creator of the independent sourdough baking website The Perfect Loaf. His cookbook, The Perfect Loaf — The Craft and Science of Sourdough Breads, Sweets, and More, is a James Beard Award-winner and a New York Times bestseller. He lives in Albuquerque, NM, with his wife and two sons, where he's been baking sourdough for over a decade. He's been labeled "Bob Ross but for bread."
Do sourdough posts like this help you in your baking? Join The Baker’s Corner for only $60 a year, and get:
Come chat with me and other bakers and get baking help
Remove all ads on website
Get my bakers tools & discounts
Get the full recipe archive in editable spreadsheets
I divided the dough in half. Used 2 8.5×4.5 pans. Used lava rock for steam and sprayed tops. .. . but very little oven spring?. . . . My final dough weight was 1385 so ran a little short as usual. . . I call it the phenomenon of the shrinking dough weight, even though I weigh all my ingredients and added all the water. The loaves had a nice dome. Flavor was great. But I need to go to a bigger pan. I guess my 9″ Pullman? Not sure why the denser crumb. Had window pane and bubbles at end of bulk.
I’ve been happily baking several of your other pan bread recipes as part of our weekly rotation, but this is the first time I’ve made a 100% whole grain sourdough pan loaf with some success. The loaf is denser than I am used to, but the flavor is delicious.
How could I incorporate seeds throughout the dough? I’m thinking whole flax, sunflower, etc.
Bonjour Monsieur, merci encore une fois pour le partage de vos recettes et surtout pour vos leçons et astuces.
Puis-je avoir le prix de votre moulin à farine, en Belgique, je ne pense pas qu’il en ait en vente.
Je ne possède pas de four à vapeur, quel serait la température à choisir pour cuire ce pain dans un four traditionnel.
En vous remerciant,
Cordialement.
Hello, would you say that your freshly milled flour is fine enough to achieve a window pane with? Or is it simple to coarse? I am trying to get an idea of how fine my freshly milled flour is. I have two sieves, coarse and fine, I believe my fine sieve is about a #40 and it removes quite a bit.
Lots of whole grains in this bread! It could very well be the flour/grain you’re using. You could use white whole wheat in place of the whole (red) wheat for a milder flavor profile.
yes, its a little bit tricky with the whole wheat flours from shops, because they milled not so fine and it cant develop that structure of dough Leo has…still I will try this recepe, maybe some advise how to improve or replace flours? Thanks!
What does “100% extraction” mean? I thought high extraction meant that more of the bran had been sifted out. Based on that understanding, “100% extraction” would not be considered whole grain, so I must be misunderstanding things.
Hello Maurizio, thank you for all your wonderful,
clear and detailed posts! I am new to baking naturally leavened breads/pastries.
One question here, how can I adjust baking time and/or temperature for my loaf pans are small 20x8x6cm? I divided this into two loaves.
You’re very welcome! With smaller loaves, expect the bake time to be reduced. It’s very hard for me to say just how much because it’s so very dependent on your oven and location! I would just shoot for around 204F internal temp, then you’ll know from there on out 🙂
Maurizio, It worked. I can’t believe it. A wholegrain sourdough loaf made from my very own hands. For a year or so I have been making beautiful loaves with white, rye, and semolina flours (thanks to Tartine Bread book) each baked in a cast iron pot in the oven, but this was my Mount Everest, my first attempt at a loaf baked in a bread pan using 100% whole grain flours. I followed your recipe pretty much to the letter, minus the wet towels (I’ll get there, it’s just a bridge too far for me still). The levain looked so weird, unpromisingly like a disk of peat moss. I decided to persevere because it looked like the levain in your photo. (Thank you for the photos!). And voila! A beautiful, delicious loaf! The most difficult part was waiting for it to cool so I could slice into it and check the crumb. Could be a •tiny• bit more open, but that’s being very picky. Thank you for your careful, detailed instructions, for the helpful schedules, and for your passionate love of what you do. Marianna PS: I also now regularly make your pancakes.
Fantastic, Marianna! Happy to hear this bread turned out so well for you 🙂 And the pancakes! A regular weekend treat over here, too. Thanks so much for the comments and enjoy!
This pan bread is da bomb! I used all stone-ground organic whole wheat (french T150) and whole spelt (grand épeautre), the dough was super silky and easy to handle and shape even at this high hydration! I thought it wouldn’t rise much so I skipped the scoring but the loaf cracked and rose super high, making a nice ear by itself! Absolutely lovely taste, crumb and crust. It made the best peanut butter and sea buckthorn jam sandwiches. Thanks again for the recipe @maurizioleo:disqus !
Cut the flour back or the water? If water, I wouldn’t say half, it’s hard to say exactly but I would likely decrease it. When you’re mixing, just hold back a good portion of the water, add it in slowly as you’re mixing and see how the dough feels. You can always leave water out of the mix if it’s feeling too wet (which can happen quickly, especially with aged spelt!).
So glad to hear all that! It’s a little challenging to work with freshly milled flour, but IMO, totally worth it for the flavor and nutrition.
Much of my baking was learned through trial and error, but also through books and discussions with other bakers over the years! I def. cannot discount how much I’ve learned from others. With regard to formulas and recipes, I create them first with intuition and then test, test, test 🙂
I wouldn’t knead any less, I find freshly milled flour usually needs more mixing than aged flour! You might want to try to Degas the dough a little more when shaping to help bring strength to the dough.
Mine only rose half what it should have. It did not rise any during the proof stage so I let it sit out a couple hours until it doubled in size and then I baked it. What went wrong?
Jason: be sure you use your starter and levain when they’re very ripe, you want to start things off with high populations of bacteria/yeast. From there, temperature is important! Make sure your dough temp comes in at the same as the recipe to ensure it’s kept on track.
Hello Maurizio, again, Verónca from Mexico, I baked the bread, the flavor is amazing I could finally get the spelt flour by mail, but I do no know if I did not shaped well, the crease came out, got the color, and also it was a little small, but the flavor is amazing, and I put grains in it, so it tastes so good, but why the crease came out from one of the sides? Thank you so much!!!
Hey there, Verónica! Glad the loaf turned out well for you. It’s hard to say, splits like that can be from under proofing, an issue with shaping, or insufficient depth to your score on top (which makes the dough sort of break in other areas). Keep practicing with it, my feeling is you’ll overcome that split with confidence in handling the dough.
I want to try this bread, but if I do not have spelt flour, can I use just bread flour instead? and, if I do not mill the grain, is it possible to use a liquid starter? I am from Mexico and unfortunatelly we do not have all the kind of wonderful flours you have up there. Thank you so much!!!
Hola, Veronica! If you have whole wheat flour, I’d use that in place of the spelt. If no ww flour, go bread flour. You can certainly use a liquid starter with any bread you see here at my site. Happy baking!
Hello!! thank you so much for answering my question, I have made the dough, now I have it in the pans, at the fridge, the dough seemed to be all right, I decided to put grains in the dough. Tomorrow I will see if every thing comes out right. Thank you so much again, and have a good night. I will let you know how it went.
They each have different baking characteristics and can be used for different reasons. The most upfront is there’s a hydration difference between the two. If you swap one for the other be sure to compensate for the lack of/or extra water in the preferment (e.g. if the recipe calls for a stiff levain and you use liquid, you might want to hold back some of the water in the mix because the preferment will bring additional water than intended). I’m working on a post on this!
Maurizio another fine recipe. However I did split the recipe into 2 loaves since I do not have the large bread pan. They came out very small. More like the size of a zucchini bread loaf. Way too small for sandwiches. I obtained the FDT used a proofing box to maintain temp as well. I used all the water including the extra 100 gr. I live at 4500 ft elevation. When done with bulk there were very little fermentation bubbles with a great starter which passed the float test when I was ready to build. No oven spring at all but I think that may be expected with this recipe? I guess next time I will put it all in one pan. Also kind of strange when I was ready to shape the total weight was off less than what it should of been. I weighed everything. Maybe my scale is inconsistent but does calibrate right on. Nonetheless the flavor is amazing just a bit frustrated the loaves were so squat. Thanks!
Marcy never have tried it again. I think I’ve become a bit frustrated when you follow the recipe to the t and then it just does not turn out. I move on to something else I doubt I’ll ever try it again..
I haven’t tried. Most recent failure was the very high hydration recipe. I thought the flour would handle the water but never built strength. Way too wet. Ended up making scones. Next time light on the water 70% at the most.
Best to you!
Yes, if you wanted to scale this up to two pans I’d likely increase the total dough weight. If you were going for two 9x4x4 Pullman pans—which is what I would do—I’d scale this recipe up to 1800g total, 900g in each pan. At 1400g, it’ll be a bit short of that and result in smaller loaves.
It’s possible the dough was over hydrated and thus didn’t show as much rise, but there are also many other areas where things could have gone awry! My other guess might be over proofing, especially if you saw little to no rise.
Thank you. Probably over hydrated. When I added the last of the water it was soupy but seemed okay since I worked it in well. Not sure if over proofed since there were very little fermentation bubbles in the dough? Next time I won’t add the remaining water and will increase the dough weight. Thanks again
You bet. I think that sounds like the way to go! Let me know how it turns out (and take photos if there’s a problem, I can help).
Made this again, similar issue with tight crumb and peak/ruptured top. I did a 24 hour cold proof. If I’m under proofing (maybe), should there be a room temperature proof before I put the dough in the fridge?
Other issue is during shaping, my dough seems to have no structure. I don’t think it’s over hydrated. It almost disintegrates structurally during the roll, after the three folds. Could this be overfermenting? Need more gluten development in the early stages?
I’ll keep trying this recipe…..for now two more tasty but dense loaves for this week.
Very interesting. It’s possible you’re over proofing if the dough falls apart like that on you, it certainly should not be doing that. It might also be the flour you’re using, you could try switching to whole wheat flour just to test, or mix spelt with some white flour to see if that helps the issues. Finally, maybe the dough is over hydrated? If it’s very sticky and falling apart, that could be a cause as well!
I’m thinking it’s partly over proofing during bulk, under proof during 2nd rise in the pan. I realize I’m out of spelt — I’ll try again with 70% hard wheat, 15% Einkorn/Rye (all freshly milled). However my second attempt was much better, it’s a wonderful flavor and nice soft texture!
Just found out why I have put spelt on the list of grains I don’t care for a long time ago. Had super active starter, proofed at 50 F and let it warm up at room temp for 2 hours before baking.
Welcome to the brick yard. Loaf split open, crust is enormous and center never quite reached 210 F. Nice looking crumb although not as open as yours. Edible but nothing to write home about.
Bummer, Art! I’m wondering if it was over hydrated or over proofed… Over hydration is a real concern with spelt, and usually leads to a sticky dough that has a tighter interior. I have to say, spelt is one of my favorite grains to work with! I’m wondering if we can help improve this loaf for you.
Fantastic website! I’d like to try this loaf but in a Pullman tin with a lid on. What adjustments would you make, if any? Many thanks in advance, Colin.
Thanks, Colin! Yes, you certainly can. You’ll have to adjust the dough weight, I’d probably drop it to say 900g per loaf for a typical 9x4x4″ Pullman. Also, you’ll likely have to bake it for longer to ensure the loaf is fully baked out. If you open the pan and realize it needs more time, you can always take it out of the pan for a few minutes to finish right on the oven rack (but don’t go too long, it’ll thicken the crust).
I’ve tried almost all the pan loaves on your site. Just amazing, thank you. One issue I keep having is a hump developing and then splitting. I am only scoring when instructed to. Thinking about scoring next time. What am I doing differently so that I need to score and you didn’t? Thanks again Sam
Super glad to hear that, Samuel! You can always score these pan loaves, not a problem. I tend to push the proof so far that scoring wouldn’t do much as there’s little rise left in the end. It’s likely your dough might be slightly under proofed. I’d say push that proof farther, the dough should be very soft and it won’t rise excessively in the oven! Keep me posted on how it’s going. Happy baking!


159 Comments
I can’t find that size (235mm x 120mm x 120mm deep) at Rackmaster UK. . . . they have multiple sizes, but not that size?
They might have changed the dimensions on their pan!
I divided the dough in half. Used 2 8.5×4.5 pans. Used lava rock for steam and sprayed tops. .. . but very little oven spring?. . . . My final dough weight was 1385 so ran a little short as usual. . . I call it the phenomenon of the shrinking dough weight, even though I weigh all my ingredients and added all the water. The loaves had a nice dome. Flavor was great. But I need to go to a bigger pan. I guess my 9″ Pullman? Not sure why the denser crumb. Had window pane and bubbles at end of bulk.
Marcy, I also found his bread tins! You can buy them here at Pleasant Hill Grain.
I want to use this stiff levain in my other recipes. How would I sub it for the regular, 100% hydration starter?
If you have a stiff lev, just add a little more water to the main dough mix as necessary.
I’ve been happily baking several of your other pan bread recipes as part of our weekly rotation, but this is the first time I’ve made a 100% whole grain sourdough pan loaf with some success. The loaf is denser than I am used to, but the flavor is delicious.
How could I incorporate seeds throughout the dough? I’m thinking whole flax, sunflower, etc.
So glad you liked this, Emily! If you want to add seeds, soak them overnight with water, drain the water, then add them at the very end of mixing.
Bonjour Monsieur, merci encore une fois pour le partage de vos recettes et surtout pour vos leçons et astuces.
Puis-je avoir le prix de votre moulin à farine, en Belgique, je ne pense pas qu’il en ait en vente.
Je ne possède pas de four à vapeur, quel serait la température à choisir pour cuire ce pain dans un four traditionnel.
En vous remerciant,
Cordialement.
De rien!
Hello, would you say that your freshly milled flour is fine enough to achieve a window pane with? Or is it simple to coarse? I am trying to get an idea of how fine my freshly milled flour is. I have two sieves, coarse and fine, I believe my fine sieve is about a #40 and it removes quite a bit.
Hmm. I don’t usually do this test and don’t usually mix to this degree. It should get there I would imagine, though it may not be super clean.
Real assertive, overly strong wheat flavor from this recipe? Is it the recipe or the fact that my taste buds are not accustomed to it?
Lots of whole grains in this bread! It could very well be the flour/grain you’re using. You could use white whole wheat in place of the whole (red) wheat for a milder flavor profile.
Thanks, that is a loaf I’ll make. Any thoughts that you’ll sell the pan that you had made?
I believe they’re on sale over at Rackmaster UK!
I have a mill, but I usually sift most flours so the bran doesn’t cut the bubbles. You’re not sifting at all?
I’m not doing any sifting here, I want 100% whole grain 🙂 You can use sifted flour if you’d like!
yes, its a little bit tricky with the whole wheat flours from shops, because they milled not so fine and it cant develop that structure of dough Leo has…still I will try this recepe, maybe some advise how to improve or replace flours? Thanks!
What does “100% extraction” mean? I thought high extraction meant that more of the bran had been sifted out. Based on that understanding, “100% extraction” would not be considered whole grain, so I must be misunderstanding things.
Yes, the higher the extraction number the more of the wheat berry you keep.
So this loaf is 100% whole wheat?
This loaf is 100% whole grain, yes!
Hello Maurizio, thank you for all your wonderful,
clear and detailed posts! I am new to baking naturally leavened breads/pastries.
One question here, how can I adjust baking time and/or temperature for my loaf pans are small 20x8x6cm? I divided this into two loaves.
You’re very welcome! With smaller loaves, expect the bake time to be reduced. It’s very hard for me to say just how much because it’s so very dependent on your oven and location! I would just shoot for around 204F internal temp, then you’ll know from there on out 🙂
Maurizio, It worked. I can’t believe it. A wholegrain sourdough loaf made from my very own hands. For a year or so I have been making beautiful loaves with white, rye, and semolina flours (thanks to Tartine Bread book) each baked in a cast iron pot in the oven, but this was my Mount Everest, my first attempt at a loaf baked in a bread pan using 100% whole grain flours. I followed your recipe pretty much to the letter, minus the wet towels (I’ll get there, it’s just a bridge too far for me still). The levain looked so weird, unpromisingly like a disk of peat moss. I decided to persevere because it looked like the levain in your photo. (Thank you for the photos!). And voila! A beautiful, delicious loaf! The most difficult part was waiting for it to cool so I could slice into it and check the crumb. Could be a •tiny• bit more open, but that’s being very picky. Thank you for your careful, detailed instructions, for the helpful schedules, and for your passionate love of what you do. Marianna PS: I also now regularly make your pancakes.
Fantastic, Marianna! Happy to hear this bread turned out so well for you 🙂 And the pancakes! A regular weekend treat over here, too. Thanks so much for the comments and enjoy!
This pan bread is da bomb! I used all stone-ground organic whole wheat (french T150) and whole spelt (grand épeautre), the dough was super silky and easy to handle and shape even at this high hydration! I thought it wouldn’t rise much so I skipped the scoring but the loaf cracked and rose super high, making a nice ear by itself! Absolutely lovely taste, crumb and crust. It made the best peanut butter and sea buckthorn jam sandwiches. Thanks again for the recipe @maurizioleo:disqus !
So glad to hear you liked this one, Mathieu!!
Cut the flour back or the water? If water, I wouldn’t say half, it’s hard to say exactly but I would likely decrease it. When you’re mixing, just hold back a good portion of the water, add it in slowly as you’re mixing and see how the dough feels. You can always leave water out of the mix if it’s feeling too wet (which can happen quickly, especially with aged spelt!).
So glad to hear all that! It’s a little challenging to work with freshly milled flour, but IMO, totally worth it for the flavor and nutrition.
Much of my baking was learned through trial and error, but also through books and discussions with other bakers over the years! I def. cannot discount how much I’ve learned from others. With regard to formulas and recipes, I create them first with intuition and then test, test, test 🙂
I wouldn’t knead any less, I find freshly milled flour usually needs more mixing than aged flour! You might want to try to Degas the dough a little more when shaping to help bring strength to the dough.
Mine only rose half what it should have. It did not rise any during the proof stage so I let it sit out a couple hours until it doubled in size and then I baked it. What went wrong?
Jason: be sure you use your starter and levain when they’re very ripe, you want to start things off with high populations of bacteria/yeast. From there, temperature is important! Make sure your dough temp comes in at the same as the recipe to ensure it’s kept on track.
What brand of loaf pan do you use in this recipe? Thank you
Hey, Inna! This was made in a Rackmaster UK pan (he has a shop online!). Super high quality and a really nice pan in general.
What brand of loaf pan do you use in this recipe? Do you prefer this one over US Pans?
Also the crumb was really nice. I can make wonderful sandwiches with this bread. Thank you so much
Hello Maurizio, again, Verónca from Mexico, I baked the bread, the flavor is amazing I could finally get the spelt flour by mail, but I do no know if I did not shaped well, the crease came out, got the color, and also it was a little small, but the flavor is amazing, and I put grains in it, so it tastes so good, but why the crease came out from one of the sides? Thank you so much!!!
Hey there, Verónica! Glad the loaf turned out well for you. It’s hard to say, splits like that can be from under proofing, an issue with shaping, or insufficient depth to your score on top (which makes the dough sort of break in other areas). Keep practicing with it, my feeling is you’ll overcome that split with confidence in handling the dough.
Thank you very much!!! I will keep practicing
Hello Maurizio,
I want to try this bread, but if I do not have spelt flour, can I use just bread flour instead? and, if I do not mill the grain, is it possible to use a liquid starter? I am from Mexico and unfortunatelly we do not have all the kind of wonderful flours you have up there. Thank you so much!!!
Hola, Veronica! If you have whole wheat flour, I’d use that in place of the spelt. If no ww flour, go bread flour. You can certainly use a liquid starter with any bread you see here at my site. Happy baking!
Hello!! thank you so much for answering my question, I have made the dough, now I have it in the pans, at the fridge, the dough seemed to be all right, I decided to put grains in the dough. Tomorrow I will see if every thing comes out right. Thank you so much again, and have a good night. I will let you know how it went.
What’s the difference if you use a stiff vs a liquid levain?
I believe it is the hydration of the starter,
They each have different baking characteristics and can be used for different reasons. The most upfront is there’s a hydration difference between the two. If you swap one for the other be sure to compensate for the lack of/or extra water in the preferment (e.g. if the recipe calls for a stiff levain and you use liquid, you might want to hold back some of the water in the mix because the preferment will bring additional water than intended). I’m working on a post on this!
Maurizio another fine recipe. However I did split the recipe into 2 loaves since I do not have the large bread pan. They came out very small. More like the size of a zucchini bread loaf. Way too small for sandwiches. I obtained the FDT used a proofing box to maintain temp as well. I used all the water including the extra 100 gr. I live at 4500 ft elevation. When done with bulk there were very little fermentation bubbles with a great starter which passed the float test when I was ready to build. No oven spring at all but I think that may be expected with this recipe? I guess next time I will put it all in one pan. Also kind of strange when I was ready to shape the total weight was off less than what it should of been. I weighed everything. Maybe my scale is inconsistent but does calibrate right on. Nonetheless the flavor is amazing just a bit frustrated the loaves were so squat. Thanks!
I would love to try again any suggestions from above post thank you
Robin, did you have success on subsequent tries? I had a similar first time experience. I am convinced I didn’t overproof.
Marcy never have tried it again. I think I’ve become a bit frustrated when you follow the recipe to the t and then it just does not turn out. I move on to something else I doubt I’ll ever try it again..
I haven’t tried. Most recent failure was the very high hydration recipe. I thought the flour would handle the water but never built strength. Way too wet. Ended up making scones. Next time light on the water 70% at the most.
Best to you!
Yes, if you wanted to scale this up to two pans I’d likely increase the total dough weight. If you were going for two 9x4x4 Pullman pans—which is what I would do—I’d scale this recipe up to 1800g total, 900g in each pan. At 1400g, it’ll be a bit short of that and result in smaller loaves.
It’s possible the dough was over hydrated and thus didn’t show as much rise, but there are also many other areas where things could have gone awry! My other guess might be over proofing, especially if you saw little to no rise.
Thank you. Probably over hydrated. When I added the last of the water it was soupy but seemed okay since I worked it in well. Not sure if over proofed since there were very little fermentation bubbles in the dough? Next time I won’t add the remaining water and will increase the dough weight. Thanks again
You bet. I think that sounds like the way to go! Let me know how it turns out (and take photos if there’s a problem, I can help).
Made this again, similar issue with tight crumb and peak/ruptured top. I did a 24 hour cold proof. If I’m under proofing (maybe), should there be a room temperature proof before I put the dough in the fridge?
Other issue is during shaping, my dough seems to have no structure. I don’t think it’s over hydrated. It almost disintegrates structurally during the roll, after the three folds. Could this be overfermenting? Need more gluten development in the early stages?
I’ll keep trying this recipe…..for now two more tasty but dense loaves for this week.
Very interesting. It’s possible you’re over proofing if the dough falls apart like that on you, it certainly should not be doing that. It might also be the flour you’re using, you could try switching to whole wheat flour just to test, or mix spelt with some white flour to see if that helps the issues. Finally, maybe the dough is over hydrated? If it’s very sticky and falling apart, that could be a cause as well!
I’m thinking it’s partly over proofing during bulk, under proof during 2nd rise in the pan. I realize I’m out of spelt — I’ll try again with 70% hard wheat, 15% Einkorn/Rye (all freshly milled). However my second attempt was much better, it’s a wonderful flavor and nice soft texture!
Excellent, Dustin!
Just found out why I have put spelt on the list of grains I don’t care for a long time ago. Had super active starter, proofed at 50 F and let it warm up at room temp for 2 hours before baking.
Welcome to the brick yard. Loaf split open, crust is enormous and center never quite reached 210 F. Nice looking crumb although not as open as yours. Edible but nothing to write home about.
Bummer, Art! I’m wondering if it was over hydrated or over proofed… Over hydration is a real concern with spelt, and usually leads to a sticky dough that has a tighter interior. I have to say, spelt is one of my favorite grains to work with! I’m wondering if we can help improve this loaf for you.
Fantastic website! I’d like to try this loaf but in a Pullman tin with a lid on. What adjustments would you make, if any? Many thanks in advance, Colin.
Thanks, Colin! Yes, you certainly can. You’ll have to adjust the dough weight, I’d probably drop it to say 900g per loaf for a typical 9x4x4″ Pullman. Also, you’ll likely have to bake it for longer to ensure the loaf is fully baked out. If you open the pan and realize it needs more time, you can always take it out of the pan for a few minutes to finish right on the oven rack (but don’t go too long, it’ll thicken the crust).
I’ve tried almost all the pan loaves on your site. Just amazing, thank you. One issue I keep having is a hump developing and then splitting. I am only scoring when instructed to. Thinking about scoring next time. What am I doing differently so that I need to score and you didn’t? Thanks again Sam
Super glad to hear that, Samuel! You can always score these pan loaves, not a problem. I tend to push the proof so far that scoring wouldn’t do much as there’s little rise left in the end. It’s likely your dough might be slightly under proofed. I’d say push that proof farther, the dough should be very soft and it won’t rise excessively in the oven! Keep me posted on how it’s going. Happy baking!