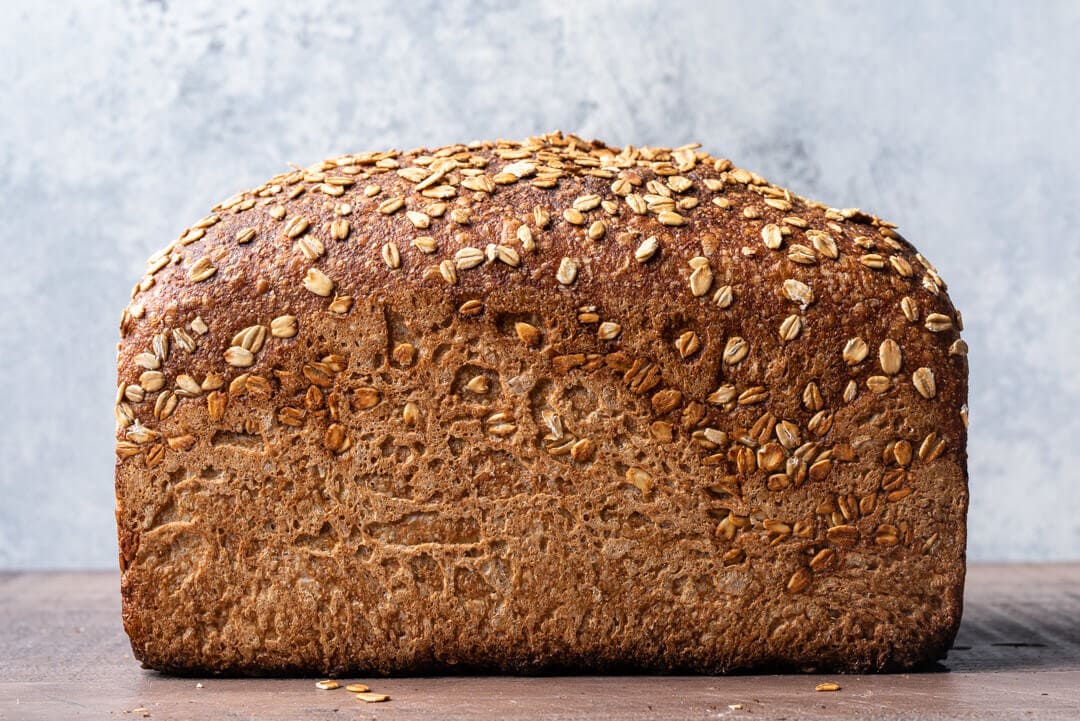
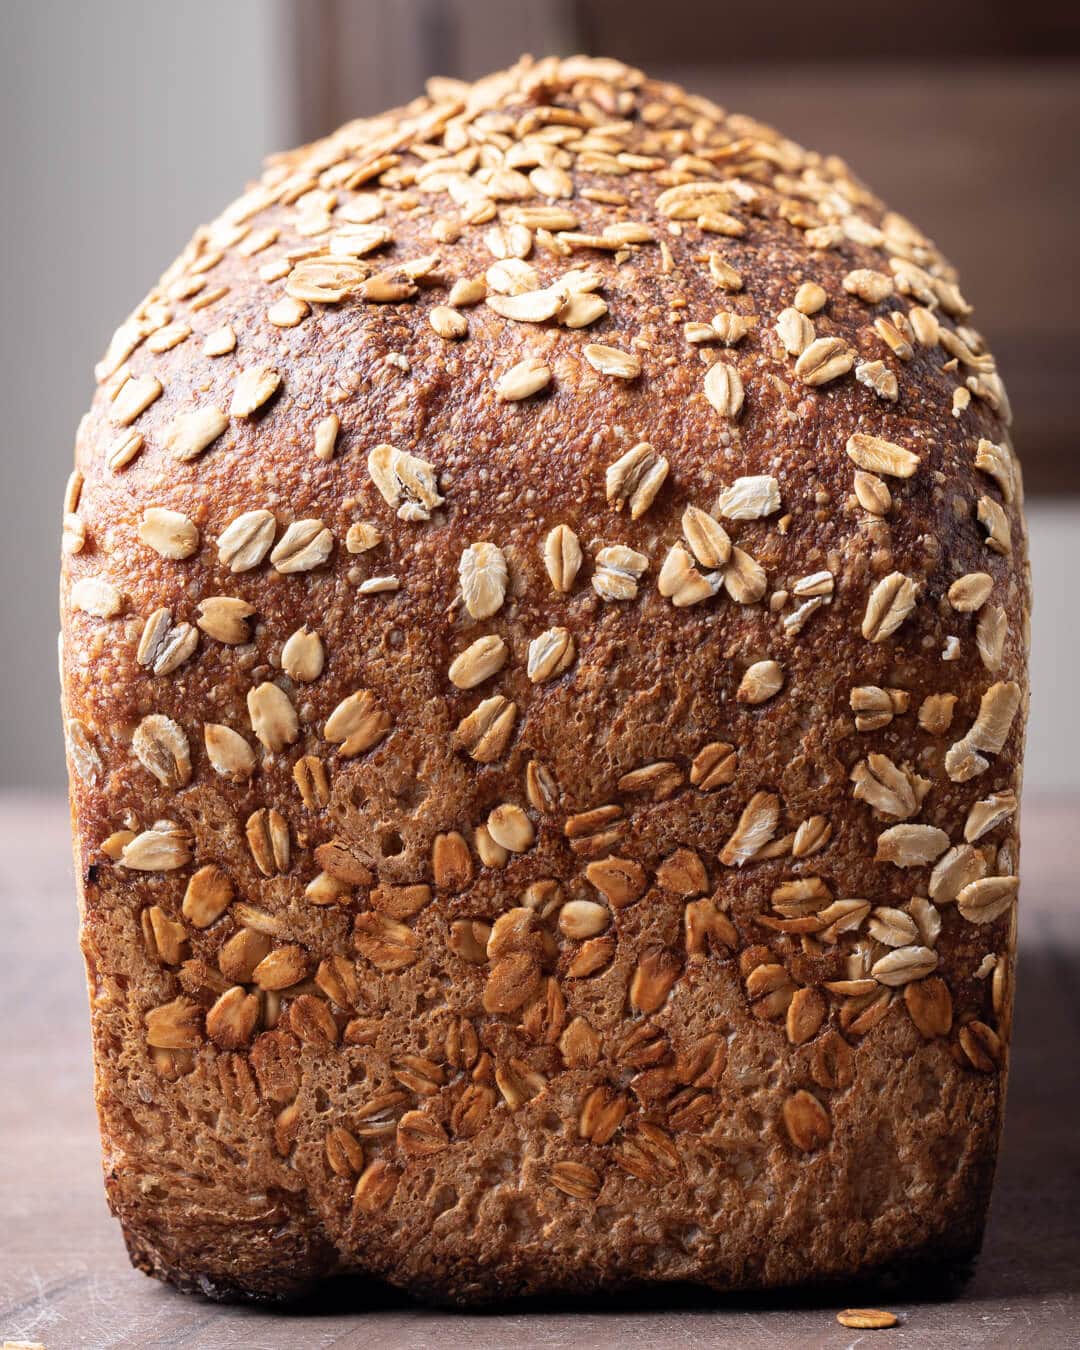
A splendid, gentle top curve from dough that’s proofed just enough. Just enough to still have “energy” to expand upward in the oven, but not so much that it causes an erratic fissure due to the lack of scoring. A balance. Add to that a striking exterior color from a bold bake, the enticing aroma from freshly milled flour, and a speckled oat topping—all contributing to a truly wonderful bread. But beyond all this, it’s one that’s meant to be eaten in thick slices carved from the loaf with a spread of soft butter, toasted and topped with fresh preserves, or used to cobble together a sandwich piled a little too high.
When baking this whole-grain wheat and spelt pan bread I could have sworn the kitchen smelled of honey… Or perhaps it was my eagerness to eat the result. When you go the distance from raw berries, freshly milled flour, to baked bread—all the while controlling each part of the transformation (or as much control as we’d like to think we have over fermentation)—it’s easy to get a little antsy, impatient, and, frankly, hungry.
At 100% fresh milled whole grain, and naturally leavened, this loaf is truly healthy fare. When making loaves like this sometimes I feel the need to mix-in seeds or nuts for even more nutrition, and that’s certainly possible here, but for me and this flour blend, this is just right. It’s fun to dredge up the simple and humble bread tin, to discover anew the appeal of confining bread to rise and bake in a single vessel. The tin can be an enabler to push the limits, to be more adventurous with hydration, grain types, and mix-ins. Chances are no matter what you do, as long as you can “get it into the tin,” your bread will bake up just fine.
Let’s have some fun.
Flour Selection
After trying a myriad of different grains in pan bread formulas, white wheat has to be among my favorites. The mild flavor works so well in this bread, and by adding in a touch of spelt, there’s an additional added layer of flavor. Spelt is almost always my go-to choice when I want to add in something special, something unexpected, something I can tell people: “oh that taste? That’s spelt.” I love it. However, feel free to sub out the spelt for whatever you have on hand. Because the white wheat is milder, you could change the 30% or so spelt to Khorasan, einkorn, or even more traditional red wheat.
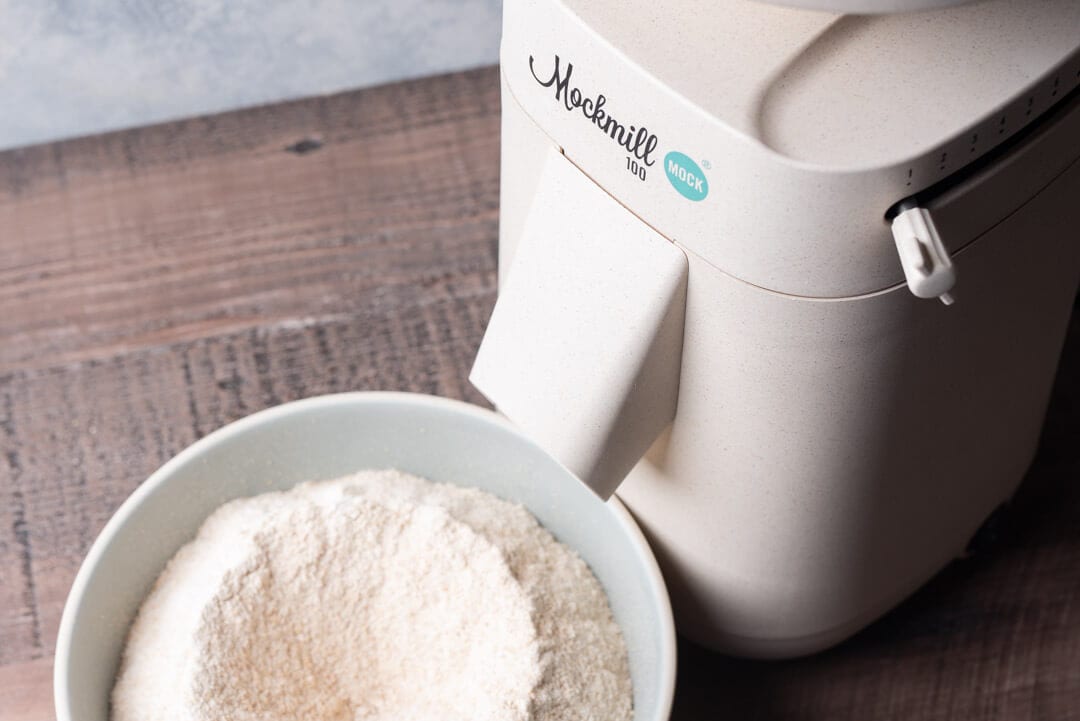
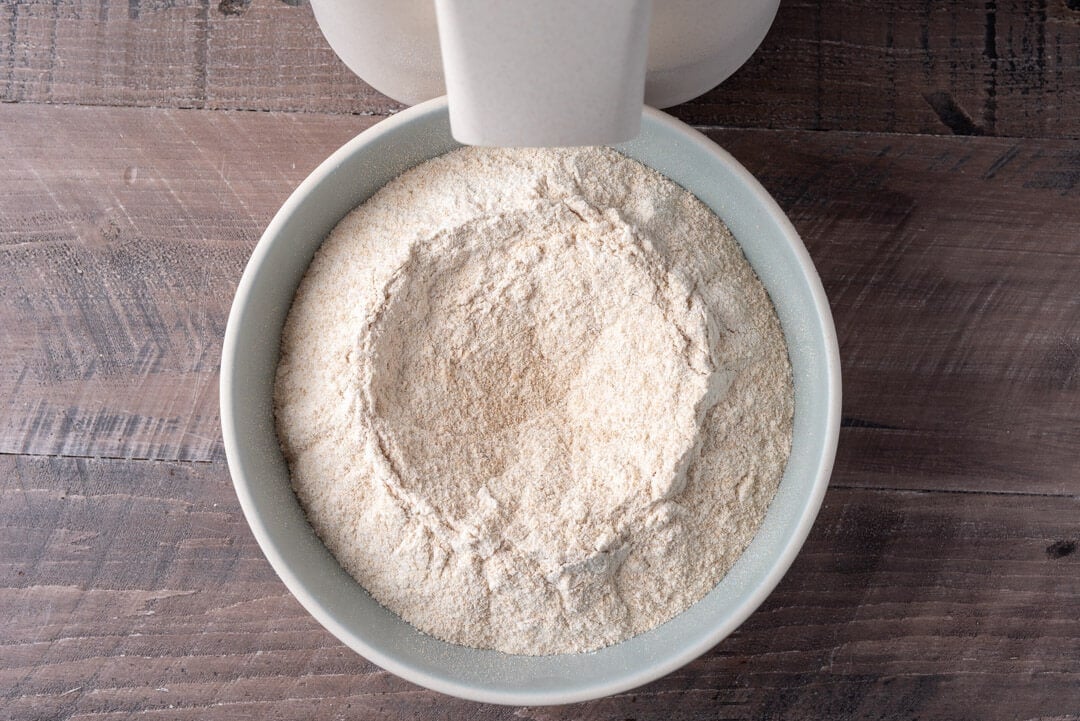
I used fresh milled organic whole white wheat (sourced from Breadtopia), as described below, but you could also use the excellent organic white wheat from King Arthur Flour. Their flour is also delicious when used in sourdough waffles and many other bread here at my site. I milled the white wheat and spelt in my Mockmill 100 home mill. I haven’t talked much about this mill yet, but I’ve been using it in my kitchen for a while, and I can safely say it’s a workhorse. It mills superbly fine flour, is built to last, and is priced exceptionally well. With mills like this, it’s easy for everyone to start milling fresh and healthy flour right from home.
For both the white wheat and spelt I mostly set the mill the finest level and turned it on. The result was freshly milled flour with a captivating aroma brimming with possibility.
Whole Grain Wheat and Spelt Pan Bread
This recipe yields a large loaf of bread: at 1400g it’s almost as large as my imposing Einkorn miche. If you are worried about fitting the dough in your pan, scale the formula down to a smaller loaf, or split it into two 700g loaves.
In a previous sandwich bread post, I was able to comfortably fit 1200g in a 9” x 5” x 2.75” pan—use this as a gauge for whatever pan you’re using.
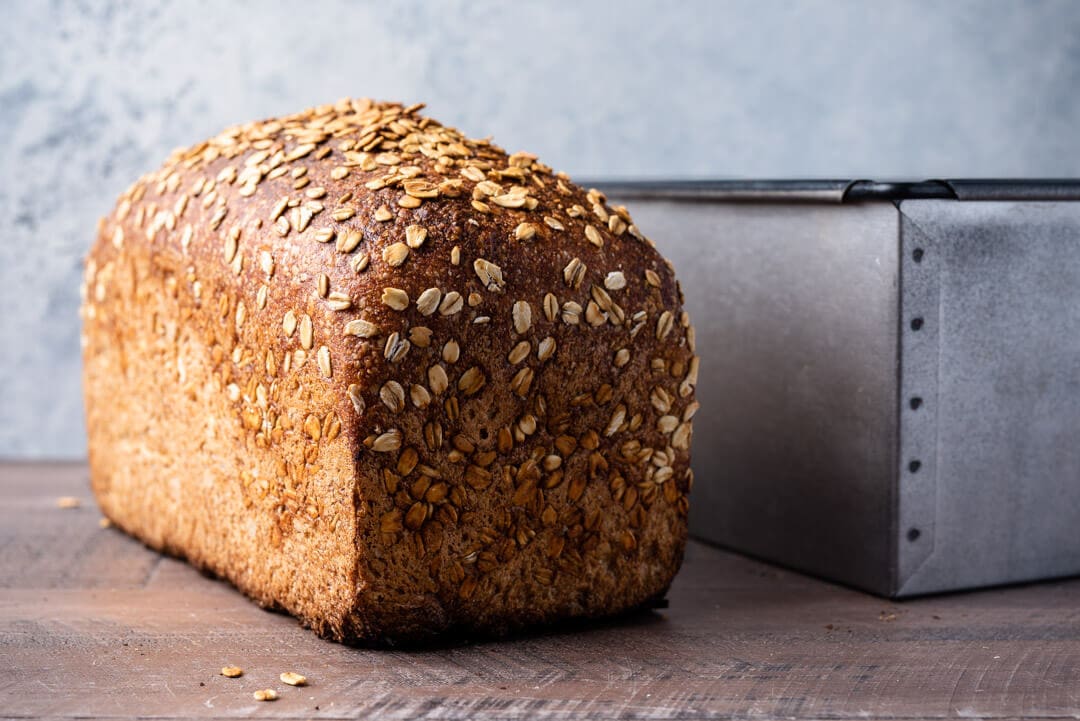
In this recipe, I’m using Campbell’s Bread Pan; the dimensions are 8.85″ x 4.7″ x 4.7″ deep (235mm x 120mm x 120mm deep).
Vitals
Total Dough Weight
1400 grams
Pre-fermented Flour
4.00%
Hydration
88%
Yield
One 1,400 gram pan loaf (or two 700 gram pan loaves)
Levain Build (Stiff)
I’ve come to rely on a stiff levain build when making bread with large percentages of freshly milled flour. The stiff levain, which can be anywhere from 50%-65% hydration depending on your starter and flour, brings loads of flavor to the resulting bread. I’ve also found that a stiff levain has a larger readiness window when it can be mixed into a dough.
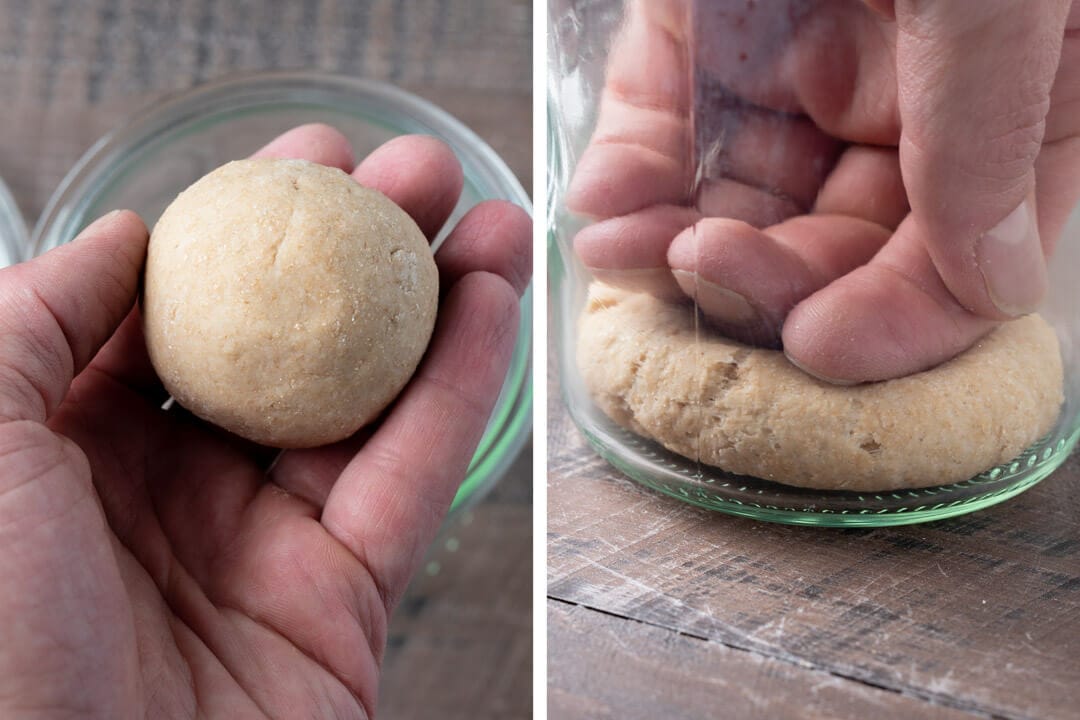
To make the stiff levain, I usually mix everything up with my plastic spatula, then knead it by hand when it becomes hard to stir. Then, I shape it into a ball and press it down into the bottom of a 1/2 liter Weck glass jar. Pressing the levain down like this helps me visually inspect when it’s ready to be used: I look for a leveling off of the “dome” that is created as it’s ripening. Additionally, you’ll see significant aeration at the sides, and, if you gently poke at the top, it’ll give readily under pressure. At 50% inoculation (the percentage of ripe starter used to build the levain) my levain was ready to be mixed into the dough after 5 hours at 78-80°F (25-26°C).
Note that the baker’s percentages listed below are with respect to the final dough ingredients and do not take into account the levain.
Weight
Ingredient
Baker’s Percentage
480g
Fresh Milled Hard White Winter Wheat (100% extraction)
68.75%
218g
Fresh Milled Spelt (100% extraction)
31.25%
625g
Water
89.58%
14g
Salt
1.98%
58g
Ripe, stiff levain (see above)
8.33%
Method
1. Stiff Levain – 10:00 a.m.
Build the levain (everything listed in the Levain Build section above) and store somewhere around 78°F (25°C) ambient until ripe, about 5 hours.
At this time it might be convenient for you to mill the required white wheat and spelt. Milling this early in the schedule also gives the flour time to cool down.
2. Autolyse
Due to the high percentage of freshly milled flour, there’s no need to use the autolyse technique with this recipe.
3. Mix – 3:00 p.m.
Add the called-for flour to a mixing bowl. Break up the ripe, stiff levain on top of the flour and add all but 100g of the water. Mix by hand until well combined.
The mix will be very wet and almost look like it won’t hold together. Perform folds in the bowl to add a little strength for about 5 minutes. Mixing in the bowl keeps things clean, and with dough this highly hydrated, it can be challenging to perform a mixing technique like slap and fold (see my guide to the slap and fold technique here) on the counter.
Add the salt to the top of the mixed dough and mix to incorporate. After this mixing, assess the dough. Does it look like it can handle the remaining 100g of water? Add the water if so, if not, omit the remaining water. Then, next time add the water if you find the dough was just fine by the end of the bake.
Transfer the dough to a tub or thick-walled bowl for bulk fermentation.
5. Bulk Fermentation – 3:00 p.m. to 6:30 p.m.
At 76-80°F (24-26°C) ambient temperature, the dough should be ready to divide after around 3 hours and 30 minutes.
Perform a total of 3 sets of stretches and folds during the bulk, spaced out by 30 minutes (the first set will take place 30 minutes after starting this step). To perform a set, with wet hands grab one side of the dough in the bowl stretch up and fold over to the other side. Do this four times at each direction (North, South, East, West).
After the last set, let the dough rest for the remaining bulk fermentation time.
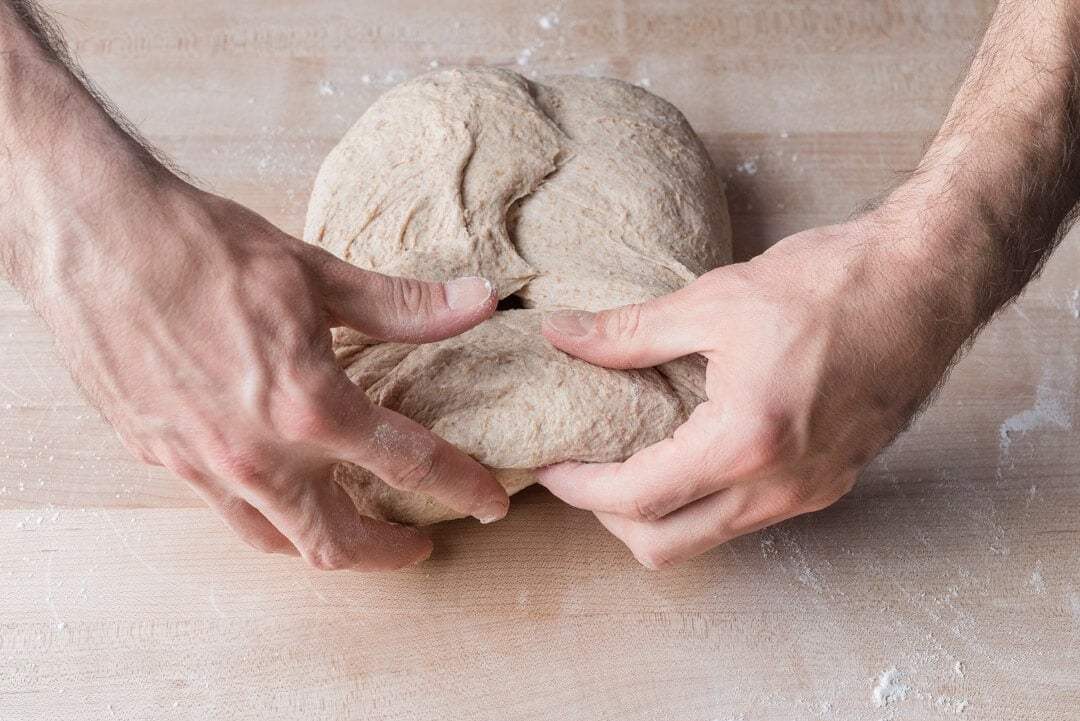
6. Divide & Preshape – 6:30 p.m.
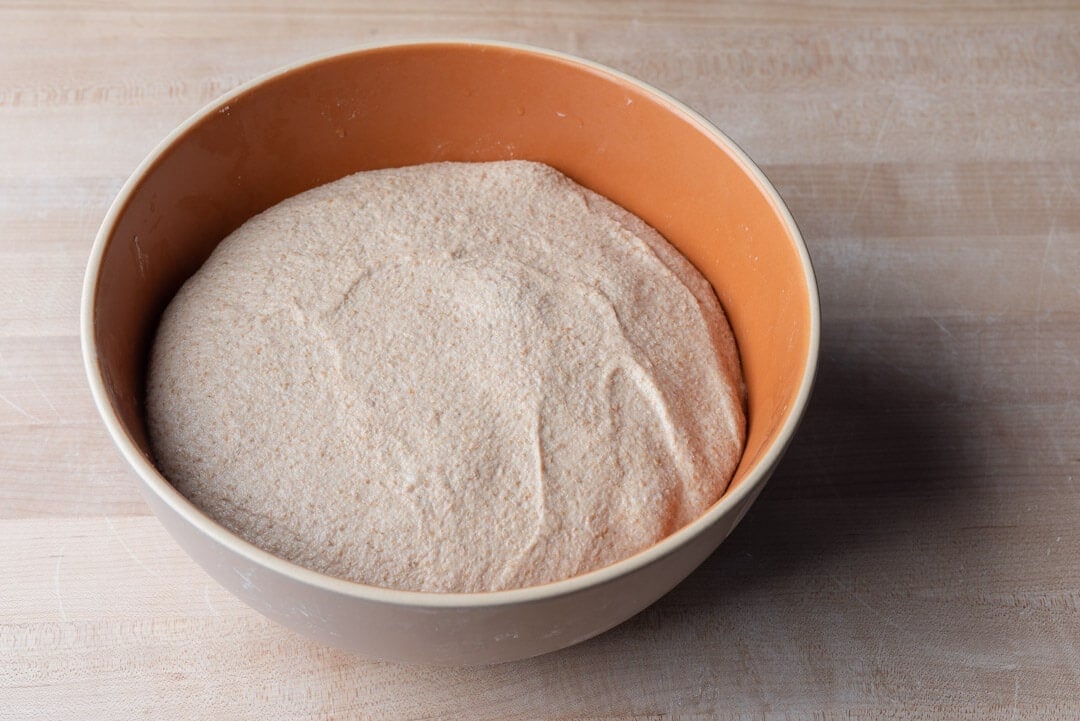
At the end of bulk fermentation, the dough will look slightly wet and be sticky to the touch, but it will be well risen and smoother than right after mixing (see the picture, below). Dump the dough from the bulk container to an un-floured work surface. Because this recipe only makes a single, large loaf, there is no need to divide the dough. Gently turn it on the bench with your hand and a bench knife to coerce it into a round.
Let the dough rest for 30 minutes, uncovered. Keep an eye on the dough. If it starts to spread quickly into a thin pancake, skip the remaining resting time and proceed directly to shaping.
7. Shape – 7:00 p.m.
For this recipe, I’m using Campbell’s Bread Pan, which results in bread with beautifully straight sides, a tall rise, and a golden crust. If you don’t have this pan, you can divide the recipe in half and bake each in a Pullman pan or other standard loaf pan.
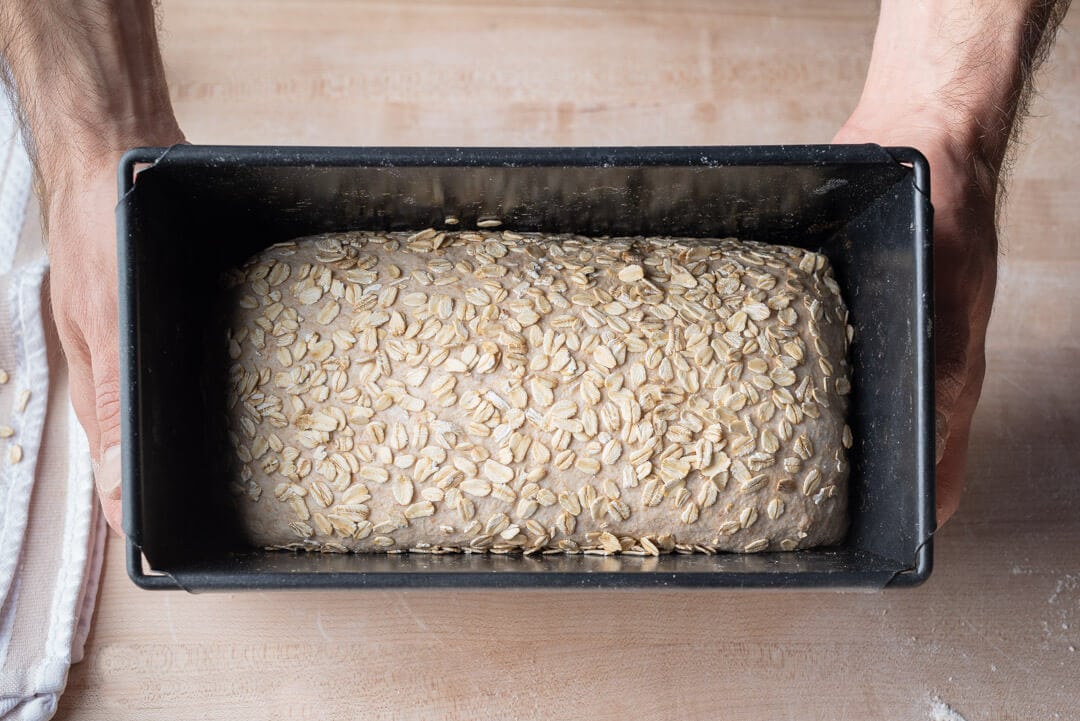
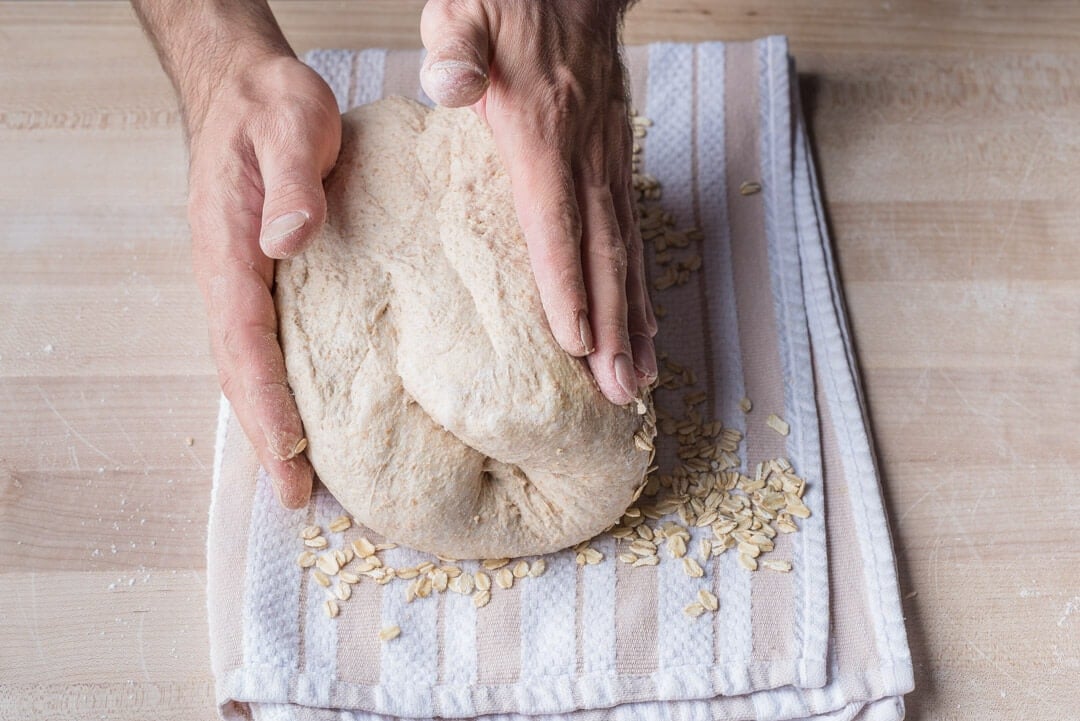
I love topping these loaves with raw, rolled oats: they crisp up in the oven and provide little bursts of toasted nut flavor when eating each slice. Lay a kitchen towel out next to your work area and spread a thin layer of thick rolled oats on top.
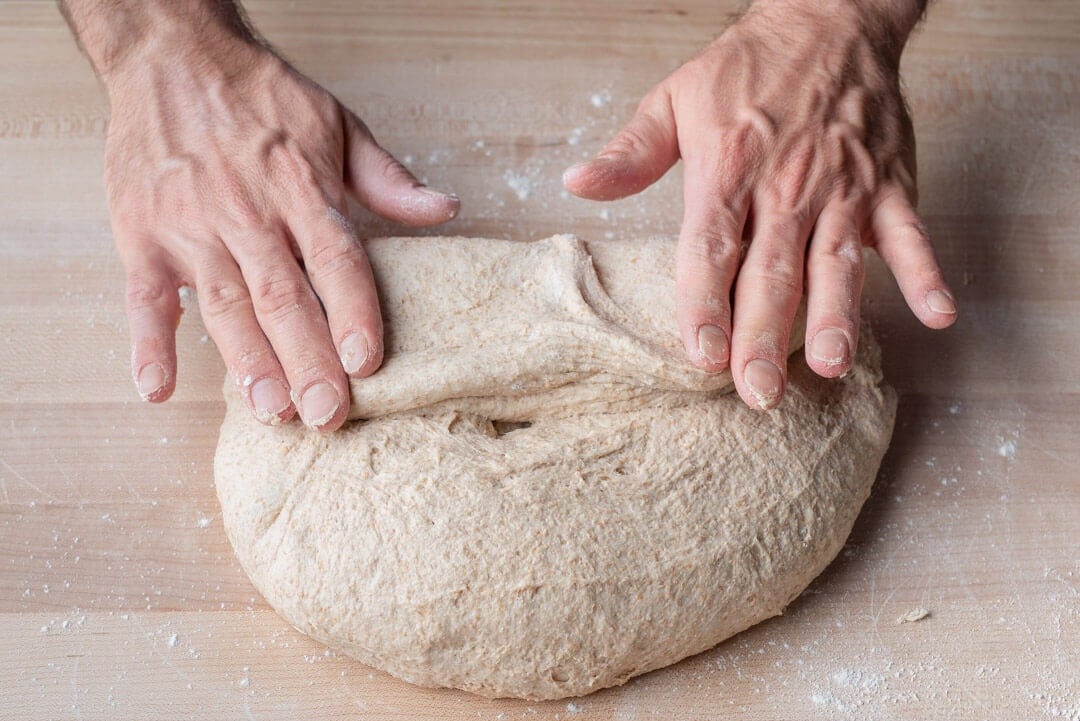
Lightly flour the top of your rested, and relaxed, dough round on the work surface. Using a bench knife and your hand, flip the round over. Fold the bottom up to the middle. Then fold each side, left and right, over to the other to form what looks like an open envelope in front of you. Then, grab the top and fold it up and down to just above the middle. Using both hands, grab the new top and gently roll it down into a long tube (imagine rolling down a beach towel or yoga mat).
Using your bench knife and a floured hand, scoop up the shaped tube and invert it onto the towel with oats (the seam will be facing up, see below). Grab the tube with each hand and gently rock it back and forth, so the oats stick to the outside.
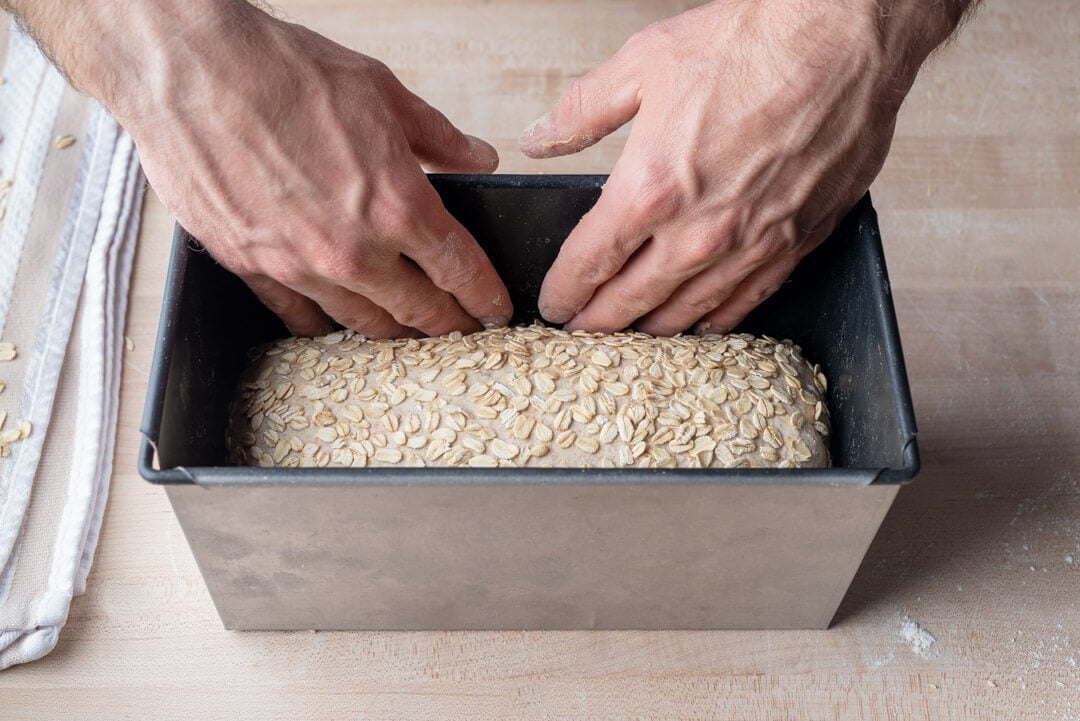
Finally, transfer the tube of dough to the pan. At this point you should be able to just drop in the dough, but if you have trouble don’t fret. Once you drop it in use your fingers to tuck the dough down at the sides. You want a smooth top on the dough when it’s in the pan so it rises uniformly.For more information on shaping, proofing, and scoring pan loaves check out my guide to shaping pan loaves.
8. Proof – 7:30 p.m. to 8:30 a.m. (the next day)
Cover the pan in an airtight reusable plastic bag and place it into the fridge overnight.
9. Bake – Preheat oven at 7:45 a.m., Bake at 8:30 a.m.
Preheat your empty oven to 450°F (230°C). There’s no need for baking stones since the dough is in a pan.
I steamed my oven in my usual way, with one deviation: I didn’t use the pan with lava rocks because there was plenty of steam with only the soaked & rolled towels. See my post on how to steam your home oven for more details.
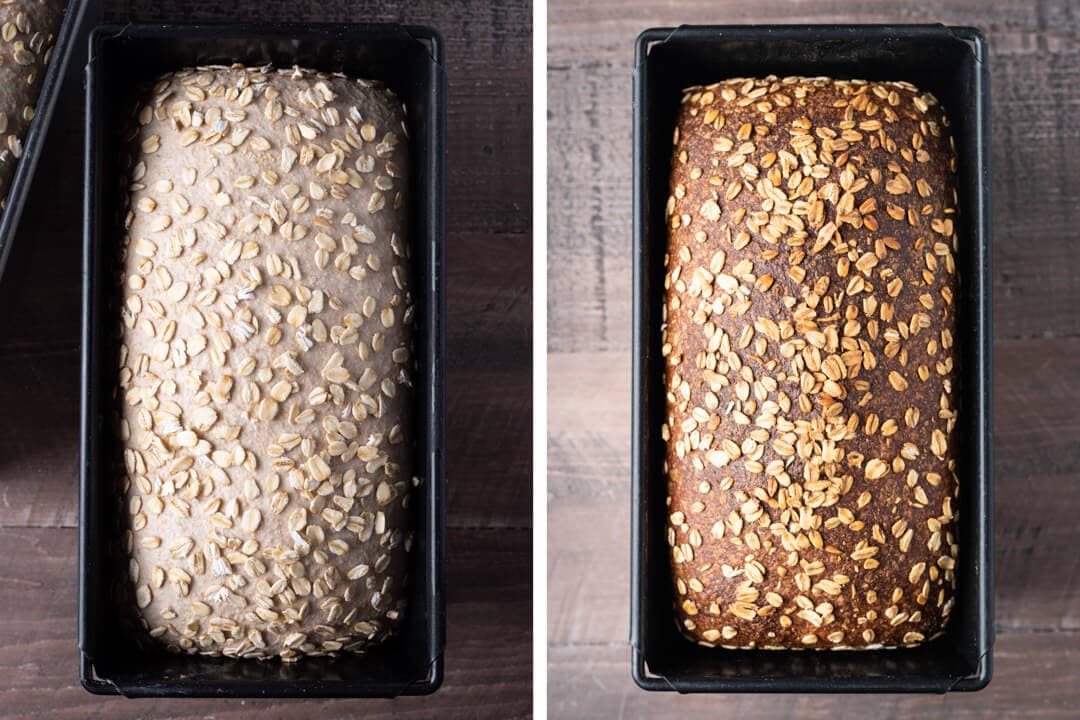
At the end of the bake, return the loaf to the oven without the pan to fully color the exterior.
Once you’ve preheated the oven, place the pan with soaked towels and the pan with your dough inside. Bake for 30 minutes. After 30 minutes, turn the oven down to 425°F (220°C), remove the steaming towels, rotate the pan 180°, and bake for 25 minutes. After this time the top should be well colored, remove the pan from the oven using oven-safe mitts. Carefully remove the loaf from the pan and return the loaf to the oven to bake for an additional 15-20 minutes at 425°F (220°C). I like to do this final bake outside of the pan to add more color to the exterior. If you find the top of the loaf starts to darken too much, tip it to the side and bake until your liking.
It’s essential with a high hydration pan bread that the loaf is fully baked out. Otherwise, you’ll have a gummy result. The outside should be colored a dark mahogany, and the interior temperature should read around 210°F (99°C). Finally, let this bread rest at least a few hours, possibly even overnight depending on when you baked, to ensure the interior is fully set.
Conclusion
With whole grain wheat and spelt pan bread like this, it’s pretty hard to justify buying anything in a plastic bag at the market. Aside from the extra time needed to mill the grain, this is a relatively straightforward formula that you could work into a weekly routine without issue. I’d venture to say pan bread might be some of the most baked around here—everyone needs good old fashioned toast, right?
Crust
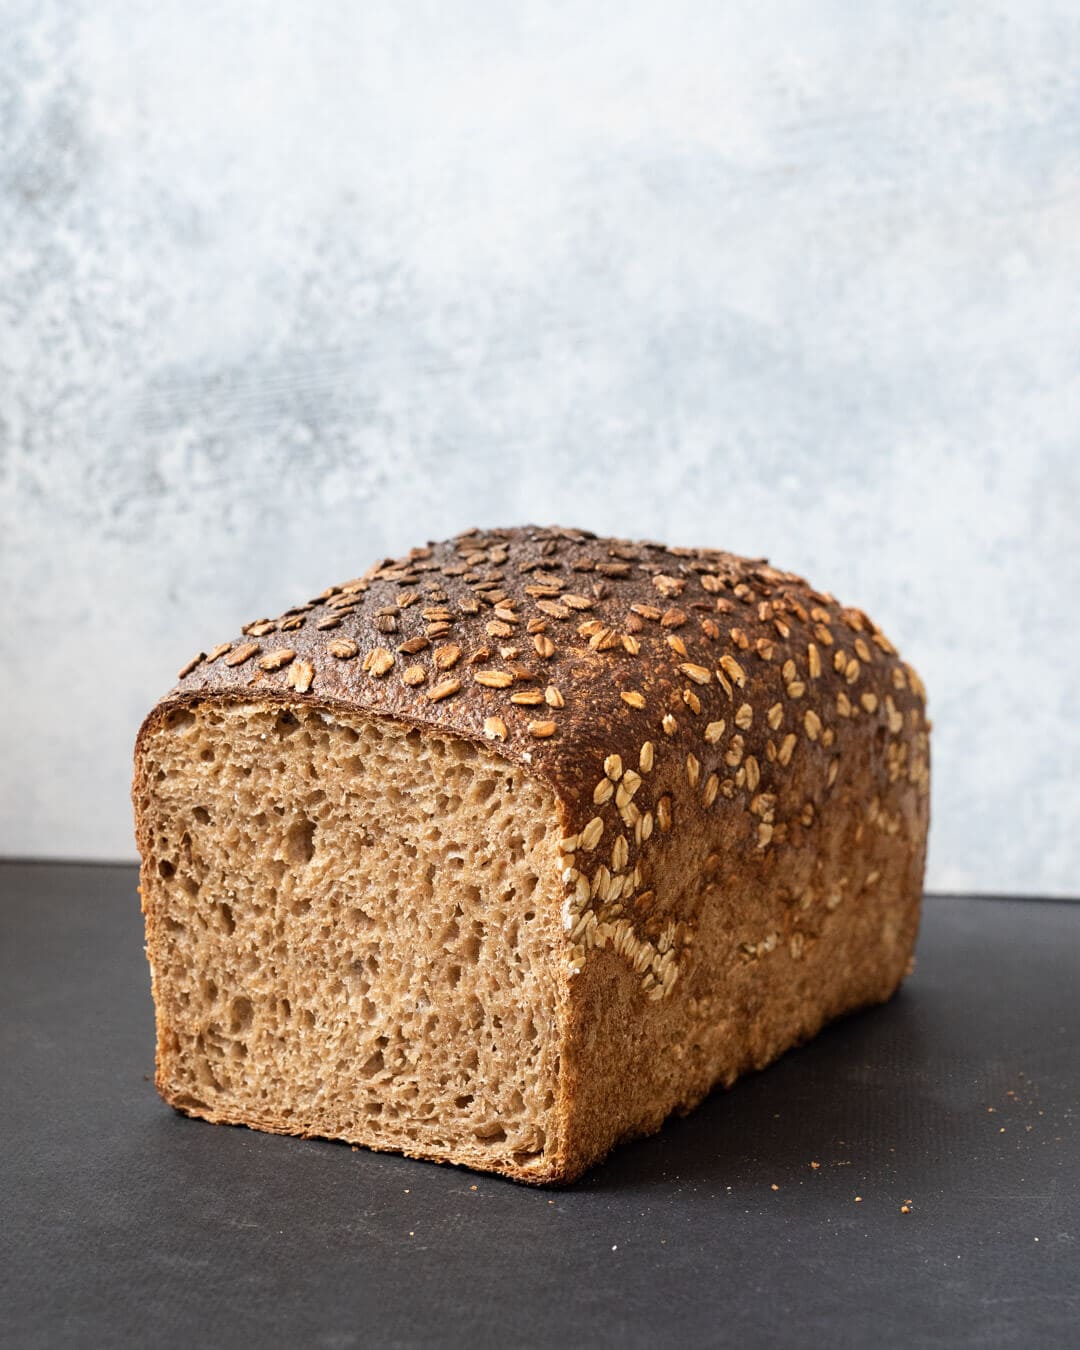
Thin and crunchy. This crust is not what you’d find from bagged sandwich bread: it has some bite to it, but it’s not overly harsh or hard. To me, it’s just right. The oats add unexpected crunch and little pockets of toasted oat flavor, a nutritious addition that isn’t necessary, but welcome.
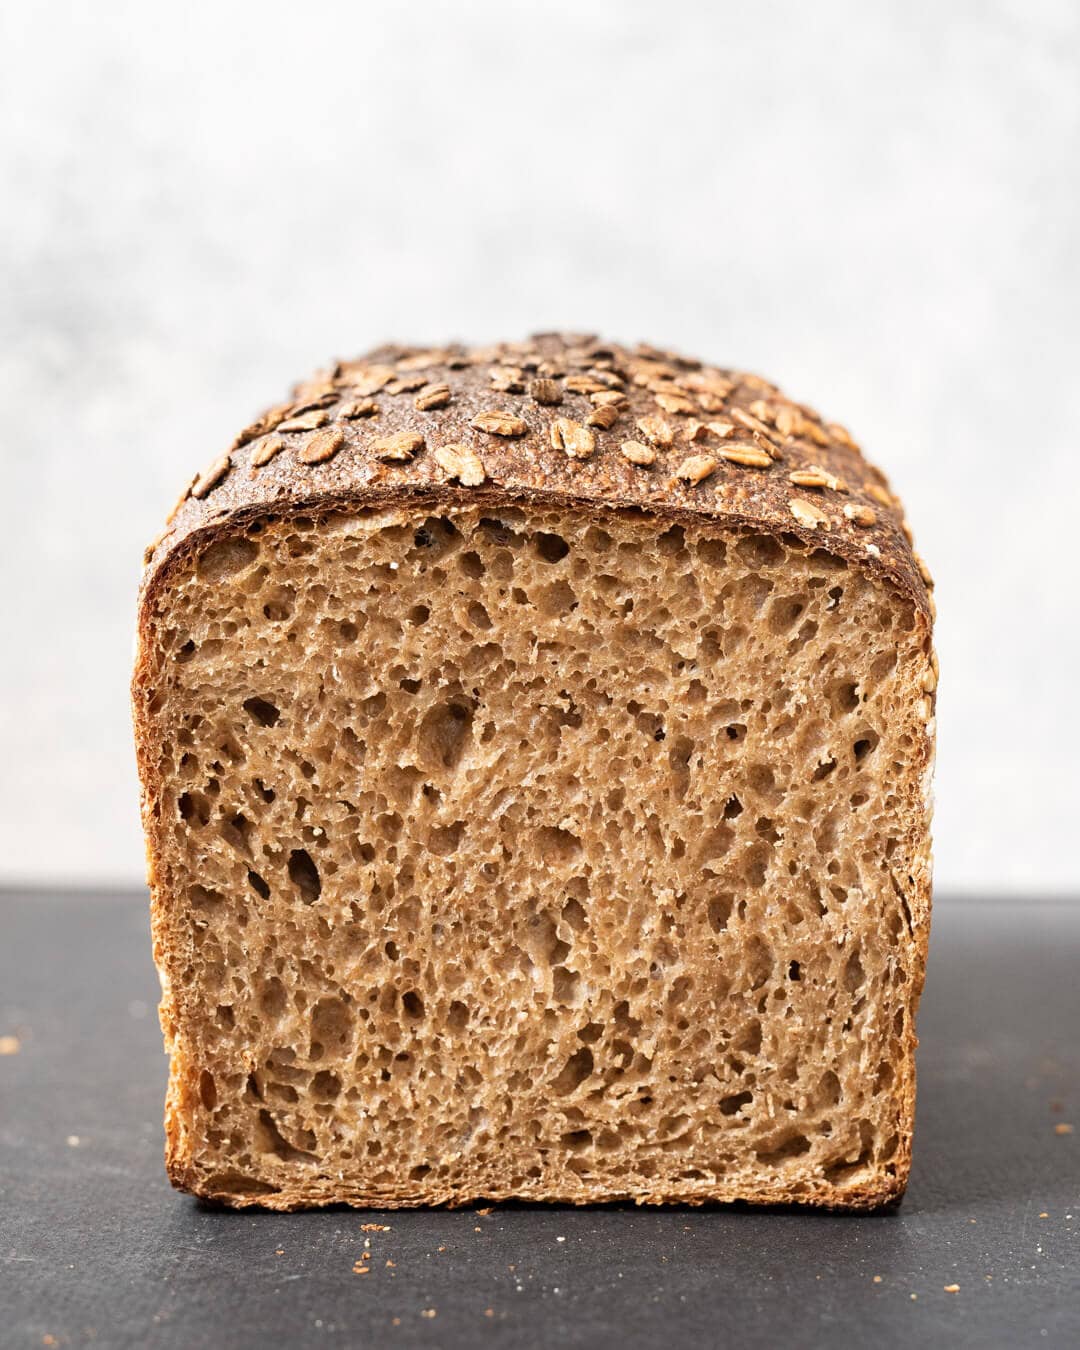
Crumb
A magnificent interior for 100% fresh milled whole grain. The high hydration helps here but so does a gentle and effective final shape. It can be a challenge to retain the open structure of this dough when first topping with oats and then finally into the pan. But, as long as you get it into the tin, this bread always bakes up nice.
With bread like this, I’m not looking for a super open interior, we need support for butter and jam, right?
Taste
There’s a subtle note of sourness in this bread that’s typical of most naturally leavened bread, but it’s so subtle it just adds depth of flavor. If you find yours is sour focus on your starter maintenance: feed it regularly and perhaps next time use it a bit sooner. Additionally, you could also try making the levain with half white flour and half whole wheat, to make things even milder.
The mild flavor of white wheat and pronounced spelt are in just the right balance with this whole-grain wheat and spelt pan bread. You can tell it’s whole grain, but it’s not overwhelming. It brings wonderful flavor to sandwiches and toast rather than just performing the backseat task of delivering other ingredients.
Whole Grain Wheat and Spelt Pan Bread Troubleshooting
Why is the inside of my bread gummy?
As I mentioned in the Bake section above, this loaf must be fully baked. If you have an instant-read thermometer, ensure the interior registers at least 205°F (96°C) before removing it from the oven. If you find it’s burning before reaching this temperature, you might want to try reducing the heat to allow for a longer bake.
It’s also possible your dough is under proofed, which can lead to a dense and gummy interior. Make sure you do a complete bulk fermentation and final proof.u003cbru003eFinally, try to wait at least several hours, preferably overnight, before slicing this loaf. Due to the high water content, cutting too early can result in gummy slices.
Why is my crust thicker than yours in the photos?
If the crust is too thick, reduce the bake time when the loaf is returned to the oven without the pan. Additionally, you could try steaming the oven a bit more or spritzing the top of the loaf with water just as you load it into the oven.
Maurizio Leo is the creator of the independent sourdough baking website The Perfect Loaf. His cookbook, The Perfect Loaf — The Craft and Science of Sourdough Breads, Sweets, and More, is a James Beard Award-winner and a New York Times bestseller. He lives in Albuquerque, NM, with his wife and two sons, where he's been baking sourdough for over a decade. He's been labeled "Bob Ross but for bread."
Do sourdough posts like this help you in your baking? Join The Baker’s Corner for only $60 a year, and get:
Come chat with me and other bakers and get baking help
Remove all ads on website
Get my bakers tools & discounts
Get the full recipe archive in editable spreadsheets
I have used this recipe several times. So far, it is our favorite whole grain sourdough bread. However, I cannot seem to keep the top crust from becoming so hard that I have trouble slicing. I have tried using soaked towels, and a pan of water, and nothing at all. All with the same results. Any ideas for achieving a softer top crust?
Glad to hear that, Mary! Hmm, that’s interesting. At first I’d say more steam in the oven, but it sounds like you’ve tried that. Is it possible you’re getting a lot of direct top heat from your oven? You might want to try dropping your rack in the oven lower, to see if that helps. Another idea is to tent some tin foil on top of the pan at the first half or so of the bake (make sure the foil is well up above the dough so it rises optimally). Additionally, if you have another pan that’s identical, you could invert it and place it on top of the pan with your dough — this will help trap steam and also provide some top insulation.
I know this is a two year old comment thread, but I wanted to vouch for using an inverted loaf pan as an almost dutch-oven like method to trap steam. I’ve been making the 100% whole spelt loaf this way, and it works perfect! No need for pans of soaked towels. I do spray into the oven every few minutes for the first ~2 minutes to help. I am not convinced it’s necessary though. Might try without spraying next time.
I just recently graduated from replicating the partially whole grain bread I learned to make in a sourdough breadmaking class, to this marvelous loaf! I’d like to try, as a next learning step, to bake two loaves at once. To be totally clear, do I simply double each ingredient, and then divide into two loaves when ready to shape?
Maurizio, I had pretty good luck with my first loaf, but the next 4 that I’ve made I am not getting hardly any oven rise, and the last two were these spelt loaves very disappointing. I did. I thought is I let the bread warm up a bit that might help, was that wrong? The levain looked very active & there was noticeable gas bubbles during bulk fermentation. I’m thinking I’m either not going far enough with bulk ferm or I’m handling the dough wrong. Any advice for how to figure this out? We are pretty warm here ambient temp is upper 70’s.
I have baked this loaf several times and the taste is amazing BUT it always “rips” on the side or at the bottom while baking in the oven. Is there a reason for this?
Lora
I’m using the version that you scaled to 1200g for Antonella and doubling the amounts to make 2 loaves but realized that I forgot to double the levain (only used 50g instead of 100g) while doing the folds in the fermentation stage. What should I do to compensate, ferment for longer before retarding in the fridge and by how much or what to look for, retard longer than overnight, other suggestions?
Reading around, I’ve seen advice for reducing commercial yeast and some for levain but they’re geared toward long fermentation on the counter, without retarding. So, it’s not clear how to compensate for this blunder.
BTW: I made this scaled version once before with the right amounts and it is absolutely wonderful. Nice job!
I am a new Baker and find your blog very informative. I am totally hooked to it. Have been reading it for continuous few hours. I have a query. At home I have – Organics Whole Wheat Flour (Organic), can I baked bread with it? It has only 5% Protein which is much less than your brand. Will the bread rise enough?
Really excited to try this bread! I’m a little confused on the formula numbers. The math hurt my head today ; ) When you say 1400 dough weight are you taking flour + water + salt + levain? The percentages are based off of the weight in flour, though, not the total weight? To be sure I’m getting it: ~700 grams of flour=100% and is used to calculate the percentages? So, to reduce the total weight of the dough to 1200 g I have to multiply everything by 85.7%? As always, thanks for your beautiful baking!
Hey M….I’ve got the dough going in bulk fermentation stage right now. I have a student here and printed the recipe and noticed you called for ‘soft’ white wheat. Did you mean soft or hard? Soft is usually used more often for pastries due to significantly lower gluten formation. Both hard red and white for breads and ‘hardier’ products. I didn’t notice until I’d already milled hard white in my new Mock Mill (bought two…one for Einkorn only so there could be no cross-contamination). Dough looks good tho. Can’t wait to see how it comes out!
Noticed that the loaf is placed directly in the frig after shaping and panning, and then baked immediately after preheating the oven the next morning. Should I look for the loaf to double in volume before baking or will oven spring alone create a good rise? Most recipes I’ve used call for some amount of proofing at room temp before retarding in the frig.
Baked this morning. Here are some pics: https://imgur.com/xAu6Tpnhttps://imgur.com/GIGPEnChttps://imgur.com/UvuLw75 I had a split on the top, crumb is tight but the texture was soft and airy with a nice mouth feel. I used rolled up saturated towels as recommended for steam. The crust is somewhat hard and takes some effort to chew. My Brod and Taylor runs 1-2 degrees cooler than the set temp so I set it for 80 F. The preshape kept it’s shape while resting. At the end of bulk fermentation the dough was sticky and a little slack which made final shaping a little challenging. My loaf is somewhat dark so I will adjust the temp of the oven for my next try. The flavor is fantastic. Do you think if I domed the pan but left it open at the sides and bottom it would help to trap some steam? It seems that the crust has formed while it was rising resulting in a less than favorable oven spring. Also in a previous post you mentioned using diastatic malt for fresh milled grains, would this recipe benefit from adding it?
hello, baked this bread today…the rise was nice, color beautiful..cut the middle and the slice gorgeous although the crumb not as open as yours ( less holes) ..but when I was slicing the rest of it I noticed that I was not getting clean cuts and some slices did not make it 100% in one piece…the crumb felt a little moist I guess…I used up all the water in the recipe…bulk 3.5 hours, yet the dough did not look too alive for me…shaped and in the fridge for around, not sure, 16 hours till the loaf passed the finger test ..I guess I will forward you a picture via email..thanks for your help again
Hi Maurizio, I have the pan you use for the rye bread which is 9x4x4. Do you think that size would work as well as the custom pan you used. Would it spill over the top? Preparing the dough now. I am excited about trying the stiffer levain!
Won’t a sourdough dough react with the tin? I read that somewhere. So I always line my tins with parchment paper. And also because I bake a lot of heavy rye breads in them, and worry about them sticking otherwise. 🙂
Hey Maurizio, Im 26 years old from Santa Monica,California and I found your website in April of last year. Somewhere in between April of last year and a couple weeks ago i gave up baking to take on other hobbies, neglected my starter and killed it. Anyways, to make a long story short. I’ve got a new starter up and running and ready to get baking again.
But now i’ve got all this old flour from last year (alot of it expensive as i had to get josey baker and grist and toll flour also lol) and was wondering if i could use it to feed my starter? Seems like a waste. I know baking bread with it is a bad idea as it smells funny and im sure it will affect my bread. I was thinking it might affect my starter also in a bad way so should i just take my loss and toss the old flour? Any info would be appreciated.
Maurizio!
Just moments before I opened your latest email, I ordered a pan variously described as either 2.2 kg (or 4 pound) Farmhouse loaf pan for wholewheat and whole grain/multigrain breads. I can’t explain my reason for wanting such a large loaf, except, ‘because it’s there’ [apologies to Sir Edmund Hillary]. Your recipes will be the first for my new pan.
I’m excited to try this tomorrow! Question: if reformatting to 50/50 whole wheat and white bread flour, do you recommend dropping the hydration? And if so, how much?


159 Comments
I have used this recipe several times. So far, it is our favorite whole grain sourdough bread. However, I cannot seem to keep the top crust from becoming so hard that I have trouble slicing. I have tried using soaked towels, and a pan of water, and nothing at all. All with the same results. Any ideas for achieving a softer top crust?
Glad to hear that, Mary! Hmm, that’s interesting. At first I’d say more steam in the oven, but it sounds like you’ve tried that. Is it possible you’re getting a lot of direct top heat from your oven? You might want to try dropping your rack in the oven lower, to see if that helps. Another idea is to tent some tin foil on top of the pan at the first half or so of the bake (make sure the foil is well up above the dough so it rises optimally). Additionally, if you have another pan that’s identical, you could invert it and place it on top of the pan with your dough — this will help trap steam and also provide some top insulation.
Hope one of these suggestions helps!
I know this is a two year old comment thread, but I wanted to vouch for using an inverted loaf pan as an almost dutch-oven like method to trap steam. I’ve been making the 100% whole spelt loaf this way, and it works perfect! No need for pans of soaked towels. I do spray into the oven every few minutes for the first ~2 minutes to help. I am not convinced it’s necessary though. Might try without spraying next time.
I just recently graduated from replicating the partially whole grain bread I learned to make in a sourdough breadmaking class, to this marvelous loaf! I’d like to try, as a next learning step, to bake two loaves at once. To be totally clear, do I simply double each ingredient, and then divide into two loaves when ready to shape?
Maurizio, I had pretty good luck with my first loaf, but the next 4 that I’ve made I am not getting hardly any oven rise, and the last two were these spelt loaves very disappointing. I did. I thought is I let the bread warm up a bit that might help, was that wrong? The levain looked very active & there was noticeable gas bubbles during bulk fermentation. I’m thinking I’m either not going far enough with bulk ferm or I’m handling the dough wrong. Any advice for how to figure this out? We are pretty warm here ambient temp is upper 70’s.
Hi Maurizio,
I have baked this loaf several times and the taste is amazing BUT it always “rips” on the side or at the bottom while baking in the oven. Is there a reason for this?
Lora
Hello,
i am wondering what do you recommend for slicing the bread with? a bread knife or a slicing machine?
Thank you
I’m using the version that you scaled to 1200g for Antonella and doubling the amounts to make 2 loaves but realized that I forgot to double the levain (only used 50g instead of 100g) while doing the folds in the fermentation stage. What should I do to compensate, ferment for longer before retarding in the fridge and by how much or what to look for, retard longer than overnight, other suggestions?
Reading around, I’ve seen advice for reducing commercial yeast and some for levain but they’re geared toward long fermentation on the counter, without retarding. So, it’s not clear how to compensate for this blunder.
BTW: I made this scaled version once before with the right amounts and it is absolutely wonderful. Nice job!
I am a new Baker and find your blog very informative. I am totally hooked to it. Have been reading it for continuous few hours. I have a query. At home I have – Organics Whole Wheat Flour (Organic), can I baked bread with it? It has only 5% Protein which is much less than your brand. Will the bread rise enough?
Really excited to try this bread! I’m a little confused on the formula numbers. The math hurt my head today ; ) When you say 1400 dough weight are you taking flour + water + salt + levain? The percentages are based off of the weight in flour, though, not the total weight? To be sure I’m getting it: ~700 grams of flour=100% and is used to calculate the percentages? So, to reduce the total weight of the dough to 1200 g I have to multiply everything by 85.7%? As always, thanks for your beautiful baking!
Hey M….I’ve got the dough going in bulk fermentation stage right now. I have a student here and printed the recipe and noticed you called for ‘soft’ white wheat. Did you mean soft or hard? Soft is usually used more often for pastries due to significantly lower gluten formation. Both hard red and white for breads and ‘hardier’ products. I didn’t notice until I’d already milled hard white in my new Mock Mill (bought two…one for Einkorn only so there could be no cross-contamination). Dough looks good tho. Can’t wait to see how it comes out!
Can i use rye flour instead of spelt? Spelt is pricey and not readily available in South Africa!
Lora
Shocked this hasn’t been asked yet: Where did you buy your custom loaf pan? I love the height and proportions of your loaf!
Noticed that the loaf is placed directly in the frig after shaping and panning, and then baked immediately after preheating the oven the next morning. Should I look for the loaf to double in volume before baking or will oven spring alone create a good rise? Most recipes I’ve used call for some amount of proofing at room temp before retarding in the frig.
my loaf split like CRAZY. should we be scoring this one?
Baked this morning. Here are some pics: https://imgur.com/xAu6Tpn https://imgur.com/GIGPEnC https://imgur.com/UvuLw75 I had a split on the top, crumb is tight but the texture was soft and airy with a nice mouth feel. I used rolled up saturated towels as recommended for steam. The crust is somewhat hard and takes some effort to chew. My Brod and Taylor runs 1-2 degrees cooler than the set temp so I set it for 80 F. The preshape kept it’s shape while resting. At the end of bulk fermentation the dough was sticky and a little slack which made final shaping a little challenging. My loaf is somewhat dark so I will adjust the temp of the oven for my next try. The flavor is fantastic. Do you think if I domed the pan but left it open at the sides and bottom it would help to trap some steam? It seems that the crust has formed while it was rising resulting in a less than favorable oven spring. Also in a previous post you mentioned using diastatic malt for fresh milled grains, would this recipe benefit from adding it?
hello, baked this bread today…the rise was nice, color beautiful..cut the middle and the slice gorgeous although the crumb not as open as yours ( less holes) ..but when I was slicing the rest of it I noticed that I was not getting clean cuts and some slices did not make it 100% in one piece…the crumb felt a little moist I guess…I used up all the water in the recipe…bulk 3.5 hours, yet the dough did not look too alive for me…shaped and in the fridge for around, not sure, 16 hours till the loaf passed the finger test ..I guess I will forward you a picture via email..thanks for your help again
one more question-Is the King Arthur flour you mentioned King Arthur Bread Flour or regular all purpose flour?
Hi Maurizio, I have the pan you use for the rye bread which is 9x4x4. Do you think that size would work as well as the custom pan you used. Would it spill over the top? Preparing the dough now. I am excited about trying the stiffer levain!
Won’t a sourdough dough react with the tin? I read that somewhere. So I always line my tins with parchment paper. And also because I bake a lot of heavy rye breads in them, and worry about them sticking otherwise. 🙂
Hey Maurizio, Im 26 years old from Santa Monica,California and I found your website in April of last year. Somewhere in between April of last year and a couple weeks ago i gave up baking to take on other hobbies, neglected my starter and killed it. Anyways, to make a long story short. I’ve got a new starter up and running and ready to get baking again.
But now i’ve got all this old flour from last year (alot of it expensive as i had to get josey baker and grist and toll flour also lol) and was wondering if i could use it to feed my starter? Seems like a waste. I know baking bread with it is a bad idea as it smells funny and im sure it will affect my bread. I was thinking it might affect my starter also in a bad way so should i just take my loss and toss the old flour? Any info would be appreciated.
Maurizio!
Just moments before I opened your latest email, I ordered a pan variously described as either 2.2 kg (or 4 pound) Farmhouse loaf pan for wholewheat and whole grain/multigrain breads. I can’t explain my reason for wanting such a large loaf, except, ‘because it’s there’ [apologies to Sir Edmund Hillary]. Your recipes will be the first for my new pan.
Is that a new mill? I remember a different one a year or so ago? I’m looking to buy a new one, which is your favorite?
I’m excited to try this tomorrow! Question: if reformatting to 50/50 whole wheat and white bread flour, do you recommend dropping the hydration? And if so, how much?
Hi Maurizio, love the two flavors for this loaf, can I double this recipe to make two loaves….?
Perfect loaf! And I like the new format of the blog. Thanks Maurizio 🙂
Sounds like a fantastic loaf of bread but why so much salt? 2.4% …..I never put more than 1.7 in my loaves without any detriment to the taste