
Spelt found its way into my baking rotation ages ago and has since become a regular in many of my recipes. It has an unmistakable flavor that permeates and pervades a loaf of bread, much like warming butter on the stove seems to occupy a house all at once. And while I’ve been keen on the nutritious grain for years, I’ve never ventured down the path of a 100% whole grain spelt pan loaf. Let’s change that.
Keeping with my recent predisposition towards baking in pans—see my recent pain de mie and my barley pan loaf—I just knew spelt would lend itself nicely to the confines of a rectangular pan, especially since I like to push pan loaves to high hydration. So my first trials with this recipe were structured around increasing the water at each attempt, but after several iterations, I found myself preferring previous results with lower hydrations: more doesn’t always mean better.
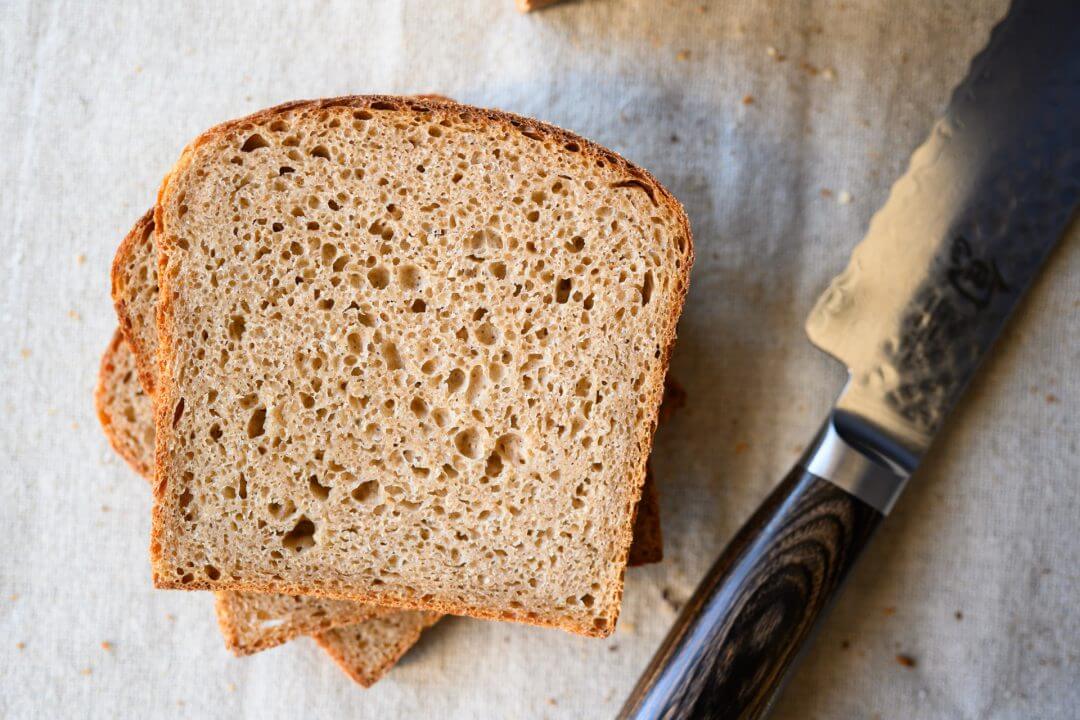
As you can see in the image above, the interior on this loaf with hydration at 80% resulted in a crumb that was very tender and custard-like. While this is typically what I’m after with a hearth loaf, I found the texture to be a little off even if the flavor was quite good. In later tests, I reduced the hydration down from 80% to 75% (stopping at each digit along the way), finally achieving a loaf that was fluffier, lighter, and more delicate—just the result I had envisioned. The difference in results is subtle but noticeable.
As always, be sure to adjust the hydration of this recipe to suit your flour, starting low and working up.
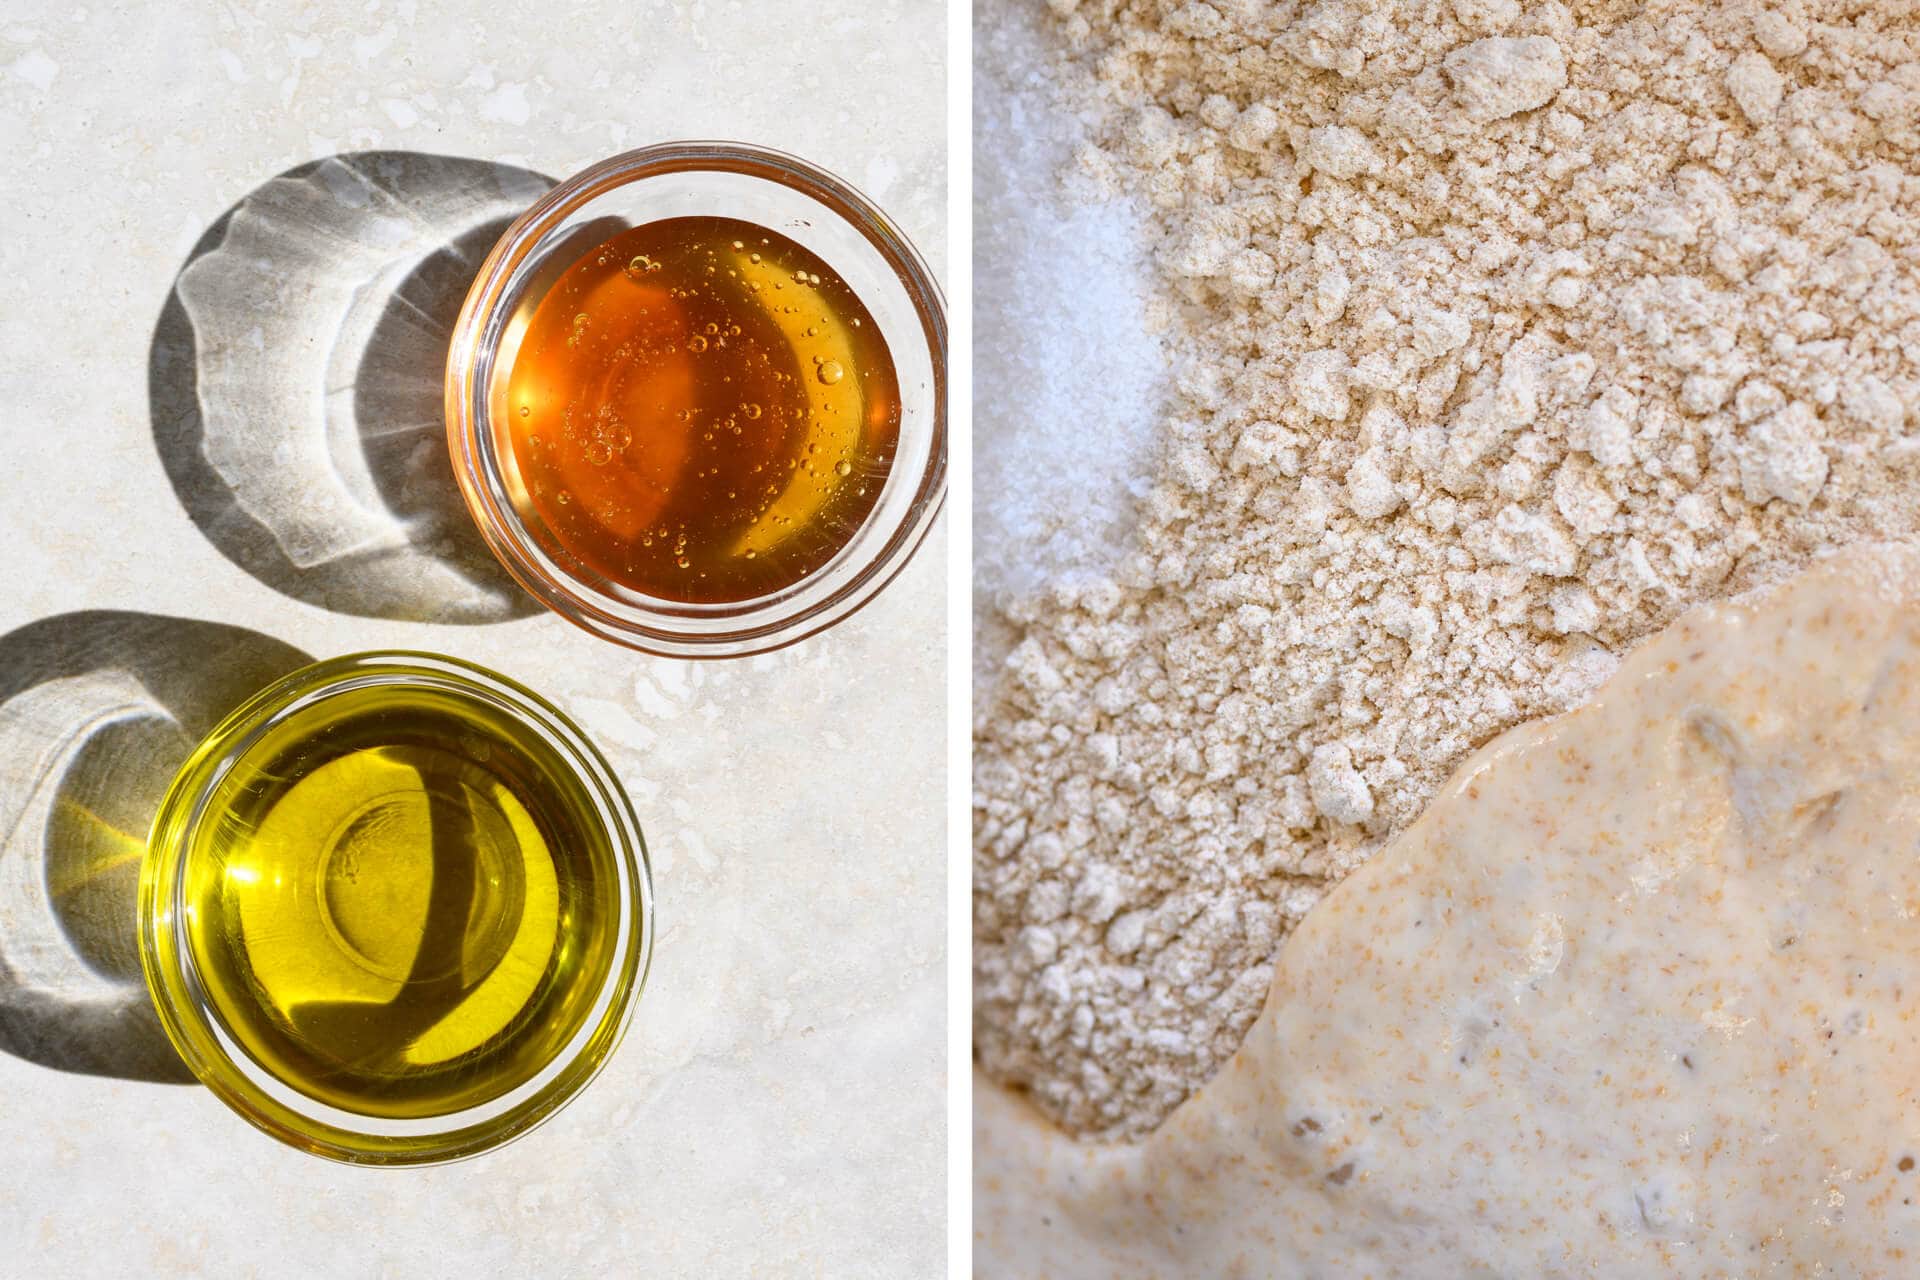
Fiddling with the hydration in any recipe is always a back-and-forth play. There’s a fine line between just hydrated enough, and gone too far. And while this recipe clocks in at 75% hydration, keep in mind there is also honey and olive oil added to the dough, two more forms of liquid. Be sure to adjust the hydration of this recipe to suit your flour, perhaps starting at 70% hydration if you’re working with new flour.
So why 100% spelt flour? A recipe such as this has been mulling around in my head for a while, but additional motivation came in the form of several emails I received on the nutritional benefits of spelt flour when used in a whole grain sourdough bread.
Spelt and a Low FODMAP Diet
Certain foods high in FODMAPs (fermentable oligosaccharides, disaccharides, monosaccharides, and polyols), which are carbohydrates, can be responsible for discomfort in those who have trouble digesting/absorbing them in their small intestine, particularly those who have IBS or other gastrointestinal disorders. While I don’t have IBS or suffer from a food-based allergy or illness, I can sympathize with those in that situation.
Traditional sourdough bread made with whole grain spelt flour can classify as a low FODMAP food, conforming to the diet. This isn’t to say spelt itself is low FODMAP, but when the grain is used in a traditional sourdough bread (with is lengthy natural fermentation), it is better tolerated. This is promising for those who strictly adhere to a low FODMAP diet, potentially allowing them to eat bread—something on the do-not-eat list—in moderation.
And in addition, spelt has higher levels of protein than modern wheat, is a good source of dietary fiber, vitamins, and minerals. Plus, it just tastes great—when you take a bit of this bread your body just knows it’s healthy.
Whole Grain Spelt Pan Loaf Recipe
The quantity of extra virgin olive oil and honey in this recipe is right in balance: you will taste a hint of sweetness from the honey and a slightly fruity flavor and a soft texture from the olive oil. I toyed with lower percentages of each (little impact) and higher percentages (too overpowering) and settled on just the right amount. Additionally, I increased the salt percentage from my typical flat 2% to 2.2% to help draw out more of the whole-grain flavor.
Note that honey is not a low FODMAP food, but the honey used in this recipe can easily be replaced, 1-for-1, by pure maple syrup.
Depending on the size of your baking pan, you might need to adjust the total weight of this dough, or split it into two loaves. See my guide to shaping a pan loaf for various pan sizes and dough weights.
I used my 8.85″ x 4.7″ x 4.7″ bread pan for this bake.
Vitals
| Total Dough Weight | 1,400 grams |
| Pre-fermented Flour | 5.50% |
| Hydration | 75% |
| Yield | One 1,400 g pan loaf |
Total Formula
| Weight | Ingredient | Baker’s Percentage |
|---|---|---|
| 745g | Whole grain spelt flour (Central Milling Whole Spelt Flour) | 100.00% |
| 558g | Water | 75.00% |
| 37g | Honey (substitute for pure maple syrup for a low FODMAP option) | 5.00% |
| 37g | Extra virgin olive oil | 5.00% |
| 16g | Salt | 2.20% |
| 6g | Sourdough starter (100% hydration) | 0.83% |
Levain Build
Note that only a small amount of sourdough starter is needed for this recipe. Overnight, this small bit of starter, fresh flour, and water, grows to an 80g levain mixed into the final dough. See my guide to the differences between a levain and sourdough starter for more information.
| Weight | Ingredient | Baker’s Percentage |
|---|---|---|
| 6g | Ripe sourdough starter (100% hydration) | 15.00% |
| 41g | Whole grain spelt flour (Central Milling Whole Spelt Flour) | 100.00% |
| 41g | Water | 100.00% |
Dough Formula
The target final dough temperature (FDT) is 78°F (25°C).
Note that the baker’s percentages listed below are with respect to the final dough ingredients and do not take into account the levain.
| Weight | Ingredient |
|---|---|
| 704g | Whole grain spelt flour (Central Milling Whole Spelt Flour) |
| 518g | Water |
| 37g | Honey (substitute for pure maple syrup for a low FODMAP option) |
| 37g | Extra virgin olive oil |
| 16g | Salt |
| 88g | Ripe liquid levain (see above) |
Method
1. Liquid Levain – Night before mixing, 9:00 p.m.
Add the called for mature sourdough starter, water, and flour listed in the Levain Build section above to a clean jar. Mix well and cover overnight.
2. Mix – 9:00 a.m.
When your levain is mature and ready to be used, add the flour, levain, honey, extra virgin olive oil, salt, and water to a mixing bowl. Usually, I hold back enrichments (EVOO, honey) from a dough until after strengthening (read why, here), but this dough came together without issue when everything was added at the onset. Using your hands, mix everything until it comes together into a shaggy mass. Continue to stretch and fold the dough over itself in the bowl to build strength, it will transform from sticky and shaggy to smooth and elastic over the course of 4-5 minutes.
Transfer the dough to a container for bulk fermentation and cover.
3. Bulk Fermentation – 9:15 a.m. to 12:45 p.m.
During the three and a half hour bulk fermentation, give the dough four sets of stretch and folds. The first set will be 15 minutes after the start of bulk fermentation, then every 30 minutes thereafter. Let the dough rest after the last set of stretch and folds for the remainder of bulk fermentation.
4. Preshape – 12:45 p.m.

I find it easier to preshape this dough using water on the bench and hand instead of flour. Fill a bowl with a little water and place it near your work surface. Gently scrape out your dough from the bulk container onto your dry counter. Using a wet hand and bench knife, preshape the amorphous blob into a very taut round.
Be sure to preshape this dough rather tight to give it extra strength and to prevent excessive spreading on the counter.

Let the dough rest, uncovered, for 20 minutes.
5. Shape – 1:05 p.m.
If your baking pan is not non-stick, lightly grease the interior of the pan with oil.
Depending on how slack your dough is, this can be a slightly challenging dough to shape. Liberally flour your work surface and the top of the preshaped round with whole-grain spelt flour, and shape quickly, tightly, and confidently.
I shaped this dough following my guide to shaping pan loaves.
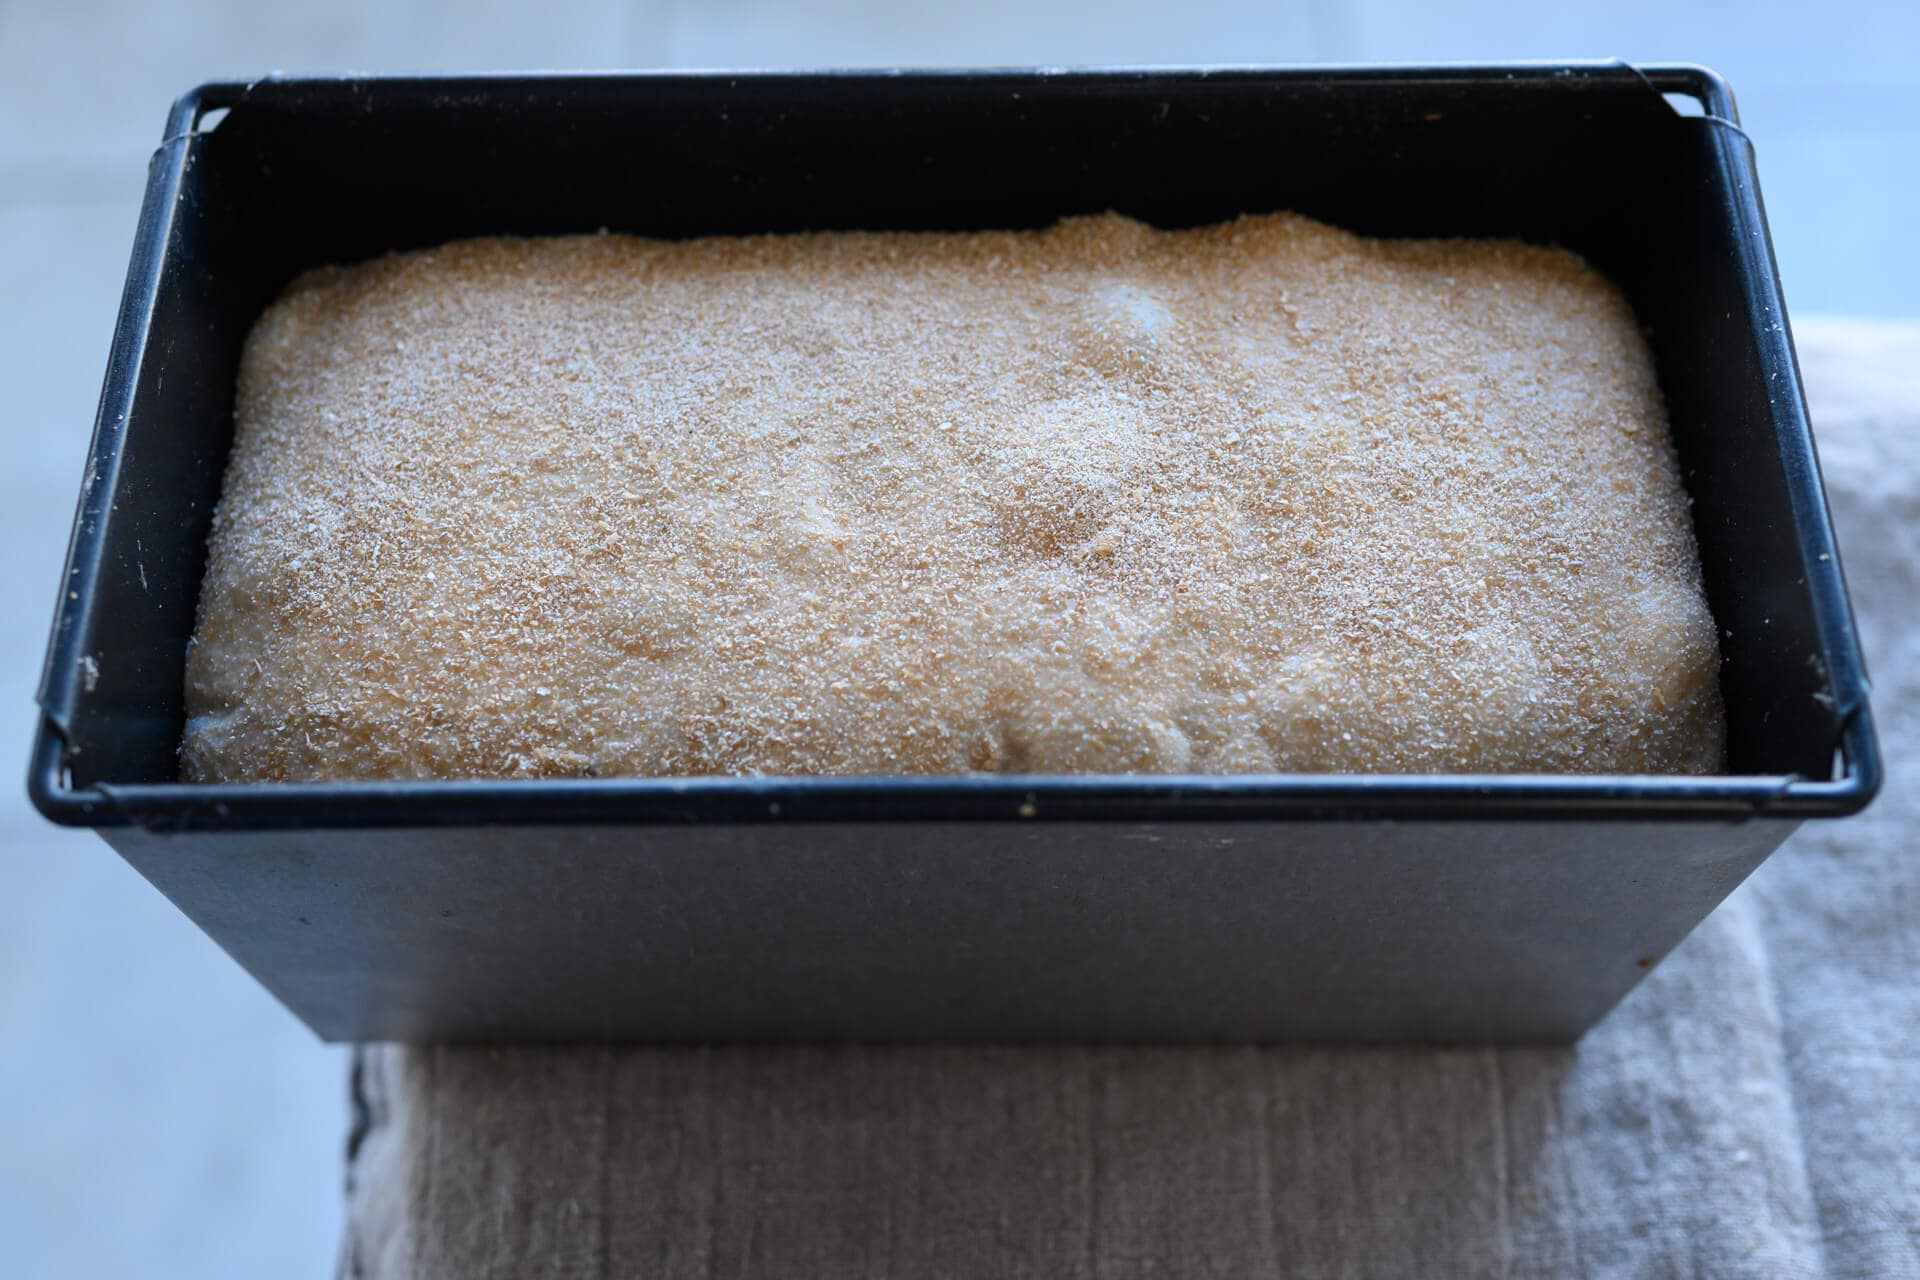
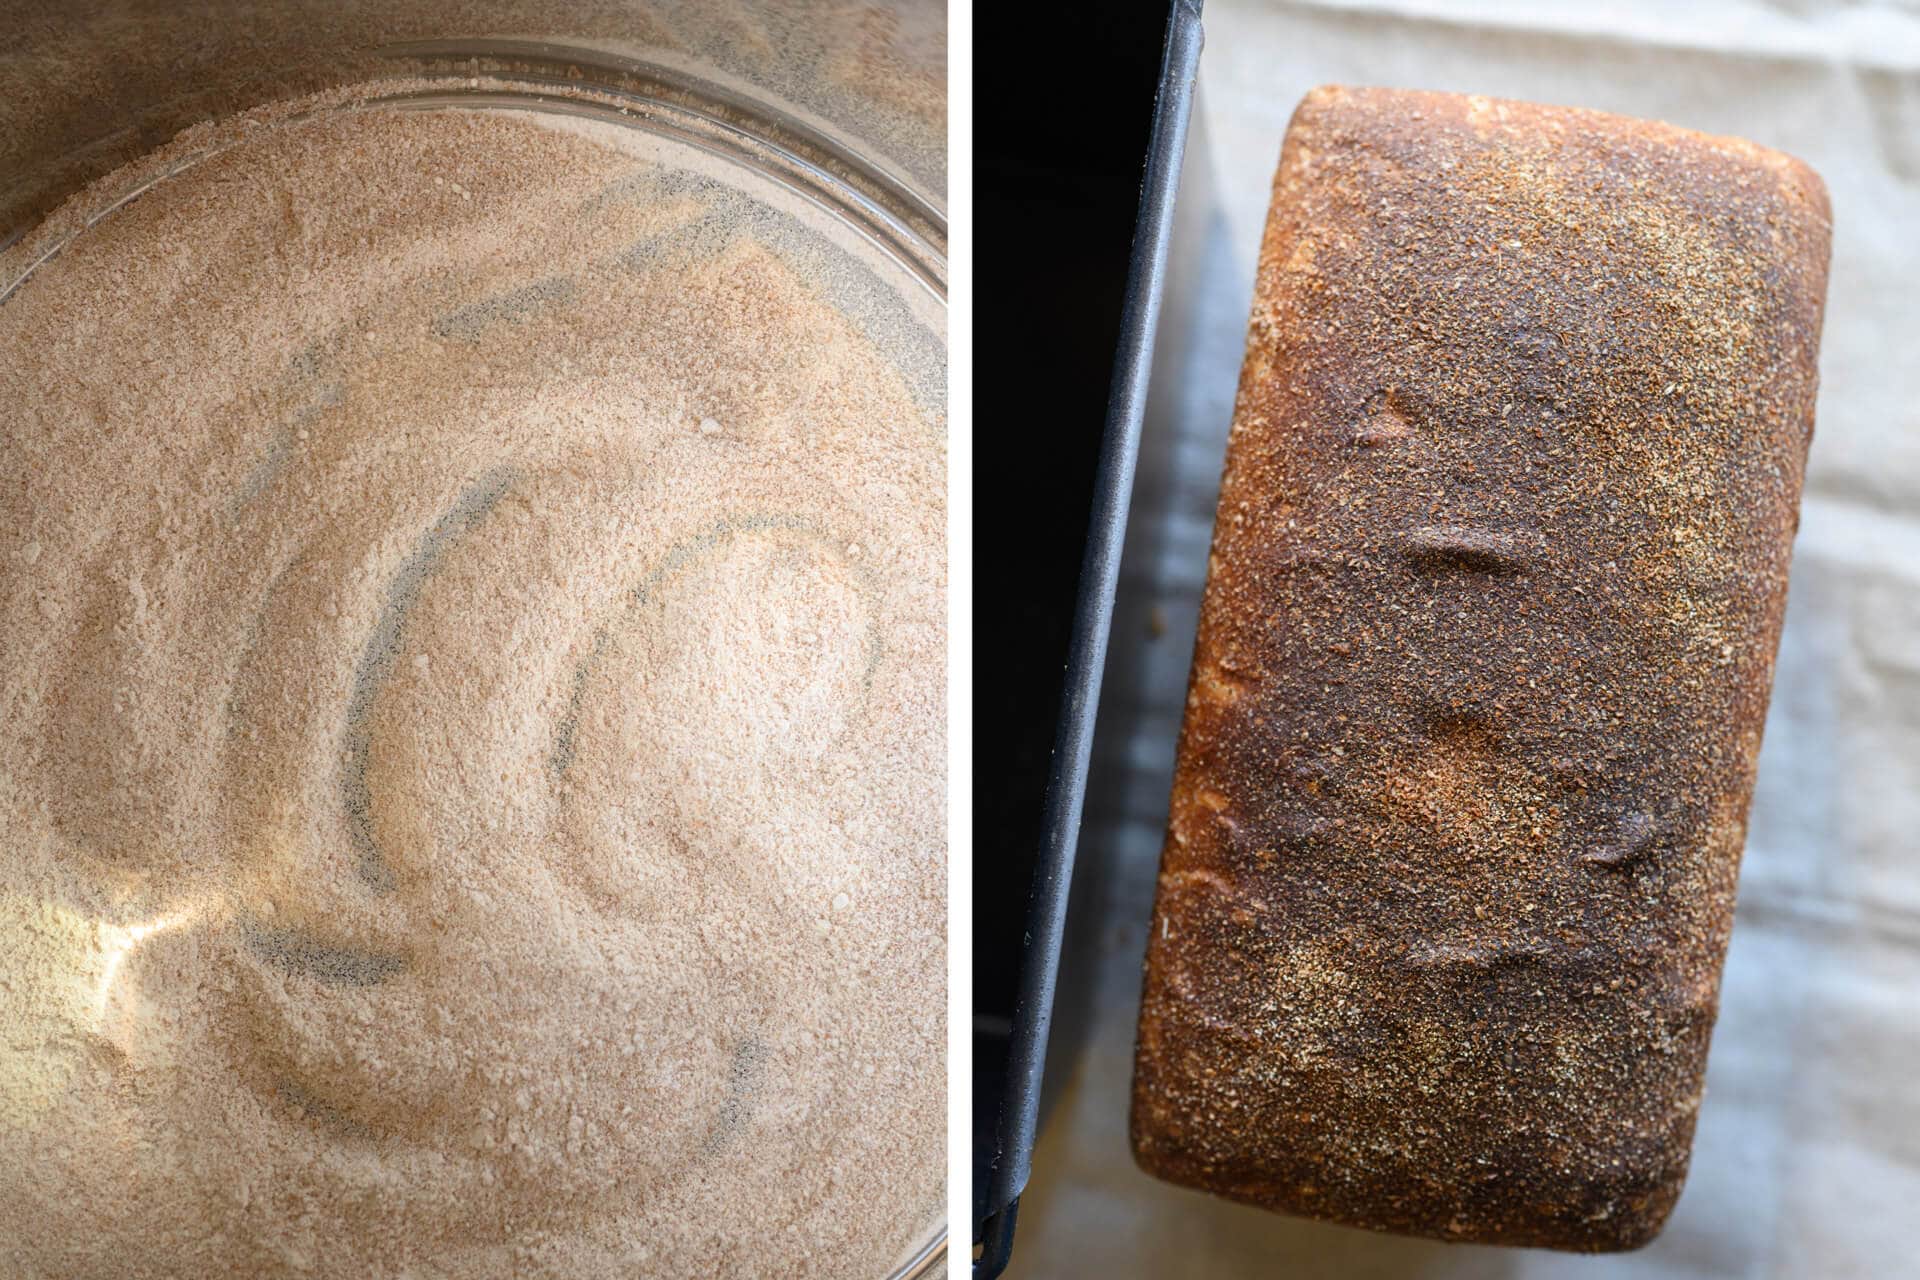
As you can see above, I milled some fresh spelt flour and sifted out the large bran pieces to use a topper to this dough after shaping. Not only does this added bran give the loaf extra texture, but it also brings extra nutrition. Feel free to use instant/rolled oats (as I often do), seeds, or simply use nothing.
After shaping your dough tightly, quickly roll the smooth (top) side on a pile of the sifted bran resting on a towel, then place the shaped dough in the pan.
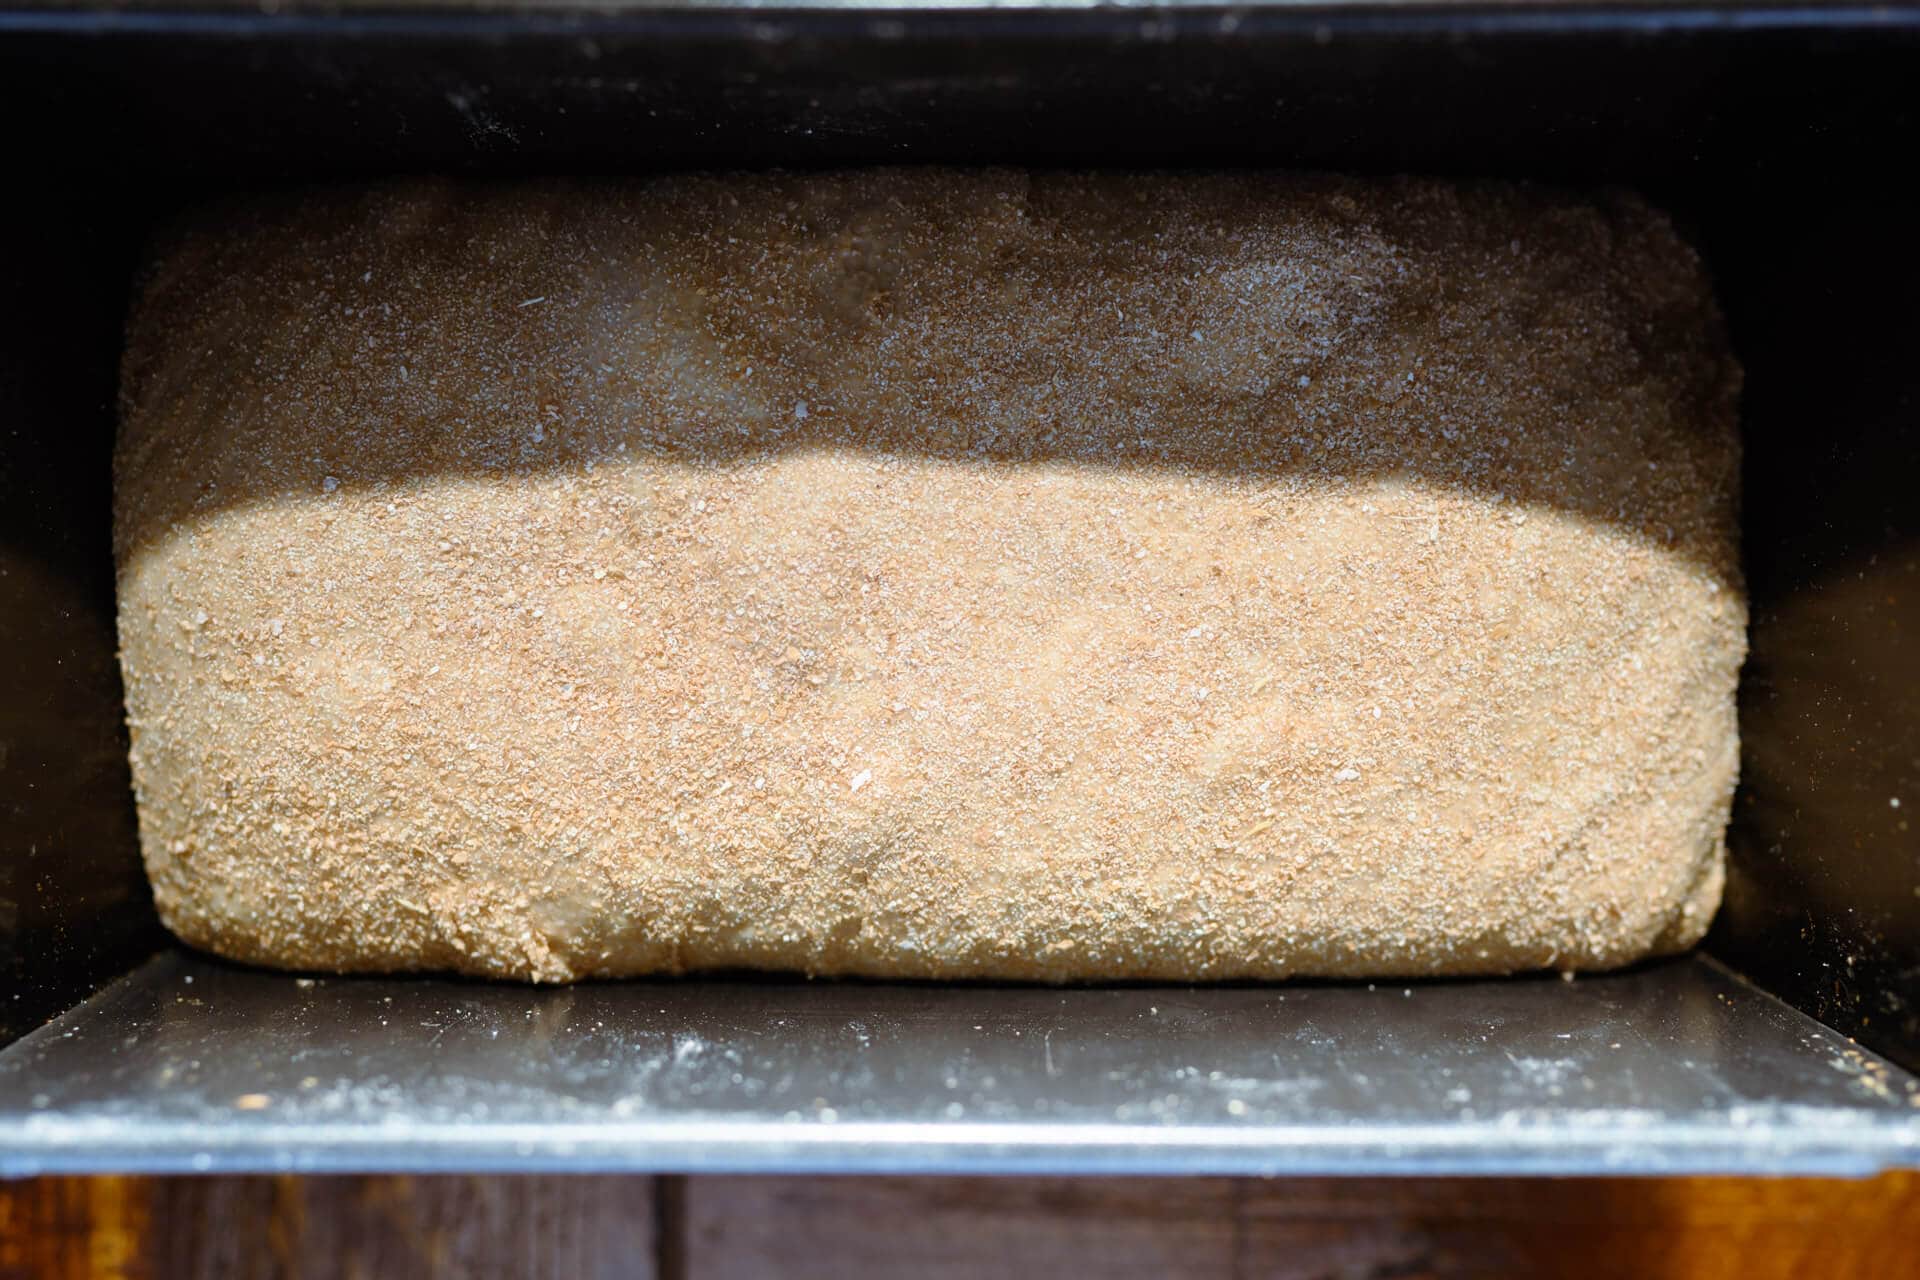
6. Proof – 1:15 p.m. to 2:45 p.m. (or until ready)
Cover the pan with a reusable plastic bag and proof for 1-2 hours, temperature depending. For me, at my kitchen temperature of 76°F (24°C), it took one and a half hours for this dough to fully proof.
Give the dough a poke periodically with a wet finger. This dough should pass the “poke test” when it’s ready to bake: a firm poke should show an impression in the dough that springs back very slowly, perhaps not quite filling the indentation.
7. Bake – 2:45 p.m. (pre-heat oven at 2:15 p.m.)
Preheat your empty oven (there’s no need for a baking stone for this bread) to 450°F (230°C).
I used my typical oven-steaming method for this loaf but did not use the pan with lava rocks. I boiled water and poured it over rolled-up towels in a pan and placed the pan at the bottom of my oven before loading the dough. Additionally, I sprayed the top of the dough with a handheld mister a few times after loading it into the oven.
When your dough is fully proofed, place the steaming pan into the oven and your dough pan on a rack above. Spray several times into the oven chamber with a handheld spray bottle and close the oven door.
Drop the oven temp to 425°F (218°C) and bake for 20 minutes with steam. After 20 minutes, remove the steaming pan and bake for an additional 25-30 minutes at 425°F (218°C). After that, when the dough looks well colored on top and the interior temp registers around 205°F (96°C), remove the loaf from its pan and finish baking in the oven directly on the oven rack for 5 minutes for more color.
Finally, remove the loaf from the oven and let it cool on a wire rack for at least 3-4 hours before slicing.
Conclusion
This whole grain spelt pan loaf with honey and olive oil fills the kitchen with the deepest, richest aroma as it bakes. The aroma lingers hours after baking as its diffusive aroma pulls you ever closer, like sirens from an island. And in much the same way, there’s little you can do on approach, you’ll just have to have a slice—maybe two.
Further, a good slather of salted butter seems to draw out more nuance, melding with the fruity olive oil and sweet honey in a concert of mouth-watering flavor. I think this bread might be one of the most versatile and flavorful whole grain sourdough recipes I’ve ever baked.
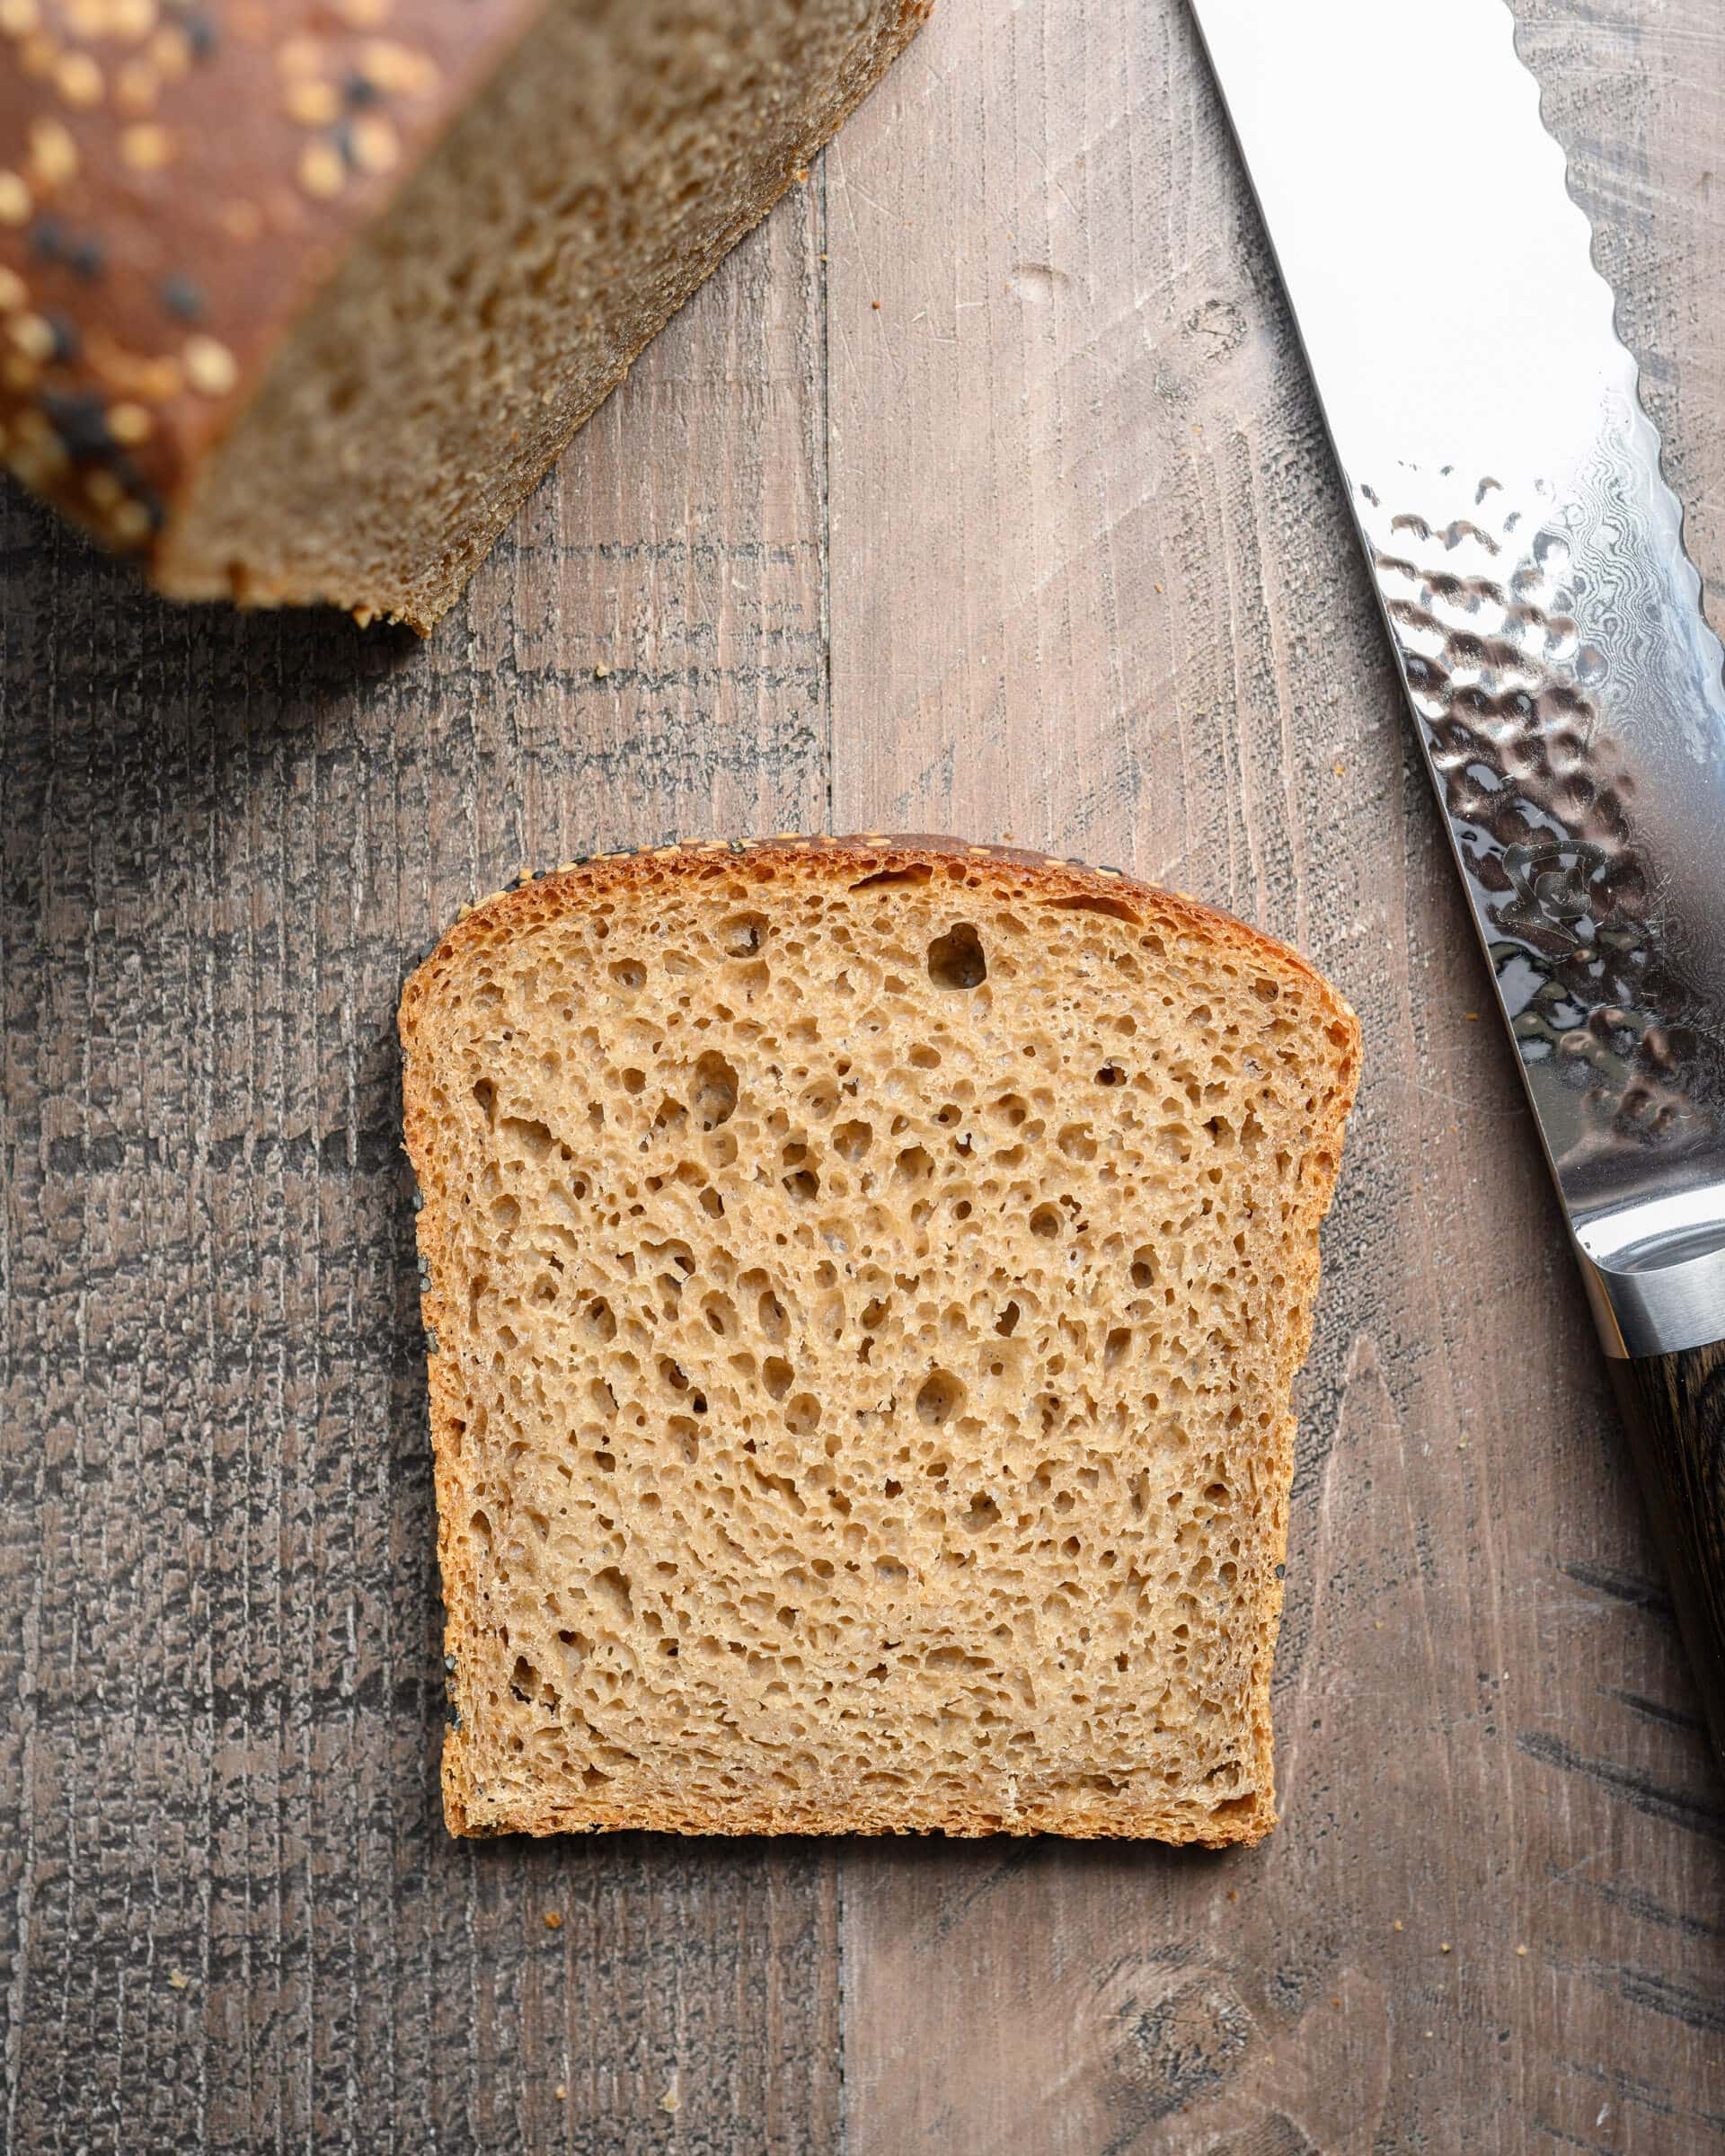
Crust
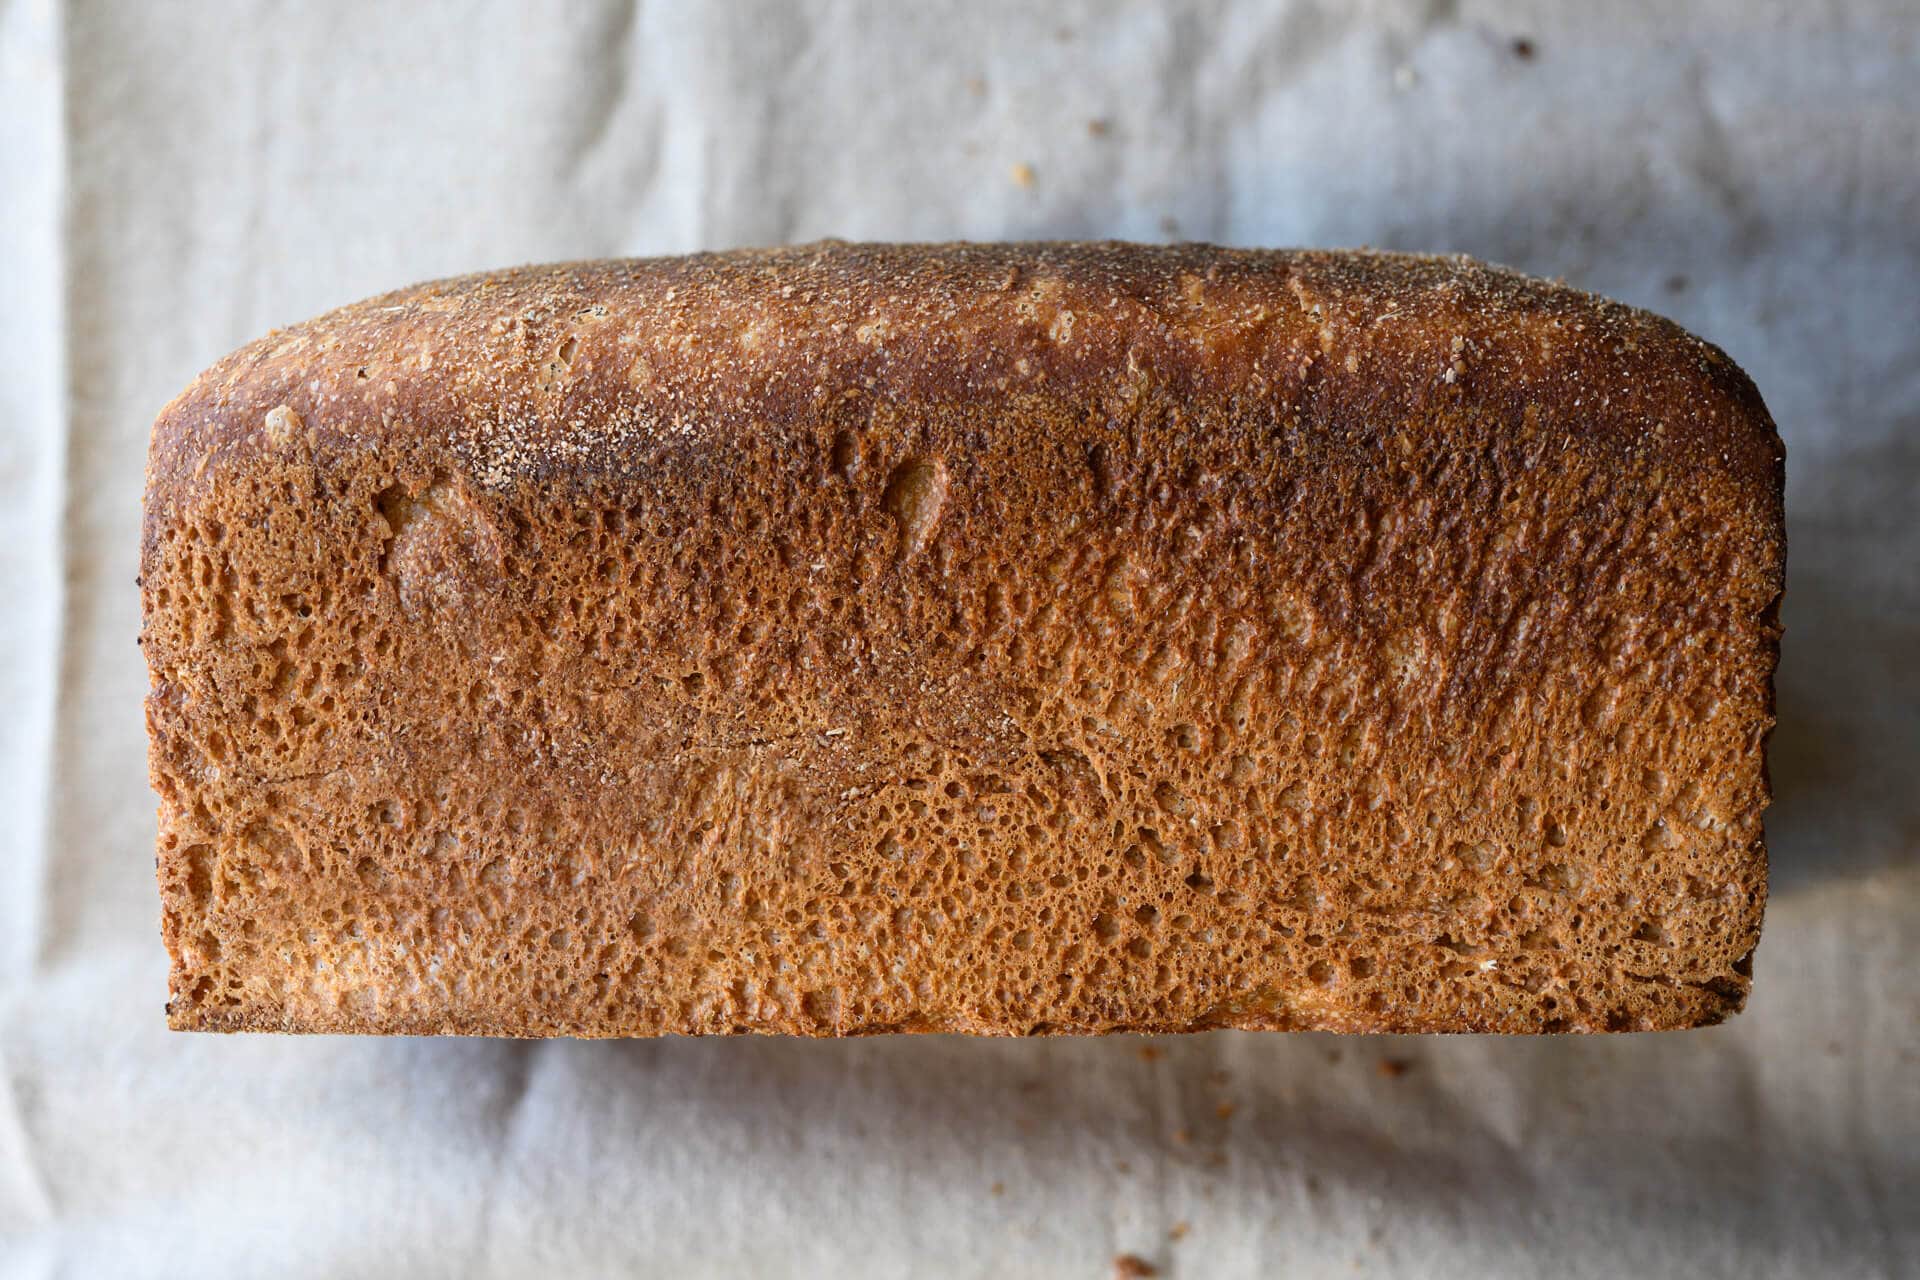
The crust bakes up golden brown, is beautifully thin (especially for a 100% whole grain bread), and brings forth just a hint of honey. As usual, I’ve been milling lots of fresh flour here in my kitchen and sifting off some of the bran to use as a topper was a useful way to add texture and nutrition to this pan loaf.
Crumb
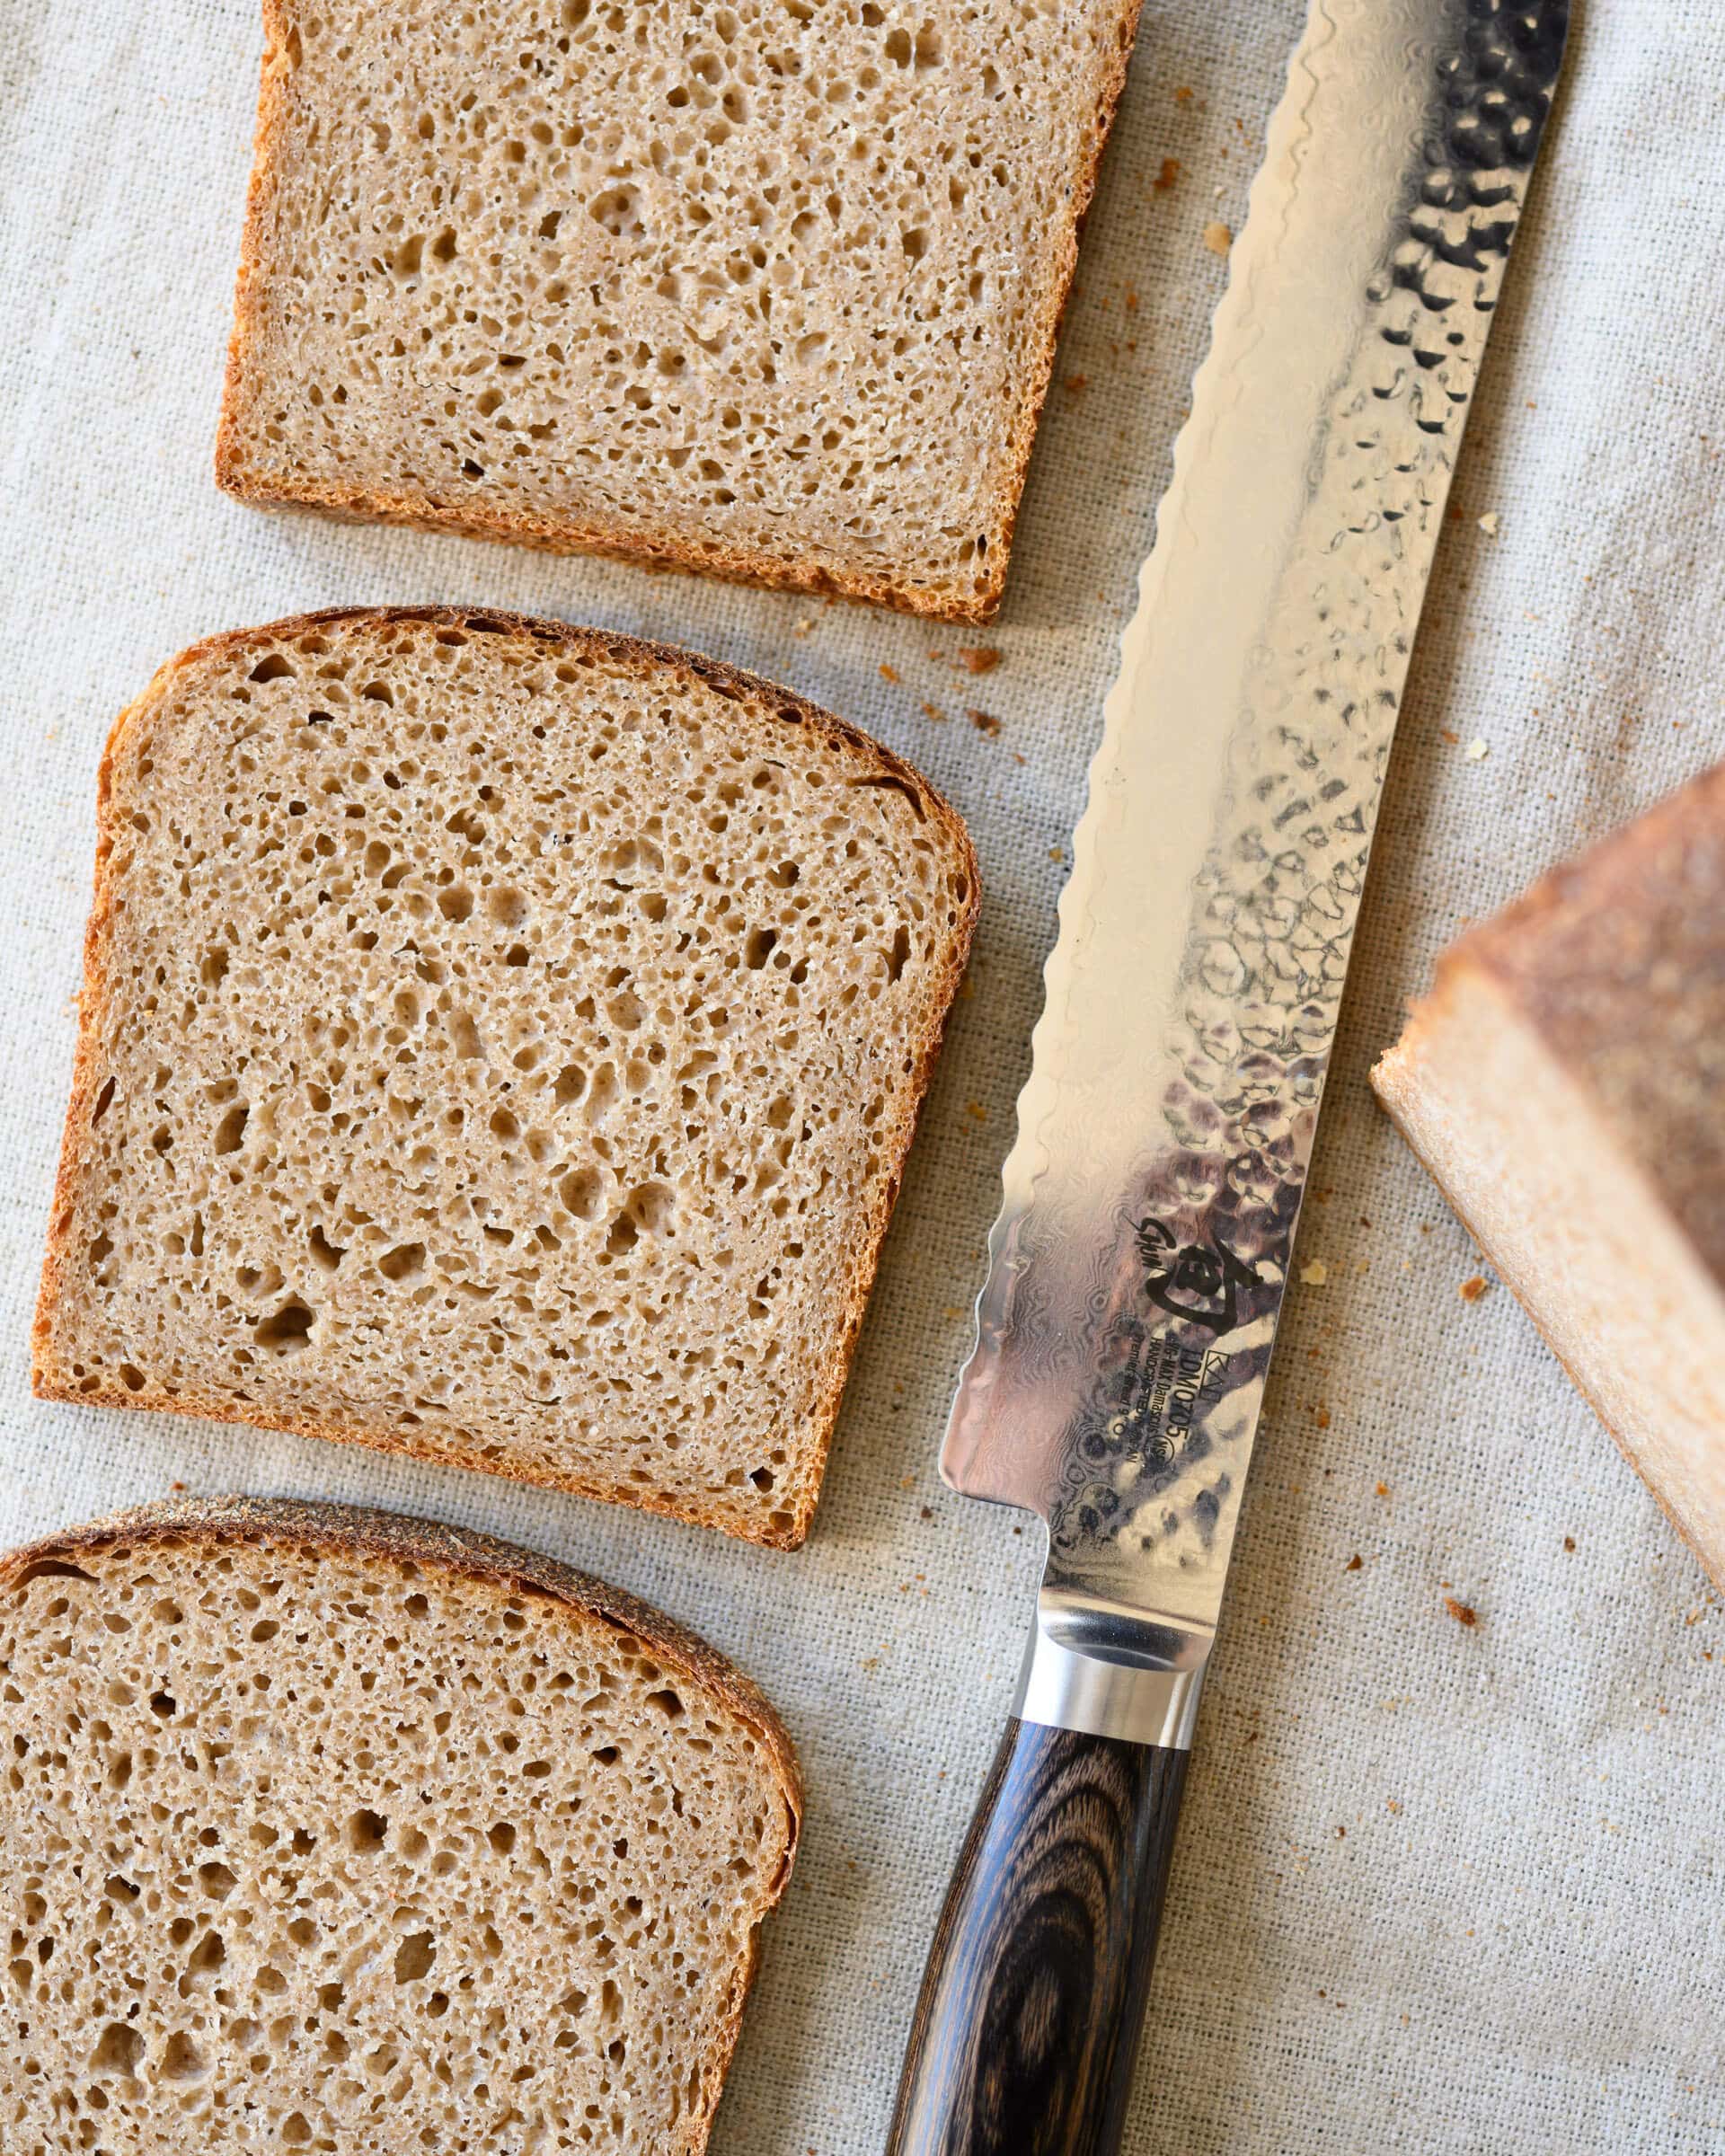
The crumb is superbly light and fluffy, soft and pliant. However, uncut the loaf feels rather heavy in hand but slicing in reveals the truth: each slice is airy and just-tight-enough for toast and sandwiches.
The extra virgin olive oil helps bring a measure of softness to the crumb, and at 5%, it is just right—any more might be too soft.
Taste
The slight fruitiness from the olive oil pairs well with the sweetness from the honey—but more than this, the spelt itself brings so much flavor this bread is a smash hit here in my house. When your family gets close to devouring a 1400g loaf in two days, you know you’re on to something.
I think this bread might be my new favorite whole grain pan loaf. There, I said it. Buon appetito!
Print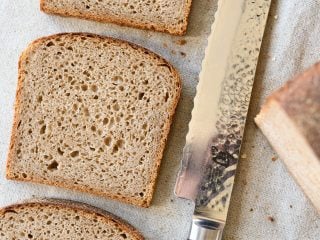
Whole Grain Spelt Pan Loaf
- Prep Time: 24 hours
- Cook Time: 55 minutes
- Total Time: 24 hours 55 minutes
- Yield: One 1400g pan loaf
Description
A deeply flavorful whole grain spelt pan loaf with a touch of honey for sweetness.
Ingredients
Levain
- 6g ripe sourdough starter
- 41g whole grain spelt flour
- 41g water
Main Dough
- 704g whole grain spelt flour
- 518g water
- 37g honey
- 37g olive oil
- 16g salt
- 88g ripe levain (above)
Optional
- Coarse wheat bran or rolled oats for topping
Instructions
- Levain (Night before 9:00 p.m.)
Add the levain ingredients to a jar and mix well. Leave to ferment overnight. - Mix (9:00 a.m.)
When your levain is mature and ready to be used, add the Main Dough ingredients and the levain (from step 1) to a mixing bowl. Using your hands, mix everything until it comes together into a shaggy mass. Continue to stretch and fold the dough over itself in the bowl to build strength, it will transform from sticky and shaggy to smooth and elastic over the course of 4-5 minutes. Transfer the dough to a container for bulk fermentation and cover. - Bulk fermentation (9:15 a.m. to 12:45 p.m.)
During the 3.5 hour bulk fermentation, give the dough four sets of stretch and folds where the first set is 15 minutes after the start, then every 30 minutes thereafter. After the fourth set, let the dough rest, covered, until the end of bulk. - Preshape (12:45 p.m.)
Gently scrape the dough out of the bulk fermentation container to an unfloured work surface and preshape tightly into a taut round. Let the dough rest, uncovered, for 20 minutes. - Shape (1:05 p.m.)
Shape the dough into a long tube and place in the loaf pan. Top with coarse bran or rolled oats, if desired. - Proof (1:15 p.m. to 2:45 p.m., or until ready)
Cover the pan with reusable plastic and proof on the counter for 1-2 hours until the dough is very soft to the touch. - Bake (2:45 p.m.)
Preheat empty oven to 450°F (230°C). Drop the oven temp to 425°F (218°C) and bake for 20 minutes with steam. After 20 minutes, remove the steaming pan and bake for an additional 25-30 minutes at 425°F (218°C). After that, when the dough looks well colored on top and the interior temp registers around 205°F (96°C), remove the loaf from its pan and finish baking in the oven directly on the oven rack for 5 minutes for more color. Finally, remove the loaf from the oven and let it cool on a wire rack for at least 3-4 hours before slicing.
Notes
- For a low FODMAP option, substitute out the honey for pure maple syrup.


200 Comments
I have a pullman loaf pan with the lid. I was under the impression that using the lid was much like using a dutch oven with the lid. This would then help with the steaming of the bread? Why do you not use the lid in this recipe? Just finished making my starter and looking forward to baking my first loaf. I have made sourdough many times using Tartian recipe but now trying yours for the loaf!
Thank you for your help
When using the lid it can trap steam and there’s no need to steam in that case. For this bread I wanted a thicker top crust with that dark coloring, that’s why I left the lid off and steamed my oven instead. When using the lid the resulting loaf will have a much thinner crust all around (which is good if that’s what you’re looking for!).
HI there. I would like to bake this spelt pan loaf. However, the only spelt flour i was able to find is sprouted spelt. Will it work? I tried feeding my starter with this flour to see how it will do and starter did not do nearly as well as with ww flour. There were bubbles but rise was minimal. Any suggestions? I am totally out of ww flour now and can’t find it anywhere, which is why I am experimenting with spelt. I do have some white though that I could use to make starter. Please advise. Also, any recommendations where I can acquire flour noways?
Just a follow up to my original post. The starter actually did double overnight and I mix up the dough. Does the bread need to pass windowpane test at the end of bulk fermentation?
I’ve never tested that to be honest. I just look that it’s well-risen, smooth, and elastic by the end of bulk!
HI there, I made the ferment this evening with my own freshly ground flour. How much water would you recommend adding to the loaf when using freshly ground spelt?
Unfortunately there’s no general rule of thumb, but I’ve found it can usually take more with freshly milled flour. You could try just using the recipe as-is to first see how the dough feels, then next time if you think the dough could have taken it, add more during mixing. My guess would be somewhere around 2-5% to start!
If I want to do a retarded ferment, do you think I would get the same results? At what point would you put it in the fridge and would overnight be possible? Thanks!
Yes, that’ll work just fine. You might end up with a slightly more sour loaf, but it would still be wonderful. I’d place it in the fridge right after you shape the dough and put it in the pan. Then take it out in the morning and bake straightaway. Enjoy!
My levain rises and falls in 4 hours by the morning comes it will have completely fallen and not at its peak what should I do..
Also I don’t like any sourness in my bread … there is not much Levain that u use in your recipe… l was told more starter or Levain u put in recipe less sour.. should I add more … I am a beginner need help.. if yes how much more levain…
Thanks a lot
I would try to use your starter and levain for this recipe right before it peaks in the jar, this will help reduce sourness. Also, don’t place this dough in the fridge if you are, that will also contribute to more sourness. If you wanted to try and increase the amount of levain/starter in the recipe you certainly could, this might also help lower the sourness in the final product but it’s related to the rest of the process as well!
Do u think if I didn’t sift the flour the bread will turn out ok?
Absolutely!
wanted to print recipe. uh………….. 22 PAGES………. uh …….. NO
When you click the print link you can select large sections of the text (just by clicking on it) and delete them so they don’t print. Additionally, you can choose exactly what pages to print and exclude the rest 🙂
Hi Maurizio, I just baked this bread and love the flavour of it but I’m wondering if you could give me some input for the next attempt. I scaled the recipe to 2000g for two of the 9*4*4 USA pan pullmans and baked them with steam lids off. I followed the recipe with the exception of twice the starter percentage in the levain to account for a 68 degree kitchen. The bulk was normal but the proof was taking forever- I started at 1:20 pm and ended up baking them at around 8:00 pm. Didn’t rise as much as I would have liked and a small fissure on the side of the top. Crumb was similar to yours but maybe a bit tighter. I suspect I under proofed them a tad but isn’t an inch below the lid enough to get them to spring above the rim?
Thanks.
Hey, Francis! If you want to double this recipe I’d recommend doubling everything as it’s shown in the tables above. You want to have the same percentages of everything, even if you scale up the recipe quantities — this is also true for the amount of starter used to make the levain. Using too little starter will mean the timeline is lengthened and it’ll take much longer, especially if your kitchen is at 68F, which would slow things down considerably.
Because this recipe is 100% whole grain, you won’t get as much rise as a white pan loaf. If you wanted it to rise up more above the lip, try giving it a little more time to rise in the pan and see if that helps. With pan loaves, it’s a bit of trial and error to see how much dough weight should go into the pan!
Hi there,
I love your page and have been baking the beginners sourdough with great success.
I just made this recipe And everything is perfect except of the 2 loaves I’ve made the crust has ruptured open/ cracked. Any advice? Could my oven be too hot or could you think of a reason why this might be happening? I did try scoring the second loaf but little success as it seems the hydration’s is a bit high for scoring without allowing it to sit for longer. Thank you so much in advance.
Glad to hear that, Stephanie! Cracking could mean the loaves were a little under proofed, especially if you’re seeing erratic rise in areas of the loaf. However, if you’re not seeing that, it might be a lack of steam in the oven during baking. Try doing whatever steaming method you’re using plus spraying in some water on top of the loaf with a handheld spray bottle to get a little more steam in the oven. Let me know if that doesn’t help!
Hi Maurizio! I made this loaf but substituted sprouted kamut flour, 1:1 (this brand: https://www.instacart.com/landing?product_id=431204&retailer_id=31®ion_id=152646238&utm_medium=sem_shopping&utm_source=instacart_google&utm_campaign=ad_demand_shopping_food_ca_sanfranciscobay_newengen&utm_content=accountid-8145171519_campaignid-1771100046_adgroupid-71623572209_device-m&gclid=EAIaIQobChMIwOH2i_OA5wIVbxitBh0FqglJEAQYASABEgJTCfD_BwE)
It rose very nicely in the oven and has great flavor but I don’t have the beautiful porosity that you do. Is this due to the properties of kamut? Or user error (aka mine!)?
I loved the idea of making sourdough sandwich loaves with interesting flours. I’d love any advice you have on adapting.
Thank you for all your great work!
Hey there, Sarah. It’s hard to say what caused the tighter loaf — it could be a combination of many factors. I actually find these sandwich loaves the perfect place to experiment and test with baking. Using a pan to bake in really gives you a lot of freedom to play with different grains/hydrations/etc. and not have to worry so much about the loaf spreading too much in the oven. I’d say have at it, experiment and see what works!
It should be just fine to use sprouted Kamut in this loaf. Perhaps try a lower percentage of the Kamut flour at the start, and then work your way up.
Question: the title “divide and shape” leads me to believe I’m separating out more than one loaf at that point but there is no specific mention of dividing below that title, does your recipe make 1 or 2 loafs? (I am new to all this and I need to know if I need to go buy one or two loaf pans before making this tomorrow morning). THANK YOU!
Great catch, it should really just say “preshape” as I list this recipe yielding one 1,400g pan loaf (fixed!). However, you could certainly divide the mass up to make two 700g loaves as well — it’s up to you!
That was very generous to have replied so fast, thank you!! I’ve got the leaven made, excited for tomorrow. Thank you for all the work you’ve put in to your recipes and website.
You’re very welcome, Ben! I hope the bread turned out great. Have fun.
I’d love to try your recipe but I have a couple of questions. May I use sprouted spelt flour and may I use date syrup in place of the honey?
Thanks
You can certainly use both. Know that with sprouted spelt, you might need to adjust the hydration up or down depending on the flour you’re using. Hold back some of the water I use in this mix — perhaps 100g or more — and add it in only if the dough feels like it can take it and it doesn’t become overly sloppy or loose. Also, in my experience with sprouted flour, it can tend to have increased fermentation activity during bulk, watch the dough and cut bulk early if it looks overly gassy/sticky/fermented!
if you have traditional spelt flour on hand, I might suggest a mix at first try (perhaps 50/50) to see how the sprouted spelt works for you.
Let me know how it goes and happy baking!
Just baked a loaf of this today, and I love it! I was sure that it would be a flop — I forgot to start with a lower hydration, so the dough was wet and unruly. I could barely shape it to put it into the pan. Even so, I love it! I did put it in the fridge for about 12 hours (I like longer fermentation times), and the dough seems to have handled it fine. Great flavor and texture, and you’re right about the crust — lovely and thin. I will be returning again to this one! And of course, holding back some of the water, to start. Thanks for the recipe and method. 🙂
Super awesome to hear that, Cassy. This is one of my favs as well, so much flavor. I’m working on another spelt loaf right now that I’ll be posting this week if all goes well. I can’t get enough of the magical grain. Thanks for the feedback and happy baking!
I made a half recipe and I love it! It was the tastiest bread (to my liking) with the softest crumb. I can’t decide between this and a porridge loaf. I tried making softer, fluffier, less chewier crumb by extending kneading time and I think it worked. I’ve never tried spelt flour for sourdough breads before, now I understand why everyone so raves about it! Thanks for the great recipe 🙂
Fantastic to hear. Yes, spelt is a magical thing I have to say. Lately more and more of my bakes seem to sneak at least some of the grain in… For good reason! Thanks for the feedback and enjoy!
I’ve made this recipe a few times now and love it—am just getting started with sourdough and have been making a low FODMAP spelt loaf for myself and a wheat/white loaf for my husband most weeks. Last week, both doughs were very wet despite weighing out all ingredients as usual, and in typically dry NM weather. Could this have been an issue with the starter? Any other thoughts on what might have gone wrong? If it were just one loaf I would assume I messed up a measurement but since it was both I’m confused. I have been keeping the starter in the fridge and starting to shortcut how many feeds I do before building a levain—could this be part of it?
Also, I find that this recipe comes out much denser if I do an overnight rise in the fridge, which doesn’t seem to be the case with the wheat loaves. Any tips for getting more rise with the overnight method? Thank you!
It sounds like it’s likely just a hydration issue with the flour you’re using. It’s common, and expected, to have to adjust the hydration almost every time you mix up a batch of dough — especially if you change flour or use a different bag. I always like to recommend holding back 5% of the water, or so, through mixing and only add it in at the end of mixing if the dough feels like it can take the added water. Over time you’ll build up a feel for the dough, how it mixes when you add water, and whether or not it can take more than my recipe states (which is possible!) or requires less (also possible!).
It’s hard to say why you’re getting a more dense result from the fridge, but it’s possible the dough might be over proofing on you during this time. If you’re seeing less-than-desired rise when doing an overnight proof, try to cut bulk fermentation a little short, perhaps just 15 minutes, and get it into the fridge right away after shaping. Additionally, you could try cutting that proof time in the fridge by a few hours to see if that moves you in the right direction.
Finally, I always do suggest feeding your starter at least twice before using it from the fridge.
I hope this helps and happy baking!
Hi,
What does it mean if the top splits open? Not shaped tight enough, proof time off? Thank you!
Hey, Lu! Usually this happens if the dough could have used a bit more proof time. Try to push it a little longer next time and you should see less explosive rise in the oven.
Would there be any issues with doing a slow ferment in the fridge overnight for the final rise?
That’ll work very well!
I’ll try this formula for sure! Just one question – what mesh # is the sieve you use to sift out the bran? Thanks!
Ideally for this I like the largest sized particles for coating the outside. In this post I milled the grain a bit too fine so the coating was finer than I would have liked, but still really nice. Next time I’ll be milling much more coarse, and then using the largest screen I have to just pull out the biggest particles (I can’t remember the size, sorry!).
Lovely, love spelt. I recently also made a 100% spelt loaf but not entirely whole wheat (you can see on IG @lowlandbaking). I noticed you used a levain fed with spelt but seeded it with a regular wheat starter if I’m correct? I recently made a spelt starter from scratch, do you think this makes any difference? Using an all spelt starter vs a conversion to a levain with spelt? I recently try to work more with spelt also, as we have great locally produced spelt here.
Thank you, Diederick. That’s right, I did inoculate my levain with a starter made with traditional wheat, but it’s a super, super small amount in relation to the overall recipe (only 6g and fermented for more than 12 hours!). I don’t think it would make a difference if you used a pure spelt starter, this would work just fine!
whoops I started making it before the error was updated. Used 1g. of the mature starter instead of 6g. bulk fermentation going very slowly. Should I start again? stretch and fold went ok but thought Id check out your pictures and discovered the update.
Sorry about that! It should come around, but it might take a while. It’s hard to say how long as temperature is definitely a factor, but it might take an hour or more longer in bulk fermentation.
well I left it all afternoon and evening as temperature in the 60s here.. I had started a couple of hours after your schedule. I sort of shaped it and put it in a basket and put it in the fridge overnight. it looked ok by morning so put it in my dutch oven (no lid) and followed the baking instructions and it rose well and looks good. so worth the wait.
Awesome, Vicki, so glad to hear this!
I have been eagerly waiting for this recipe since you posted the picture on IG! I couldn’t resist so, I am baking this tonight. I mixed my Levain early this morning and it started producing a sort of dark liquid on top after a few hours. Any ideas why that might be happening?
Thanks for all the amazing work and recipes!
You’re very welcome! Hmm, I’m not sure what that dark liquid would be, I’ve never seen this. Is it possible it has very high fermentation activity and it’s fallen in the jar? Perhaps that liquid up top is the typical “hooch” you might see after it’s fallen and been in that state for a while. Typically this liquid is clear, though. I really don’t know!
That could definitely be a possibility! Anyway, Hopefully it won’t do any harm to my loaf.
Also, should bulk fermentation go for 3:30h or 4h? On the BF section you say it should go from 9:15 until 12:45 but then you start by saying it’s a four hour bulk fermentation. I am assuming because it’s whole grain it should be 3:30h, just checking though.
For me bulk was 3.5 hours (that was a typo, fixed!), this was a rather active dough!
Perfect! Right on time, thank you Maurizio!
Thanks so much for this recipe! I started my sourdough journey with your site, but I AM that person on the FODMAP diet that can only eat spelt. I’ve experimented a lot with your recipes using my whole and white spelts and, after much trial and error, I can make a variety of recipes (including your cinnamon rolls!) I’m pretty happy with. But I can’t wait to bake this…your research and precision are so immensely helpful.
One fun tidbit to share: i’ve been experimenting with genuine maple syrup as a sweetener in my spelt loaves. It’s absolutely divine as a flavor on its own and pairs so well with the nuttiness of spelt. I hope you try it sometime! And thanks again, I’ll be starting this levin tonight!
You’re very welcome, Christy! Glad to hear my recipes are working well with your diet, it sounds like there are many out there who follow the same procedure (adapting my recipes to use spelt) — this is great. I’ll give maple syrup a try soon, I’ve been working on a Fall-time recipe and that sounds perfect 🙂
Let me know how you like this recipe when you give it a try. Happy baking!
I absolutely loved the taste and texture of this loaf! However, I found the hydration to be too high with the Spelt I was working with. I use VitaSpelt for both whole and white and I found I kept adding, and adding, (and adding!) small handfuls until I got it to where it wasn’t a complete sticky mess. I even went back and checked my numbers to make sure I didn’t make a mistake (though even with 2 g of starter instead of the corrected 6 it fermented fine). When I poured all 518 of water into the bowl I was really nervous, and I guess I probably added 75 g of flour before I got it where I wanted.
Once the hydration was right it handled and baked like a dream! I want to try it again and watch my numbers really carefully this time because it’s a killer taste and texture. But if you have any thoughts on hydration I’d love to hear them.
Right on. Yes, sounds like you just need to drop that water next time and you’re set. I’d start with perhaps 68%, hold back the remaining 7% and add it in slowly through mixing if it feels like your dough can handle it — stop when it gets super mushy and you get worried. This is typically the approach I take as well, I hold back some water as I’m mixing to ensure the dough can take it and it feels “right.”
Glad you like the recipe! I’ve made it a bunch now and it goes so fast here. Happy baking, Christy.
This has been my experience too! I tolerate spelt, both white and whole, but cannot have bread made from other grains. I can’t wait to try this loaf. It will be nice to follow a recipe without needing to modify it significantly.
I’m always amused when spelt recipes talk about low FODMAPs and then include honey in the recipe! Fortunately maple syrup is a perfect substitute 🙂
Oops. I didn’t realize honey was not low FODMAP (I didn’t see it mentioned in the articles I read). I’ll check this out and update the post — maple syrup will work very well in its place!
Christy, I’ve been looking for breads to make for my daughter who is on a low FODMAP diet. Do you have any other bread recipe ideas for making spelt loaves? Thanks so much for any advice you can offer, Shari
I have been baking with spelt for several years and I absolutely love it. This is Maurizio’s blog, so I don’t want to steal his thunder too much! In general, I take most any standard wheat recipe and reduce the amount of liquid. I find 80% of the liquid works well for whole spelt and 70-75% for white. Maurizio gives his suggested method in a reply to me below, and it’s a great and precise way to approach hydration.
For a quick and dirty solution: there is a good recipe on Breadtopia for a whole spelt loaf that’s about 40% smaller than this recipe but is simple and has great tutorial videos. I like the recipe on Perfect Loaf better (of course!) but that one will give you a confidence boost.
Once you have confidence you can adjust most any recipe. I make English Muffins, bagels, the Perfect Loaf banana bread (yum!), spice cake and more all from spelt sourdough. Just remember to start too dry and add your liquids slowly and you’ll be going in no time!
Love and blessings!
Thanks so much for the guidelines and advice, Christy. I can’t wait to try this!
Hi Christy, thank you for sharing your spelt tips! I’m thinking of trying Maurizio’s cinnamon bun recipe with spelt for Christmas—do you have any suggestions other than reducing the liquids as you write above for this recipe in particular? Thanks so much!
Wow Laura, I JUST saw this! I generally find my rise times are longer than he lists, but I’m not sure if that’s spelt or elevation or what. But hydration is the only thing you really need to watch. You’ll be so pleased with the results!
A lot of the recipes on this blog can be adapted for spelt. Start with 80% of the water the recipe calls for and work your way up very slowly until it meets the hydration that recipe is looking for. (Maurizio always does a great job of saying how the dough should feel when the hydration is right.)
What size pan did you use? Thanks!
Sorry about that, I forgot to list that I used my 8.85″ x 4.7″ x 4.7″ bread pan for this bake. I have this pan and others (with dough weights) listed on my shaping a pan loaf guide page.
what id I used a pan with a cover? would be a good substitute for the steam? or the steam will escape? thankful as usual
Sure, that could work. Just be sure the dough weight is appropriate for your pan so the loaf doesn’t rise up and squeeze out of the lid or push it off.
9x4x4
Very happy to see you work out a 100% spelt loaf. It has been my favorite grain for some years now, but I have always found it very tricky to handle. I had always expected a result that looks and feels like a normal wheat bread, but they aren’t the same (as your pictures show). I can relax now! Also, as you note, spelt doughs respond COMPLETELY differently than wheat to similar hydration levels. Spelt is, in a word, very sloppy. Thanks for the hard work!
Yes, it’s quite different in my experience (and I’ve used it for a long while). The flavor is something special, though, and definitely offsets the added attention required!