
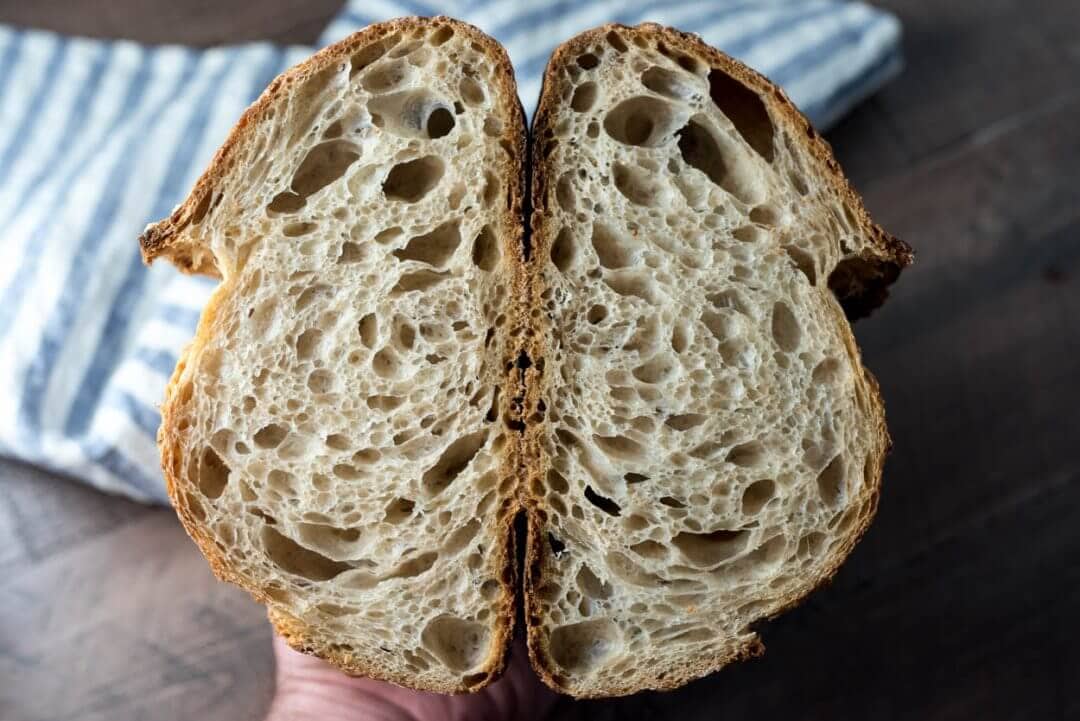
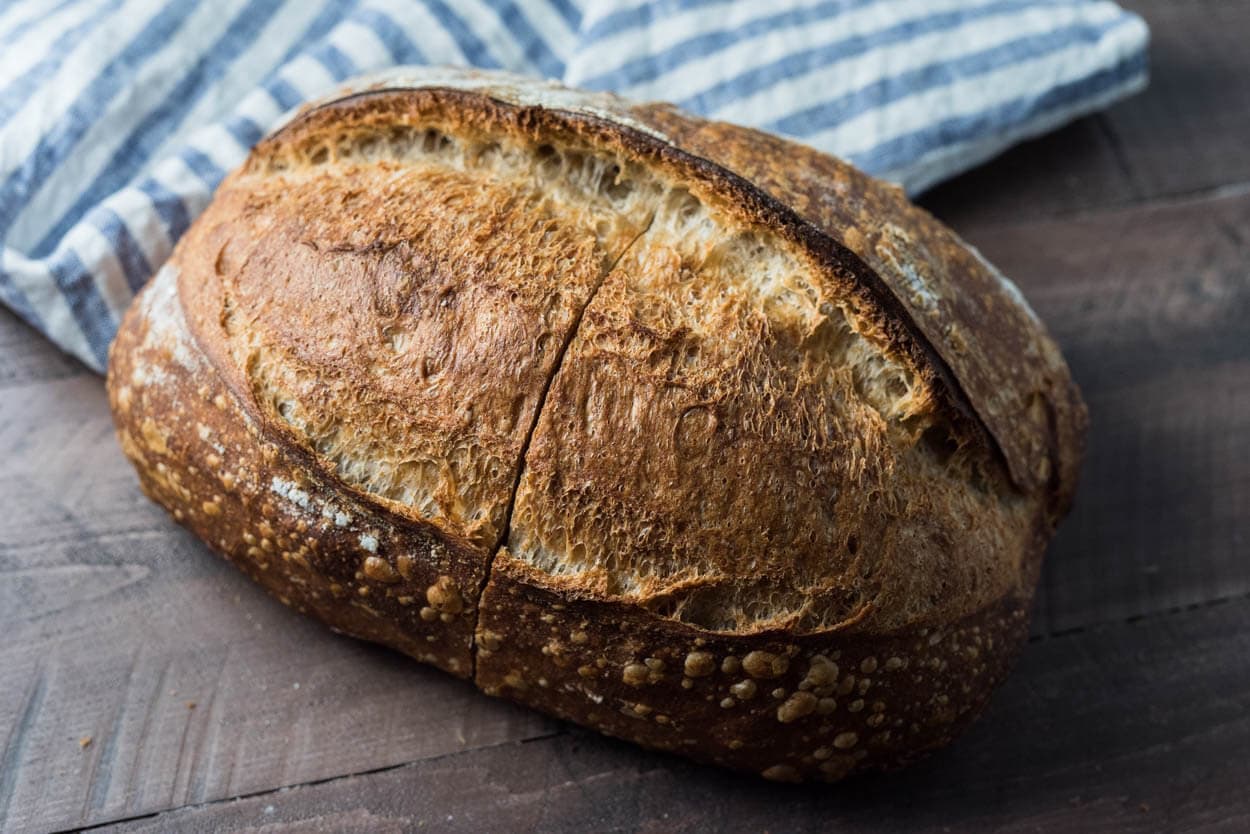
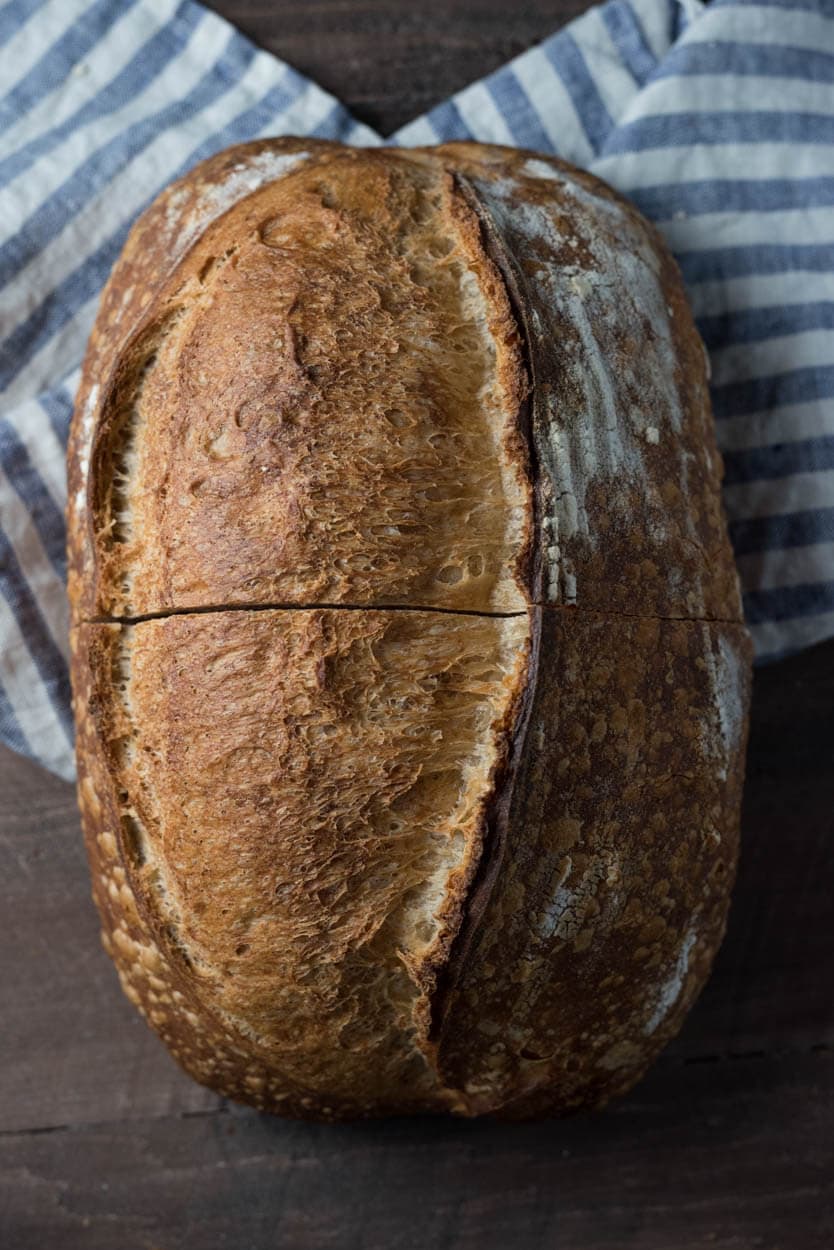
My baking focus has lately been predominantly on my sourdough starter maintenance and maximizing fermentation. And recently, I’ve made some of the best bread I can remember (I took all the bread pictures in this post with this starter). So this post is somewhat a continuation of my Managing Starter Fermentation, but in this post, I’ll focus more on the signs for spotting when a sourdough starter is ready for refreshment (ripe) and how to perform that refreshment.
Be sure to check out my post on what flour, water, and carryover ratios I’m currently using to feed my starter in my How Do I Feed My Sourdough Starter post.
There are many methods to keeping your starter healthy and in proper working order, likely as many methods as bakers. Each baker has a process for maintaining their starter according to what works for them and the bread they seek. Each starter is unique, after all: a distinctive blend of wild yeast and beneficial bacteria that has evolved in the temperature it’s kept at, the flour used for refreshments, and the time between those refreshments. I wanted to preface this article because the following is what works for me here in my kitchen and will most likely work for you as well, but I guarantee you’ll find yourself modifying my method to suit your environment. That’s to be expected. An essential requirement for a baker is flexibility and adapting techniques and inputs so everything performs optimally in your kitchen. In the end, your sourdough starter maintenance routine might be similar to mine, or it might be quite different.
I can remember back to when I first dabbled with creating my sourdough starter. I read all the books I could get a hold of; I searched online, anywhere I could find information. Once I got things up and running (using the process described in my seven steps to creating a sourdough starter entry), I followed refreshment schedules outlined in various books, and things seemed to work pretty well. But my bread didn’t improve until I modified things to suit my environment, schedule, and unique starter. As I refreshed my starter each day (feeding sourdough starter), I began to take note of things, how it looked when I neglected to refresh it for too long, how it looked after a few hours with new food, and how the smell of the starter changed throughout the day.
My goal for this entry is to convey the signs I look (and smell) for during the single-day microevolution of my sourdough starter. First, what does it seem and smell like right as I refresh it (at the start)? Then, what should it look like when I decide to refresh it again or use it for making bread? And finally, what does it look like if it’s gone too far and starts to become overly acidic? I receive frequent emails on this topic, and I hope this entry will be a visual guide to those wondering how I care for my starter.
With this post, I’m hoping to help you answer the following questions:
- What is feeding (I usually call it refreshing) a sourdough starter?
- How soon after feeding (refreshing) a sourdough starter can I use it?
- What does feeding my sourdough starter once (or twice) a day look like?

A quick note for those out there who follow my writing very carefully: you’ll notice this entire entry is about a liquid starter/levain and not about a “stiff” variety I had been baking with for almost a year. I recently shifted things back to using a liquid starter after a long while with a stiff variant, and I have to say I prefer how my bread is turning out with my change. If you use a stiff starter, some of this entry will be relevant to you, but the visual cues will be different as the consistency of your starter will be different. If you haven’t used a liquid starter/levain, I suggest you experiment with this and try it out, you might be surprised at the difference, and you might prefer it. I’m not suggesting one is better than the other, but rather a personal preference whereby I like the taste and performance of this liquid levain for the bread I’m currently baking.
If you’re curious and looking to dig more into preferments, see my guide to the differences between a sourdough starter and a levain.
Sourdough Starter Background
The key to coaxing out maximal fermentation with your starter is to be observant. Watch how it evolves throughout the day and note how long it takes to reach full ripeness: a strong sour aroma, a breakdown of the mixture, significant bubbles on top and at the sides. If it’s doing this too fast (for example, you refresh at 8 a.m., and it ripens at 2 p.m. when you’re at work), you can reduce the water temperature, change the ambient temperature, or reduce the amount of mature starter you carry over at each refreshment (this is what I do). You want to try to refresh your starter right when it’s at its peak ripeness or shortly thereafter.
The key to coaxing out maximal fermentation with your starter is to be observant.
Once you have a healthy starter showing the same signs of fermentation every day, you will be able to adopt a consistent sourdough starter maintenance schedule. I work this into my daily routine: I refresh my starter when I eat breakfast in the morning, and then I refresh again in the evening as I’m cleaning up the kitchen getting ready for bed. It only takes a few minutes (see my tips later on tools to make things easier).
Your starter will go through the following phases each day, but the times will most likely be different. For example, if fermentation is slow (due to temperatures or percentage of starter carryover, for example), then the signs I point out below might be at greater intervals, and conversely, if fermentation is fast, then the ranges will be tighter. As I mentioned initially, if you’ve not yet started your sourdough starter or received a portion from a friend, I have an intro article to creating a starter that will get you going in a few days.
Let’s look at a day in the life of my starter.
Sourdough Starter Maintenance Timeline
Before we dive into the timeline, I want to point out that below I refer to two things: my starter, which is what you’re here for in the first place, and also a levain. I talk about both almost interchangeably because mostly, they are the same thing. Your starter (mother, chef, etc.) refers to your yeast/bacteria culture you continue to refresh and care for indefinitely. In contrast, your levain is a splinter, or off-shoot, of your starter that you refresh and build only to be used in a bread recipe eventually.
For the timeline below, I used 30% whole grain dark rye flour and 70% medium-protein bread flour (similar to all-purpose, but geared toward bread baking). The percentage of flour types is really up to you; I used a little rye flour to help increase fermentation and acetic acid production, but you can use any ratio of flour you’d like (e.g., 100% whole wheat, 100% white, a mix of both, etc.). Just take note of how each flour type aids or slows fermentation.
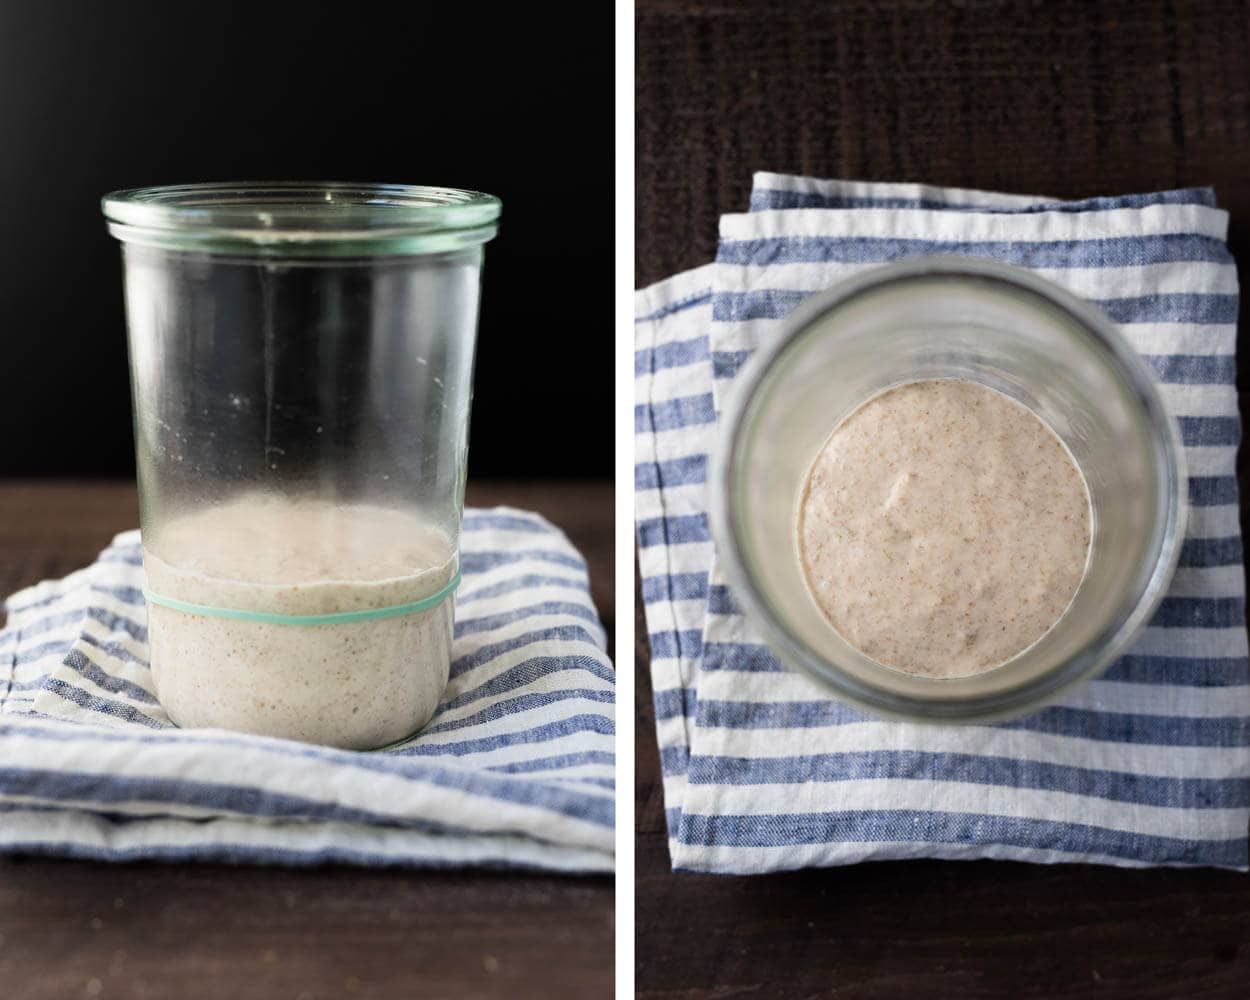
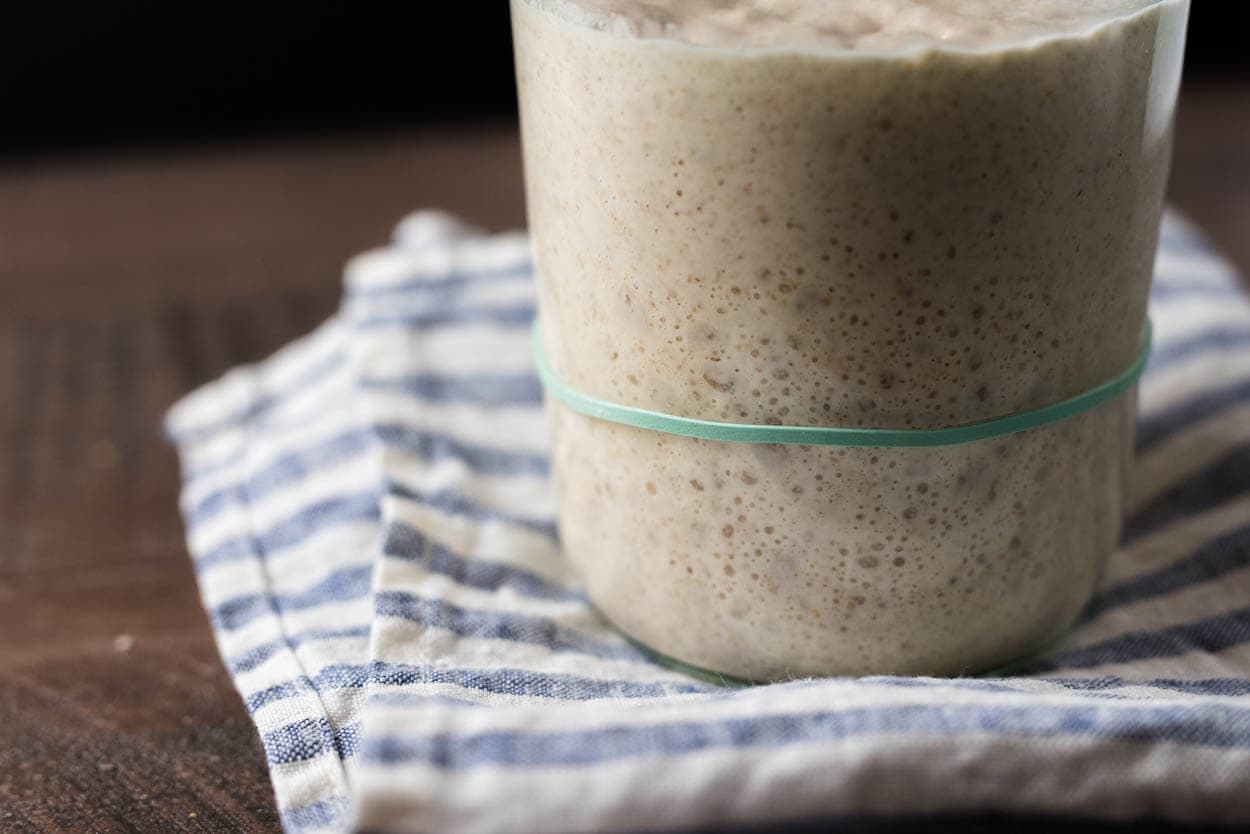
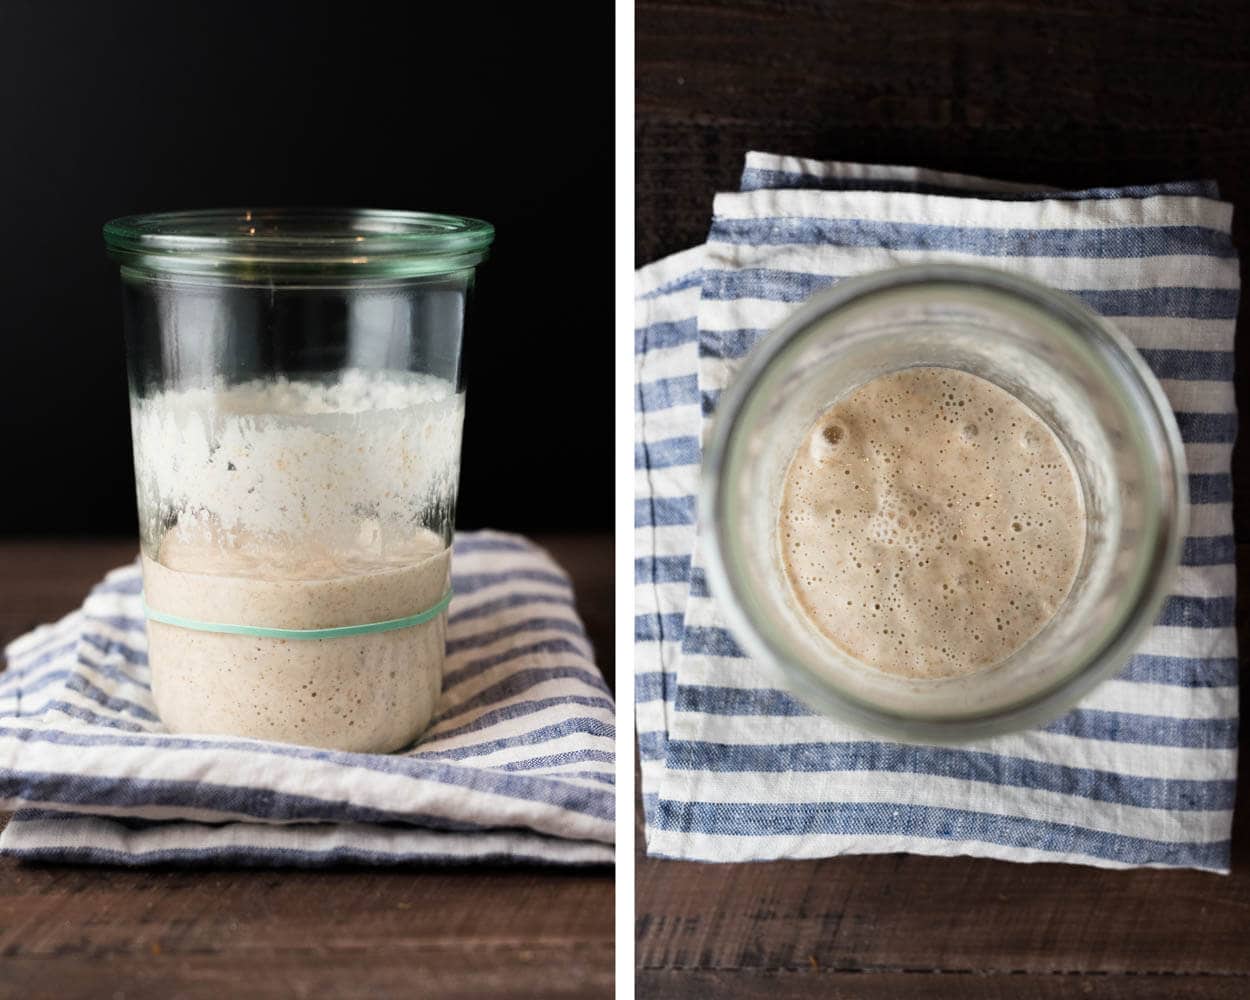
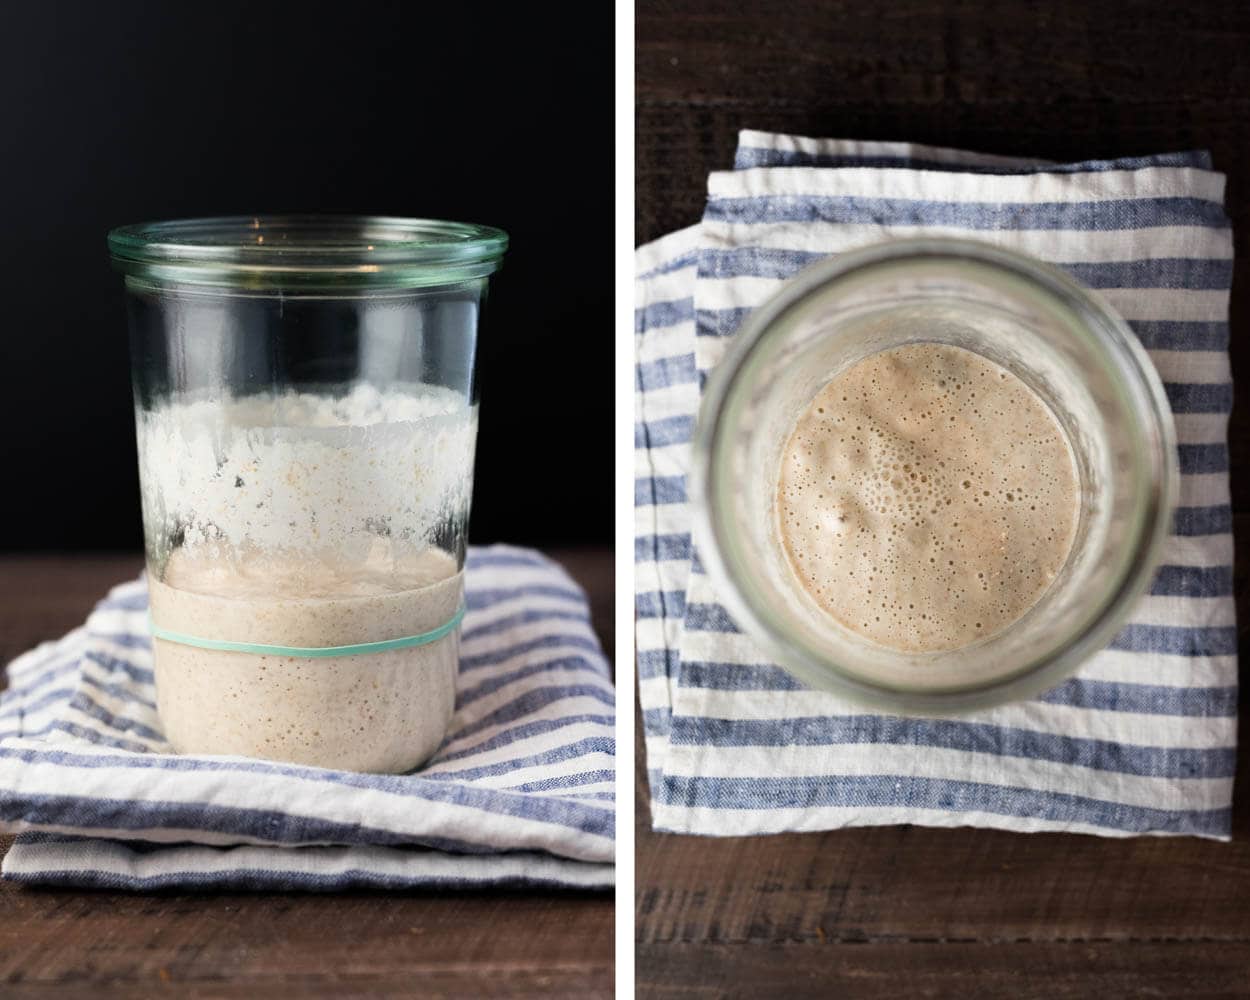
10:00 a.m. – Sourdough starter maintenance beginning
The first step is to take your mature sourdough starter, discard some part of it, refresh it with fresh flour and water, and cover (I only loosely cover with a glass lid that does not seal tight). My kitchen is currently around 75°F (23°C), and my mixture is 70g white flour, 30g rye flour, 20g mature starter, and 100g room temperature water.
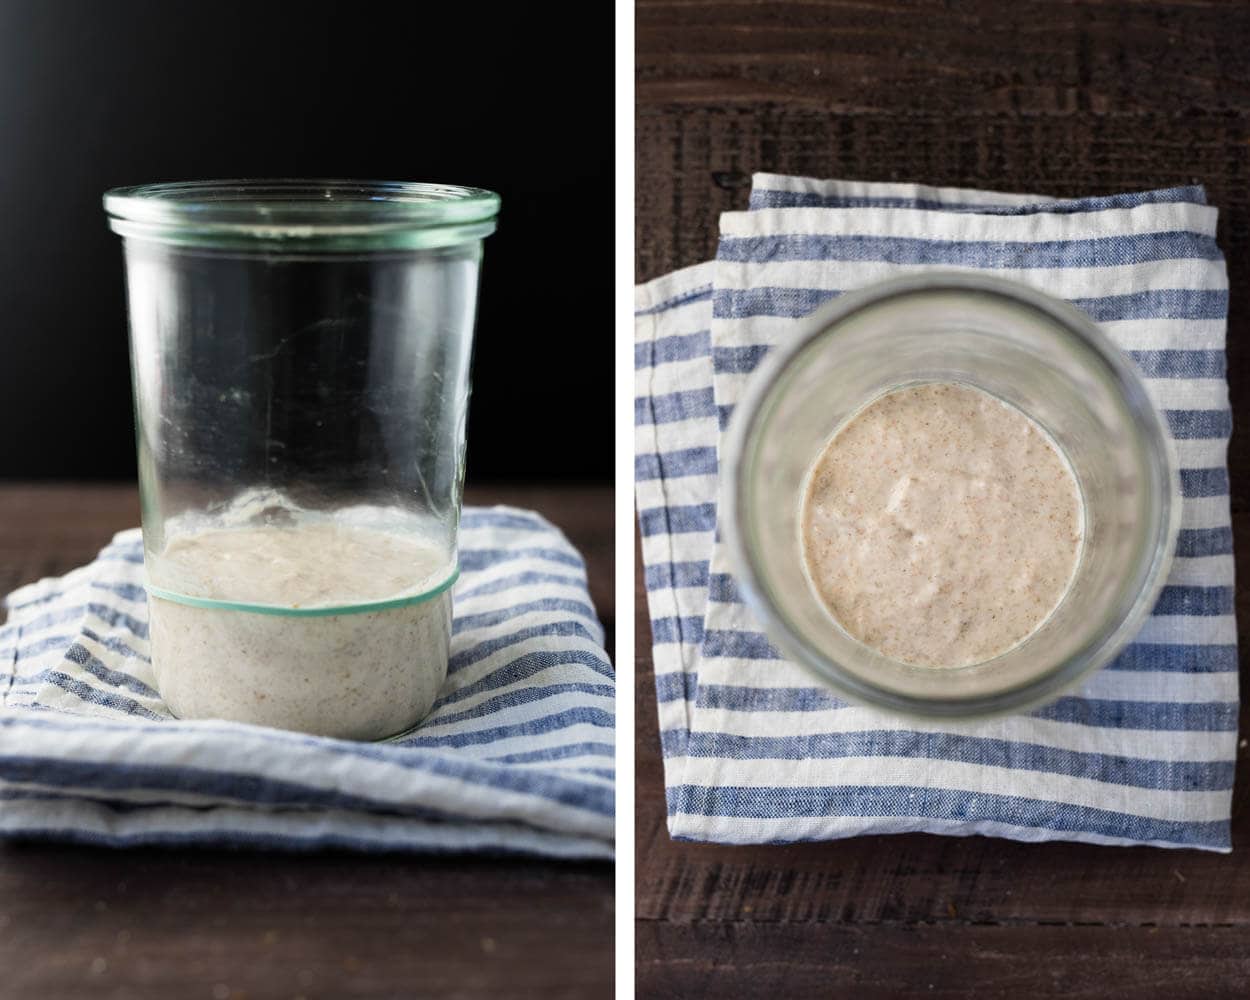
You can get a sense of how “stiff” my starter is after mixing. You want to make sure you mix everything thoroughly so it’s completely smooth with no visible clumps of dry flour.
I’ve placed the green rubber band at the beginning level of my starter so we have a good sense of how far it will rise throughout the day.
12:00 p.m.
After only a couple of hours, you can see only slight activity visible in my starter. The smell at this point would be very, very sweet, and practically the aroma of flour and water. So sit tight; things are about to get more interesting.
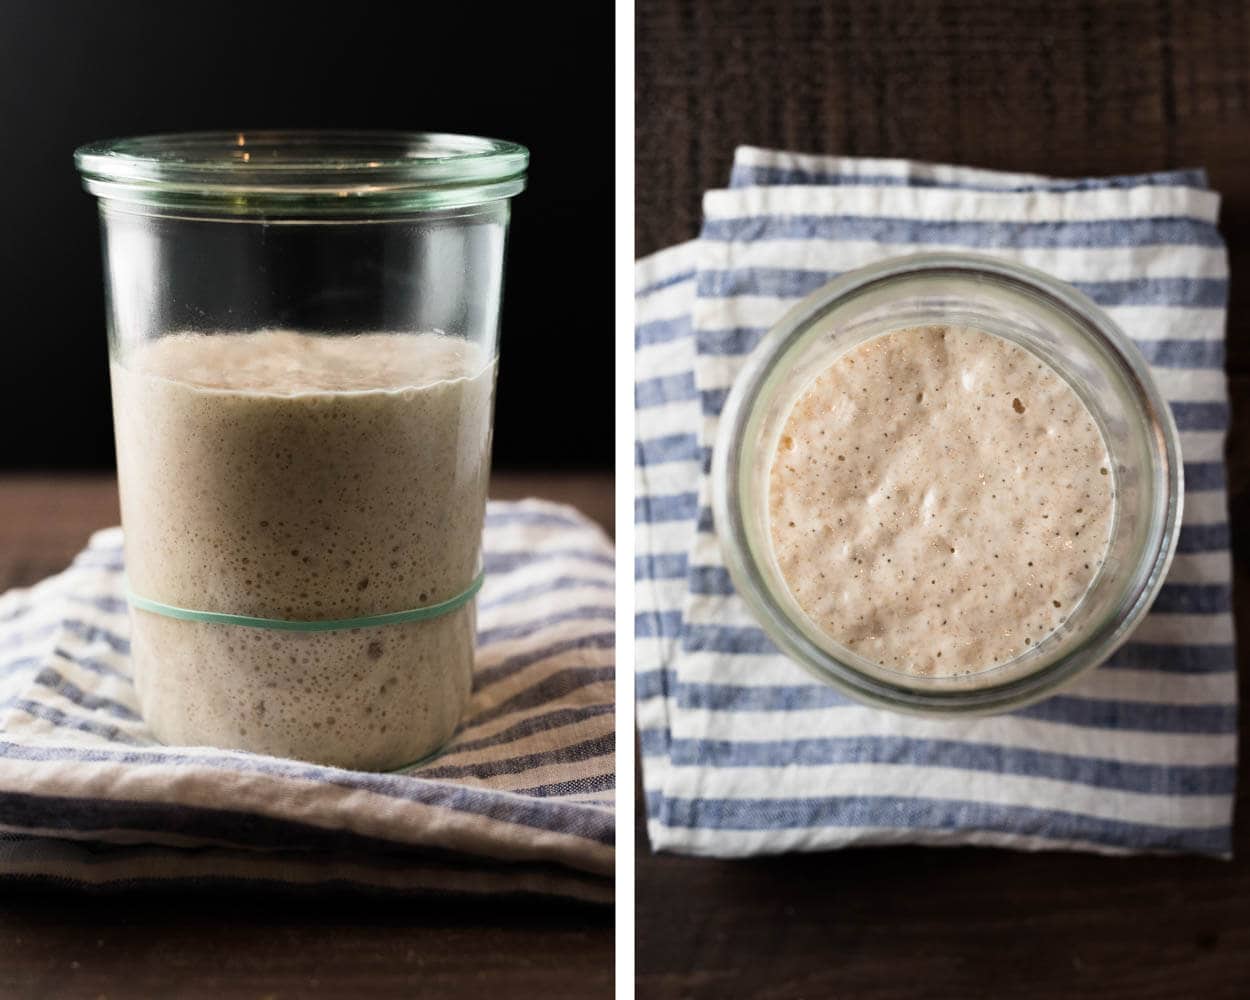
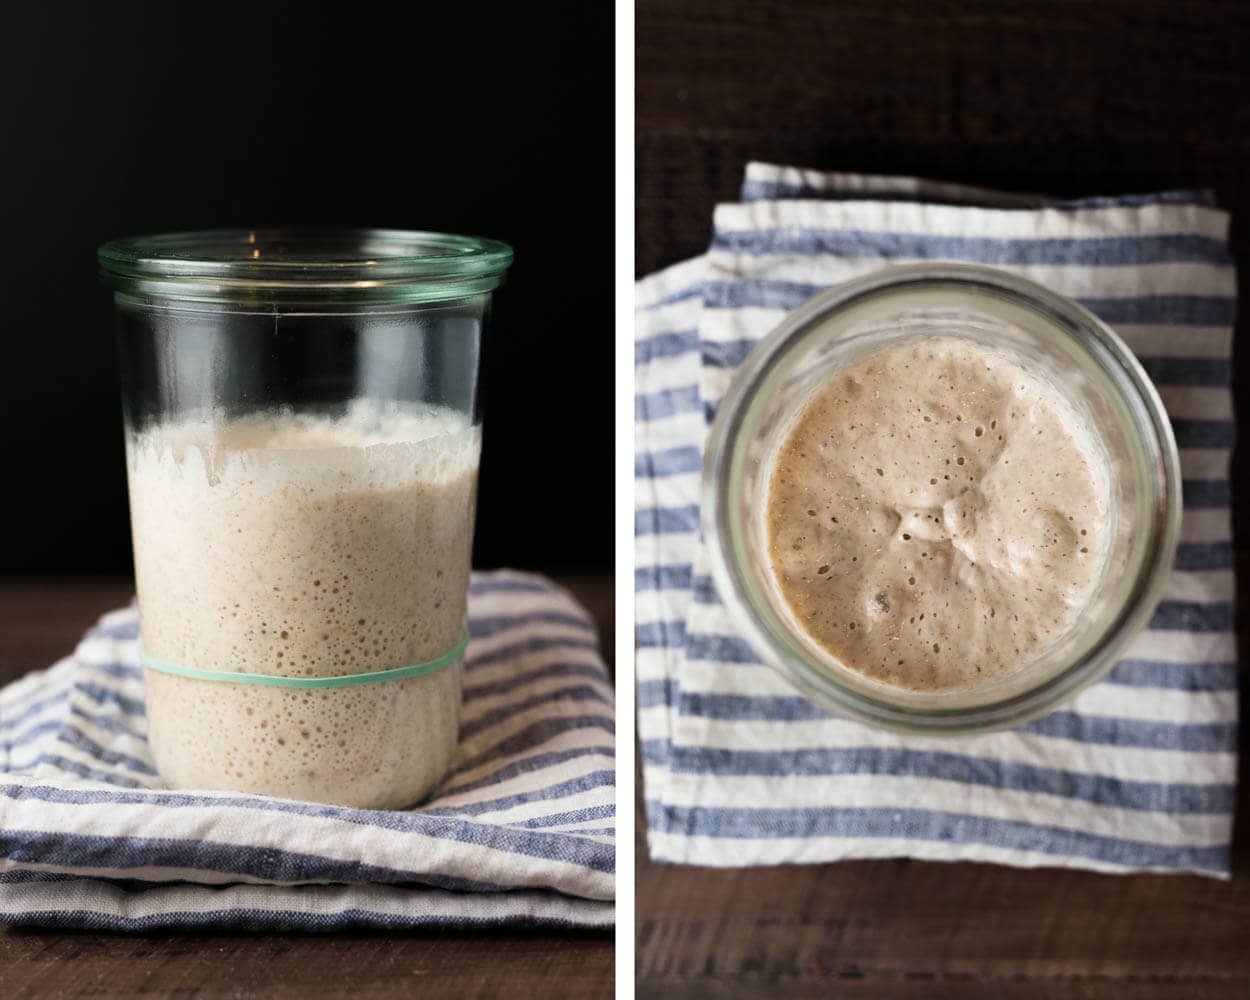
2:00 p.m.
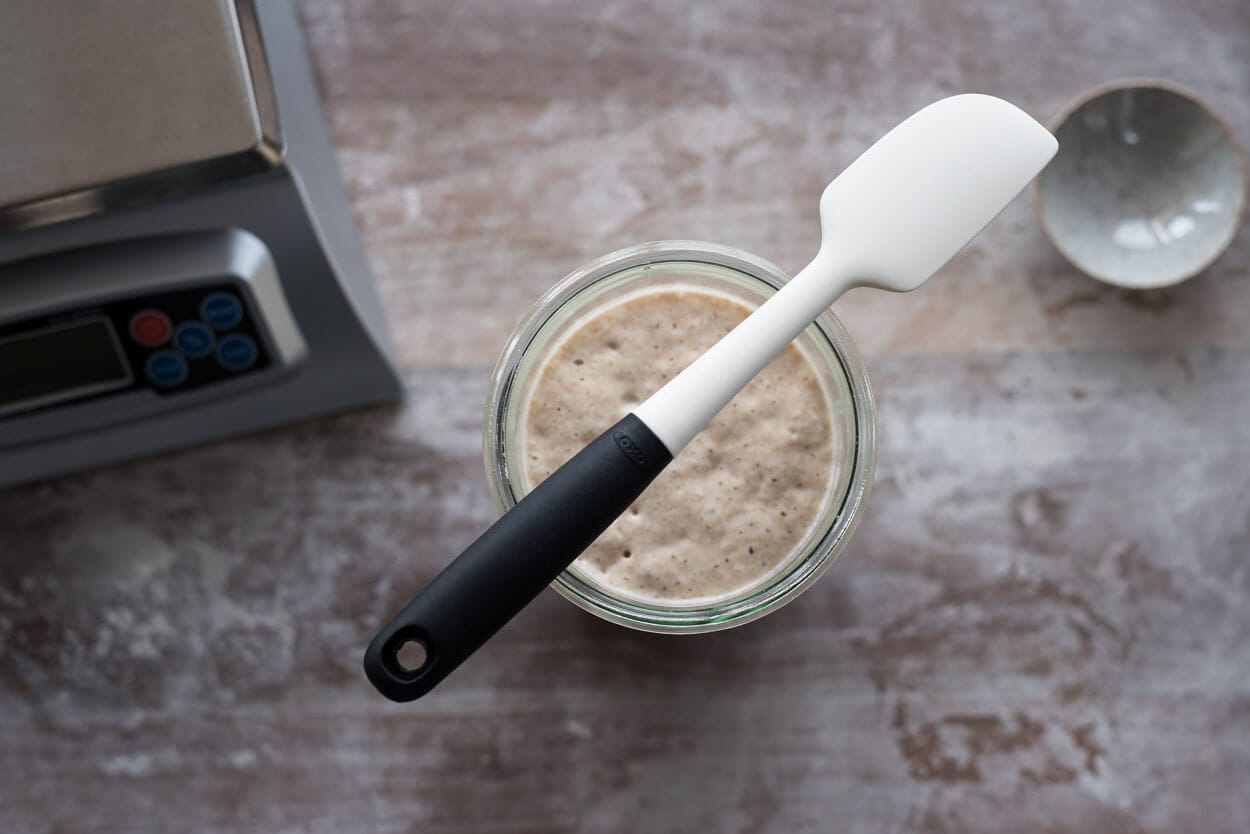
As seen below, four hours after refreshment, we have a significant expansion, a tad over 100%. In the image at right, you can see that the top is domed with a few bubbles peeking through. The mass of dough is trapping quite a bit of the gas produced through fermentation. I like to use a glass container, particularly these Weck jars, not only because it allows me to see firsthand how fermentation is progressing but also because the flared top makes sticking your hand and spatula inside very easy. I not only use these tall jars for my day-to-day starter and refreshments, but I also use them to build my levain before baking.
You’ll notice there’s quite a bit of activity already. Of course, after this initial explosive growth, things will slow down, but upward growth will continue for many hours.
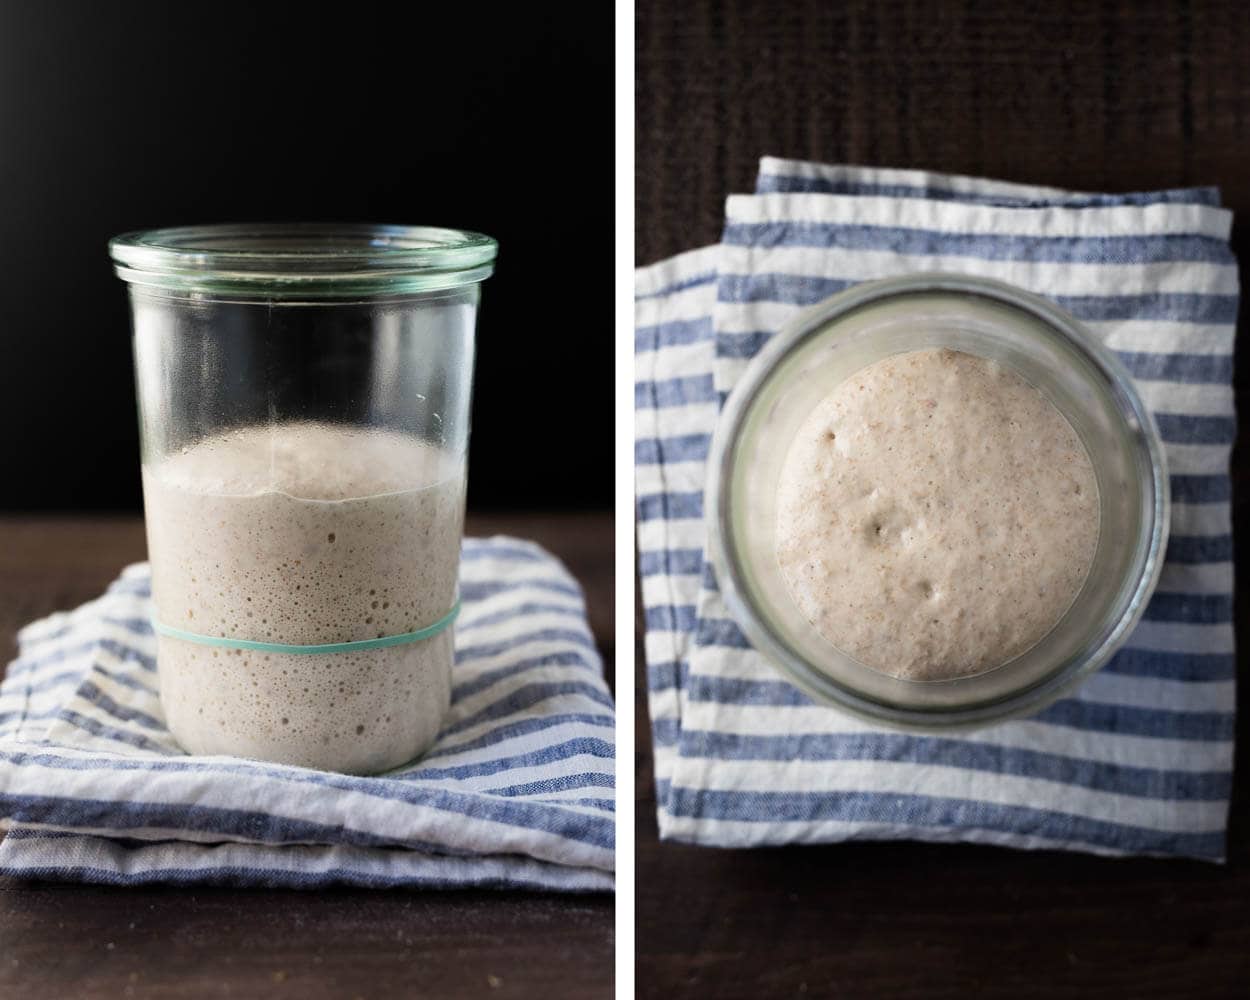
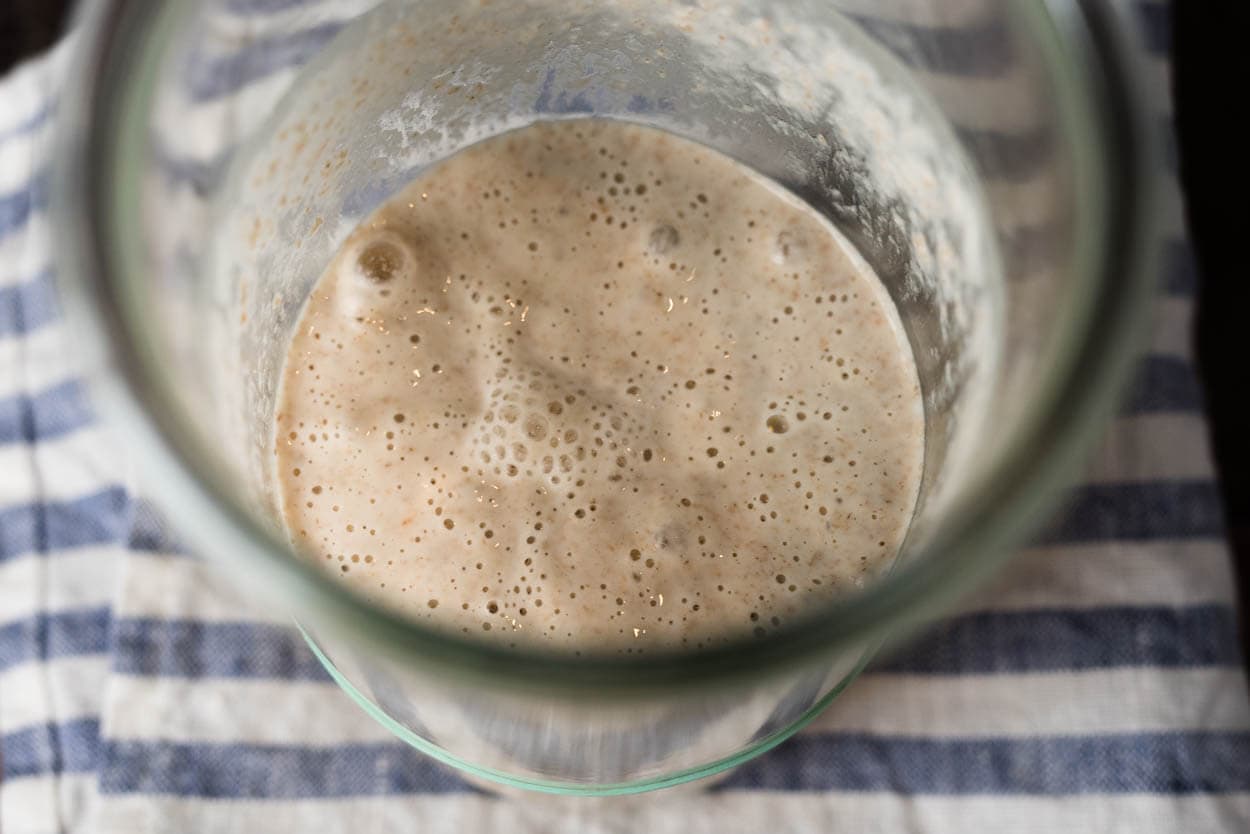
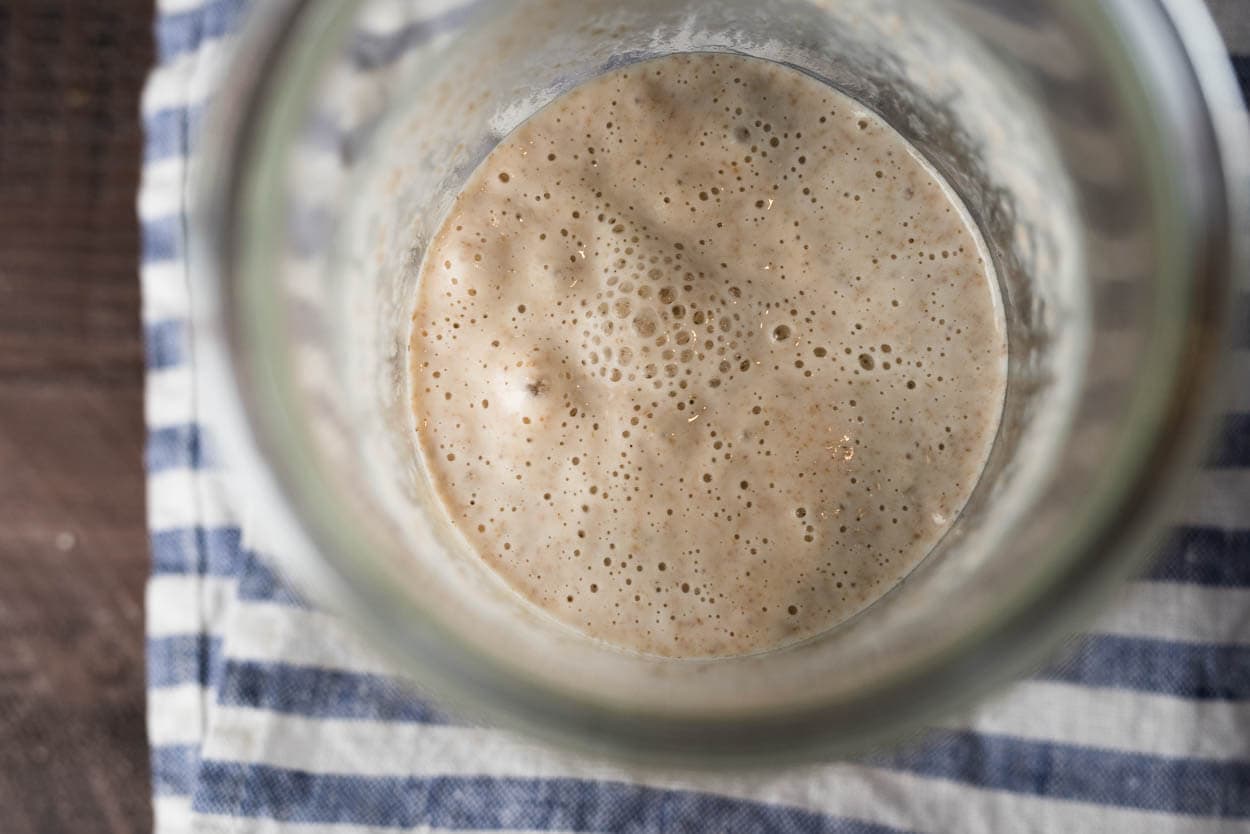
3:00 p.m.
At this point, there’s only slightly more expansion than the last check-in. But, you can see many more bubbles on top and at the sides, showing signs of the momentous fermentation taking place. All of these are good signs.

When you build your levain in preparation for baking, you may not always be able to see through the side of the container; the top-down view is sometimes all you have to judge your starter’s readiness. For example, bubbles and holes on top are a good sign, but my starter is not ready to be fed or used now. If this were a levain and not my starter, and I was attempting to use this at a “young” stage, this is most likely where I would use it for mixing my bread.
Another key indicator here is the aroma: how does it smell? Is it still sweet, sourer, or very acidic and vinegar-like? At this point, mine still has a sweet aroma to it, with a very subtle backdrop of sourness starting to creep in.
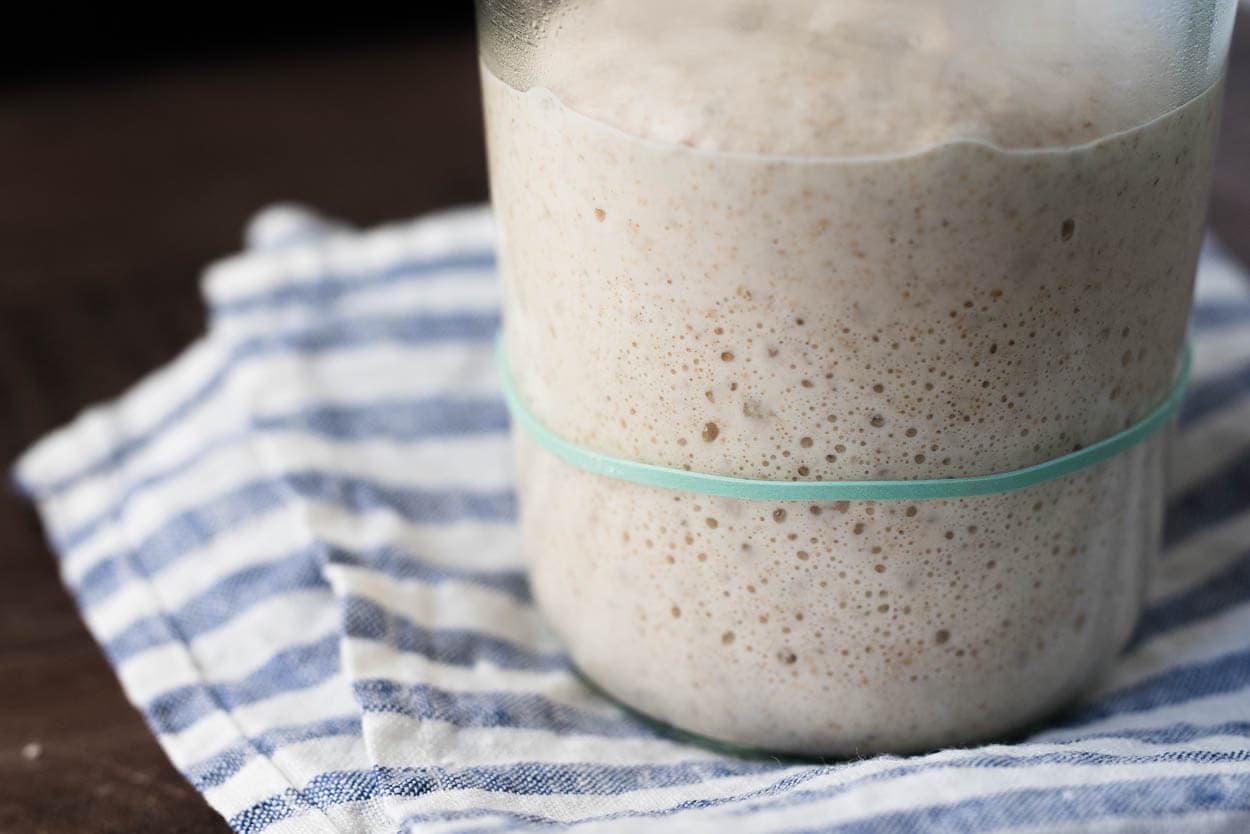
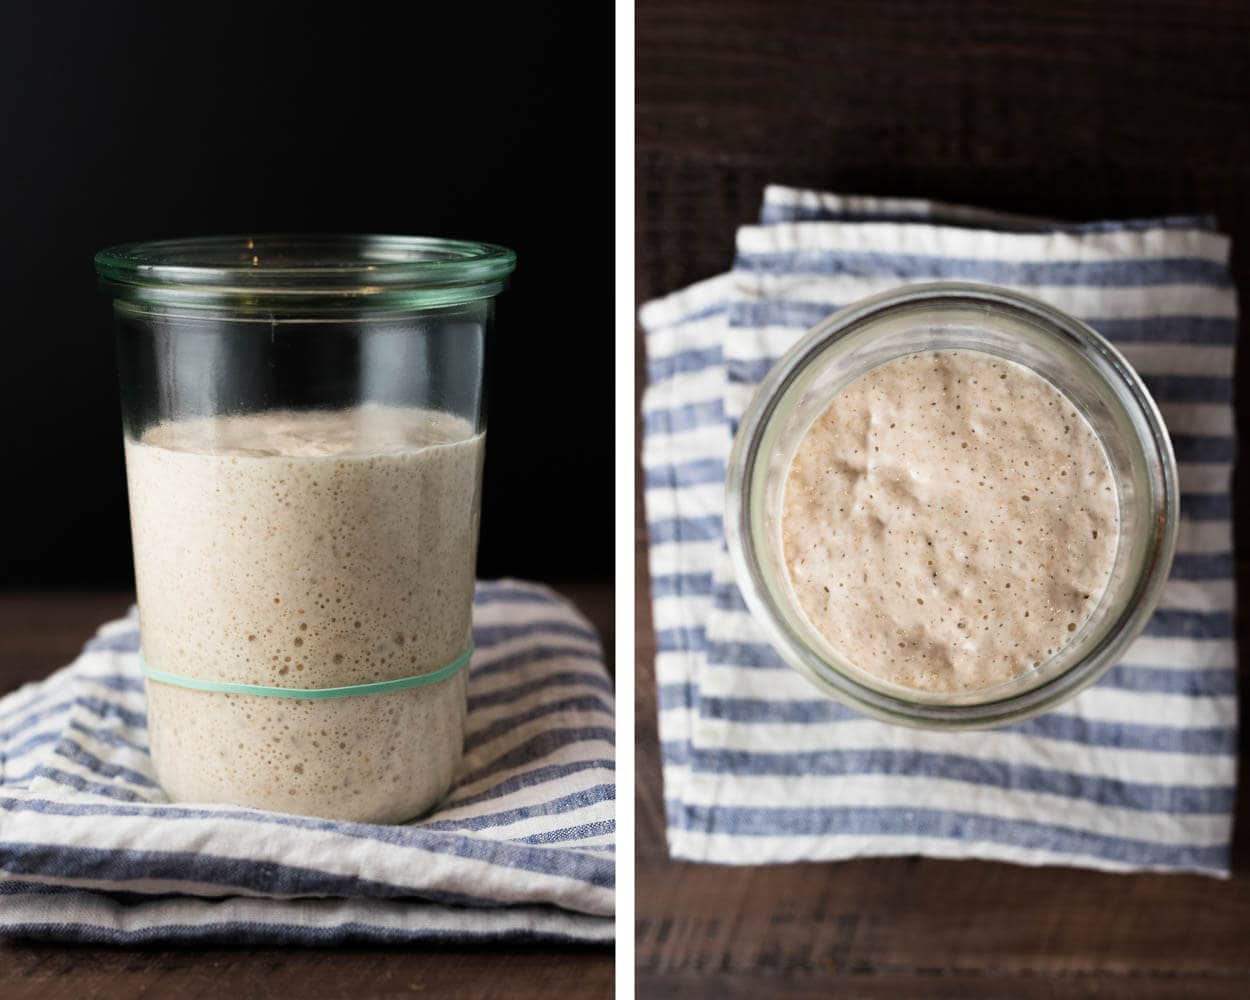
5:00 p.m.
By this time, we have significantly more bubbles at the sides and the top; overall fermentation activity is much higher. If I were to describe the aroma of the starter at this point, it would still smell quite sweet at it was at 3:00 p.m., but now the sourness is starting to escalate and build.
Given the look and aroma, I can expect my starter to rapidly come to ripeness very soon.
7:00 p.m.
You’ll notice here at 7:00 p.m. any dome that was once at the top of the starter is now gone, replaced by a reasonably flat surface. The flattening of the top usually indicates upward growth has significantly slowed, and upward movement won’t be as prominent—more holes on top and more fermentation visible at the sides. We’ll continue to let it ferment.
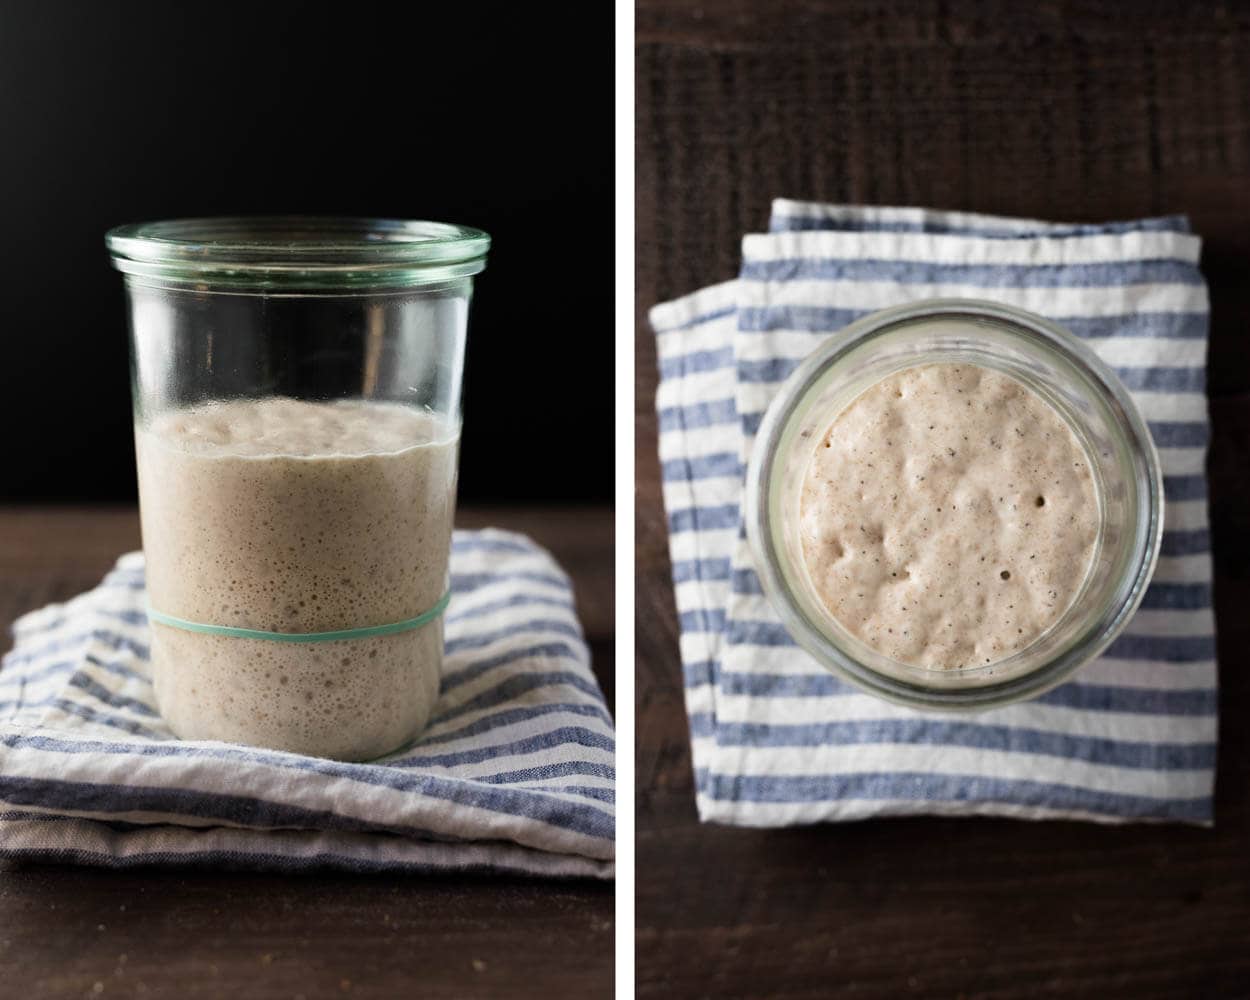
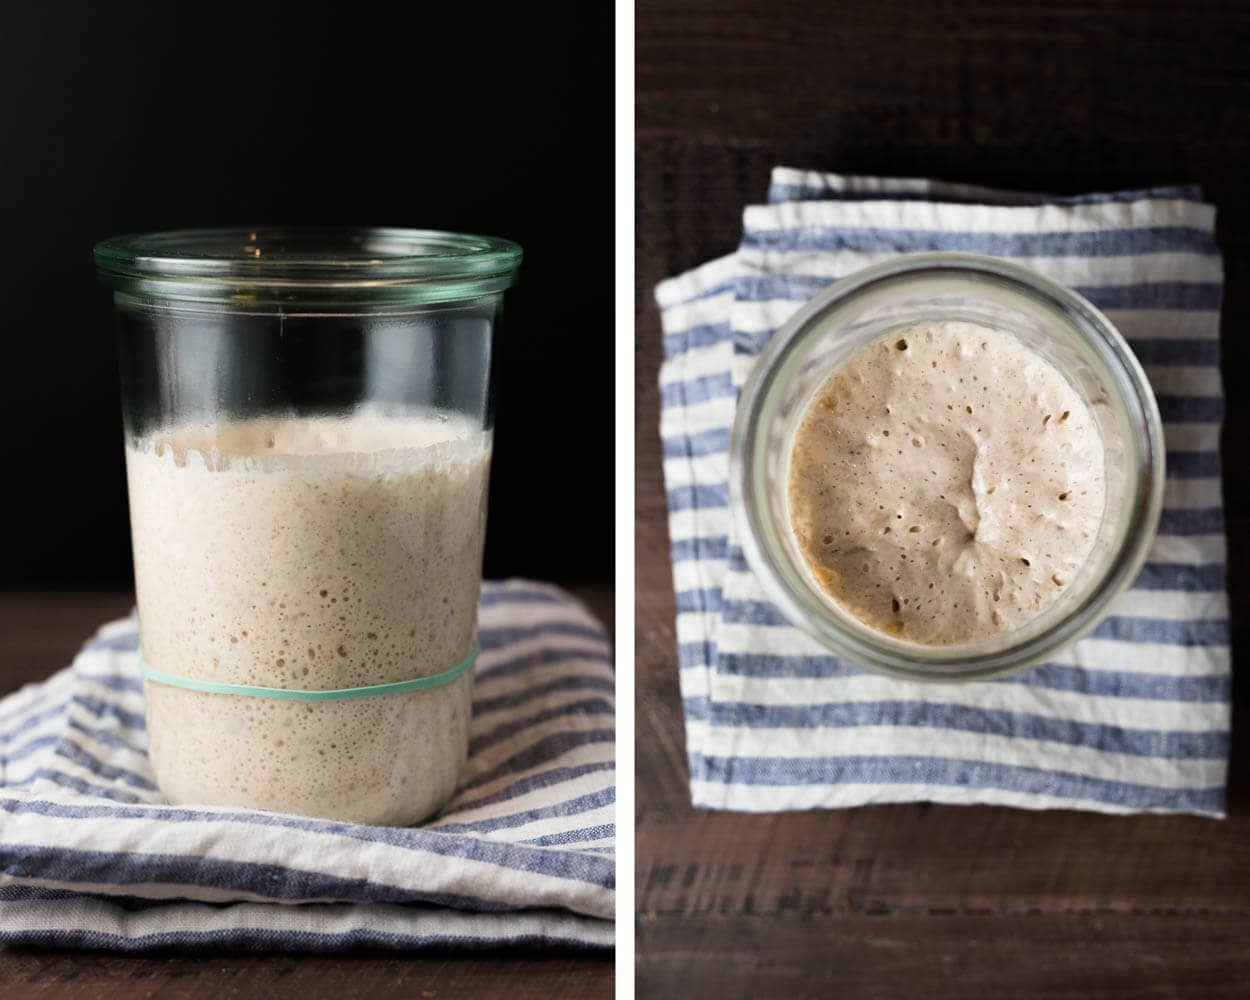
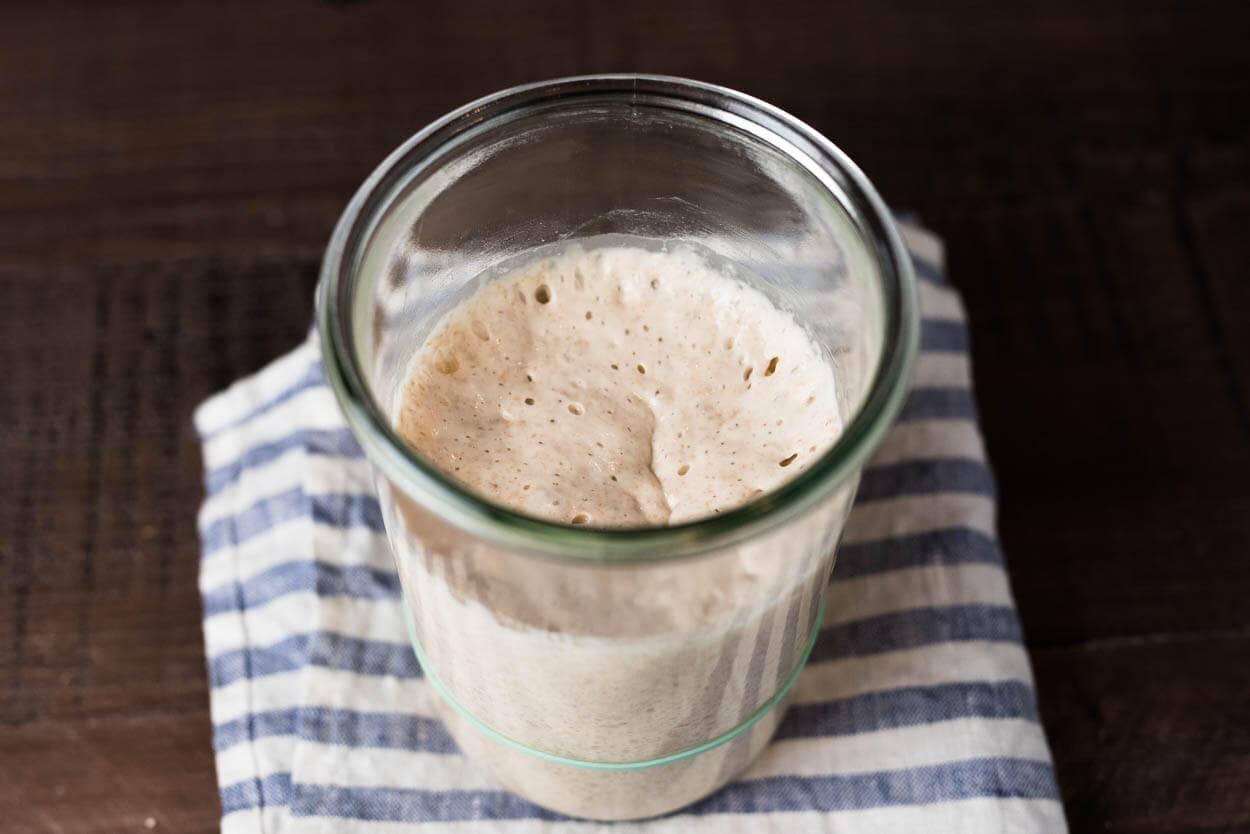
8:00 p.m. – Ripe, time to make a levain
As seen below, we still see some rise since 7:00 p.m., but not much. The top shows signs of more holes and bubbles, and the aroma is what I would describe as “ripe” and ready for use. If I were to pull back a little bit of the top, I would smell a slightly sour, vinegary smell with hints of sweetness still present.
At this point, I’d use some of the sourdough starter to make a fresh levain or use this starter directly in making bread. After making the levain, I would also refresh the starter by discarding and adding fresh flour and water.
While I find the “float test” to be misleading because it can sometimes give you false positives for when a starter or levain is ready to use, the float test would surely pass at this point.
10:00 p.m. – Just past ripe
In the photo below, you can see the culture is beginning to show signs of ripeness. There are streaks at the top that indicate where the top of the starter once was, and in the top-down view, you can see the center is starting to collapse.
The fact that it’s starting to collapse is not the single most crucial factor in judging readiness. Instead, it’s the cumulative signs that are most important.
The fact that it’s starting to collapse is not the single most important factor in judging starter and levain readiness. Instead, the cumulative signs matter: a general breakdown of the mixture, a stronger sour aroma, and significant gas production.
Again, if this were a levain I built in the morning to mix into bread, I would still feel comfortable using this to mix my dough. I’ve used my starter/levain at this point to make excellent bread. I’ve touched on the topic of a “young” levain in the past, but recently I’ve been using mine when it’s more fully fermented to achieve more flavor.
This time is also when you would want to refresh (feed) your starter. If you are using the correct mixture of inputs—water at a specific temperature, percentage of mature starter, and flour mixture—this time will coincide with when you want to feed it. For me, 10 p.m. is perfect as I start cleaning the kitchen in prep for bed (our little ones at home dictate my sleep/wake schedule, and thus my starter must conform).
If your starter has arrived at this point before you want it to, you can use a smaller percentage of ripe starter carryover or use colder water. If your starter is a bit sluggish and isn’t quite at this level, use a bit more ripe starter at the next feeding or use 2° to 8° warmer water.
Being observant helps us help our starter to maximize fermentation activity. So, as you continue to care for your starter, take a moment before you rush through refreshments to observe the look and aroma of your starter—plan to adjust things either at the current refreshment or the next based on this observation.
11:00 p.m.
My starter continued to fall at this point, with longer streaks on the side, and the center has noticeably caved. I will normally have refreshed it by this point, but I continued to let this ferment until the morning so we can observe how it looks when it’s gone farther than I’d usually allow.
6:00 a.m. (next day)
What a drop overnight! The sides are entirely streaked with how far the starter has fallen, and the top was covered in small little bubbles. My starter has gone way too far at this point and needs a refreshment.
7:00 a.m.
Even more collapse and more small bubbles. At this point, the aroma was very acidic, vinegary, and quite strong.
8:00 a.m.
My final timeline entry shows just how far my starter has fallen after almost 24 hours. The acidity will continue to rise, and if left for even longer, a clear liquid will form on the top (commonly referred to as “hooch”) that will be alcoholic and bitter tasting. Your starter might also look this way if you’ve left it for a long period in the fridge in “hibernation,” as I like to call it. When reviving a starter in this condition, I will pour off the clear liquid, mix the remaining, and refresh as usual.
There have been times when my kitchen heated up unexpectedly, or I couldn’t get home before this had happened, and I mixed up my starter per usual, and it was just fine, but I try to avoid this scenario as much as possible.
Don’t panic if you forget to refresh your starter for a day or two! It will be just fine with a few timely refreshments and some attention.
General Sourdough Starter Maintenance Tips
See my sourdough starter frequently asked questions post for a long list of common issues, but here are a few tips that will prove helpful:
- Don’t let your starter collapse and sit for extended periods as excessive acidity will change the flavor of your resulting bread (sourer). If it’s a levain, not your starter, and it’s fermented much too fast for your schedule, you can always make an intermediate build (essentially discard and add new flour and water) and use the new build to mix
- Use your nose. Observe the aroma of your starter at each phase and get to know what a particular aroma indicates by drawing a connection between aroma and visual cues
- If your area has high chlorine levels in the water, use filtered (or distilled) water or let the water sit out on the counter overnight in a water bottle before using
- Stir your starter thoroughly until there are no clumps or dry bits of flour present
Above all, take a few seconds each time you refresh your starter to sit back and assess how things look, smell, and even taste (I don’t typically taste my starter, but many bakers do). Through constant observation and attention to small details, we can maximize fermentation in our sourdough starter maintenance routine.
Sourdough Starter Maintenance Tools
It’s funny how small tools make a huge impact when compounded over multiple times a day for every day of the year. I recently changed my stirring apparatus from an old Pyrex spatula to this newer Oxo spatula, and wow… So much wasted time cleaning that old multi-piece thing. This Oxo one is covered with silicone at the top with no seams or joints, it’s very sturdy (which helps act as a firm mixer), and you can also toss it into the dishwasher. Highly recommended.
Aside from the new spatula, I still use the same Weck jars, dark rye flour, and all-purpose flour. Head to my tools page if you’d like to see more of the tools I use for my sourdough starter maintenance.
Sourdough Starter Maintenance Wrap Up
There you have it, a day in the life of my starter and my sourdough starter maintenance routine. I hope this visual guide has helped convey the visual cues and aromas I look for at various points through the microevolution of my starter. The same signs shown above are also present when I build a levain when making bread.
Remember the methods we have to impact the fermentation rate: temperature of the water, inoculation percentage (amount of ripe starter left in the jar), flour selection (whole grain flours increase fermentation), and ambient temperature. If your starter is sluggish, increase these to speed things up or decrease them to slow things down. After a few days of experimentation, you’ll discover the right mix of each for your unique starter.
Now that your starter is on a regular maintenance schedule, don’t forget you can use the daily starter discard in many delicious things in the kitchen! Buon appetite!
For more sourdough starter guides, check out my sourdough starter guide roundup.


699 Comments
Hi there! I am stumped with my starter. I typically keep it in the fridge as I don’t bake often enough, and am trying to figure out the best way to wake it up. I have been feeding it once a day with 75g whea, 75 bread and 150g water. Sounds like I could reduce the quantity of bread and water, only carry over 30g of the previous starter- but how many days to do this for? And feed twice a day?
Hi, Chris! I like to recommend feeding your starter when you notice it needs a feeding, but at least once a day when it’s on the counter.
Have a look at my Weekend Baking Schedule Guide where I talk about how I keep my starter in the fridge from time-to-time and “wake it up” with a few feedings before using it!
Hello Maurizio, Although all the signs are good (rising/falling of starter, regular feeding, floating lavein, etc), I feel like my starter is not strong enough because after 4 – 5 hours of bulk fermentation, my dough is not rising enough. I currently feed twice a day with 50/50 white flour/whole wheat flour. The ambient temp is around 80F. Do you think that I have a starter problem?
Depending on how much levain/starter you’re using in your dough, at 80°F you should see plenty of activity in your dough during bulk fermentation.
Focus on getting your starter strong. I would give it two feedings a day for a solid week, perhaps with some percentage of rye or whole wheat flour to help nurse it back to full strength. After this week you should see a reliable rise and fall pattern. Then, use this starter when it’s mature to build a levain for your dough.
Hopefully this extra care will get your starter back on track!
Maurizio, thanks for your patience! If I have a starter in the fridge, I presume it needs to be fed at some stage. From what I’ve read, it should be fed after a couple of weeks. So I discard and feed with flour and water. What if I’m not ready to bake more bread for another couple of weeks? Do I just place it back into the fridge after discarding and feeding? Or do I have to let it come to room temperature first, then feed for a couple of days before returning it to the fridge?
Ideally, if you have the time and are willing to do so, keeping your starter fed at least once a week from the fridge will really help. What you could do is take it out for a full day on the 7th day and give it one feeding, then another feeding just before placing it back into the fridge for another 6 days. If you want to do a two week schedule that’ll most likely be ok as well, I would take it out, let it come up to temp for an hour or so, feed it, and then give it another hour before placing back into the fridge.
Hope that helps!
great post, thanks!
I’m curious — have you come across any recipes that take advantage of over-ripe starter? i.e., I would assume the big acidity of over-ripe starter comes from a higher bacteria count. So in theory, a recipe could inoculate a levain with over-ripe starter (i.e., lots of bacteria)…if it also used a second source of healthier yeast to ensure good proof / rise?
I haven’t come across any recipes. When my starter is over ripe, especially if it’s very ripe and has fallen for quite a while, I’ll hold off baking until I can do a refreshment. If it’s just a little over ripe I’ll still use it and things will be just fine, perhaps the final baked product is a touch more sour. I also do notice that an over ripe starter/levain will cause the dough to ferment at a faster pace, so keep an eye on it!
Thanks for a great article. I have one question as what a “young” starter is, do I understand it correctly that at 8:00 p.m in your schedule the starter is young, using it at that stage would be considered young, you catch my drift?
The term “young” refers to a starter (or levain) that’s not fully ripe. This means it still has some time before it reaches its peak height and maturity and will still smell on the sweet side, perhaps with just a bit of sourness. Hope that helps!
Hola Maurizio, First I want to thank you for sharing with us all your knowledge and passion for baking. My question is: how do you maintain a starter on the fridge for long periods of time? Do you have to feed the starter once a week? Did a lot of research on that but still confused…
Thanks a lot!
Martin
Martin, you bet, I’m glad to help! Ideally the least refrigeration time needed the better — your culture will change when it’s kept in the fridge for extended periods. What I’d recommend is reducing the hydration of your starter, perhaps all the way down to 65%, if you plan to refrigerate your starter for long periods. I’ve successfully refrigerated, and refreshed, my starter after it had been in the fridge for about 3 weeks. There’s a lot of confusing information out there on this and it’s no wonder you found conflicting information. I think each person has probably tried a different approach and it may, or may not, have worked for them.
I can say at reduced hydration 3 weeks in the fridge has worked for me several times. Hope that helps!
Thanks a lot! I’ll do that, I truly appreciated your help! have a great day!
Hi Maurizio, I’ve been following your blog for almost a year now and have been making better and better bread, I especially love your latest Hamburger Bun recipe – and so does my granddaughter! Since I made it three days ago however, my starter has been behaving strangely. Prior to that it had been acting almost exactly the same way as yours. (I study your photos very carefully), but now it barely doubles before falling back. The flour, water and temperature are all exactly the same. Also it still smells sour. I know that sourdough consists of many different strains of yeast and bacteria. Has some unfriendly strain taken hold of mine? And if so what can I do about it? Would very much appreciate your input on this. The whole family relies on home made sourdough now, and my son-in-law says he can no longer digest store bought bread. Thank you for a lovely blog.
That’s awesome, Jay! Glad to hear you’re followed along for such a long while. That’s strange to hear about your starter. One thing I have done in the past if things have seemed to go awry in my starter is to use a bit of whole grain rye flour for all my feedings in a week — usually just 25% of the total flour for feedings. This seems to “rehabilitate” my starter if it ever has issues. I’d say give that a try and see if that perks things back up, then switch back to your normal maintenance. Keep an eye on the starter during this time, rye flour will accelerate fermentation!
Keep me posted. Happy baking!
Hi again Maurizio. I took your advice and started using 25% rye for a week without mush change, In the meanwhile I put up a new starter following your instructions. That went fine until day 8 when I used it to bake with and refreshed it as per the proportions you use. Again the same problem. I figured the problem was with the flour so I switched from all-purpose to bread flour and now both starters seem to be doing ok. Maybe the company (Bob’s Red Mill) changed the formulation of their AP flour, but it seems that the flour was the problem. My question is can I keep using bread flour for refreshing my starter? The only difference is that the bread flour contains malted barley flour in it. Hopefully that will not damage anything in the long run? Would really appreciate your feedback. Thanks a lot.
Wow, that’s very interesting! I’ve not used Bob’s flour for long periods so I can’t comment too much on it’s long term effectiveness but my thought it is should have been fine. Ah well, there are other options! I use malted flour to feed my starter and have never had any issues. You can change from bread flour to any other flour you’d like, just keep in mind the maintenance cycle will change dependent on the amount of whole grain flour used to feed (it’ll speed up typically).
Hope that helps and thanks for the update!
Each starter is going to display different visual representations of fermentation when using different flour types. I don’t typically like to focus to much on the actual height of my starter but rather the signs for when it’s time to refresh: if maintaining a high hydration stater it’ll start to fall, smell more and more sour and start to show a breakdown in structure. I’m surprised the rye starter does rise higher than wheat, though, as rye doesn’t have the same gluten characteristics of wheat and typically will not rise in the same way (whether in a starter or in a loaf).
Even if your whole wheat starter isn’t displaying fermentation in the same way as rye, it can still make amazing bread! The thing to keep in mind is they will just be different looking/smelling/feeling/tasting starters and you’ll have to learn to read the “signs” of each to know when it needs food. Neither is better or worse than the other, just different.
My suggestion is to try baking with both and see which you prefer!
Lately I’ve stopped using rye in my starter and I’m still baking some great bread 🙂
hi there, starting my first bake today and just wondering what I do with starter once my levain is made? I’m hoping to keep it in the fridge during the week – so piecing together bits from your site that I’ve read, should I feed it, leave it out for an hour and then pop it in the fridge? And do I stick with the same measurements I was using to build my starter – discard enough to get it back to jar weight +40g, then add 40g water, 40g flour?
Thanks for your help! Excited to see how my first sourdough turns out… fingers crossed!
Yes, exactly. After you make your levain from your mature starter, feed it and let it sit out for a bit before placing it back into the fridge. Yes, stick to the same percentages in the jar as you mentioned.
Good luck with the bake and have fun!
Hey Maurizio,
Love your website and posts! I am in the beginning stages of learning here so please bare with me. I am experimenting a bit, have looked through the entire site, and have not seen an answer to my forthcoming question except to say that I am reverse engineer some of your posts regarding the level of sourdough taste in the final product. I want my bread to scream “SOURDOUGH” when I bite in and would like to get your ides on a few of my initial thoughts.
1. Higher temperatures throughout, maybe as much as 5-10 degrees?
2. Waiting longer for starter and levain to mature before feeding or mixing? This seems pretty much a given but wanted to ask.
3. Anything else I have not thought of…?
Thanks in advance,
Thomas
Thomas, thanks! Answers:
1. Yes, warmer temperatures should increase the sour flavor. Try to ferment the dough at 82-84ºF.
2. Yes. let your starter/levain rise to its peak, then sit there for some period just before it’s about to fall (it’s ok if it falls for a bit, too).
3. You could add in a higher percentage of whole wheat or rye. Whole grain flours help increase acid production.
4. Try to extend your final, cold proof a few more hours.
Hope that helps!
This is super embarrassing to ask but I cannot for the life of me figure this out, I might be over thinking this whole thing.
I converted some of my 100% hydration rye starter to 60% hydration. I wanted a 150 grams of starter for which I took 30 grams (100% starter) and fed it 79 grams flour and 41 grams water. Now I have 150 grams of 60% starter.
Well now I have to feed my stiff starter for the first time after building it and I don’t know how much to feed it to keep the 60% hydration….
Let’s say I want another 150 grams of 60% stiff rye starter? What would my feeding formula be? Any help would be greatly appreciated.
To calculate the hydration just divide the flour amount by the water amount. It’s hard for me to give you exact numbers for your 150g starter because I don’t know what percentage of mature starter you’re carrying over each time (the inoculation percentage). Assuming you wanted to keep the same percentages in your example (with a 37% mature starter inoculation), you could keep a starter at 60% hydration with: 78g flour, 47g water and 29g mature starter — this will yield about 153g starter when it’s mature.
As an aside, for a starter the actual hydration of the mature starter you use to feed new flour and water is typically ignored, since the amount is usually pretty small. Additionally, if you’re going to keep your starter at a consistent hydration over time (quite quickly, actually) the hydration of the mature starter you use to inoculate the new mixture with (the mature starter carryover, in other words) will reach the hydration you’re after. I hope that makes sense.
Hope that helps!
Hi there,
Thank you for your super in depth posts, very excited to try this. Maybe I missed your explanation, but I’m trying to understand the reasons behind your practice for discarding a portion of the mature starter each day. Is it just to ensure you don’t overflow or have a manageable amount to work with? Would love to learn why you do this.
Hey, Alex! You want to discard a large portion of your starter as that “food” (flour + water) has been completely metabolized by the bacteria/yeast in your culture. Typically that discard would be used to make bread, but in a home environment it’s hard to keep up with the discard each day and it has to be composted (or used in some other foods around the kitchen). If you never discarded the culture would eventually grow out of control and become very acidic, you’d have to start adding more and more and more flour and water to ensure the same percentage of ingredients as well. Consider this: if you, at one point, had something like 200g mature starter in the jar, you’d have to add a LOT of flour and water to keep that mature starter percentage low.
Hope that makes sense. Happy baking!
I’m around 10 days into my starter and my starter starts falling pretty fast. Usually only around 8h after feeding or even less. My kitchen is quite cold too so I would expect it to take longer to reach its peak. Sometimes it falls before I can get back home from work.
That’s very interesting. Are you keeping around a large percentage of mature starter? Are you using 100% whole grain flour? These two things can definitely speed things up but that’s pretty fast if your kitchen is cool. I usually counter this type of activity (if it’s not desired) by really dropping the percentage of mature starter left in the jar at each feeding. Sometimes I’ll even go down to 5% when it’s super hot here.
I am new to sourdough and built my starter back in January. It was doing great until this spring when I used almost all of it and tried to keep the very small bit I had left by feeding it a lot at one time :/ It has “stunk” for the past month or more! It doesn’t smell like vinegar anymore…it smells like bad breath. It doesn’t seem to really raise like it use to and bubble but it also hasn’t molded or changed looks a whole lot. Any advice would be appreciated.
If you see some sluggish behavior sometimes what I’ll do is use part rye flour for a couple weeks when doing feedings. The rye should help kickstart it back into shape.
If you’re still having problems I’d recommend just starting a new one! There’s no harm in it and since you’ve already one it once you’ll have a good understanding of how the process works. Before you know it you’ll have a new starter that’ll be strong as ever.
Hope this helps and good luck!
Hi,
a very nice and illustrative tutorial, and a great site overall!
Do you happen to have a post addressing the optimal moment a starter or levain should be used for baking? You state here that you’d use one from between 8:00PM and 10:00PM (peak). Why is it that a levain/starter at this stage would be the one to use for baking? Is it because at this point the yeast has been fully activated, and is able to most efficiently feast on the nutrients (flour) of the bread mix, giving you decent leavening, or is it about the flavor, or something else? How does it affect the outcome if you’d use one that’s at a different stage (a less fermented (e.g. the 3:00PM) or a fully collapsed (6:00AM) one)?
Thanks so much I really appreciate that!
Yes, really this post is the best guide I have on illustrating when my starter is at its most optimal for refreshment and for using to build a levain. I’ve found using my starter at its peak produces not only the best flavor but also the best performance (in terms of fermentation). When you build your levain you really want to use a mature starter, this way you’re ensuring you’re making your levain using a mixture that is fully fermented and has maximal populations of yeast/bacteria. If you use your starter really early you’d be using some of the mixture before the entire thing was fully metabolized.
Also, I’ve found I do get the best flavor when using a levain that’s fully mature — but this is my personal preference. There are many bakers who like to use their levain at a more “young” (early) stage when mixing their dough. This works too it just means the dough will need a little more time to be fully fermented and ready to proof.
I hope this helps!
LOVE the site! It’s been my go-to for bread making.
I am running into a problem. My bread ends up tasting great and my co-workers love it, but my loaves are just not beautiful when they come out of the oven. I do not use a combo cooker but maybe I should. I’ve just been cooking my loaves on parchment paper on a pizza stone. That said, my loaves never have any ears. My scoring pattern is there, but it just looks sad and uninteresting. Someone told me one of my loaves looked like a roast. Is humidity/hydration the culprit? Temperature? Baking technique? Or just about any or all of the above?
I’m experimenting tonight making a cinnamon raisin loaf. Fingers crossed.
Thanks so much James, appreciate that!
There are several reasons you might not get a nice ear or spring in your loaves so it’s very hard to pinpoint what the problem is without more details. Steam is important when baking as it helps your loaves rise up nice and high before forming a hard crust on the top and sides. If you have a large roasting bowl you can invert that over your dough, this will help trap steam. Alternatively, you could follow my oven steaming process for generating quite a bit in the oven.
Aside from that it could be your dough hasn’t fermented fully. Make sure you push the bulk fermentation step pretty far, similar to what you’d see in the pictures and descriptions throughout my site.
Let me know if this works out for ya!
Hi! I’m going to try out your 20g starter + 100g flour + 100 water regime because I haven’t really been paying much attention to how much mature starter I’ve been carrying over. If I wanted to make this a lower hydration, do you think I’ll be okay just to reduce the water by 20% and keep the amount of flour and mature starter the same?
Hey there! Yes, just reduce the water to whatever percentage you’d like. Everything will be the same just know that the signs for when to refresh your starter are a little different as you reduce the hydration further and further (as it becomes more of a stiff starter instead of a liquid one). Just pay attention to the smells and the look of the starter — bubbles on top and below, the strength of it in general, and the level of rise.
Happy baking!
Hi Maurizio, I asked a few days ago about my rye/ww starter – its doing great so far. I am curious now why you use such a small percentage of starter in your feedings. Is it mostly a taste issue or do you think that the low percentage keeps the feeding more under control? Thank you! I have always used equal parts starter/flour/water in my feedings but love experimenting.
Hey! Yes, I use a small percentage because I want my starter to “last” until at least 12 hours later, when I can get to refreshing it. If you keep a large percentage of mature starter in the jar at each feeding it will mature much faster and need more frequent refreshments.
Hope that helps!
Hi, I am just curious, when you say that your “mixture” is 20g of starter, 100g of flour and 100g of water, do you mix all of these in a fresh jar each time, or do you keep the 20 g of starter in the same jar and just add the flour and water? Also, idk if I’m just being paranoid but it feels weird how much of the starter I am discarding. Am i accurate in saying that your routine is to discard 200g of starter at each feeding (400g/day)? Thank you for all your help! All paranoia aside my starter and bread have never looked better since I started frequenting your site.
I reuse the same jar, I don’t use a fresh jar until the current one is overly dirty or it’s been a couple weeks. You can use a fresh jar each time if you’d like, it’s just a lot of dishes to do 🙂
I definitely do not discard 400g but I can’t say for sure what the final weight is. The most it could be, theoretically, is 220g (since I’m feeding 20g of mature starter with 100g water and 100g flour). It does seem like a lot of discard but there are tons of things you can do with that fermented flour! If you haven’t yet had a chance check out my Top 3 Leftover Sourdough Starter Recipes for a few ideas 🙂
Glad to hear my site has helped to much! Happy baking.
Hello, I am struggling to build a strong starter. I am currently using a 50/50 mix of rye and all purpose to feed my starter. I have 40 g of starter, 40 g of flour, 40 g of water. It is slow to double over a 3-6 hour period. It is taking almost 12 hours. I would like to get more activity. I was reading in your post but I might have it wrong… Do you take 20 g of starter and use 100 g water and 100 g of flour to feed it?
From your post….
“10:00 a.m. – The Start
The first step is to take your mature sourdough starter, discard some portion of it, feed it with fresh flour & water, and cover (I only loosely cover with a glass lid that does not seal tight). My kitchen is currently around 72ºF and my mixture is 75g white flour, 25g rye flour, 20g mature starter and 100g room temperature water.”
yes, I keep 20g of mature starter in my jar and feed it with 100g water and flour at each refreshment. Temperature is incredibly important! If you keep your starter warmer, around 78F, you’ll see much more activity than at cooler temps.
Thank you for the reply. I did mix half rye and half all purpose white flour together to feed the starter. It is very thick even after 12 hours, when it is due for its feeding. I tried switching the starter to straight organic all purpose flour, that didn’t fair so well. The starter seems to lose its vigor and it didn’t provide much rise to dough. Is it wise to always keep some rye in your mix to feed the starter? Half and half of rye/all purpose to feed the starter makes left over starter a lite strong for pancakes. My kids aren’t crazy about it. Would light rye and less of it in the feeding mix be better?
Once your starter is rising and falling predictably you can change the feeding flour to whatever you’d like. You can switch to 100% white flour, 100% whole wheat, or whatever combination you’d like. Rye just helps get things started in the beginning due to the extra nutrients present in that grain. Just note that with higher percentages of whole grain flours (including rye), you’ll see more activity in your starter.
Hope that helps!
Hello, I just got some starter from a friend but it is barely rising after feedings (nowhere even close to doubling). After three days of twice daily feedings following your method, I went ahead and put it in the fridge. What can I do to encourage more activity? It does get good bubbles and has a great sweet/sour smell. Do I just keep at it and hope for the best? (It is 70+ deg. in my kitchen). Thanks for all the information on your site!
You’re very welcome! I’d recommend you try using around 50% whole wheat flour (or 25-50% whole grain rye) for several feedings until you see the activity pick up. It’ll also help quite a bit if you keep your starter a bit warmer, somewhere close to 75-80F would be ideal — temperature is super important!
I’d also say don’t give it two feedings per day if you don’t see enough activity to warrant the extra feeding. When you take it out of the fridge you might not need to feed it twice the next day (depending on temperatures).
Hope that helps and good luck!
Thanks, Maurizio! I upped the rye flour quotient and we had a warm spell here yesterday– this morning it had overflowed the container, more than doubling! Looks like I shouldn’t have doubted it. Going to make my first 100% wild yeasted loaf this weekend; next stop: trying to conquer whole grain sourdough.
Thanks again for the information and encouragement!
Right on! You’re very welcome and happy baking!
How do you make a started in the tropics?
Same process! If your environment is overly humid you could stir the starter midway between refreshments to ensure no mould is growing on top and to keep things better mixed in.
Have you made it in the tropics before?
I have not, I live in a very arid climate that’s less than 30% humidity.
Well, I need to find a way to make it work in the tropics.
This process should work just fine for you!
The issue is not molds.
Really great site – thank you. I began my starter about a week ago and it’s finally active (this is the second day it’s almost doubled) but I use a mason jar with a coffee filter lid I put the ring around. It seems to work okay and I’m using pint jars, which is about what yours appears to be. My starter is 100% stone ground whole wheat from a small batch miller who doesn’t separate the bran and germ from the endosperm so maybe that’s why it took a week to get going. If it doubles within 12 hours and starts to subside do I feed it again? I’m hoping to make one loaf every other day or so.
Thanks so much Leslee! Really glad to hear your starter has taken off. That’s great you’re using local whole wheat, very cool. Yes, you want to feed it right as it starts to fall, that’s the best time to catch it. If you find it’s fallen before you can feed it you can leave less in the jar at each feeding or keep it in a cooler spot. Hope that helps and sorry for the late reply!
Thank you this is very helpful. I’ve kept a “pure” all-purpose starter now for about 16 years. (I forgot when exactly I started it but some time in 2001). Whole wheat seems to spoil rapidly that is why I maintain a pure all-purpose mother. Much to maybe your horror, I keep it in the refrigerator and try to use or re-feed once every week or two. I’ve revived it from near death from as long as a month without food. I then use this all-purpose starter to start other flour combos, such as whole wheat, barely, buckwheat, and even teff. There are a lot more grains that I would like to try though.
I just feed my starter it just does what it does: it blooms! and always smells pleasant. It does get “sour” after sitting in the fridge for a long time, but that quickly ends if I re-feed usually by taking a 20-30% starter then triple or quadruple that with equal weights of flour and water (I don’t weigh, just eyeball till my desired consistency) and let ferment overnight if I’m going to use, back in the fridge if not. I’ve never kept a starter going at room temp for more than a few days (except when I first learned about sourdough in a kitchen 30 years ago, the sourdough was never put in the fridge!). I recently took a quick 4 hour sourdough bread class from a fantastic nearby bakery and they suggested a maintenance schedule pretty similar to yours, and use whole-wheat, AP mixtures. I just find that a bit tedious and demanding, I don’t like to throw anything out, and I just don’t bake bread, or anything else, that often.
Lately I’ve been lowering the hydration though and liking my starter much more and seems to have better refrigerator life with little or no “hootch”. So I guess my question is what are the qualities of the starter that I should be trying to achieve because I tend to do the same thing all the time, the eventual levains that I make from the starter always seem to be similar except for some differing flavors depending on what types of flours I use, but seem entirely acceptable to me but maybe my results could be better? I want to be a better bread maker.
Wow, that’s quite a long time! Nothing wrong with using the fridge at all (in fact I just published a post where I talk about using it for a Weekend Baking Schedule). My schedule actually is pretty much what you do, low maintenance (or no maintenance) 90% of the time, only taking out your starter when you need it. I didn’t read your post until just now and your comment are exactly what I have in my post — glad we see the same thing! I like to also reduce the hydration, it seems to keep longer in the fridge without that unwanted texture and smell.
One thing i might suggest is to just take a week and try to regularly feed your starter with it out on the counter. Maybe you’ll see it have more strength or produce different baking results. I’d be curious to hear if you find that the case myself! But to answer your question: what I like to see in my starter (whether it’s from the fridge or not) is just extreme signs of fermentation and strength. I almost never use my starter when I don’t see the activity I’m used to (tons of bubbles, sour/sweet smells, strong rise and fall, etc.). Once you are sure your starter is as strong as it can be then bake at will — as we know, great bread begins with a strong starter.
I hope this answers your question!
Hi Maurizio! I wanted to know at what stage would you advice to put it in the fridge? I’m not gonna be using it for a few days but I’m not quite sure when is the best time.
Thanks!
I usually do a normal feeding (discard and then feed) and let the starter sit on the counter for 30 minutes to an hour. After that I place it in the fridge and have kept it in there for 2 weeks with no problem. You essentially want to make sure your starter has fresh food while its in the fridge.
Hope that helps!