
Flour at the market is hard to come by these days, but even if it is at the market, this recipe comes together so quickly and with such little effort it’s hard to imagine not wanting to throw this together every day during the week (since we’re home anyway, right?). I’ve received many emails and comments from readers asking for a straightforward recipe using 100% all-purpose flour since that’s what many of us have in the pantry right now. But even when abundant flour choices return to the market, this same-day sourdough bread with all-purpose flour might become a weekly staple in your kitchen.
This recipe makes a single 900g loaf of bread all in a single day. It begins with your mature starter in the morning and ends in the late afternoon with a fresh loaf of bread ready for dinner. What could be better? And while it’s similar to my recent simple weekday sourdough, it’s just a bit different, using different flour and a modified timeline. They’re different, but both practical ways to sneak baking in more often than not.
What Makes This Sourdough Bread Recipe Easy?
- It uses only one type of flour: all-purpose white flour
- It’s a same-day bread, meaning the day you mix is the day you bake
- There is no need for a levain, use your sourdough starter in the mix
- It makes a single loaf of bread, no scaling or dividing dough
- You can add up to 15% mix-ins: walnuts, pecans, seeds, or dried fruit
- You can substitute flour: use 5% (23g) whole grain rye, or 10% (46g) whole wheat flour (remove that amount of AP flour) without modifying the rest of the formula
Flour Selection
One essential modification in this recipe versus my simple weekday sourdough (which uses all high-protein bread flour) is slightly reducing the hydration, especially if there are no whole grains in the recipe. Because all-purpose tends to mix up to a softer, slack dough, lowering the hydration brings strength and makes for a loaf with more rise and a crunchier crust.
Additionally, I reduced the autolyse time for this recipe. If you’d like to give this dough a little more strength and reduce mixing time (which is already minimal!), you could autolyse the dough for 30 minutes: Mix the flour and water in the mixing bowl and let sit, covered, until your sourdough starter is ripe and ready to use.
Flour note: If your “all-purpose” flour is lower in protein than the flour I used, King Arthur Flour Unbleached All-Purpose at 11.7% protein, you might want to keep an eye on the hydration as you’re adding water in the mix and add less if the dough feels overly wet. Also, strengthen the dough up front, either through folds in the fold or a more intensive strengthening technique.
Baking Schedule

The intention for this recipe is for it to be a same-day dough, meaning you mix in the morning, and you bake in the late afternoon. However, you can also place the shaped and covered dough into the refrigerator to finish the proof overnight (instead of on the counter). This way, you can have fresh bread for dinner on day one or fresh bread for lunch on day two.
Sourdough Bread with All-purpose Flour
For tips on how to calculate baker’s percentages or how to modify this formula, see my post on baker’s percentages (baker’s math).
| Total Dough Weight | 900 grams |
| Pre-fermented Flour | 10.0% |
| Hydration | 76.0% (this takes the water in the sourdough starter, which is about 50%, into account) |
| Yield | One 900g loaf |
Total Formula
My final dough temperature for this dough was 78°F (26°C). See my post on the importance of dough temperature for more information.
| Weight | Ingredient | Baker’s Percentage |
|---|---|---|
| 460g | All-purpose white flour, ~ 11.7% protein (King Arthur Unbleached All-Purpose Flour) | 100.0% |
| 340g | Water | 74.0% |
| 9g | Salt (sea salt) | 1.9% |
| 92g | Ripe sourdough starter (100% hydration) | 20.0% |
Sourdough Bread with All-purpose Flour Method
1. Mix – 9:00 a.m.
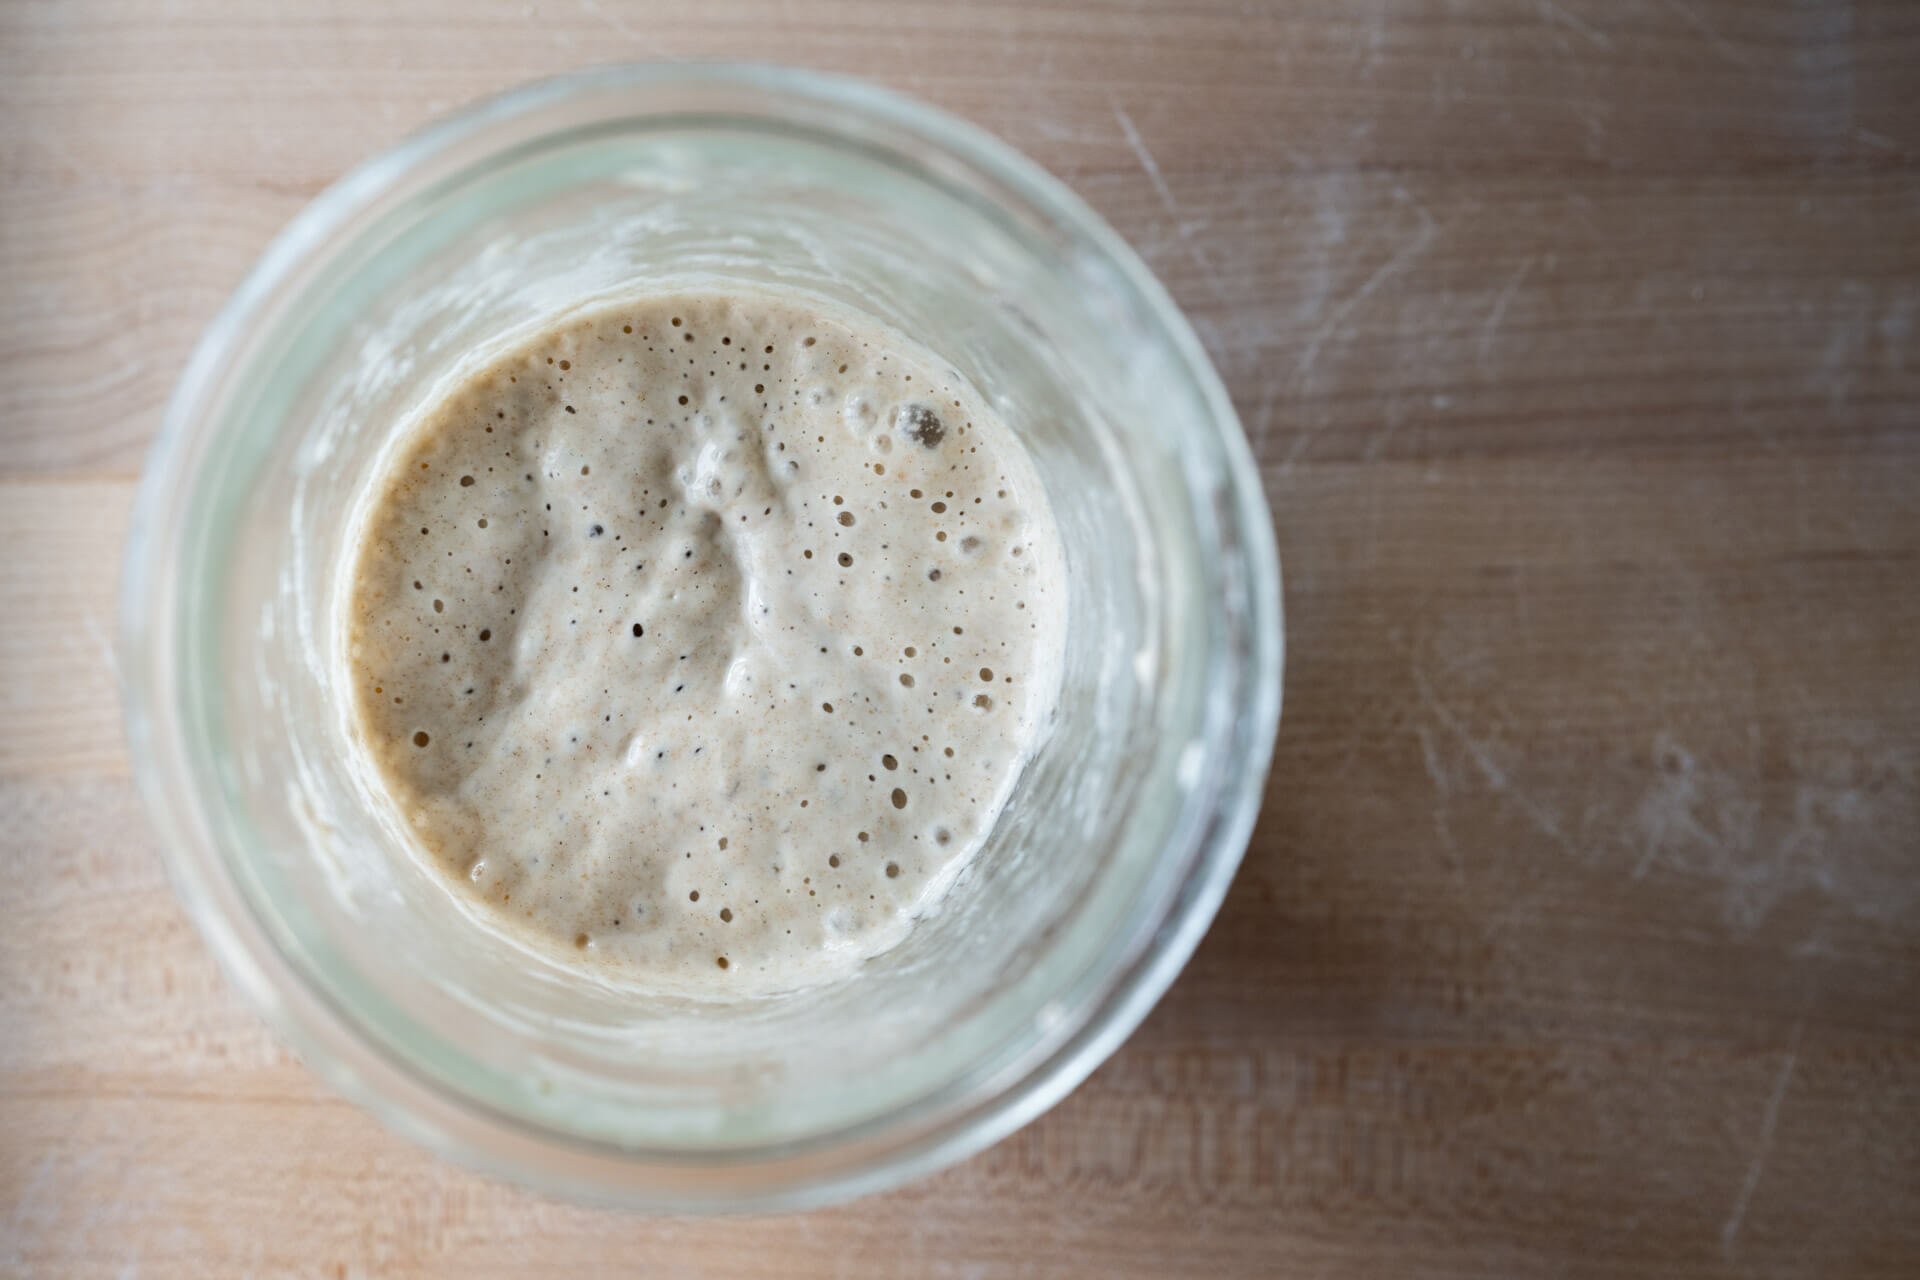
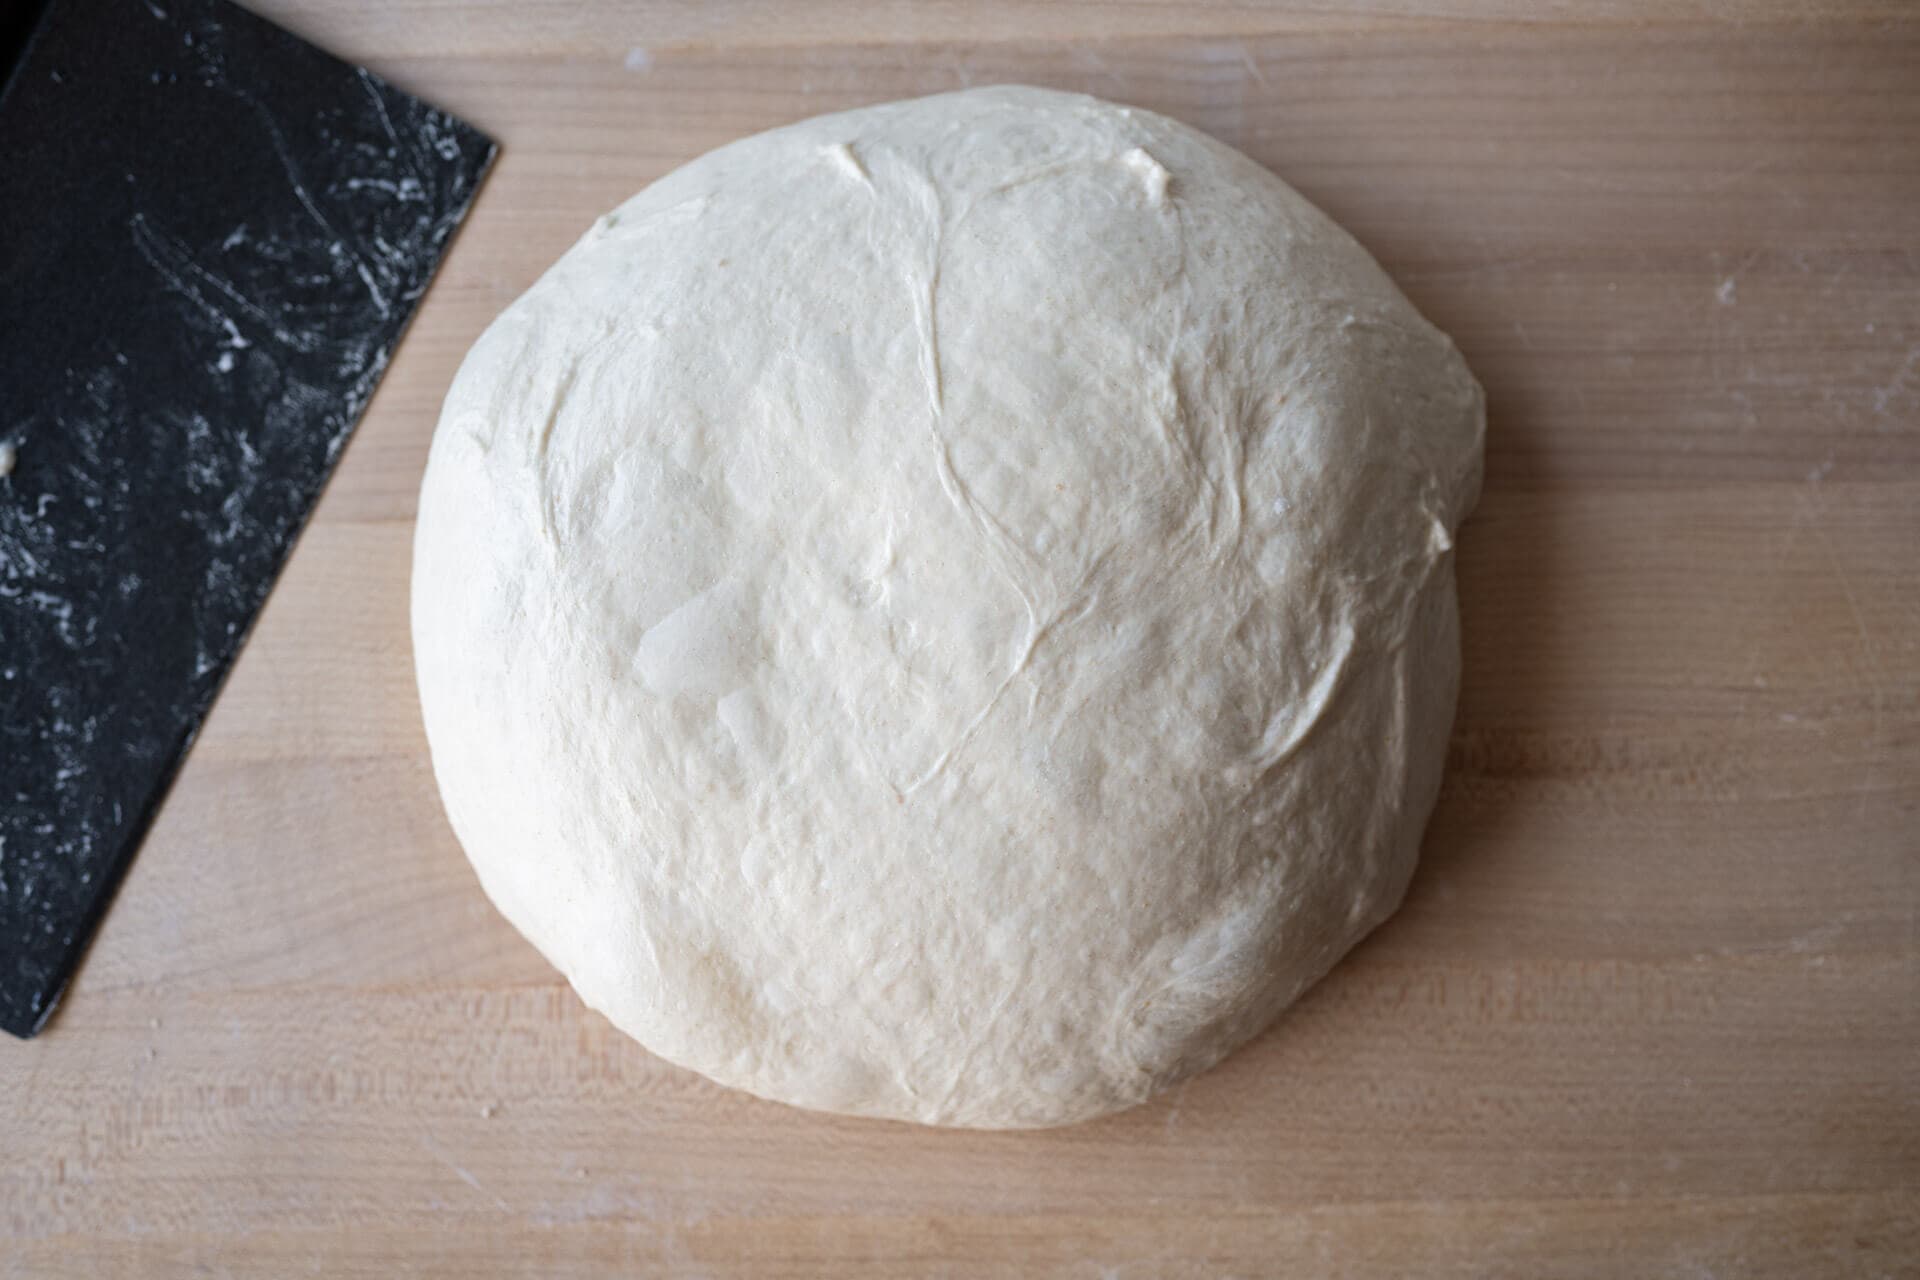
When your sourdough starter is mature (see the image, above), add the ingredients below to a large mixing bowl:
| Weight | Ingredient |
|---|---|
| 460g | All-purpose white flour (King Arthur Unbleached All-Purpose Flour) |
| 340g | Water |
| 9g | Salt (sea salt) |
| 92g | Sourdough starter (100% hydration) |
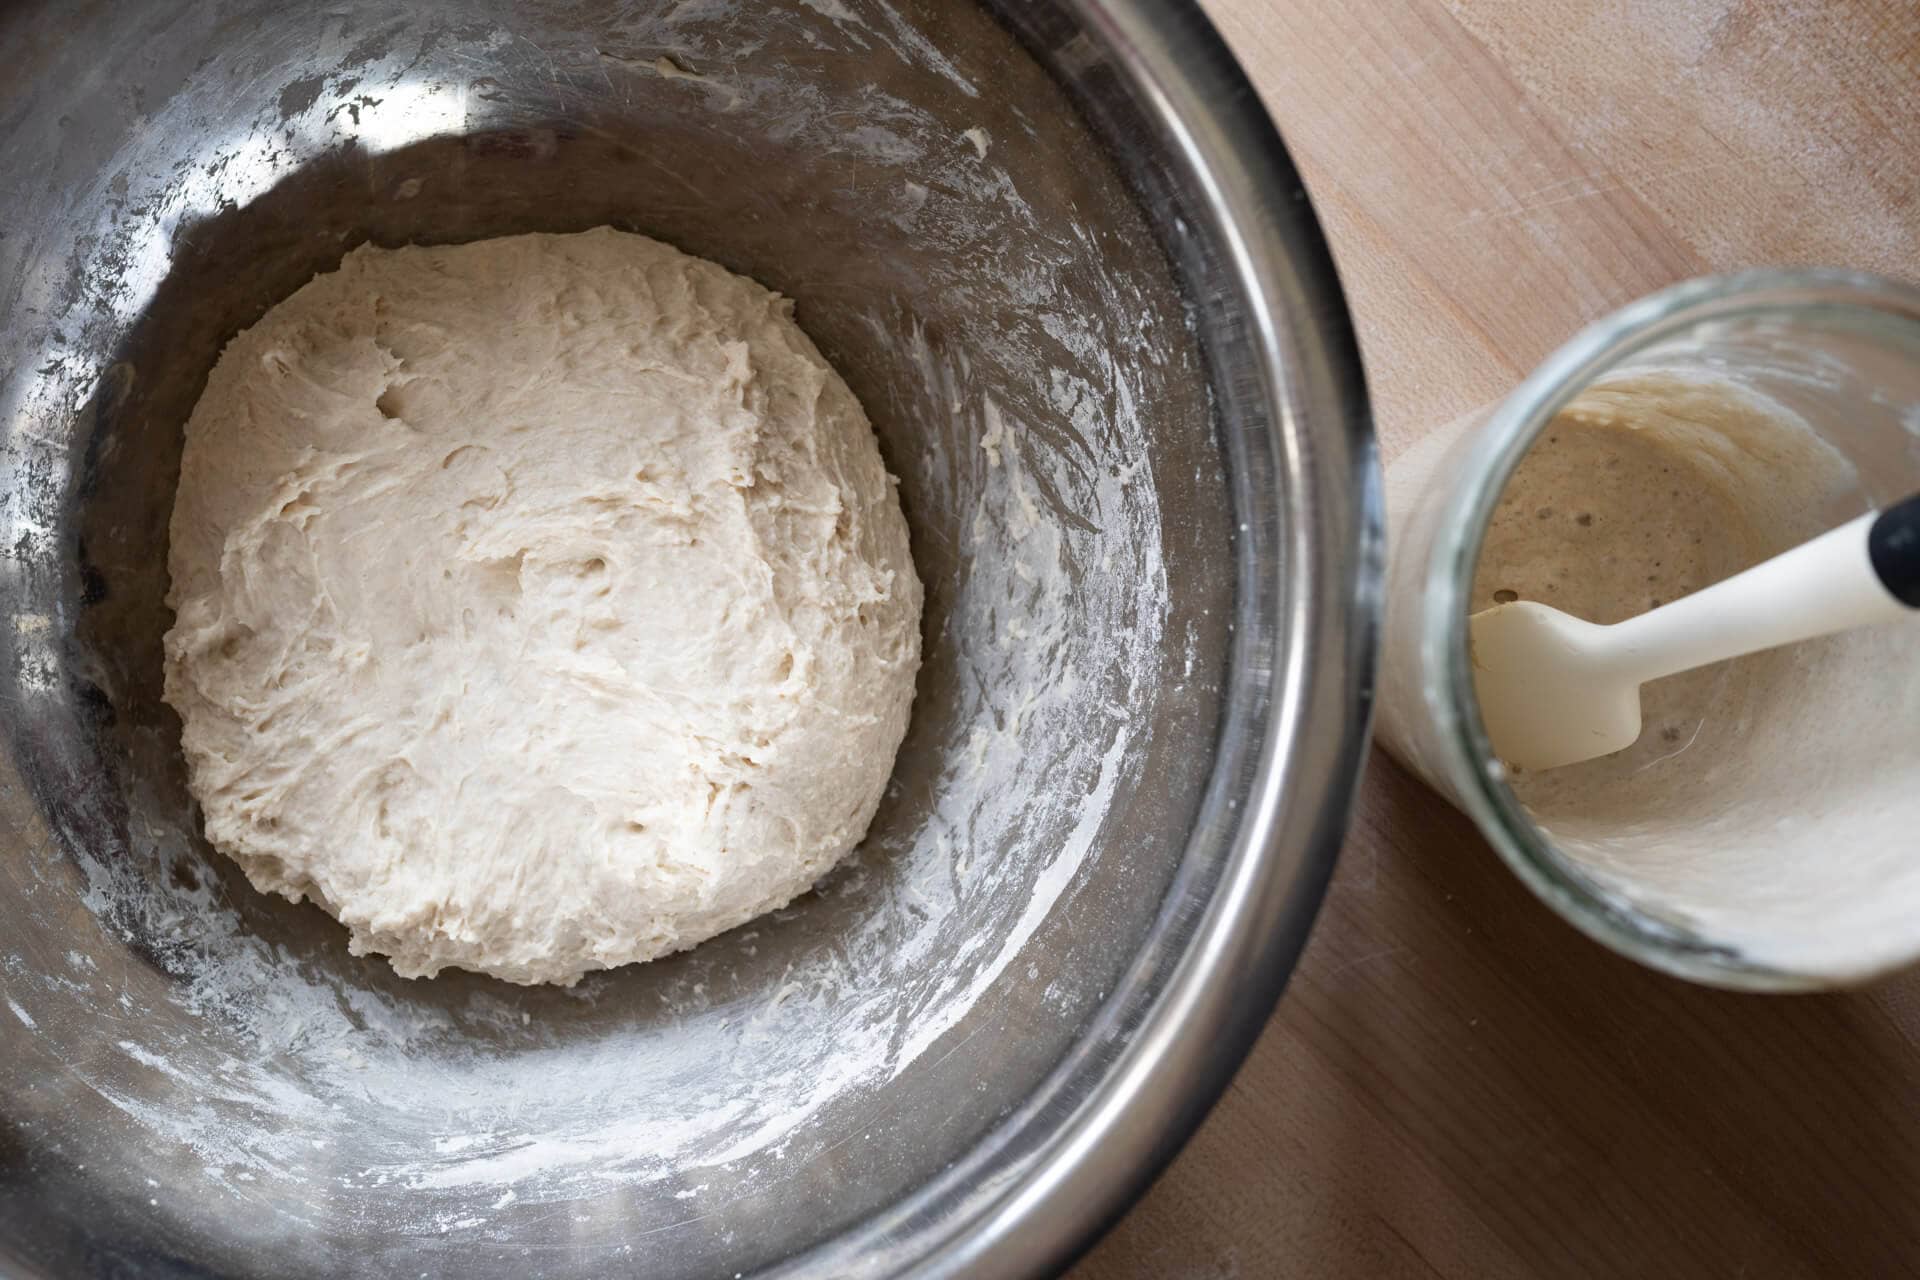
Using wet hands, mix everything — except 50g of the water (add 290g and hold back 50g) — until it comes together into a shaggy mass. I like to hold back a little of this water when mixing to pause and assess the dough: does it feel super wet and “soupy?” If so, omit the reserved 50g. If it still feels manageable, add it in slowly as your strengthening the dough in the bowl with folds.
This dough doesn’t require intensive kneading (like slap and fold) but do give it a series of folds (pickup one side and fold it over, rotate the bowl and repeat) in the bowl for 2-5 minutes until it smooths slightly and comes together in a cohesive ball.
I like to fold this dough more than my simple weekday sourdough, even though they both don’t require kneading on the counter, because this recipe is comprised of 100% all-purpose flour. I find this dough benefits from a little extra strength before bulk fermentation by performing these folds.
Cover the bowl with reusable plastic and keep somewhere warm in your kitchen for bulk fermentation.
2. Bulk Fermentation – 9:15 a.m. to 12:45 p.m. (3.5 hours)
At 75°F (24°C), bulk fermentation should take 3.5 hours. During this time, we will strengthen the dough through a series of stretch and folds directly in the bowl.
For each set wet your hands, grab one side and stretch it up and over the dough to the other side. Rotate the bowl 180° and perform another stretch and fold (this forms a long rectangle in the bowl). Then, rotate the bowl 90° and do another stretch and fold. Finally, rotate the bowl 180° and do one last stretch and fold.
Give the dough 4-5 sets of stretch and folds as indicated below:
| Set | Time |
|---|---|
| Fold set 1 | 9:30 a.m. (15 minutes after the start of bulk fermentation) |
| Fold set 2 | 9:45 a.m. (15 minutes after fold set 1) |
| Fold set 3 | 10:15 a.m. |
| Fold set 4 | 10:45 a.m. |
| Fold set 5 (as needed) | 11:15 a.m. (if the dough still looks slack, weak, and not showing any signs of defined edges, give it this fifth set) |
After the last set of stretch and folds, let the dough rest, covered, until the next step.
3. Preshape – 12:45 p.m.
After 3.5 hours, the dough should have risen in your bulk fermentation container, smoothed out, and show bubbles on the sides and surface. You want the dough to feel more elastic and strong. It should also feel alive and aerated. I also like to look at the edge of the dough in the bulk container: it should be domed, not flat, indicating the dough needs more time to rise. A flat surface with bubbles on the dough can also indicate it was over-hydrated and too slack/weak.

Fill a bowl with some water and place it on your work surface — I use water to keep the dough from sticking on my hands and my bench knife. Scrape out your dough from the bulk container onto your dry counter. Wet your hand and top of the bench knife and gently preshape the dough into a loose round.
Let the dough rest, uncovered, for 20 minutes until its relaxed outward.
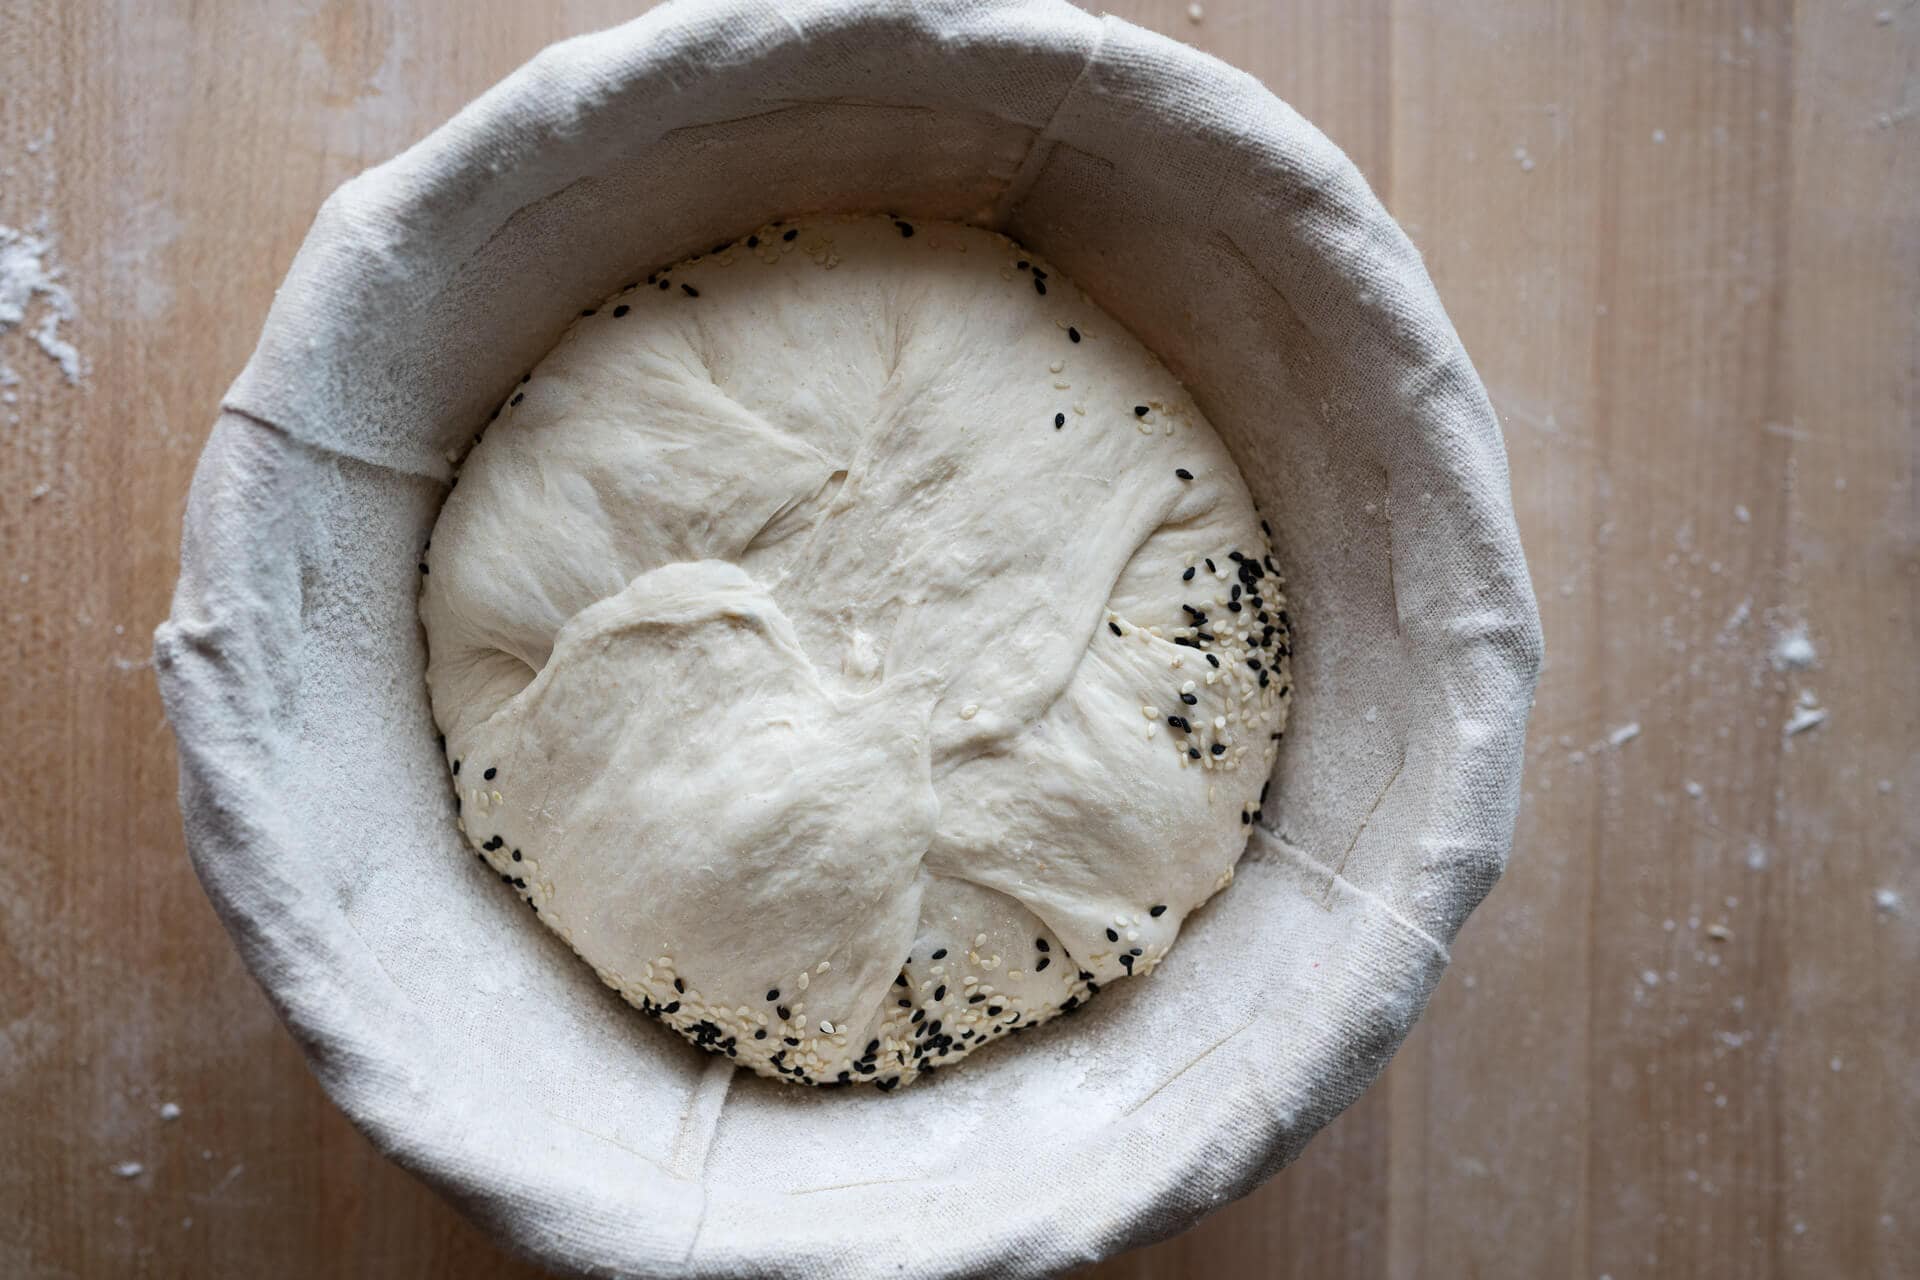
4. Shape – 1:05 p.m.
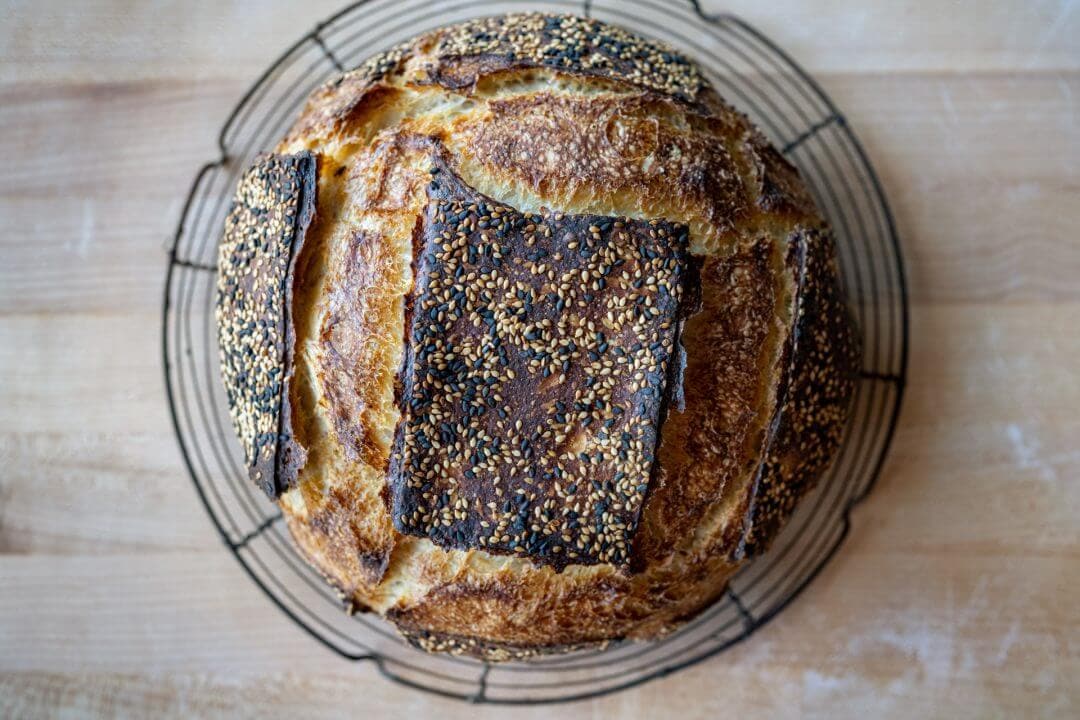
I went an extra step with this dough and coated it with a mixture of black and white sesame seeds for flavor. You can omit toppings altogether or use sesame as I did, rolled oats, flaked barley, pumpkin seeds, or anything you think would taste wonderfully toasted in the oven. Lay a towel next to your work surface and spread the topping out thinly. After you shape the dough, roll the smooth side on the towel to pick up these toppings (as shown in the video below).
Flour the work surface, your hands, and the top of the rested dough. Using your bench knife flip the round over onto the floured work surface. Next, take the left edge and fold it over midway to the right. Take the right side and fold it over the left. Take the top edge and fold it down to the middle. Pick up the bottom edge (closest to you) and fold it up over to the top of the dough but keep going until it touches the work surface, flipping everything over so the seams are now on the bottom.
Next, using both hands drag the dough down toward your body using your pinky fingers to pinch the dough between your fingers and the work surface. Rotate the dough and continue dragging to create tension on the top and outside of the dough. It’s not necessary to excessively tighten this dough (unless it feels fragile and slack to you), and as you can see in the video below, my dough was strong and did not require a firm hand to fully shape.
Read through to my guide to shaping a boule for more in-depth instruction on shaping boules.
5. Proof – 1:15 p.m. 3:45 p.m. (or when dough is ready)
Cover the proofing basket entirely and let it sit out on the counter for 2 to 4 hours, temperature depending. My dough was ready after 2.5 hours at about 75°F (23°C).
Overnight option: At this point, you can also place the covered proofing basket directly into your refrigerator and continue the process the next morning, afternoon, or even the next evening.
Use the “poke test” (as seen below) to determine when the dough is ready. While this test is not appropriate for all doughs, it’s a good test for this one because it’s made from all-white flour, has moderate hydration, and was proofed at room temperature. Notice how my pokes slowly spring back and don’t always fill in the indentation. Additional signs it’s ready are that it is well-risen in the proofing basket and quite gassy.
6. Bake – 3:45 p.m. (pre-heat oven at 3:00 p.m.)
Preheat your oven with the rack at the bottom third to 450°F (232°C). Place your combo cooker or Dutch oven inside, open, with the lid and bottom side-by-side. Review my guide to baking in a Dutch oven for in-depth details.
Cut a piece of parchment paper to fit over the proofing basket and place a pizza peel (or large cutting board) on top. Using both hands, flip the entire stack over and remove the basket.
Score the dough and load it into the Dutch oven; then, bake for 20 minutes covered. After this time, remove the lid and finish baking for 30-35 minutes or until done. The internal temp should be around 205-210°F (96-99°C).
Remove the loaf to a cooling rack for 1-2 hours before slicing. Follow my guide to storing sourdough bread to keep it fresh for the next week (or freeze for longer!).
Conclusion
What a wonderfully simple loaf of sourdough bread. I rarely bake a single loaf (unless it’s a miche), but this was so simple and so easy to put together I wonder what keeps me from making a loaf like this every day. Baking sourdough bread doesn’t have to be overly complicated; it can be as easy as mixing flour, water, salt, and your sourdough starter and giving it some guidance and time to mature into a delicious loaf of bread.
Crust
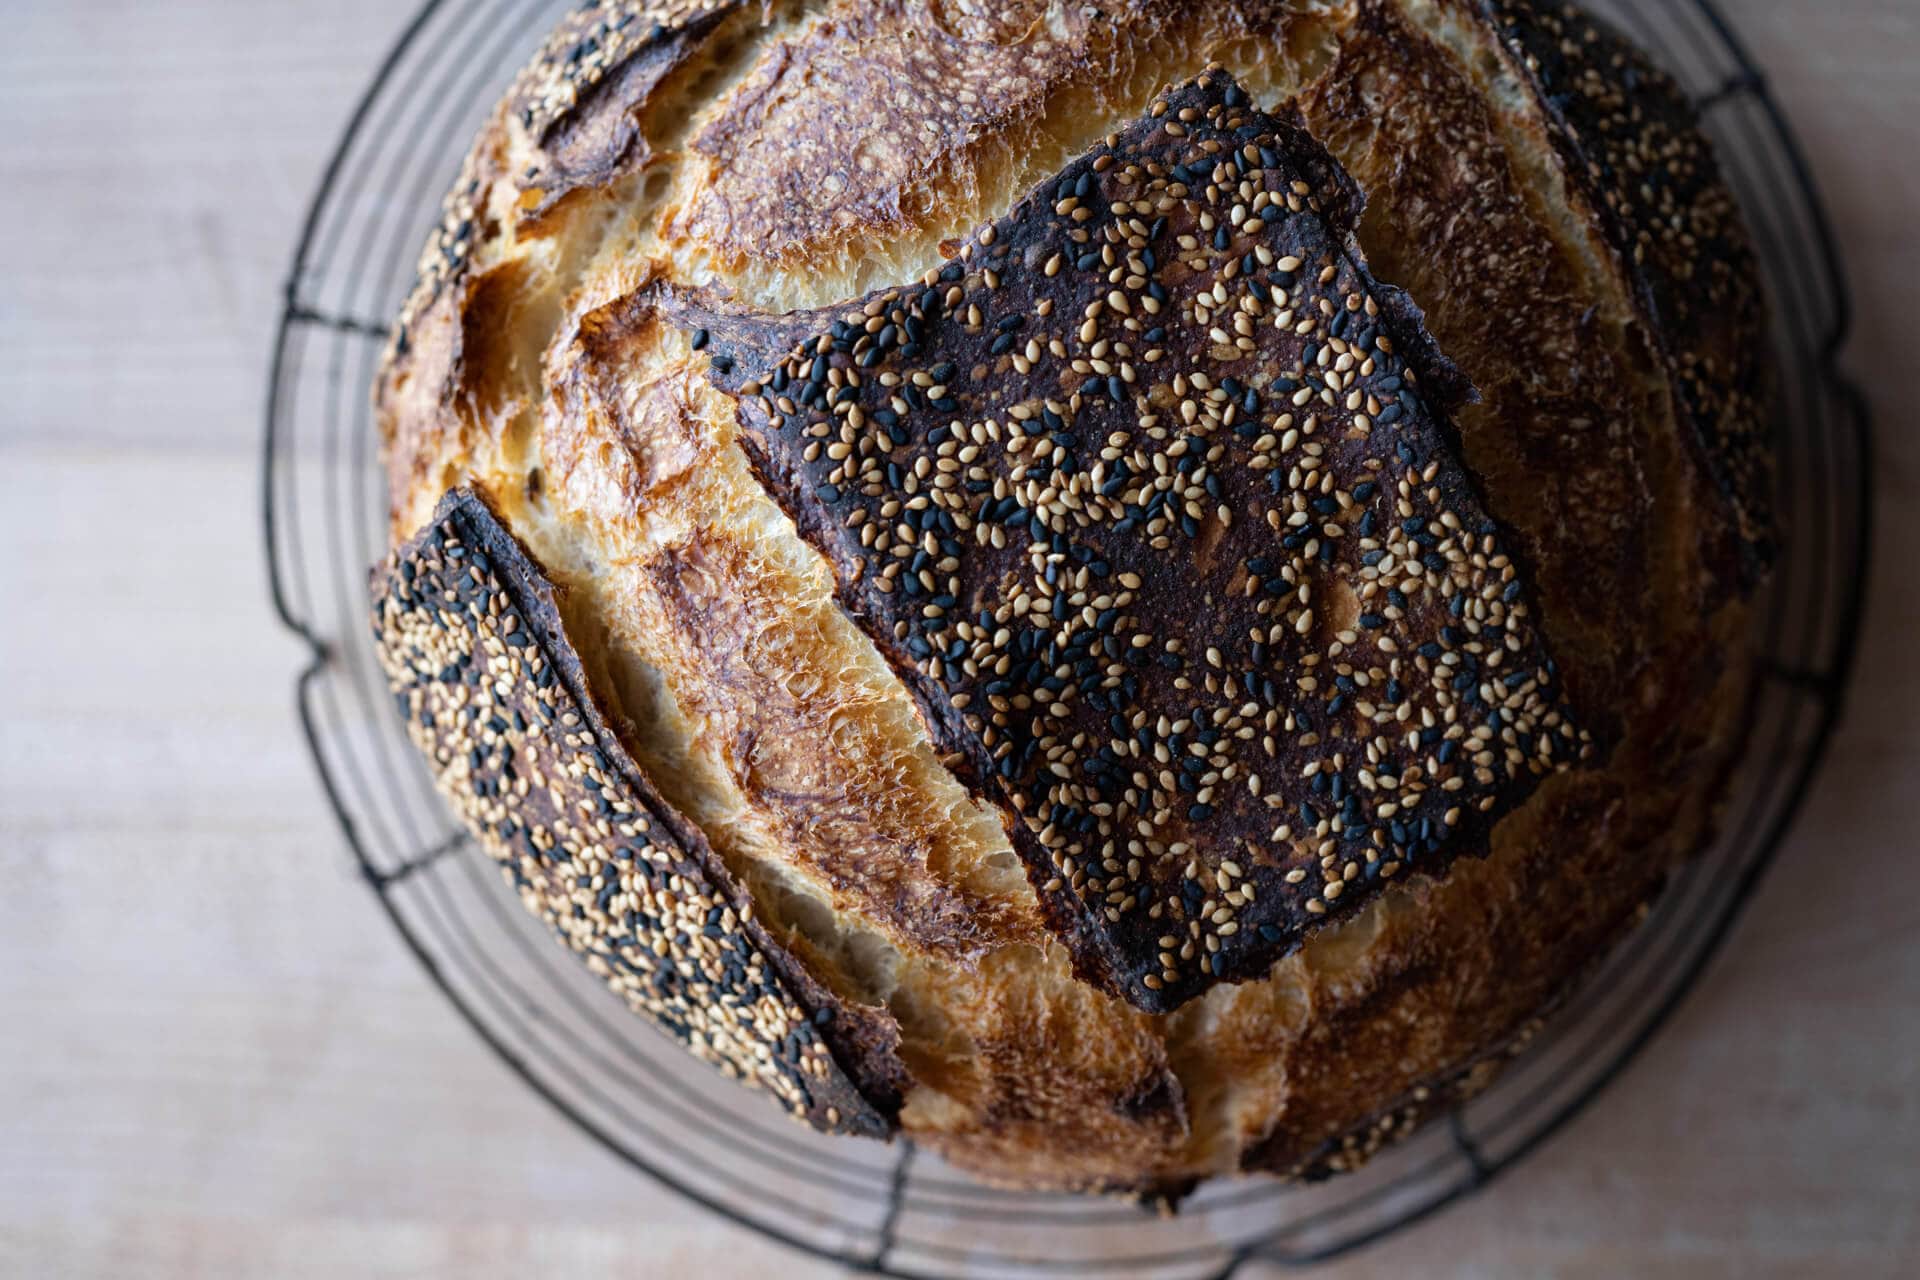
The crust was a rugged one, something I don’t mind one bit. The variegated colors from the sesame add some visual interest—not to mention tons of umami—but the color on the crust would be enough to satisfy my visual appetite. And the crust itself has all the appreciable crunch I look for in one of my sourdough loaves. And perhaps most importantly, the crust tastes incredible dipped in some olive oil—this has me yearning for the middle of summer when tomatoes will be ready in the garden.
Crumb
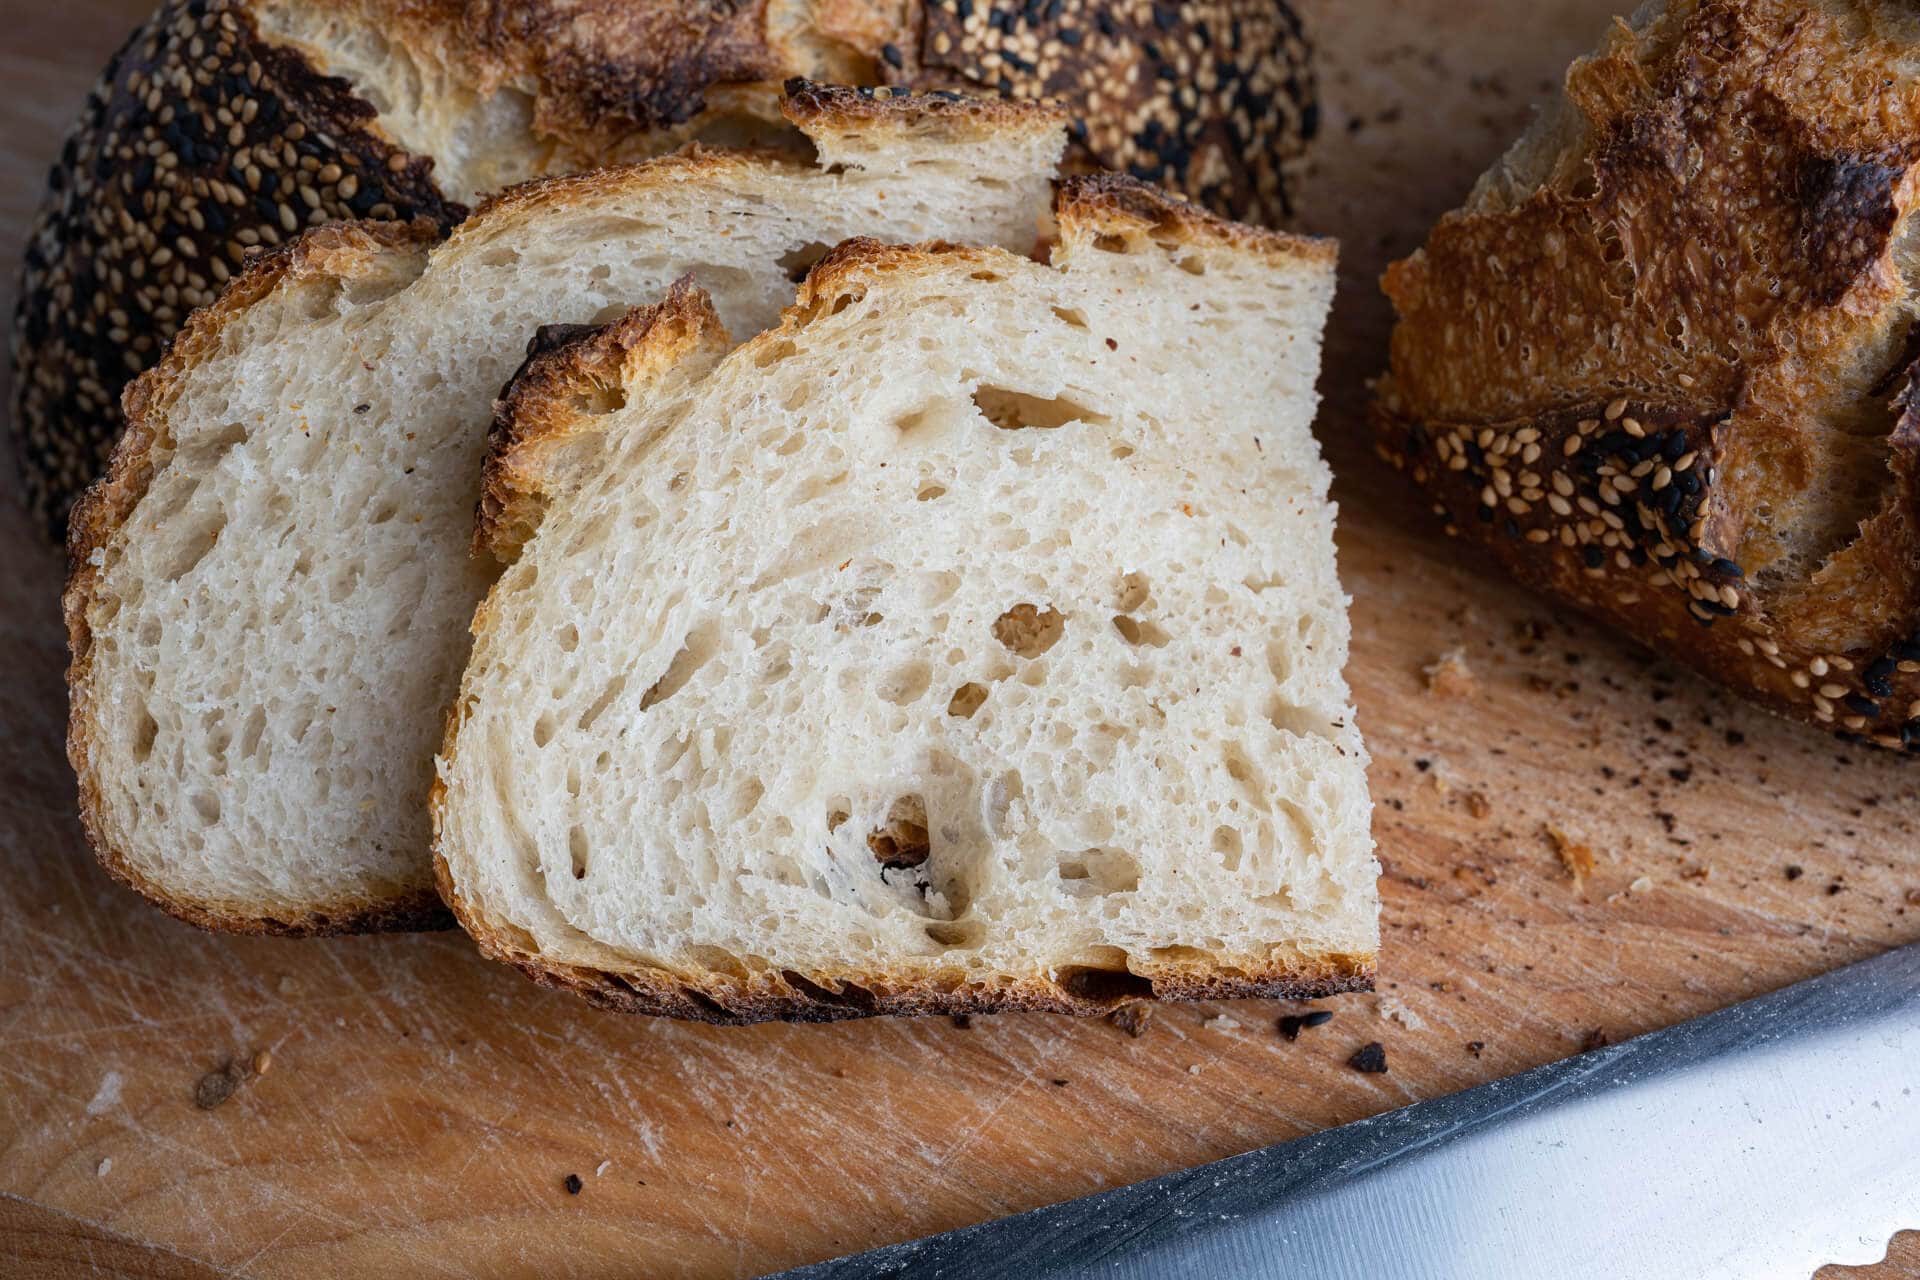
The crumb was tender, light, and wonderfully chewy. A good honest loaf of bread this is, and while not dramatically open, it’s evenly fermented and just what you’d expect—and want—from a straightforward bread recipe with minimal fuss.
Taste
Same day sourdough loaves tend to exhibit a milder flavor with reduced sourness and complexity — but this doesn’t mean it is flavorless. It’s a delicately flavored loaf with wheat flavor standing tall at the front. It still has some tinge of sourness to it, one that arrives at the very end of a bite and serves to remind you of the natural fermentation process, how healthy this bread is, and how delicious it can be when we give the dough the time to ferment properly.
Print
Sourdough Bread with All-Purpose Flour
- Prep Time: 12 hours
- Cook Time: 1 hour
- Total Time: 13 hours
- Yield: 1 loaf
- Cuisine: American
Description
My recipe for an easy loaf of healthy and nutritious sourdough bread made with all-purpose flour—all made in one day. No complicated levain steps with this recipe; just get mixing with your ripe sourdough starter!
Ingredients
Main Dough
- 460g all-purpose flour
- 340g water
- 9g salt
- 92g ripe sourdough starter
Instructions
- Mix (9:00 a.m.)
Add the Main Dough ingredients, reserving 50g of water, to a mixing bowl and mix with wet hands. Mix and strengthen the dough for 2-5 minutes, pinching the ingredients together and folding the dough over itself repeatedly until it’s cohesive and smooths. During this time, slowly add in the 50g of the reserved water if the dough feels like it can handle it: it shouldn’t be soupy or extremely wet, if it is, don’t add the remainder of the reserved water. - Bulk Fermentation (9:15 a.m. to 12:45 p.m.)
This dough will need 4 to 5 sets of stretch and folds during bulk fermentation, the first set 15 minutes after bulk fermentation begins, the second set 15 minutes after that. Then, perform the rest of them at 30-minute intervals as needed. After the last set, let the dough rest the remainder of bulk fermentation. - Preshape (12:45 p.m.)
Lightly flour your work surface and scrape out your dough. Using your bench knife, lightly shape the dough into a round shape. Let the dough rest for 20 minutes, uncovered. - Shape (1:05 p.m.)
Shape the dough into a round (boule) or oval (batard), then place the dough in proofing baskets. - Proof (1:15 p.m. to 3:45 p.m.)
Cover the proofing basket entirely and let it sit out on the counter for 2 – 4 hours, temperature depending. My dough was ready after 2.5 hours at about 75°F (23°C). - Bake (3:45 p.m., preheat oven at 3:00 p.m.)
Preheat your oven with a baking surface or combo cooker/Dutch oven inside to 450°F (230°C).When the oven is preheated, remove your dough from the fridge, score it, and transfer it to the preheated baking surface or combo cooker. Bake for 20 minutes with steam. After this time, vent the steam in the oven or remove the lid (you can keep it in the oven or remove it) and continue to bake for 30 minutes longer. When done, the internal temperature should be around 204°F (95°C).
Let the loaves cool for 2 hours on a wire rack before slicing.
Notes
- The dough can be placed into the refrigerator at the Proof step in its proofing basket and sealed bag to proof overnight. The next day, take it out and bake it straight away in a preheated oven as indicated in the Bake step.
If you use this recipe, tag @maurizio on Instagram so I can take a look!
What’s Next?
This sourdough bread with all-purpose flour is straightforward, but no less delicious, than those with complicated flour blends. If you want an even more hands-off approach to baking sourdough bread, check out my no-knead sourdough bread recipe.
On the other hand, it can be fun to experiment and discover what other flavor profiles we can draw out with a whole wheat sourdough sandwich loaf, or a fifty-fifty sourdough with 50% whole wheat—that is, once we readily have these flour choices at the market!


437 Comments
Hi Maurizio- thanks for another great recipe. And very timely given the state of flour availability! I’m working on this now. Just pre-shaped. It seems to be a little on the slack side, so I did a second pre-shape and rest. I guess I’ll find out this evening, but in general, is there anything wrong with multiple shaping sessions on the bench? Can you overwork the dough at this point?
I generally like to be gentle with the dough at that point, the more handling the more dense the result, typically. However, if the dough feels slack preshaping (once or twice) and a strong shape can help bring much needed strength to the dough to ensure it rises properly in the oven. When you are about to bake, if the dough looks flat in the proofing basket and looks super slack, pop it uncovered into the freezer for 5-10 minutes to help firm it up. Then bake it.
Awesome. Like others, I struggled with a sticky slack dough. Great taste but lackluster oven spring, even with extra stretch/folds, double pre-shaping, and so on. I’ll try the freezer trick next time, and probably backtrack a bit and practice a few bakes with a bit lower hydration and work my way up. Fingers crossed some bread flour shows up in stores again soon. Thank you as always for your wisdom and guidance!
Maybe anathema, but could this be made with a KitchenAid in a slow setting?
Absolutely can!
Hey Maurizio! If I wanted to add sliced Kalamata olives to this recipe (or any sourdough recipes in general), would I keep the percentage as 15% as suggested for nuts and dried fruit? Thanks!
Yes, I’d say 10-15% is a good general rule of thumb, but adjust from there to your preference. I suggest starting at 10%, then work it up if you feel there aren’t enough in each bite.
Great recipe but as an FYI King Arthur All Purpose has a decent amount of gluten/protein and in most situations can act more or less like a bread flour. All purpose flours can go as low as 9% protein in brands like white lily and as high as 11.7% protein in KA. King Arthur AP/Sir Galahad is probably the strongest flour advertised as all purpose on the consumer market. If making this with a gold medal or pillsbury all purpose flour more folds, longer bulk or more mechanical mixing will likely be required or even reducing the hydration.
A very good point. I’ve made this with other “all purpose” style flour — Central Milling Artisan Baker’s Craft — and it worked very well with the listed hydration. But yes, if your flour is lower than 10%, you most certainly will need to adjust things, namely reducing hydration and/or adding in some kneading to compensate. Great points!
I added a note up in the Flour Selection section pointing this out — as always, each flour will require some measure of adjustment!
Hi Maurizio. First off, your website is such an amazing resource. Just a question regarding levains. (apologies if this is something discussed elsewhere in your website). What is the reason/purpose/benefit to building a levain anyway? I often find baking straight from a well-fed starter gives me a better result than when I’ve built a levain first. Can you elaborate as to why most recipes require a levain? thank you so much.
You can certainly just use your starter in place of a levain, but I often use them here because I need to either scale up my starter for a bake or I want to use a special blend of flour for flavor/performance implications down the line. I also break out a levain step explicitly because I find it helps most people get on the same page with a bake here — I can instruct on a dedicated preferment that starts at a certain time and is used appx at a time later, which helps bring some consistency to my recipes. I find many people have a wildly different starter maintenance procedure and this way I can try to keep everyone on the same page 🙂
The two (levain/starter) are really the same thing, but a levain is simply an off-shoot of your starter used up in a single bake whereas your starter is perpetuated indefinitely.
This is great – thanks so much for the question and the great answer!! This clears up so much confusion i had around this subject! 🙏🤗
Great recipe! My biggest problem was that the Dough stuck to the lining of my proofing basket At the end. Did I not use enough flour, or did I use the wrong type of cotton towel to line it? It wasn’t terry cloth.
Terry cloth should be ok. I’d try dusting a bit more flour in the basket. Additionally, be sure you’re shaping tightly enough so the dough has a smooth, taut surface on it — you want it to feel strong and hold itself on the work surface after you shape it (like you can see in my video). A smooth and tight skin will also ensure the dough removes cleanly from the basket.
What if it stays flat after the bulk fermentation step?
You could give the dough more time or if you know it’s properly fermented and ready to divide, know you’ll have to give the dough a bit more strength through preshaping and shaping. If it’s still flat it’s a sign of a weak dough, and I’d likely preshape it very tight, let it relax for the bench rest, and then shape it even tighter to ensure it doesn’t spread in the oven. I’d then adjust my hydration (down) next time or give it more strengthening through kneading and/or stretch and folds during bulk fermentation.
Thanks!
Very nice bake on that loaf. That loaf was baked at 450°?
Thank you! Yes, that’s correct, 450°F, home oven (with combo cooker inside), no convection.
Thanks, it sure looks nice! Hope mine looks as good this afternoon…
Hey Panayiotis — I like to feed my starter at least twice before using it in any bread recipe as that seems to be the best for mine in terms of fermentation strength. I know some bakers use their starters from the fridge, but that’s not my practice. I’d take it out the day before and give it two or three feedings 12 hours apart keeping it on the counter at room temp, then use it to mix into this dough.
Thanks for the kind words about the site, I spend a lot of time and thought on this so it’s great to get feedback on that!
Gonna try this recipe and process this weekend! Wondering when is the best time to add the mix-ins?
I typically like to add them at the end of mixing with doughs that have only a few sets of stretch and folds, but with this many sets I’d likely add the mix-ins right before the second set and work them in with wet hands. Let me know how it goes!
First off, your site is wonderful! Thank you so much for the generous information on sourdough.
I have been keeping my starter at a pretty low amount, refreshing daily with only 3 grams and discarding the rest (I have been using the discard with some of your other wonderful recipes!) So my daily starter is only at 27 grams and this loaf calls for 92, could I still build a levain for this recipe to make up for the lack of starter?
Thanks, Anna! Yes absolutely, a levain will work with this. I’d likely make a 3-hour levain: 35g starter (just give your starter a little extra flour the night before), 35g white flour, 35g water and keep it at 78F until ready. You could also do a 5-hour build with 50% starter to flour and water.
Direct sourdough starter baker’s percentage 😀
There’s a solution right there, just use my starter from here on out! 🙂
Thanks, Maurizio! Excited to try this. I have a couple quick questions. If you must start with a mature starter at 9 am and your starter takes about 4 hours after feeding to reach peak rise, does this mean you really have to start the process at 5 am to feed your starter?
Also, would you change anything if you didn’t have access to high quality (e.g. King Arthur) flour and had to use cheaper flour (which to me, although I am inexperienced, seems to result in a wetter, stickier dough)?
I got a starter from a friend 2 months ago and have poured over your site, studying and learning as much as possible. I greatly enjoy how you put together your site – it’s informative and I like the presentation. I haven’t been able to get anything other than AP and didn’t feel confident enough to modify one of your other recipes since they rely heavily on high protein or ww flours. I’ve had moderate success with my loaves so far based on other AP recipes I found but seeing this post today made me so happy! Not only is it AP but it’s same day – everything I’ve been looking for right now! I’m going to bake a loaf tomorrow. So excited!!! Thank you!
Thanks for the kind words, I appreciate that. Perfect timing it seems! Have fun with this bake tomorrow and let me know how it goes!
My daughter was an Artisan Bread Maker with a medium sized operation for about 5 years, working with a decades old starter. Wouldn’t I give my eye teeth for 8 oz of that starter! Though she remained in that field for a while, she moved onto a specialized career in healthcare and is thriving. That aside, I’m a baker from way back, had been taught how to bake “lard white bread” and “how to knead” when I was 7, by my grandma in Michigan, who I was able to see only every few years. My daughter caught sight of your wonderful overnight recipe and grabbed onto it, creating the most wonderful loaves one after another. Little did she know that I found you at nearly the same time. We are both happily baking, though I’ll admit she’s greatly ahead of me, as I’ve lost my starter due to a badly spiral fracture in my Italian jar, so, I’ll simply borrow from my daughter and begin again. Thank you for providing a comprehensive and scientific approach to sourdough bread making. Every effort you make on our behalf equates to great achievements at our end.
Thanks so much for those comments, what a wonderful story and it’s awesome to hear the baking tradition is continuing — something I’m trying to instill in my young kids right now! You’re very welcome, glad my site has helped you in your baking and it means a lot to me to hear that it has. Happy baking and good health!
Thanks Maurizio! I’m curious about the size of your proofing basket. I have an 8.5″ Frieling, but I don’t think it’s large enough for a 900 gr loaf. If yours is larger, I will scale down the formula.
Susan — these are 8” in diameter and are rated to hold 1-1.5lbs of dough. I source the from SFBI.com.
Thank you so much for posting this, Maurizio! I could have used this just yesterday when made your “Best Sourdough” using AP in lieu of bread flour. Not by choice, but of necessity…it’s all I have on hand these days. I can’t wait to try this next.
You’re welcome, Tom! I think this recipe will be perfect for you and perfect timing. Let me know how it goes!
Thank you for this! I’ve been making your country sourdough recipe with all white flour and it is my family’s favorite so far. I’m excited to try this one because I can’t make the break fast enough to keep up with their eating anymore! One question for you…one of the things we love about sourdough is that it doesn’t seem to be a digestion disruptor for our gluten sensitive stomachs. Do you feel this new 1-day approach will ferment the gluten just as much as your other recipes?Thanks!
Awesome to hear that, Leilah! It’s hard for me to answer that question sufficiently. Compared to bread made with instant yeast, which can have only a few hours of fermentation time, this still has quite a bit more. And the longer the dough ferments (which is 12 hours or so longer in my other overnight-proof recipes), the more gluten will be “broken down,” but it’s hard to say if it’s enough for you to handle. Experimentation might be the only way to go (assuming it’s not a serious condition)!
Hi Maurizio, I am very excited to see this recipe!! Thank you for sharing it. Can I ask a quick question? I am based in the UK, when you say all-purpose flour, do you mean flour equivalent to what we call plain flour (i.e. a flour with about 9-10% protein). Thanks!
Hey Matthew — that’s a bit lower than AP flour here, which is typically around 11-12%. I used King Arthur Flour AP for this which 11.7% protein. While those are the numbers, the flour you’re using might still be suitable for bread making. You could contact the miller or see if they have info on the flour on their website to see if it’s typically used for bread.
I find that I get a better texture when I slap-n-fold. Even if this recipe doesn’t REQUIRE it, will it break it to do so, or is it like ‘you CAN be extra but you don’t HAVE to’?
You can absolutely do slap/fold. Expect you’ll need fewer sets of stretch and folds during bulk, though, as the dough will likely be strong enough!
I know it’s not ideal but would this recipe work with bleached all purpose flour? That’s all I have at the moment…
Should work!
I made a loaf just last week with bleached AP flour. The particular flour I used was the bulk bag of Ardent Mills Hotel & Restaurant flour I got at Costco for under $6 for a 25# bag (cheap!). Like Maurizio says, the dough will be more slack, and reducing the hydration a bit can help manage that. It turned out a very nice, tasty loaf. It had a good crumb, but perhaps not quite as nice as you’d get with better flour. But overall, a very good result. I wouldn’t hesitate to used bleached AP again, which I think may be all many of us have access to for for a while.
I love that you provided a simplified one day recipe. I can’t wait to get home and try it out.
You’re very welcome, Tibor! Let me know how you like it — seriously no-fuss and just a wonderful loaf.
Awesome! If I wanted to throw some Central Milling T85 malted, what ratio would you suggest? And would you need to change hydration? I just took my best tasting frisbee out of the oven using your Beginner’s recipe. I’m realizing I can’t handle 78% hydration yet. I also made some flour changes which may not have helped. Thanks!
You could easily do up to 25% T85. You might have to increase the hydration, but I wouldn’t rush to that, especially if you had hydration issues in the Beginner’s Loaf! Work it up slowly, if desired.
Thanks! One more thing: I only maintain a small 100% hydration starter (following your small starter guide) so I’d have to build a levain for this. Would 12g starter : 40g flour : 40g H2O be good to get the required 92g this recipe calls for?
Yes, that should work, but I would do a bit more flour and water, perhaps 45g, just to be sure you have enough leftover to perpetuate your culture.
I might not be understanding your comment, sorry! Could you explain 45g? Following your small starter guide, I’d have 55g of mature starter going into the levain build. From that, I’d take 12g to build the levain, which would leave me plenty to perpetuate my starter. In a comment above I see you suggest a 3hr 35:35:35 levain build so I guess I’m just confused.
Omg! Yay! Can’t find strong white to save my life, so thank you for this.
Would i be able to proof this in the fridge- if needed?
Yes, I show this option up there in the post (look for “Overnight option”)!
Would you say that typically–compared to proofing in the fridge– when doing a room temperature proof that the time of the initial bulk stage should be cut down slightly?
No, I almost always do the same bulk fermentation time whether the dough is ambient proofed (as this one is) or proofed in the fridge (retarded). It’s still important to get good fermentation progress during that time!