
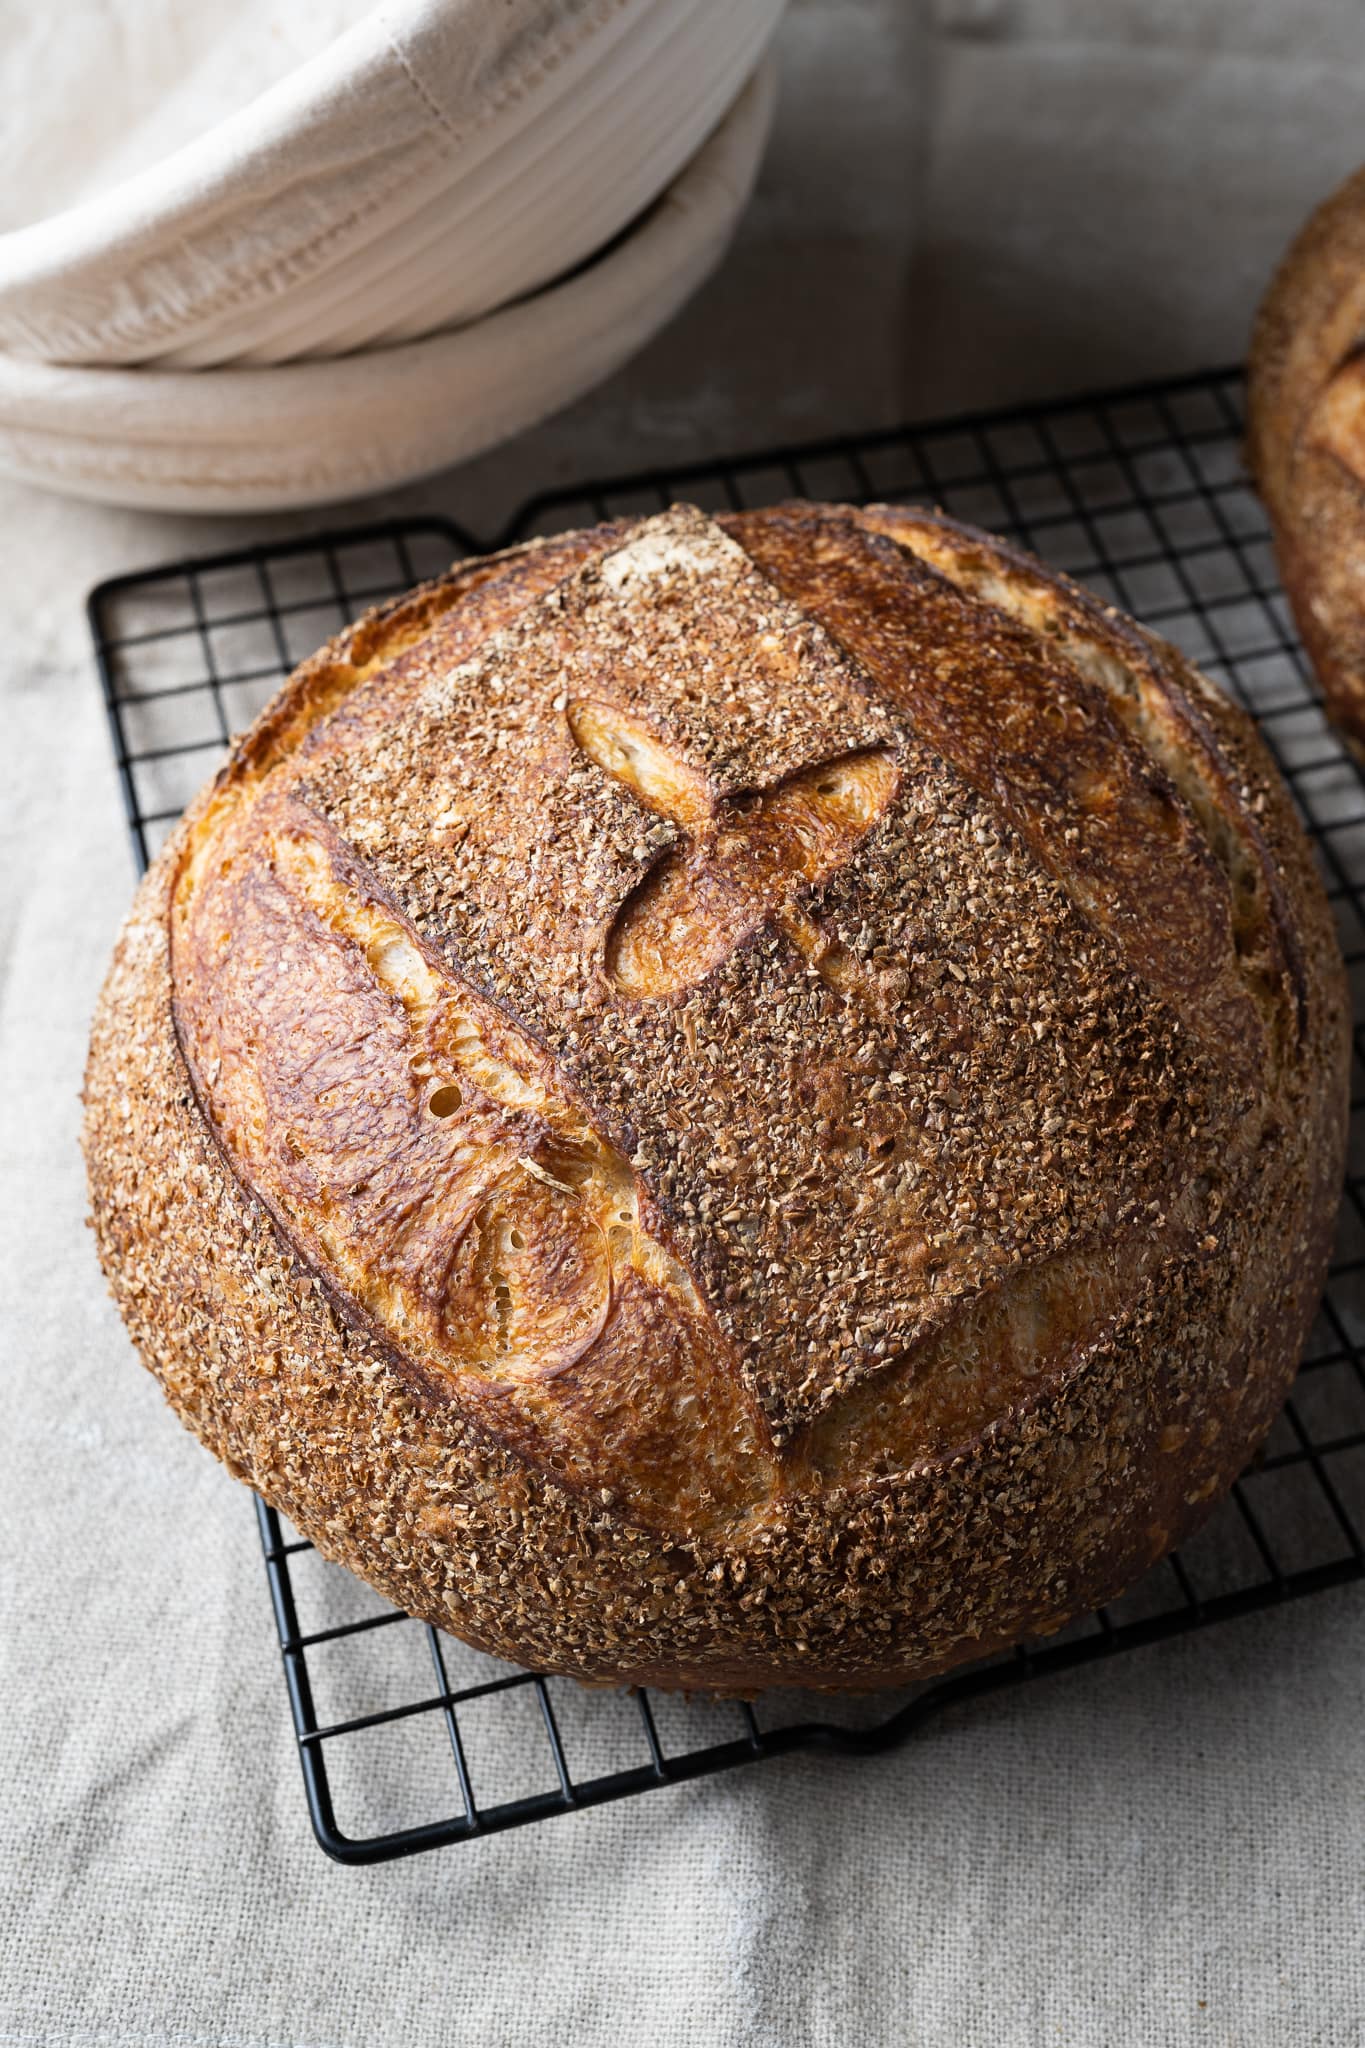
Sometimes when baking sourdough bread, the most straightforward recipes prove to be some of the most satisfying. And that’s certainly the case with this easy no-knead sourdough bread: this dough is all hand mixed, given a few folds during bulk, proofed overnight, and baked straight away in the morning. No levain to make and no kneading, a bread that, somewhat paradoxically, satisfies more than some of the more complicated and involved recipes and formulas.
This sourdough bread is the recipe you want to make when you want to spend little time in the kitchen—life!—and you still want a loaf for dinner, or sometimes, you want a no-fuss approach to healthful and delicious bread. The formula is relatively lower hydration compared to many of the high-hydration formulas you’ll find here, and this makes for a dough that’s easy to handle and a joy to shape. Still, there are no compromises with this no-knead sourdough bread: it has a soft crumb, crunchy crust, satisfying flavor, and beautiful color.
To sum it up, this is why I love this no-knead sourdough bread:
- It uses only two types of flour (both of which are easily picked up at the market)
- There is no kneading or mechanical mixer required
- The medium hydration dough is easy to handle and shape
- The loaf has a beautiful golden crust, a delightful interior texture, and a deep flavor
Flour selection
For this no-knead sourdough bread, I use a mix of medium protein bread flour (all-purpose flour will work) and whole wheat. I like to use lower protein flour for this bread instead of higher protein “bread flour” for improved texture: increased tenderness, softness, and delicate eating quality. Whole wheat brings additional flavor and nutrition, even if not in a significantly high percentage (check out my whole wheat sourdough bread for the other end of the spectrum).
Baking schedule
This bread is very flexible. I like to do a two-day ferment on this dough for additional flavor, retarding it by proofing it overnight in the refrigerator. However, you can bake this in a single day for a more delicate flavor and condensed schedule. Instead of placing the dough into the refrigerator, proof it on the counter for around 2 hours until it passes the poke test: the dough will slowly spring back when poked with a finger.
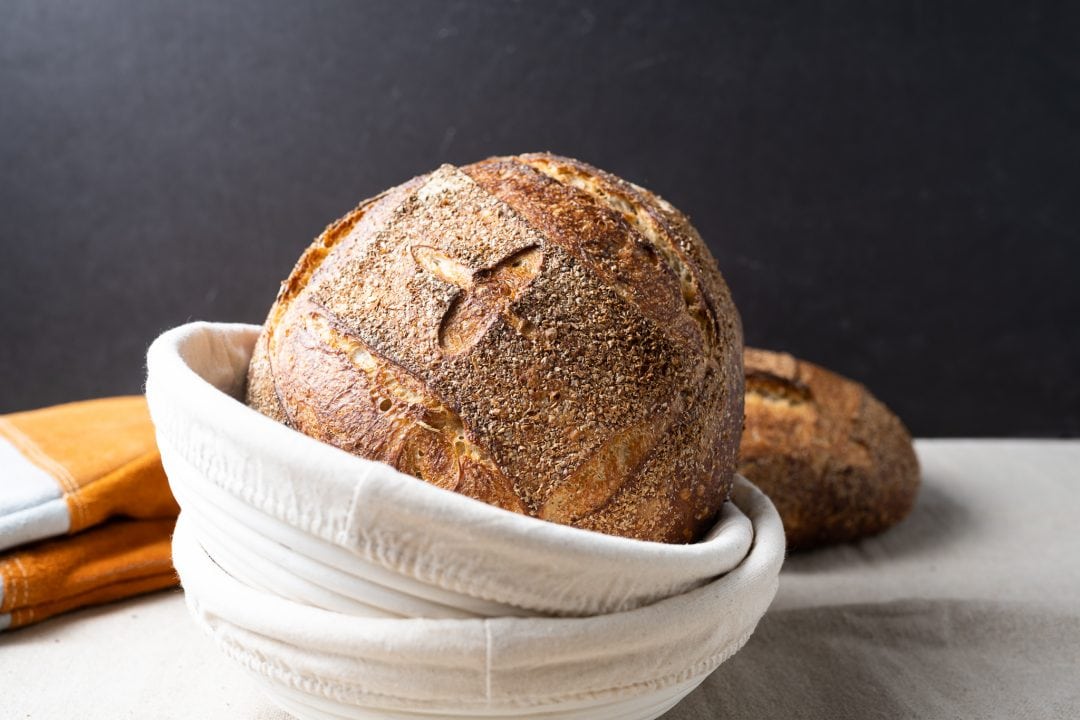
Proofing baskets
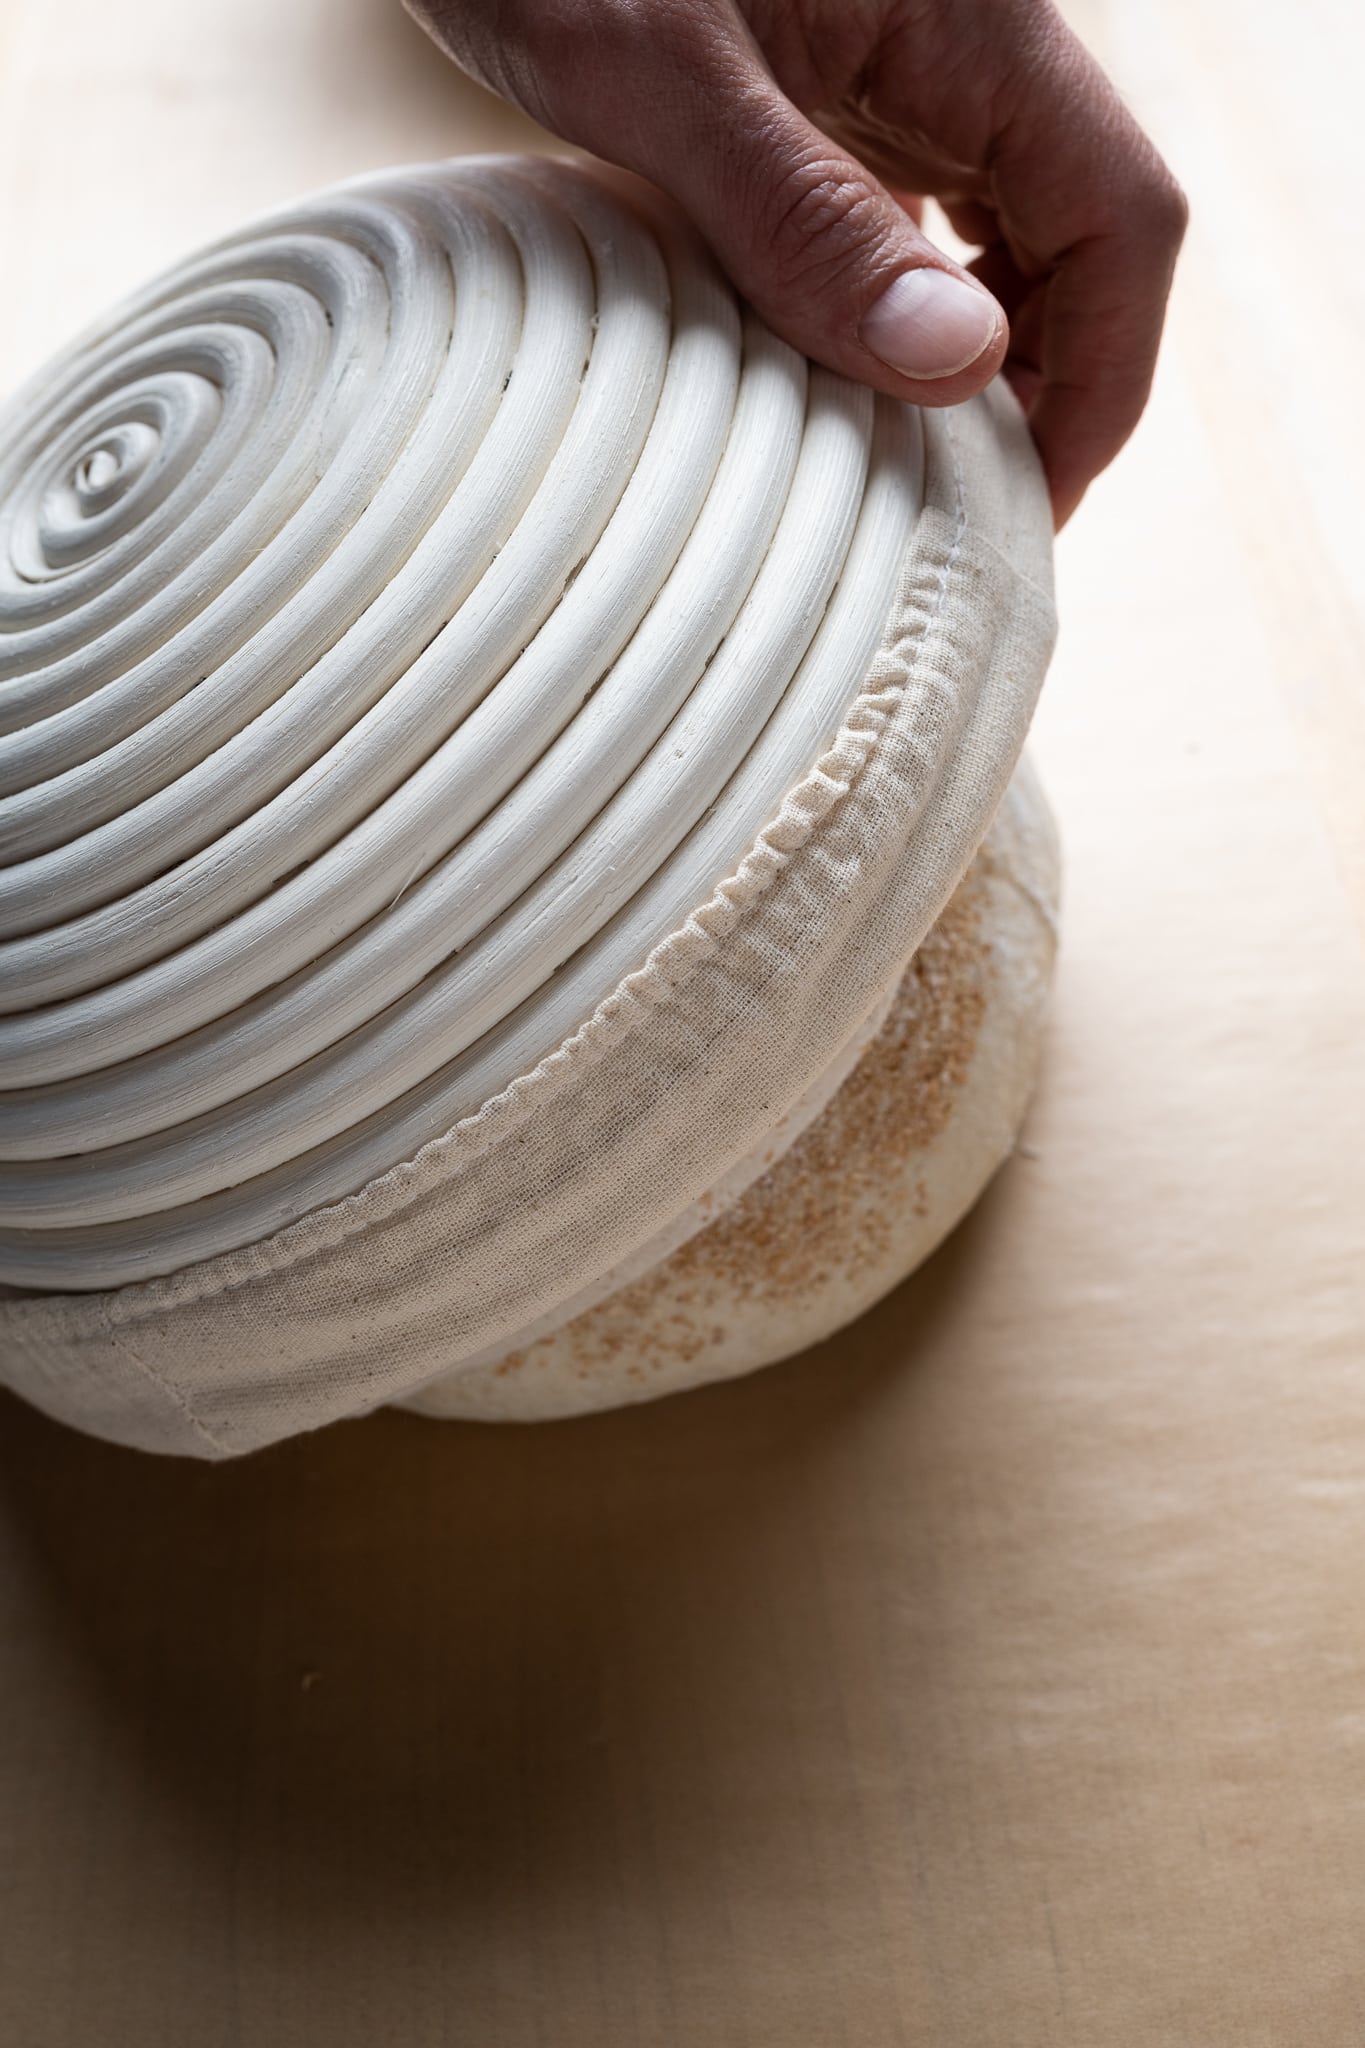
For this bread, I’m using a 9-inch round banneton with included liner, which comfortably holds 800g to 900g of dough for this no-knead sourdough bread recipe, but a 10-inch basket will work as well. The liner encourages the dough to remove cleanly from the basket, but if you want to see a spiralized design on your dough, remove the liner and dust the basket with white flour to impart a pattern.
No-knead sourdough bread formula
Vitals
| Total dough weight | 1,600g |
| Hydration | 68.0% |
| Pre-fermented flour | 9.0% |
| Levain percentage in final dough | 18.0% |
| Yield | 2 x 800g loaves |
This recipe can be split in half to make a single loaf of bread following baker’s math operations: divide all the ingredients in half.
Total formula
Desired dough temperature: 76°F (24°C). Check out my guide to dough temperatures for more information on the desired and final dough temperatures.
| Weight | Ingredient | Baker’s Percentage |
|---|---|---|
| 767g | Medium-protein bread flour or All-purpose flour (~11% protein, Central Milling Artisan Baker’s Craft or King Arthur Baking All-Purpose) | 90.0% |
| 85g | Whole wheat flour (Central Milling High Pro Fine or King Arthur Baking Whole Wheat Flour) | 10.0% |
| 537g | Water 1 (autolyse) | 63.0% |
| 43g | Water 2 (mix) | 5.0% |
| 15g | Fine sea salt | 1.8% |
| 153g | Ripe sourdough starter, 100% hydration | 18.0% |
No-knead sourdough bread method
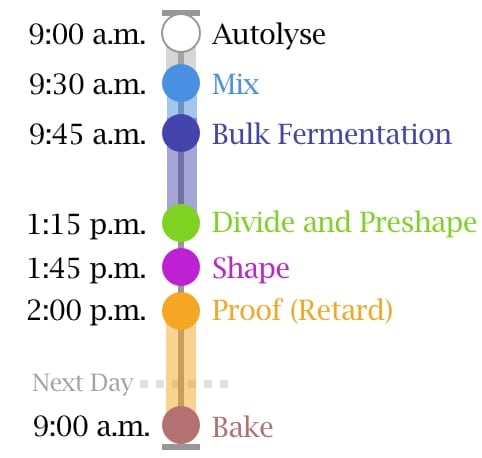
1. Autolyse with starter – 9:00 a.m.
Typically, when I perform the autolyse technique, it’s simply mixing flour and water and resting for some time. However, this recipe and its reduced hydration help to include the sourdough starter in the flour and water in the recipe.
To a large mixing bowl, add the flour, water 1, and sourdough starter and mix with wet hands until no dry bits remain. Cover the bowl and let rest for 30 minutes in autolyse.
2. Mix – 9:30 a.m.
Add the salt to the top of the dough and pour on water 2 to help it dissolve. Mix by hand until the salt is incorporated and the dough comes together in a single mass. This is no-knead sourdough bread, so it’s unnecessary to fold or knead the dough vigorously.
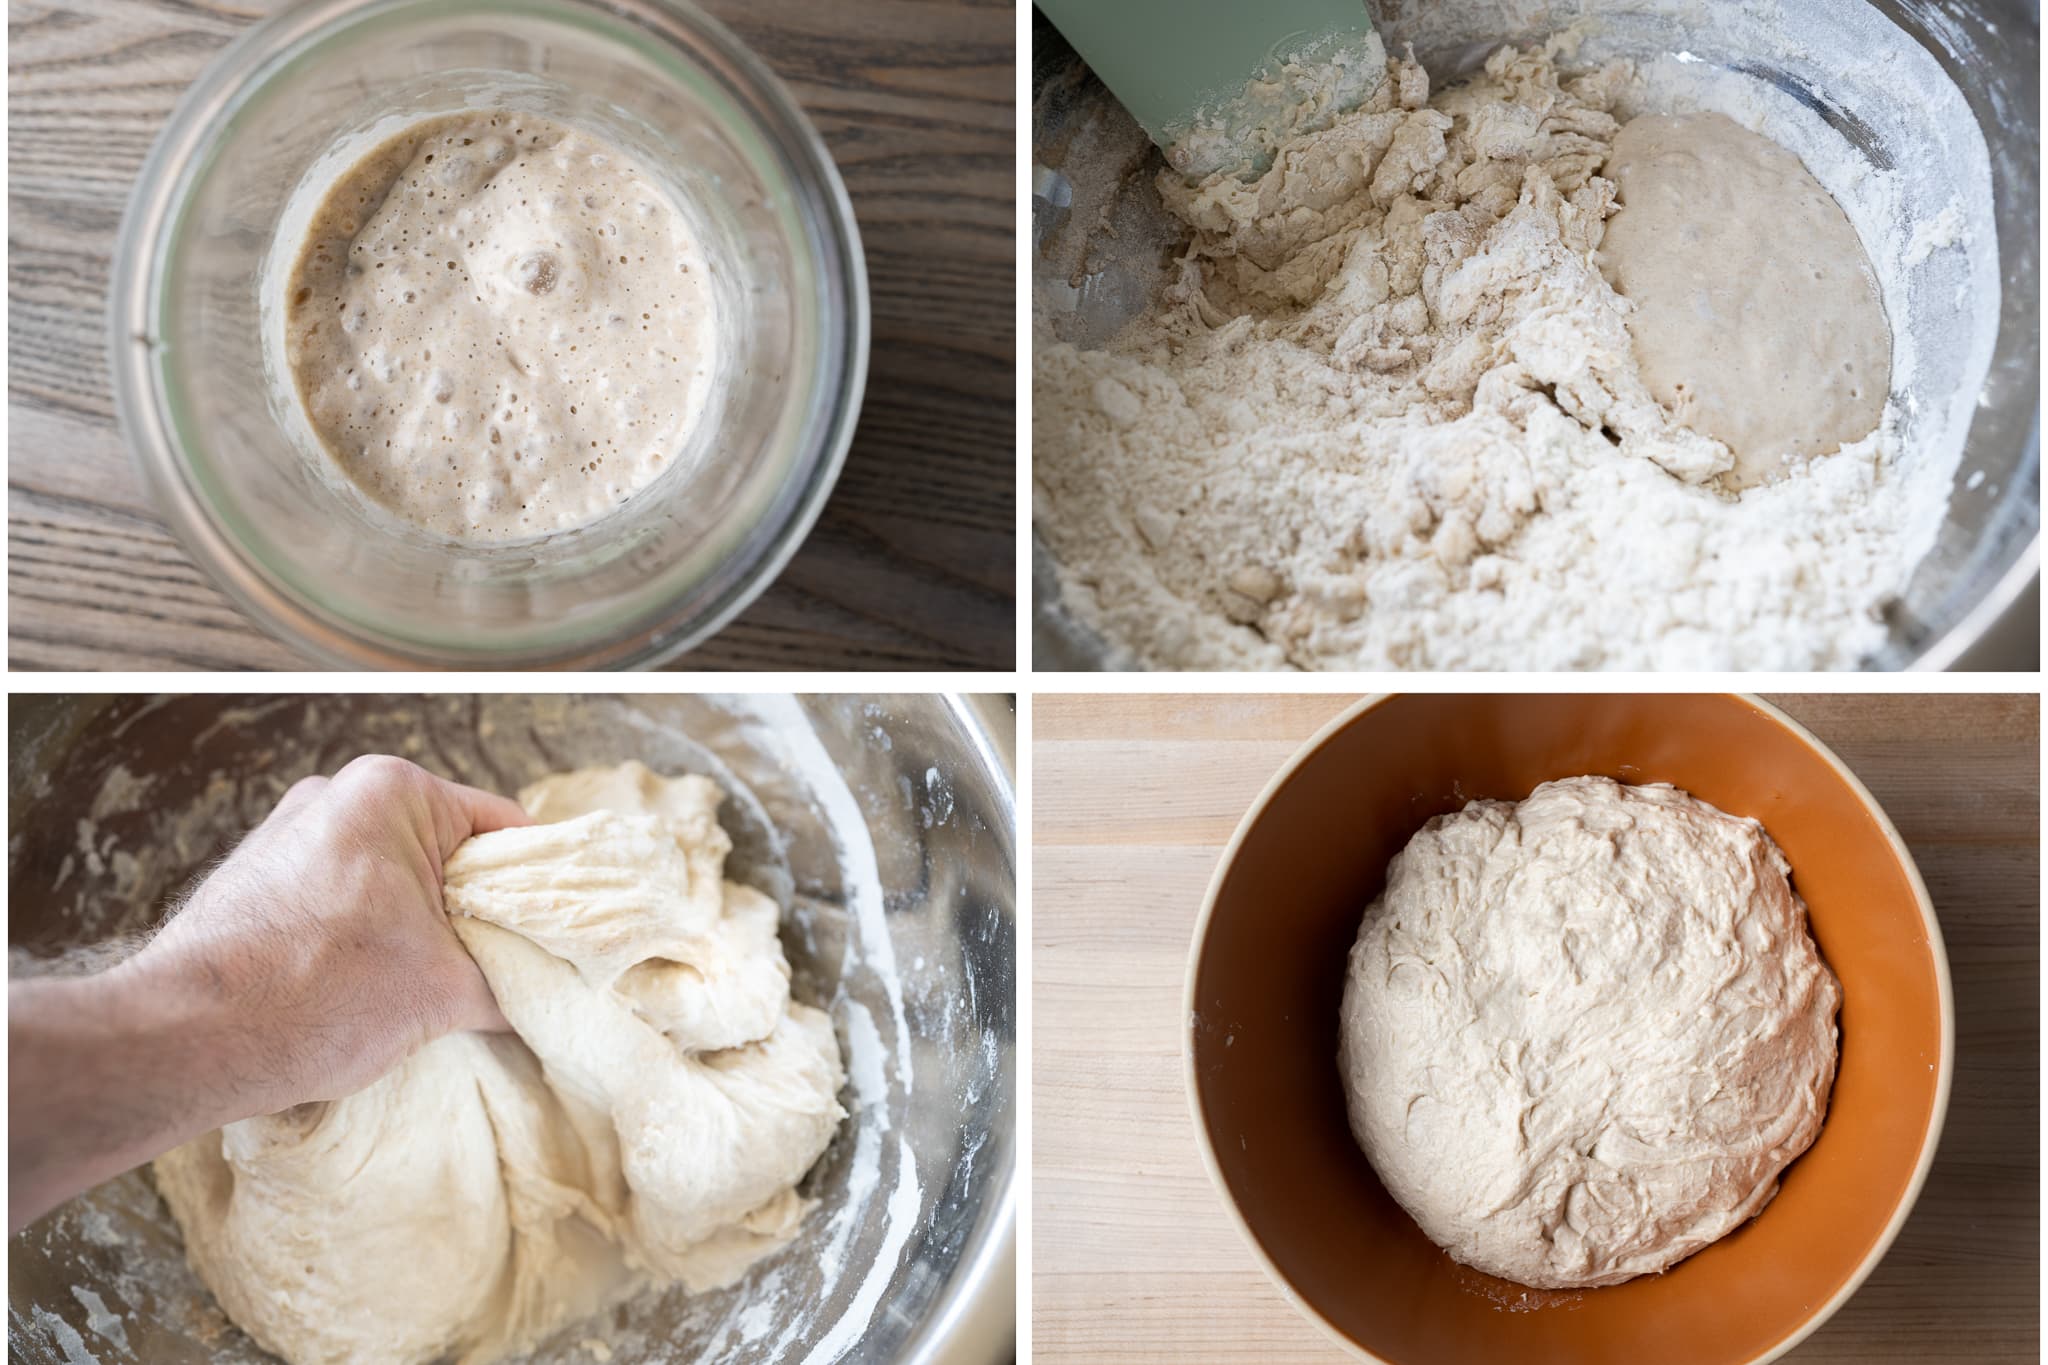
Transfer the dough to a container for bulk fermentation and cover.
3. Bulk fermentation – 9:45 a.m. to 1:15 p.m.
At a warm room temperature, around 74-76°F (23-24°C), bulk should take about 3 1/2 hours. Give the dough four sets of stretches and folds during this time. The first two sets are at 15-minute intervals (10:00 a.m. and 10:15 a.m.), and the last two are at 30-minute intervals (10:45 a.m. and 11:15 a.m.). Perform vigorous stretches and folds, as seen below, for the first 3 sets, then a gentle set for the last set.
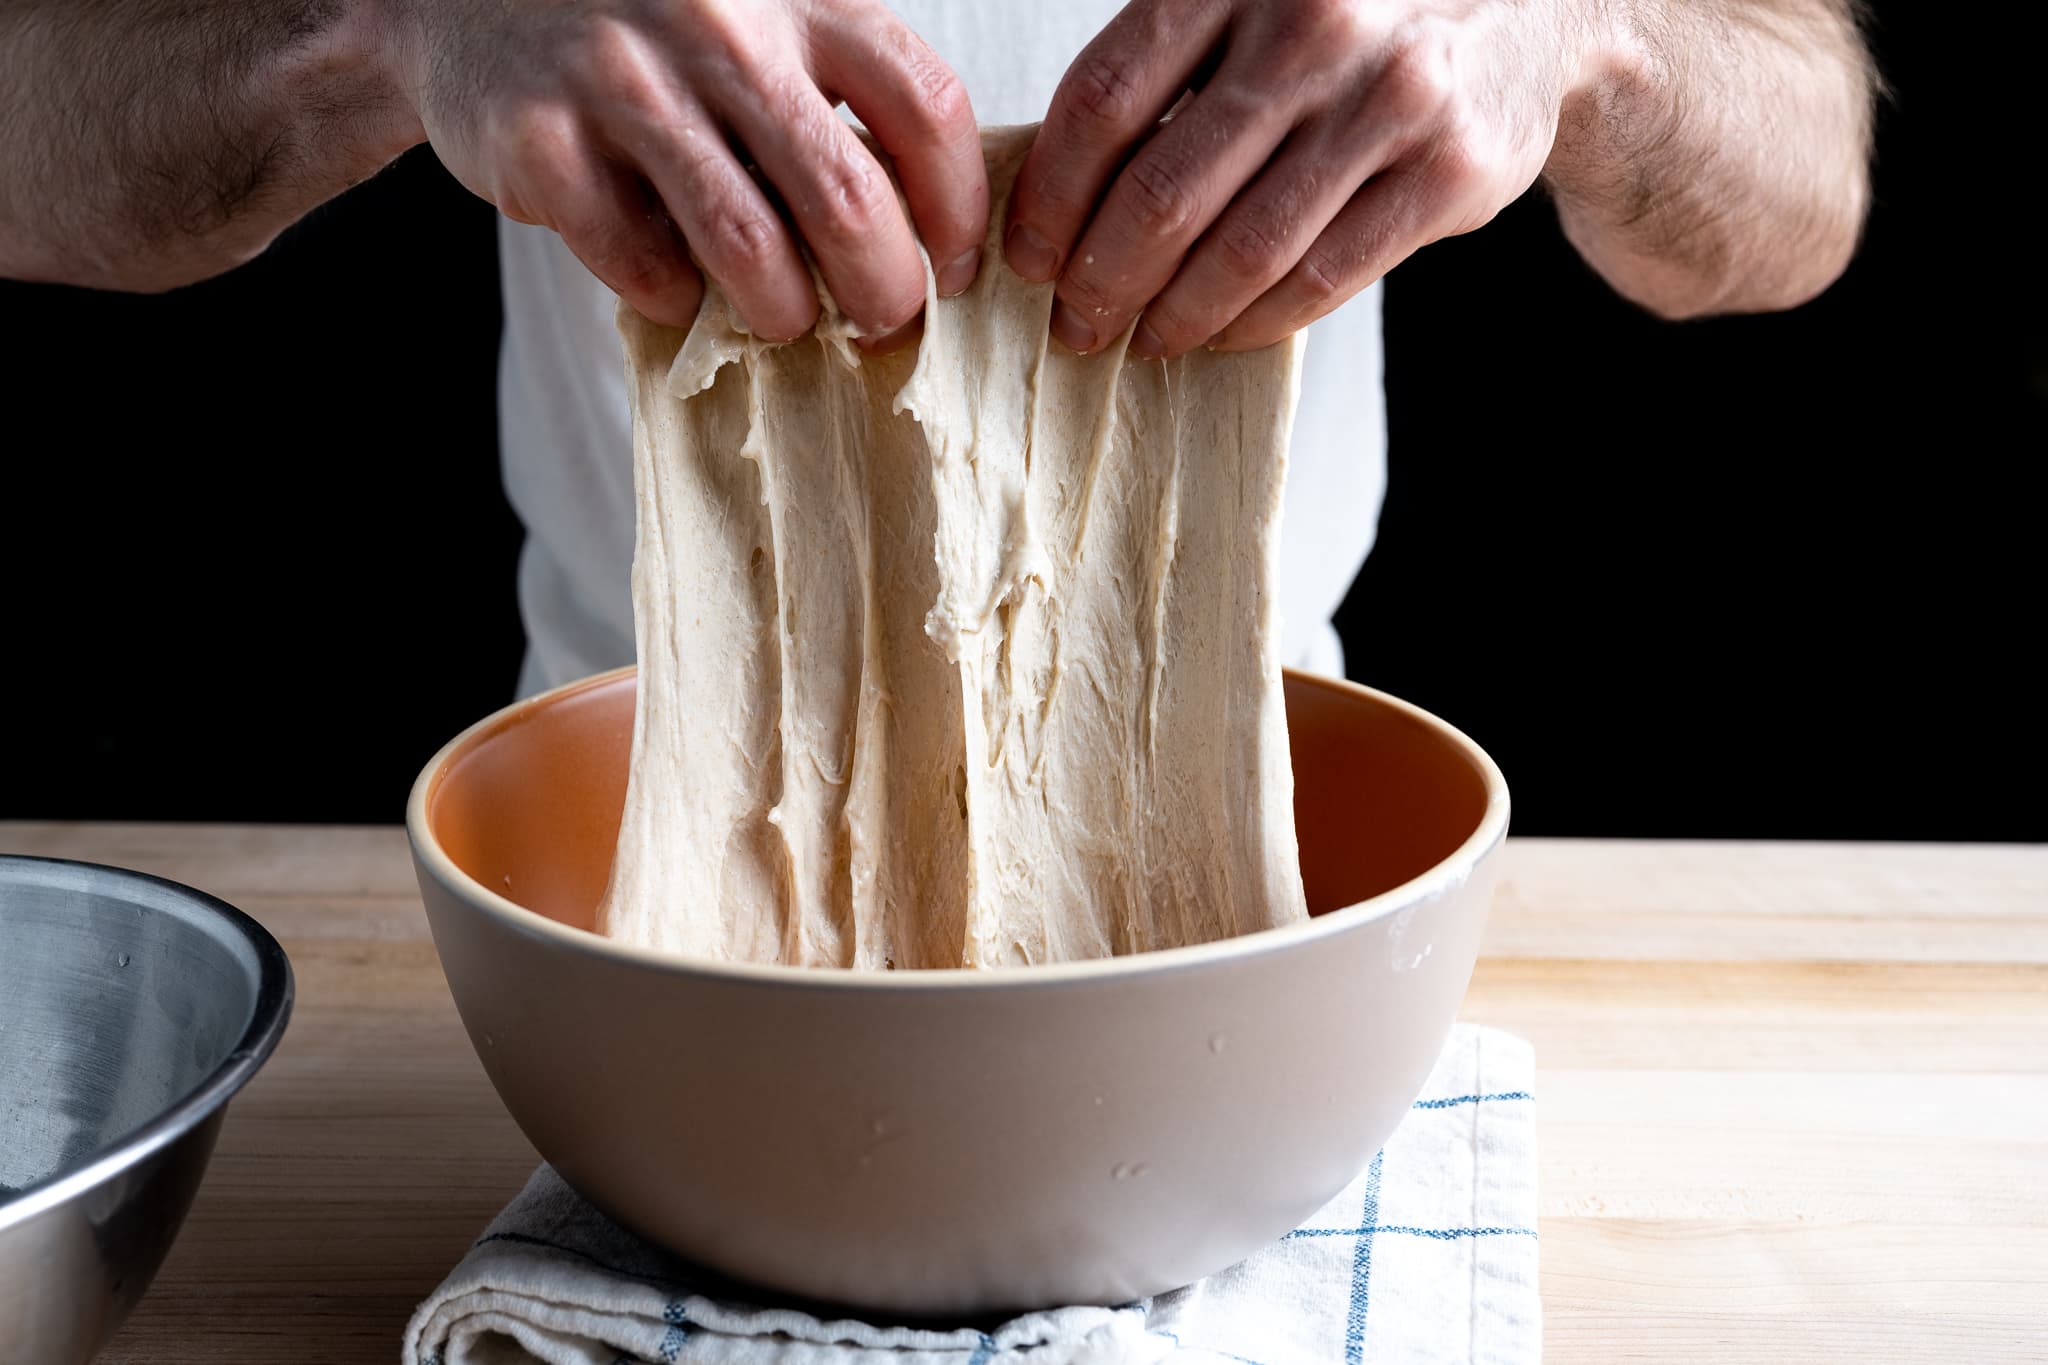
After the last set, cover the dough and let it rest until the end of bulk fermentation.
4. Divide and preshape – 1:15 p.m.
At the end of bulk fermentation, the dough should have risen considerably in the bulk container. It will be bubbly, smooth, and elastic, showing signs of significant fermentation.

Gently scrape the dough out of the bulk fermentation container and divide it into two pieces. Shape each piece into a loose round and let rest for 30 minutes, uncovered.
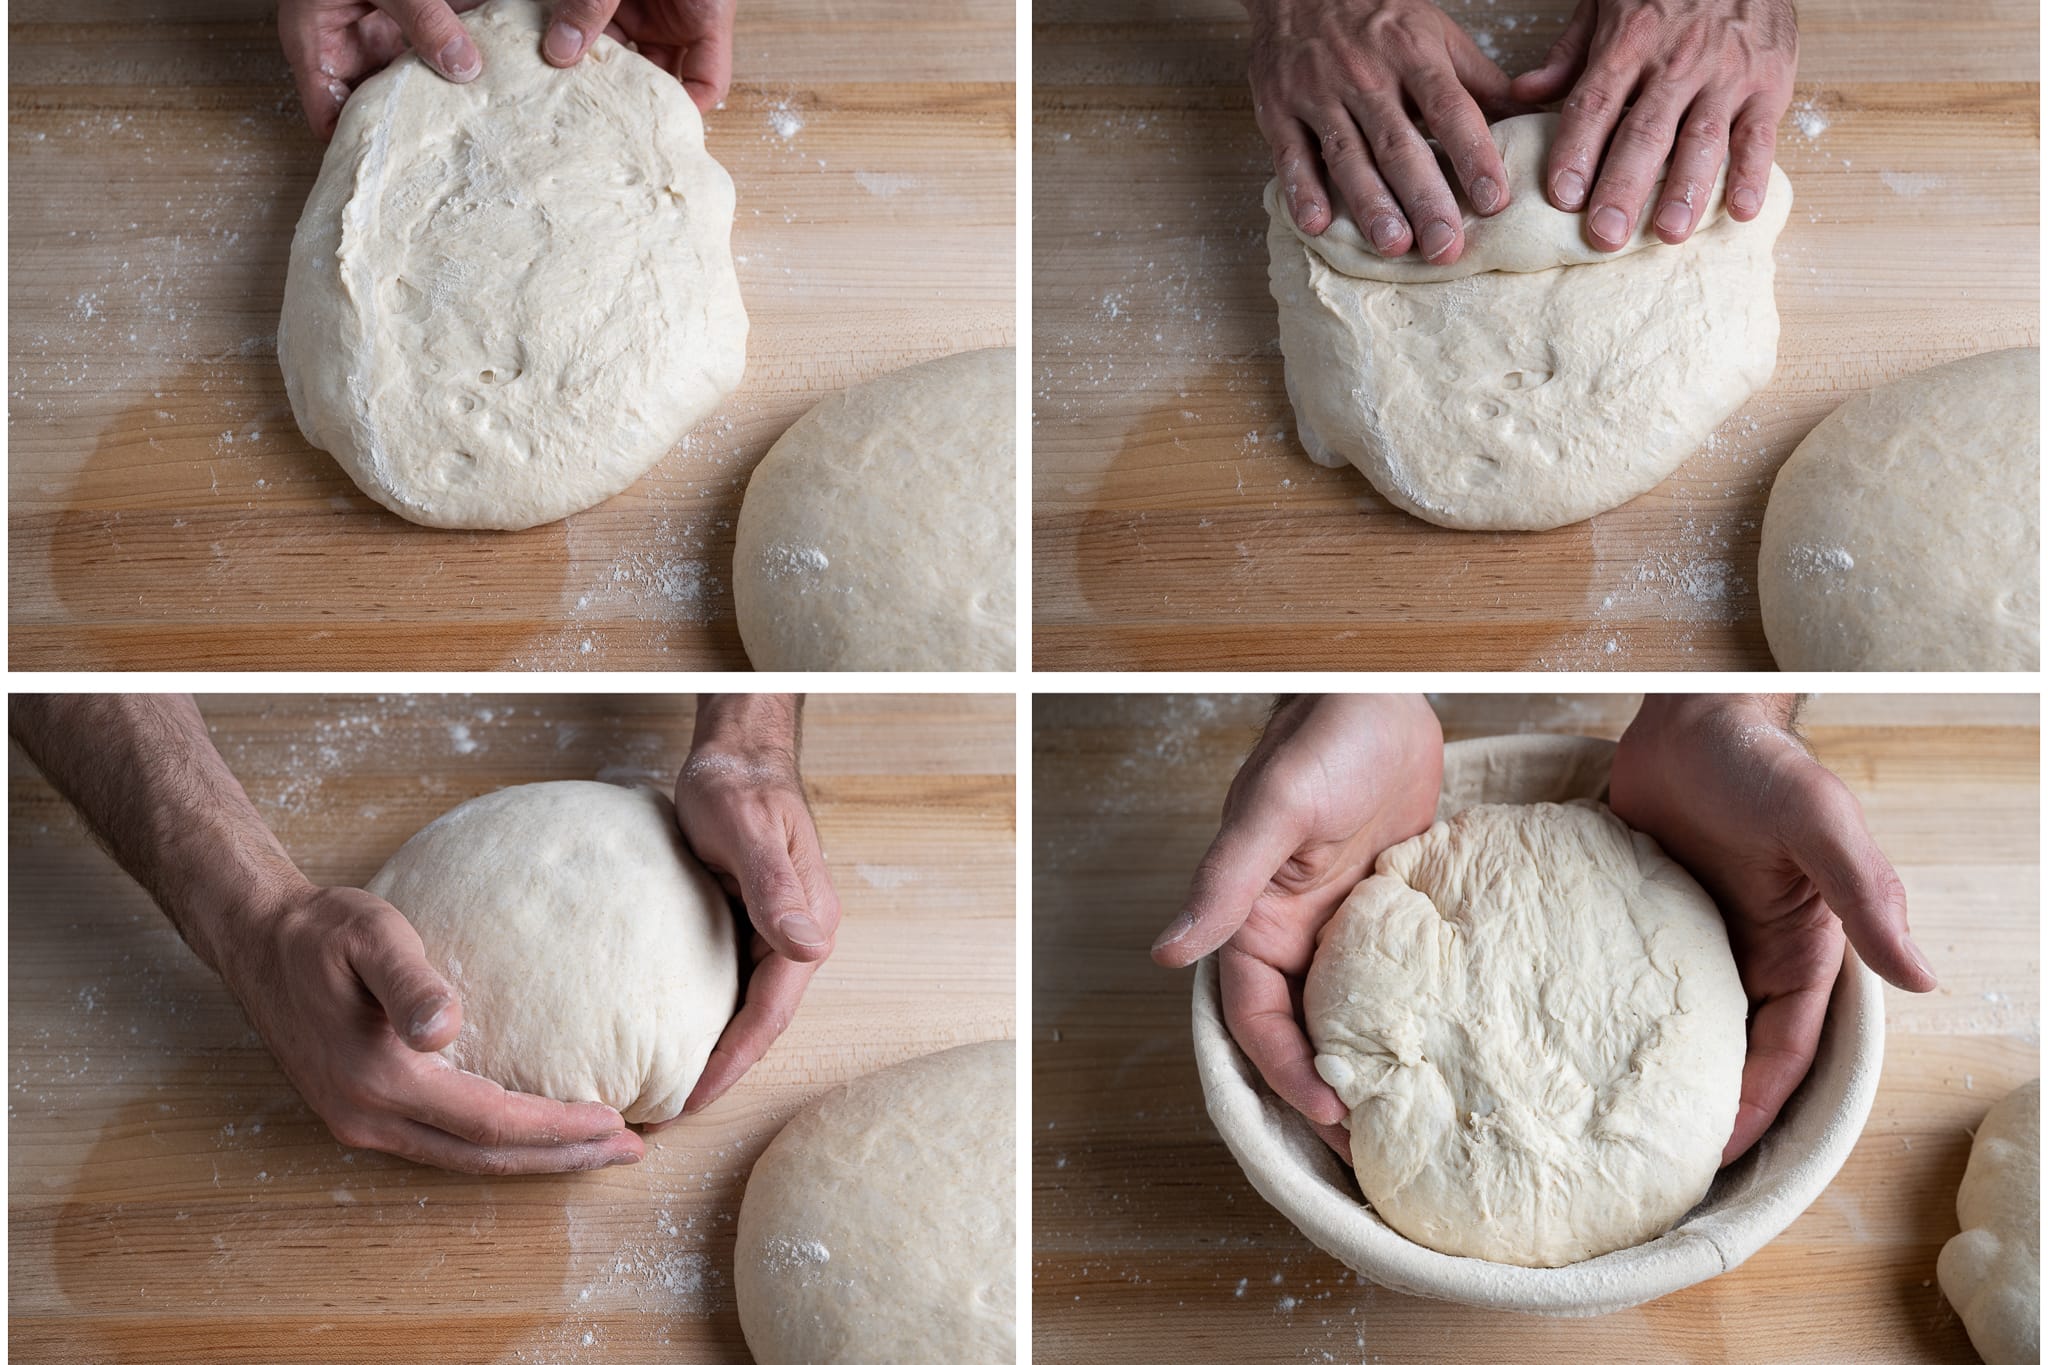
5. Shape – 1:45 p.m.
After the dough has rested and relaxed outward, shape each piece as a boule and place the dough in the proofing basket seam-side-up.
Check out the video below, where I show how I like to shape bread as a boule (round).
After shaping the dough but before placing it in the proofing basket, I rolled the top of the dough (the smooth side) on a bed of coarse wheat bran for a little extra nutrition, flavor, and texture. You could also use wheat bran, rolled oats, white sesame, or omit the topping altogether.
Read my guide to shaping a boule for a more in-depth explanation of shaping →
6. Proof – 2:00 p.m. to 9:00 a.m. (next day)
Cover the baskets with a large, reusable plastic bag and seal them shut. Place the baskets in their bags into the refrigerator overnight.
SAME-DAY OPTION: Instead of retarding the dough overnight, let proof on the counter for about 2 hours until a poke to the dough slowly springs back.
7. Bake – 9:00 a.m.
To begin baking your dough, first preheat your oven with the rack at the bottom third to 450°F (230°C). Place your Dutch oven inside, with the lid and bottom side-by-side.
Take one basket out from the fridge and uncover it. Your dough might not have risen considerably in the fridge, but that’s fine. Cut a piece of parchment paper to fit over the basket and place a pizza peel (or large cutting board) on top. Using both hands, flip the entire stack over and remove the basket.
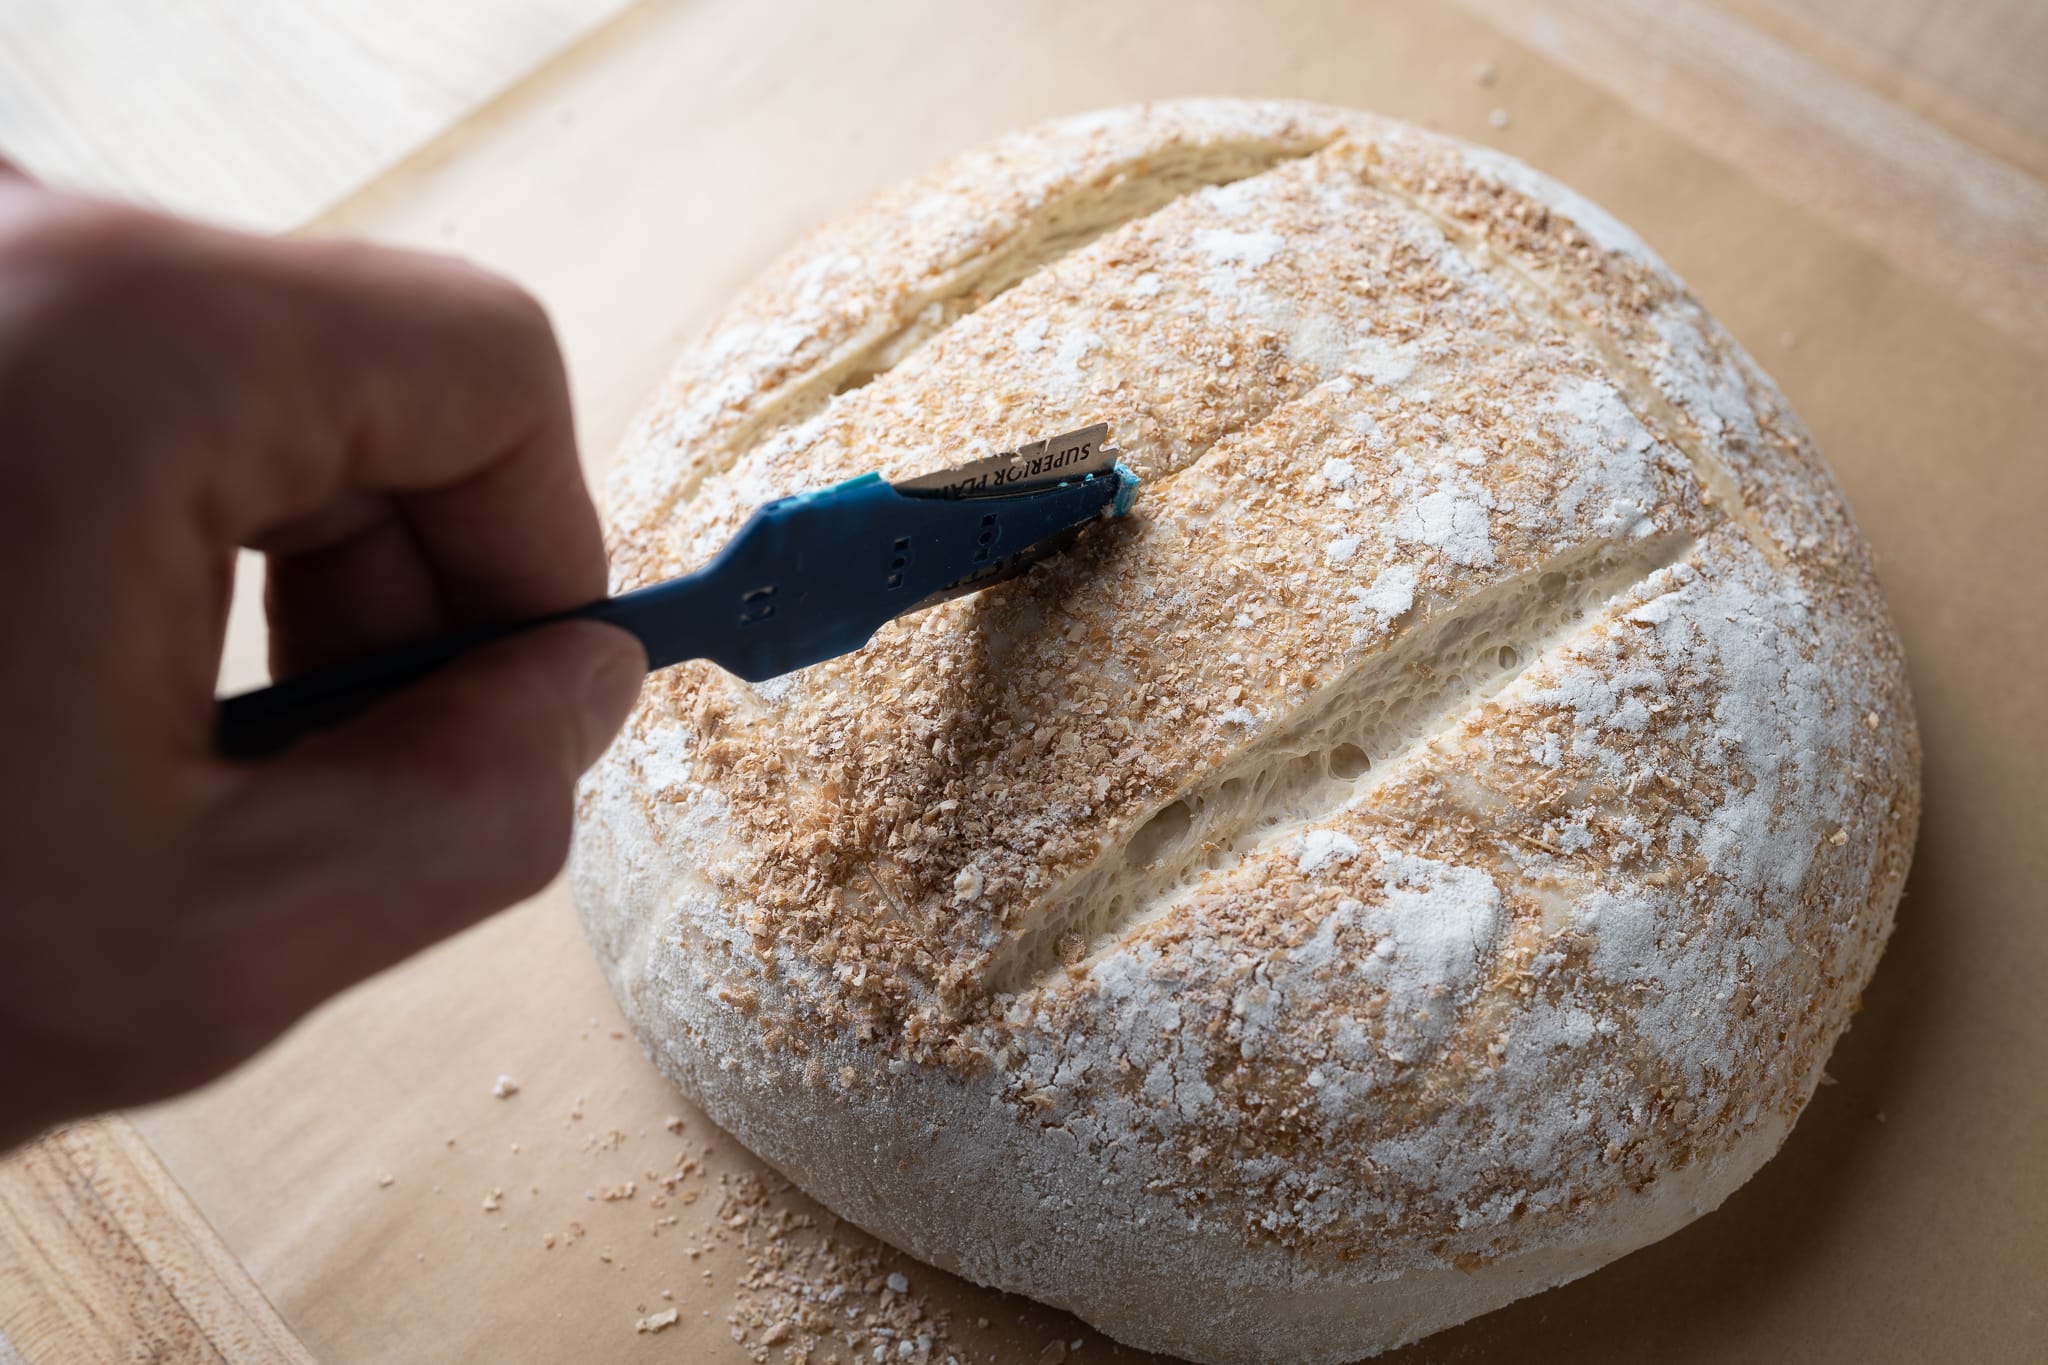
Score the dough. I like to create a “box cut” score on top, simply a square with a cross inside. Check out my video of how I like to do this score, here:
After scoring the dough, load it into the Dutch oven; then, bake for 20 minutes, covered. After this time, remove the lid and finish baking for 30-35 minutes or until done. The internal temp should be around 205-210°F (96-99°C) (unless you live at a high altitude).
Remove the loaf to a cooling rack for 2 hours before slicing. Then, return the Dutch oven to the oven (without parchment) and bring it back to temp to bake the second loaf. Follow my guide to storing sourdough bread to keep it fresh for the next week (or freeze it for longer!).
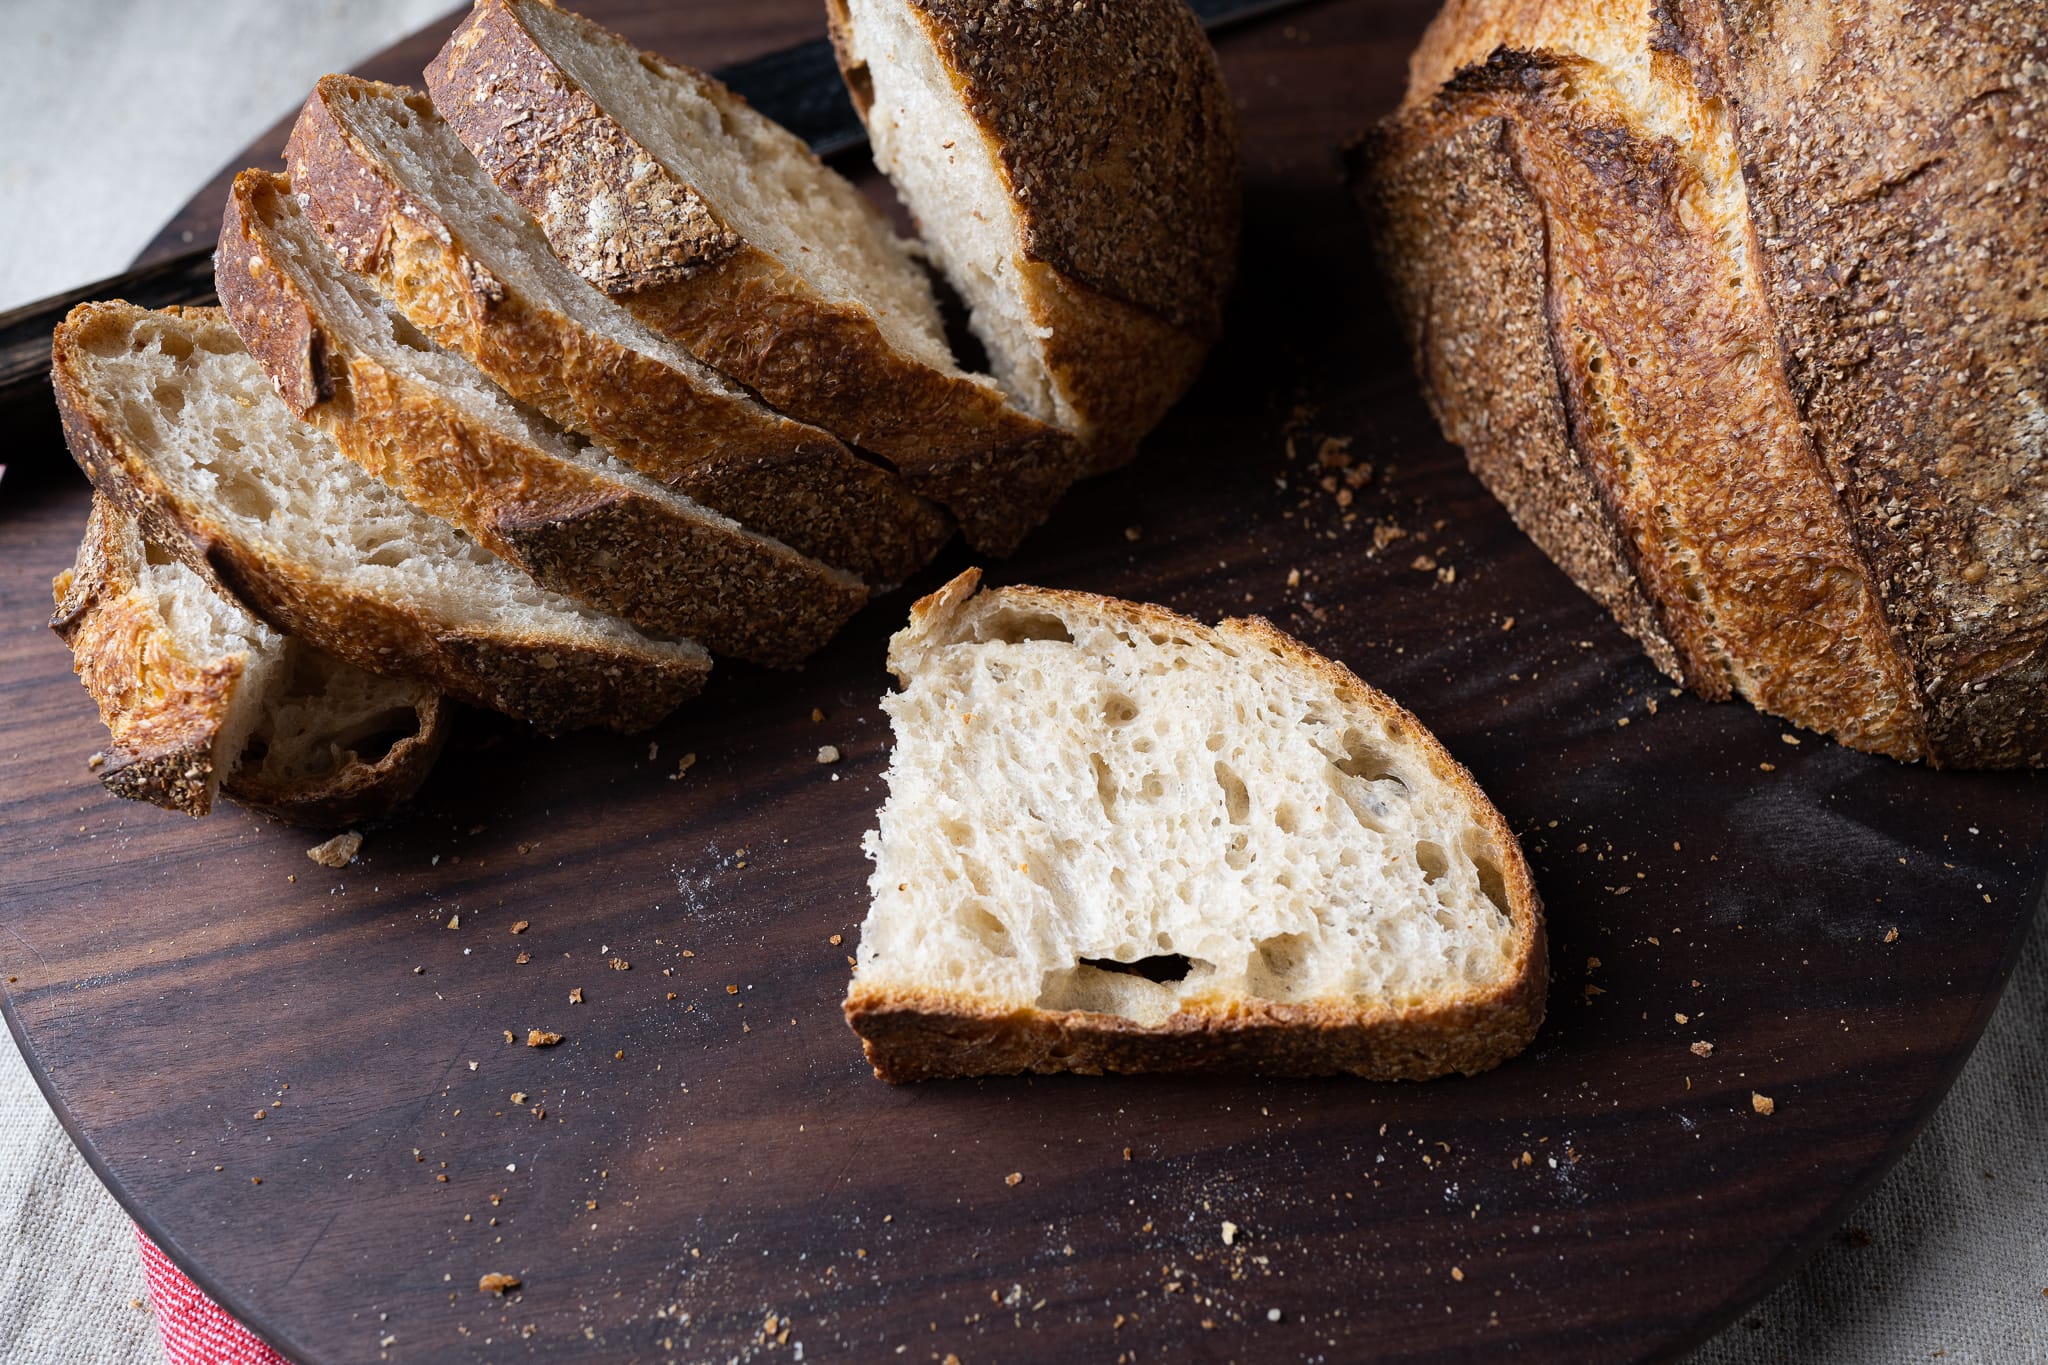
The soft crumb, crunchy crust, and wonderful flavor of this no-knead sourdough bread is a beautiful example of how, when baking, sometimes the best things only need time and require little fuss. Of course, I love a multi-step bake with complicated levain builds and a melange of ingredients as much as the next baker. Still, it’s satisfying knowing superlative bread can be made at home simply by stepping back and letting natural fermentation do all the work.
Buon appetito!
Print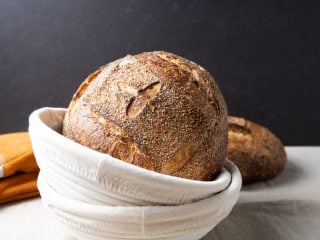
Easy No-Knead Sourdough Bread
- Prep Time: 24 hours
- Cook Time: 55 minutes
- Total Time: 24 hours 55 minutes
- Yield: 2 loaves
- Category: American
Description
My recipe for two loaves of delicious no-knead sourdough bread.
Ingredients
Main dough
- 767g medium-protein bread flour (or all-purpose flour)
- 85g whole wheat flour
- 580g water
- 15g sea salt
- 153g ripe sourdough starter (100% hydration)
Topping
- Coarse wheat bran, rolled oats, or sesame seeds for topping (optional)
Instructions
- Autolyse with starter (9:00 a.m.)
To a large mixing bowl, add the flour, 537g water, and sourdough starter and mix with wet hands until no dry bits remain. Cover the bowl and let rest for 30 minutes in autolyse. - Mix (9:30 a.m.)
Add the salt to the top of the dough and pour on the remaining 43g of water to help dissolve. Mix by hand until the salt is incorporated and the dough comes together in a single mass. Transfer to a bulk fermentation container and cover. - Bulk Fermentation (9:45 a.m. to 1:15 p.m.)
At a warm room temperature, around 74-76°F (23-24°C), bulk should take about 3 1/2 hours. Give the dough four sets of stretches and folds during this time. The first two sets are at 15-minute intervals (10:00 a.m. and 10:15 a.m.) and the last two at 30-minute intervals (10:45 a.m. and 11:15 a.m.). Perform vigorous stretches and folds, as seen below, for the first 3 sets, then a gentle set for the last set. After the last set, let the dough rest for the remainder of bulk fermentation, covered. - Divide and Preshape (1:15 p.m.)
Gently scrape the dough out of the bulk fermentation container and divide it into two pieces. Using wet hands, preshape each piece into a loose round and let rest for 30 minutes, uncovered. - Shape (1:45 p.m.)
Shape each piece of dough into a round (boule), then place the dough in proofing baskets. - Proof (2:00 p.m. to 9:00 a.m., the next day)
Cover proofing baskets with reusable plastic and seal shut. Then, place both baskets into the refrigerator and proof overnight. - Bake (9:00 a.m., the next day)
Preheat your oven with a baking surface or combo cooker/Dutch oven inside to 450°F (230°C).When the oven is preheated, remove your dough from the fridge, score it, and transfer it to the preheated baking surface or combo cooker. Bake for 20 minutes with steam. After this time, vent the steam in the oven or remove the lid (you can keep it in the oven or remove it) and continue to bake for 30 minutes longer. When done, the internal temperature should be around 205°F (96°C).
Let the loaves cool for 2 hours on a wire rack before slicing.
If you use this recipe, tag @maurizio on Instagram so I can take a look!
No-Knead Sourdough Bread FAQs
My dough didn’t rise in bulk fermentation
Be sure your sourdough starter is healthy, rising and falling predictably each day. It’s important to use your sourdough starter when it’s ripe for mixing this dough.
My dough was sticky and hard to shape
The dough might have been over-hydrated, under-strengthened, or a little of both. Next time, try reducing the water in the recipe by 25g and give it a fifth set of stretches and folds.
My loaf was gummy and wet inside
Almost always, this is due to either cutting the loaf too early before it had a chance to fully cool and set or it was due to under proofing. If it was under proofing, give the dough plenty of time in bulk fermentation until it has risen significantly, smooths, strengthens, and perhaps has a few bubbles visible.
What’s next?
If you’re looking for more simple, straightforward—but delicious—loaves, check out some of my other beginner recipes:


120 Comments
Hello. Thank you for your detailed instructions. My problem is timing my starter to be at the ripened stage when I’m ready to get started. If I feed it before I go to bed it peaks and starts to deflate before I wake up. If I feed it in the morning it peaks mid day and that doesn’t work for me. I’d Iike to start in the morning or after dinner so I can bake the next morning. What do you suggest?
It's totally fine to use it within a few hours before or (preferably) after its "peak"!
Hi Maurizio,
Thank you for your wonderful website and step by step guides. I tried making this bread on the weekend and unlike yours it did no rise and not sure what I did wrong. In the middle of baking (as I was referring to your youtube video as well since the explanations were clearer and I needed more visual) I noticed the recipes are not alike and slight difference between this recipe and the youtube one. My starter was rip but I did not see much activity in the levain, so trying to figure out why the inside was so dense and not airy. The bread did not rise 🙁 I hope I will have better luck next time. But I would appreciate your take on it. Thanks.
You're very welcome, Romena! Be sure you're using your starter when it's very ripe, you want to see rise, lots of bubbles, and a sour aroma. If you use it too early, it could result in underproofed bread.
Hey Maurizio
I’m in the middle of following this nice recipe, I am wondering at what point you might recommend adding other optional ingredients to the dough, such as rosemary, flax seed or walnuts. My instinct is to do it at the “Divide and Preshape” step
Sorry if you already answered this somewhere else.
bug
I would add these at the very end of mixing, or in the first set of stretches and folds during bulk fermentation.
I’ve been using regular table salt. I see in one of the comments below that you say “any salt without iodine.” That would be a good tip to put in your recipes. Also, it would be nice to know why you use “any salt without iodine.”
You can use sale with iodine, I just prefer using pure sea salt in my recipes (which is what I list, though some recipes need to be updated!).
Hi Maurizio,
Glad you had a wonderful trip in France and Italy. The pictures are wonderful.
I have a Pampered Chef mini baker that measures 10x6x6. I’m looking for an oval banneton to fit this size. Logic tells me that a 9″ oval would be the choice since it would give the bread an extra inch to expand. Is this correct? Also, what would be the maximum total dough weight for this size oval banneton?
If the recipe makes two loaves, like this one I want to make, the other half would bake in my round dutch oven as normal. Will be making this soon, but in the meantime, I’m having too much fun making your sourdough discard pancakes from your waffle recipe. Absolutely delicious.
Thanx in advance,
Thank you, Cindy! I had such a fantastic trip, still dreaming about it 🙂
Yes, a 9″ should work for you, though that is not very much wiggle room. I think it’ll be fine, though. For that size, I’d probably start around 600-700g of dough.
Let me know how it goes!
Made one loaf with this recipe. The outside was gorgeous and the taste was good; but it was pretty dense. Not wet or gummy (though that’s my most frequent issue) this time–just dense. Is that just the nature of this recipe or is there something I can do to open up and ‘lighten’ the crumb a bit? Any help would be appreciated!
It’s hard to say what the cause there was, Kirsten! With no-knead recipes, expect a tighter crumb, yes, but it shouldn’t be dense. It could be that it was under or over proofed, or if the dough felt dry and tough to mix, it might have needed more water… I’d need to see a photo!
Hi there, I’m about to try the
Easy No-Knead Sourdough Bread, however I just wanted to double check if I need to make any adjustments for high altitude. I’m also at 5000ft. In the text you say it is perfect for high altitude, however you don’t specify whether the adjustments are still needed or not.
Regards
Tania
Should be just fine at your altitude, Tania! I live at 5280ft. Since you’re up there like me, be sure to check out my baking guide for high alt bakers!
Hi Maurizio, I did my second batch of the no-knead sourdough, and although the bread looked very nice when it came out of the oven, both loaves had large air pockets to the point where I think I can only really use about half of each loaf. I’m wondering what I might have done wrong, or can you provide any suggestions on what to do next time, i.e. punching down the dough after overnight proofing? For this batch I got a digital scale and measured very carefully compared to my first batch that was on a much less accurate scale. Thanks in advance for your thoughts. Geoff.
It sounds like perhaps your dough was slightly underproofed. There are a few indicators your dough could be under: explosive rise in the oven, dense spots in the interior with potentially scattered large holes, and a gummy texture to the interior. Finally, it’s possible the bottom of the loaf might be slightly bowed upward (like the letter “U” — the top will kind of dome).
Make sure to build your levain from a starter that’s strong and mature (meaning it’s risen to it’s peak height before you take some to use). From there, bulk fermentation is very important! Make sure your bulk fermentation goes sufficiently far, you want the dough to look smooth, it should have risen considerably, and have bubbles here and there — it should look alive. If you tug on the dough a bit it should offer resistance to your tugging, it’ll feel stronger. Give the dough the time it needs in bulk fermentation! If you have to give it another 30m or hour to see these signs, do so. It’s important for this step to go sufficiently far for the dough to have enough fermentation activity before its proof.
Check out my guide to proofing for a bit more help, too:
https://www.theperfectloaf.com/guides/proofing-bread-dough/
Thanks for your insights Maurizio. Yes the loaves did experience explosive growth, and the air pockets were more towards the top half of the bread. Next time I’ll ensure longer bulk fermentation. My kitchen is a little cooler than yours, probably averaging 70 degrees so that may be why the dough was not sufficiently risen based on recipe timing. They were still delicious though, so looking forward to trying again. A question about baking: is it OK to bake both loaves at the same time
A quick question for you.
Hi Maurizio – my starter doubles in about 6hrs. Is that good/mature enough? Or should it more than double?
Hello Maurizio and thank you for all the information here on your site and in your book. You are inspiring novices like myself to venture into sourdough making.
I just baked my first sourdough loaf using your no-knead recipe, and while it wasn’t a complete failure, my results were a bit underwhelming. The taste was very good, the outside appearance was very good, but inside the bake was very uneven and the rise was also poor.
My starter is 21 days old, and I have been feeding it twice a day a 1:1:1 mixture of King Arthur All-Purpose, King Arthur organic Whole Wheat, and King Arthur organic Rye. I keep the starter at 75F in the proofer, and the rise of the starter is very consistent and predictable now. At feeding, I am using 20g starter to carry over into 100 g water and 100 g of my flour mix. For this bake, I harvested the starter in the morning around 9, at which point it was just past the top of its rise and began falling.
During the bulk fermentation stage, I put the dough into the proofer at 75F, and while it did rise a bit, it was a very modest rise, and I did not observe any bubbling at all like in your photos. I did the folds at the suggested intervals, and it was fairly tough and a bit hard to stretch. Maybe I overmixed it in the beginning.
After proofing in the fridge, I did not see much rise at all, if any. I baked the dough in the pre-heated dutch oven basically straight from the fridge, as you outlined.
What I saw when I sliced up the bread is that there were nice large open pores at the bottom half of the loaf, while the upper half of the loaf was pretty dense and had very small pores. The loaf overall didn’t rise much during baking and remained fairly flat.
I wonder if in my case, it would be worth doing bulk fermentation for longer or at a higher temp, or also to allow the dough to come to room temp or even put it in the proofer after the overnight proof in the fridge? My starter has always been very temperature-sensitive, so maybe the colder temps really take the activity out of it…
Any thoughts?
It sounds like perhaps your dough was slightly underproofed. There are a few indicators your dough could be under: explosive rise in the oven, dense spots in the interior with potentially scattered large holes, and a gummy texture to the interior. Finally, it’s possible the bottom of the loaf might be slightly bowed upward (like the letter “U” — the top will kind of dome).
Make sure to build your levain from a starter that’s strong and mature (meaning it’s risen to it’s peak height before you take some to use). From there, bulk fermentation is very important! Make sure your bulk fermentation goes sufficiently far, you want the dough to look smooth, it should have risen considerably, and have bubbles here and there — it should look alive. If you tug on the dough a bit it should offer resistance to your tugging, it’ll feel stronger. Give the dough the time it needs in bulk fermentation! If you have to give it another 30m or hour to see these signs, do so. It’s important for this step to go sufficiently far for the dough to have enough fermentation activity before its proof.
Hi Maurizio, thank you for taking the time to give your thoughtful advices. I repeated this bake, now using 2X the amount of starter (and added 15 g additional flour), and I let it ferment a few hours longer than indicated, this time at 80F… I shaped the loaf and proofed it for 2 hours at 84F (instead of doing overnight proof in the fridge). The results were much better. The pores were more dispersed throughout the loaf, and it wasn’t as dense as the first time. Still, the texture was a bit gummy, like it’s overhydrated. So as you said, maybe I need to proof it even longer. Sounds like my starter is nowhere as vigorous as yours and seems to need more time and higher temperatures for fermentation/proofing. Is there a way I could strengthen my starter? Perhaps maintain it at 78F instead of 75F like I have been doing?
Glad to hear there were improvements, Denis! Hmm, 75F should be just fine. Have you read through my guide to how I maintain my starter? Just to give you an idea for what it should look/smell/feel like. I also talk about temperatures there.
Doubling the amount of preferment (starter/levain) in the dough should have really gotten you there. If it was gummy but airy, it might have been over hydrated or cut too early (be sure to let the loaf cool for 2 hrs before slicing!).
I am happy to say that on my 5th try, I nailed this loaf! I think it was a combination of factors, including improved activity from my starter but particularly learning from you! I received your book as a gift during the holidays (a truly beautiful book, both visually and how it was written), and I spent some time studying the techniques you detailed there as well as what to look for in the dough as it goes through fermentation and proofing, how to pre-shape, shape, etc. This 5th loaf is truly fantastic — moist, with a nice airy crumb, crackling crust, and great taste. What I did differently was to perform autolyse without the starter in it, reduced the water from 68% hydration to about 65% (all water added as Water1, no Water2), fermented for an additional hour, and did 6 sets of stretches/folds. I used King Arthur’s Organic All-Purpose and Organic Whole Wheat. Thank you for being such an incredible teacher in all the resources you made available through your book, your videos, and this blog. I never thought I could make such wonderful bread at home. 🙂
Fantastic, Denis! So glad to hear this worked for you, makes me happy to read that. Nice modifications to suit your flour and location!
Also happy to hear you’re enjoying my cookbook—means a lot to me!
Happy baking 🙂
When you’re covering the dough for bulk fermentation, are you just covering with a cloth or an air tight container?
Anything air tight will work, I use reusable plastic bowl covers!
You don’t mention how much rise to look for during the bulk fermentation. You say considerably so is that double, almost double, 50%, 75%?
As I mention in my guide to proofing dough, I don’t typically say a rise percentage because it really varies! I’d say between 30-50%.
Great videos and recipes. Thank you for sharing. You are one of my go-to for bread and I love your approach. Really love the book. One question please – I notice after Bulk Fermentation, your end point is more an appearance of the dough (bubbly, smooth, elastic). Some bakers instead use percentage rise but you don’t mention this. Is percentage rise a better / not as good indicator of your end point for BF? Perhaps I am trying to be a bit more concrete in my approach. Kindly advise. Thank you kindly
Thanks! Happy to help and so glad you’re enjoying my cookbook 🙂
I mention this a bit in the book, but I don’t like to go by rise height for the dough, because it varies based on the recipe, how much you’ve strengthened it, and even the container your fermenting in. Instead, I prefer an overall look at all these signs to help me determine when bulk is finished!
Hi, I have a ceramic baking dish. Can I use it instead of the Dutch oven?
As long as it’s rated for 450-500F in the oven!
What is the Diamond Salt equivalent for sea salt?
Any salt without iodine will work well. I like to use very fine salt so it dissolves readily.
I’ve been using the overnight proof which works well, especially if I get a late start. I sometimes find that my loaf in the morning is almost overrisen and after letting it come to room temperature, I reshape the loaves, deflating them somewhat. Then I wait until they have risen again before baking. I also regenerate my starter for about 1 1/2 days and I use a nonconventional method. After I take the statrter out of the refrigerator and let it come to room temp, I add 1/4 c flour and a scant 1/4 c warm water without discarding any starter. I do this 2-3 times until my starter is ready to go. If I end up with too much at any point, I’ll use some in quick breads, pancakes or make sourdough pizza dough.
Right on, Ann! I usually bake my dough straight from the fridge, this should help you, too, if you’re finding they are overproofed. Also, you could reduce bulk fermentation by 15 to 20 minutes as well.
Great method there for your starter!
If i want to proof the dough for 24 hours in the fridge, will I resume at the preshape stage right after I get the dough out of the fridge? or should I stretch and fold before that?
I would go all the way to shaping the dough and placing it in the baskets, covered, then let them sit in the fridge until you want to bake them (even up to 24 hrs later).
Perfect, I will do that and let you know…thanks.
How do you buy Central Milling Flour? On their website a five lb bag is $10 but shipping is $15.42 and it is a 3 hour drive. Thanks Maurizio, btw congratulations on the book, you did a great job, am loving it!
Hey, Steve. I have to order it online, unfortunately (they’re more than a 3 hr drive for me 🙂). I usually order 50 pound bags which last me quite a while. But feel free to use any flour you have close and accessible!
Thank you Maurizio, just frustrating and unaffordable with shipping being more than flour. Too far to drive, my point being that high cost of shipping makes your recommended flour not a viable option. Cheers!
I think my favorite thing with your recipes are the timelines you include! Thank you for doing that!
Thanks, Andy!
Why not use bread flour? What would be different?
You can certainly use bread flour if you’d like. I do mention up in the post, though, why I like AP for this recipe, though: I find it results in a more-tender loaf (less gumminess), especially when the dough is at medium-hydration.
How do you get the starter to be ripe early in the morning? If you are feeding it twice/day (morning and night) it won’t have had time to rise much by 9 am. I find that it takes until about noon for the starter to get to the top of the jar.
I feed mine 2x a day, once at night and once in the morning. So I’ll mix up this dough in the morning right when I’d give my starter a feeding (then I’ll also feed it to keep the culture going).
Check out my guide to how I maintain my starter for a detailed look at this!
Trying it today hopefully it will be ok
Hope it turned out well, Ana!
I just mixed the bread for autolyse a few minutes ago but when I read the recipe I realize I will not be able to leave it in the banneton overnight because I just know it will stick. I hope it’s OK to shape it and put it in a bowl instead.
In the end I opted for the same day method, and OMG my loaf is not pretty but is it ever tasty! I followed the recipe exactly otherwise, using 100% rye starter, all purpose flour for the white part. I had only an oval Banneton so I made a long loaf which I baked directly on the stone. It is quite sour just the way I like it, thank you so much for this recipe. Next time I might try using the mixer because when my arthritis acts up like yesterday, even Stretch and folds are painful. So if you have advice about converting from noknead to stand mixer, I would appreciate it.
Awesome, Gina! I like the idea of using a rye starter/levain as well. The mixer will definitely help with this, though, it won’t need much! I’d mix only for a few minutes until the dough just starts to show signs of strength.
Buongiorno Maurizio,
I’m comparing this recipe to the no knead sourdough you created for King Arthur. Per my calculation, the KA recipe uses nearly double the starter, and slightly more water overall if you count the starter (0.3 %). Your KA recipe also uses 100% bread flour vs. your 90/10 bread/whole wheat ratio in this recipe. Curious about the modification. Curious why you reduced the starter in this recipe? And why use slightly less water (only 0.3%) when substituting with a little whole wheat (10%)?
Mille Grazie for your contributions here and at King Arthur.
P.S. I also find that this recipe results in a much stronger dough for me than your beginner recipe.
Hey, Cindy! This recipe has less water, so it makes sense it’ll mix up stronger. I find using less levain/starter results in more manageable fermentation and more flavor in the end, that’s why I created this recipe the way I did 🙂
My crust is very thick and hard to cut, but everything else is okay. What am I doing wrong?
Also, if I am only baking every other week or so, how often should I feed the starter, and do i store it in the fridge or on the counter? Thanks
It might be you’re baking too long!
made dough and cooked half today looks like a hockey puck, Put the other 1/2 in fridge to proof over night, think I will try adding some warm water in yeast to start it off (can’t hurt, just frustrated I can make this work) Jeanne
Ahh, sorry to hear that, Jeanne! Do you think it was due to your starter? Was the dough under or over proofed? Was the dough very cold and not given enough time to ferment?
I’m making one big loaf instead of dividing into 2. How do you recommend to adjust the baking time?
You’ll have to increase the bake time for sure. It might need close to 1 hour total, but go by the look of the crust and internal temp (should be around 204F).
153 g of starter for the no knead recipe is a lot compared the the 8 grams needed for other recipes. Is that really how much you need? Any advice on how to quickly increase the size of the starter so dramatically?
That’s not much starter at all for two loaves! Usually my recipes call for around 100 grams for one loaf. I take 25 grams of mother and feed it 115 grams of tepid water and same for flour (115 grams) to yield enough starter for this recipe with leftover. Put it in a sort of warm place to speed up the process. I’m making this bread as we speak!
As @amyvenable:disqus said, it’s not a large amount, but it does depend on the recipe!
Jess, starter and levain are pretty much the same. Either you build up your starter the day before/overnight or you make a levain before/overnight. The day before, take 10g starter and 20g flour/water. At night take THAT 50g starter and feed at least 60g flour/water or more and there you have it.
I live at 7,000 ft in Arizona – I have tried multiple time to cook sour dough and it comes out very tough and never really rises. I have not heard of using “steam” while baking – how do I do this? I am a very novice bread baker 🙂
Check out my guide to high-altitude baking 🙂
So I made this one time and it went great; the next time I made it, the dough went completely slack maybe 45 minutes into the bulk fermentation. Wasn’t holding gas or anything, basically just liquid no matter how much I folded. Do you know what I might have done wrong? Would love to fix the issue as the first loaf was wonderful!
Was the dough strong then fell apart like that? That’s a very strange thing to see, if you’re sure it didn’t get excessively warm or more water wasn’t added!
It might have gotten too warm; my kitchen gets zero direct sunlight so it can be pretty cold so I had the bread resting outside on my back porch for a while where the towel might have gotten direct sunlight. I’ll give it another go this weekend and let you know!
It went a lot better this weekend when I gave it a go! Added honey and toasted pumpkin seeds and rolled the top in white sesame seeds. Thank you for the tip!! Trying your sourdough pretzel recipe next for Oktoberfest 🙂
Fantastic to hear that, Addison! I love the idea of pumpkin seeds, in fact, I’m working on a recipe with them right now 🙂 Enjoy and thanks for coming back with an update!
I’m making this for the first time today. Super fast, easy. I like it!
Question: Will I get a good result if I increase the hydration, but follow the same method? Thinking I would increase from 65% to 80% or so…
Awesome, Dani! Regarding the hydration, go with that’s appropriate for your flour and what you’re after. You can certainly increase it if you feel the dough needs additional water!
I have tried all different recipes for sourdough bread including Maurizio’s long method. I’m finding the long retard in the refrigerator doesn’t pull out the sour flavor of the starter but the crumb isn’t as holy. Has anyone else found this happening. The temperature for the rise is 75 – 80 degrees in a bowl overnight (12 hrs) does pull the flavor out. What am I doing wrong?
The longer you ferment the dough the more sourness you’ll see in the end (up to a point). Fermenting overnight in the fridge will definitely slow fermentation, but this is a good think, we don’t want the dough to over proof. If you’re looking for more sourness in the final loaf, try adding 10% whole wheat to this recipe, use your starter when it’s very ripe (sour smelling and has fermented overnight), and do a proof in the fridge overnight. That should help!
I just completed my gentle stretch, now it’s wait time. 2 more hours of bulk fermentation, then divide and pre-shape, shape, proof, and bake. . . By my calculations, I should be baking tomorrow at 2:45pm due to the time I started today July 21, 2021. I’ll keep you posted on how it turns out.
How did it turn out, Marco?
They turned out awesome! Thanks so much Maurizio for the recipe. I’m actually baking two more this morning Aug 11, 2021 starting at 9am my time. Judging by the activity I saw during the bulk fermentation between the stretches, I’m assuming they will taste better and have some pretty good lift. My starter was very active this time around due to the triple digit weather we’re having. I’ll have to keep you posted on this bake.
So glad to hear that, Marco! Sounds like you’re right on track with these 🙂 Enjoy!
We’re already through the first loaf, my wife is addicted to it. lol Thanks again!
Thanks for this easy recipe, Maurizio! I will probably do a cold retard. In the past, I’ve sometimes noticed that the dough continued to rise in the fridge overnight. Is that OK? And does that mean there will be less oven spring?
You’re welcome, Josephine! That’s totally ok if the dough rises in the fridge, and a cold retard is no problem, especially with this recipe. You do want some rise during the dough’s proof, so that doesn’t necessarily mean there will be less rise in the end. Keep at it!
Thank you Maurizio, looking forward to trying this new recipe!
What are the tradeoffs vs the regular beginner bread? Why did you decide not to use bread flour, does it have to do with lower hydration?
In general, I prefer not to use much bread flour (high protein flour) if I can help it. It’s definitely useful in some baking situations, and especially with enriched doughs, but I prefer the texture and flavor of lower protein flours. And yes, I find with lower protein flour you have to reduce hydration to compensate—usually.
Let me know how you like it! I think this recipe is even easier than my Beginner’s Sourdough, but they’re both quite delicious in their own way 🙂
What-you step back? Inconceivable! These look wonderful and a welcome downshift for hot days.
Sometimes a hands-off approach is the best, especially when it’s 105°F here! 🙂 Once it cools, then we can get back to muti-stage builds, slap and fold, and all the other things!