
I have to warn you a bit here at the beginning: this whole wheat sourdough is a little more involved than some of my previous loaves. While I think it’s achievable for a beginner baker to experiment with, it may take a few tries before your results are to your liking. However, this should not dissuade you from attempting! Making a whole wheat loaf will provide an exciting flavor profile and added nutrients not customarily found in straight white bread.
I based this recipe on Chad Robertson’s Ode to Bourdon recipe found in his Tartine Nº3, a book dedicated to ancient and whole grains. My take on this has some slight modifications I’ve found to work well for me and my starter; I hope they help you as well.
So, I’ve been practicing this whole wheat sourdough for quite a while now trying to get things working the way I’d like. I usually mix in an experimental batch of bread here and there to keep things exciting and to speed up my learning, but this whole wheat bread has a purpose.
My wife has recently taken up the quest to remove most refined carbs, processed sugars, and other heavily processed foods from her (and subsequently my) diet. We’ve always been healthy eaters, but this is another step further in trying to keep things simple and use the most basic of ingredients possible. Since I make two loaves of bread every two weeks or so, I’ve decided to mix in a whole wheat version with as much whole grains as I can (there is still room for me to add even more whole grains in the future) this turns out not to be as easy as one would think!
Whole wheat sourdough bread is an entirely different beast when it comes to baking. Many of the plastic-bagged-breads you’ll find at the store that is “whole wheat” contain a bunch of additives to get it to rise high and taste sweet. Who wants all that added junk anyways? Let’s make our whole wheat bread.
Maybe I should start with a brief background on whole wheat flour, some challenges to overcome, and how it differs from white flour.
Whole Wheat Flour, What’s the Big Deal?
The word “whole” refers to the fact that all of the grain (bran, germ, and endosperm) is used and nothing is lost in the process of making the flour. This is in contrast to white, refined flours, which contain only the endosperm.
Wikipedia
Whole wheat flour retains the bran and germ, the two most nutritious parts of the wheatberry. These two, while desired for higher nutrition, causes issues when baking bread. Namely, when doing turns and working your dough, they will cut through your developed gluten strands as you’re doing your turns, weakening the loaf and preventing a higher rise during baking. It’s ok though; we can work around this somewhat with a very gentle hand when doing turns and interacting with the dough.
In addition to these troublemakers reducing overall rise, they also absorb much more water than just the endosperm. We’ll have to compensate for this by increasing the overall hydration of the dough.
One more thing to keep in mind: whole wheat flour ferments much faster than white flour. Due to the increased nutrients (bran & germ) your starter will go into overdrive when fed with so many goodies. Keep an eye out during your bulk fermentation step; things can go too far very fast. If you’re using a clear-sided container be on the lookout for those bubbles on the sides and bottom, they are a good indicator of when fermentation is rapidly increasing.
So in review:
- the bran and germ will effectively cut through your developed gluten strands, so be gentle with turns and shaping
- the bran and germ absorb more water than the endosperm; we’ll likely need to increase hydration
- whole wheat flour increases fermentation activity
Let’s get baking this whole wheat sourdough bread!
Prepare the levain – 10:00 p.m. (night before)
A slight modification to my regular 100% whole wheat levain, I do a 50/50 mix of all-purpose and whole wheat here to more closely follow Chad’s recommendations in his new book.
| Weight | Ingredient | Baker’s Percentage |
|---|---|---|
| 40g | Mature sourdough starter (100% hydration) | 50% |
| 40g | Whole wheat flour | 50% |
| 40g | All-purpose flour (medium-protein bread flour) | 50% |
| 80g | Water | 100% |
After mixing the above in a glass container, cover and set in a slightly warm area in your kitchen overnight.
Autolyse – 6:45 a.m.
Ingredients:
A few new things I’ve added to this whole wheat sourdough bread that are different from my previous entries: wheat germ and high extraction flour.
Wheat germ is a part of the wheat berry that contains a high amount of essential nutrients (Vitamin E, folate, zinc, etc.) and is an excellent source of added fiber. I’ve experimented with using wheat germ in the past and have had great success with increased fermentation (remember my comment about more nutrients for your yeast to consume?). I honestly think this recipe would do just fine without it if you don’t have it on hand.
If you buy wheat germ in bulk, remember to keep it refrigerated for long periods. It can go rancid much faster than other flour.
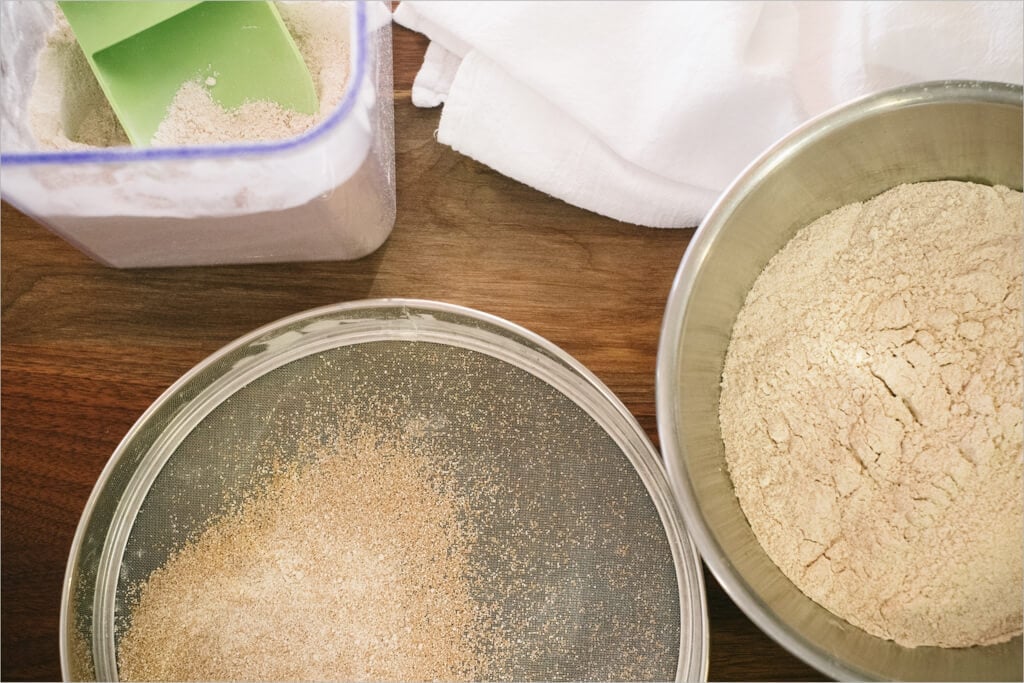
High extraction flour is easy for you to make at home; you only need one piece of equipment: a flour sifter. This sifter is the one I use, but there are many out there. The process for making high extraction flour is easy, pour some of your whole wheat flour on top of the sifter and shake so the fine particles drop down through the mesh while some of the more coarse bran stays on top. In Chad’s book, he doesn’t quite explain why he uses this high extraction flour in all of his recipes, but I can guess that it’s to remove the more intense bran pieces to prevent the severe cutting of any developed gluten.
The astute reader might say to themselves: “hey, you made a big deal about retaining all the essential nutrients in whole wheat flour, now you’re removing all of the bran from this whole wheat sourdough bread!” Well, I suppose that statement does hold some merit. However, keep in mind we are not removing all of the bran, just the huge particles. With this high extraction flour, you’re going to be somewhere between whole wheat (100% of the wheatberry retained) and sifted white flour (only the endosperm). So, in the end, this bread will have significantly more nutrition than 100% white bread, especially since the wheat germ is added as an ingredient.
With that out of the way, let’s see the full ingredient list:
| Weight | Ingredient | Baker’s Percentage |
|---|---|---|
| 200g | Levain | 20% |
| 250g | All-purpose flour (Sangre de Cristo white flour) | 25% |
| 250g | Whole wheat flour (Bob’s Red Mill whole wheat flour) | 25% |
| 500g | High Extraction Bob’s Red Mill whole wheat flour | 50% |
| 50g | Wheat Germ | 5% |
| 19g | Salt | 1.9% |
| 950g | Water | 95% |
In addition to ingredient changes, we’re going to change up the method just a tad. The normal autolyse time of 30-45 minutes is about to be increased on you to a full 2 hours. Increasing the autolyse time helps to soften and add extensibility to your dough, which is very important with whole wheat bread. If you were to do a short autolyse time of, say, 30 minutes, you’d notice the dough would be tough to mix and turn. It’s super elastic, meaning it springs back when you stretch it out. You want it to be more extensible (meaning it stretches out without too much resistance without tearing), so you get a higher rise at bake time. Check out my full guide to the autolyse technique for more on its benefits.
The best way to plan for this extended autolyse is to simply do your mixing for it 2 hours before you know your starter will be ready. For me, I mixed up my flour and water for the autolyse at 6:45 a.m. and it was ready by 8:45 a.m. when my starter is ripe and ready to go.
Two-Hour Autolyse:
- Create your 500g high extraction flour by sifting your whole wheat flour. The flour that falls through the sifter is what you’ll use now, the coarse bran that remains on the top can be reserved and used to coat your bannetons to prevent sticking instead of using white rice flour
- Add 850g water to your mixing bowl
- Add in 500g high extraction flour, 250g white bread flour, 250g whole wheat flour, and 50g wheat germ
- Mix until all the dry flour is incorporated
- Cover with plastic wrap and keep the bowl covered in a warmish place in your kitchen
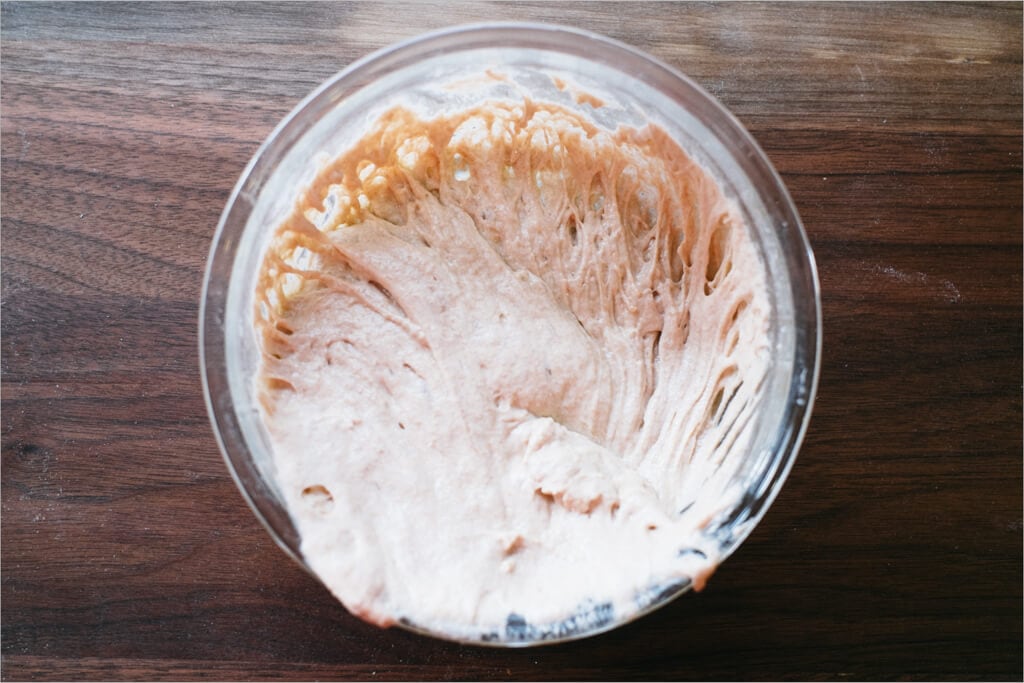
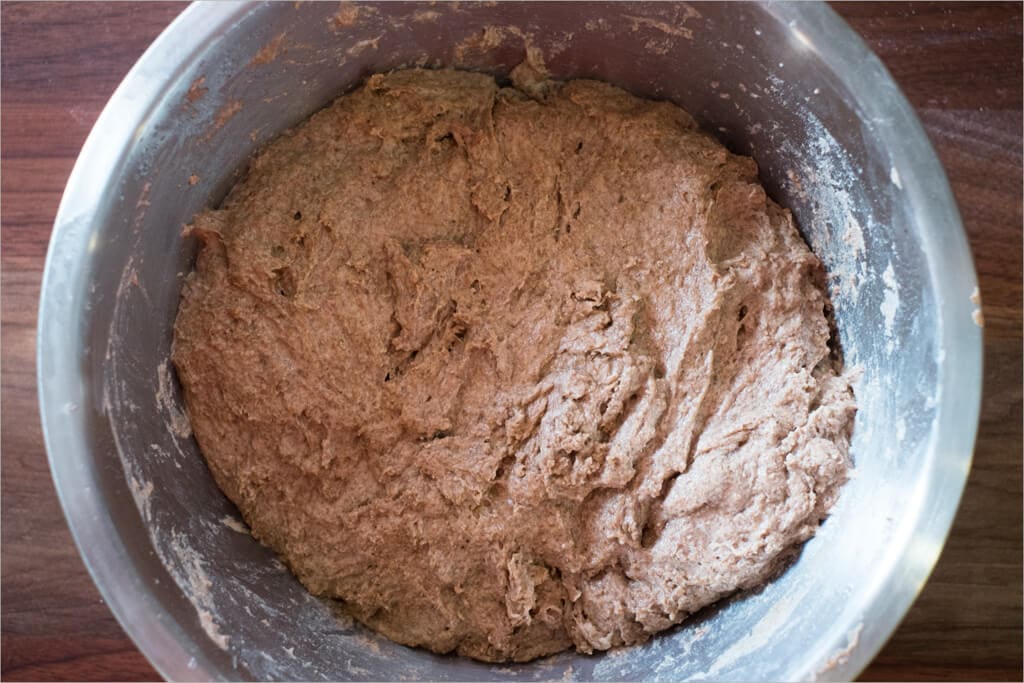
Again, for such a long autolyse you do not want to add anything except flour and water. And a shot of the dough after the two hour autolyse:
After two hours, unwrap and add:
Dough Mix:
Final dough temperature: 76°F (24°C)
- 200g levain
- 18g sea salt
- Pour on the remaining 100g of water
- Mix with your hand until the mass becomes a bit “sticky” and water is worked in
- Transfer to your bulk fermentation container
My final dough temperature was a little on the cool side, but not drastically so. This might mean a longer bulk fermentation, but we’ll have to read the dough and adjust.
Bulk Fermentation – 8:45 a.m.
As I mentioned at the beginning of this whole wheat sourdough post, we want to stretch and fold very gently to avoid tearing the dough.
- 9:15 a.m. – Turn Set 1
- 9:45 a.m. – Turn Set 2
- 10:15 a.m. – Turn Set 3
- 10:45 a.m. – Turn Set 4
- 11:15 a.m. – Turn Set 5 (very light set of turns)
- 11:15 a.m. – 1:00 p.m. – Rest on counter untouched
Note that a “set” here is four stretch and folds, one at each cardinal direction. I reach under my dough, pull up, and fold over the other side. I do that four times. For this loaf in step 6, I only did three very light turns, the dough was strong enough, and I did not want to risk tearing.
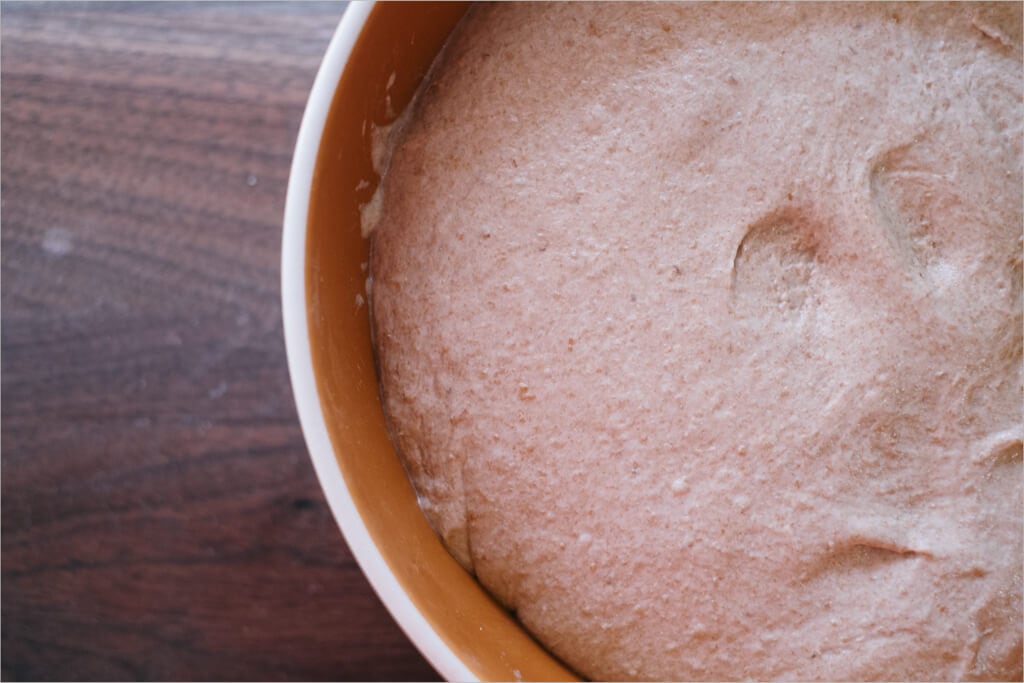
Here’s a snapshot during the bulk with a couple more folds to go:

By the end of bulk fermentation, the dough looked a little puffy and jiggly in the bowl. You won’t see as much puff as you would with white bread, but the dough should not look like it’s completely flat in there. You want a little rise in the center, or in other words, it holds its shape more than when you started.
As you can see below there is some life to it:
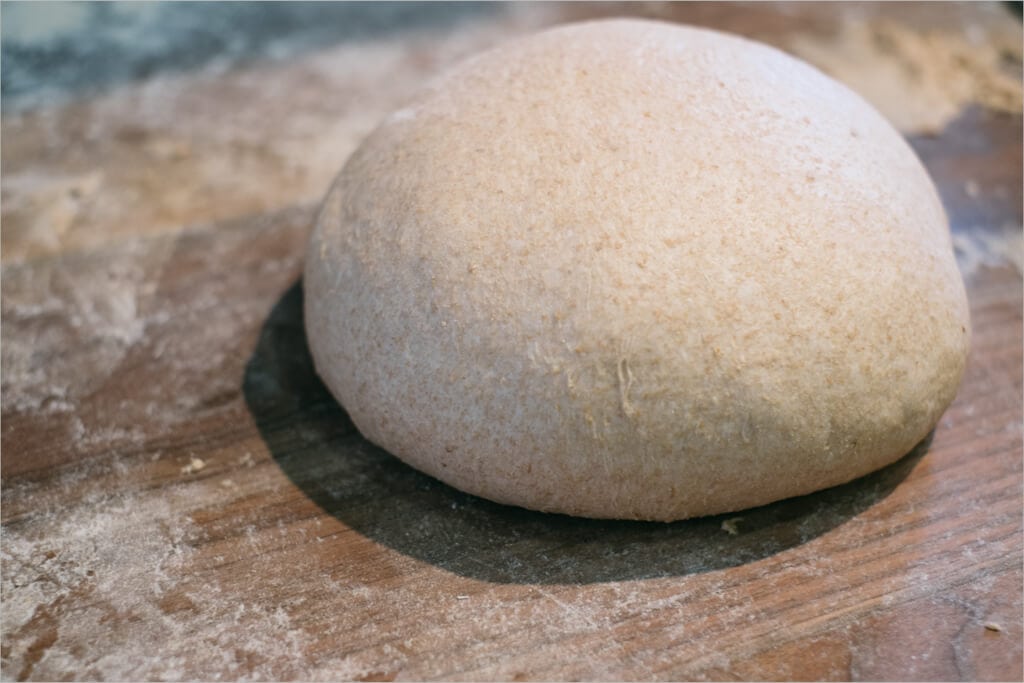
Pre-shape – 1:10 p.m.
Take the dough out of the container onto your work surface and sprinkle some flour on top before dividing. Divide the mass into two halves and lightly spin each half with your dough knife in one hand and your other hand to create some light tension on the top of the rounds. Let this pre-shape rest for 20 minutes.
Lightly dust your two linen-lined bowls with the bran you’ve reserved when creating your high extraction flour. Alternatively, you can use white rice flour.
Shape – 1:30 p.m.
I decided to do both whole wheat sourdough loaves as boules for this recipe. Creating a boule for me is much more straightforward and I didn’t want to handle the dough too much. I’d recommend you take this course as well.
Make sure to create a nice taut surface on your boules to ensure they have that desired oven spring. You don’t want to overwork them and press out all the gasses, but you should have a nice tight skin on the outside. Practice here is key.
Have a look at my guide to shaping a boule for more pictures and instruction.
Proof – 1:45 p.m.
After you’ve shaped them into nice taut boules, gently place them into their bannetons and pop ’em in the fridge for their proof.
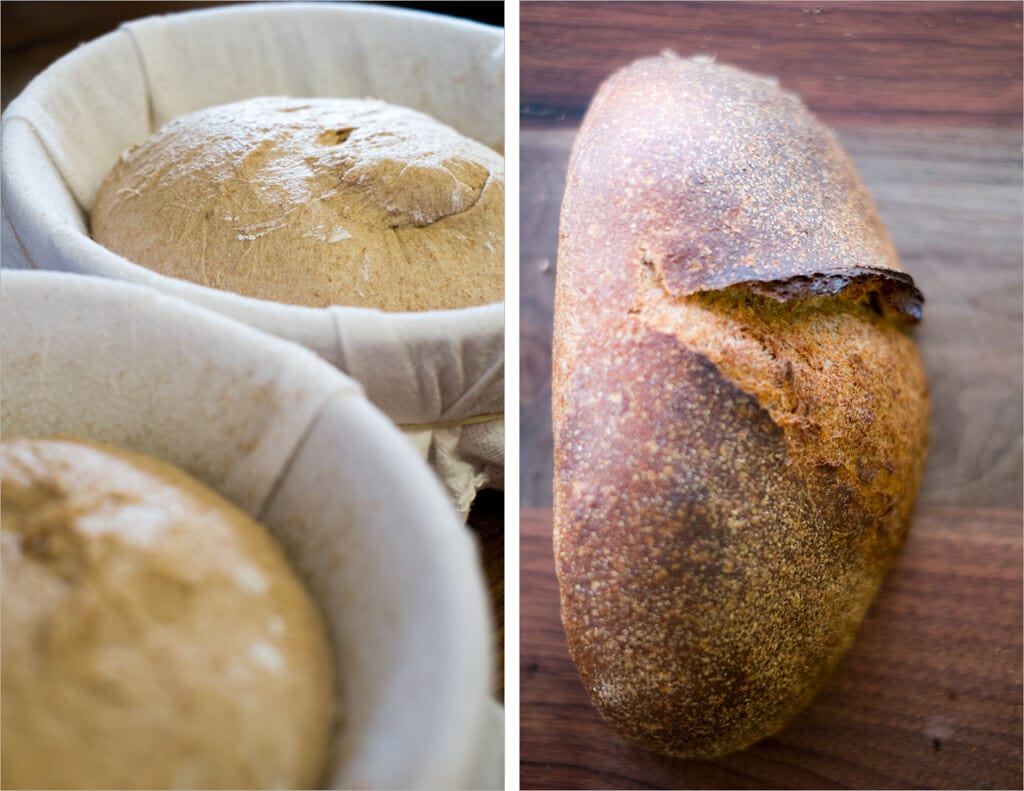
Score + Bake – 7:30 p.m. (the SAME day, at night)
So normally, I would have tossed the boules into the fridge and gone about my business, knowing they wouldn’t be ready until the morning. We’ll keep in mind what I said up above that whole wheat flour ferments at a rapid pace. To ensure I did not overproof my dough, I performed the “poke test” several times throughout the day and evening. At about 6:30 p.m. I noticed the loaves looked ready to go; the finger poke sprung back slowly and did not fill in. Bake time!
Preheat your oven to 450°F (230°C). I baked following my guide to baking with a Dutch oven (or combo cooker).
After one hour, take one of your loaves out of the fridge and cut a piece of parchment paper to place on top of the basket containing the dough. Take your peel and then put it on top of those two and quickly invert it so the dough is now resting on the parchment paper and the peel.
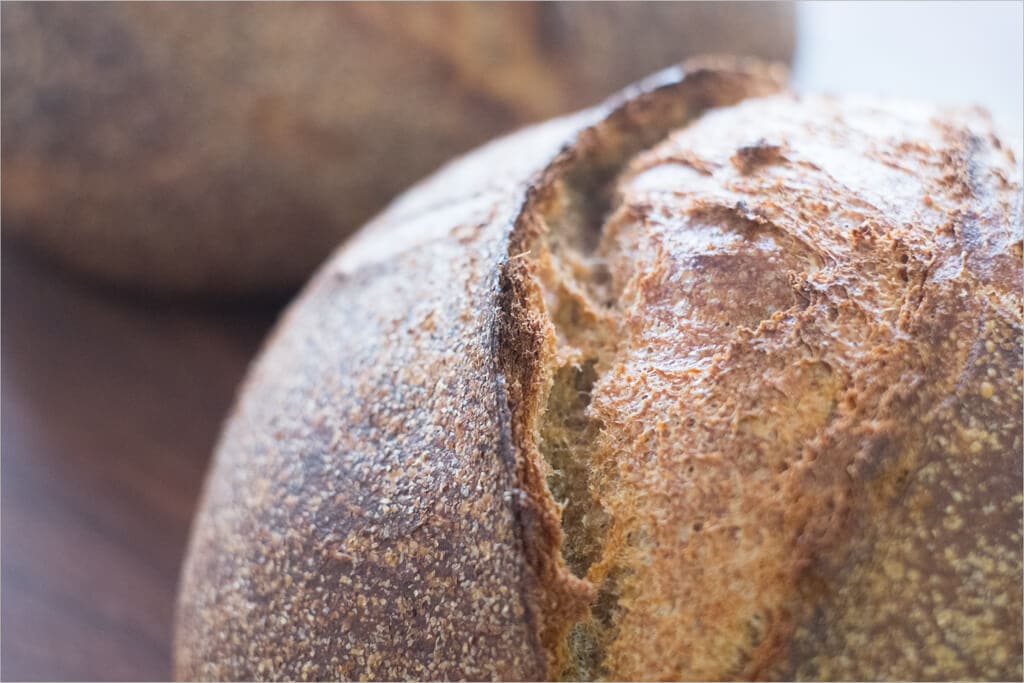
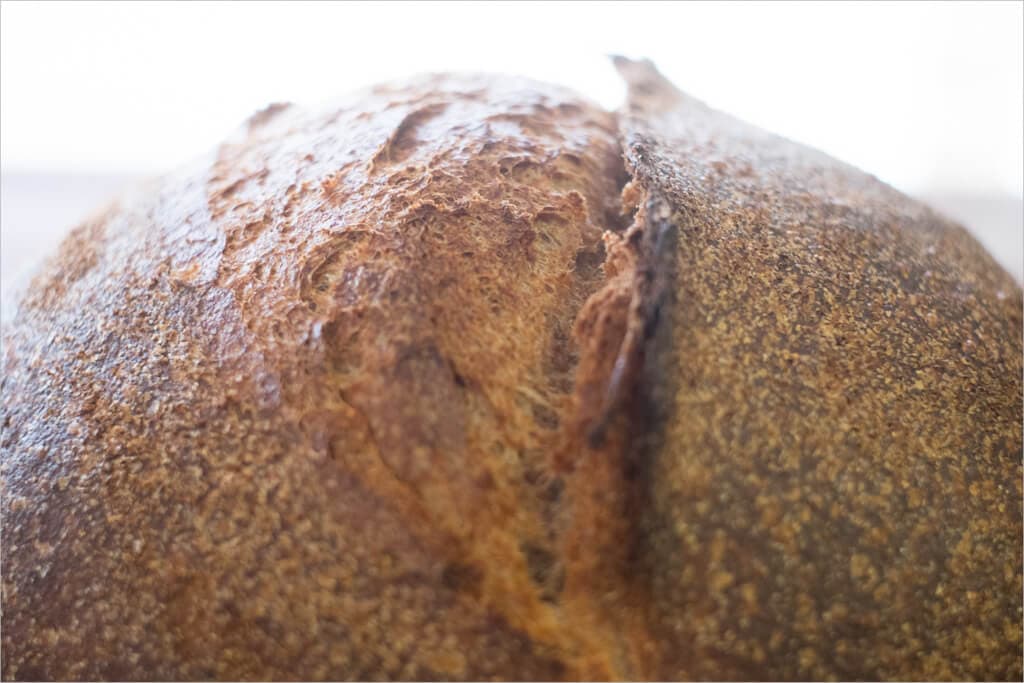
When scoring these whole wheat loaves, don’t go too deep! Since there is less rise than with white bread, you want to score lighter than you normally would so you can coax out a bit more rise while still guiding the loaf in the direction you want. On one loaf I did a very light “X” shape and the other my usual crescent slash. Both came out very nice.
Place the dough into the combo cooker, cover with the lid, and bake for 30 minutes at 450°F. After this time, take the lid off the combo cooker and bake for an additional 30 minutes until done. Let the loaves cool on a wire rack until fully set, 1-2 hours (see my guide to storing bread for why).
Conclusion
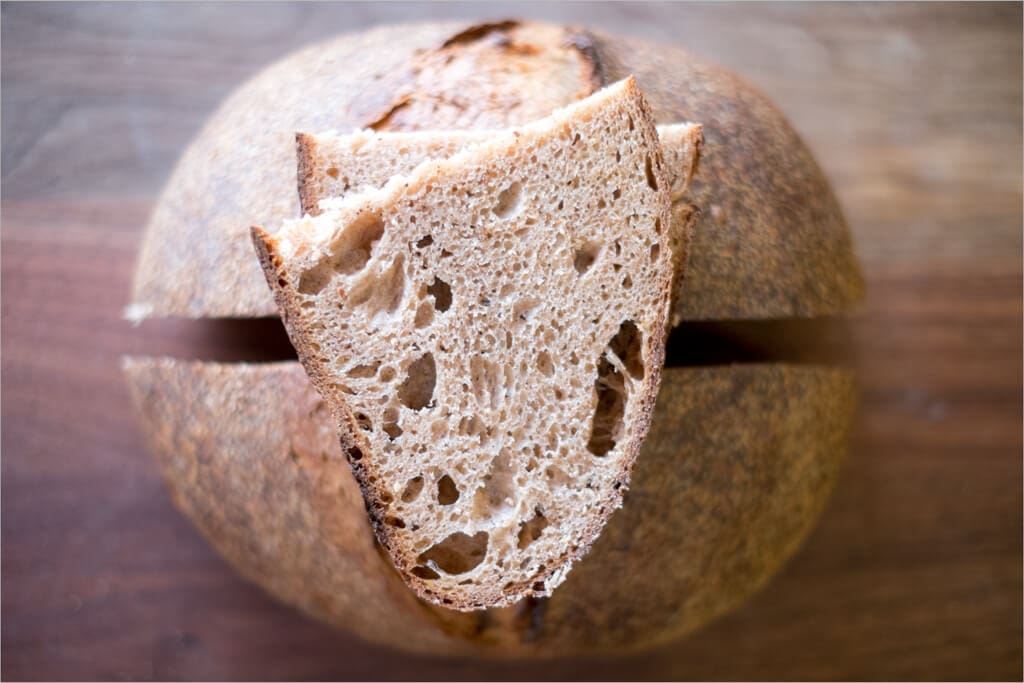
I was not expecting such a nice rise from these whole wheat sourdough loaves. I mean, really, I was totally shocked and very pleased. I have baked many whole wheat loaves that have come out a little on the flat side and these just made my day. The taste is just sublime! Such a complex flavor with a hint of sourness at the back. I’ve definitely found a whole wheat recipe that’s so good it will be my main go-to recipe for my family’s weekly whole wheat sourdough loaves.
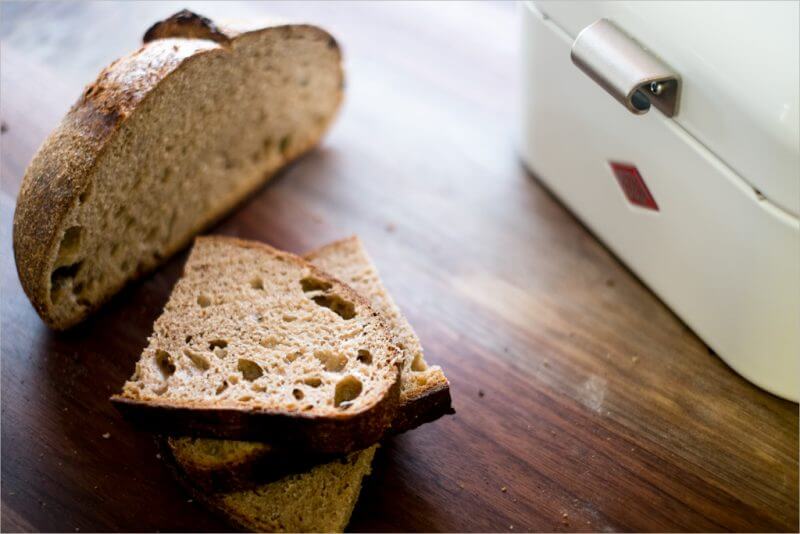
Crust
Nice and thin and very soft. The coloring is just great and the cracks and fissures are much more than I had expected. It’s not overly hard rustic like my country loaf, perfect for sandwiches and cheese plates.
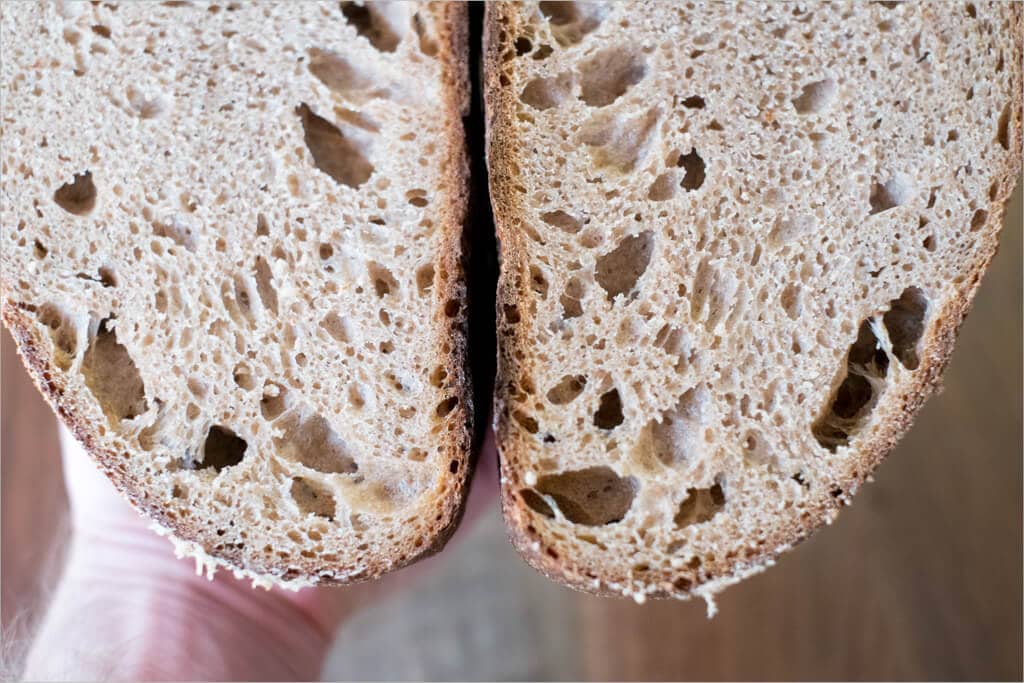
Crumb
Nice and soft with a good spring to it. The crumb could definitely be lighter, more moist, and a little more open. I’ll continue to work on this in future bakes with better shaping and tweaks to the ingredient list. This crumb is just perfect for sandwiches.
Taste
So tasty guys, really, it’s very good. This is a great departure from my normal country loaves and really mixes things up. The complex taste of the whole wheat brings something to this loaf I’m not used to after baking white bread for so long. Now I’m going to have to bake 4 loaves every two weeks just so I have both options at each meal…
After much practice, I’m finally headed in the right direction with this whole wheat sourdough bread. In future bakes I’ll try to open the crumb up more to obtain a lighter loaf, play with varying autolyse times, and I also would like to try using hard white wheat instead of red wheat to see the effects on flavor and even texture.
Buon appetito!
If you use this recipe, tag @maurizio on Instagram so I can take a look!