
Steam burns hurt. Like, really hurt. The small mark on my left forearm begs the question daily: Maurizio, was it worth it? But before we talk about my new baking badge of honor, let’s concentrate on overcoming the challenges of baking good bread at home. While many of these challenges present themselves early in the two-day process (fermentation, flour selection, mixing, shaping, and so on), there is that crucial component at the end of this ordered procession: baking bread with steam in your home oven.
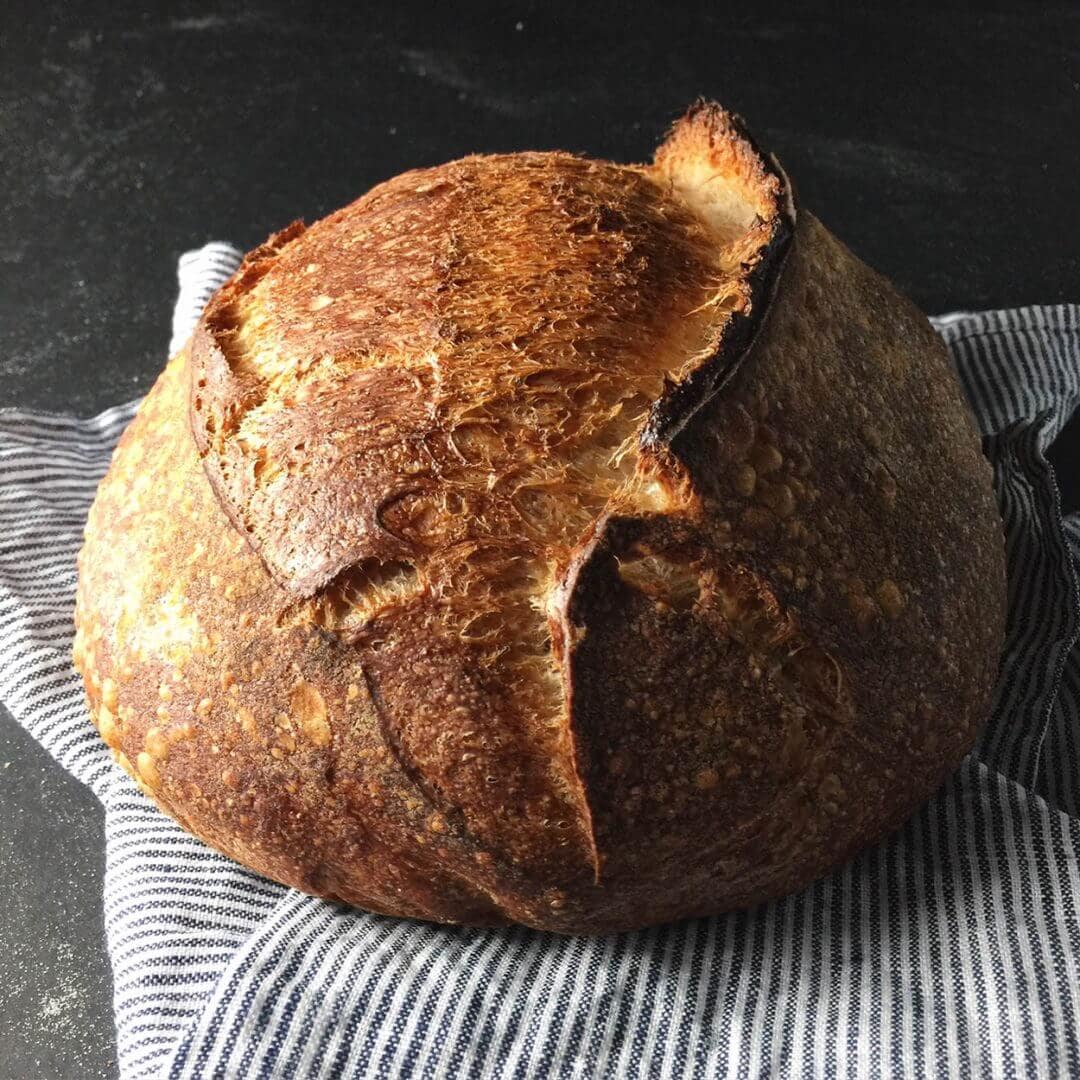
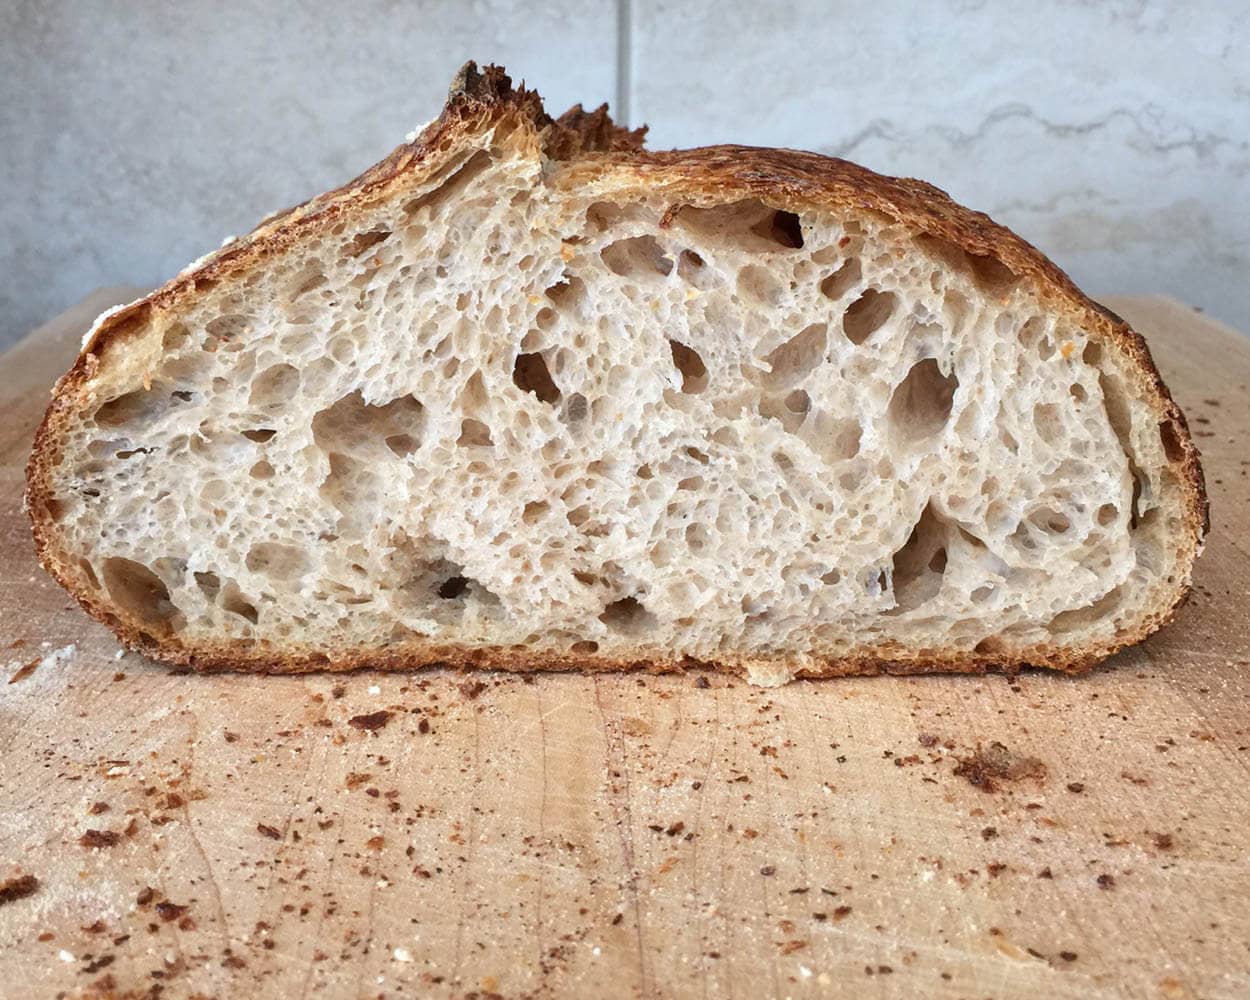
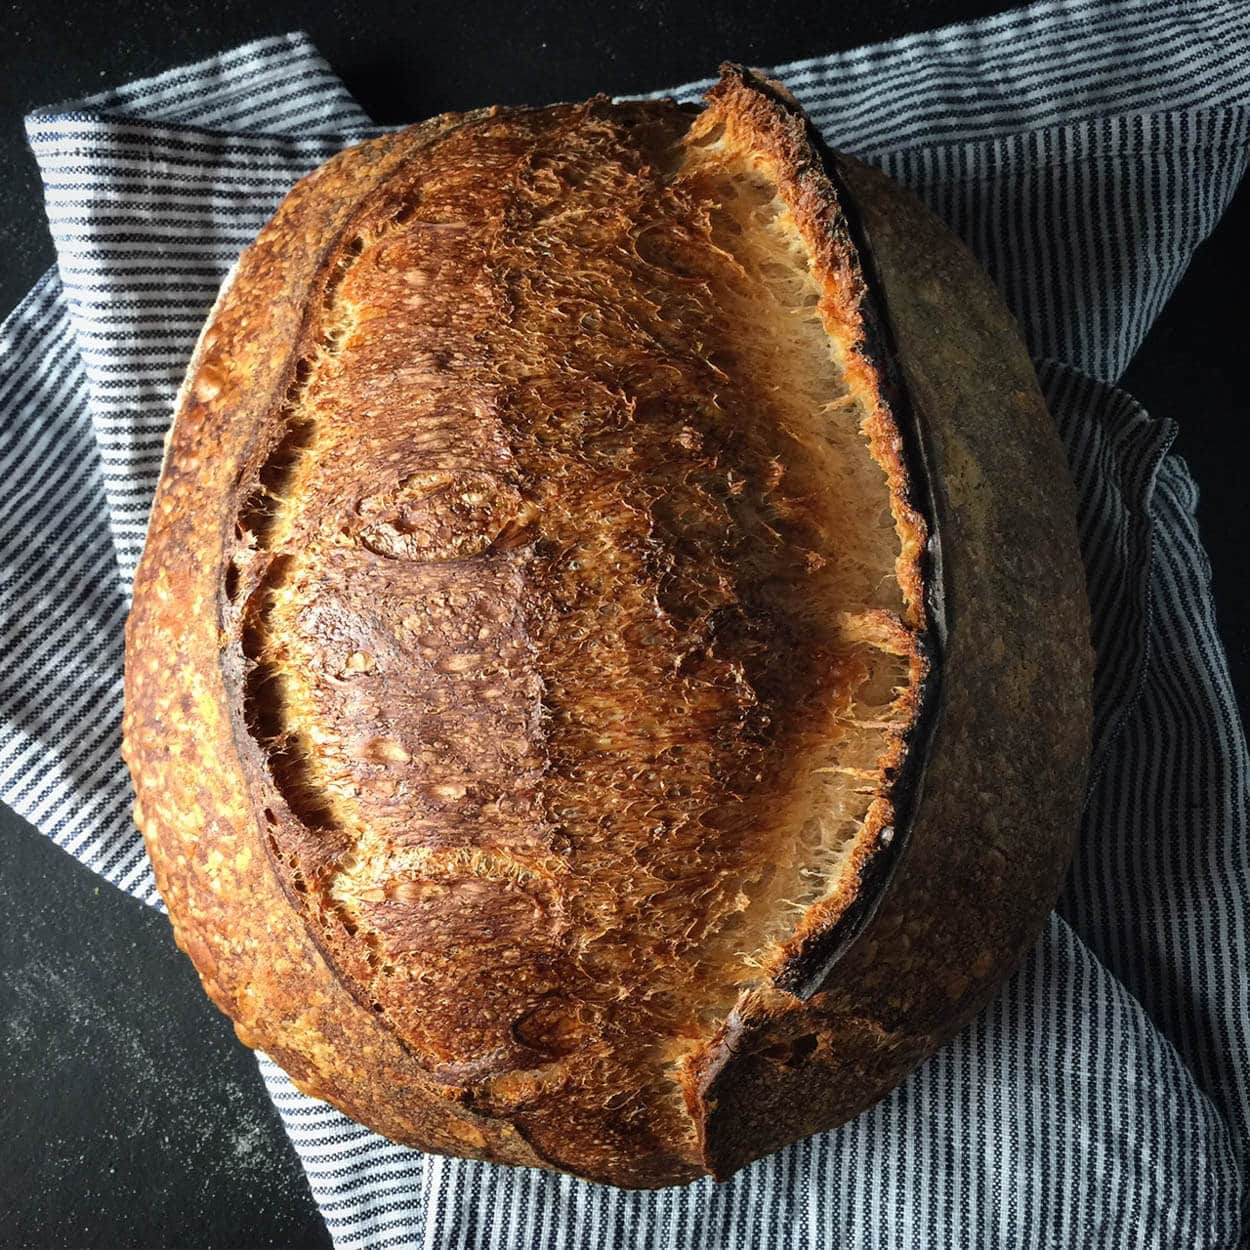
For your bread to rise to its potential, that outer, taut skin on your loaf needs to be able to expand and stretch before hardening off. Steam in the oven and subsequently on the surface of your loaves helps keep that skin pliable and stretchy during baking. If your dough dries and bakes too quickly on the exterior, it can harden off before it rises to its full potential (and you may not see a satisfying gringe, either).
So how can we get enough steam in the oven to keep those loaves rising? There are indeed methods abound, and each person has a different approach, but arguably the most popular choice at the moment, and the one I started with, is baking bread in a Dutch oven (see my guide on how to bake bread in a Dutch oven if you’re not familiar). However, there comes a time when you might want to bake two (or more) loaves at a time, or perhaps your loaves are scaled more substantial than your Dutch oven can comfortably hold. An alternative is to bake directly on stones and generate sufficient steam in your home oven by some other clever means.
Professional baking ovens have steam on tap. Press a button, and a wave of steam sprays over the decks of newly loaded dough (however, there are always challenges, no matter what oven you use). Now there are home ovens that are “steam ovens,” but the ones I’ve looked at are incredibly small. You might be able to fit two loaves, but I could also fit two Dutch ovens in my current home oven; no advantage there. Some other alternatives can’t inject steam at a button press, but they are sealed to trap steam and have a method for generating steam. These look very promising but are on the expensive side.
Since most of us bakers out there do not have one of these fancy ovens, we have to make do—read on to learn how baking bread with steam in your home oven can be a straightforward process.
Video on baking bread with steam
In the video below, you’ll see my baking bread with steam from start to finish.
Baking Steam Method
The following does take a bit of practice. First, ensure you get all your tools ready and within reach; this is a rather hectic process, and you want to do it almost without thought — muscle memory. The longer your oven door is open, the more heat will escape. Your thick baking stones or a baking steel (which is also awesome for sourdough pizza!) will help offset some of the loss, but you still want to act quickly.
Below is a quick visual showing where I have my pans, where the loaded dough goes, and where my baking stones are.
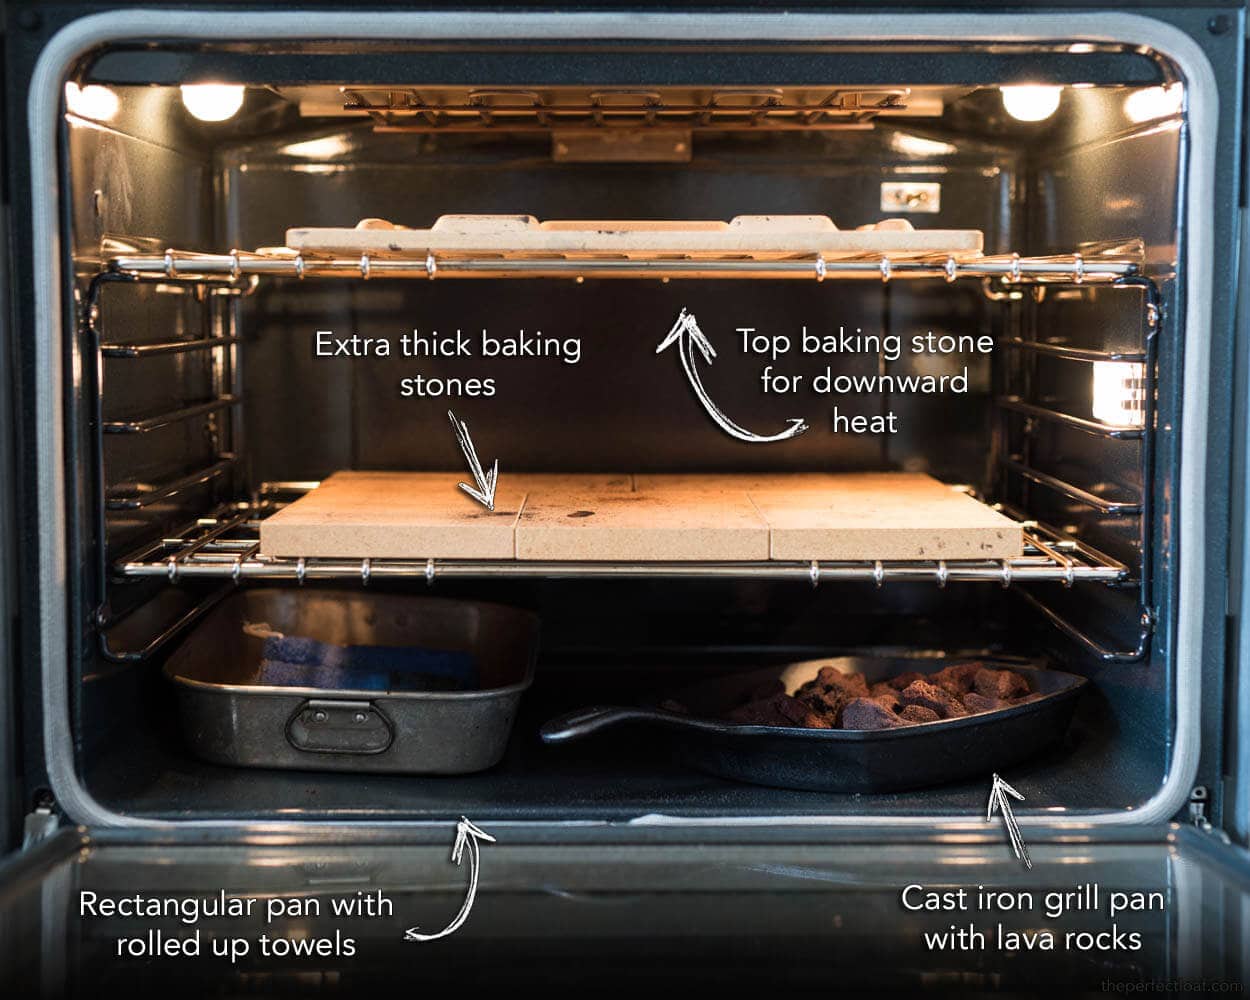
Now that we have a list of what things we need, where items will be placed, and why, let’s get to the actual method (with the animated version below!).
Home oven steaming method
- An hour before baking, turn on your oven (preheat)
- 10-20 minutes before loading your bread, boil water, pour over the towels in your rectangular baking pan, fully saturate them, and place them in the back corner of your oven
- 10-20 minutes after loading the pan, put each mass of dough on a separate piece of parchment paper
- Place the dough and parchment underneath on a pizza peel
- Score dough
- Open the oven and slide the dough (with parchment) onto baking stones
- Quickly lay a towel on the oven door glass (optional; you can see me doing this below). I’ve read that cold water dropped onto a hot oven glass door will shatter the glass, thus the towel. I have dropped some water on the oven door without any ill effect, but I do this to be safe.
- Carefully toss 1 cup of ice into your cast iron pan with lava rocks
- Quickly spray loaves a bit with a hand spritzer (optional)
- Close the oven door and watch your dough rise
- 20 minutes later, remove both steaming pans (careful these are extremely hot) to stop steaming
- Bake as usual until done
Whew, that’s it! Here is the whole process (minus the preheating and drenching of towels) in one trendy baking-with-steam GIF:
Why do we use two sheets of parchment paper for our dough? When you use two sheets, you can adjust the space between the loaves as they bake, if necessary. One of the worst things to happen is when the dough expands and joins with another loaf; this reduces the overall rise of both loaves. If you notice the loaves start to get a bit close as they rise, quickly slide them apart.
After 20 minutes of baking, we remove the cast iron and rectangular baking pan, so no more steam is generated, allowing your loaves to crisp up and harden off.
Caution: Please be careful with this method: if you drop too much cold water on your oven door, you might crack the glass. I have never had this happen to me, but I know of at least one baker who had this issue. Be sure to keep the water off the glass.
Another approach to baking bread with steam
Baking bread in a sealed post is possibly the easiest method of baking bread with steam at home. You place your dough in a preheated pot, close the lid, and put that in your oven.
That method works incredibly well, but the drawback is you can only bake round loaves this way. You’re limited to the realm of round pots.
If you’d like to keep using a Dutch oven, see my post on how to avoid burning your loaves →
Tools for Steaming Home Oven
We first need to have the right set of tools for the job. Let’s go over a few more additions to our home-baking arsenal:
Lava rocks
The first is a cast-iron pan filled with lava rocks. Other materials will work just as well here: (clean) nuts and bolts, a metal chain, or any other heat-retentive material that will increase surface area. Keep in mind whatever the material needs to be able to withstand around 525ºF and water splashed onto it.
Lava rocks are a primo choice because they get extremely hot, don’t break down easily, and have tons of jagged sides and crevices for an incredible increase in surface area. What’s the big deal about surface area? As cooler water comes into contact with a blisteringly hot surface, it instantly turns to steam. The more hot surface area you have, the more steam you generate. I found these lava rocks, specifically made for home BBQ grills, and they have turned out to be a perfect choice. They come in a fairly large bag, and I am still on my first handful — I probably have lava rocks for life.
Roasting pan
The second component is the heavy-duty stainless steel pan I use to hold the lava rocks. This stainless steel pan is great for a few reasons: it’s super thick-walled, retains heat well, and holds up to abuse.
Rectangular baking pan
The last component is an old rectangular baking pan with small dish towels rolled tightly. I use an old pan around the kitchen and roll up three small towels in the center. The more towels you add, the more steam you’ll generate. I use cheap, clean towels as these will eventually get scorched and need replacing.

Ten to twenty minutes before you start baking, you will boil some water and pour it over the towels in the rectangular pan, so they are fully drenched and steaming. You will then place this pan with towels back inside your oven. This pan will saturate the interior with steam before you even splash water on the lava rocks and will continue to do so well into the bake.
Optional Hand Spritzer
The final item is optional. A stainless steel hand spray bottle I use to spray in a bit more steam just before closing the oven door. I like to have the option to spray in a bit more steam if I feel it is warranted. Additionally, you could use this after 5-10 minutes into baking to quickly saturate the oven inside one more time. Some bakers, like Jeffrey Hamelman in Bread, recommend this second round of steaming in a home oven.
Not many new tools are needed, and if you think about it over the long run, you will probably save money as now we can bake 2-4 loaves at a time — no more wasting all that space in the hot oven. How do we do this now that we have the tool requirements squared away?
Conclusion
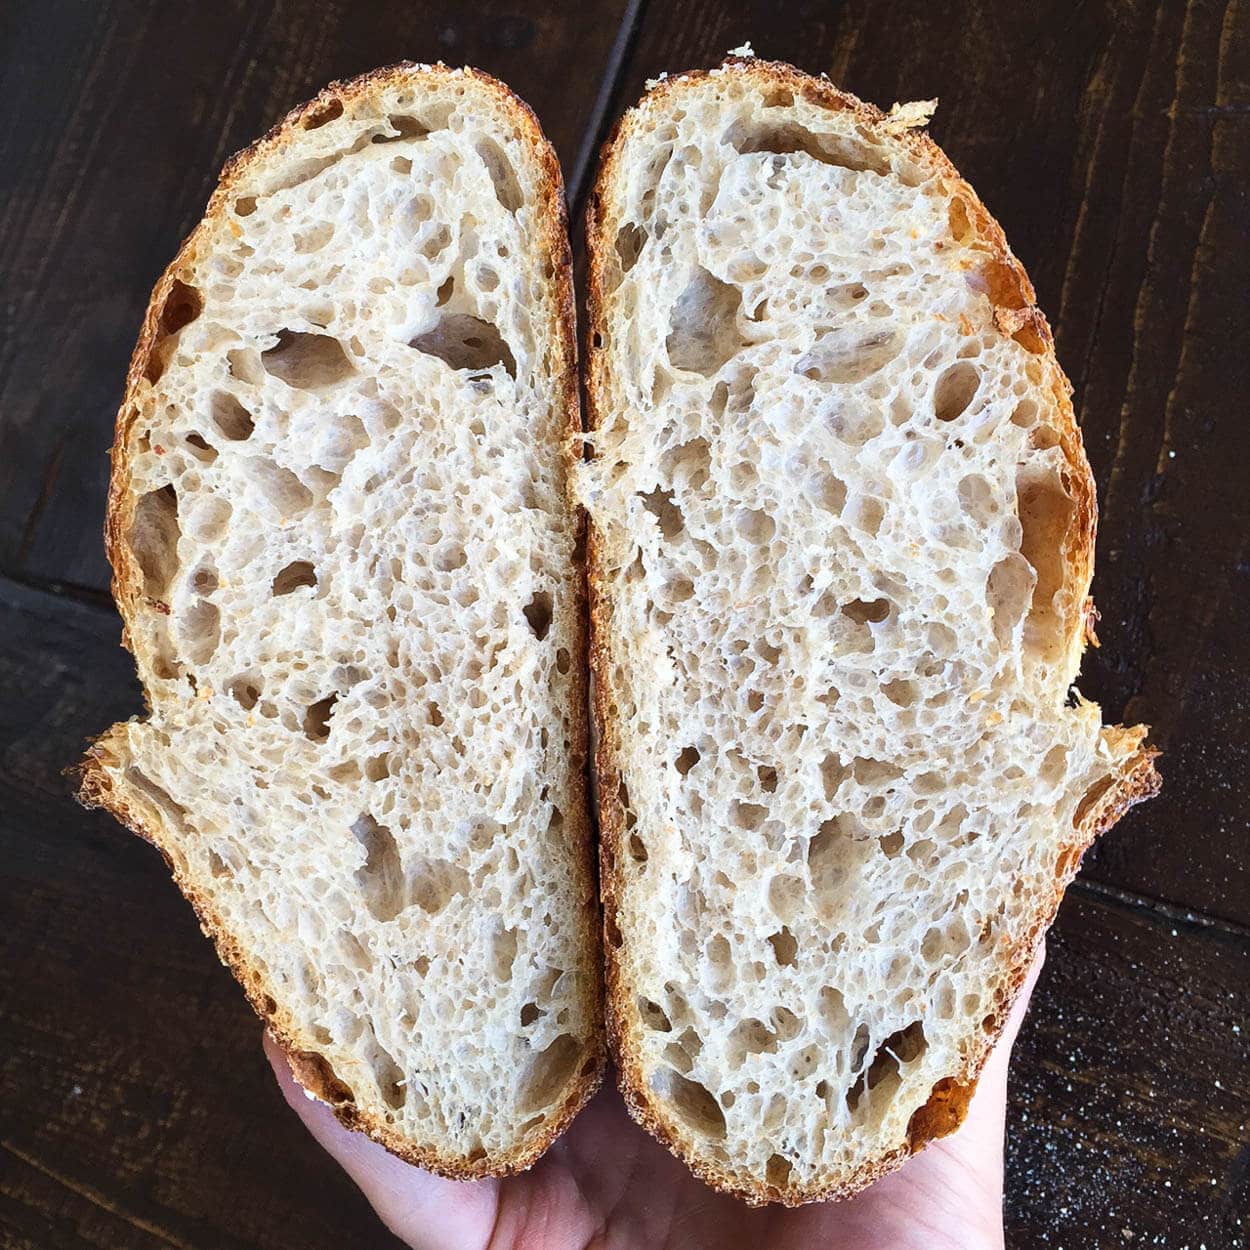
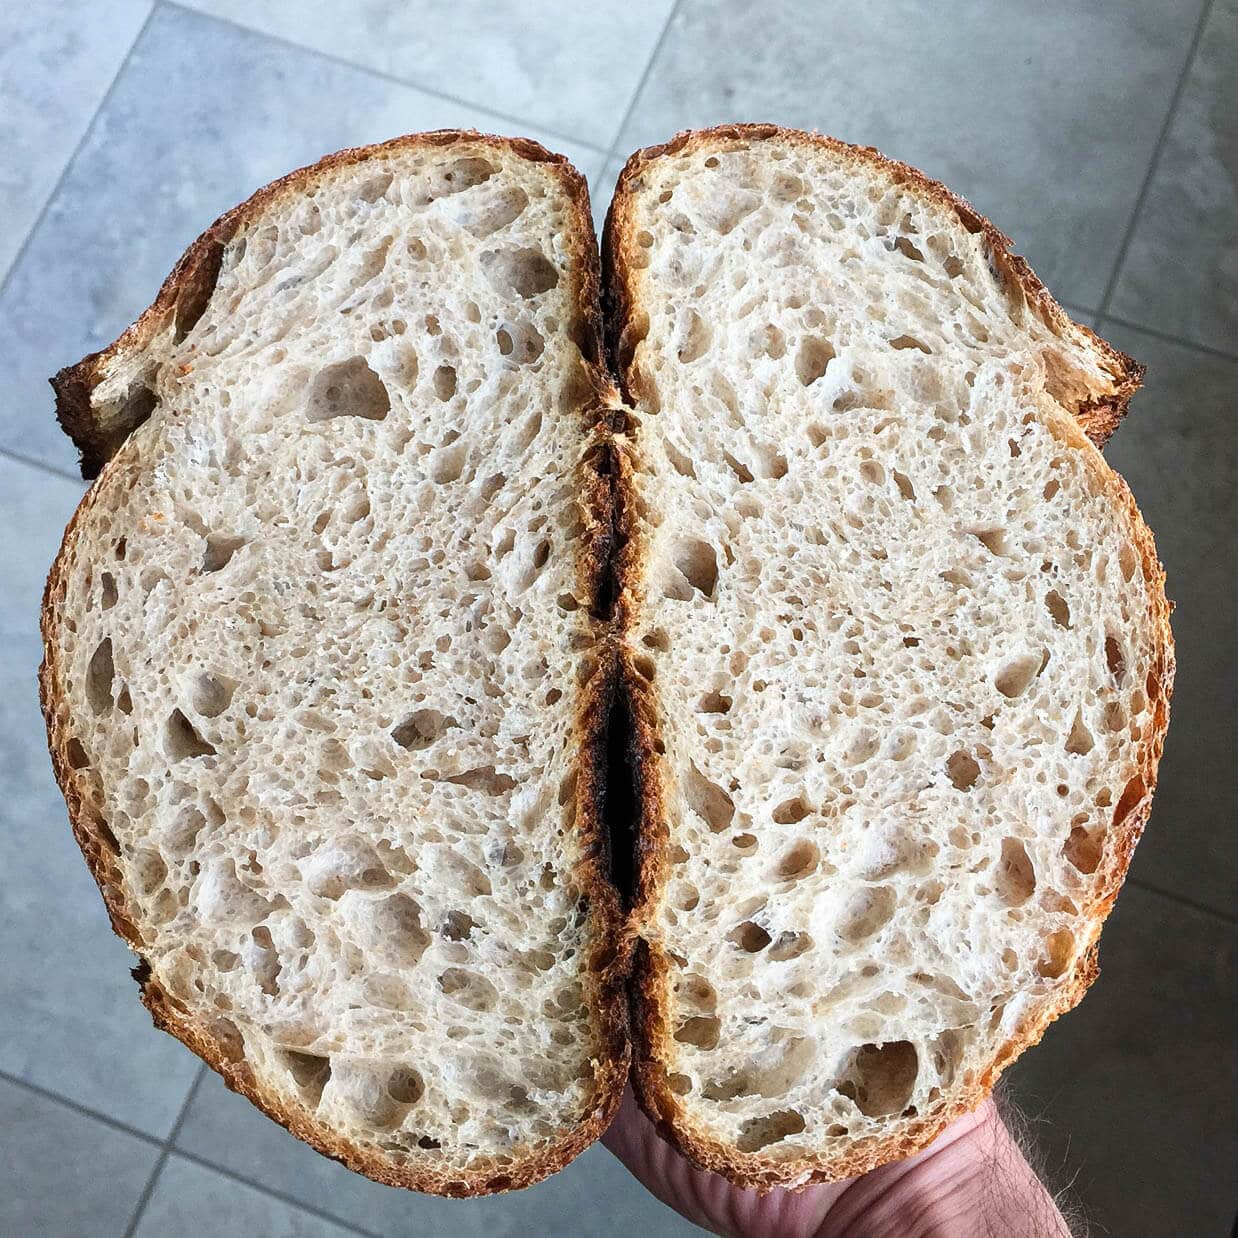
I like this method for baking bread with steam in my home oven because it allows me to cook two large loaves of bread at a time. I plan to bake four loaves at a time, and this will let me do that with no problem. Baking with a Dutch oven (or combo cooker) works exceptionally well, and I might still use that method if doing only a single loaf or a highly hydrated one (the pan will help keep the dough together). Still, I find myself using this new method more and more. The results have come out smashingly.
Small steam burns: worth it (as you can see below).
What’s Next?
Be sure to check out my full guide to baking bread at home for more details on this important step!


423 Comments
Nope, I haven’t had any issues with this at all, my cast iron pan has undergone countless bakes without cracking. If you’re super concerned, you could also use disposable tin foil roasting pans (be sure they’re oven safe) and just place the lava rocks in there — the rocks should retain sufficient heat to generate ample steam. Then when the foil pan inevitably gets beaten up too much, drop in a new one.
I recently moved and want to try streaming my oven but I have an electric oven with coils on the bottom. Do you have any suggestions for how to steam my new oven?
You can always go the Dutch oven route (which works very well)! I don’t have a lot of experience in using an oven with exposed coils, but I would imagine this method would still work pretty well. Place a rack just above the heating element and use that rack to hold the bottom pans.
When do the lava rocks go in? I would have thought when you start pre heating the oven but the steps you outlined above only talks about pouring water over the rocks after the dough goes into the oven. Would the rocks be hot by then?
That’s right, slide the rocks in right when you start preheating your oven. I’ll make sure this is more clear in the post!
i just slop 1 1/2 cups of water on river run taws @ 1 1/2″ diameter in throw away baking pan on the floor of my gas oven when i load my loaves or bolillios, a cup of ice before i start and another about 10 minutes in. works well! definitely holding steam for >10 minutes.
Sounds like a great approach!
Dear Maurizio,
I am a beginner baker and as such I enjoy reading your posts. I have already assembled all the things necessary to bake using steam. However, I am unsure which heat function should i use, my oven comes with 6 heating function and I am assuming you are using the bottom and top heat ?
I hope you could clarify on this matter.
Thanks !
Regards,
Faris Zaini
Faris — I’d try first with both top and bottom, then switch to bottom if you find the tops of your loaves coloring too fast. My oven does have both, but they are not exposed heating elements so it’s a very uniform bake. Hope this helps!
I’m new to steam, but I’ve been baking boules for a year in a dutch oven. Now I want to bake batards but they are too long to fit.
However, I recently bought a length of silicone tubing to pressure check my espresso machine; it wouldn’t be too difficult to reach over to the oven to inject a burst of steam. I’m willing to try and report results. Do you think it will work, and if so, can you suggest a protocol? (and now I just read the thread below…)
Hi Michael, not sure how much I can offer in the area you asked as I am still in a very steep learning curve with using straight steam injection into my domestic oven. I baked on the weekend and used the following steaming program
Pre loading to fill oven with steam 10 seconds
Immediately after loading 10 seconds
1 minute after loading 7 seconds
7 seconds again 2 minutes later (3 minutes after loading) and again every 2 minutes ffor the next 6 minutes
My steamer holds 260ml water and I found this process used about 120ml but that was an estimate not an accurate measure. Biggest problem is that the steam going in to a hot oven reamains clear so you cant see how much steam is actually in there. Just had a thought however i will test in a cold oven and see what i get. Next post.
I have a SAECO coffee machine (with two boilsr so instant steam) next to my oven and did consider using the steam spout for oven steaming but was concerned the process could be a bit dangerous for me and wasnt totally happy with the “instant” nature of the steam output. The VAX unit I bought was only about $80 australian and it will be a handy glass cleaner etc if it fails as a bread oven steamer.
Hope this helps as I cant think of any good way to accuraley measure steam output in my house but can say the steamer when open puts out far more steam than my coffee machine steamer in the order of 5:1 I would guess.
Finally I am still not all that happy with my results. No problem with oven spring and rise but not getting the glossy shine I would like on my bread and certainly not what Maurizio gets. Keping on experimenting though. Love to hear what you do and find.
Les
After yesterday’s post I conducted an experiment with a cold oven (25-26c) and the steam injector. I used a data logger I have that measure Relative Humidity, Temperature and dew point and found that the RH of the oven stayed fairly constant at ~95% over a 1hour period after I had injected steam in three 7 second bursts in the first 3 minutes of the test hour. Start humidity was 65%. Steam injection raised it to 95% after the 3 steam bursts and it stayed there for an hour. I have the option in my oven to use fan forced or Base heat and this test was done with the oven in base heat mode but with no heat setting so temp stayed constant.
This only demonstrates however that the steam stayed in the oven and did not dissapate. At baking temp of 220c the RH would be very much lower but at least the steam would appear to be staying in the oven. Not sure what the RH is in a steamed bakers oven after they inject the initial steam or even if at these temperatures it is even relevant.
This might work, Michael! I have a feeling, though, the steam might actually be too fine and not directional enough. You’ll have to open your oven door to inject the steam from your coffee machine, and to me, this makes me think it’d be hard to ensure the oven chamber is sufficiently saturated.
I know some bakers here who have rigged up a pressure cooker to their oven to inject steam with the door closed, but I’m not able to make this modification due to my kitchen setup (and it’ll take some guts to do so, also!).
Thank you. I bake in my Crocks but want to bake 4 at a time. I was thinking this would work. So it was great to see. Especially the pic. Thanks
You’re very welcome, Jennifer!
Maurizio, I am looking at other ways to provide steam in my home oven. Generally I use a cast iron pan plus lava rocks and pour in about two cups of boiling water after the bread is loaded. I then also spritz with a spray bottle about every 2 minutes for the first 10 minutes. This works ok but I feel the hot pan lava rock combo probably doesn’t really deliver enough steam and the spritz bottle while creating steam also allows steam and heat to escape.
So I am about to experiment with a small steam generator designed for home cleaning use. Plan is to simply inject steam from the steamer straight in to the oven initially through a door cracked open about 20mm but if it seems to work then via a silicone tube arrangement I will set up.
My question is do you have any experience with injecting steam into an oven as I am intending and also how much steam is desirable. Difficult qustions to answer I know but would appreciate your thoughts.
Sounds like a great idea, Leslie! I’ve played with so many methods of steaming my oven over the years, and the method here in my post is still my go-to. There are more intense methods I could rig up, but really only at the expense of modifying my oven in some way (which wouldn’t go over well with the rest of the family).
No, I don’t have experience in rigging something up like you’ve described. It should work assuming you can get things setup well (I’d worry about the gap in the oven door where you pass the tube through).
It’s hard to say exactly how much steam is desirable because it depends on the sealing capability of your oven with your setup. Just know that it is possible to over steam when baking: the resulting crust might not have a visible “ear,” the crust might be overly soft, and your dough might have spread more than normal in the oven. You’ll have to experiment with your setup, it depends on how efficient it is in injecting and trapping steam, but I’d say if you had a constant steam input, I’d go for like 5 seconds or so to fully saturate the oven cavity, then turn it off. See how the bread is baking that first 10 minutes, if it looks like it’s hardening off to fast hit it again with more steam and go longer the next time.
In the end, my answer is going to just be to experiment and see how it goes, sadly. Let me know how it goes with your rig, I’m always entertaining new ideas on how to improve my setup and perhaps get myself into trouble in the kitchen 🙂
A quick update on the steamer approach. So far I am simply using it to inject steam by cracking open the oven door about 20mm (3/4 inch to you guys:)) and using the fine end of the steamer which is about 10mm diameter and inject steam in the following timing.
Loaves in oven: 2 min steam
2 mins mark: 1 min steam
3 mins mark: 1 min steam
5 min mark: 30 secs steam
8 min mark: 30 secs steam
I was cooking the loaves for 34 mins so figured at the 1/3rd cook time of 11 mins there would still be residual steam. My oven has two heat options. Fan forced and Base heat. I was using fan forced for some time but found problems with the bread browning(burning) on the ends so am now using base heat but my oven still turns on an inbuilt fan in that mode although different then the fan forced fan so there is is still some air evacuation from the baking chamber and I am assuming that will expel the steam as well though not sure yet.
First bake was ok with good oven spring and great crust but no real “shine” so not sure if that is a oven moisture problem or recipe/baker problem. Loaves were pretty good though.
More to come!!!
Sounds very interesting so far. What kind of steamer are you using? And when you are listing those times, is that full on steam pumping into the oven chamber? If so, that’s a lot of steam!
The steamer is a Vax sold in Australia by Target and this is the link. https://www.target.com.au/p/vax-steam-grime-master-vstgm12/62189927
Yes those times are full steam output from the steamer although as it is going in to a hot oven so no condensation to be seen there are no visual clues that anything is actually happening so I can only go by time I hold the steamer button down for. I think commercial ovens inject steam for about 5-7 seconds after loading but that steam is probably trapped better than my oven manages. I know with the hot pan method I use 2 cups of water in the pan and that lasts about10 minutes so presumably steam is filling the oven for that period.
Your comment is a good one however so next time I will steam for 30seconds after loading and see what I get😬. Testing the extremes😳
Yes, I’d say in a pro oven steam is trapped at a high percentage, home ovens are usually designed to vent steam as most baked goods at home (cakes, etc.) need a dry environment. I like that device, I might have to pick one up myself!
I’m considering the silicone tubing hack from my espresso machine steam wand. Can you compare the output of an espresso steam wand to your portable steamer? I’d like to get some estimate on injection times.
Hi Maurizio, have been reading a lot of your posts and they’re fantastic and very helpful, as are the Instagram posts.
I haven’t yet been brave enough to try a sourdough starter, but maybe soon. I did however, make two loaves of bread with a similar method to what you linked above from Thom Leanord. I pre-heated two circular pizza stones in the oven then after they were hot, removed them one at a time and dumped a proofed loaf, scored then covered with a bowl like Thom did. 30 minutes later, I took the lid off and let the bread cook through.
You can see the finished loaves here: https://twitter.com/Frank_theTank78/status/1130047363186171904 and the crumb structure if you follow a couple of posts down in that thread.
I used a 50-50 mix of whole wheat flour and Caputo 00 (the red 1kg packet with high protein), 2gms of dry yeast, 25gms salt and 80% hydration. I initially made a poolish using all the whole wheat (500gms) and 500gms of water then mixed it in after 12 hours.
It was a cool day, so the bread needed some more time proofing and maybe some more stretch and folds up front, but they tasted pretty good!
Glad to hear that, Frank, and thank you! Yes, that’s a really easy and straightforward method and works super well (your loaves look delicious!). I’d say easier than what I typically do, but you do have to ensure you have a pan/bowl large enough. Thanks for sharing that and happy baking!
Thanks Maurizio 🙂
I actually have just commenced with a sourdough starter, based on your article. It’s winter here and maybe 17-18 degrees celcius in the kitchen so I’ve been using warmer water but after 4-5 days there’s a tangy odour but not too much bubbling yet. I did the +12 hour feeding once but wondering with the colder weather here if I need to only feed once I see some bubbling or whether I need to keep up the feeding every 12 hours to get it going. I’m using 50-50 rye flour and plain white flour with filtered water.
I’d keep up with one feeding a day (24 hours) and still work in some rye flour. Once you start seeing some bubbles on top, switch to 2x a day, still with some rye. Then pickup with the rest of the schedule. Keep at it!
Great, thanks! I’m also looking forward to the pancake recipe from your leftover starter tips 😉
EDIT: I thought about giving up on the starter but I noticed the odour changed to something slightly more yeasty and less vinegary and fed it again…got a few bubbles after 12 hours and noticed it had risen in the jar by about 50%. Progress! I’ve not fed it again as I had to come into work but I’ve put a bowl underneath the jar just in case it spills out by the time I get home but I’ll start with the 2x feedings and keep using warm water.
Excellent! Hopefully by now things are up and running, sometimes it just takes a bit longer!
Looking good so far…the real test will be when I bake with it for the first time 😉
I followed your fridge maintenance tips and carried over 20g and made a stiff starter which has been in the fridge for 6-7 days. It has expanded a little and I can see a few bubbles/holes around the sides (none on top).
Just a couple of questions if I may:
1) Is it best to feed it once a week to keep it strong or can I wait until it reaches the top of the jar, if there’s still activity?
2) If I feed it weekly and maintain a stiff starter (to keep the activity slowed down I assume?), should I take it out from the fridge to warm up a bit, discard all but 20g and then add back 100g flour and 80g water again?
3) If I remove it from the fridge to get it active again for a bake, once it’s warmed up, I would discard all but 50g of starter and then add 100g water and 100g flour and refresh it until ready to bake?
Great!
1) I prefer to feed it 1x a week at least. I know many bakers who do less than this and things are just fine, but that’s my preference to keep my culture active and strong.
2) Yes, a stiffer mixture does seem to help reduce activity but I’ve also found it to just be more robust in the fridge this way. And yes, I like to take it out, let it warm up and ferment a room temp for a few hours, then feed it again and put it back in the fridge.
3) When I take it out, I like to let it warm, give it a normal feeding and then let it ferment overnight (around 12 hours). Then in the morning, it should show signs of strong fermentation, if not, I might wait another 12 hours after another refreshment. Once you see signs of normal fermentation activity, then use that to mix into a dough directly or build a levain from that.
Let me know if that doesn’t help!
Thanks Maurizio, I am ok with feeding it once a week and only leaving it longer if I go on holidays. Last night made 1 week since I put it in the fridge but I wanted to leave it an extra couple of days and just make the feeding part of my Saturday morning routine. I noticed it has a slight acidic aroma (maybe the nail polish fragrance people refer to?). There’s a very small amount of clear liquid formed on top of one part, which I understand you can mix back in afterwards. Should I feed it right away because of the acidic smell, or can it wait til Saturday? There’s quite a few small bubbles on the bottom and a few larger ones on the side but the top looks ok, just grown out a bit since I put it in the fridge.
If it’s in the fridge it’ll likely be just fine until Saturday. Usually when you see liquid like that it means it could use a feeding, but this does seem to happen quickly in the fridge.
Cheers 🙂 I will give it a try in the morning and see how it goes. Have a good weekend!
EDIT: once I gave it a stir, it had a nice consistency and odour. I gave it a feed and put it back in the jar and it had a bit of the odour back, so I’m guessing it’s in the jar. I’ll try and bake with it on the weekend and see how it goes!
Hey Maurizio, thanks for the great article! I’ve been trying out this method and I was wondering, do you bake with the fan on in the oven? I usually do use the fan to get a more even heat distribution but I’m wondering if this disperses the steam more quickly? Thanks
You bet, you’re welcome! No, I don’t use the fan in my oven. Theoretically it should be fine, but I don’t like any air movement on the dough surface when steam is in the oven in the chance it might dry things out (especially since I can’t clog the vents in my oven and steam does escape!). Hope that helps and happy baking!
Hi Maurizio, thanks for the endless resources and inspiration. Your website makes me want to never leave my kitchen! I noticed your oven only has heating elements on the top. I was wondering how this would work if the oven has both top and bottom heating elements? Would I simply position my pans as the coils allow? Clearly, I don’t want to damage the oven.
You’re very welcome! My idea of a fun day out is staying in the kitchen, baking 🙂 My oven actually has elements at the bottom and the top, but they are not exposed to the inside cavity. But yes, I’d say just arrange things so everything fits and nothing is touching the elements directly.
You’re very welcome! My idea of a fun day out is staying in the kitchen, baking 🙂 My oven actually has elements at the bottom and the top, but they are not exposed to the inside cavity. But yes, I’d say just arrange things so everything fits and nothing is touching the elements directly.
Thank you so much for the quick response. I tend to agree re: a fun day equates to staying in, baking. I will be giving this a go over the weekend on your Seeded Sourdough!
Awesome, one of my favs. Let me know how it goes!
My seeded loaves just came out of the oven and they are a thing of beauty. This is my first time shaping a batard, so that bit needs refining, but otherwise they look perfect! I am eagerly anticipating checking the crumb and sampling that first slice.
I have tried other methods for creating steam in a home oven but this was, hands down, the most successful. I’m still looking to find a workaround with the heating elements on the bottom of my oven. This time, I used mini foil pans filled with the hot towels and lava rocks, but maneuvering them in and out of a 500F oven was precarious at best. My oven mitts most certain have some battle scars as a result! I’m thinking of acquiring a third oven rack to be placed in the lowest position for the steaming pans. Any thoughts on this?
Super, super glad to hear that, Lea! Yes, I’d say a third rack will work perfectly — that’s exactly what I would do. Thanks so much for reporting back and here’s to many more awesome bakes!
I use a clay romertopf baker which I soak for 20 minutes prior to placing i a COLD oven and then turn on the heat. Once the oven is at the right temperature I remove the baker and place my dough into in with parchment paper and slide it back in the oven. It’ll keep steaming the bread until the lid is removed for the last part of baking.
That’s fantastic. I’ve heard of these but didn’t know about the soaking part, what a great idea!
I assume it’s because they are some kind of bisqueware. There are several different kinds/stages of clay firing, and low-fire/bisqueware items are still porous, and absorb water. I’ve been meaning to make myself a ceramic bread cloche, but i didn’t consider the advantages of leaving it as bisqueware.
Rachel, I have been using clay romertopf bakers (I use two side-by-side) for the last year+ and after many, many bakes found no improvement in outcome using soaked vs non-soaked. Not soaking gives me more ease (no having to scrub the sink before soaking) and I can preheat the bakers to 500F. I usually let the empty bakers heat for 10 minutes more once the oven hits 500, then reduce heat to 475F once the loaves go in and bake for 45-48 minutes with the top on the entire time.
So glad to hear you’ve been using/enjoying a similar set-up. Happy baking!
Hello Maurizio, this is a great guide. I’ve been getting some awesome oven spring using this method. However, I believe the way my oven is deisgned (heating elements on top and bottom) it may be giving me some uneven baking. My crust typically looks OK, see here: https://i.imgur.com/JFQeuGN.jpg but my bottoms are always soft, almost underdone. As if they’re not getting enough heat, but it’s sitting on a preheated stone.
Have you encountered this issue? If so, do you have any tips to remedy this?
You may need to start out at a higher heat initially, maybe for the first 30 minutes at 500 then reduce to 450 when you remove the lid of your dutch oven, romertopf, etc.
That’s really a beautiful loaf! I have not encountered this issue. My guess is the baking stone at the bottom is not fully saturated with heat. If you have an IR thermometer you might be able to check the temp of the stone is appx. the same as the setting on your oven before you load your dough!
Hi Maurizio! First I’d like to appreciate your instructive blogs as I learned so much things. I can get nice loaves from dutch combo cookers using your methods. Recently I started steaming my oven using lava rock, however the loaf I just baked yesterday failed to peel from the slash and the whole loaf was like a football with dark crust. I was so shocked as the dough should be OK, it was prepared using same procedure as I do previously. Do you think it is the sign of insufficient steam in my oven? In this way the dough dried too quick and failed to peel.
Thank you in advance!
You’re very welcome! Yes, that’s very possible. It could also be under/over proofing and other things though as well. If your loaves also looked rather dull on the outside it’s likely under steaming. If you have a small handheld spray bottle I’d suggest also spray into your oven (and a little on the dough itself) when you load just to help it along a little and see if you get some improvement. If so, you might need to use more water in each of the baking pans.
Hi Maurizio and congratulations on everything! I started my sourdough baking addiction about a year and a half ago and I am consistently making delicious bread in my large combo cooker. So far I have only baked boules due to the shape of my proofing baskets and combo cooker (both round).
I am eager to take a shot at batards because I would like bread that is more compatible with sandwich slices, so I recently bought two oval proofing baskets. However, the length of these proofing baskets is wider than my Lodge combo cooker can accommodate!
I have a large oval turkey roasting pan, do you think it would work if I put the batard on a preheated pizza stone, with the inverted turkey pan over the top? In theory that should be as effective as the Lodge combo cooker, no? I know I need to trap the steam, and I’m not interested in going through the elaborate methods that you describe to steam my entire oven, since I only typically bake one loaf at a time. Plus, it would be nice not to have to buy any new equipment. Thank you in advance for any advice or input!
Thank you, Ehrin! Yes, an inverted turkey roasting pan will work very well — many have reported success with this method (and I have done so as well in the past). The only thing to be sure of is that the pan is tall enough to accommodate the rise in your loaf.
Happy baking!
That definitely sounds like an awesome oven. I haven’t had a chance to try one out but I sure would like to! In the end, though, I’d say as long as the bread looks and tastes (most important!) great to you, then it was a successful bake. Really though, that’s what matters!
I have a Wolf steam/convection oven. I have been baking sourdough using the Gourmet auto setting for bread. The breads have been coming out great! I can bake 2 loaves side by side on the oven’s baking pan lined with parchment paper. The thing is, I’m new to this, and I’m not sure my “great” is actually great. I’m wondering if any of you more experienced bakers have ever used this oven for your bread and what you think about the results.
First, Maurizio, your bread is stunning! The information you post has helped me immensely, so thank you. I struggled with the steam issue for years. I tried many different things to generate steam: lava rocks, melting ice, boiling water, and spritzing the oven, and nothing really seemed to work. I also found that putting things on the bottom of the oven (where the heat comes from) actually blocked the heat from penetrating the stone. One day I noticed a steam vent near the top of my oven, and while my bread was baking, a steady stream of steam was coming out. My oven was simply releasing the steam that the bread naturally produces. Simple fix: I stuff a thick rag or wash cloth over the vent hole to trap the steam in my oven, then remove it halfway through the bake to release the steam. Now, my crusts are dark and crispy. What a difference! I’m not sure if all ovens have a steam vent (I have an electric oven) but it’s worth checking out.
Brilliant! I’m going to give this a try!
Yes, I’ve heard of others doing this as well. Unfortunately with my oven I can’t easily block the vent without causing problems for my electronics control board (trust me, I’ve tried a few times…). Sounds like it works well for you and that’s awesome! Perhaps we can do an oven trade? 🙂
Thanks for sharing that, Tim, and happy baking!
ny baking stone never seems to get enough to get a great crust like I get with my dutch oven. And I leave it in my oven preheated at 475 for an hour
Ariel — it’s true, a Dutch oven will impart a super nice crust! It’s possible with baking stones, or a baking steel, in my experience. I usually let my stones/steel preheat at 500°F for at least an hour, sometimes a bit more. From there, it’s all about over steaming your oven to compensate for the fact that typically they’re not sealed in any way. Adding in more steam than usual will offset that loss to some degree and help attain a nice and shiny crust. It definitely is a bit of work, especially compared to using a Dutch oven, but with practice it’s possible!
Ah that’s a bummer! That dust would be annoying as heck, sorry to hear about that. If you pickup the other ones let me know how it goes! They’re working really well over here.
I should have followed your instructions fully. I only used the skillet with about 2 cups of boiling water in it. Ended up browning after about 8 mins. Still doughy inside 🙁
Sorry to hear that, Brent! Well it’ll be an easy fix for next time. Because our home ovens really aren’t sealed it’s hard to trap lots of steam inside, this is why I go through so many steps in my method above to really over-steam my oven. Let me know how it goes the next go!
I’ve been using lava rocks I got from my local hardware store—-probably intended for outdoor use. There is lava ash everywhere each time I use them for steaming bread. Is this characteristic for all lava rocks? Can’t seem to find where to find ones described for culinary use. On other bread blogs the baker recommends the hardware store. Are there any out there without this problem? Ash all over my oven, floor, etc, similar to a dust storm.
Kristen — that’s very strange. I don’t have this “ash” issue at all with the Charbroil lava rocks I use (I have a link to them up in the post if you want to compare with the ones you have). If you can’t get around this issue you could really use anything that has heavy mass like large clean pieces of metal (bolts, etc). If you can’t find anything, just leave the pan empty and throw the ice in there as-is!
I went to the link and read the description. Your rocks are actually made out of ceramic. Bingo. Mine are….actual rock…which is slowly turning my house into a post-Pompeii ash zone. Geez. Wish I had known this before. Definitely throwing my 20 lb bag out.
Do you have a current temperature you use during steaming? Some formulas use 500 for 20 minutes, others drop down to 450. With my electric oven I was easily able to insert a copper pipe to the tray with lava rocks, which allows me to add water at any point without opening the oven door.
Thanks!
Eli
Wow, really jealous about that copper pipe fitting — great idea! My ovens are locked down, I can’t really modify them. Regarding the time and temp: it really depends on the bread you’re baking and your oven! Usually I steam at 500°F for 20 minutes.
wow, I might try and make a home version of this tool!
Do you still use the same steaming method? Wondering if you discovered anything new. I just got a “new” oven, it’s new to me. I am considering baking on a baking stone instead of my usual two dutch oven at a time method. I have been reading a lot of about creating steam in home oven and there are a lot of variations. I have a gas oven, worried the steam will escape too fast through all the vents. I read on Freshloaf that some people when they add the steam, turn off the oven and block the vent(s) and after 10 minutes unblock and turn the oven back on. Have you ever experimented with something like this?
Congratulations on your 5 years!
Yes! I still use the same steaming method. I’ve tried all sorts of variations and I keep coming back to this same method. It just works super well for me and I have it down pat. I have not tried turning off the oven and blocking the vents because with my oven, unfortunately, I can’t block the vents. I even went so far as to call the manufacturer and asked them if it was somehow possible and they said no — the oven is built into my cabinetry and I can’t easily block the vents without possibly damaging the electronics above. I’ve seen many different methods now at this point, and even the “schwadomat” as @disqus_Q8KW9h4sE8:disqus mentioned below, but this is still my go-to!
And thank you! I know you’ve been here reading for quite a while (and on IG) — it’s great to have such an awesome community of like-minded bakers!