
Steam burns hurt. Like, really hurt. The small mark on my left forearm begs the question daily: Maurizio, was it worth it? But before we talk about my new baking badge of honor, let’s concentrate on overcoming the challenges of baking good bread at home. While many of these challenges present themselves early in the two-day process (fermentation, flour selection, mixing, shaping, and so on), there is that crucial component at the end of this ordered procession: baking bread with steam in your home oven.
For your bread to rise to its potential, that outer, taut skin on your loaf needs to be able to expand and stretch before hardening off. Steam in the oven and subsequently on the surface of your loaves helps keep that skin pliable and stretchy during baking. If your dough dries and bakes too quickly on the exterior, it can harden off before it rises to its full potential (and you may not see a satisfying gringe, either).
So how can we get enough steam in the oven to keep those loaves rising? There are indeed methods abound, and each person has a different approach, but arguably the most popular choice at the moment, and the one I started with, is baking bread in a Dutch oven (see my guide on how to bake bread in a Dutch oven if you’re not familiar). However, there comes a time when you might want to bake two (or more) loaves at a time, or perhaps your loaves are scaled more substantial than your Dutch oven can comfortably hold. An alternative is to bake directly on stones and generate sufficient steam in your home oven by some other clever means.
Professional baking ovens have steam on tap. Press a button, and a wave of steam sprays over the decks of newly loaded dough (however, there are always challenges, no matter what oven you use). Now there are home ovens that are “steam ovens,” but the ones I’ve looked at are incredibly small. You might be able to fit two loaves, but I could also fit two Dutch ovens in my current home oven; no advantage there. Some other alternatives can’t inject steam at a button press, but they are sealed to trap steam and have a method for generating steam. These look very promising but are on the expensive side.
Since most of us bakers out there do not have one of these fancy ovens, we have to make do—read on to learn how baking bread with steam in your home oven can be a straightforward process.
Video on baking bread with steam
In the video below, you’ll see my baking bread with steam from start to finish.
Baking Steam Method
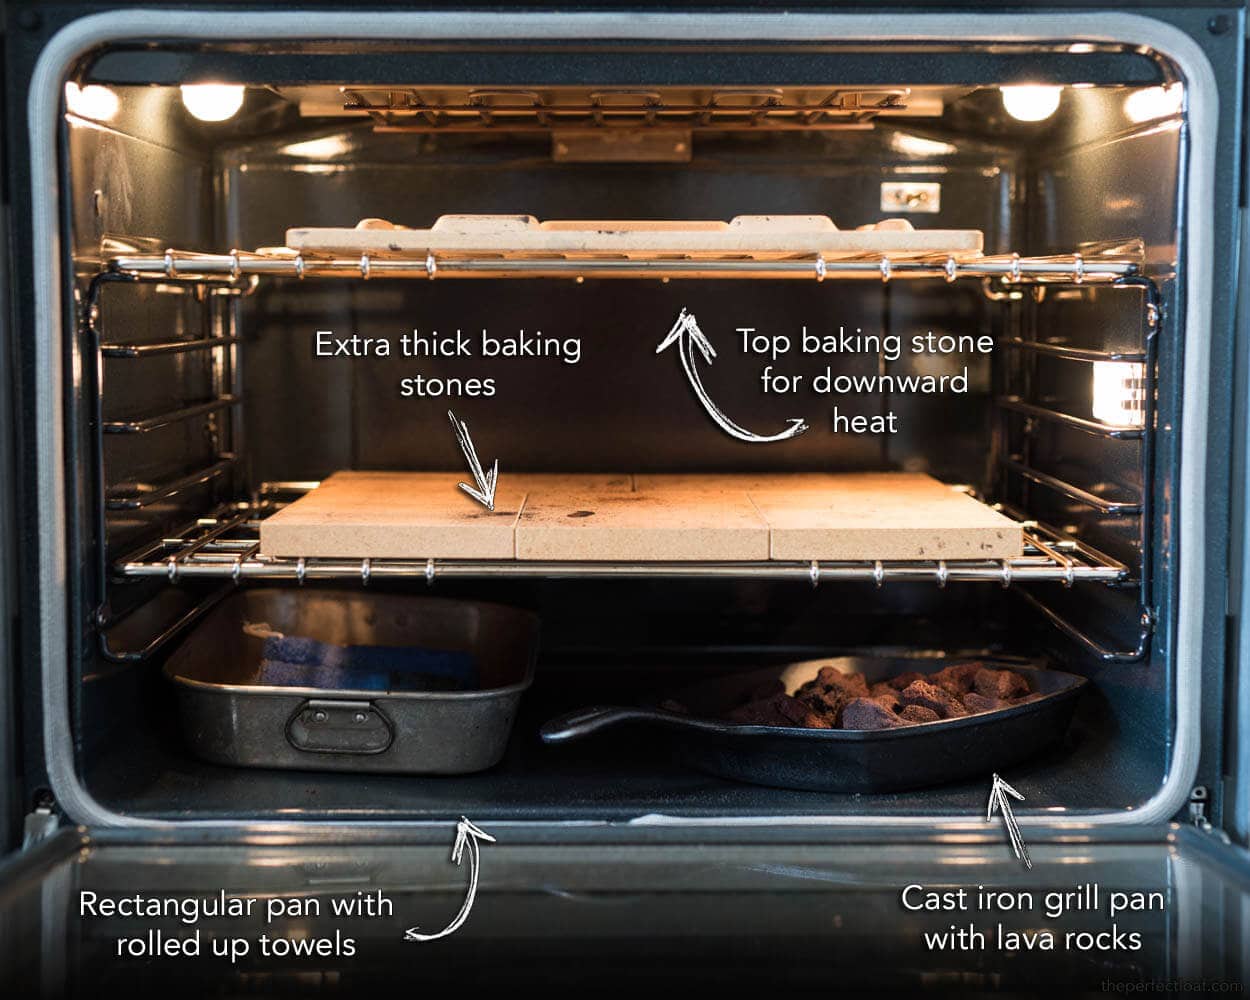
The following does take a bit of practice. First, ensure you get all your tools ready and within reach; this is a rather hectic process, and you want to do it almost without thought — muscle memory. The longer your oven door is open, the more heat will escape. Your thick baking stones or a baking steel (which is also awesome for sourdough pizza!) will help offset some of the loss, but you still want to act quickly.
Below is a quick visual showing where I have my pans, where the loaded dough goes, and where my baking stones are.
Now that we have a list of what things we need, where items will be placed, and why, let’s get to the actual method (with the animated version below!).
Home oven steaming method
- An hour before baking, turn on your oven (preheat)
- 10-20 minutes before loading your bread, boil water, pour over the towels in your rectangular baking pan, fully saturate them, and place them in the back corner of your oven
- 10-20 minutes after loading the pan, put each mass of dough on a separate piece of parchment paper
- Place the dough and parchment underneath on a pizza peel
- Score dough
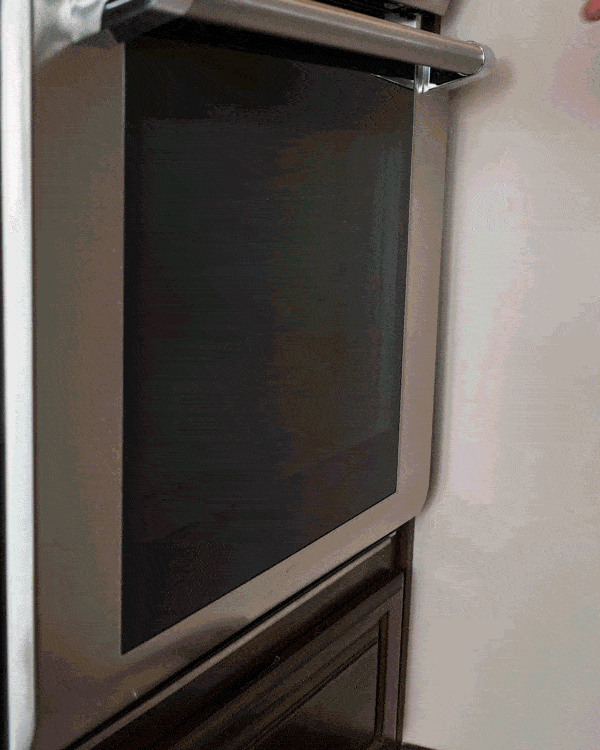
- Open the oven and slide the dough (with parchment) onto baking stones
- Quickly lay a towel on the oven door glass (optional; you can see me doing this below). I’ve read that cold water dropped onto a hot oven glass door will shatter the glass, thus the towel. I have dropped some water on the oven door without any ill effect, but I do this to be safe.
- Carefully toss 1 cup of ice into your cast iron pan with lava rocks
- Quickly spray loaves a bit with a hand spritzer (optional)
- Close the oven door and watch your dough rise
- 20 minutes later, remove both steaming pans (careful these are extremely hot) to stop steaming
- Bake as usual until done
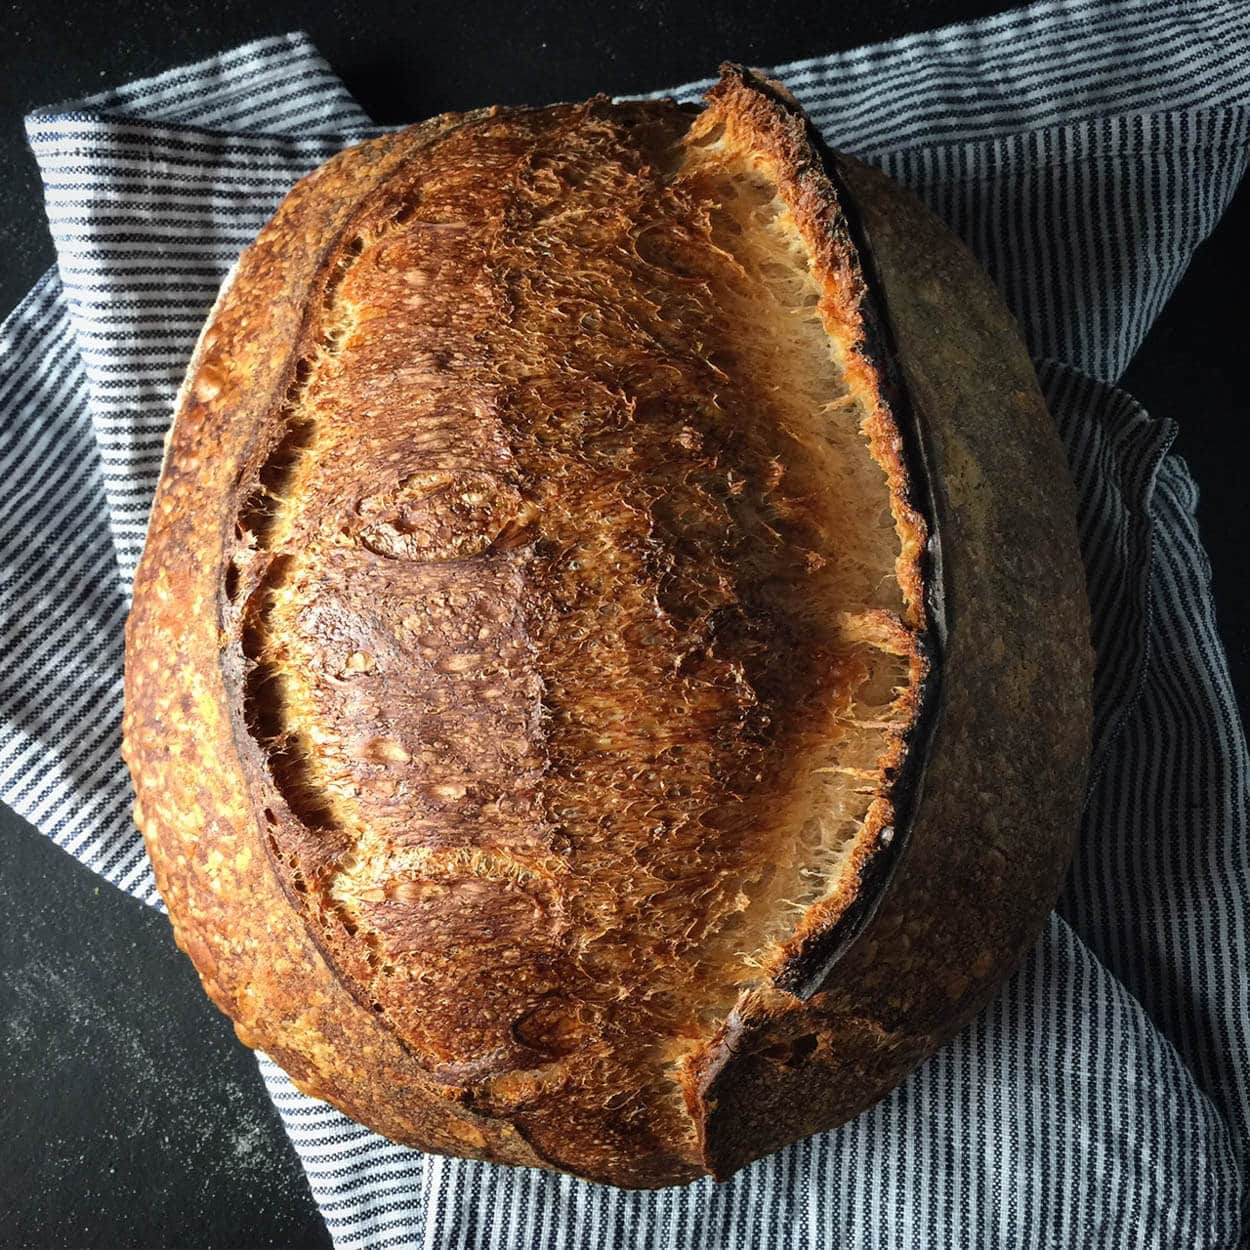
Whew, that’s it! Here is the whole process (minus the preheating and drenching of towels) in one trendy baking-with-steam GIF:
Why do we use two sheets of parchment paper for our dough? When you use two sheets, you can adjust the space between the loaves as they bake, if necessary. One of the worst things to happen is when the dough expands and joins with another loaf; this reduces the overall rise of both loaves. If you notice the loaves start to get a bit close as they rise, quickly slide them apart.
After 20 minutes of baking, we remove the cast iron and rectangular baking pan, so no more steam is generated, allowing your loaves to crisp up and harden off.
Caution: Please be careful with this method: if you drop too much cold water on your oven door, you might crack the glass. I have never had this happen to me, but I know of at least one baker who had this issue. Be sure to keep the water off the glass.
Another approach to baking bread with steam
Baking bread in a sealed post is possibly the easiest method of baking bread with steam at home. You place your dough in a preheated pot, close the lid, and put that in your oven.
That method works incredibly well, but the drawback is you can only bake round loaves this way. You’re limited to the realm of round pots.
If you’d like to keep using a Dutch oven, see my post on how to avoid burning your loaves →
Tools for Steaming Home Oven
We first need to have the right set of tools for the job. Let’s go over a few more additions to our home-baking arsenal:
Lava rocks
The first is a cast-iron pan filled with lava rocks. Other materials will work just as well here: (clean) nuts and bolts, a metal chain, or any other heat-retentive material that will increase surface area. Keep in mind whatever the material needs to be able to withstand around 525ºF and water splashed onto it.
Lava rocks are a primo choice because they get extremely hot, don’t break down easily, and have tons of jagged sides and crevices for an incredible increase in surface area. What’s the big deal about surface area? As cooler water comes into contact with a blisteringly hot surface, it instantly turns to steam. The more hot surface area you have, the more steam you generate. I found these lava rocks, specifically made for home BBQ grills, and they have turned out to be a perfect choice. They come in a fairly large bag, and I am still on my first handful — I probably have lava rocks for life.
Roasting pan
The second component is the heavy-duty stainless steel pan I use to hold the lava rocks. This stainless steel pan is great for a few reasons: it’s super thick-walled, retains heat well, and holds up to abuse.
Rectangular baking pan
The last component is an old rectangular baking pan with small dish towels rolled tightly. I use an old pan around the kitchen and roll up three small towels in the center. The more towels you add, the more steam you’ll generate. I use cheap, clean towels as these will eventually get scorched and need replacing.

Ten to twenty minutes before you start baking, you will boil some water and pour it over the towels in the rectangular pan, so they are fully drenched and steaming. You will then place this pan with towels back inside your oven. This pan will saturate the interior with steam before you even splash water on the lava rocks and will continue to do so well into the bake.
Optional Hand Spritzer
The final item is optional. A stainless steel hand spray bottle I use to spray in a bit more steam just before closing the oven door. I like to have the option to spray in a bit more steam if I feel it is warranted. Additionally, you could use this after 5-10 minutes into baking to quickly saturate the oven inside one more time. Some bakers, like Jeffrey Hamelman in Bread, recommend this second round of steaming in a home oven.
Not many new tools are needed, and if you think about it over the long run, you will probably save money as now we can bake 2-4 loaves at a time — no more wasting all that space in the hot oven. How do we do this now that we have the tool requirements squared away?
Conclusion
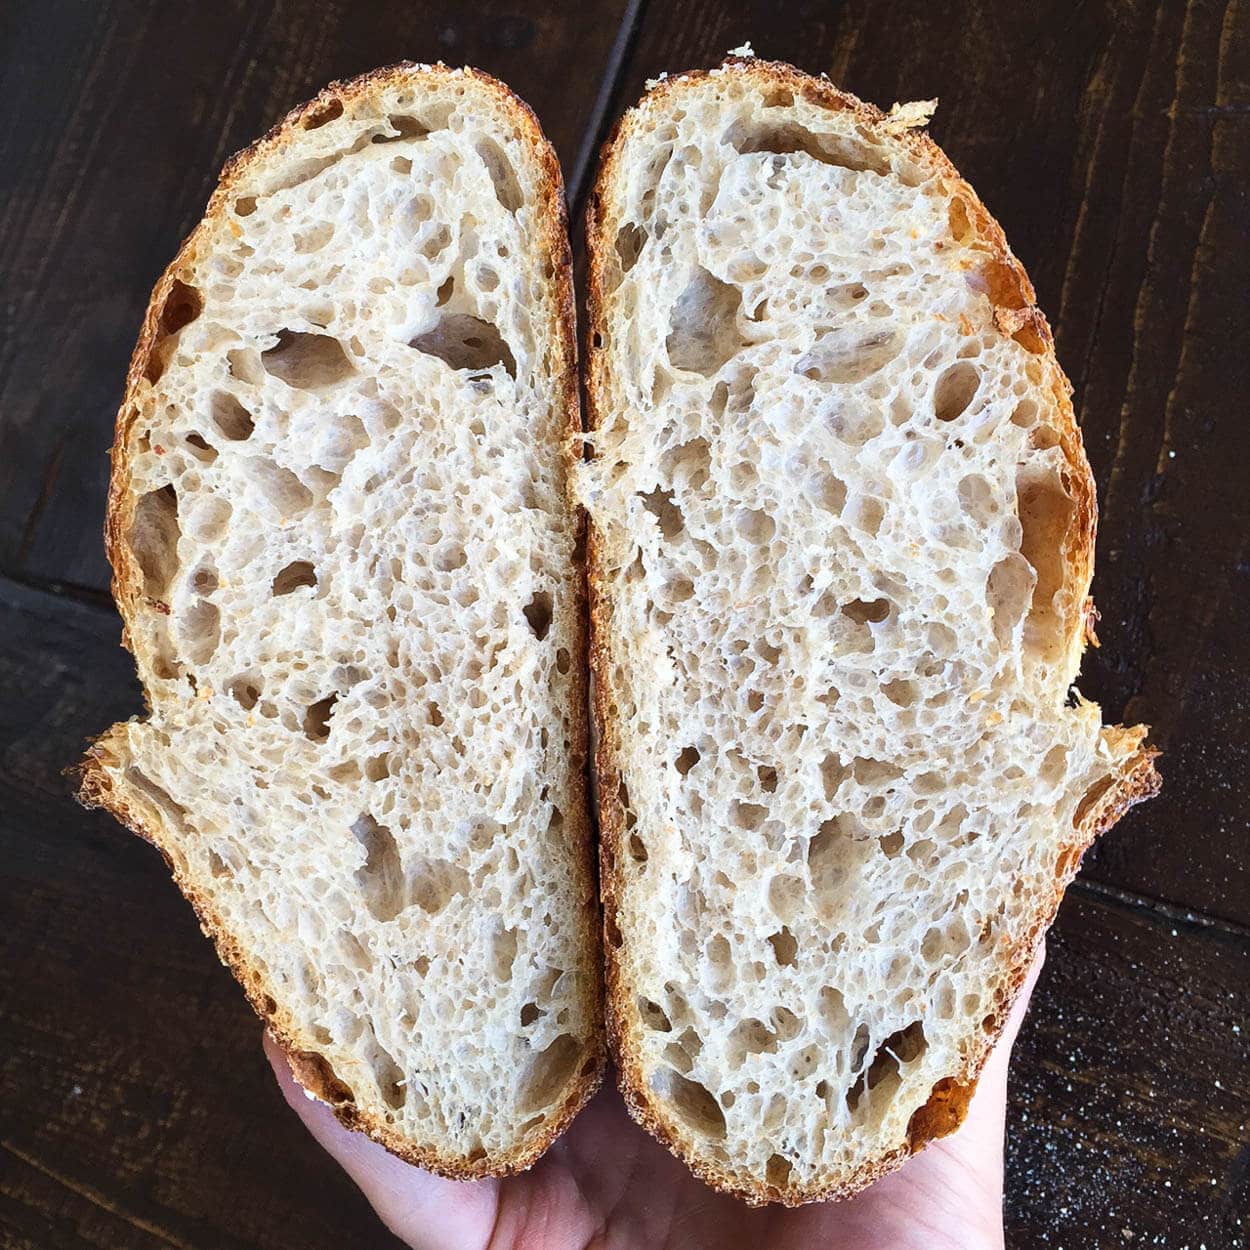
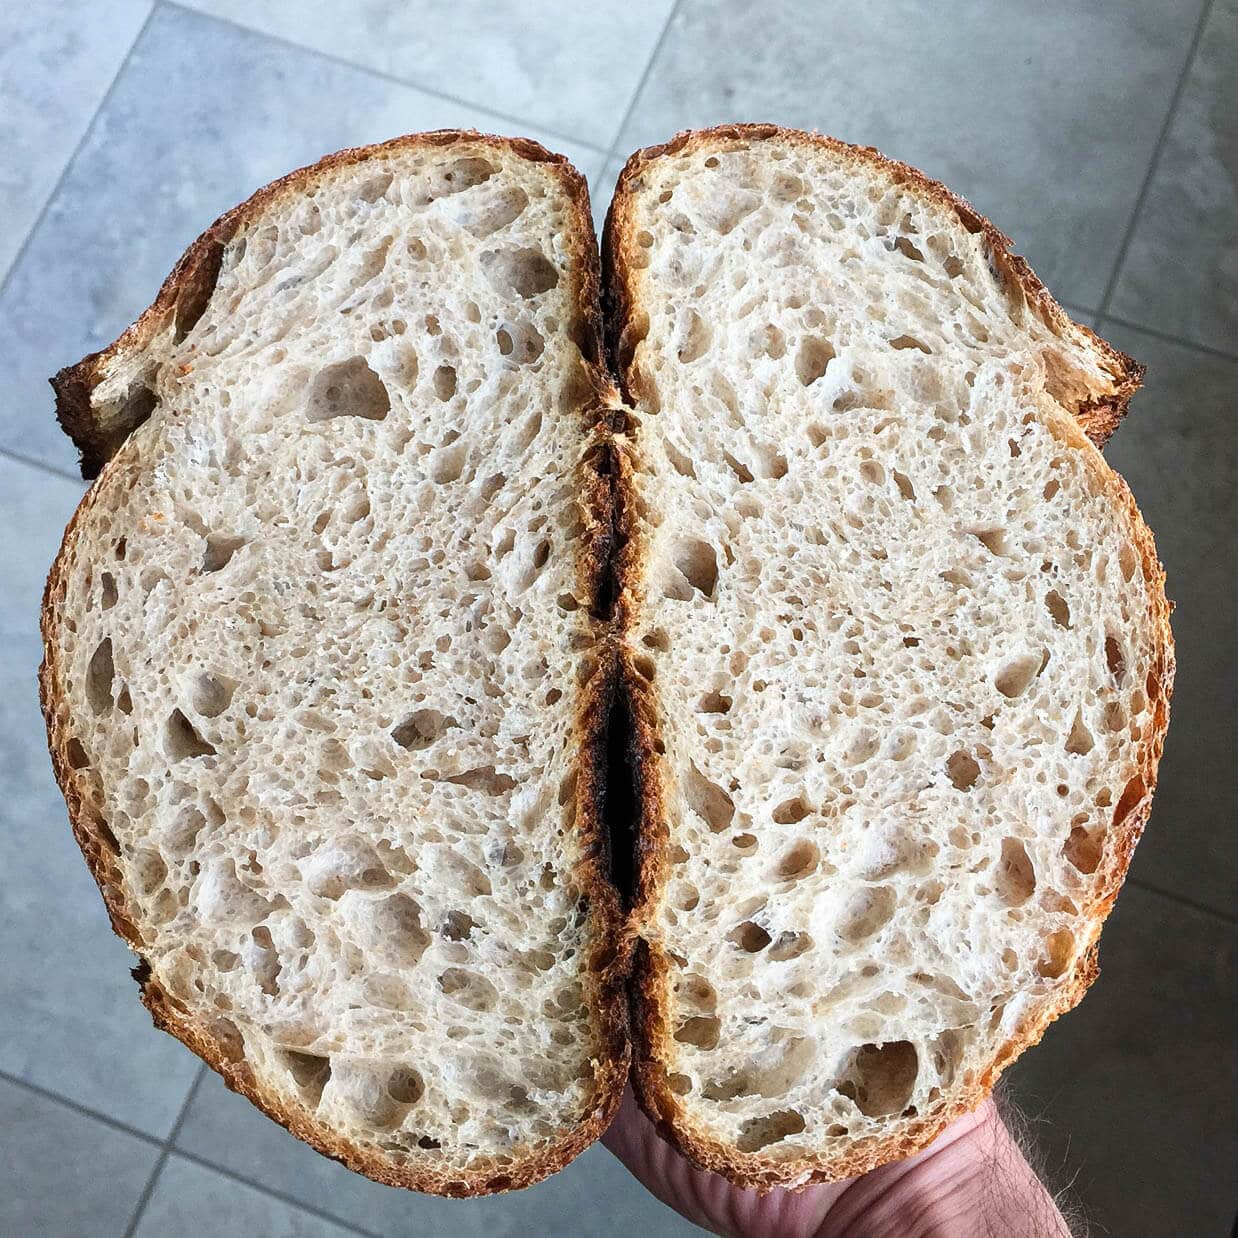
I like this method for baking bread with steam in my home oven because it allows me to cook two large loaves of bread at a time. I plan to bake four loaves at a time, and this will let me do that with no problem. Baking with a Dutch oven (or combo cooker) works exceptionally well, and I might still use that method if doing only a single loaf or a highly hydrated one (the pan will help keep the dough together). Still, I find myself using this new method more and more. The results have come out smashingly.
Small steam burns: worth it (as you can see below).
What’s Next?
Be sure to check out my full guide to baking bread at home for more details on this important step!


423 Comments
Hi Maurizio! me again 🙂 Thanks for sharing the knowledge.
I’ve just finished baking two loaves with stones ans lava rock, not bad but no full ovenspring. But i suspect overproofing.
Quick check on baking temperatures your using? I did
1- 500 preheat 1 hour
2- 500 1st phase 23 mn
3- 450 2nd phase 30 mn
Is that correct? It’s what i do usually with dutch oven (with succes).
Do i really need heat from the oven after preheating the baking stones, aren’t they hot enough alone for the rest of the bake?
Cheers
Hakim.
Hey! Yes, those times and temps look correct (for the second step you have listed, the step with steam, for me it’s typically just 20 minutes). I have to continue to keep my oven on and going at the temps listed above even after preheating — opening the oven door to load the dough, vent the steam, and everything else drastically reduces the temperature of the inside cavity, especially in a home oven with a large oven door.
Hope that helps!
Hi,
When you say you can bake more than two loaves, i assume that you mean not in the same batch?
Cause i am preparing to bake on stones of the same size and i could not imagine fitting 3 loaves on them.
Hey, Hakim. That’s correct, when baking more than two loaves I have to separate it out into multiple bakes. Usually when the dough is kept cold enough (as in a home fridge), that delay is not an issue.
I would caution against the idea of spraying a second time a few minutes into the bake. I used to do this, but I noticed that it seemed to affect the oven spring. So I watched closely one time after spraying (my oven has a glass window to look through). After closing the door after the second spraying, I saw the loaf deflate fairly dramatically. I’m not sure why, but it might simply be that I’m lowering the temperature of the loaf itself by spraying it with water, and I’m losing a fair amount of heat and steam from inside the oven while I have the door open.
On a separate note, I recently had an interesting experience. I entirely forgot to prep my oven in any way, and by the time I noticed this, my loaf was already almost over-proofed and getting ready to fall. So, I just grabbed an old cookie sheet, threw the loaf on it, threw it into the oven, and turned on the heat, not expecting anything very good to result from it. This was a rye loaf, and I have a gas oven, BTW. So the loaf turned out just fine. I actually had the best shape of any loaf I’ve baked (nice and round, without the “flying saucer” shape I so often end up with because of premature hardening of the crust). The crumb was also just as good as I usually get. The only disappointment was the crust, with looked a bit funny, with uneven browning and a weird, lumpy surface, and not very much crispness.
So that was interesting.
Thanks for the comments, Erik! Yes, that second spray could potentially drop the internal temps quite a bit — it really depends on your oven and how fast you are 🙂 Really though, I do notice a temp drop but I can usually do it fast enough so there’s minimal loss.
Very interesting about the non-preheated oven! I’ve actually never seen this done before, now i have to give it a try myself.
Happy baking!
From the photos of your results, I can see that the second spraying is working very well for you. My oven is not really the best. Maybe that’s why it’s not working so well for me.
Just a thought, since his oven is gas, I wonder if the moisture produced from burning the gas prepped the oven with steam from the start?
That’s very possible. I’m not too familiar with gas ovens!
Amaing information Maurizio, thanks!
I am new to your blog and I am loving the content.
Would your method of baking with steam work when baking gluten free sourdough bread?
Also, do you have a post written about how to bake with a dutch oven? I just got one.
Thanks very much!!
Thanks, Maite! Glad to hear that. I’m sure it’d work with gluten free bread as well, although I’ve never tried it. Principles are still the same.
I have a few posts on how to work with a Dutch oven, check out my Beginner’s Sourdough Bread post!
Hi Maurizio,
Thanks for the amazing content on this website!
I was wondering why you use the two separate methods (towels and rocks) for steaming your oven rather than just using more of only towels or only rocks. Do you find they operate in a complementary way? I was planning on using only lava rocks in my home oven and was wondering whether I’d not achieve successful results using only the one method!
Hey Leigh! You can definitely just use the lava rocks, I just find the combination of the two to work very well for me in my home oven. The rolled up and soaked towels provide constant steam throughout the bake as they retain, and release, a lot of water. This release happens slowly whereas the lava rocks with ice or water creates an initial blast of steam that dissipates much quicker.
The thought here is the lava rocks will provide that blast of steam to get the interior of the oven saturated as well as the top of the dough, and then the towels continue to steam the chamber all the way through the bake.
You could try just using the lava rocks and see the results. It’s possible your oven can trap much more steam than mine and the towels might not be necessary.
Hope that helps!
Thanks for all the help!
When baking Baguettes, I am bursting each baguette on any side adjacent to anther baguette. (If I have three on my stone, the front one burst on the inside, the middle burst on both sides, and the far one again burst on the inside. I do not think it is technique issue or a proofing concern. I typically dump ice water into a cast iron pan, where there is water throughout the entire process. Can there be too much steam? Also, I preheat to 550 and drop to 420, could the initial temp be to high causing a premature crust?
Hmm, that’s very interesting. Usually when I see excessive bursting like this it’s either because I’ve under proofed my dough slightly or I did not sufficiently score the dough in that area, or another area, to allow for smooth expansion. could either of these be a possible cause?
I don’t think it’s from over steaming, usually this causes the crust to remain too soft and pliable and will even cause a crust to not ever really harden off at the end of baking.
I have been using the Dutch oven method with no problems. I have tried to bake twice now with the lava rocks method and have no success. Bad oven spring, and the skin where I scored it has toghent back up and hasn’t cracked. What am I doing wrong. I suspect I’m not generating enough steam
Ah, bummer to hear this! I’ve used this method for quite a while now with excellent results (all my bakes are done this way), I wonder what part of the process is off in your home oven. Be sure you’re preheating your baking stones / baking steel for a full hour at least — this high heat stored up in the baking surface is crucial to this method, especially since we don’t have the retained heat from the Dutch oven. From there, make sure your lava rocks are preheated with the oven, they need to have enough stored heat to melt the ice almost immediately on contact. Finally, make sure to really drench those rolled up towels until you see they don’t hold any more water and water starts to leak out to the pan. These towels should be placed in the oven either right before you load your dough, or a few minutes beforehand.
You could also try adding in another cup of ice 5-10 minutes into the bake into your pan with lava rocks — you might need another kick of steam after the first has most likely leaked out of your oven.
Hope this helps — keep me posted!
I didn’t know I had to do both the towels and the lava rocks. I thought it was one or the other. Maybe that’s why?
It all depends on your oven. If using just one provides enough steam than that’s great, but for me, and my oven, I find I need both to really generate the steam required.
I am finding that my lava rock has an odor when hot and is leaving a residue in the pan . I am thinking of switching to glass rocks as used as ballast in vases or fish bowls. Does anyone have experience along these lines? Before lava I had used the glass fragments that the city gives away for landscaping as part of their glass recycling program. They worked fine but my wife objected to having these around the kitchen. I’m going to find something other than a cast iron skillet to hold this.
I’d be cautious using glass as it can crack when it’s exposed to temperature shock (super hot to super cold). That said, they could still work for you as I’ve never tried it — I’d just be cautious.
Another option here are small river rocks or even small pebbles/sand. I’ve talked to a few people who use these to great success as they hold quite a bit of heat and don’t cause any issues to the pan.
As for the cast iron, using a stainless steel pan will work just as well! Another option would be to pickup those cheap, disposable metal baking pans (Reynolds or the like) and cycle them out periodically.
Hope that helps!
Another item that people have used is large industrial iron chains.
Quick question — do the rectangular baking pan and cast iron pan w lava rocks go in the oven for the entire 1 hr preheat? If so, I’m assuming you only add the towels 10-20 min before baking, yes? I just ordered some lava rocks and am looking forward to trying this method for steaming. My electric oven has a vent just above the cooktop (below the controls) and anytime I’ve tried steaming with hot water, soaked towels, etc, I see a plume of smoke leaving the oven and filling my kitchen. 🙁 I’m hoping that the lava rocks will make a difference! And maybe I’ll try blocking the vent with a kitchen towel. Love your blog, thanks for sharing your expertise!
Hey, Nicole! Sorry for the late reply. The pan with the lava rocks does get preheated but the pan with the towels does not.
It’s important the towels never get dried out otherwise they can smoke up and even burn a bit. Always keep the towels out of the oven and only put them in, after soaking them, when you load your bread (a few minutes before).
Thanks and I hope that helps!
Thanks! I use the parchment simply to help me slide the bread into the oven after I score it. I’ve often thought about the point you’re bringing up, though: does the parchment insulate the dough from the surface cause less heat transfer? Honestly I don’t think that to be the case, in all my time baking I’ve used parchment (when not using a Dutch oven) and I haven’t really seen any lack of baking on the bottom of the loaves or sluggish spring. I’ve even seen some pro bakers use parchment in their deck ovens.
Further, if I weren’t to use parchment I’d have to use something else to help me ease the dough into place, such as flour, bran or cornmeal. These items would insulate in a similar fashion.
I do constantly move my dough around in the oven as there are hot and cool spots. I’ll move them around when I notice things are cooking to fast on one side or not enough on the other. In my oven the right side tends to get a little hotter than the left so halfway through the bake I’ll switch the loaves around.
Thanks for the input and insight!
These are some very good thoughts I hadn’t considered, thanks for bringing them up! I’ll have to think of some way to test this out myself and see the results…
What about the temp limit for parchment paper? I’ve been tempted to use it for my breads that include figs, cherries, etc. that tend to caramelize & make a sticky bottom. But the highest rated parchment paper I found is 450, and I bake @ at least 500…and didn’t want to start a fire. 🙁 ! do you have a higher rated parchment paper? or lower baking temp? or it just isn’t an issue?
Great write up (and website), thanks!
I have never had an issue with parchment paper in any of my bakes and I always use it. Sometimes the parchment paper does turn quite black at the edges and corners but I’ve never had an issue with a fire breaking out.
That said, be careful when using it until you’re confident you won’t have issues!
Interesting…thanks!
I have a cast iron pan so I will probably use your lava rocks method. Do you ever have a problem with rust on your pan with all that water? I also have a baking steel do you ever have a problem with that rusting?
Yes, I do notice rust will accumulate on the steel/iron parts that are exposed to water. One thing I’ve been experimenting with lately is using a regular, hardened steel baking tray to hold the lava rocks instead of a cast iron pan. This way I can toss that baking tray in the dishwasher occasionally and wash it. This has been working well!
I’ve been experimenting with the steam jet of my espresso/cappuccino maker. I unscrew the outer cover of the steam jet, leaving only the straight tube. Over that I fit a length of poly pipe from the hardware store, which has at the other end a length of small-diameter copper tubing that I have flattened slightly and bent into an “S’ so it fits past the profile of the oven door. Just before loading the bread, I turn on the steam, aim the copper at the kitchen sink and wait until all the condensate has spluttered out; then open the oven door, pop the copper tube into place, and close the door. There is of course a gap so the door is not tightly closed, but it is small enough that not much heat escapes. After steaming the oven for 30 seconds or so, I load the bread, and continue steaming for another 30 seconds to a minute. Results vary, and I’ve never been sure how long to inject the steam. After reading some of the other comments here and on other blogs, I think I may repeat the injection at intervals for the first 10 minutes of baking and see how that works out.
Note that I am wearing heavy oven mitts the whole time (if you think steam is hot, try that copper!). The espresso machine is by Breville.
This is such a great idea! And an even better idea with the heavy duty gloves 🙂
I’ve seen people rig up their oven with a pressure cooker as well. They fill it part way with water and set it on the stove. From the top of the pressure cooker (where the outlet valve is) they run a tube from there into the vent of their oven and it will pump steam into the oven for as long as the cooker is over a flame. I’ve been tempted to do this but not bold enough to follow through 🙂 Seems risky to me and I wouldn’t recommend it.
Anyways, love this idea! I might have to try that out myself. Considering you probably have a much more effective steaming of the oven you probably don’t need to steam for the entire 20 minutes as I do here. I know that in a professional bakery they might only press the steam injection button a few times the first few minutes of baking. You’re going to have to experiment some more — which is what it’s all about, anyways.
Happy baking and thanks for the idea!
Hi Maurizio! Great blog! I have a question on whether it’s better to use convectional bake or regular bake. On one hand c. bake is faster and spread the heat evenly, on the other hand it may dry the bread and be better to be used only after the first 20 minutes bake (post oven spring). I’ll be happy to hear your opinion on that.
Another question, when you mention lava rocks – are these the very same ones used for gardening?
Thanks,
Eyal
Thanks, I appreciate that! Your comments on convection vs. traditional are spot on: with convection you’ll have better heat regulation and distribution throughout the oven but a potential for reduced steam in the oven cavity. I choose to not use convection, all of the bakes shown here are with a traditional oven. My guess is that convection would be good for the second half of the bake but in the beginning it would dry out the loaf and cause it to not rise as high as it could.
The lava rocks I use are culinary grade and not the same as those used outdoors. You can find the lava rocks I use in my oven here.
Hope that helps and thanks for the comments!
I tried this method, although I didn’t have baking stones on top, and the baking stone that the bread was on was not very thick. I was pretty happy with the results, but the bottoms of my bread didn’t brown as well as the top of the bread. In fact, the top surface was almost burnt, and the bottoms were barley cooked. Do you have any idea why that would happen? Do you think it has to do with the pan in the bottom having too much water in it?
Did you preheat the oven for at least an hour to ensure the bottom baking stones were fully heated? It sounds like maybe they weren’t quite as hot as they could be and radiated less heat than the interior of the oven. It’s possible the pan had too much cold water but I wouldn’t guess that would cause this issue. If you preheated for an hour you could try 1.5 hours next time and see if that helps, if not reduce the amount of water in the pan and see if that solves the issue. The stones should be smokin’ hot!
Thanks for the reply! I did preheat for an hour, but tomorrow I will try for 1.5 preheat and less water. I’ll tag you on Instagram if they turn out better 🙂
Ciao Maurizio e complimenti per il blog.Io utilizzo la vaporetta per immettere vapore nel forno e trovo questo metodo molto comodo ed efficiente.
Grazie mille, apprezzo molto che! Trovo che questo sia il modo migliore per cuocere a vapore il forno a casa, anche se richiede un po ‘di lavoro extra. Felice cottura!
In Emmanuel Hadjiandreou’s How to Make Bread, he suggests preheating the oven with your baking stone inside and a sheet pan below it. When it’s time to bake, you add water to the sheet pan to create steam. It’s very, very simple, and thus far it’s worked beautifully for me when making sourdough. I’m about to get a new oven, though, so we’ll see how it works in that one!
That’ll work just fine as well!
Hey Maurizio, awesome blog! You’ve provided every amatuer baker out there a great service 🙂 Quick question, is there any benefit to adding some boiling water to the dutch oven (under parchment paper) to add extra steam? Doing a bake in about 2 hours and I’m really itching to try it.
Thank you! I would not add water below the parchment paper, it will just create a soupy mess there on the bottom. If you have a handheld spray bottle mist the top of your dough when you load it into the DO and then spray more in right as you’re covering the loaf to trap more steam in — I do this all the time and works well!
That’s a great suggestion! Just did the bake and it had the best oven spring I’ve ever had with pouring about 1/3 cup of hot water under the PP. However the bread tastes a little too sour and yeasty (or floury). Is it possible that this is because of the extra water? This was also the first time I proofed my dough at ~85 degree ambient temp. Thanks so much for the info. Here are some pics (not happy with the crumb 🙁 )
Top View: https://i.stack.imgur.com/fnnUe.jpg
Side View: https://i.stack.imgur.com/jMJun.jpg
Crumb: https://i.stack.imgur.com/thZ0J.jpg
Really nice rise and crust color to that! It looks like you may have proofed the dough just a little too long (and that might be an explanation for the slightly sour bread). I’d pull back on the proof time a few hours and see if that helps open the interior up a little bit and reduce the sourness!
Maurizio, I am on my second attempt for doing batards with no dutch oven and it isn’t working out so well. I have a baking steel, two loaf pans with steaming towels and no rise. I put in the loaf pans 5 minutes before and also put in hot water after I load in the loaves. I barely get any rise. I am wondering if it is that the oven is venting all to well or if my loaves are too hydrated. My two batards did though start touching each other after 5 minutes. What would you suggest to debug this issue? I am pre-heating at 475.
It sounds to me like your dough is either over hydrated or there’s not enough strength to the dough. It’s also possible your dough is over proofed. All three of these things can lead to excessive spreading in the oven. I’d first start by reducing hydration in your mix to see if that helps. Even if your oven doesn’t have any steam at all your dough will still rise up some, just not to its full potential.
Try reducing hydration some, if that doesnt help then I’d try pulling back on your proof time a bit to ensure the dough isn’t going over!
Thanks! I will try that next. I went back to 78% and using a DO just to get a win and bread to eat for the week. I might just do that with one of the loaves for next bake. This last one was insipred by Kamut 60% and at 85% hydration.
Sounds good!
Maurizio,
Is the second baking stone absolutely necessary?
I’ve seen other places use a similar method to you with good results but without the top baking stone…. Also I assume a baking steel should work in place of the thick baking stones?
Best,
Scott
Scott — no the top stone is NOT necessary. I find it helps some people who have heating elements on top and bottom with regulation of that top heat but it’s not mandatory at all. The baking steel would replace the baking stones on the bottom altogether.
Maurizio,
I ended up getting a loaf that I think got too much heat on top…. I had got some weird black burn bubbles after just 20 minutes with steam and it did not look like the loaf rose correctly…. What’s weird is I don’t think my top heating element even turns on as far as I can tell but I guess I should look into that…. Is the only solution to this to try and add that top baking stone to regulate the heat?
Best,
Scott
I’ve never seen black scorching like this unless I’m making pizza and I place my dough close to the top broiler element. I suppose it’s possible your top element is getting a tad higher. A top baking stone would help regulate this, yes. If you move your oven rack down though, perhaps that would help? Move it away from the top some if that’s the issue.
Usually ovens are pretty even in terms of top and bottom heat so I’m surprised you’re having this issue!
For example could a slightly lower temperature and slower preheat solve this problem?
Sorry one last question….
Could a lack of regulated top heat contribute to poor oven spring? I noticed the loaves did not hardly develop any open crumb and when I’ve baked in a close cast iron I haven’t had too much issue with that. I assume it’s either that or lack of steam but I followed your method for steam closely.
Best,
Scott
I’ve heard that you are really not supposed to let your baking stone get wet. Would the steam not possibly damage the stone? I just purchased my stone and I am getting ready to use it for the first time!
Thank You
I have not personally had this happen to me, but I could see really cold water splashed onto the stone causing issue (anytime really cold liquid touches anything really hot there is a possibility of a crack). I think since I’m not pouring water directly on the stone I haven’t had any issues — use caution, though!
This was very helpful! I just bought the book by Ken Forkish and I do not have a dutch oven and was wondering what a good alternative method would be. Now I will try this instead… Thank you!
Right on, glad to hear it! I still use this method almost every day when I bake and it works very well 🙂
Baked my first loaf today (60% white wheat, 20% rye, 20% spelt, added pumpkin seeds). I let it got a little too dark in color and didn’t think to score the bâtard… so it was a little dark and funky shaped… but hey, not bad for a start! I will keep trying! Thanks again!
Cool! Well, each loaf does have its own style and character 🙂 Keep at it, happy baking!
So I tried this technique and it worked pretty well but I just had one or two questions: is there a particular amount of boiling water the report over the rags in the roasting pan they need to be completely saturated or just enough to cover all the rags? Also I use your sourdough recipe that I took my load out of the fridge about an hour before baking, but it seemed to flatten out a little bit initially in the oven. Would it be beneficial to leave the loaf in the fridge until right before scoring and baking?
I boil enough water to completely soak the towels in my pan. I’m not sure exactly how much water as I just fill my kettle, boil the water, and pour until I notice the towels are totally drenched.
I do like to leave my dough in the fridge until right before baking: take the dough out, score it and load it directly into the hot oven with towels already steaming (be careful).
Hope this help!
Hi! Love your blog. I bought a Baking Steel (the thick one) and I’m going to use it for the first time tomorrow morning – will be the first time I’ve ever not used a Dutch oven.
Do you now use a Baking Steel in place of refractory bricks? Either way it would be a good subject for a blog post!
Could you put the lava rocks and the rolled up dish towels in the same baking tray? Or would the rocks scorch the towels?
PS. I bought a KoMo after reading your post but sadly the grains I bought to mill (organic, UK grown) have very little strength and result in a close textured loaf. Going to search elsewhere – do you have any tips about what to look for? Protein percentage etc?
Thanks so much!
Sorry for the late reply! Yes, I use the steel instead of the bricks, they are removed altogether. I agree, a blog post on how I use the steel and any updates to my method is due! Not too much has changed, though, just the swap for the steel instead of the bricks. They both work well, though!
I would not put the towels in with the rocks, it would defeat the purpose of the rocks. They were there to store additional heat so when the ice is thrown on them massive steam is created. The towels provide a consistent steaming throughout.
Congrats on the KoMo! Fantastic mills. Hard to say on what to look for exactly with grain, it depends on what you’re after. In general look for grain that claims a protein from 11% – 13% (you could go higher but any lower and it’s more like pastry flour).
Hope that helps — happy baking Rachel!
Since the thick stones covered enough area to handle multiple loaves I’m wondering if you found a steel that covers the same area? I looked for one since i use one for making pizza with great success but only found a large area one that was too thin. I’m curious what you use for a steel and its thickness and dimensions.
This is the baking steel I use, the dimensions are listed there at the webpage. It is a bit smaller than when I had baking stones but I can easily fit 2 x 1kg batards — it is a bit challenging to fit two boules, though. I usually will do one boule and one batard if I want to change things up. I almost always do batards, though 🙂
Is there a reason you wouldn’t go for a thicker steel like the big by Baking Steel? Would this not theoretically improve oven spring?
I actually did not see The Big by Baking Steel when I first ordered my Modernist Cuisine one, that’s quite a bit thicker and pretty heavy! Up to you on that, theoretically it should retain and radiate more heat…
Yeah, I only ask because I’d imagine it’d lose less heat when opening the oven door due to retention. It is a bit of a monster though… Ha!
Have you had any trouble with scorching on the bottom of the loaves using a steel? I baked on my steel (without parchment, may make a difference) and the bottom of my loaf was black.
I do get a little more of a cooked crust with the steel than I do with baking stones. I’ve found that I do have to turn the heat down on my oven during the preheat as the steel seems to get a bit more hot than traditional stones.
Thanks very much for your work on this site! My girlfriend and i have been having a blast learning how to care for our starter (practice child?), getting used to the quirks of our oven, and baking some fantastic bread.
I’d like to try to bake wood-fired loaves on my Weber Kettle. I have the Dough Joe stones, a Lodge pan that I already use as a drip/water pan when I smoke or slow roast meats, lava rocks to put in the Lodge, and a spritz bottle. I’m good at controlling the temp using the top and bottom dampers on the grill. I figure I can spritz through the holes in the top damper to compensate for the steam that will escape through them.
Do you think I’m missing or overlooking anything?
Thanks for any suggestions you can offer!
Right on, so glad to hear you guys are enjoying my site! Your sourdough starter is totally a child of love 🙂
I think that would be an awesome thing to try! I’d say just be careful with spritzing in the holes as some steam might come back at ya there, but I’m sure you’ve thought of that. As long as you can maintain a somewhat closed oven and get steam in there during the first part things should go very well!
Another thing is you could just use your Dutch oven inside the kettle, both bottom and top to enclose the dough during the first part of the bake for steam and then remove the lid for the last part. You won’t get quite as much “wood fired” taste I’d guess but if you find you’re not able to generate enough steam this might help.
Let me know how it goes! Jealous of that Kettle, been meaning to get one just haven’t made the leap 🙂
This is great info! I’ve been having issues getting my bread to have thick, dark crusts. I use a cast iron pan on the lowest shelf and the baking stone right above it. I’m wondering if I should either raise my stone up (it seems like the steam just hits the bottom of my stone and has no where to go) or, put my steam pan above the baking stone? My stone is also quite large and takes up most of the rack space. There is 1-2 inches of space on either side, and I can see steam escaping the oven so I know it’s in there. I’m curious to see if the steam would distribute more evenly. Any thoughts on the best place to put the steam pot, or if people have had success with it above the bread? I also have an electric oven…would that play a role in how it affects my bread?
I also use an electric oven and in fact I think they are better than gas because gas ovens usually have an internal vent of some kind, which will cause steam loss.
I put my steaming pans to the sides of my baking stone (or baking steel) so the steam can kind of get funneled up around and to the top of the oven. As long as your bread is rising well in the oven then I’d say you have plenty of steam in there to allow it to expand at the beginning of the bake. If you’re more concerned with the color and cook level of the crust there might be other issues at play here instead of the steam. To get more color on your crust make sure you’re preheating your oven at a very high temp (like 525F or 550F) for a full hour to get your baking stones nice and hot. When you load your dough try to act as quick as possible to prevent too much heat loss. Bake your dough hot for the first 20 minutes — you could wait to turn the oven heat down to 450ºF until even 30 to 40 minutes into the bake to try and really bake that crust. Keep an eye on it, though, as it can quickly scorch.
Finally one thing you could play with is purchasing another baking stone to place above your loaves as I’ve done in this post. That might help retain some top heat in your oven and radiate it downwards as you bake. I’d only do this as a last resort if you don’t already own a second baking stone (I hate buying excess equipment!).
Let me know how it goes or if you’ve made any progress! Happy baking 🙂