
Steam burns hurt. Like, really hurt. The small mark on my left forearm begs the question daily: Maurizio, was it worth it? But before we talk about my new baking badge of honor, let’s concentrate on overcoming the challenges of baking good bread at home. While many of these challenges present themselves early in the two-day process (fermentation, flour selection, mixing, shaping, and so on), there is that crucial component at the end of this ordered procession: baking bread with steam in your home oven.
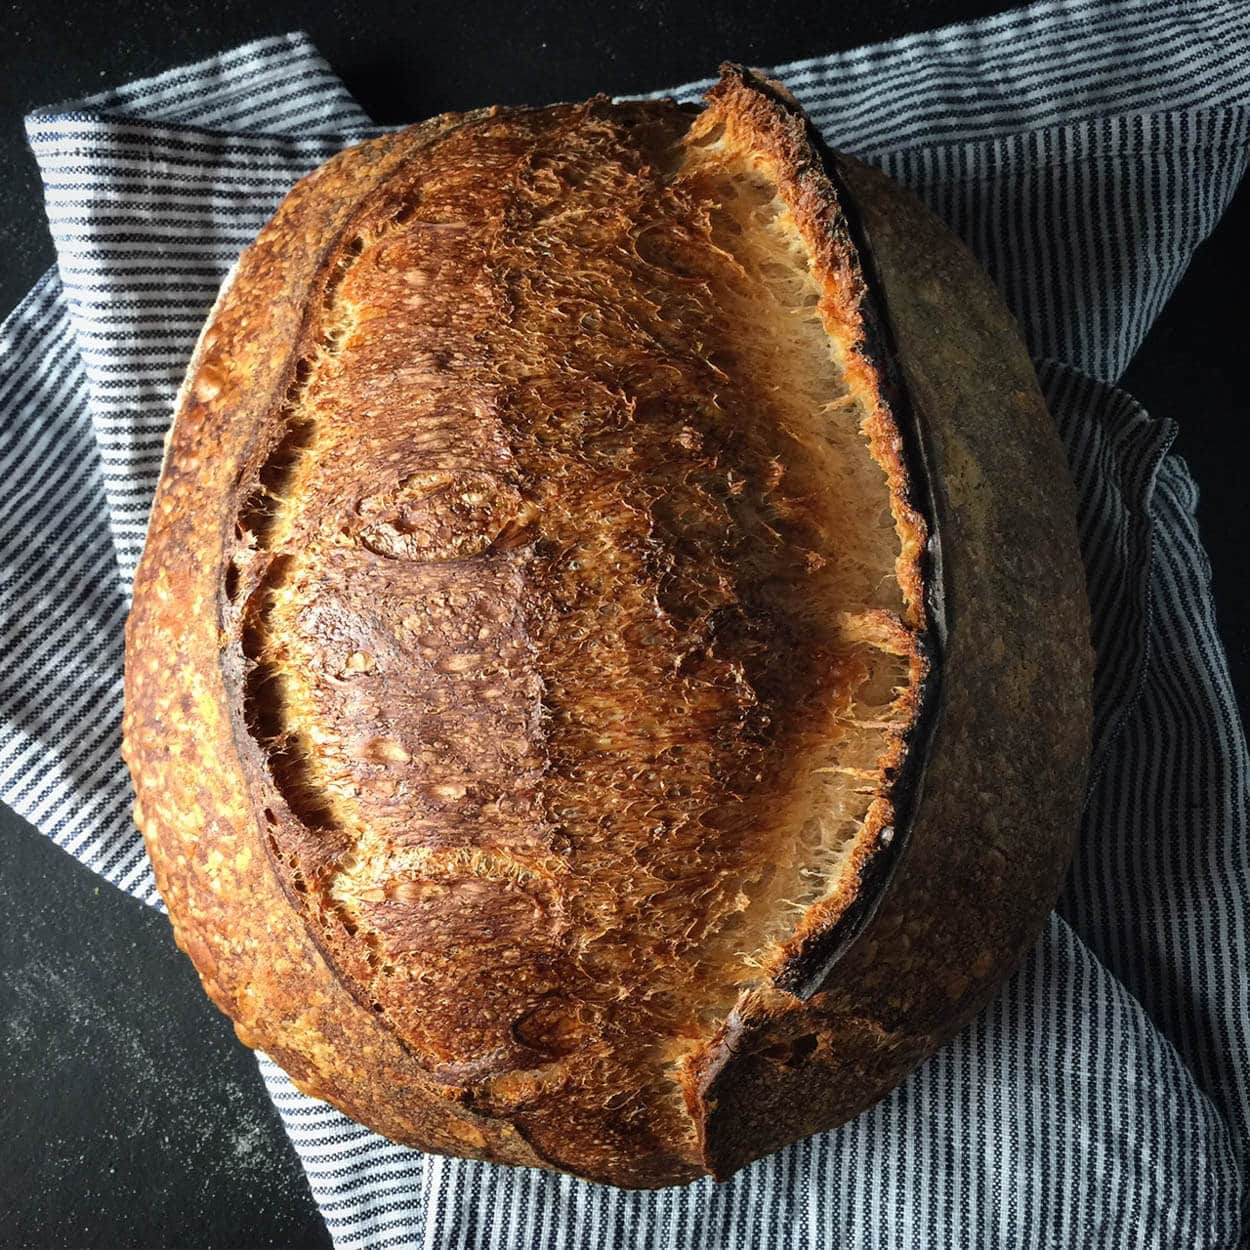
For your bread to rise to its potential, that outer, taut skin on your loaf needs to be able to expand and stretch before hardening off. Steam in the oven and subsequently on the surface of your loaves helps keep that skin pliable and stretchy during baking. If your dough dries and bakes too quickly on the exterior, it can harden off before it rises to its full potential (and you may not see a satisfying gringe, either).
So how can we get enough steam in the oven to keep those loaves rising? There are indeed methods abound, and each person has a different approach, but arguably the most popular choice at the moment, and the one I started with, is baking bread in a Dutch oven (see my guide on how to bake bread in a Dutch oven if you’re not familiar). However, there comes a time when you might want to bake two (or more) loaves at a time, or perhaps your loaves are scaled more substantial than your Dutch oven can comfortably hold. An alternative is to bake directly on stones and generate sufficient steam in your home oven by some other clever means.
Professional baking ovens have steam on tap. Press a button, and a wave of steam sprays over the decks of newly loaded dough (however, there are always challenges, no matter what oven you use). Now there are home ovens that are “steam ovens,” but the ones I’ve looked at are incredibly small. You might be able to fit two loaves, but I could also fit two Dutch ovens in my current home oven; no advantage there. Some other alternatives can’t inject steam at a button press, but they are sealed to trap steam and have a method for generating steam. These look very promising but are on the expensive side.
Since most of us bakers out there do not have one of these fancy ovens, we have to make do—read on to learn how baking bread with steam in your home oven can be a straightforward process.
Video on baking bread with steam
In the video below, you’ll see my baking bread with steam from start to finish.
Baking Steam Method
The following does take a bit of practice. First, ensure you get all your tools ready and within reach; this is a rather hectic process, and you want to do it almost without thought — muscle memory. The longer your oven door is open, the more heat will escape. Your thick baking stones or a baking steel (which is also awesome for sourdough pizza!) will help offset some of the loss, but you still want to act quickly.
Below is a quick visual showing where I have my pans, where the loaded dough goes, and where my baking stones are.
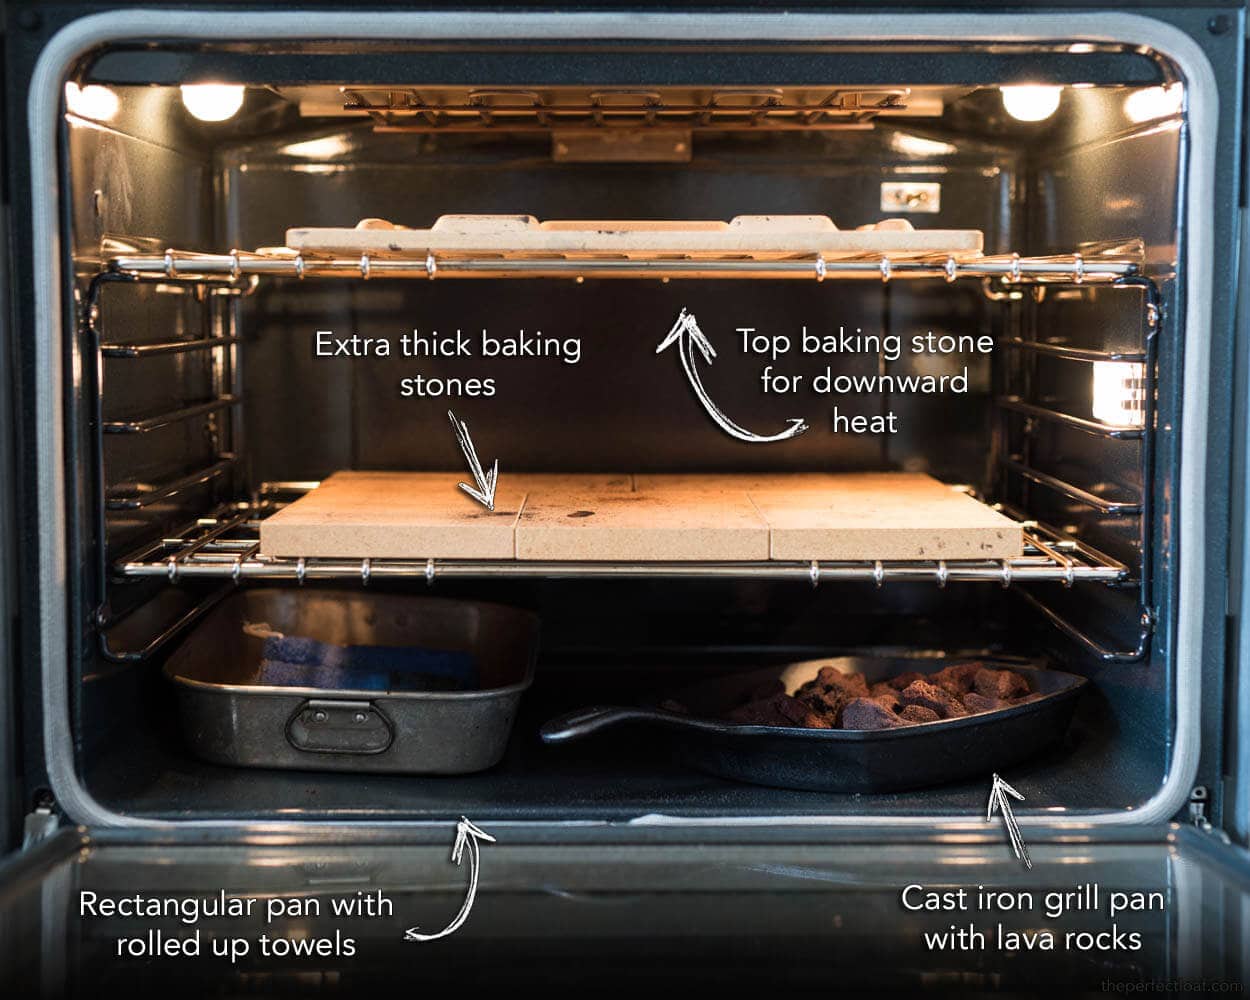
Now that we have a list of what things we need, where items will be placed, and why, let’s get to the actual method (with the animated version below!).
Home oven steaming method
- An hour before baking, turn on your oven (preheat)
- 10-20 minutes before loading your bread, boil water, pour over the towels in your rectangular baking pan, fully saturate them, and place them in the back corner of your oven
- 10-20 minutes after loading the pan, put each mass of dough on a separate piece of parchment paper
- Place the dough and parchment underneath on a pizza peel
- Score dough
- Open the oven and slide the dough (with parchment) onto baking stones
- Quickly lay a towel on the oven door glass (optional; you can see me doing this below). I’ve read that cold water dropped onto a hot oven glass door will shatter the glass, thus the towel. I have dropped some water on the oven door without any ill effect, but I do this to be safe.
- Carefully toss 1 cup of ice into your cast iron pan with lava rocks
- Quickly spray loaves a bit with a hand spritzer (optional)
- Close the oven door and watch your dough rise
- 20 minutes later, remove both steaming pans (careful these are extremely hot) to stop steaming
- Bake as usual until done
Whew, that’s it! Here is the whole process (minus the preheating and drenching of towels) in one trendy baking-with-steam GIF:
Why do we use two sheets of parchment paper for our dough? When you use two sheets, you can adjust the space between the loaves as they bake, if necessary. One of the worst things to happen is when the dough expands and joins with another loaf; this reduces the overall rise of both loaves. If you notice the loaves start to get a bit close as they rise, quickly slide them apart.
After 20 minutes of baking, we remove the cast iron and rectangular baking pan, so no more steam is generated, allowing your loaves to crisp up and harden off.
Caution: Please be careful with this method: if you drop too much cold water on your oven door, you might crack the glass. I have never had this happen to me, but I know of at least one baker who had this issue. Be sure to keep the water off the glass.
Another approach to baking bread with steam
Baking bread in a sealed post is possibly the easiest method of baking bread with steam at home. You place your dough in a preheated pot, close the lid, and put that in your oven.
That method works incredibly well, but the drawback is you can only bake round loaves this way. You’re limited to the realm of round pots.
If you’d like to keep using a Dutch oven, see my post on how to avoid burning your loaves →
Tools for Steaming Home Oven
We first need to have the right set of tools for the job. Let’s go over a few more additions to our home-baking arsenal:
Lava rocks
The first is a cast-iron pan filled with lava rocks. Other materials will work just as well here: (clean) nuts and bolts, a metal chain, or any other heat-retentive material that will increase surface area. Keep in mind whatever the material needs to be able to withstand around 525ºF and water splashed onto it.
Lava rocks are a primo choice because they get extremely hot, don’t break down easily, and have tons of jagged sides and crevices for an incredible increase in surface area. What’s the big deal about surface area? As cooler water comes into contact with a blisteringly hot surface, it instantly turns to steam. The more hot surface area you have, the more steam you generate. I found these lava rocks, specifically made for home BBQ grills, and they have turned out to be a perfect choice. They come in a fairly large bag, and I am still on my first handful — I probably have lava rocks for life.
Roasting pan
The second component is the heavy-duty stainless steel pan I use to hold the lava rocks. This stainless steel pan is great for a few reasons: it’s super thick-walled, retains heat well, and holds up to abuse.
Rectangular baking pan
The last component is an old rectangular baking pan with small dish towels rolled tightly. I use an old pan around the kitchen and roll up three small towels in the center. The more towels you add, the more steam you’ll generate. I use cheap, clean towels as these will eventually get scorched and need replacing.

Ten to twenty minutes before you start baking, you will boil some water and pour it over the towels in the rectangular pan, so they are fully drenched and steaming. You will then place this pan with towels back inside your oven. This pan will saturate the interior with steam before you even splash water on the lava rocks and will continue to do so well into the bake.
Optional Hand Spritzer
The final item is optional. A stainless steel hand spray bottle I use to spray in a bit more steam just before closing the oven door. I like to have the option to spray in a bit more steam if I feel it is warranted. Additionally, you could use this after 5-10 minutes into baking to quickly saturate the oven inside one more time. Some bakers, like Jeffrey Hamelman in Bread, recommend this second round of steaming in a home oven.
Not many new tools are needed, and if you think about it over the long run, you will probably save money as now we can bake 2-4 loaves at a time — no more wasting all that space in the hot oven. How do we do this now that we have the tool requirements squared away?
Conclusion
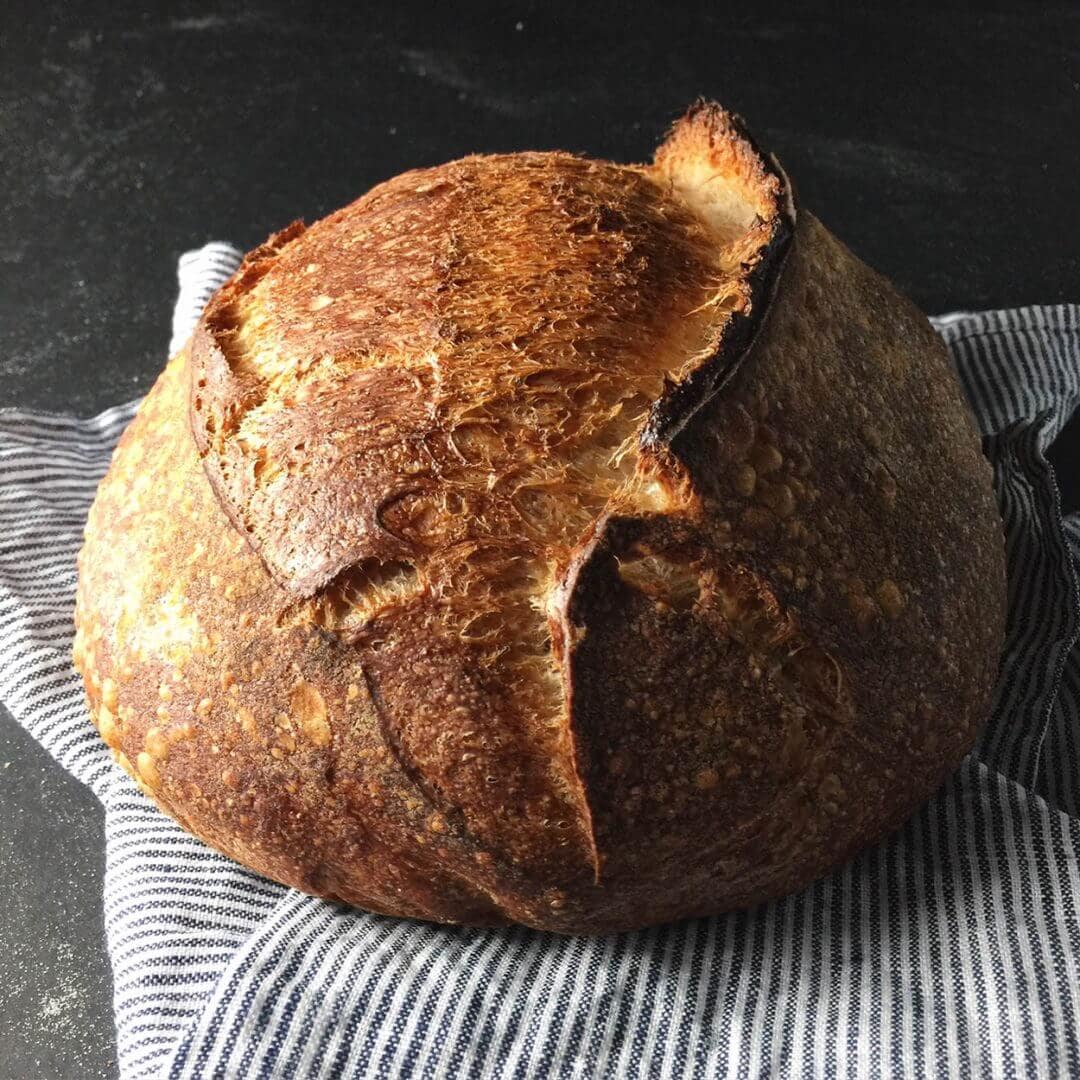
I like this method for baking bread with steam in my home oven because it allows me to cook two large loaves of bread at a time. I plan to bake four loaves at a time, and this will let me do that with no problem. Baking with a Dutch oven (or combo cooker) works exceptionally well, and I might still use that method if doing only a single loaf or a highly hydrated one (the pan will help keep the dough together). Still, I find myself using this new method more and more. The results have come out smashingly.
Small steam burns: worth it (as you can see below).
What’s Next?
Be sure to check out my full guide to baking bread at home for more details on this important step!


423 Comments
Great post. Thanks for the info. The reason I found it… I’m considering buying my wife a Roller Grill and am debating between models with or without humidity injection. Is bread the only baking use for humidity? She’s more into muffins, cakes, etc but with proper tools I’d love some sourdough! 😉 Is it worth the upgrade?
Also, we don’t have any other oven in our house. Baking would be the primary function and an occasional steak or roasted veggies.
Any advice? Thanks!
JB
You’re welcome, thanks for the kind words! I’ve never used my oven, steamed, for anything other than baking bread but I do know some of these “steaming ovens” can be used to cook vegetables with steam to keep them moist. I’m not too familiar with this, but if I were to buy an oven that had steam injection I’d want to make sure I have control over when, and how long, steam is injected into the oven. You want to steam your baking dough for some time in the beginning but then stop after a while. The other benefit I could see to buying an oven that has steam injection is it would most likely be completely sealed, meaning no steam would escape the cavity — this would be fantastic.
In the end I’d say it’s up to you! Personally I would have bought a steam oven for my house if there was a model that was large enough and let me precisely control the amount and duration of steam injected — I wasn’t able to find an oven like this at a reasonable price.
Hope that helps!
Okay, so I’ve tried a bunch of things recently since I decided to stop baking in the dutch oven, but I still can’t figure out how to get the entire crust (top and bottom) evenly cooked. My oven has an element on the top and bottom, and it seems like one always wins. My first attempt was on a round pizza stone with nothing above my bread. I removed the loaves when the top looked nice, but noticed the bottom didn’t cook nearly as much.. My second attempt was making a pan loaf with the top covered (as this post recommends) but nothing between the pan and the element. The bread that was touching the pan burned by the time the top was dark enough. Then I upgraded my stone to a baking steel (the normal one, not the thicker modernist cuisine one like you have). This time, I covered the top element and cooked until the top of the loaves looked nice, but the bottom burned! Any advice on how I can make sure the outside of my loaves cook evenly?
It’s always a constant battle to get loaves to cook completely evenly in a home oven. Usually mine will have a slightly more cooked bottom than top, but I’m ok with that. The baking stone on the top should help dissipate some of the heat generated by your top elements so they don’t overheat the top too fast. To prevent the bottom from cooking too fast you can reduce your preheat time so the Baking Steel doesn’t have quite the same amount of stored up heat. Additionally, you could raise up the bottom Baking Steel so it’s not so close to the heating element. And one more idea: you could coat the bottom of your dough with something to help burning, like coarse cornmeal or bran/germ.
So in the end it’s going to be a juggle for you to find just the right sequence of events to get things to bake evenly. I’d recommend raising the Baking Steel one rung, lower the preheat by say 15 mins (or whatever is best) and then keep that top baking stone to help dissipate the direct heat from the top element.
Keep in mind that when your oven is actively heating (trying to reach the temperature you’ve input) the elements will be on and red hot, so you might have to turn the oven down in temperature once the internal cavity reaches the desired temperature. This way they won’t activate but you will still have plenty of heat stored in your steel and stones.
Sorry I don’t have a 100% definitive answer to get your bread to bake evenly! I am constantly turning, moving and juggling things in my oven to keep things as consistent as possible — it’s not easy sometimes 🙂
I hope these ideas help!
Use a baking cloche. Cover the bread with a bowel for the first 25 minutes at as hot as your oven will go 230 degrees Centigrade for my oven . Then for the last 25 minutes turn heat down to 190 degress Centigrade and remove the cloche/cover. Saves all this messing about. I actually use stainless steel dog bowls as the cloche/cover (Unused by dogs of course). Bake straight on a thick baking Stone. I also prove the dough on non stick baking parchment and transfer the dough into the oven on the parchment saves a lot of messing about.
Yes, cloches work very, very well and have been around for quite a while. Much easier also! The reason I steam my oven this was is I’m baking 2 (and up to 4) loaves at a time, and the loaves are usually in batard shape so they won’t fit easily in my Dutch oven or even a large cloche. All depends on the bread you’re baking, I suppose. I’d say this method I have here works just as well as a cloche / Dutch oven.
Thanks for the comments!
Can you do this in a gas oven?
Hello! I’ve never baked my bread in a gas oven, but I do know because they have vents inside it is harder to keep the steam generated inside the oven cavity. I would say this would work but perhaps not quite as effective as it is in an electric oven. Give it a shot and see if the rise of your bread is comparable to something like baking in a Dutch oven (a sealed pot). Hope that helps!
Thanks Kim, appreciate the kind words and the comments!
Yes this method may be overkill for some people, for me it produces ample steam to get my loaves up — it could be that my oven vents more than usual, or the interior is larger than most home ovens and thus the need for a bit more steam. I’ve played with just the towels and it works, but the pan with rocks helps out quite a bit for me.
Happy baking!
Speaking of steam, when you set up your oven with all that steam, be careful opening the door for the first time! I got the most painful facial of my life one morning. It gives whole new meaning to the word: facial peel! Just sayin’.
Absolutely true statement there! Steam burns hurt, as I said in the post 🙂
Thanks you very much for all the tips and share your experiences.
Same Day please make tutorial videos.
Best Regards from Santiago, Chile.
You’re very welcome! I’m definitely working on videos!
I’ve had great success with everything in Tartine Bread, including the sourdough croissant recipe. To achieve steam I use a Dutch oven technique with various shapes of covered cast iron or stoneware pots. I recently decided to order a Wolf combi steam oven. Because the bread baking mode settings are proprietary, there is no way to know the temperature and % humidity. The oven instructions also say not to preheat(!!) – which makes me think the process is nothing like a commercial steam injected oven. Has anyone tried baking Tartine sourdough bread in a Wolf combi steam oven? Gaggenau or any other brand? Have the results been as good as in a Dutch oven?
That oven sounds awesome, but no preheat? That’s very, very odd! I don’t have any experience with any of those ovens (although I’d love to have any of them :)) so I can’t comment, sorry! Hopefully someone else chimes in…
I use (unused by dogs ) stainless Steel dog bowls as cloches to keep the steam around the baking dough for the first part of the bake as per the Tartine method. Bread cloches were around long before Tartine published his book.
If you don’t have rocks can you still use your skillet as a steam pan? Or will this ruin the seasoning of your skillet?
Sure, you can definitely just use your pan without the rocks. Over time you’ll want to oil or season your skillet because, yes, the water will eventually cause your pan to rust. I will oil mine periodically to keep that nice seasoned layer on top.
I have done all that but you still end up getting a thick crust. Do you think there is a way to make the crust thinner? Yet a lot of maillard.
Are you baking your bread at a high enough temperature, for the times listed in my post above? If you bake a higher temperature, for a shorter period, and your oven has sufficient steam you should get a nice thin crust.
I really like the lava rock method. I’ve been using it now for quite a while to great success. Yes, the Dutch oven is a very good tool to have around! Not only do I use it for certain round shaped loaves I like to use it for all sorts of things in the kitchen — a very versatile pan.
I actually plan to do some traditional Italian breads soon! I recently stumbled on a really, really old cookbook my Dad had that has some really interesting recipes (including Altamura style bread). Stay tuned 🙂 Sounds like you did Puglia the right way!
Glad you’re enjoying my site, thanks so much for the comments!
I’ve tried each of these methods except for the lava rocks, but will give these a go with your instructions! The Dutch Oven was a real revelation for me, and just that tip made the Tartine book totally worth it. I was lucky enough to do a bread course at the Cordon Bleu in Mexico and got to use a steam oven for three months- it was really hard to go back to my crappy Mexican oven. 🙁
On another note, would you consider doing a few posts on traditional Italian breads since that’s where your family is from? I lived in Puglia for a while and really loved the differences in bread from town to town. I have a lot of fond memories of the weekly fresh loaf with just a little olio before lunch!
I just discovered this blog and LOVE IT!
You could spray the loaves first and then pour the water over the rocks in order to trap more steam.
I’ve used lava rocks for 2 years but I recently switched to small (river ?) rocks, 0.5-1 inch diameter (or even smaller – one of the commenter suggested sand – that could work too). I figured the water will heat up and evaporate more efficiently due to larger contact area: it did.
Coincidentally I’ve just started doing this! I now spray the loaves quickly first, and then pour in the water, you’re right it’s a better order of operations.
Very good reiteration, I think river rocks (yes those are the small round ones you can buy) are a great idea and worth a test for me, thanks! I’ll add them to the list of things to pick up, and then washed thoroughly of course 🙂
Thanks for the comments, really great suggestions — happy baking!
Maurizio,
I just found your site and REALLY like it. I’ve used a variety of steam generation methods over the years and lately have reverted to a Dutch oven for simplicity 🙂 However, I’ve started researching newer steaming methods for non-boule loaves.
Here is one from Bouchon Bakery that I haven’t seen discussed. It appears to generate a TON of steam:
Hotel Pan: 13x21x3 inches
River rocks: 9-10 pounds, golf ball size or smaller
Metal Chain link: 10 feet (links appear to be 1/4″ thick) threaded among the rocks
Super Soaker water gun: Needs to deliver about 350g/1-1/2 cups of water from far enough away that the steam doesn’t burn you. (Wear long protective gloves if you are concerned about burns).
They say that there is tremendous thermal mass (I’ll say!) and it produces a lot of steam.
Any comments on this?
BTW – you might want to reemphasize putting a HEAVY towel over the oven door’s glass. I used a thin one once and a small amount of water cracked the glass! The manufacturer’s replacement part was ridiculously expensive. I replaced it with borosilicate glass I sourced from a local glass company at a fraction of the cost – and I don’t have to worry about breaking it.
Thank you! That is a fantastic idea, especially the pan with river rocks — might even be better than lava. I think, though, that method might even generate too much steam, if that’s possible. My method here, which I still use, works so well that even with other things I’ve tried I still come back to this. That said, changing the pan to river rocks might be a really great modification. Either way!
Sorry to hear about your glass! Yes I’ve always been very worried about this and it is a concern. The glass on my oven seems to be extremely strong because I have seen some water accidentally splash on there with no ill effect — thankfully. I’ll definitely be switching to a thick towel, though!
Thanks so much for the comments and these recommendations!
HI Maurizio!
I’ve been into home bread baking now for 3 months… I have 2 sourdoughs, one white flour and whole wheat flour.. Your website information is really helping me to learn and getting better with time. So big thanks for that!
I purchased the thick baking stone 3 months ago (a working friend suggested it as i even didn’t know about it). We bake everything with it – bread, pizza, cakes and even grilled food.
My question is about increasing the heat with my home oven (bloomberg)… i know that a baking stone gives it approx. 30 (celcius) degrees more then without it. I am considering now purchasing another thick baking stone…. would it give more heat especialy for pizzas?
Thanks,
Emanuel
You’re very welcome Emanuel, glad you’re finding my site useful! I would imagine adding more stones would help your oven retain more heat, but I’m not sure it would make it “hotter” overall, if that makes sense.
Have you used your broiler when making pizza in your home oven? What I do is move my rack up a little higher like if you were to broil. Preheat your stones on your rack as hot as normal (I do 525ºF for 1 hour), then when you are just about to load your pizza turn your broiler on high heat. Your thick baking stones should retain quite a bit of heat (mine get over 500ºF, I use an IR thermometer to test temperature) and then the broiler blasts the pizza from the top with a lot of heat. Works extremely well. Be careful with the broiler though, it can quickly burn your pizza (I’m taking 3-5 minutes bake time) and there might be some splattering depending on what ingredients you’ve topped with.
Hope that helps!
You should try using sand, spread in a half inch layer in a baking dish, in the bottom of the oven. Sand is going to slowly and steadily releases moisture
Chris,
Thanks for the suggestion, I’ve actually never thought of that. I could see it as a good medium given how dense it would be. Of course I’d have to find clean and sterile sand… I’ll look into that!
hello Maurizio, wonderful recipes and tempting photographs..im going through your photographs again and again from last week..cant resist it.. i have an OTG oven of 16 liters capacity. can i use it to bake breads with steam?..or should i just bake it without steam?,this oven is very compact..and can i halve the recipe for levain and dough?..if it should be changed how can i do that without changing the texture?
Thanks so much, I appreciate that!
You should bake with steam, bread requires some at the start to ensure a nice and lofty rise. I’m not familiar with your oven but you should be able to generate enough steam in there as long as it is relatively sealed. My oven doesn’t have a full seal but using the method above I’m able to generate plenty to get a nice rise.
Yes, you can halve the recipe with no problem. Just take everything and literally reduce it by 50% and you will attain the same results.
Let me know if you have any other issues and happy baking Anilitty!
thanks for your replay..by the way im from India and OTG(oven toaster grill) ovens are quite popular here…i just bought an another otg with convection mode of 33 liters capacity and it is perfect for your kind of baking..no one here in India makes sourdough breads from my knowledge..too bad for people like me..:(.. i had been searching for recipes like yours for a very long time..thanks again for the inspiration..keep baking
Ahh yes, I know what oven you are using. It should work! You’re very welcome, keep me posted on how it’s going!
Maurizio, I have ordered the extra thick baking stones, the lava rocks arrived today. I will work up to doing two loaves at once as you demonstrate, but how do you plan to get 4 in at once? Maybe two running north to south and two east to west? What shape loaves and would these be full sized?
As others have mentioned, this is a fantastic write up. By the way, I’m in Portland, OR. If you want a loaf of Ken’s (Ken Forkish’s bread is a life changing experience for those who don’t know him) just say the word and it’s done.
Thanks for everything,
Matt
Matt, excellent! I plan on doing 4 loaves by actually adding in a second shelf in my oven. I will have to remove the top stone, or rather flip it around. It will be very, very tight in there, but I should be able to get it to work.
I envy you out there in PDX! My brother lives up there and he really, really enjoys it. I’ve had Ken’s bread (and pizza) and it’s superb. Thanks for the shipping offer, I appreciate that. My brother acts as a “mule” when he comes to visit with his back stuffed full of bread and other items from out there 🙂
You’re welcome, thanks for the comments!
Great write up Maurizio!
I’ve used this technique to great effect my last two bakes, but I noticed something peculiar happens on some loaves, sometimes. The loaves in question will appear to rise just fine, but when I remove the steam I they continue to rise and “crack.” That is, they will no longer release the strain of the oven spring through the score like the loaf right next to it, but instead just burst. Any idea why this might happen? I’d never seen it before I started cooking on stones.
My theories are 1) (the simplest) they aren’t finished rising yet. I, of course, have no way of knowing this. It’s strange that that loaf right next to it will be fine. My oven is kinda crappy so maybe the distribution of heat is just complete crap as well, thus causing one loaf to rise faster than the other. I could always give them more time, and in theory as long as there is a proper amount of steam it shouldn’t really matter, right?
2) My shaping job on one isn’t as great as the other. (this is extremely possible as well)
Maybe it’s both! It’s probably both. Either way, I really love the crust this method produces. Super thin and crackly. I find it’s an immense improvement over the dutch oven (which I now suspect doesn’t have a great seal).
Thanks!
Mike
Thanks, Mike! Glad this method is working out well for you. I’ve used it many, many times now with great results. Even better if you can find all those vent holes in your oven and cover them 🙂
I sometimes get a “crack” as well. My theory on these is that you have great rise in the loaf but perhaps your scoring isn’t sufficient enough to allow the bread to bloom to its max potential. It pushes hard against areas that have no release, the outer crust is hardening as the bake progress and then eventually a crack emerges. I don’t think a crack is a bad thing at all and I’ll typically get one near the top or bottom of my batard.
Shaping could also play a role, as you suggested. No one is perfect at this 🙂
I agree, I get such a nice and thin crust it’s incredible. I too have suspected for a long while the Dutch oven does not get a full seal! I almost always bake this way at this point, but I still dream of a proper baker’s oven at home…
Cheers!
Maurizio-
Check this out – perhaps a serious way to go beyond the Lodge Combo Cooker.
https://www.kickstarter.com/projects/stranddesign/the-fourneau-bread-oven/description
Scott Schmidt
London
Scott, thanks for the link that product looks very interesting. Essentially it’s kind of a larger combo cooker if you think about it, but it might make loading bread easier. Unfortunately the size is rather small so it looks like you can only fit one loaf of bread (one of my loaves at least) at a time. I’m not sure they could make it much bigger, though, I bet that thing is heavy!
Thanks for the link, I’m definitely going to follow these guys and their product!
Thanks for sharing your alternate method, Martin. Sounds like a good approach, and a bit more straightforward than my method above. I will have to give it a shot. I don’t typically steam more through the bake as that rectangular pan I have in there continues to put off steam, however, I don’t know if it’s even possible to over-steam in a home oven (mine isn’t sealed particularly well). I’ll have to try that as well!
And yes, protective gear is a good idea! 🙂
Thank you for this post! My one attempt at steaming my oven for baguettes was not successful, and I look forward to giving it another try with your method.
You’re very welcome — good luck and let me know how this method works out for you! I have not tried it on baguettes yet, but I’m sure it will work very well.
Nice post. I use a simpler steaming technique. I preheat an old boiling drip pan in the oven along with the stone. After I load the bread, i throw boiling hot water into the drip pan. The first time it is about 1 cup. I repeat it at 3 min intervals until 10 minutes, then I carefully remove the pan. It seems to work for me, I get good spring, crust and crumb on my baguettes. I also wear some clear protective goggles, and long welding gloves to keep burns down.
Great Post. Your bread looks GREAT. I thought you would be the right person to ask a question. I have been baking yeast bread and pizza for many years. ( When baking bread I would throw ice cubes in a tray every 3-4 minutes for the first ten minutes. ). How things change.
I recently joined your newsletter and find it entertaining and informative. Well done. I came across your site in my research for making a starter for sourdough bread. I read Tartine Bread and tried the starter from the book. Not much luck. I now have a 100% hydration rye starter going for about a month. I have been using the technique from Tartine Bread.
Using a 75% hydration dough, recipe for one loaf, 20g of starter for leaven mix, 100g of leaven, ( my leaven passes the float test and it doubles in about 5-6hrs) I have let it go as long as 8-12hrs and then tried it with similar results, 60-70 minute autolyse, add salt, fold 6 times or so, pre-shape, then shape, put dough in a floured basket and refrigerate for 12hrs or less, use the cast iron skillet for baking. Thing is my bread does not rise much in the basket in the fridge and does not have much oven spring. (only about 2-1/2″ ht ) I do get some large holes in the crumb and a gelatin like look but the crumb is heavy. The exterior color is good and the scoring is not bad ( ears ) My thought is that my starter is too weak to leaven the dough. Also, the dough does not seem to have the extensibility or smoothness that I have seen on a video with Chad Robertson showing him shape his dough. I would appreciate any advice if possible. Many Thanks. Your trip to Italy looked like fun.
Thanks! I’m glad your starter is up and running, once it’s established it’s a very forgiving thing, so long as it gets regular food!
I would guess either your starter is not strong enough, as you suggested, but the fact that it passes the float test indicates there is some strength there and it should leavened your bread. My main concern is that you might not be allowing your bread sufficient time during bulk fermentation. How long do you perform your bulk fermentation for? Do you know what the ambient temperature is during this time? Or what temperature your dough is after you mix (stick a thermometer in your mass of dough)?
My bulk fermentation is typically around 4 hours at 78-80ºF. By the end of bulk fermentation my dough has risen at least 30%, but the main indicator is that the dough looks like it’s alive and holding some shape. The edges of your dough, where it meets the bowl wall, should be slightly domed down towards the wall. If you wet your hand a bit and feel the dough it should not feel extremely stretchy (extensible), and it should feel airy, light, gassy.
Your dough will become stronger (less elastic) during bulk fermentation, start to look “smoother” and have more of a shine to it. A full and strong bulk fermentation is key to producing light and airy bread!
Your comments about Chad Robertson, his dough is typically probably upwards of 90% hydration, despite what he says in Tartine Bread! That’s my guess at least. I know some of his bakers will sometimes comment on their hydration levels and they are definitely over 85%.
I hope that helps, let me know if you have any more Q’s!
Hi Maurizio,
Thanks for the tips. I have since made a new starter using your method and I ‘m pleased with the results. Big difference. I used your recipe for the bread, the only change that I made was that I used 50g of starter to make the leaven for one loaf. I’m going to try 25g of starter next time and see what happens. Thanks!
Glad to hear it, thanks for the update! I agree, slowly back off the amount of levain you use in your mix until you get sufficient leavening of your dough. Once your starter is strong enough (it probably already is) you can even get it all the way down to 20%, or like me, 15% in your mix.
Happy baking!
Yet again you’ve delivered a ripper and really informative post! What a great idea the lava rocks are and the look of that loaf is smashing, what an ear! Doubt I could fit doing this into my ‘Toy Oven’ but once (hopefully within 12 months) I get a real oven I’ll definitely give it a go. Thanks 🙂 PS, what brand of oven is that?
Thank you Maree! The lava rocks work extremely well in this case, and are pretty cheap to boot. My oven is a Thermador double oven. I don’t use convection for these bakes even though it has the option. Pretty much a standard home oven!
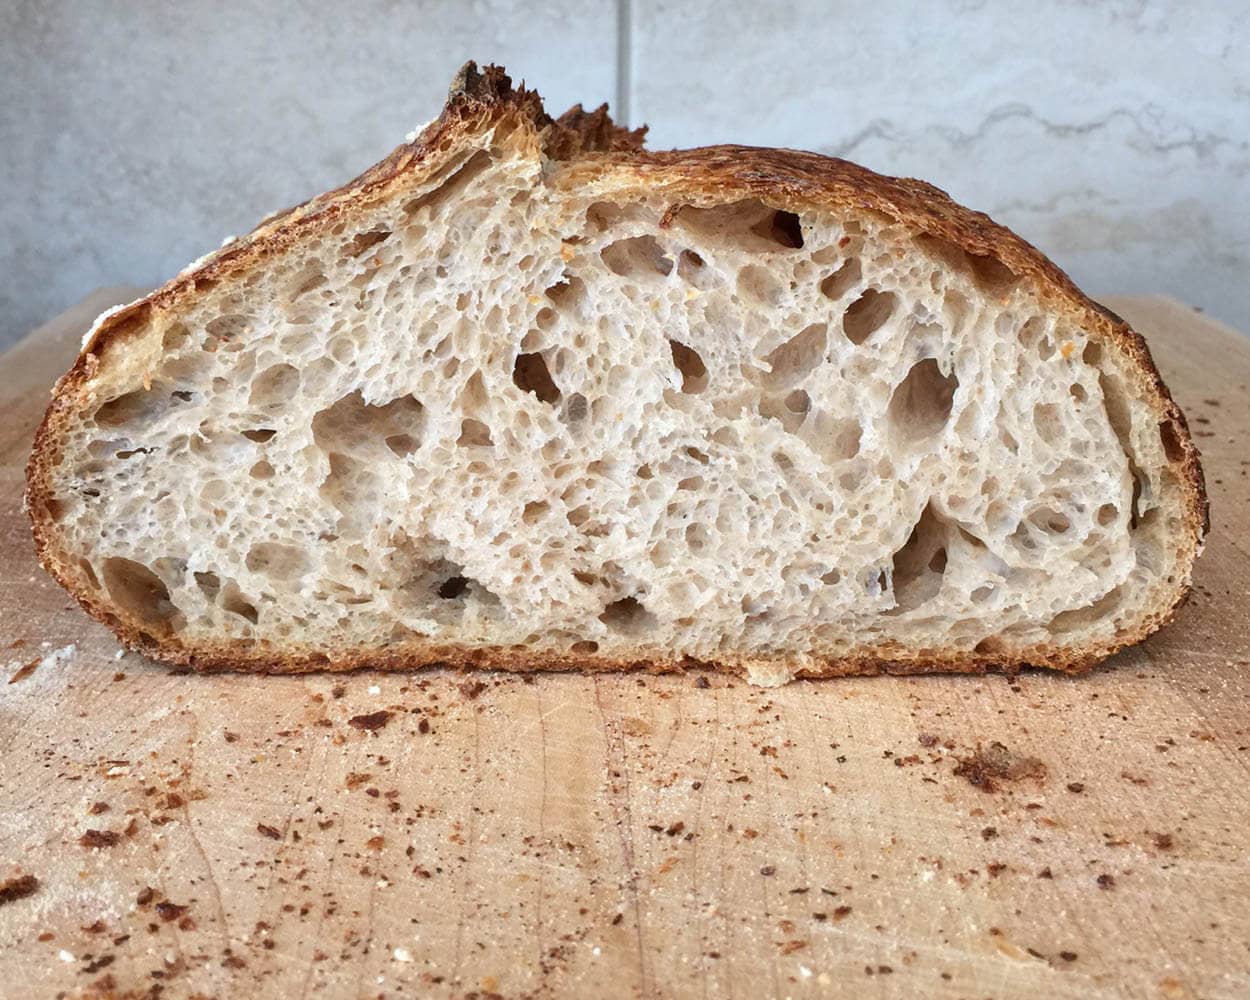
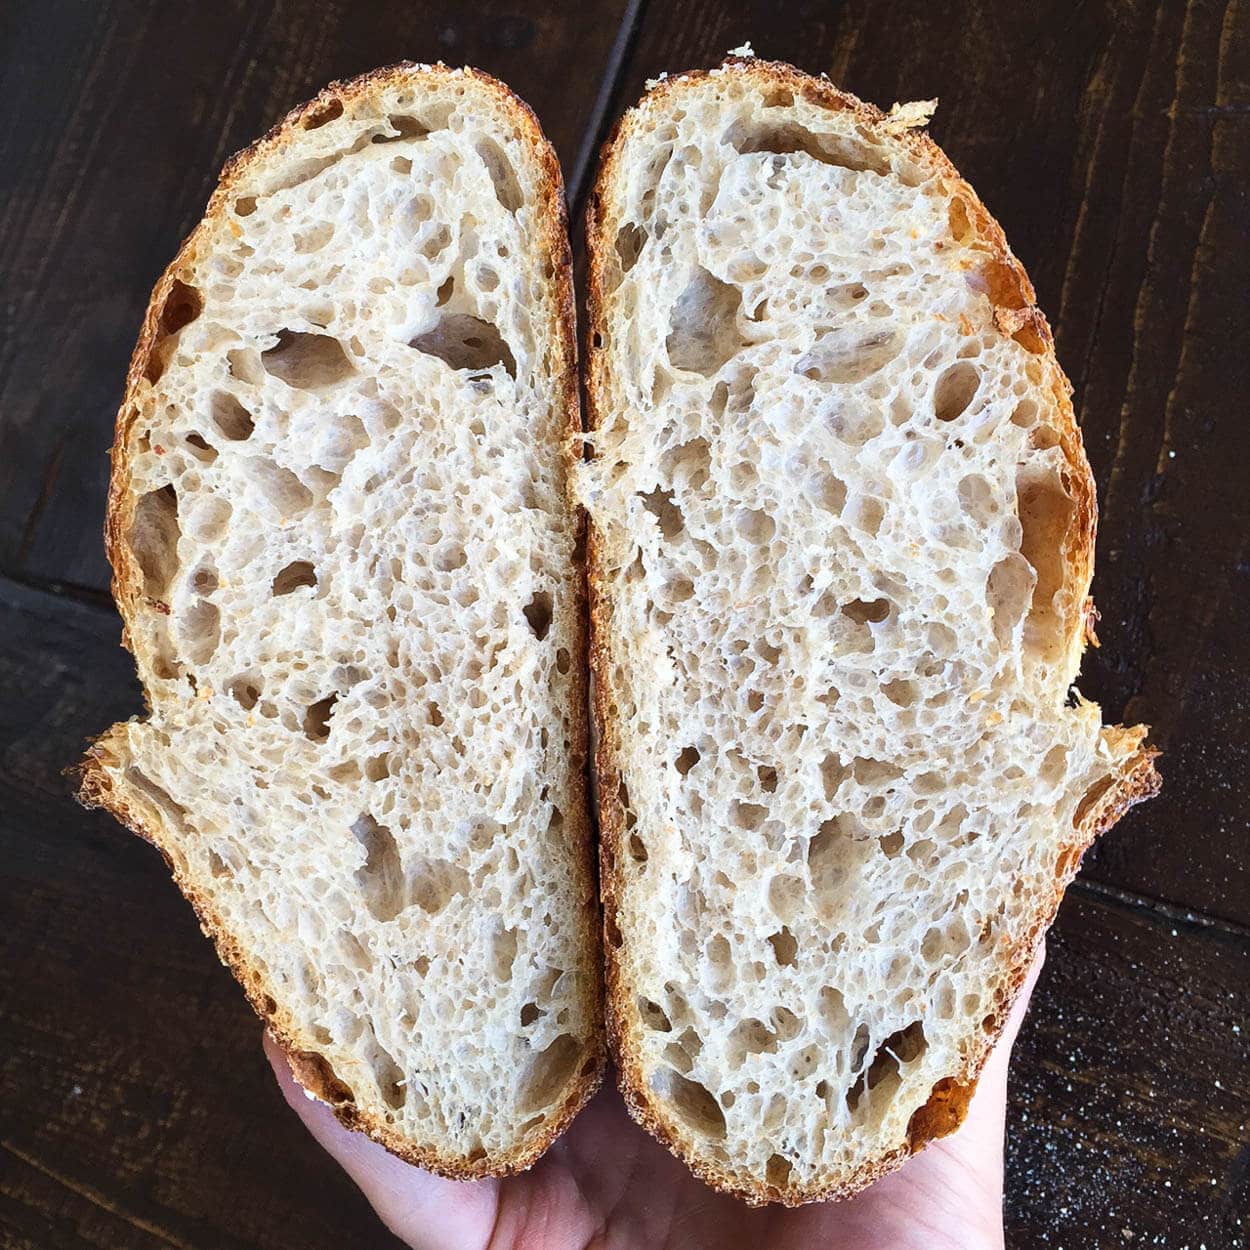
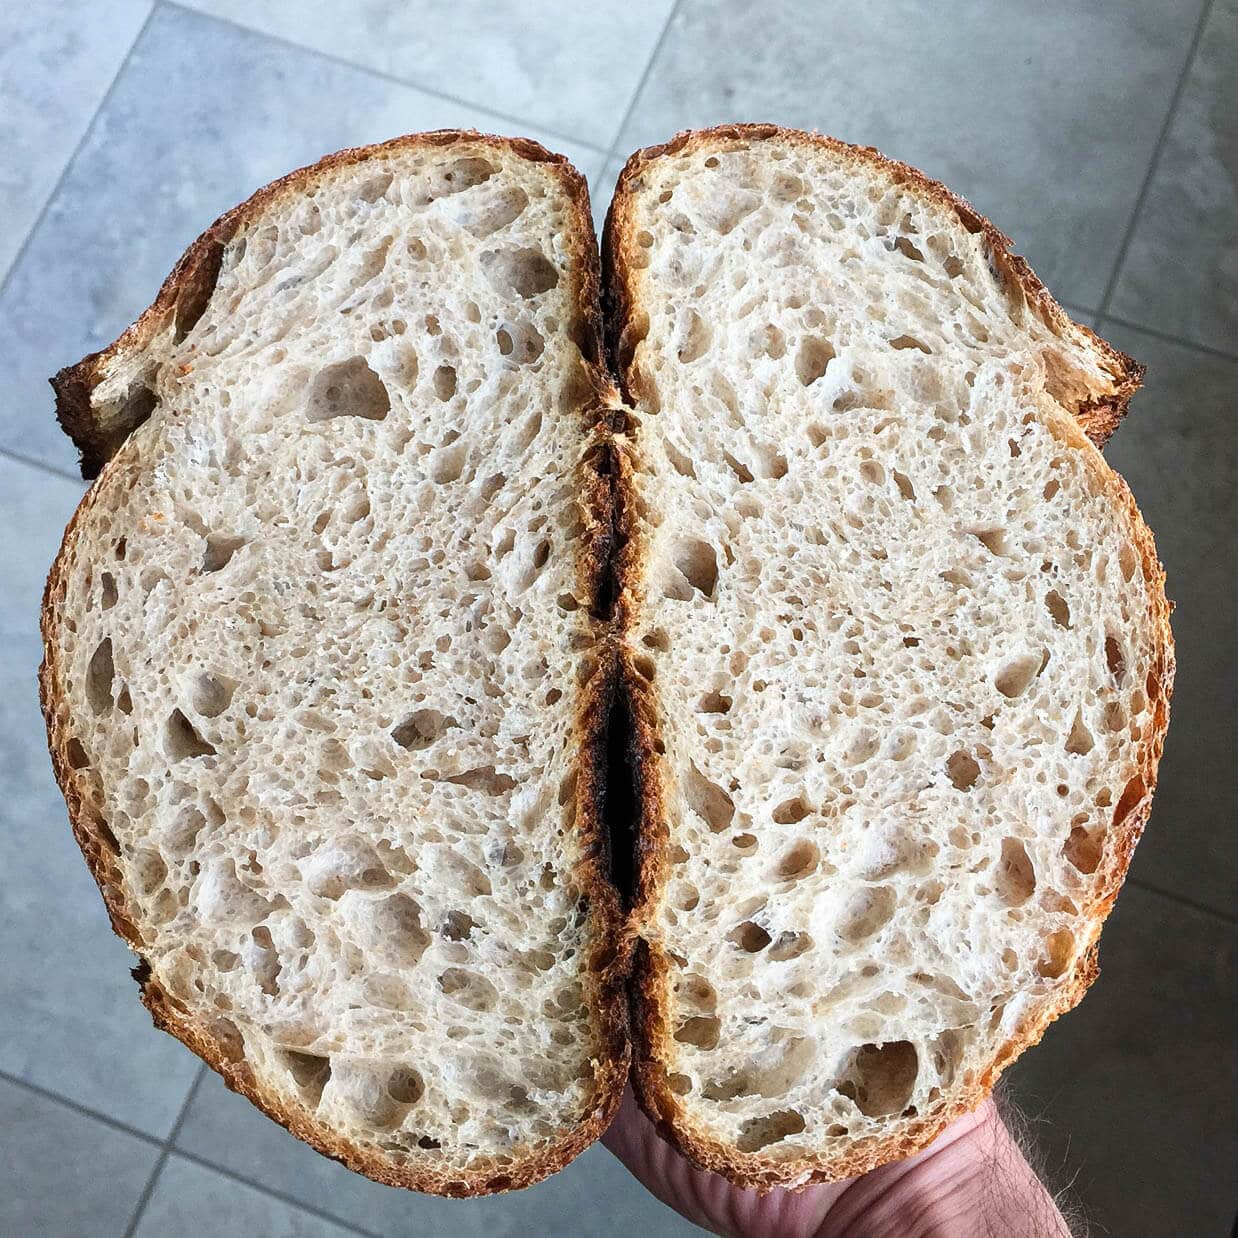
Nice write up, thanks Maurizio! But, the bread is outstanding!!! Tell us more 🙂
Thanks, Margie! These loaves were done while testing mixing techniques and flour combinations. For each of them I did ~8 minutes slap/fold up front, they used my stiff whole wheat levain (still working on a post about this), are around 80% hydration and I extended proof times in the fridge, up to 24 hours in one case. They really came out great, the one at the very top is one of my best loaves I’ve baked — now to nail down that consistency 🙂