
Steam burns hurt. Like, really hurt. The small mark on my left forearm begs the question daily: Maurizio, was it worth it? But before we talk about my new baking badge of honor, let’s concentrate on overcoming the challenges of baking good bread at home. While many of these challenges present themselves early in the two-day process (fermentation, flour selection, mixing, shaping, and so on), there is that crucial component at the end of this ordered procession: baking bread with steam in your home oven.
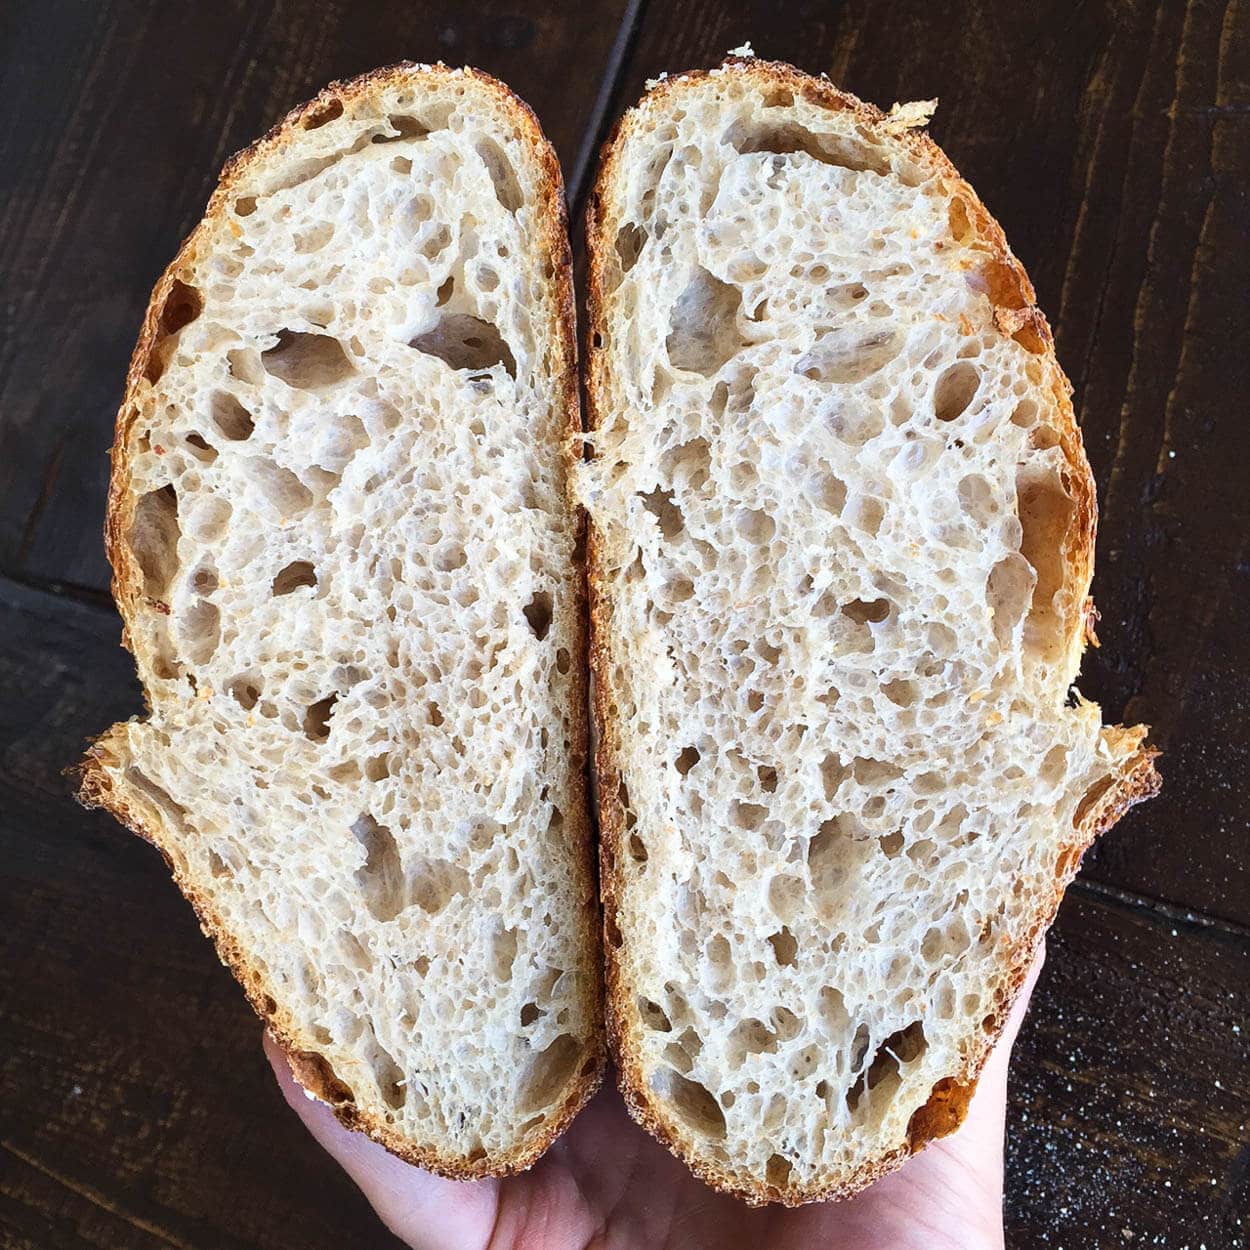
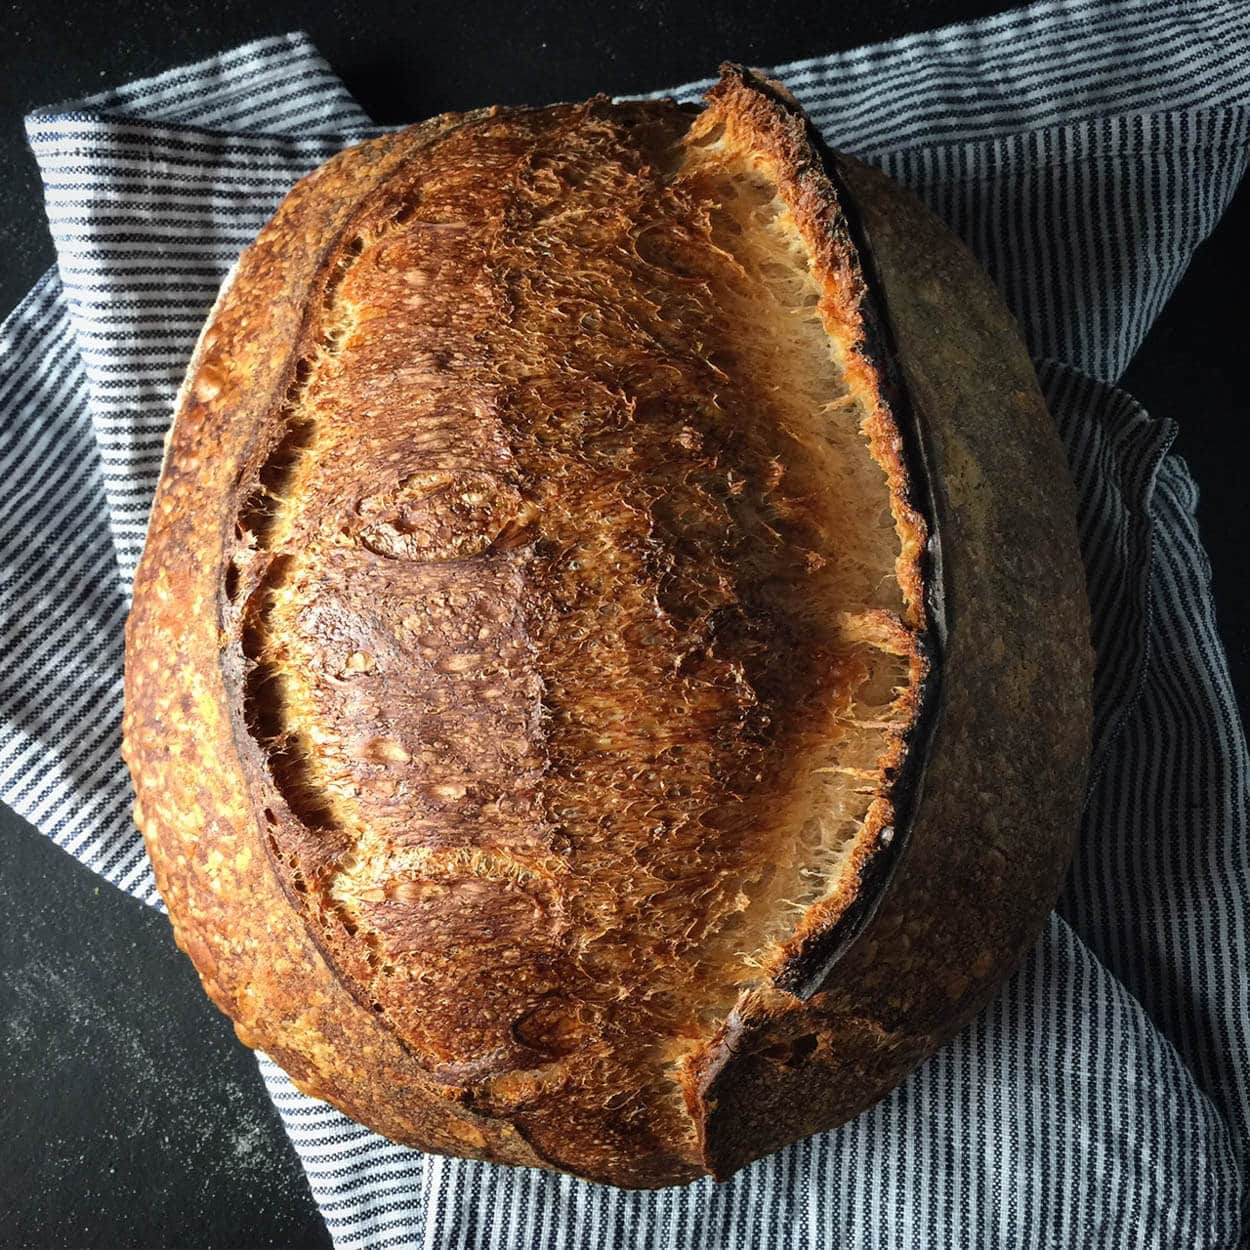
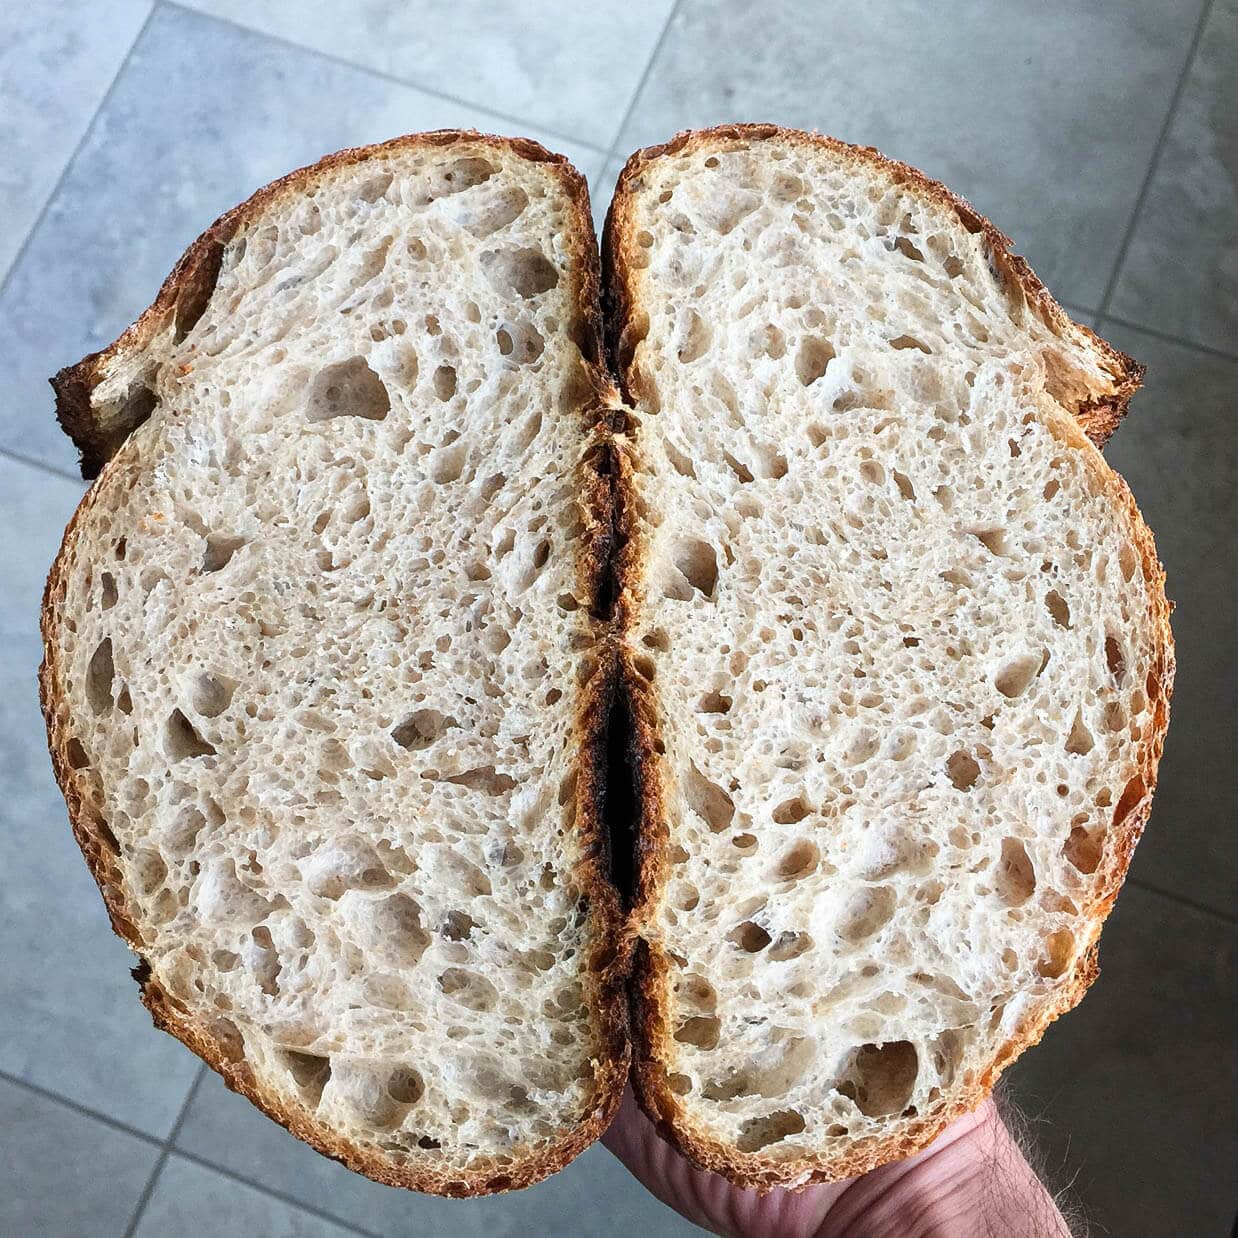
For your bread to rise to its potential, that outer, taut skin on your loaf needs to be able to expand and stretch before hardening off. Steam in the oven and subsequently on the surface of your loaves helps keep that skin pliable and stretchy during baking. If your dough dries and bakes too quickly on the exterior, it can harden off before it rises to its full potential (and you may not see a satisfying gringe, either).
So how can we get enough steam in the oven to keep those loaves rising? There are indeed methods abound, and each person has a different approach, but arguably the most popular choice at the moment, and the one I started with, is baking bread in a Dutch oven (see my guide on how to bake bread in a Dutch oven if you’re not familiar). However, there comes a time when you might want to bake two (or more) loaves at a time, or perhaps your loaves are scaled more substantial than your Dutch oven can comfortably hold. An alternative is to bake directly on stones and generate sufficient steam in your home oven by some other clever means.
Professional baking ovens have steam on tap. Press a button, and a wave of steam sprays over the decks of newly loaded dough (however, there are always challenges, no matter what oven you use). Now there are home ovens that are “steam ovens,” but the ones I’ve looked at are incredibly small. You might be able to fit two loaves, but I could also fit two Dutch ovens in my current home oven; no advantage there. Some other alternatives can’t inject steam at a button press, but they are sealed to trap steam and have a method for generating steam. These look very promising but are on the expensive side.
Since most of us bakers out there do not have one of these fancy ovens, we have to make do—read on to learn how baking bread with steam in your home oven can be a straightforward process.
Video on baking bread with steam
In the video below, you’ll see my baking bread with steam from start to finish.
Baking Steam Method
The following does take a bit of practice. First, ensure you get all your tools ready and within reach; this is a rather hectic process, and you want to do it almost without thought — muscle memory. The longer your oven door is open, the more heat will escape. Your thick baking stones or a baking steel (which is also awesome for sourdough pizza!) will help offset some of the loss, but you still want to act quickly.
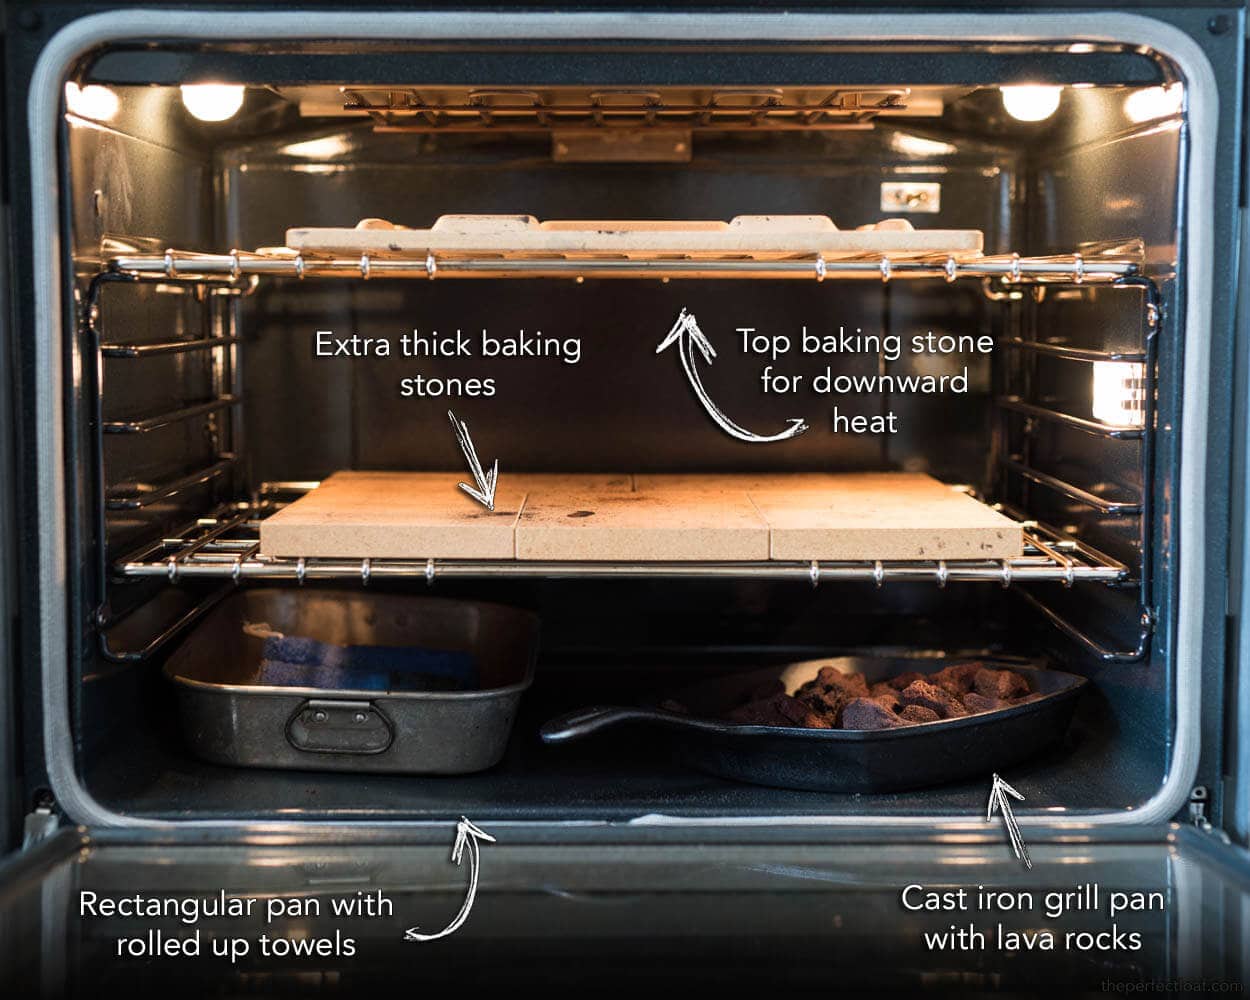
Below is a quick visual showing where I have my pans, where the loaded dough goes, and where my baking stones are.
Now that we have a list of what things we need, where items will be placed, and why, let’s get to the actual method (with the animated version below!).
Home oven steaming method
- An hour before baking, turn on your oven (preheat)
- 10-20 minutes before loading your bread, boil water, pour over the towels in your rectangular baking pan, fully saturate them, and place them in the back corner of your oven
- 10-20 minutes after loading the pan, put each mass of dough on a separate piece of parchment paper
- Place the dough and parchment underneath on a pizza peel
- Score dough
- Open the oven and slide the dough (with parchment) onto baking stones
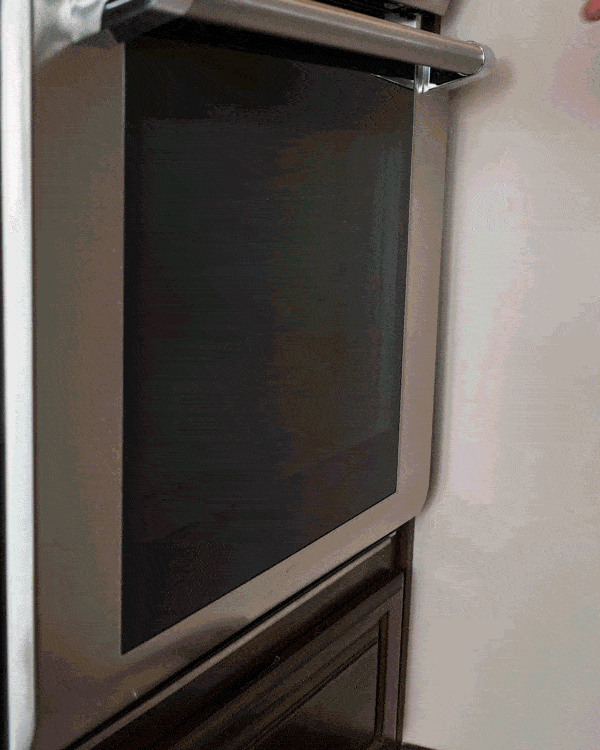
- Quickly lay a towel on the oven door glass (optional; you can see me doing this below). I’ve read that cold water dropped onto a hot oven glass door will shatter the glass, thus the towel. I have dropped some water on the oven door without any ill effect, but I do this to be safe.
- Carefully toss 1 cup of ice into your cast iron pan with lava rocks
- Quickly spray loaves a bit with a hand spritzer (optional)
- Close the oven door and watch your dough rise
- 20 minutes later, remove both steaming pans (careful these are extremely hot) to stop steaming
- Bake as usual until done
Whew, that’s it! Here is the whole process (minus the preheating and drenching of towels) in one trendy baking-with-steam GIF:
Why do we use two sheets of parchment paper for our dough? When you use two sheets, you can adjust the space between the loaves as they bake, if necessary. One of the worst things to happen is when the dough expands and joins with another loaf; this reduces the overall rise of both loaves. If you notice the loaves start to get a bit close as they rise, quickly slide them apart.
After 20 minutes of baking, we remove the cast iron and rectangular baking pan, so no more steam is generated, allowing your loaves to crisp up and harden off.
Caution: Please be careful with this method: if you drop too much cold water on your oven door, you might crack the glass. I have never had this happen to me, but I know of at least one baker who had this issue. Be sure to keep the water off the glass.
Another approach to baking bread with steam
Baking bread in a sealed post is possibly the easiest method of baking bread with steam at home. You place your dough in a preheated pot, close the lid, and put that in your oven.
That method works incredibly well, but the drawback is you can only bake round loaves this way. You’re limited to the realm of round pots.
If you’d like to keep using a Dutch oven, see my post on how to avoid burning your loaves →
Tools for Steaming Home Oven
We first need to have the right set of tools for the job. Let’s go over a few more additions to our home-baking arsenal:
Lava rocks
The first is a cast-iron pan filled with lava rocks. Other materials will work just as well here: (clean) nuts and bolts, a metal chain, or any other heat-retentive material that will increase surface area. Keep in mind whatever the material needs to be able to withstand around 525ºF and water splashed onto it.
Lava rocks are a primo choice because they get extremely hot, don’t break down easily, and have tons of jagged sides and crevices for an incredible increase in surface area. What’s the big deal about surface area? As cooler water comes into contact with a blisteringly hot surface, it instantly turns to steam. The more hot surface area you have, the more steam you generate. I found these lava rocks, specifically made for home BBQ grills, and they have turned out to be a perfect choice. They come in a fairly large bag, and I am still on my first handful — I probably have lava rocks for life.
Roasting pan
The second component is the heavy-duty stainless steel pan I use to hold the lava rocks. This stainless steel pan is great for a few reasons: it’s super thick-walled, retains heat well, and holds up to abuse.
Rectangular baking pan
The last component is an old rectangular baking pan with small dish towels rolled tightly. I use an old pan around the kitchen and roll up three small towels in the center. The more towels you add, the more steam you’ll generate. I use cheap, clean towels as these will eventually get scorched and need replacing.

Ten to twenty minutes before you start baking, you will boil some water and pour it over the towels in the rectangular pan, so they are fully drenched and steaming. You will then place this pan with towels back inside your oven. This pan will saturate the interior with steam before you even splash water on the lava rocks and will continue to do so well into the bake.
Optional Hand Spritzer
The final item is optional. A stainless steel hand spray bottle I use to spray in a bit more steam just before closing the oven door. I like to have the option to spray in a bit more steam if I feel it is warranted. Additionally, you could use this after 5-10 minutes into baking to quickly saturate the oven inside one more time. Some bakers, like Jeffrey Hamelman in Bread, recommend this second round of steaming in a home oven.
Not many new tools are needed, and if you think about it over the long run, you will probably save money as now we can bake 2-4 loaves at a time — no more wasting all that space in the hot oven. How do we do this now that we have the tool requirements squared away?
Conclusion
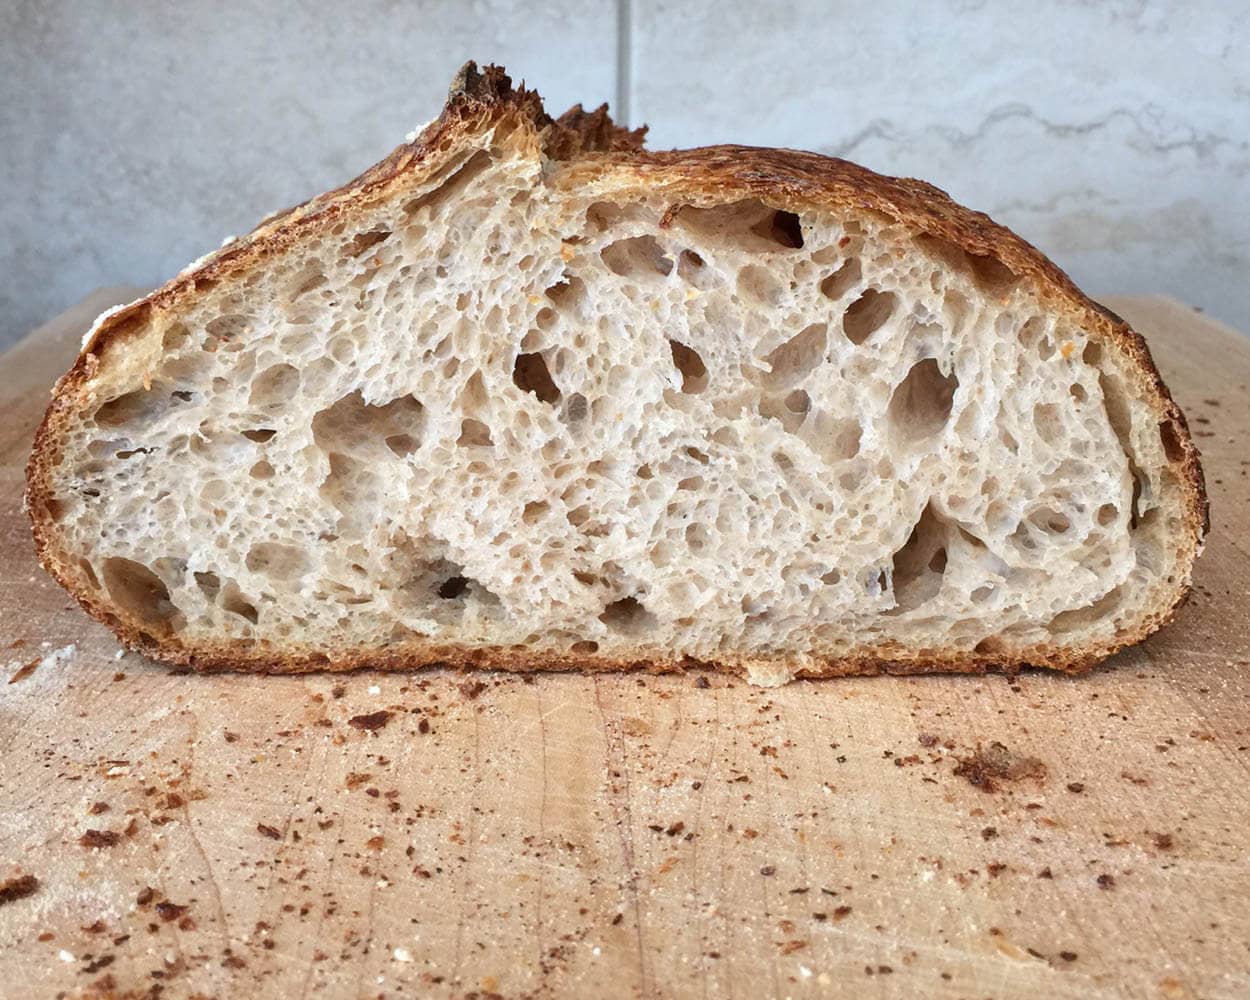
I like this method for baking bread with steam in my home oven because it allows me to cook two large loaves of bread at a time. I plan to bake four loaves at a time, and this will let me do that with no problem. Baking with a Dutch oven (or combo cooker) works exceptionally well, and I might still use that method if doing only a single loaf or a highly hydrated one (the pan will help keep the dough together). Still, I find myself using this new method more and more. The results have come out smashingly.
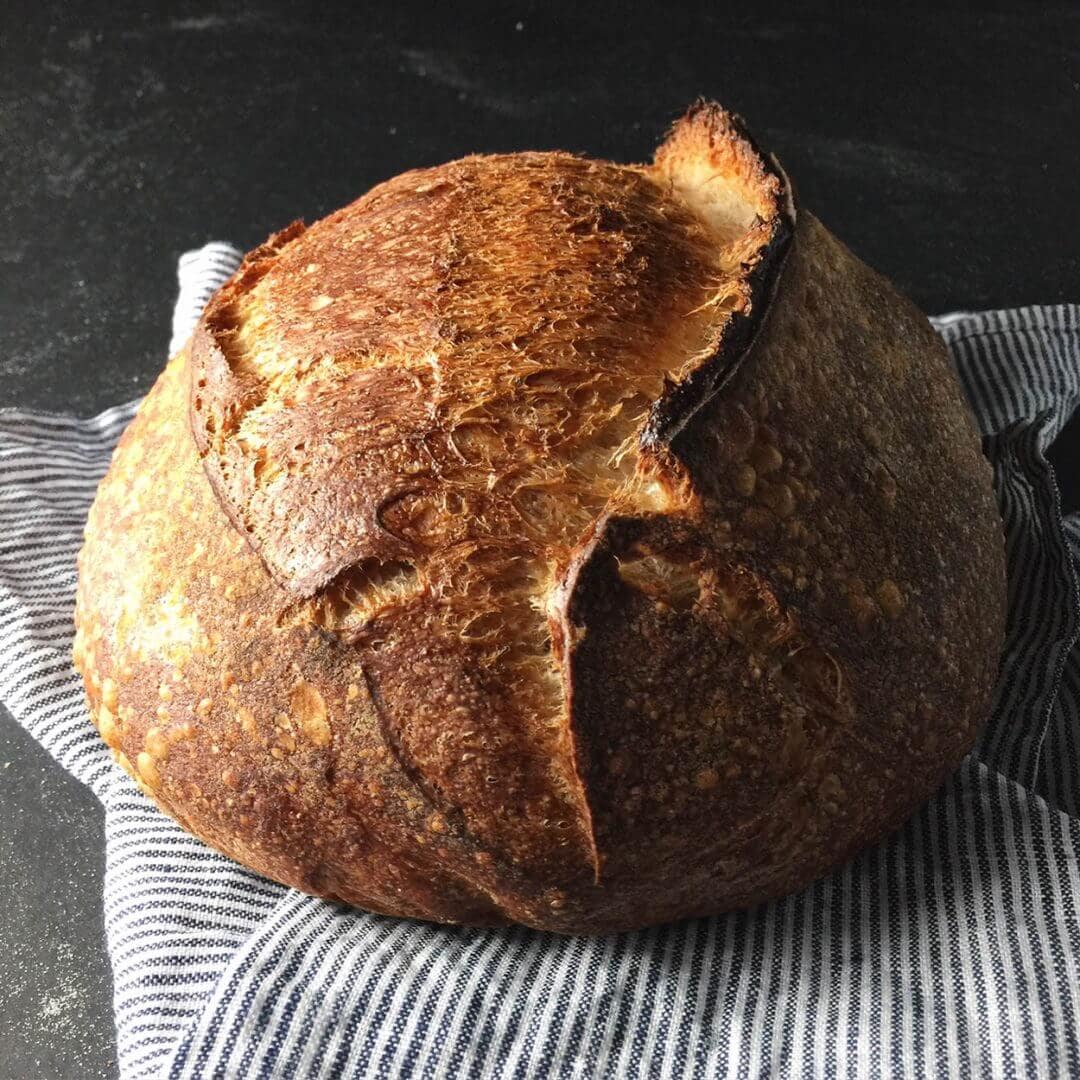
Small steam burns: worth it (as you can see below).
What’s Next?
Be sure to check out my full guide to baking bread at home for more details on this important step!


423 Comments
Greetings from the Land of Entrapment! I just got a baking steel and am worried that the steaming will cause rust (especially underneath) Have you found this to be an issue or am I worrying for nothing? TIA!
Hey! I have used my same baking steel for almost 5 years now with no rust and constant oven steaming sessions. I treat my steel like cast iron: don’t let water or liquid sit on it, and every once in a while rub a thin layer of veg oil on it to season. It looks brand new!
Thanks so much! I appreciate your guidance on this and all things bread!
Hi, do you reduce the oven temp with the steel ?
Mine got black on the bottom otherwise came out great and took a lot less time
Yes, that will work. Another option is to reduce the preheat duration. I typically drop the temperature.
Much appreciate the content on this site. I’ve been tinkering with how to add steam in my oven for baguettes and found the following method to work best. I saw it on a FB post called the Mun method. It was a simple, direct, no-fuss way to add steam to your baguette baking. You need a perforated baguette pan, a baking sheet that is larger than the baguette pan (1/2” deep or more), and an alum roasting tray (recyclable 3-4” deep works, no handles) that is bigger than the baguette pan but smaller than the baking sheet. When preheating your oven make sure the wire racks are moved to allow for the height of the roasting tray and baguette pan. Start your preheat with the baking sheet in the oven. Get 1-2 cups of hot water ready. When you get to your oven temp, place the baguette pan on the baking sheet and then use the alum roasting tray as a dome to cover the baguette tray, but fitting inside the edges of the baking sheet. Now pour the hot water onto the baking sheet. Be careful, the water will immediately steam. A good quality baking sheet shouldn’t warp, but be careful. Close the oven door quickly. If you’ve set this up correctly, the steam will rise directly into the alum roasting tray dome and keep the volume of air around the dough at a higher humidity level. Remember to close the door quickly. After the 15-20 min steam bake, feel free to remove the roasting tray. That’s it. Works for all oven sizes. As long as you have the setup right, you basically add the hot water, close the door, the steam is trapped around the dough, and you get beautifully risen baguettes. No fuss with multiple trays, spraying incessantly, etc. Thanks and happy baking.
Yes, that’s a great method! I’ve tried this with loaves of bread, using a large roasting pan over my dough to trap steam. It works well, the only catch is you need to be sure the roasting pan is taller than the loaves will rise! Great suggestions.
Hi – I have a goofy question. I like your scoring. I also read your contribution on the KAF site; the loaves look beautiful. in your gif above I see that you spray your bread after inserting it into oven. Do you also use this method, specifically spraying the top of the loaves, when scoring your design with the 50/50 rice flour/apf? I’m wondering if spraying the top diminishes the design, or perhaps cakes the flour? Thanks.
Hey, Erick! Spraying is totally optional, it just adds a little more steam in an already steamy oven. If you do spray, yes, it tends to spray off some of the pattern on top. If I’m doing an intricate design with a pattern (with scoring or flour) I won’t spray inside the oven, or if I do, not anywhere near the top of the loaf.
Maurizio, I find that when using this method, my crust ends up very very thick and hard. I also find that as soon as I put the steam in, the temperature drops and stays down for the whole time it’s steaming. Last time, it dropped from 450 all the way to 365-385 degrees! Really ruins the bake. What do you suggest? If I crank up the temperature, my baking steel / dutch oven gets too hot. Could I opt for a different method of steam? Or a longer steam?
Yes, that’s a typical issue with a home oven: opening that door really expunges quite a bit of the heat stored up in the oven. This is why a baking stone or steel is so important, it helps hang on to the heat and transfer it right to your dough once it’s loaded. It’s best to act as fast as possible when loading your dough to avoid losing too much heat. If you find the baking steel is baking your loaves a bit too much on the bottom, try preheating at a lower temp or for shorter time. You could preheat your oven to 450 or 500F, then load the baking steel to get hot for 15-20 minutes (shorter than usual so it’s not quite so hot).
Thanks Maurizio! Really appreciate the feedback, I want to try that. And yes, I’m sure my baking steel helps but definitely too hot to bake on if I preheat it for an hour.
The oven temps discussed are they for fan forced or regular oven
No fan (not convection).
Hello Maurizio, I love your site. I’ve been having loads of fun making my own sourdough and bread of course. I must mention I also love your sourdough discard recipes. I am ready to transition from my baking vessels, I have an Emile Henry cloche and a Le Creuset. They do the job but I’m curious about investing in good quality steel and/or ceramic stones. You mention you like your steel and get fabulous results for pizza. Yeah, nice extra. You also mention the extra thick baking stones are no longer available. Well I found some. I might still order the steel you recommend just to compare. Can you please comment on the baking stone on the top rack? You don’t say anything about it. Do you no longer recommend it? It shows both in your picture and video. Should I give it a go?
I don’t use the stone on the top rack any longer (I mention that in the post). I used to use it for additional top heat but have found it not necessary!
Hey Maurizio. I’ve given this method a try for my past few bakes after >1yr of doing 2 dutch ovens. Decided it was time to trade steam burns for hot steel burns (from placing the loaf in the tall ductch oven) :P.
I’m using my most common recipe, flour (80% T70, 15% high pro WW, 5% josey rye), shaping method (your youtube video), etc which I’ve mastered pretty well and get highly consistent results with the dutch oven but the loaves are coming out relatively poor using this method so I’m curious your thoughts.
The rise and crust are not turning out. The loaf is rising a bit but probably only ~2/3 what I get in the dutch oven & absoloutely no ear develops. The crust is thick and super dull (vs. nice crisp shine), has none of the little crackly bubbles, and ends up being quite soft. I’m thinking I’m not creating enough steam and/or my oven may be venting the steam faster than I’m generating it (it’s a ~1yr old oven but it still spills out a lot of heat from the top/back).
My steam setup is identical to your suggestions above with only one difference: I filled the entire pan with rolled up towels. Next bake might try fewer so the towel to no-towel ratio is similar to yours. I’m also wondering if I don’t pre-steam w/ the towels in there long enough. I’ve been doing 15-20 minutes but when I open the oven after that to load I don’t really feel any steam come out. Finally, I’m just using tap-temp water for the lava rocks, should it be colder? Probably about half the steam from the lava rock splash billows out before I can push the cast iron back in and close the door. Not sure if that’s a big deal or not.
Here’s a couple tips:
1. Check to see if your oven has a fan running or is releasing lots of steam from a vent. Many modern ovens have a convection fan on (even though they are not in convection mode) that helps prevent hot spots. If there is a vent, try to block it up with some wet towels.
2. Try using a pie tin with holes poked through the bottom. Place ice in and slide on top of your lava rocks before loading your bread. This will release a shot of steam after closing your oven.
Hope that helps!
Hi, as I don’t have a Dutch oven I tried to use a pizza stone and a roasting tray full of boiling water, however my loaves burnt. Should I reduce the temperature or the time they spend in the oven? Would using a Pyrex glass dish and it’s lid work better? Thank you for the brilliant tips!
Yes, I’d say drop that oven temp!
Just a question: why do wet towels create more steam than just adding water to the tray? Maybe it creates a larger surface?
The towels slowly release steam through the bake whereas adding ice or water will quickly disappear and do more of a blast of steam. They’re optional, but do help!
Hi Maurizio! I have an electric oven with coils on the top and bottom – how do you recommend this method for an oven like that? I’m trying to do 2 loaves at once if possible, but I’m not sure I’ll have enough room for the lava rocks/steaming tray with the bottom coils.
I’d place a rack in the oven at the very bottom rung to hold the pans, then another rack up above that to hold the baking surface!
Do you take out the bottom oven heating coils or put the pans directly on top?
My bottom coils are not exposed.
As a newbie, I’ve been working to improve my bread, with generally better loaves each of the last six weeks. I’ve been doing the bulk ferment on one day with the scheduled folding, then putting it in a basket with dishtowels for 12 hours, then into a 500-degree preheated Staub dutch oven. When I uncovered the dutch oven after 20 minutes this week, the loaf had finally given my a fantastic oven spring and I thought I had finally pulled it off. But after another 20 minutes baking uncovered at 450, the loaf had actually gone down almost an inch. The bread still had a fairly open texture and tastes great, but still isn’t quite what all the photos show or what I saw happening initially. So why did it actually come back down after such great initial spring? Is this normal? Should I have left the lid on longer? Am I baking it too hot?
Yes, that works!
Hi Maurizio!
Have you ever tried baking your bread first in a steam oven (in around 100C) for first few minutes and then move it to standard oven set up to really high temperature?
I am thinking about buying extra steam oven as I bake a lot (it would make my life easier). But because it’s expensive I want to check this approach first 🙂
Thanks for any piece of advice!
Piotr
I’ve not tried this, no. You’d have to be careful transferring the dough at that point, it would still be quite pliable. Theoretically, should work!
You may cover your loaf with a large stainless steel mixing bowl for about 20 minutes create steam. I also have a roasting pan at the bottom of my oven to which I added boiling water at the beginning of the bake.
Yes, that’s a fantastic method as well!
Is it possible to do this method with two pans of towels if I don’t have lava rocks?
Yes, that will work also! You could also just omit the towels and rocks in the other pan and throw ice in the empty, preheated pan.
What baking stones would you recommend for a beginner? I’ve been using a dutch oven but would like to start trying your steaming method using the stones. Thank you for such amazing information! You have inspired me to try all the recipes in your website. My sister and I have been each trying your recipes from different states and sharing our own experiences. Thank you for allowing us a way to connect even more, even if long distance.
Check out my baking tools page, I have options listed there!
Hi Maurizio! I love your site! I’m wondering if/how you adjust your temperatures when baking on a baking steel? I can get pretty great rise and color, but the bottoms often brown a bit too much. Thank you!
Brian, I had similar issues with mine as well! The only solution I have found so far is, after you remove the steaming trays, let the bread bake for half of the remaining time (if 20 min more without steam, bake for 10 min) and then remove the bread from the steel and bake directly on the oven rack for the remainder of the bake. Instead of removing the stone completely to do this, just quickly put your other oven rack (I keep mine outside of the oven during baking) at the notch just above the stone and place the bread on there. You still get a hard crust but it isn’t burnt or indestructibly hard.
You could try preheating at a lower temperature, or preheat for a little less time to offset all that stored heat in the steel.
Hi Maurizio!
Okay so – I’ve had great success with your recipes and methods, I just have one question/problem. I’m finding that the bottoms of my loafs don’t get as hard/dark as I’d like them. I’m baking on a 3/4” pizza stone with my temps at the same of yours. (I’m currently in Denver at your same altitude). Any reason you can think of?
THANK YOU
You could try heating your oven at a higher temp, perhaps 500F or higher. Also a baking steel is an amazing thing for sure! Be sure to preheat it an hour or so until super hot.
Well until this morning I wasn’t using lava rocks in my cast iron. But I got my hands on some yesterday and used them this morning and it worked great! Is it possible that the steam created helped the bottoms of the loafs? Bread can be so magical sometimes…at this point I believe anything is a possibility.
I find those rocks really do produce a lot of steam — lots of surface area there. It should help with the bake overall!
What size square baking stones do you use? Thanks
Unfortunately the stones I have aren’t available any longer, but this pizza stone should work quite well (just be sure the size is good for your oven). I have some other options on my baking tools page as well!
Just made the switch to baking on steel plate and I found that the combo cooker deep side I use to hold the lava rocks has its seasoning stripped by the end of the bake. Wondering if you have ever experienced this issue and if you have ideas for an alternative way of holding the lava rocks. The actual method is rock solid and I’m looking forward to baking shapes besides boules. Your website has been invaluable to me and I really appreciate your work. Thanks
Hey, Francis. I’ve tried various methods and lately I’ve been using a simple stainless steel baking pan to hold the lava rocks. Another alternative is one of those disposable tin foil baking pans used for thinks like turkeys during Thanksgiving. In the end, I’ve found that the rocks themselves get plenty hot and the pan (while nice to have it thick and cast iron) can really be just about anything. Happy to help and have fun!
Thank you very much for the quick response! I will try it tonight with the lavender, apricot, and walnut sourdough (your 2016 recipe I believe) retarding right now.
If you’re baking at 500/525 how does the paper not burn up, is it because of the moisture?
I’ve never had this happen to me. I use the parchment paper from Costco and it handles the high head just fine!
Hi, Maurizio. Thanks for the great post! I have started using the method to bake more loaves at a time and was wondering if I could pick your brain for a minute? My goal is to bake several loaves consecutively and I’m wondering how I should go about building up steam in between batches. My thought was to leave to cast iron filled with lava rocks so they would stay hot, as the water evaporates so quickly and I don’t feel like they are putting much steam after that initial 30 minutes anyway. What are your thoughts on this? I do remove the pan of towels. Do you think I need fresh/dry towels for each batch or can I just keep pouring more hot water over the same towels? If you’ve done consecutive batches and have additional insight, I would greatly appreciate it. Keep up the great work!
Hey, Lea. I think your approach is spot-on. I’d leave the pan with lava rocks, the water evaporates rapidly and they become bone dry in no time. Like you said, definitely remove the pan with towels to avoid issues (once they dry too much, it might be possible they’d burn/smoke). I would simply add more water to the towels for the next batch.
I’ve done this in the past and it works really well. After a few batches the towels get super saturated with warm water and might need to be changed. Let me know how it goes!
Thanks for the reply! I’ll give it a go and report back.
Hello again! Reporting back. My last loaves had great oven spring, but browned really quickly, especially on the bottom. What temps do you usually use? Also, is the water added to the lava rocks hot or cool? Thanks again for all your help!
I’d say if they’re browning too quickly try preheating at a lower temperature, perhaps 25°F-50°F lower. Then, bake it at that temp as well.
The water is just water straight from the tap. You could also use a glass full of ice if you want the steam to be a little more pronounced and last longer.
Thanks for reporting back and keep me posted!
After trying a lot of methods, I ended up plumbing in a basic copper tube from under my oven, spiraled it up, and drilled a bunch of holes on the bottom, which is controlled with a needle valve. I have this suspend over an open dutch oven filled with lava rocks. Preheating the oven a good hour before baking gets everything nice and hot. I then run my hot tap water to my sink to get it as hot as possible, and then crack the valve going to the tubing. Basically a shower head into inside the oven into the dutch oven, any boy it makes a lot of steam 🙂 The issue I was having is that most of the steam escapes out the front door when you pour it in, and I didn’t like the sound of getting burned. This way I can turn on the water in different intervals or even “trickle” it in vs on big poof. It looks like this and when its on
That’s a fantastic setup you have there, Nick. If I were to do this (my wife would kill me for modding the oven) that’s what I had in mind as well, although i was thinking just a long tube instead of a coil, but the coil would add more water and keep things more centrally located over a round pan. Kudos!!
Love you site! Where did you get the thick square baking stones? Do you mind sharing make/model? Doesn’t seem to be on your Amazon page any longer unless I missed it. Thanks!
Thanks, Burton! They don’t sell the same ones any more, but this thick baking stone will likely work well!