

I call this batch number 33 of the Tartine sourdough country bread recipe, while it may actually be my thirty-third pair of these I’m not 100% positive. I know for sure it can’t be any less, but it’s probably more. On to the entry.
Another Sunday, another pair of Tartine sourdough country loaves shaped and proofing. My family has come to expect this bread to be on hand during the week, and in the rare case where we have to buy some bread from the grocery store, we are always disappointed. Baking bread is a relatively simple act when you boil it down, and yet getting that perfect loaf out of the oven does not always work out — but I still strive forward.
If you’re brand new to baking sourdough, read my Beginner’s Sourdough recipe post first, it has longer in-depth explanations on every step in the baking process!
Sunday started out a bit lazy; waking in the later morning after attending a friend’s birthday party the night before. I stumbled into the kitchen and took a look outside to see completely clear skies—a good sign a warm day was ahead. Given the rising temperature, I knew Sunday would be a day of quick dough handling and preparation. As you can see, even my German shepherd Arya (yes, that Arya) was a bit lazy this morning. I suppose too many rabbits, pigeons, and tennis balls chased the day before; oh, what a life.

Although the leaven was prepared later than usual on Saturday night, it was ready to go (left-hand side image below). As you can see, the bubbles on top indicate there was significant fermentation activity overnight, and judging by the smell (like ripe fruit, almost a hint of vinegar), hopefully, it didn’t go too far.
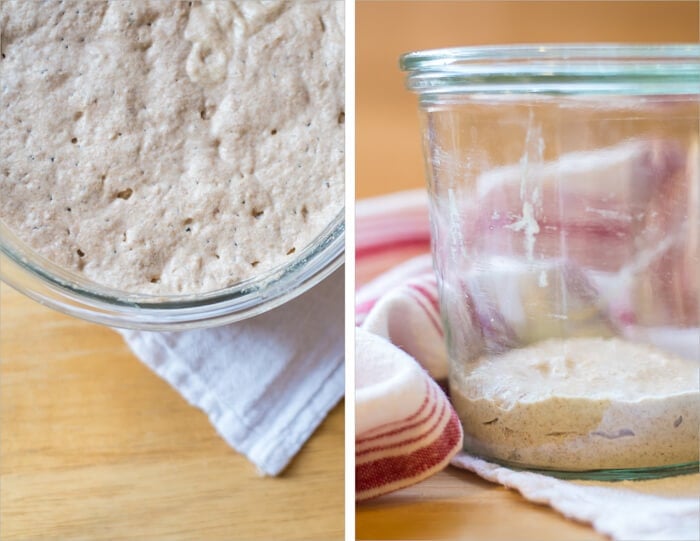
Over my starter’s lifetime, I’ve experimented with using different flour and grains and have settled on a formula that my particular strain seems to thrive on. Instead of following Chad Robertson’s Tartine starter formula in his book where he feeds 50% whole wheat, and 50% all-purpose, I feed my starter 100% rye flour. I’ve found that my starter shows noticeable activity when fed rye exclusively. If you’re interested in reading about how to create and manage a sourdough starter like mine, head over there and read on.
Also, if you’re one who frequents Instagram, head over and check out my Instagram feed. I typically post many “daily bakes” and those behind-the-scenes shots that sometimes don’t make it into these posts!
Tartine Sourdough Country Bread Recipe
Prepare the leaven – 12:00 a.m.
The night before you plan to prepare your dough, mix the following, lightly cover, and set out on the counter overnight:
| Weight | Ingredient | Baker’s Percentage |
|---|---|---|
| 31g | Mature sourdough starter (100% hydration) | 28% |
| 110g | Whole Wheat Flour | 100% |
| 116g | Water | 105% |
Mix the flour + water, autolyse – 9:00 a.m.
For this loaf, I decided to try and tweak the whole wheat to white bread flour percentages. I still wanted some of the WW taste and texture, but a bit more “white” in this loaf. Due to the WW reduction (from the last Tartine recipe), I’ve also reduced the amount of water to 79%.
Note that this is not a traditional “autolyse,” which only has water and flour mixed, but this is how Chad performs this step in Tartine—let’s follow suit for this bake. In my more recent baking adventures, I no longer mix flour, water, and levain for this step.
Gather the following:
- 250g of your new leaven
- 300g whole wheat flour (I’m currently using Great River Organic whole wheat flour)
- 700g unbleached all-purpose white flour (King Arthur)
- 20g salt
- 740g water and 50g water (reserved for step 5, below)
Method:
- Add 250g leaven to your large mixing bowl
- Pour in 740g water and mix with your hands until the leaven is completely dispersed
- Add 700g white flour and 300g whole wheat flour and mix with your hand until all the dry bits of flour are gone
- Cover your bowl with a towel, or if in a dry climate, plastic wrap and let autolyse for 30 minutes
- After 30 minutes, add 20g salt on top of the dough and slowly pour the remaining 50g of your reserved water on top. Squeeze the dough with your hand to incorporate the salt throughout
- Now reach your hand under the dough and pull the side up and over onto itself. Continue to do this as you spin the bowl; grab, pull, and push. Do this just until the dough comes together and becomes super sticky. Generally, this will only be between 5-10 turns
- Transfer your dough to your plastic or glass container, set a timer for 30 minutes
Next, we tackle the bulk fermentation step.
Bulk Fermentation
At this stage, we want to do four sets of turns, plus 1 – 2 hours of rest on the counter. A “turn” consists of reaching under your dough, grab the bottom and pull up the dough on top of itself. Do this four times, one of each side of your container (if it’s square, that is). Additionally, you want to do this rather vigorously. The stretch up and down on itself is what gives the dough strength.
- 10:10 a.m. – Turn 1
- 10:40 a.m. – Turn 2
- 11:10 a.m. – Turn 3
- 11:40 a.m. – Turn 4
- 11:40 a.m. to 1:40pm – Rest on Counter
Pre-shape – 1:40 p.m.
When the dough has risen about 20-30%, and you see a bunch of little air pockets throughout, it’s ready for pre-shaping. Take the dough out of the container onto your *unfloured* work surface.
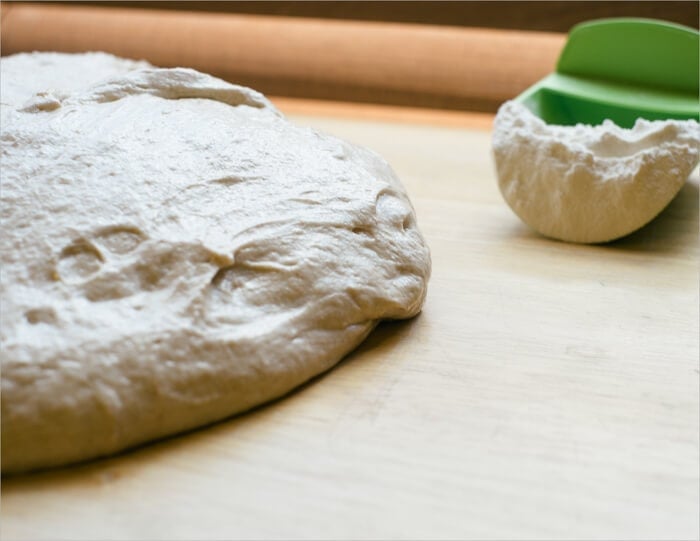
Sprinkle some flour on top of your dough and divide into two halves. Take a half, flip it over and pull each of 4 edges from under onto the top. Then, flip the folded dough over, so the seam is on your work surface. You want to form loose boules here by using your hand and your dough knife. Your work surface grabs the bottom of the dough slightly as you spin the dough around to make a little ball. Repeat with the other half and cover (I cover with two inverted mixing bowls) for 30 minutes.
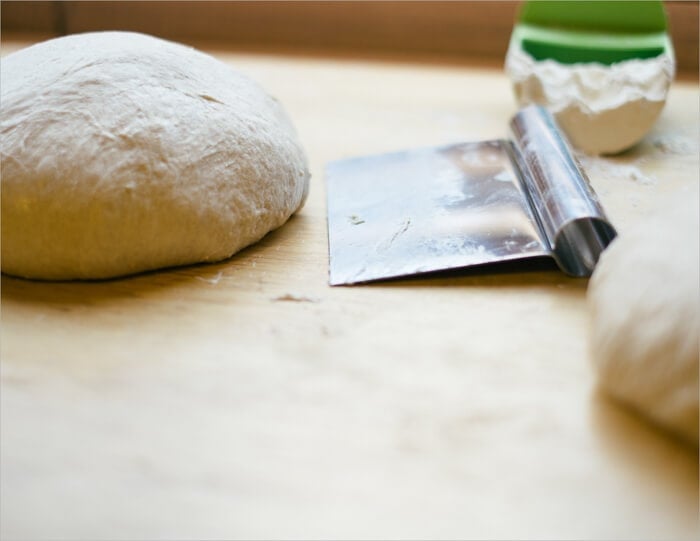
Shape – 2:10 p.m.
The resting dough should have spread out, but not quite into a pancake shape. If it has formed a pancake, you can strengthen it by pre-shaping one more time and waiting another 40 minutes.
Flour the top of one of the boules and flip it over with your lightly floured hand and dough knife. Take the part of the dough that’s closest to you and fold it up and over in half. Take the part that’s to the right, stretch it out as far as it will stretch, and fold it up and to the left. Repeat with the left side and the side of the dough farthest from you. Then take the edge that’s closest to you, pull it up and over again towards the back. When performing this last motion, you will lift the entire dough up and over until the seam side is now down on your work surface.
Spin the dough using your two hands to shape into a boule. As you slightly pick up the dough and spin it, the bottom snags the unfloured work surface and creates tension. I do this several times to create a very taught surface on the top of the boule. Sometimes small air bubbles will be visible.
If you’d like to shape this dough as a batard instead of a boule, check out my batard shaping guide.
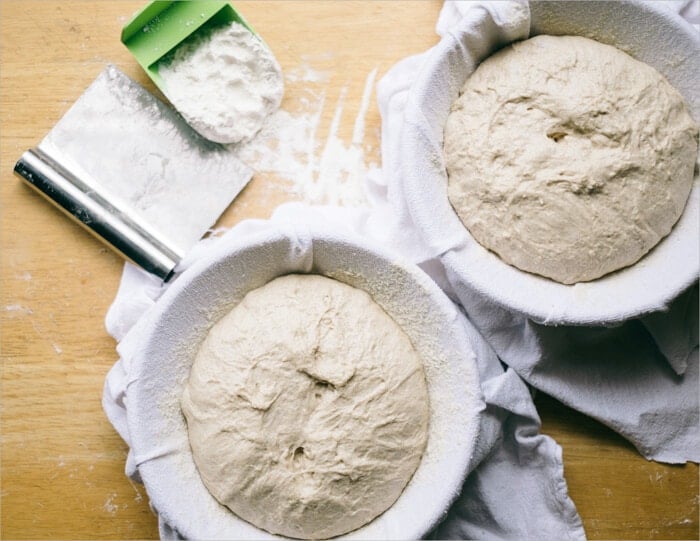
Proof – 2:20 p.m.
Place towels into small mixing bowls or proofing baskets and dust with white rice flour. These bowls will hold the dough as they proof in the fridge overnight. Take your taught boules and place them into the floured bowls with the seam *up* facing you. I place each of my bowls into plastic bags and then into the fridge.
Score + Bake – 9:00 a.m.
Gather your tools:
Speaking of tools, if you’d like to see all the tools, I use when baking head over to my tools page and take a look.
The first of these sourdough loaves was retarded for 18 hours. The Tartine formula lists an 8-hour cool fermentation in the fridge but 18-20 hours seems to be the sweet spot for me as my bread takes on a complex flavor with this extended fermentation time. It also seems to help open up the crumb more than what you would typically see; I strive for that light and soft interior.
In the morning you first want to get your oven ready. I place the rack in the bottom third of the oven. Turn your oven on to 450°F (230°C) and let it preheat.
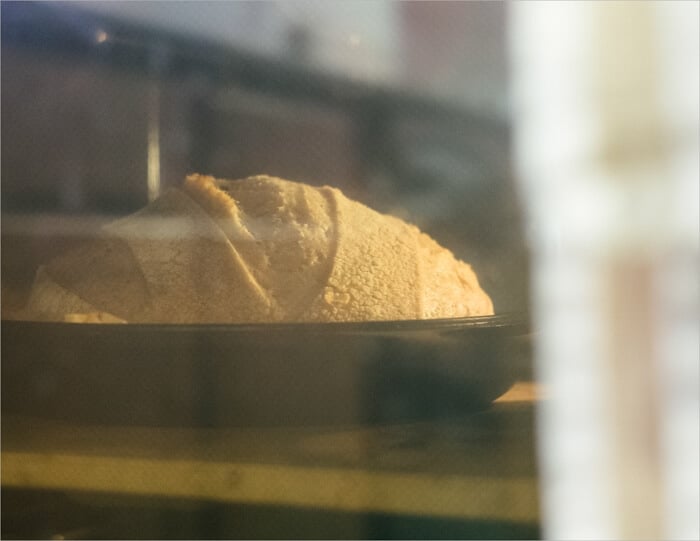
Once your oven is preheated, get your dough ready. I bake this dough straight from the refrigerator—no warmup time is necessary. Take one of your loaves out of the fridge, cut a circular piece of parchment paper, and place it on top of the bowl. I then place a pizza peel on top of the parchment paper (and bowl) and invert the whole thing quickly to get the dough out of the bowl and onto the paper + peel. Get your razor blade out and score the top of the loaf to allow the bread to expand while rising in the oven. For these sets of loaves, I scored one with my “Roman numeral three” pattern and the other with a single long slash.
Quickly take out the shallow half of your hot combo cooker and drag in the parchment paper and dough.
Cover with the other half of the combo cooker and bake for 20 minutes with the lid on. After this time, open the oven and lift off the combo cooker lid (you can leave it in the oven to the side), close the oven, and bake for an additional 35 minutes. These times and temps are a drastic change from the Tartine book, but I’ve found them necessary due to my elevation and climate. I want the crust to be nice and dark brown.
After pulling the loaves from the oven, I cool them on a wire rack for at least one hour before cutting into them. Cutting too soon can cause the crust to harden drastically and the inside to become quite dense. Easier said than done, however.
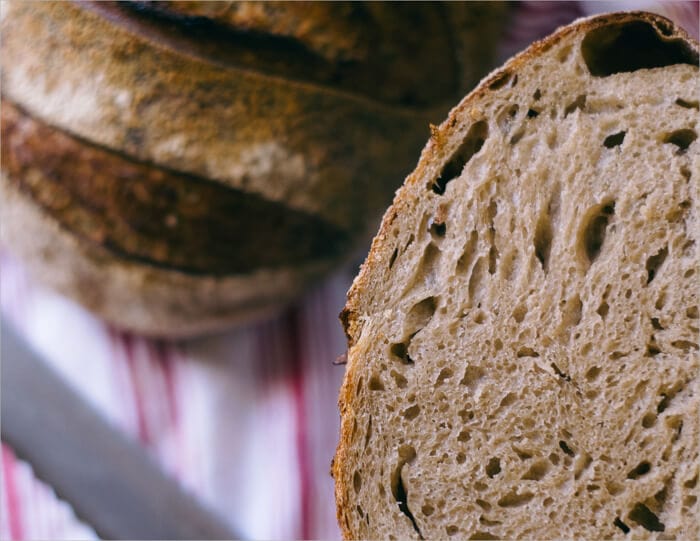

What a pair of beautiful loaves this morning. There’s no doubt the lazy Sunday morning/afternoon turned out to be a success in the kitchen, and this Tartine sourdough country bread recipe couldn’t be more delicious.
Buon appetito!
Now that you’ve attempted this recipe try your hand at the higher hydration version for a bit more challenge, and an even better tasting loaf!
If you use this recipe, tag @maurizio on Instagram so I can take a look!


374 Comments
Hi, Misha! Thanks for the pictures. Fermentation activity in your starter, in the dough and in your resulting loaves looks nice and strong — this is great. It looks to me like the hydration of the dough might have been too high and your dough might not have been strengthened enough to handle it (or your flour isn’t able to handle that high of a hydration). I’d suggest dropping the hydration by 5% next time and see if this helps bring strength to the dough and make shaping easier.
If you still have issues. you might be fermenting too long (or at too warm of a temperature) during bulk fermentation. Keep an eye on the temperature of your dough, I’d say keep it near 78°F to 80°F, and generally 4 hours is sufficient. If the dough starts to feel soupy and feel slack by the end of bulk it might be going to far, reduce the time or temperature to correct.
I hope this helps and happy baking!
I’m about to try your beginner’s sourdough recipe! I’m in Southern California, about 20 minutes from the coast. Weather right now is 70s and 80s and I’m in a city that is a bit elevated for coastline, but by no means in the mountains. Should I track closer with Chad’s oven temps or yours? Any other major recs given how my climate differs from yours? Your site is so helpful and amazing — thanks so much for sharing your knowledge! -Nick
Hey! Chad’s temps might be more accurate for your location, but mine will also work you’d just need to keep an eye on it near the end to make sure it doesn’t go too far. So yea, I’d go with Chad’s and then bake till it looks done to your liking! No other real recommendations other than have fun with it!
Rad – thanks for the quick reply! Loving your insta feed too!
You bet and thank ya! Happy baking 🙂
Hi my name is Diana and this is my first time making tartine bread, and I follow all the steps my dough was looking very good smelled great had all the air pockets you want but it was very wet from beginning to end I baked it and when I cut in to it after 1 hr of rest it was still wet. My question is where do you think I went wrong. I did use whole wheat flour and not whole wheat bread flour . That’s what I had in my pantry. My oven also turns on and off during baking would that have an effect on it. Would love to hear your thoughts on this. Thank you for your time
Hey, Diana! It could be that you over hydrated your dough or it just wasn’t fully baked out, and thus the gummy/wet interior. I’d first focus on the oven: is there any way you can stop the turning on and off? If you have another oven-safe thermometer (those ones you can hang inside), it might be helpful to stick that in there and monitor the temperature during the entire bake. Sometimes ovens can be very misleading.
If you’re still having issues you could try reducing the hydration of the dough by 5-10% and see if that further helps. Depending in your environment and your flour this might be very necessary.
Hope this helps and happy baking!
hi Maurizio, this is my first time at bread making and I got stumped at the mix! I used 1000g of organic strong white bead flour and 740g of water. It always felt it needed more water, but as it was my first time and there were no photos or descriptions at this stage I did not know…? Any descriptions and photos would really help. (every other stage is filled with great photos!:-) The pulling and turning was hard work and felt I was ripping it apart and the stretching did not stretch far without tearing. I am just about to put 1st loaf in and will wait to see what happens! Steuart and Natalie
Update. Just baked, left for an hour… Bread had good crust and flavour, but was very dense…
Hey! You might want to look around here at some of my more recent posts, they have quite a few more photos. Specifically have a look at my Beginner’s Sourdough Bread post, lots of photos in there!
It could be that your dough was too strong and needed more water, especially if it felt overly dry or really hard to work with. High protein flour can strengthen up quickly as well.
An overly dense loaf can be the result of many things, but I like to first focus on starter strength and fermentation. Make sure your starter is rising and falling predictably when you feed it, and then when you make your levain from it use it when it’s most mature.
I hope these tips help!!
Hi Maurizio, I have found bulk fermenting overnight suits my schedule – starting about 7pm with mixing and folding etc. In the morning I shape and bake. I have found that I don’t need much of a second proof. It seems to work. But wondering whether a short second proof is an issue – less than an hour. It certainly doesn’t effect the taste. And seems to rise nicely. I would appreciate your thoughts
Hey, Jill! No, your method works just fine. Of course there are many ways to make bread, a cold bulk works very, very well. I’ve been experimenting more and more with this method and hope to have a writeup here on my process but it’s essentially what you’re doing. That final proof time will vary and, as you’ve been doing, the key is to just bake the dough when it’s ready! This could be 1 hour or 4, depending on the dough and ambient temperatures.
Hope that helps and happy baking!
Thanks Maurizio, it does. Its been an interesting process. I went too cold to begin – mixing with water out of the fridge. Experience has shown me the yeasts need a little bit of warmth to do their job. Provided my room temperature is in a range of 24-18 deg C for the entire proofing it will take 8-10 hours which suits my schedule. I was also over proofing by allowing a 3-4 hour second proof and not getting a good result. I still have a disaster every now and then but I am looking and learning rather than just allowing a given time for the second proof.
Love your site BTW. It has been very inspirational in my quest for a great sourdough loaf. My starter is now over 12 months old and I am getting great results taking some info from you and some from Tartine. Now looking forward to experimenting with some of your other loaves.
That’s great to hear! Following a timeline strictly never really works out with baking bread, that’s why I always try to lay out a set of visual and tactile cues so readers can adjust their timetable to suit their particular dough.
Thanks so much for the kind words, happy that you’re enjoying my website! Lots of good info here for baking not only bread — our starters are incredibly versatile, and giving, things. Happy baking!
Just got a mini fridge to do my overnight proofs in, and I’m wondering what temp I should set it at. I have a couple glasses of water in there right now and I’ll take their temp in the morning; I’m guessing I should aim for around 40*F? What would you recommend?
The retard temperature of your dough can be set to whatever your preference is, I’ve actually been playing with this temperature quite a bit lately, trying everything from 38ºF to 55ºF. I noticed my dough is much more expanded in the morning with warmer retard temps but you have to take this into account in the overall process otherwise the dough can easily overproof.
At lower temps, like 38ºF, there’s very, very little activity going on in the dough overnight. Most of the activity takes place in the timeframe where your dough cools from room temp down to 38ºF — this could take a while depending on the fridge.
I’m working on a writeup now where I built my own retarder using a mini-freezer. I hope to have it published pretty soon, I think you’ll find it really interesting and applicable, especially since you have that fridge!
Thank you! That is helpful, and I look forward to reading more. The weather is getting warm and we don’t have AC so it’s throwing EVERYTHING off now. Hopefully I can use the fridge to help right the ship 🙂
Love this one. Just finished first bake and published on Instagram. Will run a second loaf soon so have two different cold proof times to see variation. Found this to be pretty easy and straightforward and the result is excellent. Good general purpose loaf.
Awesome, really glad to hear that! It’s a pretty solid loaf of sourdough, that’s for sure 🙂
I realise others have already asked this question, but I’m still a little confused. I want to make a smaller loaf and will therefore halve the amount of ingredients. Maurizio you recommend making the same amount of levain (i.e. not halving), but should I still add the whole amount to the dough mix, or only add halve the amount of levain and bin the rest of it? Many thanks!
Hey, Craig! Yes, I like to still make the same amount of levain since it’s really a small amount to begin with. Halve all the ingredients in the Dough Mix section, even the levain added.
In other words, the levain build will still be the same quantity, but the amount of that build added to the dough will be halved.
Happy baking!
Thanks Andy! Bertinet’s books are great. Have fun with the Tartine recipe, it’s a keeper. Happy baking!
I live at 1320 ft or something close to that should I just lower the cooking temp and cooking time? Or what
Yes, I’d reduce the cooking time. Watch the dough near the end of the bake and stop baking when it looks well colored and done to your liking. I find my temps and times are usually a little higher than those at lower elevations but not significantly so.
Hi Maurizio, I’m looking to do my first bake with your sourdough starter recipe tomorrow (thanks for all the excellent posts!), and I just noticed you’d mentioned being at a higher altitude and thereby needing a higher temperature and bake time. What would you recommend for someone at sea level? Any big changes, or should I just keep an eye on the bake, as you’d recommended to James?
Also, the dough during my shaping phase was quite sticky, making it difficult to shape and pick up; next time, should I attempt a less sticky dough or just add more flour when shaping it?
Thanks!
Marshall
You bet! I’d suggest just keeping an eye on the bake. If you’re using a Dutch oven to bake these loaves then you could preheat your oven at 475ºF, I’ve found DO’s to sometimes get too hot even at my altitude!
There are many reasons why the dough could be sticky, but it’s such a relative thing it’s hard to say why that happened (for me “sticky” might mean something completely different than for some one else). But yes, use enough bench flour until you get the hang of things. As you gain more and more experience you’ll find you will start to use less and less bench flour.
Hope that helps!
Love this recipe and method. I usually use 100g of whole wheat and 900g of bread flour, and slightly less water. The bread is fantastic.
Really glad to hear that and sounds like your modifications work quite well! Happy baking 🙂
Hi Maurizio! Love your site. I have successfully brought up a natural starter using your methods and techniques and its extremely gratifying. One quick question that i feel like I can’t seem to find the answer to anywhere is, why do you make such a large Leaven (465g total) when you only use 250g in your final dough? Also, is there a general rule of thumb as to a certain percentage of leaven to total flour or anything like that?
The extra large levain here is not really necessary. I will update this post to use my more recent methods of making just enough levain to cover the recipe and no more. Sorry about the confusion!
There’s no set rule for levain percentage in a formula. Many things go into it: flour choices, flavor, desired dough texture, etc. I usually am in the range of 10-20%, depending on the formula and my testing.
Hope this helps!
Hi! Thank you for your website- it has helped me be successful at natural yeast when I wasn’t sure if there was any hope left for my loaves! What is your elevation? I am at 4,500 ft and found my loaf to be burnt a good 8 minutes before time was up. I am not sure if I should lower the temperature due to my high elevation or just cook for less time. Thanks again.
Really glad to hear my site has helped so much! I live around 5280 ft. and I actually notice my bread takes longer to cook than most. But yes, if your bread is burning then reduce the temperature and/or bake time to suit! Hope this helps — happy baking!
Hi Maurizio! I’m curious about your choice to push the final rise longer and longer, in this recipe and others. I often find that I’m having to shorten my final rise to avoid overproofing- after just a few hours in the fridge, my bread starts failing the poke test. But I’d love to reap the benefits of a long, slow fridge rise. Is there anything you do to keep that long final rise from turning into an overproofing situation when you’re already using a pretty standard percentage of levain at the outset like you are here?
Hi, Caroline! That final proof is very dependent on many factors (amount of whole grain flour, temperatures, percentage of levain…). I like to push my final proof as far as possible (even more so lately) without my dough overproofing — it results in the best texture and flavor, in my opinion. If you want to try and lengthen that final proof you could reduce the levain percentage, cut bulk a little short (say 30 mins or so) or bulk at a slightly lower temperature to help slow things down.
One thing you should keep in mind is that I do find the poke test to be somewhat unreliable when the dough has chilled in the fridge. As your dough gets colder it becomes more and more firm, compromising the efficiency of the test.
Hope this helps!
Right, I’ve heard that about the poke test. After yesterday’s bake I wonder if maybe I was mistaking some of the signs of underproofing as overproofing- I pushed the second fermentation to about 8-9 hours in the fridge (for 100% whole wheat from Grist and Toll) and it looked pretty great. Thanks!
Inspired by this mini-discussion I tried to write out the timing for the original tartine recipe from the book and compare it to Maurizio’s timing, and I was totally stumped. If I follow Chad’s description in the book, it overlaps with Maurizio’s timing exactly, except then in the end he says to put it in the fridge for 8-12 hours. So if I’m done with all the steps by 3pm, then leave in the fridge for max 12 hours, I’d have to get up to bake at 3am the next day? Even taking into account that Chad might have a loose definition of “morning” and might start the autolyse let’s say around 11am instead of 9am, that would still have me baking at 5am on Sunday… Or am I missing something?
You’re right about that, with certain timelines you’ll end up having to wake up super early or go to bed super late. The important thing here are the durations for each step, not necessarily when they take place. For example, you could shift the entire timetable to the right so that after 12 hours you actually bake in the morning at 8am or sometime thereafter. This would mean your shaped dough would need to go into the fridge around 8pm the night before.
Hope that helps!
Hi hi! So exciting my first 80% hydration sourdough loaf is in the oven. How do I know for sure it’s done baking? I don’t have a thermometer so I can’t check the internal temperature. And I’m afraid to take it out and knock the back for that hollow sign…. am I just looking for colouring at this point? (Great blog by the way.)
That’s great, hope it turned out well! Yes, would just look for color at that point. At long as the duration is close to what I have here go by color to determine doneness after that. I’d highly recommend a thermometer at some point, though, to also help with dough temperature during the whole process. It really helps!
Thanks for the kind words and happy baking!
Hello everyone! Very new bread baker here – I don’t go through much bread myself and was curious if this recipe can be halved to make one loaf instead of two? I apologize if this has a blatently obvious answer!
Hello Alissa, and welcome! Yes, just go ahead and split the recipe in half — that’s exactly how to do it 🙂 Happy baking!
I am also new to bread baking, but I have been making 2 loaves and wrapping one tightly and freezing it after it is done cooling. It is pretty fresh and convenient in between baking opportunities!
This is exactly what I do quite often as well! I also like to slice the second loaf completely, place the slices in a freezer bag, and then use my Breville toaster with the “defrost” button to quickly defrost and toast entire slices of bread. It’s magic, actually.
Thanks for the comments!
Really happy to hear that! Yes, at lower elevations I’d probably end up baking this bread for less time overall. Just keep an eye on the bread nearing the last 10 minutes and turn down the oven and/or reduce the total bake time until the bread looks done to your liking. It’s hard to give exact temps/times to reduce as I’ve only baked here at my altitude but with a few tests you can dial it in perfect for your environment.
Hope that helps and happy baking!
Do I bake right out of the refrigerator or should I let the dough come to room temperature? Thanks again for your help and your attention to this wonderful blog.
I almost always bake right from the fridge. Thank you!
Ciao Maurizio! I’m loving my sourdough cookbooks but it is your blog that I visit for the actual bread baking instructions. Thanks for sharing your talent! Could you please offer suggestions on reducing the thickness of the bottom crust? And what a beautiful dog! Thank you.
Wow, really happy to hear that thank you! If you’re using a Dutch oven (DO) it can be hard sometimes to reduce the thickness of that bottom crust, it seems to happen more often for me in a DO than when I bake directly on baking stones or a Baking Steel. One thing you could try to do is preheat the oven for less time so it’s not quite so hot when you load your dough, or preheat at a slightly lower temperature. That might fix it for ya!
Would it be okay to let the dough ferment for about 36 hours? I didn’t read through the directions before I started and won’t be home to bake it until then :/
It’s hard to say definitively, it depends on how well developed/fermented the dough was when you put it in the fridge. I’d say bake it up and see how it turns out, chances are it will still be delicious!
I just today throughout my third batch of dough. Everytime I make it I follow the Tartine recipe to a “T”. After all is said and done the dough comes out loose and wet. I am very careful about my measurements but cannot figure out why it is so unmanageable. Any suggestions? I am ready to give up.
Ahh sorry to hear that Franco! It sounds to me like your dough is very much over hydrated, you need to reduce the water called for in the recipe as your flour might not be able to handle it. I would recommend reducing water 10% and see if that helps the next bake. Stick with it, we’ll get you there!
Thank you so very very much. I will try that tomorrow and post after it is done. I appreciate your kind response. I will keep trying.
Great job Maurizio. Dropped the water by ten percent and got two beautiful loaves of bread. Really really appreciate your help.
Excellent!!
Hi Maurizio,
Thanks for the amazing blog. I’m still having throuble getting a lot of spring and I was wondering how much you expect the loaf to increase in size after shaping the loaf and when it’s ready to cook. You note 20-30% increase before shaping but I’m curious how much bigger you do expect it to be prior to baking. Thanks!
You’re very welcome! The final rise of the dough in the proofing baskets, if kept at cold temperature for the proof, might not really rise all that much. I notice the dough usually puffs up just a tiny, tiny bit more than when I placed it into the fridge the night before but nothing significant. Home refrigerators are actually very cold for the dough at typically 38ºF — not much activity will happen at that temperature in terms of the dough rising. This is ok, though, because we’re looking more for flavor development (acid production) at this point.
I hope that helps!
Okay, thanks Maurizio. Do you ever do the final rise for this loaf out of the fridge or part of the rise out of the fridge?
I don’t usually — I love the subtle complexity imparted on this bread with the overnight proof. That cold, long period in the fridge builds up subtle sour notes in the bread that really fleshes out the flavor profile of this bread. You can definitely do that, though!
Hi Maurizio,
I gave this a try and had a reasonable looking final loaf http://m.imgur.com/zUpmKUa , but the crumb was really tacky and dense. I cooked to an internal temperature of 210F and waited 2 hours before cutting, but it was still very gummy. It left a film on the knife. One thing I was thinking was that it could be the King Arthur 100% whole wheat flour I used. I also soaked the whole wheat flour overnight but made sure to keep all the liquid percentages the same.
Have you ever had any experience with a gummy crumb?
Hi! I sometimes see a gummy crumb if the loaf is underbaked but 210ºF should be sufficient. It could be a few other things but first I’d focus on developing fermentation just a bit more in your bread. Make sure your bulk fermentation step goes long enough to develop the dough. At 78ºF or so it usually takes me around 4 hours. The dough should look very alive and if you tug on it you’ll notice it will have strength to it, it will resist stretching out.
I think if we let your dough ferment longer we’ll see some, if not all, of that gummy texture go away. Also, have a look at my Beginner’s Sourdough recipe, I have some great photos there showing my dough development and when I call bulk fermentation quits.
Happy baking!
Hey Maurizio,
Thank you for your guide and thorough explanations. I baked this bread today and it turned out wonderful. I have a couple of questions though: my loaves didn’t rise as much as I wanted them too, they spread out instead of up. I could’ve preshaped again to get a more taught top, but I’m curious what could effect the rising. Will ambient temperature effect rising during proofing? My starter hasn’t risen as much as yours during feeding but I am using a larger vessel. (I have fed it for about 2 weeks) Is there anyway to kick-start that rising from the starter? Would steam help it during cooking? I would also like to tone down the acidity a bit. Also do you ever add fruit to your levain?
Sorry for the many questions! but now that I’ve started this process I can’t help but improve
Thank you
You’re very welcome! Glad it’s helped. There are many reasons why your loaf might not have risen as high as possible. If you read down on this page a few comments below yours you’ll see my explanation for over proofing which is one such possibility. It could also be the dough wasn’t strong enough or you didn’t develop enough tension at shape time. Make sure when you’re shaping the dough is sufficiently taut, it should hold its shape on the counter after you shape it.
Warmer temperatures will speed up fermentation activity so if you keep your starter warmer you’ll directly see this. I like to keep my starter at 75ºF and my dough around 78-80ºF.
I’ve never added fruit to my levain, sorry!
Hope this all helps, happy baking Michael!
Hi Maurizio,
Have used your starter guide to get a nice strong-ish starter at two feeds a day (and LOTS of great sourdough pancakes with the cast-offs.)
Today I used your Tartine #33 to make my first loaves, and they are sat in the fridge ready for baking in the morning. So far, so good!!
A few questions I had:
1. I am new to sourdough and relatively new to bread full stop. What hydration is this? I calculated approx 81% is that correct?
2. Bulk Fermentation took about an hour longer – 3hrs15 in total – til I was comfortable it was ready. Could this just be because I have a cool kitchen? Any harm in that extra hour sitting around?
3. I have a baking stone which I have used for non-sourdough loaves along with the pan of water for steam, but a fellow baker has suggested to bake it in my thick-bottomed metal saucepan instead (as I do not yet have a dutch oven or similar.) Any thoughts? Maybe try one loaf in each method?
4. Finally my starter is currently 50% rye 50% strong white. What has more effect on the eventual loaf you make – the makeup of the starter or the makeup of the flour you use after the leaven? So if I wanted a more white loaf, should I make a more white starter or just use my 50/50 starter with more white for the bake?
5. Oh one more – if I want to make one loaf, do I literally just half the levels on this recipe? (Although I read that it’s still best to make the same amount of leaven.)
Thanks and great job on this blog (and the awards!)
I baked the loaves. I have stuck one of them on Instagram.
https://www.instagram.com/p/BN_u9MyAuGK/?taken-by=edbartlett
Crumb looks pretty good, and it’s tasty as hell!
But when I removed them from the fridge at 9am this morning they were pretty ‘wobbly’ and started spreading as soon as I took them out of the proving bowls. As you can see from the Instagram, I didn’t get the spring I was hoping for. It did rise a bit but also spread out the front. Any thoughts on why? Should I perhaps have strengthened it up a bit more before proving?
I just commented over at Instagram, your bread looks great! To me it looks like it was slightly over proofed, thus the sluggish rise and lots of small holes throughout. The longer your dough ferments the more the structure (gluten) will breakdown and that’s why your loaves spread and were wobbly (this can also be due to insufficient tension when shaping the dough, but I’m guessing over proof here). As long as you gave the dough enough of a tight “skin” on the outside when you shaped it they should be fine enough to rise nice and high.
Next bake try to reduce your final proof time a few hours or so and see if that helps increase the rise in your bread. There’s a balance of course, you want it to be “fully” proofed but not so much that it starts to breakdown like you experienced. You are definitely on the right track here with your bread, you just need a little tweaking to the proof and you’ll be set!
Answers:
1. Yes, about 81% hydration taking the 100%-ish hydration levain into account. In later recipes I clearly state the hydration so there’s no guessing.
2. Yes, the lower the temperatures (within reason) the longer it will take the dough to develop. No harm in giving the dough the time it needs to be ready, in fact this is something most beginner bakers have trouble with… as they say, watch the dough not the clock 🙂 I like to keep my dough around 78ºF.
3. You could try it, sure. I find baking directly on baking stones to work really well, though. I’ve never baked in an open pan/pot on top of stones but it might work well for you.
4. The flour you use in your final mix has more of an effect as it’s in a much higher quantity than your starter or levain. I almost always use the same exact levain for my bread, no matter what type I’m making (50% ww and 50% white).
5. Yes, just halve everything. I do suggest keeping the levain build the same quantity but even that isn’t 100% necessary, you just want to make sure you have enough levain to cover the recipe! One caveat to this is when the levain build starts to get incredibly low, like less than 40-50g or so, it becomes difficult to judge when it’s ready to be used (there’s just not a lot there!).
Hope that helps and thank you for the comments!