

I’m a serious pizza eater. There were periods back when I lived near my dad’s restaurant where I’d eat fresh pizza almost every other day. On my way home from work, I’d stop in for a slice (or a whole pie) to sort out dinner. This detour was not because I was lazy and didn’t cook but because it’s hard to deny the call of a great pizza.
I’ve had endless different topping combinations but always fall back on classics: sometimes, I think the simplest things are the best. And pizza is a food I could conceivably eat at every meal without deviation. When visiting a new restaurant, there’s a real internal struggle when I spot pizza on the menu, especially if it’s sourdough pizza dough. My ordering becomes myopic: the entire menu fades away right in front of me, and pizza is all that remains. Even if it’s at some strange fusion restaurant with nothing to do with Italian food, my meal companions can bet I’m going to order pizza. And in the end, I’ll inevitably complain about it right after the first slice. What can I say? I’m picky.

I vividly remember several buddies and I, physically exhausted and running on zero sleep, stumbling into a Peruvian restaurant in the tiny city of Aguas Calientes outside Machu Picchu. We just finished the 4-day hike through the mountains in torrential rain and finally made it to the sacred site.
This was to be our first restaurant meal in days.
As I opened the menu, I spot the typical (delicious) Peruvian fare, but what do you know, they had pizza! Of course, everyone thought I was nuts ordering pizza in the middle of the mountains in Peru. Still, I can’t remember another item on that menu except for the pizza I ordered. For the record, and to their credit, it was certainly not a good pizza. But what should I have expected? Blinders.
When you think of great pizza, what comes to mind? I think the answer depends on your background, where you grew up, and just how much you’ve eaten. I’ll always have a special place for Naples-style pizza with that thin crust and that blistered and puffy cornicione, but it’s challenging to get this type of crust that comes out of a blazing hot wood-fired oven, and that’s ok.
Pizza at home doesn’t have to try to imitate pizza Napoletana, it can be exciting and delectable in a completely different way. The focus here is to make a sourdough pizza dough that’s incredibly tasty with a fantastic texture but also versatile and flexible when it comes to preparation. Most of us aren’t making pizza professionally, so an adaptable, naturally leavened pizza dough that works around your schedule—and could chill an extended period in the fridge, if necessary—is a good thing.
Great pizza has a thin, sturdy, and well-cooked crust with an airy and soft cornicione (rim). It should sort of sag a bit when you hold a slice in the air but not flop over completely like Neapolitan-style pizza. The bottom should be well cooked with dark spots scattered about, but not the typical leopard spotting you might find when cooking pizza in a high-heat oven. The toppings should be a light dusting of items, especially the cheese—everything in balance.
This sourdough pizza dough is versatile and adaptable. So, if you like a thicker crust, increase each dough ball’s weight, and don’t stretch it out quite so thin. If you like a thin, cracker-like crust, stretch the dough ball out thinner and cook for a few minutes until things firm up. You can even use this dough recipe for pan pizza and focaccia.
If you like a Chicago-style pizza… (gasp), I’m not sure I have any suggestions, but I’m sure you can make it work.
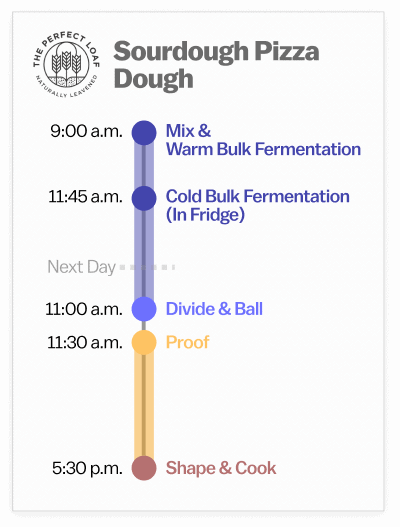
Sourdough Pizza Dough Schedule
You can adjust the schedule for this flexible sourdough pizza dough to suit your schedule. The dough can be made over two days or stretched to three or four days proofing.
Or, you could mix at 5:00 p.m. as I have listed here, and instead of shaping them into balls the next day at 11:00 a.m., you could shape them before work and cook the pizzas right when you get home.
Pizza Flour Selection
I would venture to say that Caputo flour from Italy is probably the most widely used flour for pizza. I’ve purchased a few sacks of Caputo 00 Pizzeria Flour on Amazon to test, and it is nice to work with. They list the protein percentage of their flour (in the blue bag) as between 12-13% (12.75%), but the water absorption is significantly lower than most of the flour I usually work with (meaning it cannot take on super high hydration).
The signifier Tipo 00 indicates it’s milled incredibly fine (it truly feels like light powder). You can’t go wrong with this flour—it performs exceptionally well and makes pizza with a thin, delicate crust that is strong enough to hang onto whatever toppings you throw at it.

However, lately, I’ve been working more with Central Milling Organic Type 00 Normal flour (they also have a “strong” version with a higher protein percentage at around 13.8%), and I’ve come to enjoy this flour. Much like Caputo 00, it is milled incredibly fine, has a very high extraction, and feels powdery smooth. I like that it’s a closer geographic option, and I can order large quantities without too much of a hit to the bank. Using this flour, my pizza has a wonderful crust and a tender interior. Central Milling indicates their flour has around 11.2% protein and is a hard red winter wheat blend.
I know not everyone has a sack of Tipo 00 flour in their pantry; heck, I didn’t until recently. So, feel free to swap these flours out for all-purpose flour (or even a medium-protein bread flour). This sourdough pizza dough will still be naturally leavened, flexible, delicious, and made at home.
The next frontier for me with this sourdough pizza dough recipe will be to explore more fresh-milled grains as a more significant portion of the flour percentage (and I did just that here!). My sourdough pizza formula below is a great place to start, and the 10% whole grains I call for can easily be a springboard for experimentation: swap the whole wheat out for spelt or even Khorasan to play with the texture and taste. I think there’s an equilibrium to find: you don’t want the flavor of the grain to completely overpower the toppings you’re using, but rather to produce a balanced concert of flavors.
To read more about how to adjust the flavor of your pizza, read through my ultimate guide to sourdough pizza →
Why is my sourdough pizza crust chewy?
Using high-protein white flour (13-14% protein) in your sourdough pizza dough can lead to a chewier pizza. If you’d like to reduce the chewiness, try using a lower protein flour for the pizza dough (like all-purpose flour or Type 00 with lower protein).
My Favorite Pizza Tools
I’ve decided to round up all the tools shown here in this post for those wondering what I’m using. I’ve found each of these to be great for their purpose, and I’ve finally collected everything I need to make pizza consistently each week.
- Pizza dough proofing containers – I love these large, rectangular plastic containers that also fit in the home fridge.
- Baking Steel – a highly conductive slab of steel to bake your pies on instead of stone (no cracking, higher temp, etc.)
- Pizza Peel – for sliding the sourdough pizza dough (and bread!) into the oven.
- Pizza Cutter – simple and effective pizza wheel cutter
- Calabrian chili – these are so, so good. Perfect as is or to cook down into an oil for a spicy kick to your sourdough pizza.
Sourdough Pizza Dough Formula
Why divide the pizza dough into 290g dough balls?
I like to think of pizza and bread as siblings separated in childhood.
In experimenting with varying dough weights for each pizza, I ranged from a 180g ball to a 300g ball, finally settling on 290g. This is personal, but I found 290g to be the sweet spot for a 12″ personal pizza. If you increase each ball’s weight, you can increase the crust thickness at the bottom or increase the pie’s size. Conversely, you can make a less pronounced rim or a smaller pizza by decreasing the weight.
What dough hydration is best for pizza dough?
One of the fantastic things about a super-blazing-hot wood-fired oven is that you can bake a pizza in about 90 seconds. Because it takes longer than that in a home oven, you’ll end up baking off a lot of moisture from the dough, so your pizza will turn out quite firm, like a cracker.
By increasing the dough’s hydration, the drying effect can be countered to some degree, so the dough can cook longer in the oven. I don’t think 69% is a set-in-stone number. Feel free to go up or down on this depending on how things turn out in the oven, and most importantly, to adjust for your flour.
Additionally, because I advise using parchment paper to launch your pizza into the oven (more below), increasing the hydration into the ’70s is possible (as you increase hydration, it becomes harder and harder to shape and transfer the pizza from your pizza peel to the oven).
Do I need to add diastatic malt powder to this pizza dough?
If you’ve read my site for a while, you’ll know I’m a fan of using diastatic malt powder in some of my recipes to increase enzymatic activity (the action of breaking down starches into sugars that yeast can utilize for fermentation) and add color to my crust.
Adding diastatic malt powder to this pizza dough is optional but recommended.
Vitals and Total Formula
Desired dough temperature: 78°F (25°C) (see my post on the importance of dough temperature).
| Total Dough Weight | 592 grams |
| Hydration | 69% (this hydration takes the water in the 100% hydration starter into account) |
| Yield | 2 x 290g dough balls (about two 12″ pizzas) |
| Buffer | 2% (a little extra added to the recipe to ensure enough dough is made to cover the number of pizzas called for) |
Note that the numbers add up to a little over 2 x 290g sourdough pizza dough balls (580g versus the listed total dough weight of 592g, above) in the chart below. I add a 2% “buffer” to the formula to ensure the resulting dough provides at least two 290g balls. You might end up with a little excess dough on your bench.
If you want to make more than two sourdough pizza dough balls, just scale everything up using baker’s percentages.
| Weight | Ingredient | Baker’s Percentage |
|---|---|---|
| 288g | Type 00 white flour (Central Milling Type 00 Normal) | 90.0% |
| 32g | Whole wheat flour (Giusto’s Stoneground Whole Wheat) | 10.0% |
| 165g | Water 1 | 51.4% |
| 50g | Water 2 | 15.6% |
| 2g | Diastatic malt powder (optional) | 0.5% |
| 6g | Fine sea salt | 2.0% |
| 48g | Ripe sourdough starter, 100% hydration | 15.0% |
Sourdough Pizza Method
Before we begin, a quick note about building a levain (leaven): I don’t create a specific levain to make this sourdough pizza dough. As I’ve mentioned in my Sourdough Starter Maintenance Routine, a sourdough starter and a levain are essentially the same things. A levain is built as an off-shoot, or splinter, that eventually dies off in the oven with the bread or pizza. With this pizza dough, there is such a small levain requirement there really isn’t a need to make a levain and wait for it to fully ripen before using.
Essentially, you’re using your sourdough starter discard to make this sourdough pizza.
1. Mix – 9:00 a.m.
The goal for mixing this sourdough pizza dough is to develop quite a bit of strength up front. This way, we perform fewer stretches and folds during bulk fermentation.
You can use a mixer to strengthen this pizza dough, such as a KitchenAid stand mixer, or you can do things by hand. I’ve mixed both ways to equal effect. In either case, the result will be a dough that’s not completely smooth but has a very strong feeling. Perhaps a little past medium development.
Mixer
To the mixing bowl of a stand mixer fitted with the dough hook attachment, add the water 1, ripe sourdough starter, flour, salt, and malt. Turn on speed 1 and mix for a few minutes until everything comes together. Once the dough is cohesive, dribble in the remaining water 2 over a minute or two while mixing, waiting to add more water until the previous liquid is absorbed. (If you add the water all at once, the dough will slide around and around.) Then, mix for 4 to 5 minutes until the dough starts to cling to the dough hook and begin to smooth, but it will still be far from fully developed (see image below).
By Hand
To mix this sourdough pizza dough by hand, follow the same procedure as sourdough bread. To a large mixing bowl, add the water 1, water 2, ripe sourdough starter, flour, salt, and malt, and mix by hand until incorporated. Once incorporated, dump out onto your counter and slap and fold the dough for about 5-7 minutes until it firms, smoothes, and holds shape on the counter.
If you don’t want to do slap and fold, you can also perform turns in the bowl, stretching the dough up and folding it over for several minutes until it is strong and resists stretching and folding. See my guide to mixing for more information and techniques on mixing dough.
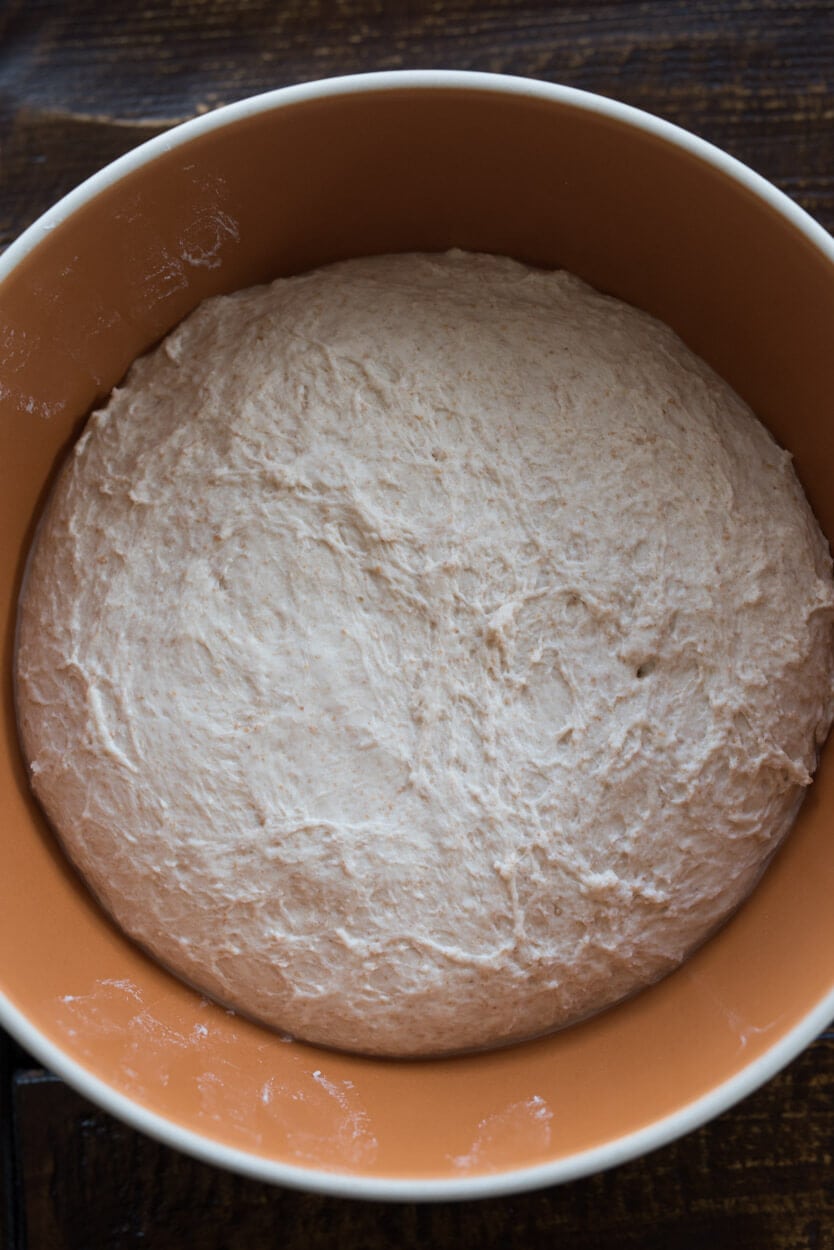
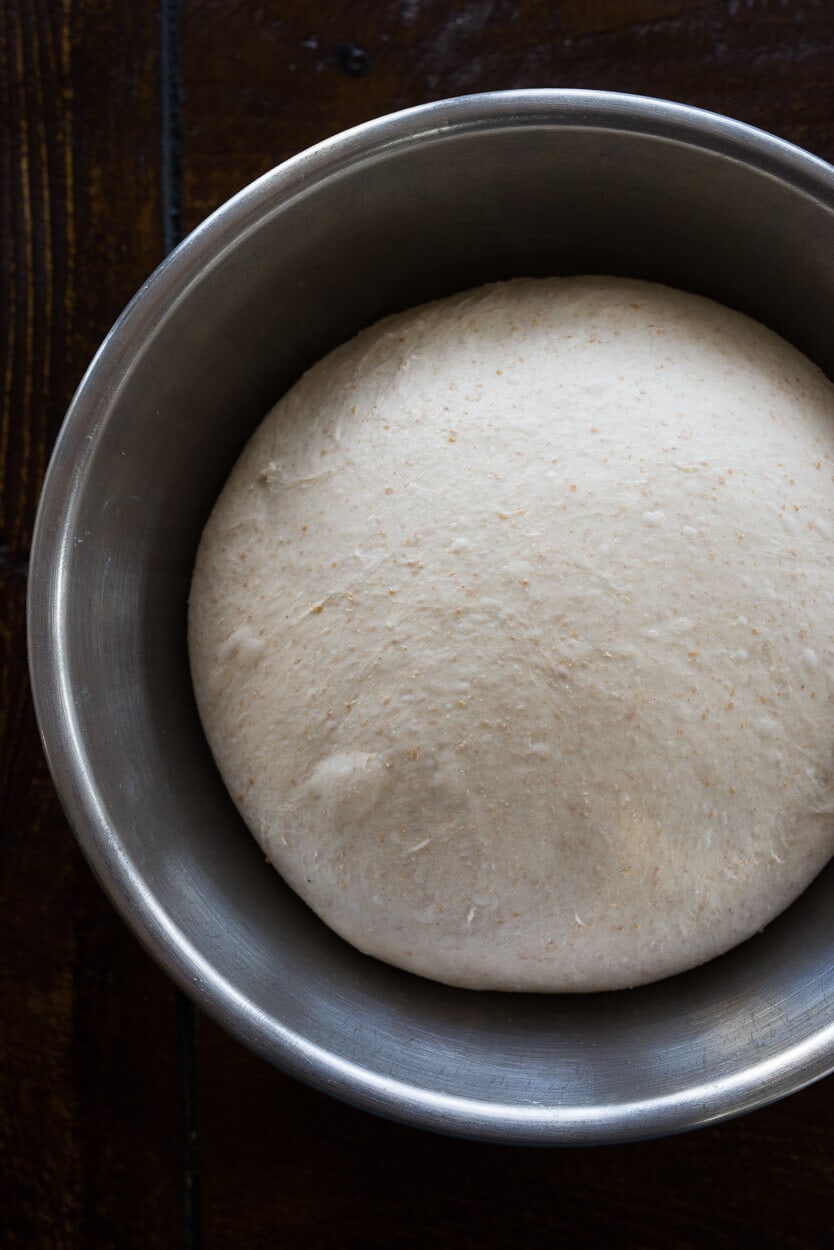
The dough should have smoothed but still shaggy at the mixing end. The low hydration of this dough means it will be hard to mix further at this point without letting it relax. Transfer dough to a thick-walled container (I use a large ceramic bowl) for bulk fermentation on the counter.
2. Warm bulk fermentation – 9:15 a.m. to 11:45 a.m.
At 75-77°F (23-25°C) ambient temperature, bulk fermentation should go for about 2 and 1/2 hours. Perform 3 to 4 sets of stretch and folds—a North, South, East, and West fold for each set – spaced out by 30 minutes during the bulk.
After the third set, check how the dough feels: is it incredibly stiff and resists any stretching? If so, let it rest for the remainder of the 2.5 hours. Give it the final fourth set if the dough is still extensible and slack.
3. Cold bulk fermentation – 11:45 a.m. to 11:00 a.m., overnight)
After 2 and 1/2 hours in bulk fermentation, use olive oil and lightly oil a bowl large enough to hold the dough. Then, dump the dough onto the counter and, using two hands, shape the dough into a very tight boule. You can spin the dough on the counter to create tension on the outside or drag it toward your body while using your pinkies to pinch the dough under itself (like how I shape a boule).
Getting the dough nice and taut is important; don’t worry about degassing.
Wrap the bowl with reusable plastic wrap and place it in the refrigerator overnight.
4. Divide and shape sourdough pizza dough balls – 11:00 a.m.
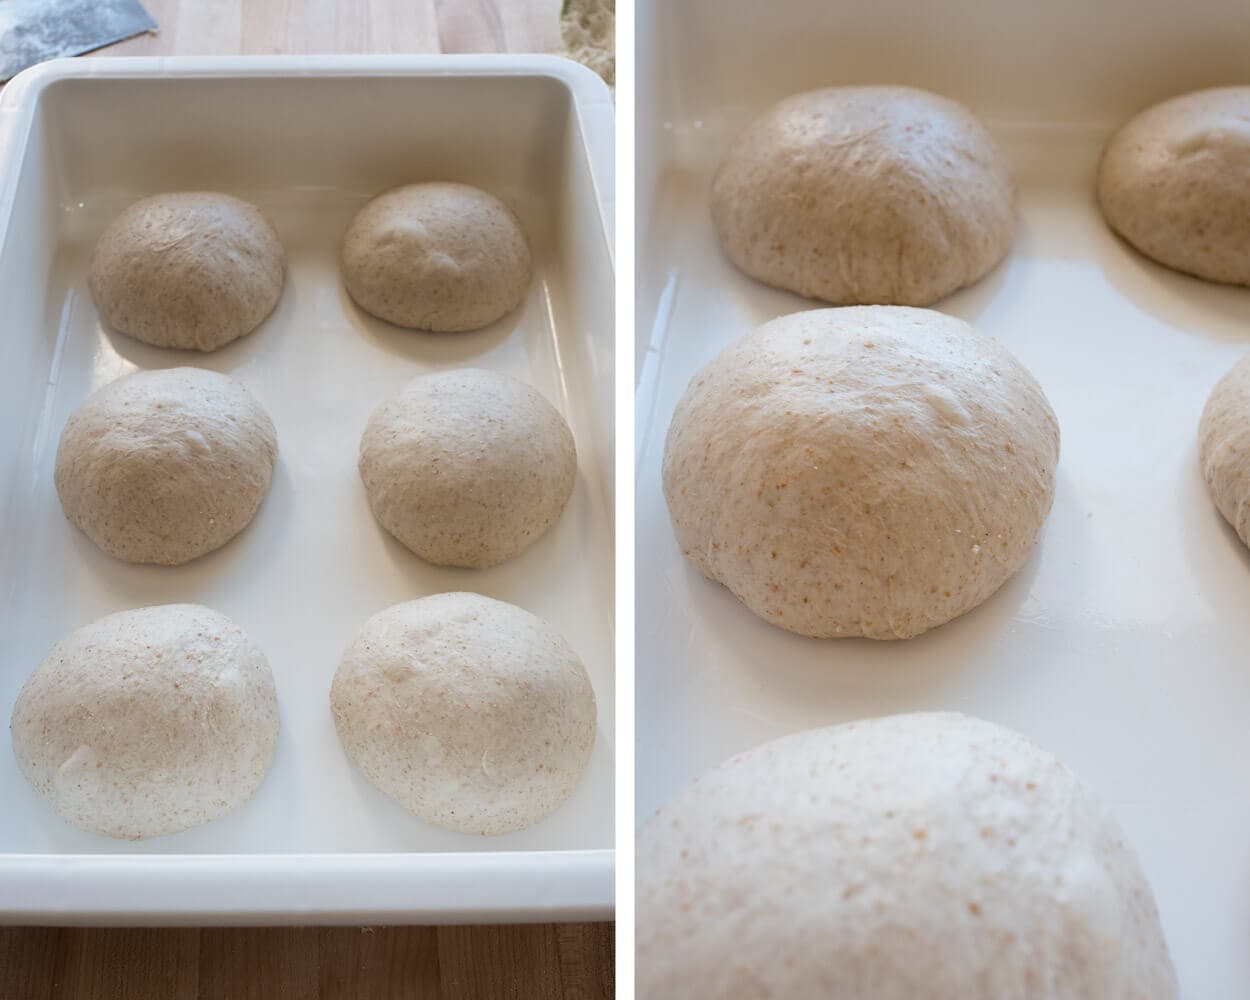
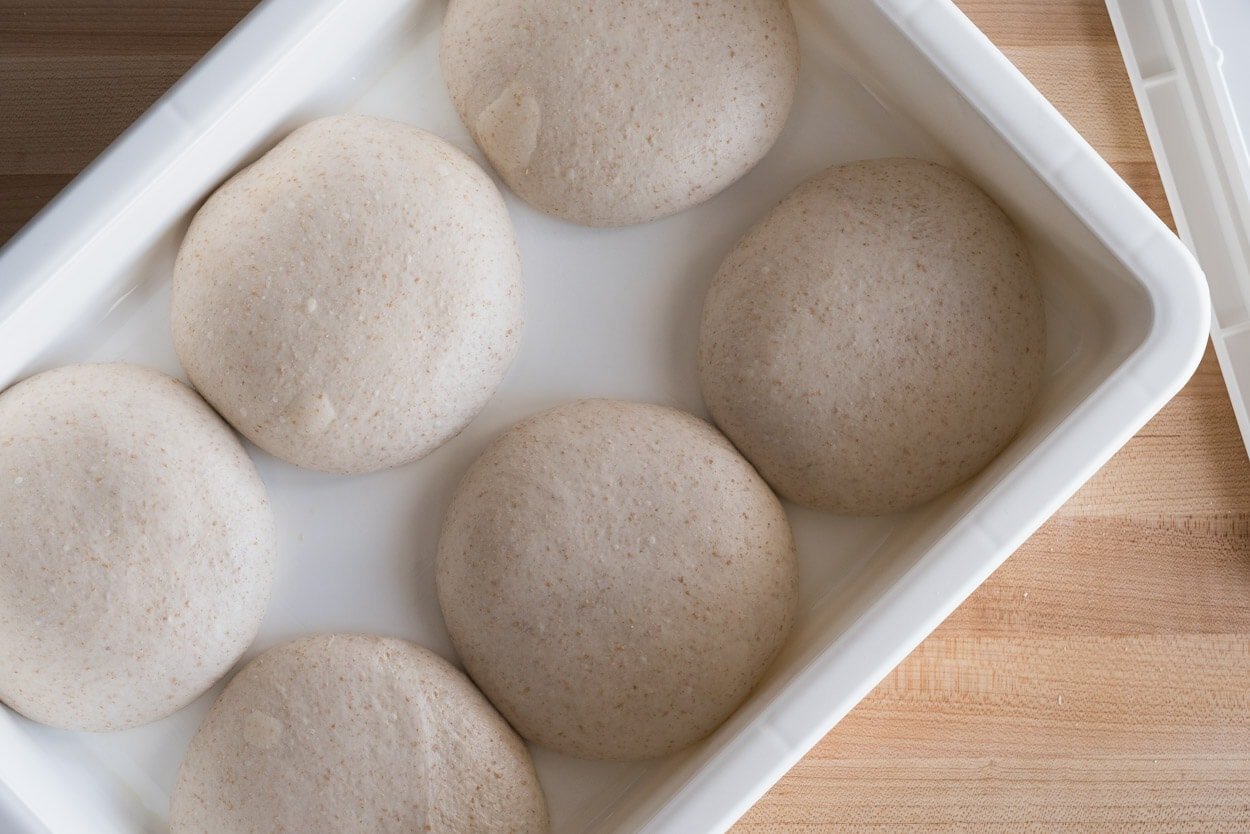
Pick a container to hold your shaped dough balls. With only two, you can use a small baking sheet (like a quarter sheet), or, even better, a high-walled baking dish. I like to use large containers specifically designed to proof pizza dough.
Regardless of the container, lightly oil it with olive oil to make it nonstick.
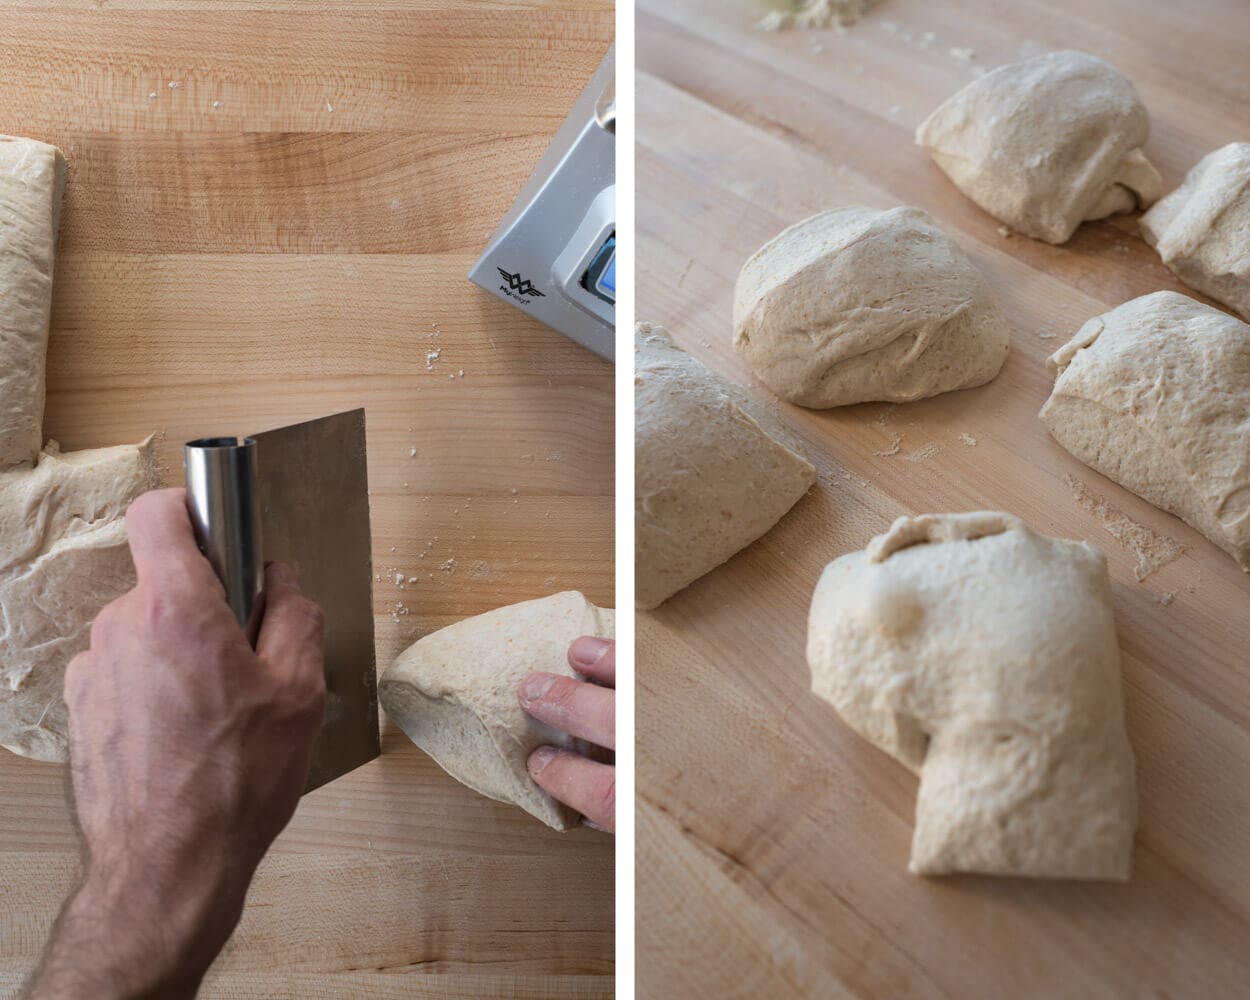
Remove the bulk container with the dough from the refrigerator and scrape it out onto your un-floured work surface.
Divide the dough into two 290g dough balls and, using almost no flour, form each into a very tight ball. It’s incredibly important to create a ball with a completely closed bottom with no seam. You want a tight skin on each of these surrounding the dough ball.
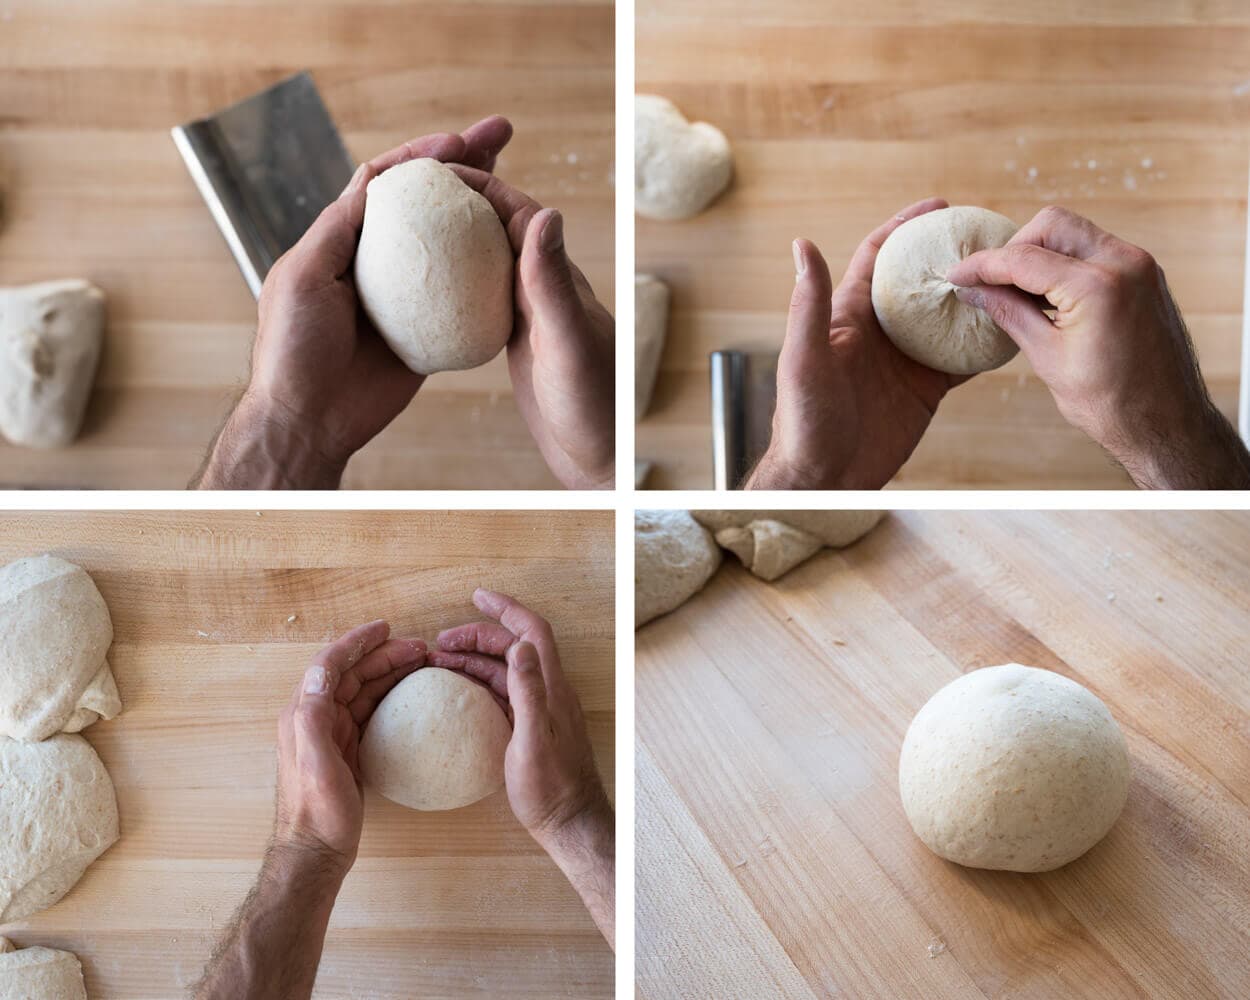
There are a few ways to do this, but my favorite way is to pick up the ball and, using both hands, tuck the dough back and into itself as you rotate it around in your hand (see the upper-left image above). Work your way around and around, stretching and tucking, then flip the ball over and pinch the bottom to close the seam.
Then place it onto the bench and lightly tug it towards my body one or two times to ensure things are sealed and perfectly round.
Here’s a video of me shaping these sourdough pizza dough balls:
The ball should be smooth all over and on the bottom—try not to have creases, seams, or holes. Transfer to your lightly oiled proofing container.
See my guide to balling pizza dough for a longer walkthrough →
5. Proof – 11:30 a.m. to 5:30 p.m.
Once the balls are shaped and placed into the proofing container, cover them with an airtight lid or plastic wrap. The balls will proof on the counter, around 75°F (23°C), for about 6 hours. At the end of this period, the dough should be puffy to the touch and should have relaxed out from its tight ball into more of a disc shape (see below).
If you’d like to use the dough immediately, start preheating your oven. Alternatively, when the dough is finished proofing, you can place it into the refrigerator, which will hold for several hours, even overnight.
6. Preheat oven at 4:30 p.m., shape and cook at 5:30 p.m.
Preheat the oven on Bake setting for one hour at 550°F (285°C) (or the highest your oven will go). Gather your handheld water mister and place it by your oven; you will use this to lightly spritz the pizza once you’ve placed it into the oven (more on this below).
While your oven is preheating, gather your pizza toppings. Make the pomodoro sauce (see recipe below), and cut the mozzarella into cubes. Remember, the smaller the blocks of cheese you make, the faster they will bake (and burn); there’s a sweet spot to find.
SHAPING TIP: If you find the dough hard to shape, place the proofing container with dough into the refrigerator to chill slightly for about 15 to 30 minutes. Shaping slightly chilled pizza dough is much easier.
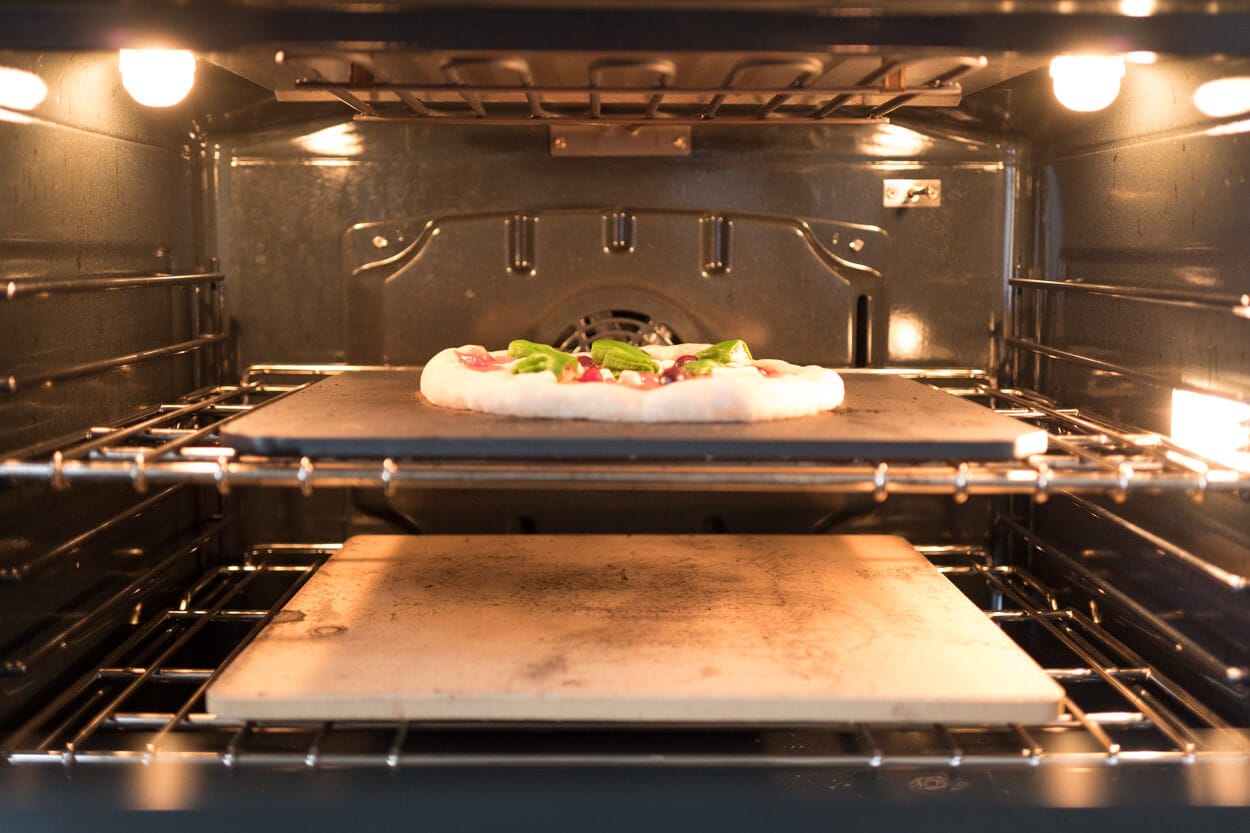
I use a Baking Steel in my oven to bake my pizza, and, as I mentioned before, it does one heck of a job of staying super hot and transferring massive heat to the sourdough pizza dough.
You can see above how I setup my home oven to make pizza.
I place a Baking Steel a few rungs down from the top broiler element. Note that the bottom pizza stone is unnecessary; I keep it in my oven and never move it to save some extra masonry mass for heat retention.
In early pizza trials, I placed the Baking Steel as close as possible to the top broiler with the thought that when I turned that broiler on to superheat the steel, it would get insanely hot—and it sure did. However, that residual heat from the boiler sticks around, so when you launch your pizza on the steel, it cooks the top of the pizza a bit too fast.
I found this extra top-heat to harden off the crust prematurely, stunting dough spring. As you can see, I like it a little lower, just low enough to still get significant heat from the broiler when it’s kicked on but not too close to overdoing the top of the pizza.
Here’s a video of how I like to stretch pizza dough:
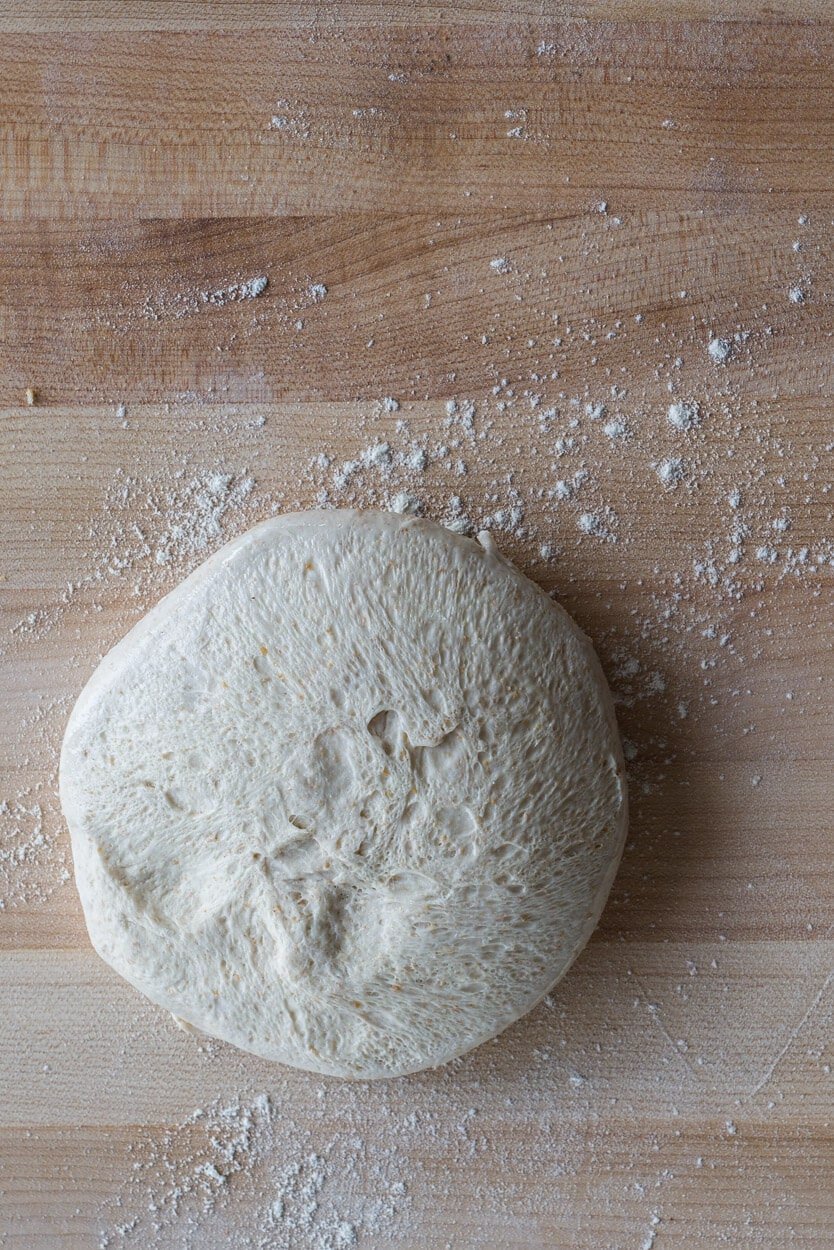
Cut a piece of parchment paper to fit your pizza peel and place it on top. Lightly flour your bench and the top of a single sourdough pizza dough ball from the fridge. Using a dough scraper, gently remove the dough ball from the proofing vessel and place the top-side down on your bench (place the remaining ball back into the fridge).
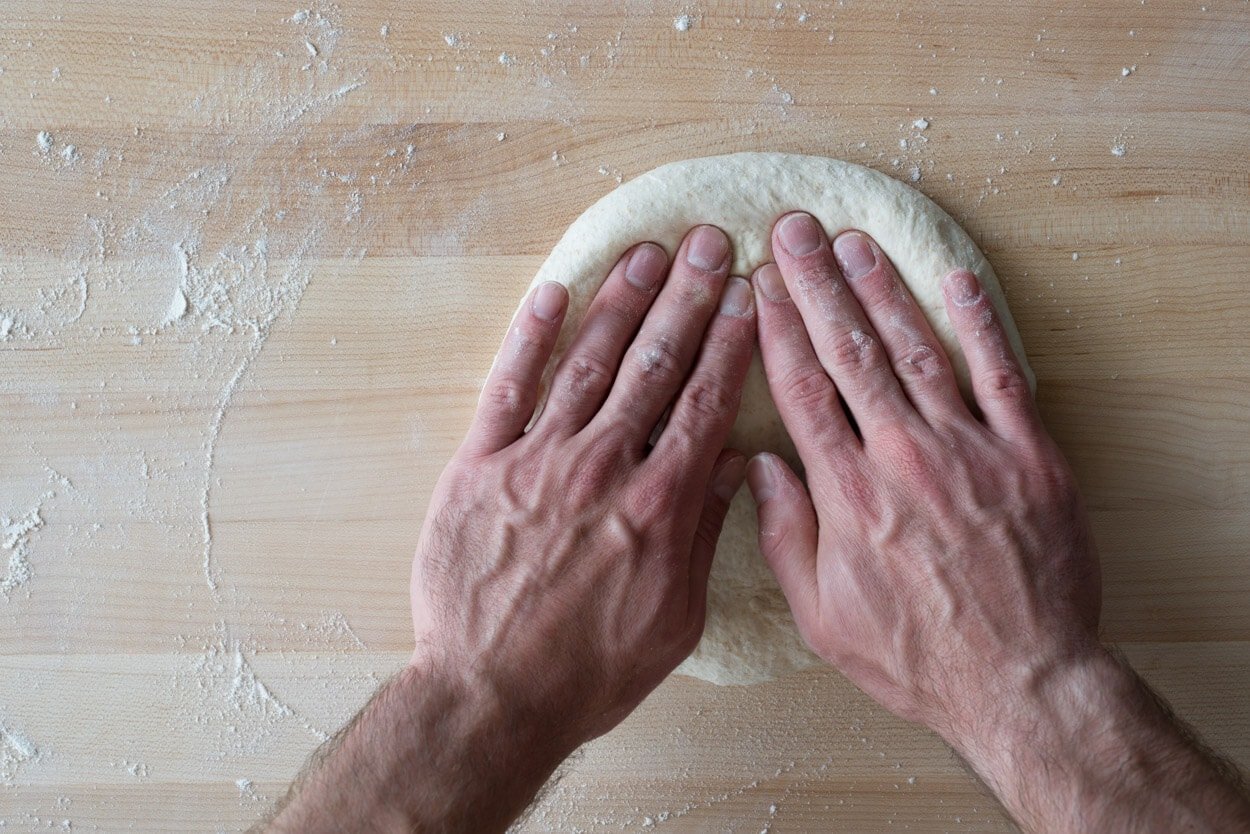
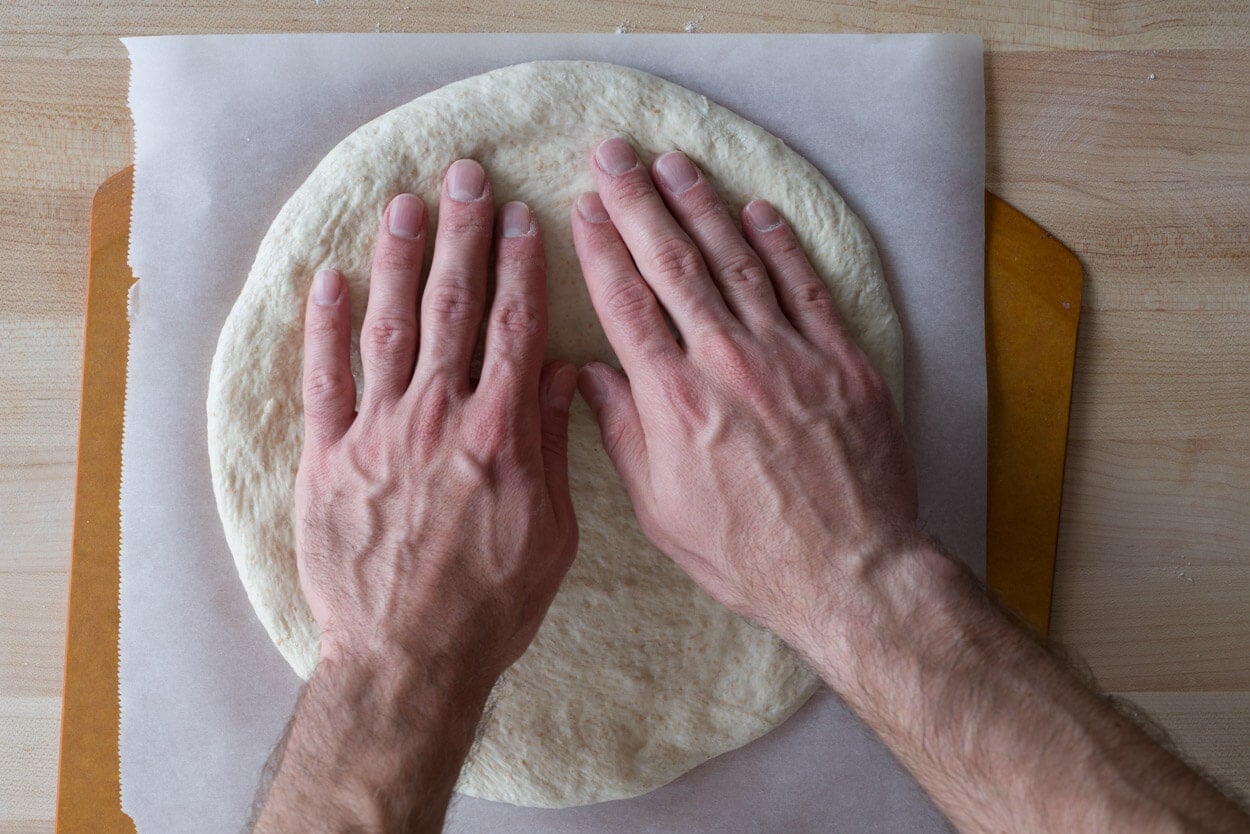
Flour your hands and the side of the ball facing up and begin shaping. Using two hands shaped like an inverted letter “V,” press down the dough uniformly, starting at the side of the dough farthest from you, working toward your body. You want to keep your hands flat with the dough. Try not to press out any gas at the rim of the dough where the edge will form—you want this to rise as high as possible.
While pressing, turning the disc from time to time is easy, and press from top to bottom in different orientations. You’ll feel yourself slightly pressing the gasses from the dough’s interior out to the edges as the center flattens and the border becomes more and more pronounced. If you find the dough sticks too much to your hands and the bench, use more flour, but I find this rarely to be the case. The dough’s cold retard just before shaping helps strengthen the dough, and the light dusting of flour takes care of any residual stickiness.
Once pressed out several times, you have a choice: you can transfer the disc to the parchment paper on the pizza peel and finish stretching the dough out on the parchment if that’s more comfortable, or you can lift the disc off the bench and using the back of your hands stretch the dough out as you work around (imagine an Irish-style boxer with their fists up, knuckles pointing away from the body with the dough draped over them).
Another method would be the Naples style “slap,” where you hold the disc on the bench with one hand, stretch the dough outwards with the other, and then lift the disc and rotate it to work around the entire dough. Each method takes some practice, and if you’re starting, shaping on parchment paper is a great way to get a feel for the process while still making it easy to slide the dough into the oven.
Once your dough is on the parchment paper and shaped, switch your oven from Bake to Broil (high). This will engage the broiler, usually taking a minute or two, while you top your pizza. When you have the dough on the parchment, you can relax and focus on working your oven and topping your pizza.
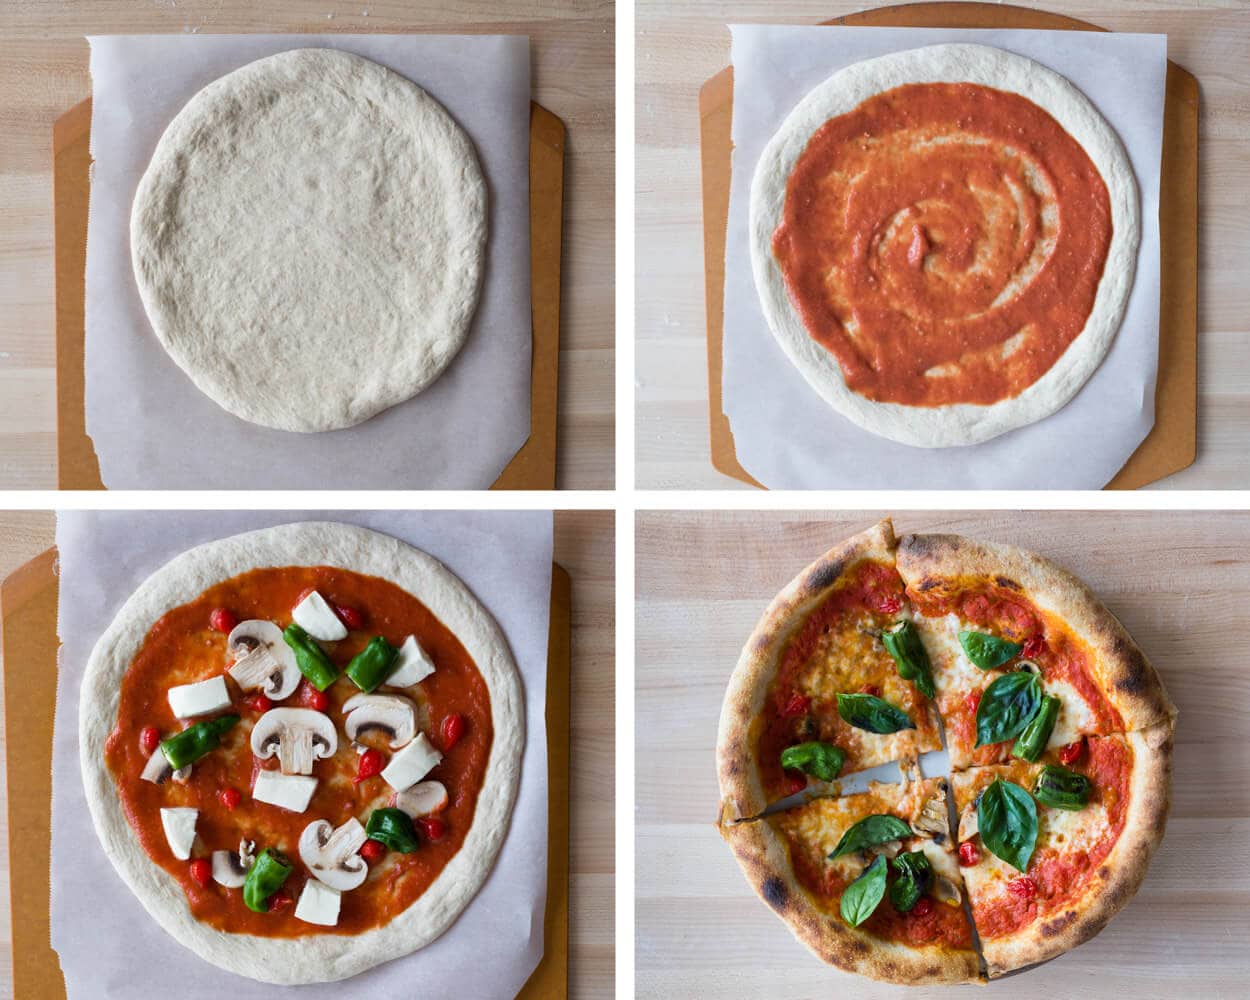
If using my tomato sauce recipe listed below, grab a ladle and scoop out a medium amount of tomato sauce. Pour onto the dough and spread out circularly using the back of the spoon. Top with the remaining items called for in the recipe.
If using parchment paper, slide it into your oven and cook the pizza on the parchment once the dough is topped.
OPTIONAL: Quickly grab your handheld water mister and carefully spray in your oven to slightly wet the dough. I’ve played with misting and not misting. I find it helps give the dough a little moisture (which, if you recall, is a problem with a home oven: we lose moisture before the pizza is cooked, drying out the crust) at the beginning to rise high and prevent overly drying out the crust. If you do not want to use a handheld mister, by all means, skip this step.
The broiler should still be active at this point, and your dough will get an initial blast of the bottom and top heat. Bake with the broiler on for 1.5-2 minutes until you see the dough slightly color, then switch your oven from Broil back to Bake (at maximum temperature). Bake for an additional minute, then using your pizza peel, carefully rotate your pizza 180º in the oven to even out the baking.
Continue baking until done to your liking. I like to underbake these ever-so-slightly, so they are still very soft. Remove from the oven using your pizza peel and transfer to a plate. Top with remaining items (basil, a little more olive oil, etc.), cut, and serve. Repeat for remaining dough balls.
Here is my overall sourdough pizza dough cooking process:
- Take a 290g dough ball out of the fridge and shape out into a disc on parchment paper
- Turn oven from Bake setting (hopefully at 550°F (285°C)) to maximum Broiler setting
- Top dough disc with toppings
- Open the oven and slide in the pizza dough on top of the parchment paper
- Quickly spritz all sides of dough with a handheld water mister and then close the oven door
- Bake for 1.5 to 2 minutes (broiler should be on)
- Turn broiler off and set oven back to Bake at 550°F (285°C)
- After 1 minute, rotate the dough 180° using a pizza peel and carefully grabbing the corner of the parchment paper
- Bake for an additional 4-5 minutes or until done to your liking
Sourdough Pizza Recipes
Below are a few suggestions for pizzas I make often. I like to top my pizza lightly, using only small amounts cheese and sauce. You’ll see in the recipes below and my images throughout—it’s just my preference.
If you like a full pizza, by all means, pack it on. And, of course, feel free to modify these to your heart’s content—use whatever is fresh, local, and in season.
If you have special dietary restrictions, many modifications can be made. For example, my wife cannot eat (most) dairy, so I’ll always sub out the mozzarella for mozzarella di bufala (lactose-free) or goat cheese with a light shaving of aged parmesan.
Basic pomodoro (tomato) pizza sauce
This is my go-to tomato sauce for just about any pizza.
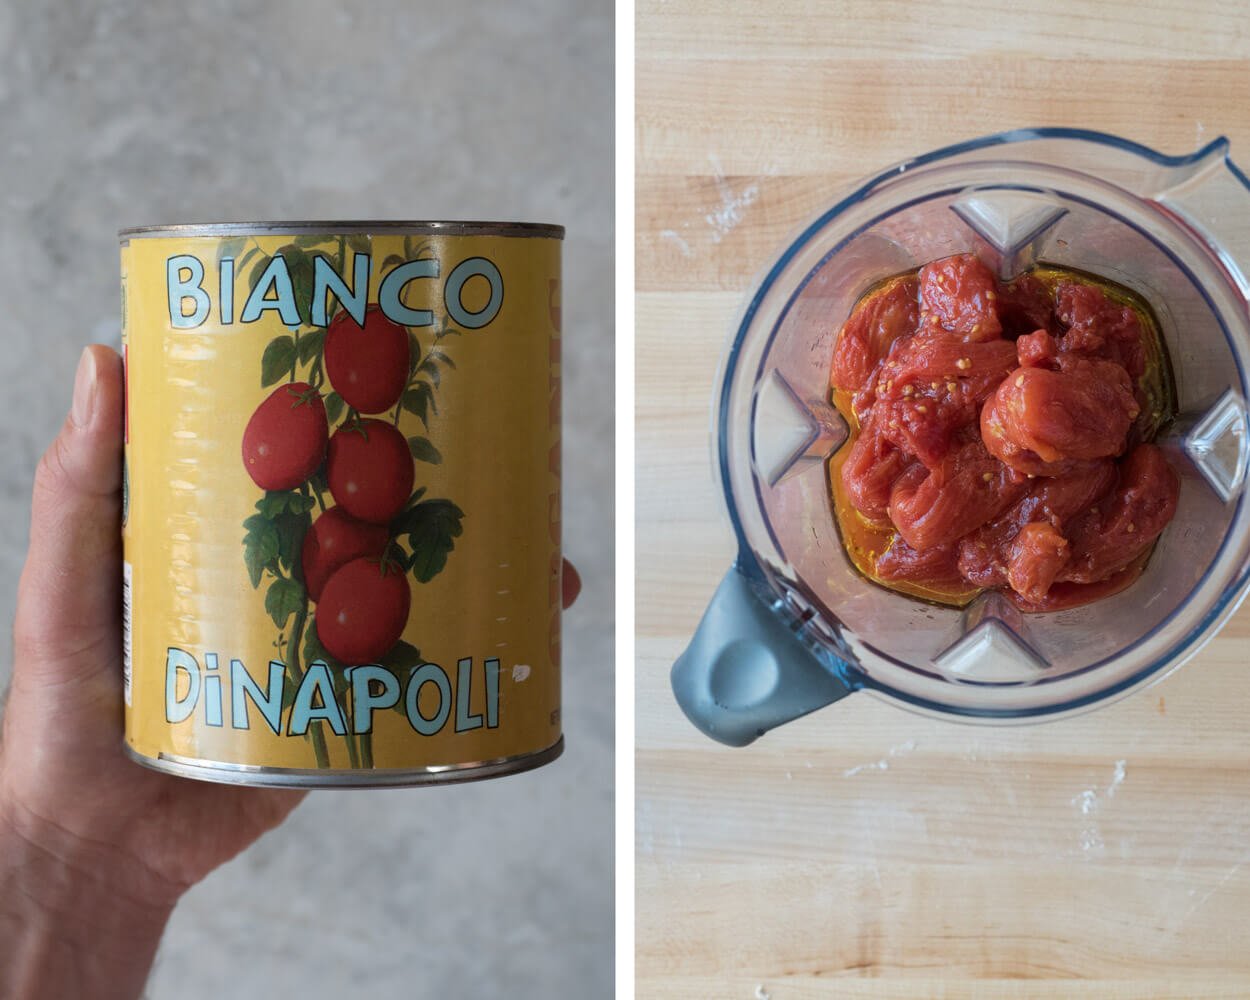
- One 28oz. can whole peeled tomatoes (Bianco DiNapoli or San Marzano)
- 1.5 Tbsp extra virgin olive oil
- 1/2 tsp salt
- 1/4 tsp dried oregano
Drain the whole peeled tomatoes reserving the liquid for another use (like pasta, see below). Place tomatoes, olive oil, salt, and oregano in a blender and blend until desired consistency (I like it very smooth). Taste the sauce and adjust the seasoning if necessary. It will last about a week in the fridge.
LEFTOVER SAUCE TIP: To make a simple and delicious weeknight pasta sauce recombine the leftover sauce with the reserved tomato liquid and cook with kalamata olives and sliced garlic on the stove until reduced significantly (it should sort of coat the back of a spoon), about 30-40 minutes. Top pasta with basil/parsley, freshly grated Parmigiano-Reggiano, and extra virgin olive oil.
Sourdough pizza with pomodoro, mushrooms, peppadew, and padrón peppers

I accidentally discovered peppadew at the market one week, and I can’t get enough of these sweet and tangy little peppers. They’re my secret weapon. They are fantastic on pizza (when used sparingly) as they give an unexpected, but not overpowering, a burst of sweetness that pairs incredibly well with this pizza’s savory and salty flavors.
- One 290g ball Sourdough Pizza Dough
- 1/3 cup Basic Pomodoro Sauce
- 35g mozzarella cut into cubes or torn by hand
- Several padrón peppers with stems removed
- Handful peppadew “sweet drop” peppers
- 2-3 medium-sized white mushrooms
- A handful of kalamata olives (optional)
- Several basil leaves
- Drizzle olive oil
Spread the pomodoro sauce evenly around the pizza in a circular fashion while keeping a 1” border clean around the dough’s outer edge (this will be the crust). Then place the padrón peppers, peppadew, mushrooms, and olives in an even distribution over the pomodoro sauce. Slide the pizza into the oven and cook.
When the pizza is finished cooking, scatter the basil on top with a drizzle of olive oil.
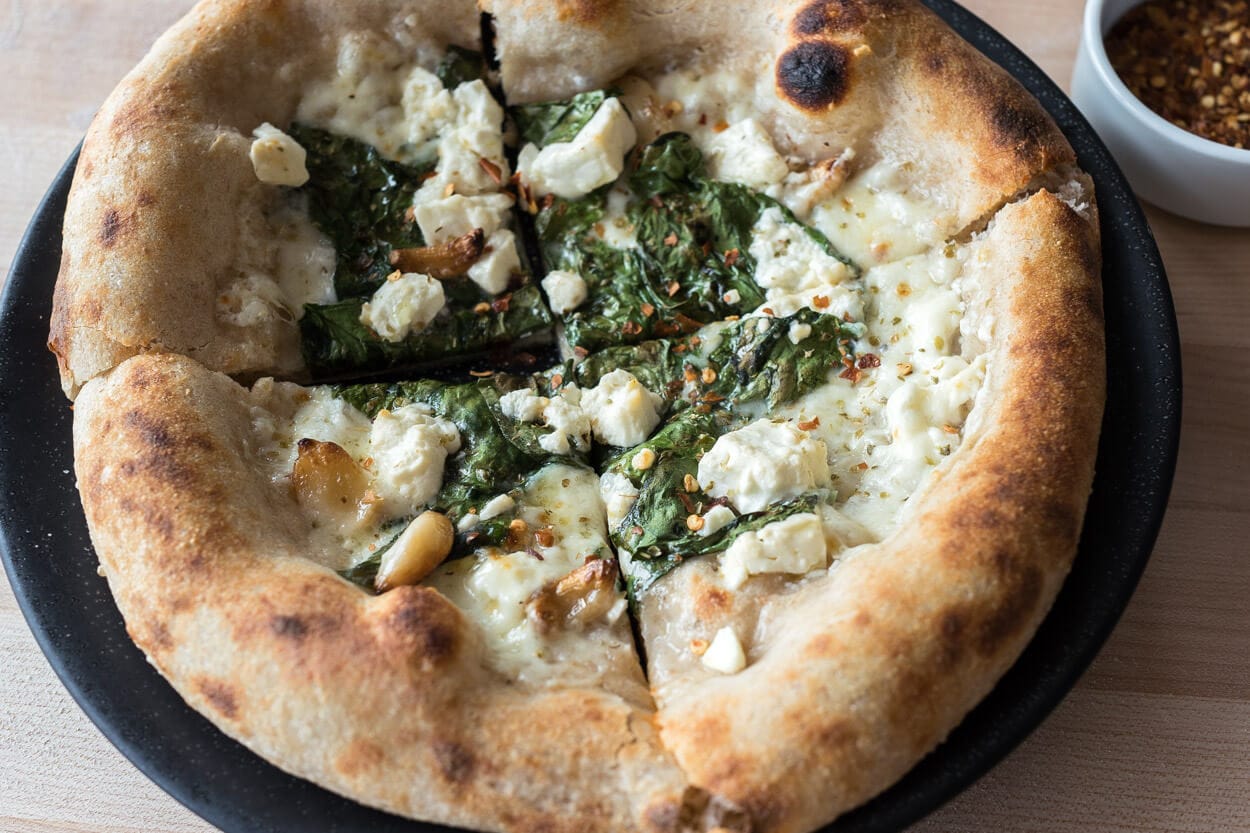
Sourdough pizza with spinach, feta, and garlic confit
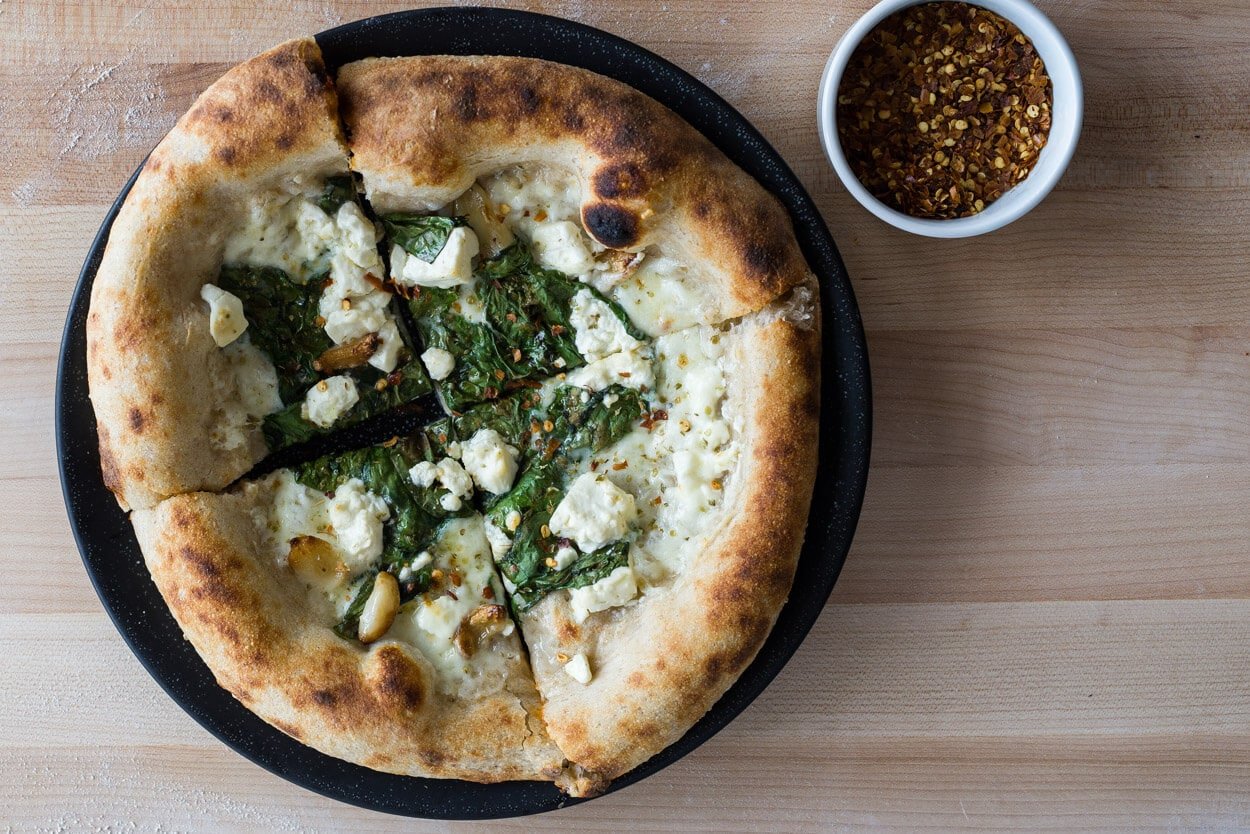
I based this recipe on a pizza from the Gjelina cookbook (one of my all-time favorite cookbooks), and it has just the right balance of flavors. There’s no tomato here, so it’s a good break if you are tomato-ed out. I like to add a pinch of red chile flakes to this one after I finish cooking the pizza.
- One 290g ball Sourdough Pizza Dough
- 2-3 cloves garlic confit (roasted garlic will work also), chopped
- 2 cups whole spinach leaves
- 35g feta cheese
- 35g mozzarella cheese cut into cubes
- Pinch red chile flakes (optional)
- Pinch of dried oregano
- A drizzle of olive oil
Scatter the chopped garlic over the dough and then pile the spinach leaves mainly in the center but a few, reaching out to the crust here and there. On top of, and occasionally below, the spinach, scatter the mozzarella and feta cheese (try not to break the feta into tiny pieces) throughout. Drizzle olive oil lightly on top and cook as described above.
When this pizza is cooked, the cheese will melt on top of and below the spinach, which is just delicious.
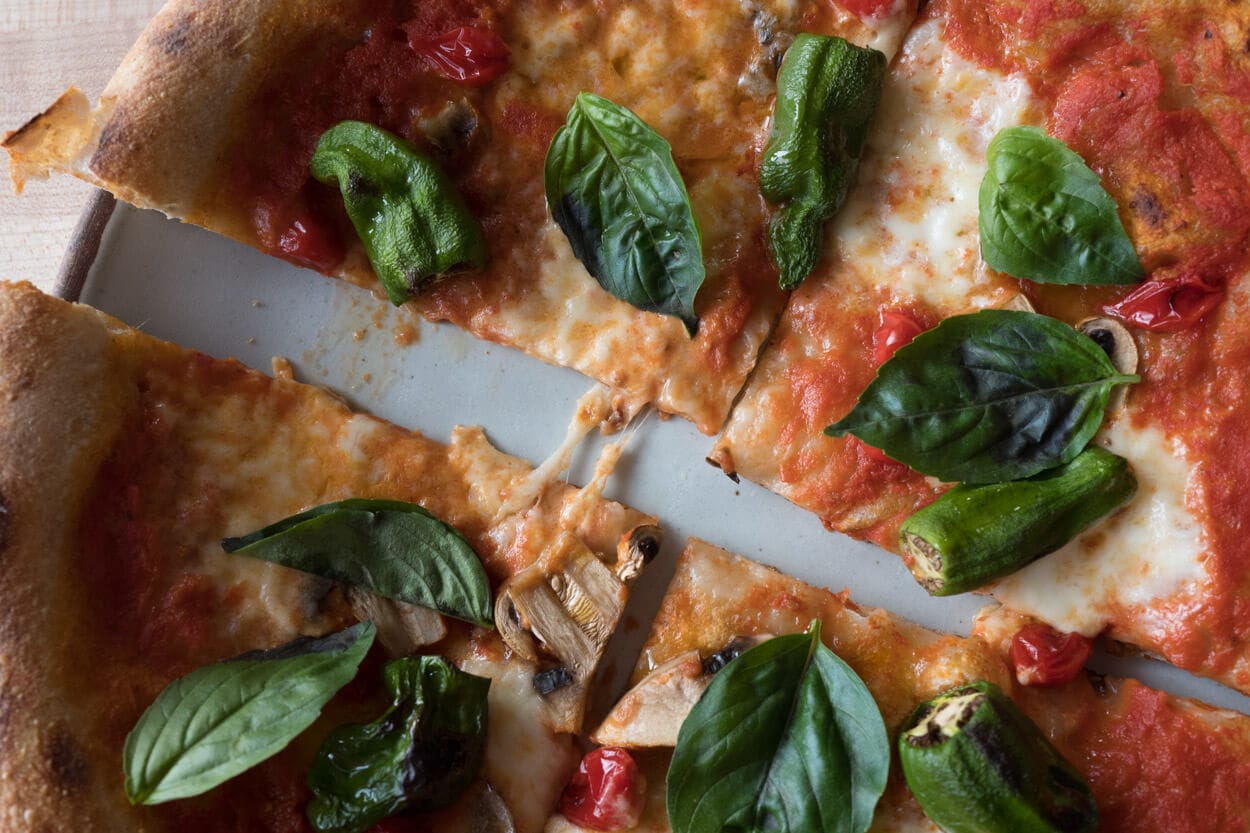
Sourdough pizza with pomodoro crudo, mozzarella, basil, and oregano

I love this pizza. I’ve had a variation of this in Italy, and each time I see it on the menu, it’s my first choice. This pizza’s flavor is lighter than one with a traditional tomato sauce, and I think this is what I like so much about it. The taste of oregano, olive oil, and slightly roasted cherry tomatoes is pretty out of this world.
- One 290g ball Sourdough Pizza Dough
- 35g mozzarella cheese cut into cubes
- 2 handfuls of multicolored cherry tomatoes, cut in half
- Scattered kalamata olives (optional but tasty)
- Dried oregano
- Several fresh basil leaves
- Drizzle olive oil
Scatter the mozzarella cheese on the dough while leaving a 1-inch border from the edge clean. Starting at the dough center, place cherry tomatoes cut side down, radiating outwards randomly (these look awesome mixed and matched with the highest density in the middle). Drizzle a few “circles” of olive oil around and slide the dough into the oven to cook.
When finished, sprinkle the dried oregano and place the basil leaves on top. This pizza would also be awesome with a pinch of red chile flakes or Calabrian chile oil.
Conclusion
Nowadays, I find myself heading to my dad’s restaurant a little less frequently, but at least when I can’t make it out during the week, I can get some pretty darn good pizza at home with my sourdough starter and this sourdough pizza dough recipe.
Also, who says it’s bad to have homemade sourdough pizza at home during the week and then head to the restaurant for more pizza on the weekend? I love that idea.
Whew, that was a hefty post! Lots of process photos, pizza photos, and comments on how I’ve been honing my sourdough pizza dough-making skills at home. I hope you do not feel overwhelmed by the length of this post but rather come away feeling like you have a single place to go back to for all the tiny details that sometimes get lost with making pizza at home.
Want a deep dive into pizza? Check out my cookbook.

My new cookbook, The Perfect Pizza, covers every step of the sourdough pizza process, with 40+ dough recipes (and toppings!) to help you make pizza in your home oven.
Sourdough pizza recipes, including:
- My go-to home oven dough
- Detroit pizza
- Chicago tavern-style pizza
- Neapolitan
- And a whole lot more, including what to make with extra dough: English muffins, breadsticks, pita, and sub rolls!

Sourdough Pizza Dough
- Prep Time: 24 hours
- Cook Time: 10 minutes
- Total Time: 24 hours 10 minutes
- Yield: 2 pizzas
- Category: Pizza, Sourdough
- Cuisine: Italian
Description
A versatile sourdough pizza dough recipe for the home oven.
Ingredients
- 288g Type 00 white flour (or all-purpose flour)
- 32g whole wheat flour
- 215g water
- 2g diastatic malt (optional)
- 6g salt
- 48g ripe sourdough starter
Instructions
- Mix – 9:00 am
Add the ingredients to a mixing bowl or stand mixer. Mix until medium development (the dough should be smooth but still shaggy and elastic. Transfer the dough to a bulk fermentation container and cover. - Warm bulk fermentation – 9:15 am to 11:45 am
This dough will need 3 sets of stretch and folds during bulk fermentation at 30-minute intervals. - Cold bulk fermentation – 11:45 am to 11:00 am, overnight
Remove the dough from the bulk fermentation bowl and lightly oil the interior with olive oil. Tighten the dough on the counter into a ball and transfer it back to the oiled bowl, seam side down. Cover the bowl and transfer it to the refrigerator overnight. - Divide and preshape into a ball – 11:00 am
Divide the dough into two 290g pieces. Shape the dough into a very tight ball with no seam on the bottom. Transfer to a pizza dough tray or baking sheet and cover. - Proof – 11:30 am to 5:30 pm
Proof the dough on the counter at around 75°F (23°C) for 5-6 hours. When fully proofed, the dough will have relaxed outward and be soft to the touch. If using the dough soon, preheat your oven. Alternatively, you can place the dough back into the fridge until the next day. - Cook – 5:30 pm
Preheat your oven with Baking Steel, one or two rungs from the top, to 550°F (285°C). Shape a dough piece into a large circle on parchment paper. Switch the oven to Broiler setting, top your pizza dough, and slide the dough onto the Baking Steel. Spritz the inside of the oven a few times with a handheld water sprayer. Bake for 1.5-2 minutes with the broiler on, then turn the oven back to the Bake setting at 550°F (285°C). After 1 minute, rotate the pizza in the oven. Bake for another 4-5 minutes until done to your liking. Repeat for the other piece of dough.
Notes
There is no need to make a levain for this recipe, use your ripe sourdough starter.
What’s Next?
If you’d like a different pizza direction, have a peek at my rectangular sheet pan pizza recipe; it’s also a winner!
Or, for more sourdough pizza shaping, stretching, and cooking guides, check out my ultimate guide to sourdough pizza.
If you use this recipe, tag @maurizio on Instagram so I can take a look!


847 Comments
I have done the pizza dough… worked like a charm but the crust did not really had a sourdough taste how can I increase the sourdough taste
You could proof it longer in the fridge!
Made this recipe and it turnd out great for my home oven. Can I make it using 00 flour only?
Yes, absolutely.
I tend to keep my starter in the fridge and only feed it once a week (per King Arthur website) and have had great success so far. What I typically do is take some discard, feed it and let it ripen on the counter or in my warm laundry room until doubled, then use it in the recipe as stated. Should I do this for the pizza dough as well or can I use the discard straight from the fridge? I have seen some other recipes in which you can do that, but was unsure how this recipe would work. In general, is it best to always feed and ripen the starter first???
Ive never had luck using my starter in this way. But if you’re getting good fermentation activity for bread, you can do the same here for pizza.
I made this recipe tonight and made it inno 3 pizza in my Ooni oen. Turned out perfect. I will do again. I’m going to try an overnight ferment next time if I plan it right.
So glad it worked out for you, Shelley!
I make a yeast-based pizza dough that is counter-fermented overnight and then in the fridge for up to 3 days. The longer fermentation brings a richer flavor. What would you say about something similar for your sourdough crust here? Thanks.
You’ll find you’ll get even more flavor with sourdough. If you even just do overnight in the fridge.
Made for the first time a couple days ago, and, as is true with all your recipes, the results were incredible! Thanks, Maurizio!
Super happy to hear that, you guys! Enjoy 🙂
Does the dough have to refrigerate for 24 hours, or will 12+ suffice? I thought it was 12 until I double checked the recipe.
Twelve will be just fine!
Is more than 24 hours ok? Say 36 hours
Hi! I have made this pizza dough several times now. It has always turned out, and using my pizza steel it puffs up nicely in the oven. However, I also always find that my dough balls relax WAY more than as shown in the picture. Am I doing something wrong? Not developing the dough enough?
It could be lack of development or, more likely, more water than I’m using in the dough here for your flour. As long as they turn out great, no worries!
Yes, I’m starting to detect a pattern here. Recently went ‘back to basics’ with my ‘plain’ recipe when I wasn’t getting the spring/shape I wanted, and reduced hydration. This IS Ireland! At any rate, getting much better, and consistent, spring and shape. I have to stop pushing the hydration, all the way round I think. Thanks for the help!
Could one potentially get all the way to final proof and then freeze the dough? My kids love the homemade pizza but often ask for it on the fly, and I’d love to be able to premake and just pull out and bake without needing the full day beforehand!
I’ve heard other bakers freeze a ball just fine!
See reply above!
Hi, I don’t have baking but I do have a pizza stone that can warm up to 450-475 or so. Is this okay? What do you suggest? Thank you!
*baking steel
Steel works fantastic, too 🙂
Yes, a baking stone will work very well!
Taking all your advice and suggestions into consideration, I came up with my own take. The pizza turned out so great, I actually surprised myself. I used white spelt flour and 20% durum rimacinata. 1 stretch and fold once and 3 coil folds every 45 minutes. Rested dough for another 2 hours. Shaped in 4 tight balls. Refrigerated 24 hours. Continued proofing on counter for 6 hours. Spelt flour demands careful handling, that’s why I chose to mix by hand. It needs less hydration, this dough was 62%. I know it sounds too low, but it was perfect for the pizza. Spelt dough also spreads out more than regular, so it’s best to store each ball in an individual container.
Sorry about the rant😂… But I’m really excited! I posted a photo on Instagram @vardiper
The sauce is delicious, too. Thank you Maurizio!
Not a rant at all, love this process! I like spelt in pizza too, though you have to watch the hydration for sure, it’ll get super extensible (makes for easy shaping, though) 🙂
Hi there, am I expecting the dough to double by the end of the warm bulk fermentation? I’m not clear on the objective of the warm bulk vs RT proof. Thanks!
No, it won’t double, maybe 30% or so. Just look for the dough to be well-aerated, billowy, and smooth.
Ciao Maurizio, thank you for all the tips and recipes, I’ve followed your steps to make an amazing starter and delicious whole wheat sourdough loaves! Quick question for the pizza: I’m always nervous when using such high temperatures in the oven, is there a rationale for doing a quick bake at very high temperature like you’re suggesting here versus a lower temp (say 450) for longer time? Grazie mille !!
You’re very welcome! Sorry for the delay. You want a quicker cook on pizza to encourage a fast spring in the oven, but also the longer it cooks the crispier and more dried out the dough will become. If you want a crispy pizza (which is awesome, too), cooking longer and lower temp is just fine!
Hmm, very strange, Allen! Sometimes I’ll see a loss, too, but that’s a bit much. What I usually do in that case is build in a little “buffer” into the dough so there’s some extra just to be sure I make the amount needed. In this recipe, if you look up to the Total Formula / Vitals area, you’ll see I have a 2% buffer in the recipe. You might need to adjust that up to 4%. If you’re a TPL member, look for the spreadsheet for this recipe and increase the buffer, if you’re not, just increase the amount of each ingredient a bit to keep everything in proportion (the same ratios).
Congrats on the mill purchase! You’re going to love it, I use mine so, so often!
Be sure to scrape down the bowls after ever transfer and hands too. There is a lot of loss due to this.
Yes, you absolutely can. Check out my guide to all things sourdough pizza dough at the bottom, in the FAQ section, I answer this exactly!
“…place the container to the refrigerator overnight, then take the dough
ball out to finish proofing on the counter until relaxed, puffy, and
soft to the touch” Will it still require 5 to 6 hours of proofing on the counter, or has much happened while in the fridge?
This is the best pizza dough I’ve made in ages! Followed the directions exactly but after about 5 hours of final proofing after shaping I was worried that it was going to overproof. I put the dough back in the fridge for an hour or so and then pulled it out to finish the recipe. Great texture and awesome flavor. We have a baking steel which I think makes all the difference.
Fantastic to hear my recipe worked well for you, Laura! I love my baking steel as well, it’s the best for pizza. Enjoy!
Pizza seems to be a mystery to me. As I’m working and proofing the dough everything seems perfect, then when I go to shape the loaf the dough gets very weak, flat and tears. I either need a chunky thick crust or one with holes in it. It seems overproofed using your timeline, but many other attempts gave me the same results with springier slightly under proofed dough. I don’t really get it
Hey, Michael! Hmm. It sounds like the dough is either over proofed or over hydrated. I would try dropping the water 5% or so and see if that helps (it should also help with fermentation stability).
Hi, what is the purpose of doing the cold bulk ferment? Why not skip that step and just have a longer warm bulk ferment and to straight to dividing and shaping?
You can absolutely keep the dough all at room temp, I find the cold bulk ferment brings additional flavor to this dough, but it can be made all room temp, too.
Hi! I need some help here figuring out what went wrong. As background, I’ve baked over 300 sourdough loaves (many of your recipes!) and can turn out a pretty decent loaf with some consistency. I tried your recipe today using ‘De Cecco Farina Di Grand Tenero 00’ which the package says is perfect for making pizza dough (11% protein). I made the recipe as written, and the dough was glop (technical bread making term) and stayed glop throughout my attempts at slap and fold (which is my usual mixing method). I eventually gave up, and tried again using Type 55 French flour, my regular bread flour. Dough was just fine at full recipe hydration. What am I missing?
The 00 flour you’re using isn’t able to handle the water content of this recipe—and that’s okay! Just reduce the amount of water in the recipe to suit that flour and all will be well.
FWIW, I’ve found that many 00 flours need a reduction in water with many recipes, especially flour I get from Italy (Caputo especially).
Thanks!
Hey, I have made a double batch and would like to freeze half, at what point do I place in the freezer?
You could put the balled up dough in the freezer, then take out to thaw overnight. Then finish proofing on the counter until ready to shape out and cook!
Hi! Trying this recipe for the first time. I proofed the dough on the counter for 3 hours at 85 degrees room temp and the dough is ready to bake. The recipe calls for 6 hours at 75 degrees. Does the accelerated proof time seem right based on the elevated room temp? Thank you!
Yes, that sounds about right at that high of a temp. How did they turn out, Amy? (sorry for the late reply!)
The Best. About to try this whole thing all in one day? Do-able?
Yes, definitely! Though, I do find it has more flavor when made over a few days, but a single day is possible. Get up a little early 🙂
I love this pizza recipe. I just made a quadruple batch, but I took half of it and made a batard. The bread came out great, nice rise and oven spring, but a tight crumb, perfect for sandwiches. I always have trouble following the baking schedule, so I did most of the bulk overnight in the fridge and then shaped and proofed at room temperature, and didn’t do many stretch and folds. Still came out fine. Really, if you give the dough enough time to mature on its own, it can be quite forgiving.
Fantastic, Ian! Sounds like a good adaptation. Sometimes I save some of this dough and make other things, too, like focaccia or even pita bread. It’s pretty flexible!
This is my favorite pizza crust, by far! Have made it many times in the oven.
We just got an Ooni, and I am wondering what changes, if any, you might make to the dough for baking at such high temps (around 800-900) Thank you so much!
Nevermind! I just read down in the comments and saw that you recommended a slight drop in hydration. 👍
🙌🏼
Amazing recipe. My kids’ favorite for sure. I’ve tried various sourdough pizza recipes but by far this is the best.
Question: how long do you think I can save the pizza balls in the fridge. The longer the more sour? It’s been 5 days now and my fridge is very cold (2 Celsius). Thanks
So glad to hear that, Marlon! I’ve not pushed to 5 days, but I’ve done a range now over the years, probably the most I’ve done is 3 or 4. I’d say it should be just fine, though! You’ll likely get less rise and a little more sourness, but still great.
Hey Maurizio, check out Adam Ragusea’s YouTube video on pizza with “old dough”. He makes pizza dough in bulk with a small amount of commercial yeast and leaves it in the fridge for up to 10 days, and apparently the flavor keeps improving for at least a week.
I’ve definitely made sourdough pizza dough and let it sit for a week in my fridge (due to laziness) and it still tastes great, although it loses its structure and becomes stickier and harder to work with, and as you assumed, doesn’t rise much. https://youtu.be/o4ABOKdHEUs
Ooh right on, love this!
Just an update, I let some of my pizza dough stay in the fridge for a little over a week before using. My levain must have been very strong because the plastic tupperware containers I used to hold the dough all overflowed in the fridge within a day. No matter, I reshaped them and they proceeded to rise in the fridge again. However, after a week, the dough was practically unusable. It was ridiculously sticky and had lost all of its strength. I couldn’t stretch it without breaking, and almost ended up just making pan pizzas. I did manage to make pizzas on parchment paper (there was no way it wouldn’t stick to the peel). The crust did not rise at all in the oven, and the crust was okay, but definitely too sour.
So after this batch, I won’t be doing it again.