
Baking a healthy and nourishing loaf of sourdough bread with your sourdough starter is gratifying, to be sure, but what if you’re not home all day to check in on the long-fermented dough? I mean, some of us do have to work, right? This simple weekday sourdough bread recipe and schedule are uncomplicated for mixing and baking a loaf of bread during the busy workweek.
This post includes pictures and videos that clearly and concisely convey the full sourdough bread-making process. But why is this recipe so easy compared to others?
Real Quick: Why is This Sourdough Bread Easy?
- It’s a no-knead sourdough bread recipe: mix everything in one bowl
- It uses only two types of flour: bread flour and whole-wheat flour
- It’s moderate hydration—no messy dough or counters
- It’s baked in a Dutch oven or combo cooker
- Timing is extremely flexible
Let’s go over the workweek schedule.
A simple weekday sourdough bread schedule
In the past, I’ve discussed a weekend baking schedule that outlines a schedule for low maintenance during the week with a bake on the weekend. The following schedule, however, allows baking during the week around a typical nine-to-five workday. It’s also quite flexible, and you always have the option to place the dough in the fridge longer to bake when you get a chance.
Read through my ultimate guide to dough proofing for more information on adjusting the proofing period for this sourdough bread.

| Time | Step |
|---|---|
| 7:00 a.m. (before work) | – Make the 10-hour levain (ready ~5:00 p.m.) – Save time later, scale-out flour & salt into bowls and cover |
| 5:00 p.m. (after work) | When levain ready, mix dough for autolyse |
| 5:30 p.m. | Finish mixing and begin bulk fermentation |
| 9:00 p.m. | Divide, pre-shape, and bench rest |
| 9:30 p.m. | Shape and place into the refrigerator to proof overnight |
| 7:00 a.m. (next day) | – Bake the next day before work – Alternatively, bake after work |
The schedule above has example times, so shift the timeline to earlier or later according to your schedule. Don’t worry if you don’t hit the times precisely as they’re written. There’s some flexibility there.
A Simple Weekday Sourdough Bread Recipe
Vitals
| Total Dough Weight | 1,800 grams |
| Pre-fermented Flour | 8.0% |
| Hydration | 76.0% |
| Yield | Two loaves |
Total Formula
The following table shows all the ingredients needed to make this bread. Each ingredient will be called out as needed in the method steps below.
My final dough temperature for this simple weekday sourdough bread was 75°F (24°C). For more information, see my post on the importance of dough temperature.
| Weight | Ingredient | Baker’s Percentage |
|---|---|---|
| 806g | High-protein white bread flour, malted (King Arthur Bread Flour) | 80.0% |
| 202g | Whole wheat flour (King Arthur Whole Wheat Flour) | 20.0% |
| 766g | Water | 76.0% |
| 19g | Fine sea salt | 1.9% |
| 8g | Ripe sourdough starter (100% hydration) | 0.8% |
Method
1. Prepare levain – 7:00 a.m., before work
A levain is simply an off-shoot of a sourdough starter. A sourdough starter is never used up completely; it’s continually fed day after day indefinitely. A levain is created with a small bit of a sourdough starter and left to mature (ferment) until ready to be mixed into a dough. Ultimately, it meets the same fate as the dough: baked in the oven.
In the morning before work, mix in a jar:
| Weight | Ingredient |
|---|---|
| 40g | Bread flour |
| 40g | Whole wheat flour |
| 81g | Water |
| 8g | Mature sourdough starter |
Loosely cover the jar; it should be ready after about 10 hours at room temperature, 72-75°F (22-24°C).
2. Autolyse with Levain – 5:00 p.m. after work
Performing an autolyse gives our dough a chance for the flour to fully hydrate and begin the gluten development process (all without kneading). I typically don’t do an autolyse with the levain included, but we’ll do that in this simple weekday sourdough bread recipe because it’s a short period.
Add all the ingredients below to a mixing bowl. Mix with wet hands until all the dry bits are incorporated. Cover and keep somewhere warm at room temperature for 20 minutes.
Note: the water in the table below is 50g less than the total water for this recipe; the water (and the salt) are held back for the next mixing step.
Dough Mix
| Weight | Ingredient |
|---|---|
| 766g | High protein bread flour, malted (King Arthur Bread Flour) |
| 161g | Whole wheat flour (King Arthur Whole Wheat Flour) |
| 635g | Water, Autolyse |
| 169g | Ripe levain (created in Step 1) |
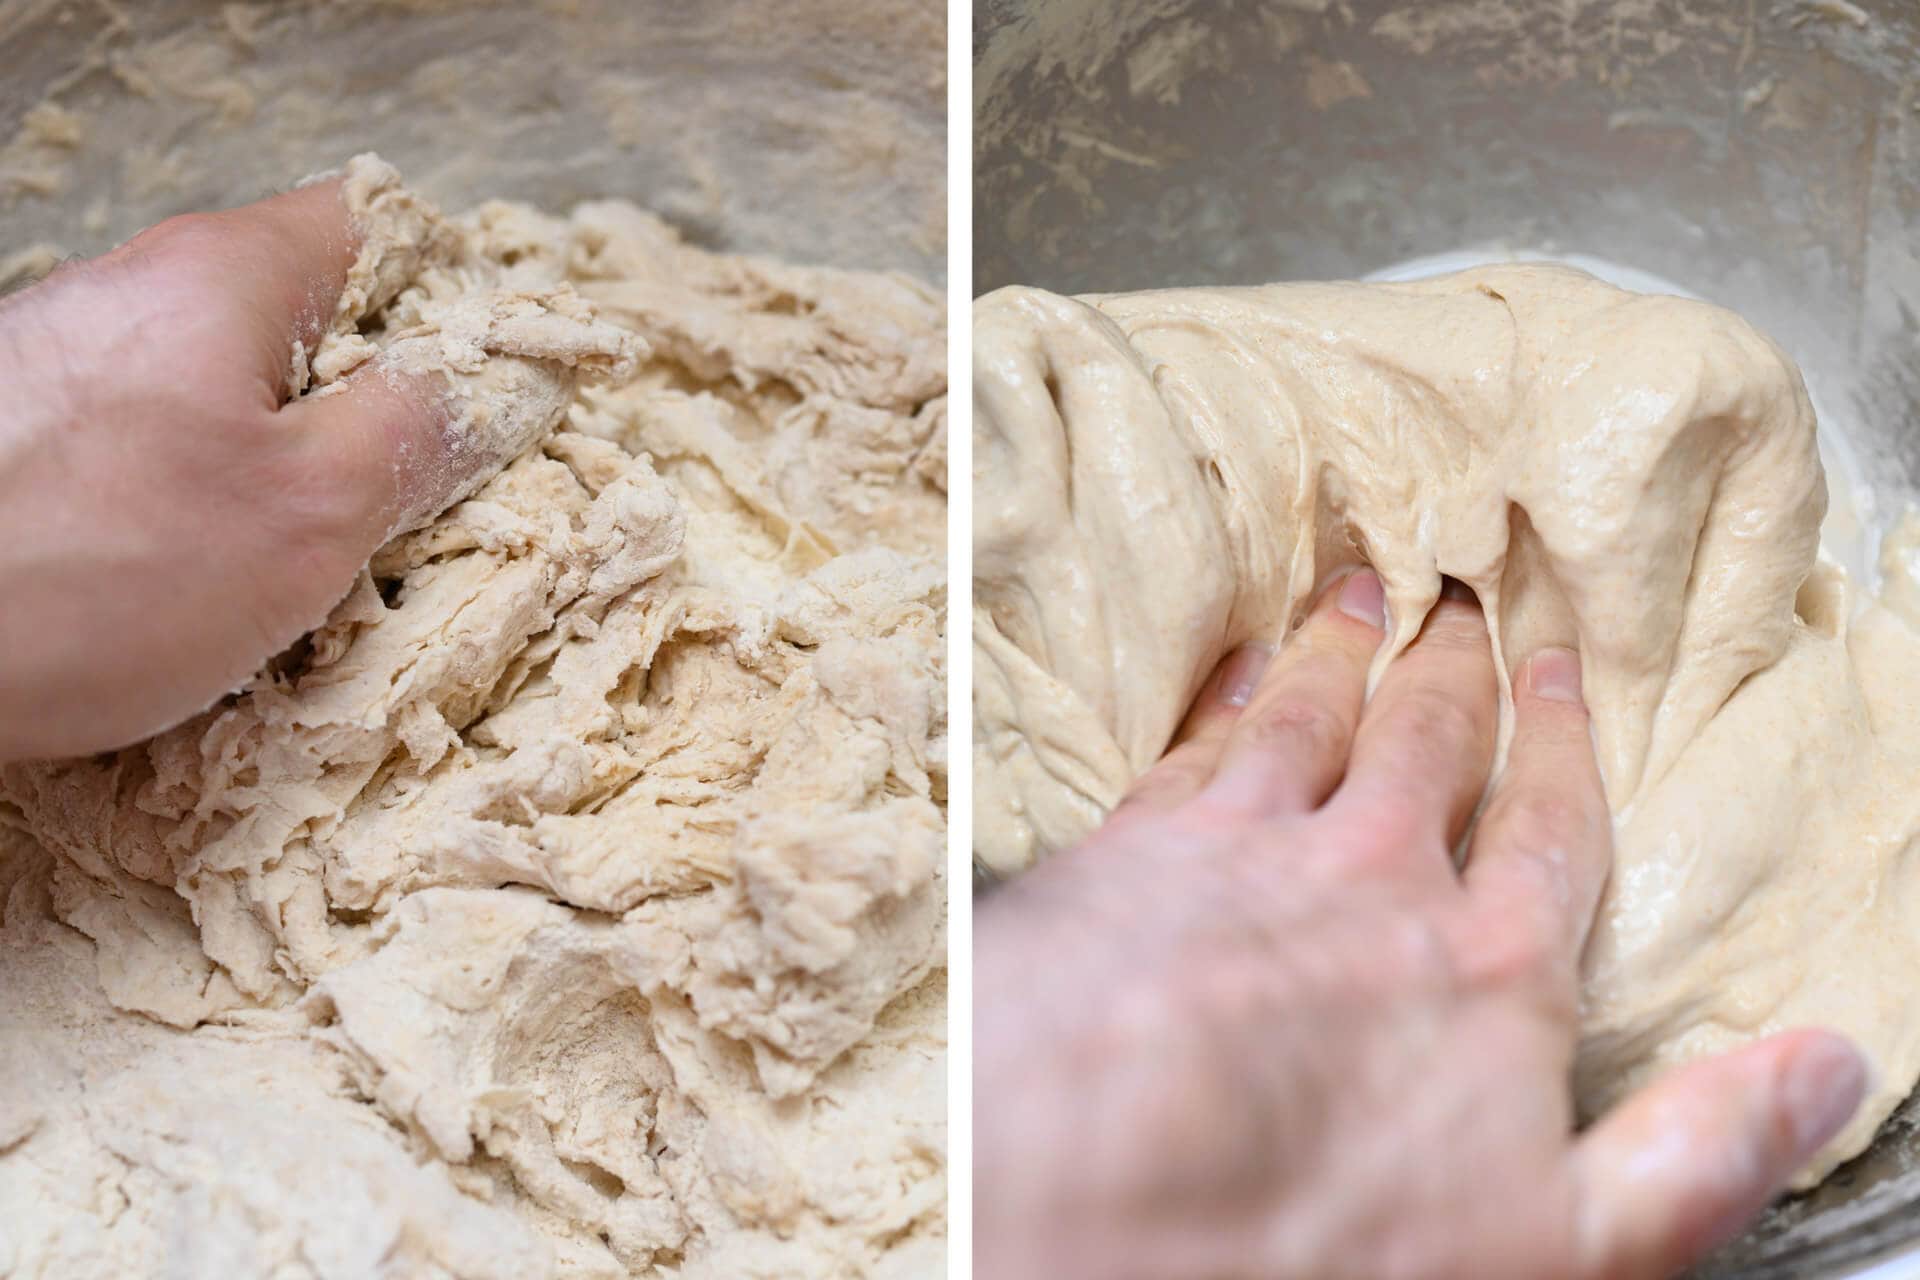
The image above shows the direct result of even a short autolyse. The left image shows the shaggy mass just before I finished incorporating everything. The right image shows how smooth and strong the dough becomes simply by resting. Let’s take this further with a little mixing.
3. Mix – 5:20 p.m.
Add the ingredients in the table below to the top of the dough: first, add the salt and then add the reserved water slowly to help dissolve the salt. Add the water a little at a time, depending on how the dough feels: it should be shaggy and loose, but not “soupy.” You can pause midway through pouring the water to incorporate it with a wet hand. If it feels like the dough can handle the rest of the water, add it all.
| Weight | Ingredient |
|---|---|
| 50g | Water, Mix (as needed) |
| 19g | Salt |
Since this dough uses a fair amount of high-protein white bread flour, it doesn’t require extensive mixing or kneading.
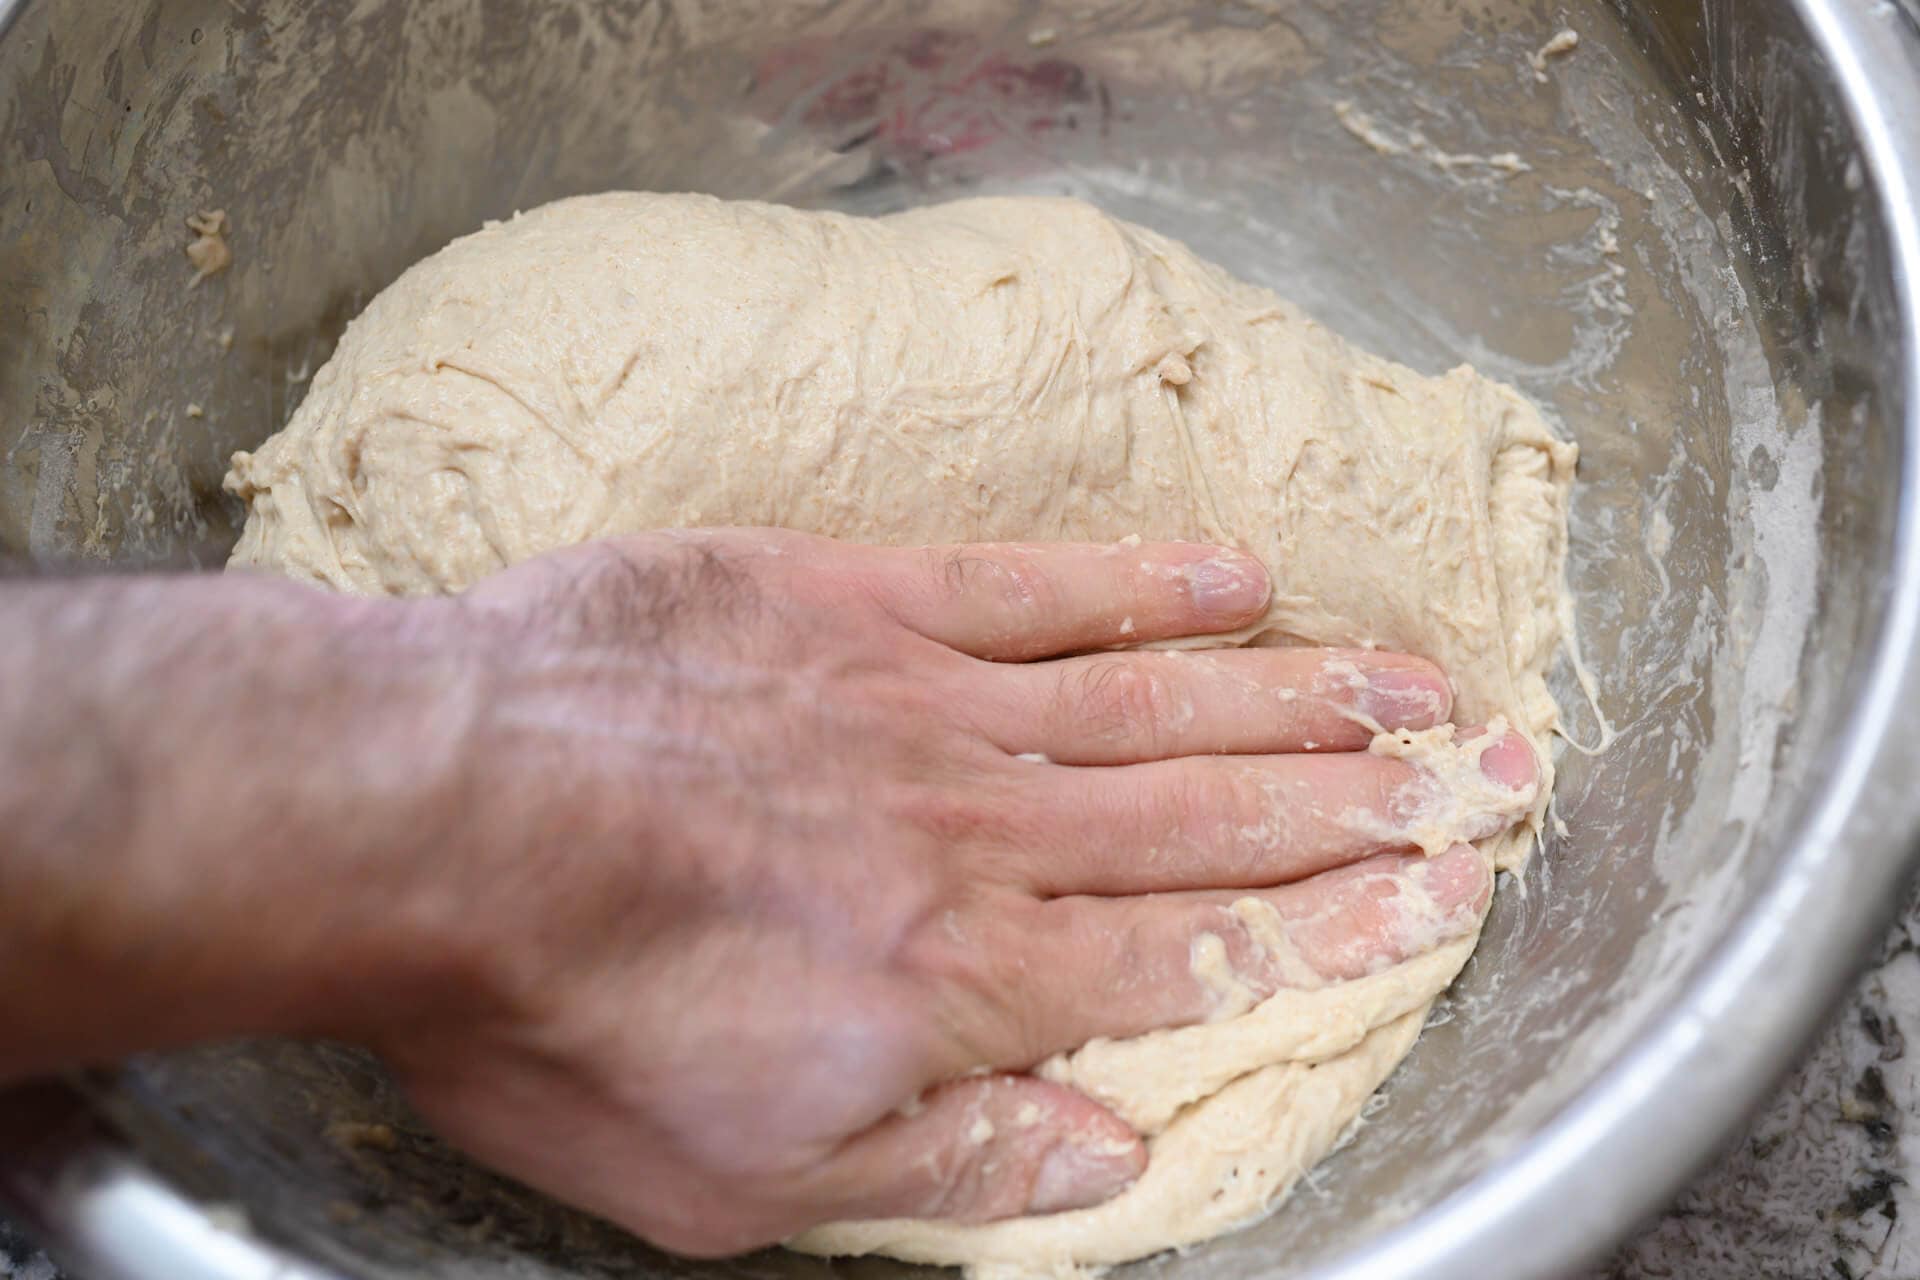
Using wet hands, mix everything until it comes together into a shaggy mass. This dough is rather strong and doesn’t require intensive mixing or kneading, but give it a few folds in the bowl, perhaps 5-10, until it smooths slightly (see the image, right).
Cover the bowl with reusable plastic and keep it somewhere warm in your kitchen for bulk fermentation.
3. Bulk Fermentation – 5:30 p.m. to 9:00 p.m.
Bulk fermentation, or first rise, occurs when the dough is leavened (through the production of carbon dioxide gas) and flavored (through the production of organic acids) as a result of natural fermentation. Below, you can see how much my dough rises during this 3-hour and 30-minute bulk fermentation at 75°F (24°C).
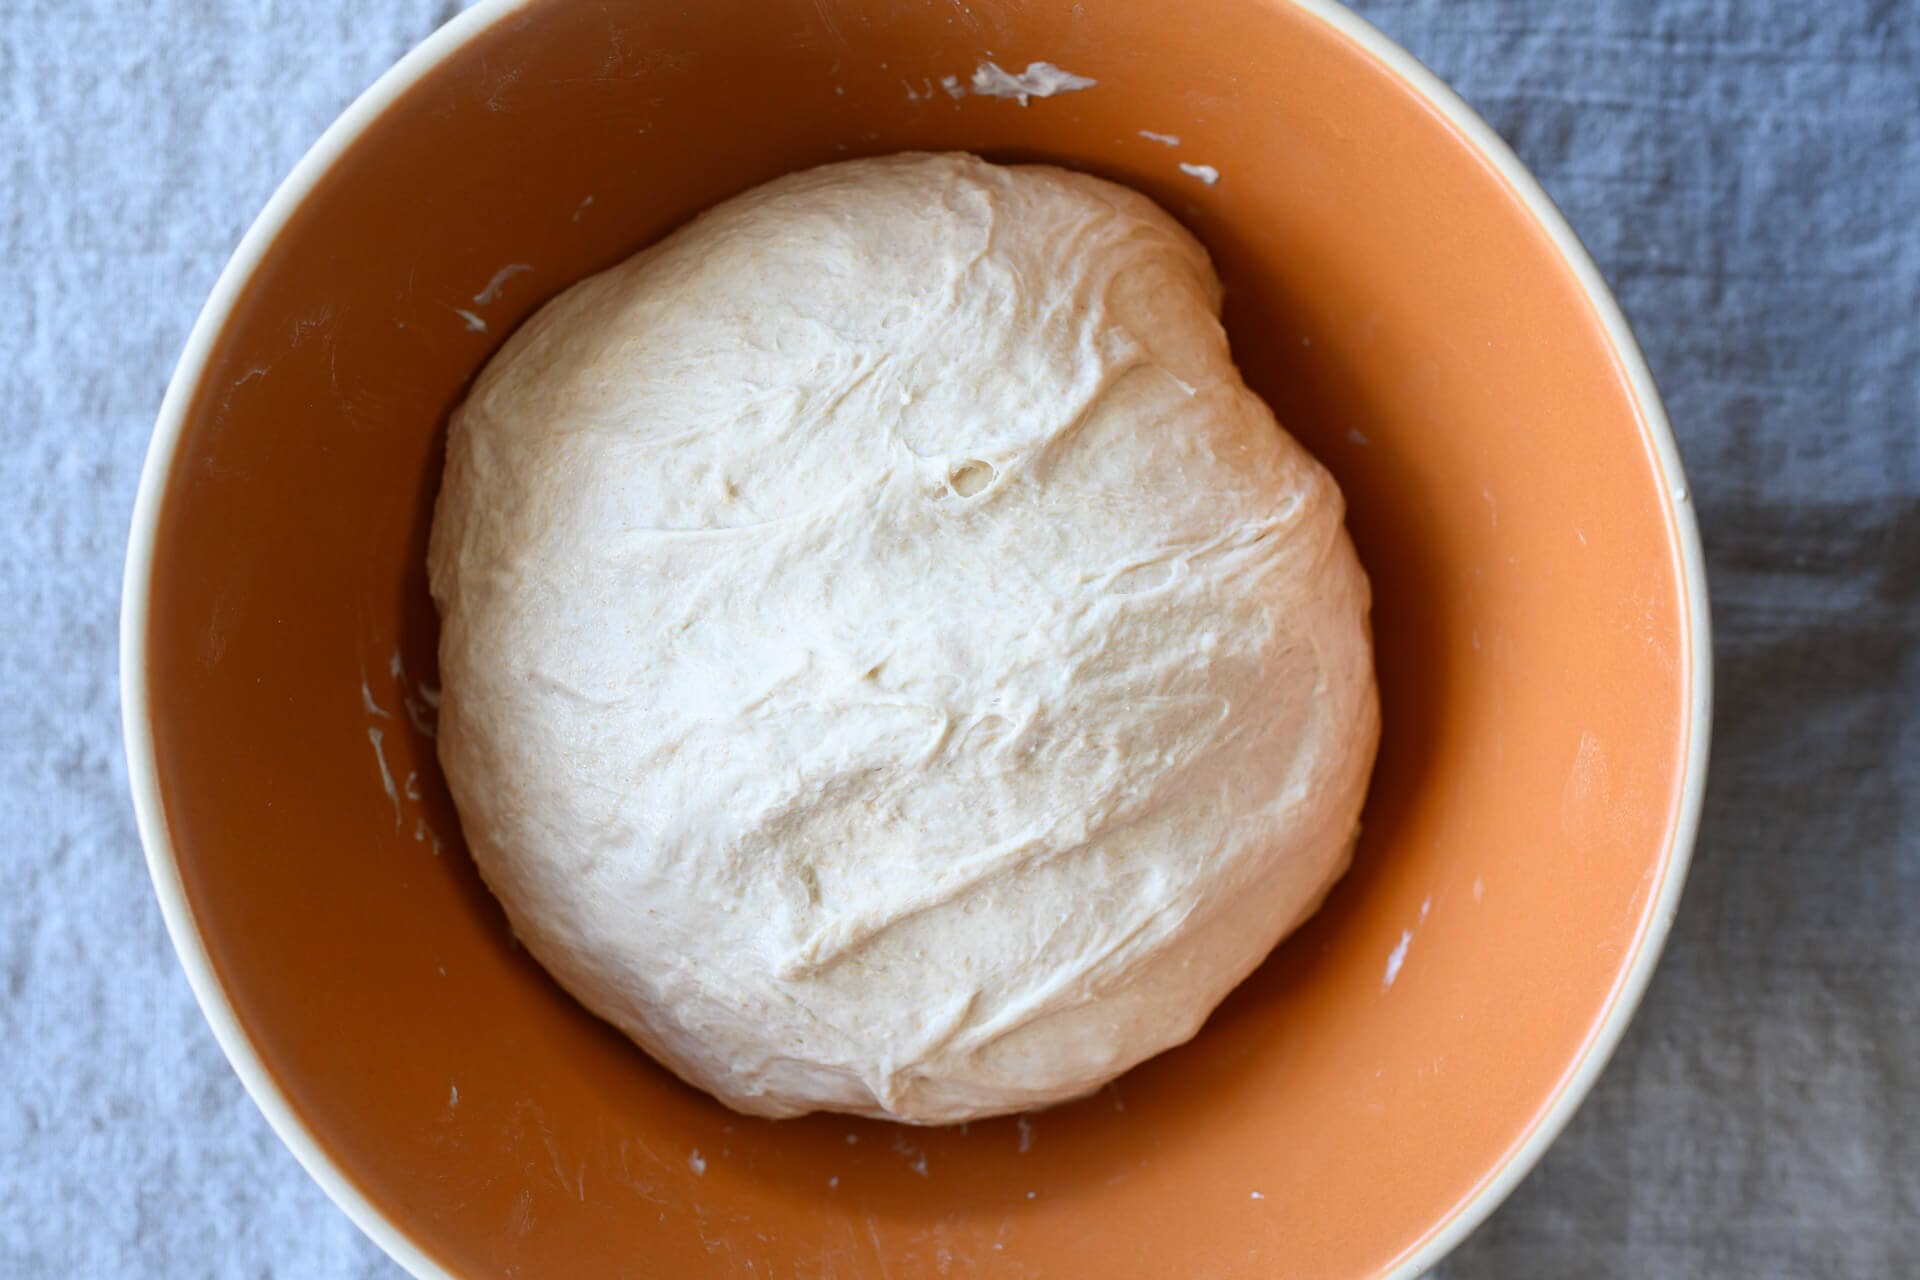
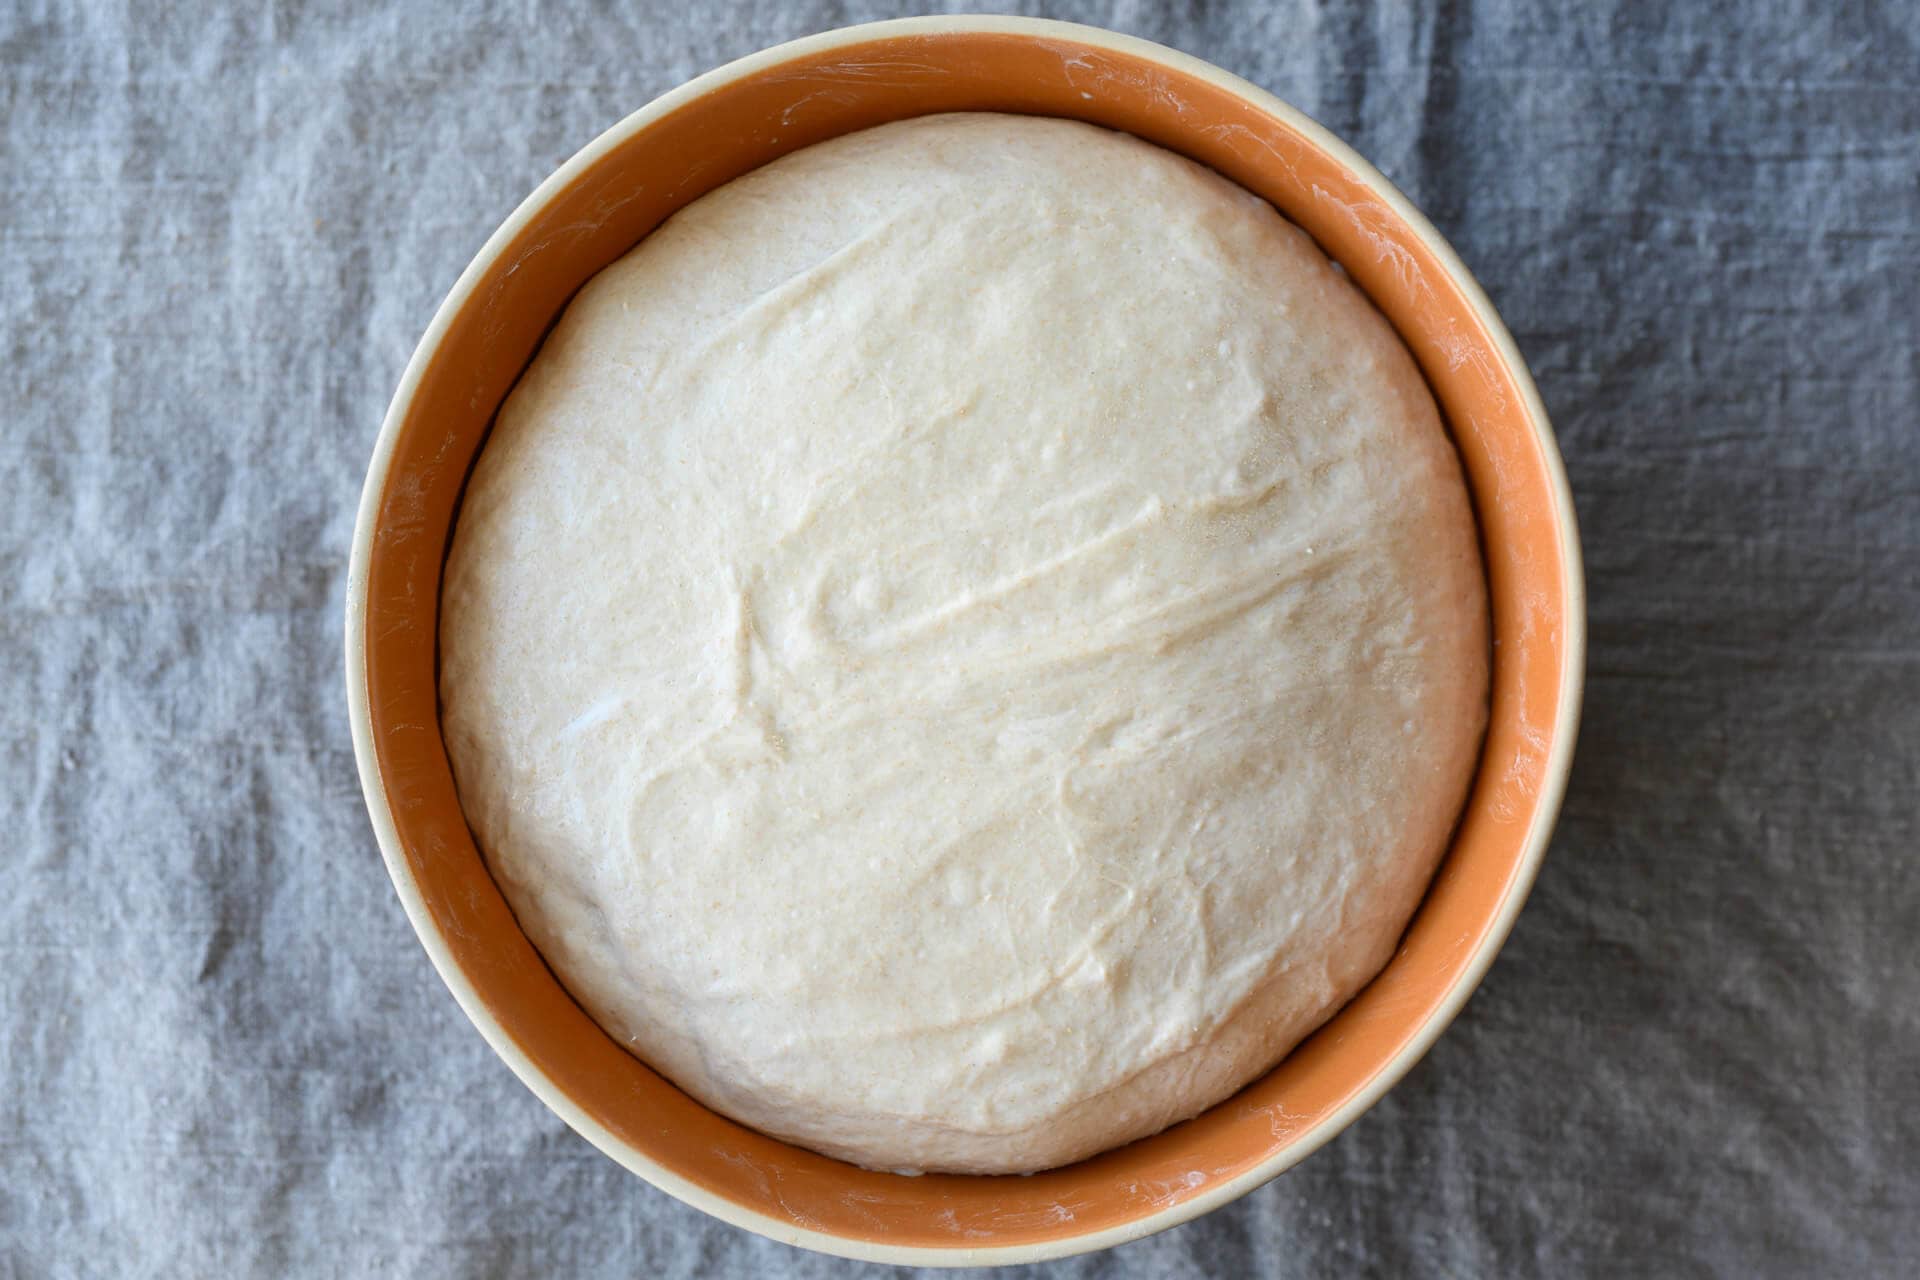
During this time, give the dough 2 sets of stretch and folds: the first set is 30 minutes after the beginning of bulk fermentation, and the second set is 30 minutes after the first. After the second set, let the dough rest, covered, until the next step.
As you can see in the video above, each set of stretches and folds is simple: With wet hands, grab one side and gently stretch it up and over to the other. Perform this fold in each direction: North, South, East, and West.
4. Divide & Preshape – 9:00 p.m.
Fill a bowl with some water and place it on your work surface. Scrape out your dough from the bulk container onto your dry counter. Divide the mass in half using a bench knife. Using a wet hand and the knife in the other, gently preshape each half into a loose round. Let the dough rest, uncovered, for 30 minutes until it’s relaxed outward.
See my guide to preshaping bread dough for a video and more instructions.
5. Shape – 9:30 p.m.
As seen in the video below, flour the top of the round with your hands and flip it over. Take the bottom edge and fold it up to about the middle. Take the left and right sides in your hands and fold the right over to about 2/3 of the left side. Repeat for the left side. Then, take the top and fold down to about the middle and gently seal. This should form a little envelope shape.
Now, flip over the entire thing and begin dragging and sealing the dough underneath itself (top-right, above). Using both hands, rotate and drag the mass toward you to create tension on the top. Repeat the dragging if necessary.
Read through my guide to shaping a boule for more instruction.
6. Proof – 9:45 p.m. to 7:00 a.m. or 6:00 p.m. (the next day)
Cover both proofing baskets entirely and put them in the fridge to proof overnight. The fridge allows us to slow fermentation to bake before or after work the next day.
7. Bake – 7:00 a.m. (pre-heat oven at 6:00 a.m.)
Preheat your oven with the rack at the bottom third to 450°F (230°C). Place your Dutch oven inside, with the lid and bottom side-by-side.
Take one basket out from the fridge and uncover it. Your dough might not have risen considerably in the fridge, but that’s fine. Cut a piece of parchment paper to fit over the basket and place a pizza peel (or large cutting board) on top. Using both hands, flip the entire stack over and remove the basket.
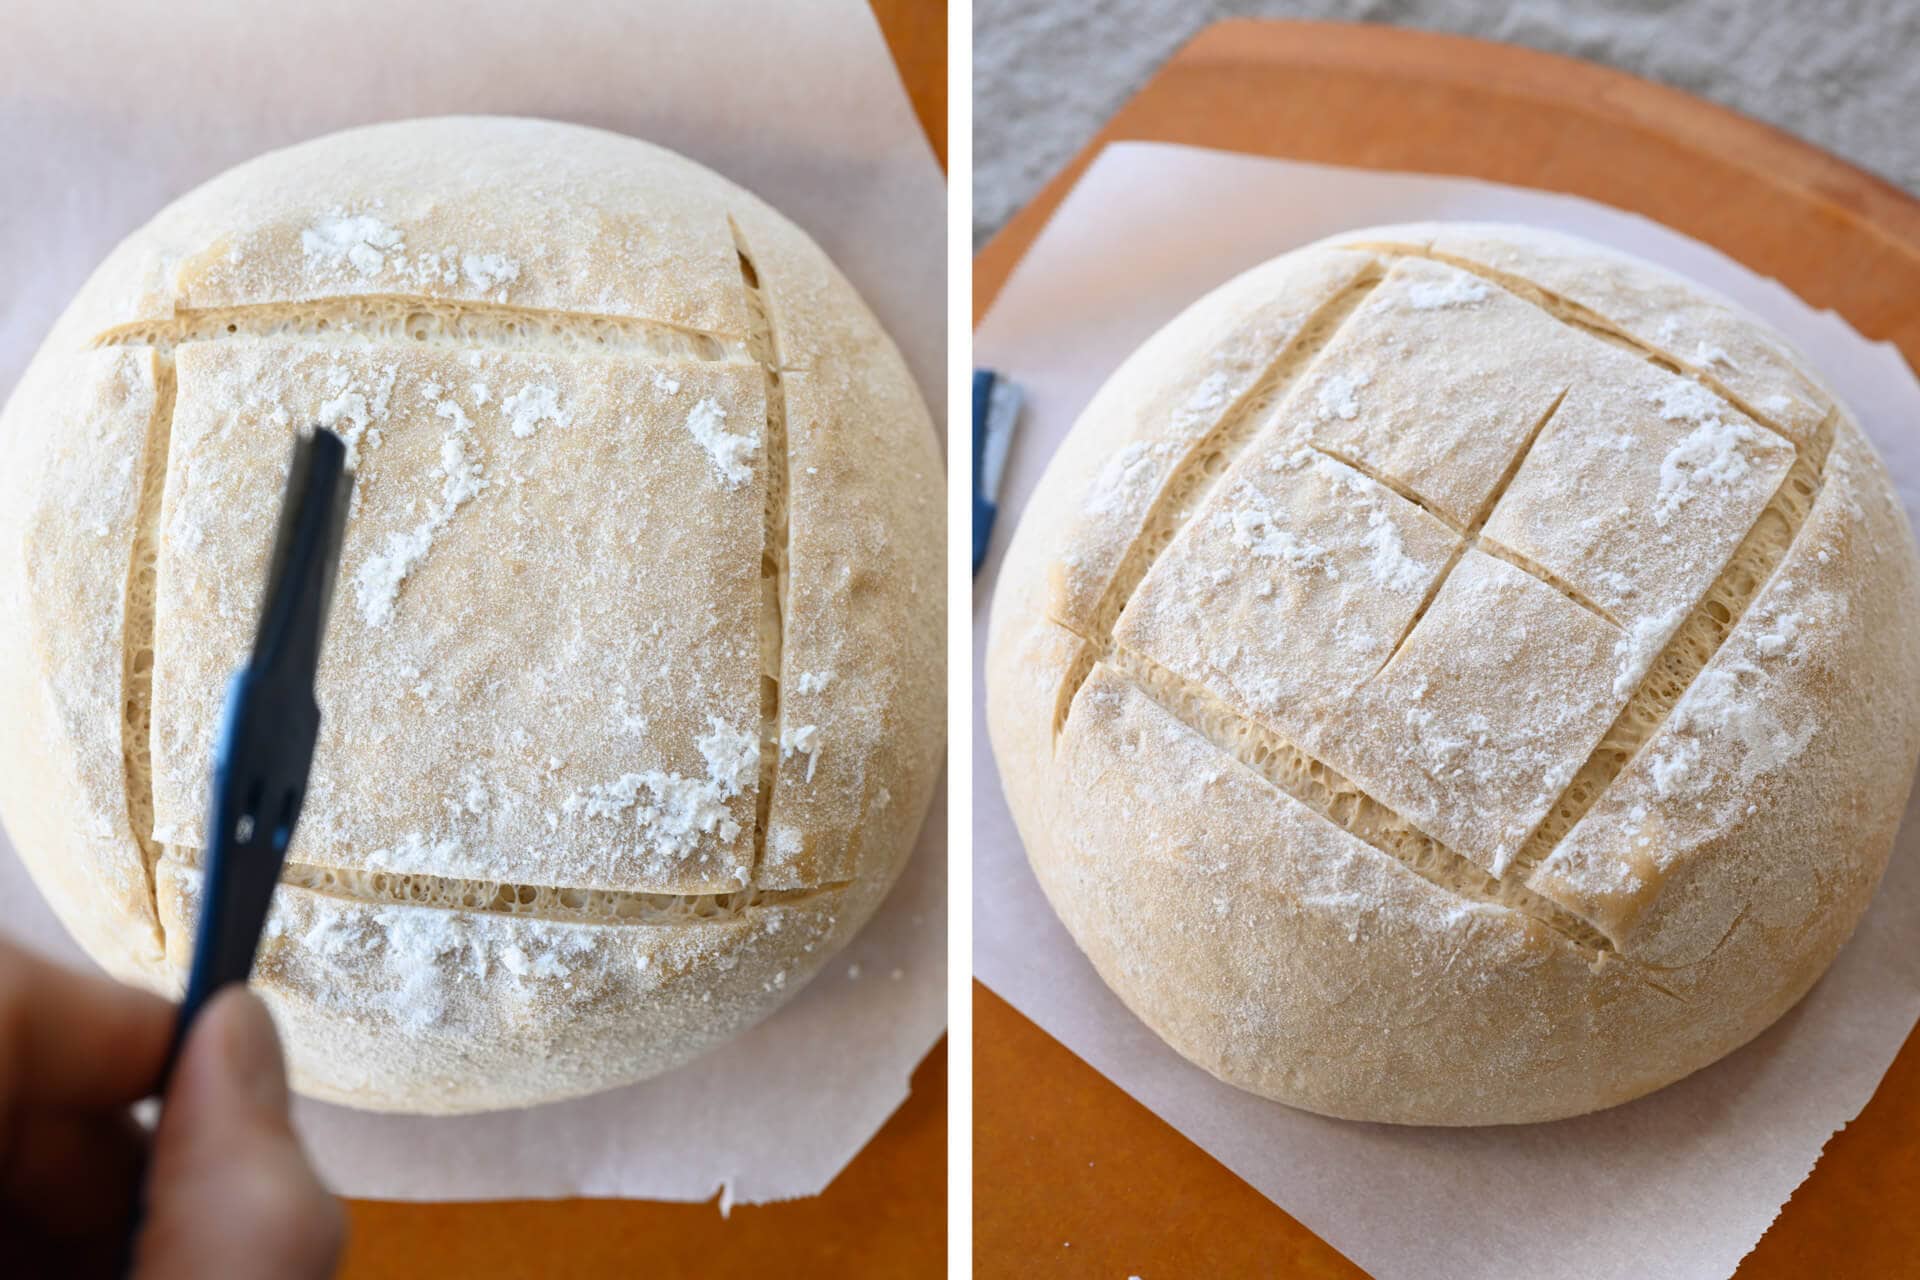
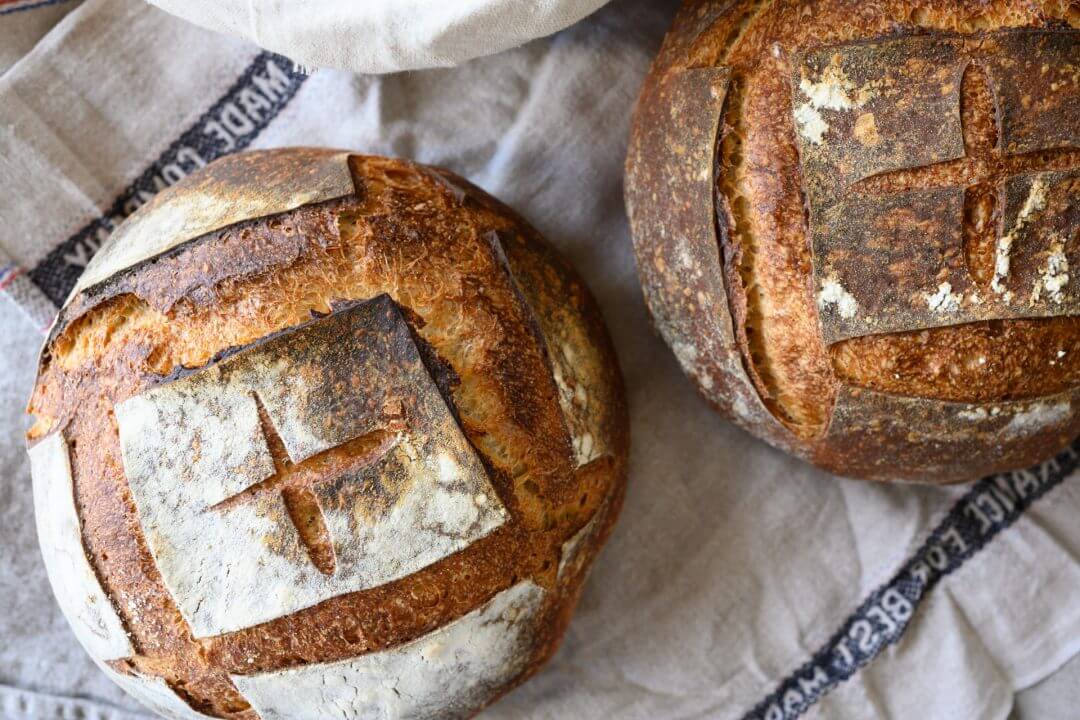
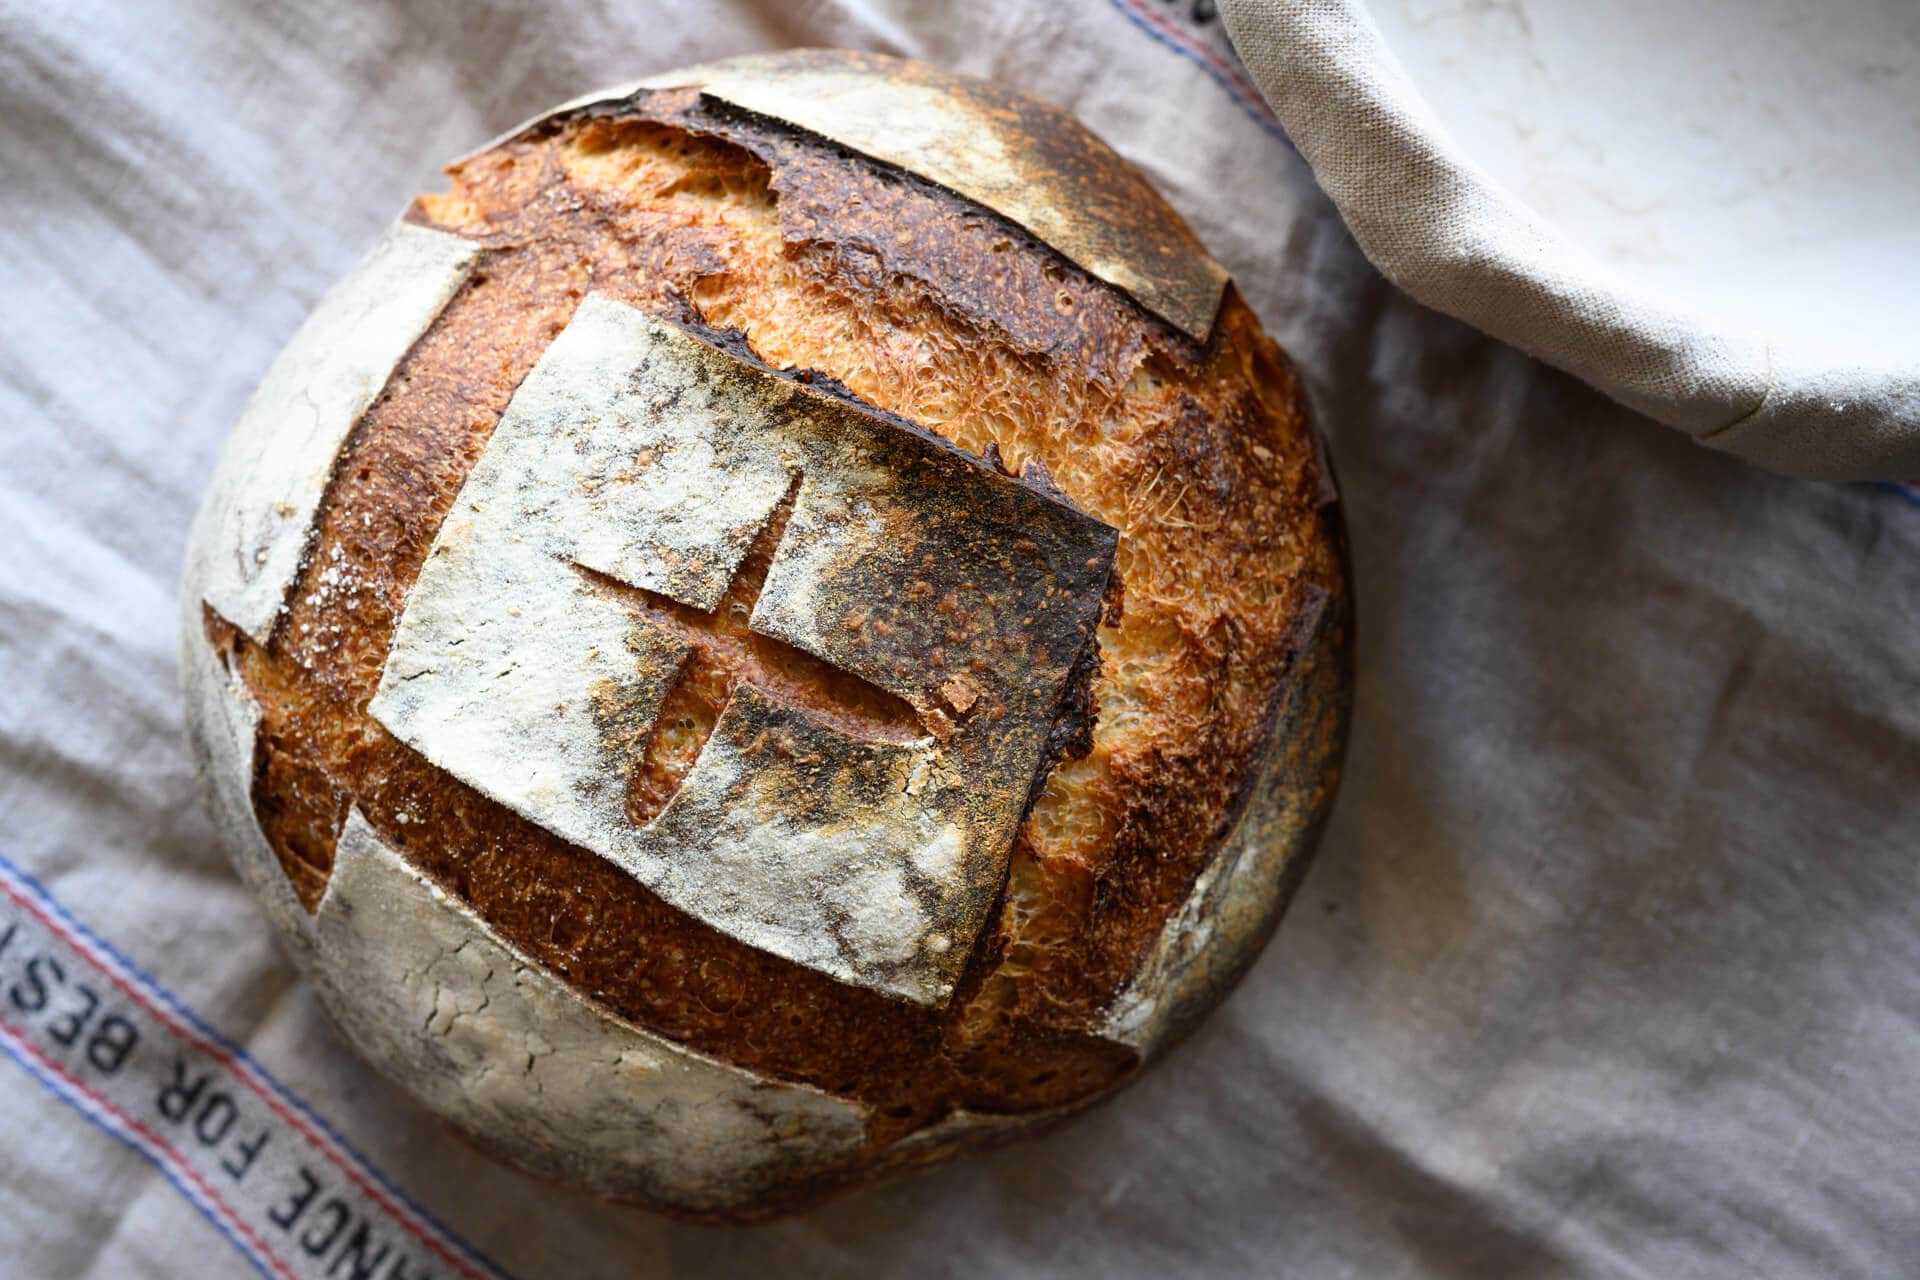
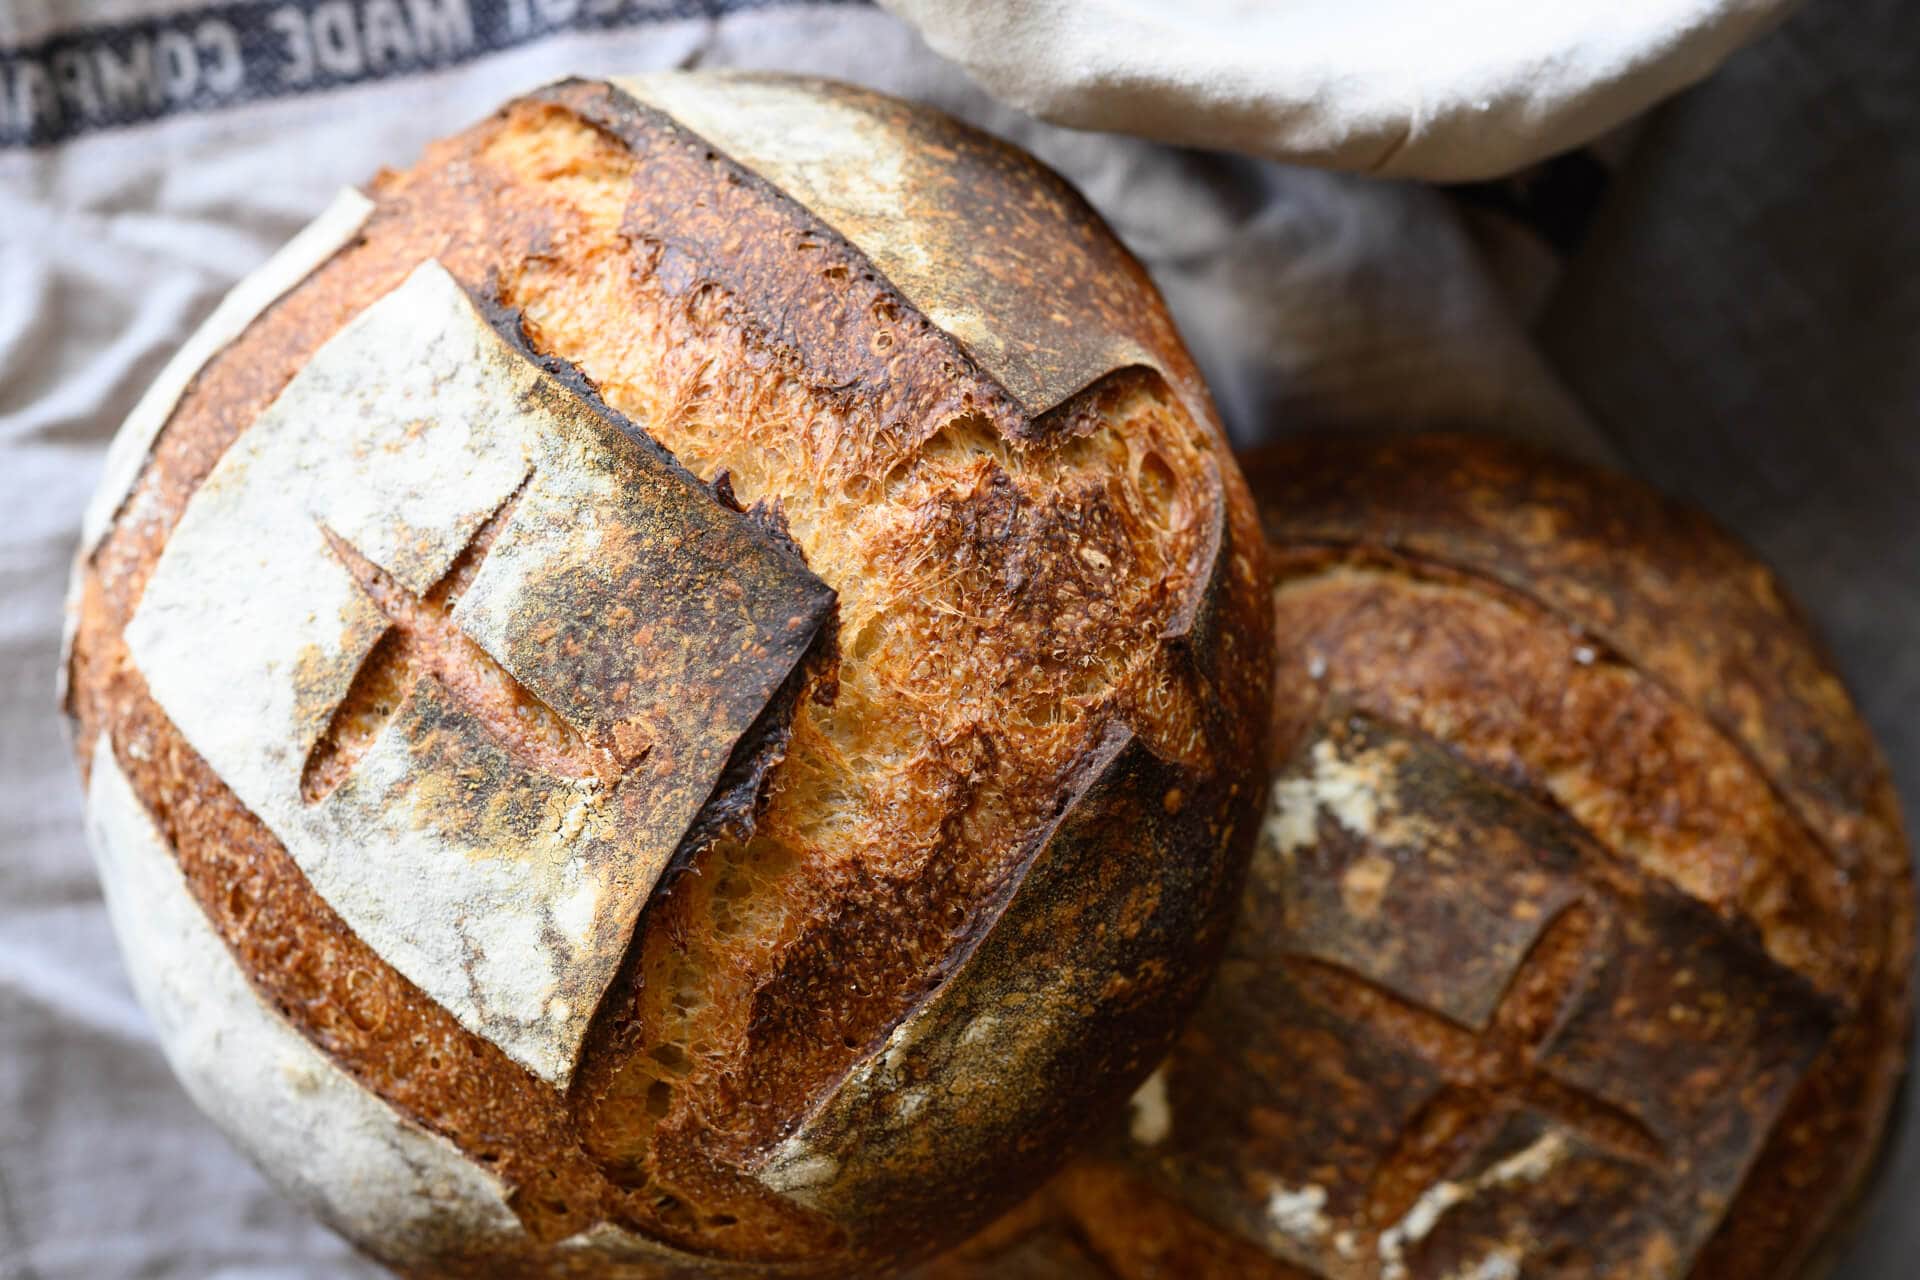
Score the dough using your favorite design. As you can see above, I love the “box top” score. Check out this video of me scoring this style (and a few others) below:
Now that your dough is scored, carefully slide it into the Dutch oven and bake for 20 minutes, covered.
After this time, remove the lid and bake for 30-35 minutes or until done. The internal temperature should be around 205-210°F (96-99°C).
(Note that If you’d like a thinner crust on this bread, increase the covered bake time to 30 minutes and reduce the second half of the bake (without steam) by 10 minutes. This increased baking time with steam can help reduce the thickness of the crust.)
Remove the loaf to a cooling rack for 2 hours before slicing. This lets the crust and crumb fully set and the flavor develop. Return the Dutch oven to the oven (without parchment) and bring it back to temp to bake the second loaf.
Follow my guide to storing sourdough bread to keep it fresh for the next week (or freeze it for longer!).
Print
Simple Weekday Sourdough Bread
- Prep Time: 24 hours
- Cook Time: 1 hour
- Total Time: 25 hours
- Yield: 2 loaves
- Category: Bread, Sourdough
- Cuisine: American
Description
A loaf of delicious sourdough bread designed around a busy workday. The levain is prepared for this bread in the morning and left to ripen while you’re at work. When you get home, continue with the baking process. The dough can then be baked at night or the next day in the morning, or after work.
Ingredients
Levain
- 40g bread flour
- 40g whole wheat flour
- 81g water
- 8g ripe sourdough starter
Main Dough
- 766g bread flour
- 161g whole wheat flour
- 19g salt
- 685g water
- 169g ripe levain
Instructions
- Levain (7:00 a.m. before work)
In a small container, mix the Levain ingredients and keep it at a warm temperature for 10 hours. - Autolyse with levain (5:00 p.m after work)
In a medium mixing bowl, add all of the levain, 766g bread flour, 161g whole wheat flour, and 635g water (50g was reserved for mixing, later) and mix until no dry bits remain. Cover the bowl and let rest for 20 minutes. - Mix (5:20 p.m.)
To the mixing bowl holding your dough, add 19g salt and some of the reserved 50g water (or all if the dough feels like it can handle it). Mix thoroughly and strengthen the dough for about 5 minutes. Using wet hands, mix everything until it comes together into a shaggy mass. This dough is relatively strong and doesn’t require intensive kneading (like slap and fold), but give it a few folds in the bowl, perhaps 5-10, until it smooths slightly. Transfer the dough to a bulk fermentation container and cover. - Bulk Fermentation (5:30 p.m. to 9:00 p.m.)
This dough will need 2 sets of stretch and folds during bulk fermentation, the first set 30 minutes after bulk fermentation begins. Perform the second set 30 minutes after the first, and then let the dough rest the remainder of bulk fermentation. - Divide and Preshape (9:00 p.m.)
Lightly flour your work surface and scrape out your dough. Using your bench knife, divide the dough in half. Lightly shape each half into a round shape. Let the dough rest for 30 minutes, uncovered. - Shape (9:30 p.m.)
Shape the dough into a round (boule) or oval (batard), then place the dough in proofing baskets. - Proof (9:30 p.m. to 7:00 a.m. or 6:00 p.m. the next day)
Cover proofing baskets with reusable plastic and seal shut. Then, place both baskets into the refrigerator and proof overnight. - Bake (The next day, bake at 7:00 a.m. before work, or 6:00 p.m. after work)
Preheat your oven with a baking surface or combo cooker/Dutch oven inside to 450°F (230°C). Remove your dough from the fridge, score it, and transfer it to the preheated baking surface or combo cooker. Bake for 20 minutes with steam. After this time, vent the steam in the oven or remove the lid (you can keep it in the oven or remove it) and continue to bake for 30 minutes longer. When done, the internal temperature should be around 204°F (95°C). Let the loaves cool for 2 hours on a wire rack before slicing.
Notes
- This recipe is wonderful left plain, or you could top the dough with rolled oats, white sesame seeds, or flax seeds.
If you use this recipe, tag @maurizio on Instagram so I can take a look!
What’s Next?
There you have it; this simple weekday sourdough bread can be made daily and adjusted to fit your schedule. Now, there’s no reason not to bake. This recipe is also a great place to experiment: mix 125g of nuts like walnuts and pecans and dried fruit like cranberries, cherries, or raisins.
Many recipes on my site can be adapted to this simple weekday sourdough bread schedule, most notably my Beginner’s Sourdough. Both recipes use flexible doughs, and the fridge provides even more.
For a more hands-off approach, check out my easy no-knead sourdough bread recipe. It can also be adapted to bake in a single day or ferment longer for an easier schedule.
Happy baking!


914 Comments
Hello! I have a question about the recipe
“The dough can then be baked at night or the next day in the morning, or after work.”
Could you clarify in the recipe when I should bake it if I want to opt for the “bake at night” mentioned in the description instead of next day (morning/after work)? I am looking for that info in the recipe but I can’t find it.
Thanks!
Also, love your site – this is how I learned to bake sourdough! And bought your book because I am a huge fan of the recipes I’ve tried thus far 🙂
Hey Alice! Thanks so much for picking up my book and the comments. Once you’ve placed the dough in the fridge after shaping, you really just need to leave it there for a few hours (say, 2-3), and at that point, you can bake it straight from the fridge. Whether that be later that same night, or the next night.
Great, thank you for the info! At the time, I just baked it without putting in the fridge because I was running short on time (so scoring was a bit stickier) but turned out ok! I’ll try to squeeze at least some time in the fridge next time!
mauricio , have spoken to you about this problem before, cannot conquer the guey interior of the bread. have tried everything. is it possible that the gas oven is the culprit, to much moisture!!!. what your take. jim d
Hey Jim. Yes, it’s one of three things:
If the hydration is too high for your dough, it can lead to an overly wet or gummy interior. If the dough feels “soupy” or very “slack,” try reducing the water percentage by 5% and see if that helps.
Make sure to bake your loaves completely. The interior should register around 204-206°F (95-96°C) or higher.
If your loaf is underproofed, it will typically result in a gummy or “wet” texture in the interior. Make sure your starter and levain are very vigorous and strong when you use them. This is very important! From there, make sure to fully bulk ferment your dough (use the images in my posts to guide you on what the dough should look/feel like). You want the dough to be alive and aerated before you divide and shape.
From there, a full and complete proof is also very important.
A few ideas there for you. Let me know how the next attempt goes!
How's it possible that bulk fermentation is finished so fast at 24 c dough temprture?
It’s based on how much levain is in the dough as well as temperature and flour types!
I’ve tried making 2 different levains these past 2 days and neither has grown? My starter has been fed a mix of whole wheat and all purpose or bread flour morning and night for 4 days now and it looks to be rising and falling but then my levain does nothing. What am I doing wrong?
I would try doubling the amount of starter in the levain to help kickstart things!
Why does ur Simple Weekday recipe’s levain only calls for 8 grams of ripe starter when ur Beginners recipe’s levain calls for 38 grams of ripe starter?? Why such a big difference of levain ingredients when both recipes have roughly same ant of flour & water??
With this recipe, I use 8g of starter to make a levain that ripens overnight. Since it’s fermenting for so long, you don’t need a lot of starter.
Hard to believe that just 8Gm of ripe starter makes four perfect 1# loaves! https://uploads.disquscdn.com/images/54db88279dded8528844910968a79703c7e7804dfc286732117049d5ed9653b8.jpg
The power of making a levain 🙂
Do you need to cut it into two loaves?
If you want to make a single big loaf, you’ll have to adjust the bake time which will take significantly longer if it’s one large piece of dough. It’ll work, though.
Just letting you know that I believe your 'double the recipe' tool with the recipe made an error! on the second step it didn't double the amount of bread flour you are meant to use in this recipe, and remained the same of if I were making two loaves. It changed in the 'Ingredients' area however, so I was able to refer to that without getting too confused. Just letting you know!
Thanks Lucy. Yes, I’ve disabled the feature until I can work out all the kinks. So sorry about the confusion there!
So you need 2 hours in the morning to bake? That might be troublesome to source.
You can wait until after work to bake as well. You can bulk ferment until the morning or the evening. I waited until the evening and my loaves turned out great!
I m new in this sourdough community. What size loaf pan can I used for this weekday recipe?
Anything bigger than a 3.2qt pot.