
The third anniversary for The Perfect Loaf just passed, and I felt like it was only fitting for me to revisit an old idea, an old recipe of mine for a seeded sourdough I posted a long, long time ago. I make this whole wheat version intermittently, and I enjoy it, but I wanted to explore some new flavors, textures, and techniques. I mean, after baking hundreds of loaves since the beginning days of this site, my process has changed and evolved quite a bit; perhaps it was time to take a new look at this old favorite.
Of course, there are endless combinations of seeds and spices one can bake into a loaf of bread, but finding just the right balance of flavors and textures can prove to be a challenging task. Personally, I find a lot of the seeded sourdough I try to be a little heavy with seeds; conceivably, I’m just more sensitive to the deep umami flavors of sesame, the spicy nature of flax, or the anise-like flavor of fennel, but I like to keep it light. Of course, there is a time and place for hearty bread, but I like my seeded sourdough a little more like a gentle peck and less like a heavy, flapping punch.
There’s no denying the additional health benefits seeds bring to bread, and that was one of the prompting factors for me to revisit the idea, but I also wanted to play with seed flavors instead of using them as an afterthought. Some seeds really work well together to play off of each other’s flavors, working in concert to give rise to an overall sense of good taste.
The seeds chosen here are those that I personally feel go well together, but there are so many other combinations to be had—if desired, one can endlessly play the seed alchemist.
I’m not a big fan of caraway (it seems like this is a very polarizing flavor), and that’s why it’s not used here, but feel free to experiment with whatever seeds you might have in your pantry: caraway, poppy, white sesame, pumpkin, hemp and so on. Fennel is probably my favorite seed of them all; the bright, zesty flavor seems to go well with most things I make in the kitchen, and I had to include it here.
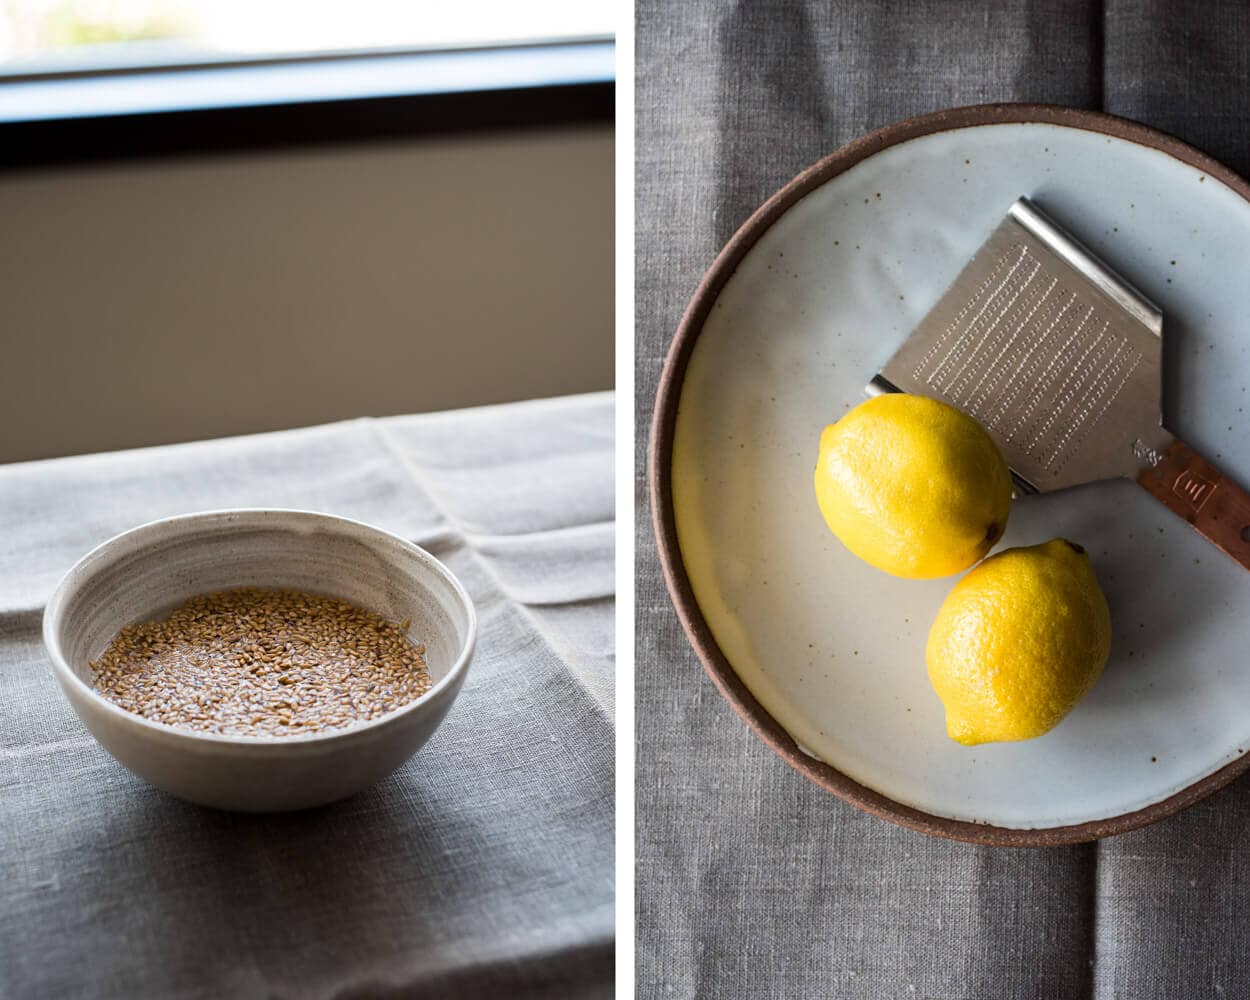
I know lemon zest is overused in baking and probably included in places where it really isn’t warranted, but it’s added here to help complement the multitude of seed flavors in this seeded sourdough bread. I found that sporadic bites would display a quick and mellow lemon flavor, which was a welcome surprise amidst the deep seed flavors’ backdrop. If you don’t have lemons on hand or feel the flavor isn’t necessary, then feel free to omit the zest; of course, it’s up to you.
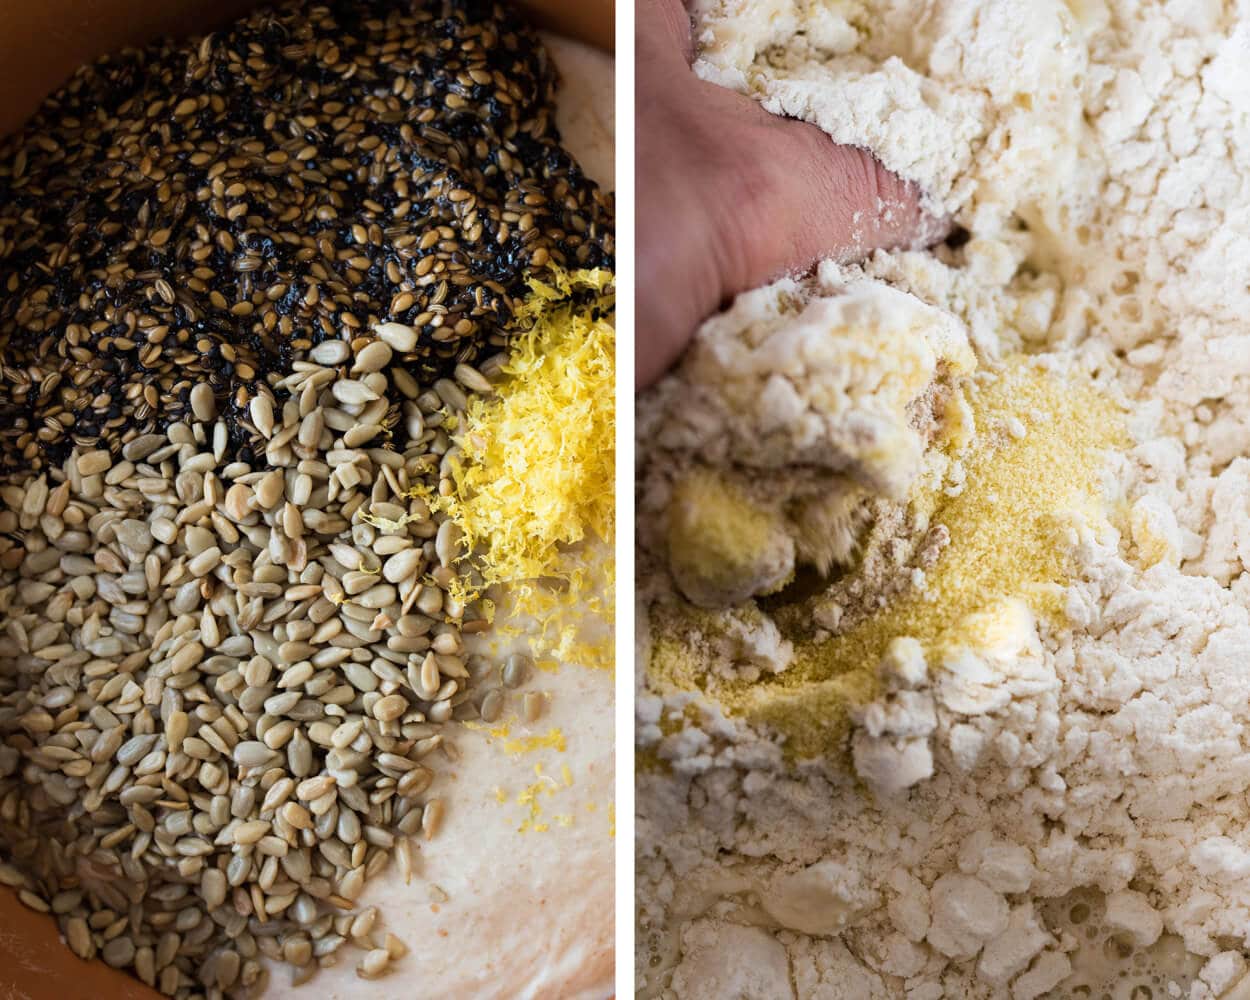
When mixing this dough with my hands, I often found myself pausing to look at the snaking sea of black sesame, the golden, gritty semolina, and the garish shine of lemon peel and thought to myself: this is going to taste really, really good.
Flour Selection
Lately, I’ve been making more and more fresh pasta at home, primarily comprised of coarse semolina flour milled from durum wheat, which has a higher-than-typical protein content. It’s a deep, luxurious yellow color and quite granular, similar to table salt. I like using this for pasta as it gives each bite a little more chew and a little density. For example, rolling thin is perfect for ravioli because you have two sheets of pasta pressed together with a filling. If the two sheets are too thick, you’ll end up tasting and chewing the pasta more than anything—you want the pasta to be thin but chewy/strong.
I added a fairly small percentage of semolina for this seeded sourdough bread, but the taste and texture are noticeable. It adds a little sweetness to help compliment all the robust seeds, and many say semolina helps attain a fragile and crunchy crust. I can say my outcome here doesn’t dispute that — the crust on my bakes have been fragile and cracker-like, how I like it; if you don’t have semolina at hand (durum works, of course), then substituting the semolina percentage in my formula for a stoneground or roller milled whole wheat. This replacement would add a level of flavor and strength to the dough and work quite well.
See my Pane Siciliano for another sourdough recipe using durum wheat →
Seeded Sourdough Formula
See my post on baker’s percentages for information on how to modify this formula.
| Total Dough Weight | 1800 grams |
| Pre-fermented Flour | 6.50% |
| Levain in Final Dough | 17.38% |
| Hydration | 83.00% |
| Yield | Two 900-gram loaves |
Total Formula
Target final dough temperature (FDT) is 78°F (25°C).
| Weight | Ingredient | Baker’s Percentage |
|---|---|---|
| 665g | Medium-protein bread flour (~11.5% protein, Giusto’s Artisan Bread Flour) | 75.00% |
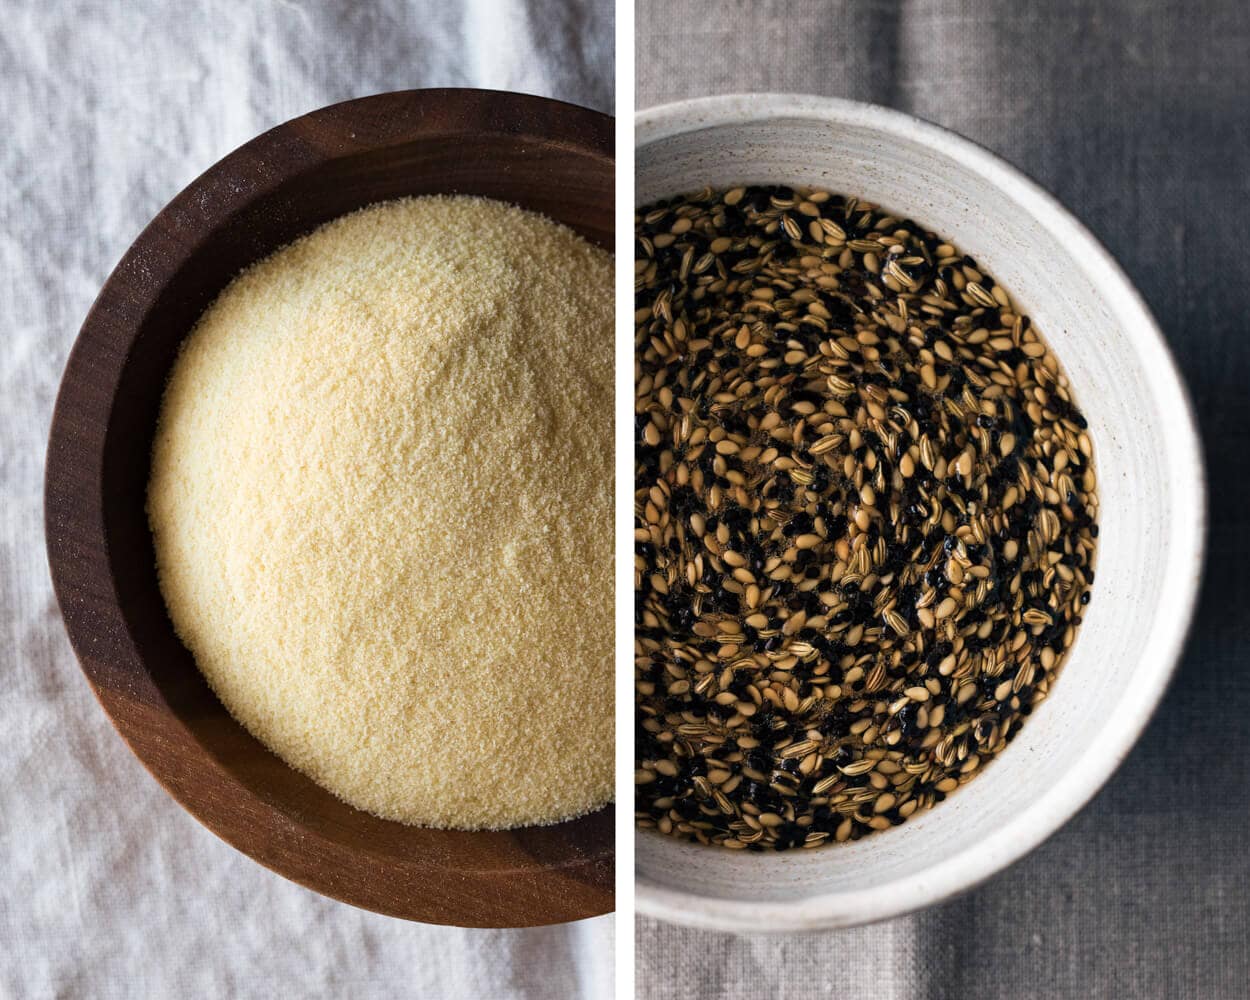
| 133g | Semolina (coarsely milled Durum wheat) | 15.00% |
| 89g | Whole wheat flour (Giusto’s Stoneground Whole Wheat) | 10.00% |
| 40g | Flaxseed | 4.50% |
| 40g | Dark sesame seed | 4.50% |
| 40g | Sunflower seed, shelled (not roasted or salted) | 4.50% |
| 13g | Fennel seed | 1.50% |
| – | Zest of two lemons (optional) | – |
| 691g | Water 1 (soaker, levain, and autolyse) | 78.00% |
| 44g | Water 2 (mix) | 5.00% |
| 16g | Sea salt | 1.80% |
| 29g | Sourdough starter | 3.25% |

Seeded Sourdough Method
1. Levain – 9:00 a.m.
Mix the following ingredients in a container and leave covered to ripen at about 78°F (25°C) for 5 hours.
| Weight | Ingredient | Baker’s Percentage |
|---|---|---|
| 30g | Ripe sourdough starter (100% hydration) | 50% |
| 30g | Medium-protein bread flour (~11.5% protein, Giusto’s Artisan Bread Flour) | 50% |
| 30g | Whole wheat flour (Giusto’s Stoneground Whole Wheat) | 50% |
| 60g | Water 1 | 100% |
2. Prepare Seed Soaker – 9:10 a.m.
After you’ve mixed your levain, prepare the seed soaker. In a heatproof bowl (stainless steel is great), add the following seeds and boiled water (note the sunflower seeds are not added to the soaker).
Boil 175g of water in a kettle. Once boiling, turn off the heat and pour 133g of the hot water over the seeds in the heatproof bowl. Let this mixture soak until called for in the bulk fermentation step.
| Weight | Ingredient |
|---|---|
| 40g | Flaxseed |
| 40g | Dark sesame seed |
| 13g | Fennel seed |
| 133g | Water 1 |
3. Autolyse – 1:00 p.m.
Add the following to a mixing bowl and mix until all dry bits are hydrated. Cover bowl and store somewhere warm (around 78°F/25°C) for 1 hour.
| Weight | Ingredient |
|---|---|
| 636g | Medium-protein bread flour (~11.5% protein, Giusto’s Artisan Bread Flour) |
| 133g | Semolina (coarsely milled Durum wheat) |
| 60g | Whole wheat flour (Giusto’s Stoneground Whole Wheat) |
| 501g | Water 1 |
4. Mix – 2:00 p.m.
To the dough in autolyse, add the remaining water, salt, and levain.
| Weight | Ingredient |
|---|---|
| 44g | Water 2 |
| 16g | Sea salt |
| 144g | Levain (see Levain section, above) |
I chose to do slap and fold for about 5 minutes, just until the dough starts to show signs of a smooth surface and it’s catching some air. If you aren’t comfortable with the slap/fold method or don’t like it, you can perform stretch and folds in the bowl until your dough tightens up and slightly hard to stretch out and fold over—medium development.
Transfer dough to a tub or thick-walled bowl for bulk fermentation.
5. Bulk Fermentation – 2:10 p.m. to 5:40 p.m.
At 78°F (25°C) ambient temperature, bulk fermentation should go for around 3 1/2 hours. Keep an eye on the dough; for me, fermentation was moving rather rapidly, and the dough became extremely puffed up (see preshape photo below).
Perform a total of 4 sets of stretch and folds during the bulk, spaced out by 30 minutes.
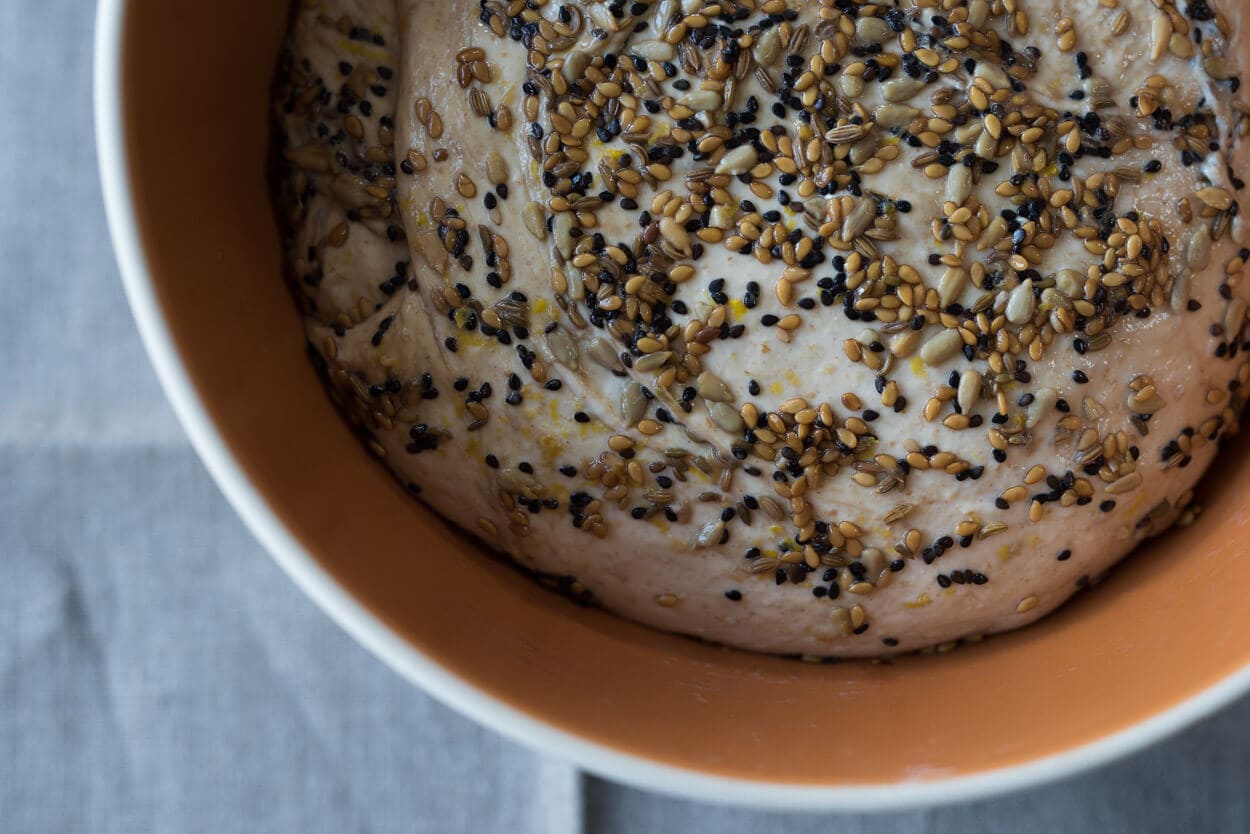
Before the first set of stretch and folds, add the cooled seed soaker and optional lemon zest. I like to spread the mix-ins on top of the dough and then perform my stretch and folds to help the ingredients distribute. They will further distribute through the dough with each subsequent set of stretch and folds.
6. Divide and Preshape – 5:40 p.m.
Gently scrape your dough from the bulk container onto an un-floured work surface. Preshape the dough into two round boules and let rest 30 minutes uncovered.
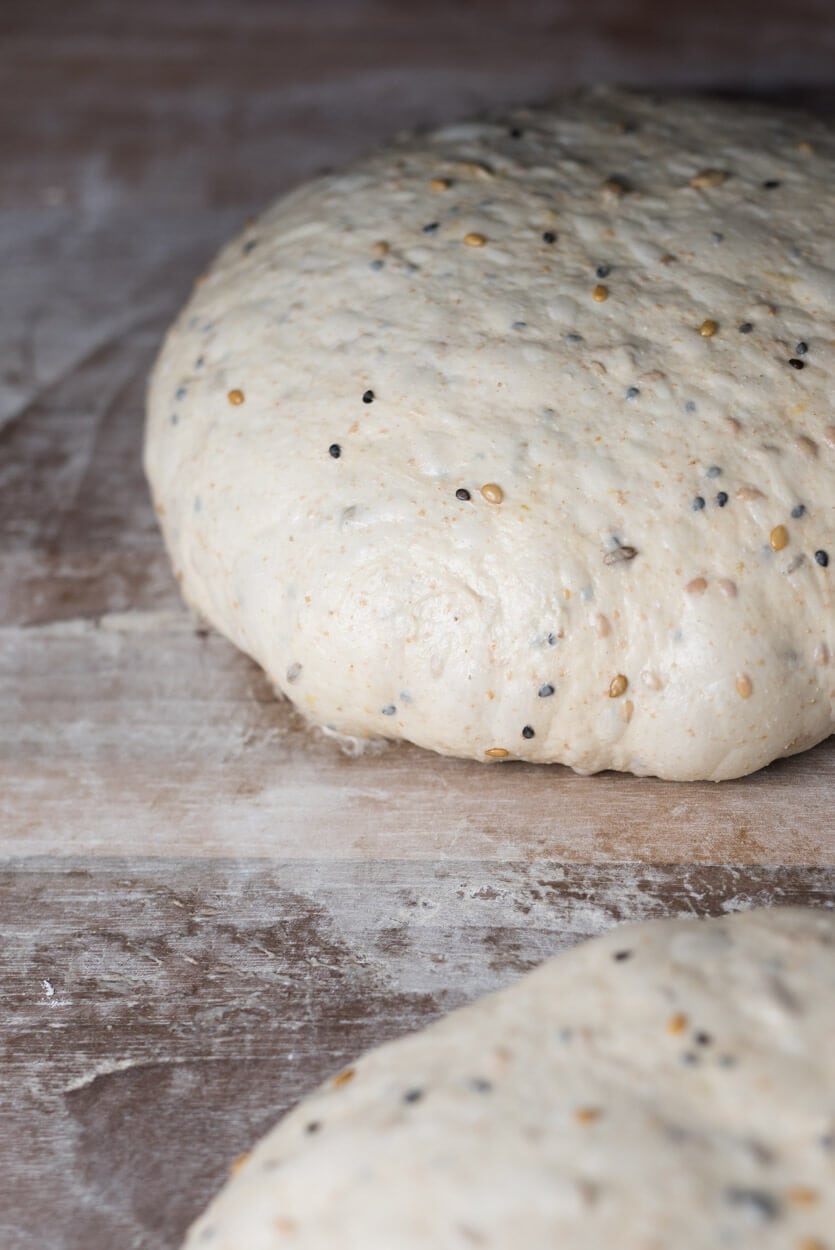
You can see the significant activity in my dough; it was seriously jiggly and quite puffed.
7. Shape – 6:10 p.m.
To coat the outside of your loaves with seeds (optional) as I’ve done, lay out a towel next to the shaping area that’s covered with a seed mixture. Take equal parts raw black sesame, flax, and fennel, and mix in a bowl. Spread this mixture out in the center of the towel evenly into a thin but cohesive layer. I didn’t include sunflower seeds in this mixture as I prefer the look of this bread with only small seeds on the exterior—personal preference. After the dough is shaped, we will quickly roll the top of each batard or boule in this mixture.
I shaped these loaves following my guide to shaping a batard.
Once you’ve shaped your dough, lightly spritz the top with a water mister, this helps the seeds stick to the exterior. Then, using your bench knife, scoop up your dough and invert it, so the seam side is facing up onto the towel with the seed mixture. Roll it around gently to coat and then transfer seam-side-up to your final proofing basket.
8. Rest & Proof – 6:20 p.m.
Cover your baskets with plastic and then retard in the refrigerator at 38°F (3°C) overnight. Even at such cool temperatures this dough can quickly overproof so keep an eye on it in the fridge in the morning. By the morning my dough was very gassy and had risen quite a bit in the fridge.
9. Bake – Next Morning: Preheat oven at 8:00 a.m., Bake at 9:00 a.m.
I steamed my oven in my usual way, described here in my post on how to steam your home oven for baking.
Preheat your oven to 450°F (230°C).
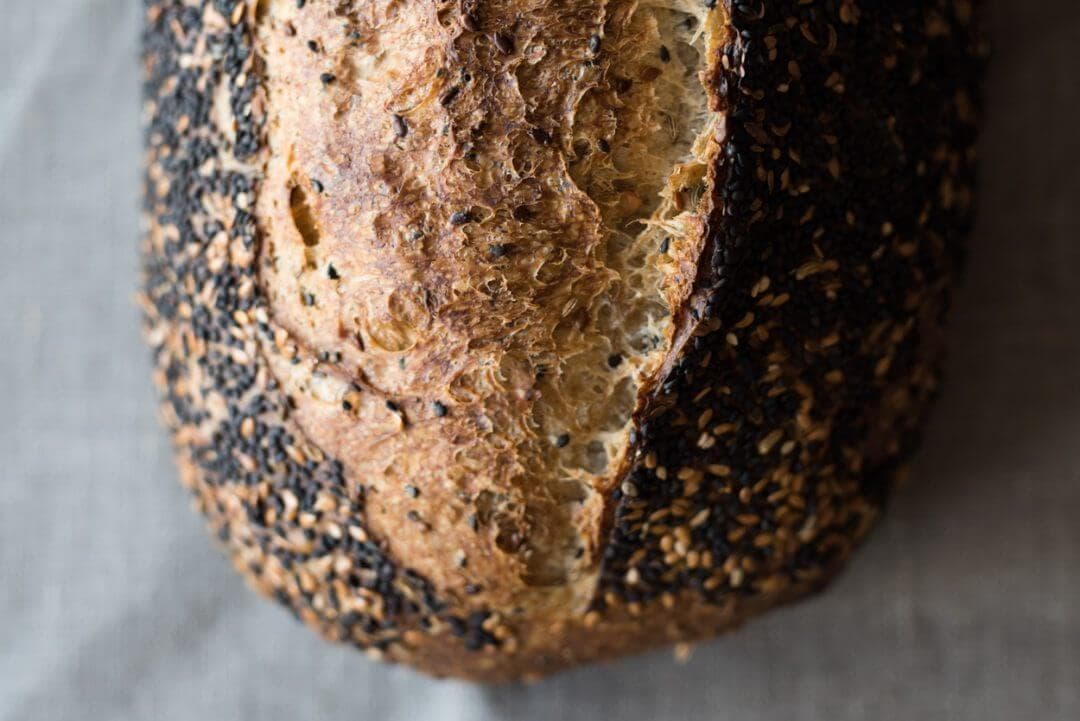
Scoring this bread can be difficult because the seeds form a hard crust on the outside. Get the blade into the dough and move quickly down to make a score. If the blade slips out of the cut, just continue where it left off and keep it going.
To make a double-score, make two straight, vertical slashes on the top of the dough, as you see below. The top one starts near the top-left of the dough and goes down halfway; the second one starts a little higher than where the first one left off and goes down straight almost to the loaf’s bottom. To visualize this, hold your two index fingers out in front of you, so the tops of your fingers are at the same height. Then shift your right hand down until your right fingernail lines up with your left finger’s middle joint—your two scores are the entire length of your index fingers.
Bake the dough for 20 minutes, then remove the steaming pans from inside the oven. Then, bake for an additional 30-35 minutes until done to your liking. Remove from the oven and cool on a wire rack for at least 1-2 hours. Be sure to store your bread properly to extend its life.
Conclusion
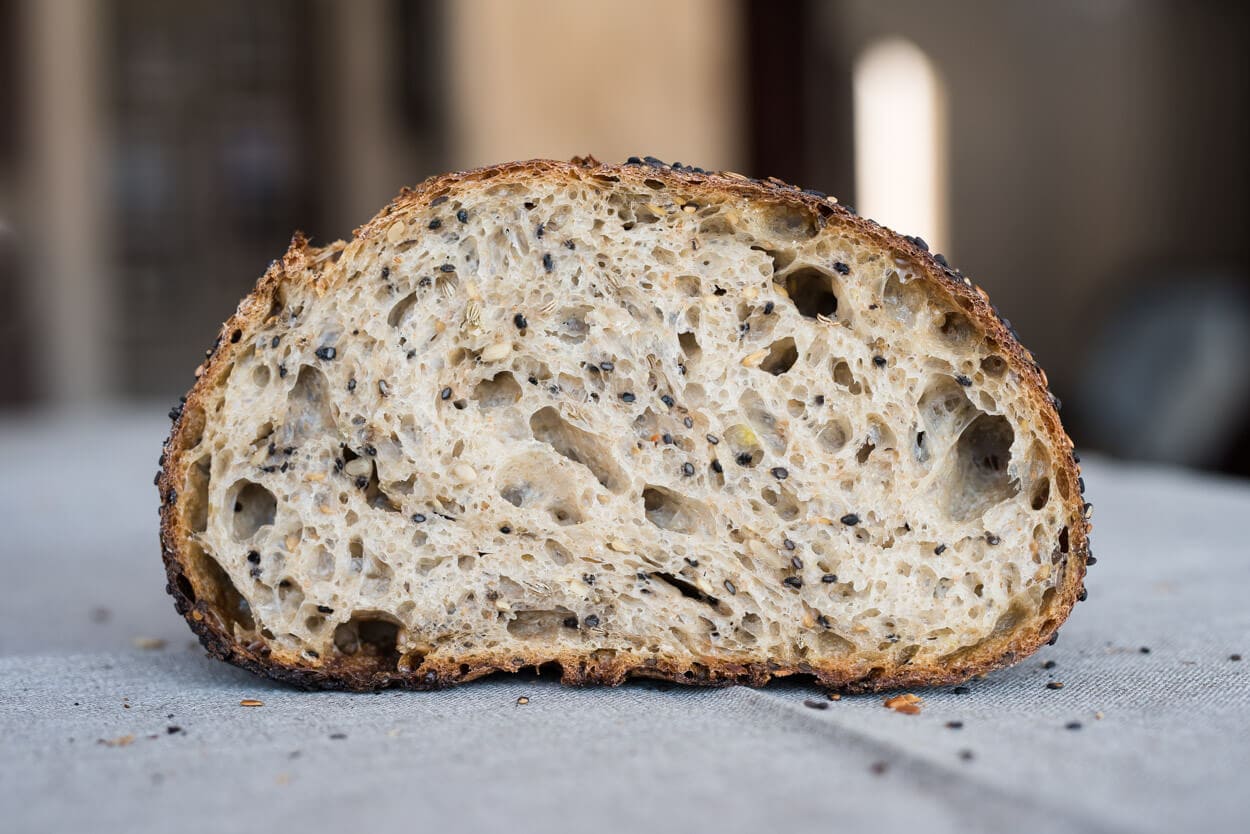
This seeded sourdough is such a great departure from weekly whole wheat or white sourdough; it brings deep flavors and interest to each slice. The interior bakes to a custard-like texture, while the crunch from the semolina-infused crust and densely woven seed mixture give a wonderful contrast. When toasted, I find the flavors actually amply further and the bread, specifically the crumb, takes on another level of brittleness that crackles constantly. It’s exemplary with good quality cultured butter and cheeses of all types (more below).
Crust
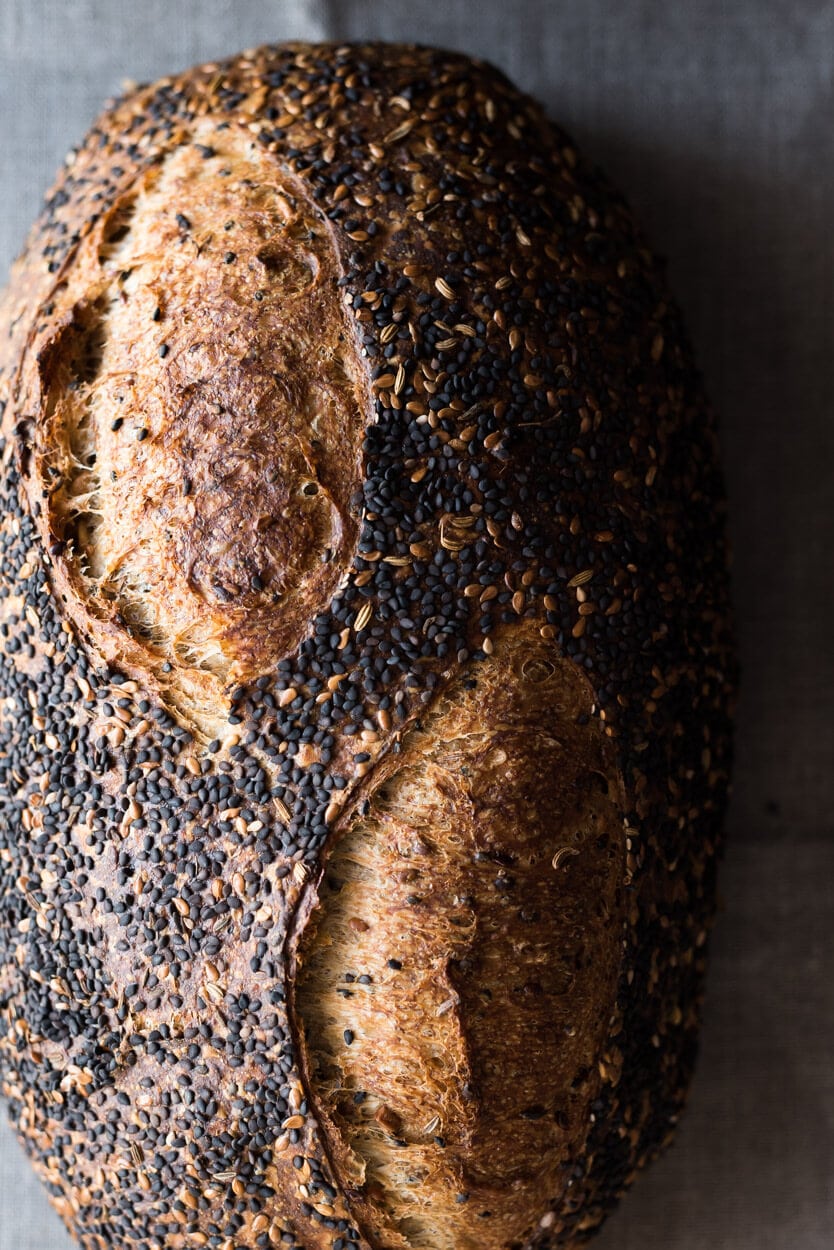
The dark, tawny crust is thin and crunchy; it feels like this seeded sourdough bread was wrapped tightly in a splintery cracker. The semolina has to play a role here, as does the high hydration and further impacted by the seed soaker. Speaking of seeds, the ominous look of the dark seeded exterior is a sight to behold. I showed these loaves to a few family members, and their initial reaction is always: “wow, that’s beautiful.” I have to say, though, the only downside to these seeds and cracker-like crust: a messy kitchen after slicing. Worth it!
The crust has to be one of my favorite parts of this seeded sourdough, but then there’s the crumb.
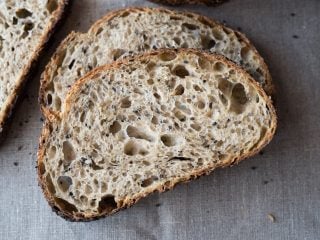
Crumb
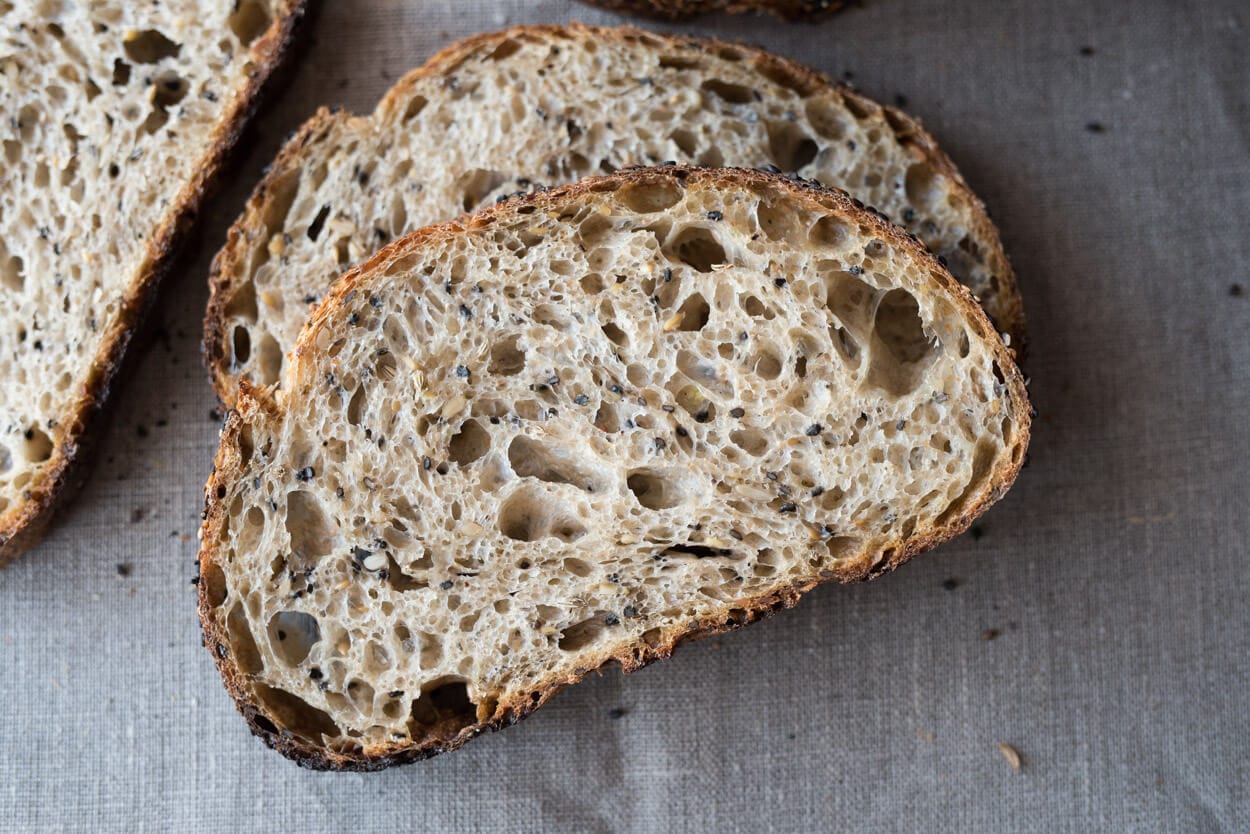
At the beginning of this post, I mentioned that finding the right texture for this type of bread can be challenging. I went heavy with the proof and pushed it as far as I felt possible. The dough was incredibly gassy and light, and this shows here in the interior. The entire loaf was very well fermented, extremely tender, and gelatinized through and through. I found that this bread’s soft, succulent interior works really well with the seeds and crust.
Taste
When you first see the outside of one of these loaves from the oven, you might think this bread is going to be way too flavor-forward, but as I said, in the beginning, I wasn’t looking for that with this formula. The loaf seems imposing, yes, even the interior, but when you taste it, you’ll see it’s more subtle than initial thoughts might indicate. Not including seeds like caraway, the loaf has just nudges of the seed flavors but nothing overpowering.
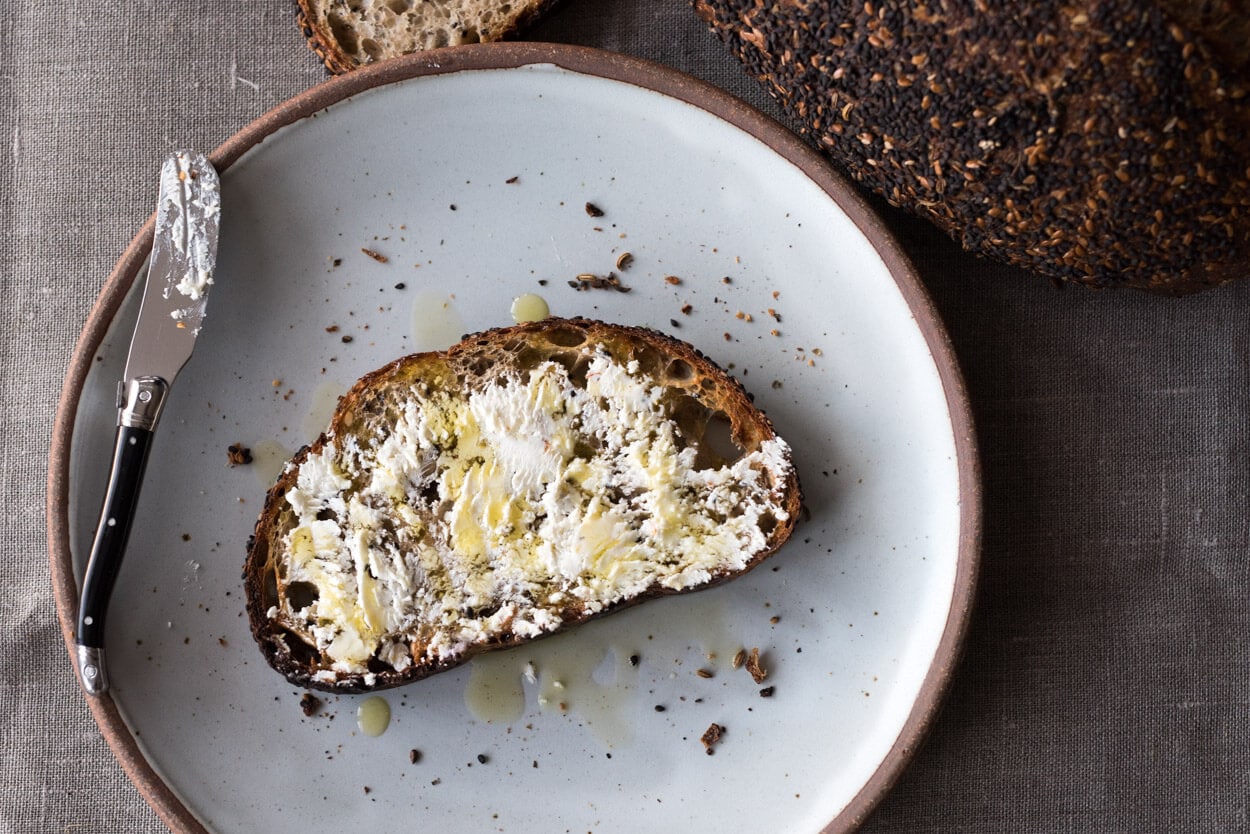
As mentioned earlier, I had a slice spread with a mixture of goat cheese, crushed pink peppercorn, lemon zest, and a drizzle of Amabile extra virgin olive oil (olive oil that’s cured in stone cisterns with a hint of mineral and fruit flavors) that was just out of this world. The seeds’ hearty flavors were balanced by the citrus flavors, mellow goat cheese, and fruity olive oil—I could live on this seeded sourdough bread.
Buon appetito!
Seeded Sourdough Recipe
- Prep Time: 24 hours
- Cook Time: 1 hour
- Total Time: 25 hours
- Yield: 2 loaves
Description
This seeded sourdough is such a great departure from weekly whole wheat or white sourdough; it brings deep flavors and interest to each slice. The interior bakes to a custard-like texture, while the crunch from the semolina-infused crust and densely woven seed mixture give a wonderful contrast. When toasted, I find the flavors actually amply further and the bread, specifically the crumb, takes on another level of brittleness that crackles constantly. It’s exemplary with good quality cultured butter and cheeses of all types.
Ingredients
Seed Soaker
- 40g flaxseed
- 40g dark sesame seed
- 13g fennel seed
- 133g water, boiled
Levain
- 30g medium-protein bread flour
- 30g whole wheat flour
- 30g ripe sourdough starter
- 60g water
Autolyse
- 636g medium-protein bread flour
- 133g semolina
- 60g whole wheat flour
- 501g water
Final Mix
- 40g sunflower seed, shelled, not roasted, unsalted
- 16g sea salt
- 144g ripe levain (from Step 1)
- 44g water
Instructions
- Levain (9:00 a.m.)
In a small container, mix the Levain ingredients and keep at 78°F (25°C) for 5 hours. - Prepare Seed Soaker (9:10 a.m.)
Add the Seed Soaker ingredients (except the sunflower seeds) to a heatproof bowl and let soak until called for in bulk fermentation. - Autolyse (1:00 p.m)
In a medium mixing bowl, add the Autolyse ingredients and mix until no dry bits remain. Cover the bowl and let rest for 1 hour. - Mix (2:00 p.m.)
To the mixing bowl holding your dough, add the Final Mix ingredients and mix to incorporate. Then, strengthen the dough for another 5 minutes until smooth and elastic. Transfer your dough to a bulk fermentation container and cover. - Bulk Fermentation (2:10 p.m. to 5:40 p.m.)
Give the dough 4 sets of stretch and folds at 30-minute intervals, where the first set starts 30 minutes after the start of bulk fermentation. Before the first set of stretch and folds, spread the seed soaker, sunflower seeds, and lemon zest (optional) over the dough. Each set of folds will help incorporate the mixture into the dough. - Divide and Preshape (5:40 p.m.)
Lightly flour your work surface and scrape out your dough. Using your bench knife, divide the dough in half. Lightly shape each half into a round shape. Let the dough rest for 30 minutes, uncovered. - Shape (6:10 p.m.)
Shape the dough into a round (boule) or oval (batard), top with a mixture of sesame, flax, and fennel, and place in proofing baskets. - Rest and Proof (6:20 p.m. to 9:00 a.m. the next day)
Cover proofing baskets with reusable plastic and seal them shut. Then, place both baskets into the refrigerator and proof overnight. - Bake (Preheat oven at 8:00 a.m., bake at 9:00 a.m.)
Preheat your oven with a combo cooker or Dutch oven inside to 450°F (230°C). When the oven is preheated, remove your dough from the fridge, score it, and transfer it to the preheated combo cooker. Place the cooker in the oven, cover with the lid, and bake for 20 minutes. After this time, remove the lid (you can keep it in the oven or remove it) and continue to bake for 30 minutes longer. When done, the internal temperature should be around 208°F (97°C). Let the loaves cool for 2 hours on a wire rack before slicing.
If you use this recipe, tag @maurizio on Instagram so I can take a look!
What’s Next?
If you loved this seeded sourdough, check out its distant cousin: a sunflower and sesame sourdough bread with an added touch of honey for a little sweetness. It’s a delicious loaf—I’d be hard-pressed to decide between baking either of these!
Or, if you’re looking to use more durum wheat, my Pane Siciliano recipe calls for 100% durum and is topped with white sesame seeds.


206 Comments
Hi! Would the seeds stick if I simply put them on the towel in the proofing bowl and jiggled the boule a little before refrigerating?
I’m a little afraid to do it the other way!
I had the same thought – I was planning on misting my proofing basket with a little water and then spreading the seed mixture on the basket, instead of the intermediary step of using a cloth and rolling it around. I’ll report back how it worked.
Didn’t work so well, the seeds didn’t want to stick to the basket. I ended up just sprinkling the seeds on the loaves after I shaped them. I am sure Maurizio use the towel method for a good reason but we’ll see how this corner-cutting method worked (or didn’t…). I’ll post an update after tomorrow’s bake.
Final update: I give the “sprinkle the seeds on top before putting in the proofing basket” method a B-. About 25% of the seeds fell off when I went to cut into the first loaf. Maybe that’s why the cloth method was recommended – better adhesion?
Hi Maurizio – great recipe and website, I’ve made this a number of times and they all turned out great!
However my new oven only goes up to 200 degrees celsius – is it still possible to make this at a lower temperature? Are there other elements I should tweak as well?
Thanks!
Hi,
I don’t have the stuff to make a steam oven, is it possible to make with a dutch oven? How long do you bake for?
Yes! Check out my guide to baking in a Dutch oven for my method.
Hi, I’ve had to shift the schedule with a levain built at midnight, meaning the dough is shaped and reading for proofing at midday. Since you suggested strictly 10 hours proofing in the fridge, how long would it take at 76-78F ambient room temp? Also, if I don’t divide it into two breads (my Dutch oven is quite big), how much longer would proofing inside and outside the fridge take? Thanks, Maurizio!
This dough could probably go another 4-6 hours in the fridge (maybe more?) if you needed to push it — the home fridge is pretty cool. If proofing ambient, I’d say 2-3 hours at those temps depending on the dough that day (use the poke test to determine readiness). Usually keeping it in one mass will slightly speed up fermentation, really hard to say precise times!
Thanks, Maurizio! I had assumed if its a larger mass it would take longer, this would have been disastrous. I will try ambient and will share results.
Great bread as usual. Used almost none of the 100g reserved water–only enough to wet my hands. Being at 500 feet elevation near Seattle, don’t need as much. Now the issue is what to do when I run out of bread flour! Got quite a bit of AP and a couple kg of 00.
Glad to hear that, John! Good move omitting the water, it’s definitely not going to be needed in your location. You could make this with AP, just be even more mindful of the water and reduce it a little more, perhaps also adding in another set or two of stretch and folds for a bit more strength. Wishing you good health and happy baking!
Great recipe and great site. Thanks. I have a couple of questions.
For this loaf, there is no sign of rice flour on top that lines the banneton to prevent sticking. Did you omit it because the seeds take care of that job?
More generally, is your oven convection? Do you try timings and temperatures with and without convection?
Thank you! That’s correct, with all the seeds on the exterior there’s no need for flour to prevent sticking to the basket. I don’t use convection when baking bread in my oven, I find the fan moving air around prematurely dries the crust! Hope that helps and happy baking.
Hi Maurizio. First of all, thanks for all your work on the website. There is a lot of information and recipes online, but just a few places so helpful as this one. My first bake with a sourdough starter, based on your beginners recipe indications, was a huge success. So thanks again.
I´d like to point out a little thing about this recipe, which I tried last week. It was my first attempt at using a soaker, and the total amount of water for the bread really struck me: 78% hydration, which is a lot, plus the water for the soaker. I decided to try it, anyway. But the dough turned out to be really wet, and it was impossible to shape it, even after 5 sets of folding, and holding back a 10% of the total water (I also didn´t dare to add the soaker after the second folding, and mixed everything from the beginning. I think it´s a good idea at the first attempts, since it´s easier to adjust hydration at this point).
Only today, at a second attempt, I´m realizing what may have failed: not having semolina at hand, I substituted it for whole wheat flour, as suggested. So here comes the thing: being a high protein flour, does semolina hold a bigger amount of water that whole wheat? Because if so, that might be the explanation fot such an epic fail.
Anyway, I´m trying something like the opposite angle now: including the water used for the soaker, and again no semolina (I´ll try that at some point, though). Again, excluding the soaking water from the total count, that will lower the hydration to some 60%, from which I can easily add some more if looks like the dough can manage it (which it should).
Tell you later how it goes.
You’re very welcome — thanks so much for the kind words.
Yes, it’s likely my semolina was particularly “thirsty” (it seems the durum/semolina I usually source is able to take on quite a bit of water), but not particularly because of the higher protein, but rather just because of the grain itself.
Your approach sounds like a good one to me. Hydration is always tricky and is always relative to the flour you have on hand. Keep that in mind in future bakes! That’s particularly why I always recommend holding back some portion of the water and only add it in if it feels like the dough can handle it (you’ll develop a sense for whether the dough can handle it over time, but even so, we sometimes make mistakes!).
Keep me posted and have fun!
I´m back, with yet another home baking bread anecdote from the kind you have already listened a trillon times. So, in case you´re up for one more, here it goes. Beyond the anecdotal experience, though, there might be something relevant regarding to baking with some kind of seeds.
I was trying a variation of this recipe, using just regular AP and whole wheat flour. I failed the first time, making a dough too wet. The second attempt, I lowered the hydration to a more manageable level, which then went up after adding the soaker. But the dough resulted too dry, and I also failed to recognize the right point to stop baking and underbaked it. A third attempt, with a little higher hydration, resulted again in a dough too wet to shape. At this point I didn´t know if the seeds were releasing water into the dough, or stealing from it.
So I decided to take another approach: improving at making a plain sourdough bread recipe, and after that, just add the seeds to it and see what happens. I went with the best sourdough recipe, which I hadn´t tried yet, lowering hydration to 75%, because I´m still a little clumsy at shaping. It turned out to be the best loaf I baked so far, so thanks for posting that recipe too. Emboldened with that success, I tried 2 things at adding seeds. First, I made a soaker with a lot more water, 200%. The idea was that the seeds would absorb as much water as needed, and then I would be able to discard the rest, making sure that, at least, no further water was absorbed. Meanwhile, I repeated the sourdough recipe lowering hydration 2% , expectog that the seeds would release some liquid and, luckily, obtain a similar hydrated dough. Again, I miscalculated, but I could correct it.
Here´s the thing, and I think it might be important to take into account when baking with seeds. When I checked the super-hydrated soaker, again the seeds had consumed all of the water, which almost doubled the amount suggested in this recipe. Yet there was something else covering them: some strange gelatinous thing, that I have noted previously but didn´t pay attention to. And this is the point where seeds matter. I mean, the type of seeds used. Mine were a mixture of sunflower, flaxseed, sesame, and chia. All good for bread baking, I though, and indeed they are. However, it just didn´t felt right that they absorbed that many water… and that gelatine released? So I searched online for some info regarding water absorption in seeds, and found this. First, the viscous liquid released is called mucilage, which is contained in high proportions in seeds like flax and chia, and whose extraction increases along with the temperature of the soaking water. Mucilage is what it´s called an hydrocolloid: basically, gum. It increases pH level of the soaking water; also, chia mucilage has high hydration capacity and great thickening power. The effect of this in bread appears to be an increase in the water absorption of the dough as well as in the development time and stability in the kneading (whatever stability means here), the generation of less extensible doughs, and an increase in the firmness of the breads (in addition, those are all oilseeds, and of course a little oil is released into the doughs, with the expectable results). In sum, the thing that was unbalancing my dough was, I think, the amount and quality of the mucilage. So, as a first conclusion: not the same high mucilage content seeds than not, with special regards to chia.
And back to the anecdote: I had an autolysed dough of, so far, 64% hydration (with some more water remaining to be incorporated). I added the highly-mucilaged soaker (I like this new word I learned, so I keep using it) to see what happened… The thing was so gelatinous that I wouldn´t incorporate in the dough: it just squeezed from my hands, but didn´t mix. Folding the dough did the trick: after a long series of foldings, it became a highly hydrated and sticky dough (the slap and fold technique would have also probably worked). Yet it appeared to be too hydrated (even at this early stage), at least for what I was looking for. So I added 15% more flour, making the dough maybe not too wet, but way too sticky. Same after the incorporation of the levain. After many foldings, it started to develop. Of course, the soaker could have been incorporated to the autolysing dough, but seeds would probably impair the alignment of gluten strands, so there´s no point. Therefore, I think it´s a good advice to incorporate them after the first series of foldings… once you got to know the resulting dough a little better.
As it is impossible to properly calculate hydration here, I decided to go with the best sourdough recipe treatment: folding, folding and folding (and then, folding, folding, and folding once again). Turned out to be a wonderful dough, after a little extra bulk time.
Results were good. Improvable, sure, but not bad for the first time, even with some on-the-fly corrections.
One more thing regarding to hydration: It´s impossible to calculate it. How much water is in the stupid mucilage? And how much of this if absorbed by the flour? Do the seeds release some water in the dough after being fully hydrated? Were they even fully hydrated? Or were they not, in which case they probably took some more water? Hydration level is hard to calculate even by looking at the dough, because it is basically mixed with some gum, so visuals can be disorienting. Which lead me to the question: should the soaking water be taken into account for the hydration calculation? Hamelman, for example, claims that of course it should; after all, it´s part of the recipe. However, I think, the importance of water is its ratio to the flour, not to the whole solid ingredients. Therefore, I think it´s correct not to include it in the hydration calculations, as it is done in this recipe. But the use of seeds will have an effect on it, which is difficult to establish beforehand. Some other thing to keep tweaking are the hydration of the soaker and the temperature of its water.
And lastly, in case anyone is faced with some high-mucilage dropping seed in the soaker, this is what I baked: 90% AP flour, 10% whole wheat flour, 60% water, 2% salt, 14% seed mix in a 200% hydration soaker (that is, double water content)@41ºC which rested for 1 hour, 17% levain with 100% hydration prepared the same day and used inmediatly after its peak (hydration level calculation includes of course levain water). The temperature of the dough shifted from 27,2º during autolysis to 25º before final shaping. 4,5 hours of bulk fermentation, 6 foldings as indicated in best sourdough recipe, 45′ bench rest.
Visual results of crust and crumb here: https://imgur.com/a/ZHw05vh
And some other results of baking with seeds, here: https://imgur.com/a/1ZS5IwE
I though calling this piece “nature finding its way”, but then came up with a better title: “do not mess with seeds – they are tough guys”.
Some interesting info on seeds, mucilage, and its effect on dough rheology and bread quality can be found in this academic research: https://www.ncbi.nlm.nih.gov/pmc/articles/PMC6262637/#B1-foods-07-00191
And that´s it for now. Again, thanks for the recipes and, more important, the inspiration.
Thanks so much for sending over that research article, fantastic information here and also lines up with what I’ve experienced firsthand: soaking some types of seeds gives a gooey substance and mixes interestingly into a dough. The result is also noticeable after you bake, the crumb (you can see it in my photos above) is shiny, slick, more tender even. Which I’ve always liked. It is interesting it effects the pH, though.
I don’t know the answer to a lot of your statements here and how this really effects the hydration in the end. Lately I’ve been of the thought that the water used in the soaker should be a part of the final hydration calculation, after all, it is going into the final bake. However, part of me wonders if that’s even correct because the seeds do seem to absorb the water and form that gel-like substance — is it more solid or liquid at that point? And further, does the water in the seeds/gel get released back into the dough? I’m not sure.
Sorry I don’t have more answers, if I do stumble on them, I’ll update 🙂
Well, I was not really looking for answers, just sharing some thoughts… I don´t think anyone has them, because dealing with that… thing is not an usual situation. So we´re left with just practice. But that´s part of the fun in baking bread, isn´t it?
This week I tried again with the recipe, and obtained the same results (everything might fail here). The water used for the autolyse barely covers the flour, resulting in a dry dough. At this point, hydration is 60% (or less if I reserve some water, but there´s no need). After a hard struggle to incorporate the gelatinous soaker, the dough turns into a highly hydrated one. It appears that, after taking most of the water, seeds release this thing, which adds some more water to the dough. Therefore, yes, it makes sense to count the soaker water to calculate final hydration. But how much of it? Impossible to know. Counting the total water, hydration would be 86%, but it doesn´t look or feel like it. Not to me, at least.
Formed a consistent dough, its hydration doesn´t look like going up or down over bulk time. So I don´t think seeds are releasing water back, nor stealing it. Again, impossible to know for sure.
So hydration is obviously higher than the initial 60%, but lower than 86%… Looks similar to other dough I usually handle, which is 75% hydrated, so maybe more like that? I don´t have enough experience to tell.
So, no definite answers for all this, you have to rely some more on practice. Or: just don´t use a lot of flax/chia seeds, and everything will be again under control – as much as it can be in home baking, at least.
dear i did not see where you put the salt?
At the end of step (4) 🙂
Hi Maurizio,
Just a quick suggestion/correction. The amount of Levain asked for in the recipe (128g) is more than the total amount in the Levain build (125g). As most of your recipes make a levain build with some extra, I think there might be a mistake somewhere.
I’ll try this recipe this weekend! Looking forward for the results.
Leonardo — thanks for catching that! You’re right, the levain included in the Dough Formula should be 125g (14.20%). I hope the bake turns out great, happy baking!
Nice, not a relevant difference then, I was concerned there was a bigger error somewhere 🙂
The bake came out very good! Very nice and simple recipe, great results.
Thank you very much for all the work and attention you put in here!
This bread was absolutely amazing, thanks a lot for the recipe! Everybody loved the combination of fennel seeds and lemon zest 🙂
Fantastic — great to hear that, Misa!
Hello Maurizio,
I just watched the video of Chad Robertson (as mentioned above) shaping the dough and baking it in a Dutch oven which he obviously did not preheat. Can we do that? I though we always had to preheat the dutch oven!
Hello, Maurizio! I’ve just started baking sourdough breads and this is the 3rd recipe I’ve tried. It came out of the oven a little too much toasted, even thought I left it baking on 230 celsius for 20 min and 200 for 25 min. My family likes it like that, so that’s not a problem, but it’s not my preference. But!!! It tastes incredible and it’s my favorite loaf so far, I’ll definately be trying it again. I’ve had a couple of problems with it, I hope you can help me. I tried the folding method, to strenghten the dough and the gluten, but it just never came together. By the 4th folding, I tried doing it for over 20 minutes and the dough was definately better, but it was still sticky and didnt hold its shape very well. The white flour I used had 13% protein and the whole grain, 36%, so I dont think that’s the problem. Also, the crumb came out beautiful and open in some places but dense in others, do you know why that happens? Anyway, the loaf puffed up beautifuly in the oven and its chewy and full of seeds, it’s delicious, thank you for sharing the recipe!
Have a great week,
Anna
Glad to hear it mostly went well, Anna! It could be that your dough was over hydrated, which would make it feel more slack and weak. However, it could also be that your dough was insufficiently fermented.
If the dough felt really wet at mix time, try reducing the water in the recipe by 5% and see if that helps next time. This will bring a lot of strength to the dough early on and you should notice the difference. The seed soaker has a lot of water in it which won’t really show itself until later in bulk fermentation (about when you said you were having issues).
In terms of fermentation, make sure your starter is strong, it should rise and fall at about the same schedule each day and show good signs of fermentation (bubbles, smell sour, etc.). Additionally, make sure you use your starter when it’s mature (ripe) to build your levain, and further, use your levain when it’s nice and mature as well. From there, it’s all about ensuring your dough temperature meets the “final dough temperature” I list in the recipe and then give it the time it needs during bulk — if it looks like it’s not well risen and doesn’t look alive, give it more time!
Hope this helps and happy baking 🙂
Hey Maurizio,
My family has been thoroughly enjoying your recipes! I was hoping to give this one a shot this weekend but had a quick question about the flour selection. We live in an area that is hard to find a wide variety of flours (I have been lucky enough to find a local mill an hour away to get stone ground whole wheat!), but other than this our selection is limited. As far as the malted flour goes would it be possible to add some of the diastatic dry malt to either bread flour or all purpose in order to achieve similar results?
Thanks again for all the time you have put in to share these wonderful recipes!
-James Pelegrin
Hey, James. Glad to hear that and also that you’re able to find local wheat, super cool! Yes, you can definitely add your own diastatic malt powder. I’d shoot for somewhere around 0.5% to 1.5% of the total flour. If you’re using a large portion of fresh milled flour you might not even need the diastatic malt, it’ll take some experimentation there!
Hope that helps and happy baking!
Hi Maurizio,
I’m trying this bread again today – it’s been a huge success at home =]
But I’m also trying to troubleshoot some issues I have when making different sourdough recipes and using different approaches, and would love to have some input from you..
I’ve tested some of the recipes which require long(er) autolyse, and during bulk they’ve never seemed to acquire that bubbly, puffed form that indicate strong activity – even when waiting longer than usually expected. Nevertheless, they’ve been put to 2nd fermentation overnight and have grown pretty well on the oven.
When doing breads using the tartine method (which requires dissolving the levain in water, then mixing the flour and leaving it to a 40min autolyse), the bulk fermentation results have been great – bubbly, puffed clouds of dough. On the other hand, after secondary fermentation in the fridge, growth in the oven has been quite underwhelming.
I’m betting here that perhaps for the “tartine method” the breads may have been too long in the fridge (or even bulk), and overproofed. for the first case though, I am in doubt what to do. I’ve been trying to control for temperature (I’m in Brazil, so even during winter is not that cold in here), so I guess this wouldn’t be reason enough for the sluggish primary fermentation.
Do you have any ideas what should I try? Have you or someone else had such contrasting results from the two different methods?
Thanks in advance!
Glad to hear it, Lilian! The moment you add your levain to your dough, even if it’s during an “autolyse,” fermentation begins. If, with one method, you’re adding the levain at the beginning of a long-ish autolyse, and then with the other you’re not, you’ll have vastly different durations for when the dough is fermenting (i.e. 40 minutes with the levain is a long time!). I’m not sure you’re doing this, but it’s something to be aware of.
When you’re doing the Tartine approach it does sound like your dough is fermenting a little too long (either in bulk, in proof, or both). A sluggish rise the next day in the oven could be an indicator for this. Cut back the bulk fermentation time or the proof to help with this issue. Generally I find the longer the time the dough ferments the more sluggish the rise in the oven — gluten begins to break down and the “food” available to our sourdough culture begins to run out. That said, I do like to push this fermentation time as far as possible, I find the resulting bread to taste the best and have the best texture. There’s a balance there.
Other than that I really haven’t noticed a difference between when I break up the levain in water and add it to my dough or just add it in and mix by hand. Just be sure when you do mix in your levain, either way, you make sure it’s thoroughly mixed through the dough and evenly dispersed.
I hope that helps!
Hi Maurizio,
Thanks for your reply! I’ll cut back the bulk fermentation time as you suggested – Hope that solves It 🙂
I must say tour blog has been really helpful for me since I’ve begun doing sourdough breads, so thanks again and keep up with the excelent work!
Hi Maurizio,
I am trying this bread today. My daughter and I discovered your blog earlier this year and perfected our starter care. After spending a lot of time reading your blog our starter and bread making improved immensely! We have made several of your breads and pizza dough. Our favorite recipes are the Oat Porridge, Apricot and Walnut (without the lavender, someday we will throw in the lavender) and the fennel and golden raisin. The pizza dough is to die for, far better than anything I can get in the local pizza shops. Thank you!
Hi, Kim! Happy to hear my recipes have worked out well for you and your daughter. Those are some of my favs as well! The oat porridge loaf sure is a winner, every time I make that I get requests for a follow up. Thanks for the note and I hope you like this recipe just the same! The seeds really bread a wonderful, deep flavor. Happy baking!
Hi Maurizio, I have tried the beginners sourdough , pancake, and waffles with success. I tried the recipe for the seeded sourdough. Though there was hardly any oven rise. the texture was soft (a little dense though) and bread tasted good. I noticed that the levain percentage for this recipe is less that that for the beginners sourdough(20%). Should I increase the amount the next time I try ?
Glad to hear those recipes worked out well for you! There are many reasons why the dough couldn’t rise and without more details it’s hard for me to give a solid recommendation. If you have any photos feel free to email me (the Contact link at top) and I’ll help ya out.
The reason for the reduced levain percentage in this recipe is because I found, after many tests, the dough seems to ferment faster than what I’d like. It’s possible your dough still over proofed a bit and thus the lack of rise (this is just one possibility). You really want to keep an eye on this dough and cut bulk fermentation when it looks like it’s ready — watch the dough not the clock, as they say!
I hope this helps, again, feel free to email me with more details if you’re still running into this issue!
Lovely blog. May I know if the slap and fold is chosen, do I still need to carry on with the stretch and fold method?
Thank you! It all depends on how strong the dough is at the end of your slap/fold session(s). The goal is to get the dough strong enough to trap the gasses created during fermentation but not so strong that it cannot expand out in the oven when baked. Even when doing slap/fold I will usually do at least 2 sets of stretch and folds during bulk to finish off the dough. If you kneaded for much longer than me (or the majority of your flour is very strong) you might be able to get away with one set, or none. All depends!
I have one question/concern the time between the levain build and mixing in the levain for this recipe is 8 hours is this correct? Seems like the levain might no longer be at its prime…in all your sourdough bread you let the levain build for 5 to 6 hours and autolyse sooner than with this recipe, should I follow this time table? Also my house is exactly 80 degree and 8 hours for anything just seems too much. Any feedback?
Really glad to see your bake went so well on Instagram! If your house is at 80ºF then yes, things will move a lot faster and you’ll have to adjust your levain and every other step of the process. The levain build here is completely different than the others I’ve been recently been doing with warmer water and higher mature starter percentages (thus the shorter timeline!).
So yes, please adjust to suit your warmer environment!
Love the bread. I made it last week turned out wonderfully. Making it today and wondering how necessary a full 2 hour autolyse is? Or can I do it more tartine style where you mix levain directly with the flour and water. Thanks.
Really glad to hear that! You can certainly reduce the autolyse time, just note how the dough feels when you’re mixing and during bulk. You might need less strengthening (sets of stretch and folds) but not necessarily, this depends on a lot of factors. But yes, it wont hurt to reduce the autolyse time (or eliminate it altogether). Happy baking, Isaiah!
First of all, thanks so much for this blog site; what a gift! I discovered it just this year, and now on my 9th batch using your methods and recipes, and am truly “geeking out” on making sourdough bread! My question: for this recipe, why such a short proofing?
Rick — glad to have you along! I know how you feel, I geek out every day with sourdough 🙂
The final proof time sometimes takes a bit of adjustment depending on many factors (levain percentage, temperatures, add-ins, etc.). For this bake I found the dough moved faster than usual and thus I cut the proof time to suit. I discovered this after a few test bakes, the early tests showed the dough overproofed just a bit (perhaps because of the temperatures or the seed additions).
Really the key is for everyone out there to watch the dough and not really the clock. If the dough looks like it’s ready to hit the oven then get it in there as soon as you can. The times I list here are good guidelines but by no means exact, each environment is different!
I hope that make sense and helps in some way. Happy baking, Rick!
Hello Maurizio! Your blog is absolutely phenomenal. Your beginners sourdough loaf is exactly what I needed to appreciate the intricacies of sourdough baking. I just bought semolina flour and wanted to experiment this weekend. I love this recipe, but I am wondering if it would still hold up with any of the seeds added? I have little ones that aren’t fans of bread with seeds. Thanks for your help!
Amanda, thank so much I really appreciate that! Glad to hear my Beginner’s Sourdough recipe helped tie things together.
Yes, this bread will still be delicious without the seeds! I love semolina, it adds an awesome color and flavor to the dough which will be splendid on its own. Happy baking!
Dear Maurizio, I have followed this blog for a long time and enjoy it, especially the accurate and complete information provided. You have much to be proud of for many reasons. I am intending to make the seeded sour dough recipe for my wife who likes multi-grain style breads. The seed mix and seed soaker is where my questions lie. I have made the starter and sourdough breads from your recipes many times with great success…thanks so much. Now for my questions as I am intending to personalize the seed mix and preparation. First off, I must eliminate the fennel seeds, not a favorite of the wife. Sunflower and sesame (both white and black) are on hand in the baking larder, so no worries on those. The flax seeds are the difficult bit. I do not have flax seeds, but I do have a good amount of flax seed meal that we use in other things often. I want to use the flax seed meal in your seeded sourdough recipe. Since the meal is ground roughly so the flax seeds are broken up, I am tending to guess that I do not have to soak the flax seed meal. What do you think? I intend to add the flax seed meal to the dough when I add the 150 g water soaker made with sesame seeds and sunflower seeds. My second question is whether there is any benefit to toasting the flax seed meal to bring out its taste a bit more since there are oils and other goodies that could be enhanced? What is your opinion about toasting flax seed meal? Thanks again for all you do for home bakers like myself. Robert Paluf
Robert, really happy to hear that and thanks for following along for such a long while! I think the seed substitutions will work well! I’m not too familiar with flaxseed meal, I’ve never used it in baking before. I would agree that you probably don’t need to soak this at all since it’s ground down, you should be able to add it directly to the dough like you would buckwheat or some other flour/grain. I don’t think I’d toast it, I would just mix it in like you suggested.
I’d love to hear how it works out, I’m pretty sure it’s going to be just fine (and healthy)! Hope this helps, keep me posted when you get to it!
Hello Maurizio,
Great Blog I love it.
One question- How do you prevent the loaf from being stick to the proofing baskets?
I had this issue with the “My Best Sourdough Recipe” although I floured my baskets very well with bread flour.
I thinking maybe in this recipe it will be better because of the seeds outside the loaf but do you have any recommendations?
Thank you! I typically use cloth liners for my baskets when the dough is overly wet (although with My Best Sourdough Recipe I did not because those baskets I used really prevent sticking), I’d recommend doing that. I have the liners listed in my baking tools page if you’re interested. Even when using these liners I dust the basket/liner liberally with white rice flour (also on my tools page), this really helps prevent sticking.
It’s also possible you don’t have enough tension in your dough (not enough strengthening or it’s too wet) when you shaped the dough. Make sure you develop a tight enough skin on the dough so it holds its shape pretty well in the basket. That, in combination with the rice flour, should prevent all sticking.
My 2nd attempt went much better….loved the added lemon zest. Smelt so wonderful during stretch and folds. Used less water as suggested by you, Maurizio. Also less fennel, only 5g and ground this up. Next time might do a little more. I found 14g too much so will aim for 8g next time. As you have said its all a matter of personal taste. Thank you for sharing your recipes.
Super glad to hear that! Totally agree, these spices can be overwhelming to some and underwhelming to others, I find it always takes a little tweaking on the part of the baker according to their preference. I sure do love the lemon zest in here as well!
Thanks again for the message and happy baking, Trish!
Hey Maurizio,
I’m having difficulty understanding the process of adding the seeds in this recipe. So, I soaked the flax seeds only. Was that right? Are all seeds supposed to be added into the dough at the same time (1 hour into bulk)? Also, what is the “seeded soaker”?
Jeffrey, sorry for the confusion. To clarify:
– toast only the dark sesame seeds, then set out to cool
– boil 150g almost-boiling water over the flax seeds (only) and let cool
– once the flax seeds and water in bowl are cool, mix in the toasted (but cooled) sesame, and then the fennel.
The mixture of flax, sesame and fennel is the “seeded soaker”. Mix this in all at the same time (1 hour into bulk).
Hope that clarifies!
Thanks, Cynthia! I know how you feel about the Gjelina/Gjusta affair, but what’s GTA? I think Gjelina is one of the best cookbooks I have.
I pickup my Giusto’s straight from their homebaker website, that’s the only option I have out here. You might be able to find a reseller somewhere since you’re in Cali, but if all else fails go through their website. It’s pricey flour, but I love it. Since you have T85 and T70 you might want to think about just omitting the T85 and go all T70 for the white flour portion… I could be a close approximation. For the bread flour (high protein) section use King Arthur Bread Flour if you dont have CM High Mt.
Just some thoughts. Let me know how this bake goes, I’ve made it a bunch of times now and it’s awesome bread!
GTA would be so, so dangerous for me. I’m really glad it’s not here in Albuquerque 🙂
Awesome! Let me know how baking with the Giusto’s goes, would love to hear your thoughts on the flour. It’s been a little while since I’ve used KA flour, but I might be picking it up again here soon to give it a go again.
Have fun!
Hi Maurizio, I read your blog every now and then but this is my first time commenting. It was in your blog where I learned, about a year ago when I first started (seriously) making bread, to use parchment paper to transfer loaves into the oven :-). To me, at that time, it was a big deal! I just wanted to say congratulations on your 3rd year anniversary of making sourdough and for maintaining this blog. In my opinion, your blog is one of the best around. And also, thank you for your generosity in sharing your knowledge and experiences to us. We are eternally grateful!
Johnny — thanks for the comments, I appreciate that! That’s the thing about baking at home: there are so many moving parts and variables even little insights (like the parchment paper) do mean a lot!
Thanks again for all the comments, I really appreciate it and I’m so glad I can help. Happy baking!
Hi Maurizio, I’m curious, can you share what camera(s)/lense(s) you are currently using? Thanks!
Sure! I use a Nikon D810 with a Sigma 50mm ART lens.
Hi Maurizio, I love the idea of this seeded loaf recipe and will give it a try asap.
I have been using a version of my own that has 4 tablespoons of LSA [Linseed, Sunflower and Almond] in a fine ground mix. My loaf has 450 gm of bakers flour and 50gm of whole wheat and 70% hydration plus levain and salt. There is a course grind of the same mix but I find that it does not rise as well, I think the rough cut seeds destroy the gluten strands.
Any way, this mix gives a really nutty flavor to the bread, especially when toasted, I some times add sesame to the outside for additional flavor, but as you said, it leads to a messy kitchen when cutting those crusty loaves.
Love your post, keep up the good work, thanks from Down Under.
Sounds good! I really like this loaf, fantastic flavors in here.
I like that combination idea, sounds really flavorful. I haven’t tried baking with linseed or almond before, need to get ahold of some! Thanks for that suggestion.
Thanks for the comments and happy baking!
Excellent recipe, Maurizio, which I’ve just baked (with only minor changes to the flour and seed mixes) and it’s turned out beautifully. I’m under strict instructions to remember where the recipe came from because it went down so well at home.
Awesome, thanks for the feedback! Now that we are all out of this bread I find myself missing it, will have to remedy that.
I like a little diastatic malt added to my mix as well, usually it’s already in the flour I’m using but if not dried options can be found online. It gives the crust a little more color and helps fermentation. I typically shoot for 0.50 – 2.0% or so for my formulae.
Thanks again and happy baking!
I thought I wrote a message yesterday but I don’t see it. Odd. I wanted to thank you for this recipe. The night before you posted it I was feeding my starter and thinking about what to bake next. I had some semolina left from Tartine’s Fennel and Semolina recipe and since we had loved that (and I kinda like the pretty golden crumb) I wanted to use it again. Plus I had some freshly milled whole wheat. This recipe added some other thoughts at just the right time. My bread is a little different from this in flour proportions and seeds but turned out really nicely. So thank you. I really appreciate your thoughtful writing and the conclusions you draw – so helpful. Your guidance and support are amazing helps.
Congrats on three years of this beautiful site!
I do see your other post! It’s right below this one, strange (I’ll reply here).
What an great serendipitous outcome! I think you taking my recipe as inspiration and building your own is the best part of all this — that’s what I hope to do with these posts: inspire new ideas. It sounds like your mods came out really well and I’m happy to hear that! I’m eager to explore more ideas with semolina, it’s fantastic flour to have around and can not only be used for bread but pasta, double win.
I’m glad this post provided some inspiration at just the right time 🙂 Thanks so much for the kind words and the congratulations — here’s to another 3 years!
Thanks so much for this. The night before you posted it as I was feeding my starter before turning in for the night, I was thinking about what kind of bread I wanted to make the next day. I had some semolina left from a bake a couple of weeks back and since we had really enjoyed the bread I wanted to make something using semolina, but not the same bread as last time. I imagined a loaf with whole wheat and semolina in balance and something else. I never got to the something else. It was fun to get up and see your post, which completed the something else. I changed the percentages and the seed mix and made larger loaves – not because I think my ideas are better than yours (ha!! Not even close to possible) but just because that is the way I usually roll. It is wonderful to have your experience to jump off from. I truly appreciate your guidance and support. Thanks so much.
Hi Maurizio
Lovely recipe, as usual. I couldn’t see in the notes where you add your levain. I assume it is added with the flour and water for autolyse?
Kind regards
Erica
Thanks, Erica!
Oops, forgot to add the levain bit in. No, please mix in the levain in the “Mix” step. A traditional autolyse is always with just water and flour (no salt or levain). I’ve fixed the post and thanks for spotting that!
Thanks Maurizio! I was a bit concerned I was just having a “senior moment”!
Congratulations on 3rd and wish you many more perfect loaves to come. Absolutely love the look of this bake. I really want to try it at my next bake..let’ya know.
Thanks Jinal! I messaged you on Instagram but let me know how you like this bake, I really love the flavors of these seeds, the lemon and semolina. Happy baking!
Cheers Maurizio and happy third anniversary. Keep up the brilliant work and here’s to many more years!
Thanks so much I really appreciate that! No signs of me slowing down 🙂
Happy baking!