
After the past few weeks, I’m not sure I want to move ever again. Throughout the last year as our new house has been under construction, we’ve been steadily reducing anything superfluous around the house. My wife and I don’t have much “fluff” to start with (we try only to buy what we need), and yet, this move (just across town mind you) has been a sprint from start to finish. We had only a few weeks to fix all the small issues found by the inspector, prepare all the paperwork required, pack up our belongings, and finally do the last cleaning. Toss on a graduation trip one of the weekends plus visiting family, and that leaves only a smidgen of time to get all this done. But as is always true with me when it comes to baking, making this oat porridge sourdough bread was a priority.
We finally finished packing the track to the brim; furniture on top of furniture, kitchen stuff on top of bedroom stuff, clothes on top of everything else, but one sure thing was my starter acted as a co-pilot up front in the moving truck where I could keep a close eye on it.

Somehow we pulled it off and are now in a temporary abode until our home is finished hopefully only a few more weeks. Baking for the rest of the month is going to be tough, but it’s going to make moving into a home with a double oven that much better. I cannot wait to double my bread baking experiments.
Now that the moving gripes are out of the way let’s get started with this entry. I’ve been working on it for quite a while now through several attempts, failures, and successes. Let’s talk about oats.
My wife typically gives me dirty looks when she catches me finishing off the household’s supply of rolled oats before she can even get a few days of breakfasts in (since writing this I’ve started to stock these oats in bulk so we always have supply). I eat them just about every morning for breakfast with cut fresh fruit, pecans/walnuts/almonds, honey and either currants or raisins. It’s one of the only things I can eat in the morning that keeps me completely full until lunch. Given my high activity level (running, gym, dog walking, hiking, etc.) I almost always wake up ravenous, and oats do the trick.
A while back when I was flipping through Tartine No. 3, I stumbled on their oat porridge recipe and immediately read it with unwavering attention. So let me get this straight, oat porridge, my favorite breakfast concoction, cooked into a loaf of my already favorite sourdough recipe? I tell you I was ready to grab the package of oats from the cabinet and get baking straight away.
Despite my fervor for cooking this loaf, I’ve been hesitant to share my progress on until I finally tinkered and tested enough to discover some insight, with a bit of luck here and there, and a process that will deliver worthy results. Now that I’m happy with the outcome, and I’ve consistently made some exceptional tasting loaves, it’s time for me to share my findings with you.
Your first attempt at this bread might be more challenging than previous the recipes I’ve written in the past. I have never made a porridge bread before this, and I wasn’t sure what to expect, but really, what could be so hard about folding in some cooked oats? I’ve added all kinds of ingredients (walnuts, olives, sesame seeds, stout beer, etc.) and had smashing results so this shouldn’t be any different… Well, it turns out those cooked oats come with a lot of surprises. First and foremost, cooked oats do hold on to a lot of water, so you have to take that into account when hydrating your dough.
Additionally, the simple act of cooking oats pushes them into releasing much of their starches which in turn makes them very, very sticky (ever noticed if you leave your morning oatmeal in the bowl the oats stick to the bowl like glue?). Not only these two things but since they are sticky and hold together tightly after they are cooked, they can be quite difficult to properly mix through your fermenting dough without destroying the gluten network built up during bulk fermentation. Don’t worry though; we’ll work through each of these issues in turn.
Aside from all the doom and gloom, this is one incredibly moist, tender, light and tasty loaf. Once you get the hang of dealing with the porridge and the effect it has on your dough, you’ll be hooked on the results. This bread is one that’ll cause people to line up outside your door in the rain, hoping to get a loaf.
I’ve received a few comments and emails asking for me to show you a few of my “failed attempts” and the process from beginning to end, not just the final results. For this oat porridge bread, I chronicled each attempt, the results, and any notes and lessons learned. The method and ingredients directly below represent my best effort thus far, and the entries afterward show those that didn’t quite hit the mark. If you’re interested, read on as they might provide some added insight for those struggling with this tricky recipe.
Prepare the levain – 6:30 a.m.
The levain used for this bread is the same young levain I described in my last post. Start this in the morning when you wake, and it’ll be ready in around 5-6 hours.
| Weight | Ingredient |
|---|---|
| 18g | Ripe starter |
| 35g | Whole wheat flour (King Arthur whole wheat flour) |
| 35g | White bread flour, ~13% protein (Sangre de Cristo, a local high protein flour) |
| 70g | Water |
I try to keep the levain somewhere warm in the kitchen, at around 78°F (25°C). One handy little trick rick I’ll use if my house is still a tad on the cool side, especially in the early morning, is to put the levain in the oven and turn the interior light on until it warms up slightly (not the actual oven!). This setup provides a fairly sealed environment where the levain can do its thing for about 5 hours. If you’d like even more control, a home dough proofer is a way to go.
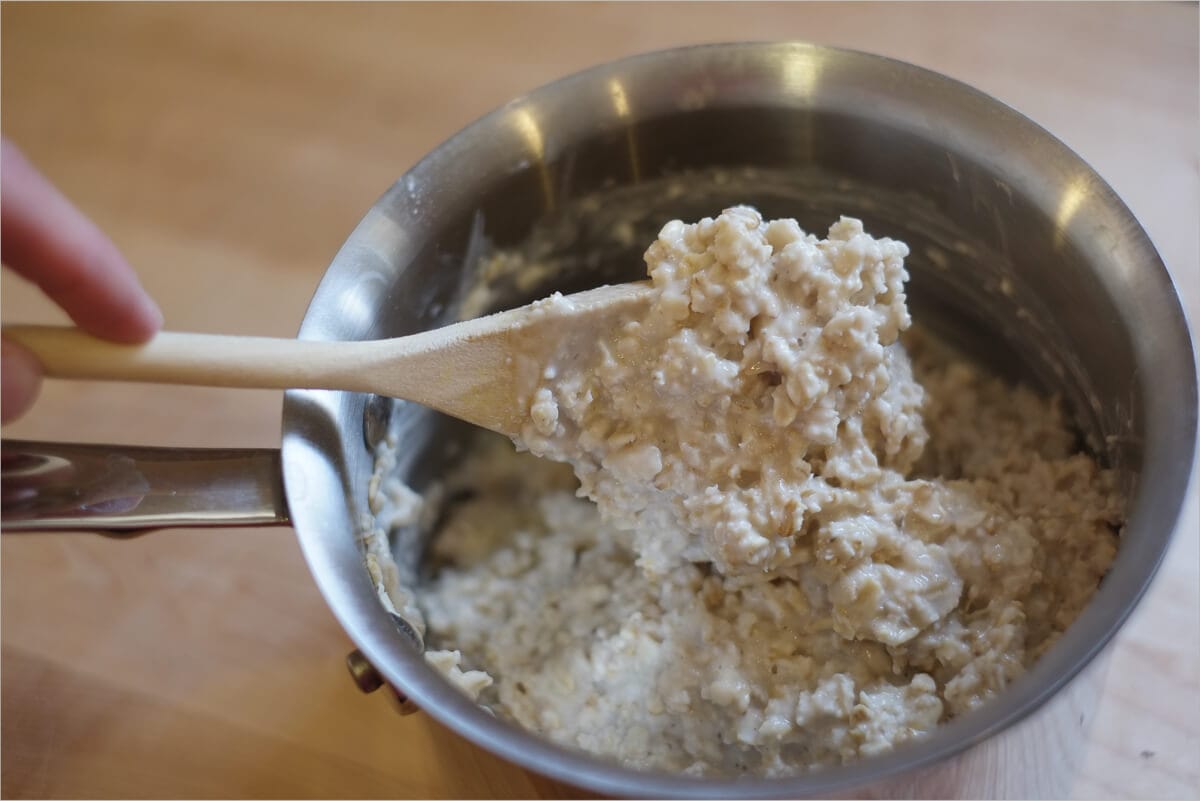
When your levain build is ready for use after its ~ 5-hour rest, first cook your oat porridge.
Oat porridge – 11:30 a.m.:
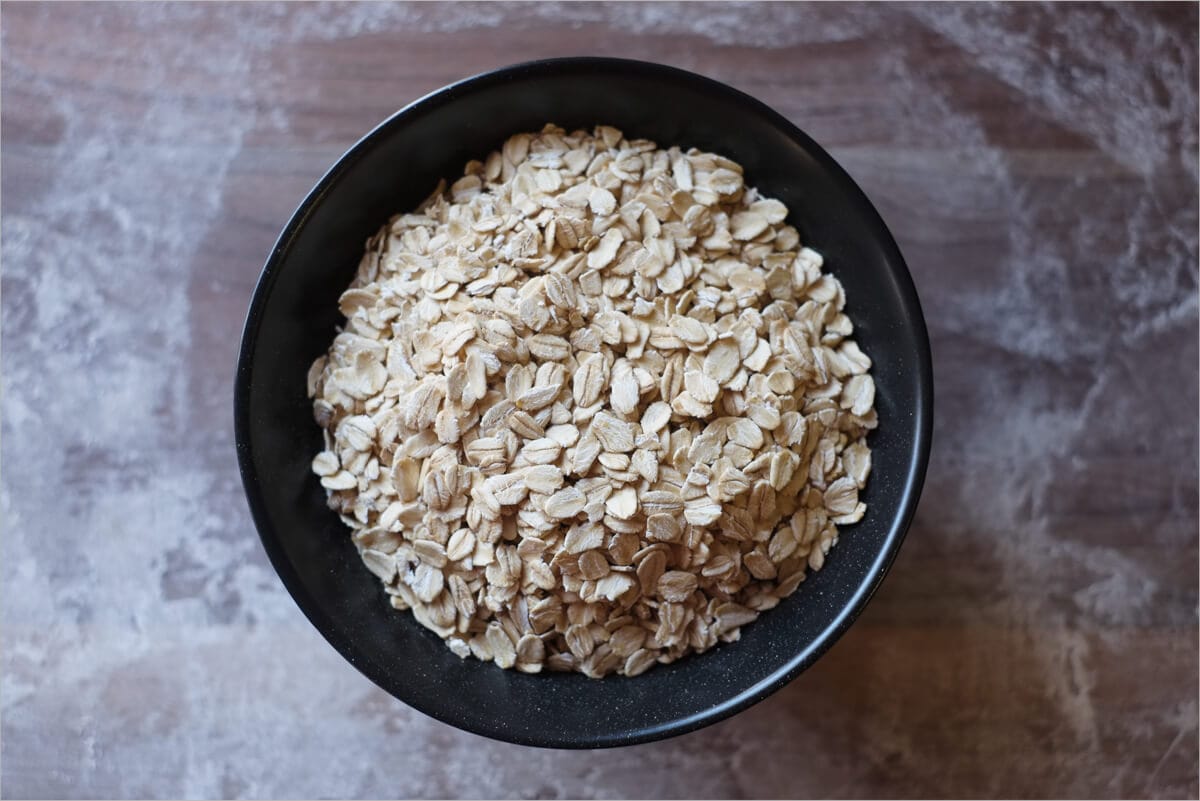
I cooked the following in a covered saucepan over the lower end of medium-low heat for about 16 minutes. You want the porridge to be creamy and ever so slightly on the liquid side. Don’t cook for too long or at too high a high a heat or the porridge will dry out and become very stiff. I’ve found that cooking this porridge requires a bit of trial and error; each person has a different idea of what “porridge” means and typically for me, it’s more on the dry side. When I made the porridge for this bread at a lower heat and only for 16 minutes, it was creamy with a whitish color that was easy to later fold and incorporate into the dough.
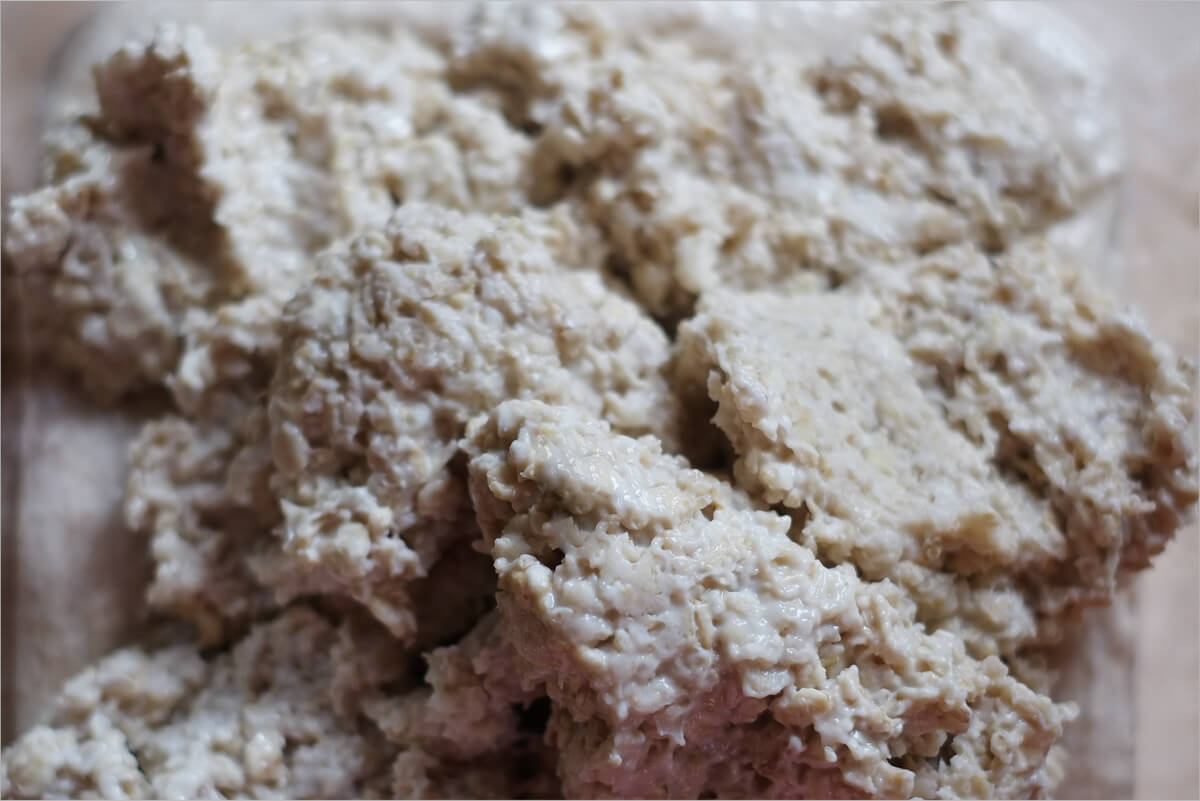
After this cooking time, I scooped out the porridge onto a baking sheet and covered with aluminum foil to cool but not dry out.
| Weight | Ingredient |
|---|---|
| 500g | Water |
| 250g | Bob’s Red Mill old fashioned regular rolled oats |
| A Pinch | Fine sea salt |
You’ll want to cook this far enough in advance to ensure it cools sufficiently before mixing into your dough right before the first set of stretch and folds during bulk fermentation. You don’t want to mix warm/hot oats into your dough; fermentation will pick up at a rapid pace I have nightmares about dough like this. I cook the porridge right before I start the 1 hour autolyse to give it much needed cooling time.
Now that the porridge is cooked and cooling let’s start our 1 hour autolyse.
Pseudo-autolyse & Mix – 11:30 a.m.
For this bread, I’ve found the best results with a 1 hour autolyse, which increases the extensibility of the dough. This leads to a more relaxed dough to help incorporate the oat porridge later in bulk fermentation.
I label this a “pseudo-autolyse” because it does include my preferment (levain), which isn’t typically added to an autolyse. For this mix, it makes sense for me to add my levain to the autolyse because the dough is rather stiff due to the lower hydration. Adding the levain, and all of its water, is necessary so I can effectively mix the dough.
Gather the following:
| Weight | Ingredient | Baker’s Percentage |
|---|---|---|
| 700g | White bread flour, ~13% protein (Sangre de Cristo, a local high protein flour) | 70% |
| 300g | Whole wheat flour (King Arthur Flour Whole Wheat flour) | 30% |
| 750g | Water | 75% |
| 150g | Ripe levain | 15% |
Then:
- In a thick bowl add in your 150g levain
- Add 700g of your total water to your mixing bowl and mix with your hand until the levain is wholly dissolved
- Add in your white and whole wheat flours
- Mix by hand until all the dry ingredients are incorporated
- Cover with wrap and keep covered in a warmish place in your kitchen at around 78°F (25°C) for 1 hour
After your one hour pseudo-autolyse, add to your mass:
- 25g sea salt
- 25g of the remaining water
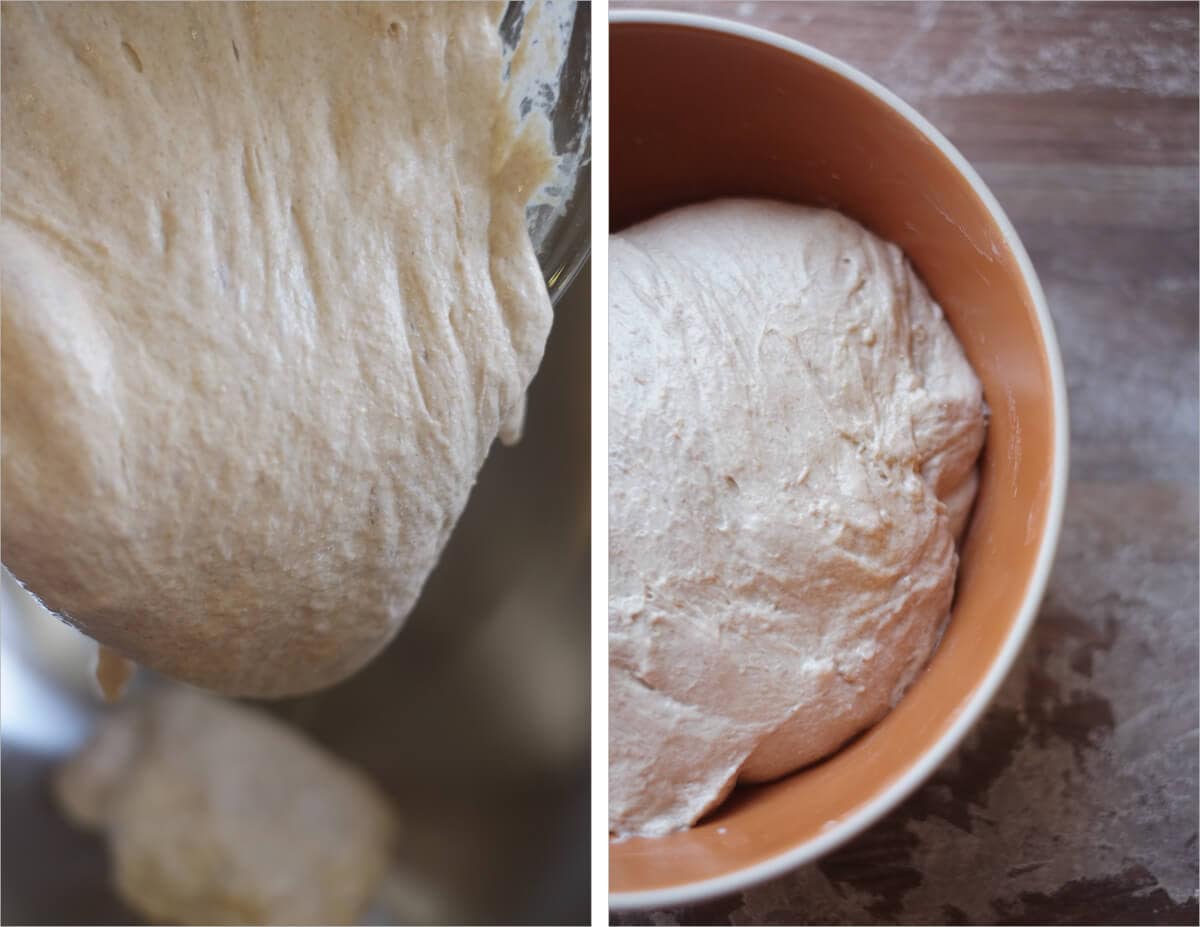
Cut the salt through your dough with your hand and mix everything until it comes back together and becomes sticky.
At this point, as I was mixing in the 25g salt and 25g water, I started to feel a little anxious… I wanted to add more water; things just felt strangely stiff. You must fight the urge to add more water here, trust me. Once you add in your cooked oat porridge later in the process, the oats will release quite a bit of water into your dough, dramatically increasing hydration. Early attempts at this bread had me sweating as I was trying to shape hydrations that were undoubtedly more than 100%.
| Final dough temperature: | 79°F (25°C) |
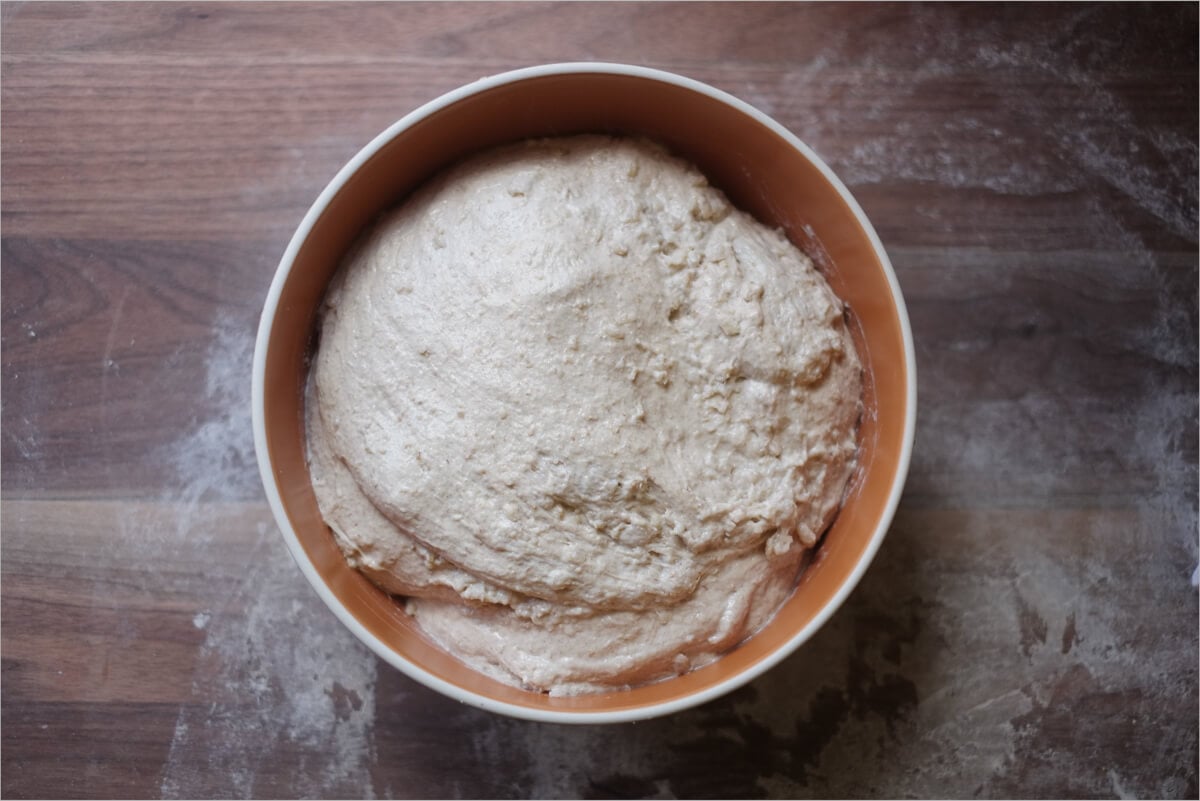
Bulk Fermentation – 12:30 p.m. to 6:00 p.m.
Transfer your dough to a clear container to be used during bulk fermentation and let rest for the first 30 minutes.
After the first 30 minutes and right before your first set of stretches and folds, add in the oat porridge a little bit at a time folding well after each addition (as I show in my guide to stretches and folds). Use splashes of your remaining 25g of water a little at a time as your folding the porridge into your dough. You’ll have to make the judgment call here whether you’ll need the entire 25g based on how your dough feels. I ended up using it all, but it has been quite dry lately here in New Mexico.
Now that the porridge is incorporated perform the first turn set, and each subsequent, in 30-minute intervals. When performing each set, pinch any large clumps of oats with your fingers to break them up; we want a fairly uniform distribution of porridge throughout the dough and very, very few pockets of porridge hiding in your final loaves.
- 1:00 p.m. – Turn Set 1
- 1:30 p.m. – Turn Set 2
- 2:00 p.m. – Turn Set 3
- 2:30 p.m. – Turn Set 4
- 3:00 p.m. – Turn Set 5
- 3:30 p.m. – Turn Set 6
- 4:00 p.m. – 6:00 p.m. – Rest on counter untouched
The dough was so wet I felt like I could have just kept strengthening it until the sun set. You’ll need to judge when the dough has reached sufficient strength to stop the stretch and folds. Six sets did the trick for me.
Pre-shape – 6:00 p.m.
Take the dough out of the container onto your work surface and sprinkle some flour on top before dividing. Divide into two halves and lightly scoot the dough in little circles across your work surface with your bench knife in one hand and your other empty hand. Let this pre-shape rest, covered with a damp towel or inverted bowls, for 20 minutes.
You want to do the pre-shape rather tight, a little tighter than you’d typically do for my standard country sourdough. The tight pre-shape will help strengthen the dough just a little bit more before your final shaping.
Lightly dust your proofing bowls/baskets with white or brown rice flour in preparation for the next step.
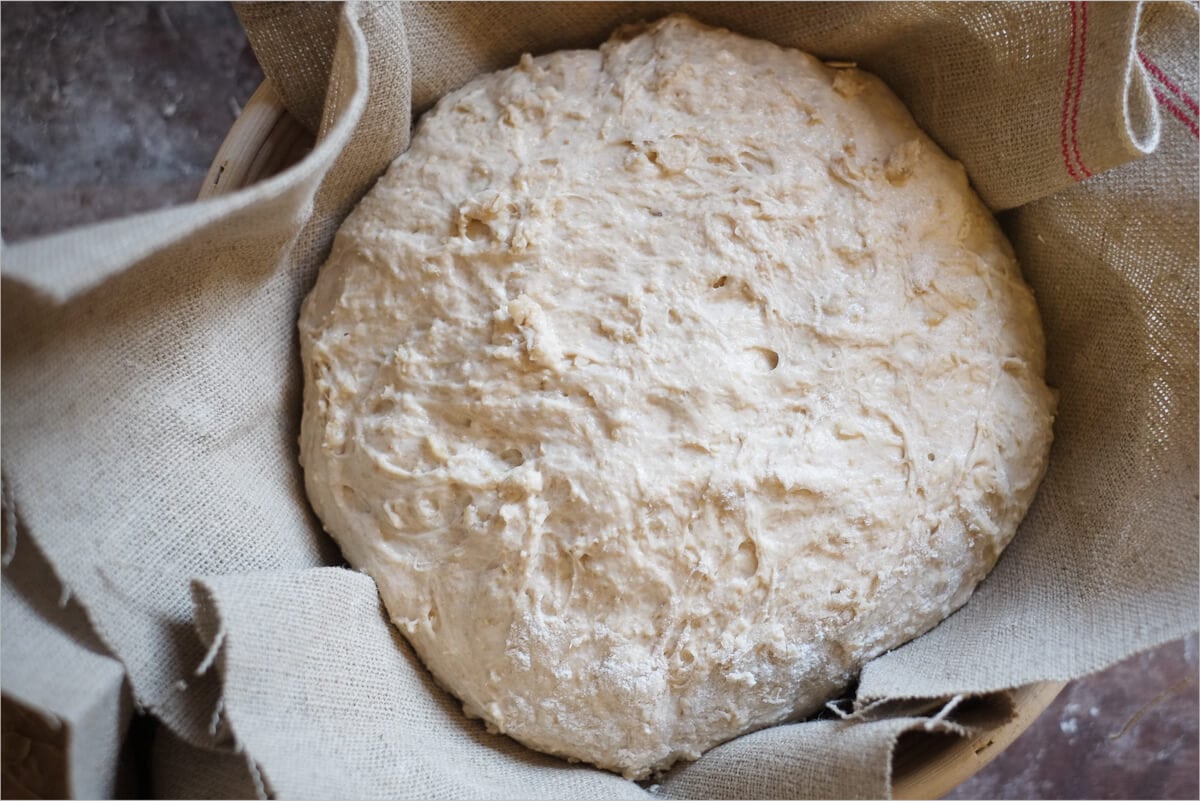
Shape + Proof – 6:30 p.m.
Take a clean kitchen towel and lay it on the counter. Spread flat some of the uncooked rolled oats onto the towel in a circle about the size of your desired finished boules. After shaping, you’ll quickly plop the shaped boule on top of these oats to coat the surface before placing into your proofing baskets, creating a nice dotted surface with a touch of crunch after baking.
Make sure you shape these boules tight to give them added structure during their overnight proof in the fridge.
For this wet porridge dough, I find shaping into tight boules produces a much better result than using Tartine’s “structural shaping” technique for a batard shape. Shaping here is your typical procedure, folding the dough up like a package and then twisting on the work surface to create tension. For a detailed explanation see this post’s section on shaping.
After each boule is shaped tight and resting on the counter, scrape up the first boule and gently invert and drop onto the resting rolled oats. Pick up the boule with both hands and gently lower into the proofing basket, seam side up. Spread out some more rolled oats for the next boule and repeat.
I found that this bread requires a little more proof time to get that fermentation active. After doing the final shape, I left these loaves out on the kitchen counter (ambient temp was around 74°F/23°C) for an hour.
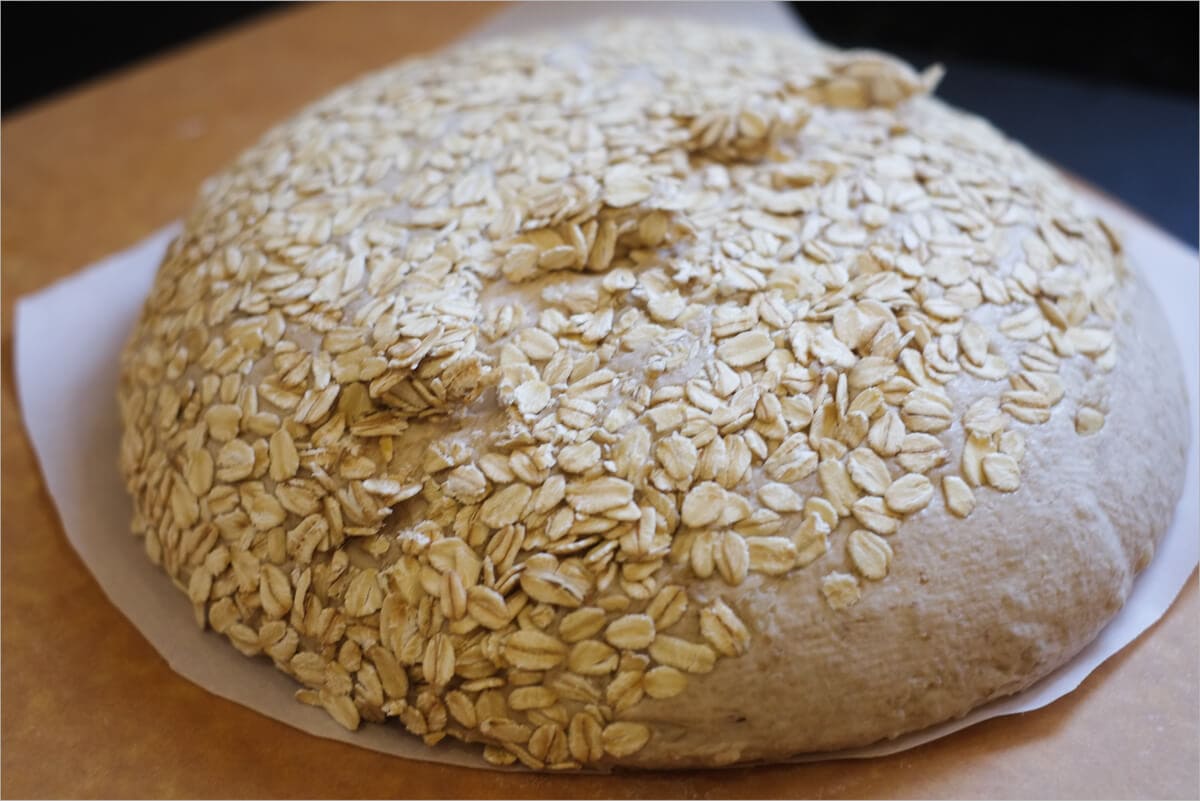
Score + Bake – 9:00 a.m. (next day)
In the morning, preheat your oven with Dutch oven inside to 450°F (230°C). I usually leave the shallow side facing up on the left, and the deeper side on the right facing down. This way when it’s time to load the bread I can quickly grab the shallow side, slide in the dough, and then place back on the stone and place the deep side on top to cover.
See my guide to baking with a Dutch oven for more pictures and instruction.
After one hour, take one of your baskets out of the fridge and cut a piece of parchment paper to place on top. Take your peel and then put it on top of those two and quickly invert it, so the dough is now resting on the parchment paper and the peel.
For these oat porridge loaves, I have taken quite a liking to Tartine’s “zipper” like scoring. Grab your kitchen shears and do 3-4 snips across the top of the dough so that the shears are almost entirely parallel to the surface. This score opens up so beautifully and creates a very rustic feel to these loaves, which contrasts elegantly with the dotted rolled oat surface.
Wait at least 1-2 hours before cutting into the finished loaves to let the interior fully set.
Take out the shallow side of your Dutch oven and drag in your boule. Quickly place the pan back in the oven, cover with the deep side, and bake for 20 minutes. After this time, open the oven and take off the deep lid of the Dutch oven (set it next to the other half inside the oven, which will help regulate oven temperature for the rest of the bake), then bake for an additional 35 minutes or so, until the bread is to your desired doneness.
This oat porridge sourdough requires a little longer bake time to get that nice dark outer crust. Additionally, the interior, extremely hydrated by the porridge, takes several additional minutes to bake thoroughly. For this dough you’ll want to experiment with bake times and temperatures, potentially decreasing the heat towards the end of the bake to extend the bake time without scorching the crust. I ended up baking for a total of 35 minutes for the last uncovered portion.
Once your bake is finished, be sure to wait to slice it, and store it properly to keep it fresh for up to a week.
Conclusion
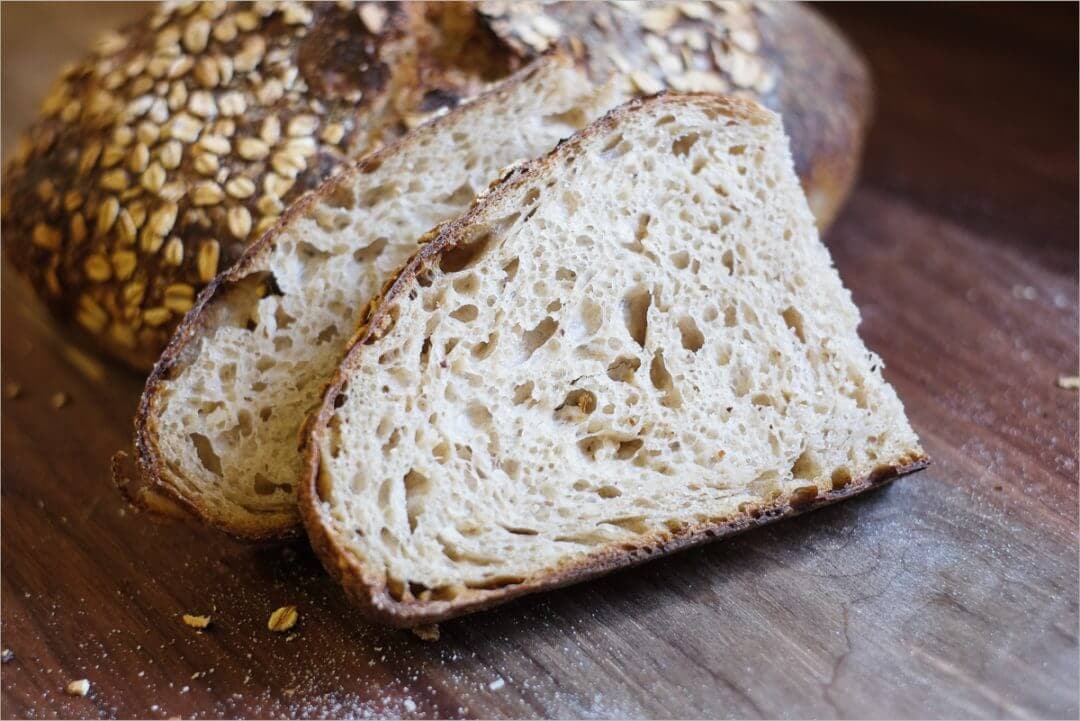
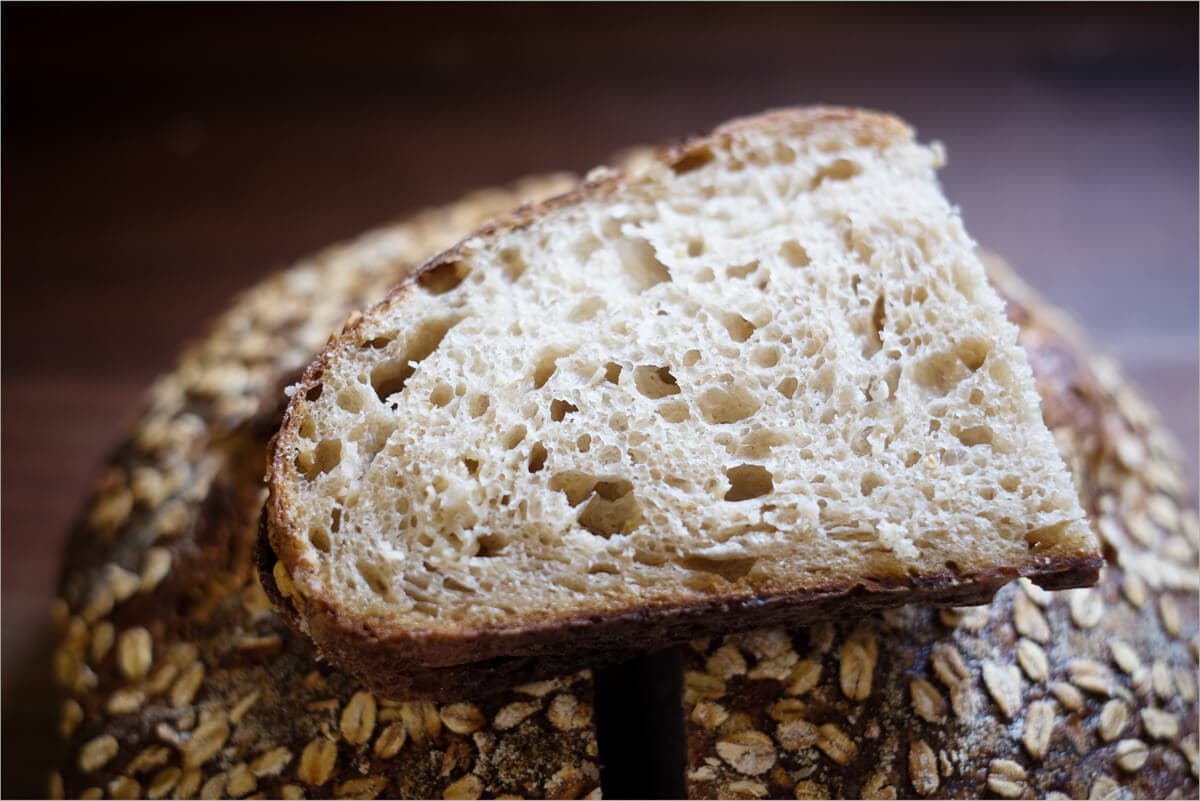
This first venture into porridge bread was a challenge for me; adding in another type of grain that has been cooked with additional hydration threw a wrench into my process and had me experimenting until things came out how I was hoping. The results, though, are pretty darn great. This bread has a very, very moist crumb with a fragile crust that stays good for many days after baking. I made toast almost a week after and the bread still tasted fresh to me.
Crust
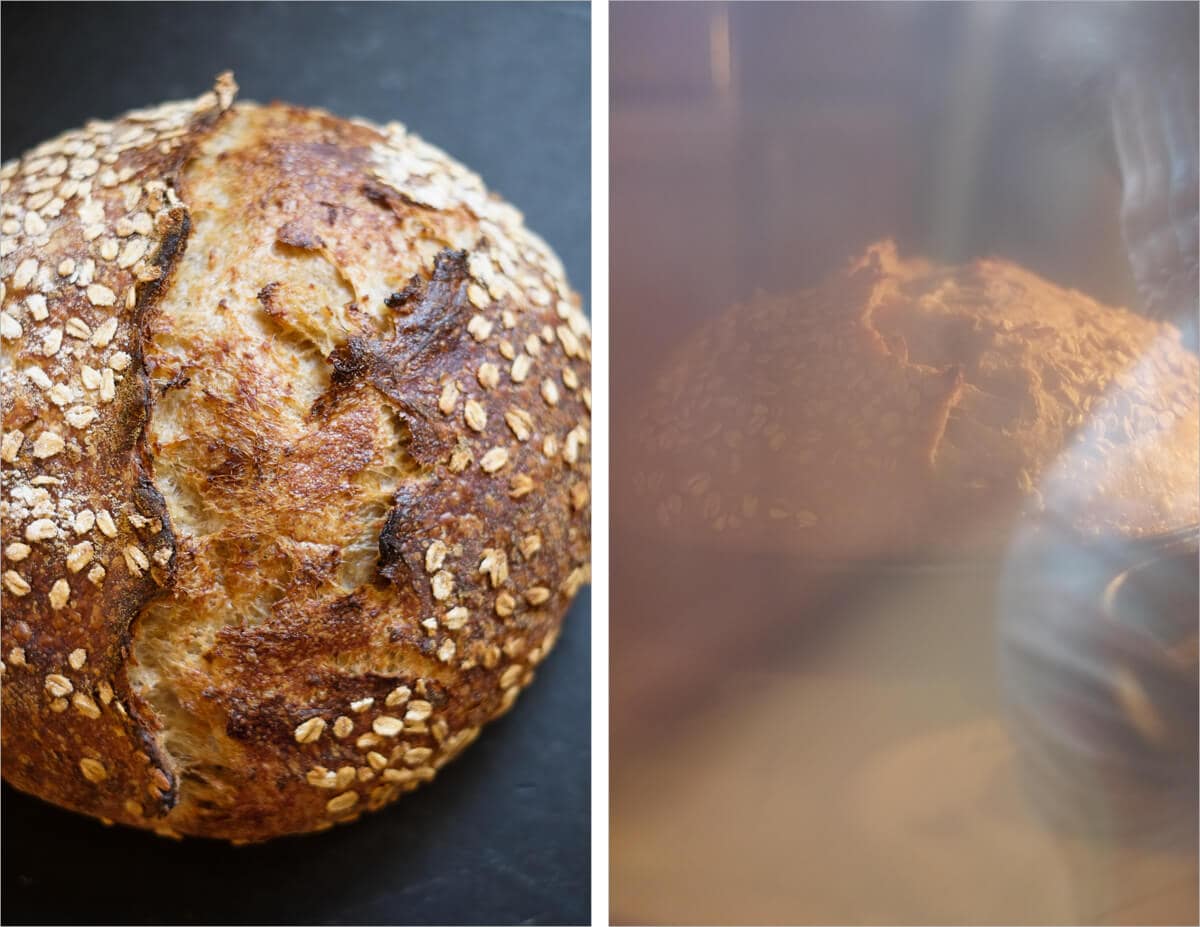
Marvelously thin and unexpectedly soft, this crust was colored so well and had such a unique taste. It’s something different than the other bread I’ve made, hard to put into words, but if I had to sum it up, I’d say soft like silk. The super high hydration must leave its mark and the mark is very welcomed.
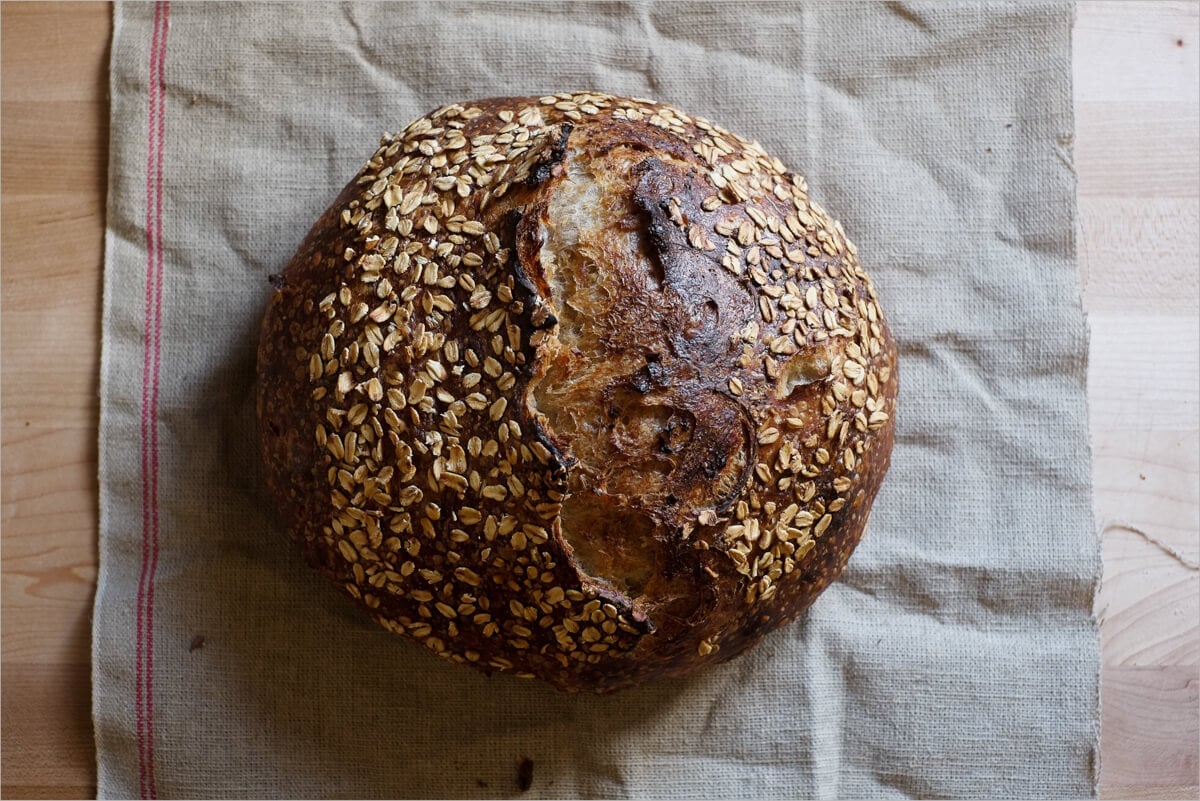
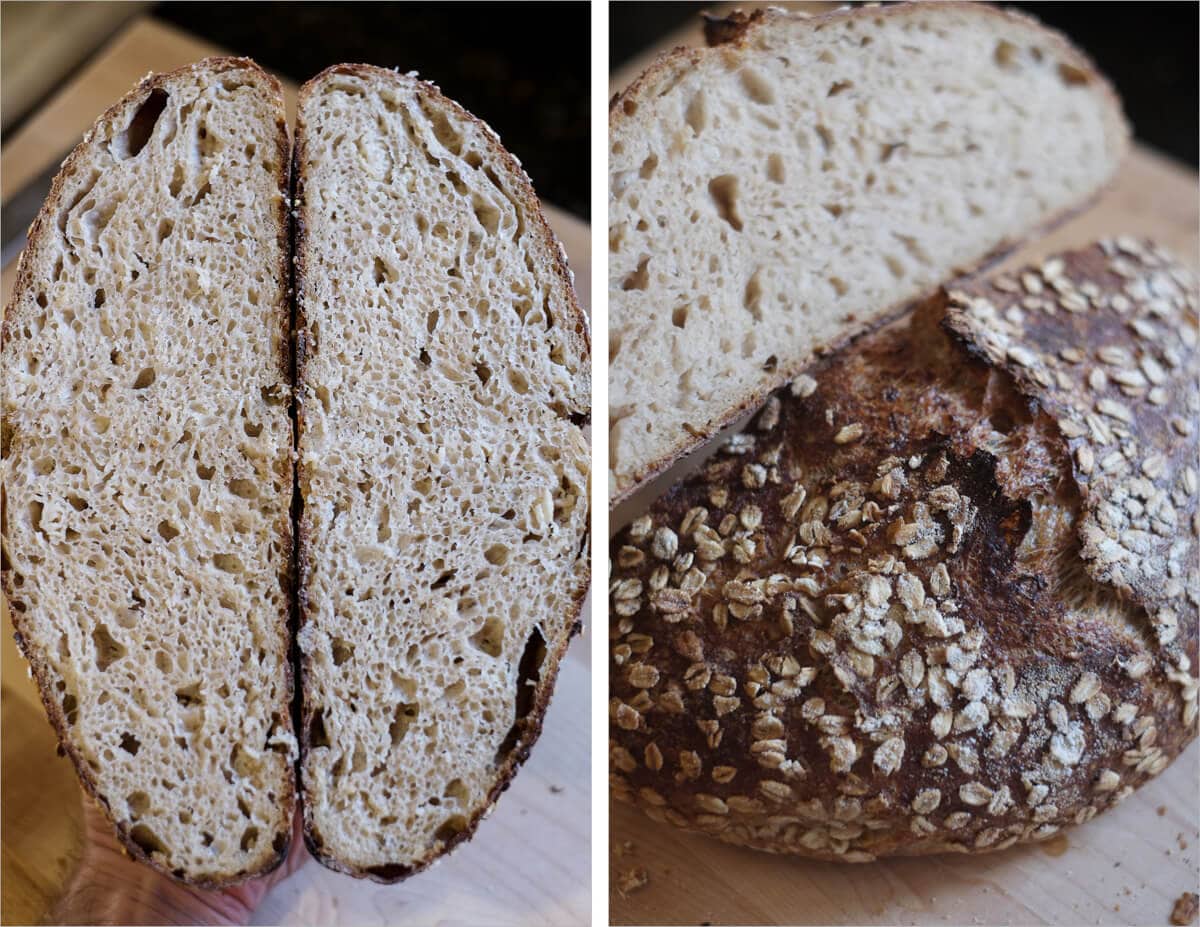
Just look at those colors. I heard myself saying “oooooh” in my head as I first saw that picture from my camera roll. I love the sheen and the shine, the striations of color, the dark spots and the light spots. The crunchy baked oats on top impart a nice crispness to the outside when you bite into the bread, I wouldn’t bake this bread without them.
Crumb
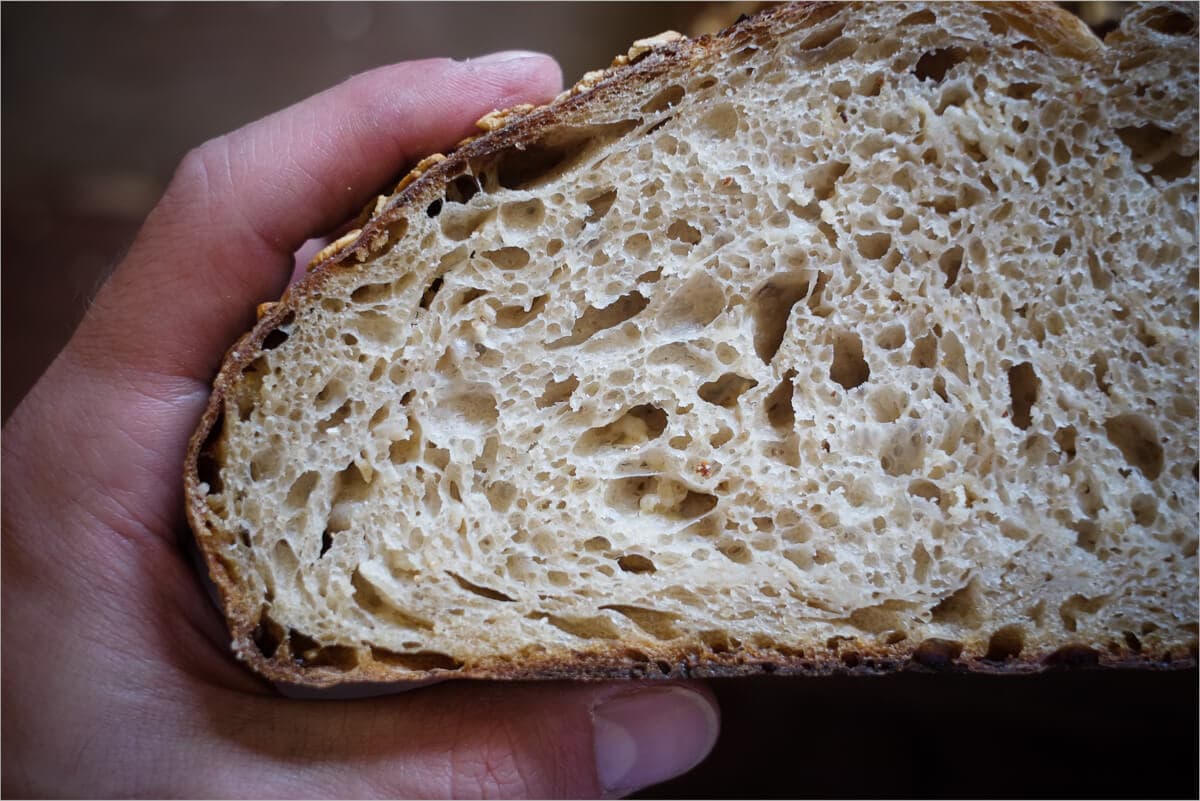
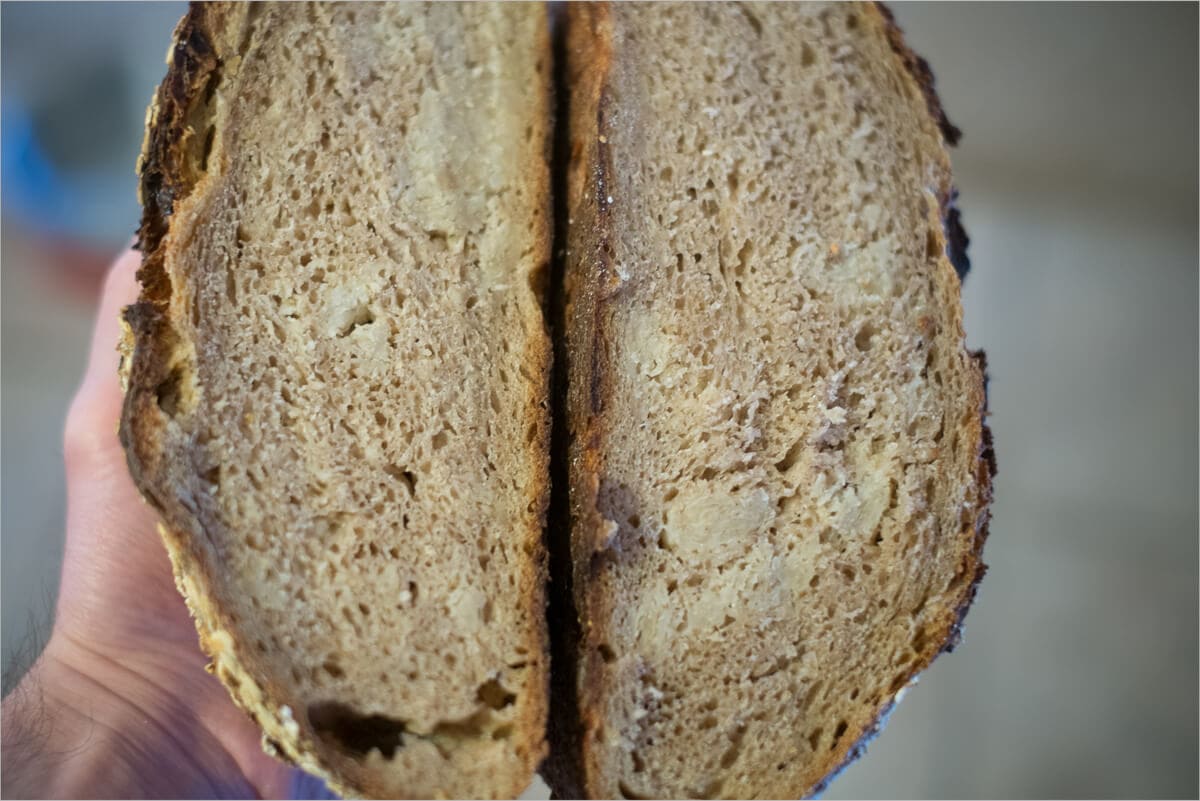
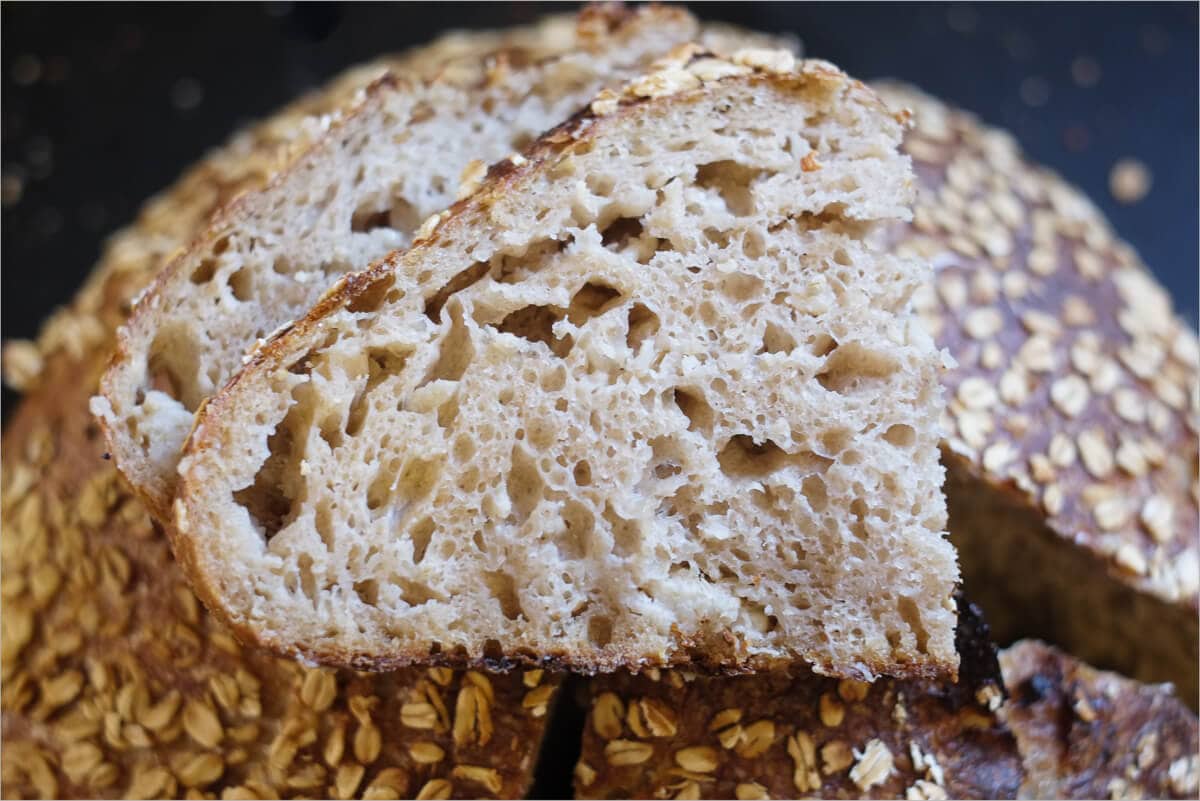
The crumb is just straight tender. Nothing I’ve had can compare to this light, stretchy and custard-like interior. My latest attempt produced an excellent and open result.

You can see in this shot the crumb was quite light and airy, I love this aspect of this bread. With my mixing and stretch and folding, I finally was able to sufficiently incorporate the oat porridge throughout the loaf.
Taste
Not much more to say here than already stated: it’s remarkable. This cooked oat porridge does not impart a particularly heavy “oat” taste to the bread, but rather, adds moistness and tenderness that hints at a light nutty flavor. For days after the bread remained moist inside, and when toasted, became crisp and continued to have that fresh-baked-bread taste.
I highly recommend trying this bread! If you have any issues or questions, drop me a post below, and I shall do my best to get you on track. For the curious, read on for some of my “missed” attempts including some notes, pictures, and my hypotheses on why things didn’t quite pan out.
Previous Oat Porridge Attempts
Attempt #1 – The Strong Dough
The following bake was my very first attempt at this recipe and my first endeavor into the world of porridge bread. As you can see in the following pictures, the results were less than stellar. I did not sufficiently mix the porridge through the dough, the crust was on the pale side, and hardly any oven spring. Also, there was almost no openness to the crumb — a rather dense product.
Yikes, that’s ugly! I followed the Tartine No. 3 Oat Porridge Bread recipe nearly precisely, except for two deviations: I only had Bob’s Red Mill Thick Rolled Oats on hand (this is what I typically eat for breakfast) instead of traditional rolled oats which are much thinner, and I upped the levain amount by 25g (to a total of 175g).
Using thick oats and cooking them uncovered at medium heat most definitely overcooked them and dried them out to the point where they became stiff & hard to integrate into the dough. These rigid pockets of oats were scattered throughout the final loaf and were both unsightly and not very pleasant.
For this attempt, I also only performed a 40 minute autolyse and the resulting dough was not extensible enough, adding to the difficult task of mixing in the dry and stiff porridge.
Key Lessons Learned from Attempt #1
- Don’t use thick rolled oats, instead opt for traditional rolled oats
- Dough needs at least a 1 hour autolyse to increase extensibility
- Mix in the porridge until it’s thoroughly incorporated
- Cook porridge covered to prevent it from drying out
Attempt #2 – The Hydrated Surprise
For my second go at this recipe, I vowed to rectify the stiff porridge by using regular rolled oats and upping the amount of water used during cooking. Instead of 500g for the porridge, I ended up using 800g, added in 100g increments after the 500g at the start. This was cooked again at medium heat in an uncovered saucepan.
In addition to adding more water to the porridge, I also increased the autolyse time to a full 1 hour. This length of time did help to increase extensibility in the dough to make oat incorporation easier.
When it came to adding in the porridge everything was looking good: the dough was rather tight, and strength was there, but there was some excellent extensibility thanks to the increased autolyse. A few turn sets into the bulk fermentation, and that’s when I noticed things were starting to go south on me… The dough became extraordinarily slack and was failing to hold any shape after stretching and folding. It was quickly turning into a nightmare scenario where hydration levels are pushed too far for the flour to handle. Cooked oats can absorb a significantly large amount of water, about 84% by weight, and that water is coaxed out of the grain later as bulk fermentation progresses. I ended up cobbling together some decently shaped boules, but at hydration that must have exceeded 100%, I was seriously having trouble.
The result was again abysmal. The crust was pale, displaying almost no caramelization during the bake and little dynamic oven spring.
The crumb was marginally open, but it was far too wet. After cutting into the bread, it had a shine to it that almost looked damp to me. The actual taste of it was not that bad, but it needed a good solid run through the toaster to firm things up, perhaps the loaf required a little bit more baking time.
Key Lessons Learned from Attempt #2
- Do not add excess water to the porridge. Shoot for the 500g outlined in the successful recipe above
- Cook the oats on medium-low heat to prevent burning and rapid cooking
- The oat porridge was incorporated more thoroughly but not quite enough; we’ll need to do more pinching and folding
- Because of the extremely high hydration here, there was not enough strength in the dough, causing poor oven spring
- 1 hour autolyse time right on the money
Attempt #3 – Oh The Beautiful Crust
My hopes and energies were high at the start of my third attempt. I felt like I had successfully flanked the two sides of this bread: one side was under hydrated with a stiff porridge, and the other side was way over hydrated with an almost soupy mess of porridge and flours. At this point, I surely could find the middle point and create something magnificent.
I reduced the amount of water in the porridge down to 500g but cooked it on medium-low heat, covered, for 18 minutes. The result was a more creamy porridge which was much easier to fold into the dough and thoroughly incorporate. There was still some work to do here though; I needed to continue to pinch any oat pockets found during subsequent stretch and folds to break them up and do a more intensive job of incorporating.
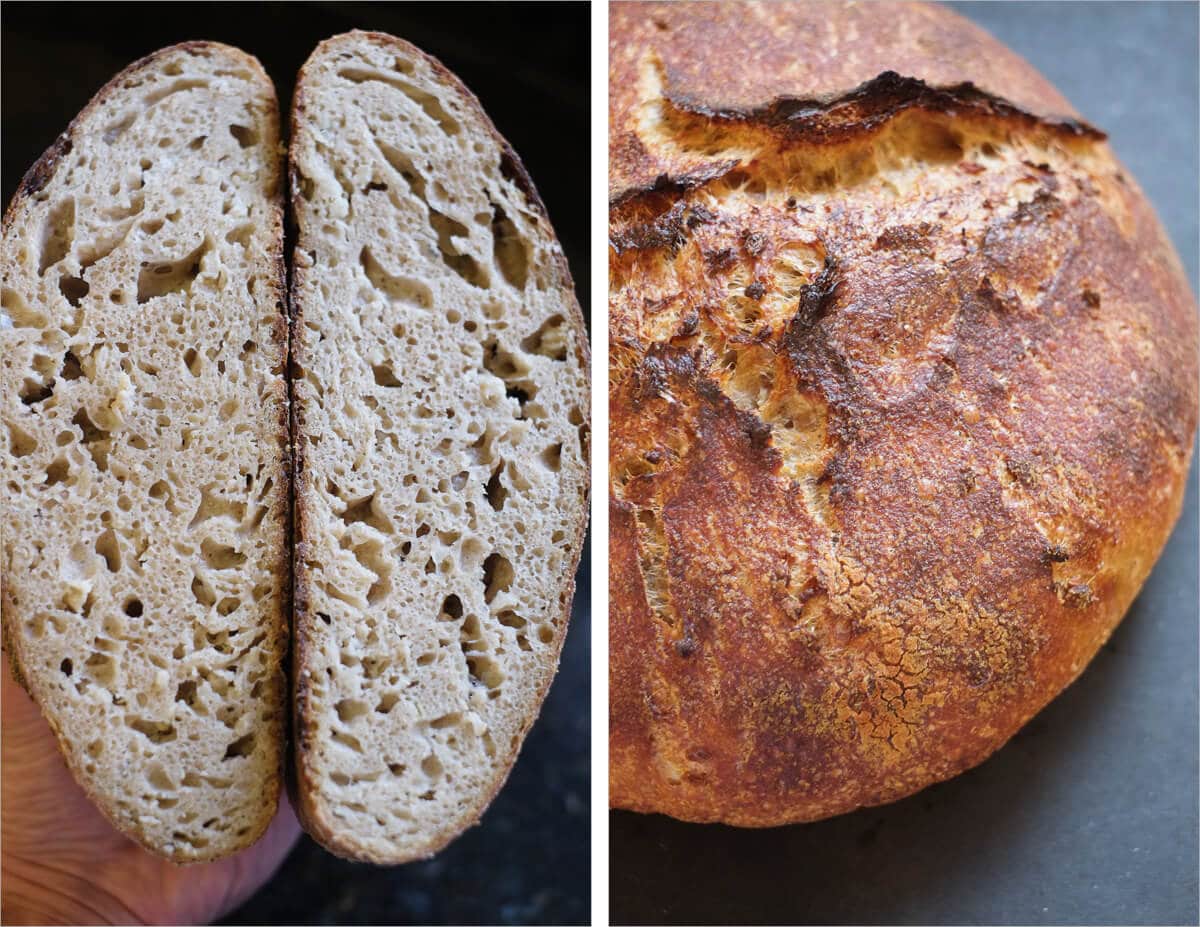
As I lifted the top part of the Dutch oven off, I noticed the oven spring for this attempt was respectable, but it did not hit my self-imposed goal. Crumb, well, there was some excellent openness to it, but it was still far too tight more deep holes and pockets, please.
I was happily surprised at the beautiful color and caramelization of the crust when baking these loaves. Beautiful dark colors at the edges and light centers where the scissors had left their marks. Gorgeous.
All-in-all it was a solid attempt with some excellent improvements on the outward appearance. With notes scribbled down in my notebook, I was determined to adjust a few parameters and give this another shot.
Key Lessons Learned from Attempt #3
- Cover the oat porridge while cooking to prevent burning and water evaporation
- Wait as long as possible before cutting into the baked loaves, at least 1 (seriously!) hour and preferably overnight
- Oats were incorporated much more uniformly, but still had some room for improvement here
Attempt #4 – Just Roll With It
I was eager, excited, and confident at the start. Keen to cook the oats to the correct creamy consistency, excited to get the hydration level spot on, and confident the result was going to be what I had been searching for the previous attempts. So. Close. Oh so close. My results had much promise, but there still were a few tweaks needed.
I found that the key is to cook the oats at the lower end of medium-low for a full 16 minutes, and covered. 500g is the correct amount of water for 250g of oats, and you want to add the pinch of salt at the beginning of the cook, right when you put the water and oats together.
The crumb for this attempt was really splendid! I think things could have opened up a bit more with larger pockets given additional proof time. Since I reduce the levain to a meager 150g I should have realized the proof time should have been extended until I noticed things were moving along far enough.
The crust on this loaf came out gorgeous, yet again. Perfect caramelization, dynamic movement from the excellent oven spring and the scissor snips again showed a great zig-zag all the way down with dark colors on one side and light on the other.
Key Lessons Learned from Attempt #4
- Cook oats covered on the low end of medium-low for 16 minutes, you want a creamy consistency
- Add porridge before the first turn of bulk, incorporate well
- The dough will become pretty slack, do vigorous turns
- The 50g you hold back should be used cautiously. If your dough starts to feel slack, don’t add it all in.
- Pre-shape tight and shape tight
- Ensure fully proofed
Fin
And so that’s all we have, folks. Many attempts led up to what I believe was the best loaf yet. I know there will be more and more improvements as I continue to bake this bread, and don’t worry, those will be chronicled and entered into a future post if the loaf improves sufficiently.
Even though some of these bakes were not encouraging, especially at the outset, this craft is one that takes patience and persistence. Sometimes I almost forget this axiom but then I’m reminded I always have something exceptional to eat, and my troubled thoughts vanish as I take the first bite. I think it was best said by Hamelman:
Experiment, play, realize that failure isn’t really a failure, it’s an edible part of your evolution as a baker.
Jeffrey Hamelman
Buon appetito!
If you use this recipe, tag @maurizio on Instagram so I can take a look!


239 Comments
Hey Maurizio, hoping you still occasionally scan these comments because I’m just about to try the oat porridge bread, having just about finally mastered to create an acceptable country sourdough!
I have 2 questions for you:
– why not incorporate the oats during first mix prior to autolyse or even just after autolyse but before moving to the stretch and folds? Would the oats not be better incorporated this way?
– would adding some lovely extensible spelt aid development of the dough? (thinking 20% wholemeal spelt)
Thanks!
I do monitor all the comments here and still reply! Especially since this is one of my favorite recipes here at my website 🙂
You can definitely add in the oats earlier in the process if you’d like. I would not add them before actual mixing (as in after the levain and salt are added) because it will make mixing more difficult and I’m not sure what effect the oats would have on the dough (would it breakdown over time?). I find sometimes it is easier, especially after I’ve made this recipe so many times now, to add the porridge right at the end of mixing before bulk has begun.
You could certainly add spelt here! Just keep in mind spelt does not absorb water as well as modern wheat, be very weary about adding the called for water here to avoid a possibly extremely wet dough later. I’d probably cut back 5-10% from what I have here and work up if possible.
Hope this helps — happy baking!
Thanks for your insights, just wanted to report back on my findings:
For my first bake, I followed your method and got some pretty decent results although I did feel the porridge was not evenly distributed throughout the bread. No major issue though as the taste was still amazing. I also added extra water to the porridge because they very quickly turned into ‘stodge’ while cooking (even at low temp, covered etc). Because of this I dropped hydration to around 70%
For my second bake (and on a few subsequent bakes since then!), I used 400gr strong white flour, 100gr whole spelt and 125gr oats (cooked in 300gr water). I used my Kenwood chef for mixing, gradually incorporating the oats 1/2 tbsp at a time with the mixer working on the slowest setting. Then autolysed for an hour, stretch & folds etc. Dropped hydration to 65% in light of your comments regarding spelt and the additional water in the oats; for a relative novice, this dough was still pretty wet and sticky but I eventually managed to pre-shape & shape OK. The resulting loaf was spectacular, really light but with a profound depth of flavour. Thanks again for your advice!
Thank you so much for reporting back and I’m really glad that baked turned out so well for ya! I can imagine the spelt added some extra flavor as well, great idea. I’ve tried mixing in the porridge in several places along this process now and using a mixer would definitely help.
Thanks again and super happy to hear all that!
Hi Maurizio!
I’ve made bread with oats incorporated before, but used to soak them overnight and drain to use in the dough without cooking them and it still has a good taste and probably be easier to mix than cooked porridge. in your opinion what benefit comes from cooking the oats before mixing? i understand cooking things like the millet and polenta as it will be too hard and gritty otherwise, but from my experience the oats pretty much completely disappears in the texture when cooked.
also have you tried any of the sprouted grains recipes in tartine 3?
There are a few different methods for incorporating oats and I think they all work equally well as long as the oats are tender enough so you’re not chewing on raw oats. Another method instead of actively cooking the oats is to just pour boiling water over them in the morning before you use them in the mix to slightly cook and soften. So yeah, that will totally work if your oats are thin enough and soften/cook so you don’t chew on raw oats.
I haven’t gotten to try any sprouted sourdough, yet. It’s in the plans! Hope this helps 🙂
cool! ok hope you write it up on here if you do a sprouted one! ?
You can count on it!
Hello! I just found your blog and love it.
Anyway, have you ever heard of Red River cereal? It’s a hot cereal made from cracked wheat, cracked rye and whole flax, and it’s divine. You can get it in the grocery stores all over Canada, but I’ve never seen it in stores here in the US, but you can find it online at Amazon.
https://www.amazon.com/Red-River-Cereal-1-35kg/dp/B00BPXR5PY.
I tried to make bread using some cooked Red River and my loaves looked similar to your first few tries.
I am going to follow your method above and see what happens. I never thought to add the cereal AFTER I made the dough/autolyse, I treated it like a soaker and mixed it right in.
When I bake bread, I have to bake a smaller loaf or roles for my family to devour immediately and I post a note on a jar near the cooling bread that will be used for the meal with promises of dire consequences if they break into the loaf. 🙂
Glad you’re enjoying my website! I’ve never had Red River but it looks really tasty. I know there are lots of recipes out there using cracked grains so I’m sure this could be incorporated successfully, might just take a few tries — looks like you’re on top of it! I’ll have to add a box of this to my cart and try it out in the future, I’ve been meaning to experiment with fresh cracked grains in my flour mill.
I know what you mean, sometimes I have to hide the bread somewhere to cool otherwise people will slice prematurely 🙂
Happy baking and thanks for the message!
I couldn’t find a sourdough recipe for Oatmeal Bread that sounded like success, and so I took the plunge and translated a favourite yeast bread recipe for Oatmeal Molasses Bread into one for sourdough. I don’t know how I missed yours in my online search! Anyway I had just finished mixing up my dough when I found this post. So it was too late to follow your recipe this time, but I did pick it up at your instructions, since I respect and appreciate all you have learned through your experimenting!
I followed your stretch and folds schedule and proofing times, and baked it as you advised as well. My bread turned out beautifully, and I am quite sure your instructions and caveats about oatmeal bread had a lot to do with it. 🙂 So thank you for posting, very helpful indeed – you probably saved me from a wet and heavy disaster. 🙂
For my loaf, as per the instructions in the recipe as a commercial yeast bread, instead of cooking the oats into a porridge, I soaked them in boiling water for about 6 hours. I used large flake oats, steel cut quick cooking oats, a bit of oat flour and some white whole wheat flour in my soaker. I then mixed my starter with the remaining water, molasses and salt, and then added the liquid and the remaining flour to the starter using the mixer, alternating additions until it was well mixed. At that point I picked your instructions up, and continued.
My bread has lovely soft and chewy crumb – I’m sure it’s texture has a lot to do with your stretch and fold schedule.
Here’s a link to a picture
https://scontent-yyz1-1.xx.fbcdn.net/v/t1.0-9/14199257_10155220037358712_3734423480601525133_n.jpg?oh=6b6a38244061de35cbc0fdb4023226aa&oe=584368C5
Thanks again for a great post
Shelley
Shelley — you’re very welcome! I’m super glad to hear my instructions helped play a role in your beautiful bread. It really looks great!
In some of my more recent oat porridge bakes I’ve also done as you have: I just soak the raw oats in boiled water for several hours instead of cooking them. I think the end result is a little better. I’m currently working on a second version of this post and hope to have it out sometime soon. I’ve learned a few things since posting this one!
These are challenging breads but they are so, so good. Thanks for the message and for sharing your wonderful bread with me — happy baking!
Is there an updated recipe?
Still working on one!
Any big changes I should incorporate before I plunge in?
– I will be sauteeing my oats in butter (pilaf-style) until golden and soaking with boiling water.
– And making the levain with Apple Raisin Yeast Water
Since you’re sautéing the oats you won’t have the typical hydration issue — that’s going to work just fine I’d imagine!
Hi! Your page has helped my bread making tremendously. Started with your beginner loaf and then to the walnut bread. This weekend, I attempted this loaf and many thanks for such detailed steps!
Here is my attempt, http://imgur.com/a/E1JVT
I actually started the levain on Friday, but did not leave work as early as I would have liked so the loaf is actually pretty sour. I’ll definitely try this again but making sure to use a levain that is only 5-6 hours old.
Apart from using an older levain, the only thing I altered was using 800 g bread flour and 200 g whole wheat flour for the dough because I did not have high extraction whole wheat. Do you think this may have resulted in the tight crumb? Or maybe it’s because the porridge was too dry (I am just relieved there doesn’t seem to be pockets of poorly distributed oats)? Also, because this dough was so hydrated, I may have incorporated too much flour during the pre-shaping. I recently got a bench scraper and using that was extremely helpful during the shaping.
I’m very excited to see how long this stays fresh when cut and kept out on the counter. I’m also very nervous about gifting my attempts at this loaf to friends without knowing what the crumb looks like, especially seeing how dense this crumb can be (from your attempt #1).
So glad to hear that! Your bread really looks great, nice crust and crumb. Using a “younger” levain will definitely aid in reducing some of that sourness in the final bread. Additionally, you could try proofing for an hour or two less to see if that helps further. I don’t think omitting the high extraction flour would be the sole cause for a tight interior. There are a lot of factors that go into this but I would try to reduce the total proof time and see if that helps. You might also want to try giving your dough one more set of stretch and folds during bulk to help add in a little more strength.
You can almost always tell whether the loaf is going to be extremely dense inside after the bake. Just tap on the bottom of it, if it sounds hollow you’re usually fine. Also, the loaf should feel a little lighter in the hand than you’d expect — properly risen and aerated dough will feel lighter. Keep in mind, though, that a porridge bread can feel heavier than a normal loaf.
Hope that helps, I think you’re definitely doing well and on the right track!
Hi! Porridge Bread versus the Perfect Sourdough recipe, regards the bulk fermentation schedule. For Porridge Bread you wait 30-minutes for all six turns. But for Perfect Sourdough you do a turns at 15″, 15″, 15″, 30″, 30″, 30″. Was wondering why the schedules differ? Secondly, how come you do 30 stretch-and-folds for the perfect sourdough recipe, but not the porridge bread? Thanks!
Hey, there! The number of turns depends a lot on the flour you’re using and the strength needed in the dough. My “best sourdough” recipe is very, very high hydration and therefore needs quite a bit of strengthening, especially since the flour used in the recipe is not bread flour (like the oat porridge bread here). That extra number of turns helps build strength in that extremely wet and slack dough.
That said, you could definitely follow the same procedure here for this bread! It’s also quite a high hydration and the added oat porridge really loosens up the dough. I’d say it would work just as well!
Thanks again for your detailed version of this recipe! I’m making it for the second time and am expecting brilliant bread, thanks to your instructions–they gave me much better results the first time than the Tartine No. 3 directions alone. They should really have you write a “Tartine Breads ‘for Dummies’/Ambitious Amateurs” book for us home bakers! 🙂
You’re welcome! Exactly the reason I wrote this post: I needed more instruction when making this bread! It’s a winner, though, so good 🙂 Happy baking, Rachel!
What is it” no thick roller oat” Do you mean to “quaker oat” ? Thanks
I found this recipe to work best with just regular oats, not the “thick rolled oats” you can buy. Don’t use instant oats either — just regular roller milled oats!
Hello! I’ve been making the tartine country loaf for awhile and am ready to make this bread. I’m having a really, really hard time figuring out what flour to buy. I know you list some on your recipe. However, I can’t find King Arthur “high extraction” whole wheat flour. On your baking tools page, you list some brands of flour, but I am not sure which type is the right kind. More detailed help would be appreciated!
Sorry for the confusion, there is no King Arthur “high extraction” whole wheat you can directly buy from the store! In Tartine’s book they make high extraction flour by taking 100% whole wheat and sifting out some of the larger bran particles from the flour using a sifting screen (I have one listed in my tools page). If you don’t have a sifting screen no problem, you could mix in less whole wheat flour in this recipe, say do a total of 15 or 20% instead of the 30% I have listed here. That sort of meets it in the middle, if that makes sense.
For the white flour in this recipe go with King Arthur Bread flour (the blue bag) to start with and then you can experiment with other flours as you find them locally or in the store. Because the oat porridge bread has a very high hydration level (water in the mix but also the water held in the oats) the high protein in KA’s Bread flour will help the bread keep its structure.
I hope that helps, let me know if you need more help — happy baking!
Thank you thank you! I really appreciate your response. I will spend more time on your blog (I just found it 3 days ago) because I see you have a lot of great resource pages!
Beautiful bread…but exactly how much oat porridge did you incorporate into the dough? 500g water and 250g rolled oats makes for a huge addition to the 1000g dough.
Janet, thanks! Yes, that is one thing I’m going to adjust in my upcoming “updated” version of this bread. Instead of adding all the porridge I made, I’m just going to add in 500g total of the cooked porridge. The Tartine book is not clear on this and it made this bread that much more challenging.
However, it turned out pretty amazing, just a little bit more difficult than it would be with only 500g cooked porridge 🙂
I did it! Used 50% all wheat and 50% bread flour. So the final product is a bit darker in color. I am so surprised on how soft the inside is! Totally different from a traditional chewy sourdough crumb. Thank you again for the details listed in the post!
Awesome news! 50% whole wheat might be a pretty good idea for this bread as it can absorb more water. You’re right, the crumb on this bread is pretty amazing: very moist and tender. You’re welcome, glad I could help!
Hi Maurizio,
I’ve just taken my two loaves out of the oven and I’m sure they won’t even come close to what you described. But this is my first time with porridge, so I guess I should be realistic.
I’ve used a cast-iron pot that’s big but oval in shape, and the dough didn’t quite fit properly in it. The second loaf I baked directly on the stone and it didn’t grow as much.
So I guess we’ll have a lot to eat, and I still have a lot to practice. But I wanted to thank you for sharing such generous display of art, as well as pitfalls. I’ll carry on and hope to improve.
Sandra
Milan, Italy
Sandra,
I’ve gotten much better results baking in my covered dutch oven than directly on a baking stone. It’s not impossible, but you need to get quite a bit of steam in your oven to properly allow the bread to rise.
You’re very welcome and I’m glad I could help in any way with my writeup. I’d love to hear from you in the future on how your bakes progress, especially with this challenging bread.
Ciao!
As it turned out, both loaves were VERY good, with the first one, baked in the pot, being more moist than the one baked directly on the stone. Too moist, actually.
My strategy for attempt nr 2: bake it longer. After the first 30 minutes, remove lid. Keep the oven door ajar for the last 10 minutes.
Thanks again. Grazie!
Excellent! Good idea on leaving the door ajar, that will dry it up a bit and make that crust crispy. Ciao!
Hi Maurizio!
Thank you very much for this recipe.
🙂 One short question, though: you’re talking about a different (from Chad’s) way of shaping here. Can you give some details, please?
Thanks’ a lot,
Dana
Dana,
You’re very welcome! The shaping method used here is actually the method Chad describes in his book (I might not have made that clear). It’s the boule shaping method I’ve used in several recipes here, usually with my whole wheat breads. If you have his books take a look at the shaping instructions, you’re almost making a little package with the dough and then I do a few spins on the counter top at the end if there is not a tight enough skin on the outside.
You don’t want to handle the dough too much, but just enough to get that taut skin… I hope that helps!
Hi Maurizio,
Thank you very much. 🙂 Yes, it does help.
One more question: How do you do the stretch&folds? Directly in the container, or on the counter top? Do you use flour, or wet hands?
… 🙂 I have tried this recipe yesterday. It was the most difficult dough I’ve worked with until now ( 🙂 since I’m a beginner this doesn’t mean much). The dough was too hydrated for me, while the porridge was too dry 🙂 .
Still I’m quite happy with the result, considering this was the first try, and that I’ve never worked with such a high hydration dough before.
Your clear and detailed explanations helped me a lot. The descriptions of your previous attempts with their key lessons are essential, too!
The taste was very good so I must try it again.
🙂 Thank you!
Dana,
You’re very welcome! I do my stretch & folds directly in the bulk container with wet hands.
I’m glad my instructions helped out, and yes, you’re right this is a challenging bread to bake. Just remember those oats hold on to a lot of water so you’ll have to reduce your starting hydration and/or get some nice strong flour (high protein).
The taste is worth it!
You’re right, the taste makes the trials and tribulations worth it. It’s a hard one to master, that’s for sure! Hopefully I presented some tips you might not have discovered. I plan to do another writeup here once I make some more breakthroughs with this.
Doing the “oat dip” is always a scary task but the results are worth it.
Yes, it sounds like proofing/bulk went too far, sorry about that. It’s a difficult task determining when to pre-shape and when to stop proofing. When they spread out like that after the dough felt strong enough that’s typically when I know I’ve pushed it too far. Good news is that next time you know when to cut it short!
And as almost always, the results are edible 🙂 I just love this bread, it’s one of my favorite recipes when I have the time to make it. I’ve made it a few times since and it’s come out even better since I wrote this.
Thanks for the feedback and I hope next time it’s spot-on with that proof!
You’re very welcome! Yes the porridge bread definitely takes some practice to get good results. I’m going to keep at it even longer to hopefully open things up just a bit more.
It is definitely possible to over proof here, it really depends on your environment and your starter. You have to take my recipe as more of a set of guidelines and adjust to suit your developing dough. Look for the signs at each step as I describe and if things are moving faster, change the timetable. My bread needed more proof time because I reduced the quantity of my starter by 50g from usual, which is significant for me.
So yes, adjust as needed based on how things are progressing for you!
Thanks for the comments and happy baking!
The levain is lowered in this recipe to 150g to prevent over fermenting/over proofing the dough. When I upped the amount to even just 175g things moved so fast I didn’t have sufficient time to develop strength in the dough during bulk fermentation (when I do my stretch & folds).
I think the slightly warm oats and added sugars for the yeast speeds up fermentation in this loaf. I have a feeling most of these “porridge” loaves (rye, oat, etc.) will need the same reduced levain percentage!
Your loaves are gorgeous and the high(er) hydration loaf is superb. One thing I have yet to achieve is the golden carmelized crust. I bake my loaves in a 7 quart Lodge cast iron dutch oven according to your directions and have yet to see that beautifully blistered, carmelized crust. I use KA UAPF and Bob’s Red Mill Stone Ground WWF, and I pay careful attention to the final dough temp. Can you offer any tips that may help?
BTW, I live in Arizona, where it’s typically around 108 degrees these days.
Dave — thanks again!
How long do you do your autolyse for? A little longer autolyse might help pull out more sugars in your dough, leading to more caramelization. I will go at least 40 minutes, but longer for a batch like this oat bread.
If you have a nice tight skin on your dough from shaping you should be setup for some blistering. You don’t want to shape too tight, but tight enough to hold the dough in shape. I know… all these tips in baking are so vague with statements like “just right”. It’s hard to convey some of them, I think they just come with practice!
I live in New Mexico where it’s been close to 100 lately, not quite as hot as you there, but it’s still toasty out here! If your house isn’t air conditioned just keep an eye on your dough, it might progress faster than you think at those high temps.
Thanks for all of the great recipes!
Just one question, when you take the proofed loaf out of the fridge, do u have to wait to let the dough to room temp before u pop them to the oven? If so, for how long? Thanks again!
Thank you!
No, I do not let the loaf rest before placing into the oven — I bake directly from the fridge. When the dough is cold it’s much easier to slash and also helps to prevent the bottom from getting a little more cooked than the rest of the loaf.
Have fun!
Thanks a lot! Can you recommend a recipe from your website for a beginner? Every recipe looks so good and I want to try them all! Thanks!
I’d recommend one of my earlier posts on just the standard sourdough approach, it’s a great place to start:
http://www.theperfectloaf.com/tartine-sourdough-country-loaf-bread-recipe/
Feel free to post there with any questions or shoot me an email in the “Contact” section at the top!
I just know you’ll love the results — happy baking!
Thanks for the kind words! I’ve actually found that I’ve reverted back to really no modifications for high altitude baking. I’ve taken recipes and methods bakers use at sea level and have used them just fine here at about 5.5k feet altitude. If you’re at sea level all the recipes and methods here at my site should work out just fine for you!
Happy baking!
Do you mean bake straight from bulk after shaping (no proof)? I actually haven’t tried that! I would imagine you’d get some intense oven spring.
I typically go with 700g white and 300g whole wheat. I like the taste of whole wheat but still want that open crumb… trying to find that balance.
Well that’s good to know! No plastic baskets for me. I typically use my bannetons lined with either flour sack towels or a canvas-type material that is breathable. I actually prefer the flour sack towels.
That’s a pretty crazy loaf you’re experimenting with there — good luck! I’d like to know how that 24 bulk works out, never done that. I’ve proofed all the way up to 36 hours with no problem (but then again, I think my fridge is crazy cold, as you know).
Would love to hear how that works out!
Hah! That’s interesting, I might have to give that a shot I’m interested to see how crazy the results would be!
One more question: Have you changed anything besides flour (from your blog) in the way you manage your levain?
Nope, everything is essentially the same as my post a while back. The only change I might say is that I’ll feed with around 100g or so of my rye/apw flour mix in the morning if I can’t get to my starter mid-day to do a feeding. Really though, it depends on your starter and how active it is.
Also, even though I’m doing extra proof time on the counter my bread really hasn’t taken on any more of a sour taste, which is how I like it. I keep my starter fed frequently so acidity is quite low.
Is the traditional loaf you “squeezed in” 🙂 the young levain?
Yes! It was using my “young levain” post with extra proof time on the counter before retarding.
Thanks, I really appreciate that!
Thank you! Yes, the lid on the saucepan when cooking the porridge really made a difference for me — I found that the consistency of the porridge is really important.
My fridge is actually very close to your 5ºC, it’s around 3-4ºC. I’m definitely going to play with longer and longer proofs outside of the fridge before popping it in.
Thanks for the comments!
Thanks! Yes, the extended proof (per your previous comments) really helped open things up. I’m going to start doing a little more proof time on the counter for my next few bakes to see if I can get things even more open.
I think using more white flour is a good idea for this bread. My goal is to slowly add in more whole wheat as I get more confident with the hydration change when adding the porridge, but it’s a tricky thing.
Thanks for the comments!